

Page 1

MODELS
4786 & 4787
User Manual
P. N. 108521
HORIZONTAL
ROTISSERIE
Page 2

2
safety
When using electrical appliances, basic safety precautions should always
be followed including the following:
•
READ ALL INSTRUCTIONS, PRODUCT LABELS AND
WARNINGS BEFORE USING THE ROTISSERIE.
• Do not touch hot surfaces, use the handles or knobs. Always use oven
mitts when handling hot materials. Allow metal parts to cool before
cleaning. Allow the Rotisserie to cool thoroughly before inserting
and removing parts.
• When the unit is not in use, keep the Rotisserie unplugged.
• To protect against electric shock, do not place cord, plug or appliance
in water or other liquids.
• Close supervision is always necessary when this or any appliance
is used by or near children or incapacitated persons.
• Do not allow anything to rest on the power cord. Do not plug in cord
where people may walk or trip on it.
• Do not operate this or any appliance with a damaged cord or plug
or after the appliance malfunctions or has been damaged in any
manner. Return appliance to an authorized service facility for
examination, repair or adjustment.
• Avoid contact with moving parts.
• Do not use attachments that are not recommended by the
manufacturer; they may cause fire, electric shock or injury.
• Do not use outdoors or for commercial purposes.
• Do not let the cord hang over the edge of a table or counter or
touch hot surfaces. Do not place the appliance on an unsteady
or cloth-covered surface.
• Do not place the appliance near a hot gas or electric burner or
in a heated oven.
• To unplug, grip plug and pull from wall outlet.
• Extreme caution must be used when moving an appliance containing
hot oil or other hot liquids.
• Do not use appliance for other than intended use.
• Use extreme caution when removing drip pan or disposing of
hot grease.
IMPORTANT SAFEGUARDS
Page 3

3
safety
• Do not operate without food inside.
• Use of extension cords:
A. A short power supply cord is provided to reduce the risk resulting
from becoming entangled in or tripping over a longer cord.
B.
Longer extensions cords may be used if care is exercised in their use.
C. If a longer detachable power-supply cord or extension cord is used:
1. The marked electrical rating of the cord set or extension cord
should be at least as great as the electrical rating of the
appliance, and
2. The cord should be arranged so that it will not drape over
the countertop or tabletop where it can be pulled on by children
or tripped over unintentionally.
D. If the appliance is of the grounded type, the extension cord
should be a grounding-type 3-wire cord.
• Electrical Power: If electric circuit is overloaded with other appliances,
your Rotisserie may not operate properly. The Rotisserie should be
operated on a separate electrical circuit from other appliances.
Read the following instructions
before using this unit for the first time.
THIS UNIT IS FOR HOUSEHOLD USE ONLY
For 120 V and /or 127V Versions Only
To reduce the risk of electrical shock, this appliance has a polarized plug
(one plug is wider than the other). This plug fits a polarized outlet only
one way; if the plug does not fit fully into the outlet, reverse the plug.
If it still does not fit, contact a qualified electrician. Do not attempt
to override this safety feature.
NO USER SERVICEABLE PARTS
IF UNIT MALFUNCTIONS RETURN TO SERVICE STATION
SAVE THESE
INSTRUCTIONS
• No ponga en operación el aparato cuando está vacío.
• Utilización de cables de extensión.
• Corriente Eléctrica: Si el circuito eléctrico es sobrecargado con otros
ESTA UNIDAD ES SÓLO PARA USO DOMÉSTICO
Para reducir el riesgo de descargas eléctricas, este aparato cuenta con una
clavija polarizada (una cuchilla es más ancha que otra). Como medida de
seguridad, esta clavija entra sólo de una manera en un enchufe polarizado.
Si la clavija no encaja en el enchufe simplemente colóquela al revés.
Si aún así no encaja llame a un electricista calificado. De ninguna
manera intente modificar esta medida de seguridad.
Page 4

4
contents
Important Safeguards . . . . . . . . . . . . . . . . . . . . 2
Use of Extension Cords . . . . . . . . . . . . . . . . . . . 3
Table of Contents . . . . . . . . . . . . . . . . . . . . . . . 4
Learning About Your Rotisserie. . . . . . . . . . . . . 6
Features of Your Rotisserie . . . . . . . . . . . . . . . . 7
Step-by-Step Instructions . . . . . . . . . . . . . . . . . . 8
Using Basket Accessory . . . . . . . . . . . . . . . . . . . 12
Cleaning and Caring for Your Rotisserie . . . . . . 14
Cooking Times . . . . . . . . . . . . . . . . . . . . . . . . . 15
Rotisserie Cooking Chart . . . . . . . . . . . . . . . . . 16
Carving Tips . . . . . . . . . . . . . . . . . . . . . . . . . . . 17
Warranty Information . . . . . . . . . . . . . . . . . . . . 18
Product Information . . . . . . . . . . . . . . . . . . . . . 20
Table of Contents
Page 5

5
welcome
Welcome
Enjoy rotisserie cooking at home in just a few, easy
steps with your new OSTER®Horizontal Rotisserie.
We've done everything we can to make rotisserie
cooking a breeze. Our instruction manual is designed
to give you helpful information on operating your
new OSTER®Horizontal Rotisserie.
Your OSTER®Horizontal Rotisserie:
• Seals in natural juices while unwanted fats
drip away.
• Cooks chicken to be moist and flavorful inside,
crispy and golden brown outside.
• Evenly browns and cooks a wide variety of
foods to perfection.
• Provides an enclosed cooking environment
with see-through door.
• Cleans up easily with dishwasher-safe
components.
• If you do have additional questions, please
contact us at 1-800-334-0759 or log on
to www.oster.com.
Page 6

6
learning
Before Use
• Read all instructions carefully.
• Make sure to remove all foreign matter from the drip tray.
• Peel off static label from the door, if present.
• Plug the Rotisserie into a properly wired outlet.
Where to Use
• Use only on a stable, heat resistant surface.
• Do not use the Rotisserie where it will be exposed to direct
sunlight or other heat sources, such as a stove or oven.
• Keep the Rotisserie out of the reach of children — it is hot!
• Place the unit at least eight inches away from walls.
• Do not use under a cabinet or in an enclosed area.
While in Use
• The Rotisserie is very hot during operation. Be careful
to keep your hands and face away from the unit.
• Do not operate the Rotisserie without reflector shield
in place.
• Do not open the door or remove the cooking basket
during operation.
• Do not cover the vents on the top of the Horizontal
Rotisserie.
After Use
• Use oven mitts or a pot holder when removing the basket
and the drip pan after cooking.
• Make sure to disconnect the power by unplugging the unit.
Allow the Rotisserie to cool down before storing.
• Read instructions before cleaning. DO NOT IMMERSE
THE UNIT IN WATER.
Learning About Your Rotisserie
Page 7
7
featurres
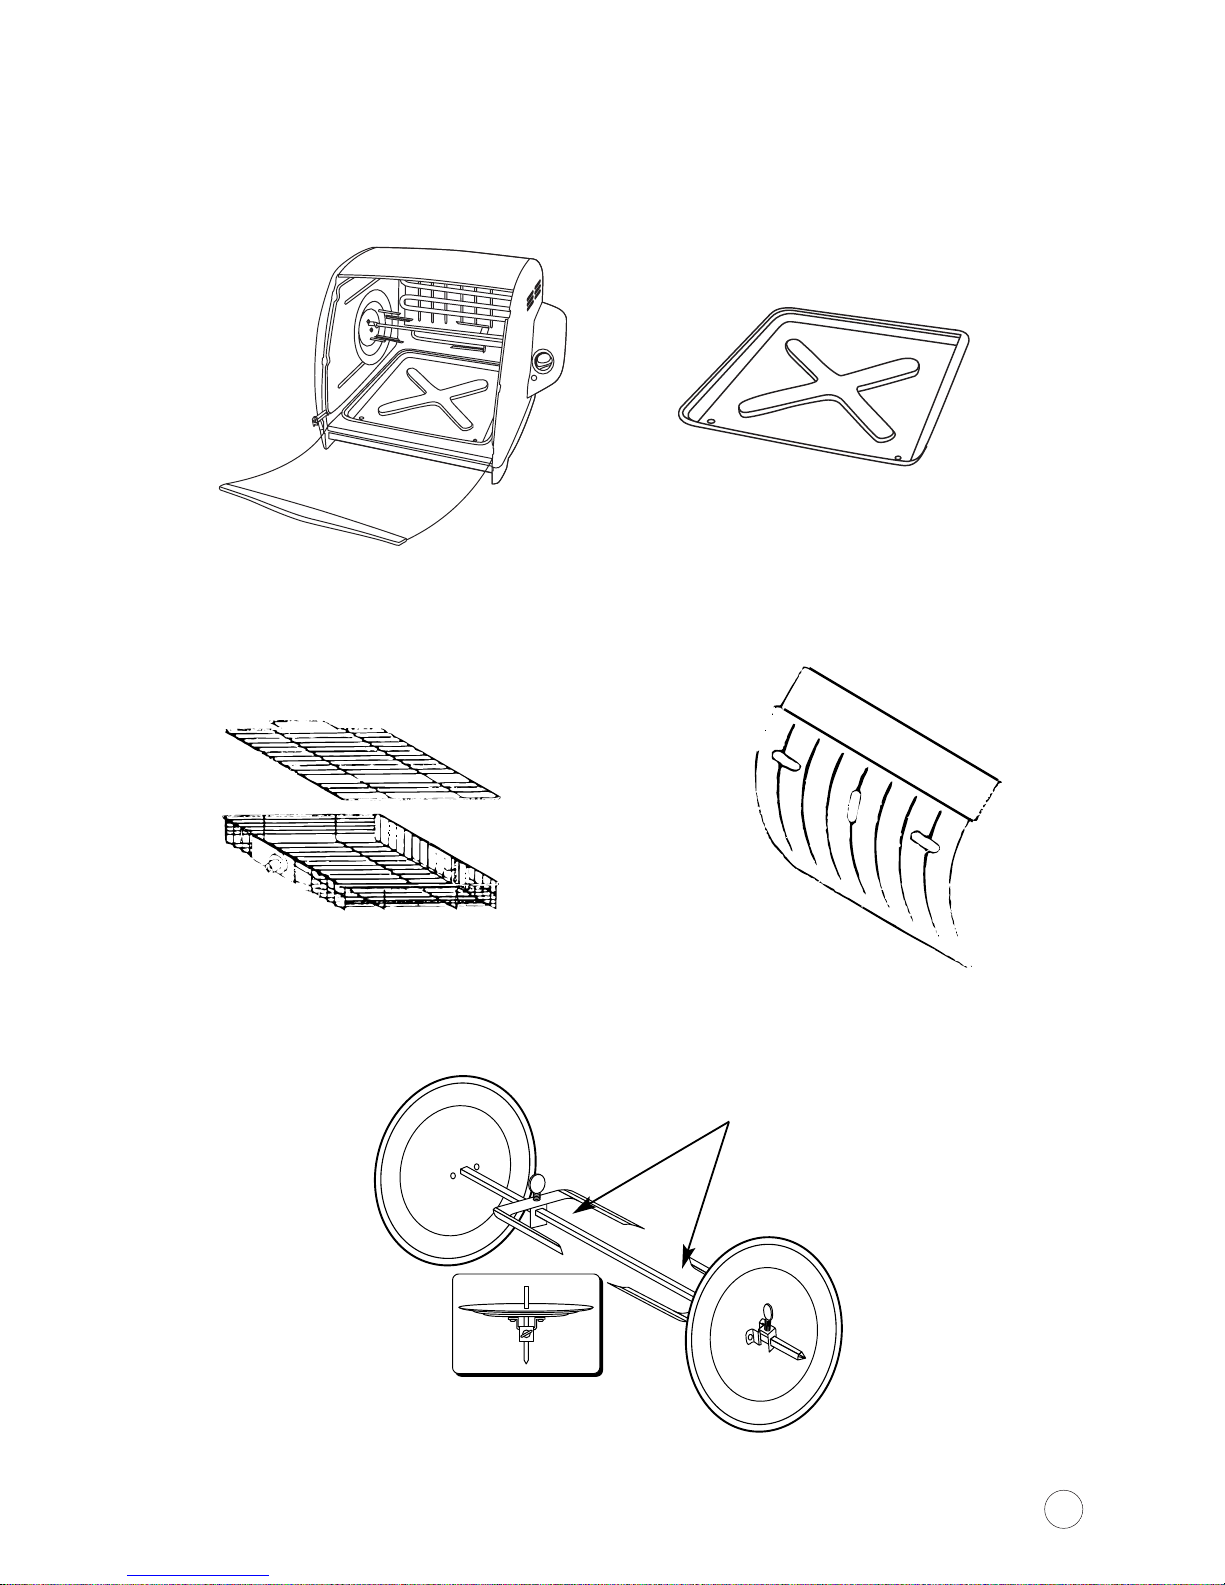
Features of Your Horizontal Rotisserie
Rotisserie Unit
Food Basket and Cover
Drip Tray
Heat Reflector
Spit Assembly
A
DJUSTABLE FORKS
características
Características de Su Asador Horizontal
Canasta para Alimentos y Tapa
Page 8
8
step by step
1. Be sure unit is unplugged before starting.
Clean all parts and accessories with warm,
soapy water. Rinse well and dry thoroughly.
2. Rotisserie should be placed at least 8 inches from
walls and should not be positioned under cabinets.
3. Slide the drip tray into machine at the base
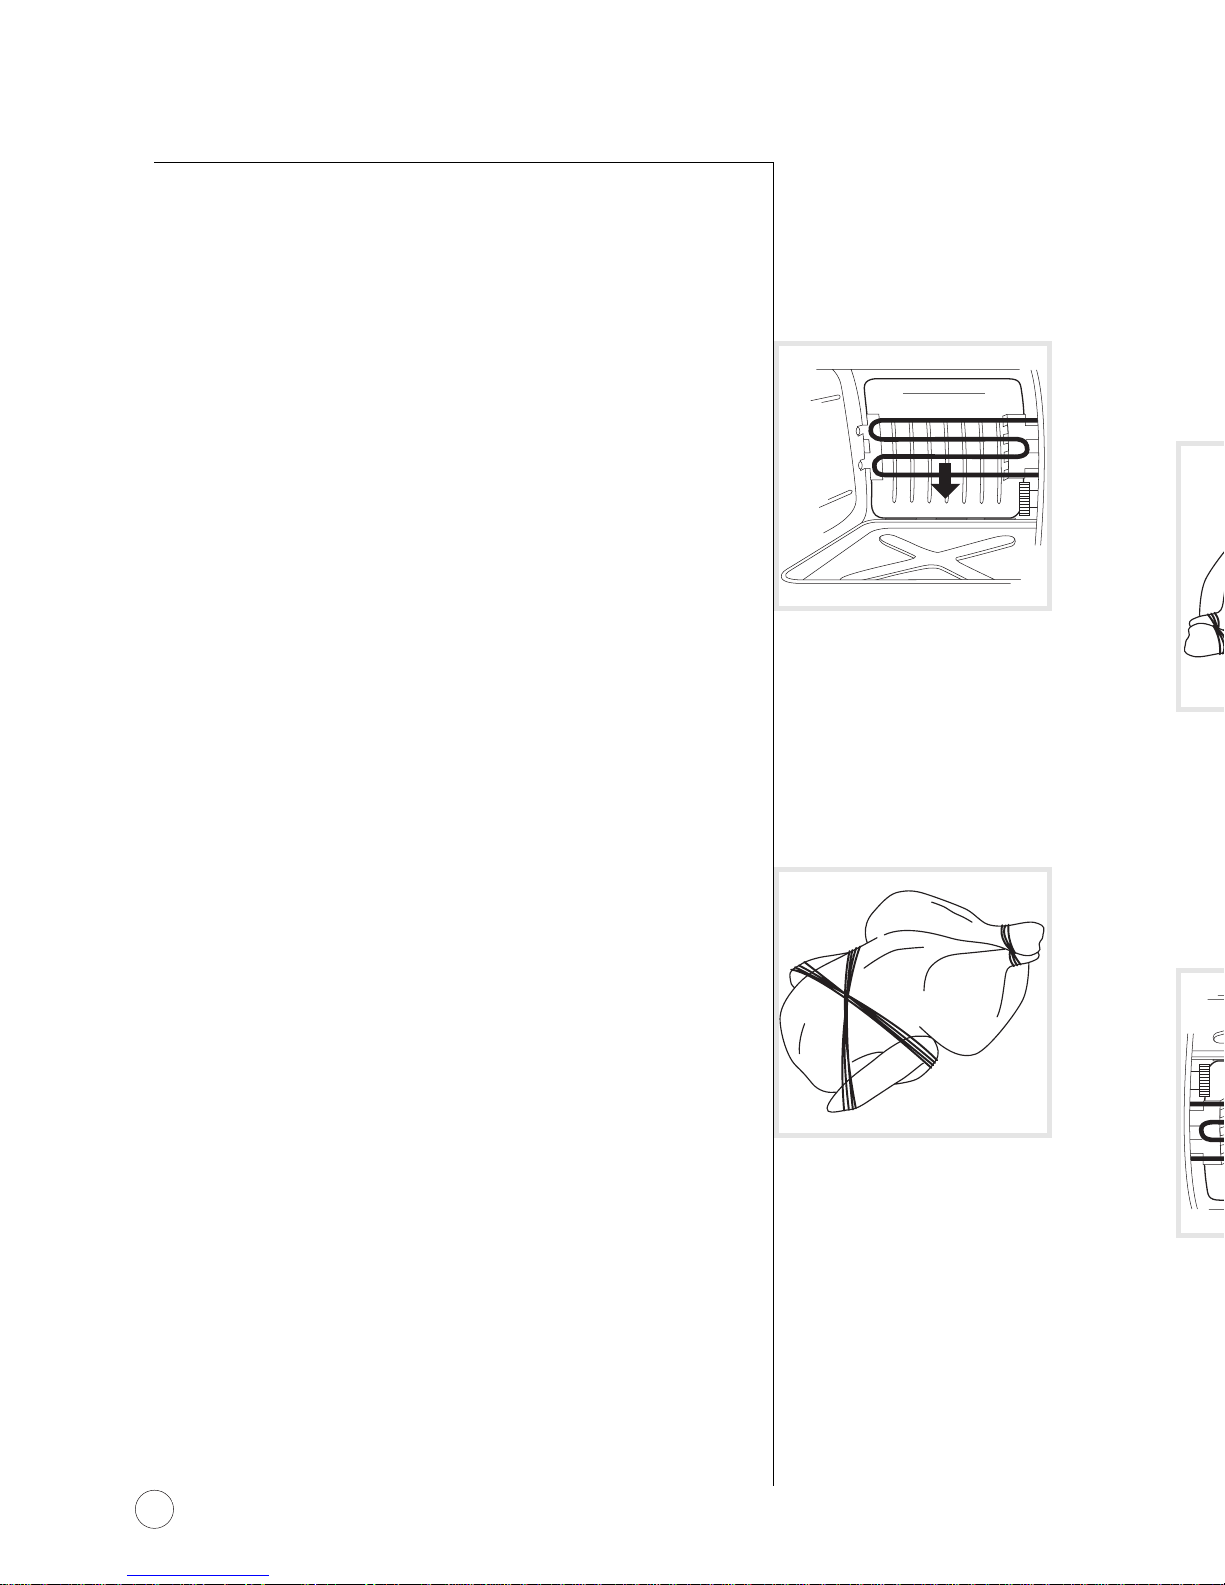
of unit. (Figure 1)
4. Position the heat reflector by sliding along
the inside top towards the back and placing it
behind the heating element. Reflector should fit
neatly into grooves at the back of heating element
leading into the drip tray.
5.
DO NOT EXCEED MAXIMUM SIZE.
MEAT OR POULTRY SHOULD NOT RUB
THE HEATING ELEMENT. MAXIMUM
LOAD OF 8 POUNDS.
Trim any excess fat
or loose hangings from meat or poultry before
positioning in Rotisserie.
6.
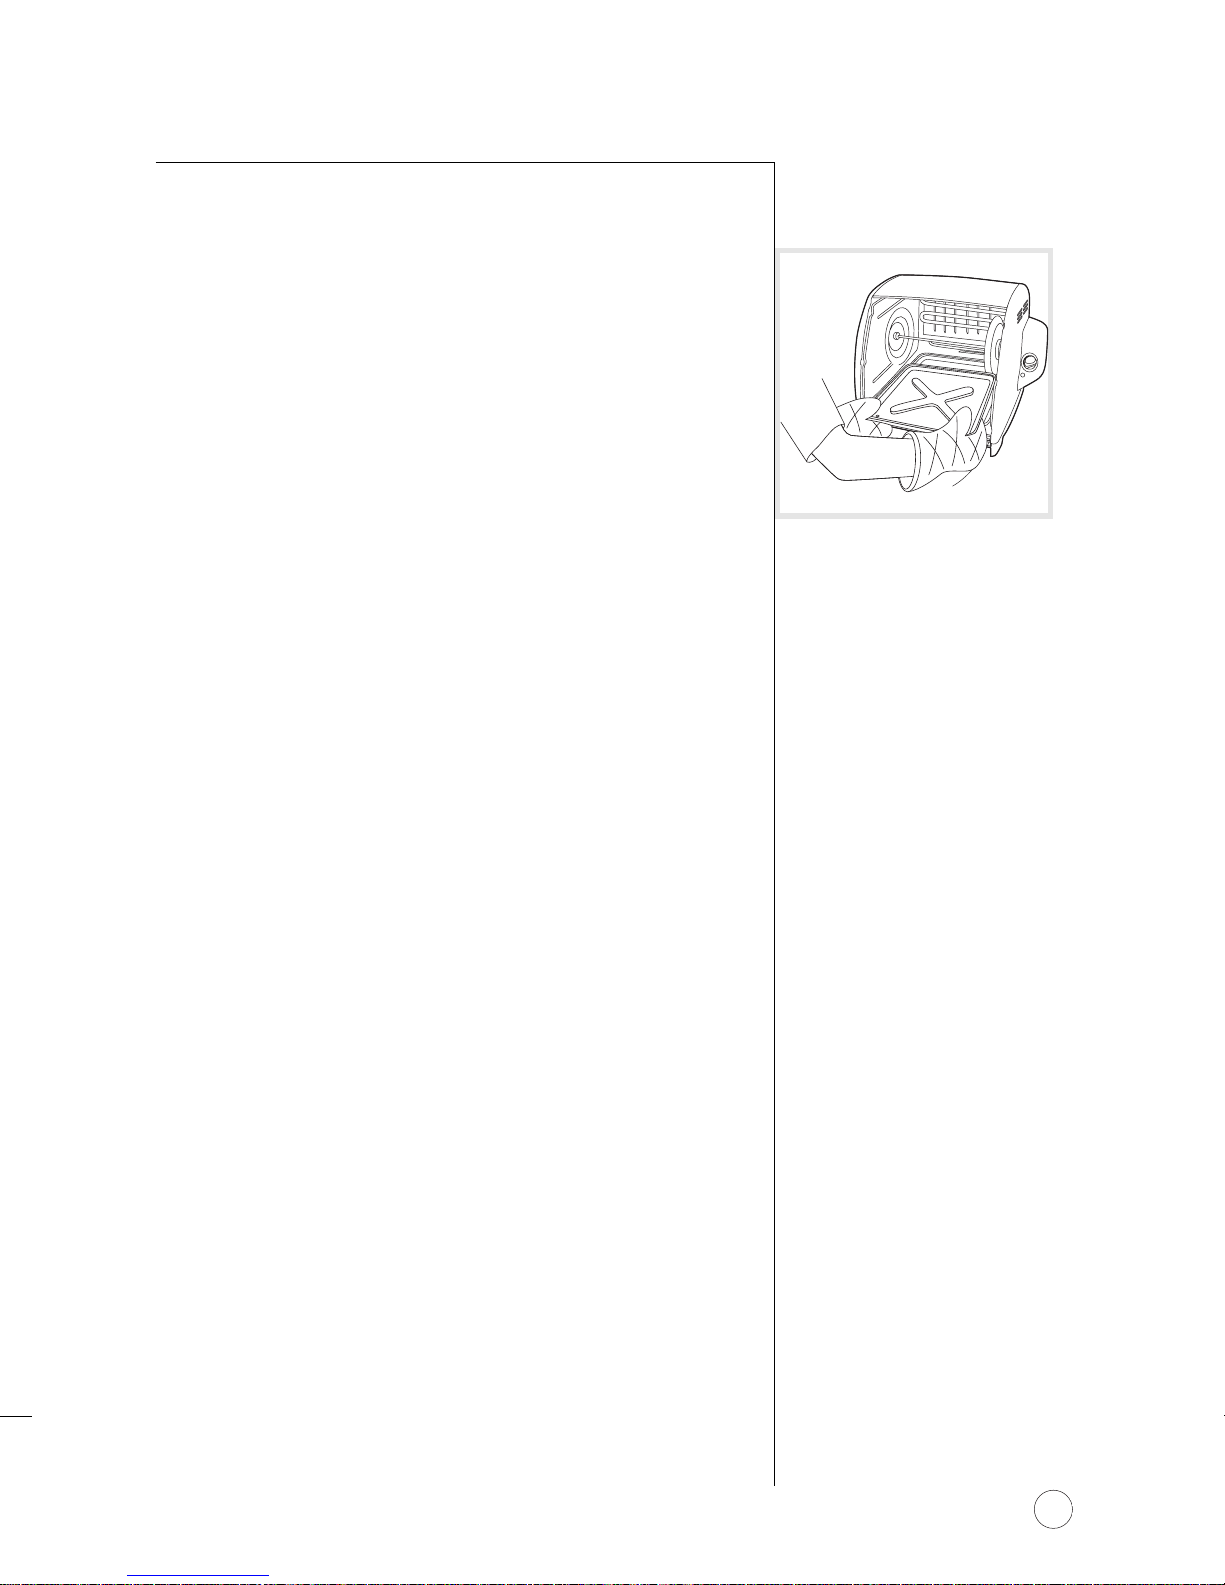
It is necessary to tie the wings and legs of poultry
together with plain string or butcher’s twine
to prevent loose pieces from rubbing the inside
of the door, heat shield or heating element as
the spit rotates inside the Rotisserie. (Figure 2)
7. Start with the end of a leg and loop a suitable
length of the string (about 12 inches) or twine
and tie-off. Bring the string to the next leg, pull
tightly and wrap once or twice around the end
and tie-off. Next, wrap approximately 36 inches
(3 feet) of string or twine around the body of the
bird making sure to secure the wings and legs
close to the body by wrapping crossways so there
is a big “X” of string or twine pulled tightly
across the breast. Bring free end of string to the
leg again and tie-off with a secure or double knot.
Cut off the excess string or twine so it does not
hang loose. The bird should now be a securely
bound bundle with no loose parts hanging from
its body.
Step-By-Step Instructions
Heat Reflector
Must be behind heating element
INSERT FROM TOP
FIGURE 1
FIGURE 2
Page 9
9
step by step
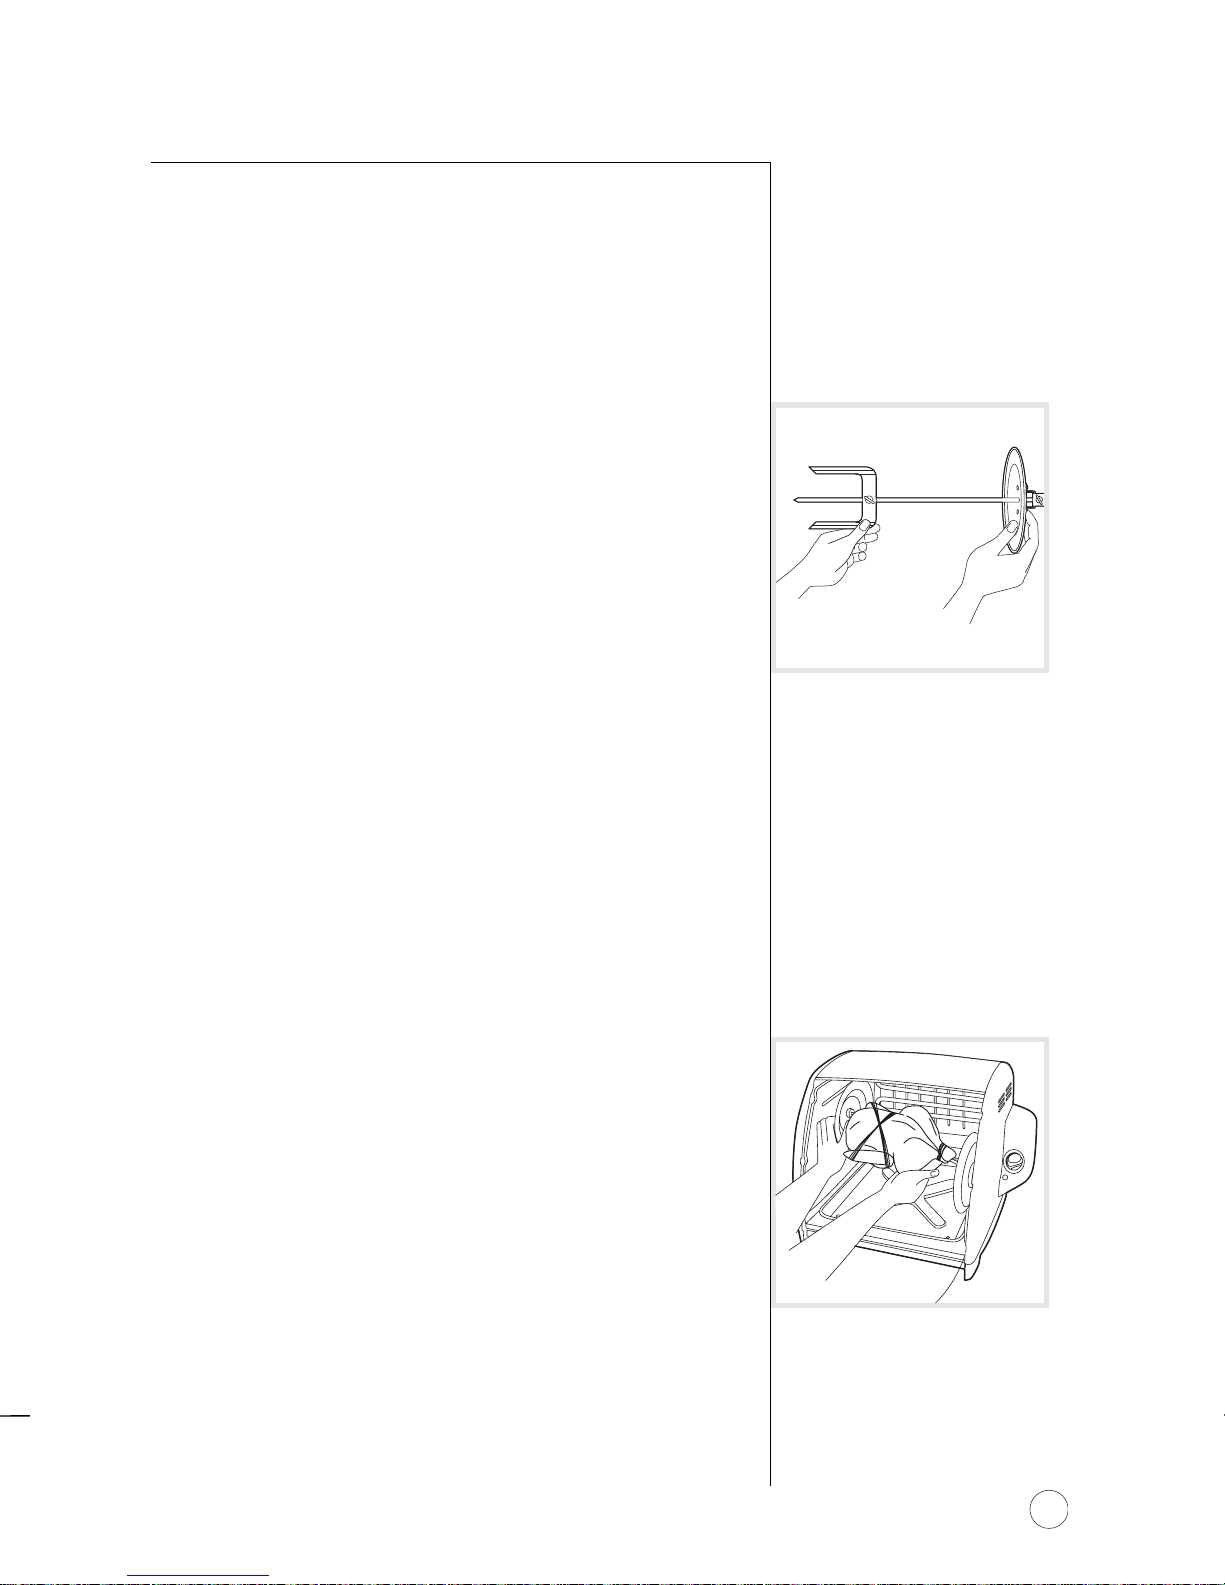
8. Open screws on adjustable fork then slide onto
spit rod with pointed ends facing open end of
spit rod. (Figure 3)
9. When cooking a chicken or turkey, reinsert spit
rod through center of poultry, starting at the
breast area.
10. Push food onto spit rod and into fork as close
to the fixed wheel as possible.
11. Place second fork onto spit rod and slide into
meat, adjust both forks
making sure that meat
or poultry is balanced on the spit. Make sure
that forks are tightly fixed on spit by securing
screws tightly by hand.
12. Once your meat or poultry is securely fixed on
spit rod, attach other wheel to end of spit rod
and secure the third screw tightly by hand.
13. Before placing the spit rod into the machine
remove the door by undoing the safety latch
and lift up and out on the right side.
14. To place the spit rod into machine, place right
hand under meat, use your left hand to firmly
hold the permanent wheel, place loaded spit into
unit at an angle with the pointed end on the
right side pointing down. Slide the pointed end
into the hole on the right side of the machine,
while lowering the left side into the cradle.
(Figure 4)
15. If BBQ sauce is desired, it can be applied to the
meat or poultry by gently brushing on with a
basting brush after cooking process.
8.Abra los tornillos sobre el trinche ajustable y
9.Cuando cocina un pollo o un pavo, inserte
10.Presione los alimentos dentro de la varilla y
11.Coloque el segundo trinche en la varilla y
12.Una vez que la carne o ave esté centrada y
13.Antes de colocar la varilla en la máquina,
14.Para colocar la varilla en la máquina, coloque
15.Si desea usar salsa BBQ o algún otro sazonador,
Step-By-Step Instructions
FIGURE
3
FIGURE 4
paso a paso
Instrucciones Paso a Paso
Page 10
10
step by step
16. Close the glass door. Make sure that the unit is
at least 8 inches from the walls and is not placed
under cabinets.
17. Plug unit into outlet and turn unit on by setting
timer to the desired cooking time.
18. Allow the food to rotate one or more times to
ensure that nothing hits the heating element,
heat reflector or door. If necessary, turn timer off
and adjust food.
19. If the spit does not rotate
properly, the poultry
or meat must be set closer to the fixed wheel
and
balanced on the spit. Turn unit off, unplug
the cord and reposition
food so that it will
be weighted evenly on the rotating spit.
Plug cord into outlet and set timer to
desired setting.
20. A bell will sound at the end of the cooking cycle
indicating that the machine is off and your food
is ready. Unplug the electric cord.
21. At the end of the cooking cycle allow the
Rotisserie to cool down for a few minutes before
removing hot food. Be sure to wear protective
gloves or oven mitts while handling hot machine
or food. Remove the door by undoing the safety
latch and lift up and out on the right side.
Always assume that both the Rotisserie and
food are hot after cooking.
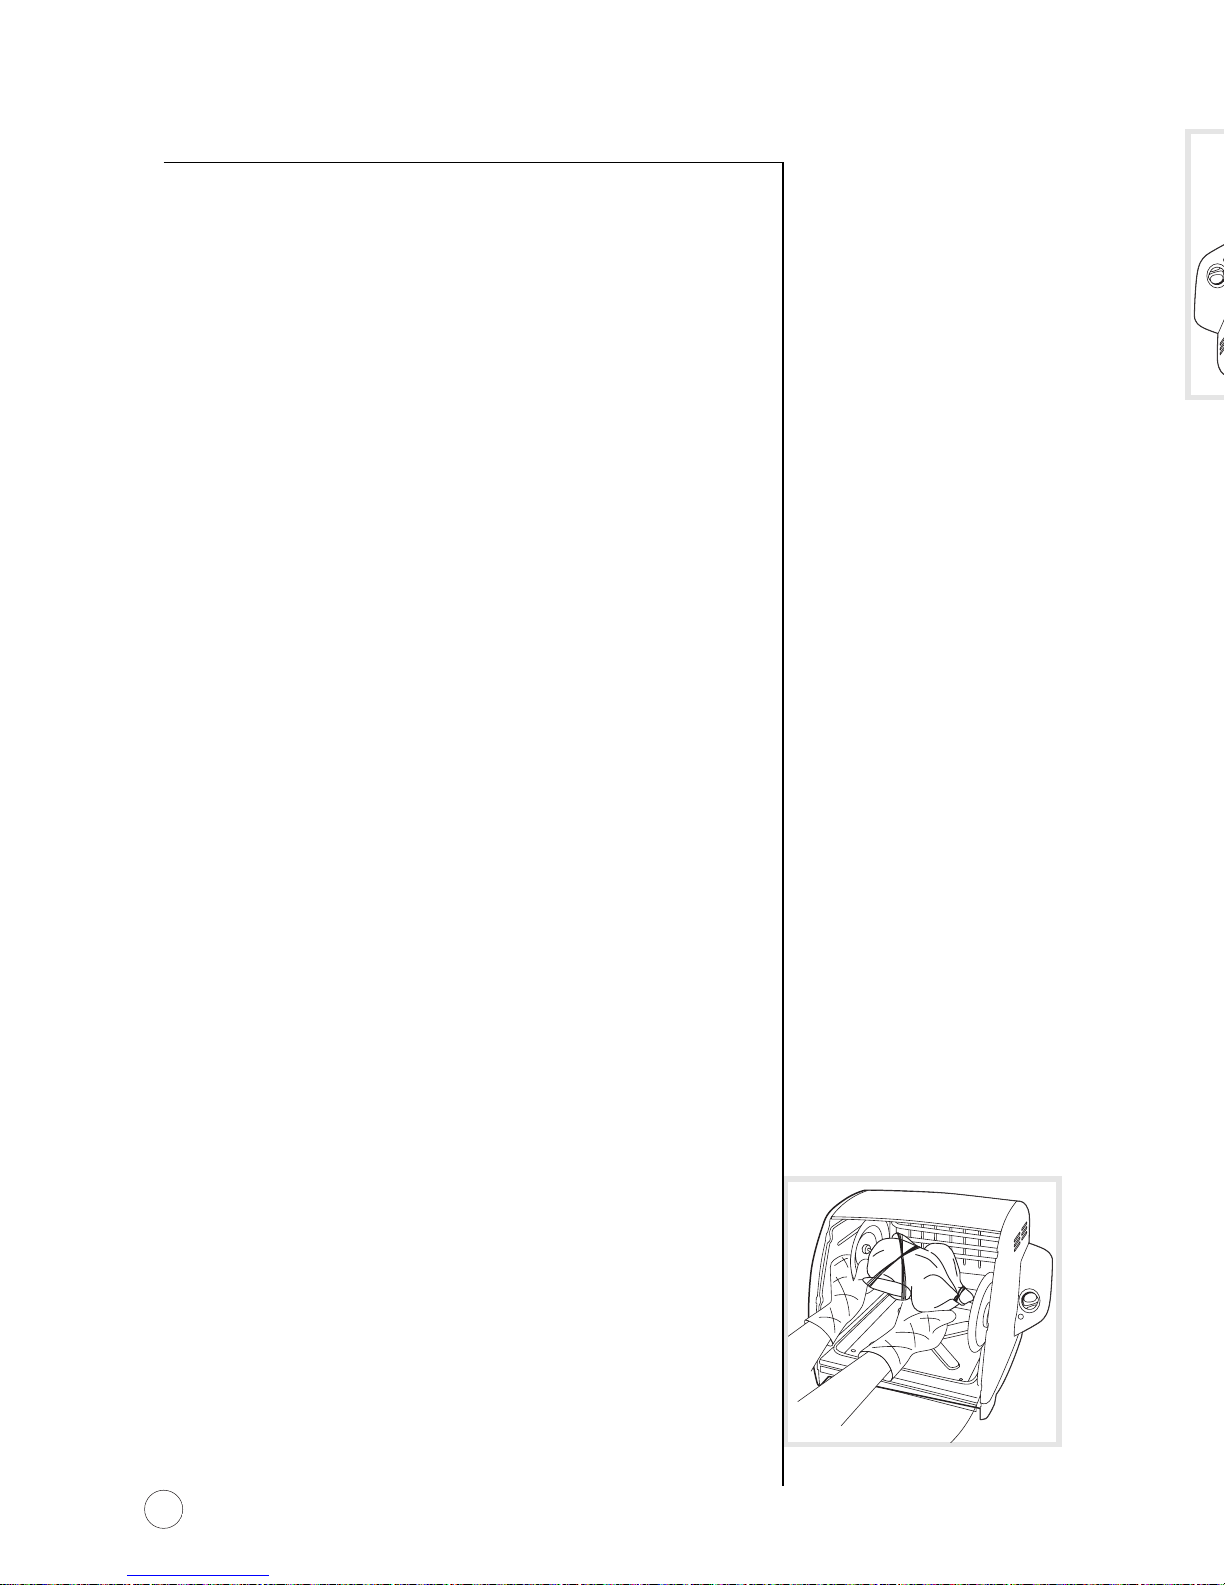
22. With glove or oven mitt, lift the left wheel out
of the cradle, while sliding the right pointed side
out of the hole. Remove the spit from the
machine and set food on a platter. (Figure 5)
FIGURE 5
Page 11
11
step by step
23. Once the unit is cooled down and while
wearing protective gloves, remove drip tray.
BEC
AREFUL
:
Contents of drip tray
are very hot. (Figure 6)
24. Place platter carefully on the counter.
25. Carefully remove detachable wheel located
on the right side.
26. Loosen screw on adjustable fork and slide fork
out of meat or poultry and off spit rod.
BEC
AREFUL
:
Food may be very hot and
screws may be slippery due to meat’s juices.
27. While holding the fixed wheel, use a fork or
gloved hand to gently push meat or poultry off
spit rod onto platter.
28. Disassemble the remaining removable fork from
the spit rod. Wash with warm, soapy water.
Rinse all parts and accessories and dry thoroughly
after every use
.
*Be very careful when handling spit rod and
adjustable forks. The ends are very sharp and
can cause serious injury if not handled carefully.
*As with any other high-temperature appliance,
some discoloration will occur after usage and
does not indicate any problem with the unit.
23. Después de que la unidad se enfríe
24. Coloque el platón cuidadosamente sobre la mesa
25. Cuidadosamente, saque la rueda removible
26.
27. Mientras sostiene la rueda fija, use un tenedor
28. Desarme el otro trinche removible de la varilla.
*
Tenga muy cuidado al manejar la barra de la escupida
y forkes ajustables. Los extremos son muy sostenidos
y pueden causar lesión seria si no están manejados
cuidadosamente.
*Como con cualquier otro aparato de temperaturas
elevadas, puede ocurrir alguna decoloración después
del uso, pero esto no indica que exista ningún
problema con el aparato.
paso a paso
FIGURE 6
Page 12

12
basket
1. Make sure unit is unplugged before starting and
is positioned at least 8 inches from walls and is
not beneath cabinets.
2. Be sure that the basket has been washed and
dried before using. Use warm, soapy water to
wash and clean basket. The basket should be
cleaned after each use.
3.
Place drip tray into position at the bottom of unit.
4. Release the basket lid by pulling the fastening
pins out of the positioning holes located at both
sides of the basket. (Figure 7)
5. Remove the lid from basket.
6. Place food items into basket being sure that food
fits neatly into basket and that food items
cannot slip between basket’s grid.
7. Affix lid by placing the back of the lid into the
appropriate groove located at the back of the
basket. The basket is designed so that the lid
will only fit into the back at different levels for
varied thicknesses of food. Press the front of the
lid down onto food; be careful not to damage
food within basket.
8.
Use one hand to hold lid firmly against food
located within the basket,
use other hand to
fasten pins in positioning holes located on both
sides of basket. Be sure that lid holds the food
firmly in place. *Note there are various holes to
choose from to hold food secure. (Figure 8)
9. Turn basket upside down assuring that no loose
or small pieces of food will slip out of basket.
It is important that food within basket cannot fit
through grid.
Using Basket Accessory
FIGURE 7
FIGURE 8
Page 13

13
basket
10. Place the basket into machine at an angle
with the pointed end on the right side.
11. Close glass door and plug unit in.
12.
Turn on timer to desired cooking time and observe
the basket rotate one or more times to be sure
that food is secure and basket is rotating correctly
and that nothing is hitting the door, heating
element or heat shield.
13. After timer has stopped and bell has rung, unplug
electric cord and allow the basket and food
several minutes to cool down before removing.
14. Remove the door by undoing the safety latch
and lift up and out on the right side. Always
assume that both the Rotisserie and food
are hot after cooking.
15. Position a plate or platter beneath the basket with
one hand and secure the basket with the other
hand. Lift up on the left side of the basket and
pull the pointed end out of the hole on the right
side, then carefully remove platter with basket.
16. Once the unit has cooled down and while using
protective gloves or oven mitts, remove drip tray
from unit. (Be very careful: contents of drip tray
are extremely hot.) (Figure 9)
17. Place platter on clean counter, while using heat
resistant gloves. Remove fastening pins at the side
of basket. (Be very careful: food and basket may
be extremely hot.) If necessary, use fork or tongs
to assist in removing basket lid as it may be hot.
18. Use a fork or tongs to remove food from basket.
19. Enjoy !
10.Coloque la canasta dentro de la máquina en un
11.Cierre la puerta de vidrio y conecte la unidad a la
12.
13.Después de que el reloj se ha detenido y que
14.Quite la puerta desabrochando la aldabilla de
15.Levante el lado izquierdo de la canasta y jale
16.
17.Póngase los guantes protectores y coloque el
18.Utilice un trinche o pinzas para quitar
19.¡Disfrutelos!
FIGURE 9
canasta
Page 14

14
cleaning
• Be sure to clean Rotisserie and accessories before first use.
• Make sure no packaging material is caught inside on the heating element.
•
After using Rotisserie, always allow unit to cool completely before
cleaning.
• Do not use any chemicals or solvents for cleaning unit or accessories.
You may damage the unit or protective coating.
• Be sure to clean all accessories before using Rotisserie.
• Make sure unit is unplugged before cleaning unit and when loading
and unloading food.
• Use warm, soapy water to clean the inside and outside of the unit and
all accessories.
• If using a dishwasher to clean accessories, please place items on top shelf.
• You may soak accessories in hot, soapy water if food particles are hard
to remove.
•
DO NOT IMMERSE THE UNIT OR THE CORD IN WATER.
• You may notice some smoke or light odor coming from your unit when
being used for the first time, this is due to the burning off of a protective
coating on the heating element; this is normal.
• Some foods may splatter grease or juices while cooking causing
some smoke during normal use. While this is normal, look through glass
door to make sure that spit or food basket is rotating normally. Food
should not touch element, heat reflector or glass door during operation.
• Be sure to keep the Heat Reflector clean and free of cooked-on foods.
Wash thoroughly after cooking foods that splatter.
Cleaning and Caring for Rotisserie
Page 15

15
The cooking times provided by this chart are only
a guideline to the APPROXIMATE MINIMUM
COOKING TIMES, based on test averages.
Cooking times do vary because of differences in
meat, shape, size and the amount of fat and bone.
When cooking with the OSTER®Rotisserie, use a meat
thermometer
– it takes the guesswork out of cooking.
A meat thermometer measures the internal temperature
of cooked meat and poultry to assure that a safe
temperature has been reached. By using a meat
thermometer, you can help prevent overcooking
and cook foods at a safe temperature.
Use a regular, oven-proof type thermometer which
goes into the food at the beginning of the cooking
time and can be easily read. Insert the point of the
thermometer stem at least 2 inches into the thickest
part of the meat, away from bone, fat and gristle.
For poultry, insert the thermometer stem into the
inner thigh area,
near the breast but not touching
the bone. THE MEAT THERMOMETER
MUST
NOT TOUCH THE HEATING ELEMENT WHEN
THE BASKET OR SKEWER IS ROTATING.
cooking
Cooking Times
Page 16

16
O
STER
®
H
ORIZONTALROTISSERIECOOKINGCHART
T
EMPERATURE
A
PPROXIMATE
F
OOD
W
EIGHT
M
EATTHERMOMETER
C
OOKINGTIME
P
OULTRY
Chicken, whole 3-1/2 to 4-1/2 lbs. 180°F 20 min./lb.
Chicken, pieces
with bones 2 to 3-1/2 lbs. breast
: 170
°
F; 20 min./lb.
legs and thighs
: 180
°
F 20 min./lb.
boneless 1 to 1-1/2 lbs. breast
: 170
°
F; 30 min./lb.
legs and thighs
: 180
°
F 30 min./lb.
Cornish Hens 2 to 3 hens 180
°
F 20 min./lb.
Turkey, unstuffed 12 lbs. or under 180
°
F 20 min./lb.
Turkey Burgers 1 lb. 165°F 30 minutes total
P
ORK
Boneless Rolled Pork Roast 3-1/2 to 7 lbs. 160
°
F 25 min./lb.
Pork Tenderloin about 1 lb. 160
°
F 30 to 40 min. total
Pork Chops
with bones 2 lbs. 160
°
F 15 min./lb.
boneless 2 lbs. 160
°
F 15 min./lb.
Spareribs 1-1/2 to 2 lbs. 160
°
F 30 min./lb.
Boneless Ham Roast 160
°
F 20 min./lb.
Uncooked Sausage 1 lb. 160
°
F 25 min./lb.
Cooked Hot Dogs & Sausages 1 lb. 165°F 20 min./lb.
B
EEF
Standing Rib Roast 6 to 8 lbs. rare : 145
°
F 20 min./lb.
medium
: 160
°
F 25 min./lb.
Boneless Rolled Beef Roast rare
: 145
°
F 20 min./lb.
medium
: 160
°
F 25 min./lb.
Steaks 1-1/2 to 2 lb. 1-inch thick rare
: 145
°
F 20 min./lb.
medium
: 160
°
F 25 min./lb.
Hamburgers 1-inch thick medium : 160
°
F 25 min./lb.
L
AMB
Boneless Rolled Lamb Roast rare : 145
°
F 20 min./lb.
medium
: 160
°
F 25 min./lb.
Lamb Chops rare
: 145
°
F 20 min./lb.
medium : 160
°
F 25 min./lb.
S
EAFOOD– SPRAY BASKET WITH NON-STICK COOKING SPRAY BEFORE PLACING FOOD
Fish Steaks 2 lbs. : 1-inch thick 25 min. total
Fish Filets 1 lb. 20 min. total
O
THER
Baked Potatoes Cut in half, placed in basket 45 min. total
Vegetables sliced 1/2-inch thick,
brushed with oil,
placed in basket 25 min. total
Cooking times given in the chart are based on foods that have already been thawed.
* If timer needs to be set for less than 10 minutes, turn the knob beyond the 10-minute marking, then set.
STER
®
T
IEMPO
C
OCCIÓN
Page 17

17
Carving Poultry
On a carving board, arrange the chicken or other poultry on its back with
the legs to the right. Remove string or twine used to bind legs and wings
for cooking. Starting at the side facing the carver, cut the leg off body by
grasping the leg with your left hand pulling gently while cutting through
the meat and the joint at the thigh.
Place the leg on the carving board and cut through the joint to sever the
thigh bone from the drumstick. Slice the meat from the leg and thigh,
carving parallel to the bone.
Insert the meat fork into the breast meat to secure the body.
Sever the wing from the body by carving through the joint.
Start carving the breast just above the joint where the wing was removed.
Cut thin slices of white meat, carving upward and cutting parallel to the
breast bone.
Carving a Whole Ham, Pork Roast or Roast Leg of Lamb
Place a whole ham, pork roast or leg of lamb on the carving board with
the shank end to the right of the carver. For a ham, turn the scored fat side
up. For the leg of lamb, place the roast so that the meaty section faces
away from the carver.
Insert a meat fork into the heavy part of the meat and cut several
lengthwise slices from the less meaty side.
Turn the ham, pork roast or leg of lamb so that it rests upright on the cut
surface. Cut a wedge from the shank end by starting at the base of the
bulge and slicing down to the leg bone. Then, make another cut at an
angle to this, close to the shank end. Lift out the wedge.
Starting at the shank end, cut thin uniform slices down to the leg bone.
Carving a Rib Roast
Arrange the roast on a platter or a cutting board with the largest end of
the roast down, and the rib side to your left. The small end of the roast
is nearest the carver. Insert a carving fork between the two top ribs.
Slice across the roast from the fat edge of the rib bone. Free the slice
from the bone using the tip of the knife.
Rebanando Aves
Sobre una tabla para cortar, coloque el pollo u otra ave sobre su espalda con
las patas hacia la derecha.
las piernas y las alas para el cocinar. Empezando por el lado que quede
enfrente del cuchillo, corte una pierna del cuerpo agarrando la pierna con
su mano izquierda, jale gentilmente mientras corta completamente la carne
y la articulación en el muslo.
Coloque la pierna en la tabla para cortar y corte a través de la articulación
para separar el hueso del muslo de la pierna. Rebane la carne de la pierna
y muslo, corte paralelamente al hueso.
Inserte el tenedor de carne en la pechuga para sostener el cuerpo fijamente.
Separe el ala del cuerpo cortando en la articulación.
Empiece rebanando la pechuga justo encima de la articulación de donde el
ala fue removida. Corte en rebanadas delgadas la carne blanca, moviendo
el cuchillo hacia arriba y en forma paralela al hueso de la pechuga.
Rebanando un Jamón Entero, Asado de Carne de Cerdo
o Asado de Pierna de Cordero
Coloque el jamón entero, el asado de carne de cerdo o la pierna de cordero
en una tabla para cortar, con la punta de la pierna hacia el lado derecho
del cuchillo. Para el jamón, voltee el lado rayado hacia arriba. Para la pierna
de cordero, colóquela de forma que la parte carnosa quede hacia el lado
contrario del cuchillo.
Introduzca el tenedor de carne en la parte con más carne y corte bastantes
rebanadas longitudinalmente desde la parte con menos carne.
Voltee el jamón, el asado de carne de cerdo y la pierna de cordero de forma
que se sostenga sobre la parte anteriormente rebanada. Corte una rebanada
de la punta de la pierna empezando por la base de la protuberancia y rebanando
hacia abajo con dirección al hueso de la pierna. Después, haga otro corte
con otro ángulo con respecto al anterior, cerca de la punta de la pierna.
Levante la rebanada.
Empezando por el final de la punta de la pierna, corte rebanadas delgadas
y uniformes en rebanadas hacia abajo en dirección al hueso de la pierna.
Rebanando Costillas
Arregle el asado en un plato o en una tabla de cortar con la parte más grande
hacia abajo y la parte de las costillas hacia su izquierda. La parte más
pequeña del asado debe estar cerca del cuchillo. Inserte un tenedor entre
las dos costillas superiores.
Rebane alrededor del asado desde el borde más ancho de los hueso de costilla.
Libere la rebanada del hueso usando la punta del cuchillo.
carving
Carving Tips
consejos
Consejos para Rebanar y Cortar Carnes
Page 18

18
Sunbeam Products, Inc. (“Sunbeam”) garantiza, por un período de dos años
a partir de la fecha de compra, que este producto está libre de defectos de
material y fabricación. Sunbeam, a su discreción, reparará o reemplazará
este producto o cualquier componente del producto que se encontrara
defectuoso durante el período de la garantía. El reemplazo se hará con
un producto o componente nuevo o refabricado. Si el producto ya no
estuviera disponible, el reemplazo podrá hacerse con un producto similar
de igual o mayor valor. Esta garantía excluye cualquier otra.
Esta garantía es válida para el comprador minorista a partir de la fecha
de compra inicial y no es transferible. Guarde el recibo de venta original.
Se requiere el comprobante de venta para obtener el cumplimiento de
la garantía. Los distribuidores de Sunbeam, los centros de servicio o las
tiendas de venta de productos Sunbeam no tienen derecho a alterar,
modificar ni cambiar en modo alguno los términos y condiciones
de esta garantía.
Esta garantía no cubre el desgaste normal de las piezas ni los daños que
resulten de cualquiera de las siguientes situaciones: uso negligente o mal uso
del producto, uso del producto con voltaje o corriente inadecuados,
contravención de las instrucciones de funcionamiento, desensamblaje,
reparación o alteración por parte de personal ajeno a Sunbeam o a un
Centro de Servicio Autorizado. Más aún, la garantía no cubre factores
imprevisibles tales como incendio, inundaciones, huracanes y tornados.
Sunbeam no será responsable por daños incidentales o consecuentes causados
por la violación de cualquier garantía expresa o implícita. Excepto en la
medida que lo prohiban las leyes aplicables, cualquier garantía implícita de
uso general o específico estará limitada a la duración de la presente garantía
indicada anteriormente. Algunos estados, provincias o jurisdicciones no
permiten la exclusión o limitación de los daños incidentales o consecuentes
ni las limitaciones en la duración de una garantía implícita, por lo tanto
las limitaciones o exclusiones anteriores pueden no aplicarse en su caso.
Esta garantía le otorga derechos legales específicos y usted también puede tener
otros derechos que varían de un estado a otro o de una provincia a otra.
Cómo Obtener Servicio de la Garantía
Lleve el producto a un Centro de Servicio de Productos Sunbeam Autorizado.
Puede obtener una lista de centros de servicio y otras instrucciones de
reparación/reemplazo llamando al teléfono:
mensaje por correo electrónico a: Consumeraffairs@consumer.sunbeam.com.
NO DEVUELVA ESTE PRODUCTO AL LUGAR DONDE LO COMPRÓ.
warranty
Two -Year Limited Warranty
Sunbeam Products, Inc. (“Sunbeam”) warrants that for a period of
two years from the date of purchase,
this product will be free from
defects in material and workmanship. Sunbeam, at its option,
will repair or
replace this product or any component of the product
found to be defective during this warranty period.
Replacement
will be made with a new or remanufactured product or component.
If the product is no longer available, replacement may be made with a
similar product of equal or greater value. This is your exclusive warranty.
This warranty is valid for the original retail purchaser from the date
of initial retail purchase and is not transferable. Keep the original sales
receipt. Proof of purchase is required to obtain warranty performance.
Sunbeam dealers, service centers or retail stores selling Sunbeam products
do not have the right to alter, modify or in any way change the terms
and conditions of this warranty.
This warranty does not cover normal wear of parts or damage
resulting
from any of the following: negligent use or misuse of the product, use on
improper voltage or current, use contrary to the operating instructions,
disassembly, repair or alteration by anyone other than Sunbeam or
an Authorized Service Center. Further, the warranty does not cover
Acts of God, such as fire, flood, hurricanes and tornadoes.
Sunbeam shall not be liable for any incidental or consequential
damages caused by the breach of any express or implied warranty.
Except to the extent prohibited by applicable law, any implied warranty
of merchantability or fitness for a particular purpose is limited in duration
to the duration of the above warranty. Some states, provinces or
jurisdictions do not allow the exclusion or limitation of incidental or
consequential damages or limitations on how long an implied warranty
lasts, so the above limitations of exclusion may not apply to you.
This warranty gives you specific legal rights, and you may also have
other rights that vary from state to state or province to province.
How to Obtain Warranty Service
Take the product to an Authorized Sunbeam Service Center.
You can find the nearest Authorized Sunbeam Service Center
by calling
1-800-334-0759
or visit our Website at www.oster.com.
DO NOT RETURN THIS PRODUCT TO THE PLACE OF PURCHASE.
Page 19

notes
Notes
notas
Notas
19
Page 20

DO NOT SEND THIS PRODUCT TO THE PLACE OF PURCHASE.
For product questions:
Sunbeam Consumer Service
P. O. Box 948389
Maitland, FL 32794-8389
1-800-334-0759
www.oster.com
DO NOT SEND PRODUCT TO THE ABOVE ADDRESS
©2001 Sunbeam Products, Inc. All rights reserved.
OSTER®is a registered trademark of Sunbeam Products, Inc.
Distributed by Sunbeam Products, Inc.
Boca Raton, FL 33431
Printed in China
14
A
ug
2
001
B
B
OOB
B
RR
EELLEEAA SSEEDD
Page 21

P. N. 108521
Manual de
Usuario
ASADOR
HORIZONTAL
MODELO
S
4786 y 4787
Page 22

2
When using electrical appliances, basic safety precautions should always
be followed including the following:
•
READ ALL INSTRUCTIONS, PRODUCT LABELS AND
WARNINGS BEFORE USING THE ROTISSERIE.
• Do not touch hot surfaces, use the handles or knobs. Always use oven
mitts when handling hot materials. Allow metal parts to cool before
cleaning. Allow the Rotisserie to cool thoroughly before inserting
and removing parts.
• When the unit is not in use, keep the Rotisserie unplugged.
• To protect against electric shock, do not place cord, plug or appliance
in water or other liquids.
• Close supervision is always necessary when this or any appliance
is used by or near children or incapacitated persons.
• Do not allow anything to rest on the power cord. Do not plug in cord
where people may walk or trip on it.
• Do not operate this or any appliance with a damaged cord or plug
or after the appliance malfunctions or has been damaged in any
manner. Return appliance to an authorized service facility for
examination, repair or adjustment.
• Avoid contact with moving parts.
• Do not use attachments that are not recommended by the
manufacturer; they may cause fire, electric shock or injury.
• Do not use outdoors or for commercial purposes.
• Do not let the cord hang over the edge of a table or counter or
touch hot surfaces. Do not place the appliance on an unsteady
or cloth-covered surface.
• Do not place the appliance near a hot gas or electric burner or
in a heated oven.
• To unplug, grip plug and pull from wall outlet.
• Extreme caution must be used when moving an appliance containing
hot oil or other hot liquids.
• Do not use appliance for other than intended use.
• Use extreme caution when removing drip pan or disposing of
hot grease.
IMPORTANT SAFEGUARDS
Page 23

3
• Do not operate without food inside.
• Use of extension cords:
• Electrical Power: If electric circuit is overloaded with other appliances,
To reduce the risk of electrical shock, this appliance has a polarized plug
(one plug is wider than the other). This plug fits a polarized outlet only
one way; if the plug does not fit fully into the outlet, reverse the plug.
If it still does not fit, contact a qualified electrician. Do not attempt
to override this safety feature.
IF UNIT MALFUNCTIONS RETURN TO SERVICE STATION
seguridad
• No ponga en operación el aparato cuando está vacío.
• Utilización de cables de extensión.
A. El aparato está equipado con un cordón eléctrico corto como
medida de seguridad para reducir el riesgo de tropezar, tirar
o enredarse con un cordón más largo.
B. Puede usar cables de extensión si se observan las precauciones
adecuadas.
C. Si se utilizan cables eléctricos más largos o cables de extensión:
1. La capacidad nominal eléctrica del cable de extensión debe ser
igual o mayor que el que se muestra en el electrodoméstico y
2. Coloque el cable de extensión de manera que no cuelgue
sobre el borde del mostrador o mesa donde pueda tirarlo
un niño o pueda tropezar con él accidentalmente.
D. Si el electrodoméstico tiene toma eléctrica de tierra, el cable de
extensión deberá de ser del tipo de 3 alambres con toma eléctrica
de tierra.
• Corriente Eléctrica: Si el circuito eléctrico es sobrecargado con otros
aparatos, su Asador Horizontal no operará adecuadamente.
El Asador Horizontal debe de ser operado en un circuito eléctrico
separado de otros aparatos.
Lea las instrucciones siguientes antes de usar
esta unidad para la primera vez.
ESTA UNIDAD ES SÓLO PARA USO DOMÉSTICO
Para reducir el riesgo de descargas eléctricas, este aparato cuenta con una
clavija polarizada (una cuchilla es más ancha que otra). Como medida de
seguridad, esta clavija entra sólo de una manera en un enchufe polarizado.
Si la clavija no encaja en el enchufe simplemente colóquela al revés.
Si aún así no encaja llame a un electricista calificado. De ninguna
manera intente modificar esta medida de seguridad.
EL USUARIO NO PUEDE DAR MANTENIMIENTO
REGRESE EL APARATO A LA ESTACIÓN DE SERVICIO
CONSERVE ESTAS
INSTRUCCIONES
Page 24

4
Page 25

5
bienvenido
Bienvenido
Disfrute de cocinar asando sus alimentos en casa,
en unos sencillos y fáciles pasos con su nuevo
Asador Horizontal
OSTER®.
Hemos hecho todo lo posible para hacer que
la utilización de su Asador sea sencilla y rápida.
Nuestro manual de instrucciones está diseñado
para darle información útil y consejos.
Su Asador Horizontal
OSTER®hace lo siguiente:
•
Sella en el interior los jugos naturales mientras
que escurre las grasas no deseadas.
•
Cocina el pollo haciéndolo jugoso y sabroso
por dentro, crujiente y dorado por fuera.
•
Dora uniformemente y cocina una amplia
variedad de alimentos a la perfección.
•
Provee un ambiente incluido de cocinar que
permite la visibilidad a través de la puerta
deslizable.
• Se limpia fácilmente, sus partes y accesorios
pueden lavarse en lavadora de platos.
• Si usted tiene más preguntas, por favor
contáctenos al 1-800-334-0759 ó en
www.oster.com.
Page 26

6
learning
Before Use
• Read all instructions carefully.
• Make sure to remove all foreign matter from the drip tray.
• Peel off static label from the door, if present.
• Plug the Rotisserie into a properly wired outlet.
Where to Use
• Use only on a stable, heat resistant surface.
• Do not use the Rotisserie where it will be exposed to direct
sunlight or other heat sources, such as a stove or oven.
• Keep the Rotisserie out of the reach of children — it is hot!
• Place the unit at least eight inches away from walls.
• Do not use under a cabinet or in an enclosed area.
While in Use
• The Rotisserie is very hot during operation. Be careful
to keep your hands and face away from the unit.
• Do not operate the Rotisserie without reflector shield
in place.
• Do not open the door or remove the cooking basket
during operation.
• Do not cover the vents on the top of the Horizontal
Rotisserie.
After Use
• Use oven mitts or a pot holder when removing the basket
and the drip pan after cooking.
• Make sure to disconnect the power by unplugging the unit.
Allow the Rotisserie to cool down before storing.
• Read instructions before cleaning. DO NOT IMMERSE
THE UNIT IN WATER.
Learning About Your Rotisserie
Page 27

7
featurres
Features of Your Horizontal Rotisserie
características
Características de Su Asador Horizontal
Asador
Canasta para Alimentos y Tapa
Bandeja para Goteo
Reflector de Calor
Ensamble de la Varilla
T
RINCHES AJUSTABLES
Page 28

8
step by step
1. Be sure unit is unplugged before starting.
2. Rotisserie should be placed at least 8 inches from
3. Slide the drip tray into machine at the base
4. Position the heat reflector by sliding along
5.
6.
7. Start with the end of a leg and loop a suitable
Step-By-Step Instructions
Page 29

9
step by step
8. Open screws on adjustable fork then slide onto
9. When cooking a chicken or turkey, reinsert spit
10. Push food onto spit rod and into fork as close
11. Place second fork onto spit rod and slide into
12. Once your meat or poultry is securely fixed on
13. Before placing the spit rod into the machine
14. To place the spit rod into machine, place right
15. If BBQ sauce is desired, it can be applied to the
8.Abra los tornillos sobre el trinche ajustable y
después deslice sobre la varilla con los extremos
en punta colocados el extremo abierto de
la varilla. (Figura 3)
9.Cuando cocina un pollo o un pavo, inserte
de nuevo la varilla a través del centro del ave,
iniciando en el área de la pechuga.
10.Presione los alimentos dentro de la varilla y
del trinche.
11.Coloque el segundo trinche en la varilla y
deslícelo introduciéndolo en la carne, ajuste
ambos trinches para asegurarse de que la carne
o ave esté centrada a lo largo de la varilla.
Verifique que los trinches estén fijos en la varilla,
apretando manualmente los tornillos.
12.Una vez que la carne o ave esté centrada y
colocada firmemente en la varilla, y asegure
el tercer tornillo firmemente con la mano.
13.Antes de colocar la varilla en la máquina,
quite la puerta desabrochando la aldabilla de
seguridad, levantando la puerta hacia arriba
y afuera en el lado derecho.
14.Para colocar la varilla en la máquina, coloque
la mano derecha debajo de la carne y la mano
izquierda para sostener firmemente la rueda
permanente, coloque la varilla dentro de la
unidad en un ángulo con el extremo con punta
en el lado derecho hacia abajo. Deslice el extremo
de la flecha dentro del orificio en el lado derecho
de la máquina, mientras baja el lado izquierdo
dentro de la horquilla. (Figura 4)
15.Si desea usar salsa BBQ o algún otro sazonador,
puede aplicarlo antes del proceso de cocción
a la carne o al ave, untándola ligeramente
con una brocha o pincel.
Step-By-Step Instructions
paso a paso
Instrucciones Paso a Paso
FIGURA
3
FIGURA 4
Page 30

10
step by step
16. Close the glass door. Make sure that the unit is
17. Plug unit into outlet and turn unit on by setting
18. Allow the food to rotate one or more times to
19. If the spit does not rotate
20. A bell will sound at the end of the cooking cycle
21. At the end of the cooking cycle allow the
22. With glove or oven mitt, lift the left wheel out
Page 31

11
step by step
23. Once the unit is cooled down and while
24. Place platter carefully on the counter.
25. Carefully remove detachable wheel located
26. Loosen screw on adjustable fork and slide fork
27. While holding the fixed wheel, use a fork or
28. Disassemble the remaining removable fork from
*Be very careful when handling spit rod and
adjustable forks. The ends are very sharp and
can cause serious injury if not handled carefully.
*As with any other high-temperature appliance,
some discoloration will occur after usage and
does not indicate any problem with the unit.
23. Después de que la unidad se enfríe
, use guantes
resistentes al calor y quite la bandeja
del goteo.
T
ENGA
C
UIDADO
:
El contenido de la bandeja
del goteo está extremadamente caliente. (Figura 6)
24. Coloque el platón cuidadosamente sobre la mesa
o sobre el mostrador.
25. Cuidadosamente, saque la rueda removible
localizada en el lado derecho.
26.
Afloje el tornillo sobre el trinche ajustable y deslice
el trinche fuera
de la carne o del ave y sáquelo de
la varilla. Tenga Mucho Cuidado: Los alimentos
pueden estar muy calientes y los tornillos pueden
estar resbalosos debido a los jugos de la carne.
27. Mientras sostiene la rueda fija, use un tenedor
o su mano usando un guante, para empujar
la carne o el ave fuera de la varilla y colocarla
sobre el platón.
28. Desarme el otro trinche removible de la varilla.
Lávelos con agua tibia y jabonosa. Enjuague
todas las partes y accesorios. Séquelos muy bien
después de cada uso. No es necesario limpiarla
después de cada uso.
*
Tenga muy cuidado al manejar la barra de la escupida
y forkes ajustables. Los extremos son muy sostenidos
y pueden causar lesión seria si no están manejados
cuidadosamente.
*Como con cualquier otro aparato de temperaturas
elevadas, puede ocurrir alguna decoloración después
del uso, pero esto no indica que exista ningún
problema con el aparato.
paso a paso
FIGURA 6
Page 32

12
basket
1. Make sure unit is unplugged before starting and
is positioned at least 8 inches from walls and is
not beneath cabinets.
2. Be sure that the basket has been washed and
dried before using. Use warm, soapy water to
wash and clean basket. The basket should be
cleaned after each use.
3.
Place drip tray into position at the bottom of unit.
4. Release the basket lid by pulling the fastening
pins out of the positioning holes located at both
sides of the basket. (Figure 7)
5. Remove the lid from basket.
6. Place food items into basket being sure that food
fits neatly into basket and that food items
cannot slip between basket’s grid.
7. Affix lid by placing the back of the lid into the
appropriate groove located at the back of the
basket. The basket is designed so that the lid
will only fit into the back at different levels for
varied thicknesses of food. Press the front of the
lid down onto food; be careful not to damage
food within basket.
8.
Use one hand to hold lid firmly against food
located within the basket,
fasten pins in positioning holes located on both
sides of basket. Be sure that lid holds the food
firmly in place. *Note there are various holes to
choose from to hold food secure. (Figure 8)
9. Turn basket upside down assuring that no loose
or small pieces of food will slip out of basket.
It is important that food within basket cannot fit
through grid.
Using Basket Accessory
Page 33

13
basket
10. Place the basket into machine at an angle
11. Close glass door and plug unit in.
12.
13. After timer has stopped and bell has rung, unplug
14. Remove the door by undoing the safety latch
15. Position a plate or platter beneath the basket with
16. Once the unit has cooled down and while using
17. Place platter on clean counter, while using heat
18. Use a fork or tongs to remove food from basket.
19. Enjoy !
10.Coloque la canasta dentro de la máquina en un
ángulo con el extremo con punta en el lado
derecho.
11.Cierre la puerta de vidrio y conecte la unidad a la
toma de corriente.
12.
Encienda el reloj y seleccione el tiempo de cocción
deseado. Observe cómo gira la canasta una o más
veces para revisar que los alimentos están
correctamente colocados dentro ésta y que gira
libremente sin rozar la puerta, el elemento
calefactor o el escudo de calor.
13.Después de que el reloj se ha detenido y que
escuche la señal de la campana, desconecte el
cordón eléctrico y permita que la canasta y los
alimentos se enfríen durante unos minutos antes
de sacarlos.
14.Quite la puerta desabrochando la aldabilla de
seguridad, levantando la puerta hacia arriba y
afuera en el lado derecho. Siempre asuma que
tanto el Asador como la comida están calientes
después de cocinar.
15.Levante el lado izquierdo de la canasta y jale
el extremo con punta fuera del orificio en el lado
de la derecha, después remueva cuidadosamente
el platón con la canasta, sosteniendo la canasta
con una mano.
16.
Después de que la unidad se enfríe, mientras utiliza
guantes resistentes al calor,
quite la bandeja
del goteo
.
(Tenga cuidado: los contenidos de la bandeja de
goteo estan extremadamente calientes.)
(Figura 9)
17.Póngase los guantes protectores y coloque el
platón sobre una superficie limpia. Remueva los
seguros en la parte lateral de la canasta. (Tenga
cuidado: los alimentos y la canasta pueden estar
extremadamente calientes.) Si es necesario,
utilice un tenedor o pinzas para remover la tapa
de la canasta, ya que puede estar muy caliente.
18.Utilice un trinche o pinzas para quitar
los alimentos de la canasta.
19.¡Disfrutelos!
canasta
FIGURA
9
Page 34

14
cleaning
• Be sure to clean Rotisserie and accessories before first use.
• Make sure no packaging material is caught inside on the heating element.
•
After using Rotisserie, always allow unit to cool completely before
cleaning.
• Do not use any chemicals or solvents for cleaning unit or accessories.
You may damage the unit or protective coating.
• Be sure to clean all accessories before using Rotisserie.
• Make sure unit is unplugged before cleaning unit and when loading
and unloading food.
• Use warm, soapy water to clean the inside and outside of the unit and
all accessories.
• If using a dishwasher to clean accessories, please place items on top shelf.
• You may soak accessories in hot, soapy water if food particles are hard
to remove.
•
DO NOT IMMERSE THE UNIT OR THE CORD IN WATER.
• You may notice some smoke or light odor coming from your unit when
being used for the first time, this is due to the burning off of a protective
coating on the heating element; this is normal.
• Some foods may splatter grease or juices while cooking causing
some smoke during normal use. While this is normal, look through glass
door to make sure that spit or food basket is rotating normally. Food
should not touch element, heat reflector or glass door during operation.
• Be sure to keep the Heat Reflector clean and free of cooked-on foods.
Wash thoroughly after cooking foods that splatter.
Cleaning and Caring for Rotisserie
Page 35

15
Los tiempos de cocción que se indican en este cuadro
son solamente una guía de los
TIEMPOS MÍNIMOS
APROXIMADOS DE COCCIÓN
, basados en
los promedios de prueba. Los tiempos de cocción
pueden variar debido a las diferentes carnes, formas,
tamaños y cantidad de grasa y hueso que ésta contenga.
Cuando cocine con el Asador OSTER,®use un
termómetro de alimentos – así evita el estar adivinando
el nivel de cocción. Un termómetro para carnes mide
la temperatura interna de la carne y aves que cocina,
para asegurar que ha alcanzado una temperatura
segura. Al usar un termómetro para carnes, puede
ayudar a prevenir el cocinar demasiado las carnes
y cocinar las carnes a una temperatura segura.
Use un termómetro regular a prueba de horno que
se introduce en los alimentos al inicio del tiempo
de cocción y que puede leerse fácilmente. Inserte
la punta del termómetro por lo menos 2 pulgadas
dentro de la parte más gruesa de la carne, no lo
inserte cerca del hueso o del cartílago. Para cocinar
aves, inserte el termómetro en el interior del muslo
del ave, cerca de la pechuga pero no debe tocar el
hueso.
EL TERMÓMETRO DE LA CARNE NO
DEBE TOCAR EL ELEMENTO CALEFACTOR
MIENTRAS LA CANASTA O LA VARILLA
ESTÉN GIRANDO.
cocción
Tiempos de Cocción
Page 36

16
P
OULTRY
Chicken, whole 3-1/2 to 4-1/2 lbs. 180
Chicken, pieces
with bones 2 to 3-1/2 lbs. breast
boneless 1 to 1-1/2 lbs. breast
Cornish Hens 2 to 3 hens 180
Turkey, unstuffed 12 lbs. or under 180
Turkey Burgers 1 lb. 165
P
ORK
Boneless Rolled Pork Roast 3-1/2 to 7 lbs. 160
Pork Tenderloin about 1 lb. 160
Pork Chops
with bones 2 lbs. 160
boneless 2 lbs. 160
Spareribs 1-1/2 to 2 lbs. 160
Boneless Ham Roast 160
Uncooked Sausage 1 lb. 160
Cooked Hot Dogs & Sausages 1 lb. 165
B
EEF
Standing Rib Roast 6 to 8 lbs. rare : 145
Boneless Rolled Beef Roast rare
Steaks 1-1/2 to 2 lb. 1-inch thick rare
Hamburgers 1-inch thick medium : 160
L
AMB
Boneless Rolled Lamb Roast rare : 145
Lamb Chops rare
S
EAFOOD
Fish Steaks 2 lbs. : 1-inch thick 25 min. total
Fish Filets 1 lb. 20 min. total
O
THER
Baked Potatoes Cut in half, placed in basket 45 min. total
Vegetables sliced 1/2-inch thick,
Cooking times given in the chart are based on foods that have already been thawed.
* If timer needs to be set for less than 10 minutes, turn the knob beyond the 10-minute marking, then set.
Page 37

17
Carving Poultry
On a carving board, arrange the chicken or other poultry on its back with
the legs to the right. Remove string or twine used to bind legs and wings
for cooking. Starting at the side facing the carver, cut the leg off body by
grasping the leg with your left hand pulling gently while cutting through
the meat and the joint at the thigh.
Place the leg on the carving board and cut through the joint to sever the
thigh bone from the drumstick. Slice the meat from the leg and thigh,
carving parallel to the bone.
Insert the meat fork into the breast meat to secure the body.
Sever the wing from the body by carving through the joint.
Start carving the breast just above the joint where the wing was removed.
Cut thin slices of white meat, carving upward and cutting parallel to the
breast bone.
Carving a Whole Ham, Pork Roast or Roast Leg of Lamb
Place a whole ham, pork roast or leg of lamb on the carving board with
the shank end to the right of the carver. For a ham, turn the scored fat side
up. For the leg of lamb, place the roast so that the meaty section faces
away from the carver.
Insert a meat fork into the heavy part of the meat and cut several
lengthwise slices from the less meaty side.
Turn the ham, pork roast or leg of lamb so that it rests upright on the cut
surface. Cut a wedge from the shank end by starting at the base of the
bulge and slicing down to the leg bone. Then, make another cut at an
angle to this, close to the shank end. Lift out the wedge.
Starting at the shank end, cut thin uniform slices down to the leg bone.
Carving a Rib Roast
Arrange the roast on a platter or a cutting board with the largest end of
the roast down, and the rib side to your left. The small end of the roast
is nearest the carver. Insert a carving fork between the two top ribs.
Slice across the roast from the fat edge of the rib bone. Free the slice
from the bone using the tip of the knife.
Rebanando Aves
Sobre una tabla para cortar, coloque el pollo u otra ave sobre su espalda con
las patas hacia la derecha.
Quite la cadena o la guita usada para atar
las piernas y las alas para el cocinar. Empezando por el lado que quede
enfrente del cuchillo, corte una pierna del cuerpo agarrando la pierna con
su mano izquierda, jale gentilmente mientras corta completamente la carne
y la articulación en el muslo.
Coloque la pierna en la tabla para cortar y corte a través de la articulación
para separar el hueso del muslo de la pierna. Rebane la carne de la pierna
y muslo, corte paralelamente al hueso.
Inserte el tenedor de carne en la pechuga para sostener el cuerpo fijamente.
Separe el ala del cuerpo cortando en la articulación.
Empiece rebanando la pechuga justo encima de la articulación de donde el
ala fue removida. Corte en rebanadas delgadas la carne blanca, moviendo
el cuchillo hacia arriba y en forma paralela al hueso de la pechuga.
Rebanando un Jamón Entero, Asado de Carne de Cerdo
o Asado de Pierna de Cordero
Coloque el jamón entero, el asado de carne de cerdo o la pierna de cordero
en una tabla para cortar, con la punta de la pierna hacia el lado derecho
del cuchillo. Para el jamón, voltee el lado rayado hacia arriba. Para la pierna
de cordero, colóquela de forma que la parte carnosa quede hacia el lado
contrario del cuchillo.
Introduzca el tenedor de carne en la parte con más carne y corte bastantes
rebanadas longitudinalmente desde la parte con menos carne.
Voltee el jamón, el asado de carne de cerdo y la pierna de cordero de forma
que se sostenga sobre la parte anteriormente rebanada. Corte una rebanada
de la punta de la pierna empezando por la base de la protuberancia y rebanando
hacia abajo con dirección al hueso de la pierna. Después, haga otro corte
con otro ángulo con respecto al anterior, cerca de la punta de la pierna.
Levante la rebanada.
Empezando por el final de la punta de la pierna, corte rebanadas delgadas
y uniformes en rebanadas hacia abajo en dirección al hueso de la pierna.
Rebanando Costillas
Arregle el asado en un plato o en una tabla de cortar con la parte más grande
hacia abajo y la parte de las costillas hacia su izquierda. La parte más
pequeña del asado debe estar cerca del cuchillo. Inserte un tenedor entre
las dos costillas superiores.
Rebane alrededor del asado desde el borde más ancho de los hueso de costilla.
Libere la rebanada del hueso usando la punta del cuchillo.
carving
Carving Tips
consejos
Consejos para Rebanar y Cortar Carnes
Page 38

18
warranty
Two -Year Limited Warranty
Sunbeam Products, Inc. (“Sunbeam”) warrants that for a period of
two years from the date of purchase,
defects in material and workmanship. Sunbeam, at its option,
will repair or
found to be defective during this warranty period.
will be made with a new or remanufactured product or component.
If the product is no longer available, replacement may be made with a
similar product of equal or greater value. This is your exclusive warranty.
This warranty is valid for the original retail purchaser from the date
of initial retail purchase and is not transferable. Keep the original sales
receipt. Proof of purchase is required to obtain warranty performance.
Sunbeam dealers, service centers or retail stores selling Sunbeam products
do not have the right to alter, modify or in any way change the terms
and conditions of this warranty.
This warranty does not cover normal wear of parts or damage
from any of the following: negligent use or misuse of the product, use on
improper voltage or current, use contrary to the operating instructions,
disassembly, repair or alteration by anyone other than Sunbeam or
an Authorized Service Center. Further, the warranty does not cover
Acts of God, such as fire, flood, hurricanes and tornadoes.
Sunbeam shall not be liable for any incidental or consequential
damages caused by the breach of any express or implied warranty.
Except to the extent prohibited by applicable law, any implied warranty
of merchantability or fitness for a particular purpose is limited in duration
to the duration of the above warranty. Some states, provinces or
jurisdictions do not allow the exclusion or limitation of incidental or
consequential damages or limitations on how long an implied warranty
lasts, so the above limitations of exclusion may not apply to you.
This warranty gives you specific legal rights, and you may also have
other rights that vary from state to state or province to province.
How to Obtain Warranty Service
Take the product to an Authorized Sunbeam Service Center.
You can find the nearest Authorized Sunbeam Service Center
by calling
DO NOT RETURN THIS PRODUCT TO THE PLACE OF PURCHASE.
Page 39

notes
Notes
notas
Notas
19
Page 40

DO NOT SEND THIS PRODUCT TO THE PLACE OF PURCHASE.
Printed in China
 Loading...