

Page 1
It is of vital importance, before attempting to operate
your eng ine, to read the gene ral 'SAFETY
INSTRUCTIONS AND WARNINGS' section on
pages 2-5 of this booklet and to strictly adhere to the
advice contained therein.
Also, please study the entire contents of this
instruction manual, so as to familiarize yourself
with the controls and other features of the engine.
Keep these instructions in a safe place so that you
may readily refer to them whenever necessary.
It is suggested that any instructions supplied with
the vehicle, radio control equipment, etc., are
accessible for checking at the same time.
1
CONTENTS
SAFETY INSTRUCTIONS AND
WARNINGS ABOUT YOUR O.S. ENGINE
ENGINE CONSTRUCTION, NOTES WHEN
APPLYING AN ELECTRIC STARTER,
NOTES ON OPERATION
ABOUT THE ENGINE,
TOOLS, ACCESSORIES, etc.
BASIC ENGINE PARTS,
CARBURETOR CONTROLS
GLOWPLUG
INSTALLATION
STARTING THE ENGINE &
RUNNING-IN ('Breaking-in)
2-5
6-8
9-11
15
36-37
FINAL ADJUSTMENT
CARE AND MAINTENANCE
TROUBLE SHOOTING
ENGINE EXPLODED VIEWS &
PARTS LIST
CARBURETOR EXPLODED VIEW &
PARTS LIST
O.S. GENUINE PARTS & ACCESSORIES
THREE VIEW DRAWING
28-31
12-14
19-23
34-35
24-25
26-27
38
16-18
32-33
Page 2
2
!
!
Remember that your engine is not a "toy", but a highly efficient internalcombustion machine whose power is capable of harming you, or others, if it is
misused.
As owner, you, alone, are responsible for the safe operation of your engine, so act
with discretion and care at all times.
If at some future date, your O.S. engine is acquired by another person, we would
respectfully request that these instructions are also passed on to its new owner.
SAFETY INSTRUCTIONS AND WARNINGS ABOUT YOUR O.S. ENGINE
The advice which follows applies basically to ALL MODEL ENGINES and is
grouped under two headings according to the degree of damage or danger
which might arise through misuse or neglect.
WARNINGS
NOTES
Th e se co v er ev e nts wh ich
mig h t inv o lve se rious (in
extreme circumstances, even
fatal) injury.
These cover the many other
possibilities, generally less obvious
sources of danger, but which, under
certain circumstances, may also
cause damage or injury.
3
!
WARNINGS
Model engine fuel is poisonous. Do not allow it to come into
contact with the eyes or mouth.
Always store it in a clearly
marked container and out of the
reach of children.
Model engine fuel is also highly
flammable. Keep it away from
open flame, excessive heat,
sources of sparks, or anything
else which might ignite it. Do
not smoke or allow anyone else
to smoke, near to it.
Never operate your engine in an enclosed
space. Model engines, like automobile
engines, exhaust deadly carbon-monoxide. Run your engine only in an open
area.
Model engines generate
considerable heat. Do not
touch any part of your engine
until it has cooled. Contact
with the muffler (silencer),
cylinder head or exhaust
header pipe, in particular,
may result in a serious burn.
Never touch, or allow any
object to come into contact
with, the rotating propeller and
do not crouch over the engine
when it is running.
Page 3
4
!
This engine was designed for model boats.
Do not attempt to use it for any other purpose.
Mount the engine in your model securely,
following the manufacturers' recommendations, using appropriate screws and locknuts.
Install an effective silencer (muffler).
Frequent close exposure to a noisy exhaust
(especially in the case of the most powerful
high-speed engines) may eventually impair
your hearing and such noise is also likely to
cause annoyance to others over a wide area.
Take care that the glowplug clip or battery
leads do not come into contact with the propeller or any other rotating parts. Also check
that the linkage to the throttle arm is secure.
If your engine does not have a built-in recoil
starter, use an electric starter. The wearing of
safety glasses is also strongly recommended.
When handling the boat immediately prior to
launching, be especially cautious.
Keep the propeller and other rotating parts
away from you.
NOTES
For their safety, ke ep al l onlooke rs
(especially small children) well back (at
least 20 feet or 6 meters) when preparing
your model for running.
Before starting the engine, always check the
tightness of all the screws and nuts especially those of joint and movable parts such as
throttle arm. Missing retightening the loose
screws and nuts often causes the parts
breakage that is capable of harming you.
5
!
Adjust the throttle linkage so that the
engine stops when the throttle stick and
trim lever on the transmitter are fully
retarded. Alternatively, the engine may be
stopped by cutting off the fuel supply.
Never try to stop the engine physically.
Warning! Immediately after a glowplugignition engine has been run and is still
warm, conditions sometimes exist whereby
it is just possible for the engine to abruptly
restart if it is rotated over compression
WITHOUT the glowplug battery being
reconnected.
NOTES
Page 4
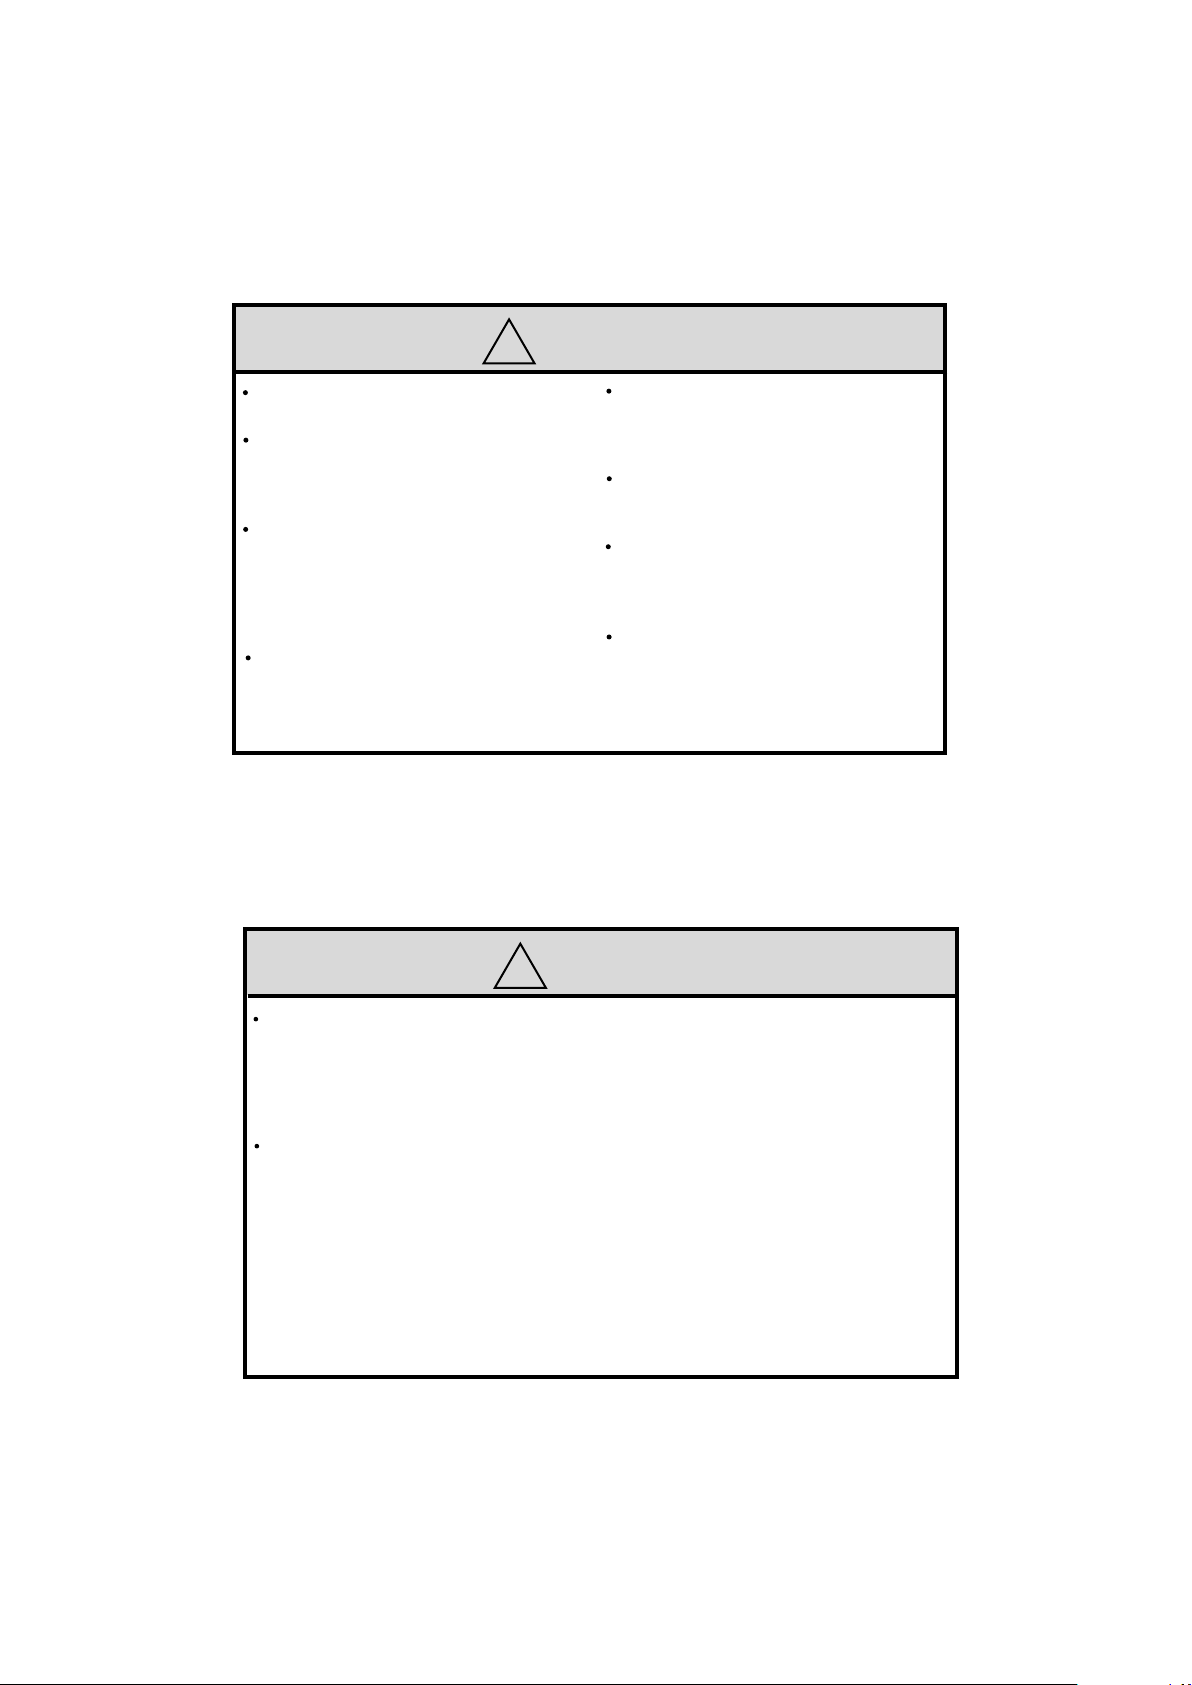
6
Piston
Cylinder Liner
Crankshaft
ENGINE CONSTRUCTION
With this engine, the piston will
feel tight at the top of its stroke
(TDC) when the engine is cold.
This is normal. The cylinder bore
has a slight taper. The piston
and cylinder are designed to
achieve a perfect running
clearance when they reach
operating temperature.
Near TDC
Slight taper
When the engine is cold.
When the engine is hot.
7
NOTES WHEN APPLYING
AN ELECTRIC STARTER
Do not over-prime. This could
cause a hydraulic lock and damage
the engine on application of the
electric starter.
If over-primed, remove glowplug,
close needle-valve and apply
starter to pump out surplus fuel.
Cover the head with a rag to
prevent any pumped out fuel from
getting into your eyes.
Page 5
8
GUARANTEE
This engine is constructed from the very
best materials available and to the very
highest engineering standards, using
the most advanced precision machinery.
However, the extremely high stresses
imposed by car racing operation under
very severe conditions, as well as
stresses which are exacerbated by the
use of powerful fuels containing very
high concentrations of nitromethane,
constitute hazards which are beyond a
manufacturer's control. Accordingly, we
regret that it is not possible to extend
our usual warranty terms to this
particular engine -i.e. no guarantee is
offered against material wear, or damage
resulting from, actual use.
As delivered, the engine has the
carburetor lightly fit into its intake.
Secure it changing its angle according
to the hull.
NOTE
NOTES ON OPERATION
We do not recommend running your boat
on the sea, or in any other saltwater
environment. Under such conditions, it is
difficult to prevent the engine from
becoming corroded and, eventu ally,
inoperative.
NOTE
9
ABOUT THE ENGINE
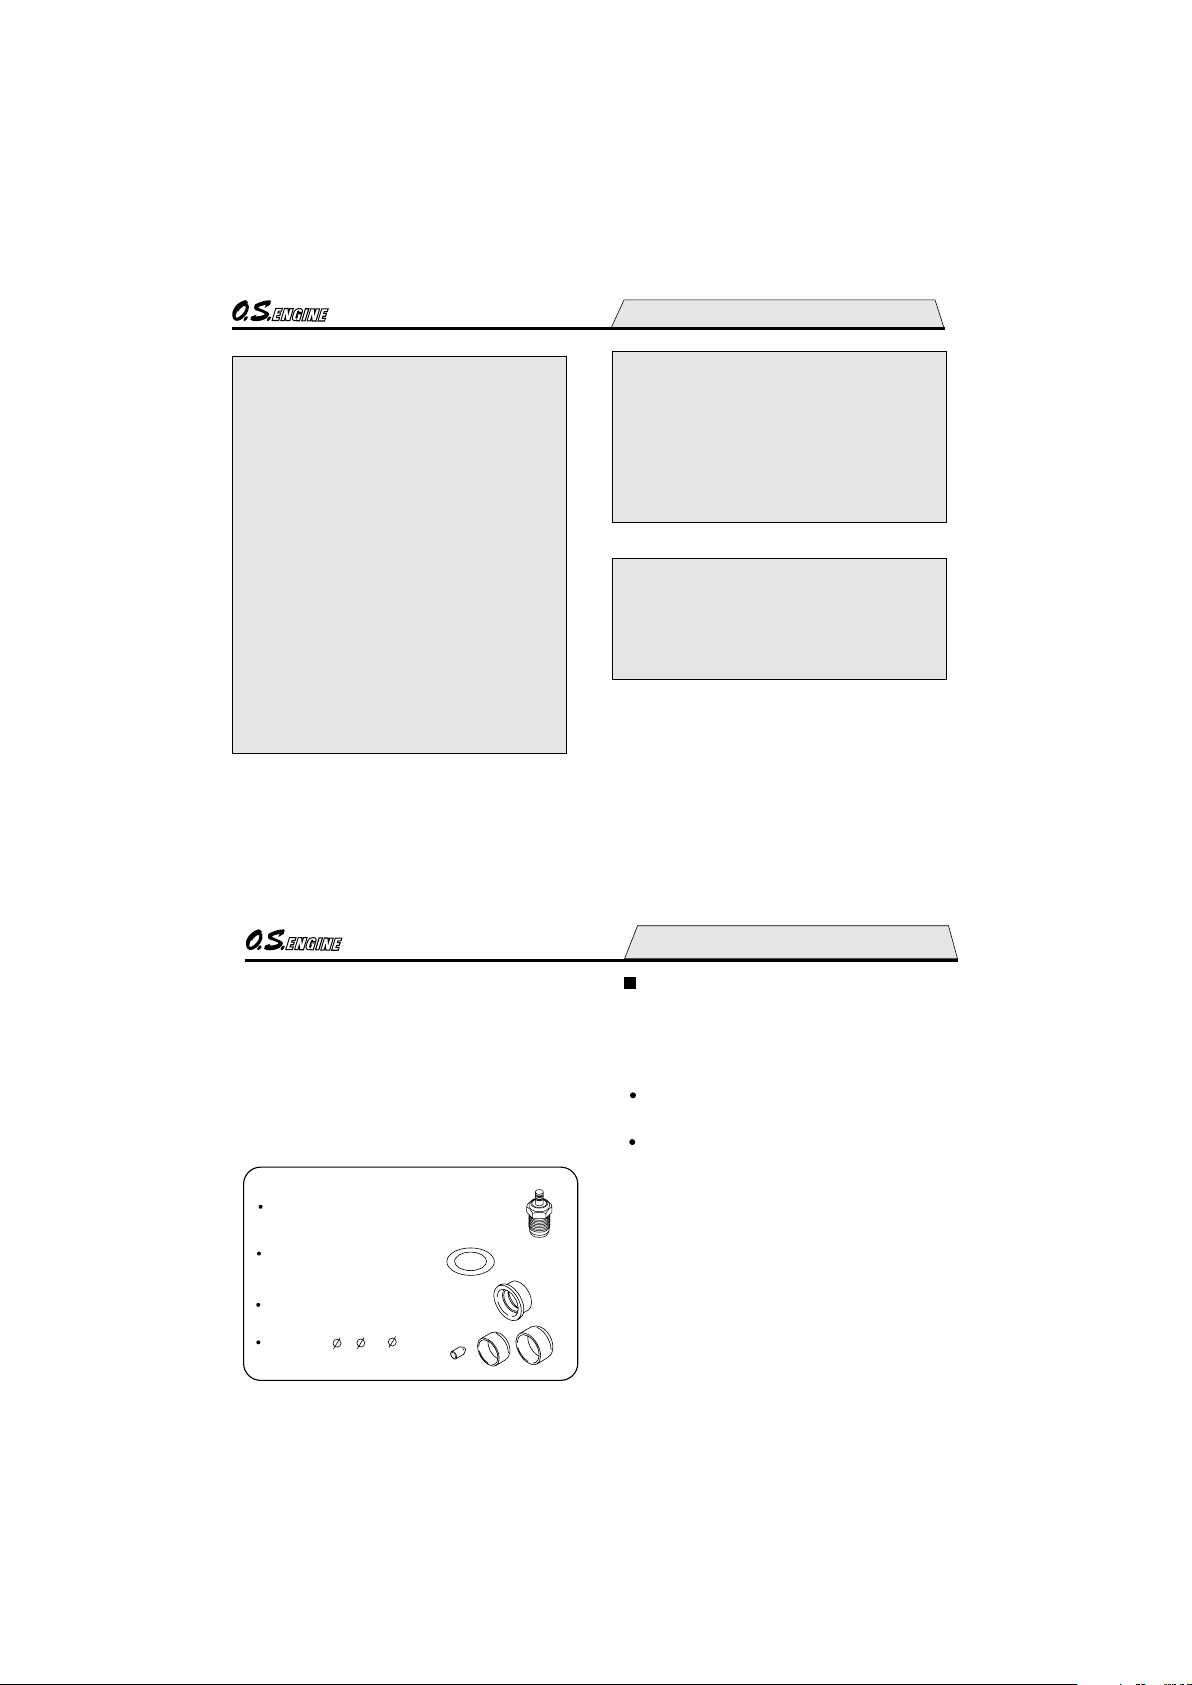
Standard accessories
Glow Plug RP7 For T-type head
(Turbo head) 1piece
Cylinder-head gasket
(0.2mm) 1 sheet
Exhaust Seal Ring 1piece
Dust Cap 3, 16, 18
1piece each
The MAX-21XZ-M is designed expressly for
21 class boat racing, basing on the race
proven MAX-21XZ-R on road car racing
engine.
The big bore of 10mm 21D carburetor
copes with high nitro fuel.
This engine offers high racing potential
maintaining O.S. traditional easy-to-handle
characteristics.
Head Gaskets
The engine comes with a o.2mm and 0.1mm
thick head gasket installed. If you find the
following symptoms after running the engine,
add a 0.2mm thick gasket supplied.
With the appropriate needle setting, engine
r.p.m. drop and power loss during running.
Composition and proportion of lubricant in the
fuel may affect the symptoms.
Glow plug burns out frequently.
Page 6
10
FUEL
Generally, it is suggested that the user selects a fuel
that is commercially available for model two-stroke
engines and contains 10-30% nitromethane. As a
starting point, we recommend a fuel containing 20%
nitromethane, changing to a fuel containing more
nitro if necessary. When the brand of fuel is changed,
or the nitro content increased, it is advisable to
repeat the running-in procedure referred to in the
RUNNING-IN paragraphs. Please note that with
high-nitro fuels, although power may
be increased for competition purposes,
glowplug elements do not last as long
and engine life will be shortened.
Items necessary for starting
!
REMINDER!
Model engine fuel is poisonous. Do not
allow it to come into contact with the
eyes or mouth. Always store it in a
clearly marked container and out of the
reach of children.
TOOLS, ACCESSORIES, etc.
The following items are necessary for operating the engine.
!
Model engine fuel is also highly
flammable. Keep it away from open
flame, excessive heat, sources of
sparks, or anything else which might
ignite it. Do not smoke or allow anyone
else to smoke, near to it.
PROPELLER
Use well balanced propellers only. As the ideal
diameter, pitch and shape vary according to the
size, weight and type of model, final selection
can be made after practical experiment. As a
starting point, suggested propeller diameter is
41-43mm with a pitch/dia ratio of 1.0-1.1 for indrive Vee type hulls, 40-45mm with a pitch/dia.
ratio of 1.2-1.6 for out-drive Vee type
hulls and 44-46mm with a pitch/dia.
ratio of 1.4-1.6 for hydroplanes.
NOTE
Never use a propeller that has even
slight damage.
11
TOOLS
GLOWPLUG IGNITER
Commercialy available handy glowplug
heater in which the glowplug battery
and battery leads are integrated.
Never touch, or allow any object to come into
contact with, the rotating propeller and do not
crouch over the engine when it is running.
REMINDER!
!
SILICONE TUBING
This is required for the connection between the
fuel tank and engine, also for the water cooling
system. Inner dia. of 2.3-2.5mm
and outer dia. of 5-5.5mm would be
suitable.
ELECTRIC STARTER AND STARTER BATTERY
Use a 12-volt electric starter
with suitable battery for starting the engine.
Necessary for starting the engine.
It is suggested to keep a starter rope as a reserve.
STARTER BELT
Install a filter to the outlet tube of your
refuelling container to prevent entry of
foreign matter into the fuel tank.
SUPER FILTER (L)
(Option)
O.S. SPEED DRIVER TOOLS
O.S. SPEED PLUG WRENCH
Page 7

12
Marine Head
Crankcase
Mounting Lugs
Exhaust
Cover Plate
Carburetor Type 21D
Crankshaft
BASIC ENGINE PARTS
Ball Bearing (Front)
Glow Plug RP7
13
CARBURETOR CONTROLS
(21D)
The Needle-Valve:
The Mixture Control Screw:
Two adjustable controls are provided on this
carburetor.
For adjusting the mixture strength when the
throttle is fully open.
For adjusting the mixture strength at partthrottle and idle speed, to obtain steady idling
and smooth acceleration to mid speeds.
Mixture Control Screw
Mixture
Control Valve
Mixture Control Screw
Needle Valve
BASIC POSITION OF MIXTURE CONTROL SCREW
(Mixture Control Valve)
Thick
Lean
shown in the sketch. (In case of 30% nitro fuel)
In case of 65% nitro fuel, basic position should
be approximately 45 degrees turned left from
the center. Mixture gets lean when the Mixture
Control Screw is turned right, while mixture gets
rich when the Mixture Control Screw is turned
left. With a model boat, adjustments vary with
combined various factors such as climatic
conditions, fuel, muffler, etc. Therefore, Mixture
Control Screw position varies with each model
and set-up, and it is normal if the Mixture Control
Screw position is off center.
As delivered, the Mixture Control screw is
positioned at approximately the center as
45
Page 8
14
As the idle mixture control screw is
installed with LOCTITE, it may initially feel stiff, and it is suggested
to use a little larger screwdriver.
The screw can be turned only 90 degrees either way. Do
not force it to turn further, or it may break end cause
trouble.
NOTE
90 degrees
90 degrees
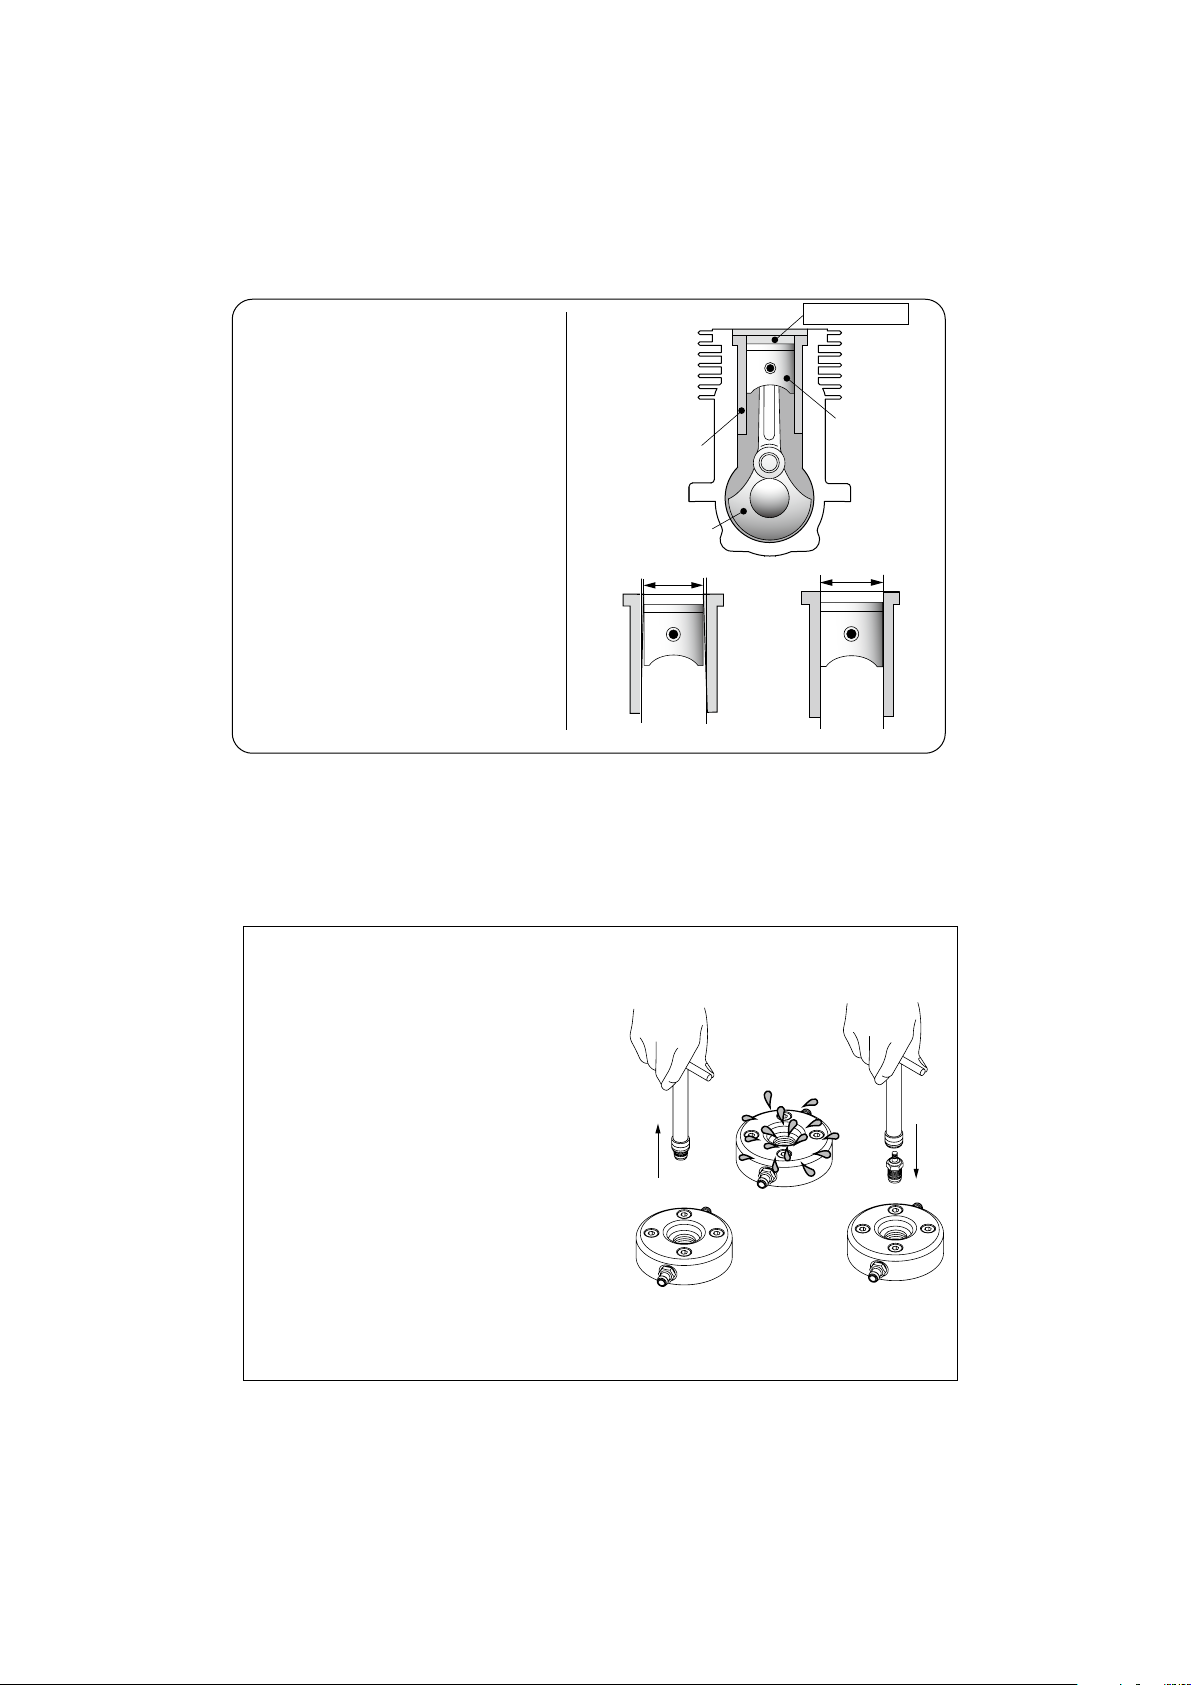
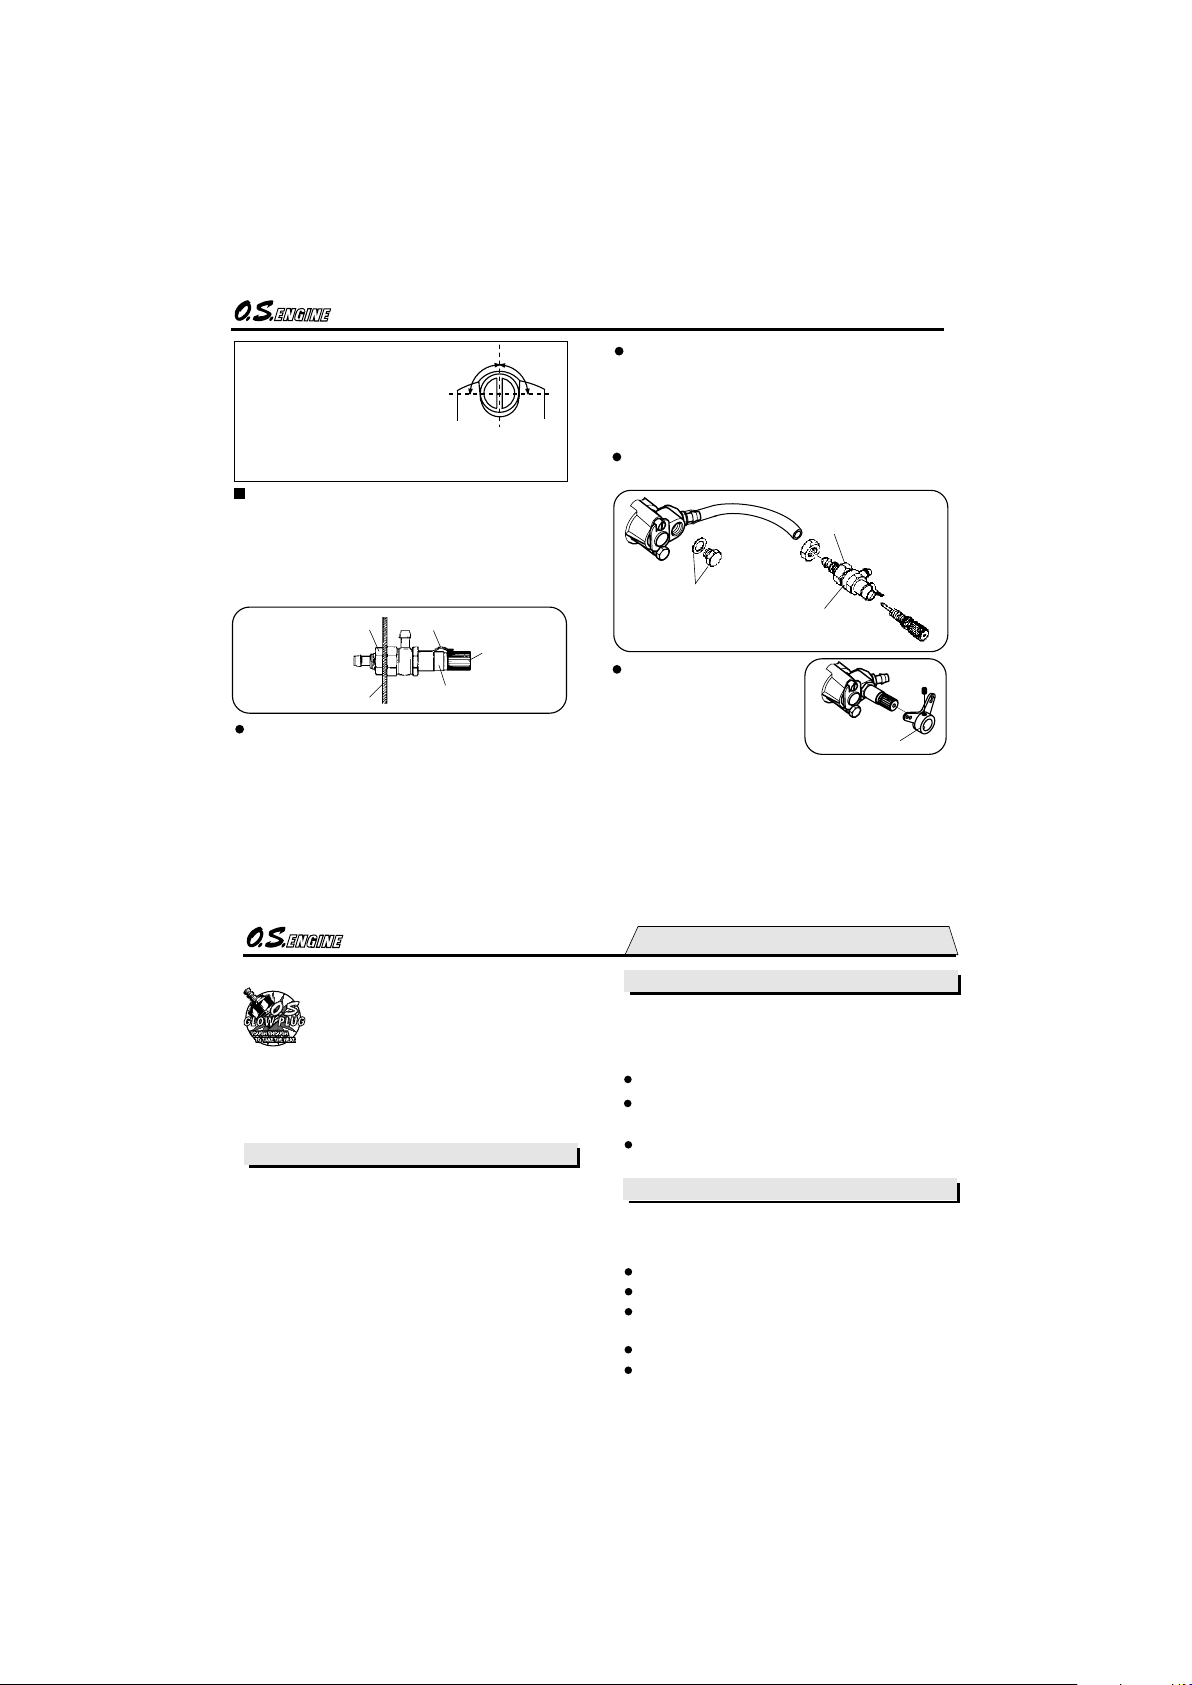
Type 20G Remote-mounting
Needle Valve Assembly (Optional parts)
It enables the Needle Valve to be installed separately
from the engine in a position where (especially with a
cowled or enclosed engine) it may be more accessible
for adjustment. (See sketch.) Install as follows:
Remove the needle-valve holder from the
carburetor and fit the plug screw in its place.
Drill a 6mm dia. hole in the required position
on the model and insert the Remote Needle
Valve Assembly. If necessary, install a suitable
mounting plate in the model to which the
Remote Needle Valve Assembly may be fitted.
You may also use the
Needle Control Lever in
conjunction with the Remote-mounting Needle
Valve Assembly.
lock nut
Ratchet spring
Needle
Remote needle holder
Model or fitting plate
Tube length should be kept as short as
possible.
Remote needle holder
Remote needle nut
Plug screw
Silicone tubing
Needle valve
control lever
15
GLOWPLUG
The role of the glowplug
Glowplug life
Particularly in the case of very high performance
engines,
glowplugs must be regarded as expendable
items. However, plug life can be extended and engine
performance maintained by careful use, i.e.:
Install a plug suitable for the engine.
Use fuel containing a moderate percentage of
nitromethane unless more is essential for racing events.
Do not run the engine too lean and do not leave the
battery connected while adjusting the needle.
With a glowplug engine, ignition is initiated by the
application of a 1.5-volt power source. When the
battery is disconnected, the heat retained within the
combustion chamber remains sufficient to keep the
plug filament glowing, thereby continuing to keep the
engine running. Ignition timing is 'automatic' : under
reduced load, allowing higher rpm, the plug becomes
hotter and, appropriately, fires the fuel/air charge
earlier; conversely, at reduced rpm, the plug become
cooler and ignition is retarded.
Apart from when actually burned out, a plug may
need to be replaced because it no longer delivers its
best performance, such as when:
When to replace the glowplug
Filament surface has roughened and turned white.
Filament coil has become distorted.
Foreign matter has adhered to filament or plug
body has corroded.
Engine tends to cut out when idling.
Starting qualities deteriorate.
Since the compatibility of the glowplug
and fuel may have a marked effect on
performance and reliability, it is suggested
to use the O.S. RP7 plug when it is
necessary to replace. Carefully install
plug finger-tight, before final tightening
with the correct size plug wrench.
Page 9

16
INSTALLATION OF THE STANDARD ACCESSORIES
Install the exhaust seal ring supplied.
Exhaust
Seal Ring
Glowplug
INSTALLATION OF THE DUST CAP SET
If the engine is to be stored or out of use for a while,
install the included exhaust and carburetor dust caps
to prevent foreign matter from entering the engine.
Installing the glow plug. Insert RP7 plug
supplied into marine head carefully, making
sure that it is not cross-threaded before
tightening firmly.
(All the O.S. T-Type plugs including the RP7
are not supplied with a washer.)
17
INSTALLATION OF THE CARBURETOR
As delivered, the engine has its carburetor lightly
installed in the intake boss. Secure it as follows.
Loosen the retainer screw, rotate the
carburetor to its correct position and make
sure that it is pressed well down into the
intake boss, compressing the rubber gasket,
before retightening screw.
1.
2.
Rotate the retainer nut
gently until it stops.
Tighten a further
120-180
Rotate the retainer screw gently until it
stops, then tighten a further 120-180 .
Do not overtighten the screw as this will
damage the carburetor spacer.
Note
Be careful not to damage the O rings when
removing the carburetor retainer from the
engine.
First, remove the retainer Retaining screw,
then pull out each part. Do not push the
part in or damage the O rings.
Retaining Screw
"O" Ring
"O" Ring
Page 10
18
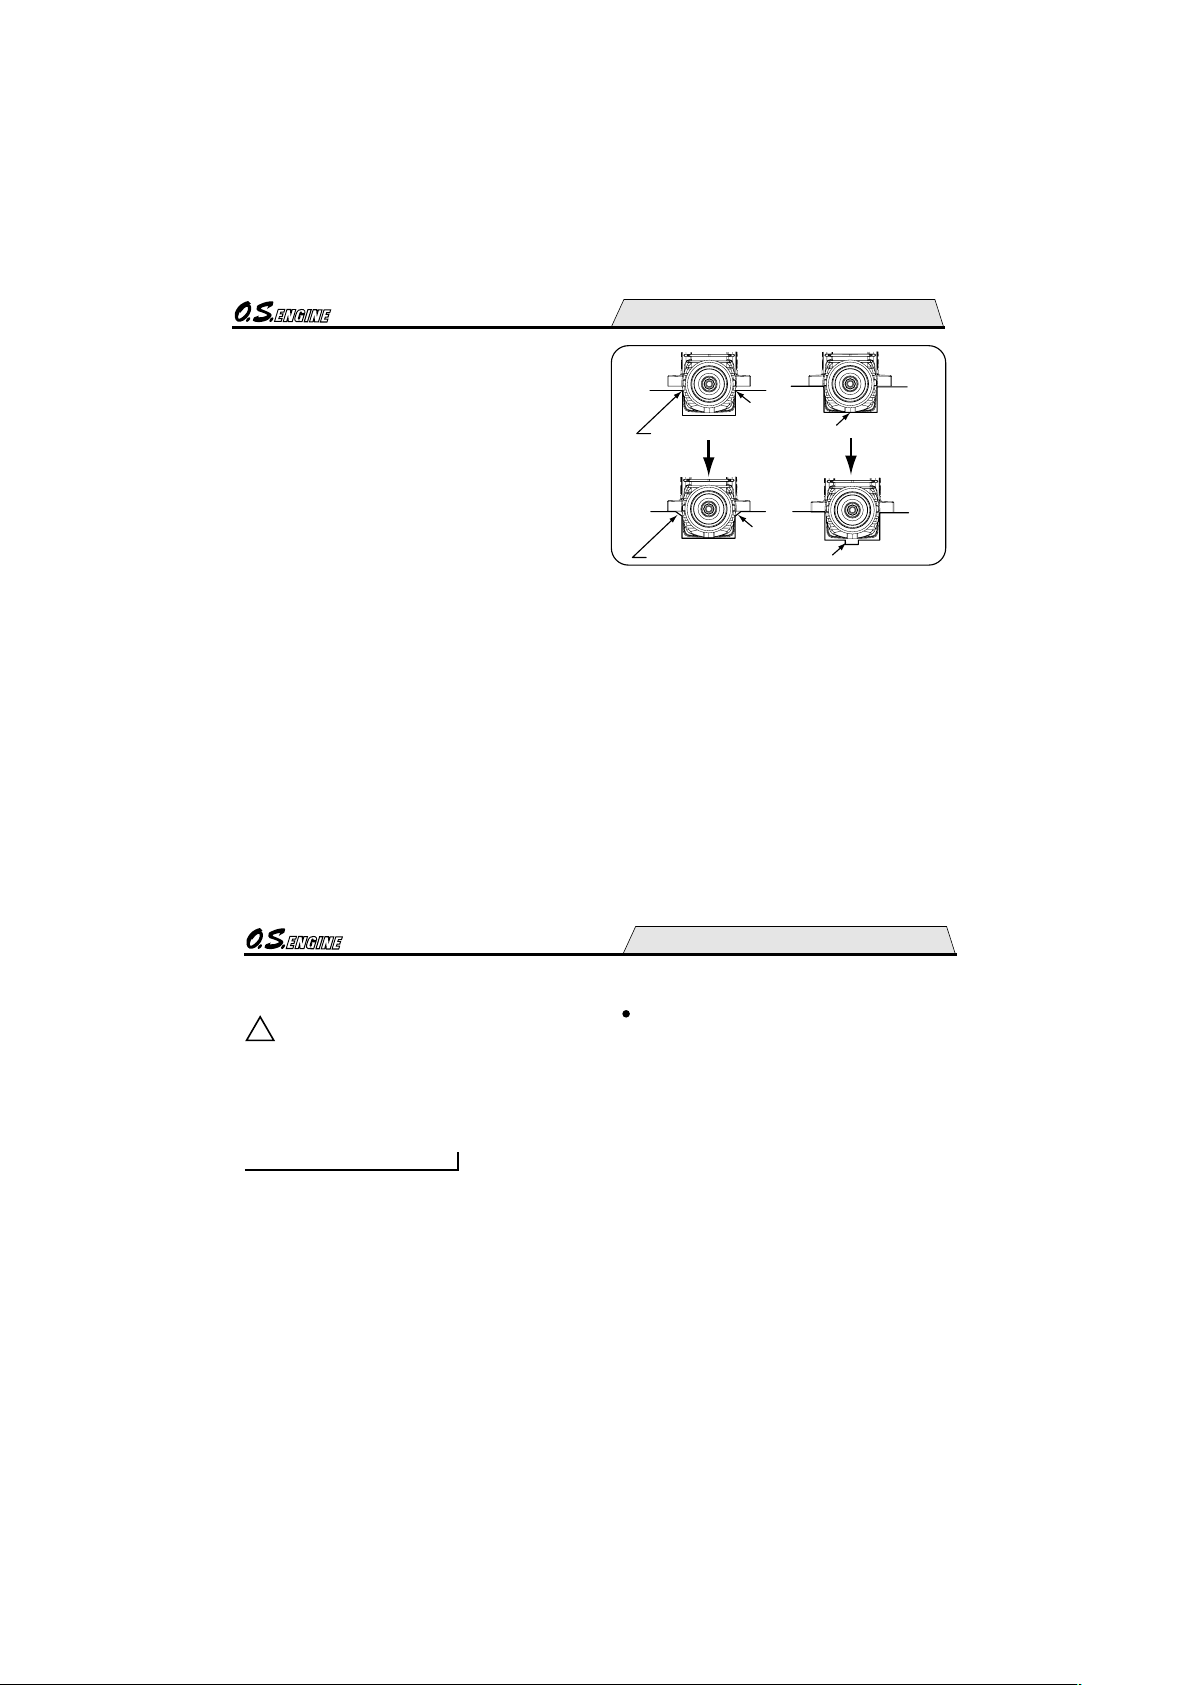
ENGINE INSTALLATION
Make sure that the engine mounting beams in
the hull are parallel, with their top surfaces in
the same plane. If they are not, the engine will
not rest firmly as the engine mounting faces
(undersides of the mounting lugs) are precision
machined to be flat and in the same plane.
Poor installation may not only cause vibration,
erratic running and loss of performance, but
may also damage the engine itself by
deforming the crankcase, cylinder, etc.
The mounting beams and adjacent hull
structure should be as rigid as possible so that
the engine may develop its full performance.
Use 3mm steel screws, such as Allen sockethead type, with locknuts, for bolting the engine
to the mounting beams.
1.
2.
3.
Touches here
Chamfer edges
Touches here
File off
Before installing the engine in the model, clean out the
engine compartment. If any remaining sand paper and
glass wool residues are not removed completely, they
may be sucked into the engine and damage the engine.
Screws are prone to loosen during running.
Be sure to use the Lock Washers available as
optional extra or locking glue to prevent their
loosening.
4.
If the holes in the mounting beams do not align
exactly with the engine's mounting lugs,
enlarge them slightly with a needle file so that
the mounting screws pass through the holes
smoothly without being forced.
19
STARTING THE ENGINE & RUNNING-IN ('Breaking-in)
PRESSURIZED FUEL SYSTEM
!
Before starting the engine, always
check the tightness of all the screws
and nuts especially those of joint and
movable parts such as throttle arm.
Missing retightening the loose screws
and nuts often causes the parts breakage that is capable of harming you.
Running- in is a procedure for an engine to
come close to actual running conditions
(fuel, r.p.m., engine temperature, etc.).
Excessively rich running and prolonged
low speed running should be avoided.
Prolonged low speed running and low
temperature running may result in the oil in
the fuel becoming gelled and the
piston/liner becoming stuck together.
RUNNING-IN ('Breaking-in)
The somewhat violent changes of hull attitude
that occur in running, combined with the fact
that, in boats the fuel tank is often located
some distance from the carburetor, means
that fuel 'head' at the carburettor can vary
and upset running.
Therefore,it is recommended that a muffler
pressurized fuel feed system be used.
Page 11

20
The following procedure is suitable when a
fuel containing 30% nitro-methane is used.
Fill the tank completely with fuel.
Temporarily remove the glowplug to check
that it glows bright red when energized.
Glow Plug Igniter
Pliers
Element glows when energized.
Replace the plug when the
element does not glow or is
burnt out.
Turn the needle-valve clockwise slowly until
it stops. This is the fully closed position.
Do not force to turn further.
Open the Needle-Valve 1.5 turns from the
fully closed position.
Open
Close
Needle Valve
Swith on the transmitter and make sure that
each linkage moves correctly.
21
Throttle Trim
Raise the throttle trim 2 or 3 clicks on the
transmitter for easier starting.
Turn the engine with an electric starter or
recoil starter to draw fuel into the engine.
Fuel
Deliver fuel into the carburetor.
Fuel tank side
Now connect glowplug battery lead to heat
the plug filament and start the engine.
Start the engine using an electric starter
making sure the engine rotation direction is
correct (counter-clockwise seen from the
crankshaft end).
When the engine starts, first repeat low
speed running and medium speed running
by raising and lowering throttle stick on the
transmitter to warm up the engine.
Aviod high speed running.
Page 12

22
PRECAUTIONS
When starting the engine, with the hull out
off the water and no load on the engine,
even below half throttle, the engine can
over-rev. Prolonged running at higher
throttle settings can result in seizure of the
connecting rod and crankpin. Never run the
engine with the throttle above the starting
setting with the hull out of the water and no
load on the engine.
Next, disconnect the glowplug battery and
try running the hull on the water. If the
engine stalls, open the throttle fractionally,
but try to keep the engine running as rich as
possible: if it stops because of being
excessively over-rich, close the NeedleValve 30˚ and try again.
Run the hull on the water until one tank of fuel
has been consumed, then close the NeedleValve one click and run the hull for another full
tank of fuel. Repeat this procedure until 5 more
tanks of fuel have been consumed, during
which time the throttle may be opened for brief
bursts of increased power.
If the engine stops at medium speeds, close
the Mixture Screw 10˚.
23
Needle
The position of the needle-valve
when starting the engine.
Close the needle-valve approx.
30˚ after running the hull for one full
tank of fuel. Repeat this procedure
several times.
If the engine should need to be
disassembled (e.g. for cleaning or minor
parts replacement) it is advisable to return
the Needle-Valve to the original rich,
starting setting and check whether further
running-in time is required before the car is
raced again. In the event of any major
working parts(e,g, piston/cylinder liner
assembly) being replaced, the complete
running-in should be repeated.
Remember!
Warning!
Do not touch rotating parts, engine and silencer when stopping the engine as they
become very hot, and contact with them
may result in a serious burn.
Throttle Trim
Throttle Stick
TO STOP THE ENGINE
Lower the throttle trim and/or throttle stick on
the transmitter.
Page 13

24
FINAL ADJUSTMENT
Final adjustment should be carried out only after
the running-in has been completed.
Run the hull (with throttle fully open) over the
longest available straight, in order to observe
the model's speed. Next return the hull to the
starting point, close the Needle-Valve 30˚
and repeat the run, taking note of the
improvement in performance. Continue with
further runs, gradually reducing the NeedleValve setting and aiming to achieve the
highest straight-line speed. Remember,
however, that, if the Needle-Valve is shut
down too far, the engine will overheat and,
accompanied by visibly diminished exhaust
smoke, the model will lose speed. At this
point, throttle down immediately, stop the hull
and reopen the Needle-Valve 30˚.
Having established the optimum NeedleValve setting, check the Mixture Control
Valve setting as follows.
With the engine running, close the throttle
and allow it to idle for about five seconds,
then reopen the throttle fully. If, at this point,
the engine puffs out an excessive amount of
smoke and the hull does not accelerate
smoothly and rapidly, it is probable that the
idle mixture is too rich.
In this case, turn the Mixture Control Valve
clockwise 10˚. If, on the other hand, the
engine tends to speed up momentarily and
then cut out abruptly when the throttle is
opened,the idle mixture is too lean. Correct
this by turning the Mixture Control Valve
counter-clockwise 10˚.
25
NOTE:
Mixture Control Valve adjustment should
be made in steps of not more than 45-90˚,
carefully checking the effect,on throttle
response, of each small adjustment.
Warning!
Carry out adjustments patiently, under
actual running conditions, until the engine
responds quickly and positively to the
throttle control.
Mixture adjustments (whether via the
Mixture Control Valve, or the Needle-Valve)
cannot be made accurately under 'no-load'
conditions, which, in any case, are not
advised, since such operation carries the
risk of seriously damaging the engine
through over-revving and overheating.
With the optimum mixture control position,
light smoke is visible during high speed
running,and the engine rpm increases
smoothly during acceleration. Remember
that, if the engine is operated with the fuel/air
mixture slightly too lean, it will overheat and
run unevenly. As with all engines, it is
advisable to set both needle-valve and
mixture control screw very slightly on the rich
side of the best rpm setting, as a safety
measure.
If the engine runs too fast with the throttle
closed, the throttle stop screw should be
turned counter-clockwise to allow the throttle
opening to be reduced.
Finally, beyond the nominal break-in period,
a slight readjustment toward a leaner needle
setting ma y be required to maintain
performance.
Page 14

26
CARE AND MAINTENANCE
1.
2.
3.
The minute particles of foreign matter, that
are present in any fuel may, by accumulating
and partially obstructing fuel flow, cause
engine performance to become erratic and
unreliable. O.S. 'Super-Filters' (large and
small) are available, as optional extras, to
deal with this problem. One of these filters
installed to the pickup tube inside your
refueling container, will prevent the entry of
foreign material into the fuel tank. It is also
recommended that a good in-line filter be
installed between the tank and carburetor.
Do not forget to clean the filters regularly to
remove foreign matter that accumulate on
the filter screens. Also, clean the carburetor
itself occasionally.
At the end of each operating session, drain out
any fuel that may remain in the fuel tank.
Afterwards,energize the glow-plug and try to
restart the engine, to burn off any fuel that may
remain inside the engine. Repeat this
procedure until the engine fails to fire. Do this
while the engine is still warm.
4.
Then, inject some after-run oil into the
engine, and rotate the engine with an
electric starter for 4 to 5 seconds to
distribute the oil to all the working parts.
Note:
Do not inject after-run oil into the
carburetor as this may cause the O-rings
inside the carburetor to deteriorate. These
procedures will reduce the risks of starting
difficulties or corrosion after a period of
storage.
27
CHECKING THE ENGINE
Engine will not develop normal performance
after long time running due to wearing of parts.
It is suggested to replace necessary parts when
the following symptoms are detected.
Engine sound changes and easily overheats.
Power has dropped extremely.
Idling is unstable and/or engine tends to stop
at idling.
In most cases, ball bearings, cylinder & piston
assembly, connecting rod and/or crankcase have
become worn out or abnormal. Check the
parts carefully and replace them if necessary.
5.
Finally, when cleaning the exterior of the
engine, use methanol or a household
cleaning agent. Do not use gasoline,
kerosene, or any petroleum based chemical
which can damage silicone fuel tubing.
Crankshaft of this engine is filled with
silicone. Do not use light oil nor
kerosene, etc. for washing, or the
silicone will swell. Use alcohol or fuel for
washing.
Note:
Remove this with
an 8mm wrench
Dirt and fbrous matter
mostly accumulate here
Page 15

28
TROUBLE SHOOTING
Symptom
Cause
Corrective action
Engine fails to fire.
Fuel tank is empty.
Fuel not reaching the engine.
Fill the tank with fuel and repeat
Priming procedure.
Glowplug element is burnt out.
Glowplug battery discharged
Replace glowplug.
Recharge or replace the battery.
Clogged fuel filter
Silencer inside is dirty.
Clean or replace fuel filter.
Clean inside silencer.
Over priming Remove glowplug and pump out excess fuel.
Fuel tubing is disconnected.
Connect fuel tubing securely.
Fuel tubing is kinked, split or has a hole.
Check the tubing carefully and replace if necessary.
Incorrect servo linkage Connect correctly after setting servo at neutral.
Reverse rotating direction of electric starter.
Mare sure it rotates counter clockwise seen
from crankshaft side.
29
Symptom
Cause
Corrective action
Engine fires intermittently but does not run.
Insufficient fuel in the tank. Fill the tank with fuel.
Deteriorated glowplug
Replace glowplug.
Clogged fuel filter
Silencer inside is dirty.
Clean or replace fuel filter.
Clean inside silencer.
Engine overheated
Wait until engine is cool.
Starting battery disconnected too soon.
Do not disconnect plug battery and wait until
r.p.m. becomes stable.
Vibration causing air bubbles in fuel.
Install "O" rings to the tank screws to
prevent bubbles.
Page 16

30
Symptom
Cause
Corrective action
Symptom
Cause
Corrective action
Unstable idle
Unsuitable glowplug
Use suggested glowplug in the instructions.
Unsuitable fuel
Do not use extremely high nitro or low oil content fuel.
Extremely light flywheel
Add heavier flywheel.
Silencer is disconnected or has play
Install silencer securely.
Not reaching expected peak r.p.m.
Insufficient warming up or running-in.
Set the needle only after warming up.
Complete running-in.
Silencer or manifold is not securely connected
or disconnected.
Replace seal ring.
Check the connections and secure them.
Fuel tubing from tank is split or broken.
Replace the tubing.
31
Symptom
Cause
Corrective action
Symptom
Cause
Corrective action
Poor response
Deteriorated glowplug
Replace glowplug.
Incorrect carburetor settings
Readjust low r.p.m. range with metering
needle and mixture control valve.
Incorrect setting of transmitter Exponential function.
Check the transmitter setting.
Poor r.p.m. drop
Throttle position open too far.
Incorrect carburetor installation
Install carburetor properly.
Lower the throttle trim on the transmitter.
needle-valve and/or
mixture control screw closed to far.
Open the needle-valve an/or mixture control
screw a little.
Page 17
32
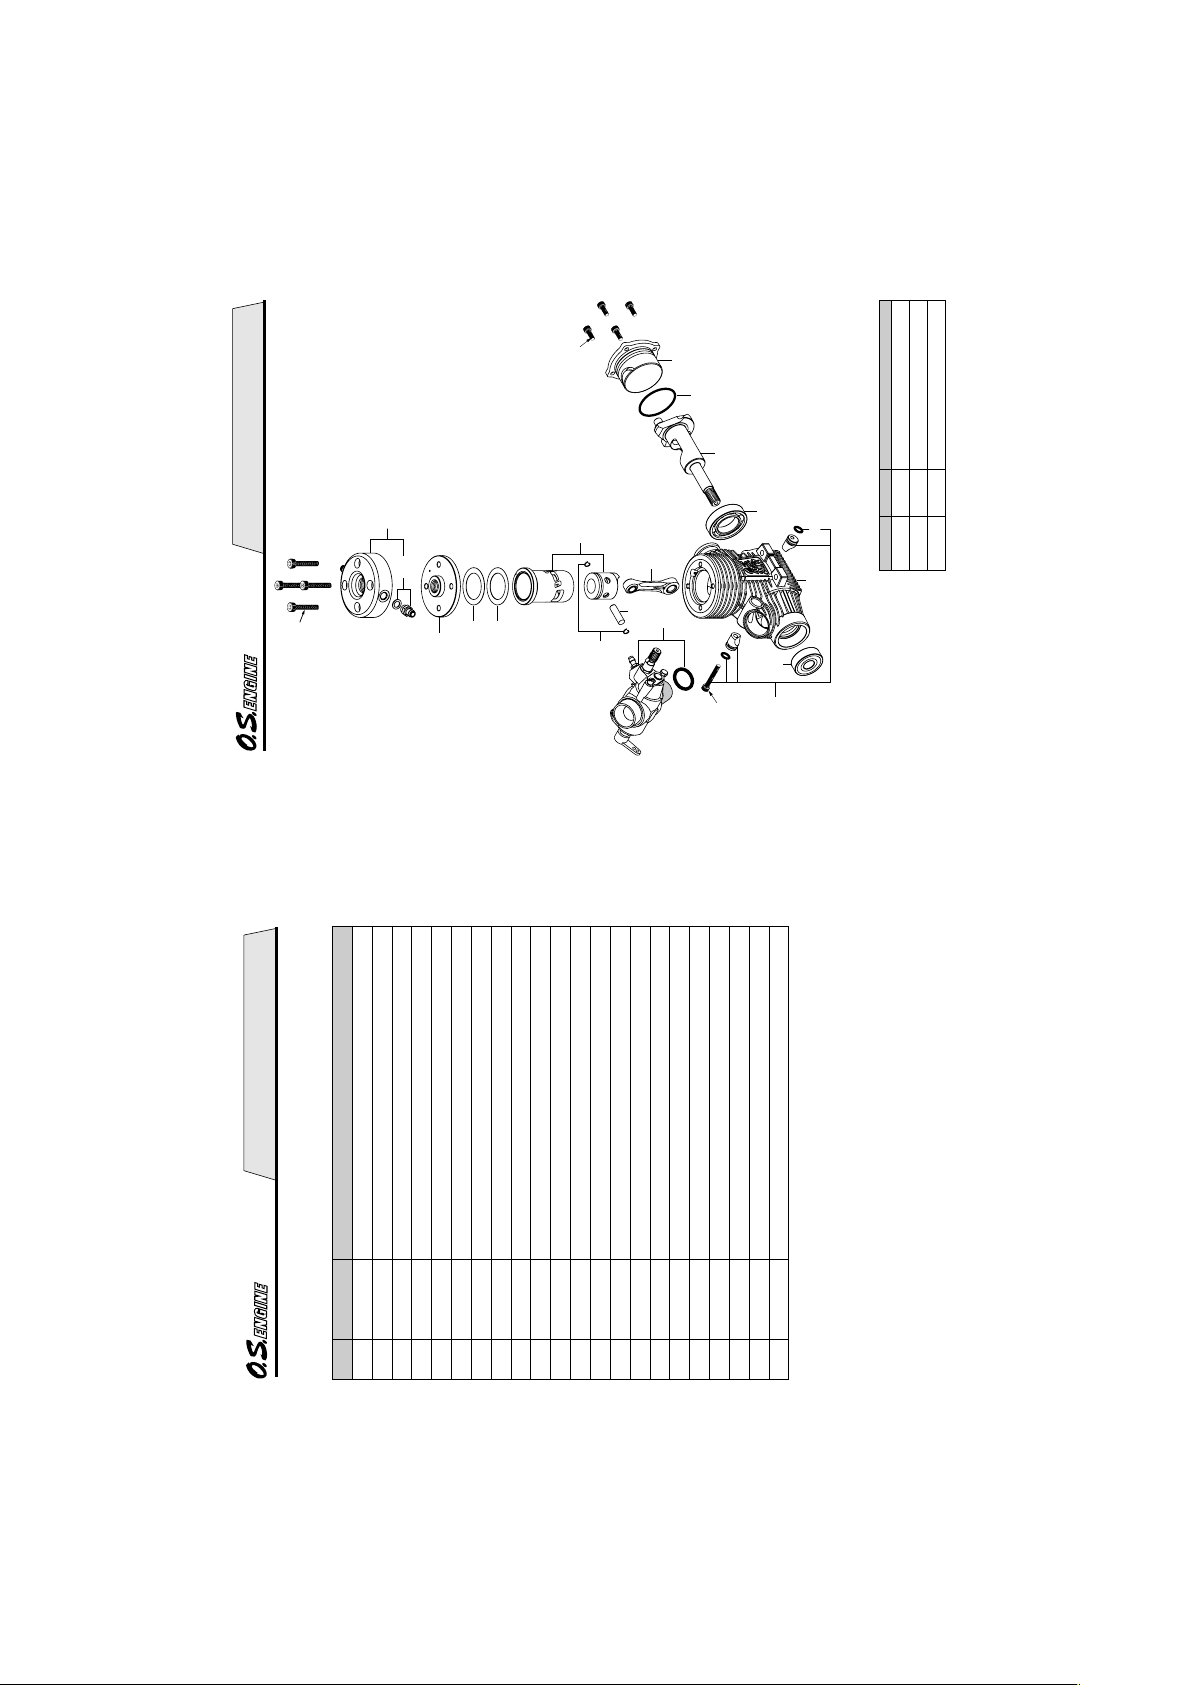
ENGINE EXPLODED VIEW
Type of screw
C…Cap Screw
*
1
3
2
4
5
6
7
10
11
12
13
14
15
C.M2.6x18
C.M2.6x7
C.M3x18
8
9
16
1-1
10-1
79871020
79871055
79871180
M2.6x7
M2.6x18
M3x18
CAP SCREW SETS
(
10pcs./sets
)
Code No.
Size Pcs. used in an engine
Marine Head Retaining Screw (4pcs.)
Cover Plate Retaining Screw (4pcs.)
Carburetor Retainer Retaining Screw (1pc.)
33
ENGINE PARTS LIST
The specifications are subject to alteration for improvement without notice.
Marine Head
Nipple No.18
Inner Head
Head Gasket Set (0.2mm)
Head Gasket Set (0.1mm)
Cylinder & Piston Assembly
Piston Pin
Piston Pin Retainer (2pcs.)
Connecting Rod
Carburetor Complete (Type 21D)
Carburetor Retainer Assembly
"O" Ring (2pcs.)
Crankshaft Ball Bearing (Front)
Crankcase
Crankshaft Ball Bearing (Rear)
Crankshaft
Cover Gasket
Cover Plate
Glow Plug RP7
Head Gasket Set (0.2mm)
Exhaust Seal Ring (2pcs.)
Dust Cap Set ( 3mm,16mm, 18mm)
Description
Code No.
No.
1
1-1
2345678
9
10
10-1
1112131415
16
22014040
23754721
22014100
22014160
22014170
22013000
22016000
21817000
23755020
23882000
23981740
24881824
23731000
22011000
23730020
22012020
23107100
22417000
71642070
22014160
22826140
22884250
Page 18

34
CARBURETOR EXPLODED VIEW
4
C.M3X8
1
2
8
7
S.M3X3
3-2
3-1
10
3
5
6
9
9-1
9-4
9-5
9-2 9-3
5-1
Type of screw
C…Cap Screw S...Set Screw
*
79871110
M3x8
CAP SCREW SETS
(
10pcs./sets
)
Code No.
Size
Pcs. used in an engine
Throttle Lever Retaining Screw (1pc.)
35
The specifications are subject to alteration for improvement without notice.
CARBURETOR PARTS LIST
Throttle Lever Assembly
Carburetor Rotor
Mixture Control Valve Assembly
"O" Ring Set (2pcs.)
"O" Ring (S) (2pcs.)
Rotor Guide Screw
Carburetor Body
Carburetor Spacer
Fuel Inlet (No.1)
Mixture Control Screw
Mixture Control Valve Stopper
Needle Valve Assembly
Needle Assembly
"O" Ring (2pcs.)
Set Screw
Needle Valve Holder Assembly
Ratchet Spring
Carburetor Rubber Gasket
1
2
3
3-1
3-2
4
5
5-1
6
7
8
9
9-1
9-2
9-3
9-4
9-5
10
22081408
23882200
23882600
27981850
23882630
45581820
23882100
23882210
22681953
27881330
27681340
25581900
22681980
24981837
26381501
27381940
26711305
29015019
Description
Code No.
No.
Page 19

36
(71641800)
O.S. GENUINE PARTS & ACCESSORIES
(71642060)
RP6
(71642070)
RP7
O.S. Glow Plug
RP8
The specifications are subject to alteration
for improvement without notice.
(72106300)
(55500002)
(72403050)
(71531010)
(L)
M3
SUPER FILTER
LOCK WASHER
SUPER
JOINT TUBE 21
NON-BUBBLE
WEIGHT S
(10set)
71410150
71410200
71410250
71410300
71411200
71411250
71412300
71413550
71413600
71413700
O.S. SPEED HEX WRENCH DRIVER 1.5
O.S. SPEED HEX WRENCH DRIVER 2.0
O.S. SPEED HEX WRENCH DRIVER 2.5
O.S. SPEED HEX WRENCH DRIVER 3.0
O.S. SPEED HEX BALL WRENCH DRIVER 2.0
O.S. SPEED HEX BALL WRENCH DRIVER 2.5
O.S. SPEED FLAT HEAD SCREWDRIVER 3.0
O.S. SPEED NUT DRIVER 5.5
O.S. SPEED NUT DRIVER 6.0
O.S. SPEED NUT DRIVER 7.0
(71520100)
O.S. SPEED DRIVER TOOLS
Code No.
Description
O.S. SPEED PLUG WRENCH
37
(23882900)
1
1-1
1-2
1-3
1-4
1-5
1-6
1-7
1-8
2
2-1 2-2
The specifications are subject to alteration for improvement without notice.
REMOTE NEEDLE
1
1-1
1-2
1-3
1-4
1-5
1-6
1-7
1-8
2
2-1
2-2
23882900
23882940
26711305
23818176
23882950
23882960
22881300
28282300
26381501
22681980
24981837
26381501
Description
Code No.
No.
Remote Needle Assembly
Remote Needle Holder Assembly
Ratchet Spring
Universal Nipple No.9
Remote Needle Nut
Remote Needle Plate
Plug Screw
Needle Control Lever
Retaining Screw
Needle
"O" Ring
Set Screw
Page 20

38
■
■
■
■
■
■
Displacement
Bore
Stroke
Practical R.P.M.
Power output
Weight
SPECIFICATIONS
THREE VIEW DRAWING
Dimensions (mm)
45
31.6
4
UNF / -28
1
20.5
37
45
22
44
55.6
66.15
33.5
44
31.6
28.5
21
3.49 cc (0.213 cu.in.
)
16.27 mm (0.641 in.
)
16.8 mm (0.661 in.
)
4,000-45,000 r.p.m.
2.75 ps / 2.79 hp / 33,000 r.p.m.
307.5 g (10.85 oz.)
C
Copyright 2011 by O.S.Engines Mfg. Co., Ltd. All rights reserved. Printed in Japan.
60092480 061103
TE L. (06) 6702-0225
FAX. (06)6704-2722
6-15 3-Chome Imagawa Higashisumiyoshi-ku
Osaka 546-0003, Japan
URL : http://www.os-engines.co.jp
 Loading...