

Page 1
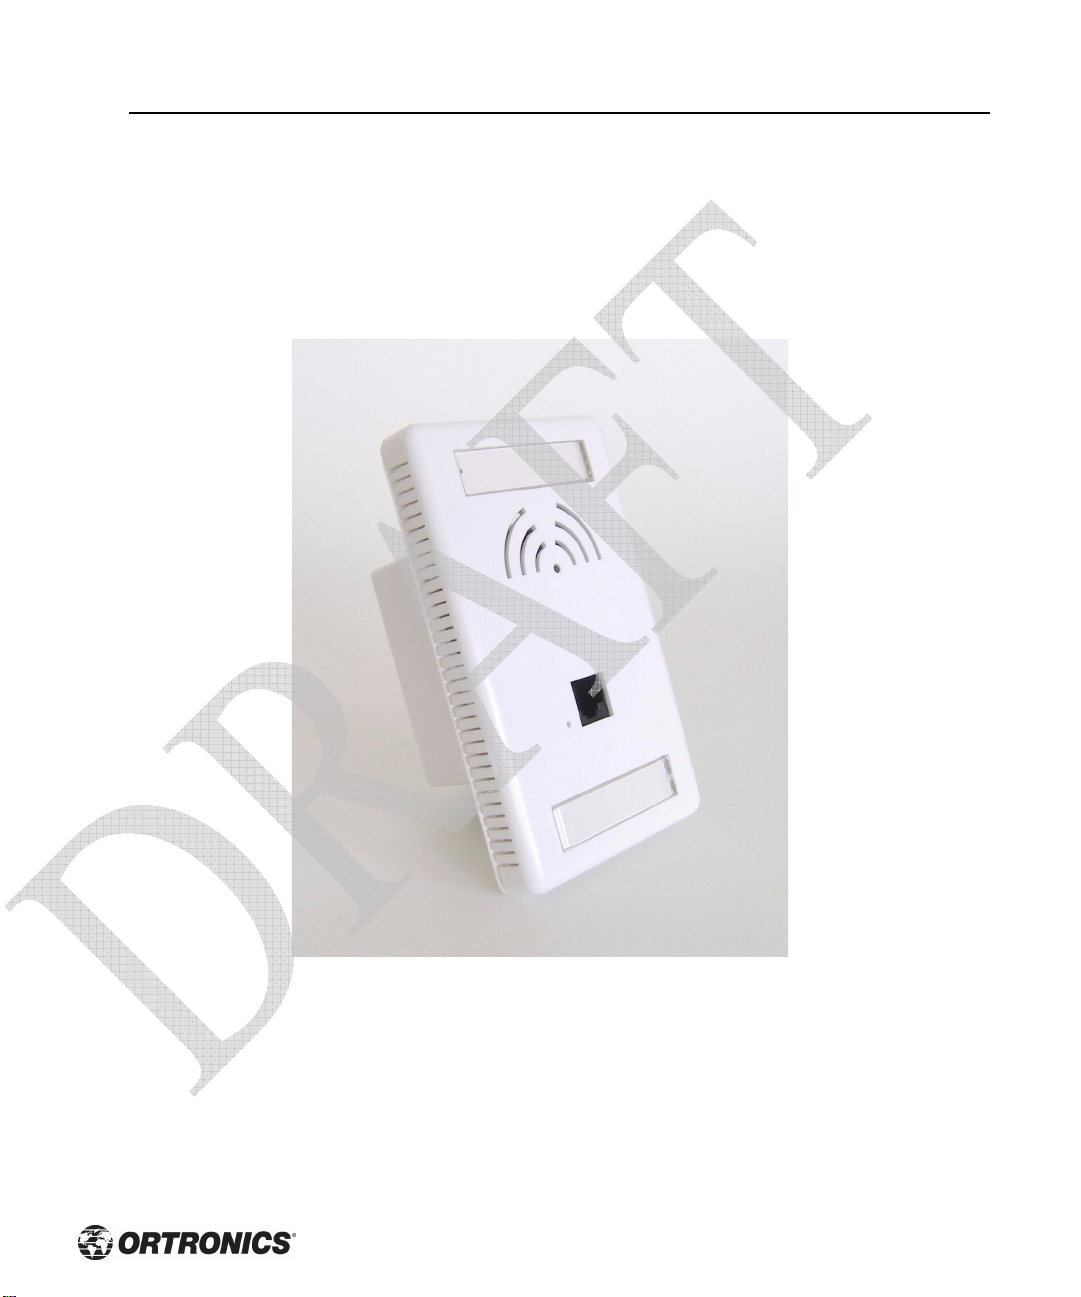
Wi-Jack DUO Installation Guide
DRAFT
Page 2

Copyright © 2006 Ortronics, Inc. All rights reserved.
Specifications in this manual are subject to change without notice.
Originated in the USA.
Trademarks
Any other trademarks appearing in this manual are owned by their respective companies.
ii Ortrontic Wi-Jack DUO Draft
Installation Guide 2006
Page 3

Contents
Wi-Jack DUO Installation Guide . . . . . . . . . . . . . . . . . . . i
Chapter 1
Chapter 2
Chapter 3
Appendix A
Appendix B
Introduction. . . . . . . . . . . . . . . . . . . . . . . . . . . . . . . . . 1
Front View
Overview of Ortronics AP Setup Process
. . . . . . . . . . . . . . . . . . . . . . . . . . . . . . . 2
. . . . . . . . . . . . 4
Provisioning Access Points. . . . . . . . . . . . . . . . . . . . . 5
Discovery Protocol
AP Reprovisioning
AP Provisioning
Manual Provisioning
Connecting the Console Terminal
. . . . . . . . . . . . . . . . . . . . . . . . . . . . 6
. . . . . . . . . . . . . . . . . . . . . . . . . 7
. . . . . . . . . . . . . . . . . . . . . . . . . . . . . . 8
. . . . . . . . . . . . . . . . . . . . . . . . . . 12
. . . . . . . . . . . . . . . . . 12
AP Deployment . . . . . . . . . . . . . . . . . . . . . . . . . . . . . 13
Mounting the Ortronics Wi-Jack DUO
Connecting Required Cables
Selecting Horizontal Cable
. . . . . . . . . . . . . . . . . . . . 13
. . . . . . . . . . . . . . . . . . . 13
. . . . . . . . . . . . . 13
Cables. . . . . . . . . . . . . . . . . . . . . . . . . . . . . . . . . . . . . 17
“To AP” Specifications
“To Network” Specifications
. . . . . . . . . . . . . . . . . . . . . 17
. . . . . . . . . . . . . . . . . 17
Troubleshooting . . . . . . . . . . . . . . . . . . . . . . . . . . . . 19
Accessing the AP Support Prompt
Direct SPOE Connection to Wireless Controller
Direct Terminal Connection
Remote Telnet Connection
AP Support
Access Levels
User Commands
Privileged Commands
. . . . . . . . . . . . . . . . . . . . . . . . . . . . . . . . . 22
. . . . . . . . . . . . . . . . . . . . . . . . . . . . 22
. . . . . . . . . . . . . . . . . . . . . . . . . . 22
. . . . . . . . . . . . . . . . . . . . . . 22
. . . . . . . . . . . . . . . . 19
. . . 19
. . . . . . . . . . . . . . . . . . 20
. . . . . . . . . . . . . . . . . . . 21
Appendix C
Product Specifications . . . . . . . . . . . . . . . . . . . . . . . 23
Compliance
Certifications
. . . . . . . . . . . . . . . . . . . . . . . . . . . . . . . . . 23
. . . . . . . . . . . . . . . . . . . . . . . . . . . . . . . . 24
Contents iii
Page 4

Product Features. . . . . . . . . . . . . . . . . . . . . . . . . . . . . . 25
Ethernet Compatibility
Radio Characteristics
Power over Ethernet
Physical Description
Package Contents
Optional Items
Related Documents
Text Conventions
Contacting Ortronics
. . . . . . . . . . . . . . . . . . . . . . . . . . . . 26
. . . . . . . . . . . . . . . . . . . . . . . . . . . . . 31
. . . . . . . . . . . . . . . . . . . . . . . . . . . . 30
. . . . . . . . . . . . . . . . . . . . . . 25
. . . . . . . . . . . . . . . . . . . . . . . 25
. . . . . . . . . . . . . . . . . . . . . . . . 26
. . . . . . . . . . . . . . . . . . . . . . . . . . . 26
. . . . . . . . . . . . . . . . . . . . . . . . . . 26
. . . . . . . . . . . . . . . . . . . . . . . . . . . 32
Notes . . . . . . . . . . . . . . . . . . . . . . . . . . . . . . . . . . . . . 51
Notes . . . . . . . . . . . . . . . . . . . . . . . . . . . . . . . . . . . . . 52
iv Ortronics Wi-Jack DUO Part OR-71601435 Rev 02
Installation Guide 2006
Page 5

CHAPTER 1
Introduction
The Ortronics Wi-Jack DUO™ is part of a comprehensive wireless network solution. The
device works in conjunction with the Ortronics Wireless Controller and can act as a wireless
access point or air monitor.
As a wireless Access Point (AP), the Ortronics Wi-Jack DUO provides transparent, secure,
high-speed data communications between wireless network devices (fixed, portable, or
mobile computers with IEEE 802.11a and IEEE 802.11b/g wireless adapters) and the wired
LAN.
As a wireless Air Monitor (AM), the Ortronics Wi-Jack DUO enhances wireless networks
by collecting statistics, monitoring traffic, detecting intrusions, enforcing security policies,
balancing wireless traffic load, self-healing coverage gaps, and more.
Introduction 1
Chapter 1
Page 6
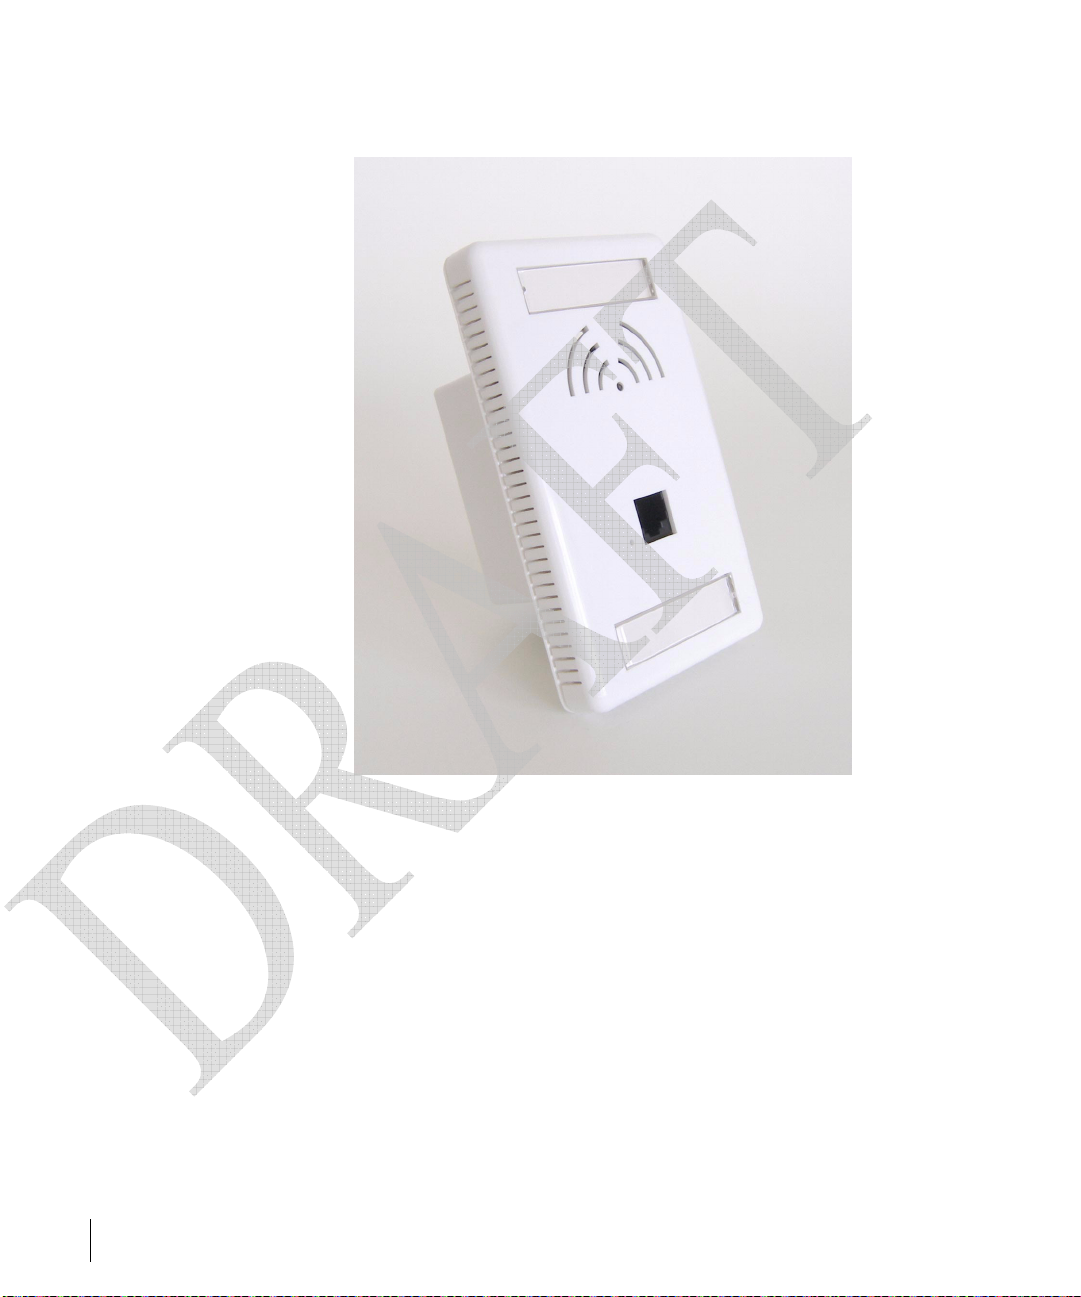
Front View
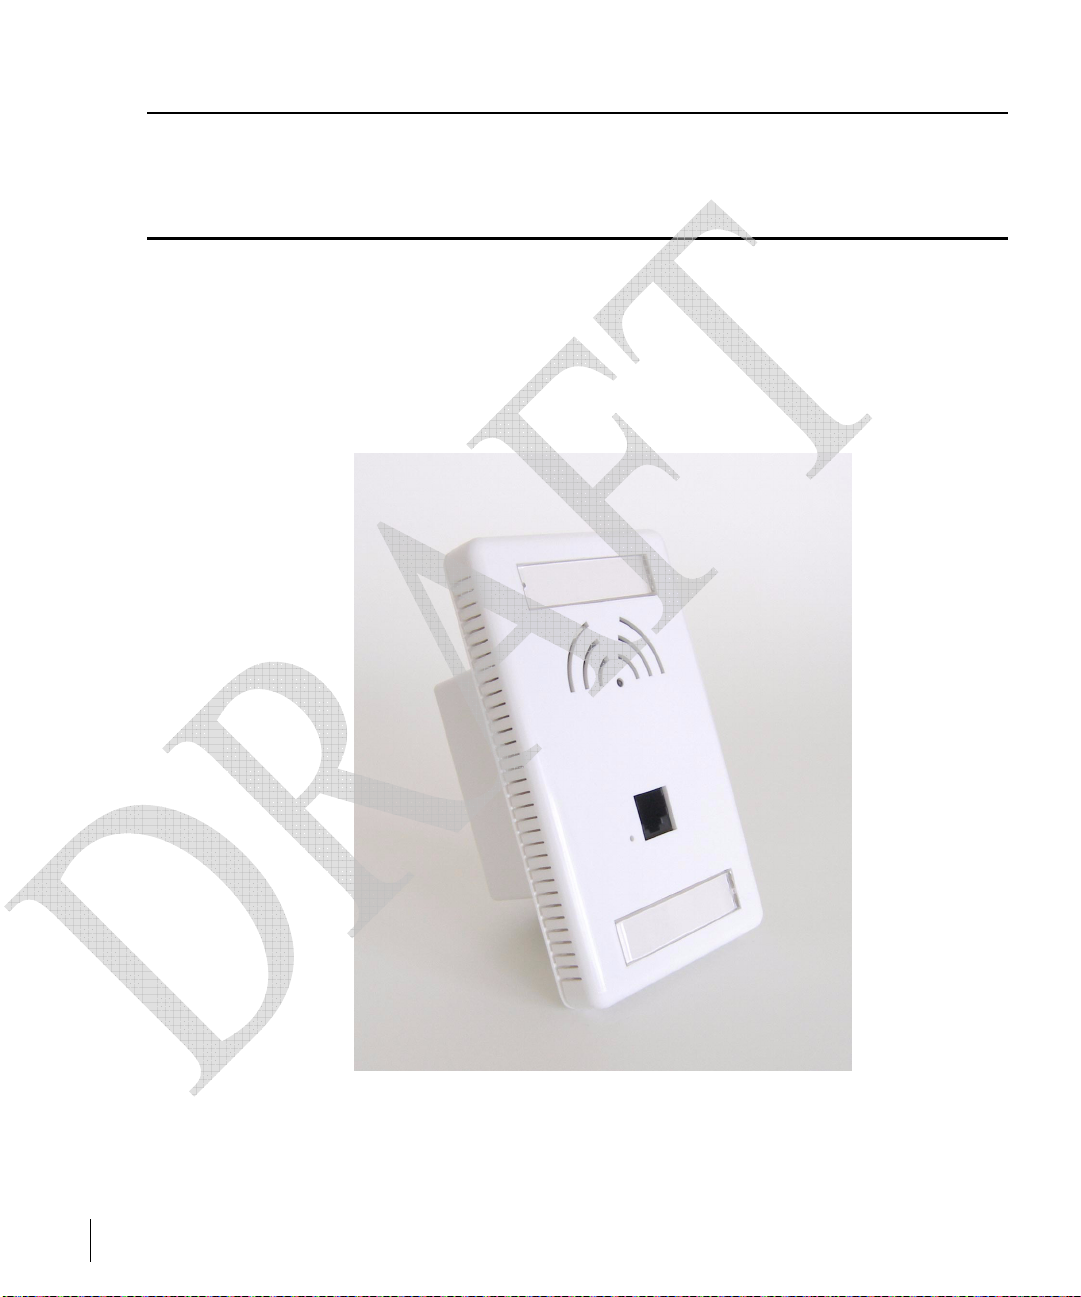
FIGURE 1-1 Ortronics Wi-Jack DUO
2 Ortronics Wi-Jack DUO Part OR-71601435 Rev 02
Draft 2006
Page 7

1. Air Vents
These vents promote proper air circulation for cooling the device. Do not allow these vents
to be obstructed by mounting equipment, network cables, or any other material.
2. Designation Labels
3. User Port
This port attaches the Ortronics Wi-Jack DUO to a 10Base-T/100Base-TX (twisted-pair)
Ethernet LAN segment. This port supports wired users to gain access to the WLAN.
See Appendix A.
4. Serial Number & MAC Address
5. Backhaul Plug
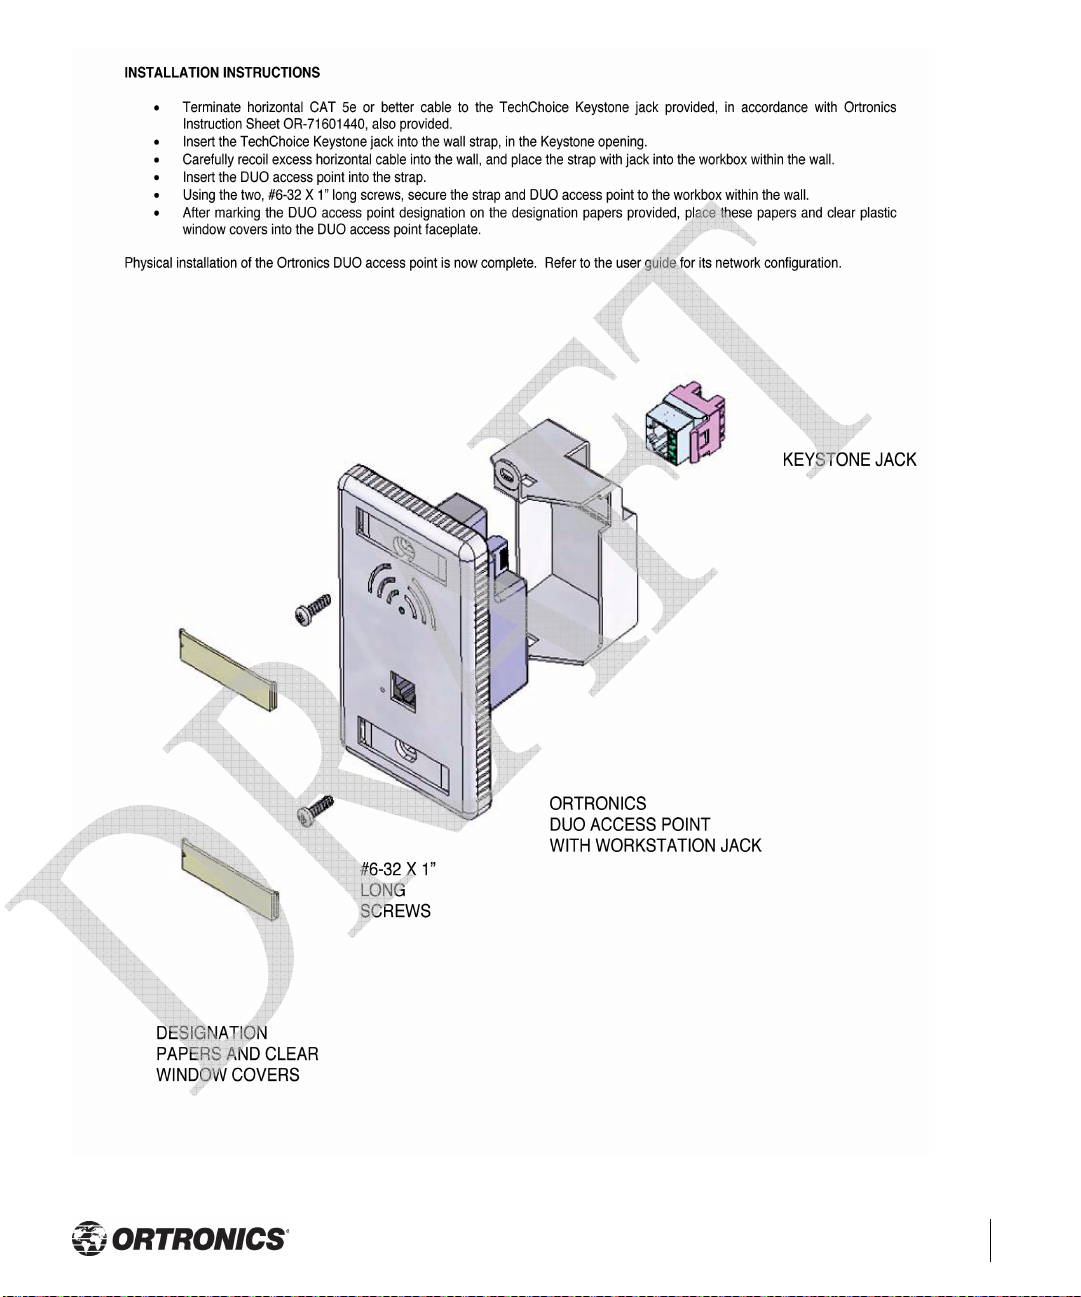
An Ortronics Keystone Jack is provided for installation/integration of Wi-Jack DUO into the
LAN. See Chapter 3 for Details.
6. Internal Antennas for Wireless Communication
Introduction 3
Chapter 1
Page 8

Overview of Ortronics AP Setup Process
Setting up an Ortronics AP typically consists of four stages:
1 WLAN Planning—The administrator determines how many Ortronics APs will be
needed for their wireless network strategy and where they will be deployed. This can be
easily accomplished using Ortronics’ automated RF Plan site-survey software (available
separately as part of the Ortronics Wireless Controller).
2 AP Provisioning—Provisioning provides each Ortronics AP with initial settings that
allow it to locate the host Ortronics Wireless Controller. Depending on the network
topology and services, AP provisioning can be performed manually for each AP or
plug-and-play for batches of APs.
AP provisioning is discussed in 5.
3 AP Deployment—Once provisioned, the AP can be physically installed at its intended
place of operation.
AP deployment is covered in 13.
4 AP Configuration—The administrator defines the operational behavior for each
Ortronics AP, such as RF characteristics and security features.
For AP configuration information, refer to the Ortronics Wireless Software User’s
Guide.
4 Ortronics Wi-Jack DUO Part OR-71601435 Rev 02
Draft 2006
Page 9

CHAPTER 2
Provisioning Access Points
Access Points are radio broadcast devices and as such are subject to governmental
regulation. Network administrators responsible for the configuration and operation of
Access Points must comply with local broadcast regulations. Specifically, Access Points
must use channel assignment appropriate to the location in which the Access Point will be
used. Ortronics, in compliance with governmental requirements, has designed the Wi-Jack
DUO such that only authorized network administrators can change these settings. For more
information on Wi-Jack DUO configuration, refer to the Ortronics Wireless Software User’s
Guide.
Provisioning provides the AP with initial network settings that allow it to locate the host
Ortronics Wireless Controller. The following provisioning methods (listed in the order of
preference recommended by Ortronics) are available:
z Plug and Play—Also known as the Discovery Protocol. This is the easiest method for
AP provisioning. With plug and play, Ortronics APs can be connected to the network
and brought into operation automatically. Although plug and play requires no manual
intervention for the APs, this method does require specific services to be configured on
your network in advance.
z AP Provisioning—Using this AP programming mode, AP configuration parameters are
defined on the Wireless Controller (using the CLI or Web interface) and then uploaded
to the APs.
This method can be used for adding Ortronics APs to a highly customized network, or
greatly simplified for the most common provisioning.
z Manual Provisioning—APs can be individually provisioned using a serial console
terminal connected to the AP. Although this method is complex and requires
considerable care, manual provisioning can be used in almost any scenario, with or
without access to the Wireless Controller.
Note Manual provisioning is intended for use when no Ortronics Wireless
Controller is available, and is not generally recommended as the
primary method of AP provisioning. Plug and play or AP programming
mode are the preferred provisioning methods.
Provisioning Access Points 5
Chapter 2
Page 10

Each of these three methods is explained in the following sections. Use these procedures for
initial provisioning of APs. To change the configuration for APs that have already been
provisioned, go to Maintenance > Program AP > Re-Provision. See the Ortronics Wireless
Software User’s Guide for more information on reprovisioning existing APs.
Discovery Protocol
The Discovery Protocol is a plug and play provisioning tool for Ortronics Wi-Jack DUO.
The Discovery Protocol performs two tasks:
z Obtains the IP address of the TFTP server from which it downloads the AP boot image
z It discovers the IP address of the master Ortronics Wireless Controller in the network
from which the AP can download its configuration.
The address of the TFTP server that the protocol discovers is the equivalent of the
BOOTROM environment variable serverip. The IP address of the Ortronics Wireless
Controller is the equivalent of the environment variable master.
The protocol can discover these values using DHCP or by discovery. In the case of DHCP,
the discovery protocol relies on a DHCP server which is configured to return the IP address
of the master Controller using the Vendor Specific Options in DHCP. To facilitate the
discovery protocol, Ortronics APs include this Vendor Specific Option in the requested
Option list, and if the DHCP server is configured to return the IP address of the Master
switch, the IP address will be a part of the DHCP response. This is used by the AP to get its
image as well as its configuration.
Discovery of the serverip and master variables is necessary when the DHCP response does
not include the Vendor Specific option. The AP attempts to discover an Ortronics Master
Wireless Controller by sending multicast packets and broadcast packets on its subnet. To use
the discovery method, the ADP discovery mechanism needs to be enabled on the Ortronics
Master Wireless Controller (using the adp discovery enable command).
If multicast routing is enabled in the IP network between the AP and the Master Wireless
Controller (which can be any one or more Ortronics Wireless Controllers in the network),
the IGMP-Join option should be enabled on the Ortronics Wireless Controller (using the
adp igmp-join enable command). If multicast routing is not enabled on the
network, the Ortronics Wireless Controllers need to be on the same broadcast domain as the
AP or an “IP Helper” must be configured to direct the broadcast discovery protocol packets
to the Ortronics Wireless Controller.
6 Ortronics Wi-Jack DUO Part OR-71601435 Rev 02
Installation Guide Draft 2006
Page 11

Once these discovery prerequisites are met, the switch will respond to APs with the IP
address of the Ortronics Master Wireless Protocol. The APs can then obtain their image and
configuration.
To enable Discovery Protocol on an Ortronics Wireless Controller, enter:
(A5000) (config) #adp discovery enable
To enable IGMP-Join on an ADP multicast group on an Ortronics Wireless Controller, enter:
(A5000) (config) #adp igmp-join enable
Note If you have location-specific configurations for your Access Points, you will
need to apply this configuration information using AP Reprovisioning.
Refer to the Ortronics Wireless Software User’s Guide for details on AP
Reprovisioning and see the feature description below.
AP Reprovisioning
AP Reprovisioning is the process by which APs are assigned, for example, location codes.
Location codes are important for recalibration and triangulation. For details on AP
Reprovisioning, see the Ortronics Wireless Software User’s Guide.
Provisioning Access Points 7
Chapter 2
Page 12
AP Provisioning
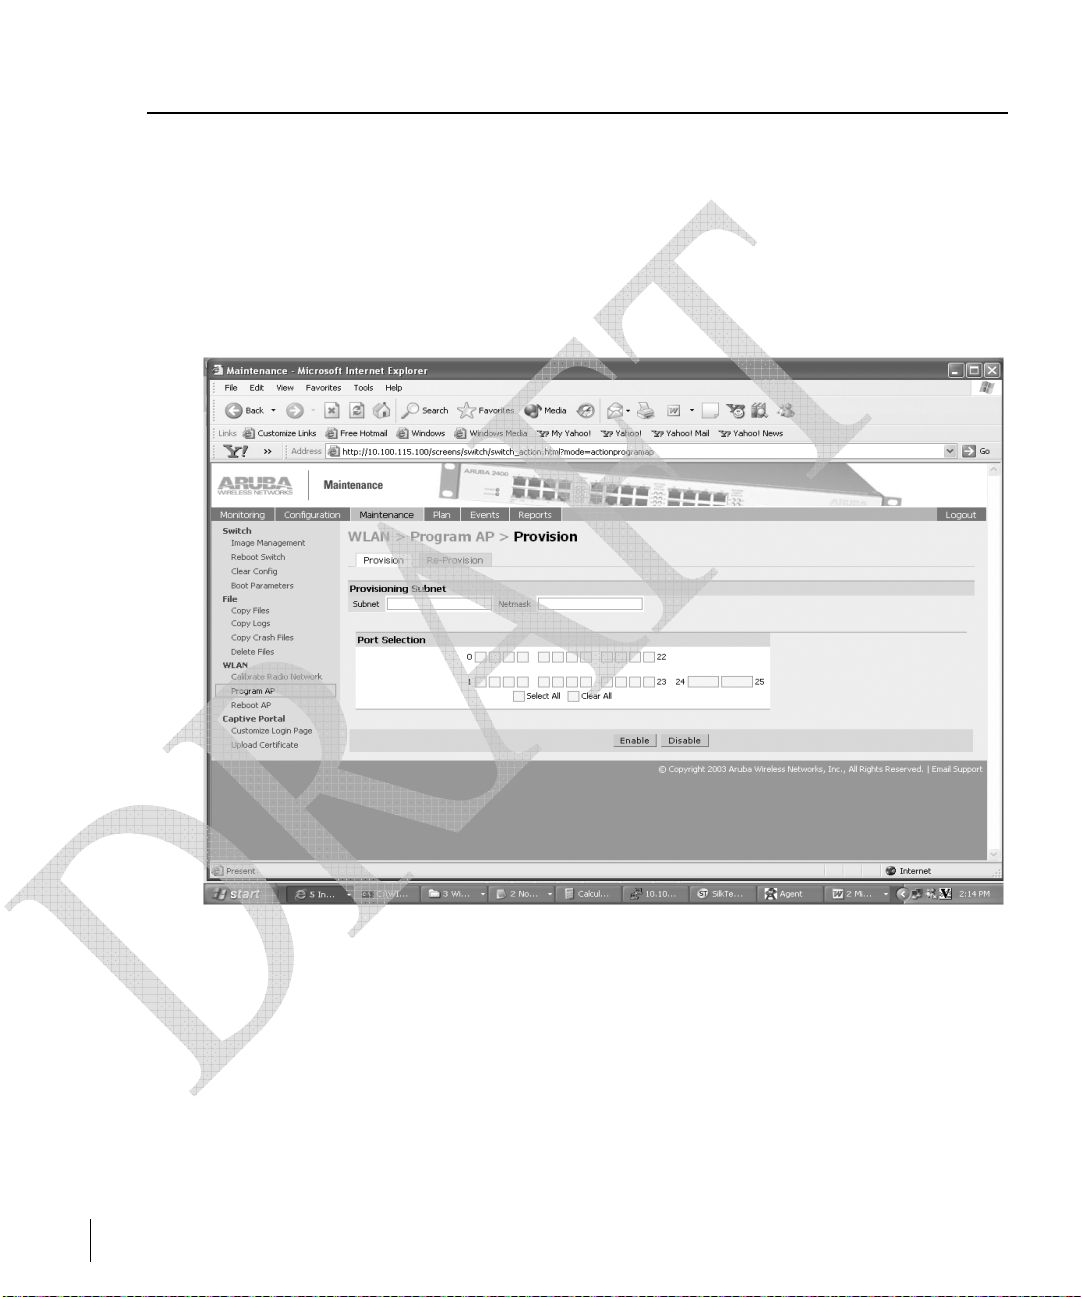
AP Provisioning is useful for brand new APs with default configurations. To perform AP
Provisioning from the GUI:
1Go to Maintenance > Program AP.
On this window, there are two tabs: Provisioning and Reprovisioning. The
Provisioning tab is selected by default.
FIGURE 2-1 Provisioning Tab
2 Configure the APs IP address on the Subnet and the Netmask.
This is the subnet from which the AP gets an IP during provisioning.
3 Select the Port or Port Range for provisioning.
To set the Port Range, select the first and the last ports of your range. All the ports in
between are automatically selected. (Ports have to be sequentially assigned.)
8 Ortronics Wi-Jack DUO Part OR-71601435 Rev 02
Installation Guide Draft 2006
Page 13
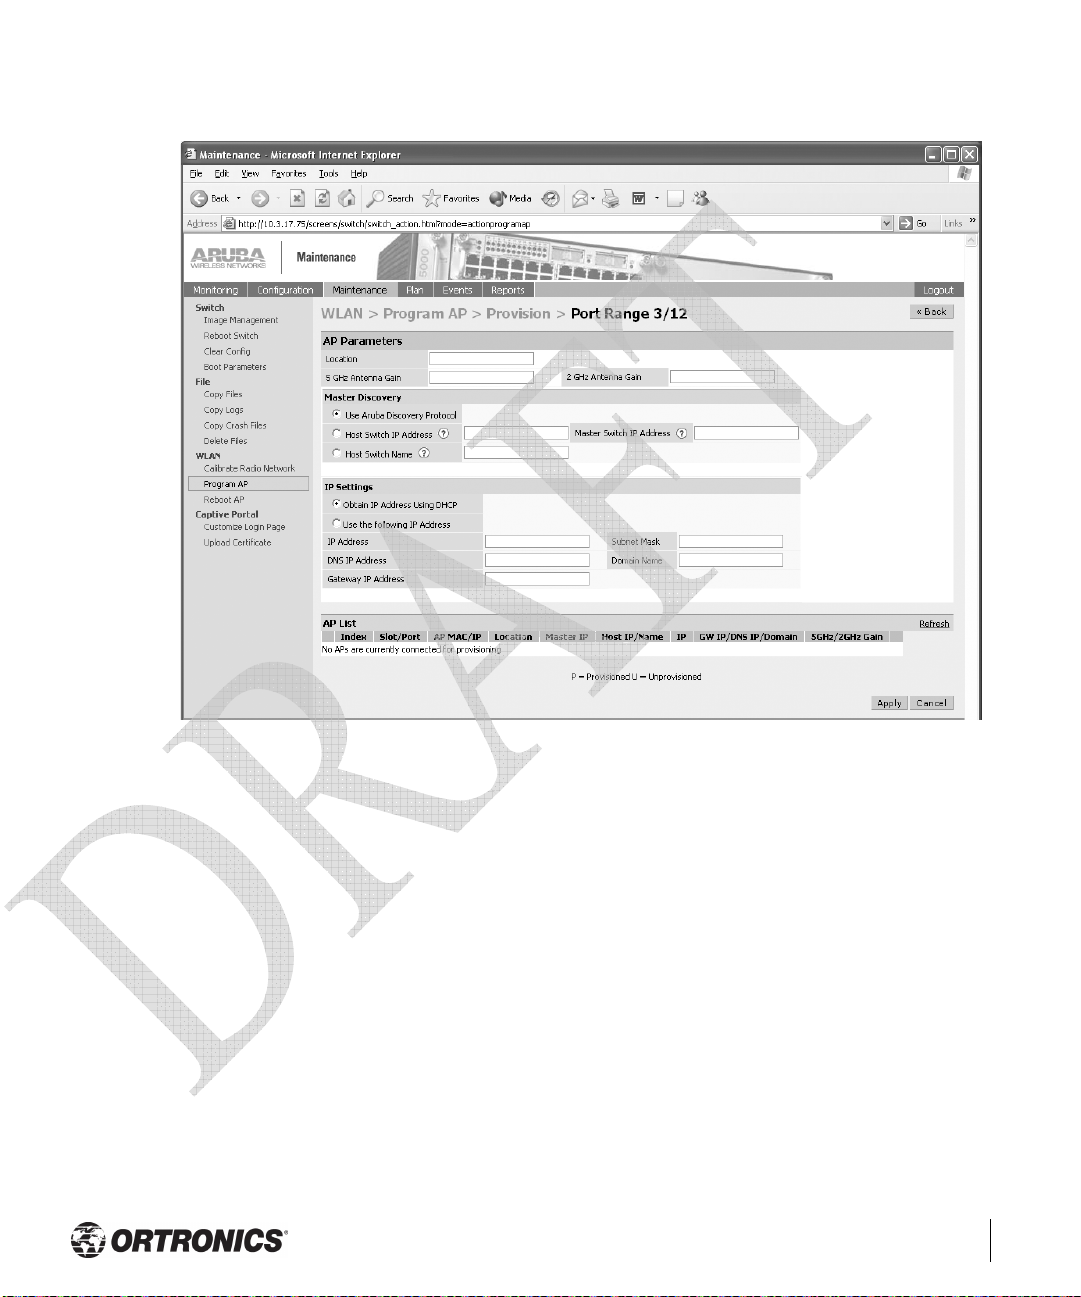
4 Enter the required information and click Enable.The Port Range screen displays.
FIGURE 2-2 Port Range Screen
5 Plug the AP into one of the ports configured for provisioning.
If your AP is already plugged into the port, unplug it and plug it in again.
If AP is connected through PoE, enter poe off followed by poe on.
The AP will come up with an IP from the provisioning subnet
After the AP comes up it should be in the provisioning list. Provisioning list shows the
list of APs which are plugged into the provisioning ports.
Provisioning Access Points 9
Chapter 2
Page 14

6 Click the Refresh link (not the browser Refresh option) to see if the AP entry has
displayed. (This might take a moment.)
If you cannot see the entry after 1-2 minutes, click Refresh again.
The Clear Table button appears after an entry in the list appears.
To erase all the table entries, click Clear Table. (You cannot clear selected entries.) If a
number of APs are provisioned and you click Clear Table, only the entries which come
up afterwards can be provisioned.
If the entry does not show up in the AP list, check network connectivity. Go to the AP
console and verify if the AP has come up with the IP from the provisioning subnet.
7 After the entry shows up on the page, configure the location, Host IP/Name, Master IP
address.
If AP is going to be assigned a static IP, click Use the following IP Address and enter
the IP address, Netmask, Gateway IP.
If the AP is going to obtain an IP address using DHCP, click Use IP Address Using
DHCP.
8 After configuring the required parameters, select the entry from the list (AP to which the
configuration has to be applied) and click Apply.
The State field changes from U (Unprovisioned) to In Progress.
9 After a few seconds, click the Refresh link again and the State will have changed to P
(Provisioned).
Note Check that the configured parameters are reflected in the AP list entry.
Note Ortronics recommends that you provision each AP for a unique location as
suggested by site-survey planning. Label each AP with this location information and place the AP in its proper location. Failure to place APs in the
location for which they were provisioned will reduce the effectiveness of
such RF features as triangulation.
10 Click Back to go into the previous page
We can see that the Subnet is still configured and Port/s are selected.
11 When finished provisioning APs, click Disable to disable AP Provisioning.
10 Ortronics Wi-Jack DUO Part OR-71601435 Rev 02
Installation Guide Draft 2006
Page 15

Note Disable AP Provisioning after all the required APs are provisioned. Ports
that are enabled for provisioning do not handle traffic. Therefore plugging
an already provisioned AP into a port still set to provisioning mode will prevent that AP from functioning.
Now the AP is configured with the Parameters given
12 Reboot the AP so the AP will come up with the new configured parameters.
Use the Reprovisioning tab for APs which are already deployed but need to be reconfigured.
See the Ortronics Wireless Software User’s Guide for information on reprovisioning.
Provisioning Access Points 11
Chapter 2
Page 16
Manual Provisioning
Connecting the Console Terminal
Manual provisioning requires this procedure. You must use the serial console breakout
adapter cable to be able to access the serial console interface to the Ortronics Wi-Jack DUO
while allowing the device to be powered by the AC adapter or PoE (from an Ortronics
Wireless Controller).
FIGURE 2-3 Wi-Jack AP DUO
12 Ortronics Wi-Jack DUO Part OR-71601435 Rev 02
Installation Guide Draft 2006
Page 17

CHAPTER 3
AP Deployment
This chapter covers installation of the Ortronics Wi-Jack DUO Access Point.
Mounting the Ortronics Wi-Jack DUO
When provisioning is complete, mount the Ortronics Wi-Jack DUO at its intended service
location.
The Ortronics Wi-Jack DUO with internal antennas is intended only for installation in
Environment A as defined in IEEE 802.3.af. All interconnected equipment must be
contained within the same building, including the interconnected equipment’s associated
LAN connections.
Select a location as close as possible to the center of the intended coverage area. If
necessary, use the Ortronics RF Plan site survey tool to determine the optimum locations for
your access points and air monitors.
The service location should be free from obstructions or obvious sources of interference.
Normally, the higher you place an access point or air monitor, the better its performance.
The Ortronics Wi-Jack DUO is not suitable for outside use.
Connecting Required Cables
The Ortronics Wi-Jack DUO with internal antennas are intended only for installation in
Environment A as defined in IEEE 802.3.af. All interconnected equipment must be
contained within the same building, including the interconnected equipment's associated
LAN connections.
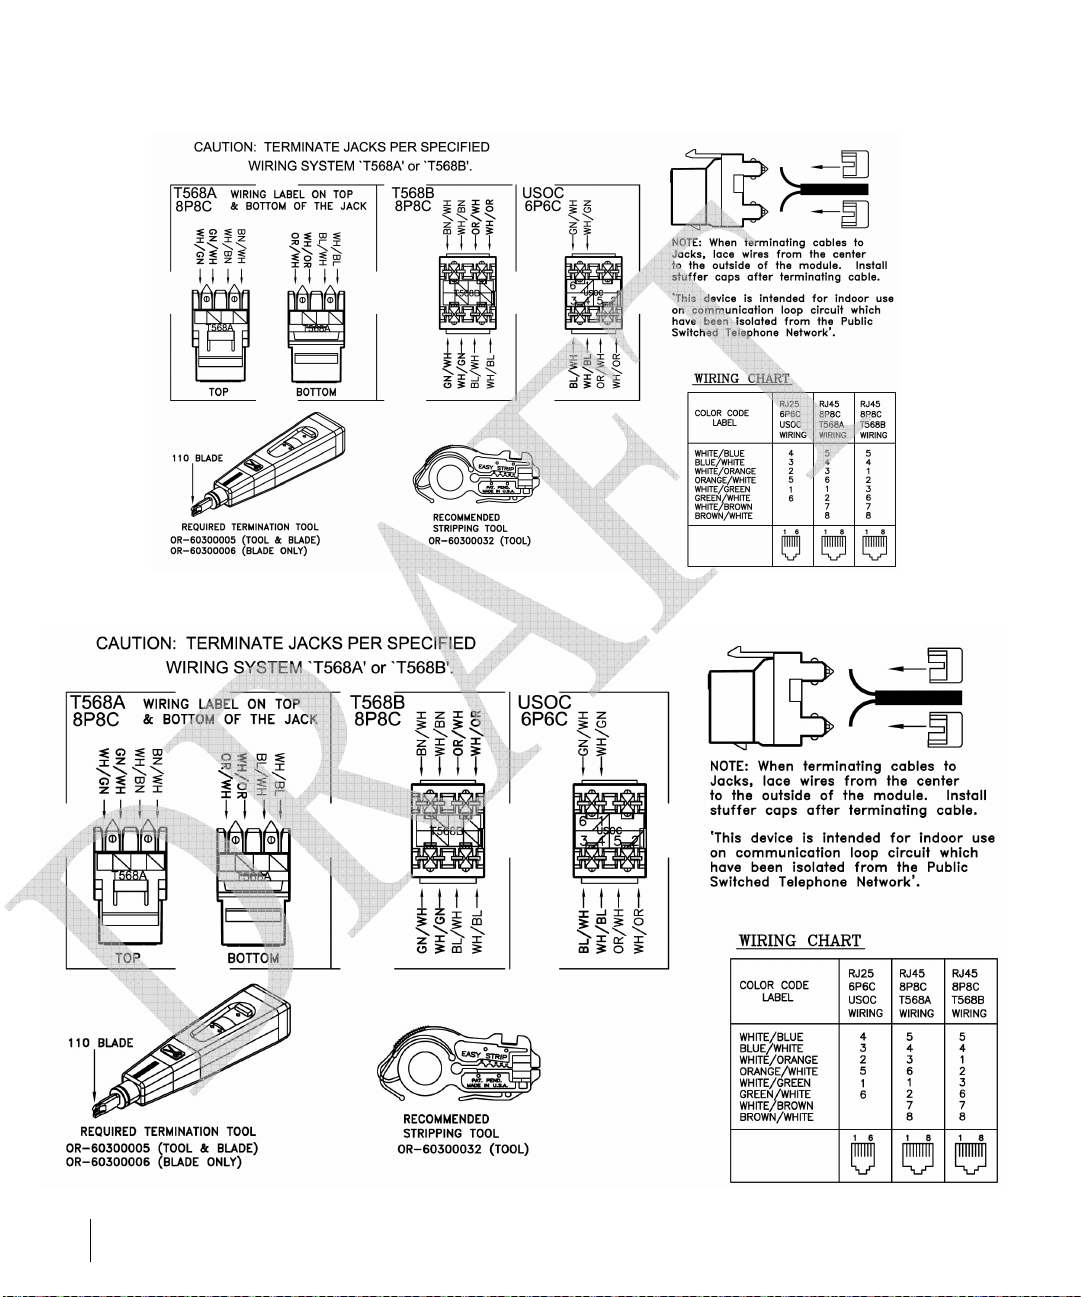
Selecting Horizontal Cable
The 10/100 Mbps Ethernet (FE) port is used to connect the AP to a 10Base-T/100Base-TX
(twisted-pair) Ethernet LAN segment. The appropriate FE jumper cable is supplied.
Horizontal cable most be 8-conductor, Category 5e minimum, UTP, straight-through FE
cable.
The maximum horizontal run length for FE cable is 100 meters (325 feet).
AP Deployment 13
Chapter 3
Page 18

Install cables in accordance with all applicable local regulations and practices.
For more port and cable details, see Appendix B.
14 Ortronics Wi-Jack DUO Part OR-71601435 Rev 02
Installation Guide Draft 2006
Page 19
AP Deployment 15
Chapter 3
Page 20
16 Ortronics Wi-Jack DUO Part OR-71601435 Rev 02
Installation Guide Draft 2006
Page 21

APPENDIX A
Cables
“To AP” Specifications
The RJ-45 connector labeled “To AP” attaches to the Ortronics Wi-Jack DUO User port
either directly (if the AP is physically available) or indirectly (if the AP is already deployed).
When connecting indirectly, use a straight-through FE coupler to attach the “To AP” connector
to the FE cable leading directly to the AP’s User port with no intervening hubs, routers, or
other network equipment. The cable must be 8-conductor, Category 5e or 6, straight-through
FE cable with a maximum length of 100 meters (325 feet).
Install cables in accordance with all applicable local regulations and practices.
“To Network” Specifications
The RJ-45 connector labeled “To Network” attaches to an FE LAN segment. This
connection is optional unless IEEE 802.11af Power over Ethernet (PoE) is used to power the
AP during manual provisioning.
A straight-through FE coupler may be used to attach the “To Network” connector to a LAN
FE cable. The appropriate cable depends on the level of connectivity required of the User
port:
z If the connecting device supports IEEE 802.3af Power over Ethernet (PoE), use an
8-conductor, Category 5e or 6, straight-through FE cable with male RJ45 connectors.
The Ortronics WCU-5, WCU-16 and WCU-48 support SPOE.
z Otherwise, use an 8-conductor, Category 5e or 6, FE cable with male RJ45 connectors.
The port detects MDI/MDX and automatically adjusts for straight-through or crossover
cables.
Note Only IEEE 802.3af Power over Ethernet is supported for manual provision-
ing. “Inline” or “midspan” PoE devices will not work with the Ortronics serial
breakout adapter.
The maximum horizontal cable run length for FE cables is 100 meters (325 feet).
Install cables in accordance with all applicable local regulations and practices.
Cables 17
Appendix A
Page 22

18 Ortronics Wi-Jack DUO Part OR-71601435 Rev 02
Installation Guide Draft 2006
Page 23

APPENDIX B
Troubleshooting
After provisioning and deployment, the Ortronics Wi-Jack DUO can be configured and
managed through the Ortronics Wireless Controller. However, the Ortronics Wi-Jack DUO
includes built-in troubleshooting features for situations where the controller commands are
unable to diagnose AP problems.
This appendix describes using the built-in AP support prompt for troubleshooting.
Accessing the AP Support Prompt
Depending on your network topology, the built-in AP Support prompt can be accessed using
the AP serial console port or through the Wireless Controller using the Serial Over Ethernet
(SoE) interface or using Telnet from a remote management station.
Direct SPOE Connection to Wireless Controller
This method requires that the Ortronics Wi-Jack DUO is connected directly to an
SPOE-compatible network port on the Ortronics Wireless Controller (see “Connecting
Required Cables” on page 13).
1 Telnet to the Ortronics Wireless Controller Serial-Over-Ethernet (SoE) interface.
Use a Telnet client on your management workstation to connect to the Ortronics Wireless Controller IP address using logical port 2300. The connection command may vary
depending on the specific software used, but commonly appears as follows:
> telnet <Wireless Controller IP address> 2300
Troubleshooting 19
Appendix B
Page 24

2 When prompted, log in to the Ortronics Wireless Controller as the administrator:
user: admin
password: <administrator password (not displayed)>
This will present you with the Ortronics Wireless Controller SoE console prompt:
Available commands:
baud [9600|19200|38400|57600|115200]
connect <slot/port>
exit (no args)
soe>
3 Connect to the port to which the Ortronics Wi-Jack DUO is physically attached:
soe>
connect <slot number>/<port number>
where slot number is the physical slot of the line card in the Wireless Controller, and port
number is the physical port.
If the AP has not finished booting, allow the Autoboot timer to expire. When the device has
booted, the AP support prompt (#) will appear.
Direct Terminal Connection
This method requires that the Ortronics Wi-Jack DUO is connected to a compatible serial
console using the Ortronics serial breakout adapter OR-AP-SPOE (see “Connecting the
Console Terminal” on page 12).
1 Set up your local terminal.
This procedure requires a terminal or computer running terminal emulation software
with the following settings:
Tab le B -1 Console Terminal Settings
Baud Rate Data Bits Parity Stop Bits Flow Control
9600 8 None 1 None
2 Establish console communication.
Press <Enter> a few times to establish communication between the Ortronics Wi-Jack DUO
and terminal.
If the AP has not finished booting, allow the Autoboot timer to expire. When the device has
booted, the AP Support prompt (#) will appear.
20 Ortronics Wi-Jack DUO Part OR-71601435 Rev 02
Installation Guide Draft 2006
Page 25

Remote Telnet Connection
If properly set up, the AP support prompt can be accessed remotely using Telnet. By default,
this feature is turned off for security purposes and cannot be turned on using the AP interface.
Setting Telnet Access
Telnet access can only be changed from the Wireless Controller management interface. Log
in to the Wireless Controller CLI using the admin account, access the configuration (con-
fig) prompt, and issue the following commands:
(Aruba 5000) (config) # ap location <building>.<floor>.<device>
(Aruba 5000) (sap-config location b.f.d) # telnet
{enable|disable}
Using Telnet to Connect
Use a Telnet client on your management workstation to connect to the Ortronics Wi-Jack
DUO’s individual IP address. The connection command may vary depending on the specific
software used, but commonly appears as follows:
> telnet <Ortronics Access Point IP address>
When the connection is established, the AP support prompt (#) will be displayed.
Troubleshooting 21
Appendix B
Page 26

AP Support
Access Levels
z User Access
User access is a low security level, featuring only the most basic commands. It is available without any additional login after the AP has booted.
z Privileged Access
Privileged-level access requires the privileged password (the same privileged password
used on the controller) to be entered using the user level enable command. The privileged access level is available only after the AP has successfully booted and synchronized with Wireless Controller.
User Commands
z ping <host|IP address>
Verify IP connectivity between the AP and the host address.
z route
Display the contents of the AP route table.
z ifconfig
Display the AP’s IP address settings.
z enable <privileged password>
Access the AP Support privileged mode.
Privileged Commands
In addition to the user commands, the following commands are available upon successfully
entering the privileged mode:
z ps
z show [config|stats|version]
Note— These commands should be used only as directed by Ortronics
Customer Support.
22 Ortronics Wi-Jack DUO Part OR-71601435 Rev 02
Installation Guide Draft 2006
Page 27

APPENDIX C
Product Specifications
Compliance
FCC - Class A
This equipment has been tested and found to comply with the limits for a Class A digital device,
pursuant to Part 15 of the FCC Rules. These limits are designed to provide reasonable protection
against harmful interference when the equipment is operated in a commercial environment. This
equipment generates, uses, and can radiate radio frequency energy and, if not installed and used in
accordance with the instruction manual, may cause harmful interference to radio communications.
Operation of this equipment in a residential area is likely to cause harmful interference in which case
the user will be required to correct the interference at their own expense.
Any changes or modifications not expressly approved by the party responsible for compliance could
void the user’s authority to operate this equipment.
This product complies with Part 15 of the FCC Rules. Operation is subject to the following two
conditions: (1) this device may not cause harmful interference, and (2) this device must accept any
interference received, including interference that may cause undesired operation.
CAUTION STATEMENT: FCC RF Radiation Exposure Statement
This equipment complies with FCC RF radiation exposure limits set forth for an uncontrolled
environment. This equipment should be installed and operated with a minimum distance of 20
centimeters (8 inches) between the radiator and your body. This transmitter must not be co-located or
operating in conjunction with any other antenna or transmitter.
Radio Frequency Interference Requirements
This device is restricted to indoor use due to its operation in the 5.15 to 5.25 GHz frequency range.
The FCC requires this product to be used indoors to reduce the potential for harmful interference to
co-channel Mobile Satellite systems. High power radars are allocated as primary users of the 5.25 to
5.35 GHz and 5.65 to 5.85 GHz bands. These radar stations can cause interference with and/or
damage this device.
Industry Canada - Class A
This digital apparatus does not exceed the Class A limits for radio noise emissions from digital apparatus
as set out in the interference-causing equipment standard entitled “Digital Apparatus,” ICES-003 of the
Department of Communications.
Cet appareil numérique respecte les limites de bruits radioélectriques applicables aux appareils
numériques de Classe A prescrites dans la norme sur le matériel brouilleur: “Appareils Numériques,”
NMB-003 édictée par le ministère des Communications.
Product Specifications 23
Appendix C
Page 28

CE - Class A
Warning—This is a Class A product. In a domestic environment, this product may cause radio
interference in which case the user may be required to take adequate measures.
EU - Class A
This product complies with EN5022 Class A and EN5024 standards.
Certifications
Item Measurement
Electromagnetic
Compatibility
FCC Part 15 Class A, FCC Part 15 Class C 15.207/15.247,
FCC Part 15 Class E 15.407
ICES-003 Class A,
RSS 210 (CAN)
Safety UL Listed (UL60950)
UL Listed (CAN/CSA 22.2 No. 60950)
24 Ortronics Wi-Jack DUO Part OR-71601435 Rev 02
Installation Guide 2006
Page 29

Product Features
z Wireless dual-band transceiver
z Protocol-independent networking functionality
z Supports IEEE 802.11a and IEEE 802.11b/g operation as an AP
z Supports IEEE 802.11a and IEEE 802.11b/g operation as an AM
z Compatible with IEEE 802.3af Power over Ethernet (PoE)
z Seamless connectivity to wired LANs augment existing networks quickly and easily
z Can be centrally managed, configured, and upgraded through the Ortronics Wireless
Controller to take advantage of network changes and security improvements
Ethernet Compatibility
The Ortronics Access Point attaches to 10/100 Mbps Ethernet (FE) LAN segments that
utilize 10Base-T/100Base-TX (twisted-pair) wiring. The device appears as an Ethernet node
and performs a routing function by moving packets between the wired LAN and remote
workstations on the wireless infrastructure.
Radio Characteristics
The Ortronics Access Point can be configured to support IEEE 802.11a and IEEE 802.11b/g
operation as an AP, and supports both IEEE 802.11a and IEEE 802.11b/g operation as an
AM:
z 802.11a provides a high data rate and reliable wireless connectivity.
802.11a operation uses a radio modulation technique known as Orthogonal Frequency
Division Multiplexing (OFDM), and a shared collision domain (CSMA/CA). It operates
in the 5GHz Unlicensed National Information Infrastructure (UNII) band. Data is transmitted over a half-duplex radio channel operating at up to 54 Megabits per second
(Mbps).
z 802.11b provides compatibility with a large user base.
802.11b operation uses the IEEE 802.11 High-Rate Direct Sequence (HRDS) specification, and a shared collision domain (CSMA/CA). It operates in the 2.4 GHz Industrial/Scientific/Medical (ISM) band. The ISM band is available worldwide for
unlicensed use. Data is transmitted at speeds of up to 11 Mbps.
z 802.11g provides a high data rate and is backwards compatible with 802.11b.
802.11g operation uses ODFM and a shared collision domain (CSMA/CA). It operates
in the 2.4 GHz Industrial/Scientific/Medical (ISM) band. The ISM band is available
worldwide for unlicensed use. Data is transmitted at speeds of up to 54 Mbps.
Product Specifications 25
Appendix C
Page 30

Power over Ethernet
The Ortronics Access Point supports the IEEE 802.3af standard for Power over Ethernet
(PoE). With this feature, the Ortronics Access Point can accept electrical power from a
compatible PoE-capable device (such as the Ortronics OR-WCU-5, OR-WCU-16 and ORWCU-48) directly over the FE cable. PoE eliminates the need to provide separate power
outlets in environments that are difficult or undesirable to wire for electricity.
The Ortronics Access Point also supports “inline” and “midspan” PoE devices for normal
operation.
Physical Description
Package Contents
The Ortronics Wi-Jack DUO Access Point package includes:
z One Ortronics Wi-Jack DUO
z Assorted documentation
z Keystone Jack
z Mounting hardware and Keystone Jack designation label
Inform your distributor if there are any incorrect, missing or damaged parts. If possible,
retain the carton, including the original packing materials. Use them to repack the product in
case there is a need to return it.
Optional Items
The following optional items can also be ordered for the Ortronics Access Point:
z OR-AP-SPOE Ortronics Serial Break Out Adapter
Check with your Ortronics distributor for the availability of optional items.
26 Ortronics Wi-Jack DUO Part OR-71601435 Rev 02
Installation Guide 2006
Page 31

TABLE C-1 Wi-Jack DUO Specifications
Description 802.11a 802.11b 802.11g
Antenna Dual, diversity internal tri-band 802.11a/b/g antennas
Frequency
Band
Radio
Technology
Modulation
Type
Transmit
Power
Media Access
Control
z 5.250 ~ 5.350
Ghz (middle
band) 4 channels
z 5.725 ~ 5.825
Ghz (higher
band) 4 channels
Orthogonal
Frequency Division
Multiplexing
(OFDM)
BPSK, QPSK,
16-QAM, 64-QAM
Configurable by
system
administrator/
professional installer
CSMA/CA with
ACK
z 2.4 ~ 2.483 Ghz
(US, Canada &
ETSI)
z 2.4 ~ 2.497 Ghz
(Japan)
z 2.412 ~ 2.462
Ghz (US, Canada)
z 2.412 ~ 2.472
Ghz (ETSI)
z 2.412 ~ 2.484
Ghz (Japan)
Direct Sequence
Spread Spectrum
(DSSS)
Orthogonal
Frequency Division
Multiplexing
(OFDM)
CCK, BPSK, QPSK CCK, BPSK, QPSK,
16-QAM, 64-QAM
Configurable by
system administrator/
Configurable by
system administrator
professional installer
CSMA/CA with
ACK
CSMA/CA with
ACK
Operating
Channels
z US & Canada: 8
z ETSI: 13
z Japan: 5
Data Rates 6, 9, 12, 18, 24, 36,
48, 54 Mbps per
channel
z US & Canada: 11
z ETSI: 13
z Japan: 13
1, 2, 5.5, 11 Mbps per
channel
z US & Canada: 11
z ETSI: 13
z Japan: 13
6, 9, 12, 18, 24, 36,
48, 54 Mbps per
channel
Product Specifications 27
Appendix C
Page 32

TABLE C-2 Wi-Jack DUO (Continued)
Description
Maximum Clients 64
Multi-mode Radio
Selectable via software
Band
Manageability: z Management of all 802.11 parameters
z Network Wide AP Management via:
CLI
WEB GUI
SNMPv3
z Access Point Profiles, Management by:
Geographical Location
BSSID
Radio Type
Encryption Support
40bit / 64bit / 128bit / 152bit WEP, TKIP, AES
(AP and Switch)
Physical:
(H/W/D)
z Wi-Jack DUO
z 4.7” x 2.75” x 2”
Interfaces
(Electrical):
z 1 x 10/100 Base Tx User Port
z Autosensing MDI/MDIX
z Secure-Jack wired port
Internal Indicators
(LEDs)
z Ready power On/Off green
z RF activity 802.11a AP blue
z RF activity 802.11b/g AP blue
Power z Access Point Input—
48 VDC, 200 mA (PoE)
28 Ortronics Wi-Jack DUO Part OR-71601435 Rev 02
Installation Guide 2006
Page 33

TABLE C-2 Wi-Jack DUO (Continued)
Description
Power Requirements z 48V DC / 200mA Power over Ethernet (802.3af compliant)
Output Power 100 mW maximum (or lower as configured on the Ortronics
Wireless Controller to comply with local regulatory
requirements)
Environmental
Operating Ambient
Standards
Compliance
Electromagnetic
Compliance
Humidity 5% to 95% (non-condensing)
Maximum 40C
z Ethernet IEEE 802.3 / IEEE 802.3u
z Power over Ethernet IEEE 802.3af
* Note
z Wireless IEEE 802.11a/b/g
z FCC Part 15 Class A, FCC Part 15 Class C 15.207/15.247
z FCC Part 15 Class E 15.407
z ICES-003 Class A,
z RSS 210 (CAN)
z VCCI Class A
z EN 61000-3, EN 61000-4-2, EN 61000-4-3,
EN 61000-4-4,
z EN 61000-4-5, EN 61000-4-6, EN 61000-4-8,
EN 61000-4-11
z EN 55022, EN55024 (89/336/EEC),
z ETS 300 328 (89/336/EEC), ETS 301 489 (89/336/EEC)
z ETS 301 893
Safety Compliance z CSA/NTRL (CSA 22.2 No. 950 & UL 1950)
z EN60950 (TÜV/GS), IEC60950 (CB)
Product Specifications 29
Appendix C
Page 34

Related Documents
The following items are part of the complete documentation for the Ortronics Wireless
Solution:
z Ortronics Wi-Jack DUO Installation Guide (this document)
z Ortronics Wireless Controller Installation Guide
z Ortronics RF Plan User’s Guide
z Ortronics Wireless Software User’s Guide
For the current versions of these manuals, or to obtain the latest product release notes, visit
the support section of our Web site (see page 32).
Note: Wireless Access Points with or without external antenna ports are only intended for
installation in Environment A as defined in IEEE 802.3.af. All interconnected equipment
must be contained within the same building including the interconnected equipment's
associated LAN connections.”
30 Ortronics Wi-Jack DUO Part OR-71601435 Rev 02
Installation Guide 2006
Page 35

Text Conventi o n s
The following conventions are used throughout this manual to emphasize important
concepts:
TABLE 3-1 Text Conventions
Type Style Description
Italics This style is used to emphasize important terms and to mark the
titles of books.
System items This fixed-width font depicts the following:
z Sample screen output
z System prompts
z Filenames, software devices, and certain commands when
mentioned in the text.
Commands In the command examples, this bold font depicts text that the user
must type exactly as shown.
<Arguments> In the command examples, italicized text within angle brackets
represents items that the user should replace with information
appropriate to their specific situation. For example:
# send <text message>
In this example, the user would type “send” at the system prompt
exactly as shown, followed by the text of the message they wish to
send. Do not type the angle brackets.
[ Optional ] In the command examples, items enclosed in brackets are optional.
Do not type the brackets.
{ Item A | Item B } In the command examples, items within curled braces and
separated by a vertical bar represent the available choices. Enter
only one choice. Do not type the braces or bars.
Product Specifications 31
Appendix C
Page 36

Contacting Ortronics
z Main US 877-599-5393 - Toll-free
z Main 860-445-3800
z Fax 888-282-0043 - Toll-free
z Fax 860-405-2970
z Email [email protected]
z Web Site http://www.ortronics.com
32 Ortronics Wi-Jack DUO Part OR-71601435 Rev 02
Installation Guide 2006
Page 37

Notes
Page 38

Notes
 Loading...