


Guardian MOB Beacon Watch
121.5MHz Man Overboard Alarm Watch
User Manual

WARNINGS
Use the beacon function of the Guardian MOB Beacon
Watch only in situations of grave and imminent danger.
The beacon function can only be used in conjunction with a
suitable 121.5MHz receiver.
The beacon function is set at the factory to manual
activation. For automatic activation, the beacon must be
armed by the user. THIS FUNCTION WILL NOT WORK IN
FRESH WATER.
This product contains a lithium battery. Do not puncture,
incinerate or recharge. Dispose of safely.
Use of the beacon may require radio licences, depending on
the country of use.
2

Contents
WARNINGS ....................................................................................................................... 2
1. Introduction ................................................................................................................. 4
1.1 Man Overboard Operation ........................................................................................ 4
1.2 Battery Life ................................................................................................................ 5
2. Beacon controls ........................................................................................................... 6
2.1 Transmitter Control .................................................................................................... 7
2.2 ARMING & CONFIRM Button Control ....................................................................... 7
2.4 Transmit (Manually) ................................................................................................... 9
2.5 Disable Transmitting .................................................................................................. 9
2.6 Test Function ............................................................................................................. 9
3. Watch Time Functions .............................................................................................. 10
3.1 Normal Readout ...................................................................................................... 10
3.2 Alarm operation ....................................................................................................... 10
3.3 Setting Sequence .................................................................................................... 11
3.4 Hourly Chime ........................................................................................................... 12
3.5 Chronograph ............................................................................................................ 12
4. Service ....................................................................................................................... 13
4.1 Battery change ........................................................................................................ 13
4.2 Safety ....................................................................................................................... 13
4.3 Spares ...................................................................................................................... 13
5. Training Watch .......................................................................................................... 14
6. Battery reset .............................................................................................................. 15
3

1. Introduction
The Guardian MOB Beacon Watch is a full function alarm chronograph which
incorporates an emergency distress transmitter. The transmitter may be activated
automatically if the Watch is immersed in water; it may also be activated manually.
This product is designed to be worn in conditions where the user is at risk of falling
into water and where it may be difficult to locate the person in the water visually. The
beacon is used in conjunction with a receiver to generate an alarm; a direction
finder is available to help locate the person in the water.
1.1 Man Overboard Operation
Once armed, the beacon will activate automatically when immersed in sea water,
and will continue to transmit until disabled. Arming and disabling are detailed in the
Features section. In fresh water the beacon must be activated manually.
The beacon cannot transmit effectively when underwater, and needs to be as high
as possible for best signal range. Ideally, the user should hold up the arm wearing
the watch, but this is impractical for long periods. It is recommended that the arm is
rested on top of the lifejacket, as shown opposite.
4

1.2 Battery Life
The battery is designed to power this product for a period of 1 year.
When the battery is running low the LED flashes and the sounder beeps four times,
repeating every minute. This warning normally indicates that the battery has
reached the minimum level at which performance can be guaranteed; any further
deterioration may jeopardise the performance of the beacon in an emergency.
Refer to Page 15 for information on testing the beacon to verify the alarm.
Refer to the Service section for information on replacing the battery.
Beacon transmitting in emergency
5
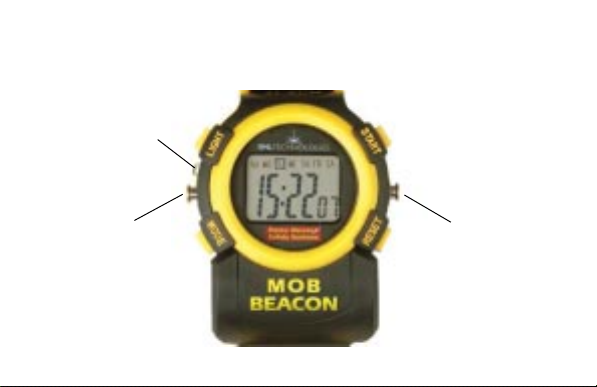
2. Beacon controls
LED indicator
6
CONFIRM
ARMING

2.1 Transmitter Control
The transmitter can be set into one of two modes:
Off
Transmitting - Permanently transmitting on full power
The activation system can be triggered by one of two methods:
Manually
Automatically, by immersion in water
2.2 ARMING & CONFIRM Button Control
2.2.1 Status Check
To check the armed status of the beacon, press and hold the ARMING button only.
ARMED Continuously repeating ‘beep-beep’ with LED flashes
DISARMED A single beep-beep with an accompanying LED flash
7

2.3.1 ARM (for automatic activation by immersion in water)
To set the Watch in ARMED mode:
Step 1: Press the CONFIRM button 3 times:
A single beep and LED flash confirms this step.
Step 2: Press the ARMING button once:
Once armed the LED will flash once every minute or so to indicate that it is in ARM mode.
The acknowledgement is a double beep and LED flash.
2.3.2 DISARM
To DISARM the Watch:
Step 1: Press the CONFIRM button 6 times:
A single beep and LED flash confirm this step.
Step 2: Press the ARMING button once:
The acknowledgement is a double beep and LED flash.
2.3.3 Water Sensor
The housing has 2 stainless steel sensors that are exposed on the outside of the
main housing. For activation, the beacon must be submerged in water for at least 4
seconds. The Water Activation Sensor functions only when the beacon is in the
ARMED mode.
NOTE: The beacon may activate automatically in extremely damp or wet
conditions. If this occurs, use the beacon in Manual Transmit mode.
8

2.4 Transmit (Manually)
To start transmitting manually, press and hold both the ARMING and CONFIRM
buttons for 3 seconds. The acknowledgement is a single beep. The LED flashes
during the period of transmission.
To stop transmitting the Disable Transmittlng sequence must be performed.
2.5 Disable Transmitting
To stop transmitting manually, press and hold both the ARMING and CONFIRM
buttons for 6 seconds.
The acknowledgement is a single beep and LED flash.
2.6 Test Function
To test the transmitter function of the beacon, press and hold the CONFIRM button.
After 3 seconds there is a single beep and a single LED flash to confirm the test
mode, followed by transmission at low power. The internal sounder buzzes to
indicate that the unit is transmitting. Once the CONFIRM button is released, the
transmission ceases.
9

3. Watch Time Functions
The time functions use 4 external push buttons (Start, Reset, Mode and Light) for
setting and adjustment. The following features are included:
Hour, Minute, Seconds and Day of the Week
Month and Date
Chronograph 1/100 Second with Lap/Split Control
Maximum chronograph count: 23 Hours 59 Minutes 59 Seconds
Alarm
Hourly Chime
12/24 Hour display at user’s option
3.1 Normal Readout
Pressing and holding START displays Month, Date and Day of Week
Pressing and holding RESET displays Alarm Time
Pressing MODE is reserved for changing functions, as described later
Pressing LIGHT once turns on the backlight for 3 seconds
3.2 Alarm operation
When the alarm sounds, press RESET to silence it. Alternatively, press START to silence the
alarm for 5 minutes (Snooze function).
10

3.3 Setting Sequence
3.3.1 Normal Time Setting
3.3.2 Alarm Time Setting
Press Mode 3 times to enter normal time setting mode. TU flag will flash.
Seconds will start flashing, press Start to set seconds to zero.
Press Reset once: Minutes flashing, press Start to advance.
Press Reset once: Hour flashing, press Start to advance (A is AM, P is PM and H is
24 hour format).
Press Reset once: Date flashing, press Start to advance.
Press Reset once: Month flashing, press Start to advance.
Press Start once: Day of Week flashing, press Start to advance.
Press Mode once: Setting completed, return to normal time readout.
Press Mode twice. MO flag will flash.
Alarm TIme Hour flashing, press Start to advance.
Press Reset once, Alarm Time Min flashing, press Start to advance.
Press Mode once, setting Is completed, return to normal time readout.
Arm the Alarm by pressing Start & Reset simultaneously; ALM flag will appear.
Disarm the Alarm by pressing Start & Reset simultaneously; ALM flag will
disappear.
11

3.4 Hourly Chime
Chime is activated by pressing and holding Reset, then pressing Mode once; the
SU through SA flags appear.
Deactivate Chime by pressing and holding Reset then pressing Mode once; the SU
through SA flags disappear.
3.5 Chronograph
Press Mode once to enter Chronograph mode; the SU, FR, SA flags flash. Pressing
the Start button starts and stops the time display; the time accumulates on
successive starts. Reset sets the timer to 0:00:00. Note that the colon sign flashes
whenever timing is running.
Whilst timing is running, pressing Reset puts the watch into Lap Time mode; the
SU, TH, SA flags flash. This freezes the display whilst the timing continues in the
background. Pressing Reset again updates the display; pressing Reset yet again
freezes the display, and so on. The time is reset to 0:00:00 by pressing Start while
the display is counting, and then pressing Reset.
To return to normal timekeeping, press Mode once.
12

4. Service
4.1 Battery change
It is not recommended to attempt to replace the product battery, as this is a task for
a skilled specialist. It is advisable to return the product to McMurdo, or to take it to a
McMurdo Service Agent.
A kit containing all necessary parts and instructions is available. The product must
be fully tested after battery replacement. It is essential that a pressure test is
performed to ensure that the housing is waterproof, as otherwise the
lifesaving capability of the beacon may be compromised.
4.2 Safety
The battery contains Lithium. Do not incinerate, puncture or recharge this type of
battery. Dispose of it safely in accordance with local regulations.
4.3 Spares
Battery/Gasket Kit 88-127
Strap Replacement Kit 88-126
13

5. Training Watch
The Training Watch is identical to the Guardian MOB Beacon Watch in operation,
except that it transmits on 121.65MHz. As a consequence its signal cannot be
received on normal distress alarm receivers, thus training exercises may be
conducted without creating false alarms. The training watch is clearly identified by its
strap markings.
NEVER WEAR THE TRAINING WATCH EXCEPT FOR TRAINING EXERCISES.
The MOB Emergency Receiver has a special listening mode designed for use in
training exercises.
14

6. Battery reset
Under certain conditions, typically when the beacon has activated for short periods,
the low battery alarm may sound although the battery does not need to be replaced.
If this is suspected, the battery alarm function should be reset by:
1 Press and hold the CONFIRM button
2 Press the ARMING button once
3 Release buttons. The unit will acknowledge with 5 beeps.
4 Immediately press the CONFIRM button twice. The unit will
acknowledge with a LED flash.
5 Immediately press the ARMING button once. The unit will
acknowledge with 4 beeps.
6 Confirm that the low battery alarm has been reset by monitoring
the Beacon for 2 minutes.
If the alarm does not sound, the Beacon may be used as normal.
If the low battery alarm sounds at this time or subsequently, a new battery
must be fitted.
15

McMurdo Limited Product Warranty
Subject to the provisions set out below McMurdo Limited warrants that this
product will be free of defects in materials and workmanship for a period of
12 months from the date of purchase.
McMurdo Limited will not be liable to the buyer under the above warranty:-
• for any defect arising from fair wear and tear, wilful damage, negligence, abnormal
working conditions, failure to follow McMurdo Limited’s instructions (whether oral or in
writing) including a failure to install properly and/or to use batteries recommended and/or
supplied by McMurdo Limited, misuse or alterations or repair of the product by persons
other than McMurdo Limited or an Approved Service Agent;
• for parts, materials or equipment not manufactured by McMurdo Limited in respect of
which the buyer shall only be entitled to the benefit of any warranty or guarantee given by
the manufacturer to McMurdo Limited;
• for the battery storage life which is specifically excluded from this warranty;
• if the total price for the product has not been paid.
McMurdo Limited does not make any other promises or warranties (express, implied or
statutory) about the product except where the product is sold to a consumer in which case the
statutory rights of a consumer are not to be affected.
16

In order to be valid, claims must be made under the above warranty in writing as soon as
practicable after discovery of the defect or failure and within the warranty period referred to.
Following a valid warranty claim McMurdo Limited shall be entitled to repair or replace the
product (or part) in question free of charge, or at McMurdo Limited’s sole discretion to refund to
the buyer the price of the product (or a proportional part of the price). McMurdo Limited shall not
be liable to a buyer who is not a consumer for any other loss or damage (whether indirect,
special or consequential loss of profit or otherwise) costs, expenses or other claims for
compensation which arise out of or in connection with this product. In the case of a consumer
McMurdo Limited shall only be liable where other loss or damage is foreseeable.
Nothing shall limit McMurdo Limited’s liability for death or personal injury caused by its
negligence.
This warranty is to be interpreted under English law.
All enquiries relating to this warranty or Approved Service Agents should be sent to:
McMurdo Limited
Silver Point, Airport Service Road, Hampshire, PO3 5PB, United Kingdom
Telephone: Int + 44 (0) 23 9262 3900 Fax: Int + 44 (0) 23 9262 3999
Web: www.mcmurdo.co.uk Email:sales@mcmurdo.co.uk
17

Specification
Chronograph watch - see text for functions
Operational temperature range: –10°C to +60°C
121.5MHz beacon
Environmental
Operational temperature range: –20°C to +55°C
Water Pressure Rated: 50 metres or 5atm
Weight inc. strap: 81grams
RF Transmitter
Frequency: 121.5MHz
Class of Emission: A3X
RF Power: -25dBm
Frequency error: +/- 3.5kHz
Duty cycle: 100%
Modulation type: Sweep downward from 1.5kHz to 650Hz
Modulation duty cycle: 50%
Power
Voltage: 3.2 Volts max.
Current drain: 20uA Quiescent
sweep repetition rate 2Hz
110mA Transmitting
See Page 14 for details
of the Training Watch
18

19

McMurdo Ltd
Silver Point
Airport Service Road
Portsmouth
Hampshire
United Kingdom
PO3 5PB
A member of Chemring Group PLC
88-151 Issue 2
 Loading...