

Page 1
INSTRUCTION MANUAL
Addendum to the Orion®
SteadyStar
™
Manual:
Plug-In for MaxIm DL
#53076, #53077, #53081
Overview
The SteadyStar Plug-In for Cyanogen’s MaxIm DL allows the Orion
SteadyStar to be operated from MaxIm DL. This plug-in works with
any version of the SteadyStar software.
This plug-in can be used with any camera supported by MaxIm DL.
System Requirements
Operating System
Windows XP SP3, Windows Vista x32/x64 and Windows 7 x32/x64
Prerequisites
The standard Orion SteadyStar application should be installed
before this plug-in. This ensures that all prerequisites are already
installed and that the configuration directory already exists.
MaxIm DL
This plug-in requires MaxIm DL Pro or Pro Suite version 5.19 and
later.
Providing Exceptional Consumer Optical Products Since 1975
OrionTelescopes.com
Customer Support (800) 676-1343
E-mail: support@telescope.com
Corporate Offices (831) 763-7000
89 Hangar Way, Watsonville, CA 95076
© 2012 Orion Telescopes & Binoculars
IN 443 Rev. A 02/12
Page 2
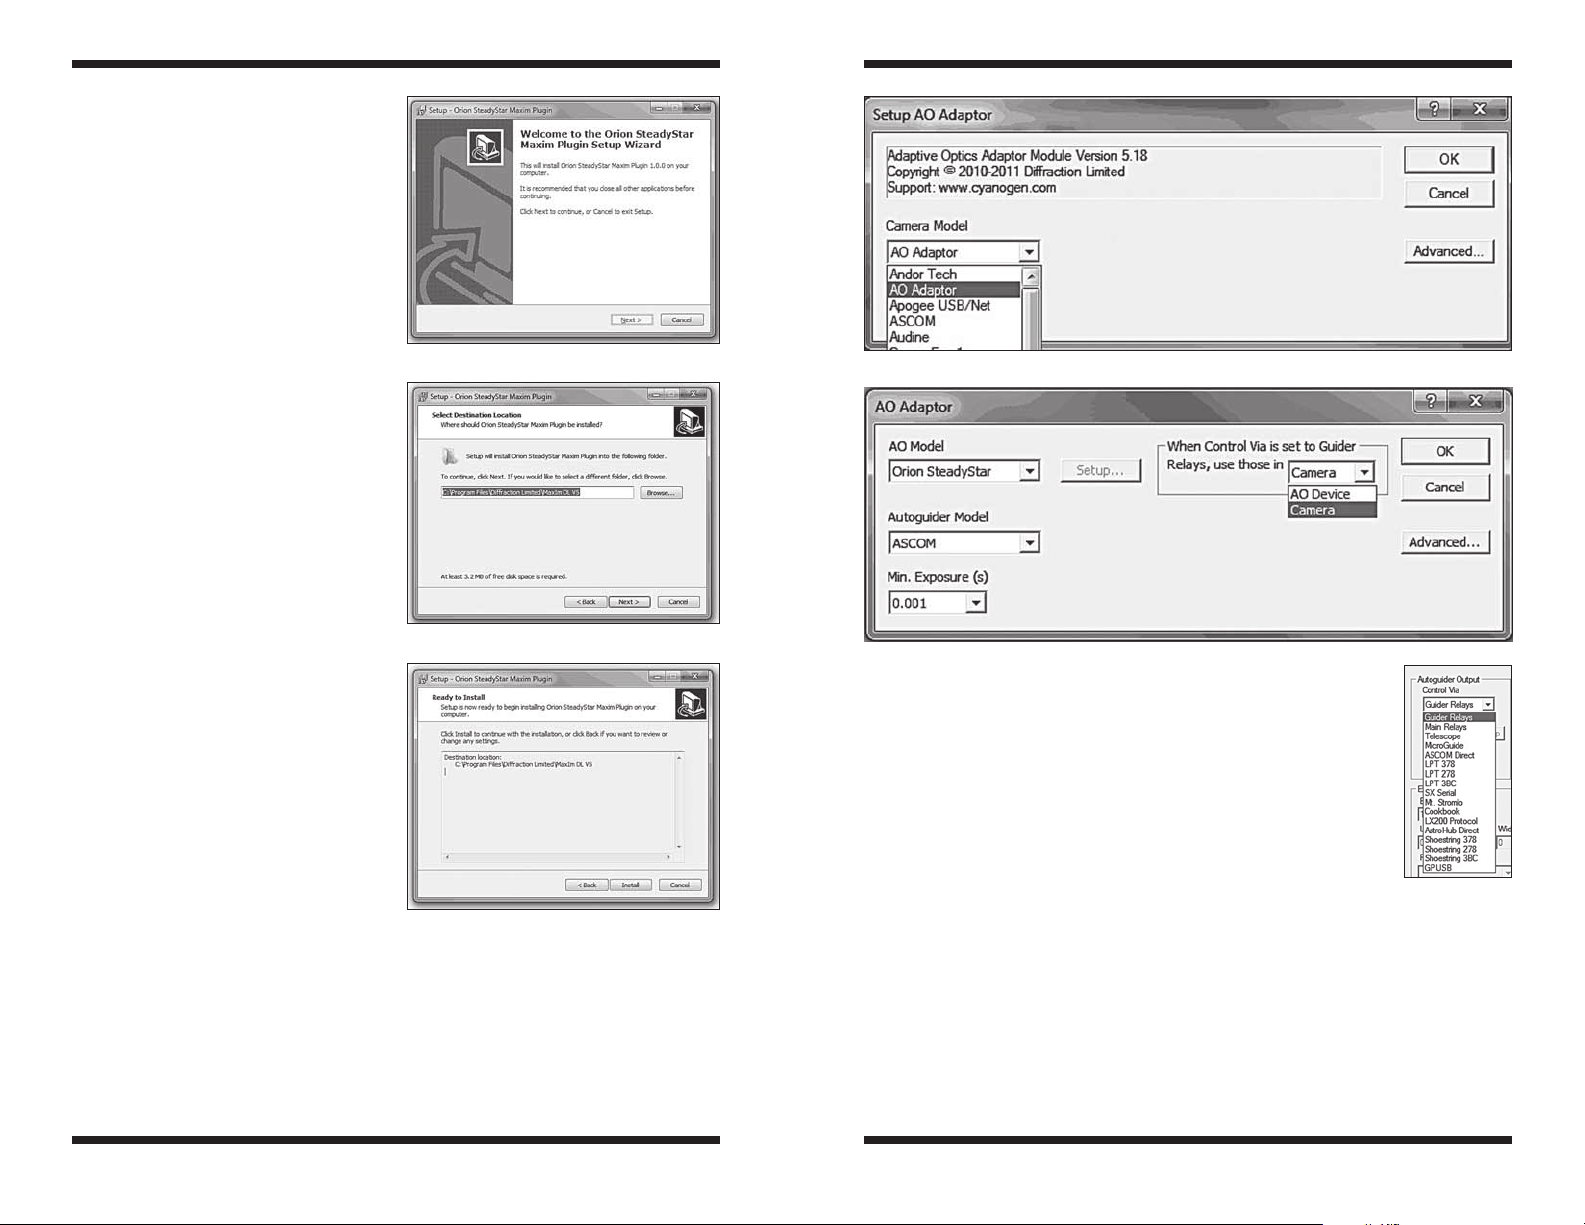
Installation
Please run the provided setup file and
follow the prompts (Figures 1-3).
Setup will determine your MaxIm
directory. If for some reason this
cannot be determined, please browse
to the path, as seen in Figure 2.
Configuration
Camera Setup
The SteadyStar plug-in uses the new
MaxIm DL AO Adaptor. On the guide
camera setup, select “AO Adaptor” on
the drop list (Figure 4).
Then click the “Advanced …” button
and the dialog in Figure 5 will be
shown.
Select your guide camera in the
“Autoguider Model” drop list. Then
select “Orion SteadyStar” for “AO
Model”.
Guide Relays
There are three ways to command the
mount from within the plug-in.
1. Use the SteadyStar guide port
2. Use the Guide camera guide port
3. Use the MaxIm Autoguider Output
To use the SteadyStar Guide port,
the plugin determines when a mount
bump is required. It sends the bump
Figur e 1.
Figure 2.
Figure 3.
Figure 4.
Figure 5.
notification back to MaxIm. Depending on the Autoguider
Output settings, MaxIm can issue the bump in many different
ways. For example, it can use the telescope interface or
Shoestring adapter. Or it can redirect the bump to the “Guider
relays”. But the guider is the AO Adaptor. So to distinguish
between the guide camera guide port and the SteadyStar
guide port, go to the AO Adaptor setup dialog and select “AO
Device” or “camera” on the “When Control Via is set to Guider
Relays, use those in…” (Figure 6).
Figure 6.
2 3
Page 3

Operation
Locate Tab
After a successful connection, the
plug in dialog is shown. On the right,
the exposure time and binning can be
changed. Using the “Locate” mode,
a suitable star can be chosen. The
“Continuous” checkbox maintains an
exposure loop during location, useful
for focusing or framing.
The plug in will load the latest
calibrations, if they exist. The AO
calibration only needs to be done
once or when the guide camera is
rotated in respect to the AO.
The mount calibration has to be
redone for different areas of the sky,
especially after a meridian flip.
Figure 7 shows a mount calibration
in progress. As the window is
small, the plug in auto zooms to the
measured calibration points. This is
a good way to check if the mount is
receiving the impulses and the output
should be similar to the one shown
(perpendicular axis).
The “More >>” button shows a log list. As this plug in accepts automation
commands from MaxIm, normal message boxes with information could not be
shown, so all relevant information is displayed here, including calibration output
result.
Track Tab
The Track tab (Figure 8) is where guiding takes place. The exposure time can
be set at any moment, even during guiding. The aggressiveness works as the
normal SteadyStar software aggressiveness control. The “More >>” button
displays a mini graph to monitor guiding and bumps.
Fi gu r e 7. Figure 9.
Figure 8.
Drive Tab
The Drive tab (Figure 9) has the
settings for the mount calibration, as
in the normal SteadyStar software.
Setup Tab
The Setup tab (Figure 10) allows
several configurations of AO
operation.
The Exercise tool allows for a test of
SteadyStar motor condition. The glass
tilts between all 4 extreme positions,
stopping for one second at each
position and allows a visual inspection
on the motor state.
The dithering is activated each time
a new main camera exposure is
complete.
The Track Box size is by default
140x140 pixels. This is suitable for
long focal length telescopes, where a strong wind gust might shift the guide
star for several pixels. The SteadyStar algorithm is quite fast, so reducing box
size will only reduce camera download time.
Automation
The SteadyStar MaxIm plug-in implements the MaxIm automation script
interface. This allows a complete control without user interface handling.
Figure 10.
Rotator
This plug-in supports SteadyStar with Rotator. The AO plug-in must be
connected first. Then the rotator can be connected through the ASCOM
interface, even on a different program. The SteadyStar Rotator ASCOM driver
was updated to improve compatibility with this plug-in. Please uninstall the
previous version of the ASCOM driver before installing the new version.
The new version number is 1.2.0 and it is provided with the installation package
of the plug-in.
4 5
Page 4

One-Year Limited Warranty
This Orion SteadyStar Adaptive Optics Guider is warranted against defects in materials or
workmanship for a period of one year from the date of purchase. This warranty is for the benefit
of the original retail purchaser only. During this warranty period Orion Telescopes & Binoculars
will repair or replace, at Orion’s option, any warranted instrument that proves to be defective,
provided it is returned postage paid to: Orion Warranty Repair, 89 Hangar Way, Watsonville,
CA 95076. If the product is not registered, proof of purchase (such as a copy of the original
invoice) is required.
This warranty does not apply if, in Orion’s judgment, the instrument has been abused, mishandled, or modified, nor does it apply to normal wear and tear. This warranty gives you
specific legal rights, and you may also have other rights, which vary from state to state. For
further warranty service information, contact: Customer Service Department, Orion Telescopes
& Binoculars, 89 Hangar Way, Watsonville, CA 95076; (800) 676-1343.
OrionTelescopes.com
89 Hangar Way, Watsonville, CA 95076
Customer Support Help Line (800) 676-1343
© 2012 Orion Telescopes & Binoculars
 Loading...