

Page 1

INSTRUCTION MANUAL
Orion
®
SteadyPix™ Telescope
Afocal Adapter for iPhone
#5303
®
Providing Exceptional Consumer Optical Products Since 1975
OrionTelescopes.com
Customer Support (800) 676-1343
E-mail: support@telescope.com
Corporate Offices (831) 763-7000
89 Hangar Way, Watsonville, CA 95076
© 2011 Orion Telescopes & Binoculars
IN 425 Rev. A 10/11
Page 2
Introduction
Congratulations on your purchase
of the Orion SteadyPix Telescope
Afocal Adapter for iPhone! The
adapter securely couples an Apple
iPhone to a standard 1.25" telescope eyepiece, enabling the capture of high-magnification digital
photographs through the telescope
using the iPhone’s built-in camera – in daytime or at night. The
technique of afocal, or “eyepiece
projection,” photography has been
used for decades with standard
cameras. The new wrinkle is that
now you can do it with an iPhone.
Figure 1. The SteadyPix Afocal Adapter
for iPhone mounted on the 1.25" eyepiece
of a refractor telescope.
And with the SteadyPix Telescope
Afocal Adapter for iPhone to precisely position and hold the iPhone’s
camera lens over the center of telescope’s eyepiece, you can achieve
astounding results!
The SteadyPix for iPhone also lets you display a live view of the image projected by your
telescope on your iPhone screen, which is perfect for sharing real-time views of the night
sky with friends and family. The iPhone becomes a mini display monitor!
We hope you have fun taking pictures with your iPhone using the SteadyPix Telescope
Afocal Adapter!
What’s Included
• iPhone cradle bracket
• Slotted L-bracket with lock knobs
• Eyepiece clamp (for 1.25" eyepieces) with lock knob
• Carrying pouch
Compatibility
The Orion SteadyPix Telescope Afocal Adapter for iPhone is designed to fit the Apple
iPhone 4S, 4, 3GS, 3, and original iPhone. The SteadyPix for iPhone was designed specifically for use with the Apple iPhone. It is not intended or known to work with the iPod Touch,
or any other brand or model of smartphone.
WARNING: Never look directly at the Sun through your telescope or its finder
scope – even for an instant – without a professionally made solar filter that
completely covers the front of the instrument, or permanent eye damage could
result. Young children should use this telescope only with adult supervision.
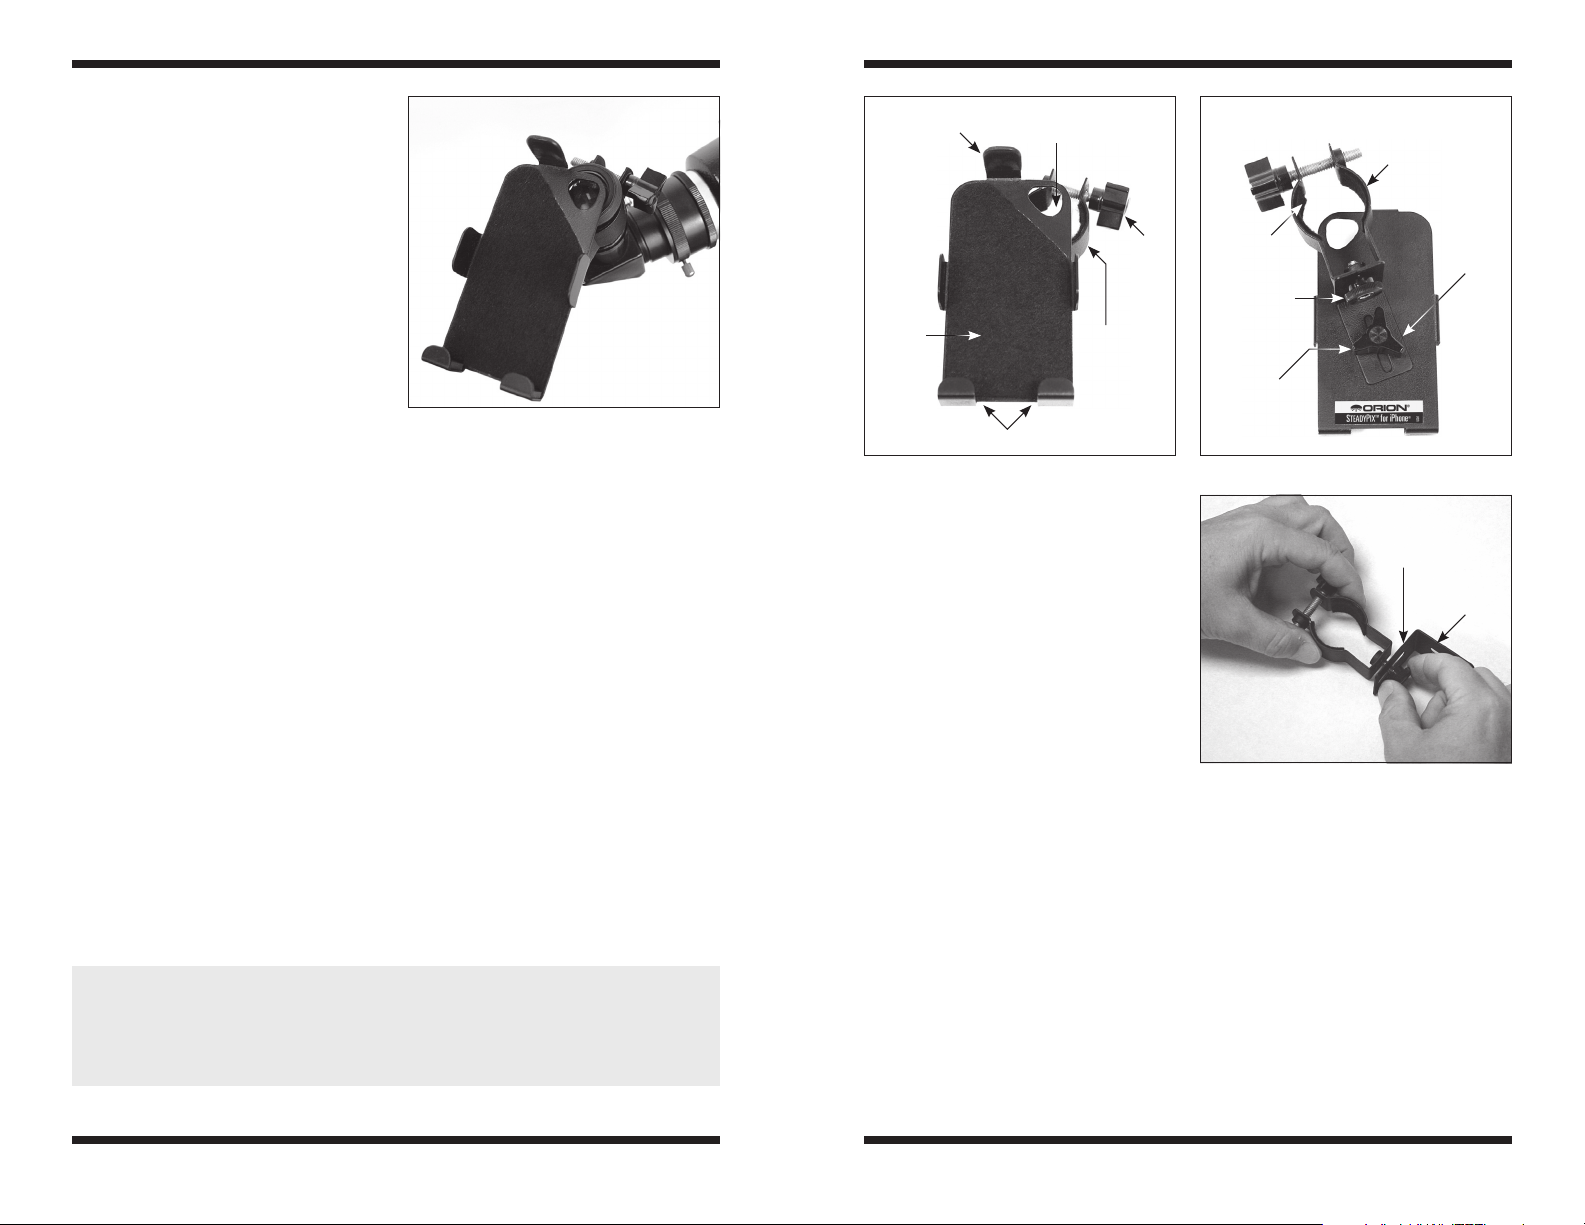
Upper rubbercoated tab
FRONT
VIEW
Cradle
bracket
Padded retaining tabs
Figure 2. Front and back views of the SteadyPix Afocal Adapter for iPhone.
Note that you will likely have to remove the
iPhone from any external protective case,
sleeve, or bumpers to allow it to seat properly in the SteadyPix bracket.
The SteadyPix can be mounted to virtually
any size or type of telescope – refractor,
reflector, or Cassegrain-type – that utilizes
a standard 1.25"-diameter telescope eyepiece (Figure 1). The included eyepiece
clamp fits eyepieces with housing diameters up to 1.5". If your 1.25" eyepiece has
a housing diameter larger than 1.5", you
may need the Orion Large 1.25" Eyepiece
Clamp for iPhone SteadyPix (sold separately), which accommodates housings of
1.5" to 1.75" in diameter.
Opening for iPhone
camera lens
Clamp
lock
knob
Eyepiece
clamp
Clamp
lock knob
Felt
lining
Lens height
lock knob
Triangular
lock knob
Figure 3. Attach the eyepiece clamp to
the short arm of the slotted L-bracket using
the round lens height lock knob.
Eyepiece
clamp
BACK
VIEW
L-br ac ke t
Short arm
Long arm
Getting Started
Before using the SteadyPix Telescope Afocal Adapter for iPhone, please familiarize with its
features and parts, referring to Figure 2.
To capture images afocally projected by your telescope, the iPhone’s camera lens must be
carefully aligned over the center of the telescope’s eyepiece and the two properly spaced
apart. The following steps will help you achieve the necessary alignment and positioning of
the SteadyPix bracket.
1. Begin assembly by attaching the eyepiece clamp to the shorter arm of the slotted
L-bracket (Figure 3) with the round lens height lock knob.
2 3
Page 3

2. Now attach the longer arm of the
L-bracket to the back of the cradle
bracket using the triangular lock
knob (Figure 4). Leave both lock
knobs slightly loose for now to allow
adjustment.
It is easiest to first align the telescope
eyepiece with the phone’s camera lens
before installing the whole eyepiece/
SteadyPix/iPhone assembly on the
telescope.
3. Insert your iPhone into the cradle
bracket by placing the bottom of the
iPhone into the padded retaining tabs,
then pushing the top of the iPhone
under the upper, rubber-coated tab
(Figure 5). Once installed in this way,
the iPhone will not fall out, even when
facing down toward the ground.
4. Now, place the iPhone face down
(place a cloth on the table to protect
the iPhone’s screen from getting
Figure 4. The triangular lock knob fastens
the long arm of the L-bracket to the cradle
bracket.
scratched) so the eyepiece clamp is
facing up. Using a fairly low-power
(long focal length) eyepiece to start
with, like a 25mm, insert it into the
eyepiece clamp and tighten the clamp
bolt (Figure 6).
5. Rotate the eyepiece clamp so that the
eye lens of the eyepiece is facing the
iPhone’s camera lens, then lower the
clamp until the eyepiece is touching,
or nearly touching, the cradle bracket.
6. Looking through the rear of the
eyepiece barrel, move the eyepiece
until the lens of the iPhone appears
approximately centered in the lens
of the eyepiece (Figure 7). Then
lightly tighten both the lens height
thumbscrew and the triangular
L-bracket lock knob. Make sure the
eyepiece is flat relative to the cradle
bracket, not skewed (Figure 8).
iPhone
camera lens
Figure 7. Adjust the eyepiece clamp in
the L-bracket so that the iPhone’s camera
lens appears roughly centered in the
eyepiece lens, as shown in this view from
the bottom of the eyepiece.
Figure 5. Push the iPhone under the
rubber-coated upper tab to secure it in place.
Figure 6. Rotate the eyepiece clamp and
insert the eyepiece, then tighten the clamp
around the housing with the triangular
lock knob.
a.
b.
Figure 8. The eyepiece lens should be
flat relative to the cradle bracket (a), not
skewed at an angle (b).
4 5
Page 4

You can check the alignment by turning
on the camera app in your iPhone to view
through the camera lens and the attached
telescope eyepiece. You should see a
distinct, round (but possibly clipped) “field
of view” centered on the iPhone’s display
(Figure 9). If needed, you can adjust the
position of the L-bracket and eyepiece
clamp until the field of view appears centered in the display. (Any objects in the field
of view will not be in focus.)
7. Now you’re ready to install the
eyepiece and iPhone assembly into
the telescope’s focuser. Carefully
insert the eyepiece into the focuser or
star diagonal and secure it firmly with
the locking setscews(s) (Figure 10).
CAUTION! The SteadyPix and iPhone
combination adds additional weight to your
telescope and eyepiece. Make sure that the
eyepiece and any diagonal and Barlow lens
are firmly secured in place! Failure to do so
could result in a dropped iPhone!
8. With the telescope aimed at a fairly
bright object and with the camera app
turned on, use the telescope’s focuser
to bring the object into focus.
9. If you have trouble achieving focus,
you may have to adjust the spacing
between the iPhone’s camera lens
and the eyepiece lens. This is done by
adjusting the eyepiece clamp position
on the slotted L-bracket arm, using the
lens height thumbscrew. If the slot on
the L-bracket does not provide enough
travel, the height of the eyepiece
can be adjusted further by sliding it
forward or back in eyepiece clamp,
and tightening with the clamp bolt.
If the image is not centered in the eyepiece
or the image does not appear clearly, try
re-adjusting the telescope focus and the
Eyepiece
field of view in
camera app
Eyepiece
Figure 9. Position the telescope eyepiece
so that its field of view is centered on the
iPhone’s display.
a.
SteadyPix adjustment points. It’s takes a
little time initially to get everything adjusted
just right, so be patient. After a couple of
sessions, you’ll get the hang of it.
Taking Photographs with the
SteadyPix Afocal Adapter and
Your iPhone
Moon: Our closest neighbor in the solar
system is dazzling through even a very
small telescope. The SteadyPix will allow
you to take beautiful images of the whole
Moon or closeups that showcase the
craters, mountains, or maria (Figure 11).
Single snapshots work well and multiple
shots can be stacked later in a program
such as Registax to increase the signal-tonoise ratio and dynamic range of the image.
Also, you can take video and then stack a
series of individual video frames.
Bright Planets: The bright planets Venus,
Mars, Jupiter and Saturn also make excellent targets for afocal photography. Try
using a higher power eyepiece and maybe
a Barlow lens to boost the magnification – planets are tiny objects in the sky!
You’ll need a steady atmosphere, i.e., good “seeing,” to get sharp planetary images. The
iPhone’s display will allow you to show off your target object to friends and passers-by – no
waiting in line at the eyepiece!
No need to stop at Saturn, though. At least one amateur astronomer has captured the distant planet Neptune with his iPhone and an 8" Schmidt-Cassegrain telescope!
Deep-sky Objects: Most deep-sky objects are extremely difficult to photograph using afocal photography. Try working with brighter objects such as M42 (Orion Nebula) or M13
(Hercules Cluster). You will likely need a mount that tracks the motion of the sky so that
you can take “long” exposures using a 3rd-party app that offers that capability (try Slow
Shutter by Tomoki Kobayashi), and you will have to stack multiple images to get a good
final image.
Sun: If you have a proper solar filter to cover the front of your telescope, you can get terrific images of sunspots on the surface of our nearest star in the daytime with your iPhone.
Sunspots are constantly changing, so shooting them is always interesting and a lot of fun.
Nature/Terrestrial: The SteadyPix can be used to take through-the-telescope photos and
videos of distant subjects in daylight.
Figure 11. An iPhone afocal close-up
image of the lunar surface captured with an
Orion StarMax 90mm Maksutov-Cassegrain
at 62x magnification.
b.
Figure 10. Inserting the eyepiece with
iPhone attached into the star diagonal.
Before doing this be sure that the diagonal
is tightly secured in the telescope!
6 7
Page 5

Mouting the SteadyPix on a
Photo Tripod
The SteadyPix also allows you to mount
your iPhone directly on a standard photo
tripod as shown in Figure 12, for taking
scenic panoramas and for holding the
camera while taking self-portraits or group
photos (when you’re part of the group).
The SteadyPix bracket can be mounted in
either portrait or landscape orientation. The
only requirement is that the tripod have a
1/4"-20 threaded post.
1. To attach the SteadyPix to the tripod,
first remove the eyepiece clamp from
the L-bracket by completely removing
the clamp height thumbscrew. Put the
thumbscrew in a safe place as it will
not be needed for tripod mounting of
the SteadyPix.
2. Adjust the L-bracket for the orientation you want (portrait or landscape). Make sure
the bottom of the L-bracket clears the lower edge of the cradle bracket. Then tighten
the traingular lock knob.
3. Assuming that the tripod has a removeable mounting shoe, remove it from the tripod.
Place the 1/4"-20 threaded bolt on the shoe through the slot in the short arm of the
L-bracket, then place the empty eyepiece clamp onto the threaded bolt.
4. Now thread the 1/4"-20 bolt into the eyepiece clamp by turning the bolt itself until
tight. The SteadyPix and iPhone assembly should look like Figure 12 (shown in
landscape orientation).
Figure 12. The SteadyPix can mount
directly on a photo tripod for steady widefield shots and self-portraits.
Camera Apps
The camera app that comes pre-installed on the iPhone is adequate, but not terribly versatile. There are other, 3rd party camera apps available in the App Store that offer additional
features and settings that you may find useful, such as shutter delay (or self-timer), burst
mode, and the ability to take “long exposures” (really probably just multiple exposures digitally stacked).
Exposure delay is nice to have. With the native camera app, when you tap the camera icon
on the screen to take the picture, the exposure commences immediately. The vibration
from the tap is enough to cause blurring of the image in many instances. Having a delay of
8 9
a few seconds between the screen tap and the onset of exposure eliminates the problem
by allowing any vibration to dissipate prior to image capture.
Two camera apps that offer exposure delay are Camera Plus (by Global Delight
Technologies) and Slow Shutter (by Tomoki Kobayashi). For more 3rd party camera apps,
type “camera apps” in the search field on the iTunes App Store.
Have fun!
Page 6

iPhone, iPod, and iPod touch are trademarks of Apple Inc., registered in the U.S. and other
countries. App Store is a service mark of Apple Inc.
One-Year Limited Warranty
This Orion SteadyPix Telescope Afocal Adapter for iPhone is warranted against
defects in materials or workmanship for a period of one year from the date of purchase. This warranty is for the benefit of the original retail purchaser only. During
this warranty period Orion Telescopes & Binoculars will repair or replace, at Orion’s
option, any warranted instrument that proves to be defective, provided it is returned
postage paid to: Orion Warranty Repair, 89 Hangar Way, Watsonville, CA 95076.
If the product is not registered, proof of purchase (such as a copy of the original
invoice) is required.
This warranty does not apply if, in Orion’s judgment, the instrument has been
abused, mishandled, or modified, nor does it apply to normal wear and tear. This
warranty gives you specific legal rights, and you may also have other rights, which
vary from state to state. For further warranty service information, contact: Customer
Service Department, Orion Telescopes & Binoculars, 89 Hangar Way, Watsonville,
CA 95076; (800) 676-1343.
10
 Loading...