

Page 1
INSTRUCTION MANUAL
™
Orion® SteadyPix
Universal Camera Mount
#5228
Providing Exceptional Consumer Optical Products Since 1975
Customer Support (800) 676-1343
E-mail: support@telescope.com
Corporate Offices (831) 763-7000
89 Hangar Way, Watsonville, CA 95076
IN 167 Rev. B 03/09
Page 2
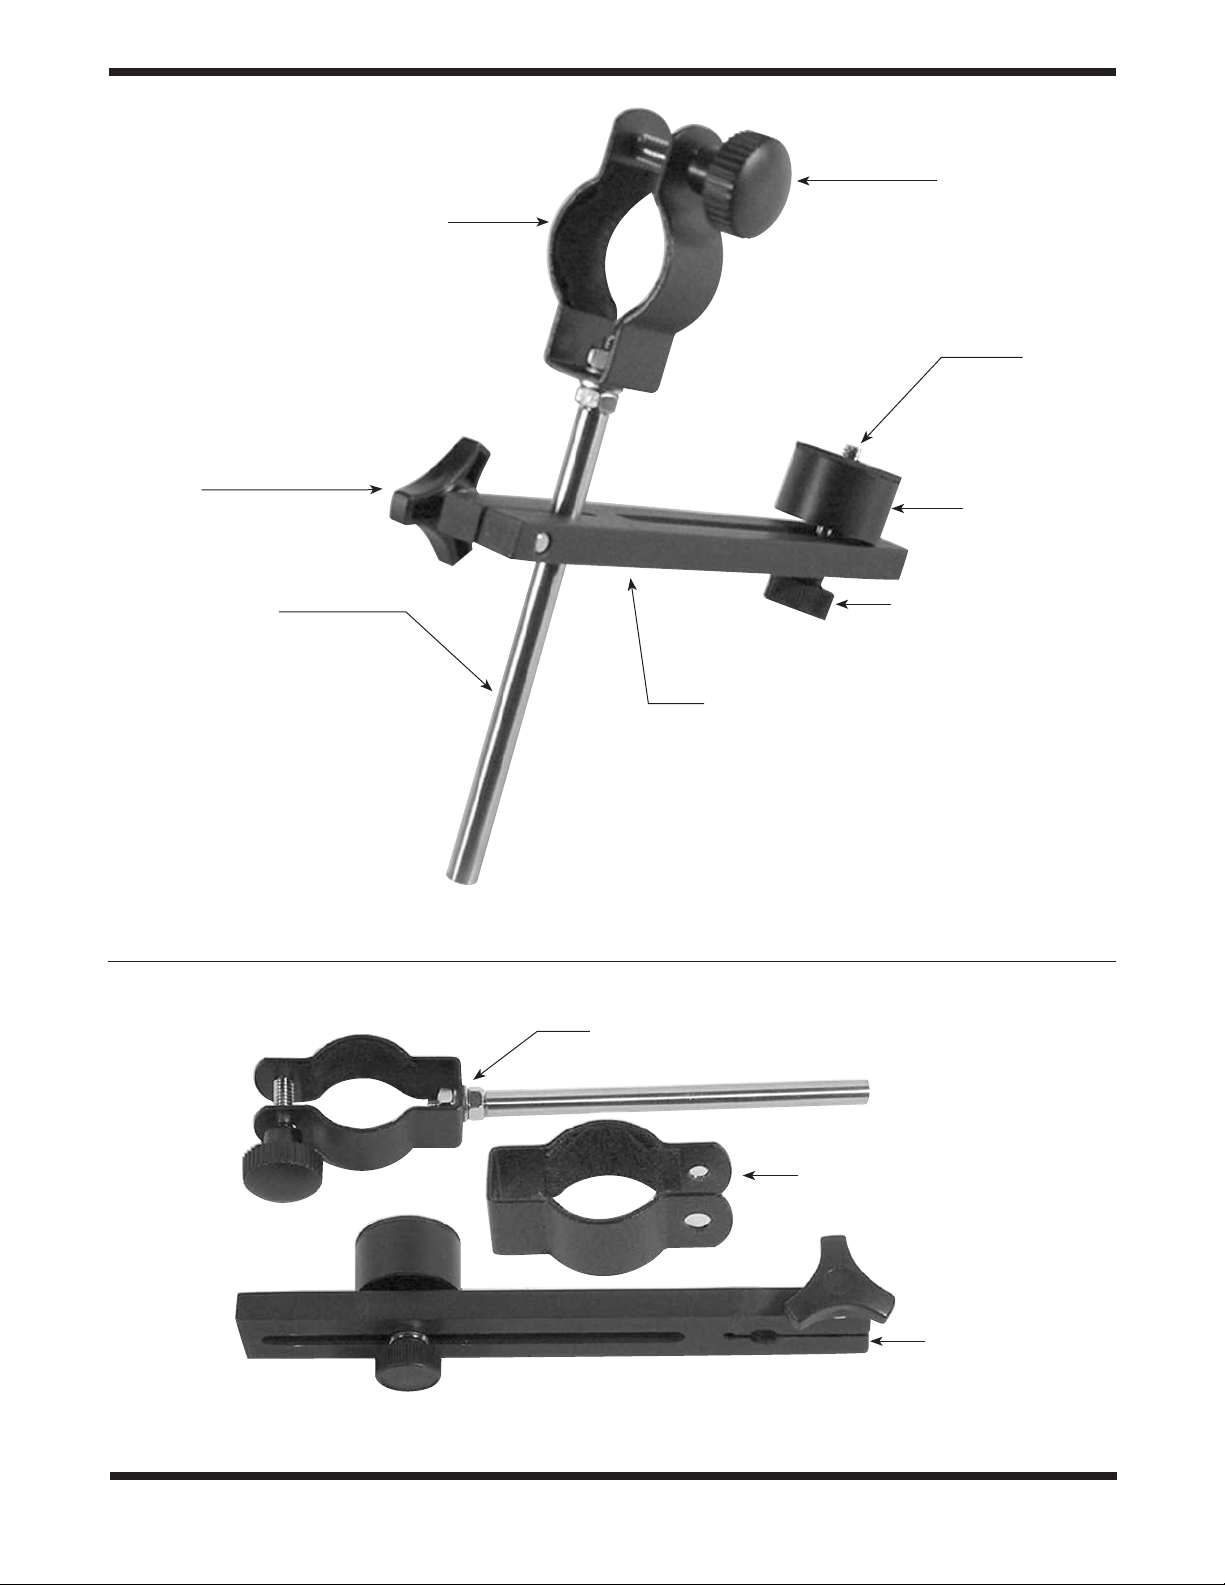
Shaft
securing knob
Eyepiece clamp
Eyepiece
clamp knob
1/4"-20
Camera fastener
Camera spacer
Shaft
Camera fastener knob
Camera support plate
Figure 1. Fully assembled SteadyPix
Eyepiece clamp with shaft
Large eyepiece clamp
Camera
support
plate
Figure 2. Parts of the SteadyPix as they arrive in the box.
2
Page 3

Welcome to the exciting world of astrophotography. With the Orion SteadyPix universal camera mount,
you can shoot your own pictures of celestial objects with just a telescope and camera. The SteadyPix is
designed for use with today’s digital cameras, as well as traditional 35mm SLR (single-lens reflex) cameras.
By using the SteadyPix, you won’t need all the difficult set-up and extra equipment that astrophotography
normally requires.
Table of Contents
1. Assembly .............................................................................................................................. 3
2. About Afocal Photography .................................................................................................... 3
3. Using the SteadyPix ............................................................................................................. 3
4. Changing the Eyepiece Clamp ............................................................................................... 5
5. What to Photograph ................................................................................................................ 6
6. Warranty ................................................................................................................................. 8
Parts List
1 Camera support plate, with camera spacer,
1/4"-20 camera fastener, and shaft securing knob.
1 Shaft with eyepiece clamp and eyepiece
clamp knob.
1 Large eyepiece clamp.
Figure 2 shows the parts of your SteadyPix as they come
straight from the box.
1. Assembly
Loosen the shaft securing knob (see Figure 1) on the camera
support plate and insert the eyepiece clamp shaft into the
hole. Make sure the eyepiece clamp and camera spacer are
on the same side of the camera support plate, as shown in
Figure 1. Tighten the knob just enough to hold the shaft in
place for now. You will need to make further adjustments later
once yo ur camera and eyepiece are attached to the
SteadyPix.
Your SteadyPix camera mount should now appear as it does
in Figure 1.
2. About Afocal Photography
The SteadyPix lets you couple almost any camera to almost any
telescope to do afocal photography. In the afocal method, the
camera lens is aimed into the telescope eyepiece. SteadyPix is
not designed for prime-focus photography, in which the telescope
takes the place of the camera’s own lens (which is removed).
While it is possible to take pictures by holding the camera up
to the eyepiece by hand, small movements of the camera
make it difficult to maintain perfect focus and to keep the
image centered on the camera’s film frame. SteadyPix eliminates those problems by locking the camera lens in position
relative to the eyepiece. Such coupling also allows the camera
to move in synchrony with the eyepiece if the telescope is
motor driven.
To get the best pictures with the SteadyPix, we recommend using
an eyepiece with a long (around 20mm) eye relief. The Orion
Lanthanum series, for example, has very long eye relief. Long
eye relief will allow the camera to see the whole field of view in
the eyepiece. Some eyepieces, especially high-power designs,
may not have enough eye relief to project the entire field of view
into the camera lens, that is, even when the camera lens is right
up against the eyepiece, the views will still be constricted.
3. Using the SteadyPix
A cautionary note: The SteadyPix was designed to be as
light as possible. But since it attaches to your telescope by
the eyepiece, the weight of your camera may cause it to
rotate downward and potentially fall off the telescope if it is
not secured adequately. Always make certain the eyepiece (and diagonal, if appropriate) is secured in the
focuser with the appropriate thumbscrews.
Consider turning the whole camera and SteadyPix assembly so that it faces down (Figure 3). This will reduce the
chance of the SteadyPix assembly rotating downward due
to its weight.
3
Page 4

Figure 3. By orienting the camera and SteadyPix
assembly as shown you will bring the center of
mass of the assembly as low as it can get. This
will prevent the SteadyPix and camera from
rotating downward.
6. Loosen the 1/4"-20 camera fastener knob, then slide the
camera along the camera support plate towards the eyepiece. Loosen the shaft knob just a bit and adjust the
camera support plate so that the eyepiece will line up with
the camera lens. Do this by rotating the camera support
plate around the eyepiece clamp shaft. Raise or lower the
plate as well to match the level of the camera lens with the
level of the eyepiece. The camera lens and eyepiece will
likely need to get quite close to each other to work properly,
but make sure they do not touch or else damage to the
eyepiece or camera lens may occur. Figure 6 shows several cameras in position next to the eyepiece, on the
telescope, and ready to shoot.
7. Look at the camera’s viewscreen or viewfinder to see if the
object is there. If not, some more adjustments may need to
be made. Try bringing the camera lens closer to the eyepiece, or adjust the camera support plate by loosening the
shaft knob and moving it left or right and up or down. Note
that unless your eyepiece has long eye relief, the viewscreen or viewfinder may have a constricted view of the
object you wish to photograph. Keep making minor adjustments until the image from the eyepiece takes up as much
space in the viewscreen or viewfinder as it possibly can.
Be sure to tighten the 1/4"-20 camera fastener knob and
shaft knob when you are ready.
To set up and use the SteadyPix:
1. If you examine the bottom of your digital or SLR camera,
you will notice a threaded adapter that will accept the
SteadyPix’s 1/4"-20 camera fastener. Attach the camera to
the SteadyPix by inserting the camera fastener into this
adapter. Certain inexpensive cameras may not have this
threaded socket and cannot be used with the SteadyPix.
Figure 4 shows a camera about to be attached to the suppor t plate. Figure 5 shows several different cameras
attached to the SteadyPix. If the SteadyPix’s 1/4"-20 camera fastener does not thread all the way into your camera's
threaded adapter, use one or two washers to take up the
extra space between the camera space and your camera.
Now set the SteadyPix and camera assembly aside while
you aim your telescope.
2. Locate the object you wish to photograph in your telescope. Before attaching the SteadyPix, focus the image in
the telescope’s eyepiece using the telescope’s focuser.
3. Remove the eyepiece from the telescope.
4. Loosen the eyepiece clamp knob until the clamp is wide
enough to fit around the barrel of the eyepiece. Then place
the clamp over the eyepiece and tighten the eyepiece
clamp knob until the SteadyPix is secure on the telescope.
For some eyepiece designs, the barrel may be too large for
you to fit the regular eyepiece clamp over the eyepiece. If
this is the case then you should try using the larger clamp
that came with your SteadyPix. (See Part 4. Changing the
eyepiece clamp.)
5. Place the eyepiece back into the telescope with the
SteadyPix and camera assembly attached.
8. Focus the camera, and shoot the picture.
Some telescopes mounts, such as Dobsonian mounts, may
move very easily if any pressure is put against the eyepiece.
The act of placing the SteadyPix over the eyepiece and readying it for shooting may cause the telescope to move off of its
target. You may find it easier to attach the eyepiece and camera to the SteadyPix in advance, then find the object you wish
to photograph with a separate eyepiece with similar characteristics. Then replace that eyepiece with the SteadyPix, camera,
and eyepiece assembly you have prepared in advance.
Figure 4. A camera about to be attached to the
SteadyPix. The SteadyPix’s 1/4"-20 camera fastener
will thread easily into the camera’s adapter.
4
Page 5

a. b. c.
Figure 5. Several different cameras attached to SteadyPix. Figure 5a shows a digital camera with its
adapter in line with the camera's lens. 5b shows a digital camera that has its adapter off to one side
of the camera lens. 5c shows a 35mm film camera attached to the SteadyPix.
You may find it handy to use a camera shutter release to take
the picture, as this will result in minimal disturbances to the
camera or telescope when snapping the photo. The movement of pressing the shutter button may be enough motion to
lose the picture.
4. Changing the eyepiece
clamp
Some eyepieces may have barrels that are too large for the
regular eyepiece clamp to go around. For these eyepieces you
should remove the regular eyepiece clamp and replace it with
the large eyepiece clamp. You will need a crescent wrench to
change clamps.
1. Remove the shaft from the camera support plate by loosening the shaft knob and sliding the shaft out of the camera
support plate.
2. Hold the shaft securely in one hand and use the crescent
wrench to turn the lower nut (the nut underneath the eyepiece clamp) clockwise until it is loose. Thread the nut
clockwise a couple more turns.
3. Hold the upper nut securely between your finger and thumb
so that it does not move. With your other hand, rotate the
shaft clockwise until the upper nut comes loose from the
threads of the shaft. Put the nut aside for the moment.
4. Remove the upper washer and the clamp from the shaft,
leaving the lower nut and washer in place.
5. Put the shaft through the bottom of the large eyepiece
clamp with the SteadyPix. Then place the upper washer on
the shaft and thread the upper nut clockwise with your fingers onto the threaded portion of the shaft. If there is not
enough exposed thread to hold the upper nut, remove the
washer and clamp and turn the lower nut clockwise until it
is about an 1/4" further down the threaded part of the shaft.
Then replace the clamp and washer and start threading
the upper nut onto the shaft again. Thread the upper nut as
far as you can with your fingers (it will still be loose). You
may also find it helps to hold the nut with your finger and
thumb and turn the shaft counterclockwise to thread the
upper nut.
6. Hold the shaft securely with one hand while turning the
lower nut counter-clockwise with the crescent wrench until
it is secure against the washer and eyepiece clamp.
7. Remove the eyepiece securing knob from the regular eyepiece clamp by turning it counter-clockwise until it is
unthreaded from the top of the eyepiece clamp.
a. b. c.
Figure 6. The same cameras in Figure 5, but with the SteadyPix attached to a telescope and ready to
shoot. Note how the camera support plate must be adjusted for different camera designs.
5
Page 6

8. Push the threaded bolt of the eyepiece securing knob
through the larger of the two holes on the top of the eyepiece clamp. Make sure it lines up with the smaller hole on
the other side of the clamp. Thread the bolt into the smaller
hole by turning it clockwise. Do not thread it more than a
few turns.
9. You are now ready to use the new clamp to secure eyepieces. Replace the shaft in the camera support plate as
described in the assembly section (Part 1).
5. What to photograph with
the SteadyPix
Now that you have assembled the SteadyPix, the only question remaining is “What do I want to photograph?” We have a
few suggestions for you:
Terrestrial Photography
With literally millions of objects to photograph on earth, there
are only a few hints we can give for using the SteadyPix for
terrestrial photography. One is to consider using a telescope
with an Alt/Az (short for altitude/azimuth) mount on a sturdy
tripod. An Alt/Az mount will allow simple up/down, left/right
motions of the telescope so that you can easily adjust and aim
the camera. Equatorial mounts (mounts designed to track the
movement of stars in the sky) are not recommended, as they
will be needlessly heavy due to the counterweight, and their
ability to track celestial objects is of no use when photographing an object like a bird’s nest. In fact it will likely get in the way.
Dobsonian mounts will also have trouble with terrestrial photography since aiming a Dobsonian mounted telescope at
something close to the horizon (where most terrestrial photography takes place) will mean it has to be very low to the ground
and hard to use.
Remember that objects viewed through certain types of telescopes can be oriented backwards, upside-down, or both.
The Moon
The Moon is one of the easiest and most interesting targets to
photograph. With its rocky, cratered surface there is a wealth
of detail to be photographed with your camera and SteadyPix.
The Moon is a very large target, so at higher magnifications
you will only get a part of the surface in each picture. Use eye-
pieces that provide low powers (50x and below should work
with most telescopes) if you wish to have the entire surface of
the Moon in your field of view.
Try to avoid photographing the full moon since sunlight falling
directly on lunar surface will mean there are very few shadows, so details will be harder to see. Instead, photograph the
Moon when it is in one of its partial phases, when the angle of
the sun provides many detailed shadows on its surface. You
might also want to use an optional Moon filter that threads
onto the bottom of the eyepiece to bring out more subtle features on the lunar surface.
The Bright Planets
Next to the Sun and the Moon, the planets Mars, Venus,
Jupiter and Saturn are the brightest objects in the sky and
make excellent targets for photography. Keep in mind that the
planets don’t stay still like the stars, so to find them you should
refer to Sky Calendar at our website (telescope.com), or to
charts published monthly in Astronomy, Sky & Telescope, or
other astronomy magazines.
To get the right amount of detail on the planets, eyepieces that
give high powers (at least 75x or more) should be used when
using the SteadyPix. Low powers will make it easier to find the
planets, but they will not bring out any significant details on
the planets to make them worth photographing. High powers
must be used to get images of the famous details of the planets, such as the rings of Saturn or bands on Jupiter’s surface.
You might also consider using colored planetary filters that
thread onto the bottom of the eyepiece (just like the Moon filter
does). These colored filters bring out the subtle detail of the
planets by filtering out various colors that reduce detail. Orion
has several sets of colored filters available. Visit our website,
telescope.com, for more information on colored planetary filters
Deep-Sky Objects
Since deep-sky objects are very faint, use only digital cameras to photograph them when using the SteadyPix. Film
cameras require too much exposure time to get good results.
A few bright deep-sky objects can be photographed effectively
using your SteadyPix (such as the Orion Nebula). Other
deep-sky objects may also be photographed for interesting
pictures. Try experimenting with different deep-sky objects to
see what kind of results you can obtain.
6
Page 7

One-Year Limited Warranty
This Orion SteadyPix Universal Camera Mount is warranted against defects in materials or workmanship
for a period of one year from the date of purchase. This warranty is for the benefit of the original retail
purchaser only. During this warranty period Orion Telescopes & Binoculars will repair or replace, at Orion’s
option, any warranted instrument that proves to be defective, provided it is returned postage paid to:
Orion Warranty Repair, 89 Hangar Way, Watsonville, CA 95076. If the product is not registered, proof of
purchase (such as a copy of the original invoice) is required.
This warranty does not apply if, in Orion’s judgment, the instrument has been abused, mishandled, or
modified, nor does it apply to normal wear and tear. This warranty gives you specific legal rights, and you
may also have other rights, which vary from state to state. For further warranty service information, contact: Customer Service Department, Orion Telescopes & Binoculars, 89 Hangar Way, Watsonville, CA
95076; (800) 676-1343.
Orion Telescopes & Binoculars
89 Hangar Way, Watsonville, CA 95076
Customer Support Help Line (800) 676-1343 • Day or Evening
7
 Loading...