

Orion IQ404, ORI30181 Advantage IQ404, ORI30182 Advantage IQ404, ORI30184 Advantage IQ404, ORI30183 Advantage IQ404 Instruction Manual
Page 1
ORI30181 Advantage IQ404 Charger (220V - CH)
ORI30182 Advantage IQ404 Charger (220V - EU)
ORI30183 Advantage IQ404 Charger (110V - USA)
ORI30184 Advantage IQ404 Charger (220V - UK)
Page 2

Team Orion Advantage IQ404
2
Thank you for choosing Team Orion’s Advantage IQ404 charger. This charger
features the latest developments in battery charging technology. Its design
is based on Team Orion’s world championship winning battery technology.
The charger can work with 12VDC and mains power when using the supplied
power adapter.
Features
• Charges 2 – 4S LiPo batteries
• Integrated balancer
• Up to 5A charge current
• Charge status LED display
• 110/240VAC or 12VDC power supply
How to use
Connect only 2 - 4 cell LiPo batteries!
1. Power from mains power: connect the mains power adapter to the charger
and then connect the mains power adapter to a mains power outlet.
2. Power from 12 VDC power source: use the supplied adapter to connect the
charger to a 12 VDC power source (power supply or car battery).
3. Once the charger is powered on, the 4 control LED on the charger lit green,
the charger is in standby mode.
4. Before connecting the battery to the charger, adjust the proper charge rate
for your battery using the adjustment dial. Usually one time the capacity
(ex. 2000mAh battery = 2A charge current). Once you connect the battery
to the charger, you cannot modify the charge current anymore! To modify
the charge current, disconnect the battery!
Page 3
www.teamorion.com
3
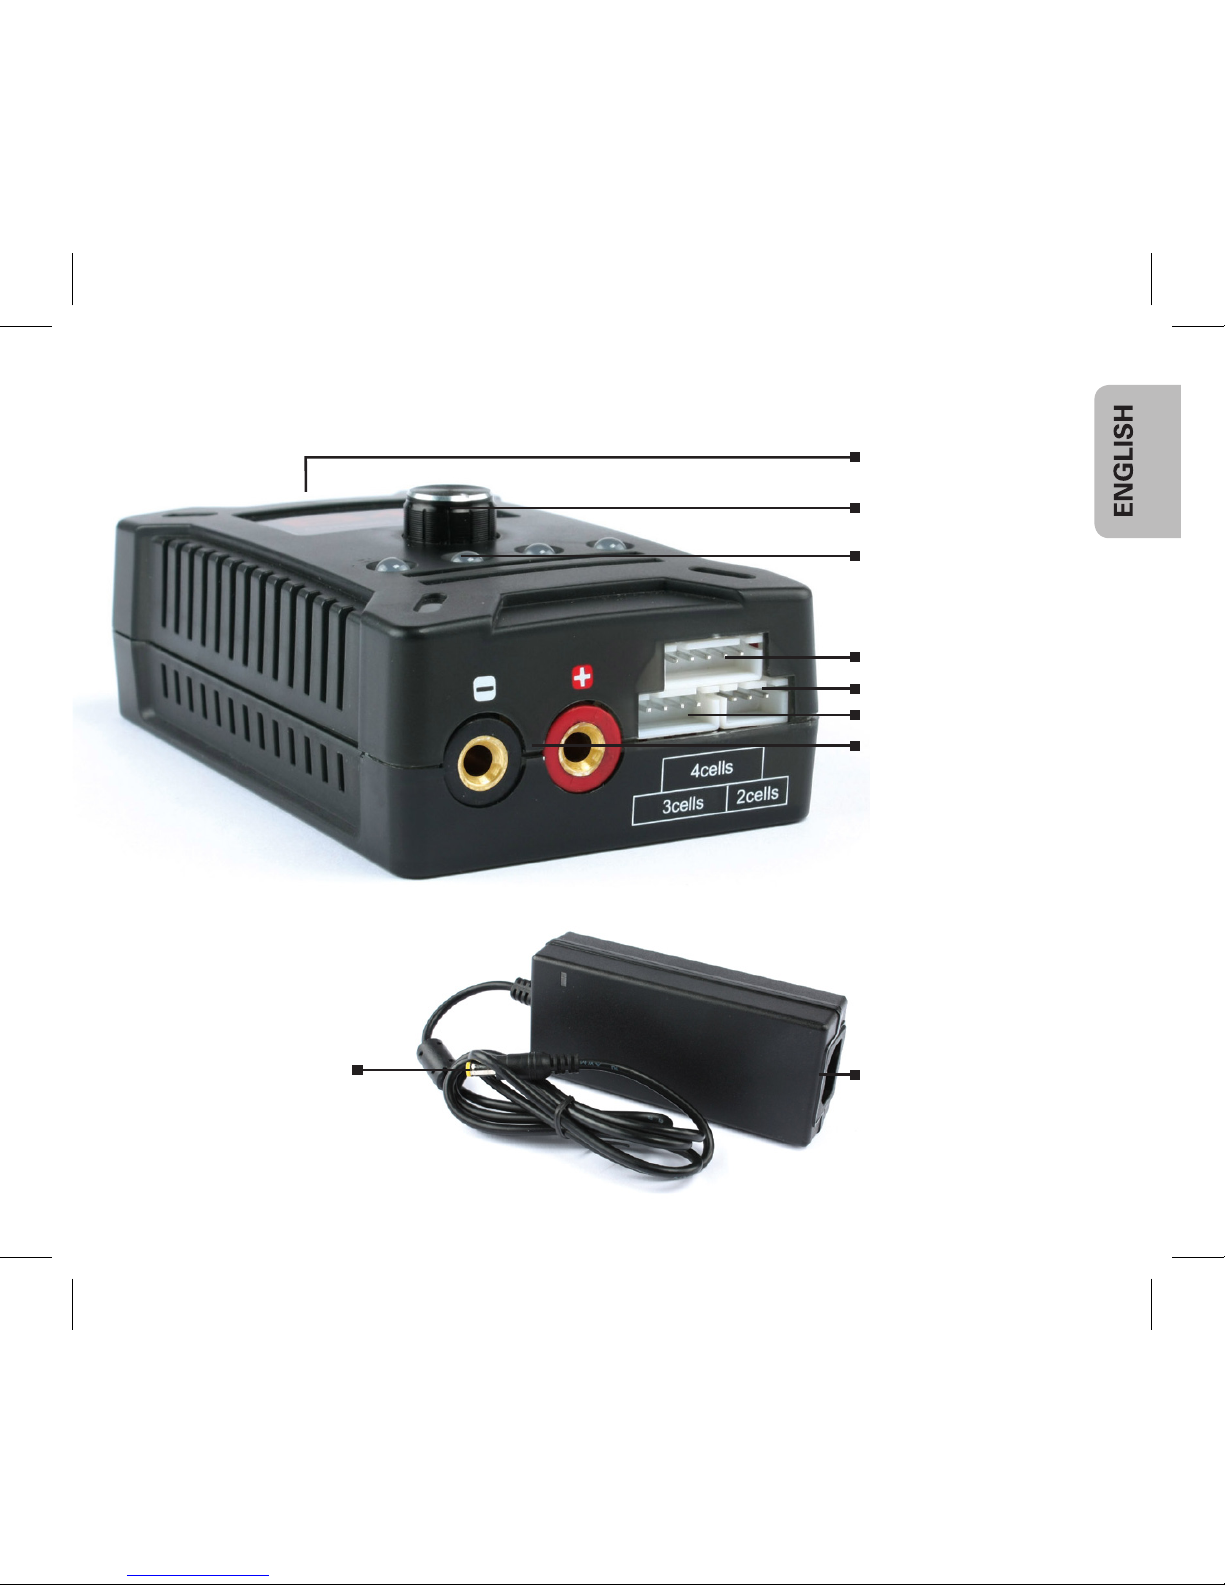
Charger
Power Input
Adjustment Dial
Control LED
4S Balance Port
2S Balance Port
3S Balance Port
Charge Output
Power Input:
Connect to mains
power adapter
Power Output:
Connect to Charger
Power Adapter
Page 4

Team Orion Advantage IQ404
4
5. Connect the battery to the charger using its power connector and its balancing connector (JST-XH type). The control LED lit red according to the
number of cells. If the LED is flashing red it indicates a problem with the
wiring or the battery. Check the connections or discontinue use of this battery immediately if it is defective.
6. When the battery is fully charged, all the control LED will lit green.
Depending on the charge state of the battery and its capacity, it can take a
long time before all the LED become green.
Troubleshooting
• If the charge does not start, make sure all connectors are plugged in, that
the polarities are correct and that the battery is functional.
• If the LED flash red, check that the connections are correct and that the battery is functional.
• If some LED lit green at the end of the charge and others remain red, it
means that the charger is balancing the battery.
Warnings
• This charger is designed to charge only 2 to 4 cell LiPo batteries.
• Make sure that the charger’s charge rate is compatible with the battery.
• You cannot adjust the charge current when the battery is connected to the
charger.
• Never leave the charger unsupervised while it is powered on.
• Never let children operate the charger without supervision from an adult.
• The charger is for indoor use only. Do not use in case of high humidity or
condensation.
• Do not attempt to open or modify the charger’s case.
Page 5

www.teamorion.com
5
• Do not let objects or liquids penetrate the charger’s cooling vents.
• The charger can get hot during use; use the charger in a well ventilated
area, away from people and electrically conductive or inflammable materials.
• If the battery has suspicious reactions during the charge or discharge, such
as overheating, venting or leaking, immediately disconnect the battery and
store it in a safe location, away from people and inflammable materials.
Warranty
Team Orion guarantees this product to be free from manufacturing and
workmanship defects. The warranty does not cover incorrect installation,
components worn by use, or any other problem resulting from incorrect
use or handling of the product. No liability will be accepted for any damage
resulting from the use of this product. By the act of connecting and operating
this product, the user accepts all resulting liability.
Is considered incorrect use:
• Failure to follow instructions.
• Improper use of the product (abusive use, out of spec, etc.).
• Failure to adapt settings for proper function (improper connections, wrong
gearing, installation, setup, etc.).
• Overload, overheating (desoldering, melting, etc.).
• Using in inadequate conditions (damage or rust from rain, humidity, etc.).
• Improper maintenance (presence of dirt, etc.).
• Disassembly, modification by the user (modifying original connectors,
wires, components, etc.).
• Mechanical damage due to external causes.
Page 6

Team Orion Advantage IQ404
6
Specifications
Charger:
• Charging Mode: fast charge CC/CV, with balancing
• Charging Capability: LiPo 2 to 4 cells (3.70V/cell)
• Charge current: 0.4A to 5A (40W max)
• 4mm gold connectors
• JST-XH balance connectors
• 4 LED charge status display
• Input Voltage: 11-18VDC or 110/240VAC w/adapter
• Dimensions: 65x40x100mm
• Weight: 95g
Mains power adapter:
• Input: 110 - 240VAC 1.5A 50-60Hz
• Output: 12 VDC 5A
• Dimensions: 53x31x120mm
• Weight: 203 g
Package contents
• Advantage IQ404 charger
• Mains power adapter
• Deans and Tamiya charge leads
• Power cord
• Instructions manual
Page 7

www.teamorion.com
7
Page 8

Team Orion Advantage IQ404
8
Vielen Dank, dass Sie sich für das Team Orion Advantage IQ404 Ladegerät
entschieden haben. Dieses Gerät ist mit der neusten Ladetechnologie ausgestattet. Das Design basiert auf der Erfahrung von Team Orion aus zahlreichen Welt- und Europameistertiteln im Elektro-Bereich. Das Gerät kann an
einer 12VDC oder einem 110/240 Netzanschluss betrieben warden.
Eigenschaften
• Lädt 2-4S LiPo Akkus
• Integrierter Balancer
• Bis zu 5A Ladestrom
• Ladestatusanzeige mit LED
• 110/240VAC oder 12VDC Anschluss
Anwendung
Nur 2-4S LiPo-Akkus anschliessen!
1. Betrieb an einer Netzsteckdose: verbinden Sie das Netzgerät mit dem
Ladegerät und verbinden Sie es anschliessend mit einer Netzsteckdose.
2. Betrieb an einer 12VDC Stromquelle: verwenden Sie den beigelegten
Adapter, um das Gerät an eine 12VDC Stromquelle anzuschliessen (Autobatterie oder stabilisiertes Netzgerät).
3. Wenn das Gerät an einer Stromquelle angeschlossen ist, leuchten die
4 Kontroll-LED’s grün. Das Ladegerät befindet sich nun im Standby-Modus.
4. Stellen Sie mit dem Drehknopf den korrekten Ladestrom für Ihren Akku
ein. Wir empfehlen einen Ladestrom von 1C, z.B. für einen 2000mAh Akku
einen Ladestrom von 2A.
5. Verbinden Sie den Akku mit dem Ladegerät. Verwenden Sie hierzu die
Page 9
www.teamorion.com
9
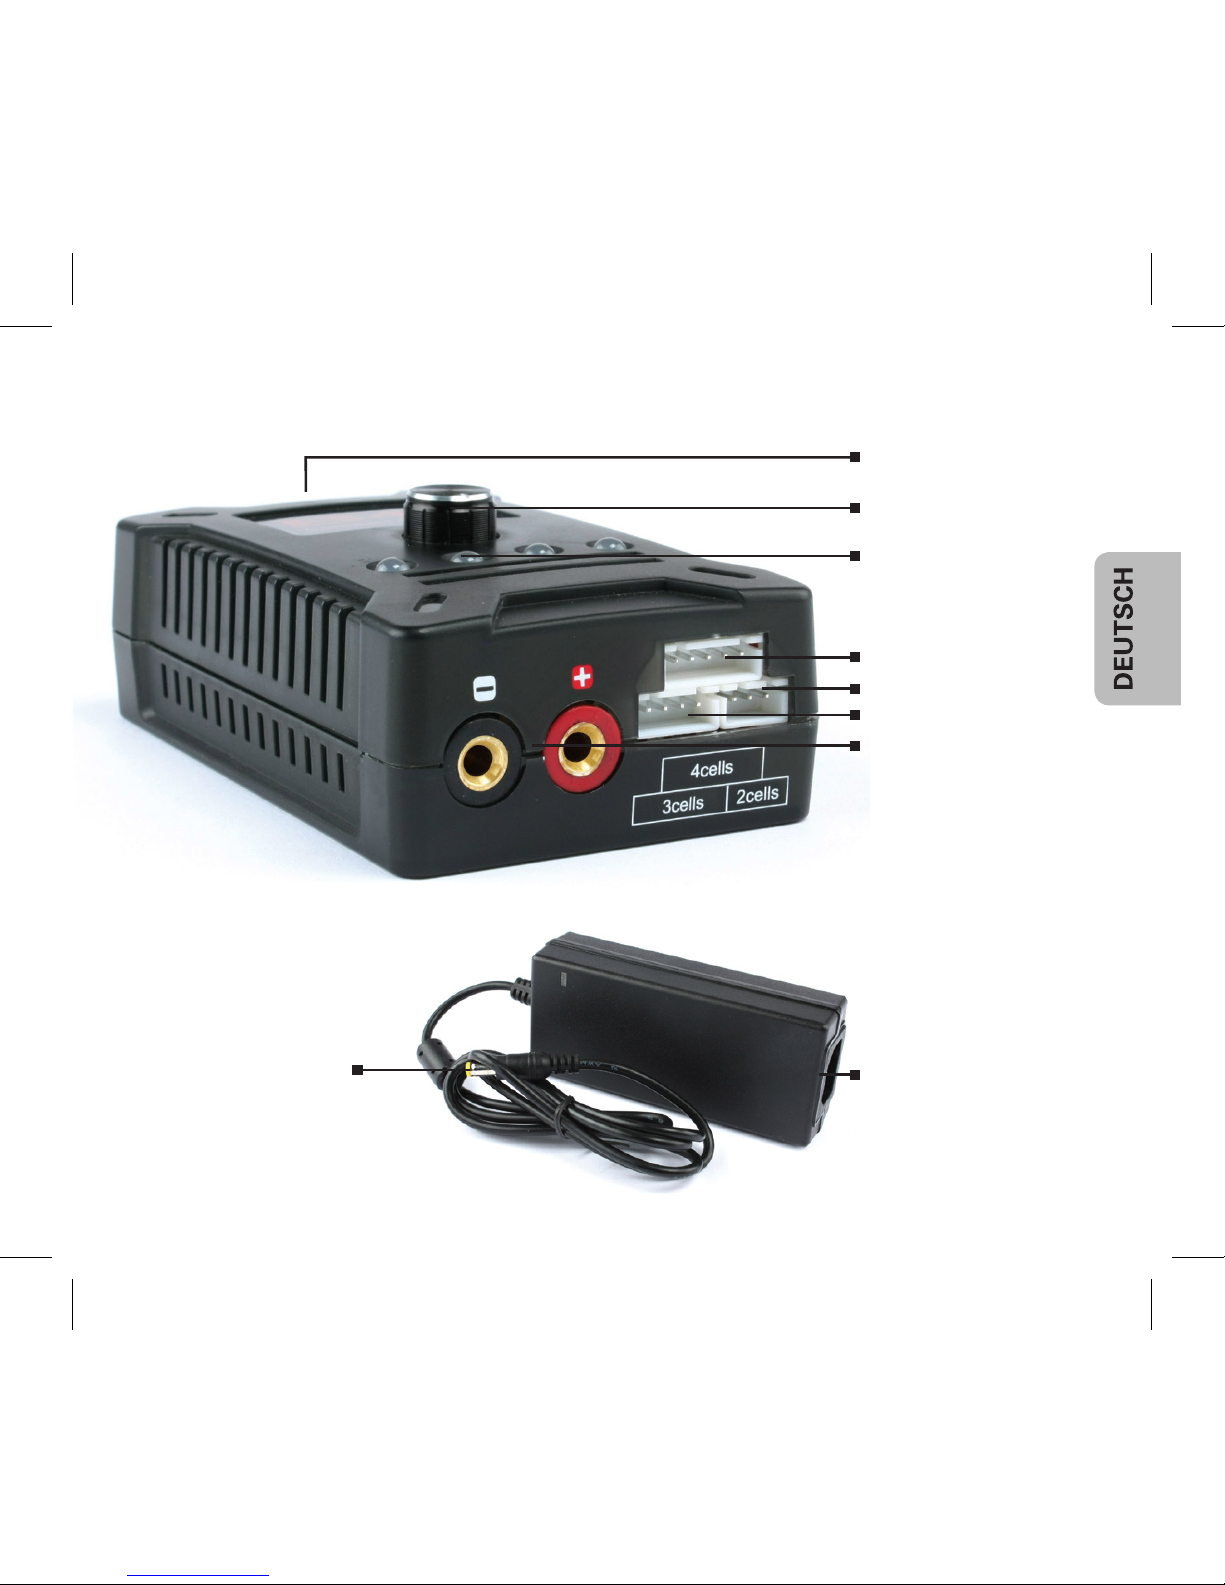
Ladegerät
Power Eingang
Strom einstellen
Kontroll LED’s
4S Balance Port
2S Balance Port
3S Balance Port
Lade-Ausgang
Eingang:
mit Netzsteckdose
verbinden
Ausgang:
mit Ladegerät
verbinden
Netzgerät
Page 10

Team Orion Advantage IQ404
10
dicken Kabel furs Laden und die dünnen Anschlüsse für den Balancer
(JST-XH). Die Kontroll-LED’s leuchten entsprechend der Anzahl Zellen der
Akkus. Wenn die LED’s rot blinken, liegt ein Problem mit dem Anschluss
vor. Prüfen Sie in diesem Fall den Anschluss oder verwenden Sie den Akku
nicht mehr, wenn er defekt ist.
6. Wenn der Akku voll geladen ist, leuchten alle LED’s grün. Je nach Ladestatus und Kapazität kann es lange dauern, bis die LED’s grün leuchten.
Fehlerbehebung
• Wenn die Ladung nicht startet, prüfen Sie alle Anschlüsse, dass die Polaritäten korrekt sind und der Akku funktionsfähig.
• Wenn die LED’s rot blinken, prüfen Sie die Anschlüsse und dass der Akku
funktionsfähig ist.
• Wenn eine LED am Ende der Ladung grün leuchtet und andere rot bleiben,
führt der Lader einen Balancer-Vorgang durch.
Warnings
• Dieses Gerät ist nur für 2-4 Zellen LiPo Akkus geeignet.
• Stellen Sie sicher, dass der Ladestrom für Ihren Akku geeignet ist.
• Lassen Sie den Lader nie unbeaufsichtigt, währenddem er an einer
Stromquelle angeschlossen ist
• Kinder müssen beim Gebrauch des Laders von Erwachsenen beaufsichtigt warden
• Das Gerät ist nur für den Indoor-Einsatz vorgesehen. Verwenden Sie es nie
bei hoher Luftfeuchtigkeit bei Kondensation.
• Öffnen und verändern Sie nicht das Gehäuse des Geräts
• Stellen Sie sicher, dass keine Objekte oder Flüssigkeiten den Lüfter des
Page 11

www.teamorion.com
11
Geräts behindern.
• Das Gerät kann während des Gebrauchs warm werden. Verwenden Sie es
nur in einem gut belüfteten Raum, fern von Menschen und elektrisch leitbaren oder entflammbaren Materialien.
• Wenn der Lader auffällige Reaktionen zeigt, so wie Überhitzen oder starkes
Ventilieren, entfernen Sie den Akku sofort vom Gerät und lagern Sie ihn an
einem sicheren Ort, fern von Menschen und elektrisch leitbaren oder entflammbaren Materialien.
Garantie
Team Orion garantiert, dass dieses Produkt frei ist von Herstellungsund Bearbeitungsfehlern. Die Garantie deckt nicht inkorrekte Installation,
Gebrauchsabnützung oder jegliche andere Probleme, die durch inkorrekte
Anwendung des Produkts entstanden sind. Jegliche Haftung für Schäden,
die durch den Gebrauch dieses Produkts entstehen, wird abgelehnt. Mit dem
Gebrauch dieses Produkts übernimmt der Anwender jegliche Haftung. Nicht
korrekte Anwendung ist:
Nicht befolgen der Anleitung.
• Nicht korrekter Gebrauch des Produkts (Missbrauch, Überlastung etc)
• Falsche Einstellungen für korrekte Funktion (falscher Anschluss, falsche
Übersetzung, Installation etc.)
• Überlastung, Überhitzung (schmelzen, ablöten etc)
• Anwendung bei nicht adäquaten Bedingungen (Beschädigung oder Rost
durch Schmutz, Feuchtigkeit etc.)
• Falsche Pflege (Anwesenheit von Schmutz etc.)
• Demontage/Modifikation des Produkts durch den Anwender (Ändern der
Page 12

Team Orion Advantage IQ404
12
Originalstecker, Kabel, Komponenten etc.)
• Mechanische Beschädigung von aussen
Technische Daten
Ladegerät:
• Lademodus: Schnellladung CC/CV, mit balancen
• Ladefähigkeit: LiPo 2 bis 4 Zellen (3.7V/ Zellen)
• Ladestrom: 0.4A bis 5A (max. 40W)
• 4mm Gold Stecker
• JST-XH Balancer-Anschluss
• Ladestatus-Anzeige über 4 LED’s
• Eingangsspannung: 11-18VDC oder 110/240VAC mit Adapter
• Abmessungen: 65x40x100mm
• Gewicht: 95g
Netzteil:
• Eingang: 110 - 240VAC 1.5A 50-60Hz
• Ausgang: 12 VDC 5A
• Abmessungen: 53x31x120mm
• Gewicht: 203 g
Lieferumfang
• Advantage IQ404 Ladegerät
• Netzteil
• Deans und Tamiya Ladekabel
• Netzkabel
• Bedienungsanleitung
Page 13

www.teamorion.com
13
Page 14

Team Orion Advantage IQ404
14
Nous vous remercions d’avoir choisi le chargeur Team Orion Advantage
IQ404. Ce chargeur possède les dernières innovations dans le domaine de
la charge des batteries rechargeables. Son concept est basé sur la technologie Team Orion championne du monde. Ce chargeur s’alimente depuis une
source de courant 12VDC ou depuis le courant secteur grâce à l’adaptateur
fourni.
Caractéristiques
• Charge les batteries LiPo 2 -4S
• Equilibreur intégré
• Courant de charge jusqu’à 5A
• LED de contrôle
• Alimentation 110/240VAC ou 12VDC
Utilisation
Branchez uniquement une batterie LiPo 2-4 éléments.
1. Alimentation depuis le courant secteur: raccordez l’adaptateur secteur au
chargeur, puis raccordez l’adaptateur à une prise de courant secteur.
2. Alimentation 12VDC: raccordez l’adaptateur au chargeur, puis raccordez
l’adaptateur à une source de courant 12VDC.
3. Une fois que le chargeur est sous tension, les 4 LED de contrôle deviennent vertes. Le chargeur est en mode standby.
4. Avant de connecter la batterie au chargeur, réglez le courant de charge
adapté à votre batterie à l’aide du potentiomètre. En général le courant de
charge est équivalent à une fois la capacité (p. ex. 2000mAh = 2A). Une
fois que la batterie est connectée au chargeur, vous ne pouvez plus modi-
Page 15

www.teamorion.com
15
Charger
Power Input
Adjustment Dial
Control LED
4S Balance Port
2S Balance Port
3S Balance Port
Power Output
Power Input:
Connect to mains
power adapter
Power Output:
Connect to Charger
Power Supply
Page 16

Team Orion Advantage IQ404
16
fier le courant de charge ! Pour modifier le courant de charge, débranchez
la batterie !
5. Branchez la batterie sur le chargeur en utilisant son connecteur de puissance et son connecteur d’équilibrage (type JST-XH). En relation avec le
nombre d’éléments de la batterie, de 2 à 4 LED de contrôle deviennent
rouges. Si une LED rouge clignote, cela indique un problème avec la connexion ou la batterie. Vérifiez les connexions ou arrêtez immédiatement
d’utiliser la batterie si elle présente un défaut.
6. Lorsque que la batterie est chargée, les LED deviennent vertes. Selon l’état
de la batterie et sa capacité, cela peut prendre beaucoup de temps afin
que toutes les LED deviennent vertes.
Dépannage
• Si la charge ne démarre pas, vérifiez que toutes les connecteurs sont branchés, que les polarités sont correctes et que la batterie est fonctionnelle.
• Si les LED clignotent rouge, vérifiez que les connections sont correctes et
que la batterie est fonctionnelle.
• Si certaines LED deviennent vertes à la fin de la charge et que d’autres
restent rouges, cela indique que le chargeur est en train d’équilibrer la batterie.
Mises en garde
• Ce chargeur est conçu pour charger uniquement des batteries LiPo de 2 à
4 éléments.
• Assurez-vous que le courant de charge du chargeur est compatible avec la
batterie.
• Le courant de charge ne peut être ajusté lorsque la batterie est connectée
Page 17

www.teamorion.com
17
au chargeur.
Lorsqu’il est en fonction, ne laissez jamais le chargeur sans supervision.
Ne laissez pas les enfants utiliser le chargeur sans la supervision d’un
adulte.
Ne laissez pas des objets ou des liquides pénétrer les ouvertures sur le
boîtier.
• N’essayez pas d’ouvrir ou de modifier le boîtier du chargeur.
• le chargeur est conçu pour être utilisé à l’intérieur. Ne l’utilisez pas en
présence de forte humidité ou de condensation.
• Le chargeur peut chauffer pendant l’utilisation, utilisez-le uniquement dans
un endroit bien ventilé, à l’écart des personnes et des matières conductrices d’électricité ou inflammables.
• Si la batterie réagit de façon anormale pendant la charge ou la décharge,
tel que surchauffe, fuite de gaz ou de liquide, déconnectez immédiatement
la batterie du chargeur et stockez la dans un endroit sûr, à l’écart des personnes et des matériaux inflammables.
Garantie
Team Orion garanti que ce produit ne comporte pas de défauts de fabrication. Cette garantie n’est pas valable lors d’une mauvaise utilisation, d’usure
due à l’utilisation ou tout autre problème résultant d’une utilisation ou d’une
manipulation inappropriée du produit. Aucune responsabilité ne sera assumée pour un quelconque dommage résultant de l’utilisation du produit.
Du fait de connecter et d’utiliser ce produit, l’utilisateur accepte toutes les
responsabilités découlant de son utilisation.
Sont considérés comme mauvaise utilisation:
Page 18

Team Orion Advantage IQ404
18
• Ne pas suivre les instructions.
• Utilisation inadaptée (abus, utilisation extrême, etc.) :
• Réglages inadaptés (mauvaises connexions, rapport inadapté, mauvaise
installation, etc.).
• Surcharge, surchauffe (éléments dessoudés, brûlés, etc.).
• Conditions d’utilisation inappropriées (humidité, pluie, etc.).
• Mauvais entretien (présence de saleté, etc.).
• Démontage, modifications par l’utilisateur (modification des connecteurs,
câbles, composants, etc.).
• Dommage dus aux chocs
Spécifications
• Mode de charge – charge rapide CC/CV, avec équilibrage
• Capacité de charge – LiPo 2 à 4 éléments
• Courant de charge – 0.4-5A (max 40W)
• Prises dorées 4mm
• Prises d’équilibrage JST-XH
• 4 LED de contrôle
• Alimentation 11-18VDC ou 110/240VAC avec adaptateur
• Dimensions 64x40x100mm
• Poids 95g
Adaptateur secteur :
• Alimentation 110 - 240VAC 1.5A 50-60Hz
• Sortie 12 VDC 5A
• Dimensions: 53x31x120mm
• Poids 203 g
Page 19

www.teamorion.com
19
Contenu de la boîte
• Chargeur Advantage IQ404
• Adaptateur secteur
• Cordon de charge Deans et Tamiya
• Cordon d’alimentation
• Mode d’emploi
Page 20

Team Orion Advantage IQ404
20
La ringraziamo per avere scelto il caricabatterie Team Orion Advantage
IQ404. Questo caricabatterie è dotato delle ultime tecnologie per la carica delle batterie. Il caricabatteria viene alimentato da una fonte di corrente
12VDC o tramite l’alimentatore fornito collegato ad una presa di corrente
standard 110-240VAC.
Caratteristiche
• Ricarica le batterie LiPo da 2- 4S
• Bilanciatore integrato
• Corrente di carica fino a 5A
• LED per il controllo
• Alimentazione 110-240VAC o 12VDC
Utilizzazione
Collegate unicamente batterie LiPo da 2-4 celle.
1. Alimentazione tramite presa di corrente standard: collegate l’alimentatore
al caricabatterie e poi collegate l’alimentatore a una presa di corrente.
2. Alimentazione 12VDC: collegare l’adattatore al caricabatterie e poi collegare l’adattare alla fonte di corrente 12VDC.
3. Una volta il caricabatterie alimentato, le LED di controllo diventano verdi.
Il caricabatterie e in stand-by.
4. Prima di collegare la batteria al caricabatterie, impostate la corrente di carica corretta per la vostra batteria tramite il potenziometro. La corrente di
carica standard e uguale a una volta la capacita (per esempio 2000mAh
= 2A). Una volta la batteria collegata al caricabatterie, non e più possibile
modificare la corrente di carica! Per modificare la corrente di carica, scol-
Page 21

www.teamorion.com
21
Charger
Power Input
Adjustment Dial
Control LED
4S Balance Port
2S Balance Port
3S Balance Port
Power Output
Power Input:
Connect to mains
power adapter
Power Output:
Connect to Charger
Power Supply
Page 22

Team Orion Advantage IQ404
22
legate la batteria!
5. Collegate la batteria al caricabatterie tramite il connettore principale e la
spina di bilanciamento tipo JST-XH. Le LED in relazione con il numero di
celle della batteria diventano rosse. Se una LED lampeggia, questo indica
un problema. Verificate i collegamenti e smettete subito di utilizzare la batteria se questa e difettosa.
6. Una volta la batteria carica, le LED di controllo ridiventano verdi. A secondo dello stato della batteria e della sua capacita, la carica può impiegare
molto tempo.
Risoluzione dei problemi
• Se la carica non parte, verificate che tutti i connettori sono collegati, che le
polarità sono corrette e che la batteria e funzionale.
• Se le LED lampeggiano rosso, verificate i collegamenti e che la batteria sia
funzionale.
• Alla fine della carica, se certe LED diventano verdi e altre rimangono
rosso, ciò vuol dire che il caricabatteria sta bilanciando la batterie, questo
può impiegare molto tempo.
Avvertenze
• Questo caricabatterie può caricare unicamente batterie LiPo da 2 a 4 celle.
• Assicuratevi che la corrente di carica e compatibile con la vostra batteria.
• Non e possibile modificare la corrente di carica quando la batteria e collegata al caricabatterie.
• Non lasciate il caricabatterie senza sorveglianza quando è in funzione.
• Non lasciate bambini utilizzare il caricabatterie senza la sorveglianza di un
adulto.
Page 23

www.teamorion.com
23
• Non lasciate oggetti o liquidi penetrare le aperture di raffreddamento.
• Non provate ad aprire o smontare il caricabatterie.
• Il caricabatterie e concepito per essere utilizzato all’interno. Non utilizzatelo in presenza di forte umidità o condensazione.
• Il caricabatterie può diventare caldo durante l’utilizzo, utilizzatelo unicamente in un posto ben ventilato, lontano da persone e da materiali infiammabili o conduttori dell’elettricità.
• Se la batteria ha delle reazioni anomale durante la carica o la scarica,
come surriscaldamento, sfiato di gas o perdita di liquido, scollegate immediatamente la batteria e conservatela in un posto sicuro, lontano da persone e da materiali infiammabili.
Garanzia
Team Orion garantisce che questo prodotto è privo di difetti nel materiale e
nell’assemblaggio. La garanzia non copre danni dovuti ad un’installazione
sbagliata ed all’utilizzo di componenti o qualunque altro danno dovuto a un
uso scorretto del prodotto. Team Orion non accetta alcuna responsabilità per
qualunque danno inerente all’utilizzo di questo prodotto. Utilizzando questo
prodotto, l’utente si fa automaticamente carico della piena responsabilità . E’
considerato come uso scorretto:
• Non seguire le istruzioni
• Utilizzo scorretto del prodotto
• Non utilizzare le impostazioni consigliate (impostazioni, collegamento,
montaggio, etc.)
• Sovraccarica, surriscaldamento (dissaldamento, bruciatura, etc.)
• Utilizzo in condizioni inadeguate (polvere, umidità, pioggia, etc.)
• Insufficiente manutenzione
Page 24

Team Orion Advantage IQ404
24
• Smontaggio, modifica del prodotto dall’utente (modificazione dei connettori originali, cavi, etc.)
• Guasti meccanici dovuti a cause esterne.
Specifiche tecniche:
• Modo di carica rapida CC/CV, con bilanciamento
• Compatibilità LiPo 2 a 4 celle
• Corrente di carica 0.4 – 5A
• Prese dorate 4mm
• Prese di bilanciamento JST-XH
• 4 LED di controllo
• Alimentazione 11-18VDC o 110-240VAC
• Dimensioni 64x40x100mm
• Peso 95g
Alimentatore:
• Alimentazione 110 - 240VAC 1.5A 50-60Hz
• Uscita 12 VDC 5A
• Dimensioni 53x31x120mm
• Peso 203 g
Contenuto imballaggio
• Caricabatteria Advantage IQ404
• Alimentatore
• Cavi di carica Deans e Tamiya
• Cavo di alimentazione
• Istruzioni
Page 25

www.teamorion.com
25
Page 26

Team Orion Advantage IQ404
26
Tack för att du valt Team Orion’s Advantage IQ404 laddare. Denna laddare
innehåller den senaste tekniken inom modern batteriladdning. Designen är
baserad på Team Orion’s världsmästerskapsvinnande batteriteknologi. Laddaren kan drivas av både 12V DC och från vägguttaget med hjälp av det
inkluderade nätaggregatet.
Egenskaper
• Laddar 2 – 4S LiPo batterier.
• Integrerad balanseringskrets.
• Variabel laddström (upp till 5A).
• Laddstatus indikator (LED).
• Drivs av 110/240V AC eller 12V DC.
Användning
Ladda endast LiPo-batterier med 2, 3 eller 4 celler!
1. Inkoppling till vägguttaget: Koppla in nätaggregatet till laddaren. Koppla
sedan in nätaggregatet till vägguttaget.
2. Inkoppling till 12V spänningskälla: Använd den inkluderade adaptern för
att koppla in laddaren till en 12 DC spänningskälla (spänningsaggregat
eller bilbatteri).
3. När laddaren är påslagen lyser alla fyra LED-indikatorlampor. Laddaren
står nu i standby-läge.
4. Innan inkoppling av batteriet till laddaren sker är det viktigt att korrekt
laddström ställs in. Använd vredet för strömstyrka för detta. Riktvärdet för strömstyrkan är en gånger kapaciteten (ex. 2000mAh batteri = 2A
laddström).
Page 27

www.teamorion.com
27
Charger
Inspänning
11-18V DC
Vred för justering av laddström
Indikatorlampor (LED)
4S balanseringsport
2S balanseringsport
3S balanseringsport
Power Output
Spänning in :
Anslut till vägguttaget med hjälp
av nätkabeln.
Spänning ut :
anslut till laddaren
Nätkabel
Page 28

Team Orion Advantage IQ404
28
5. När du kopplat in batteriet till laddaren får du absolut inte ändra
laddströmmen! För att ändra laddströmmen, koppla ur batteriet först!
6. Koppla in batteriet till laddaren via både batterikontakten och balanseringskontakten (JST-XH kontakt). Indikatorlamporna (LED) lyser nu rött
för de celler som laddas. Om indikatorlamporna blinkar rött indikerar det
problem med kablage eller batteri. Kontrollera då att inkopplingen är korrekt. Alternativt sluta använda batteriet om det är defekt och inte längre
fungerar korrekt.
7. 5. När batteriet är fulladdat lyser alla indikatorlampor grönt. Beroende på
vilken grundladdning batteriet hade vid laddningens början och batteriets
kapacitet kan det ta relativt långt tid innan batteriet blir fullt och alla indikatorlampor lyser grönt.
Felsökning
• Om laddningen inte startar, kontrollera då att alla kablar är korrekt ansluta
(med korrekt polaritet) till laddaren samt att batteriet fungerar som det ska.
• Om indikatorlamporna blinkar rött, kontrollera då att alla kablar är korrekt
ansluta (med korrekt polaritet) till laddaren samt att batteriet fungerar som
det ska.
• Om en eller flera (men inte alla) indikatorlampor lyser grönt i slutet av laddcykeln betyder det att laddaren håller på att balansera batteriet.
Varningar
• IQ404 är designad för att ladda LiPo-batterier med 2, 3 eller 4 celler.
• Säkerställ att laddarens strömstyrka är kompatibel med batteriet som ska
laddas.
• Du får absolut inte ändra laddströmmen under tiden batteriet är inkop-
Page 29

www.teamorion.com
29
plat till laddaren. Ska strömstyrkan ändras, koppla först ur batteriet, ändra
strömstyrkan och koppla sedan in batteriet till laddaren igen.
• Lämna ALDRIG laddaren oövervakad när den är spänningssatt och/eller
laddar.
• Låt aldrig barn handha laddaren utan överinseende av vuxen person.
• Laddaren ska endast användas inomhus i torr miljö.
• Öppna eller modifiera inte laddarens hölje.
• Låt inte föremål eller vätska komma in genom laddarens ventilationshål i
höljet.
• Laddaren kan bli relativt varm under laddning. Använd laddaren i ett väl
ventilerat utrymme. Ladda inte i närheten av folk, elektriskt ledande eller
lättantändliga material.
• Om batteriet reagerar konstigt vid laddning (ex. överhettning, läckage eller
att det blåser upp sig), koppla då genast ur batteriet. Lägg det på en säker
plats där det inte finns människor eller lättantändliga material.
Garanti
Team Orion garanterar att denna produkt är fri från tillverkningsfel. Garantin
täcker ej: felaktig inkoppling, slitagedelar som slitits ut eller några andra fel
som orsakats av felaktigt bruk av produkten. Inget ansvar tas för skada som
orsakats av användning av denna produkt. Genom att koppla in och använda
produkten accepterar användaren allt ansvar för skador uppkomna genom
användning av produkten. Följande anses vara felaktigt bruk av produkten:
• Misslyckande att följa med laddaren bifogade instruktioner.
• Inkorrekt användande av produkten (ovarsamt användande, användning
utanför produktens begränsningar etc.).
Page 30

Team Orion Advantage IQ404
30
• Överbelastning och överhettning (smälta lödningar, komponenter, kablar etc.).
• Användning i olämpliga miljöer (regn, fukt etc.).
• Bristfälligt underhåll av produkten (smuts, etc.).
• Demontering eller modifiering av produkten (modifierat orginalkontakter,
kablar, komponenter etc.).
• Mekanisk skada orsakad av externa händelser.
Specifikationer
Laddare
• Laddläge: snabbladdning CC/CV, med balansering
• Batterityp: LiPo 2 till 4 celler (3.70V/cell)
• Laddström: 0.4A ttill 5A (40W max)
• 4mm guldpläterade kontakter
• JST-XH balanseringskontakter
• 4 LED laddindikatorlampor
• Inspänning: 11-18V DC alternativt 110/240V AC/DC (via nätaggregat)
• Dimensioner: 65x40x100 mm
• Vikt: 95 g
Nätaggregat
• Inspänning: 110 - 240V AC 1.5A 50-60Hz
• Utspänning: 12V DC 5A
• Dimensioner: 53x31x120 mm
• Vikt: 203 g
Page 31

www.teamorion.com
31
Innehåll i lådan
• Advantage IQ404 laddare
• Nätaggregat
• Deans och Tamiya adapterkablar
• Nätkabel för anslutning till vägguttag
• Manual
Page 32

www.teamorion.com | 2011 © Team Orion
 Loading...