

Page 1
Bulletin #: V012116-01
Quick Start Guide
Thank You for Purchasing an Orion Flex Stretch Wrapper!
Your new FLEX stretchwrapper was designed to get up and running quickly upon
delivery. This guide will help you begin using your machine effectively by providing step
by step instructions in the basic operations of the machine. More advanced capabilities
are described in the manual. For your convenience, there is an
interactive on-screen troubleshooting guide under the Diagnostics
screen. You can download the complete manual, electrical prints,
and mechanical drawings at this location:
http://www.orionpackaging.com/landing/flex-manual-download/
Unpacking
Remove skidding/ packaging materials.
Please inspect the machine for any fasteners that may have loosened in
shipping. Although this is highly unlikely, long delivery distances may have an
effect on fastener torque.
Inspect for any obvious shipping damage and report to your machine provider.
Issue Date: January 21, 2015
(HPA, HPD, LPA, LPD) Carriage Obstacle Detect Error
Recovery
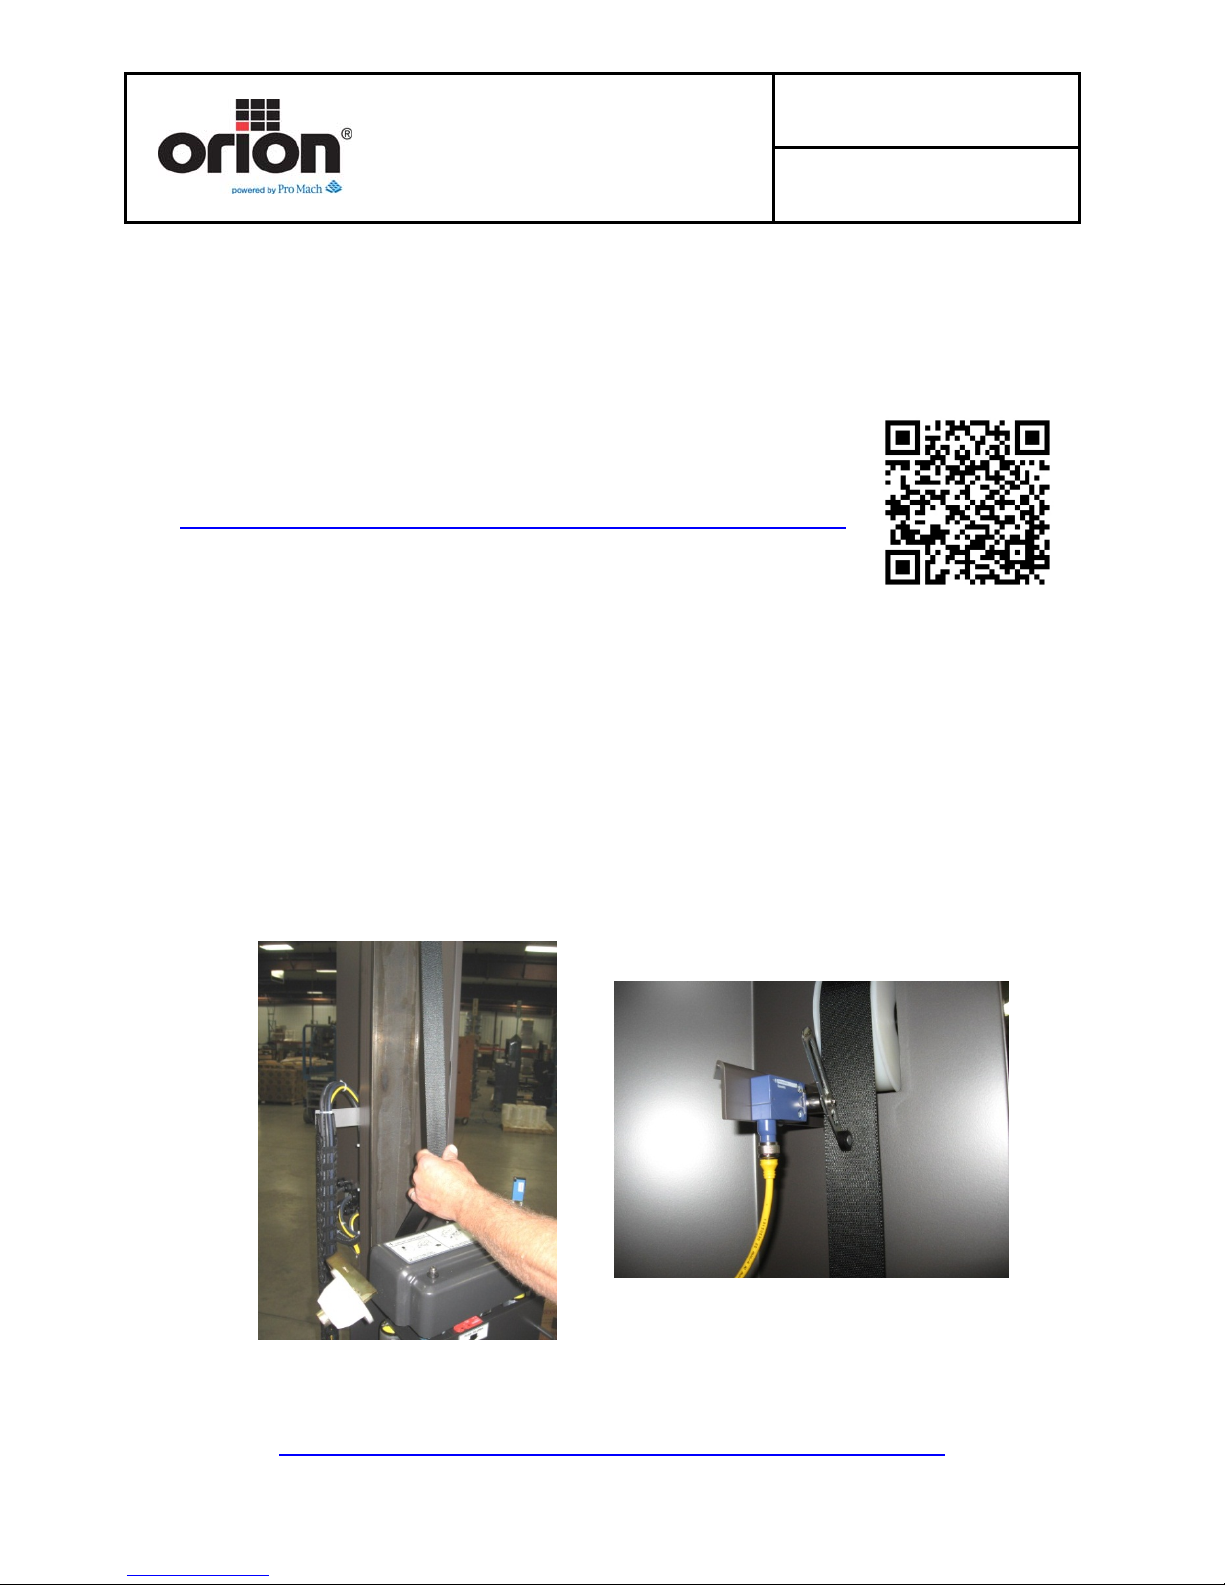
When the obstacle detect error occurs, the brake must be released.
To release the brake, pull outward on the carriage strap on the front side of the
tower until the brake releases.
Align the limit switch on the inside of the tower with the center of the strap.
Orion Packaging Systems * A division of Pro Mach
4750 County Road 13 NE Alexandria, MN 56308
(800) 333-6556
http://www.orionpackaging.com/landing/flex-manual-download/
Page 1 of 9
Page 2

Positioning
Move the machine by the integrated forklift tubes only.
Picking up the machine at any other location can damage the equipment.
Don’t slide the equipment, lift and place only.
Place the machine on level surfaces only. Un-level surfaces can cause excessive
vibration. Shim if needed.
Move the wrapper into its final position. If the turntable machine must be secured
to the floor, we recommend that the wrapper base section be bolted to the floor
by the 1/2" concrete floor anchors (leg & shield or expandable type-Red Heads).
For rigging the RT tower machines, see your user manual.
Connect Power
Make sure the MAIN POWER switch on the wrapper’s panel is set to the OFF
position.
Orion Packaging insists that a dedicated circuit is used for this wrapper.
Extension cords are not allowed and can void your warranty.
Plug the machine into the 115 VAC/ 60 Hz/ 1 Phase / 15 Amp outlet.
Quick Start Guide
Bulletin #: V012116-01
Issue Date: January 21, 2015
Power Up / Boot Up
After verifying that the area around the machine is safe, you may apply power to
the machine by turning the MAIN POWER switch to the ON position.
Please allow 30 seconds before pressing any buttons to allow the program to
boot up.
Release the E-stop button.
Press and release the Start button once to gain Control Power.
Initializing will display in the information banner momentarily.
See jogging on the next page to begin testing your machine.
Orion Packaging Systems * A division of Pro Mach
4750 County Road 13 NE Alexandria, MN 56308
http://www.orionpackaging.com/landing/flex-manual-download/
(800) 333-6556
Page 2 of 9
Page 3

Jogging
Go to the Menu Screen. Choose Jogging.
If you have an HPA or LPA you will see the Brush & Cutter and Film Clamp
It’s advisable to jog the machine prior to wrapping your first load to ensure
Bulletin #: V012116-01
Quick Start Guide
buttons. If you have an HPD or LPD, you will not see these buttons.
components run smoothly and there are no mechanical binds caused by
shipping.
o Press and hold the Main Drive button to jog the turntable/ tower. Allow it
to travel about one full revolution, then release the button.
o Press and hold the Carriage Up button. Allow it to travel to the adjustable
top stop on the mast, then release the button.
o Press the Home Machine button to bring the Turntable/ Tower and
Carriage back to the Home position.
o If you have an A model, press Brush and Cutter to cycle the Brush and
Cutter.
o If you have an A model, press Film Clamp button. Each press of this
button will move the clamp to the next position. Return the clamp to the
down and clamped position.
Issue Date: January 21, 2015
Orion Packaging Systems * A division of Pro Mach
4750 County Road 13 NE Alexandria, MN 56308
(800) 333-6556
http://www.orionpackaging.com/landing/flex-manual-download/
Page 3 of 9
Page 4

Set Up Load
Carefully place the load to be wrapped on the turntable. Be sure the load is
centered and stable.
Load the Film
The film roll can be loaded on the carriage mandrel from either end of the roll.
When using tacky film, please verify that the tacky surface of the film is inward on
the load.
Press in the E-stop.
Swing up the top mandrel spool.
Put the roll of film on the bottom mandrel.
Install the top mandrel on top of the roll to prevent upward movement.
Press the latch down and pull out on the carriage door to open the carriage. The
film carriage is equipped with a magnetic switch that detects when the carriage
threading door is open. When opened, it will set off an alarm on the HMI and
prevent the carriage from moving.
Pass the roped tail of the film through opening.
Close the carriage door. Ensure the latch clicks shut properly.
When the film feeding is completed, release the E-stop.
For machines without a fence, press the Start button once to reset control power.
If your machine has a fence, the multistretch will reset as soon as the E-stop is
released.
Peel off the first few winds of
the film (multistretch will run
due to displacement of the
dancer roller) and fix the film
end onto the load-or film
clamp if so equipped.
The system is now ready to
begin the first wrapping cycle.
Quick Start Guide
Bulletin #: V012116-01
Issue Date: January 21, 2015
Orion Packaging Systems * A division of Pro Mach
4750 County Road 13 NE Alexandria, MN 56308
http://www.orionpackaging.com/landing/flex-manual-download/
(800) 333-6556
Page 4 of 9
Page 5

Quick Start Guide
Running a Test Load
Now that you have the machine unloaded, unpacked, the film is loaded, you’ve
jogged all components, and a load is ready to wrap, let’s run a test wrap.
Go to the Run Screen.
Attach the film tail to the load or clamp for “A” models.
Release the E-stop button.
Press the Start button once to reset control power.
Toggle to Low Speed Mode on the Run Screen.
If everything is clear and you are ready to run, press and hold the Start button for
the amount of time set in the machine settings to start the machine.
Allow the load to wrap.
Since you still have control power present, you may toggle to high speed mode,
then press Start Cycle on the HMI to wrap the load again in high speed mode.
When the carriage is half way up the load, press Reinforce. The number of
reinforce wraps set on the HMI will be applied then the load will continue its
cycle.
The Reset Cycle button will either stop the current wrap cycle or reset any
displayed faults.
Bulletin #: V012116-01
Issue Date: January 21, 2015
Orion Packaging Systems * A division of Pro Mach
4750 County Road 13 NE Alexandria, MN 56308
http://www.orionpackaging.com/landing/flex-manual-download/
(800) 333-6556
Page 5 of 9
Page 6

Quick Start Guide
Adjusting Wrap Settings
To adjust the wrap setting, you must be logged in. Press the login button in the
bottom left corner of the screen
Enter the password then press the X to close the keypad.
Press the Wrap Settings button to display the Wrap Settings Screen.
Press the Top Wraps button to set the number of top wraps applied to the load.
Parameters are 1-20.
Press the Bottom Wraps button to set the number of bottom wraps applied to the
load. Parameters are 1-20.
Press the Carriage Up Speed % button to change the speed of the carriage on
the upward move, in terms of percentage. Min - 5% Max - 100% The slower the
move, the more film overlap on the load.
Press the Carriage Down Speed % button to change the speed of the carriage on
the downward move, in terms of percentage. Min - 5% Max - 100% The slower
the move, the more film overlap on the load.
You may choose more advanced wrap settings for Wrap Direction, Speed
Selection, and Autoheight or Film Fault Enable/ Disable. See your manual for
more information on these wrap setting adjustments.
Bulletin #: V012116-01
Issue Date: January 21, 2015
Orion Packaging Systems * A division of Pro Mach
4750 County Road 13 NE Alexandria, MN 56308
http://www.orionpackaging.com/landing/flex-manual-download/
(800) 333-6556
Page 6 of 9
Page 7

Wrap Recipes
Press the Menu, then Recipes.
The Wrap Settings parameters set on the previous page are saved to the
highlighted “Running Recipe.” You may set ten Wrap Recipes and name each.
For example, if you are running a fragile light product and a heavy sturdy
product, you would want to set up a recipe for each type of load. The light fragile
load would have Wrap Top First and Unstable Load Selected, for instance. When
you change to the sturdy load, you would want to quickly select the sturdy load
on the recipe screen instead of changing the wrap parameter each time.
Whichever Recipe you have selected on this screen is the recipe you are
adjusting on the Wrap Settings, Main Drive, Reinforce, and Timer Screens.
Quick Start Guide
Bulletin #: V012116-01
Issue Date: January 21, 2015
Orion Packaging Systems * A division of Pro Mach
4750 County Road 13 NE Alexandria, MN 56308
http://www.orionpackaging.com/landing/flex-manual-download/
(800) 333-6556
Page 7 of 9
Page 8

Quick Start Guide
View All Recipes
On the Recipes Screen, press View all Recipes.
This screen is used to view the parameters you’ve set up for each recipe.
You may press Next and Previous to scroll through each recipe to view their
parameters.
On this screen, you can edit the name of each recipe. To edit the name of the
recipe, press the “Recipe #” box at the top of the page. A keypad appears to
rename the recipe to rename to something more intuitive. For example, you may
want to rename the loads from the previous page “Fragile” and the other
“Sturdy.”
Bulletin #: V012116-01
Issue Date: January 21, 2015
Orion Packaging Systems * A division of Pro Mach
4750 County Road 13 NE Alexandria, MN 56308
http://www.orionpackaging.com/landing/flex-manual-download/
(800) 333-6556
Page 8 of 9
Page 9

Quick Start Guide
Reinforce Wraps
You may set the number of reinforce wraps applied when the Reinforce button is
pressed on the Run screen.
To adjust the reinforce settings, you must be logged in. Press the login button in
the bottom left corner of the screen
Enter the password then press the X to close the keypad.
Press the Machine Settings button to display the Machine Settings Screen.
Press Reinforce to display the Reinforce Wraps Setting Screen.
Press the number under Reinforce to display the numeric keypad.
Enter the number of reinforce wraps you desire to apply when the reinforce
wraps button on the Run screen is pressed.
Press Enter.
Bulletin #: V012116-01
Issue Date: January 21, 2015
There are additional adjustments you can make on the
HMI. For complete details, see your user manual.
Orion Packaging Systems * A division of Pro Mach
4750 County Road 13 NE Alexandria, MN 56308
http://www.orionpackaging.com/landing/flex-manual-download/
(800) 333-6556
Page 9 of 9
 Loading...