

Page 1
INSTRUCTION MANUAL
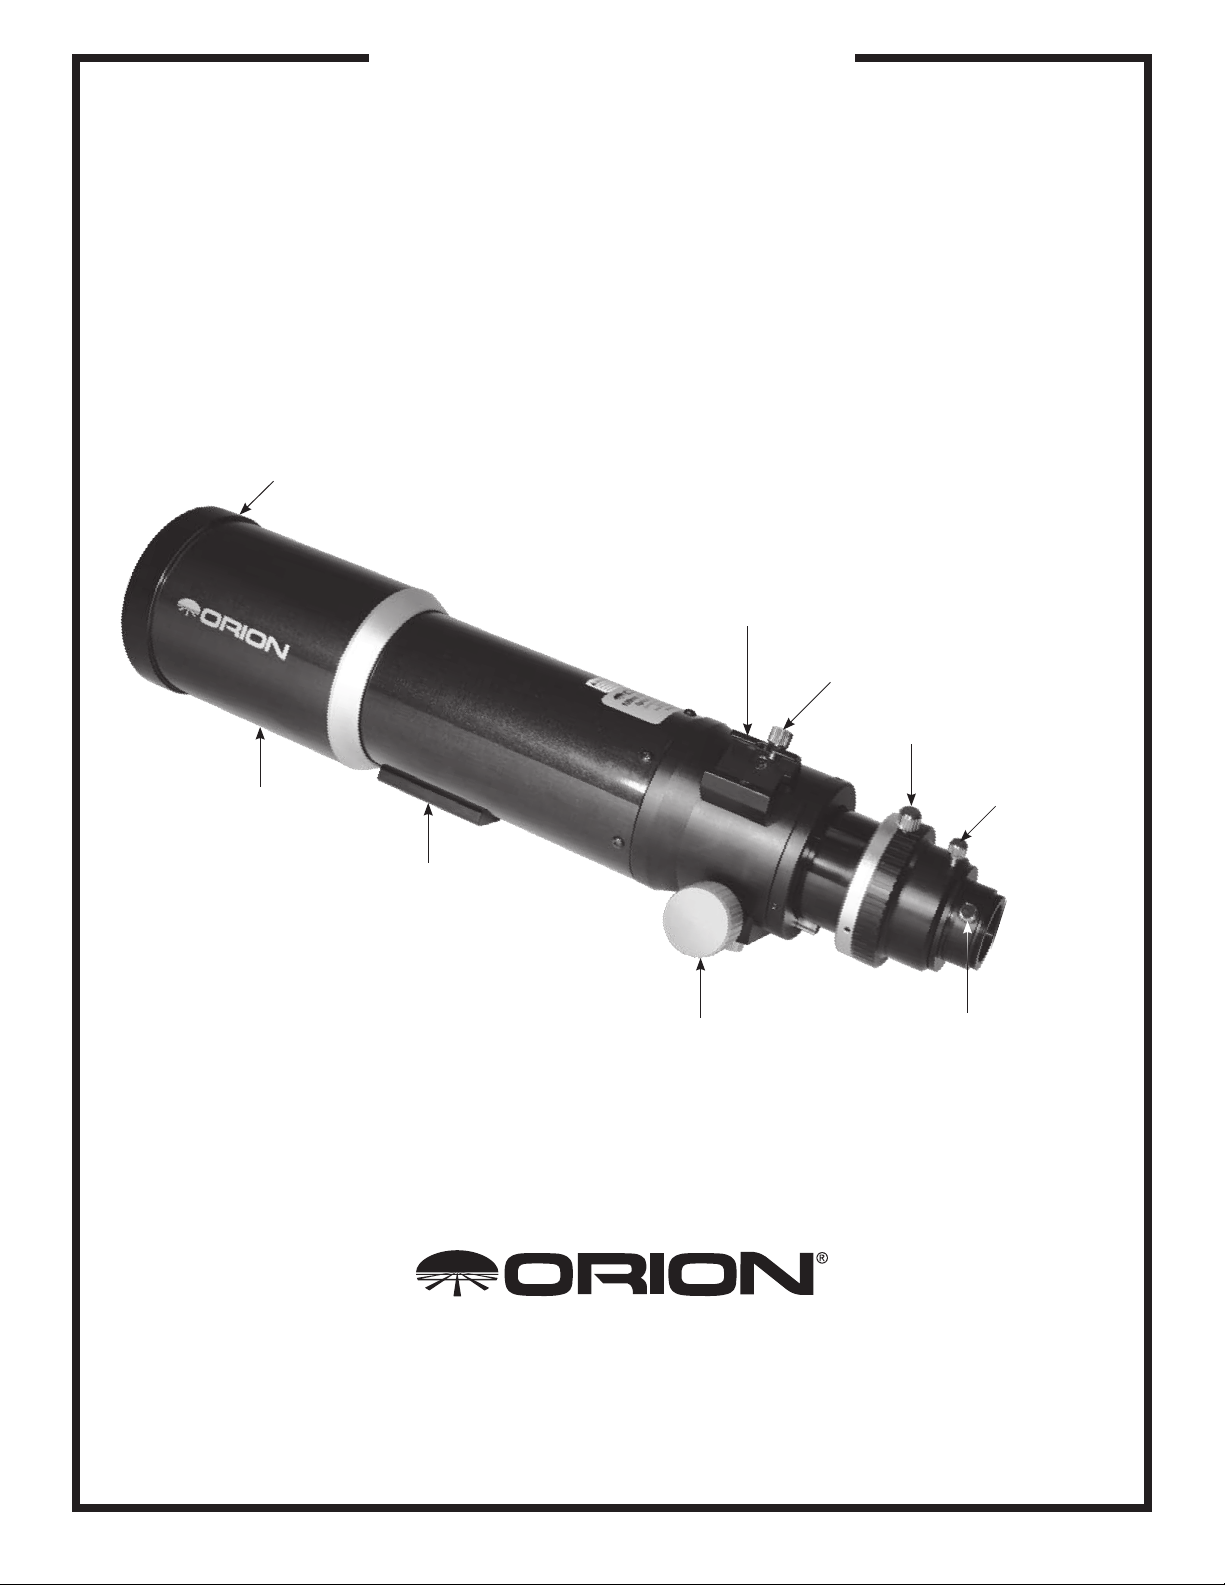
Orion® Deluxe 100mm f/6
Refractor
#7338
Dust cap
Dovetail base
for finder
Finder scope
lock knob
Dew shield
(retracted)
1/4"-20 Mounting block
Figure 1: The Deluxe 100mm f/6 refractor optical tube.
Focus knob
Focuser rotation
lockscrew
2" accessory
thumbscrew
1.25" accessory
thumbscrew
Providing Exceptional Consumer Optical Products Since 1975
OrionTelescopes.com
Customer Support (800) 676-1343 • E-mail: support@telescope.com
Corporate Offices (831) 763-7000 • 89 Hangar Way, Watsonville, CA 95076
© 2008-2010 Orion Telescopes & Binoculars
IN 392 Rev. A 05/10
Page 2

Congratulations on your purchase of an Orion
Deluxe 100mm f/6 optical tube. Your telescope has
been designed with high quality precision optics
and excellent mechanical construction. The linear
bearing dual-speed (10:1) Crayford focuser will
make getting sharp images a breeze and reduce
image shift to almost zero. The intermediate f/6
focal ratio will show only moderate color fringing.
Your new telescope is versatile enough to also be
used as a guidescope. These instructions will help
you set up and use your optical tube.
Getting Started
The Deluxe 100mm f/6 comes fully assembled from the factory. The telescope’s optics have been assembled and collimated at the factory, so you should not have to make any
adjustments to them.
Please keep the original shipping box. In the unlikely event
you need to ship the telescope back to Orion for warranty
repair service, you should use the original packaging. The box
also makes a very good container for storing the telescope
when it is not in use.
Optical Use
The fine optics and precision machining make the Deluxe
100mm f/6 an excellent choice for astronomical and terrestrial observation. You will need to add an optional diagonal
and eyepiece to the back end of the telescope. The telescope
will accept 2" or 1.25" accessories. Simply slide your diagonal
into the open end of the telescope and inser t the eyepiece
into the diagonal and it is ready to show you the visual beauty
of the night sky.
For terrestrial observation a correct image diagonal is recommended. These are typically available as 1.25" accessories
only.
Use of Optional Eyepieces, Diagonal, and
Finder Scope
The Deluxe 100mm f/6 does not come with a finder scope,
diagonal or eyepieces in order to grant the user the greatest
versatility in customizing the instrument to suit their needs.
However, certain rules for using accessories still apply.
Any Orion finder scope with a dovetail bracket can be used
with the Deluxe 100mm f/6. Simply unthread the thumbscrew
on the dovetail mount and insert the assembled finder scope
and dovetail bracket. Retighten the thumbscrew (Figure 1).
Finder scopes that do not use a dovetail bracket will need to
be attached by other means.
The Deluxe 100mm f/6 can use 1.25" accessories. Please
note that the telescope will not come to focus without the use
of a diagonal or extension tube. To install a diagonal, unthread
the thumbscrew on the 1.25" adapter until it is flush with the
interior of the adapter (Figure 1). Insert the diagonal or exten-
sion tube and secure it with the thumbscrew. Then insert the
eyepiece into the diagonal or extension tube and secure it
with the thumbscrew(s).
Use of 2" Eyepieces and Diagonals
A feature of the Deluxe 100mm f/6 is its ability to also use 2"
barrel-diameter eyepieces and diagonals. At low magnifications, 2" eyepieces can give a wider field of view than standard 1.25" eyepieces. This is especially desirable for observing deep-sky objects, as many of them appear quite large,
but faint.
To use 2" eyepieces, simply loosen the large thumbscrew on
the 2" adapter (Figure 1). Once this thumbscrew is loosened,
the entire back end of the focuser, including any 1.25" diagonal and eyepiece that may be attached, comes off, exposing
the 2" adapter. Now, insert your 2" diagonal into the drawtube
and secure with the thumbscrew loosened previously. Insert
a 2" eyepiece into the diagonal, secure it in place with the
thumbscrew on the diagonal, and you’re ready to observe.
About the 2" Linear Bearing Dual-Speed Crayford
Focuser
The Deluxe 100mm f/6 comes equipped with a 2" linear bearing dual-speed Crayford focuser. The linear bearing Crayford
design allows for smooth, precise focusing without the image
shift that rack-and-pinion and typical Crayford designs experience. The linear bearing is a “track” that guides the drawtube
in and out on a precise path to further reduce any wobble in
the drawtube which could cause image shift.
There is also a fine adjustment capability on this focuser. Ten
turns of the small knob protruding from the right focus knob
equals one turn of the coarse adjustment knob. Once you
have achieved the best possible focus on an object using the
coarse adjustment knob; you can fine-tune your focus using
this slow motion knob to make micro-adjustments. This will
allow delicate adjustments to be made to get the sharpest
images possible.
If you find that the focus adjustment is too hard to turn or does
not hold in place properly once you’ve achieved focus, you
can make adjustments to the focuser tension by using the
focus tension thumbscrew located on the bottom of the optical tube, between the focus knobs. Make adjustments to this
thumbscrew until the focuser motion feels smooth to turn and
holds in place when you have obtained focus. It may be necessary to make adjustments when the weight of your accessories change significantly.
Using as a Guidescope
The purpose of the guidescope is to monitor a guide star during long-exposure astrophotography in order to make corrections to the mount’s tracking rate. This is done by centering a
star on the reticle of the illuminated reticle eyepiece used with
the guidescope. By keeping that star centered you assure
that the view through the telescope (and imager) remains
constant. Without use of a guidescope, the telescope will not
2
Page 3

Linear
bearing
Left coarse
focus knob
Focus tension
thumbscrew
10:1 fine
focus knob
Right coarse
focus knob
Figure 2: Focuser detail
track the motion of the night sky accurately enough and longexposure photography will be difficult, if not impossible.
The Deluxe 100mm f/6 comes without accessories. To set
up and use the guidescope for use as a guidescope you will
need the following:
2 Guide scope tube rings
1 Guide scope tube ring mounting plate
1 Illuminated reticle eyepiece or Autoguider
1 Diagonal (optional)
First, adjust the guidescope in the guidescope tube rings so
that it is as parallel with the main optical tube. This may involve
some large adjustments to the guidescope alignment thumbscrews. Loosen and tighten the alignment thumbscrews as
needed to adjust the direction of the guidescope.
Once you have centered the object you wish to photograph,
you will need to center the guidescope on a bright star near
the object being photographed. Look in the illuminated reticle
eyepiece (with the reticle turned on) and select a star that is
in the field of view. To center the star, loosen one guidescope
alignment thumbscrew and tighten another until the star is
centered in the reticle. Check again to make certain that the
object you wish to photograph is still centered in its field of
view. If it is not, you will have to start the process over again.
Once you begin exposure you will make any adjustments necessary so that the guide star remains centered in the reticle of
the illuminated eyepiece.
Photography with the Deluxe 100mm f/6
The Deluxe 100mm f/6 refractor makes a very capable astrograph for your CCD or DSLR camera. With an optional camera
adapter, the Deluxe 100mm f/6 becomes a 600mm f/6 telephoto lens for a single-lens reflex camera. For long-distance
terrestrial or astronomical photography, you need a T-ring for
your particular camera model and a camera adapter. A 2"
prime focus camera adapter is suggested to obtain the best
focal distance for this optical tube. Simply attach the T-ring
to the camera body and thread the 2" prime focus camera
adapter into the T-ring. Insert the barrel of the camera adapter
into the 2" eyepiece holder on the focuser. Use the camera’s
viewfinder to frame the picture. Use the telescope’s focuser
to focus the image. Tighten the focus tension thumbscrew to
make sure the camera does not slip out of focus.
Most CCD cameras will have a 1.25" or 2" barrel ready to
attach directly to your telescope like an eyepiece or diagonal.
No adapter is required, simply insert the barrel of the CCD
camera into the 1.25" or 2" eyepiece holder and secure the
camera with the silver thumbscrew lock.
The Deluxe 100mm f/6 Refractors were designed to reach
focus with both DSLR and CCD cameras. However, every
camera focus point is a little different. Depending on your
camera, you may need to use an extension tube for your
particular imaging setup. Any imaging accessory, such as a
color filter wheel increases the amount of inward focus travel
required. Before attaching any extra imaging accessory, try
reaching focus first with the camera directly attached to the
focuser, then see if you have enough focus travel left for extra
accessories.
Imaging equipment is sometimes heavier than a diagonal
and eyepiece. The dual-speed Crayford focuser is capable of
handling the weight of your CCD or DSLR camera. Adding
tension to the focuser drawtube will increase the amount of
weight the focuser can handle. Install your camera onto the
2" or 1.25" adapter on the focuser during the day. Check the
focuser for any slippage. If the focuser drawtube slides under
the weight of the camera, you will need to add more tension
to the focuser.
You may want to consider using a remote shutter release
instead of the shutter release on the camera. Touching the
camera can vibrate the system and blur the resulting photographic image. Also, be sure to use a solid tripod.
Attaching the Deluxe 100mm f/6 to a Tripod
or Mount
The Deluxe 100mm f/6 can be attached to a tripod or mount
by the use of the pre-installed 1/4"-20 mounting block. The
1/4"-20 shaft of a sturdy camera tripod will thread into the
hole on the mounting block on the underside of the optical
tube (Figure 1).
Optional tube rings can also be used to mount the 100mm f/6
to attach it to an equatorial mount. Tube rings with an inner
diameter of 100mm (3.9"), such as Orion item #7371, are
needed. If you are using tube rings, you should first attach
them to your telescope mount or dovetail bar and then lay the
optical tube in the tube rings. You will need to extend the dew
shield in order to accommodate tube rings on each side of the
¼"-20 mounting block.
Calculating Magnification (Power)
It is desirable to have a range of eyepieces of different focal
lengths, to allow viewing over a range of magnifications. To
calculate the magnification, or power, of a telescope, simply
3
Page 4

divide the focal length of the telescope by the focal length of
the eyepiece:
Telescope Focal Length (mm)
Eyepiece Focal Length (mm)
For example, the 100mm, which has a focal length of 600mm,
used in combination with a 25mm eyepiece, yields a power of:
600mm
25mm
Every telescope has a useful limit of power of about 50x per
inch of aperture. Claims of higher power by some telescope
manufacturers are a misleading advertising gimmick and
should be dismissed. Keep in mind that at higher powers, an
image will always be dimmer and less sharp (this is a fundamental law of optics). The steadiness of the air (the “seeing”)
will limit how much magnification an image can tolerate.
Always start viewing with your lowest-power (longest focal
length) eyepiece in the telescope. After you have located and
looked at the object with it, you can try switching to a higherpower eyepiece to ferret out more detail, if atmospheric conditions permit. If the image you see is not crisp and steady,
reduce the magnification by switching to a longer-focal-length
eyepiece. As a general rule, a small but well-resolved image
will show more detail and provide a more enjoyable view than
a dim and fuzzy, overmagnified image.
= Magnification
= 24x
the lens! Clean only a small area at a time, using a fresh lens
tissue on each area. Never reuse tissues.
Specifications
Objective lens: Achromatic doublet, air-spaced
Objective lens diameter: 100mm
Objective lens coatings: All air-to-glass surfaces coated,
with at least one surface
multi-coated
Focal length: 600mm
Focal ratio: f/6
Baffling: Two in optical tube, two in focuser
drawtube
Focuser: 2" dual-speed linear bearing
Crayford (with 1.25" adapter)
Tube diameter
(not including dew shield): 100mm
Tube length
(with dew shield): 20.6"
Weight: 7.1 lbs.
Care & Maintenance
Give your telescope reasonable care and it will last a lifetime.
When not in use, keep its dust cover on as well as the dust cap
on the eyepiece opening. Store it indoors or in a dry garage.
Do not leave the telescope outside except when using it. The
optical tube is aluminum and has a smooth painted surface
that should resist scratches and smudges. If a scratch does
appear on the tube, it will not harm the telescope. Smudges
on the tube can be wiped off with standard household cleaners such as Windex or Formula 409.
Any quality optical lens tissue and cleaning fluid specifically
designed for multi-coated optics can be used to clean the
telescope’s objective lens as well as the lenses of the eyepieces and finder scope. Never use regular glass cleaner or
cleaning fluid designed for eyeglasses. Before cleaning with
fluid and tissue, however, blow any loose particles off the lens
with a blower bulb or compressed air, or lightly brush the lens
with a soft camel hair brush. Apply some cleaning fluid to a
tissue, never directly on the optics. Wipe the lens gently in
a circular motion, then remove any excess fluid with a fresh
lens tissue. Oily fingerprints and smudges may be removed
using this method. Use caution; rubbing too hard may scratch
Orion Telescopes & Binoculars
One-Year Limited Warranty
The Orion Deluxe 100mm f/6 Refractoris warranted against defects in materials or workmanship for
a period of one year from the date of purchase.
This warranty is for the benefit of the original retail
purchaser only. During this warranty period Orion
Telescopes & Binoculars will repair or replace,
at Orion’s option, any warranted instrument that
proves to be defective, provided it is returned postage paid to: Orion Warranty Repair, 89 Hangar
Way, Watsonville, CA 95076. Proof of purchase
(such as a copy of the original receipt) is required.
This warranty does not apply if, in Orion’s judgment, the instrument has been abused, mishandled, or modified, nor does it apply to normal wear
and tear. This warranty gives you specific legal
rights, and you may also have other rights, which
vary from state to state. For further warranty service information, contact: Orion Customer Service
(800) 676-1343; support@telescope.com.
OrionTelescopes.com
89 Hangar Way, Watsonville CA 95076
Customer Support Help Line (800) 676-1343 • Day or Evening
© 2008-2010 Orion Telescopes & Binoculars
4
 Loading...