

Page 1
IN 218 Rev A 1100
Providing Exceptional Consumer Optical Products Since 1975
Customer Support (800) 676-1343
E-mail: support@telescope.com
Corporate Offices (831) 763-7000
P.O. Box 1815, Santa Cruz, CA 95061
INSTRUCTION MANUAL
Newtonian reflectors perform at their best when their mirrors
are accurately aligned.While it’s not difficult to do, collimation
can be a chore if you do not have the proper tools.The Orion
LaserMate Deluxe provides a clear, easy way to determine if
your telescope’s mirrors need adjustment, and which adjustments need to be made. With the highly precise alignment
provided by the LaserMate Deluxe, you’ll be enjoying better,
crisper views in no time!
The LaserMate Deluxe’s laser diode has been precisely
aligned within it’s housing at the factory. Do not drop the
LaserMate Deluxe or otherwise roughly handle it, or it may
need to be returned for re-alignment. Re-alignment is a service that is not covered in the product’s limited warranty. Also,
do not remove the label on the LaserMate Deluxe or otherwise
attempt to make adjustments to the LaserMate Deluxe’s alignments screws; doing so will void the terms of the warranty.
WARNING:The LaserMate Deluxe emits laser
radiation, so it is important not to shine the beam
into your or anyone’s eye. During the collimation
procedure, it is also important to avoid direct
reflections of the laser beam into your eye. Rather,
look only at off-axis reflections to determine the
position of the laser spot on the mirrors. It is safe
to view the laser when it is reflected off a surface
that will diffuse the light, such as the viewing
screen of the LaserMate Deluxe. It is also safe to
view the reflection off a mirror surface as long as
the beam is not directed into your eye. Because of
the potential danger from the laser beam, store
your LaserMate Deluxe out of the reach of children.
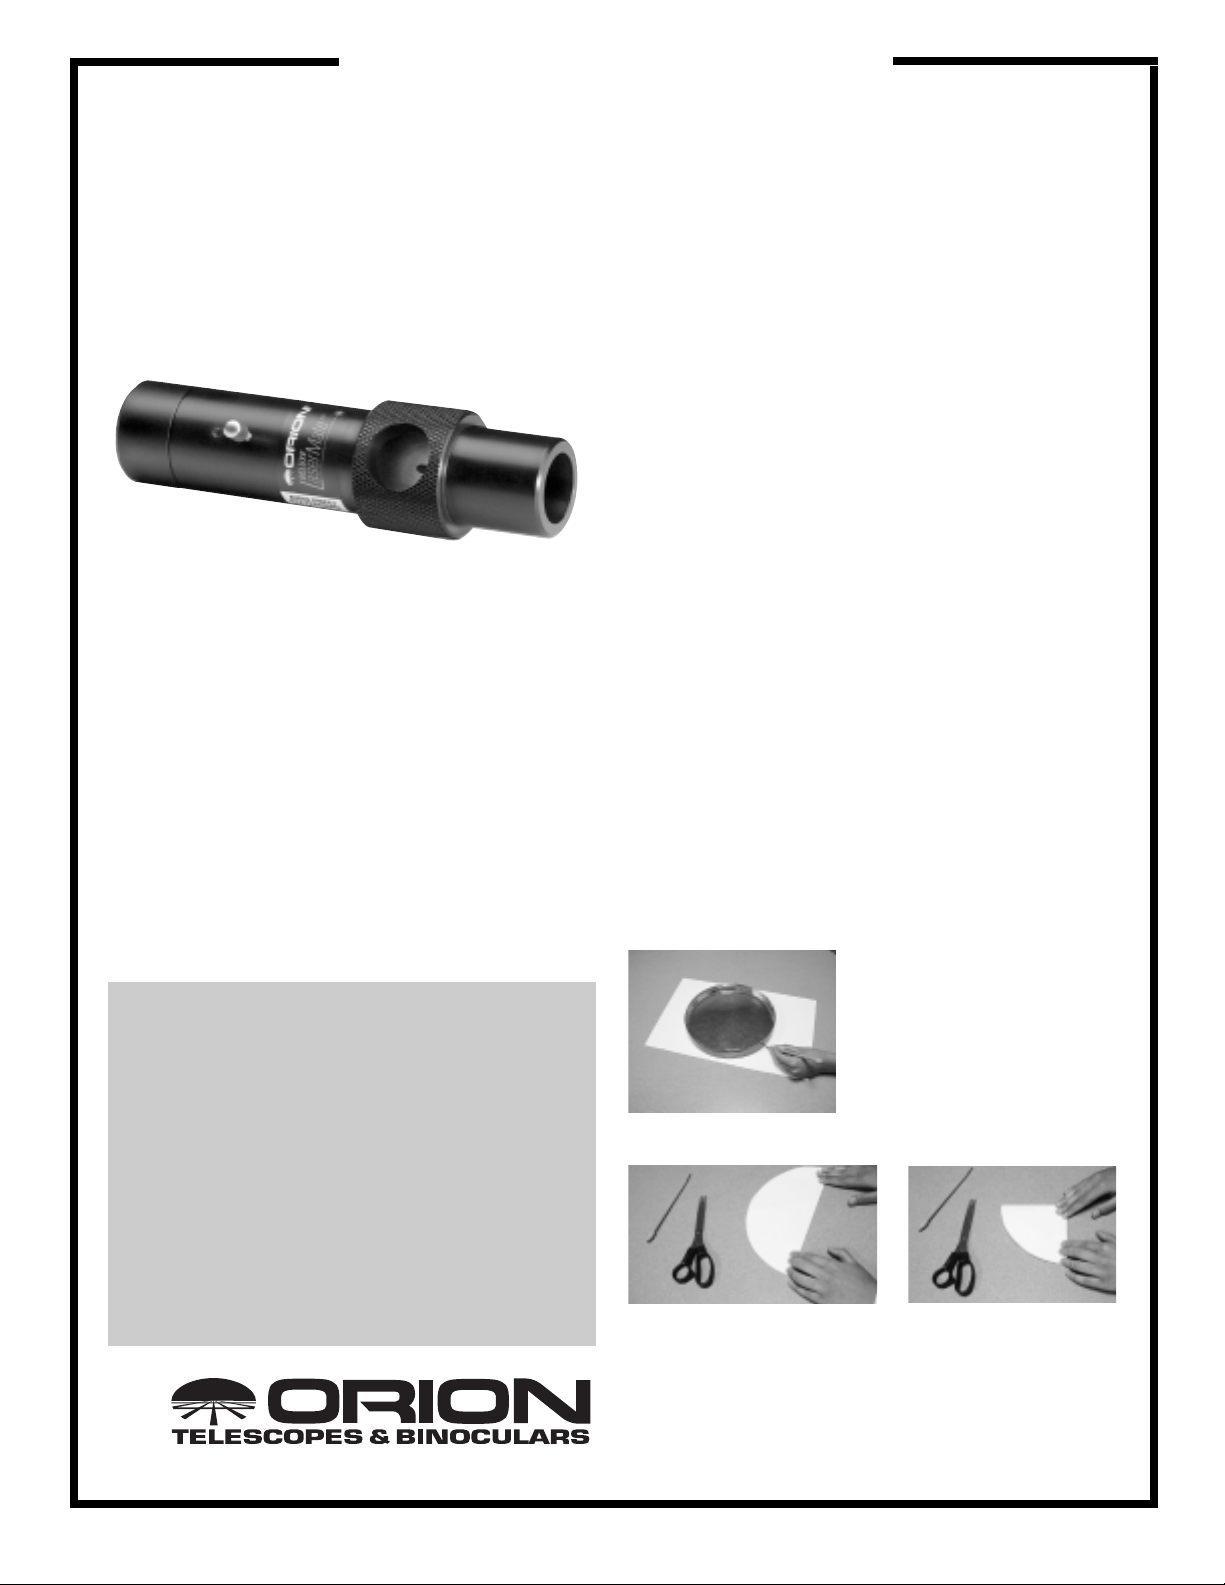
Marking the Primary Mirror
To achieve best accuracy when collimating with the Orion
LaserMate Deluxe, you will need to mark the center of the
primary mirror with one of the supplied collimation targets.
This will not affect the telescope’s performance. If you do not
wish to mark your primary mirror, you will need to judge the
primary mirror’s center by eye during the collimation procedure. While this is not recommended, it is possible to get
adequate alignment of the optics without marking the primary
mirror’s center.
To accurately locate and mark the mirror’s center point, you
will need to make a paper template.
First, remove the primary mirror from your telescope. If you
are unsure how to do this, consult your telescope’s instruction
manual.If the primary mirror is glued into its cell, it is not necessary to remove it from the cell. Handle the mirror by its
edges only, and be careful not to touch the surface with your
fingers.
Get a clean sheet of paper that is big enough to cover the
entire mirror’s surface. For large diameter mirrors, you may
need to tape several sheets of paper together. Lay the primary mirror on the paper and trace its outline with a pencil
(Figure 1). Next, cut out the circle you have just traced with a
pair of scissors. Fold the paper circle into quarters by folding
the circle precisely in half, and
then folding it in half again
(Figure 2). Now, cut about 1/4
inch off the tip of the paper
wedge you have created (Figure
3).Unfold the paper, and you will
find that you have a paper template of your mirror with a hole
at the center.
Orion
®
LaserMate
™
Deluxe
#5690
Figure 2a, 2b: Fold the paper circle in half, and then
in half again.
Figure 1: Trace the outline
of the mirror on the paper.
Page 2
Make sure the template is still
clean; place the paper template
over the surface of the primary
mirror.Carefully register the template edge with the edge of the
mirror (Figure 4). Now, take one
of the supplied collimation targets and affix it to the center of
the mirror’s surface through the
hole of the paper template
(Figure 5). The center of the primary mirror is now marked, and
you can reinstall the primary mirror in the telescope (Figure 6).
Note: For mirror cells that
use mirror clips to secure
the primary mirror in place,
it is important not to
overtighten the mirror clips.
For Orion reflector
telescopes, tighten the
mirror clip anchor screws
until just snug, and then
back off each screw by 1/2
turn. Overtightened mirror
clips will put stress on the
primary mirror's figure, and
will introduce astigmatism
into the optical system as a
result.
Before You Begin Collimating Using the
LaserMate Deluxe
Accurate collimation of your telescope’s optics using the
LaserMate Deluxe will most easily be achieved if you do a
rough collimation of the optics with your eye first. This is
because if the optics are grossly misaligned, it may be confusing to interpret which surfaces the laser is being reflected
off of.Refer to your telescope’s instruction manual for the procedure on how to do a rough collimation with your eye.
Note About Centering the Secondary Mirror
Under the Focuser
Centering the secondary mirror under the focuser is an
adjustment that can be made with the aid of the LaserMate
Deluxe, but it requires marking the center of the secondary
mirror in the same way the center of the primary mirror was
marked.This is generally undesirable due to the large area of
the supplied collimation targets compared to the total area of
the secondary mirror. Since centering the secondary mirror
under the focuser is an adjustment that very rarely, if ever,
needs to be done, we recommend simply making this adjustment by eye. Again, refer to the collimation instructions in
your telescope’s manual for the procedure on how to do this.
If you wish to use the LaserMate Deluxe for centering the
secondary mirror under the focuser, refer to the appendix
section at the end of this manual.
Adjusting the Tilt of the Secondary Mirror
The first collimation adjustment made with the LaserMate
Deluxe will be to adjust the tilt of the secondary mirror.
Insert the LaserMate Deluxe into your telescope’s focuser
drawtube (Figure 7). Secure it in place with the thumbscrew
on the drawtube.Then turn the LaserMate Deluxe on by turning its thumbscrew clockwise.
Before looking into the optical tube, take a sheet of white
paper and place it across the front aperture of the telescope.
If you see a red laser spot on the sheet of paper, then your
telescope is considerably out of collimation (Figure 8). Take
note of the position of the red
spot, and be careful not to
place your eye in that position. Remember, it is safe to
view the reflection of the
laser beam off mirror surfaces as long as the beam is
not directed into your eye.
Look down the front of the
optical tube. Remember to
keep your eyes clear of any
direct reflections of the
beam. Notice the red spot on
the surface of the primary
mirror itself; this is the laser
beam being reflected from
2
Figure 3: Cut the tip off
the paper wedge.
Figure 4: Place the
template on the mirror
surface and carefully
register its edge.
Figure 6: The primary mirror’s
center is now marked, and it is
ready to be reinstalled.
Figure 5: Affix the ring
label to the mirror surface
through the hole in the
template.
Figure 7a, 7b: The LaserMate Deluxe fits directly into the
drawtube of 1.25" focusers (left).If you have a 2" focuser,
you will need to use an optional 2"-to-1.25" adapter (right).
2"-to-1.25"
adapter
Red laser spot
Figure 8: Place a piece of
white paper in front of the
open tube. If you see a
laser spot on the paper,
be careful not to place your
eye in that position.
Page 3

the secondary mirror off the surface of the primary mirror.The
red spot should be centered on the primary mirror’s surface.
If it isn’t, adjustments will be need to be made to the secondary mirror’s tilt (Figure 9). This is done with the secondary
mirror collimation screws, usually located on the central hub
of the telescope’s spider vane assembly.
Make adjustments to the telescope’s secondary mirror collimation screws until the reflection of the laser beam is
centered on the primary mirror. If you have marked your primary mirror, then the red spot should fall directly in the center
of the collimation target.
Adjusting the Tilt of the Primary Mirror
The final collimation adjustment is to adjust the tilt of the primary mirror. Make certain that the viewing screen on the
collimator is facing the rear of the telescope.If it isn’t, loosen
the securing thumbscrew on the focuser and rotate the
LaserMate Deluxe until it’s viewing screen is clearly visible
from the rear of the telescope. While standing at the rear of
the telescope (where the primary mirror collimation screws
are), look up at the viewing screen of the collimator. You
should see the reflection of the laser somewhere on the viewing screen. If you do not see the reflection, then a large
adjustments to the tilt of the primary mirror will be needed.
Place a piece of paper in front of the open tube (as was done
in Figure 8) and note the position of the laser on the paper.If
the primary mirror is grossly misaligned, the laser spot may
be hitting the inside wall of the telescope tube or the focuser
drawtube. Make large adjustments to the collimation screws
as needed to get the laser spot onto the viewing screen.
Once the laser spot is on the viewing screen (Figure 10), you
can perform the final collimation. Use the primary mirror collimation screws to move the laser spot until it is going bac k into
the hole the laser beam originally came out of (Figure 11).
Once this is done, you will see laser spot spray around the
hole. You can make certain the laser spot is properly aimed
into the hole by slightly adjusting one of the collimation
screws to bring the laser spot out of the hole, then return it by
turning the collimation screw in the opposite direction by the
same amount.
Collimation of the optical system is now complete.Go out and
enjoy the view! The alignment of the mirrors should not need
to be adjusted again unless the telescope is handled roughly.
If you handle the telescope gently during transport, then only
slight adjustments will need to be made to the mirrors. Use
the LaserMate Deluxe before each observing session to
check and make adjustments to the mirrors as needed.
Care and Maintenance of Your LaserMate Deluxe
Your LaserMate Deluxe is manufactured of the highest quality components and is carefully aligned and tested at the
factory. Like all electronic equipment, it should be handled
with care. If it is dropped or handled roughly, it may need to
be returned to the factory for re-alignment. It should not be
exposed to water, dust, heat or sunlight.To extend battery life
store in a cool, dry environment.
Installing New Batteries
When the LaserMate Deluxe’s laser beam starts to dim or
completely fades, it is necessary to install new batteries. To
3
Figure 9a, 9b: To center the red laser spot on the primary
mirror, you will need to adjust the tilt of the secondary mirror.
Laser point
Laser spot
on primary
mirror
Before
After
Hole
Viewing screen
Laser hole
Viewng screen
Laser Mate
Deluxe’s
case
Laser
housing
Batteries
Top of laser
housing
Spring
Top of Laser Mate
Deluxe’s case
Figure 12: To install new batteries, remove the top of the
LaserMate Deluxe’s case and the top of the laser housing.
Figure 10: The laser spot has been reflected back to the
viewing screen of the LaserMate Deluxe.The object now is to
adjust the tilt of the mirror until the laser point is going back
into the hole.
Figure 11: Once the laser spot is going back into the hole the
laser beam originally came out of, the telescope is properly
collimated.
Page 4

change batteries, you must unthread the top of the LaserMate
Deluxe’s black aluminum case (Figure 12). This will expose
the laser housing. Be careful not to lose the spring that goes
between the top of the case and the laser housing.
Do not attempt to remove the laser housing from the
LaserMate Deluxe unit, or your collimator will need to be realigned at the factory .Also, removing the laser housing will void
your factory warranty. It is necessary, however, to remove the
top of the laser housing to access the battery compartment.
Unthread the top of the laser housing. The battery compar tment will now be exposed. If you have difficulty unthreading
the top of the laser housing, slip a straightened paper clip or
small rod through the hole in the top of the housing for extra
leverage.
Remove the spent batteries and install two fresh batteries.
The batteries should be inserted so that the positive (+) end
of the batteries face the open end of the battery compartment. After installing new batteries, replace the top of the
laser housing, the spring, and the top of the LaserMate
Deluxe’s case. Batter y life is approximately three hours, so
remember to keep the LaserMate Deluxe turned off when not
in use to maximize battery life. Orion has sets of LR-44 batteries available, so call Orion Customer Service at
1-800-447-1001 or visit our website at www.telescope.com to
order a new set.
Specifications
Laser power: less than 5mW
Laser wavelength:650nm
Alignment: ± 3 arcmin
Focuser size:1.25", fits 2" with optional 2"-to-1.25" adapter
Case: aluminum, black anodized
Dimensions: 5.875" long x 1.6" diameter
Weight: 9.8 oz
Batteries: LR-44, quantity 2
Battery life: approximately 3 hours
Certification: meets all FDA regulations applicable
at the time of manufacture
Appendix: Centering the Secondary Mirror Under
the Focuser
In order to use the LaserMate Deluxe to center the secondary
mirror underneath the focuser, you must mark the center of
the secondary mirror.Do this by first removing the secondary
mirror from the telescope and making a paper template the
same way you made a template for the primary mirror. Use
the template and one of the remaining collimation targets to
mark the secondary mirror’s center. Reinstall the secondary
mirror once its center has been marked.
Place the LaserMate Deluxe into the telescope’s focuser and
turn it on. Now, peer into the optical tube and look at the primary mirror. Notice the reflection of the secondary mirror on
the primary mirror ; you will see a bright red spot on the secondary mirror where the laser beam is reflecting off it.The red
spot should be exactly at the center of the collimation target
on the secondary mirror. If it is not, you will need to make
adjustments to the secondary mirror’s position until it is. For
adjustments perpendicular to the optical axis, lengthen and
shorten the spider vanes.For adjustments parallel to the optical axis, loosen or tighten the screw centered in the spider’s
central hub.You may also need to adjust the rotation of the
secondary mirror relative to the focuser.
This product complies with 21 CFR 1040.10 and 1040.11
Orion Telescopes & Binoculars
Post Office Box 1815, Santa Cruz, CA 95061
Customer Support Help Line (800) 676-1343 • Day or Evening
One-Year Limited Warranty
The Orion LaserMate Collimator Deluxe is warranted against defects in materials or
workmanship for a period of one year from the date of purchase. This warranty is for the
benefit of the original retail purchaser only. During this warranty period Orion Telescopes
& Binoculars will repair or replace, at Orion’s option, any warranted instrument that proves
to be defective, provided it is returned postage paid to: Orion Warranty Repair, 89 Hangar
Way, Watsonville, CA 95076. If the product is not registered, proof of purchase (such as
a copy of the original invoice) is required.
This warranty does not apply if, in Orion’s judgement, the instrument has been abused,
mishandled, or modified, nor does it apply to normal wear and tear. In addition, the warranty is also void if the laser housing is removed from the unit, the product’s label is
removed, or any other attempt is made to change the laser’s alignment. Factory realignment is a service not covered by this warranty. This warranty gives you specific legal
rights, and you may also have other rights, which vary from state to state. For further warranty information, contact: Customer Service Department, Orion Telescopes & Binoculars,
P.O. Box 1815, Santa Cruz, CA 95061; (800) 676 1343.
 Loading...