


Origen
VF110 User Guide

Contents
Page
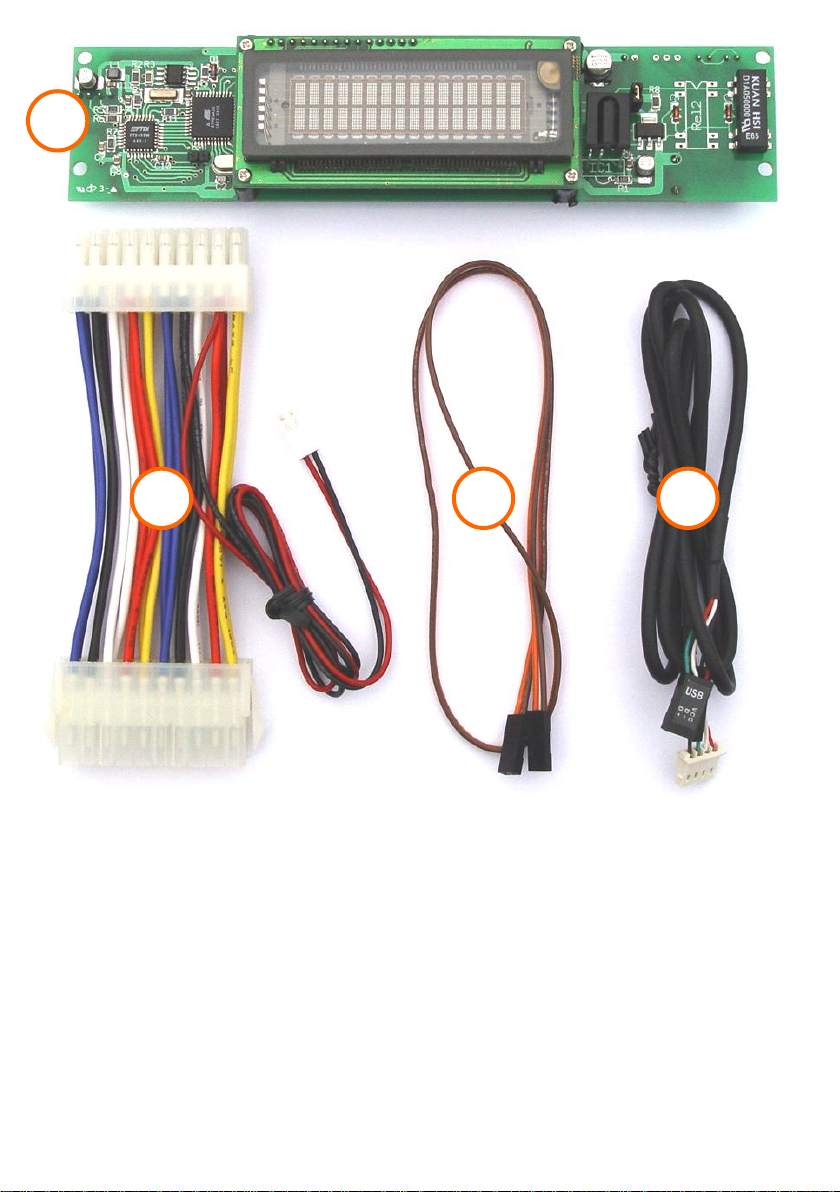
VFD/IR Module Components
Installing Hardware
Installing Software
Using IR Trans
Changing the Boot Message
Power On Function
3
4 - 5
6
7 - 14
15
16 - 17
1
2
1. VFD/IR Module
2. ATX Power Cable
3. Motherboard Power Switch Cable
4. Internal USB Header Cable
3
4
3

Please note: Before installing any hardware please ensure
that the power is switched of and disconnected from any
live source. VFD Modules carry a high voltage that can
cause electricution
Remove drive chassis to allow access to the VFD case
mounts. Attach the VFD module using the 4 screws
provided.
4
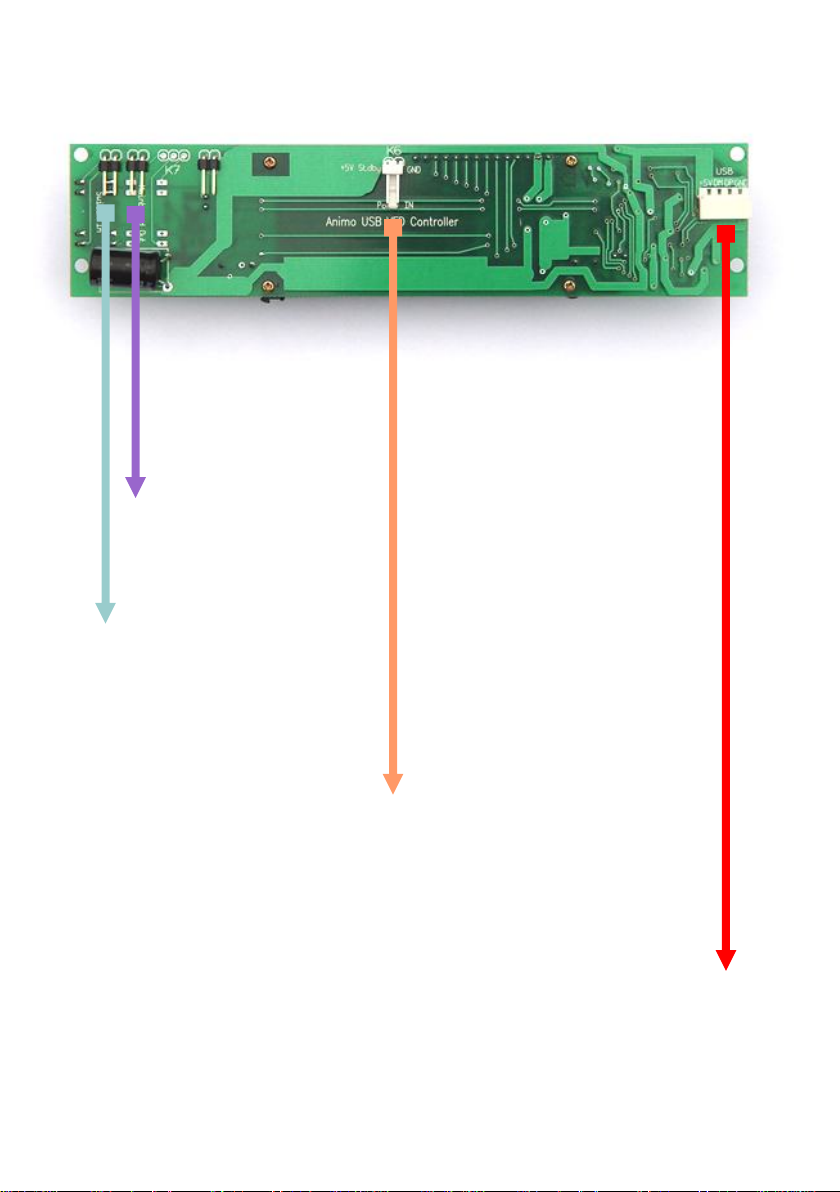
To Motherboard ‘Power
On Switch’ Header
To Case Power On
Switch
To ATX Power Supply
Cable
To Motherboard
Internal USB Header
USB Pin
Configuration
RED:
WHITE:
GREEN:
BLACK:
VCC+
D-
D+
GND
5
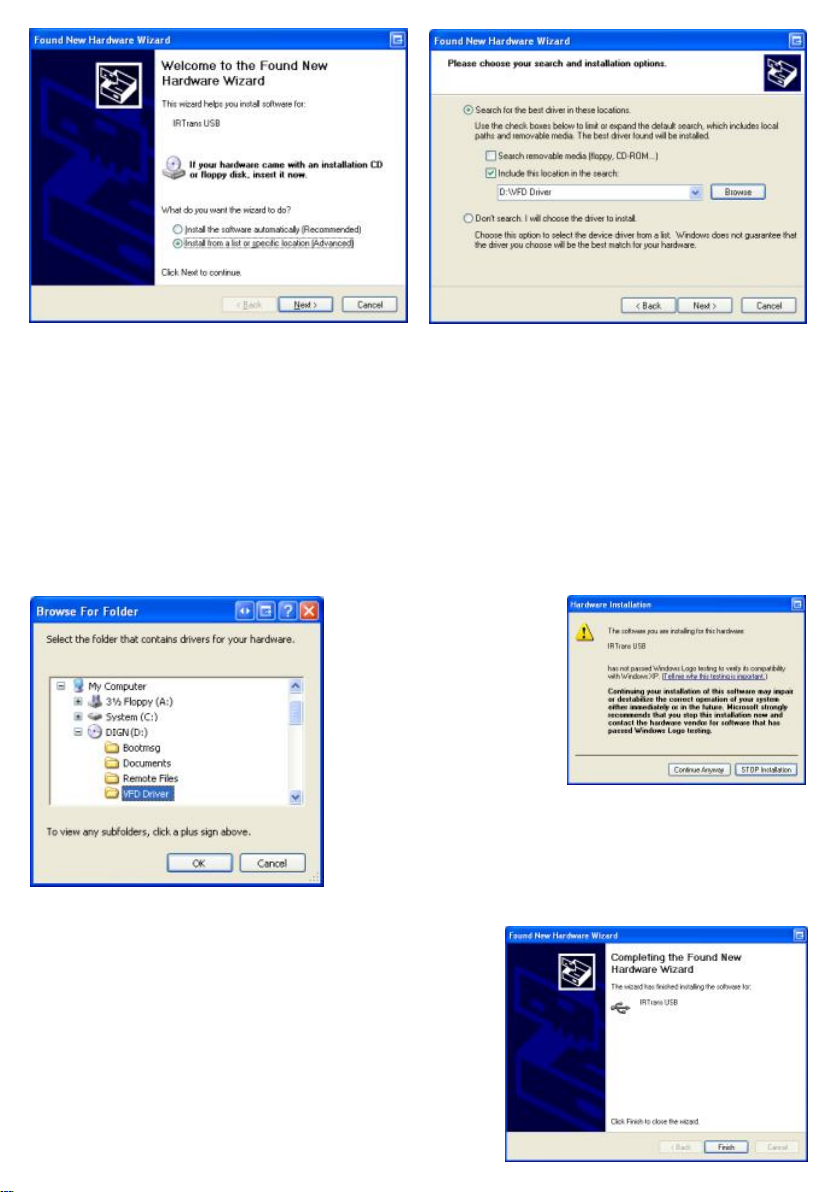
(1) If the hardware has been
installed correctly, when windows
boots for the first time you will be
prompted by the ‘Found New
Hardware Wizard’. Make sure the
Origen CD is in your ROM drive,
select ‘Install from a specific
location (Advanced)’ and click
‘Next’
(3) Browse to your ROM DRIVE
and select the folder ‘VFD Driver’,
then Click ‘OK’. When returned to
the previous dialogue box, click
‘Next’
(2) Make sure ‘Search for the best
driver in these locations’ and
‘Include this location in the search’
are selected. Then click ‘Browse’
(4) Click ‘Continue anyway’ at the
compatibility prompt, then click
‘Finish on the screen below to
complete the driver installation.
6

(1) If you are installing the VFD
software from the CD, select your
case model and click ‘DIGN VFD
Software Setup’ alternatively
download the software from our
website, unzip and run setup.exe
Select Language
(2)
Click Next
(3)
(4) Select destination folder
(5) Select installation type, typical
is recommended.
7

(6) Select start menu group. (7) Click ‘Next’ to begin the install.
(8) If the ‘could not rename file’
and ‘could not delete file’ message
appears, ignore this message and
click ‘OK’ to continue.
(9) Setup is now complete.
8

?IRTrans CCF Format (for Commands used by the Philips Pronto™):
[REMOTE]
[COMMANDS]
The CCF Format allows to use the huge number of IR Codes available for the Philips Pronto™ for the IRTrans
system. Currently all Mode 0, 1, 5 and 6 (first Field = 0000, 0001, 0005, 0006) Commands can be used.
These are almost all files available for example at . The codes that are used
have to be extracted using the Pronto Edit™ Software. Informations about the Philips Pronto™ can be found
www.pronto.philips.com
at . New command files can easily be created based on the file ccf.rem.
When copying definitions care should be taken to change the name of the remote in the [REMOTE]
section of the file..
In any case the terms of license provided Philips Corporation for the Pronto Edit Software should be
observed!
IRTrans GUI Client
The VB client allows learning of IR Commands. Furthermore IR Commands can be sent and you can set up a
simple Remote Control. Even commands that are not included in the simple Remote Control can
be sent. In addition, all the parameters of all IRTrans units connected to the serial bus can be configured. The
GUI client uses the IRTrans Server Socket (21000) to connect to the server.
The GUI Client is a Windows program, nevertheless via a TCP/IP Network it can also control a system
connected to a LINUX Server. When starting the Client the Hostname or IP Address of the IRTrans Server can
be entered as a command line Parameter. If it is not entered this setting
defaults to localhost.
[NAME]ccf
[1][CCF]0000 0067 0000 000d 0060 0018 0018 0018 0018 0018 0018 0018 0018 0018
0018 0018 0018 0018 0018 0018 0030 0018 0018 0018 0018 0018 0018 0018 0030
043c
[v+][CCF]0000 006d 0022 0002 0155 00aa 0016 003f 0016 0015 0016 003f 0016 003f
0016 003f 0016 003f 0016 003f 0016 0015 0016 0015 0016 003f 0016 0015 0016 0015
0016 0015 0016 0015 0016 0015 0016 003f 0016 003f 0016 0015 0016 003f 0016 003f
0016 0014 0016 0014 0016 0014 0016 003f 0016 0015 0016 003f 0016 0015 0016 0015
0016 003f 0016 003f 0016 003f 0016 0015 0016 05e7 0155 0055 0016 0e3b
www.remotecentral.com
Currently the GUI Client supports German
and English. The language is selected
based on the language of the Operating
System.
After starting the program the GUI Client
shows a sample Remote Control. It is defined
in the file remote.irm in the working folder of
the GUI Client. It can easily be configured by
editing this file. Of course that sample Remote
Control does not work until the corresponding
commands have been learned.
Main window of the IRTrans GUI Client
9

The format of the file remote.irm:
[MAIN]
[FRMPIX]400,300
[SEP]0,45 [END]500,45
[MOD]10,10 [SIZE]40,25[PANEL]TV
[MOD]60,10 [SIZE]40,25[PANEL]CD
[END]
[CD]
[FRMPIX]460,280
[LBL]10,250 [SIZE]300,30[TEXT]CD[FONT]14
[POS]10,10 [SIZE]100,30[TEXT]Power On [REMOTE]Yamaha
[COMMAND]PowerOn
[POS]120,10 [SIZE]100,30[TEXT]Power Off [REMOTE]Yamaha
[COMMAND]PowerOff
[POS]10,50 [SIZE]100,30[TEXT]Vol - [REMOTE]Yamaha
[COMMAND]Vol-
[POS]120,50 [SIZE]100,30[TEXT]Vol + [REMOTE]Yamaha
[COMMAND]Vol+
[POS]230,10 [SIZE]100,30[TEXT]CD [REMOTE]Yamaha [COMMAND]CD
[POS]340,10 [SIZE]100,30[TEXT]Tuner [REMOTE]Yamaha
[COMMAND]Tuner
[POS]10,200 [SIZE]100,30[TEXT]Prev Track [REMOTE]Sony
[COMMAND]Prev
[POS]120,200 [SIZE]100,30[TEXT]Play [REMOTE]Sony [COMMAND]Play
[POS]230,200 [SIZE]100,30[TEXT]Next Track [REMOTE]Sony
[COMMAND]Next
[POS]340,200 [SIZE]100,30[TEXT]Stop [REMOTE]Sony [COMMAND]Stop
[END]
This excerpt shows a sample configuration
[Main] section defines the part of the remote that is always visible. This section should be used to
place commands to select different devices or commands that should be available with every
device (like
Volume +/-).
[MOD] lines define commands used to switch between different panels of the remote. In addition
these remotes appear in the „Remotes“ menu.
[FRMPIX] is used to define the size of different panels of the remote (in Pixels). That allows to
use different sizes for different panels of the remote.
[LBL] allows to insert texts in different sizes.
[POS] finaly defines the Remote Buttons itself. They can have different sizes and, of course, a
text.
[REMOTE] and [COMMAND] are used to assign the remote commands. Commands that are not
defined in the current IR Database appear in Gray (disabled).
10

Using the Learn Command in the Mode Menu new IR Commands can be learned. To learn commands a
remote control is entered at first. This is the name of the ASCII File used by the database to store the
commands of this remote. If the remote control already exists the new commands will be appended.
First the Name for a new Remote control is chosen and entered. Of course it is also possible to enter the
name of an existing Remote. Then the newly learned commands are added to the existing ones.
After the remote has been defined, a timing has to be
learned. This timing will be the basis for the commands. To
learn the timing the remote has to be kept in a straight line
with the receiver. The distance does not matter to much but
the IR ray should reach the receiver in a direct line and not
reflected by walls.
The advantage of the separate learning of the timing is, that
the commands can be learned very easily afterwards
because the exact timing does not matter. In general it is
best to press the key of the remote only once and for a
short period of time. If you hold the key depressed for a
longer time the recognition of the codes may be
compromised by special repeat codes the remote control
uses.
Now a Timing can be learned. During that procedure the
IRTrans measures the Pulse
lengths of the IR Codes and analyzes the Protocol. This is
the Remote controls buttons. When learning a timing the Remote control
should face the IRTrans directly, not reflected by wall as that might affect the timings learned.
After the timing is learned, the IR commands can be learned. Every command gets an alphanumeric name
that is used to identify the command later on. The normal learn mode is based on the timing learned before. If
you relearn a command already in the database, the old command will be replaced by the new one.
done by shortly pressing one of
Next the IR Commands are learned. To do that a command name is
entered and the learning is started by pressing Learn Command. Now
the corresponding Remote Button is pressed.
To learn a command the Button of the Remote Control should be
pressed very short.
This procedure is repeated for every Remote Button. The VB Client
always counts the
Commands and Timings and shows the Code of the learned
Commands.
11
For special purposes there are additional Learn modes:
?Repeat Code. This mode learns Repeat Codes. These codes are sent if a key is held
depressed. Not all remote systems use repeat codes. You only need to learn them if keeping a
button depressed does not work. You only need to learn these codes for keys like “Vol-Up” or
other keys you like to hold down. To learn these codes you need to keep the corresponding
button of the remote control pressed a little bit longer (like 1s).
?Learn command with timing. Some remote controls use different timings for different
commands. If some commands can not be learned with the recorded timing, this function allows
learning them. The timing for every command is stored individually.
?Toggle Command. Some remotes use Toggle bit and command variation. They send
different codes every time you press a button. This allows easier detection of keys that are held
down. If you use this option you have to learn the same command more then once (normally 2-5
times is enough). Every code is stored individually. You do not need this option for the popular
Philips RC5 / RC6 codes. They are recognized by the IRTrans firmware and the firmware takes
care of the Toggle Bits. RC5 / RC6 are the only popular systems using Toggle bits.
?RAW Mode. Certain remotes use codes, which are very special and can not be decoded
by IRTrans on the fly. These codes are rare but some exist. For instance some light control
systems use very special codes as the receivers are very simple. Using RAW mode IRTrans can
learn almost every Code and send it again. If you want to use RAW Codes to control the PC, the
IRTrans has to be set into RAW mode in the status menu. You do not need to do that to learn and
send RAW codes. If this mode is activated, only RAW codes can be used to control the PC.
However you can still learn and send decoded commands. If the RAW mode is activated, RAW
codes are also used on the serial bus. Because there is more data transferred and the
recognition of commands is not as safe as in decoded mode the RAW mode of the IRTrans
should only be enabled if you need to control the PC using a special remote. You can learn and
send RAW codes even without activating the RAW mode.
?RAW Repeat. RAW Codes can also be learned as repeat codes. Here you also have to
press the key a bit longer. All learning modes can be used via the serial bus, too. It does not
matter, which IRTrans unit is used.
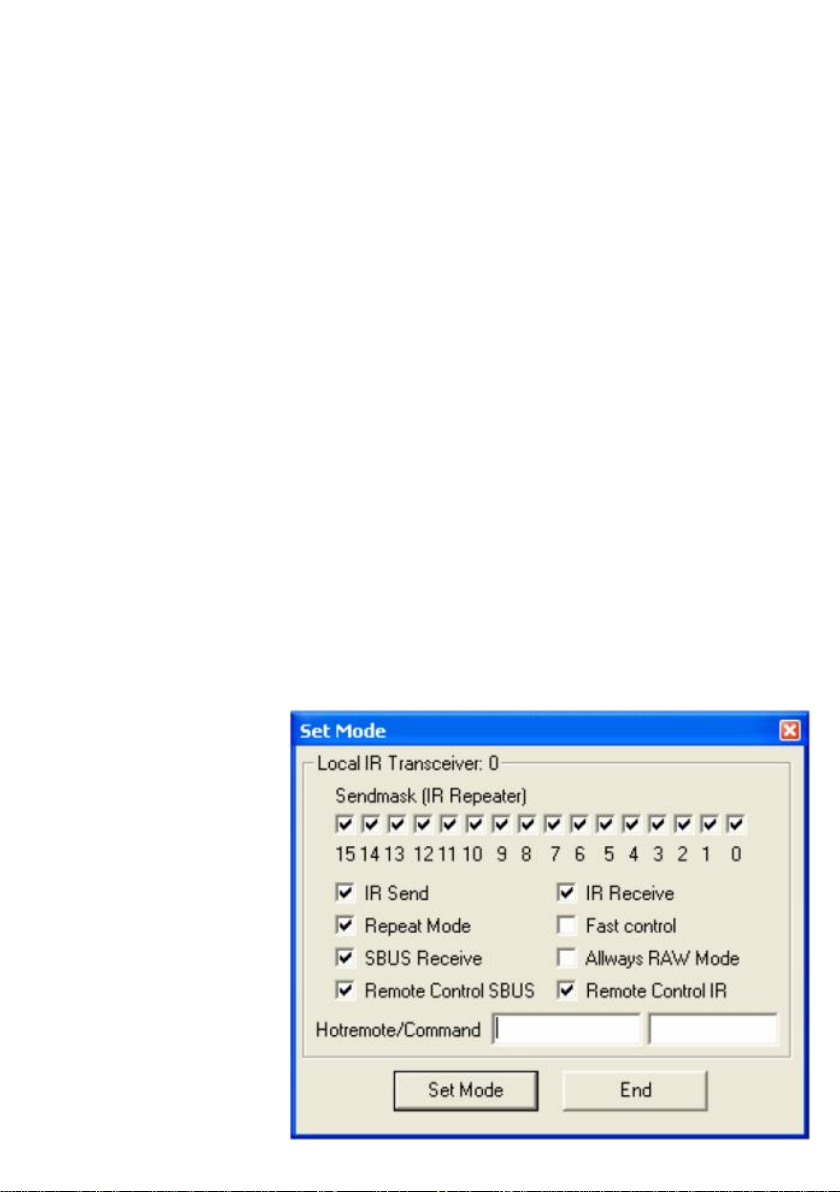
The Status page can be
reached through the Menu
Option Mode-Device Status.
All selections in this Page will
be stored permanently in the
EEPROM of the IRTrans. If
more then one IRTrans
Module is connected the
correct one has to be selected
in the Device list first.
If your IRTrans Module does
not work correctly (e.g. no
IR Receive) you should first
check if the options of the
Status Page are set
correctly.
12

?The Sendmask defines which source addresses are accepted as source for IR commands to be
repeated.
?IR Send. This flag activates the IR transmitter.
?IR Receive. This flag activates the IR Receiver.
?SBUS Receive. If this flag is set, IRTrans reacts on commands coming through the serial bus.
?Remote Control IR. This flag activates the IR Remote control mode for a connected PC.
?Remote Control SBUS. This flag activates the Remote control mode for a connected PC through
the serial bus.
?Always RAW Mode. This mode allows controlling the PC using RAW Codes. It is only needed, if
the PC has to be controlled using a remote control that can only be learned in RAW mode. Not all
controllers on the serial bus have to use this. Typically only the controller connected to the PC has
to use this mode. If you use this special mode, every command that will be used to control the
PC has to be learned as a RAW code. Commands that will only be sent can still be learned as
decoded commands.
?Fast Control. This is a special mode to control the PC very fast and easy. To achieve this, the
received codes are decoded faster then normal. RAW codes will be decoded in a limited length;
normal codes will be decoded without taking repeats into account. This makes it easier and faster to
detect pressed and held buttons. However, that can lead to problems using the Repeat mode on the
serial bus. Therefore it makes sense to activate this flag only on controllers connected to the PC.
Because of the latency of the serial bus this mode does not make to much sense on controllers not
directly connected to the PC. If you are learning codes that should be sent again, never use this
mode while learning the codes! If you are learning RAW codes to control the PC this mode has to
be switched on during learning. If you are learning decoded codes, it should be switched off while
learning.
?Hotremote/Command. If you want to switch on the PC using the IRTrans PowerOn module, you
have to specify the command to use here. (Remote + command to use). If you do not use the
Power On module you can leave these fields blank.
If you use the IRTrans in RAW mode this has to be a RAW command, too.
The ASCII / Batch Client
Works on Windows and LINUX. When the Server is running on the same System the Client can be started
with the Command line ./irclient localhost. The Client allows Learning and Sending of Commands and the
setting of the Status flags of the IRTrans. Normally it works Menu-Driven but it can also be used to send
commands with Programs and scripts. To do that it is started with irclient <hostname> <Remote>
<Command>. If needed an Adressmask to control multi-zone systems can be used, too. When used it will be
the 4th parameter.
When using the Menu Driven Mode it can also be used to control the IRTrans Firmware settings.
Using LIRC Clients
Every LIRC client can be used with IRTrans. The IRTrans server implements a standard LIRC application
socket (only LINUX) and a standard LIRC TCP/IP socket to be compatible with LIRC. Every LIRC
client can be used with IRTrans. Using LIRC clients you can remotecontrol your PC and send commands.
Only the learning of commands has to be done through the GUI or ASCII client as the LIRC protocol does not
support learning of commands.
The irserver completely replaces lircd. That means that the LIRC server (lircd) should not run on the
system.
There can be several LIRC and IRTrans clients connected to the server at the same time. The TCP/IP socket
allows connections from different clients over the network. A very versatile client is irexec, delivered with
LIRC. It allows executing any command triggered by an IR command received by IRTrans. It is also possible
to send commands. That can be used to store complex commands: Switch on your Receiver and TV if you
start the DVD player on the PC …
The IRTrans Server is fully compatible with the LINUX VDR system. It is used in the same way as LIRC. Of
course you have to learn your commands the right way, because the name of the commands is fixed
inside VDR.
13
Changing the Rom Boot Message
Follow the steps below ensuring that IR Trans software is installed and
running correctly:
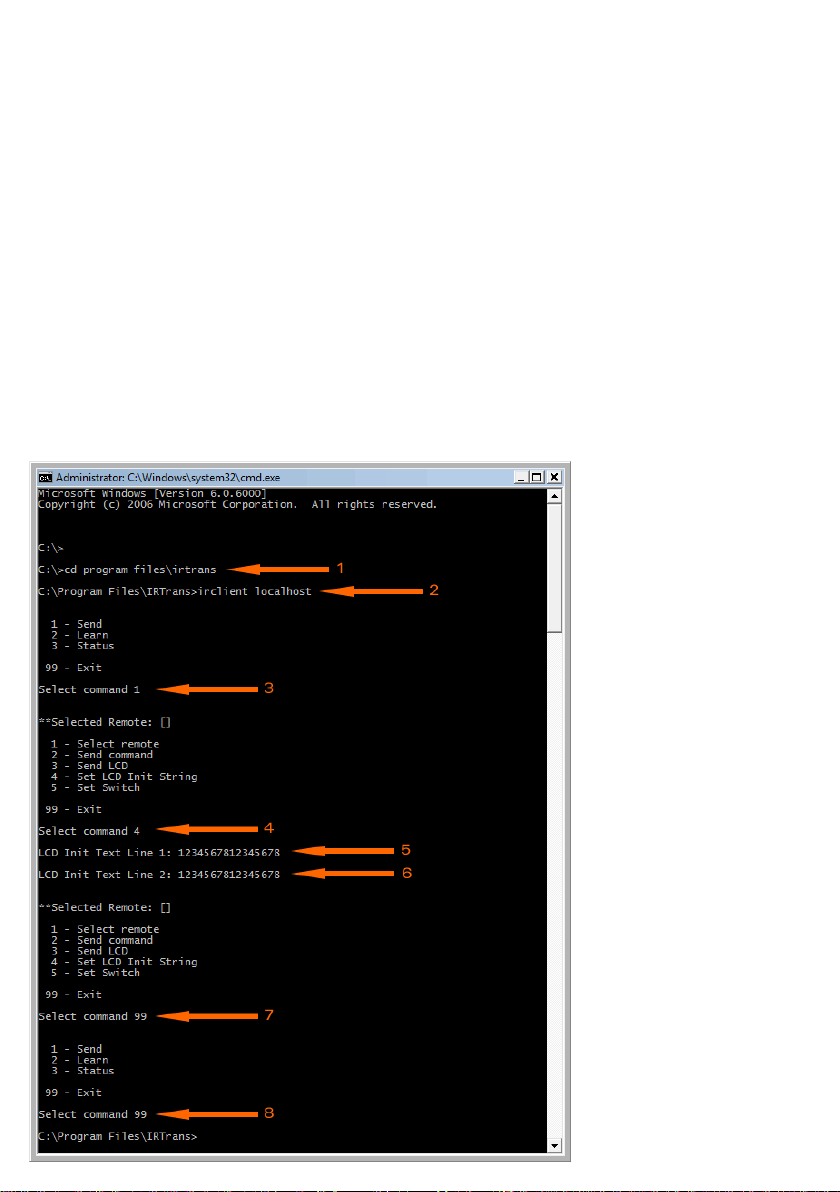
1. Open a command prompt and go to the IRTrans install folder
2. Type ‘irclient localhost’ and press enter
3. You will get a prompt with 3 options. Type ‘1’ (send) and press enter
4. At the next prompt type ‘4’ (set LCD init string) and press enter
5. Enter up to 16 characters that will be displayed on the first line of the VFD
and press enter
6. Enter up to 16 characters that will be displayed on the second line of the VFD
and press enter
7. Type ‘99’ to exit and press enter
8. Type ‘99’ to exit the program and close the command prompt window
When you next power off then on the VFD, the display will show the new text.
14

Setting Up Power On Feature
The DIGN VFD Module is capable
of switching a HTPC off or on from
cold state. For this feature to work,
you must ensure that the
motherboard power on switch is
connected to the VFD Module. IR
Trans must also be installed.
1. Locate and Run the ‘IR Trans
GUI Client’
3. In the Open / Create Remote
box type “SKPOWER”
4. Click ‘Learn Timing’ and press
any button on the remote you are
using.
2. Click on ‘Learn Command’
A number should appear in the
‘Timings’ and ‘Commands’ box.
15

5. In the ‘Learn Command’ box
type “POWERBUTTON” then click
the ‘Learn Command’ and press
the ‘Power Button’ on the remote.
6.The ‘Code’ box should now show
a string on 0’s and 1’s. Click Finsh
8. In the Hotremote/Command
input boxes enter “SKPOWER” in
the first box and
“POWERBUTTON” in the second.
Then click ‘Set Mode’
7. In the IR Trans GUI Client
click on ‘Device Status’
9. The Power Button on the remote
will now function like the Power
Button on the case. You can
change what the Power Button
does by going into ‘Power Option
Properties’ in Windows.
16

Notes
17
 Loading...