


ENGLISH
ANALOGUE QUARTZ WATCHES
INSTRUCTION MANUAL
Thank you for choosing our product. To ensure prolonged use and optimum
performance, please read this instruction manual carefully and familiarize
your-self with the terms of the guarantee.
Please keep this Instruction Manual handy for future reference.
SAFETY PRECAUTIONS
Make absolutely sure to observe the demarcated contents indicated below to
prevent any possible physical danger and property damage to you as well as
other people concerned.
... A demarcation with this symbol represents the contents
assuming possibility for death or serious injury
!
!
WARNING
CAUTION
when the product is used in any manner different from
given instructions.
... A demarcation with this symbol represents the contents
assuming possibility of causing human injury or
material damage only when a product is used in any
manner different from given instructions.
ENGLISH
1

ENGLISH
IN HANDLING THE WATCH
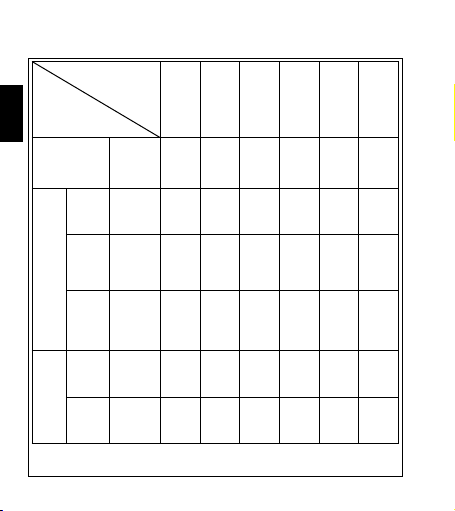
(1) Water-resistance
Type
Non water resistant
Water
resistant for
daily life
Reinforced
water
Water
resistance
resistant
for daily
watches
life I
Reinforced
water
resistance
for daily
life II
Diver’s
watch for Air
Diving
Diver’s
watches
Diver’s
watch for
Mixed-gas
Diving
* It is recommended that you use the watch correctly following the above-mentioned scope of usage
after ascertaining water resistance precautions marked on the dial or caseback.
Conditions
of use
Without
WATER
RESISTANT
(WATER
RESIST)
WATER
RESISTANT
(WATER
RESIST)
WATER
RESISTANT
(WATER
RESIST)
50m (5bar)
WATER
RESISTANT
(WATER
RESIST)
100m (10bar)
200m (20bar)
AIR DIVER’S
100m / 150m
200m
He-GAS
DIVER’S
200m / 300m /...
Underwater
Exposure
Water sports
Skin diving
operation of
crown and
operation
of crown
with drops
of water
on it
to small
amounts
of water
(facewashing,
rain, etc.)
(swimming,
etc.),
frequent
contact with
water (carwashing,
etc.)
(air tanks
are not
used)
Scuba
diving
(air tanks
are used)
ЧЧЧЧЧЧ
×
×
×
×
×
××××
×××
2
Mixed-gas
Diving
(using
helium
gas)
××
×

WARNING
!
1 A watch with water resistance for daily life 30m (3 bar) can be used during
face-washing, etc. but cannot be used in an environment in which it will be
submerged in water.
2 A watch with reinforced water resistance for daily life I 50m (5 bar) can be
used while swimming, etc. but cannot be used during any type of diving
including skin diving.
3 A watch with reinforced water resistance for daily life II 100m or 200m (10
or 20 bar) can be used while skin diving, but cannot be used while scuba
diving using oxygen tanks or saturation diving using helium gas, etc.
CAUTION
!
4 Keep the crown pushed in at all times (in the normal position) while using
the watch. If the crown is the screwed-down type, check that it is securely
screwed down.
5 Do not operate the crown underwater, or while the watch is wet. Water
may enter the interior of the watch and defeat the water resistance.
6 If your watch is non-water resistant, beware of splashes of water (during
face washing, rain, etc.) and sweat. If the watch becomes wet from water
or sweat, wipe the moisture off with a dry, soft cloth.
7 Even with a water resistant watch for everyday use, avoid directing strong
jets of mains water onto the watch. Water pressure above the limit can
apply, which may defeat the water resistance.
8 With a water resistant watch for everyday use, rinse sea water off the case
after exposure, then wipe it thoroughly to avoid corrosion and other effects.
9 The interior of the watch contains some amount of moisture, which may
cause fogging on the inside of the glass when the outside air is cooler than
the internal temperature of the watch. If the fogging is temporary it causes
no harm inside the watch, but if prolonged, or if water enters the watch,
consult your place of purchase and do not leave the problem untreated.
ENGLISH
3

(2) Handling the Battery
ENGLISH
WARNING
!
1 Store the battery out of the reach of infants and other young children. Should
the battery be accidentally ingested, contact a doctor immediately.
2 Do not remove the battery from the watch. Contact the place of purchase
of the watch or your nearest ORIENT authorized service center for
assistance when wanting to remove the battery.
3 The battery used in this watch is not a rechargeable battery, so it cannot be
recharged and used again. Do not attempt to charge the battery as doing
so could cause it to overheat or explode.
4 A skin rash or other symptom may develop if leaking battery fluid comes
into contact with skin. Do not leave depleted batteries sitting around for
long periods of time.
(3) Replacing the Battery
CAUTION
!
1 Depleted batteries that are left sitting in the watch for long periods of time
may begin to leak battery acid, which could lead to malfunction. Be sure to
replace depleted batteries as soon as possible.
2 Replace the watch battery only with the specified battery type.
3 Battery replacement requires special-purpose tools, techniques, etc.
Reversing the polarities when inserting the battery may cause the battery
to overheat or explode. Contact the place of purchase or your nearest
ORIENT authorized service center for assistance when wanting to replace
the battery.
4

(4) Shock
1 Be sure not to carry the watch when you engage in strenuous
sports, whereas playing such light sports as golf, etc., will not
adversely influence the watch.
2 Avoid a violent shock such as dropping the watch on the
floor.
(5) Magnetism
1 If the watch is left at a location with strong magnetism for an extended
period of time, the components may be magnetized, resulting in
malfunction. Be careful.
2 The watch may temporarily speed up or slow down when exposed to
magnetism. Precision is restored when placed away from magnetism. In
such a case, reset the time.
(6) Vibration
The watch may lose precision if subjected to strong
vibrations such as from riding motorcycles, using
jackhammers, chain saws, etc.
(7) Temperature
In environments below and above normal temperatures (5°C-35°C), the
watch may malfunction and stop.
CAUTION
!
Do not use the watch at high temperatures, such as in a sauna. The watch
may heat and cause burns.
(8) Chemicals, Gases, etc.
Utmost caution must be exercised when coming into contact with gases,
mercury, chemicals (paint thinner, gasoline, various solvents, detergents
containing such components, adhesives, paint, drugs, perfumes,
cosmetics, etc.), and so forth. Such may cause discoloration of the
watchcase, watchband, and dial face. Discoloration, deformation, and
damage to various resin-based component parts may also occur.
ENGLISH
5

(9) About accessory parts
ENGLISH
CAUTION
!
Do not attempt to disassemble or modify this product.
WARNING
!
Store the bracelet/strap pin and other small parts out of the reach of
children.
If any small parts are swallowed, immediately contact a doctor.
(10) Allergic reactions
CAUTION
!
If you develop a skin rash or your skin becomes abnormally irritated due to
contact with the watch or strap, stop wearing the watch immediately and
consult a doctor.
(11) About “luminous light”
Some Products have luminous light on the hands and dial.
The luminous light is a safe paint that stores sunlight and artificial light
without using any radioactive material, and emits that light in a dark
setting. As the paint discharges the stored light, it will become dimmer
over time. The amount of light emitted and the time that light is emitted
depends on various factors when the light is stored, such as the shape
of the glass, the thickness of the paint, surrounding brightness level, the
distance from the watch to the light source, and the light absorption level.
Please note that when not enough light energy is stored, the watch may
emit weak light or emit light for only a short time.
(12) Water resistant watchband
Some products employ leather and nylon bands on which a special
treatment to resist perspiration and water absorption have been applied.
Please understand that the water resisting effect of this watchband can be
lost depending on the period and conditions of use.
6

HOW TO IDENTIFY THE CALIBER NUMBER
Check the caliber number by referring to the model number of your watch or
the case code on the watch’s case back.
1. Searching by 10-digit model number
Check the 10-digit model number on the guarantee supplied with your watch.
You can also see the number on the product tag put on the watch. Its second
and third digits indicate the caliber number of your watch.
If the model number is “□UW00005B□”, the caliber number is
Example:
“UW”.
2. Searching by the case code
See the case code on the case back of your watch.
The first two digits indicate the caliber number.
Example: When the case code is “UW00-C0”, the caliber number is “UW”.
Case code
* The place of case code may vary and its letter size may be small and
difficult to see depending on the characteristics of watches.
* The pictures and illustrations on this manual may differ from the actual
appearance of your watch but the function and operation procedures are
the same.
FEATURES
(1) This is an analogue crystal oscillator watch.
(2) The current time is indicated by the hour, minute and second hands.
(3) The date and the day of the week are indicated by hands.
*The day of the week is shown using retrograde display *UU(KHA) only
(4) The 24-hour time is indicated by hand *UU(KHA) only
ENGLISH
7

ENGLISH
SPECIFICATIONS
(1) Crystal oscillator frequency …
(2) Wrist-worn accuracy … Mean monthly rate: ±20 seconds
(3) Operating temperature range … –5°C to +50°C
(4) Drive system … Step motor
(5) Battery … SR920SW ; 1 piece
(6) Battery life … Approximately 3 years from insertion of
* The above specifications may change without notice for improvement.
NAMES AND FUNCTIONS OF INDIVIDUAL COMPONENT PARTS
A: Hour hand
B: Minute hand
C: Second hand
D: Crown
E: Dial
F: Date hand
G:
Day of the week hand
H: 24-hour hand
* The position of date, day of the week, 24-hour hands and crown differ on
some models.
32,768 Hz (Hz = Oscillations per second)
(at 5°C to 35°C)
a new battery
<UU (KHA)> <UW (KUA)>
G
A
C
G
B
F
A
C
D
E
H
㻿
㻹
㻿
㼀
㻲
㼃
㼀
MODELS WITH SCREWED-DOWN CROWN
Depending on the model, you may not be able to pull the crown out without
unscrewing it (models with screwed-down crown).
Operate this type of watch as follows:
(1) Before setting the date and time, first turn the crown to the left to loosen
the screw lock.
(2) After setting the date and time, turn the crown to the right while pressing
in, until it stops turning to securely tighten the screw.
8
B
D
E
F

HOW TO SET THE TIME AND CALENDAR
[How to set the time and day of the week]
* Days of the week are not automatically adjusted. Adjust the day of the week
by turning the hour and minute hands before setting the time.
(1) Pull out the crown to the second click when the
second hand is at the 12 o’clock position. The second
hand stops on the spot.
(2) Turn the crown to set the day of the week.
• Turn the crown clockwise.
When the 12 o’clock
position is passed, the day
of the week hand begins to
change.
• Advance the hour and minute hands until the day of the week hand
indicates the next day.
• If further adjustment of the day of the week hand is required, turn the
crown counter-clockwise and go back 4 to 5 hours.
Turn the crown forward again to advance the day of the week hand
faster.
• Repeat this step and set the day of the week.
(3) After the day of the week is set, set the time.
* This watch features a calendar function.
When setting the hour hand, check that AM/PM is
set correctly. The date changes at “0:00 AM”.
Check AM or PM with the 24-hour hand. *UU(KHA) only
* When setting the time, first advance it 4 to 5 minutes ahead of the
desired time, and then turn it back to the exact
time.
Clockwise
㻿
㻹
㻿
㼀
㻲
㼃
㼀
㻿
㻹
㻿
㼀
㻲
㼃
㼀
Counterclockwise
(4) Push the crown back in to the normal position.
ENGLISH
9

[How to set the date]
ENGLISH
CAUTION
!
* Do not set the date during the time period noted below because the date
is changing.
9 PM to 1 AM
If date is set during this time period, the date may not change properly on
subsequent days.
* Avoid this time period when setting the date.
(1) Pull out the crown to the first click.
* The crown on this watch has two click positions.
(2) Turn the crown counterclockwise and adjust the date.
(3) Push the crown back in to the normal position.
* Adjusting the date at the end of months
It is necessary to adjust the date following months with
30 days or less. Set the date to “1” on the first day of the
following month.
[24-hour hand]
The 24-hour hand is interlocked with the hour hand and cannot be adjusted
individually.
* The position of date, day of the week and 24-hour hands and crown differ
*UU(KHA) only
on some models.
Counterclockwise
10

U HOW TO USE THE ROTATING INDICATOR BEZEL
Please notice that some models come with a rotating
indicator bezel, which should be used properly.
Turn the bezel by pointing the mark to the minute
hand.
While certain time goes by, you can measure the
elapsed time from the distance between minute hand
and figures on the rotating indicator bezel.
You can also set the mark as a desired time to
remind you how long time is still remain for an
appointment.
You cannot turn the bezel reversely since it comes
with a protection mechanism for preventing wrong
operation by force or shock. Figures on the bezel could also help you to read
the current time easily.
* Depending on design, anti-reversely and 1 minute “click” sound mechanism
on rotating indicator ring does not apply to some models.
Rotating indicator bezel
i
The above shows
that 20 minutes have
elapsed from 10:10.
T
l
e
e
m
ENGLISH
d
e
s
p
a
11

ENGLISH
12

DEUTSCH
ANALOGE QUARZARMBANDUHR
BEDIENUNGSANLEITUNG
Wir danken Ihnen für den Kauf unseres Erzeugnisses. Bitte lesen Sie diese
Bedienungsanleitung sorgfältig durch und befolgen Sie die Anweisungen, um
dieses Produkt lange Zeit und mit optimaler Leistung verwenden zu können.
Bitte bewahren Sie diese Bedienungsanleitung für spätere Bezugnahme gut
auf.
Sicherheitsmaßnahmen
Um zu verhindern, dass Sie oder andere Personen sich verletzen
oder Sachschäden entstehen, lesen Sie die Anweisungen, die mit den
nachfolgenden Symbolen gekennzeichnet sind, sorgfältig durch und befolgen
diese.
!
!
... Die Missachtung dieser Anweisung kann zum Tod
WARNUNG
ACHTUNG
oder zu schweren Verletzungen führen.
... Die Missachtung dieser Anweisung kann zu
Verletzungen oder Schäden an der Uhr führen.
13
DEUTSCH
HANDHABUNG DER UHR
(1) Wasserbeständigkeit
Verwendungsbedingungen
DEUTSCH
Typ
Nicht wasserbeständig
Wasserbeständig für
das tägliche
Leben
Verstärkte
Wasserbe-
Was-
ständigkeit
serbe-
I für das
ständige
tägliche
Uhren
Leben
Verstärkte
Wasserbeständigkeit
II für das
tägliche
Leben
Taucheruhr
für das
Tauchen mit
Sauerstofftank
Taucheruhren
Taucheruhr
für das
MischgasTauchen
* Es wird empfohlen die Uhr entsprechend des oben beschriebenen Gebrauchsumfangs korrekt zu
verwenden, nachdem Sie die Wasserbeständigkeits-Vorsichtsmaßnahmen auf dem Ziffernblatt oder
der Gehäuserückseite ermittelt haben.
14
Ohne WATER
RESISTANT
(WATER
RESIST)
WATER
RESISTANT
(WATER
RESIST)
WATER
RESISTANT
(WATER
RESIST)
50m (5bar)
WATER
RESISTANT
(WATER
RESIST)
100m (10bar)
200m (20bar)
AIR DIVER’S
100m / 150m
200m
He-GAS
DIVER’S
200m / 300m /...
Betätigung
Spritz-
Wassersport
der Krone
unter Wasser
oder mit
anhaftenden
Wassertropfen
wasser
(Waschen
des
Gesichts,
Regen
usw.)
(Schwimmen
usw.),
häufiger
Kontakt
mit Wasser
(Autowäsche
usw.)
Sporttauchen ohne
Sauerstofftank
(ohne
Sauerstoffflasche)
ЧЧЧЧЧЧ
×
×
×
×
×
××××
×××
Sporttau-
Mischgas-
chen
Tauchen
(mit
(mit
Sauerstoff-
Heliumgas)
flasche)
××
×

WARNUNG
!
1 Eine Uhr mit Wasserfestigkeit für täglichen Gebrauch 30m (3 bar) kann beim
Gesichtwaschen usw. verwendet werden, ist aber nicht dafür geeignet, in
Wasser getaucht zu werden.
2 Eine Uhr mit gesteigerter Wasserfestigkeit für täglichen Gebrauch I 50m
(5 bar) kann beim Schwimmen usw. verwendet werden, ist aber nicht zum
Tauchen, einschließlich Tauchen ohne Geräte, geeignet.
3 Eine Uhr mit gesteigerter Wasserfestigkeit für täglichen Gebrauch II 100m
oder 200m (10 oder 20 bar) kann beim Tauchen ohne Geräte verwendet
werden, ist aber nicht zum Scuba-Tauchen mit Sauerstoffflaschen oder
Sättigungstauchen mit Heliumgas usw. geeignet.
ACHTUNG
!
4 Lassen Sie die Krone beim Gebrauch der Uhr immer eingedrückt (in
Normalposition). Wenn die Krone als Schraubensperrtyp ausgelegt ist, stellen
Sie sicher, dass sie sicher eingeschraubt ist.
5 Betätigen Sie die Krone nicht unter Wasser oder bei nasser Uhr. Dabei kann
trotz Wasserbeständigkeit Wasser kann in die Uhr eindringen.
6 Wenn Ihre Uhr nicht wasserbeständig ist, achten Sie auf Wasserspritzer (beim
Gesichtwaschen, Regen usw.) und Schweiß. Wenn die Uhr durch Wasser
oder Schweiß nass wird, wischen Sie die Feuchtigkeit mit einem trockenen,
weichen Lappen ab.
7
Auch bei einer für täglichen Gebrauch wasserfesten Uhr vermeiden Sie es, direkte
starke Wasserstrahlen auf die Uhr auftreffen zu lassen. Bei Wasserdruck über
dem Grenzwert kann trotz Wasserbeständigkeit Wasser in die Uhr eindringen.
8 Bei einer für täglichen Gebrauch wasserbeständigen Uhr wischen Sie
Meerwasser sofort von der Uhr ab und wischen Sie sie dann gründlich ab, um
Korrosion und andere Auswirkungen zu vermeiden.
9 Das Innere der Uhr enthält eine geringe Menge Feuchtigkeit, die zu Beschlag
innen auf dem Deckglas führen kann, wenn die Außenluft kälter als die
Innentemperatur der Uhr ist. Wenn der Beschlag kurzzeitig ist, werden keine
Schäden in der Uhr verursacht, aber wenn der Zustand länger anhält oder
falls Wasser in die Uhr eindringt, wenden Sie sich an das Geschäft in dem die
Uhr gekauft wurde und ignorieren Sie das Problem nicht.
15
DEUTSCH

(2) Handhabung der Batterie
WARNUNG
!
1 Lagern Sie die Batterie außerhalb der Reichweite von Säuglingen oder
DEUTSCH
Kleinkindern. Sollte die Batterie versehentlich verschluckt werden, wenden
Sie sich sofort an einen Arzt.
Entnehmen Sie die Batterie nicht aus der Uhr. Wenden Sie sich beim Entfernen
2
der Batterien an Ihren Händler, bei dem Sie die Uhr erworben haben oder an
das nächstgelegene autorisierte ORIENT-Servicecenter für Hilfestellung.
3 Die Batterie dieser Uhr ist nicht wiederaufladbar und kann daher nicht ein
weiteres Mal verwendet werden. Laden Sie die Batterie nicht wieder auf,
da sie sich anderenfalls überhitzen oder explodieren kann.
4 Es kann zu Hautreizungen oder anderen Symptomen kommen, wenn
auslaufende Batterieflüssigkeit in Kontakt mit der Haut gerät. Lagern Sie
entleerte Batterien nicht für eine lange Zeitdauer.
(3) Austauschen der Batterie
ACHTUNG
!
1 Aus entleerten Batterien, die lange in der Uhr verbleiben, kann
Batteriesäure auslaufen, was zu Fehlfunktionen führen kann. Tauschen
Sie entleerte Batterien so schnell wie möglich aus.
2 Ersetzen Sie die Batterie der Uhr nur mit dem angegebenen Batterietyp.
Für den Batterieaustausch sind spezielle Werkzeuge und Techniken usw.
3
notwendig. Eine falsche Polausrichtung beim Einsetzen der Batterie kann zu ihrem
Überhitzen oder einer Explosion führen. Wenden Sie sich beim Austauschen der
Batterien an Ihren Händler, bei dem Sie die Uhr erworben haben oder an das
nächstgelegene autorisierte ORIENT-Servicecenter für Hilfestellung.
16

(4) Stöße
1 Tragen Sie die Uhr nicht bei harten sportlichen Aktivitäten;
bei relativ sanften sportlichen Aktivitäten wie Golf usw. kann
die Uhr aber getragen werden.
2
Vermeiden Sie starke Stöße, wie z. B. Herunterfallen auf den Fußboden.
(5) Magnetismus
1 Wenn die Uhr längere Zeit starkem Magnetismus ausgesetzt
wird, werden die einzelnen Teile magnetisiert, wodurch Störungen
verursacht werden können. Bitte lassen Sie Vorsicht walten.
2 Wenn die Uhr Magnetismus ausgesetzt wird, kann sie zeitweilig vor- oder
nachgehen, aber wenn sie nicht mehr dem Magnetismus ausgesetzt ist,
geht sie wieder mit ihrer ursprünglichen Genauigkeit. Stellen Sie in einem
solchen Fall die Uhr auf die richtige Zeit.
(6) Vibration
Wenn die Uhr starken Vibrationen ausgesetzt ist, wie z.
B. beim Fahren auf einem Motorrad oder bei Verwendung
eines Presslufthammers oder einer Motorsäge, kann sie
zeitweilig nachgehen.
(7) Temperatur
In Umgebungen unter oder über Normaltemperaturen (5°C - 35°C) kann
die Uhr Fehlfunktionen aufweisen und stoppen.
ACHTUNG
!
Tragen Sie die Armbanduhr nicht an Orten mit sehr hohen Temperature,
wie etwa in einer Sauna. Die Uhr kann sehr heiß werden und
Hautverbrennungen verursachen.
(8) Chemikalien, Gase usw.
Bei Kontakt mit Gasen, Quecksilber, Chemikalien (Verdünnungsmittel, Benzin,
Lösungsmittel, Reinigungsmittel mit solchen Bestandteilen, Klebstoffe, Farben,
Medikamente, Parfüme, Kosmetika usw.) usw. ist äußerste Vorsicht erforderlich.
Solcher Kontakt kann Verfärbung des Uhrgehäuses, des Armbands bzw. des
Zifferblatts verursachen. Es kann auch zu Verfärbung, Verformung oder
Beschädigung der verschiedenen auf Harz basierenden Bestandteile kommen.
17
DEUTSCH

(9) Über Zubehörteile
ACHTUNG
!
Versuchen Sie nicht dieses Produkt auseinanderzubauen oder zu modifizieren.
DEUTSCH
WARNUNG
!
Legen Sie den Armbandstift und andere kleine Teile außer Reichweite
kleiner Kinder ab.
Falls kleine Teile verschluckt werden, suchen Sie sofort einen Arzt auf.
(10) Allergische Reaktionen
ACHTUNG
!
Falls Sie einen Hautausschlag bekommen oder Ihre Haut durch Berührung
mit der Uhr oder dem Armband gereizt wird, nehmen Sie die Uhr sofort ab
und suchen einen Arzt auf.
(11) Über „Fluoreszierende stoffe“
Einige Produkte verfügen über leuchtende Zeiger bzw. Ziffernblatt.
Das Leuchten entsteht durch eine fluoreszierende Sicherheitsfarbe, die
Sonnenlicht und Kunstlicht speichert, ohne den Einsatz von radioaktivem
Mate-rial, und gibt dieses Licht in dunkler Umgebung ab. Da die Farbe
das gespeicherte Licht allmählich abgibt, wird das Leuchten mit der Zeit
immer dunkler. Die Intensität und Dauer der Lichtabgabe hängt von
verschiedenen Faktoren bei der Lichtspeicherung ab, wie der Form des
Glases, der Dicke der Farbe, der Helligkeit der Umgebung, der Entfernung
der Uhr zur Lichtquelle und der Lichtaufnahme. Bitte beachten Sie, dass
bei einer ungenügenden Lichtspeicherung die Uhr nur schwach oder nur
für kurze Zeit leuchtet.
(
12
) Wasserbeständiges Armband
Einige Produkte verwenden Leder- und Nylonarmbänder, die besonders
behandelt wurden, um die Aufnahme von Ausdünstungen und Wasser
zu verhindern. Der wasserbeständige Effekt dieses Armbands kann
allerdings abhängig von Art und Dauer der Verwendung verloren gehen.
18

IDENTIFIZIEREN DER KALIBER-NUMMER
Prüfen Sie die Kaliber-Nummer entsprechend der Modellnummer Ihrer Uhr
oder dem Gehäusecode auf der Gehäuserückseite der Uhr.
1. Suchen nach der 10-stelligen Modellnummer
Prüfen Sie die 10-stellige Modellnummer auf der der Uhr beiliegenden
Garantiekarte. Sie können die Nummer auch auf dem Produktaufkleber auf der
Uhr prüfen. Die zweite und dritte Stelle gibt die Kaliber-Nummer Ihrer Uhr an.
Beispiel: Wenn die Modellnummer „
Nummer „UW“.
2. Suchen nach dem Gehäusecode
Suchen Sie den Gehäusecode auf der Gehäuserückseite der Uhr.
Die ersten zwei Ziffern zeigen die Kalibernummer an.
Beispiel:
Beträgt der Gehäusecode „UW00-C0“, dann ist die Kaliber-Nummer „UW“.
Gehäuse-Code
Die Lage des Gehäusecodes kann sich unterscheiden, und die Buchstabengröße
*
kann klein und schwer lesbar sein, je nach Auslegung der Uhr.
* Die Bilder und Abbildungen in dieser Bedienungsanleitung können sich von
dem tatsächlichen Aussehen Ihrer Armbanduhr unterscheiden, aber die
Funktionen und Bedienverfahren sind gleich.
□UW00005B□
“ ist, ist die Kaliber-
EIGENSCHAFTEN
(1) Dies ist eine Quarzarmbanduhr mit analoger Anzeige.
(2) Die momentane Uhrzeit wird durch Stunden-, Minuten- und Sekundenzeiger
angezeigt.
(3) Das Datum und der Wochentag werden mithilfe von Zeigern angezeigt.
*Der Wochentag wird im retrograden Format angezeigt. *nur UU(KHA)
(4) Die 24-Stunden-Uhrzeit wird mithilfe eines Zeigers angezeigt. *nur
UU(KHA)
19
DEUTSCH

TECHNISCHE DATEN
(1) Quarz-Schwingfrequenz …
(2) Ganggenauigkeit … Mittlere monatliche Gangabweichung:
(am Arm getragen) ±20 Sekunden (bei 5 °C bis 35 °C )
DEUTSCH
(3) Betriebstemperaturbereich … -5 °C bis +50 °C
(4) Antrieb … Schrittmotor
(5) Batterie … SR920SW ; 1 Knopfzelle
(6) Batterielebensdauer … Ca. 3 Jahre nach Einsetzen der Batterie
* Die oben genannten Angaben können sich aufgrund von
Produktverbesserungen ohne vorherige Ankündigung ändern.
NAMEN UND FUNKTIONEN DER EINZELTEILE
A: Stundenzeiger
B: Minutenzeiger
C: Sekundenzeiger
D: Krone
E: Ziffernblatt
F: Zeiger für Datum
G:
Zeiger für Wochentag
H: 24-Stunden-Zeiger
*
Die Position des Zeigers für das Datum, den Wochentag und der 24-StundenUhrzeit sowie die Position der Krone unterscheiden sich bei einigen Modellen.
32.768 Hz (Hz = Schwingungen pro Sekunde)
<UU (KHA)> <UW (KUA)>
G
A
C
G
B
F
A
C
D
E
H
㻿
㻹
㻿
㼀
㻲
㼃
㼀
MODELLE MIT VERSCHRAUBBARER KRONE
Abhängig vom Modell müssen Sie die Krone erst losschrauben, bevor Sie sie
herausziehen können (Modell mit verschraubbarer Krone).
Verfahren Sie bei diesem Uhrentyp wie folgt:
(1) Vor dem Einstellen von Datum und Zeit drehen Sie die Krone nach links,
um die Verschraubung zu lösen.
(2) Drehen Sie die Krone nach dem Einstellen von Datum und Uhrzeit unter
Druck nach innen nach rechts bis zum Anschlag. Hierdurch wird die Krone
sicher verschraubt.
20
B
D
E
F

EINSTELLEN DER UHRZEIT UND DES KALENDERS
[Einstellen der Uhrzeit und des Wochentags]
Der Wochentag wird nicht automatisch eingestellt. Stellen Sie vor dem Einstellen
*
der Uhrzeit den Wochentag durch Drehen von Stunden- und Minutenzeiger ein.
(1) Ziehen Sie die Krone bis zur zweiten Stufe heraus,
wenn sich der Sekundenzeiger in der 12-Uhr-Position
befindet. Der Sekundenzeiger hält an.
(2) Drehen Sie zuerst die Krone, um den Wochentag einzustellen.
• Drehen Sie die Krone im Uhrzeigersinn. Wenn die 12-Uhr-Position
passiert wird, ändert sich
die Stellung des Zeigers für
den Wochentag.
Stellen Sie Stunden- und
•
Minutenzeiger vor, bis der
Zeiger für den Wochentag den nächsten Tag anzeigt.
• Sollte eine weitere Einstellung des Zeigers für den Wochentag erforderlich
sein, drehen Sie die Krone gegen den Uhrzeigersinn um etwa 4 bis 5
Stunden zurück. Drehen Sie die Krone wieder vorwärts, um den Zeiger
für den Wochentag schneller vorzustellen.
• Wiederholen Sie diesen Schritt, bis Sie den gewünschten Wochentag
eingestellt haben.
(3) Stellen Sie nach dem Einstellen des Wochentags die
Uhrzeit ein.
Diese Uhr ist mit einer Kalenderfunktion ausgestattet.
*
Stellen Sie aus diesem Grund sicher, dass bei
der Einstellung des Stundenzeigers Vormittag bzw. Nachmittag richtig
eingestellt ist. Das Datum wird um Mitternacht umgeschaltet. Sie
können die korrekte Einstellung von Vor- bzw.
Nachmittag auch mithilfe des 24-Stunden-Zeigers überprüfen. *nur UU(KHA)
*
Bewegen Sie den Minutenzeiger beim Einstellen der Uhrzeit zuerst 4 bis 5
Minuten hinter die korrekte Zeit, und stellen Sie ihn
dann auf die korrekte Zeit zurück.
㻿
㻲
㻿
㻹
㼀
㼃
㼀
Im Uhrzeigersinn
㻿
㻲
Gegen den Uhrzeigersinn
㻿
㻹
㼀
㼃
㼀
(4) Drücken Sie die Krone zurück in die Normalposition.
DEUTSCH
21

[Einstellen des Datums]
VORSICHT
!
* Stellen Sie das Datum nicht während des unten genannten Zeitraums ein,
DEUTSCH
da zu dieser Zeit die Datumsanzeige umgeschaltet wird.
21:00 Uhr bis 01:00 Uhr
Wenn das Datum während dieses Zeitraums eingestellt wird, wird es an
den darauf folgenden Tagen möglicherweise nicht korrekt umgeschaltet.
* Vermeiden Sie diesen Zeitraum, wenn Sie das Datum einstellen.
(1) Ziehen Sie die Krone bis zur ersten Stufe heraus.
* Die Krone dieser Armbanduhr ist in zwei Stufen
herausziehbar.
(2) Drehen Sie die Krone gegen den Uhrzeigersinn
und stellen Sie das Datum ein.
(3)
Drücken Sie die Krone zurück in die Normalposition.
* Bei Monaten mit weniger als 31 Tagen ist eine
Korrektur des Datums am Monatsende erforderlich.
Stellen Sie in diesem Fall am Monatsersten des
Folgemonats die Datumsanzeige auf „1”.
[24-Stunden-Zeiger] *nur UU(KHA)
Der 24-Stunden-Zeiger ist mechanisch mit dem Stundenzeiger verbunden
und kann nicht gesondert eingestellt werden.
* Die Position des Zeigers für das Datum, den Wochentag und der 24-
Stunden-Uhrzeit sowie die Position der Krone unterscheiden sich bei
einigen Modellen.
Gegen den Uhrzeigersinn
22

VERWENDEN DER EINER DREHBAREN ANZEIGE-LÜNETTE
Bitte beachten Sie, dass manche Modelle mit einer
drehbaren Anzeige-Lünette ausgestattet sind, die
richtig verwendet werden muss.
Drehen Sie die Lünette indem Sie die Markierung
auf den Minutenzeiger weisen lassen. Während
verschiedene Zeiten durchlaufen werden, können
Sie die vergangene Zeit am Abstand zwischen dem
Minutenzeiger und den Angaben auf der AnzeigeLünette messen. Sie können auch die Markierung
auf eine gewünschte Zeit einstellen, um Sie daran
zu erinnern, wieviel Zeit bis zu einer wichtigen
Verabredung verbleibt.
Sie können die Lünette nicht rückwärts drehen,
da sie mit einem Schutzmechanismus gegen Fehlbedienung durch
Gewalteinwirkung oder Erschütterungen ausgestattet ist. Die Angaben auf
der Lünette können auch zum leichten Ablesen der aktuellen Uhrzeit helfen.
* Je nach dem Design sind der Schutzmechanismus gegen Rückwärtsdrehen
und der 1-Minuten-„Klick“-Ton bei bestimmten Modellen nicht vorhanden.
Drehbare Lünette
Die obere Abbildung
zeigt, dass von 10:10
Uhr ab 20 Minuten
verstrichen sind.
n
e
h
c
i
r
t
s
r
e
V
23
t
i
e
Z
e
DEUTSCH

DEUTSCH
24

ITALIANO
OROLOGI AL QUARZO ANALOGICI
MANUALE DI ISTRUZIONI
Grazie di aver acquistato il nostro prodotto. Per garantire un uso prolungato e
le migliori prestazioni, leggere con attenzione questo Manuale di istruzioni e
familiarizzarsi con le clausole della garanzia.
Tenere questo Manuale di istruzioni a portata di mano e consultarlo nel
momento di bisogno.
PRECAUZIONI PER LA SICUREZZA
Osservare con la massima attenzione quanto specificato dai contrassegni
sotto indicati per evitare qualsiasi pericolo di danneggiare cose e di ferire voi
stessi e altre persone.
AVVERTENZA
!
ATTENZIONE
!
... Questo simbolo indica la possibilità di causare morte
o ferite gravi quando il prodotto viene utilizzato in modo
diverso rispetto alle istruzioni fornite.
... Questo simbolo indica
o danneggiare cose quando il prodotto viene utilizzato
in modo diverso rispetto alle istruzioni fornite.
la possibilità di ferire persone
25
ITALIANO

CURA DELL’OROLOGIO
(1) Resistenza all’acqua
Condizioni di impiego
Tipo
ITALIANO
Non resistente all’acqua
Resistente
all’ acqua
per l’uso
giornaliero.
Resistente
all’acqua
Orologi
rinforzato
resistenti
per l’uso
all'acqua
giornaliero I
Resistente
all’acqua
rinforzato
per l’uso
giornaliero II
Orologio per
immersioni
con aria
Orologi
compressa
per
immer-
Orologio per
sioni
immersioni
con miscele
di gas
* Si consiglia di utilizzare l'orologio correttamente, seguendo le modalità di impiego sopra menzionate
dopo aver controllato le precauzioni sulla resistenza all'acqua indicate sul quadrante e sul retro
della cassa.
26
Senza WATER
RESISTANT
(WATER
RESIST)
WATER
RESISTANT
(WATER
RESIST)
WATER
RESISTANT
(WATER
RESIST)
50m (5bar)
WATER
RESISTANT
(WATER
RESIST)
100m (10bar)
200m (20bar)
AIR DIVER’S
100m / 150m
200m
He-GAS
DIVER’S
200m / 300m /...
Utilizzo della
Sport
Immersioni
Immersioni
corona con
l’orologio
bagnato o
immerso in
acqua
acquatici
(nuoto, ecc.)
e frequenti
contatti
con l’acqua
(lavaggio
dell’auto,
ecc.)
in apnea
(senza
bombola
d’aria)
con respi-
ratore
(con
bombola
d’aria)
Utilizzo
della
corona con
l’orologio
bagnato o
immerso in
acqua
ЧЧЧЧЧЧ
×
×
×
×
×
××××
×××
Immersioni
con
miscele di
gas (uso di
gas d’elio)
××
×

AVVERTENZA
!
1 I comuni orologi impermeabili resistenti sino alla profondità di 30 metri (3
bar) possono essere usati a contatto con l’acqua, ad esempio quando ci si
lava il viso, ma non dovrebbero essere impiegati in immersione.
2 I comuni orologi impermeabili rinforzati per profondità sino a 50 metri (5
bar) possono essere usati durante il nuoto ma non dovrebbero essere
impiegati in alcun tipo d’immersione, compresa quella in apnea.
3 I comuni orologi impermeabili rinforzati per profondità sino a 100-200 metri
(10-20 bar) possono essere usati durante le immersioni in apnea ma non
dovrebbero essere impiegati durante quelle con respiratore e ossigeno o
o in saturazione d’elio.
ATTENZIONE
!
4
Mantenere sempre la corona premuta (in posizione normale) quando si utilizza
l’orologio. Se la corona è del tipo a vite ci si deve accertare che sia ben serrata.
5 Non utilizzare la corona con l’orologio immerso in acqua o bagnato.
L’acqua potrebbe penetrare all’interno dell’orologio e comprometterne la
resistenza all’acqua.
6 Se il modello non è impermeabile, fare attenzione agli spruzzi d’acqua
(durante le abluzioni, la pioggia, ecc.) e al sudore. Se l’orologio si bagna
con acqua o sudore, asciugarlo con un panno soffi ce e asciutto.
7 Anche con orologi resistenti all’acqua per uso normale, evitare forti getti
o fl ussi diretti d’acqua verso l’orologio. Potrebbe essere applicata una
pressione dell’acqua superiore al limite, che potrebbe comprometterne la
resistenza all’acqua.
8
Con orologi resistenti all’acqua per uso normale, asciugare con cura
l’acqua di mare dalla cassa dopo l’esposizione, per evitare corrosione e
altri effetti indesiderati.
9
L’interno dell’orologio contiene una certa quantità di umidità, che potrebbe
provocare formazione di condensa all’interno del vetro, quando l’aria
esterna diventa più fredda della temperatura interna dell’orologio. Se la
formazione di condensa è temporanea, non provoca danni all’interno
dell’orologio, altrimenti, se prolungata o se all’interno dell’orologio penetra
acqua, rivolgersi al rivenditore per risolvere il problema quanto prima
possibile.
27
ITALIANO

(2) Trattamento della batteria
AVVERTENZA
AVVERTENZA
!
!
1 Conservare la batteria fuori dalla portata dei bambini. Nel caso la batteria
venga ingerita accidentalmente, rivolgersi immediatamente a un medico.
2
Non rimuovere la batteria dall’orologio. Contattare il rivenditore presso cui è
stato acquistato l’orologio o il centro di assistenza autorizzato ORIENT più
vicino per richiedere assistenza nel caso si desideri rimuovere la batteria.
ITALIANO
3 La batteria utilizzata in questo orologio non è una batteria ricaricabile,
quindi non può essere ricaricata e riutilizzata. Non tentare di caricare la
batteria, altrimenti questa potrebbe surriscaldarsi o esplodere.
4 Se la pelle dovesse venire a contatto con i fluidi della batteria, ciò potrebbe
provocare un arrossamento cutaneo. Non lasciare batterie esaurite
all’interno dell’orologio per lunghi periodi di tempo.
(3) Sostituzione della batteria
ATTENZIONE
ATTENZIONE
!
!
1
Se si lascia la batteria esaurita all’interno dell’orologio per lunghi periodi
di tempo ciò potrebbe provocare fuoriuscite di acido e conseguenti
malfunzionamenti. Assicurarsi di sostituire al più presto le batterie esaurite.
2 Sostituire la batteria dell’orologio solo con una del tipo specificato.
3 La sostituzione della batteria richiede l’utilizzo di strumenti speciali,
tecniche, ecc. Se durante l’inserimento della batteria le polarità vengono
invertite, ciò potrebbe provocare il surriscaldamento o l’esplosione della
batteria. Contattare il rivenditore presso cui è stato acquistato l’orologio
o il centro di assistenza autorizzato ORIENT più vicino per richiedere
assistenza nel caso si desideri sostituire la batteria.
28

(4) Urti
1 Si raccomanda di togliere l’orologio dal polso durante la
pratica di sport pesanti, mentre la pratica di quelli leggeri, ad
esempio il golf, non v’influisce negativamente.
2
Evitare urti violenti, come il lasciare cadere l’orologio per terra.
(5) Magnetismo
1 Qualora l’orologio venga lasciato nelle vicinanze di un forte
magnetismo per un tempo più o meno lungo, le parti componenti possono
rimanere magnetizzate fino al punto di causare malfunzionamenti. È
opportuno prestare la dovuta attenzione.
2 L’orologio può temporaneamente andare avanti o indietro mentre rimane
esposto al magnetismo, ma quando viene allontanato dal magnetismo
esso riprende il suo funzionamento con la precisione originale. In questo
caso correggere l’ora.
(6) Vibrazioni
L’orologio può risultare meno preciso se esposto a forti
vibrazioni, come in caso di guida di motociclette, o per
l’uso di martelli pneumatici, seghe a catena, ecc.
(7) Temperatura
Alle temperature inferiori o superiori a quelle normali (5-35°C) l’orologio
potrebbe non funzionare correttamente o addirittura arrestarsi.
ATTENZIONE
!
Non utilizzare l’orologio alle alte temperature, come ad esempio nelle
saune. Potrebbe infatti riscaldarsi eccessivamente a causare ustioni.
(8) Prodotti chimici, gas, ecc.
Prestare la massima cautela in caso di contatto con gas, mercurio,
prodotti chimici (diluenti, benzina, solventi vari, detergenti contenenti
tali componenti, prodotti adesivi, vernici, medicine, profumi, cosmetici) e
così via. In questi casi si potrebbe verificare lo scolorimento della cassa
dell’orologio, del cinturino e del quadrante. Si potrebbe anche verificare lo
scolorimento, la deformazione e il danneggiamento di vari componenti a
base di resina.
29
ITALIANO

(9) Informazioni sugli accessori
ATTENZIONE
!
Non tentare di disassembrare o modificare il prodotto.
AVVERTENZA
!
Conservare perni e altri elementi di piccole dimensioni fuori dalla portata
dei bambini.
In caso di ingestione accidentale di piccoli pezzi, chiamareimmediatamente
ITALIANO
un medico.
(10) Reazioni allergiche
ATTENZIONE
!
In caso di arrossamento cutaneo, o se la pelle dovesse presentare
irritazioni anomale causate dal contatto con l’orologio o con il cinturino,
toglierlo immediatamente e consultare un medico.
(11) Vernice luminescente
Le lancette e il quadrante di questo orologio sono ricoperti da una vernice
luminescente.
Tale vernice, di tipo sicuro poiché non radioattiva, immagazzina la luce del
sole e quella artificiale restituendola quindi al buio. Via via che libera la luce
l’intensità luminosa si riduce gradualmente. La quantità di luce emessa
e la durata dell’emissione dipendono dai vari fattori in atto nel periodo
d’immagazzinamento, tra i quali la forma del vetro, lo spessore della
vernice stessa, il livello di luminosità circostante, la distanza dell’orologio
dalla sorgente luminosa e il livello di assorbimento. Va infine notato che
quando la quantità di energia luminosa immagazzinata è insufficiente
l’orologio ne potrebbe emettere poca, oppure per un tempo limitato.
(12) Cinturino impermeabile
Alcuni prodotti impiegano cinturini di pelle e nylon sottoposti a uno speciale
trattamento per renderli impermeabili e resistenti alla traspirazione. La
durata dell’effetto di resistenza all’acqua dipende dal periodo e dalle
condizioni di utilizzo del cinturino.
30

COME IDENTIFICARE IL CALIBRO DELL’OROLOGIO
Il calibro va ricavato dal nome di modello dell’orologio o dal codice impresso
sul fondello della cassa.
1. Individuazione dal nome del modello a 10 cifre
Il nome del modello a 10 cifre è ricavabile dalla scheda di garanzia fornita con
l’orologio. È altresì ricavabile dall’etichetta che appare sull’orologio stesso. La
seconda e la terza cifra ne indicano, appunto, il calibro.
Esempio: se il nome del modello è “
2. Individuazione dal codice della cassa
Il codice della cassa è riportato sul fondello dell’orologio.
Le prime due cifre indicano il calibro.
Esempio: Se il nome del modello è “UW00-C0” il calibro è “UW”.
Codice della cassa
* L’ubicazione del codice della cassa può cambiare, e i relativi caratteri essere
più piccoli e pertanto difficili da leggere, a seconda delle caratteristiche
dell’orologio.
* Le immagini e le illustrazioni riportate nel manuale potrebbero differire
dall’aspetto effettivo dell’orologio in proprio possesso, pur rimanendo
identiche le funzioni e le procedure d’uso.
CARATTERISTICHE PECULIARI
(1) Questo prodotto è un orologio analogico con oscillatore a cristallo.
(2) L’ora corrente è indicata dalla lancetta delle ore, dei minuti e dei secondi.
(3) La data e il giorno della settimana sono indicati da lancette.
* I giorni della settimana sono indicati utilizzando un movimento a riavvolgimento
*Solo UU(KHA)
(4) Una lancetta riporta anche l’ora nel formato 24 ore. *Solo UU(KHA)
□UW00005B□
” il calibro è “UW”.
31
ITALIANO

SPECIFICHE
(1) Frequenza dell’oscillatore a cristallo … 32.768 Hz
(2) Precisione indossato al polso … Media mensile:
(3) Intervallo temperatura di funzionamento … Da –5°C a +50°C
(4) Sistema d’azionamento … Motore a passo
(5) Batteria … SR920SW ; 1 elemento
(6) Durata della batteria … Circa 3 anni dal momento
ITALIANO
* Le specifiche sopra riportate sono soggette a modifica senza preavviso.
NOME E FUNZIONI DELLE PARTI
A: Lancetta delle ore
B: Lancetta dei minuti
C: Lancetta dei secondi
D: Corona
E: Quadrante
F: Lancetta della data
G: Lancetta dei giorni
H: Lancetta del formato
24 ore
* La posizione di data, giorno della settimana, ora nel formato 24 ore e della
corona su alcuni modelli può risultare diversa.
MODELLO DI TIPO CON CORONA AD AVVITAMENTO
A seconda del modello, potrebbe non essere possibile estrarre la corona
senzasvitarla (Modello di tipo con corona ad avvitamento).
Azionare questo tipo di orologio nel modo descritto di seguito:
(1) Prima di impostare data e ora, ruotare la corona verso sinistra per allentare
l’avvitamento.
(2) Dopo aver impostato data e ora, ruotare la corona verso destra, mentre la
si tiene premuta, fino a quando smette di ruotare. In questo modo la vite
sarà avvitata saldamente.
<UU (KHA)> <UW (KUA)>
G
A
C
(Hz = oscillazioni al secondo)
±20 secondi (da 5°C a 35°C)
dell’inserimento di una nuova
batteria
B
F
D
E
H
G
㻿
㻹
㻿
A
㼀
㻲
㼃
㼀
C
32
B
D
E
F

COME IMPOSTARE ORA E CALENDARIO
[Come impostare ora e giorno]
* I giorni non vengono regolati automaticamente. Regolare il giorno facendo
ruotarele lancette delle ore e dei minuti prima di impostare l’ora.
(1) Estrarre la corona al secondo click quando la lancetta
dei secondi si trova sulle 12. La lancetta dei secondi si
arresta immediatamente.
(2) Girare la corona per impostare il giorno.
• Ruotare la corona in senso orario. Quando si superano le 12, la lancetta
dei giorni inizia a cambiare.
• Portare in avanti le lancette
delle ore e dei minuti fino a
quando la lancetta dei giorni
indica il giorno successivo.
• Se fosse necessario regolare ulteriormente la lancetta dei giorni, girare
lacorona in senso antioriario e tornare indietro di 4 o 5 ore. Girare nuova
mentela corona in avanti per velocizzare l’avanzamento della lancetta dei
giorni.
• Ripetere questo punto e impostare il giorno.
(3) Dopo aver impostato il giorno, impostare l’ora.
* Questo orologio presenta la funzione calendario.
Quando si imposta la lancetta delle ore, verificare
che l’impostazione di AM/PM sia corretta. La data
cambia al punto “0:00 AM”.
Selezionare AM o PM con la lancetta del formato
24 ore. *Solo UU(KHA)
* Quando si imposta l’ora, portare sempre la lancetta avanti di 4 o 5
minuti rispetto al valore desiderato, quindi riportarla
indietro sull’ora esatta.
(4) Spingere la corona all’interno per riportarla nella
posizione normale.
In senso orario
㻿
㻹
㻿
㼀
㻲
㼃
㼀
㻿
㻹
㻿
㼀
㻲
㼃
㼀
In senso antiorario
ITALIANO
33

[Come impostare la data]
ATTENZIONE
!
* Non impostare la data durante il periodo di tempo sotto riportato, perché è
in fase di modifica.
Dalle 9 PM all’1 AM
Se si imposta la data durante questo periodo di tempo, il cambiamento
potrebbe non avvenire correttamente nei giorni successivi.
ITALIANO
* Evitare di impostare la data in questo periodo di tempo.
(1) Estrarre la corona al primo click.
* La corona di questo orologio presenta due
posizioni di click.
(2) Girare la corona in senso antiorario e regolare la
data.
(3) Spingere la corona all’interno per riportarla nella
posizione normale.
* Regolare la data alla fine di ogni mese
È necessario regolare la data alla fine dei mesi
con 30 giorni o meno. Impostare la data su “1” il primo giorno del mese
successivo.
[Lancetta del formato 24 ore] *Solo UU(KHA)
La lancetta del formato 24 ore dipende dalla lancetta delle ore e non può
essere regolata singolarmente.
* La posizione di data, giorno della settimana, ora nel formato 24 ore e della
corona su alcuni modelli può risultare diversa.
In senso antiorario
34

COME UTILIZZARE LA LUNETTA ROTANTE CON INDICATORE
Si prega di notare che alcuni modelli sono provvisti di
una lunette rotante con indicatore rotante.
Ruotare la lunette sino a far coincidere il simbolo
con la lancetta dei minuti. È così possibile misurare il
tempo trascorso osservando la distanza angolare tra
la lancetta dei minuti e le cifre riportate sulla lunetta
rotante. Ruotando lo stesso simbolo
desiderato si può inoltre ottenere l’indicazione del
tempo residuo.
Essendo provvista di un meccanismo di protezione
che ne impedisce la rotazione a forza o per impatto,
la lunetta non può essere ruotata al contrario. Le cifre
disposte sulla lunetta facilitano infine la lettura dell’ora attuale.
* A seconda del design dell’orologio l’anello indicatore rotante non è provvisto
del meccanismo di prevenzione della rotazione antioraria né dello “scatto”
udibile ad ogni minuto di rotazione.
sul punto
Lunetta rotante con indicatore
La figura precedente mostra
che dalle 10:10 sono
trascorsi 20 minuti.
m
e
T
o
s
r
o
c
s
a
r
t
o
p
ITALIANO
35

ITALIANO
36

ESPAÑOL
RELOJES DE CUARZO ANALÓGICOS
MANUAL DE INSTRUCCIONES
Gracias por adquirir un producto de nuestra compañía. Lea cuidadosamente
este manual de instrucciones para familiarizarse con la operación y los
términos de la garantía.
Guarde este manual a mano para futuras consultas.
PRECAUCIONES DE SEGURIDAD
Asegúrese absolutamente de observar los contenidos demarcados indicados
abajo para evitar de antemano ocasionar daños materiales, o personales a
usted u otras personas involucradas.
ADVERTENCIA
!
PRECAUCIÓN
!
... Un contenido demarcado con este símbolo indica
peligro de muertte o de sufrir graves daños
personales si el producto no es usado como se
especifica en las instrucciones suministradas.
... Un contenido demarcado con este símbolo indica
la posibilidad de ocasionar solamente daños
personales o materiales si el producto no es usado
como se especifica en las instrucciones suministradas.
37
ESPAÑOL

ACERCA DEL MANEJO DEL RELOJ
(1) Resistencia al agua
Tipo
No resistente al agua
Resistente
ESPAÑOL
al agua para
uso diario
normal
Resistente
al agua
Was-
reforzado
serbes-
para uso
tändige
diario
Uhren
normal I
Resistente
al agua
reforzado
para uso
diario
normal II
Buceo con
botellas
de aire
Reloj
para
buceadores
Buceo con
gas mixto
* Se recomienda utilizar el reloj correctamente siguiendo las indicaciones descritas arriba después de
haber confirmado el tipo de resistencia al agua, marcado en la esfera del reloj o en la tapa posterior
de la caja del reloj.
Condiciones
de uso
Sin WATER
RESISTANT
(WATER
RESIST)
Con WATER
RESISTANT
(WATER
RESIST)
Con WATER
RESISTANT
(WATER
RESIST)
50 m (5 bar)
Con WATER
RESISTANT
(WATER
RESIST)
100 m (10 bar)
200 m (20 bar)
AIR DIVER’S
100 m / 150 m
200 m
He-GAS
DIVER’S
200 m / 300 m /...
Operación
Exposición
Deportes
Buceo sin
de la corona
bajo el agua
con gotas
de agua
sobre ella
a pequeñas
cantidades
de agua
(lavarse
las manos,
lluvia,
etc.)
acuáticos
(natación,
etc.), contacto frecuente
con agua
(lavado de
autos, etc.)
botellas de
aire
(no se
utilizan
tanques de
aire)
Buceo con
botellas de
aire
(se utilizan
tanques de
aire)
ЧЧЧЧЧЧ
×
×
×
×
×
××××
×××
38
Buceo
con aire
mixto (con
helio)
××
×

ADVERTENCIA
!
1 Un reloj de uso diario, con estanqueidad para 30 m (3 bar), puede usarse
para el lavado diario de la cara, etc., pero no podrá sumergirse en agua.
2 Un reloj con estanqueidad reforzada para uso diario I 50 m (5 bar) puede
utilizarse para practicar natación, etc., pero no puede utilizarse para
practicar buceo, inclusive buceo libre.
3 Un reloj con estanqueidad reforzada de uso diario II, 100 m o 200 m
(10 ó 20 bar) puede utilizarse para practicar buceo libre, pero no puede
utilizarse para practicar buceo de profundidad, con tanques de oxígeno, ni
buceo de saturación que utilice gas helio, etc.
PRECAUCIÓN
!
4 Mantenga siempre la corona hacia adentro (en la posición normal)
mientras lleva puesto el reloj. Si la corona es del tipo de bloqueo por
rosca, compruebe que esté firmemente enroscada.
5 No opere la corona bajo el agua o cuando el reloj esté mojado. El agua
podría entrar en el interior del reloj y dañar la resistencia al agua.
6 Si su reloj no es resistente al agua, cuídese de las salpicaduras de agua
(durante el lavado de cara, lluvia, etc.) y del sudor. Si el reloj llegara a
mojarse con agua o sudor, séquelo con un paño suave y seco.
7 Incluso con un reloj resistente al agua para el uso diario, evite poner el
reloj debajo de un chorro fuerte de agua. Podría aplicarse una presión de
agua por encima del límite, y dañar la resistencia al agua.
8 Con un reloj resistente al agua para el uso diario, limpie la caja si ha estado
expuesto al agua del mar, y a continuación séquelo por completo para evitar
la oxidación y otros efectos perjudiciales.
9 El interior del reloj contiene una cierta cantidad de humedad, la cual
podría causar el empañamiento sobre el lado interior del cristal cuando
la temperatura del aire exterior esté por debajo de la temperatura interna
del reloj. Si el empañamiento es temporal, no causará ningún daño en el
interior del reloj, pero si es prolongado, o si penetrara agua en el reloj, no
deje este problema sin tratar, póngase en contacto con el vendedor.
39
ESPAÑOL

(2) Manipulación de la pila
ADVERTENCIA
!
1 Guarde la pila fuera del alcance de los niños y lactantes. En caso de
ingesta accidental, acuda al médico inmediatamente.
2 No extraiga la pila del reloj. Póngase en contacto con el lugar de compra
del reloj o con el centro de reparaciones autorizado de ORIENT más
cercano si desea extraer la pila.
3 La pila que se usa en este reloj no es recargable, de modo que no puede
recargarse y volverse a utilizar. No intente cargar la pila, ya que podría
sobrecalentarse o explotar.
4 Si la pila pierde líquido, pueden producirse irritaciones si este entra en
contacto con la piel. No deje las pilas agotadas durante mucho tiempo sin
ESPAÑOL
desechar.
(3) Sustitución de la pila
PRECAUCIÓN
!
1 Si una pila agotada se deja dentro del reloj durante mucho tiempo, puede
salir de ella ácido de batería provocando averías. Cambie la pila lo antes
posible.
2 Cambie la pila únicamente por otra del tipo especificado.
3 Para cambiar la pila son necesarias herramientas especiales, formación
específica, etc. Si los polos se colocan a la inversa al insertar la pila,
pueden producirse sobrecalentamiento o explosiones. Póngase en
contacto con el lugar de compra del reloj o con el centro de reparaciones
autorizado de ORIENT más cercano si desea cambiar la pila.
40

(4) Golpes
1 Asegúrese de quitarse el reloj cuando participe en deportes
extenuantes, aunque el uso del reloj para un deporte ligero
como el golf, etc., no tendrá efectos perjudiciales.
2 Evite los impactos fuertes, como dejarlo caer al suelo.
(5) Magnetismo
1 Si deja el reloj en un lugar cerca de un campo magnético
fuerte durante largo tiempo, los componentes del mismo podrán
magnetizarse y ocasionar una avería. Tenga cuidado.
2
El reloj se podrá adelantar o atrasar temporalmente cuando sea expuesto a
un campo magnético. El reloj se adelantará o atrasará temporalmente cuando
sea expuesto a un campo magnético, pero volverá a funcionar con la precisión
original cuando lo retire del magnetismo. En este caso, corrija la hora.
(6) Vibraciones
El reloj puede retrasarse temporalmente si se expone
a vibraciones fuertes, como al conducir una moto o al
utilizar martillos mecánicos, sierras de cadena, etc.
(7) Temperaturas
En ambientes por debajo o por encima de la gama de temperaturas
normales (5°C a 35°C), el reloj puede funcionar defectuosamente y
detenerse.
PRECAUCIÓN
!
No utilice el reloj a altas temperaturas, por ejemplo, en un sauna. El reloj
podría calentarse y causarle quemaduras.
(8) Sustancias químicas, gases, etc.
Preste suma atención al entrar en contacto con gases, mercurio, sustancias
químicas (diluyente, gasolina, diversos disolventes, detergentes que contengan
tales componentes, adhesivos, pinturas, medicinas, perfumes, cosméticos,
etc.), y otros productos similares. El contacto con tales sustancias podrá
ocasionar la decoloración de la caja del reloj, la correa y la esfera. También
podrán decolorarse, deformarse y dañarse varios componentes fabricados a
base de resinas.
ESPAÑOL
41

(9) Acerca de los accesorios
PRECAUCIÓN
!
No intente desmontar o modificar este producto.
ADVERTENCIA
!
Guarde el broche de la pulsera/correa y otras piezas pequeñas fuera del
alcance de los niños.
Si se ingiere accidentalmente alguna pieza pequeña, consulte
inmediatamente a un médico.
(10) Reacciones alérgicas
PRECAUCIÓN
!
ESPAÑOL
Si ha experimentado irritación en la piel o ha sufrido una irritación
anormal a causa del contacto con el reloj o la correa, deje de usar el reloj
inmediatamente y consulte a un médico.
(11) Sobre la “luz luminosa”
En algunos relojes se iluminan las manecillas y la esfera.
La luz luminosa es una pintura segura que almacena luz solar y luz
artificial, sin hacer uso de ningún material radioactivo, y que emite luz en
lugares oscuros. La luminosidad se desvanece gradualmente, a medida
que la pintura descarga la luz almacenada. La cantidad de luz emitida y su
duración dependen de varios factores vinculados al almacenamiento de
la luz, por ejemplo la forma del cristal, el espesor de la pintura, el nivel de
brillo circundante, la distancia entre el reloj y la fuente de luz, y el nivel de
absorción de luz. Por favor tenga en cuenta que cuando no se almacene
suficiente energía lumínica, el reloj podría emitir una luz débil o emitirla
sólo por un tiempo breve.
(12)
Correa resistente al agua
Algunos productos emplean correas de cuero y nilón que han recibido un
tratamiento especial para resistir la transpiración y la absorción de agua.
Tenga en cuenta que el efecto de resistencia al agua de esta correa se
puede perder, dependiendo de los periodos y condiciones de uso.
42

CÓMO IDENTIFICAR EL NÚMERO DE CALIBRE
Compruebe el número de calibre consultando el número de modelo del reloj
o el código de caja en la parte posterior de la caja del reloj.
1. Búaqueda por número de modelo de 10 dígitos
Compruebe el número de modelo de 10 dígitos en la garantía suministrada
con su reloj. Asimismo el número podrá encontrarse en la etiqueta del
producto que viene con el reloj. Los dígitos segundo y tercero indican el
número de calibre de su reloj.
Si el número de modelo es “
Ejemplo:
será “UW”.
2. Búsqueda por código de la caja
Vea el código de la caja en la parte posterior de la caja de su reloj.
Los dos primeros dígitos indican el número de calibre.
Ejemplo:
Si el código de la caja es “UW00-C0”, el número de calibre será “UW”.
Código de caja
* Dependiendo de las características del reloj, el lugar en que está inscrito el código
de la caja puede variar y sus letras pueden ser pequeñas y difíciles de leer.
* La apariencia de su reloj puede diferir de aquella en las fotos e ilustraciones de
este manual, pero las funciones y los procedimientos operativos son los mismos.
□UW00005B□
”, el número de calibre
CARACTERÍSTICAS
(1) Este es un reloj analógico con oscilador de cristal.
(2) La hora actual se indica mediante las manecillas de hora, minutos, y
segundos.
(3) La fecha y el día de la semana se indican mediante manecillas.
*El día de la semana se indica mediante visualización retrógrada *Solo UU(KHA)
(4)
La hora en formato 24 horas se indica mediante manecillas *Solo UU(KHA)
43
ESPAÑOL

ESPECIFICACIONES
(1)
Frecuencia del oscilador de cristal
(2) Precisión del reloj de pulsera … Variación media mensual:
(3) Gama de temperaturas … –5°C a +50°C
de funcionamiento
(4) Sistema de accionamiento … Motor paso a paso
(5) Pila … SR920SW ; 1 pieza
(6) Duración de la pila … Aproximadamente 3 años a partir de
* Las especificaciones de arriba están sujetas a cambios sin previo aviso
para la mejora del producto.
PARTES COMPONENTES Y SUS FUNCIONES
ESPAÑOL
A: Manecilla de horas
B: Manecilla de minutos
Manecilla de segundos
C:
D: Corona
E: Dial
F: Manecilla de la fecha
G: Manecilla del día
H:
Manecilla de 24 horas
* La posición de las manecillas y la corona de la fecha, el día de la semana
y la hora en formato 24 horas difiere en algunos modelos.
MODELO CON CORONA DEL TIPO DE BLOQUEO POR ROSCA
Dependiendo del modelo, es posible que no pueda extraer la corona sin
desenroscarla (modelo con corona del tipo de bloqueo por rosca).
Si su reloj es de este tipo, proceda de la siguiente manera:
(1) Cuando desee ajustar la fecha y la hora, primero gire la corona hacia la
izquierda para aflojar la rosca.
(2) Después de ajustar la fecha y la hora, gire la corona hacia la derecha
mientras la presiona hacia adentro, hasta que deje de girar. La rosca
quedará firmemente apretada.
44
… 32.768 Hz (Hz = Oscilaciones por
segundo)
±20 segundos (de 5°C a 35°C)
la inserción de una pila nueva
<UU (KHA)> <UW (KUA)>
G
A
C
B
F
D
E
H
G
㻿
㻹
㻿
A
㼀
㻲
㼃
㼀
C
B
D
E
F

CÓMO AJUSTAR LA HORA Y EL CALENDARIO
[Cómo ajustar la hora y el día]
* Los días no se ajustan automáticamente. Ajuste el día girando las
manecillas de la hora y los minutos antes de ajustar la hora.
(1) Tire de la corona hasta escuchar el segundo
chasquido, cuando la manecilla de segundos esté
en la posición de las 12 en punto. La manecilla de
segundos se detendrá en esa posición.
(2)
Gire la corona para ajustar el día.
• Gire la corona en el sentido
de las manecillas Cuando
pase la posición de las 12
en punto, la manecilla del
día comenzará a cambiar.
• Haga avanzar las manecillas
de la hora y los minutos
hasta que la manecilla del día indique el día siguiente.
• Si es necesario hacer más ajustes a la manecilla del día, gire la corona
en sentido contrario al de las manecillas y retroceda 4 a 5 horas.
Gire la corona hacia adelante nuevamente para hacer avanzar más
rápido la manecilla del día.
• Repita este paso y ajuste el día.
(3) Una vez que haya ajustado el día, ajuste la hora.
* Este reloj posee una función de calendario.
Al ajustar la manecilla de la hora, compruebe que
el indicador de AM/PM esté ajustado de manera
correcta. La fecha cambia en “0:00 AM”.
F
ije el indicador en AM o PM con la manecilla de 24 horas. *Solo UU(KHA)
*
Al ajustar la hora, hágala avanzar primero 4 a 5 minutos por delante de la hora
deseada, y luego hágala retroceder a la hora exacta.
(4) Presione la corona para que vuelva a quedar en la
posición normal.
En el sentido de las manecillas
㻿
㻹
㻿
㼀
㻲
㼃
㼀
㻿
㻹
㻿
㼀
㻲
㼃
㼀
En sentido contrario al de las
manecillas
45
ESPAÑOL

[Cómo ajustar la fecha]
PRECAUCIÓN
!
* No ajuste la fecha durante el periodo de tiempo indicado abajo, ya que la
fecha cambia.
9 PM to 1 AM
Si la fecha se fija durante este periodo de tiempo, puede ocurrir que la
fecha no cambie correctamente en los días subsiguientes.
* Evite este periodo de tiempo al ajustar la fecha.
Tire de la corona hasta escuchar el primer chasquido.
(1)
* La corona de este reloj tiene dos posiciones de
chasquido.
ESPAÑOL
(2) Gire la corona en sentido contrario al de las
manecillas y ajuste la fecha.
En sentido contrario al de
(3) Presione la corona para que vuelva a quedar en la
posición normal.
* Ajuste de la fecha a fin de mes
Es necesario ajustar la fecha después de los meses
de 30 días o menos. Ajuste la fecha a “1” el primer día del mes siguiente.
[Manecilla de 24 horas] *Solo UU(KHA)
La manecilla de 24 horas está unida a la manecilla de la hora y no se puede
ajustar por separado.
* La posición de las manecillas y la corona de la fecha, el día de la semana
y la hora en formato 24 horas difiere en algunos modelos.
las manecillas
46

CÓMO USAR EL BISEL INDICADOR GIRATORIO
a una
Bisel giratorio
La ilustración superior
indica que han pasado
20 minutos desde
las 10:10
T
r
t
o
p
m
e
i
Por favor tenga en cuenta que algunos modelos
están equipados con un bisel giratorio, el cual
deberá ser utilizado correctamente.
Gire el bisel dirigiendo la marca
de minutos. Después de un cierto tiempo, podrá
medir el tiempo transcurrido a partir de la distancia
entre la manecilla de minutos y las cifras del bisel
giratorio. Asimismo podrá ajustar la marca
hora dada, como un recordatorio del tiempo que le
falta para un compromiso.
El bisel no puede girarse en sentido inverso ya
que está provisto de un mecanismo de protección
para prevenir el mal funcionamiento debido a
operaciones forzadas o golpes. Las cifras del bisel podrán asistirle además a
leer fácilmente la hora actual.
* Dependiendo del diseño, el mecanismo anti-inversión y el sonido de
chasquido de 1 minuto en el aro indicador giratorio no se emplea en
algunos modelos.
hacia la manecilla
47
o
d
i
r
r
u
c
s
n
a
ESPAÑOL

ESPAÑOL
48

РУССКИЙ
АНАЛОГОВЫЕ КВАРЦЕВЫЕ ЧАСЫ
ИНСТРУКЦИЯ ПО ЭКСПЛУАТАЦИИ
Благодарим Вас за то, что Вы выбрали наше изделие! Для длительного и
эффективного пользования изделием прочитайте данную инструкцию и
ознакомьтесь с условиями гарантии.
Сохраните эту инструкцию для использования в дальнейшем.
МЕРЫ ПРЕДОСТОРОЖНОСТИ
Строго соблюдайте приведенные ниже инструкции для предотвращения
любого ущерба здоровью и повреждения Вашего имущества и имущества
других лиц.
ПРЕДУПРЕЖДЕНИЕ
!
ВНИМАНИЕ
!
... Данный символ означает
исхода или серьезных травм в случае, если
данный продукт будет использоваться любым
способом, отличным от приведенных инструкций.
... Данный символ означает
травм или материального ущерба только в том
случае, если данный продукт будет использоваться
любым иным способом, отличным от приведенных
инструкций.
возможность летального
возможность серьезных
49
РУССКИЙ

ПРИ ОБРАЩЕНИИ С ЧАСАМИ
(1) Водонепроницаемость
Условия эксплуатации
Тип
Водопроницаемые
Водонепроницаемые для
повседневного использования
Усиленная
водонепро-
Водо-
РУССКИЙ
ницаемость
непрони-
класса I для
цаемые
повседневного
часы
использования
Усиленная
водонепроницаемость
класса II для
повседневного
использования
Дайверские
часы для
погружений с
аквалангом
Дайверские
Дайверские
часы
часы для
погружений с
дыхательной
смесью
* Рекомендуется использовать часы в соответствии с приведенной выше классификацией,
предварительно проверив маркировку по водонепроницаемости на циферблате или корпусе.
Без маркировки
WATER
RESISTANT
(WATER
RESIST)
WATER
RESISTANT
(WATER
RESIST)
WATER
RESISTANT
(WATER
RESIST)
50m (5bar)
WATER
RESISTANT
(WATER
RESIST)
100m (10bar)
200m (20bar)
AIR DIVER’S
100m / 150m
200m
He-GAS
DIVER’S
200m / 300m /...
Работа
Воздействие
Водные
головки
под водой
и работа
головки с
каплями
воды
на ней
небольших
количеств
воды
(умывание,
дождь и
т. д.)
виды спорта
(плавание и
т. п.), частые
контакты с
водой (мойка
автомобиля
и т. п.)
Подводное
плавание
(без использования
кислородных
баллонов)
ЧЧЧЧЧЧ
×
×
×
×
×
××××
×××
50
Подводное
Погружение
плавание (с
с дыха-
использо-
тельной
ванием кис-
смесью (с
лородных
исполь-
баллонов)
зованием
гелия)
××
×

ПРЕДУПРЕЖДЕНИЕ
!
1 Часы с водонепроницаемостью для повседневного использования 30 м (3 бар) могут
использоваться во время умывания и т. п., но не могут использоваться в условиях, при
которых они будут погружаться в воду.
2 Часы с усиленной водонепроницаемостью для повседневного использования класса I 50
м (5 бар) могут использоваться во время плавания и т. п., но не могут использоваться во
время ныряния или подводного плавания.
3 Часы с усиленной водонепроницаемостью для повседневного использования класса II
100 м или 200 м (10 или 20 бар) могут использоваться во время ныряния или подводного
плавания, но не могут использоваться во время подводного плавания с кислородным
баллоном или выполнения водолазных работ с автономными дыхательными аппаратами
на гелии.
ВНИМАНИЕ
!
4 При эксплуатации часов головка должна находиться в утопленном (нормальном)
положении. Если головка относится к типу завинчиваю¬щихся, то она должна быть
плотно завинчена.
5 Не используйте головку под водой или если на часах имеется влага. Вода может
проникнуть внутрь корпуса часов и нарушить их герметич¬ность.
6 Если Ваши часы не являются водонепроницаемыми, то не допускайте попадания
на них водяных брызг (во время умывания, в дождливую погоду и т. д.), а также
запотевания. При попадании на часы воды или при запотевании удалите влагу с
помощью сухой мягкой ткани.
7 Даже если Ваши часы, предназначенные для повседневного использо¬вания,
обладают водонепроницаемостью, не допускайте воздействия на них сильной струи
воды. При превышении допустимого уровня давления воды может быть нарушена
герметичность часов.
8 При попадании на Ваши водонепроницаемые часы, предназначенные для
повседневного использования, морской воды, стряхните воду и протрите корпус насухо,
чтобы не допустить возникновения коррозии или иных негативных последствий.
9 Внутри корпуса часов содержится небольшое количество влаги. Поэтому когда
температура окружающего воздуха ниже температуры воздуха внутри корпуса
часов, на внутренней поверхности стекла может образовываться запотевание. Если
запотевание носит временный характер, то это не наносит вреда часам. Однако если
запотевание остается на стекле продолжительное время или если в часы попала вода,
проконсультируйтесь по месту приобретения часов и не остав¬ляйте эту проблему без
внимания.
51
РУССКИЙ

(2) Батарейка
ПРЕДУПРЕЖДЕНИЕ
!
1 Не давайте батарейку детям. В случае проглатывания батарейки сразу же
обращайтесь к врачу.
2 Не вынимайте батарейку из часов. Для замены батарейки обращайтесь к
продавцу или в ближайший авторизованный сервисный центр ORIENT.
3
В этих часах используется батарейка, а не аккумулятор, поэтому ее нельзя
перезаряжать. Перезарядка батарейки может привести к перегреву или взрыву.
4 В случае контакта жидкости из батареек с кожей возможно появление
сыпи и других симптомов. Не храните разряженные батарейки в течение
длительного времени.
(3) Замена батарейки
ВНИМАНИЕ
!
1 Если надолго оставить в часах разряженную батарейку, может произойти
утечка кислоты, которая, в свою очередь, может нарушить работу часов.
РУССКИЙ
Заменяйте разряженные батарейки как можно скорее.
2 Устанавливайте только батарейки указанного типа.
3 Для замены батарейки используются специальные инструменты и
технологии. Несоблюдение полярности может привести к перегреву и взрыву
батарейки. Для замены батарейки обращайтесь к продавцу или в ближайший
авторизованный сервисный центр ORIENT.
(4) Ударопрочность
1 Снимайте часы во время занятий энергичными видами спорта,
однако, занятие такими видами спорта, как гольф и т. д., не
окажет негативного воздействия на состояние часов.
2 Избегайте сильного удара типа падения часов на пол.
52

(5) Воздействие магнитных полей
1 Запрещается подвергать часы воздействию сильных магнитных полей в
течение длительного периода времени, поскольку компоненты часов могут
намагнититься, что приведёт к нарушению работы часов. Соблюдайте
осторожность.
2 Под воздействием магнитного поля часы могут временно спешить или
отставать.Точность показаний часов будет восстановлена, если устранить
воздействие магнитного поля на часы. В таком случае повторно установите
время.
(6) Вибрация
Часы могут потерять точность, если будут подвержены
сильной вибрации, например, вызываемой поездкой на
мотоцикле, использованием отбойного молотка, цепной
пилы и т. д.
(7) Температура
Часы могут идти неправильно или остановиться при температурах ниже или
выше нормального диапазона (5°С – 35°С).
ВНИМАНИЕ
!
Не пользуйтесь часами при высокой температуре (например, в сауне). Часы
могут нагреваться и вызывать ожоги.
(8) Химические вещества, газы и т.п.
Следует соблюдать максимальную осторожность при контакте с газами,
ртутью, химическими веществами (разбавителем для краски, бензином,
различными растворителями, моющими средствами, содержащими такие
вещества, клеями, красками, лекарственными препаратами, парфюмерией,
косметикой и пр.) и т.п. Эти вещества могут изменить цвет корпуса часов,
браслета/ремешка и циферблата. Возможны также изменение цвета,
деформация и повреждение полимерных компонентов.
53
РУССКИЙ

(9) Дополнительные детали
ВНИМАНИЕ
!
Не пытайтесь разбирать или вносить изменения в конструкцию изделия.
ПРЕДУПРЕЖДЕНИЕ
!
He давайте шпильки браслета/ремешка и другие мелкие детали детям.
B случае проглатывания мелкой детали немедленно обратитесь к врачу.
(10) Аллергические реакции
ВНИМАНИЕ
!
Боли после контакта c браслетом на коже появляется сыпь или раздражение,
прекратите носить часы и незамедлительно обратитесь к врачу.
(11) Люминесцентное покрытие
На некоторых часах имеется люминесцентное покрытие на стрелках и
циферблате.
РУССКИЙ
Оно выполнено из безопасной нерадиоактивной краски, накапливающей
солнечный и искусственный свет и отдающей его в темноте. Отдавая
накопленный свет, покрытие постепенно становится более тусклым.
Количество отдаваемого света и время свечения зависят от различных
факторов: формы стекла, толщины слоя краски, уровня яркости окружающей
среды, расстояния от часов до источника света и степени поглощения света.
Помните, что если накоплено немного света, часы будут светиться слабо
или недолго.
(12) Водонепроницаемый браслет
B некоторых моделях используются кожаные и нейлоновые ремешки,
подвергнутые специальной обработке для защиты от потоотделения и
воздействия воды. Свойство водонепроницаемости данного браслета может
быть потеряно в зависимости от периода и условий эксплуатации.
54
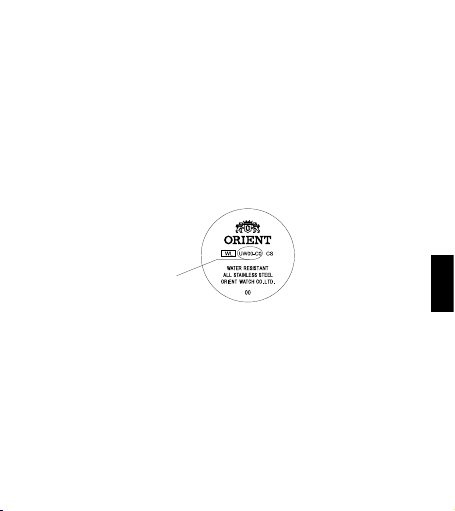
ОПРЕДЕЛЕНИЕ НОМЕРА КАЛИБРА
Проверьте номер калибра Ваших часов по номеру модели часов или коду
корпуса на задней крышке корпуса часов.
1. Поиск по 10-значному номеру модели
Проверьте 10-значный номер модели на гарантийном талоне, прилагаемом
в комплекте поставки часов. Вы также можете найти номер на этикетке
изделия, прикрепленной к часам. Второй и третий знак номера указывают
номер калибра Ваших часов.
Пример:
Если номер модели представляет собой “
номер калибра — “UW”.
2. Поиск по коду корпуса
Найдите код корпуса на задней крышке корпуса Ваших часов.
Первые две цифры соответствуют номеру калибра.
Пример: Если код корпуса “UW00-C0”, то номер калибра — “UW”.
□UW00005B□
”, то
Код корпуса
В зависимости от характеристик часов расположение кода корпуса может
*
отличаться, его знаки могут иметь маленький размер и быть трудно различимыми.
* Рисунки и иллюстрации в данной инструкции могут отличаться от
реального вида Ваших часов, однако функции и рабочие процедуры
остаются неизменными.
ХАРАКТЕРИСТИКИ
(1) Данное изделие представляет собой аналоговые часы с кварцевым
генератором.
(2) Текущее время обозначается с помощью часовой, минутной и
секундной стрелок.
(3) Число и день недели указываются стрелками.
*
День недели указывается ретроградными стрелками *только UU(KHA)
(4)
В 24-часовом формате время показывается стрелкой *только UU(KHA)
55
РУССКИЙ

ТЕХНИЧЕСКИЕ ХАРАКТЕРИСТИКИ
(1) Частота кварцевого генератора … 32 768 Гц
(2) Точность хода … Среднемесячный уровень:
(3) Рабочий диапазон температур от … –5°C до +50°C
(4) Система привода … Шаговый электродвигатель
(5) Батарейка … SR920SW, 1 шт.
(6) Срок службы батарейки … Приблизительно 3 года с
*
Вышеприведенные технические характеристики могут быть изменены без
предварительного уведомления в целях улучшения качества изделия.
НАЗВАНИЯ И НАЗНАЧЕНИЕ КОМПОНЕНТОВ
A: Часовая стрелка
B: Минутная стрелка
C: Секундная стрелка
РУССКИЙ
D: Головка
E: Циферблат
F: Стрелка даты
G: Стрелка дней недели
H: Стрелка 24-часового
формата времени
* Расположение указателя числа, дня недели, стрелок 24-часового
циферблата и головки у разных моделей могут различаться.
МОДЕЛИ С ЗАВИНЧИВАЮЩЕЙСЯ ГОЛОВКОЙ
B некоторых моделях Вы не сможете вытянуть головку, не выкрутив ее
(модели с завинчивающейся головкой).
Для эксплуатации часов данного типа:
(1) Перед установкой даты и времени поверните головку против часовой
стрелки, чтобы разблокировать винт.
(2) Установив дату и время, нажмите на головку и поверните ее по
часовой стрелке до упора, чтобы заблокировать винт.
G
A
C
(Гц= количество колебаний в
секунду)
±20 секунд (от 5°C до 35°C)
момента установки новой
батарейки
<UU (KHA)> <UW (KUA)>
G
B
F
D
E
H
㻿
㻹
㻿
A
㼀
㻲
㼃
㼀
C
56
B
D
E
F

КАК УСТАНОВИТЬ ВРЕМЯ И КАЛЕНДАРЬ
[Как установить время и дни недели]
* Дни недели не регулируются автоматически. Установите дни недели,
повернув часовую и минутную стрелки до того, как установите время.
(1) Вытяните головку по второму щелчку, когда
секундная стрелка будет в положении 12 часов.
Секундная стрелка остановится на месте.
(2) Поверните головку и установите
дни недели.
• Поверните головку по
часовой стрелке. Когда
положение 12 часов
будет пройдено, стрелка
дней недели начнет меняться.
• Продвигайте вперед часовую и минутную стрелки до тех пор, пока
стрелка дней недели не обозначит следующий день.
• Если потребуется дальнейшая настройка стрелки дней недели,
поверните головку против часовой стрелки и вернитесь на 4-5 часов
назад. Снова поверните головку вперед, чтобы передвинуть вперед
стрелку дней недели.
• Повторите этот шаг для установки дней недели.
(3) После установки дней недели установите время.
* Данные часы имеют функцию календаря. При
установке часовой стрелки убедитесь, что AM
(до полудня)/PM (после полудня) установлены
верно. Дата меняется при “0:00 AM”.
Проверьте установку AM (до полудня) /PM (после полудня) с
помощью стрелки 24-часового формата времени. *только UU(KHA)
*
При установке времени сначала установите время на 4-5 минут вперед,
затем вернитесь назад и установите точное время.
(4) Установите головку обратно в нормальное
положение.
㻿
㻹
㻿
㼀
㻲
㼃
㼀
По часовой стрелке
㻿
㻹
㻿
㼀
㻲
㼃
㼀
Против часовой
стрелки
57
РУССКИЙ

[Как установить дату]
ВНИМАНИЕ
!
* Не производите установку даты в нижеприведенный промежуток
времени, поскольку в этом случае дата меняется.
От 9 PM (после полудня) до 1 AM (до полудня)
Если дата будет установлена в течение указанного промежутка
времени, то в последующие дни смена даты может происходить
неправильно.
* Избегайте этого промежутка времени при установке даты.
(1) Вытяните головку по первому щелчку.
* Головка этих часов имеет два положения
щелчка.
(2) Поверните головку против часовой стрелки и
установите дату.
РУССКИЙ
(3) Установите головку обратно в нормальное
положение.
* Настройка даты в конце месяца
Необходимо настроить дату следующих
месяцев с 30 днями или меньше. Установите
дату на “1” в первый день следующего месяца.
[Стрелка 24-часового формата времени] *только UU(KHA)
Стрелка 24-часового формата времени взаимосвязана с часовой
стрелкой и не может быть настроена отдельно от нее.
Расположение указателя числа, дня недели, стрелок 24-часового
*
циферблата и головки у разных моделей могут различаться.
Против часовой стрелки
58

РАБОТА С ВРАЩАЮЩИМСЯ ИНДИКАТОРНЫМ БЕЗЕЛЕМ
Обратите внимание, что некоторые модели
оснащены вращающимся безелем индикатора,
которое следует использовать надлежащим
образом.
Поверните безеле таким образом, чтобы
совместить метку
прохождении определенного времени Вы можете
измерить истекшее время по расстоянию между
минутной стрелкой и цифрами на вращающемся
безеле индикатора. Вы также можете установить
метку
себе, сколько времени остается до условленного
времени.
Безеле не может поворачиваться в противоположном направлении,
поскольку оно оснащено защитным механизмом, предназначенным
для защиты от ошибочной операции в результате приложения силы
или удара. Цифры на вращающемся безеле также могут упрощать
считывание текущего времени.
* В зависимости от конструкции защита от поворота в обратном
направлении и 1-минутный “щелчок” на некоторых моделях
отсутствует.
с минутной стрелкой. При
на желаемое время, чтобы напоминать
Вращающийся безель
На рисунке выше
показано, что с момента,
когда было 10:10, прошло
20 минут.
И
я
м
е
р
в
е
е
ш
к
е
т
с
РУССКИЙ
59

РУССКИЙ
60

ﻲﺑﺮﻋ
١٢
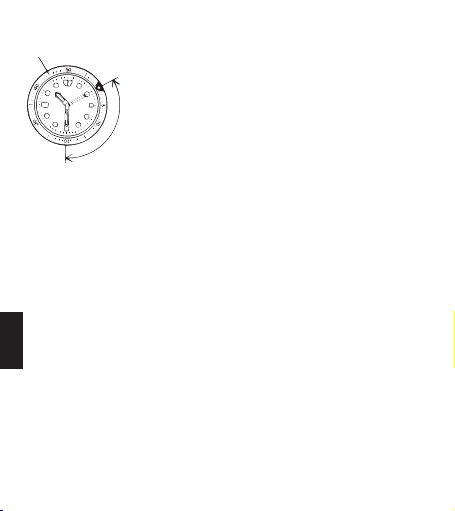
ﺓﺭﺍّﻭﺪﻟﺍ ﺔﻴﺷﺎﺤﻟﺍ
ﺓﺭﺍّﻭﺪﻟﺍ ﺔﻴﺷﺎﺤﻟﺍ
٢٠ ﺭﻭﺮﻣ ﻩﻼﻋﺃ ﺢﺿﻮﻳ
٢٠ ﺭﻭﺮﻣ ﻩﻼﻋﺃ ﺢﺿﻮﻳ
.10:10 ﺔﻋﺎﺴﻟﺍ ﻦﻣ ﺔﻘﻴﻗﺩ
.10:10 ﺔﻋﺎﺴﻟﺍ ﻦﻣ ﺔﻘﻴﻗﺩ
ﻲﺑﺮﻋ
١١
ﺐﺠﻳ ،ﺭﺍّﻭﺩ ﺮﺷﺆﻣ ﺔﻴﺷﺎﺤﺑ ﺓﺩﻭﺰﻣ ﺕﻼﻳﺩﻮﻤﻟﺍ ﺾﻌﺑ ﺡﺮﻃ ﻢﺘﻳ ﻪﻧﺃ ﺔﻈﺣﻼﻣ ءﺎﺟﺮﻟﺍ
،ﻦﻴﻌﻣ ﺖﻗﻮﺑ ﻩﺭﻭﺮﻣ ءﺎﻨﺛﺃ .ﻖﺋﺎﻗﺪﻟﺍ ﺏﺮﻘﻋ ﻰﻟﺇ
ﺓﺩﻮﺟﻮﻤﻟﺍ ﻡﺎﻗﺭﻷﺍﻭ ﻖﺋﺎﻗﺪﻟﺍ ﺏﺮﻘﻋ ﻦﻴﺑ ﺔﻓﺎﺴﻤﻟﺍ ﻦﻣ ﻲﻀﻘﻨﻤﻟﺍ ﺖﻗﻮﻟﺍ ﺱﺎﻴﻗ ﻚﻨﻜﻤﻳ
ﺏﻮﻠﻄﻣ ﺖﻗﻭ ﻰﻠﻋ
ﺍ
ﺍ
ﻟ
ﻟ
ﻮ
ﻮ
ﻗ
ﻗ
ﺖ
ﺖ
ﺍ
ﺍ
ﻟ
ﻟ
ﻤ
ﻤ
ﻞﻴﻐﺸﺘﻟﺍ ﻊﻨﻤﻟ ﺔﻳﺎﻤﺣ ﺔﻴﻟﺂﺑ ﺔﺑﻮﺤﺼﻣ ﻲﺗﺄﺗ ﺎﻬﻧﻷ ؛ﺎًﻴﺴﻜﻋ ﺔﻴﺷﺎﺤﻟﺍ ﺓﺭﺍﺩﺇ ﻚﻨﻜﻤﻳ ﻻ
ﻨ
ﻨ
ﻘ
ﻘ
ﻀ
ﻀ
ﻰﻠﻋ ﺓﺩﻮﺟﻮﻤﻟﺍ ﻡﺎﻗﺭﻷﺍ ﻙﺪﻋﺎﺴﺗ ﻥﺃ ﻦﻜﻤﻳ ﺎﻤﻛ .ﺕﺎﻣﺪﺼﻟﺍ ﻞﻌﻔﺑ ﻭﺃ ﺓﻮﻘﻟﺎﺑ ﺊﻃﺎﺨﻟﺍ
ﻲ
ﻲ
ﺎًﻴﺴﻜﻋ ﻥﺍﺭﻭﺪﻟﺍ ﻡﺪﻋ ﺔﻴﻟﺁ ﻖﺒﻄﻨﺗ ﻻ ،ﺯﺍﺮﻄﻟﺍ ﻢﻴﻤﺼﺗ ﻰﻠﻋ ًءﺎﻨﺑ *
.ﺕﻼﻳﺩﻮﻤﻟﺍ ﺾﻌﺑ ﻰﻠﻋ ﺭﺍّﻭﺪﻟﺍ ﺮﺷﺆﻤﻟﺍ ﺔﻴﺷﺎﺣ ﻰﻠﻋ ﺓﺪﺣﺍﻭ ﺔﻘﻴﻗﺩ “ﺓﺮﻘﻧ”ﻭ
ﺭﺍّﻭﺪﻟﺍ ﺮﺷﺆﻤﻟﺍ ﺔﻴﺷﺎﺣ ﻝﺎﻤﻌﺘﺳﺍ ﺔﻴﻔﻴﻛ
.ﺢﻴﺤﺻ ﻞﻜﺸﺑ ﺎﻬﻟﺎﻤﻌﺘﺳﺍ
ﺔﻣﻼﻌﻟﺍ ﻪﻴﺟﻮﺘﺑ ﺔﻴﺷﺎﺤﻟﺍ ﺭِﺩﺃ
ﺔﻣﻼﻌﻟﺍ ﻂﺒﺿ ﻚﻨﻜﻤﻳ ﺎﻤﻛ .ﺭﺍّﻭﺪﻟﺍ ﺮﺷﺆﻤﻟﺍ ﺔﻴﺷﺎﺣ ﻰﻠﻋ
.ﻦﻴﻌﻣ ﺪﻋﻮﻣ ﻰﻠﻋ ﺔﻴﻘﺒﺘﻤﻟﺍ ﺓﺪﻤﻟﺍ ﻝﻮﻄﺑ ﻙﺮﻴﻛﺬﺘﻟ
.ﺔﻟﻮﻬﺴﺑ ﻲﻟﺎﺤﻟﺍ ﺖﻗﻮﻟﺍ ﺓءﺍﺮﻗ ﻰﻠﻋ ﺔﻴﺷﺎﺤﻟﺍ

[ﺦﻳﺭﺎﺘﻟﺍ ﻂﺒﺿ ﺔﻴﻔﻴﻛ]
!
.ﺮﻴﻴﻐﺗ ﺔﻟﺎﺣ ﻲﻓ ﻥﻮﻜﻳ ﺦﻳﺭﺎﺘﻟﺍ ﻥﻷ ﻩﺎﻧﺩﺃ ﺔﻨﻴﺒﻤﻟﺍ ﺔﻴﻨﻣﺰﻟﺍ ﺓﺮﺘﻔﻟﺍ ءﺎﻨﺛﺃ ﺦﻳﺭﺎﺘﻟﺍ ﻂﺒﻀﺗ ﻻ *
ﻡﺎﻳﻷﺍ ﻲﻓ ﺔﺤﻴﺤﺻ ﺔﻘﻳﺮﻄﺑ ﺮّﻴﻐﺘﻳ ﻻﺃ ﺦﻳﺭﺎﺘﻠﻟ ﻦﻜﻤﻤﻟﺍ ﻦﻣ ،ﺔﻴﻨﻣﺰﻟﺍ ﺓﺮﺘﻔﻟﺍ ﻩﺬﻫ ءﺎﻨﺛﺃ ﺦﻳﺭﺎﺘﻟﺍ ﻂﺒﺿ ﻢﺗ ﺍﺫﺇ
ﺔﻋﺎﺴﻟﺍ ﺏﺭﺎﻘﻋ ﻩﺎﺠﺗﺍ ﺲﻜﻌﺑ
(ًﺎﺣﺎﺒﺻ ١) 1 AM ﻰﻟﺇ (ًءﺎﺴﻣ ٩) 9 PM ﻦﻣ ﺓﺮﺘﻔﻟﺍ
.ﺦﻳﺭﺎﺘﻟﺍ ﻂﺒﺿ ﺪﻨﻋ ﺔﻴﻨﻣﺰﻟﺍ ﺓﺮﺘﻔﻟﺍ ﻩﺬﻫ ﺐّﻨﺠﺗ *
.ﻰﻟﻭﻷﺍ ﺓﺮﻘﻨﻟﺍ ﻰﺘﺣ ﺝﺭﺎﺨﻟﺍ ﻰﻟﺇ ﺝﺎﺘﻟﺍ ﺐﺤﺳﺍ (١)
.ﻥﺎﺘﻘﻃ ﻪﻟ ﺔﻋﺎﺴﻟﺍ ﻩﺬﻫ ﻰﻠﻋ ﺩﻮﺟﻮﻤﻟﺍ ﺝﺎﺘﻟﺍ *
.ﺦﻳﺭﺎﺘﻟﺍ ﻂﺒﺿﺍﻭ ﺔﻋﺎﺴﻟﺍ ﺏﺭﺎﻘﻋ ﻩﺎﺠﺗﺍ ﺲﻜﻌﺑ ﺝﺎﺘﻟﺍ ﺭِﺩﺃ (٢)
.ﺔﻴﻟﺎﺘﻟﺍ
.ﻱﺩﺎﻌﻟﺍ ﻊﺿﻮﻟﺍ ﻰﻟﺇ ﻪﺗﺩﺎﻋﻹ ﻞﺧﺍﺪﻟﺍ ﻰﻟﺇ ﺝﺎﺘﻟﺍ ﻂﻐﺿﺍ (٣)
“1” ﻢﻗﺮﻟﺍ ﻰﻠﻋ ﺦﻳﺭﺎﺘﻟﺍ ﻂﺒﺿﺍ .ﻞﻗﺃ ﻭﺃ ًﺎﻣﻮﻳ ٣٠ ﻦﻣ ﺔﻧﻮﻜﻤﻟﺍ ﺭﻮﻬﺸﻟﺍ ﺔﻳﺎﻬﻧ ﻲﻓ ﺦﻳﺭﺎﺘﻟﺍ ﻂﺒﺿ ﻱﺭﻭﺮﻀﻟﺍ ﻦﻣ
.ﻩﺩﺮﻔﻤﺑ ﻪﻄﺒﺿ ﻦﻜﻤﻳ ﻻﻭ ﺕﺎﻋﺎﺴﻟﺍ ﺏﺮﻘﻌﺑ ﱠﺎﻴﻠﺧﺍﺩ ﻂﺒﺗﺮﻣ ﺔﻋﺎﺳ ٢٤ ﺖﻴﻗﻮﺗ ﺏﺮﻘﻋ
.ﺯﺮﻄﻟﺍ ﺾﻌﺑ ﻲﻓ ﺝﺎﺘﻟﺍﻭ ،ﺔﻋﺎﺳ ٢٤ﻭ ﻉﻮﺒﺳﻷﺍ ﻡﻮﻳﻭ ﺦﻳﺭﺎﺘﻟﺍ ﺏﺭﺎﻘﻋ ﻊﺿﻭ ﻒﻠﺘﺨﻳ *
ﺮﻬﺸﻟﺍ ﺔﻳﺎﻬﻧ ﻲﻓ ﺦﻳﺭﺎﺘﻟﺍ ﻂﺒﺿ *
.ﻲﻟﺎﺘﻟﺍ ﺮﻬﺸﻟﺍ ﻦﻣ ﻝﻭﻷﺍ ﻡﻮﻴﻟﺍ ﻲﻓ
ﻂﻘﻓ UU(KHA)* [ﺔﻋﺎﺳ ٢٤ ﺖﻴﻗﻮﺗ ﺏﺮﻘﻋ]
ﻲﺑﺮﻋ
١٠

ﻢﻳﻮﻘﺘﻟﺍﻭ ﺖﻗﻮﻟﺍ ﺔﺌﻴﻬﺗ ﺔﻴﻔﻴﻛ
[ﻉﻮﺒﺳﻷﺍ ﻡﻮﻳﻭ ﺖﻗﻮﻟﺍ ﺔﺌﻴﻬﺗ ﺔﻴﻔﻴﻛ]
ﺔﺌﻴﻬﺗ ﻞﺒﻗ ﻖﺋﺎﻗﺪﻟﺍﻭ ﺕﺎﻋﺎﺴﻟﺍ ﻲﺑﺮﻘﻋ ﺓﺭﺍﺩﺇ ﻖﻳﺮﻃ ﻦﻋ ﻉﻮﺒﺳﻷﺍ ﻡﻮﻳ ﻂﺒﺿﺍ .ًﺎﻴﺋﺎﻘﻠﺗ ﻉﻮﺒﺳﻷﺍ ﻡﺎﻳﺃ ﻂﺒﺿ ﻢﺘﻳ ﻻ *
ﺏﺮﻘﻋ ﻥﻮﻜﻳ ﺎﻣﺪﻨﻋ ﺔﻴﻧﺎﺜﻟﺍ ﺓﺮﻘﻨﻟﺍ ﻰﺘﺣ ﺝﺭﺎﺨﻟﺍ ﻰﻟﺇ ﺝﺎﺘﻟﺍ ﺐﺤﺳﺍ (١)
.ﺔﻄﻘﻨﻟﺍ ﻚﻠﺗ ﺪﻨﻋ ﻲﻧﺍﻮﺜﻟﺍ ﺏﺮﻘﻋ ﻒﻗﻮﺘﻳ .١٢ ﺔﻋﺎﺴﻟﺍ ﻊﺿﻭ ﻰﻠﻋ ﻲﻧﺍﻮﺜﻟﺍ
.ﻉﻮﺒﺳﻷﺍ ﻡﻮﻳ ﻂﺒﻀﻟ ﺝﺎﺘﻟﺍ ﺭِﺩﺃ (٢)
ﻩﺎﺠﺗﺎﺑ ﺝﺎﺘﻟﺍ ﺭِﺩﺃ •
ﻲﺑﺮﻘﻋ ﻢﻳﺪﻘﺘﺑ ﻢﻗ •
.ﻲﻟﺎﺘﻟﺍ ﻡﻮﻴﻟﺍ ﺓءﺍﺮﻗ ﻉﻮﺒﺳﻷﺍ ﻡﻮﻳ
AM/PM ﻂﺒﺿ ﻦﻣ ﺪﻛﺄﺗ
ﻂﻘﻓ UU(KHA)*
ﻲﺑﺮﻋ
㻿
㻹
㻿
㼀
㻲
㼃
㼀
ﺔﻋﺎﺴﻟﺍ ﺏﺭﺎﻘﻋ ﻩﺎﺠﺗﺎﺑ
㻿
㻹
㻿
㻲
㼃
㼀
.ﺕﺎﻋﺎﺳ ٥ ﻭﺃ ٤ ﺭﺍﺪﻘﻣ ﻊﺟﺭﺍﻭ ﺔﻋﺎﺴﻟﺍ ﺏﺭﺎﻘﻋ ﻩﺎﺠﺗﺍ ﺲﻜﻌﺑ ﺝﺎﺘﻟﺍ ﺭِﺩﺃ ،ﻂﺒﻀﻟﺍ
.ﺮﺒﻛﺃ ﺔﻋﺮﺴﺑ ﻉﻮﺒﺳﻷﺍ ﻡﻮﻳ ﺏﺮﻘﻋ ﻢﻳﺪﻘﺘﻟ ﻯﺮﺧﺃ ﺓﺮﻣ ﻡﺎﻣﻷﺍ ﻰﻟﺇ ﺝﺎﺘﻟﺍ ﺭِﺩﺃ
،ﺕﺎﻋﺎﺴﻟﺍ ﺏﺮﻘﻋ ﻂﺒﺿ ﺪﻨﻋ .ﻢﻳﻮﻘﺘﻟﺍ ﺔﻔﻴﻇﻭ ﺔﻋﺎﺴﻟﺍ ﻦﻤﻀﺘﺗ *
.ﺢﻴﺤﺼﻟﺍ ﺢﺿﻮﻟﺍ ﻰﻠﻋ (ًءﺎﺴﻣ)/(
.(ﻞﻴﻠﻟﺍ ﻒﺼﺘﻨﻣ ﺪﻨﻋ) “0:00 AM” ﺔﻋﺎﺴﻟﺍ ﺪﻨﻋ ﺦﻳﺭﺎﺘﻟﺍ ﺮّﻴﻐﺘﻳ
.ﺔﻋﺎﺳ ٢٤ ﺕﺎﻋﺎﺳ ﺏﺮﻘﻋ ﻊﻣ (ًءﺎﺴﻣ) PM ﻭﺃ (ًﺎﺣﺎﺒﺻ) AM ﺺﺤﻓﺃ
ﺓﺩﺎﻳﺯ ﻖﺋﺎﻗﺩ ٥ ﻭﺃ ٤ ﺭﺍﺪﻘﻣ ﻢﻳﺪﻘﺘﻟﺎﺑ ًﻻﻭﺃ ﻢﻗ ،ﺖﻗﻮﻟﺍ ﺔﺌﻴﻬﺗ ﺪﻨﻋ *
ﻊﺿﻭ ﻰﻠﻋ ﺭﻭﺮﻤﻟﺍ ﺪﻨﻋ .ﺔﻋﺎﺴﻟﺍ ﺏﺭﺎﻘﻋ
㼀
ﺔﻋﺎﺴﻟﺍ ﺏﺭﺎﻘﻋ
.ﺮّﻴﻐﺘﻟﺎﺑ ﻡﻮﻴﻟﺍ ﺏﺮﻘﻋ ﺃﺪﺒﻳ ١٢ ﺔﻋﺎﺴﻟﺍ
ﺏﺮﻘﻋ ﻦﻴﺒﻳ ﻥﺃ ﻰﻟﺇ ﻖﺋﺎﻗﺪﻟﺍﻭ ﺕﺎﻋﺎﺴﻟﺍ
ﻩﺎﺠﺗﺍ ﺲﻜﻌﺑ
ﻦﻣ ﺪﻳﺰﻤﻟ ﻉﻮﺒﺳﻷﺍ ﻡﻮﻳ ﺏﺮﻘﻋ ﺝﺎﺘﺣﺍ ﺍﺫﺇ •
.ﻉﻮﺒﺳﻷﺍ ﻡﻮﻳ ﻂﺒﺿﺍﻭ ﺓﻮﻄﺨﻟﺍ ﻩﺬﻫ ﺭّﺮﻛ •
.ﺖﻗﻮﻟﺍ ﺔﺌﻴﻬﺘﺑ ﻢﻗ ،ﻉﻮﺒﺳﻷﺍ ﻡﻮﻳ ﻂﺒﺿ ﺪﻌﺑ (٣
ً
ﺎﺣﺎﺒﺻ)
.ﺢﻴﺤﺼﻟﺍ ﺖﻴﻗﻮﺘﻟﺍ ﻰﻟﺇ ﻊﺟﺭﺍ ﻢﺛ ،ﺏﻮﻏﺮﻤﻟﺍ ﺖﻴﻗﻮﺘﻟﺍ ﻦﻋ
.ﻱﺩﺎﻌﻟﺍ ﻊﺿﻮﻟﺍ ﻰﻟﺇ ﻪﺗﺩﺎﻋﻹ ﻞﺧﺍﺪﻟﺍ ﻰﻟﺇ ﺝﺎﺘﻟﺍ ﻂﻐﺿﺍ (٤)
٩
.ﺖﻗﻮﻟﺍ
)

ﺕﺎﻋﺎﺴﻟﺍ ﺏﺮﻘﻋ :A
ﻉﻮﺒﺳﻷﺍ ﻡﻮﻳ ﺏﺮﻘﻋ :G
D
ﺔﻋﺎﺳ ٢٤ ﺖﻴﻗﻮﺗ ﺏﺮﻘﻋ :H
ﺕﺎﻔﺻﺍﻮﻤﻟﺍ
ﻖﺋﺎﻗﺪﻟﺍ ﺏﺮﻘﻋ :B
ﻲﻧﺍﻮﺜﻟﺍ ﺏﺮﻘﻋ :C
ﺝﺎﺘﻟﺍ :D
ﺎﻨﻴﻤﻟﺍ :E
ﺦﻳﺭﺎﺘﻟﺍ ﺏﺮﻘﻋ :F
ﻰﻟﺇ ٥ ﻦﻣ ﺓﺭﺍﺮﺣ ﺔﺟﺭﺩ ﺪﻨﻋ) ﺔﻴﻧﺎﺛ ٢٠ ± :ﻂﺳﻮﺘﻣ ﻱﺮﻬﺷ ﻝّﺪﻌﻣ
G
A
C
(ﺔﻴﻧﺎﺛ ﻞﻛ ﺔﺑﺬﺑﺫ = ﺰﺗﺮﻫ) ﺰﺗﺮﻫ ٣٢٧٦٨ ... ﻱﺭﻮّﻠﺒﻟﺍ ﺏﺬﺑﺬﻤﻟﺍ ﺩﺩﺮﺗ (١)
(ﺔﻳﻮﺌﻣ ﺔﺟﺭﺩ ٣٥
ﺔﻳﻮﺌﻣ ﺔﺟﺭﺩ ٥٠+ ﻰﻟﺇ ٥– ﻦﻣ
ﻲﻠﺣﺮﻣ ﺭﻮﺗﻮﻣ ... ﻊﻓﺪﻟﺍ ﻡﺎﻈﻧ (٤)
SR920SW ... ﺔﻳﺭﺎﻄﺒﻟﺍ (٥)
.ﺓﺪﻳﺪﺠﻟﺍ ﺔﻳﺭﺎﻄﺒﻟﺍ ﺐﻴﻛﺮﺗ ﺦﻳﺭﺎﺗ ﻦﻣ ًﺎﺒﻳﺮﻘﺗ ﺕﺍﻮﻨﺳ ٣
㻿
㻹
㻿
㼀
㻲
㼃
㼀
١ ﺩﺪﻋ ؛
.ﻦﻴﺴﺤﺘﻟﺍ ﺽﺮﻐﻟ ﻚﻟﺫﻭ ﺭﺎﻌﺷﺇ ﻥﻭﺩ ﺮﻴﻴﻐﺘﻠﻟ ﺔﺿﺮﻋ ﻩﻼﻋﺃ ﺕﺎﻔﺻﺍﻮﻤﻟﺍ *
B
E
F
<UU (KHA)><UW (KUA)>
G
A
D
C
... ﻢﺼﻌﻤﻟﺍ ﻰﻠﻋ ءﺍﺪﺗﺭﻻﺍ ﺪﻨﻋ ﺔﻗﺪﻟﺍ (٢)
... ﺔﻴﻠﻴﻐﺸﺘﻟﺍ ﺓﺭﺍﺮﺤﻟﺍ ﺕﺎﺟﺭﺩ ﻕﺎﻄﻧ (٣)
... ﺔﻳﺭﺎﻄﺒﻟﺍ ﺮﻤﻋ (٦)
ﺔﻳﺩﺮﻔﻟﺍ ﺕﺎﻧﻮﻜﻤﻟﺍ ﻊﻄﻗ ﻒﺋﺎﻇﻭﻭ ءﺎﻤﺳﺃ
B
F
E
H
.ﺯﺮﻄﻟﺍ ﺾﻌﺑ ﻲﻓ ﺝﺎﺘﻟﺍﻭ ،ﺔﻋﺎﺳ ٢٤ﻭ ﻉﻮﺒﺳﻷﺍ ﻡﻮﻳﻭ ﺦﻳﺭﺎﺘﻟﺍ ﺏﺭﺎﻘﻋ ﻊﺿﻭ ﻒﻠﺘﺨﻳ *
ﺔﻄﺳﺍﻮﺑ ﺖّﺒﺜﻣ ﺝﺎﺗ ﻰﻠﻋ ﻱﻮﺘﺤﺗ ﻲﺘﻟﺍ ﺕﻼﻳﺩﻮﻤﻟﺍ) ﻲﻏﺮﺒﻟﺍ ﻚﻓ ﻥﻭﺩ ﺝﺭﺎﺨﻟﺍ ﻰﻟﺇ ﺝﺎﺘﻟﺍ ﺐﺤﺳ ﻦﻣ ﻦﻜﻤﺘﺗ ﻻ ﺪﻗ
ّﺪﺸﻟ ﻥﺍﺭﻭﺪﻟﺍ ﻦﻋ ﻒﻗﻮﺘﻳ ﻥﺃ ﻰﻟﺇ ﻞﺧﺍﺪﻟﺍ ﻰﻟﺇ ﻪﻄﻐﻀﺗ ﺎﻤﻨﻴﺑ ﻦﻴﻤﻴﻟﺍ ﻰﻟﺇ ﺝﺎﺘﻟﺍ ﺭِﺩﺃ ،ﺖﻗﻮﻟﺍﻭ ﺦﻳﺭﺎﺘﻟﺍ ﺔﺌﻴﻬﺗ ﺪﻌﺑ (٢)
ﻲﻏﺮﺑ ﺔﻄﺳﺍﻮﺑ ﺖّﺒﺜﻣ ﺝﺎﺗ ﻰﻠﻋ ﻱﻮﺘﺤﺗ ﻲﺘﻟﺍ ﺕﻼﻳﺩﻮﻤﻟﺍ
.ﻞﻳﺩﻮﻤﻠﻟ ًﺎﻌﺒﺗ ﻚﻟﺫﻭ (ﻲﻏﺮﺑ
.ﻲﻏﺮﺒﻟﺍ ﻞﻔﻗ ءﺎﺧﺭﻹ ًﻻﻭﺃ ﺭﺎﺴﻴﻟﺍ ﻰﻟﺇ ﺝﺎﺘﻟﺍ ﺭِﺩﺃ ،ﺖﻗﻮﻟﺍﻭ ﺦﻳﺭﺎﺘﻟﺍ ﺔﺌﻴﻬﺗ ﻞﺒﻗ (١)
:ﻲﻠﻳ ﺎﻤﻛ ﺯﺍﺮﻄﻟﺍ ﺍﺬﻫ ﻞﻴﻐﺸﺘﺑ ﻢﻗ
.ﻡﺎﻜﺣﺈﺑ ﻲﻏﺮﺒﻟﺍ
ﻲﺑﺮﻋ
٨

ﻲﻔﻠﺨﻟﺍ ءﺰﺠﻟﺎﺑ ﺩﻮﺟﻮﻤﻟﺍ ﺔﻋﺎﺴﻟﺍ ﻞﻜﻴﻫ ﺰﻣﺭ ﻭﺃ ﻚﺘﻋﺎﺴﺑ ﺹﺎﺨﻟﺍ ﻞﻳﺩﻮﻤﻟﺍ ﻢﻗﺭ ﺔﻌﺟﺍﺮﻤﺑ ﺭﺎﻴﻌﻟﺍ ﻢﻗﺭ ﺺﺤﻓﺍ
ﻚﻨﻜﻤﻳ ﺎﻤﻛ .ﺔﻋﺎﺴﻟﺍ ﻊﻣ ﺩﻭﺰﻤﻟﺍ ﻥﺎﻤﻀﻟﺍ ﻰﻠﻋ ﺩﻮﺟﻮﻤﻟﺍﻭ ،ﻡﺎﻗﺭﺃ ١٠ ﻦﻣ ﻥﻮﻜﻤﻟﺍ ﻞﻳﺩﻮﻤﻟﺍ ﻢﻗﺭ ﺔﻌﺟﺍﺮﻤﺑ ﻢﻗ
ﺭﺎﻴﻌﻟﺍ ﻢﻗﺭ ﻰﻟﺇ ﺚﻟﺎﺜﻟﺍﻭ ﻲﻧﺎﺜﻟﺍ ﻥﺎﻤﻗﺮﻟﺍ ﺮﻴﺸﻳ .ﺔﻋﺎﺴﻟﺍ ﻰﻠﻋ ﺩﻮﺟﻮﻤﻟﺍ ﺞﺘﻨﻤﻟﺍ ﻖﺼﻠﻣ ﻰﻠﻋ ﻢﻗﺮﻟﺍ ﻰﻠﻋ ﻉﻼﻃﻻﺍ
.“U
W
” ﻮﻫ ﺭﺎﻴﻌﻟﺍ ﻢﻗﺭ ﻥﺃ ﻲﻨﻌﻳ ﺍﺬﻬﻓ ،“
.ﺔﻋﺎﺴﻟﺍ ﻞﻜﻴﻬﻟ ﻲﻔﻠﺨﻟﺍ ءﺰﺠﻟﺎﺑ ﺩﻮﺟﻮﻤﻟﺍ ﺔﻋﺎﺴﻟﺍ ﻞﻜﻴﻫ ﺰﻣﺭ ﻰﻠﻋ ﻊﻠّﻃﺍ
.“UW” ﻮﻫ ﺭﺎﻴﻌﻟﺍ ﻢﻗﺭ ﻥﻮﻜﻳ ،“UW00-C0” ﺔﻋﺎﺴﻟﺍ ﻞﻜﻴﻫ ﺰﻣﺭ ﻥﻮﻜﻳ ﺎﻣﺪﻨﻋ :ﻝﺎﺜﻣ
ﺔﻋﺎﺴﻟﺍ ﻞﻜﻴﻫ ﺰﻣﺭ
ﻡﺎﻗﺭﺃ ١٠ ﻦﻣ ﻥﻮﻜﻤﻟﺍ ﻞﻳﺩﻮﻤﻟﺍ ﻢﻗﺮﺑ ﺚﺤﺒﻟﺍ .١
□UW00005B□
.ﺭﺎﻴﻌﻟﺍ ﻢﻗﺭ ﻰﻟﺇ ﻥﺎﻴﻟﻭﻷﺍ ﻥﺎﻤﻗﺮﻟﺍ ﺮﻴﺸﻳ
.ﺔﻋﺎﺴﻟﺍ ﻞﻜﻴﻬﻟ
.ﺔﻋﺎﺴﻟﺎﺑ ﺹﺎﺨﻟﺍ
” ﻞﻳﺩﻮﻤﻟﺍ ﻢﻗﺭ ﻥﺎﻛ ﺍﺫﺇ :ﻝﺎﺜﻣ
ﺔﻋﺎﺴﻟﺍ ﻞﻜﻴﻫ ﺰﻣﺮﺑ ﺚﺤﺒﻟﺍ .٢
ﺭﺎﻴﻌﻟﺍ ﻢﻗﺭ ﺪﻳﺪﺤﺗ ﺔﻴﻔﻴﻛ
ﺎًﻘﻓﻭ ،ﻪﺘﻳﺅﺭ ﺐﻌﺼﻟﺍ ﻦﻣﻭ ﺍًﺮﻴﻐﺻ ﻪﺑ ﺏﻮﺘﻜﻤﻟﺍ ﻂﺨﻟﺍ ﻢﺠﺣ ﻥﻮﻜﻳ ﺪﻗﻭ ﺔﻋﺎﺴﻟﺍ ﻞﻜﻴﻫ ﺰﻣﺭ ﻥﺎﻜﻣ ﻒﻠﺘﺨﻳ ﺪﻗ *
ﻲﺑﺮﻋ
ﺕﺍءﺍﺮﺟﺇﻭ ﻒﺋﺎﻇﻮﻟﺍ ﻦﻜﻟﻭ ،ﻚﺘﻋﺎﺴﻟ ﻲﻠﻌﻔﻟﺍ ﻞﻜﺸﻟﺍ ﻦﻋ ﻞﻴﻟﺪﻟﺍ ﺍﺬﻬﺑ ﺓﺩﺭﺍﻮﻟﺍ ﺕﺎﺤﻴﺿﻮﺘﻟﺍﻭ ﺭﻮﺼﻟﺍ ﻒﻠﺘﺨﺗ ﺪﻗ *
.ﻲﻧﺍﻮﺜﻟﺍﻭ ﻖﺋﺎﻗﺪﻟﺍﻭ ﺕﺎﻋﺎﺴﻠﻟ ﺏﺭﺎﻘﻋ ﺔﻄﺳﺍﻮﺑ ﻲﻟﺎﺤﻟﺍ ﺖﻴﻗﻮﺘﻟﺍ ﻥﺎﻴﺑ ﻢﺘﻳ (٢)
ﻂﻘﻓ UU(KHA)* ﺔﻴﺳﺎﻜﻌﻧﺍ ﺔﺷﺎﺷ ﻡﺍﺪﺨﺘﺳﺎﺑ ﻉﻮﺒﺳﻻﺍ ﻡﻮﻳ ﺽﺮﻋ ﻢﺘﻳ *
.ﻱﺭﻮّﻠﺑ ﺏﺬﺑﺬﻤﺑ ﺓﺰّﻬﺠﻣ ﺏﺭﺎﻘﻌﺑ ﺔﻋﺎﺳ ﻩﺬﻫ (١)
.ﺏﺭﺎﻘﻌﻟﺎﺑ ﻉﻮﺒﺳﻷﺍ ﻡﻮﻳﻭ ﺦﻳﺭﺎﺘﻟﺍ ﻰﻟﺇ ﺓﺭﺎﺷﻹﺍ ﻢﺘﺗ (٣)
ﻂﻘﻓ UU(KHA)* ﺏﺮﻘﻌﺑ ﺔﻋﺎﺳ ٤٢ ﺖﻗﻭ ﻰﻟﺇ ﺓﺭﺎﺷﻹﺍ ﻢﺘﺗ (٤)
.ﺕﺎﻋﺎﺴﻟﺍ ﺺﺋﺎﺼﺨﻟ
.ﻲﻫ ﺎﻤﻛ ﻞﻴﻐﺸﺘﻟﺍ
ﺓﺰّﻴﻤﻤﻟﺍ ﺺﺋﺎﺼﺨﻟﺍ
٧

ﺕﺎﻘﺤﻠﻤﻟﺍ ﻊﻄﻘﺑ ﻖﻠﻌﺘﻳ ﺎﻤﻴﻓ (٩)
!
.ﻪﻠﻳﺪﻌﺗ ﻭﺃ ﺞﺘﻨﻤﻟﺍ ﺍﺬﻫ ﻚﻓ ﻝﻭﺎﺤﺗ ﻻ
ﺔﻳﺃ ﻉﻼﺘﺑﺍ ﻢﺗ ﺍﺫﺇﻭ ،ﻝﺎﻔﻃﻷﺍ ﻝﻭﺎﻨﺘﻣ ﻦﻋ ﺍًﺪﻴﻌﺑ ﻯﺮﺧﻷﺍ ﺓﺮﻴﻐﺼﻟﺍ ءﺍﺰﺟﻷﺍﻭ ﻁﺎﺑﺮﻟﺍ/ﺭﺍﻮﺴﻟﺍ ﺓﺮﺑﺇ ﻦﻳﺰﺨﺘﺑ ﻢﻗ
.ﺭﻮﻔﻟﺍ ﻰﻠﻋ ﺐﻴﺒﻄﺑ ﻞﺼﺗﺎﻓ ،ﺓﺮﻴﻐﺻ ﻊﻄﻗ
!
ﺔﻴﺳﺎﺴﺤﻟﺍ ﺕﺎﺑﺎﺠﺘﺳﺍ (١٠)
!
ﻒﻗﻮﺘﻓ ،ﻁﺎﺑﺮﻟﺍ ﻭﺃ ﺔﻋﺎﺴﻟﺍ ﺲﻤﻠﻟ ﺔﺠﻴﺘﻧ ؛ﺔﻴﻌﻴﺒﻃ ﺮﻴﻏ ﺓﺭﻮﺼﺑ ﻙﺪﻠﺟ ﺞﱠﻴﻬﺗ ﻭﺃ ﻱﺪﻠﺟ ﺢﻔﻃ ﺩﻮﺟﻭ ﺖﻈﺣﻻ ﺍﺫﺇ
،ﺔّﻌﺸﻣ ﺩﺍﻮﻣ ﺔﻳﺃ ﻡﺍﺪﺨﺘﺳﺍ ﻥﻭﺪﺑ ﻲﻋﺎﻨﺼﻟﺍ ءﻮﻀﻟﺍﻭ ﺲﻤﺸﻟﺍ ءﻮﻀﺑ ﻆﻔﺘﺤﻳ ﻦﻣﺁ ءﻼﻃ ﻮﻫ ﻲﺋﻮﻀﻟﺍ ﻥﺎﻌﻤﻠﻟﺍ
ﺢﺒﺼﻴﺳ ،ﻥﺰﺘﺨﻤﻟﺍ ءﻮﻀﻟﺍ ﻎﻳﺮﻔﺗ ﻰﻠﻋ ءﻼﻄﻟﺍ ﻞﻤﻌﻳ ﺚﻴﺣﻭ .ﺔﺘﻓﺎﺨﻟﺍ ﺓءﺎﺿﻹﺍ ﻑﻭﺮﻇ ﻲﻓ ءﻮﻀﻟﺍ ﺍﺬﻫ ﻊﺸﻳﻭ
ﻢﺘﻳ ﺎﻣﺪﻨﻋ ،ﺓﺩﺪﻌﺘﻣ ﻞﻣﺍﻮﻋ ﻰﻠﻋ ءﻮﻀﻟﺍ ﻉﺎﻌﺷﺇ ﺖﻗﻭﻭ ﺞﺗﺎﻨﻟﺍ ءﻮﻀﻟﺍ ﺭﺍﺪﻘﻣ ﺪﻤﺘﻌﻳ .ﺖﻗﻮﻟﺍ ﺭﻭﺮﻤﺑ ﺮﺜﻛﺃ ﺎًﺘﻓﺎﺧ
ﺭﺪﺼﻣﻭ ﺔﻋﺎﺴﻟﺍ ﻦﻴﺑ ﺔﻓﺎﺴﻤﻟﺍﻭ ﻂﻴﺤﻤﻟﺍ ﻉﻮﻄﺴﻟﺍ ﻯﻮﺘﺴﻣﻭ ءﻼﻄﻟﺍ ﻚﻤُﺳﻭ ﺝﺎﺟﺰﻟﺍ ﻞﻜﺷ :ﻞﺜﻣ ،ءﻮﻀﻟﺍ ﻦﻳﺰﺨﺗ
ّ
ﺔﻋﺎﺴﻟﺍ ﻊ
ﺸﺗ ﺪﻗ ،ﺔﻴﻓﺎﻛ ءﻮﺿ ﺔﻗﺎﻃ ﻦﻳﺰﺨﺗ ﻡﺪﻋ ﺪﻨﻋ ﻪﻧﺃ ﻢﻠﻌﻟﺍ ءﺎﺟﺮﻟﺍ .ءﻮﻀﻟﺍ ﺹﺎﺼﺘﻣﺍ ﻯﻮﺘﺴﻣﻭ ءﻮﻀﻟﺍ
ﺹﺎﺼﺘﻣﻻ ﺔﻣﻭﺎﻘﻣ ﺔﺻﺎﺧ ﺔﺠﻟﺎﻌﻣ ﺔﻘﺒﻄﺑ ﺓﺎﻄﻐﻣ ﻥﻮﻠﻳﺎﻨﻟﺍﻭ ﺪﻠﺠﻟﺍ ﻦﻣ ﺔﻣﺰﺣﺃ ﺎﻬﻴﻓ ﻡﺪﺨﺘﺴُﻳ ﺕﺎﺠﺘﻨﻤﻟﺍ ﺾﻌﺑ
ﺎﻫﺮﻴﺛﺄﺗ ﺪﻘﻔﺗ ﻥﺃ ﻦﻜﻤﻳ ءﺎﻤﻠﻟ ﺕﺎﻋﺎﺴﻟﺍ ﺭﺍﻮﺴﻟ ﻦﻣ ﻉﻮﻨﻟﺍ ﺍﺬﻫ ﻞﺜﻣ ﺔﻣﻭﺎﻘﻣ ﻥﺃ ﻢﻠﻌﻟﺍ ﺬﺧﺃ ﻰﺟﺮُﻳ .ءﺎﻤﻟﺍﻭ ﻕﺮﻌﻟﺍ
.ﺎﻨﻴﻤﻟﺍﻭ ﺏﺭﺎﻘﻌﻟﺍ ﻰﻠﻋ ءﻲﻀﻣ ﺡﺎﺒﺼﻣ ﻰﻠﻋ ﺕﺎﺠﺘﻨﻤﻟﺍ ﺾﻌﺑ ﻞﻤﺘﺸﺗ
.ﺎًﺒﻴﺒﻃ ﺮﺸﺘﺳﺍﻭ ﺭﻮﻔﻟﺍ ﻰﻠﻋ ﺔﻋﺎﺴﻟﺍ ءﺍﺪﺗﺭﺍ ﻦﻋ
“ﻲﺋﻮﻀﻟﺍ ﻥﺎﻌﻤﻠﻟﺎﺑ” ﻖﻠﻌﺘﻳ ﺎﻤﻴﻓ (١١)
.ﻂﻘﻓ ﺓﺮﻴﺼﻗ ﺓﺮﺘﻔﻟ ﺍًءﻮﺿ ﻊّﺸﺗ ﻭﺃ ﺎًﻔﻴﻌﺿ ﺍًءﻮﺿ
ءﺎﻤﻠﻟ ﺔﻣﻭﺎﻘﻣ ﺔﻋﺎﺳ ﺭﺍﻮﺳ (١٢)
.ﻝﺎﻤﻌﺘﺳﻻﺍ ﻑﻭﺮﻇﻭ ﺓﺪﻤﻟ ًﺎﻌﺒﺗ ﻚﻟﺫﻭ
٦
ﻲﺑﺮﻋ

ﺎﻤﻨﻴﺑ ،ﺔﻔﻴﻨﻋ ﺕﺎﺿﺎﻳﺭ ﺔﺳﺭﺎﻤﻣ ﺪﻨﻋ ﺔﻋﺎﺴﻟﺍ ﻞﻤﺣ ﻡﺪﻋ ﻦﻣ ﺪﻛﺄﺗ
ﻰﻠﻋ ﻲﺴﻜﻋ ﻞﻜﺸﺑ ﺮﺛﺆﻳ ﻦﻟ ﻚﻟﺫ ﺮﻴﻏﻭ ﻒﻟﻮﺠﻟﺍ ﻞﺜﻣ ﺔﻔﻴﻔﺨﻟﺍ ﺕﺎﺿﺎﻳﺮﻟﺍ ﺔﺳﺭﺎﻤﻣ
.ﺽﺭﻷﺍ ﻰﻠﻋ ًﻼﺜﻣ ﺔﻋﺎﺴﻟﺍ ﻁﺎﻘﺳﺈﻛ ﺔﻔﻴﻨﻌﻟﺍ ﺔﻣﺪﺼﻟﺍ ﺐﻨﺠﺗ
ﺓﺮﺘﻔﻟ ﻱﻮﻗ ﻲﺴﻴﻃﺎﻨﻐﻣ ﻝﺎﺠﻣ ﻦﻣ ﺐﻳﺮﻗ ﻥﺎﻜﻣ ﻲﻓ ﺔﻋﺎﺴﻟﺍ ﻙﺮﺗ ﻢﺗ ﺍﺫﺇ
ﻰﻟﺇ ﻱﺩﺆﻳ ﺎﻤﻣ ،ﺔﻋﺎﺴﻟﺍ ﻊﻄﻗ ﺔﻄﻨﻐﻣ ﻰﻟﺇ ﻚﻟﺫ ﻱﺩﺆﻳ ﻥﺃ ﻦﻜﻤﻤﻟﺍ ﻦﻤﻓ ،ﺔﻠﻳﻮﻃ ﺔﻴﻨﻣﺯ
ﺎﻣﺪﻨﻋ ﺔﻴﻠﺻﻷﺍ ﺔﻗﺪﻟﺍ ﺓﺩﺎﻌﺘﺳﺍ ﻢﺘﺗﻭ .ﻲﺴﻴﻃﺎﻨﻐﻣ ﻝﺎﺠﻤﻟ ﺽﺮﻌﺘﺗ ﺎﻣﺪﻨﻋ ﺎًﺘﻗﺆﻣ ﺮﺧﺆﺗ ﻭﺃ ﻡﺪﻘﺗ ﻥﺃ ﺔﻋﺎﺴﻠﻟ ﻦﻜﻤﻳ
ﺭﻮﺼﻗ ﺙﺪﺤﻳ ﺪﻗ ،ﺔﻳﻮﺌﻣ ﺔﺟﺭﺩ ٣٥ ﻦﻋ ﺪﻳﺰﺗ ﻭﺃ ﺔﻳﻮﺌﻣ ﺕﺎﺟﺭﺩ ٥ ﻦﻋ ﺎﻬﺗﺭﺍﺮﺣ ﺔﺟﺭﺩ ﻞﻘﺗ ﻲﺘﻟﺍ ﺕﺎﺌﻴﺒﻟﺍ ﻲﻓ
ﺓﺭﺍﺮﺣ ﺔﺟﺭﺩ ﻊﻔﺗﺮﺗ ﺪﻘﻓ .(ﺎﻧﻭﺎﺴﻟﺍ) ﺭﺎﺨﺒﻟﺍ ﺕﺎﻣﺎﻤﺣ ﻲﻓ ﺎﻤﻛ ،ﺔﻌﻔﺗﺮﻣ ﺓﺭﺍﺮﺣ ﺕﺎﺟﺭﺩ ﻲﻓ ﺔﻋﺎﺴﻟﺍ ﻡﺪﺨﺘﺴﺗ ﻻ
ﻲﺑﺮﻋ
،ﻦﻳﺰﻨﺒﻟﺍ ،ءﻼﻄﻟﺍ ﺮﻨﺛ ،ﻞﺜﻣ) ﺕﺎﻳﻭﺎﻤﻴﻜﻟﺍﻭ ﻖﺒﺋﺰﻟﺍﻭ ﺕﺍﺯﺎﻐﻟﺍ ﺔﺴﻣﻼﻣ ﺪﻨﻋ ﺭﺬﺤﻟﺍ ﺕﺎﺟﺭﺩ ﻰﺼﻗﺃ ﻲّﺧﻮﺗ ﺐﺠﻳ
،ﺔﻳﻭﺩﻷﺍ ،ءﻼﻄﻟﺍ ،ﺔﻘﺻﻼﻟﺍ ﺩﺍﻮﻤﻟﺍ ،ﺕﺎﻧﻮﻜﻤﻟﺍ ﻚﻠﺗ ﻞﺜﻣ ﻰﻠﻋ ﻱﻮﺘﺤﺗ ﻲﺘﻟﺍ ﺕﺎﻔﻈﻨﻤﻟﺍ ،ﺔﻔﻠﺘﺨﻤﻟﺍ ﺕﺎﺒﻳﺬﻤﻟﺍ
ﺭﺍﻮﺳﻭ ﺔﻋﺎﺴﻟﺍ ﻞﻜﻴﻫ ﻥﻮﻟ ﻥﺍﺪﻘﻓ ﻰﻟﺇ ﻚﻟﺫ ﻱﺩﺆﻳ ﺪﻘﻓ .ﻚﻟﺫ ﻰﻟﺇ ﺎﻣﻭ ،(.ﺦﻟﺇ ،ﻞﻴﻤﺠﺘﻟﺍ ﺕﺍﺮﻀﺤﺘﺴﻣ ،ﺭﻮﻄﻌﻟﺍ
ﺱﺎﺳﻷﺍ ﺕﺍﺫ ﺔﻔﻠﺘﺨﻤﻟﺍ ﺕﺎﻧﻮﻜﻤﻟﺍ ءﺍﺰﺟﺃ ﻥﻮﻟ ﻥﺍﺪﻘﻓ ﻰﻟﺇ ﻚﻟﺫ ﻱﺩﺆﻳ ﻥﺃ ﻦﻜﻤﻳ ﺎﻤﻛ .ﺎﻨﻴﻤﻟﺍ ﻪﺟﻭﻭ ﺔﻋﺎﺴﻟﺍ
.ﺖﻗﻮﻟﺍ ﻂﺒﻀﺑ ﻢﻗ ﺔﻟﺎﺤﻟﺍ ﻩﺬﻫ ﻲﻓ .ﻲﺴﻴﻃﺎﻨﻐﻤﻟﺍ ﻝﺎﺠﻤﻟﺍ ﻦﻋ ﺎﻫﺩﺎﻌﺑﺇ ﻢﺘﻳ
ﻲﺘﻟﺍ ﻚﻠﺘﻛ ﺔﻳﻮﻗ ﺕﺍﺯﺍﺰﺘﻫﻻ ﺽﺮﻌﺘﺗ ﺎﻣﺪﻨﻋ ﺖﻗﻮﻟﺍ ﺔﻗﺩ ﺔﻋﺎﺴﻟﺍ ﺪﻘﻔﺗ ﺪﻗ
.ﺦﻟﺇ ،ﻲﻠﺴﻠﺳ ﺭﺎﺸﻨﻣ ﻭﺃ ﺏﺎﻘﺜﻣ ﻡﺍﺪﺨﺘﺳﺍ ﻭﺃ ﺔﻳﺭﺎﻧ ﺕﺎﺟﺍﺭﺩ ﺏﻮﻛﺭ ءﺎﻨﺛﺃ ﺙﺪﺤﺗ
ﻲﺴﻴﻃﺎﻨﻐﻤﻟﺍ ﻝﺎﺠﻤﻟﺍ (٥)
.ﺎًﺼﻳﺮﺣ ﻦﻜﻓ ،ﺎﻬﺋﺍﺩﺃ ﻲﻓ ﺭﻮﺼﻗ
ﺯﺍﺰﺘﻫﻻﺍ (٦)
ﺓﺭﺍﺮﺤﻟﺍ ﺔﺟﺭﺩ (٧)
.ﻞﻤﻌﻟﺍ ﻦﻋ ﻒﻗﻮﺘﺗﻭ ﺔﻋﺎﺴﻟﺍ ءﺍﺩﻷ
.ﺎﻬﻗﺍﺮﺘﺣﺍ ﻰﻟﺇ ﻱﺩﺆﺗﻭ ﺔﻋﺎﺴﻟﺍ
.ﺦﻟﺇ ،ﺕﺍﺯﺎﻐﻟﺍﻭ ﺔﻴﺋﺎﻴﻤﻴﻜﻟﺍ ﺩﺍﻮﻤﻟﺍ (٨)
.ﺎﻬﻔﻠﺗﻭ ﺎﻬﻫﻮﺸﺗﻭ ﻲﺠﻨﺗﺍﺮﻟﺍ
٥
ﺔﻣﺪﺼﻟﺍ (٤)
.ﺔﻋﺎﺴﻟﺍ
!

ﺔﻳﺭﺎﻄﺒﻟﺍ ﻊﻣ ﻞﻣﺎﻌﺘﻟﺍ (٢)
!
ﻞﺼﺗﺎﻓ ،ﺊﻃﺎﺧ ﻞﻜﺸﺑ ﺔﻳﺭﺎﻄﺒﻟﺍ ﻝﻭﺎﻨﺗ ﻢﺗ ﺍﺫﺇ .ﺭﺎﻐﺼﻟﺍ ﻝﺎﻔﻃﻷﺍﻭ ﻊﺿُﺮﻟﺍ ﻝﻭﺎﻨﺘﻣ ﻦﻋ ﺍًﺪﻴﻌﺑ ﺔﻳﺭﺎﻄﺒﻟﺍ ﻥﺰﺧ
ﻝﻮﺼﺤﻠﻟ ﺪﻤﺘﻌُﻣ ORIENT ﺰﻛﺮﻣ ﺏﺮﻗﺃ ﻭﺃ ﺔﻋﺎﺴﻟﺍ ءﺍﺮﺷ ﻥﺎﻜﻤﺑ ﻞﺼﺗﺍ .ﺔﻋﺎﺴﻟﺍ ﻦﻣ ﺔﻳﺭﺎﻄﺒﻟﺍ ﺔﻟﺍﺯﺈﺑ ﻢﻘﺗ ﻻ
ﺓﺮﻣ ﺎﻬﻣﺍﺪﺨﺘﺳﺍﻭ ﺎﻬﻨﺤﺷ ﺓﺩﺎﻋﺇ ﻦﻜﻤﻳ ﻻ ،ﺍﺬﻟ ،ﻦﺤﺸﻟﺍ ﺓﺩﺎﻋﻹ ﺔﻠﺑﺎﻗ ﺮﻴﻏ ﺔﻋﺎﺴﻟﺍ ﻩﺬﻫ ﻲﻓ ﺔﻣﺪﺨﺘﺴﻤﻟﺍ ﺔﻳﺭﺎﻄﺒﻟﺍ
.ﺔﻳﺭﺎﻄﺒﻟﺍ ﺭﺎﺠﻔﻧﺍ ﻭﺃ ﺓﺪﺋﺍﺯ ﺔﻧﻮﺨﺳ ﻰﻟﺇ ﻚﻟﺫ ﻱﺩﺆﻳ ﺪﻗ ﺚﻴﺣ ،ﺔﻳﺭﺎﻄﺒﻟﺍ ﻦﺤﺷ ﻝﻭﺎﺤﺗ ﻻ .ﻯﺮﺧﺃ
ﺕﺎﻳﺭﺎﻄﺒﻟﺍ ﻙﺮﺘﺗ ﻻ .ﺪﻠﺠﻟﺍ ﺏﺮﺴﺘﻤﻟﺍ ﺔﻳﺭﺎﻄﺒﻟﺍ ﻞﺋﺎﺳ ﺲﻣﻻ ﺍﺫﺇ ﻯﺮﺧﺃ ﺽﺍﺮﻋﺃ ﻭﺃ ﻱﺪﻠﺟ ﺢﻔﻃ ﺙﺪﺤﻳ ﺪﻗ
ﻱﺩﺆﻳ ﺪﻗ ﺎﻤﻣ ،ﺔﻳﺭﺎﻄﺒﻟﺍ ﺾﻤﺣ ﺐﻳﺮﺴﺗ ﻲﻓ ﺃﺪﺒﺗ ﺪﻗ ﺔﻋﺎﺴﻟﺍ ﻲﻓ ﺔﻠﻳﻮﻃ ﺕﺍﺮﺘﻔﻟ ﻙﺮﺘﺗ ﻲﺘﻟﺍ ﺓﺪﻔﻨﺘﺴﻤﻟﺍ ﺕﺎﻳﺭﺎﻄﺒﻟﺍ
ﺪﻗ ﺔﻳﺭﺎﻄﺒﻟﺍ ﻝﺎﺧﺩﺇ ﺪﻨﻋ ﺏﺎﻄﻗﻷﺍ ﻊﺿﻭ ﺲﻜﻋ .ﻚﻟﺫ ﻰﻟﺇ ﺎﻣﻭ ﺔﻨﻴﻌﻣ ﺕﺍﻭﺩﺃﻭ ﺐﻴﻟﺎﺳﺃ ﺔﻳﺭﺎﻄﺒﻟﺍ ﻝﺍﺪﺒﺘﺳﺍ ﺐﻠﻄﺘﻳ
ORIENT ﺔﻣﺪﺧ ﺰﻛﺮﻣ ﺏﺮﻗﺃ ﻭﺃ ﺔﻋﺎﺴﻟﺍ ءﺍﺮﺷ ﻥﺎﻜﻤﺑ ﻞﺼﺗﺍ .ﺔﻳﺭﺎﻄﺒﻟﺍ ﺭﺎﺠﻔﻧﺍ ﻭﺃ ﺓﺪﺋﺍﺯ ﺔﻧﻮﺨﺳ ﻲﻓ ﺐﺒﺴﺘﻳ
.ﻥﺎﻜﻣﻹﺍ ﺭﺪﻗ ﺎًﻌﻳﺮﺳ ﺓﺪﻔﻨﺘﺴﻤﻟﺍ ﺕﺎﻳﺭﺎﻄﺒﻟﺍ ﻝﺍﺪﺒﺘﺳﺍ ﻦﻣ ﺪﻛﺄﺗ .ﻞﻄﻋ ﺙﻭﺪﺣ ﻰﻟﺇ
.ﺔﻳﺭﺎﻄﺒﻟﺍ ﻝﺍﺪﺒﺘﺳﺍ ﻲﻓ ﺐﻏﺮﺗ ﺎﻣﺪﻨﻋ ﺓﺪﻋﺎﺴﻣ ﻰﻠﻋ ﻝﻮﺼﺤﻠﻟ ﺪﻤﺘﻌُﻣ
.ﺔﻳﺭﺎﻄﺒﻟﺍ ﺔﻟﺍﺯﺇ ﻲﻓ ﺐﻏﺮﺗ ﺎﻣﺪﻨﻋ ﺓﺪﻋﺎﺴﻣ ﻰﻠﻋ
.ﺩﺪﺤﻤﻟﺍ ﺔﻳﺭﺎﻄﺒﻟﺍ ﻉﻮﻨﺑ ﻂﻘﻓ ﺔﻋﺎﺴﻟﺍ ﺔﻳﺭﺎﻄﺑ ﻝﺪﺒﺘﺳﺍ
.ﺭﻮﻔﻟﺍ ﻰﻠﻋ ﺐﻴﺒﻄﻟﺎﺑ
.ﺔﻠﻳﻮﻃ ﺔﻴﻨﻣﺯ ﺓﺮﺘﻔﻟ ﺓﺪﻔﻨﺘﺴﻤﻟﺍ
ﺔﻳﺭﺎﻄﺒﻟﺍ ﻝﺍﺪﺒﺘﺳﺍ (٣)
!
!!
ﻲﺑﺮﻋ
٤

ﻦﻜﻟﻭ ،ﻚﻟﺫ ﺮﻴﻏﻭ ﻪﺟﻮﻟﺍ ﻞﺴﻏ ءﺎﻨﺛﺃ ﻲﻣﻮﻴﻟﺍ ﻡﺍﺪﺨﺘﺳﻼﻟ (ﺔﻃﺮﺷﺃ ٣) 30m ءﺎﻤﻠﻟ ﺔﻣﻭﺎﻘﻣ ﺔﻋﺎﺳ ﻡﺍﺪﺨﺘﺳﺍ ﻦﻜﻤﻳ
،ﺎﻫﺮﻴﻏﻭ ﺔﺣﺎﺒﺴﻟﺍ ءﺎﻨﺛﺃ (ﺔﻃﺮﺷﺃ ٥)
.ﺲﻔﻨﺗ ﺓﺰﻬﺟﺃ ﻥﻭﺪﺑ ﺹﻮﻐﻟﺍ ﻚﻟﺫ ﻲﻓ ﺎﻤﺑ ،ﺹﻮﻐﻟﺍ ﻉﺍﻮﻧﺃ ﻦﻣ ﻉﻮﻧ ﻱﺃ ءﺎﻨﺛﺃ ﺎﻬﻣﺍﺪﺨﺘﺳﺍ ﻦﻜﻤﻳ ﻻ ﻦﻜﻟﻭ
٢٠ ﻭﺃ ﺔﻃﺮﺷﺃ ١٠) 200m ﻭﺃ 100m II ﻲﻣﻮﻴﻟﺍ ﻡﺍﺪﺨﺘﺳﻼﻟ ﺓﺯﺰﻌﻣ ءﺎﻤﻠﻟ ﺔﻣﻭﺎﻘﻣ ﺔﻋﺎﺳ ﻡﺍﺪﺨﺘﺳﺍ ﻦﻜﻤﻳ
ﺲﻔﻨﺘﻟﺍ ﺓﺰﻬﺟﺃ ءﺍﺪﺗﺭﺍ ﻊﻣ ﺹﻮﻐﻟﺍ ﺪﻨﻋ ﺎﻬﻣﺍﺪﺨﺘﺳﺍ ﻦﻜﻤﻳ ﻻ ﻦﻜﻟﻭ ،ﺲﻔﻨﺗ ﺓﺰﻬﺟﺃ ﻥﻭﺪﺑ ﺹﻮﻐﻟﺍ ءﺎﻨﺛﺃ (ﺎًﻄﻳﺮﺷ
ﻂﺒﻀﻟﺍ ﺭﺯ ﻥﺎﻛ ﺍﺫﺇ .ﺔﻋﺎﺴﻟﺍ ﻡﺍﺪﺨﺘﺳﺍ ءﺎﻨﺛﺃ (ﻱﺩﺎﻌﻟﺍ ﻊﺿﻮﻤﻟﺍ ﻲﻓ) ﺖﻗﻮﻟﺍ ﻝﻮﻃ ﻞﺧﺍﺪﻠﻟ ﺎًﻋﻮﻓﺪﻣ ﺝﺎﺘﻟﺎﺑ ﻆﻔﺘﺣﺍ
ﻂﺒﺤﻳﻭ ﺔﻋﺎﺴﻟﺍ ﻞﺧﺍﺩ ﻰﻟﺇ ءﺎﻤﻟﺍ ﺏﺮﺴﺘﻳ ﺪﻗ .ﺔﻋﺎﺴﻟﺍ ﻞﻠﺑ ءﺎﻨﺛﺃ ﻭﺃ ،ءﺎﻤﻟﺍ ﺖﺤﺗ ﺭﺍﺭﺯﻷﺍ ﻭﺃ ﺝﺎﺘﻟﺍ ﻞﻴﻐﺸﺘﺑ ﻢﻘﺗ ﻻ
(ﻚﻟﺫ ﺮﻴﻏﻭ ﺮﻄﻤﻟﺍ ﻭﺃ ﻪﺟﻮﻟﺍ ﻞﺴﻏ ءﺎﻨﺛﺃ) ءﺎﻤﻟﺍ ﺫﺍﺫﺭ ﻦﻣ ﺍًﺭﺬﺣ ﻦﻜﻓ ،ءﺎﻤﻠﻟ ﺔﻣﻭﺎﻘﻣ ﺮﻴﻏ ﻚﺘﻋﺎﺳ ﺖﻧﺎﻛ ﺍﺫﺇ
.ﺔﻤﻋﺎﻧﻭ ﺔﻓﺎﺟ ﺵﺎﻤﻗ ﺔﻌﻄﻗ ﻡﺍﺪﺨﺘﺳﺎﺑ ﺔﺑﻮﻃﺮﻟﺍ ﺢﺴﻣﺎﻓ ،ﻕﺮﻌﻟﺍ ﻭﺃ ءﺎﻤﻟﺍ ﻦﻣ ﺔﻋﺎﺴﻟﺍ ﺖﻠﺘﺑﺍ ﺍﺫﺇ .ﻕﺮﻌﻟﺍﻭ
ﻥﺃ ﻦﻜﻤﻳ .ﺔﻋﺎﺴﻟﺍ ﻰﻠﻋ ﺓﺮﺷﺎﺒﻤﻟﺍ ﺔﻳﻮﻘﻟﺍ ءﺎﻤﻟﺍ ﺕﺎﻘﻓﺪﺗ ﺐﻨﺠﺗ ،ﻲﻣﻮﻴﻟﺍ ﻡﺍﺪﺨﺘﺳﻼﻟ ءﺎﻤﻟﺍ ﺔﻣﻭﺎﻘﻣ ﺔﻋﺎﺳ ﻊﻣ ﻰﺘﺣ
ءﺎﻤﻟ ﺎﻬﺿﺮﻌﺗ ﺪﻌﺑ ﺔﻋﺎﺴﻟﺍ ﻞﻜﻴﻫ ﻰﻠﻋ ﻦﻣ ﺮﺤﺒﻟﺍ ءﺎﻣ ﻒﻄﺷﺍ ،ﻲﻣﻮﻴﻟﺍ ﻡﺍﺪﺨﺘﺳﻼﻟ ءﺎﻤﻟﺍ ﺔﻣﻭﺎﻘﻣ ﺔﻋﺎﺳ ﻊﻣ
ﻲﺑﺮﻋ
ﺝﺎﺟﺯ ﻦﻣ ﻲﻠﺧﺍﺪﻟﺍ ءﺰﺠﻟﺍ ﻰﻠﻋ ﺏﺎﺒﺿ ﻲﻓ ﺐﺒﺴﺘﺗ ﺪﻗ ،ﺔﺑﻮﻃﺮﻟﺍ ﺾﻌﺑ ﻰﻠﻋ ﺔﻋﺎﺴﻠﻟ ﺔﻴﻠﺧﺍﺪﻟﺍ ءﺍﺰﺟﻷﺍ ﻞﻤﺘﺸﺗ
ﺏﺎﺒﻀﻟﺍ ﻥﺎﻛ ﺍﺫﺇ .ﺔﻋﺎﺴﻠﻟ ﺔﻴﻠﺧﺍﺪﻟﺍ ﺓﺭﺍﺮﺤﻟﺍ ﺔﺟﺭﺩ ﻦﻣ ًﻻﺍﺪﺘﻋﺍ ﺮﺜﻛﺃ ﻲﺟﺭﺎﺨﻟﺍ ءﺍﻮﻬﻟﺍ ﻥﻮﻜﻳ ﺎﻣﺪﻨﻋ ﺔﻋﺎﺴﻟﺍ
ﻻﻭ ﻊﺋﺎﺒﻟﺍ ﺮﺸﺘﺳﺎﻓ ،ﺔﻋﺎﺴﻟﺍ ﻲﻓ ءﺎﻤﻟﺍ ﻞﺧﺩ ﻭﺃ ،ﺮﻤﺘﺳﺍ ﺍﺫﺇ ﻦﻜﻟﻭ ،ﺔﻋﺎﺴﻟﺍ ﻞﺧﺍﺩ ﺭﺮﺿ ﻱﺃ ﺐﺒﺴﻳ ﻻ ﻪﻧﺈﻓ ﺎًﺘﻗﺆﻣ
٣
50m I ﻲﻣﻮﻴﻟﺍ ﻡﺍﺪﺨﺘﺳﻼﻟ ﺓﺯﺰﻌﻣ ءﺎﻤﻠﻟ ﺔﻣﻭﺎﻘﻣ ﺔﻋﺎﺳ ﻡﺍﺪﺨﺘﺳﺍ ﻦﻜﻤﻳ
.ﻚﻟﺫ ﺮﻴﻏﻭ ﻡﻮﻴﻠﻴﻬﻟﺍ ﺯﺎﻏ ﻡﺍﺪﺨﺘﺳﺎﺑ ﻲﻌﺒﺸﺘﻟﺍ ﺹﻮﻐﻟﺍ ﻭﺃ ﻦﻴﺠﺴﻛﺃ ﺕﺎﻧﺍﻮﻄﺳﺃ ﻡﺍﺪﺨﺘﺳﺎﺑ
.ءﺎﻤﻟﺍ ﺔﻣﻭﺎﻘﻣ ﻂﺒﺤﻳ ﺪﻗ ﻱﺬﻟﺍ ﺮﻣﻷﺍ ،ﺩﺪﺤﻤﻟﺍ ﻦﻣ ﻰﻠﻋﺃ ءﺎﻣ ﻂﻐﺿ ﺙﺪﺤﻳ
.ءﺎﻤﻟﺎﺑ ﺎﻬﻴﻓ ﺮﻤﻐُﺘﺳ ﺔﺌﻴﺑ ﻲﻓ ﺎﻬﻣﺍﺪﺨﺘﺳﺍ ﻦﻜﻤﻳ ﻻ
.ﻡﺎﻜﺣﺈﺑ ﻞﻔﺳﻸﻟ ﻪﺘﻴﺒﺜﺗ ﻦﻣ ﺪﻛﺄﺘﻓ ،ﻞﻔﺳﻸﻟ ﺖﺒﺜﻤﻟﺍ ﻉﻮﻨﻟﺍ ﻦﻣ
.ءﺎﻤﻟﺍ ﺔﻣﻭﺎﻘﻣ
.ﻯﺮﺧﻷﺍ ﺕﺍﺮﻴﺛﺄﺘﻟﺍﻭ ﻞﻛﺂﺘﻟﺍ ﺐﻨﺠﺘﻟ ﻞﻣﺎﻜﻟﺎﺑ ﺢﺴﻣﺍ ﻢﺛ ،ﺮﺤﺒﻟﺍ
.ﺝﻼﻋ ﻥﻭﺪﺑ ﺔﻠﻜﺸﻤﻟﺍ ﻙﺮﺘﺗ
!
!

ﺔﻋﺎﺴﻟﺍ ﻊﻣ ﻞﻣﺎﻌﺘﻟﺍ
WATER
(WATER
RESIST)
WATER
(WATER
RESIST)
WATER
(WATER
RESIST)
50m (5bar)
WATER
(WATER
RESIST)
200m
He-GAS
DIVER’S
ﻥﻭﺪﺑ
ءﺎﻤﻟﺍ ﺔﻣﻭﺎﻘﻣ (١)
ءﺎﻤﻠﻟ ﻡﻭﺎﻘﻣ
ﻝﺎﻤﻌﺘﺳﻺﻟ
ﻲﻣﻮﻴﻟﺍ
ءﺎﻤﻠﻟ ﻡﻭﺎﻘﻣ
I ﺯﺰﻌﻣ
ﻝﺎﻤﻌﺘﺳﻺﻟ
ﻲﻣﻮﻴﻟﺍ
ءﺎﻤﻠﻟ ﻡﻭﺎﻘﻣ
II ﺯّﺰﻌﻣ
ﻝﺎﻤﻌﺘﺳﻺﻟ
ﻲﻣﻮﻴﻟﺍ
ﻦﻴﺻﺍﻮﻐﻟﺍ ﺔﻋﺎﺳ
ﻲﻓ ﻖﻴﻠﺤﺘﻠﻟ
ءﺍﻮﻬﻟﺍ
ﺹﻮﻏ ﺔﻋﺎﺳ
ﻂﻠﺘﺨﻣ ﺹﻮﻐﻠﻟ
ﺕﺍﺯﺎﻐﻟﺍ
ءﺎﻤﻠﻟ ﻡﻭﺎﻘﻣ ﺮﻴﻏ
ﺕﺎﺿﺎﻳﺮﻟﺍ
ﺹﻮﻏ
ﻂﻠﺘﺨﻣ ﺯﺎﻐﺑ
ﻡﺍﺪﺨﺘﺳﺎﺑ)
(ﻡﻮﻴﻠﻴﻬﻟﺍ ﺯﺎﻏ
×
ﺹﻮﻐﻟﺍ
ﻝﺎﻤﻌﺘﺳﺈﺑ
ﺹﻮﻐﻟﺍ ﺱﺎﺒﻟ
ﺔﻧﺍﻮﻄﺳﺍﻭ
××
ءﺍﻮﻬﻟﺍ
ﺹﻮﻐﻟﺍ
ﻱﺮﻌﺘﻤﻟﺍ
ﻡﺍﺪﺨﺘﺳﺍ ﻥﻭﺪﺑ
ﺔﻧﺍﻮﻄﺳﺃ
×××
ءﺍﻮﻬﻟﺍ
ﺔﺣﺎﺒﺴﻟﺍ) ﺔﻴﺋﺎﻤﻟﺍ
،(ﺎﻫﺮﻴﻏﻭ
ﺔﺴﻣﻼﻤﻟﺍ
ءﺎﻤﻠﻟ ﺓﺮﺷﺎﺒﻤﻟﺍ
ﺓﺭﺎﻴﺴﻟﺍ ﻞﻴﺴﻐﻛ)
(ﻩﺮﻴﻏﻭ
××××
ﺾﻳﺮﻌﺘﻟﺍ
ﻱﺭﺍﺮﺤﻟﺍ
ﻦﻣ ﺕﺍﺮﻄﻘﻟ
ﻞﺴﻏ) ءﺎﻤﻟﺍ
،ﻪﺟﻮﻟﺍ
ﻰﻟﺇ ،ﺮﻄﻤﻟﺍ
.ﺔﺒﻠﻌﻟﺍ ﺔﻴﻔﻠﺧ ﻭﺃ ﺹﺮﻘﻟﺍ ﻲﻓ ءﺍﻮﻬﻟﺍ ﺔﻣﻭﺎﻘﻣ ﺕﺎﻃﺎﻴﺘﺣﺍ ﻦﻣ ﻖﻘﺤﺘﻟﺍ ﺪﻌﺑ ﻩﻼﻋﺃ ﺩﺭﺍﻮﻟﺍ ﻡﺍﺪﺨﺘﺳﻻﺍ ﻕﺎﻄﻧ ﺪﻌﺑ ﺢﻴﺤﺻ ﻞﻜﺸﺑ ﺔﻋﺎﺴﻟﺍ ﻡﺍﺪﺨﺘﺳﺎﺑ ﻰﺻﻮﻳ *
(ﺓﺮﺧﺁ
ﺝﺎﺘﻟﺍ ﻝﺎﻤﻌﺘﺳﺍ
ءﺎﻤﻟﺍ ﺖﺤﺗ
ﻝﺎﻤﻌﺘﺳﺍﻭ
ﻪﻴﻠﻋﻭ ﺝﺎﺘﻟﺍ
ءﺎﻣ ﺕﺍﺮﻄﻗ
××××××
×
×
×
×
×
ﻡﺍﺪﺨﺘﺳﻹﺍ ﺕﻻﺎﺣ
RESISTANT
RESISTANT
RESISTANT
RESISTANT
100m (10bar)
200m (20bar)
AIR DIVER’S
100m / 150m
200m / 300m /...
ﺕﺎﻋﺎﺳ
ﺔﻣﻭﺎﻘﻣ
ﺕﺎﻋﺎﺳ
ﻦﻴﺻﺍﻮﻐﻟﺍ
ﻉﻮﻧ
ءﺎﻤﻠﻟ
ﻲﺑﺮﻋ
٢

ﻲﺑﺮﻋ
ﺔﻳﺮﻇﺎﻨﺗ ﺰﺗﺭﺍﻮﻛ ﺕﺎﻋﺎﺳ
ﻞﻴﻟﺩ ﺓءﺍﺮﻗ ﻰﺟﺮُﻳ ،ءﺍﺩﺃ ﻞﻀﻓﺃ ﻰﻠﻋ ﻝﻮﺼﺤﻟﺍﻭ ﻦﻣﺰﻟﺍ ﻦﻣ ﺔﻠﻳﻮﻃ ﺓﺮﺘﻔﻟ ﻝﺎﻤﻌﺘﺳﻻﺍ ﻥﺎﻤﻀﻟ .ﺎﻨﺠﺘﻨُﻣ ﻚﺋﺍﺮﺸﻟ ﻙﺮﻜﺸﻧ
ﺹﺎﺨﺷﻷﺍ ﻦﻣ ﻱﺃ ﻭﺃ ﺖﻧﺃ ﻚﺿّﺮﻌﺗ ﻱﺩﺎﻔﺘﻟ ﻩﺎﻧﺩﺃ ﺔﻴﻟﺎﺘﻟﺍ ﺕﺎﻣﻼﻌﻟﺎﺑ ﺎﻬﻴﻟﺇ ﺭﺎﺸﻤﻟﺍ ﺕﺎﻤﻴﻠﻌﺘﻟﺎﺑ ﺪّﻴﻘﺘﻟﺍ ﻦﻣ ًﺎﻣﺎﻤﺗ ﺪﻛﺄﺗ
ﻭﺃ ﺓﺎﻓﻭ ﺙﻭﺪﺣ ﻝﺎﻤﺘﺣﺍ ﻰﻠﻋ ﻱﻮﻄﻨﻳ ﺪﻗ ﻥﻮﻤﻀﻤﻟﺍ ﻥﺃ ﻰﻟﺇ ﺮﻴﺸﺗ ﺔﻣﻼﻌﻟﺍ ﻩﺬﻫ ...
ﺕﺎﻤﻴﻠﻌﺘﻟﺍ ﻦﻋ ﻒﻠﺘﺨﺗ ﺔﻘﻳﺮﻃ ﻱﺄﺑ ﺞﺘﻨُﻤﻟﺍ ﻝﺎﻤﻌﺘﺳﺍ ﻢﺗ ﺍﺫﺇ ﺓﺮﻴﻄﺧ ﺡﻭﺮﺠﺑ ﺔﺑﺎﺻﻹﺍ
ﺹﺎﺨﺷﻷﺍ ﺔﺑﺎﺻﺇ ﻝﺎﻤﺘﺣﺍ ﻰﻠﻋ ﻱﻮﻄﻨﻳ ﺪﻗ ﻥﻮﻤﻀﻤﻟﺍ ﻥﺃ ﻰﻟﺇ ﺮﻴﺸﺗ ﺔﻣﻼﻌﻟﺍ ﻩﺬﻫ ...
ﺔﻘﻳﺮﻃ ﻱﺄﺑ ﺞﺘﻨُﻤﻟﺍ ﻝﺎﻤﻌﺘﺳﺍ ﺔﻟﺎﺣ ﻲﻓ ﻂﻘﻓ ﻚﻟﺫﻭ ﺔﻳﺩﺎﻣ ﺭﺍﺮﺿﺃ ﺙﻭﺪﺣ ﻭﺃ ﺡﻭﺮﺠﺑ
ﻲﺑﺮﻋ
١
.ﻥﺎﻤﻀﻟﺍ ﻁﻭﺮﺷ ﻦﻋ ﺓﺪﻴﺟ ﺓﺮﻜﻓ ﺬﺧﺃﻭ ًﺍﺪﻴﺟ ﺍﺬﻫ ﻞﻴﻐﺸﺘﻟﺍ
.ًﻼﺒﻘﺘﺴﻣ ﻪﻴﻟﺇ ﻉﻮﺟﺮﻠﻟ ﻙﺪﻳ ﻝﻭﺎﻨﺘﻣ ﻲﻓ ﺍﺬﻫ ﻞﻴﻐﺸﺘﻟﺍ ﻞﻴﻟﺪﺑ ﻅﺎﻔﺘﺣﻻﺍ ﻰﺟﺮُﻳ
.ﺕﺎﻜﻠﺘﻤﻤﻠﻟ ﻒﻠﺗ ﻭﺃ ﺔﻠﻤﺘﺤﻣ ﺔﻴﻧﺪﺑ ﺭﺎﻄﺧﺃ ﻱﻷ ﻦﻴﻴﻨﻌﻤﻟﺍ ﻦﻳﺮﺧﻵﺍ
.ﺓﺩﺭﺍﻮﻟﺍ ﺕﺎﻤﻴﻠﻌﺘﻟﺍ ﻦﻋ ﻒﻠﺘﺨﺗ
ﺔﻣﻼﺴﻟﺍ ﻞﺟﺃ ﻦﻣ ﺕﺎﻬﻴﺒﻨﺗ
.ﺓﺩﺭﺍﻮﻟﺍ
ﻞﻴﻐﺸﺘﻟﺍ ﻞﻴﻟﺩ
!
!
 Loading...