

Page 1

Oricom S6000 Series
SMS Capable DECT Cordless phone with
Speakerphone
Multi-handset capable
1 of 42
Page 2

TABLE OF CONTENTS
Adjusting the Handset Ringing Volume............................................14
Adjusting the Receiver Volume.........................................................14
Safety Information..........................................4
Getting Started.......................................................5
Contents of Pack.................................................................................5
Your cordless phone...........................................................................5
LCD Display on the Handset...............................................................6
Basic steps to install ...........................................................................6
Battery Level Indication.......................................................................7
Charging the Handset.........................................................................7
Menu Overview......................................................7
Menu Short-cuts................................................................................10
Basic Operations.................................................10
During Standby.................................................................................10
Making External Calls.......................................................................10
Using Traditional Dialling...............................................................10
To End a Call.................................................................................10
Using Pre-Dialling..........................................................................11
Using Phonebook Dialling.............................................................11
Using Quick Dialling ......................................................................11
Using Direct Dialling......................................................................12
Using Re-Dialling...........................................................................12
Making 2nd External Call ...................................................................13
Inserting Pause for PBX System ......................................................13
Receiving External Calls...................................................................13
Handsfree Operation.........................................................................14
Using the Handsfree Speaker .......................................................14
Using a (Optional) Headset...........................................................14
Microphone Mute / Un-mute .............................................................14
Page..................................................................................................15
Handset Keypad Lock/Unlock...........................................................15
Low Power Mode ..............................................................................15
Using the Phone Book ....................................... 15
Storing an Entry ................................................................................15
Reviewing the Phonebooks ..............................................................16
Editing an Entry.................................................................................16
Copy an Entry from the Private Phonebook to the Shared Phonebook
..........................................................................................................17
Copy an Entry from the Shared Phonebook to the Private Phonebook
..........................................................................................................17
Deleting a Phonebook Entry in Private/Shared Phonebook.............18
VIP Ringing (Melody)........................................................................18
Caller ID............................................................... 18
Call Waiting Caller ID........................................................................19
Call Log.............................................................................................19
Review the Call Log..........................................................................19
Saving the CID record into phonebook.............................................19
Deleting a CID Record......................................................................20
Call Back from the Call Log ..............................................................20
Recall................................................................................................14
Using SMS........................................................... 20
2 of 42
Page 3

SMS Service .....................................................................................20
Setting up the Service Centre...........................................................21
Setting the Service Centre Number..................................................21
Setting up the Sub-Address..............................................................21
Connection with the Service Centre .................................................22
Composing a Message.....................................................................22
Sending Message..........................................................................22
Saving Message............................................................................22
Exit from Compose Message ........................................................23
Receiving Message...........................................................................23
Deleting the Message....................................................................23
Forwarding the Message...............................................................23
Replying the Message...................................................................24
Reply and Delete the Message .....................................................24
Saving the Sender’s Number ........................................................25
Calling the Sender’s Number ........................................................25
Retrieving Message from Outbox.....................................................25
Creating New Messages from the Saved Messages....................26
Editing the Saved Message...........................................................26
Deleting the Saved Message ........................................................27
SMS Error Codes..............................................................................27
Setting the Alert Tone.......................................................................27
Deleting all Messages in the Inbox...................................................27
Deleting all Messages in the Outbox................................................27
Dialling out the Service Number....................................................29
Editing Service Number.................................................................30
Delete a Service ............................................................................30
Prefix Matching .................................................................................30
Call Barring .......................................................................................31
Handset Ringer Melody for External Calls........................................32
Handset Ringer Melody for Internal Calls.........................................32
Ringing Volume for Base..................................................................32
Base Ringer Melody for External Calls.............................................33
Alert Tones........................................................................................33
Out of Range Warning......................................................................33
Auto Answering.................................................................................33
Flash (Recall) Timing........................................................................34
Adjust Time Display Format..............................................................34
Handset Name..................................................................................34
Call Timer..........................................................................................34
Backlit LCD / Backlit LCD & Keypad.................................................35
Change the PIN Code for Base ........................................................35
Delete All Records ............................................................................36
Reset Factory Default.......................................................................36
Text Entry for SMS............................................................................28
Additional Features.............................................28
Message Waiting Indication..............................................................28
One Touch access to Telstra® Home Messages 101.......................28
Operator Services.............................................................................29
Service Number................................................................................29
Adding a Service ...........................................................................29
Reviewing Services .......................................................................29
Using Additional Handsets................................ 36
Registration.......................................................................................36
Base Selection..................................................................................37
Making Internal Calls.........................................................................37
To end a call..................................................................................37
Using Pre-Dialling..........................................................................38
Receiving external call during Internal Call.......................................38
Inquiry Call........................................................................................38
3 of 42
Page 4

Call Transfer .....................................................................................38
Conference Call ................................................................................38
Room Monitoring...............................................................................39
De-register a Handset.......................................................................39
Appendix: Default Settings................................40
Troubleshooting..................................................40
Warranty Information..........................................42
Safety Information
• Avoid exposure of this telephone to moisture or liquid.
• To prevent electric shock, do not open the handset or base cabinet.
• Avoid metallic contact (e.g. metal clips, keys) between the battery
contacts and charging conductors.
• Do not use the handset in an explosive hazard area such as where
there is gas leaking.
• There is a chance that the telephone could be damaged by an
electrical storm. It is recommended that users unplug the phone
from the mains supply and telephone socket during a storm.
• Follow the local regulations regarding the disposal of your packing
materials, exhausted batteries and used phone. Wherever
possible, recycle those materials.
• We advise that this phone should not be used near intensive care
medical equipment or by persons with pacemakers.
• Clean with a dry, soft, lint-free cloth. Never use cleaning agents,
particularly aggressive solvents.
•
Because the phone works by sending radio signals between base
station and handset, wearers of hearing aids may experience
interference in the form of a humming noise.
•
Your phone can interfere with electrical equipment such as
answering machines, TV and radio sets, clock radios and
computers if placed too close. It is recommended that you position
the base unit at least one metre from such appliances
.
CAUTION
This telephone is not designed for making emergency telephone
calls when the mains power fails. Always have a corded phone
available to be able to make and receive calls to emergency
services if the mains power fails.
Do not use your telephone during a thunderstorm as it is possible
to get an electric shock. Refer to information contained in Telstra
White pages directory.
4 of 42
Page 5
Getting Started
p
Contents of Pack
Depending on the model you have purchased the pack should contain
the following items, and this user guide:-
S6000 S6000+1 S6000+2
Base units 1 1 1
Handsets 1 2 3
Charger + power adaptors NIL 1 2
Base power adaptors 1 1 1
Number of phone cord 1 1 1
Handset Batteries 2 x AAA
Rechargeable
Ni-MH
Batteries
(1.2V
650mAh)
4 x AAA
Rechargeable
Ni-MH
Batteries
(1.2V
650mAh)
6 x AAA
Rechargeable
Ni-MH
Batteries
(1.2V
650mAh)
If any of these items are missing, please contact the retailer where you
purchased the product from.
Additional handsets
You may expand your S6000 by adding more handsets (SM6050).
These may be purchased separately from he retailer where you
purchased the product from or from Oricom direct.
Note the S6000 can accommodate a total of 5 Handsets.
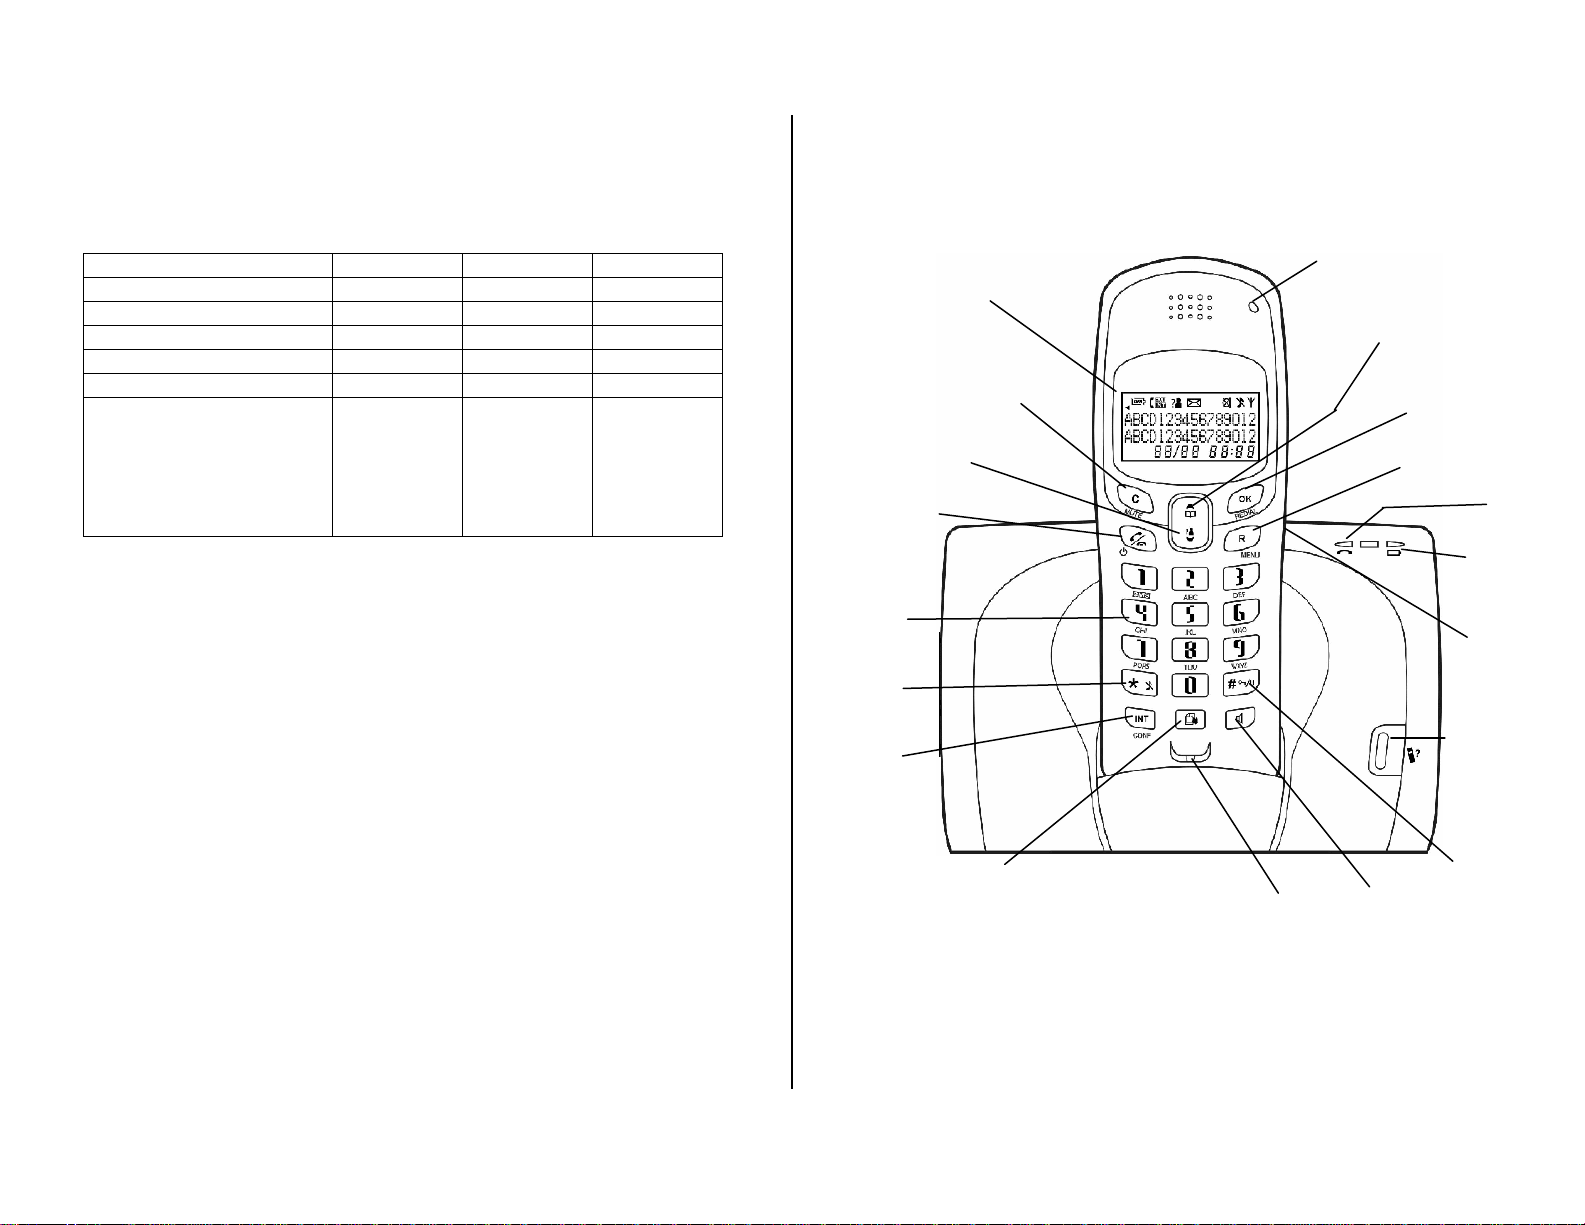
Dialling key /
Ringer Off / On
Intercom /
Conference Call
Your cordless phone
LCD Display
Cancel / Mute
CID / Scroll down /
Volume down
PHONE On / Off
POWER On / Off
Dialling keys
Operator Service
Microphone
LED
Phonebook / Scroll up /
Volume u
Speakerphone
Redial / Confirm
Menu / Recall
Paging
Dialling
key /
Pause /
5 of 42
In Use
Charging
Headset Jack
Page 6
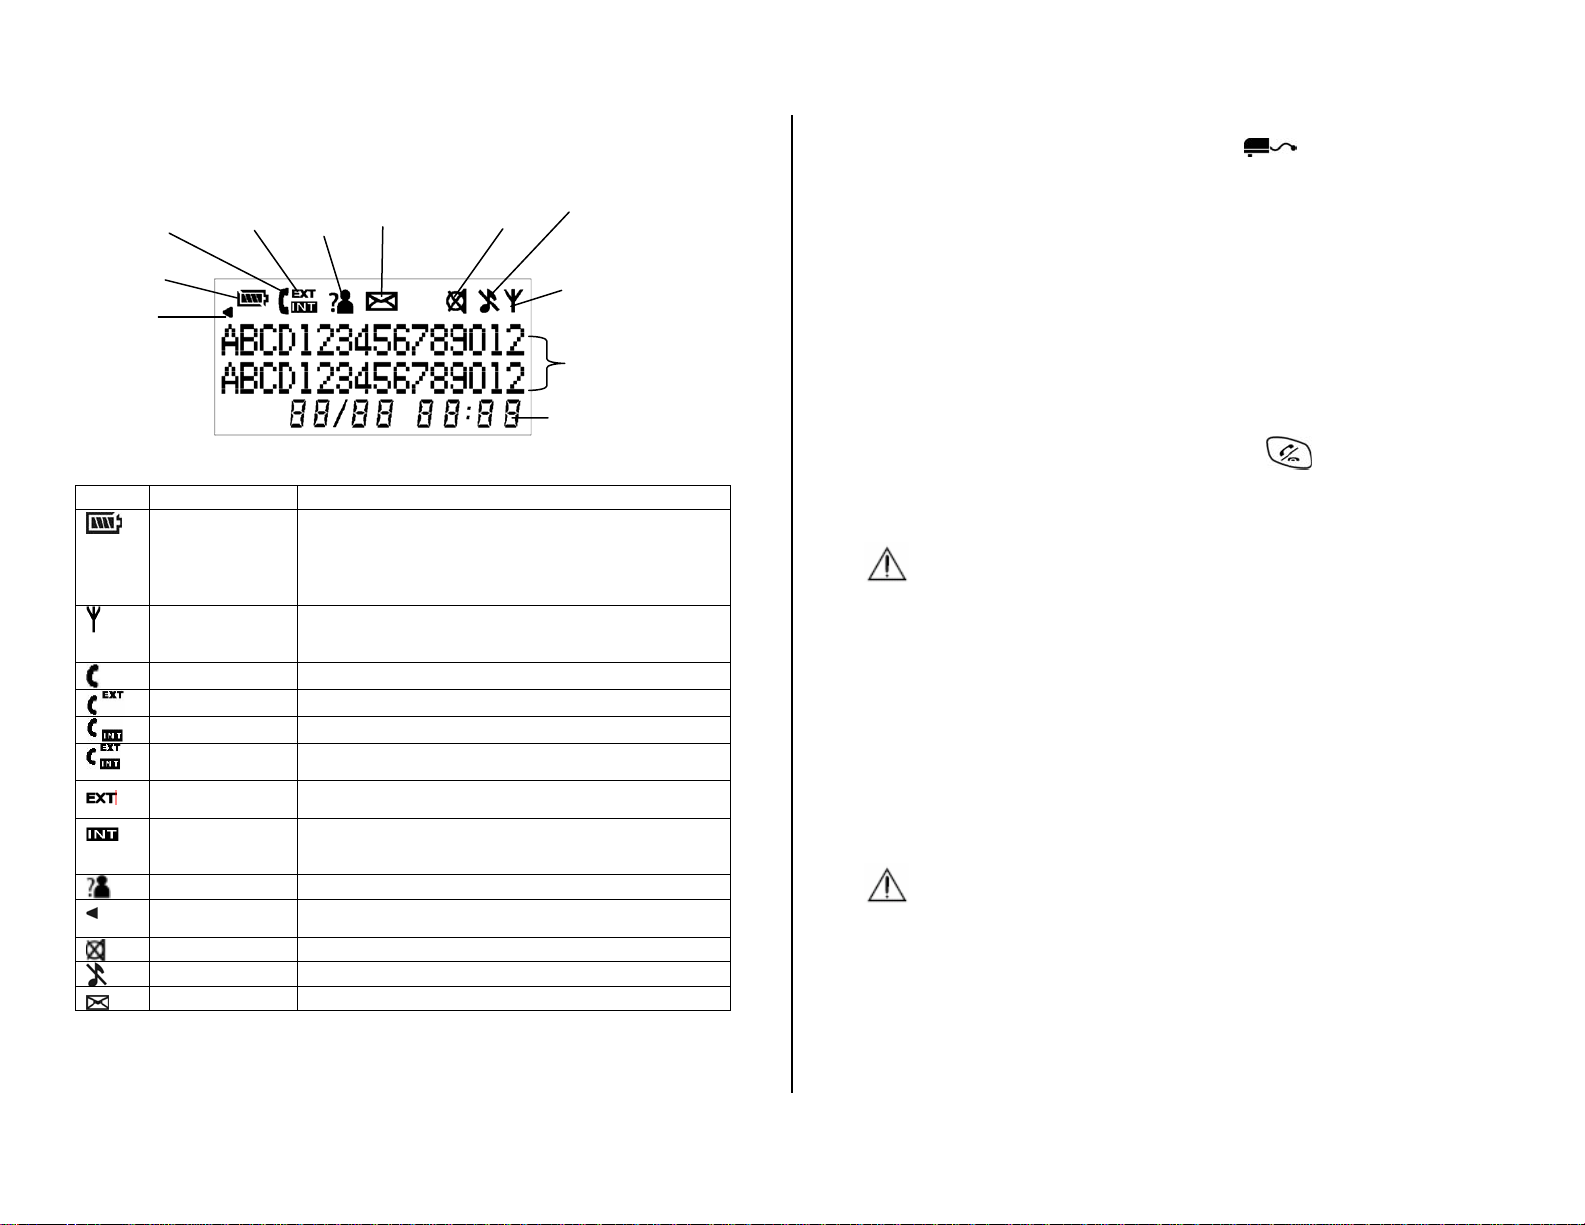
LCD Display on the Handset
Phone On
Battery
Left Scroll
External /
Internal /
Conference
New CID
Message
Waiting
Icon Name Description
Battery
Signal Indicator Steadily – signal linkage between handset and base is
Off Hook Display during off hook.
Calling External User is calling outside.
Calling Internal User is making an intercom call
Conference User is talking with one external and another internal
External Call Blinking – there is a call from outside.
Intercom Blinking – there is an intercom call.
New CID New CID received.
Left Scroll
Mute Handset microphone is muted during off hook.
Ringer Off The handset ringer is turned off.
Message Waiting Message waiting indication (VMWI) has been received.
• Animated when charging.
• When the battery indicator displays 4 blocks, the
battery is fully charged.
• When the battery indicator displays no block, the
battery is almost empty, and requires charging.
established.
Blinking – no signal linkage with any base.
user.
Steady – Line is engaged.
– when being paged.
Steady – Line is engaged.
The number displayed contains more than 16 digits and
the rightmost 16 digits are displayed.
Mute
Ringer Off
Signal Indicator
Digits & Text
Display
7-segment Clock
Basic steps to install
1. Connect the plug of the mains adaptor
to the socket on the
back of the base unit and the mains adaptor to the wall mains
supply.
2. Plugs the mains adaptor of the additional handset charger to the
wall mains supply.
3. Insert 2 rechargeable batteries (included) in each handset
observing the polarity, into the battery compartment of each
handset.
4. Slide the battery door into place on each Handset.
5. Place the handsets on the chargers and let the batteries charge for
a full 14 hours before using for the first time.
6. Connect one end of the telephone lead to the socket on bottom of
base unit and the other to the phone socket on the wall.
7. Check handsets for dial tone by pressing
.
8. Handset may get warm during initial charge. This is normal.
CAUTION
Use only the mains adapter supplied with this telephone.
Incorrect adapter polarity or voltage can seriously damage the
unit.
Adaptor for Base
Input: 230 VAC 50 Hz
Output: 9 VDC 300 mA
Adaptor for Charger
Input: 230 VAC 50 Hz
Output: 9 VDC 150 mA
CAUTION
RISK OF EXPLOSION IF BATTERY IS REPLACED BY AN
INCORRECT TYPE. Never use non-rechargeable batteries; use
recommended type supplied with this telephone. Ni-MH batteries
must be disposed of in accordance with applicable waste disposal
regulations.
6 of 42
Page 7
Battery Level Indication
The Battery icon is always displayed when the
handset is powered on. When charging, the battery
icon will be scrolling to indicate that the batteries are
being charged. When fully charged, four bars are
displayed. The scrolling will stop.
When an empty battery icon is displayed, place the
handset on the base cradle to recharge the batteries.
If low battery level happens during off-hook, a series
of short beeps will be heard from the speaker of the
handset. Those beeps will be stopped once the
handset is placed back on the base cradle.
When the battery level is low, the handset will automatically power off
and LOW BATTERY will be display on the screen. Place the handset
on the base cradle to charge up the batteries.
Charging the Handset
When the handset is placed on the base cradle to charge the handset
batteries, a charging tone, if set to On, will be emitted from the
handset’s speaker. (Refer to Alert Tone Section). During charging, the
charge LED on the base unit will be steadily lit.
If the batteries inside the handset do not have enough charge, the
handset may take some time to power up when it is put on the charging
cradle.
It is recommended to keep the handset on the base unit to ensure the
handset is always fully charged.
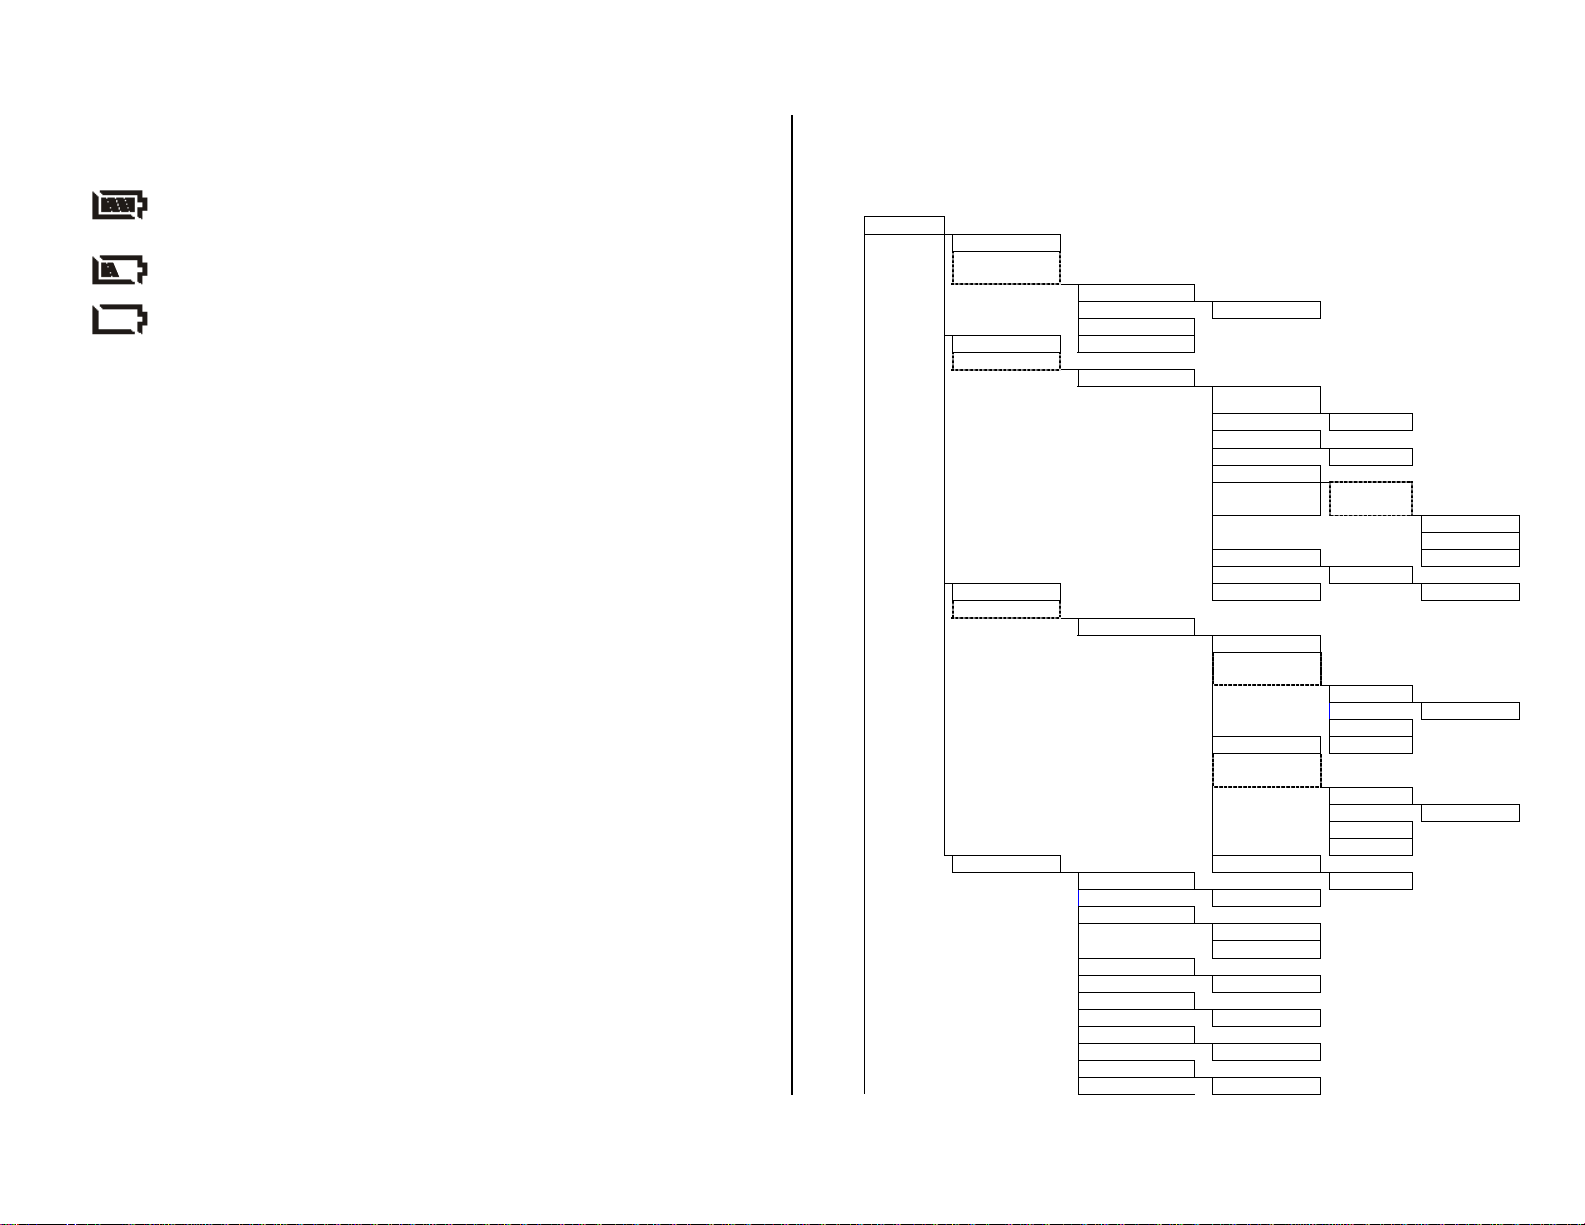
Menu Overview
SMS
COMPOSE
SEND
NUMBER?
SAVE
INBOX EXIT
Select Message
Message
DELETE?
FORWARD
NUMBER?
REPLY
SEND
SAVE
SAVE NUMBER EXIT
NAME?
OUTBOX CALL SENDER NUMBER?
Select Message
Message
USE TEXT
SEND
NUMBER?
SAVE
EDIT EXIT
SEND
NUMBER?
SAVE
EXIT
SETTINGS DELETE
ALERT TONE DELETE?
ON/OFF
SELECT SMSC
SMS CENTRE 1
SMS CENTRE 2
SMS CENTRE 1
NUMBER?
SMS CENTRE 2
NUMBER?
SUB ADDRESS
NUMBER?
RESET INBOX
RESET?
Compose
Message
DELETE
REPLY & DEL
Compose
Message
Compose
Message
Compose
message
7 of 42
Page 8

RESET OUTBOX
RESET?
SMS SERVICE
ON/OFF
FEATURES
MONITOR
ON
OFF
DIRECT DIAL
ON
NUMBER?/Number
OFF Enter Number
QUICK DIAL
Select a key 2…9
ON
PREFIX P OFF Number
Select a prefix
ON
PREFIX?
CALL BARRING P OFF
OFF NUMBER?
ALL
EXEMPT
SOUNDS Number?
HS RINGER BAR
VOLUME Number?
Select a level/OFF
EXT MELODY
Select a Melody
INT MELODY
BS RINGER Select a Melody
VOLUME
Select a level/OFF
MELODY
TONES Select a Melody
KEY BEEP
Select ON/OFF
CONFIRMATION
Select ON/OFF
CALL
SETTING
AUTO ANSWER Select ON/OFF
Select ON/OFF
FLASH TIMING
Select Flash timing
DISPLAY
ADJUST TIME
HH:MM
Edit time
Edit Name
CALL TIMER
CHARGING
HANDSET
NAME
Select a handset
Select a
name
Enter
Prefix
Select ON/OFF
BACKLIT
Select ON/OFF
SYSTEM
REGISTER
BS 1 2 3 4
Enter Base #
SELECT BASE PIN?
AUTO Enter PIN
PREFER
BS 1 2 3 4
FIXED
DELETE HS
Select a Handset
CHANGE PIN
PIN?
RESET Enter PIN
PRIV PBOOK NEW PIN?
RESET?
RESET? REPEAT
CALL LOG
RESET? Repeat New Pin
REDIAL LIST
RESET?
SERVICES
RESET?
RESET?
SETTINGS
PIN?
RESET?
SHARED
PBOOK
SMS
MESSAGES
SEARCH
Enter
base
Number
BS 1 2 3 4 SEARCH
Enter
base
Number
PIN? SEARCH
Enter New PIN
BASE X
BASE X
BASE X
8 of 42
Page 9

Phonebook Menu
Press a
Phonebook Key
PRIVATE
ADD ENTRY
Select a Record M
EDIT ENTRY
Edit Name
TO SHARED
DELETE
DELETE?
VIP MELODY
ON
SHARED OFF
ADD ENTRY
Select a Record M
EDIT ENTRY
Edit Name
TO PRIVATE
DELETE
DELETE?
Edit
Number
Select a
Melody
Edit
Number
Call Log Menu
Select a CID M
SAVE ENTRY
NAME?
Enter/Edit Name
NUMBER?
DELETE
DELETE? Enter/Edit Number
Redial Menu
Select a redial number M
SAVE ENTRY
NAME?
Enter/Edit Name
NUMBER?
DELETE
DELETE? Edit Number
Service Menu
Select a Service M
EDIT ENTRY
Edit Name
DELETE Edit Number
ADD ENTRY DELETE?
NAME?
Enter Name
NUMBER?
Enter Number
9 of 42
Page 10
Menu Short-cuts
Once the Menu key is pressed from standby, user can press the digit
that corresponds to the position of a main menu item to enter that
menu directly. User can press 1 for the SMS menu, 2 for the
FEATURES menu, 3 for the SOUNDS menu, 4 for the CALL SETTING
menu, 5 for the DISPLAY menu, 6 for the SYSTEM menu, and 7 for the
RESET menu.
• Once a digit is pressed, menu items of the corresponding menu will
be displayed and the first item will be selected (eg. MONITOR if 2
is pressed).
• Pressing a digit will be equivalent to scrolling to the particular menu
item and pressing OK.
• This shortcut will work whenever the user is in the level of the main
menu items (i.e. user can scroll through the items and still press a
digit to enter a menu).
Once inside a main menu, user can also press the digit that
corresponds to the position of a submenu item to enter that submenu
directly.
• Once a digit is pressed, menu items of the corresponding sub-
menu will be displayed and the first item will be selected (eg. ON if
1 is pressed inside the FEATURES menu and monitor is currently
ON).
• Pressing a digit will be equivalent to scrolling to the particular
submenu item and pressing OK.
• This short-cut will work whenever the user is in the level of the
submenu items (i.e. user can scroll through the items and still press
a digit to enter a submenu).
Basic Operations
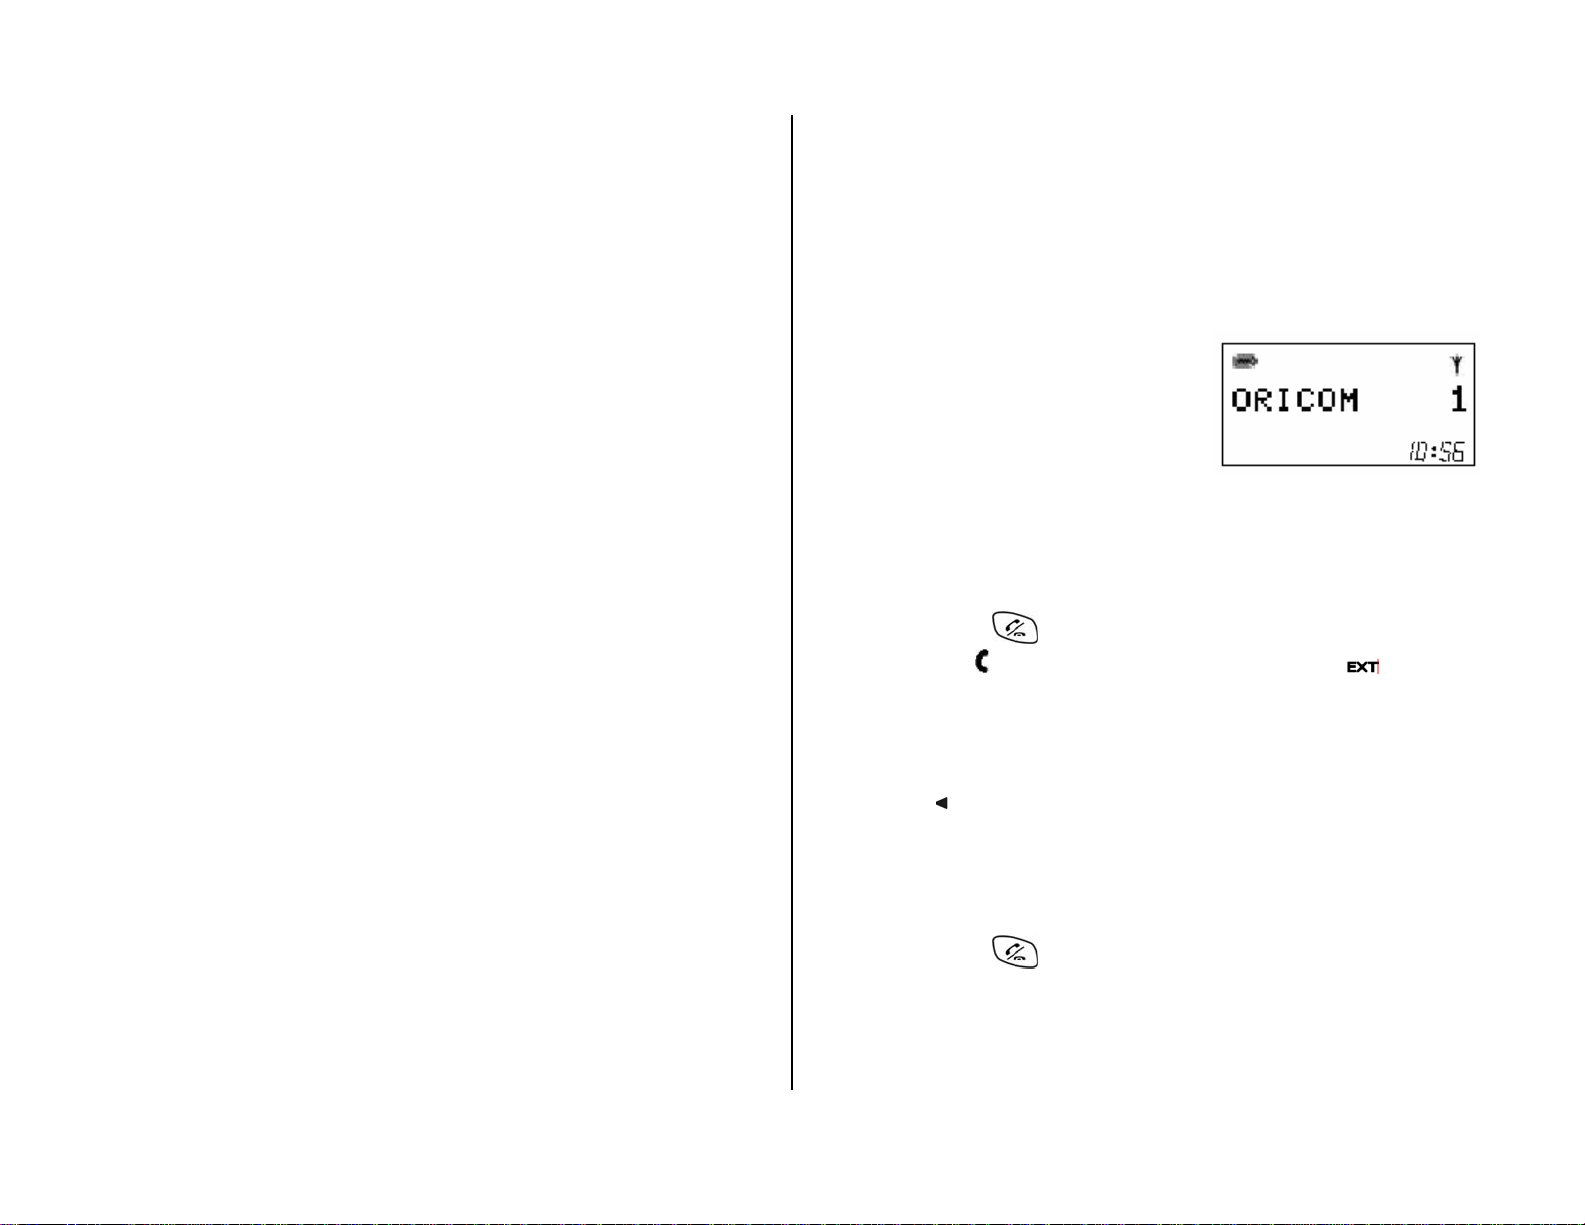
During Standby
When the phone is not in use, the LCD displays:
i) the battery icon, and the Signal indicator;
ii) the handset name (Factory default Oricom can be changed),the
handset no.; and
iii) the clock
Making External Calls
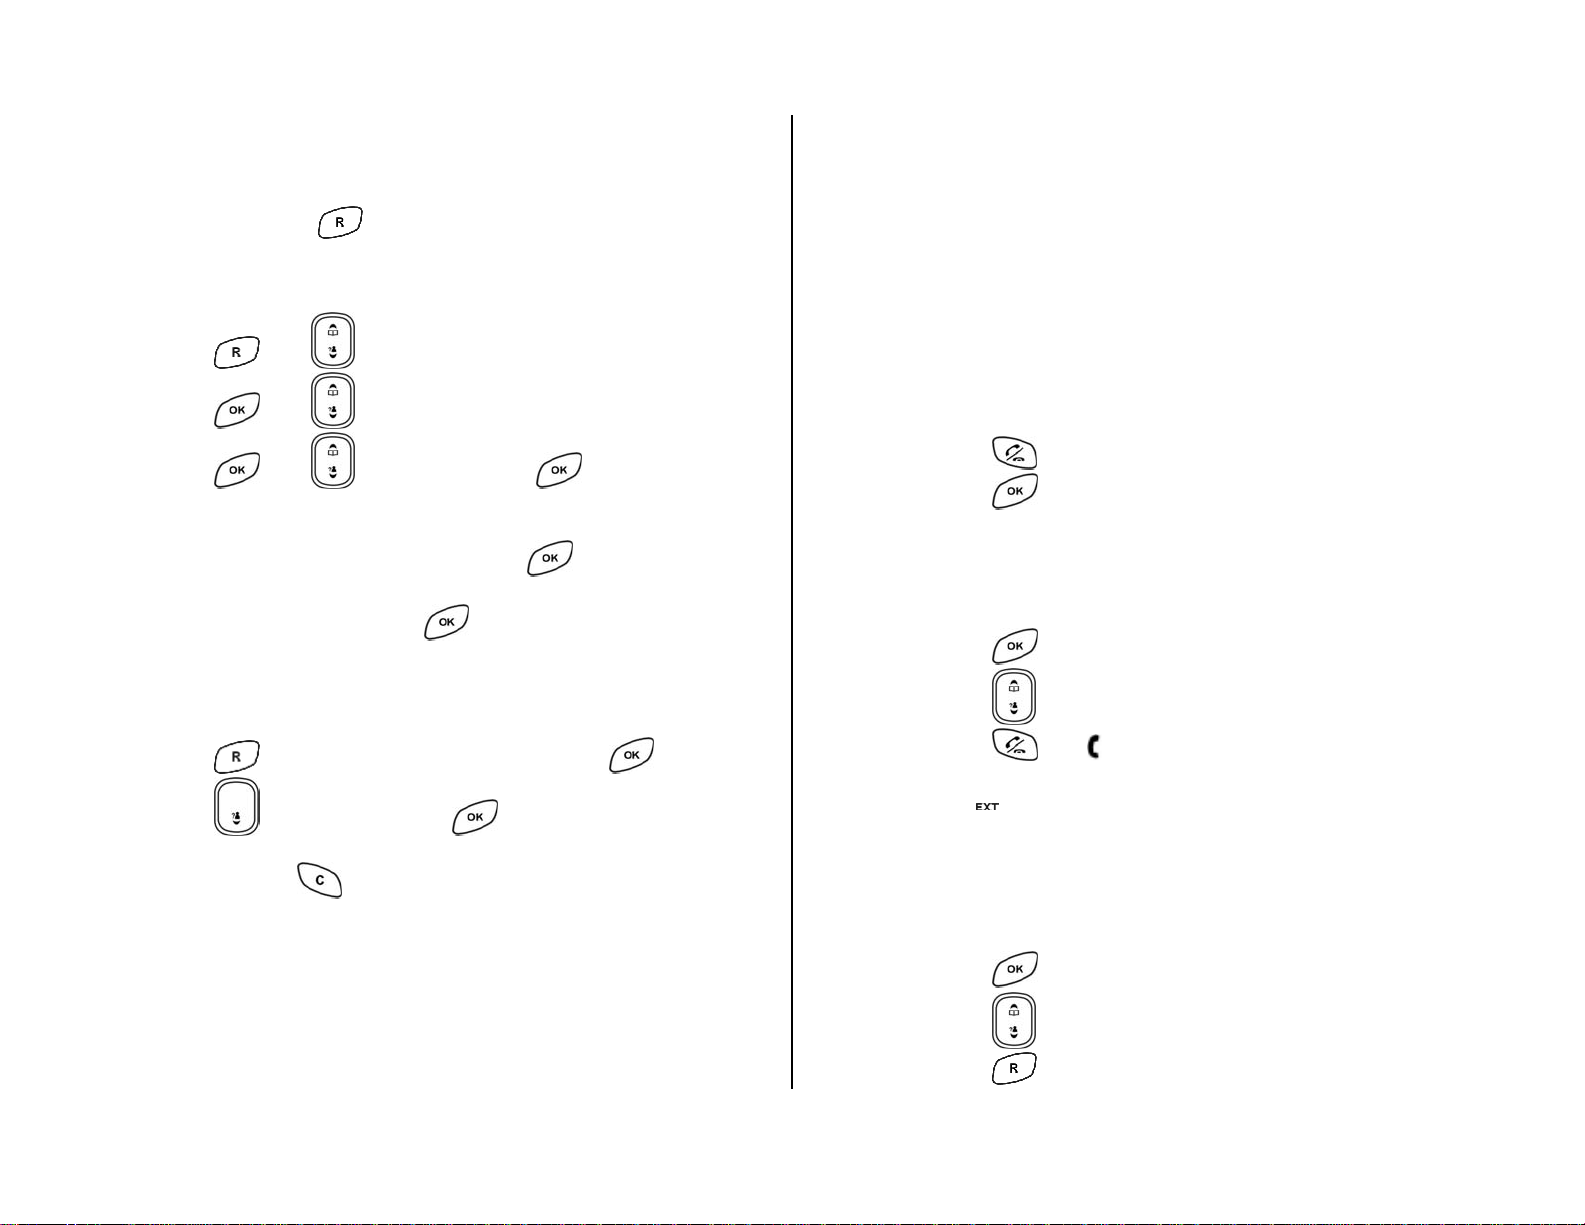
Using Traditional Dialling
• Press
• The
and wait for dialling tone.
icon on handset will be on and then the will also be
on.
• The LED on the handset and the In Use LED on the base unit
will also be turned on.
• Use the keypad to dial the phone number.
• If the number of digits entered exceeds the display space the
icon will be turned on.
• The call timer will display after a while and start timing the call.
To End a Call
• Press
, or
• Place the handset on the base cradle.
• The duration of the call will remain for about 5 seconds after
you hang up.
10 of 42
Page 11

Using Pre-Dialling
You can enter a telephone number and verify it on the display
before you place the call.
• Use the keypad to enter the phone number. The display shows
the digits as you enter them.
• Press
, the number entered will be dialled out.
Note: If you make a mistake, press
time, or press and hold
to erase one digit at a
to clear the entire number and
return to Standby.
Using Phonebook Dialling
• Press
• Use
• Press
during predial or standby.
to select PRIVATE or SHARED phonebook.
on the selected phonebook.
• The display reads ADD ENTRY and the first entry of the
phonebook, if any.
• Use
to scroll through the records.
Using Quick Dialling
Each key of 2, 3, 4, 5, 6, 7, 8, and 9 can be attached with a
phonebook record.
• During standby, press and hold the key will dial out the number
directly.
• The number dialled will be displayed on the LCD.
To Set the Quick Dial:
• Press
• Use
• Use
during predial or standby.
to select FEATURES. Press .
to select QUICK DIAL.
• Press . Use to scroll through KEY 2 to KEY 9.
• Press
• Press
on a selection. Use to select ON or OFF.
at OFF will de-activate the quick dial feature for the
selected key.
• Press
at ON will activate the quick dial feature for the
selected key. The name of the first record in the phonebook will
be displayed.
• Press
• Press
to view the number.
on the selected record to dial out the number.
• Use
to scroll through the phonebook records or use the
starting letters to select record.
• Press
• Press
at a record to view the number.
at the number to confirm. The quick dial feature is
activated on the selected key.
Note: If there is no record in the phonebook, press
at ON will
show EMPTY.
11 of 42
Page 12
Using Direct Dialling
When the direct dial feature is activated, the prompt, DIRECT
DIAL, will be blinking on the first line of the display during standby.
Press any key except
during standby to dial out the
designated number.
To activate:
• Press
. Use to select FEATURES.
• Press . Use to select DIRECT DIAL.
position in the list will be changed to reflect the real history of last
dialled calls. Digits entered after off hook are recorded. Pause will
also be stored in the redial number.
When more than 18 digits were dialled out, only the first 18 digits
will be saved as redial number.
User can select any number on the redial list to redial in PreDialling mode. However, user can only select the last number for
redial in Dialling mode.
Redial the Last Dialled Number
• Press
. Use to select ON. Press .
• The display will read NUMBER? or the previously entered
direct dial number.
• Enter the number to be dialled out. Press
to confirm.
• A blinking DIRECT DIAL is displayed during standby.
• If no number was entered but
is pressed, the feature will
be de-activated.
To de-activate:
• Press
• Press
will go directly to DIRECT DIAL. Press .
to select OFF. Press to de-activate the
function.
• Press and hold
to return to standby.
• The blinking DIRECT DIAL on the display is turned off.
Using Re-Dialling
The last 10 dialled external numbers each consists of up to 18
digits are stored. Operator services numbers will be stored. Internal
calls will not be stored. If a number is dialled several times, its
• Press
• Press
and wait for dialling tone.
, the last number dialled will be displayed and
dialled out automatically.
Redial the Dialled Number by Using Pre-dialling
• Press
• Press
• Press
, the last number dialled will be displayed.
to scroll through the last 10 dialled numbers.
. The icon on the display will be turned on.
• The phone will connect the line and dial the number displayed.
• The
icon on the display will also be turned on.
Save the Redial Number in the Phonebook
The number in the redial list can be saved into the private
phonebook.
• Press
• Press
• Press
, the last number dialled will be displayed.
to scroll through the last 10 dialled numbers.
on the selected number when reviewing redial list.
12 of 42
Page 13
• Use to select SAVE ENTRY. Press .
• The display will show NAME?.
• Use the numeric keys & the
• Press
to confirm. The redial number will be displayed.
key to enter the name.
• Edit the number by using the numeric keys & the
• Press
to confirm the entry.
• If the new entry would have the same name as a previously
entered record in the phonebook, the prompt ‘REPLACE?’ will
be displayed. Press
, the number of the record in the
phonebook record with the same name will be replaced with
the new number.
• Press
to return to standby.
Delete a Redial Number
• Press
• Use
• Press
• Use
• The display reads DELETE?. Press
, the last number dialled will be displayed.
to scroll through the last 10 dialled numbers.
on a selected number.
to select DELETE. Press .
. The selected
number will be deleted.
• The display will return to the redial list.
• Repeat the above steps to delete another dialled number.
key.
Making 2
nd
External Call
This is a network dependent feature.
• During a call, press
hold. Dialling tone for the 2
will put the current external call on
nd
call can be heard.
• Enter the number you want to dial out by using the keypad.
nd
• When the 2
call is answered, press to toggle between
the two callers or activate a conference call with two external
parties.
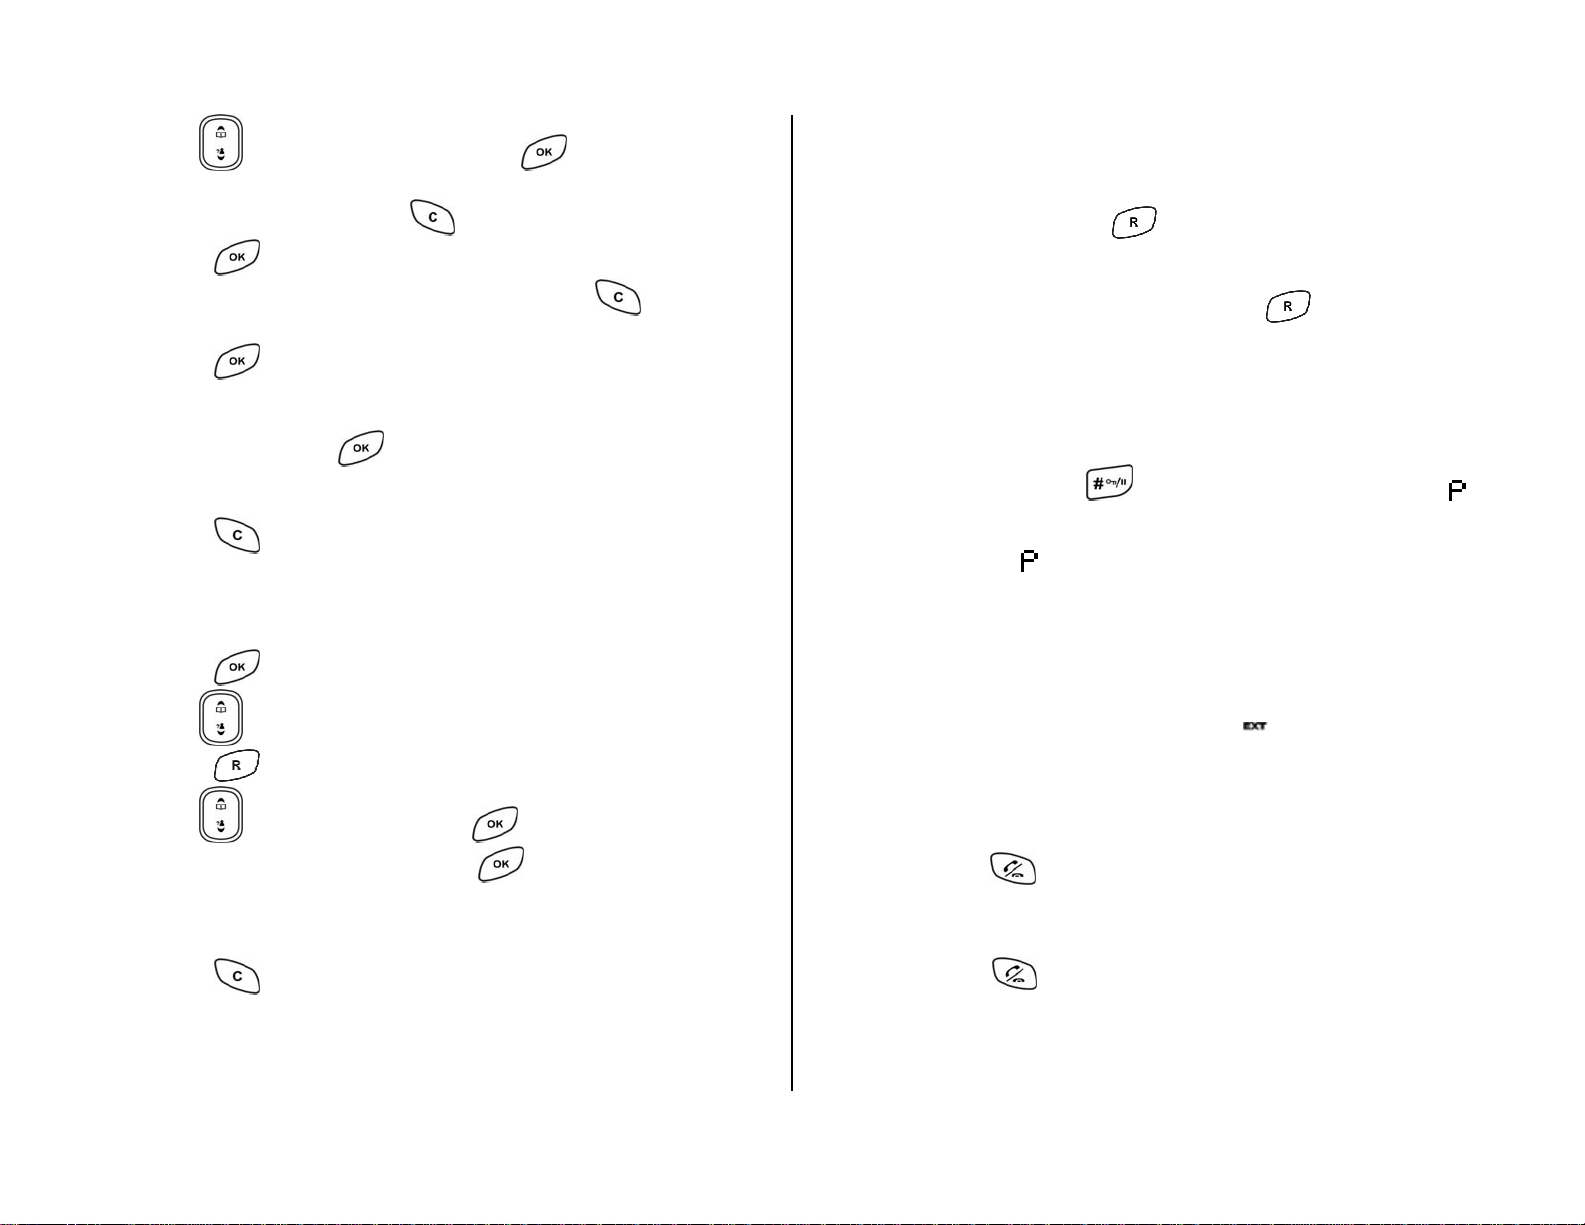
Inserting Pause for PBX System
User can press and hold
to insert a Pause of 3 seconds. A “
will be shown on the display.
Note: If there is a
in the predial, phonebook, redial or service
number, the handset will pause for the pre-programmed duration
before dialling out the next digit.
Receiving External Calls
When receiving an external call, all handsets including the base unit will
ring, provided that the ringers are on. The
icon on the display will
blink. The LED on the handset and the In Use LED on the base unit will
also blink.
When the handset is on the base unit, lift the handset:
• to answer the call when the AUTO ANS feature is turned on.
• press
to connect the call if the AUTO ANS feature is
turned off. (Refer to section “Auto Answering” for details)
When the handset is not on the base unit:
• Press
to exit the redial list.
Note: Refer to Delete All Records section to delete the entire redial
log at once.
• Press
to connect the call.
13 of 42
Page 14

Recall
This key is also used for a number of services available from the
telephone network such as call waiting, and for use when connected to
certain telephone phone systems (PBX’S). Details on how o use this
button will be explained by the network service provider. (Refer to
Recall Timing Section)
Adjusting the Handset Ringing Volume
• Press
. Use to select SOUNDS.
• Press
• Press
• Press
, the current volume level is displayed.
to increase the volume.
to decrease the volume.
Handsfree Operation
Using the Handsfree Speaker
• Press . Use to select HS RINGER.
• Press
• Press
• Use
. The display reads VOLUME.
. The currently selected volume is displayed.
to select from , , , , and OFF.
represents the minimum volume level whereas
represents the maximum volume level.
• Press
• To turn off the ringer volume, press
to confirm the selection and exit to VOLUME.
on OFF. The icon on
the display will be turned on.
• User can also press and hold
during phone ringing or s
tandby
to turn off the ringer. To turn on the ringer again, user can press
and hold
d g phone ringing or standby. urin
Adjusting the Receiver Volume
During a call, user can adjust the receiver volume by pressing
There are 3 levels of receiver volume to choose from: VOLUME 1,
VOLUME 2 and VOLUME 3. VOLUME 1 is the minimum level and
VOLME 3 is the maximum level
• Press
for handsfree operation during a call.
• HANDSFREE is displayed on the second line of the display.
• The speaker is turned on and user can now talk to the
microphone without holding the handset to the ear.
• Press
again. The speaker is turned off. User will need to
hold the handset against the ear in order to listen to the caller.
Using a (Optional) Headset
• Connect the headset to the headset jack on the side of the
handset.
• The handset receiver and microphone will be turned off.
• Voice signals are diverted from earpiece of the handset to the
headset.
Microphone Mute / Un-mute
During a call, User can mute the microphone by pressing
icon on the display will turn on. To un-mute, press
. The
again. The
icon on the display will turn off.
.
14 of 42
Page 15

Page
In the event of misplacing the handset, press the
button on the
base unit will page all handsets. All handsets on standby will ring for
30 seconds. The
icon and the prompt BASE PAGING will be
blinking. User can press the page key on the base unit or any key on a
handset to stop the paging.
Note: If you press and hold the page key for more than 4 seconds, the
phone will enter into registration mode.
Handsets, which are not in the standby mode, won’t be paged.
Handset Keypad Lock/Unlock
User can lock the handset to prevent pressing any keys accidentally.
When the keypad is locked, all keys will be inactive.
To lock:
• Press and hold
during standby.
• The display will show KEY LOCKED.
To unlock:
• Press and hold
during standby.
Note: When the keypad is locked, press any key except pressing and
holding the
will display PRESS&HOLD #.
When a call comes in, user can answer the call by pressing
if the handset is not on cradle or lift the handset from the cradle
provided AUTO ANSWER is ON. Once the call is ended by
User can put the handset in low power mode to conserve the battery
consumption. The display and ringer will be turned off. Any incoming
alls will ric ng at the base and other handsets that are not on low power
mode.
er
To activate Low Pow Mode,
• Press and ho
ld
for 2 seconds during standby.
To de-activate,
• Press
; or
• Place the handset back on the base cradle.
Using the Phone Book
There are two phonebooks in this model: Private numbers stored on
the handset and Shared, numbers stored on the base. Each handset
an accec
the base.
User can store up to 50 phone records with up to 10 characters for
name and 18 digits for number in the Private and up to 40 phone
records with up to 10 characters for name and 18 digits for number in
the Shared phonebook. Phonebook entries with names are sorted
lphanumerica
hose with names.
t
Storing an Entry
• Press
ss both the private phonebook and the shared phonebook on
ally. Entries without name are sorted by numbers after
during predial or standby.
pressing
locked.
Low Power Mode
or returning to the cradle, the keypad remains
• Use the key to select PRIVATE or SHARED.
ess • Pr
the phon ook, if any.
• Press
. The display will read ADD ENTRY and the first entry of
eb
. The display reads NAME?.
15 of 42
Page 16

• Use the alphanumeric keypad to enter the name of the person
e whose tel phone number you wish to enter.
• Press
. The display reads NUMBER?.
• Enter the telephone number (maximum 18 digits).
• e Pr ss
to confirm storing of the number.
If the new entry has the same name as a previously entered
record. The display will • read REPLACE? together with the
name of the entry.
•
Press
, the number of the previous record with same
name will be replaced with the new number.
• press
If you do not want to replace the record,
to return to
ng mode to edit the name. name editi
• To exit, Press
.
Note: Records without a name will not be checked for duplication.
If there have already been maximum numbers of records,
pressing
at ADD ENTRY the display will show MEMORY
FULL and then return to ADD ENTRY.
Reviewing the Phonebooks
The private and shared phonebooks can be reviewed separately.
first entry starting with the next available character of the key and
so on. For example, pressing
with A will be selected. Pressing
once, the first entry starting
twice, the first entry starting
with B will be selected.
• Press
on the name of an entry, the number of the entry is
displayed.
• ess Pr
again will display the name of the entry.
• When there’s no name, the number will be displayed on the list. If
the number includes more than 15 digits, the first 14 digits will be
displayed with the … character on the last space.
• To exit, press
.
Note: The shared phonebook cannot be accessed when the handset is
not connected to the base unit that has shared phonebook. The
TO SHARED function will not work too.
Editing an Entry
Press during standby.
•
• Use the
to select the phonebook you want to review and
•
• e Use th
Press during standby.
to select the phonebook you want to review and
press
.
The display read• s ADD ENTRY and the first entry of the
phonebook, if any.
• Use the
User can also use the alphanumeric keys to view the entries. When
•
or key to scroll through the entries.
1…9 is pressed, the first entry starting with the first character of th
key will be selected. Pressing the same key again will select the
e
press
.
• The display reads ADD ENTRY and the first entry of the
phonebook, if any.
• Use the numeric key,
or key to scroll through the
records.
• Press
• Press
on an entry. Use to select EDIT ENTRY.
. The name of the entry will be displayed.
16 of 42
Page 17

• Use the alphanumeric keypad and the key to make the
changes. ress
P
to confirm.
The num• ber of the entry will be displayed.
• Press
m
nu ber.
• Pre
ss
to delete any digits you wish to alter and re-enter the
to confirm.
• If the edited entry has the same name as a previously ente
record. The display will read REPLACE? together with the
name of the entry.
• Press
, the number of the previous reco same
name will be replaced with the new nu
If you do not want to replace the record, press •
rd with
mber.
to return to
name editing mode to edit the name.
• Press
to exit.
Copy an Entry from the Private Phonebook to the Shared
Phonebook
red
• If the new entry has the same name as a previously entered
record in the shared phonebook. The display will read
E
R PLACE? together with the name of the entry.
o Press
, the number of the previous reco sa
name will be replaced with
y t want to replace the record, press o If ou do no
the new number.
rd with me
to
return back to that record.
Press to exit.
•
Copy an Entry from the Shared Phonebook to the Private
Phonebook
Press during standby.
•
• Use the
ADD ENTRY and the f entr the phonebook are displairst y of yed.
•
• Use the numeric key,
to select the shared phonebook and press .
or key to scroll through the
records.
Press during standby.
•
• Use the
ADD ENTRY of the phonebook are displaand the first entry yed.
•
• Use the numeric key,
to select the pr ebook and press ivate phon .
or k
ey to scroll through the
records.
• e
Pr ss
• e Pr ss
If the shared phonebook is full, MEMORY FULL will be
•
on an entry. Use the to select TO SHARED.
.
displayed.
• e
Pr ss
• ePr ss
on an entry. Use the to select TO PRIVATE.
.
• If the private phonebook is full, MEMORY FULL will be
displayed.
If the entry has the same name as a pre• viously entered record
in the private honebook. The display will read REPLACE?
g
to ether with the name of the entry.
o Press
name will be replaced with
y t want to replace the record, press o If ou do no
p
, the number of the previous reco sa
rd with me
the new number.
to
return back to that record.
• Press
to exit.
17 of 42
Page 18

Note: If the handset loses link with the base when is pres
SHARED, UNAVAILABLE will be displayed.
ting a Phoneboo Private/Shared Phonebook
Dele k Entry in
sed from
•
• Use the
ADD ENTRY and the first entry of the phonebook are displayed.
•
during Press predial or standby.
to select the private phonebook and press .
• ess Pr
during standby.
• Use the to select IVAT r SHARED and press PR E o .
ADD ENTRY of the phonebook are displaand the first entry yed.
•
• Use the numeric key,
or k e ey to scroll through th
records.
• Press
Press •
• Press
on an entry. Use the to select DELETE.
. The display will read DELETE?.
. The selected entry is deleted and the display will
return to phonebook.
Pr
ess •
to exit.
Note: Refer to Delete A
Shared phoneboo
ll Records section to delete the entire Private or
k at once.
VIP Ringing (Melody)
You can assign a distinctive ringing tone to incoming calls from specific
callers. When the CID of an incoming
number, the phonebook name will be displayed and the VIP
call matches with a phonebook
melody
defined for that record, provided the VIP melody is set to on, will be
played as the handset ringing melody.
This menu is nly accessible from private
o phonebook menu.
• key, Use the numeric
or key to scroll through the
records.
• Press
displayed. Press
on an entry. Use to scroll until VIP MELODY is
.
• Use to choo N. Press se OFF or O .
If OFF is chosen, only the external dy will be played when a
• melo
call from this number comes in.
If ON is chosen, Use •
MELODY 1 to MELODY 10. Press
to select from one of the ten melodies:
on a melody to confirm the
VIP ringing for the selected number.
Press•
to exit.
Note: VIP ring
ing melody will not be played on the base unit.
Caller ID
If you subscribe to the Caller ID service, CIDs of the incoming calls will
be displayed on the screen and stored in the call log. (Please consult
your telephone service provider for details, s rvice charges may apply)
icon will be displayed when some digits of the caller ID number
The
an’t be fixed in the screen.
c
hen you have new/unanswered calls, the
W
that currently connected to the same base unit will be turned on.
e
icon on all the handsets
18 of 42
Page 19

Call Waiting Caller ID
f you haI
Calle
ve subscribed your telephone network operators Call Waiting
r ID service, your phone will display the number of the other
incoming call for around 30 seconds while you are talking on the
pho
ne.
external call, a series of short beeps is
While the handset is on an •
heard announcing the second call. You can look at the number
displayed on the h et and choose to place the first call on hold
and answer the seco
ands
nd call.
Press
•
answer the 2
• Press
then to place the first external call on hold and
nd
call.
then to toggle between two calls.
Call Log
Up to 20 calls can be stored in the call log.
If the same call is missed more than once, the number of time it has
called will be saved together with the caller ID.
Once there is at least one new CID on the call log, the
icon will be
ily on all the time until all the new records are reviewed. stead
ote: The call log is stored on the handset. Deletion or reviewing of call
N
records on one h
andset will not affect other handsets registered
to the same base unit.
Review the Call Log
•
Press
during standby.
• The number of new and old records will be displayed.
• After two seconds time-out or a function key is pressed, the most
recent received CID is
displayed first. If the call log is empty,
EMPTY will be displayed for 2 seconds and returned to standby.
• Use
to scroll through the call log.
• The status (new) of the caller ID will be displayed together with the
numbe
Press
•
• To exit, press
r of times the call has come in, if applicable.
to view other information of the caller ID.
Saving the CID record into phonebook
The number of the selected CID can be saved into the
private
phonebook.
Pr
• ess
• Use
on a CID while reviewing the call log.
to select SAVE ENTRY and press .
NAME? and the name of the CID (transmitted from the network or
from the phoneboo• k) will be displayed.
• Use the numeric keys and
to enter or edit the name for the
entry. User can refer to Editing an Entry Section on how to edit the
phonebook name.
• Press
CID will be displayed. Use the numeric keys and
the number for the entry.
edit
• Pr
ess
•
If the new entry has the same name as a previously entered
re ord in the private phonebook. The display will
. The display reads NUMBER? and the number of the
to enter or
to confirm.
c read
REPLACE? together with the name of the entry.
o Press
, the number of the previous record with same
name will be replaced with the new number.
19 of 42
Page 20

o If you do not
want to replace the record, press to
return to name editing mode to edit the name.
Deleting a CID Record
Press on a CID while reviewing the call log.
•
• Use
to select DELETE. Press .
The display will read DELETE?. •
• Press
to confirm and the selected CID is deleted.
If there is no • more record in the call log, the display will show
EMPTY for 2 seconds and return to standby.
Note: Refer to Delete All Reco
rds section to delete the entire call log at
once.
Call Bac
k from the Call Log
This feature o ly works if the CID record contains a valid phone
n
number.
• Press
• The mo t recent received CID is displayed.
during predial or standby to bring out the call log.
s
• If the call log is empty, EMPTY will be displayed for 2 seconds and
returned to standby.
Using SMS
Incoming SMS (Text) messages will be stored in the INBOX which ha
a maximum capacity of 70 messages. When the INBOX is full, any
further messages will be rejected. SMS FULL will be displayed during
the standby mode.
Saved and error messages will be stored in the OUTBOX which can
store up to 30 messages. When the OUTBOX is full, no new messages
can be created anymore. OUTBOX FULL will be displayed when an
is made to create a new message.
ttempta
Only one hand
will be d splai
set can access the SMS menu at one time. SMS IN USE
yed on every other handset when one handset is in SMS
menu.
SMS Service
SMS Service needs to be turned on to access the SMS menu and to
send/receive messages. When the SMS Service is off, incoming rings
won’t be suppressed and CID’s wo
n’t be checked with SC numbers.
Only the SMS SERVICE menu will be accessible in the SMS menu
when SMS Service is off. If the SMS Service is set to off while there is
more messa s in sent, they won’t be sent out
one or ge the queue to be
until the SMS Service is set to on.
s
Use
•
to scroll through the call log. Press on the selected
CID to dial out the number.
• Press
• Press
• Press
. Use to select SMS.
. Use to select SETTINGS.
. Use to select SMS SERVICE.
20 of 42
Page 21

• Press . Use to select between ON or OFF.
•
Setting up the Service Centre
To assist in set up the service centre numbers have been preprogrammed. These should not need to be changed.
SMS Centre 1 “183201983391”
SMS Centre 2 “01983391”
IMORTANT NOTE:
If you normally have your Calling Number display blocked you mu
remove 1832 in front of 01983391 in the SMS centre o
therwise you can
st
not send a text message. However you should be aware that this will
allow presentation of your phone number to the called party.
the base unit is tryin connection with the service
When g to make a
centre, the active service centre number will be used. However,
messages fro any s ce centre can be receiv
m ervi ed.
Press
. Use to select SMS.
• Press . Use to select SETTINGS.
• Press
• Press
. Use to select SMSC.
. Use to select between SMS CENTRE 1 and SMS
CENTRE 2.
• Press
to confirm.
Setting the Serv e Number
ice Centr
Numbers for two service centres can be entered and one of them will
be selected as the active service centre for outgoing messages.
•
Press
• Press
• Press
. Use to select SMS.
. Use to select SETTINGS.
. Use to select SMS CENTRE1 or SMS
CENTRE2.
• Press
.
• The display will read NUMBER? and the previously entered
umber will be displayed.
n
Enter/edit the service centre number. Maximum of 18 digits can be
•
ntered.
e
• Press
to confirm.
If there is no Service Centre number for the selected Service
Note:
is pre
Cent
re, SC NOT READY will be displayed when
to enter SMS menu or
is being pressed and held from
ssed
standby.
Since the Service Centre
override the CLIR, 18
programmed SMS centre 1 number. This prefix does not
must recognize your CLI, the prefix to
32, has already been added in the factory
apply to
any other calls.
To remove this prefix from the SMS centre 1 number is not
recommended as the Service Centre may not recognize your c
Setting up the Sub-Address
Sub address identifies each SMS-enabled device on the same
telephone lin The d lt sub address is 0 and
changed unless ther more than one SMS-ena
e. efau it doesn't need to be
e are bled phones
connected to the same line. When a call from Service Centre comes
in, only the one d sub address will ans
♦ Press
ph with intende wer the call.
. Use to select SMS.
all.
21 of 42
Page 22

♦ Press . Use to select SETTINGS.
• Press . Use to select COMPOSE.
♦ Press
♦
Press
. Use
.
to select SUB ADDRESS.
♦ The display will read NUMBER? and the previously entered su
ddress will be displayed.
a
Edit the sub address number. It can be b
etween 0 to 9.
♦
Press
♦
to confirm.
Note: Changing sub address can affect the message sending and
receiving. Please get advice from network operator before
making changes to sub address.
Connection with the Service Centre
The base unit will make a connection with the service centre when
a. The number in the incoming CID is matched with one of the ser
centre nu
mbers saved in the base unit.
b. There are messages to be sent to service centre.
Whenever a connection with the service centre is made, all the
handsets currently co
ONNECT during standby and none of the handsets can enter the
C
nnected with the same base unit will display SMS
SMS menu.
During the SMS connection, if one of the handsets tries to seize the
line, the connection with SMS will be stopped and the handset w
llowed to seize line.
a
ill be
Composing a Mess
age
A message o 160 alph umeric characters can
f an be composed.
•
Press
. Use to select SMS.
b
vice
• Press
how the total number of characters that can be entered.
s
Use the alphanumeric keys and •
• Press
. The lower right hand corner of the LCD display will
to compose the message.
when no character is entered will return to menu.
Note: If an external call comes in while composing a
m tbox. It can be retrieved and
essage will be saved in the Ou
message, the
edited as necessary at later time.
n
Se ding Message
• Press
after the me s composed. ssage i
• The display will show SEND.
• Press
• mb
Enter the nu er of the recipient.
• User can lso press the
o Use the
Press o
, the display will show NUMBER?
a
key to bring out the phonebook.
to select a name.
. The number of the record is copied as the
recipient number.
ess • Pr
to confirm. The message is sent.
Note: If there would be an error in transmission, the message will
be sent agai
After maximum numbe
n for two more times with five minutes apart.
r of failure attempts to send out a
message, it will be removed from queue and saved in the
Outbox together with the error code in the
message header.
SMS ERROR! will be displayed until the Outbox is accessed.
Saving Message
22 of 42
Page 23

• Press after the message is composed.
• Use to select SAVE. Press .
• The message is saved in Outbox.
Exit from Compose Message
• Press
after the message is composed.
• Use to select EXIT. Press .
• The message composed will be neglected.
Receiving Message
SMS messages with up to 160 characters in the message body will be
accepted and saved in the Inbox. Messages with more than one
segment or 160 characters in message body would be rejected.
Once there’s at least one new message received or whenever there’s
at least one unread SM
S message, NEW SMS MSG will be displayed
on all the handsets connected to the same base unit. Periodic alert, if
on, will also b emitte nce every minute
e d (o ).
When the Inbox is full, SMS FULL will be displayed on the handset. All
incoming mes ages w e rejected.
s ill b
To
view the message:
• Press
. Use to select SMS.
• Press . The name or number of the sender will be displayed
on the first line and serial number of message and status will be
displayed on the second line. Date and/or time of the message will
also be displayed below.
• Use
• Press
to select a message.
to view the message. The first and second line of the
message will be displayed.
• Use
• Press
to scroll the message.
will bring up the Inbox menu.
Not is no me
e: If there ssage in the Inbox, EMPTY will be displayed on
th
e first line when
is pressed on INBOX.
Deleting the Message
• ess Pr while reviewing a message in the Inbox to bring up
the Inbox menu.
• Use
to select DELETE. Press .
• The display reads DELETE?
• Press
to confirm.
• If the Inbox becomes empty, the display will show EMPTY and
then exit INBOX.
to
For
warding the Message
The message in the Inbox can be forwarded.
Press •
. Use to select INBOX. The number of messages
saved in the Inbox will be displayed beside the prompt, INBOX.
The first two digits represent the number of new messages and the
ber of old messages. last two digits represent the num
• Press
while reviewi a message in the Inbox to bring up
ng
the Inbox menu.
• Use
to select FORWARD. Press .
23 of 42
Page 24

• The di ber.
splay will read NUMBER?. Enter the recipient num
o Press
while composing the message.
• User can so press the
• Use the
•
al
to select a name. Press .
The number of the record is copied as the recipient
key to bring out the phonebook.
number.
• Press
to send the message.
Note: If the Outbox alre
messages, OUT
ady contains maximum number of
BOX FULL will be displayed and then return
to FORWARD.
Replying the Message
To reply a message,
• Press
while reviewing a message in the Inbox to bring up
the Inbox menu.
• Use
• de.
The handset will be in text editing mo
• ed to the sen
Compose a message to be repli der.
to select REPLY. Press .
• To send the reply message,
o Use to select EXIT. Press .
o The message composed is neglected.
Not CID is absent, this menu will not be available.
e: If the sender’s
Reply and Delete the Message
User te the incoming message.
can choose to reply and dele
•
Press
while reviewing a message in the In
box to bring up
the Inbox menu.
• Use
to select REPLY & DEL. Press to compose a
message.
• To send the reply message,
o Press
o Use
while composing the message.
to select SEND. Press to send the
message.
• To save the reply message for review before sending,
o Press
while composing the message.
o Press
o Use
while composing the message.
to select SEND. Press to send the
message.
• To save the reply message for review before sending,
o Press
Use o
while composing the message.
to select SAVE. Press .
o The me sage is saved in ths e Outbox.
• ving the reply
To exit from the Inbox without sending or sa
e
m ssage,
o Use to select SAVE. Press .
o The message is saved in the Outbox.
To exit from the Inbox without sending or• saving the reply
message,
o
Press
o Use
while composing the message.
to select EXIT. Press .
o The message composed is neglected.
Note: If the sender’s CID is absent, this menu will not be available.
24 of 42
Page 25

When REPLY & DEL is selected, the original message in the
Inbox will be deleted when the reply message is sent out or
saved.
Saving the Sender’s Number
The number of the sender can be saved in the private phoneboo
If th
e sender’s CID is absent, this menu will not be available.
• Press
while reviewing a message in the Inbox to bring up
the Inbox menu.
• Use
• Press
to select SAVE NUMBER.
. The display reads NAME? and the name of the
sender (if it matches a name in the phonebook) will be
displayed.
Enter/edit the name.
•
Press
•
he number of the sender will be displayed.
t
• Enter/ed number.
to confirm. The display will read NUMBER? and
it the
k.
The number of the sender can be dialled out directly from the me
nu.
If the sender’s CID is absent, this menu will not available.
• Press
while reviewing
a message in the Inbox to bring up
the Inbox menu.
• Use
• Press
to select CALL SENDER.
. The number of the sender will be dialled out.
Note: You cannot go back to the message when the number has
been dialled out.
Retrieving Message from Outbox
Messages saved will be in the Outbox. Messages, which encounter
err
or when being sent or which are saved automatically due to the
inco al call while composing or editing a message, will also
ming extern
be saved in the Outbox.
To
retrieve,
• Pr
ess
• If
the new entry would have the same name as a previously
e REPLACE? will be displayed together with the
ntered record,
name of the entry. Press
to confirm.
. The number of the previous
would be replaced with the new record with the same name
number.
Note: Press
at SAVE NUMBER, the display will read
MEMORY FULL if the private phonebook has been full.
No two cords with the same name will be saved in the
re
phonebook.
Calling the Sender’s Number
•
Press . Use to select SMS.
• Press
messag s saved in the Ou
. Use to select
e tbox will be displayed beside the prompt,
OUTBOX. The number of
OUTBOX.
• Press
. The first line will display the number or name (from
phonebook) if there’s a number in the message. Otherwise, the
first line will be blank. The second line will display the serial num
of message and the type of message. If there has been an erro
the display on the second line will display ERROR with an erro
ber
r,
r
code.
•
Use to select a message.
• Press
to view the message. Use to scroll.
25 of 42
Page 26

Note: If Outbox already contains maximum number of messages,
Not o ge ie: If there is n messa n the Outbox, press
EMPTY. The displa turn to OUTBy will re OX after a while.
Cre Saved Messages
ating New Messages from the
Saved messages can be us
s
me sages.
ed as templates to create new
Whi viewing the message in the OUTBOX,
le
• e
Pr ss
• Press
. Use to select USE TEXT.
. The handset will be in text editing mode with the
text from the saved message.
• Compose the message
• me
To send the ssage,
Press
o
o Use
while composing the message.
to select SEND. Press .
.
o The display will show NUMBER?. Enter the number of the
recipient
Press
o
to confirm. The message is sent.
• To save the message,
will display
LL will be di enOUTBOX FU splayed wh
is pressed on
USE TEXT.
Editing the Saved Me
ssage
Saved Message in the Outbox can be edited or sent out. When
sen on edited message left
t out, there w ’t be any copy of original or
in the Outbox.
Wh
ile ewing the message in the OUTBOX, vi
•
Press
• Press
. Use to select EDIT.
. The handset will be in text editing mode.
• • Edit the message.
To send the message,
o Press
o Use
o The display will show NUMBER?. Enter
while editing the mes e. sag
to select SEND. Press .
the number of the
recipient
o Press
to confirm. The message is sent.
• To save the message,
o Press
while composing the message.
o Use to select SAVE. Press .
o X.
The message is saved in the OUTBO
• To
exit,
o Press
o Use
while composing the message.
to select EXIT. Press .
o The message composed will be neglected.
o Press
while editing the message.
Use o to select SAVE. Press .
o essage is saved in the OUTBOX.
The m
• To exit,
o Press
o Use
while editing the message.
to select EXIT. Press .
o The message composed will be neglected.
26 of 42
Page 27

Note: If Outbox already contains maximum number of messages,
OUTBOX FULL will be displayed when
is pressed on
EDIT.
Dele
ting the Saved Message
While viewing th
e message in the OUTBOX,
•
Press
• Press
. Use to select SETTINGS.
. Use to select ALERT TONE.
• Press . Use to select between ON or OFF.
• Press
to confirm the selection and exit to A LERT TONE.
• Press
• Press
• Press
. Use to select DELETE.
. DELETE? will be displayed.
again. The message is deleted. The display will
return to OUTBOX showing the other available messages.
Note: If there is no message left in the Outbox, the display will
show EMPTY
for a while and then return to OUTBOX.
SMS Error Codes
a SMS message cannot be sent out successfully, it would be
When
saved in the Outbox together with an error code in the format of
"ERROR XX AA/BB" where XX stands for the error code, AA stands
or current message number and BB stands for total number of f
messages in the Outbox. (See Troubleshooting Section for details of
the error codes.)
Setting the Alert Ton
e
If the alert tone is on, the speaker of the handset will emit an alert
during standby when a new SMS error is created or
a new SMS is
received.
If the alert tone is on, the beep will be repeated on
during standb when there’s at least one new SMS message in Inb
y ox
ce every minute
• Press
. Use to select SMS.
Deleting all Messages in the Inbox
• Press
• Press
• Press
• Press
• Press
. Use to select SMS.
. Use to select SETTINGS.
. Use to select RESET INBOX.
. The display will read RESET?
. All messages in the Inbox will be delet ed.
Deleting all Messages in the Outbox
• Press
• Press
. Use to select SMS.
. Use to select SETTINGS.
. Use to select RES• Press ET OUTBOX.
• Press
• Press
. The display will read RESET?
. All messages in the Outbox will be deleted.
27 of 42
Page 28

Text Entry for SMS
For text entry for SMS, the followings will be available. The default will
be lower case.
KEY 1x 2x 3x 4x 5x 6x 7x 8x 9x 10x 11x
1 space 1 € £ $ ¥
2ABC a b c 2 à ä å Ç
3DEF d e f 3 è é ∆
4GHI g h i 4 ì Γ
5JKL j k l 5 Λ
6MNO m n o 6 ñ ò ö ø Ω
7PQRS p q r s 7 ß Π Φ Ψ Σ
8TUV t u v 8 ù ü Θ
9WXYZ w x y z 9 æ Ξ
0 0 . , ? ! : ; “ ‘ ¡ ¿
* * - = ( ) < > / _ + %
# # @ & §
Pressing
will change the case.
KEY 1x 2x 3x 4x 5x 6x 7x 8x 9x 10x 11x
1 space 1 € £ $ ¥
2ABC
3DEF
4GHI
5JKL
6MNO
7PQRS
8TUV
9WXYZ
0 0 . , ? ! : ; “ ‘ ¡ ¿
* * - = ( ) < > / _ + %
# # @ & §
A B
D
G
J
M
P
T
W
C
E F
H I
K l
N O
Q R S
U V
X Y Z
2 à
3 è
4 Ì Γ
5 Λ
6
8 ù
Ä Å
É
Ñ
ò
7 ß Π Φ Ψ Σ
Ü
Æ
9
Ç
∆
Ö Ø
Θ
Ξ
Ω
The special character € (euro) counts for two characters.
Additional Features
Message Waiting Indication
If you subscribe to Telstra’s Message bank service* you can check if
you have messages. When message waiting ON indication is received
from your network service provider, the
currently connected to the same base unit will be turned on. The LED
on those handsets will be blinking. User can make a call to the network
service provider to check the new message in the voice mailbox.
When message waiting OFF indication is received from the network
service provider, the
Press and hold
handset dismisses the
icon and LED on all handsets will be turned off.
during standby to turn off the icon. Once a
icon, the icon on all the other handsets
currently connected to the same base unit will also disappear.
(*Please consult your telephone service provider for details about the
service)
®
One Touch access to Telstra
Home Messages 101
If you have activated Telstra’s Home Messages 101 you can check if
you have messages. This service is free to turn on from most phones in
Australia.
1. Press and hold for
2 seconds in standby mode.
2. The phone will automatically go off-hook and dial 101. You can
then follow the voice prompts to hear your messages.
For more information about this service contact Telstra.
icon on all handsets
28 of 42
Page 29

Operator Services
A total of 7 operator services, each up to 10 characters for name and
18 digits for number, can be stored in the handset. There also will be
factory-programmed numbers. You can programme services of your
choice by using the ADD ENTRY menu. The operator services works
like the phonebook except that the operator services can also be
accessed during off-hook.
Service Number Name Service code Service1 Call W ON *43# Service2 Call RTN *10# Service3 Call W OFF #43# Service4 Service5 Service6 Service7
Adding a Service
• Press
The display will read ADD ENTRY and the first entry of the
•
Services list, if any.
• Press
during predial or standby
. The display reads NAME? (If 7 services have
already been recorded, MEMORY FULL will be displayed for 2
second and returned to ADD ENTRY)
Note: If the new service has the same name as a previously
entered one, the display will read REPLACE? Press
The new service will replace the previous service with the
same name.
Reviewing Services
• Press
during predial or standby.
• The display will read ADD ENTRY and the first entry of the
Services list, if any.
• Use
to scroll through the services or press a digit to
search like the phonebook records.
• On the name of a service, press
to view the number of
that service.
• Press
to exit.
Dialling out the Service Number
During standby,
• press to bring out the list of service,
.
• Use the alphanumeric keys and
service (up to 10 characters). (If no name is entered, the
display will remain at NAME?. Every entry must have a name)
• Press
numeric keys and
to confirm. The display reads NUMBER? Use the
to enter the number of the service (up
to 18 digits). (If no number is entered, the display will remain at
NUMBER?. Every entry must have a number)
• You can also enter a recall by pressing
displayed.
• Press
to confirm.
to enter the name of the
, R will be
• Use
• Press
to select a service.
on a selected service will dial out the number.
When off-hook,
• press
• Use
• Press
. The list of services will be available to select.
to select a service.
and the number of the selected service will be
dialled out.
29 of 42
Page 30

Editing Service Number
• Press
during predial or standby.
• The display will read ADD ENTRY and the first entry of the
Service list.
• Use
to scroll through the services or press a digit to
search like the phonebook entries.
• Press
• Press
on a service. Use to select EDIT ENTRY.
. NAME? and the name of the service will be
displayed.
• Edit the name and press
to confirm.
• NUMBER? and the number of the entry will be displayed.
• Edit the number and press
• Press
to exit.
to confirm.
Note: If the edited service would have the same name as a
previously entered one, the display will read REPLACE?
together with the name of the service. Press
replace the previous service with the new service.
Delete a Service
will
Press again to confirm and the selected service is
•
deleted.
• Press
to exit.
Note: Refer to Delete All Records section to delete all the services
numbers at once.
Prefix Matching
User can program to automatically add a prefix to the number dialled if
the first few digits of the number match the ones described in the prefix
rules. User can add up to three rules each of which includes up to five
digits for both prefix and the starting digits of the number to match.
When the prefix rules are activated, the numbers for quick dial, direct
dial, predial, phonebook dial, call back from call log, and redial will be
checked if a prefix would be added to them.
If the number going to be dialled starts with the digits entered in the
prefix rules, the respective prefix will be appended before the number
and dialled out. For example, prefix for rule one is 123, and the number
for rule one is 589, when trying to dial out the number 5897648, it will
be dialled as 1235897648. The prefix will not be displayed or stored in
the redial log.
• Press
. Use to select FEATURES.
• Press
The display will read ADD ENTRY and the first entry of the
•
Services list.
• Use
during predial or standby.
to scroll through the services or press a digit to
search like the phonebook entries.
• Press
• Press
on a service. Use to select DELETE.
. The display reads DELETE?.
• Press
• Press
Enter the correct PIN of the base. Press .
•
• Use
• Press
. Use to select PREFIX.
. The display reads PIN?.
to scroll through PREFIX 1 to PREFIX 3.
on a selection.
30 of 42
Page 31

• Use to select ON or OFF.
• Press
• Press
on OFF will de-activate the selected prefix rule.
on ON to activate the selected prefix rule.
• The display will read PREFIX? and the previously entered prefix
will also be displayed.
• Press
• Press
with the barred prefix, calls to those numbers will be
allowed.
. Use to select FEATURES.
. Use to select CALL BARRING.
• Use the numeric keys and the
• Press
to confirm the prefix entered.
to enter the prefix.
• The display will read NUMBER? and the previously entered
number will also be displayed.
• Use the numeric keys and the
• Press
to confirm the number entered.
to enter the number.
Note: When the number for the prefix rule does not contain any digit, it
will apply to any number dialled.
PREFIX 1 will be checked first. If the number dialled is matched
with one prefix, it will not be checked for other prefixes.
The feature is not applicable to traditional dialling.
The dialled prefix will not be stored into the redial list.
Prefix matching will not be done on the emergency numbers.
Call Barring
Call barring prevents dialling of certain types of calls.
The following call barring options can be selected:
OFF: All calls are allowed
ALL: All external calls except those to emergency numbers
are barred
EXEMPT: All external calls starting with the exempt number will be
allowed. Other external calls except those to the
emergency numbers will be barred.
BAR: All the external calls starting with that barring number will
be barred. However, if the emergency numbers begin
• Press
Enter the correct PIN of the base. Press .
•
. The display reads PIN?.
• Use to scroll through HANDSET 1 to HANDSET 5.
• Press
on a selection.
• To de-activate any call bar setting for the selected handset,
o Use
o Press
to select OFF.
.
• To bar all external calls on the selected handset,
o Use
o Press
to select ALL.
.
• To bar external calls except the EXEMPT number on the selected
handset,
o Use
o Press
to select EXEMPT.
. The display reads NUMBER? and the previously
entered exempt number will also be displayed.
o Use the numeric keys and
to enter the number to be
exempted.
o Press
to confirm the entry.
• To bar external calls starting with the BAR number on the selected
handset,
31 of 42
Page 32

o Use to select BAR.
Handset Ringer Melody for Internal Calls
o Press
. The display reads NUMBER? and the previously
entered bar number will also be displayed.
o Use the numeric keys and
to enter the number to be
barred.
o Press
to confirm the entry.
Note: If
is pressed when no digit is entered for EXEMPT and
BAR, the call barring feature will be de-activated for that
handset.
Handset Ringer Melody for External Calls
• Press
• Press
• Press
• Press
. Use to select SOUNDS.
. Use to select HS RINGER.
. Use to select EXT MELODY.
.
• Press
• Press
• Press
• Press
• Use
. Use to select SOUNDS.
. Use to select HS RINGER.
. Use to select INT MELODY.
.
to select the desire melody, MELODY 1 to MELODY 10,
for internal calls.
• Press
to confirm the selection.
Note: The default ringer melody for internal calls is MELODY 2.
Ringing Volume for Base
• Press
• Press
. Use to select SOUNDS.
. Use to select BS RINGER.
• Use
to select the desire melody, MELODY 1 to MELODY 10,
for incoming external calls.
• Press
to confirm the selection.
Note: The default ringer melody for external calls is MELODY 1.
• Press
• Press
. Use to select VOLUME.
. The currently selected volume is displayed.
• Use to select from , , , , and VOL
OFF.
represents the minimum volume level whereas
represents the maximum volume level.
• Press
To turn off the base ringer volume, press
to confirm the selection.
on OFF.
32 of 42
Page 33

Base Ringer Melody for External Calls
• Press
• Press
• Press
• Press
. Use to select SOUNDS.
. Use to select BS RINGER.
. Use to select MELODY.
. Use to select the desire melody, MELODY 1 to
MELODY 10, for incoming external calls.
• Press
to confirm the selection.
Alert Tones
User can choose to turn on or off the following tones according to their
preference.
Key Beep: Sound a tone whenever a key is pressed.
Confirmation: Sound a tone when a setting or choice is confirmed.
Charging: Sound a tone when the handset is returned to the base
cradle for charging.
Out of Range Warning
When the handset is too far away from the base during standby, the
display will show SEARCH BASE and the
icon will blink.
• Bring the handset nearer to the base so that the signal gets
stronger.
• When the signal between the handset and base re-establishes, the
display will go to standby and the
icon will be steady.
When the handset is too far away from the base during a call, user will
hear an alert tone through the earpiece.
• Bring the handset closer to the base so that the signal gets
stronger.
• If you fail to bring the handset back in range with the base, your
call may be disconnected.
Auto Answering
When the function is activated, user is able to answer a call by lifting
the handset out of the base cradle without having to press the
key.
• Press
. Use to select CALL SETTING.
• Press
• Press
• Press
and CHARGING.
• Press
• Press
. Use to select SOUNDS.
. Use to select TONES.
. Use to select from KEY BEEP, CONFIRMATION
on a selection to select ON or OFF.
to confirm.
• Press
• Press
. Use to select AUTO ANSWER.
.
• To activate:
o Use
to select ON. Press .
o User can answer a call by lifting the handset out of the base
cradle without having to press the
key.
• To de-activate:
o Use
to select OFF. Press .
33 of 42
Page 34

o User will need to press the key to answer a call no matter
the handset is on the base cradle or out of the base cradle.
Flash (Recall) Timing
When talking on the phone, pressing
will send a signal to the
telephone network.
The flash timing default is 100ms for Australia (Flash 1). You should not
need to change this setting unless you connect the phone to a
telephone system in your office.
If you need you can select between the three factory programmed flash
timing from this menu.
• Press
• Press
. Use to select CALL SETTING.
. Use to select FLASH TIMING.
• Press
• Press
• Press
. Use to select DISPLAY.
. Use to select ADJUST TIME.
. The current time will be displayed.
• Enter the new time. Value for hour (two digits before “:”) must be
less than 24 and value for minute (two digits after “:”) must be less
than 60.
• Press
to confirm.
Handset Name
Each handset can be programmed with its own name, which will be
displayed during standby. You can enter up to 10 alphanumeric
characters.
• Press
. Use to select from the three durations.
Flash 1 = 100ms (Australia)
Flash 2 = 600ms (New Zealand)
Flash 3 = 1000ms (for some older phone systems)
• Press
on to confirm the selection.
Adjust Time Display Format
During standby, there will be 7-segment clock displayed on the lower
right hand corner of the display. The clock will be displayed in 24-hour
format.
When a CID with time is received, the clock will automatically be
adjusted with the CID time. When the handset batteries are replaced or
handset enters low power mode, the clock will restart from 00:00.
To adjust the time,
• Press . Use to select DISPLAY.
• Press
• Press
• Use the numeric keys and
• Press
. Use to select HANDSET NAME.
. The current handset name will be displayed.
to enter the name for the handset.
to confirm the name entered.
Call Timer
The length of the call can be timed and displayed. The timer will start
counting once the phone goes off hook. When the call has started for
10 seconds, the call timer in the format of mm:ss (e.g. 00:10) will be
displayed on the first line of the display if the call timer is activated.
Once the timer reaches 59 minutes and 59 seconds (59:59), the format
will change to hh:mm:ss (e.g. 01:00:00). It will keep counting until the
call ends. When the call has ended, the call timer will stop counting and
keep on displaying for 5 seconds.
34 of 42
Page 35

• Press
• Press
• Press
• Press
. Use to select DISPLAY.
. Use to select CALL TIMER.
. Use to choose ON or OFF.
to confirm.
Backlit LCD / Backlit LCD & Keypad
The backlight will turn on when:
• a key is pressed
• there is an incoming call
• paging from the base.
The backlight will turn off:
• 10 seconds after a key is pressed
• 10 seconds after the internal or external call is answered if no key
is pressed afterwards
• 10 seconds after a call is ended
• when paging is stopped.
• when the incoming internal call ends without being answered
• when the incoming call expires at the handset.
You can also choose to turn off the backlight by
• Press
• Press
. Use to select DISPLAY.
. Use to select BACKLIT.
• Press . Use to select ON.
• Press
to turn on the backlight.
Change the PIN Code for Base
PIN code for the base unit is required in order to
• Change Prefix settings,
• Change Call Barring settings,
• Register a handset,
• Deregister a handset,
• Reset the phone settings, and
• Change the current PIN.
The PIN code includes zero to eight digits.
To change the PIN code:
• Press
• Press
. Use to select SYSTEM.
. Use to select CHANGE PIN. Press .
• The display reads PIN?. Enter the correct PIN of the connected
• Pressing
• Press
• Press
• Press
. Use to select DISPLAY.
. Use to select BACKLIT.
. Use to select OFF.
to turn off the backlight.
To turn on the backlit, user can
base. Press
.
• The display reads NEW PIN?. Enter the new PIN (maximum 8
digits).
• Press
to confirm. The display will read REPEAT.
• Re-enter same PIN again.
• Press
to confirm.
Note: If you changed the PIN CODE, you’ve to use the new PIN CODE
in all handsets.
35 of 42
Page 36

Delete All Records
User can delete the records of the private phonebook, shared
phonebook, call log, redial list, services number and SMS messages by
resetting the respective menu.
Press . Use to select RESET.
•
• Press . Use to select from PRIV PBOOK, SHARED
PBOOK, CALL LOG, REDIAL LIST, SERVICES or SMS
MESSAGES.
• Press
• Press
. The display will show RESET?.
to confirm.
Note: If PRIV PBOOK is reset, the quick dial feature of all quick dial
keys will be automatically off.
If SERVICE is reset, factory pre-programmed services, if any, will
be restored.
If SMS MESSAGES is reset, all SMS messages, if any, will be
deleted.
Reset Factory Default
All settings for both the handset and base can be restored to the
factory defaults by this menu.
Note: Factory default settings can’t be restored on the base or on the
handset alone. Also, if you want to restore factory settings on
other handset currently connected to the same base, you will
need to restore factory setting on that handset.
Using Additional Handsets
Registration
Each additional S6050 handset purchased separately must go through
the registration process with the base. Each handset can be registered
to up to 4 base units and each base can be registered to up to 5
handsets.
When registering, each handset can select base number for the base
to be registered so that it can be identified at base selection setting.
To register:
• Press
• Press . Use to select REGISTER.
• Press
been registered to a base, the number of the registered base will
be flashing.
• Enter the number of the base unit you wish to register using the
numeric key. The entered base number will be displayed on the
second line.
. Use to select SYSTEM.
. The display will read BS 1 2 3 4. If the handset has
• Press
• Press
. Use to select RESET.
. Use to select SETTINGS. Press .
• The display reads PIN?. Enter the correct PIN of the connected
base. Press
.
• All settings will be restored to the factory defaults.
• Press
. The handset will read PIN?.
• Enter the PIN number of the base to be registered (maximum 8
digits, the default PIN is 0000).
• Press and hold the PAGE button
on the base unit until you hear
2 beeps.
36 of 42
Page 37

• Press on the handset. The handset will read SEARCH BASE
X while it searches for the base unit (where ‘X’ is the number of the
base you are registering to).
• Once a connection has been made, the handset name and number
will be shown on the display.
Base Selection
AUTO If the base selection setting is set to auto, whenever the
handset loses link or is powered up, it will search any
available registered base to connect.
PREFER One of the bases registered can be assigned as a
preferred base so that it will be searched for certain period
when the handset loses link or is powered up. If that base
cannot be found, the handset will search for other
registered bases to connect.
FIXED One of the bases registered can be assigned as a fixed
base so that it will be the only base to be searched when
the handset loses link or is powered up. If that base cannot
be found, the handset will not link up to any other base.
To set:
o Press
. The display reads BS 1 2 3 4.
Use the numeric keyo s to enter the base number to be set as
the prefe ed base.
o
Press
rr
to confirm. The handset will search the selected
base.
• To select Fixed base,
o Press
o Press
Use the numeric
o keys to enter the base number to be set as
. Use to select FIXED.
. The display reads BS 1 2 3 4.
the fixed base.
o
Press
to confirm. The handset will search the selected
base.
Note: Base selectio
egistered to a base.
r
n setting will change to auto when the handset is
Making Internal Calls
This fe
ature requires more than one handset registered to the same
base.
• Press
. Use to select SYSTEM.
• Press . Use to select SELECT BASE.
• To select AUTO,
o Press
o Press
. Use to select AUTO.
to confirm. The handset will search any available
registered base.
• To select PREFER,
o Press
. Use to select PREFER.
• During standby, press
• The
icon on handset will be turned on.
.
• Press the registered handset number you wish to call.
The other handset will ring.• Answer the call from that handset and
wo handsets can now talk.
t
To end a call
• Press
, or
• Place the handset back on the base unit.
37 of 42
Page 38

Using Pre-Dialling
• Enter the number of the han
• Press
.
dset you wish to call.
• The call will be connected.
call comes through, you Note: During an internal call, if an external
will hear short beeps.
icon on handset will blink.
Receiving external call during Internal Call
f an external call comes in while the handset is on internal call, the I
icon will be blinking and a series of short beeps can be heard from the
earpiece. The CID of the caller will be display
ed on the screen.
Press
•
• Press
to hang up the internal call.
again to answer the external call.
Inquiry Call
While talking on the external line, the handset can put the external call
on hold and make an inquiry call to another handset. The handset can
hen toggle between the ext
ternal call and the other handset. While the
external call is on hold, a tone will be emitted to the external party to
indicate that the call is on hold.
During an external call, press •
• The external call will be put on hold and interna diallinl
.
g tone can
be heard from the earpiece or speaker.
• The
icon is displayed dition to in ad and icons.
• Press the number of the handset you wish to call.
If there is no reply, press
•
call and the other handset will stop ringing. Press
again to reconnect to the external
again to
make another call to other handset number.
• When er handset answers the call, the two handsets ca
the oth n
communicate while keeping the external call on hold.
• Press
to toggle between the internal and external calls.
Call Trans
fer
You ca er h dsets registered to the same
n transfer phone calls to oth an
base unit.
• During an external call, press
The external call will be put on hold.
•
• The
icon is displayed in addition to and icons.
.
Press the number of the handset you wish to call. •
When the other handset answers the call, press •
on the
nsfer the call. handset or place the handset on the cradle will tra
The
and icons will be turned off.
Conference Call
Confe etwe n external call, and two
rence call can be activated b e
hand
sets.
• During an external call, press
.
• The external call will be put on hold.
• The
icon is displayed in addition to and icons.
Press the number of the handset you wish to call. •
will activate the conference call. The
l, pre• When the other handset answers the cal ss and hold the
icon on both handsets will
be turned on.
e • During th conference call, pressing the
on the handset,
which initiated the conference call, will put the external call on hold
and still connect with the other handset.
• Press
again on the first handset will put the other handset on
hold and connect with the external call.
•
Pressing and holding
will activate the conference call again.
38 of 42
Page 39

• You can exit the conference call by pressing on the hands
or place the handset on the cradle. The o her ha set and the
external call will still be connected. The
turned off.
Room Monitoring
When more than one handset is registered to the same base unit, one
of the handse
To activate:
ts can be used as a room (baby) Monitor device.
t nd
and icons will be
et
De-register a Handset
One hand
base unit.
• Press
• Press
• Press
set can de-register all other handsets registered to the same
. Use to select SYSTEM.
. Use to select DELETE HS.
.
• Press
• Press
• Press
• Press
MONITOR will flash on the display to indicate the handset is in monitor
mode during standby. User can make internal call to this handset from
anoth dset, the microphone on this handset is activated (being in
er han
monito ode) and noise from the room can be heard. User can also
press
To de-activat :
• Press
• Press
• Press
• Press
N
r m
ote: The handset under monitor mode will not ring when an external
call comes in.
. Use to select FEATURES.
. Use to select MONITOR.
. Use to select ON.
to confirm.
to hear from the speaker. There will be no internal ringing.
e
will take you to the MONITOR menu directly.
. The display reads ON.
to select OFF.
to confirm.
Use
•
5) to be d leted.
• Press
Enter the correct PIN of the connecte
• d base and press
confirm the deletion of the handset.
ote: Each handset can’t de-register itself.
N
to select the desired handset (HANDSET 1 to HANDSET
e
to confirm the selection. The display will rea PIN?.
d
to
39 of 42
Page 40

Appendix: Default Settings
External ringer melody (handset and base): MELODY 1
Internal ringer melody (handset): MELODY 2
Handset Ring Volume:
Base Ring Volume:
Receiver Volume: Med
Flash Timing: FLASH 1
Dial Mode: Tone
Auto Answer: On
Key Beep Tone: On
Confirmation Tone: On
Charging Tone: On
Backlit (if applicable): On
Call Timer: On
Message Waiting Indicator: Off
Monitor: Off
Direct Dial function: Off
Direct Dial number: Empty
Prefix Dialling: Off
Prefixes and numbers: Empty
Call Barring: Off
Call bar and exempt numbers: Empty
Operator services: Default services
Base Selection: Auto
PIN Code: 0000 (for base menu)
SMS Service: ON
Service centre numbers: Pre-programmed #
Active service centre: Service centre 1
Sub-Address: 0
SMS Alert Tone: On
Handset Name: ORICOM
Language: English
Troubleshooting
The phone does not work at all
• Make sure that adapter and phone cord are connected properly.
• Check that the batteries are fully charged and installed properly.
• Check that the handset is correctly registered to the same base
unit.
• Move the handset closer to the base unit.
The phone does not ring
• Make sure the adapter and the phone cord are connected properly.
• Move the handset closer to the base unit.
• Check that the handset is correctly registered to the same base
unit.
• Make sure the handset (or base) ringer is turned on.
The phone does not dial out
• Check that the phone cord is connected properly.
• Check the handset is fully charged.
• Check that the handset is correctly registered to the same base
unit.
• The dialled number may be barred. See Call Barring section
• The keypad may be locked. See Handset Keypad Lock/Unlock
section.
CID does not work properly
• Check with your local phone company that the CID service is
subscribed to.
• Let the phone ring at least once before answering.
The CIDCW call cannot be answered
• Check with your local phone company and select the correct recall
duration.
Base charge light does not work
• Make sure that adapter is connected properly.
• Make sure the handset is making contact in the cradle.
The empty battery icon appears soon after the batteries are charged
• Replace the batteries with new ones.
40 of 42
Page 41

SMS is not working properly
• Check if the Service Centre numbers are set correctly.
• Check if the sub-address is set correctly.
• Check if the SMS service is ON.
• Clear all the messages from RESET > SMS MESSAGES menu
because some messages received can have errors. Please do this
with caution as all the messages will be deleted once reset.
• Check with service provider if the SMS service is registered.
Wrong characters are displayed for SMS messages
• When the messages were sent with unsupported encoding, they
will not be displayed correctly. Please ask the sender to use basic
characters and default SMS encoding. Please contact the service
provider for more information. This phone supports 7-bit GSM
Default alphabets.
SMS Error Codes
‘01’
Problem: Make sure that adapter and phone cord are connected
properly.
• Check if the phone is properly installed.
• Check if the SC number is correct.
‘02’
Problem: Transmission error
• Contact customer service if problem persists.
‘03’
Problem: Reject the message from SC
• Check with provider about the services available
‘04’
Problem: User Interruption
• Make sure that the line is not interrupted during SMS transmission.
‘C0’
Problem: SC busy
• Retry the transmission again later
• Contact service provider if the error persists.
‘C1’
Problem: No SC Subscription
• Need to subscribe or activate the account
• Check with service provider.
‘C2’
Problem: SC system failure
• Retry the transmission again later
• Contact service provider if the error persists
‘C3’
Problem: Invalid SME address
• Check recipient's address.
‘C4’
Problem: Destination SME barred
• Check with recipient if he/she can receive the message
• Check with service provider why the destination SME is barred.
‘E0’
Problem: Unknown SM-TE
• Make sure that Caller ID is not restricted.
• Add necessary prefix to SC number so that CLIR would be
temporarily off.
‘FF’
Problem: Unknown
• Unknown
41 of 42
Page 42

Warranty Information
This product is covered by a 12 month warranty against defective
workmanship or parts. The warranty does not extend to damage caused
by misuse, negligence, excessive voltage, faults on the telephone line or
lightning. This guarantee in no way affects your statutory rights. Full
details of the warranty are contained in the enclosed warranty card.
If you feel this product is not working correctly please consult the user
guide and ensure that you are using the product in accordance with the
instructions.
Remove all extra telephone equipment and connect only this telephone
directly to the telephone socket.
If the fault is still present, connect another telephone (if available) to the
telephone socket. The results will show you whether the fault lies with
this unit or with the telephone line. If the product is working correctly
the fault is on the telephone line. Please contact your network operator
for assistance
To orders spare parts additional handsets, replacement batteries
and in case of any technical issues you may have with product
please consult our website for further information or send us an
email for a prompt response to your enquiry. In the unlikely event
of a fault developing, please contact us for assistance. If the
product is then found to be faulty you will be asked to return it
directly to us with a copy of the purchase receipt.
Australia
Oricom International Pty Ltd
PO Box 5681
South Windsor, NSW 2756
Customer support
Email:
support@oricom.com.au
Web: www.oricom.com.au
Fax: (02) 4572 0939
Ph: 1300 889 785
42 of 42
 Loading...