

Page 1
User Guide S209
1.8GHz DECT Dual line expandable cordless phone system
Retain this user guide for future reference
Page 2

Page 3

Table of Contents
1 Environment and Safety.....................................................................................................................................................................1
2 What’s in the Box? .............................................................................................................................................................................2
3 Welcome............................................................................................................................................................................................3
How to use this user guide?...............................................................................................................................................................3
Need more help?................................................................................................................................................................................3
4 About your Oricom S209 cordless handset........................................................................................................................................4
The Handset.......................................................................................................................................................................................4
The Base ............................................................................................................................................................................................5
Handset icons ....................................................................................................................................................................................5
The menus .........................................................................................................................................................................................5
5 Getting Started...................................................................................................................................................................................7
Connecting your phone......................................................................................................................................................................7
Connecting your charger ...................................................................................................................................................................7
Charging your handset ......................................................................................................................................................................7
Checking the battery level..................................................................................................................................................................8
Wall mounting the base .....................................................................................................................................................................8
Greeting you with “HELLO”................................................................................................................................................................9
What is standby mode? .....................................................................................................................................................................9
Registering your handset ...................................................................................................................................................................9
Checking the signal strength .............................................................................................................................................................9
Switching your handset on/off..........................................................................................................................................................10
Setting the clock...............................................................................................................................................................................10
6 Call...................................................................................................................................................................................................11
Making a call ....................................................................................................................................................................................11
Ending a call.....................................................................................................................................................................................13
Answering a call ...............................................................................................................................................................................13
During a call .....................................................................................................................................................................................14
Dual line calls ...................................................................................................................................................................................15
7 Intercom and Conference Calls........................................................................................................................................................16
Calling another handset...................................................................................................................................................................16
Transferring a call.............................................................................................................................................................................16
Making a conference call.................................................................................................................................................................16
8 Text and Numbers............................................................................................................................................................................18
Changing the letter case..................................................................................................................................................................18
Entering text and numbers...............................................................................................................................................................18
Erasing text and numbers................................................................................................................................................................18
9 SMS Text Messaging (Australia only)...............................................................................................................................................19
Activating SMS .................................................................................................................................................................................19
Deactivating SMS.............................................................................................................................................................................19
Setting up SMS service centres.......................................................................................................................................................19
About mailbox ..................................................................................................................................................................................20
Organizing the public mailbox .........................................................................................................................................................20
Organizing private mailbox ..............................................................................................................................................................21
Setting new message alert...............................................................................................................................................................22
Reading and retrieving messages ...................................................................................................................................................23
Returning a call to the sender ..........................................................................................................................................................23
Composing and sending messages................................................................................................................................................23
Deleting a message .........................................................................................................................................................................24
Deleting all messages......................................................................................................................................................................25
Checking the mailbox memory status..............................................................................................................................................25
10 Voicemail Indication and Notifications..............................................................................................................................................26
Voicemail indication .........................................................................................................................................................................26
Notifications......................................................................................................................................................................................26
11 Phonebook.......................................................................................................................................................................................27
Viewing the phonebook....................................................................................................................................................................27
Calling from the phonebook.............................................................................................................................................................27
Adding a record ...............................................................................................................................................................................28
Editing a record................................................................................................................................................................................29
Deleting a record..............................................................................................................................................................................29
Deleting all records ..........................................................................................................................................................................29
Using speed dial ..............................................................................................................................................................................29
- i -
Page 4

Table of Contents
Checking the memory status ...........................................................................................................................................................30
12 Call Log............................................................................................................................................................................................31
Viewing the call records ...................................................................................................................................................................31
Making a call ....................................................................................................................................................................................31
Saving a call record to your phonebook..........................................................................................................................................32
Deleting a call record .......................................................................................................................................................................32
Deleting all records ..........................................................................................................................................................................32
Call timeR.........................................................................................................................................................................................32
Log option ........................................................................................................................................................................................32
13 Services Directory ............................................................................................................................................................................33
Viewing the directory........................................................................................................................................................................33
Calling from the directory.................................................................................................................................................................33
Adding a record ...............................................................................................................................................................................33
Editing a record................................................................................................................................................................................34
Deleting a record..............................................................................................................................................................................34
Deleting all records ..........................................................................................................................................................................34
14 Custom Options...............................................................................................................................................................................35
Personalizing your phone’s display .................................................................................................................................................35
Personalizing your phone’s sounds.................................................................................................................................................35
15 Your Digital Assistant .......................................................................................................................................................................37
The alarm clock................................................................................................................................................................................37
The stopwatch..................................................................................................................................................................................37
The countdown timer .......................................................................................................................................................................38
16 Calling Features ...............................................................................................................................................................................39
Auto answer .....................................................................................................................................................................................39
Do not disturb...................................................................................................................................................................................39
Recall selection ................................................................................................................................................................................39
Pause Selection................................................................................................................................................................................39
Prefix insertion..................................................................................................................................................................................40
PABX Prefix ......................................................................................................................................................................................40
Call barring.......................................................................................................................................................................................41
17 Extra Features..................................................................................................................................................................................42
Direct paging....................................................................................................................................................................................42
Call camping ....................................................................................................................................................................................42
Keypad lock .....................................................................................................................................................................................42
Missing handset(s)...........................................................................................................................................................................42
New message indication..................................................................................................................................................................43
18 The System......................................................................................................................................................................................44
Reviewing/Selecting your country....................................................................................................................................................44
Registering your handset(s) with additional base............................................................................................................................44
Selecting a base unit........................................................................................................................................................................44
Deleting a handset...........................................................................................................................................................................44
Defining line matrix...........................................................................................................................................................................45
Changing the system PIN ................................................................................................................................................................46
Resetting to default settings.............................................................................................................................................................46
19 Appendix..........................................................................................................................................................................................47
Default Settings................................................................................................................................................................................47
Troubleshooting ...............................................................................................................................................................................48
Notes for Operation in New Zealand ...............................................................................................................................................48
Warranty ...........................................................................................................................................................................................49
Customer Support............................................................................................................................................................................50
- ii -
Page 5

Environment and Safety
y
IMPORTANT
Please read the safety instructions before first use of this phone.
• Avoid exposure of this telephone to moisture or liquid.
• To prevent electric shock, do not open the handset or base cabinet.
Avoid metallic contact (e.g. metal clips, keys) between the battery contacts and charging conductors.
•
• There is a slight chance that the telephone could be damaged by an electrical storm. It is recommended that users unplug the
phone from the mains supply and telephone socket during a storm.
• Do not open the base unit or charger. This could expose you to high voltages.
• Do not use the handset in an explosive hazard area such as where there is gas leaking.
• There is a chance that the telephone could be damaged by an electrical storm. It is recommended that users unplug the
phone from the mains supply and telephone socket during a storm.
• Do not use your telephone during an electrical storm thunderstorm as it is possible to get an electric shock. Refer to
information contained in the White pages directory.
• Follow the local regulations regarding the disposal of your packing materials, exhausted batteries and used phone. Wherever
possible, recycle those materials.
• We advise that this phone should not be used near intensive care medical equipment or by persons with pacemakers.
• Clean with a dry, soft, lint-free cloth. Never use cleaning agents, particularly aggressive solvents.
• Because the phone works by sending radio signals between base station and handset, wearers of hearing aids may
experience interference in the form of a humming noise.
• Your phone may interfere with electrical equipment such as answering machines, televisions, clock radios and computers if
placed too close. It is recommended that you position the base unit at least one metre from such appliances.
This telephone complies with applicable safety requirements for exposure to radio waves (EMR). The mean power of this
•
telephone does not exceed 20mW limit at which point testing is required.
The earpiece of the handset may attract small metal objects such as staples and pins. Care should be taken when placing the
•
handset near these items.
This telephone is not designed for making emergency telephone calls when the mains power fails. Always have a corded
•
phone available to be able to make and receive calls to emergency services if the mains power fails.
CAUTION: Use only the mains adaptors supplied with this equipment. Incorrect adapter polarity or voltage can
seriousl
Handset Charger Adapter
Input: 230VAC 50Hz
Output: 6VDC 400mA
Base Unit Adapter
Input: 230VAC 50Hz
Output: 9VDC 300mA
Battery requirements
Each handset requires two rechargeable Ni-MH batteries, size AAA 1.2V 750mAh (HR10/44).
WARNING: RISK OF EXPLOSION IF BATTERY IS REPLACED BY AN INCORRECT TYPE. Never use non-
rechargeable batteries. Use recommended type supplied with this product. NiMH batteries must be disposed
of in accordance with the applicable waste disposal regulations.
damage the unit.
- 1 -
Page 6
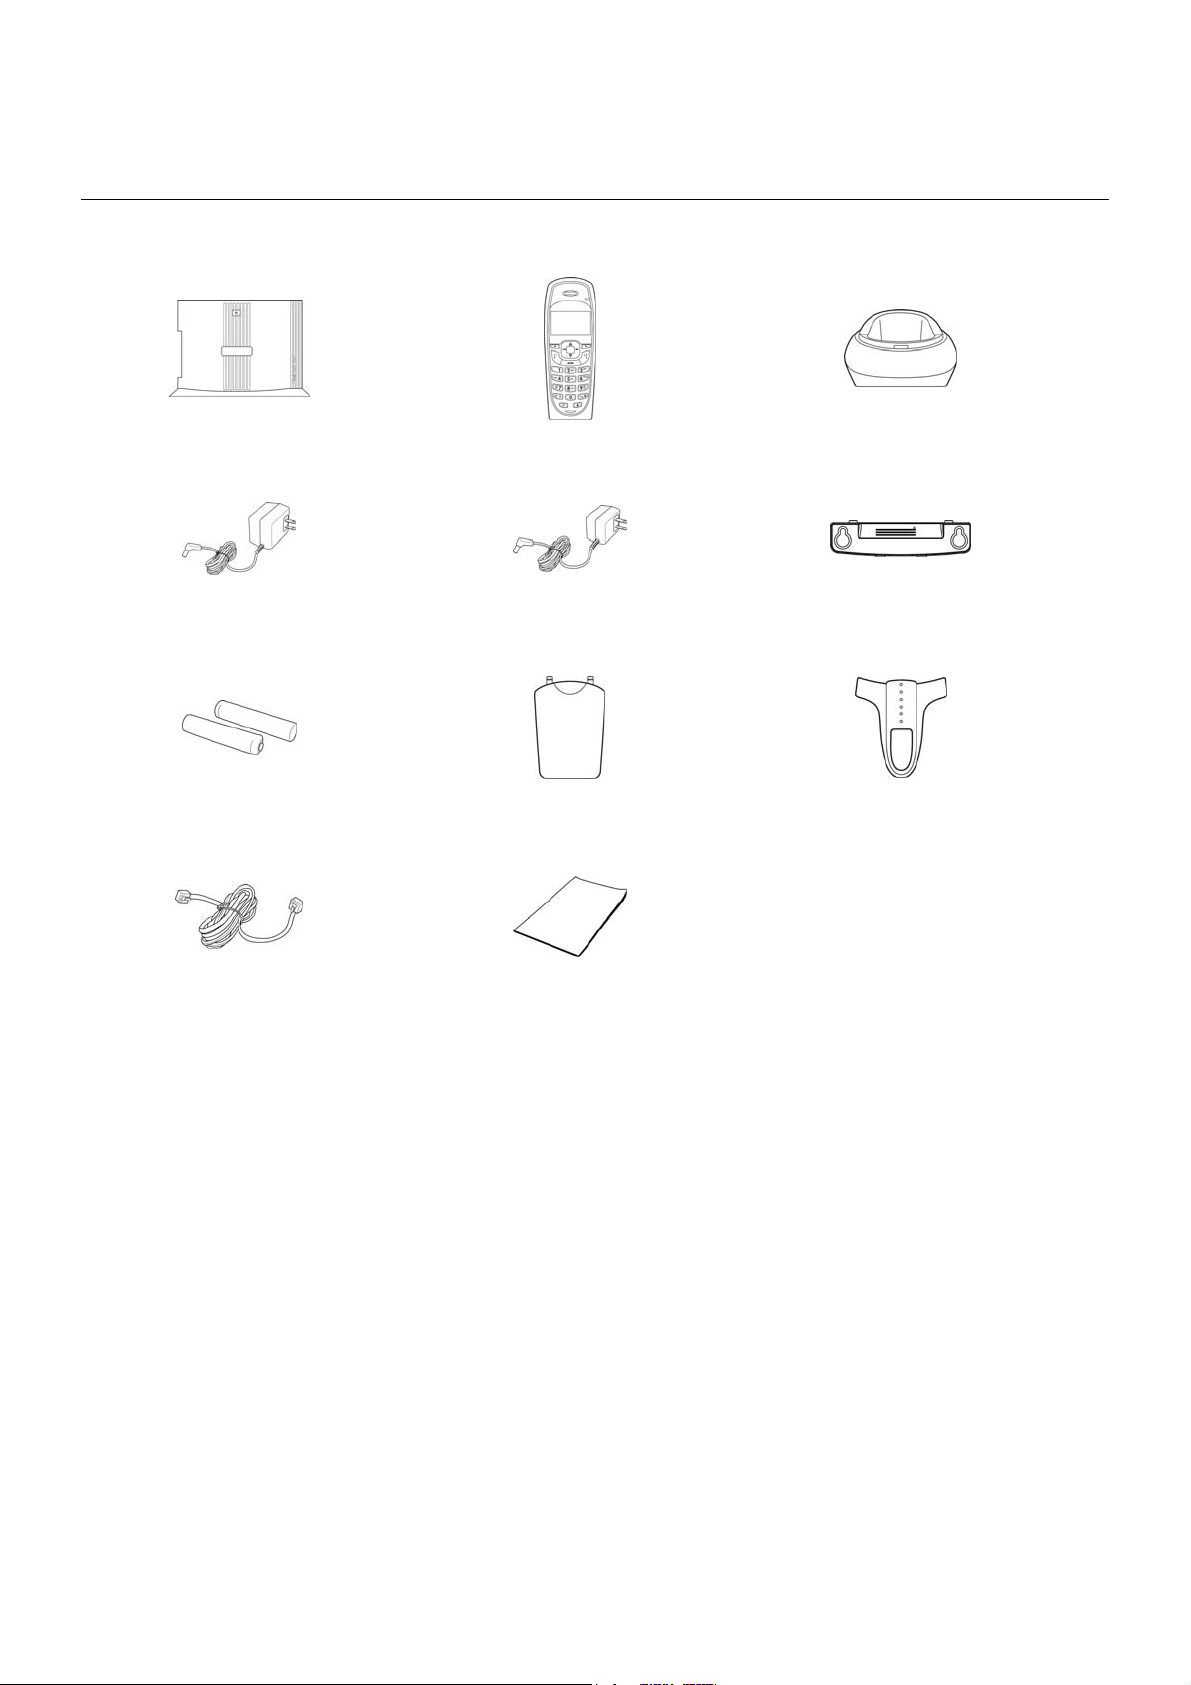
What’s in the Box?
Make sure you have all these items in the box. For missing item(s), contact your dealer.
Base Unit Handset x 2 Charger x 2
Base Power Adapter x 2 Charger Power Adapter x 2 Base Wall Mount Bracket
Rechargeable Ni-MH AAA Battery x 4 Handset Battery Cover x 2 Belt Clip x 2
Modular telephone Line Cord
x 2
This Owner’s Manual Modular (Australia only) adaptor plug
X 2
- 2 -
Page 7
Welcome
This user guide provides you with information and instruction you need to get the most from your phone system.
HOW TO USE THIS USER GUIDE?
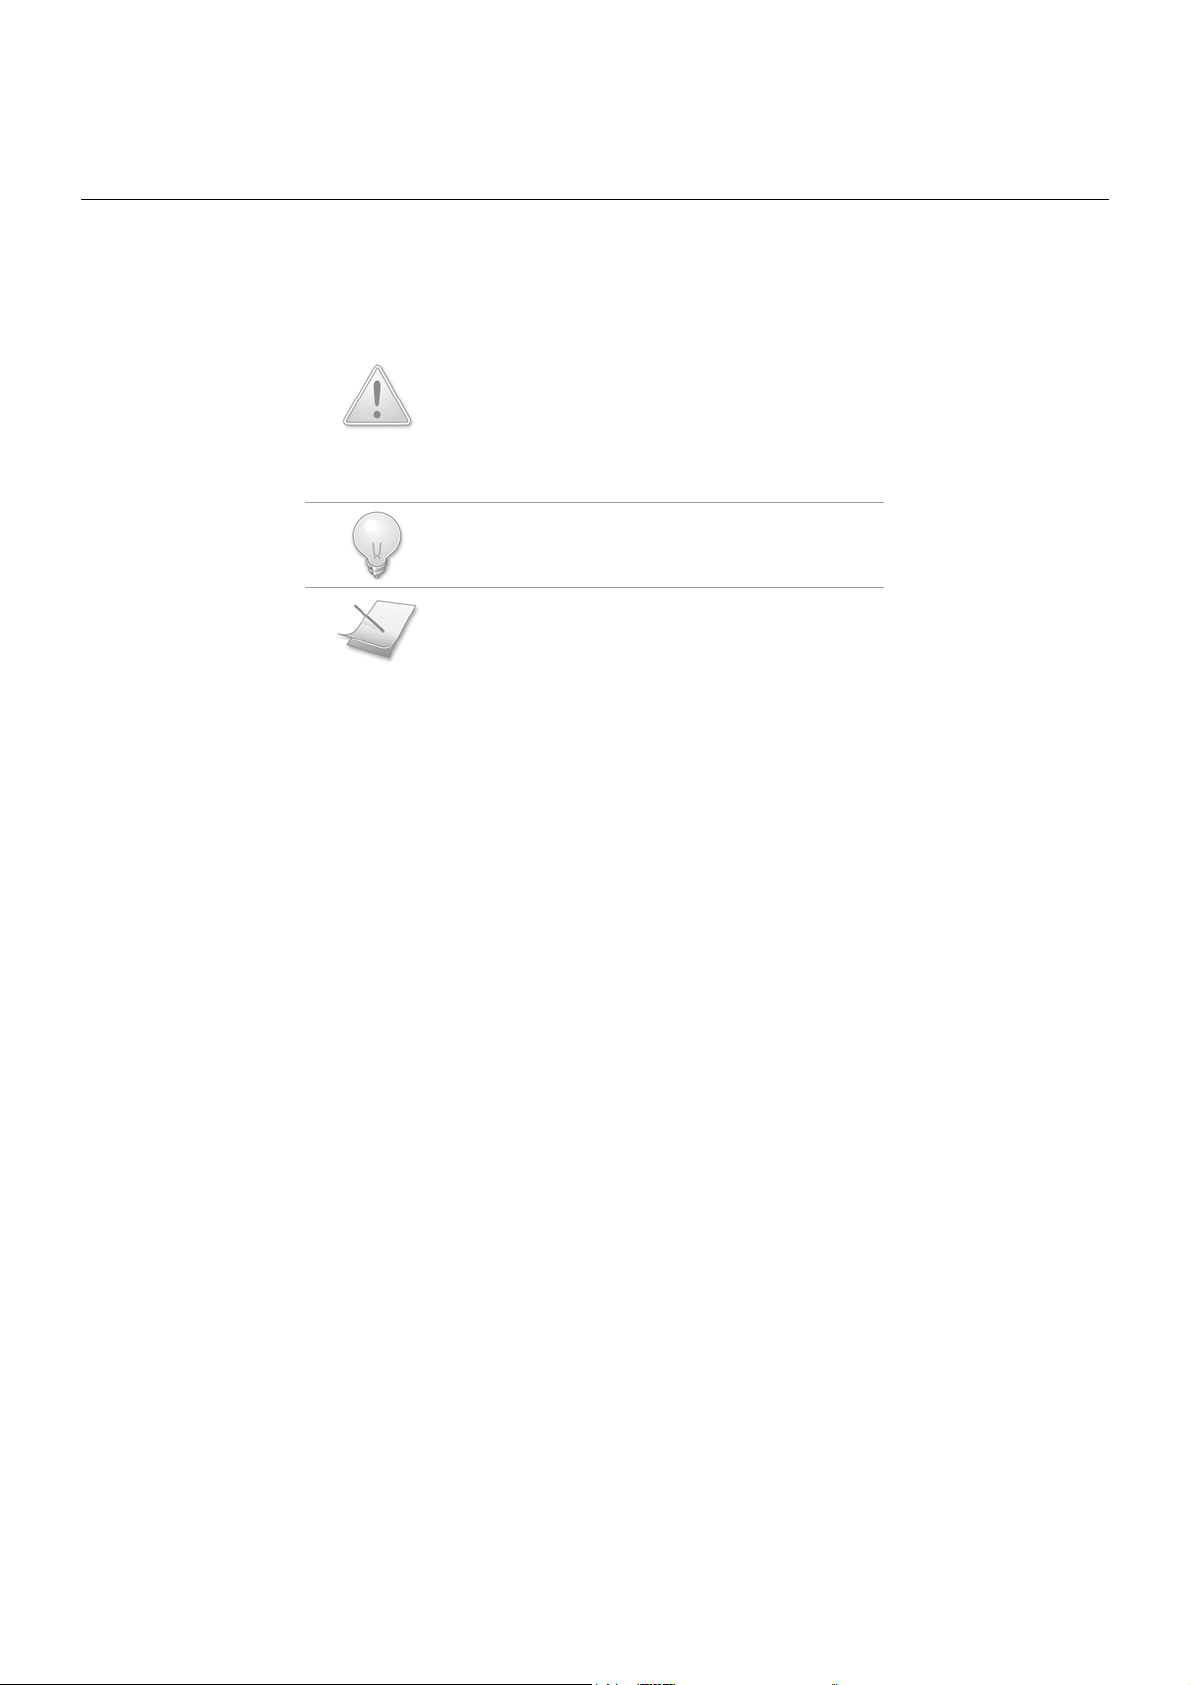
The following symbols are used to alert you on important information.
This symbol has two meanings:
• Warning:
injury.
• Caution: Critical information for preventing damage
on the product.
• Tip: Information for easier operation.
• Note: Explanatory or critical information for carrying
out an operation correctly.
NEED MORE HELP?
• See the Troubleshooting section in this user guide on page 47.
Critical information for preventing personal
- 3 -
Page 8

About your Oricom S209 cordless handset
THE HANDSET
1 Handset Indicator
Lit when call in progress.
Blink if there is unread SMS message(s) or missed call(s).
2 Direct Page key
Use to make an instant call to another handset.
3
Soft Key 1 & 2
&
Use to perform function displayed above the key. It is displayed as text in a
4
box (i.e
5 Left & Dialed List key
Use to move the cursor.
Use to change selection.
Use to enter the dialed list.
6 R i g h t & D i a l e d L i s t k e y
Use to move the cursor.
Use to change selection.
Use to enter the dialed list.
7 Li n e 1 & R k e y
Use to make and receive calls.
Use to send flash signal.
8 Li n e 2 & R k e y
Use to make and receive calls.
Use to send flash signal.
9 Up & Message key
Use to scroll up menu items.
Use to increase the ringer and receiver volume.
Use to enter the Message menu.
10 Down & Mess a g e k e y
Use to scroll down menu items.
Use to reduce the ringer and receiver volume.
Use to enter the Message menu.
) in this guide.
MENU
11 End & On/Off key
Use to end a call.
Use to exit menus.
Use to turn the handset on/off.
13 Star & Ringer Off key
Use to dial *.
Use to turn the ringer on/off.
15 In t e r c o m key
Use to make an intercom call.
Use to start a conference call.
12 Digit keys
Use to dial digits.
Use to enter characters.
14 Hash, Keylock, & Pause key
Use to dial #.
Use to enter a pause.
Use to lock the keypad.
16 Service key
Use to enter the services menu.
- 4 -
Page 9
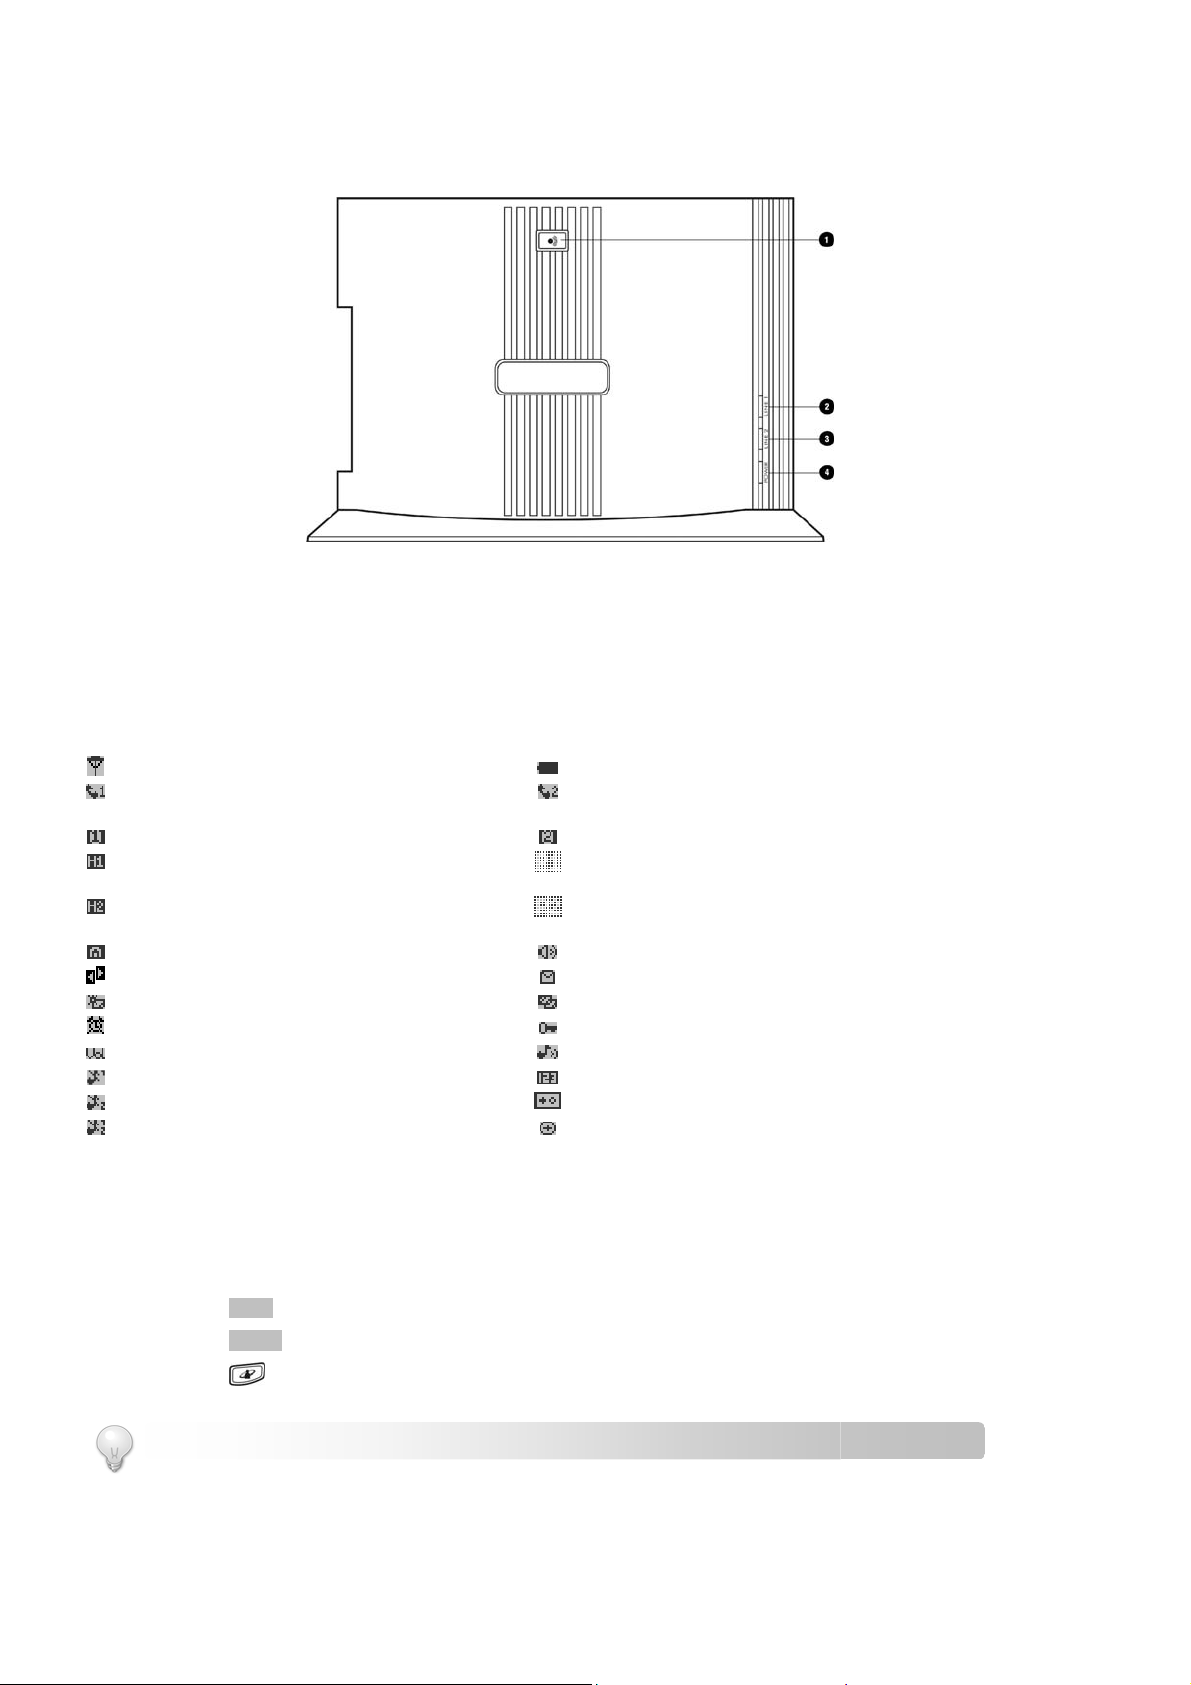
THE BASE
About Your Phone
1 Page ke y
Use to find handset(s).
Use to register handset(s).
3 Line 2 indicator
Lit when line 2 is in use.
2 Line 1 indicator
Lit when line 1 is in use.
4 Power indicat o r
Lit when base unit is powered on.
HANDSET ICONS
Each icon gives you a visual message of what is happening on your handset.
Signal strength
Line 1 in use
Line 1 call record
Line 1 indicator
Line 1 on hold (cannot be picked up from other
handsets)
Line 2 on hold (cannot be picked up from other
handsets)
Internal call indicator
Left and right arrows
New missed call
Alarm clock on
Volume
Line 1 ringer off
Line 2 ringer off
Line 1 & 2 ringers off
Battery level
Line 2 in use
Line 2 call record
Line 2 indicator
Line 1 on hold (can be picked up from other handsets)
Line 2 on hold (can be picked up from other handsets)
Speaker on
New message
New (repeated) missed call
Keypad locked
Melody
Number
Mode or status
Prefix insertion rule
THE MENUS
Your phone offers a variety of features and functions grouped in the menus.
Browsing the menus
The main menu includes the SMS, Call Log, Setting, Advanced, Extras, and System menu.
Press
Press
MENU
to enter the main menu.
NAMES
to enter the phonebook menu.
Press
to enter the services menu.
TIP: Use UP and
DOWN
to navigate the menus.
- 5 -
Page 10

About Your Phone
TIP: Quick Exit. Press to exit from any menu instantly. All unconfirmed changes will not be save.
Taking a glance at the menus
*This menu only applies to a certain model or country group.
SMS CALL LOG SETTINGS ADVANCED
Private
Compose
Inbox
Outbox
Profile
Logout
Public
Compose
Inbox
Outbox
Setting
Close Service
Mailbox
Service Centre
Alert Tone
Template
Memory Status
EXTRAS SYSTEM PHONEBOOK SERVICES
Alarm Clock
Timer
Stopwatch
Missed
Dialed
Received
Notification
Call Timers
Last Call
Dialed
Received
Total
Reset All
Reset
Missed
Dialed
Received
Notification
VMWI
Log Option
Log All
Missed Only
Register
Select Base
Auto
Base 1 … 4
Delete Handset
Line Matrix
Line 1 In
Line 2 In
Line 1 Out
Line 2 Out
Ring Count
Reset
Change PIN
Country Setting
(for model
with multiple-country
settings only)
Sounds
Line 1 Ringer
Line 2 Ringer
Intercom Ringer
Key Tone
Handset Tone
Equalizer
Date And Time
Date Format
Date
Time Format
Time
Handset Name
Language*
Call Services
Do Not Disturb
Auto Answer
Contrast
Private
View Record
New Entry
Quick Dial
Memory Status
Delete All
Public
View Record
New Entry
Memory Status
Delete All
Recall
Pause
Prefix*
Call Barring
PABX
View
Reset
- 6 -
Page 11
Getting Started
p
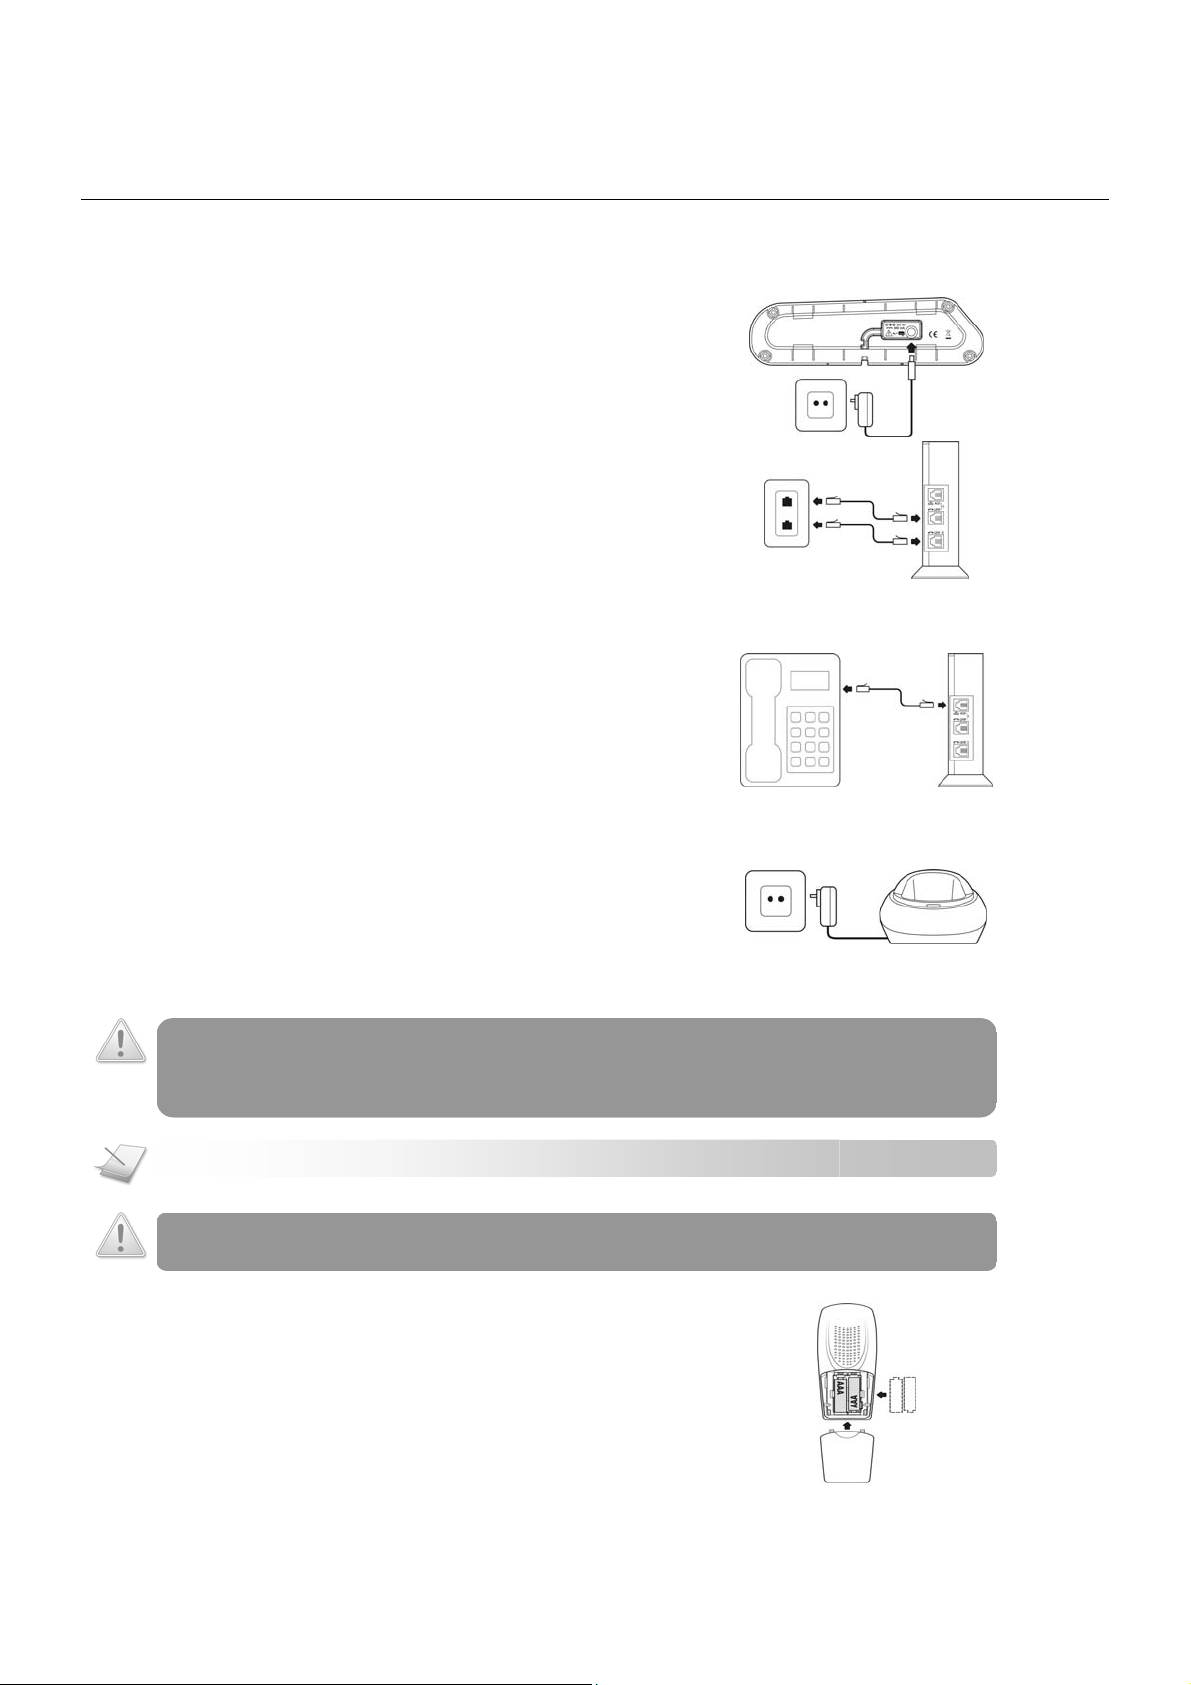
CONNECTING YOUR PHONE
1. Connect the output plug of the mains adapter to the bottom
of the base unit.
2. Connect the mains adapter to a standard wall outlet.
3. Connect the telephone line cords to the phone sockets
(Line 1 & Line 2) on the side of the base unit and the wall
phone sockets.
SMS is supported on Line 1 only. Connect the SMS-enabled PSTN telephone line cord to Line 1.
4. Connect the auxiliary device such as a Fax, eftpost
terminal, phone, or answering system (not supplied) to the
AUX socket.
The auxiliary corded phone maybe used on Line 1 for calls
during power failure situation.
CONNECTING YOUR CHARGER
1. Connect the power adapter of the charger to a powerpoint.
CHARGING YOUR HANDSET
WARNING: RISK OF EXPLOSION IF BATTERY IS REPLACED BY AN INCORRECT TYPE. Never use non-
rechargeable batteries. Use recommended type supplied with this product. NiMH batteries must be disposed
of in accordance with the applicable waste disposal regulations.
NOTE: Charge the handset(s) for 14 hours before initial use!
CAUTION: Check the batteries polarity when inserting the batteries. Incorrect polarity may damage the
roduct.
1. Place the 2 rechargeable batteries (included) into the
battery compartment.
2. Slide the battery door firmly into place.
- 7 -
Page 12
Call
p
3. Place the handset on the charging cradle. Charge for 14
hours before initial use.
NOTE: Handset may get warm during initial charge. This is normal. The handset may take a few seconds to
ower up.
CHECKING THE BATTERY LEVEL
The battery icon displays the current battery level.
= 100% full
= 60% full
= 30% full
= Empty. Require charging.
Your handset may power down shortly if it is not charged after the battery is empty. If you are on the phone while the battery is nearly
empty, you will hear warning tones. Your call maybe cut off shortly after the warning.
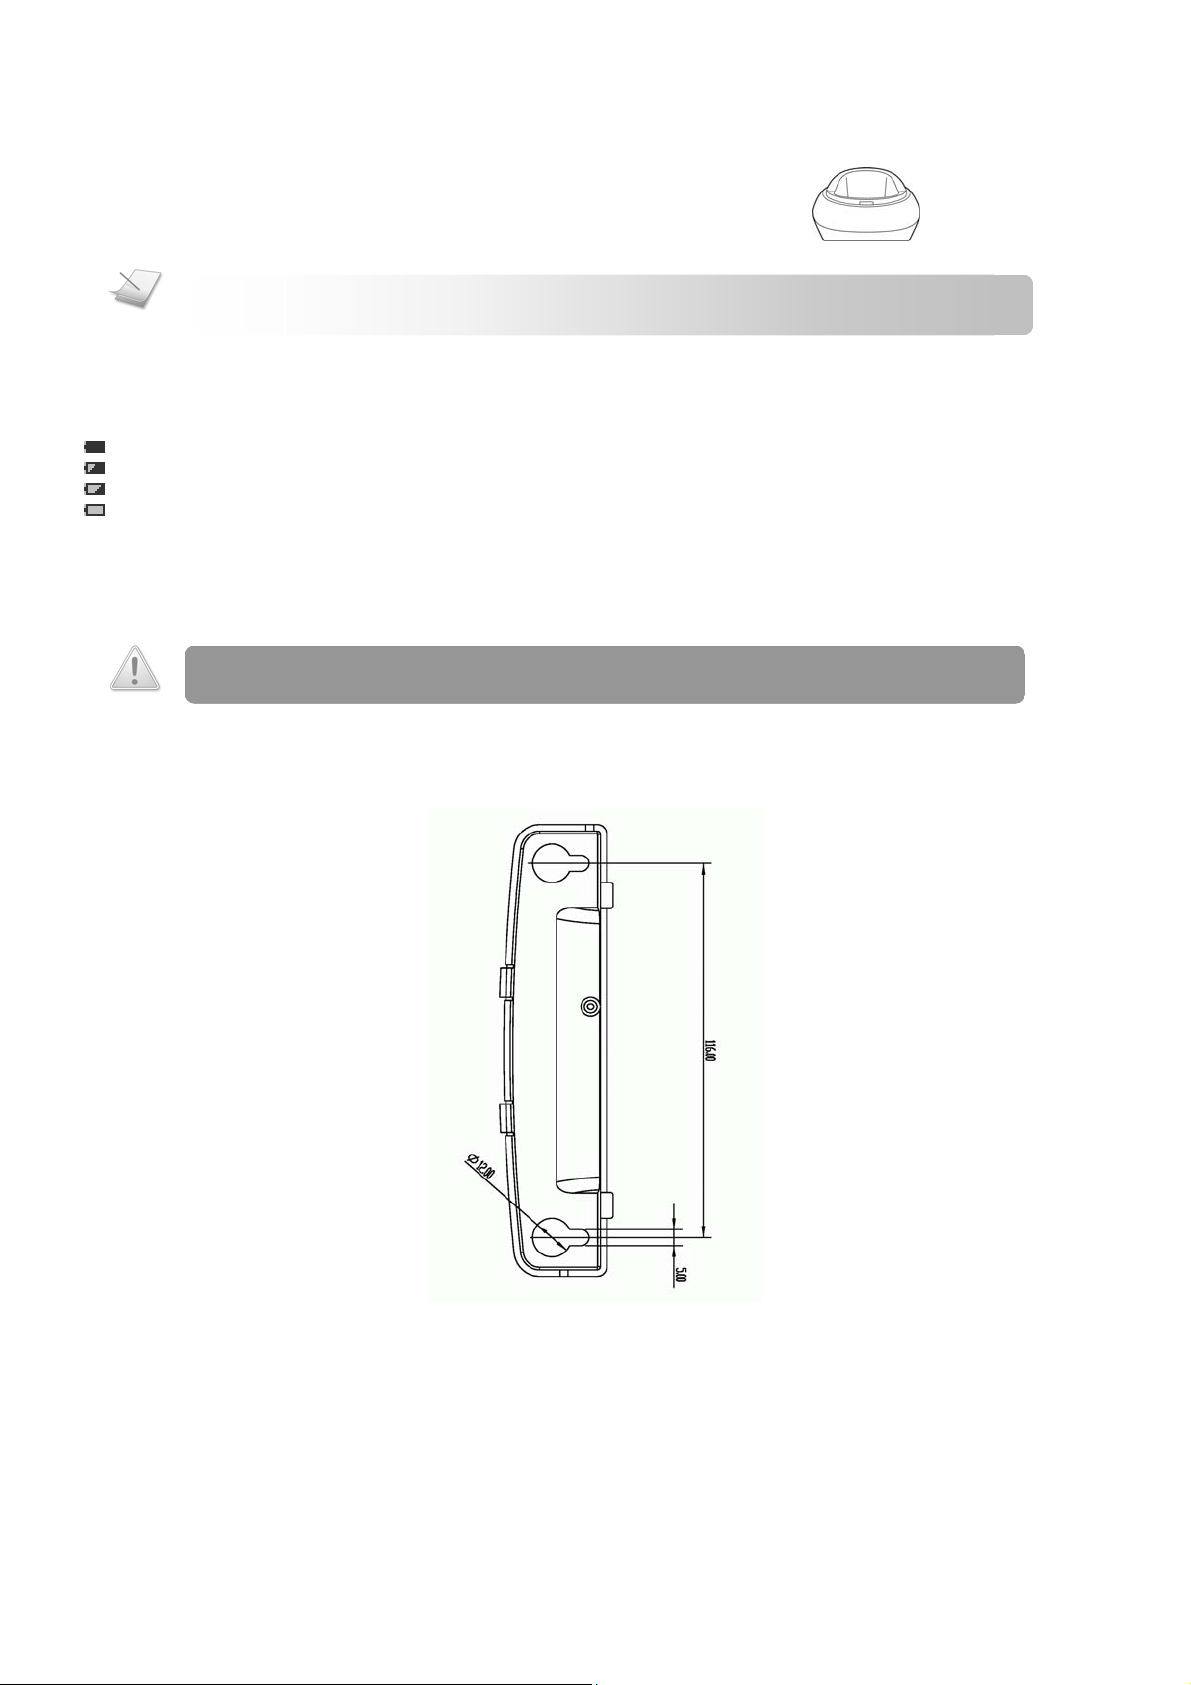
WALL MOUNTING THE BASE
CAUTION:
Please use the following wall mount template to locate and install the mounting pins/screws if you prefer to wall mount your base unit.
The dimensions are shown in millimeters (mm).
Other wall mounting methods are not recommended and may damage the product.
1. Insert screws (not supplied) into the wall.
The recommended mounting screws are “Philips Pan Head Self-Tapping Screws” with diameter 4mm and length 20mm.
The diameter of the screw head and the screw should not be greater than 12mm and 5mm respectively.
2. Push the locking tabs of the wall mount bracket into the mounting holes at the back of the base unit.
3. Align the mounting holes of the wall mount bracket with the wall posts.
- 8 -
Page 13

Call
4. Slide the base unit down into place.
GREETING YOU WITH “HELLO”
At first start up, your handset welcomes you with a “Hello” message. At the “Hello” screen, set the country to start using the phone.
The Country menu is only available in models that support multiple-country settings. If the model has only one country setting, the “Hello” message will
not be available and therefore you will not need to select the country setting before use
Selecting your country
It is necessary to select the correct country for the phone to work properly according to your country’s standards.
At the “Hello” screen,
1. Press >> to navigate to your country.
2. Press OK to confirm. Your phone is now ready to use.
To re-configure your country setting, see page 44.
WHAT IS STANDBY MODE?
Your phone is in standby mode when it is idle. The standby screen displays the handset name, the date and time, the signal icon, and
the battery icon.
REGISTERING YOUR HANDSET
Registration allows communication between your base unit and handset(s). If your handset cannot communicate with its base, you will
not be able to make any call or use some of the functions and features on the phone.
NOTE: Your S209 Twin pack handsets are registered at the factory. Follow the procedure below only if you
have bought extra handsets or you have de-registered a handset.
To register your handset to an additional base unit, see Registering your handset(s) with additional base on page44.
If your handset displays NOT REG, follow the steps below to register your handset.
1. Press
2. Press OK to confirm selection.
3. Select the base number you want. Press OK. This base number will be assigned to the base unit you are about to register
4. Enter the system PIN. Use
5. Press OK to confirm. Your handset starts searching for the base.
6. Press
NOTE: Your base can register up to 9 handsets. After registering 9 handsets, your base unit registration
memory is full. If you attempt to register an additional handset, you will hear a reject tone from the base.
The registration process will be aborted.
REG
. REGISTER shall be highlighted.
to.
DELETE
PAGE
on the base unit for 4 seconds. The registration process shall be completed within 30 seconds. If registration
is successful, the signal icon
to make correction.
displays steadily. If registration failed, repeat the above procedure.
.
CHECKING THE SIGNAL STRENGTH
The signal icon displays the link status between your handset and the base unit.
Steady signal icon: Your handset and base unit are linked. They can communicate.
Flashing signal icon: Your handset and base unit have lost link. They are not able to communicate. Take your handset closer to the
base unit to reconnect the link.
- 9 -
Page 14

Call
If you move too far away from the base unit while you are on the phone, you will hear warning tones notifying you that your handset is
almost out of range – lost link. Take your handset closer to the base unit or your call will be cut off shortly after the warning.
NOTE: If your handset has lost the link with the base, you will not be able to make or receive any call. In
addition, you will not be able to carry out many of the phone functions and features.
SWITCHING YOUR HANDSET ON/OFF
Switching on your handset
1. Press . The handset may take a few seconds to power up.
Switching off your handset
2. Press and hold . The handset’s screen turns off.
NOTE: Your handset cannot receive any call if the power is switched off.
SETTING THE CLOCK
Your phone has a calendar and digital clock. Set the date and time before initial use of the phone.
If the base’s power resets, the clock resets to 12:00AM (for 12-hour format) and 00:00 (for 24-hour format), and the date resets to the
factory default date.
TIP: Use UP and
DOWN
to navigate the menus.
Selecting the date format
1. Press
2. Select SETTINGS. Press OK.
3. Select DATE AND TIME. Press OK.
4. Select DATE FORMAT. Press OK.
5. Select the date format you want.
6. Press OK to confirm. The new setting is saved.
MENU
.
Setting the date
1. Press
2. Select SETTINGS. Press OK.
3. Select DATE AND TIME. Press OK.
4. Select DATE. Press OK.
5. Press
6. Press
7. Press OK when finished. The new setting is saved.
MENU
.
LEFT
RIGHT
or
DOWN
to set the next item.
to select the value for the Month/Day/Year.
Selecting the time format
1. Press
2. Select SETTINGS. Press OK.
3. Select DATE AND TIME. Press OK.
4. Select TIME FORMAT. Press OK.
5. Select the time format you want.
6. Press OK to confirm. The new setting is saved.
MENU
.
Setting the time
1. Press
MENU
.
- 10 -
Page 15

Call
2. Select SETTINGS. Press OK.
3. Select DATE AND TIME. Press OK.
4. Select TIME. Press OK.
LEFT
RIGHT
5. Press
6. Press
7. Press OK when finished. The new setting is saved.
NOTE: Emergency Call. This cordless phone is not designed for making emergency telephone calls when
the power fails. Alternative arrangements should be made for access to emergency services.
or
DOWN
to select the value for the Hour/Minute and AM/PM (for 12-hour format only).
to set the next item.
Call
TIP: Use UP and
DOWN
to navigate the menus.
MAKING A CALL
This section describes the different ways to make a call.
NOTE: Signal Strength. Check the signal strength before making a call and during a call. For details, see
cChecking the signal strength on page 9.
1. Press
2. Dial the phone number. The number displays on the screen and is dialed out.
NOTE: Call Timer. During a call, the call timer displays the talk time of your current call.
NOTE: Low Battery. During a call, you will hear warning tones if your handset is almost out of battery.
Charge your handset as soon as possible or your call will be cut off. Placing the handset on the charger
will end the call. For details, see checking battery level on page 8.
for line 1 or for line 2.
Pre-dialing
Pre-dialing lets you view and make changes to the number before making the call.
1. Enter the phone number. The number displays on the screen. You can make changes before dialing out.
TIP: Press
Use
Press and hold
2. Press
TIP:
Press
DELETE
to erase a digit.
LEFT
and
RIGHT
to move the cursor.
to enter a pause. P displays on the screen.
to dial out the call on line 1 or to dial out on line 2.
DIAL
to auto-select a free line to make the call.
Redialing the last number
1. Press for line 1 or for line 2.
- 11 -
Page 16

Call
2. Press
Calling from the dialed list
Each handset stores the last 10 numbers (up to 32 digits) you have dialed. The most recent dialed number is stored at the top of the list.
For details on the dialed list, see
REDIAL
. The last dialed number displays on the screen and is dialed out.
Call Log on page 30.
LEFT
RIGHT
1. Press
2. Select the number you want.
3. Press
or
to dial out the call on line 1 or to dial out on line 2.
to enter the dialed list.
Calling from your phonebook
For details on the phonebook, see Phonebook on page 27.
1. Press
2. Select the phonebook you want. Press OK.
3. Select VIEW RECORD. Press OK.
4. Select the phonebook record you want.
5. Press
NAMES
.
to dial out the call on line 1 or to dial out on line 2.
Calling from the call log
The call log stores dialed, received, and missed calls. For details about the call log, see
- 12 -
Page 17

Call
Call Log on page 30.
1. Press
2. Select CALL LOG. Press OK.
3. Select the call log you want. Press OK.
4. Select the record you want.
5. Press
MENU
.
to dial out the call on line 1 or to dial out on line 2.
Speed dialing
Spend less time dialing! Speed dialing gives you the convenience of dialing a number by pressing a single key. To program a number
for speed dialing, see Assigning a speed dial key on page 28.
To make a call using speed dialing, during standby,
1. Press and hold the assigned key. The number displays on the screen and is dialed out on a free line.
ENDING A CALL
1. Press OR
Place the handset on the charger.
ANSWERING A CALL
When you receive a call, your phone rings.
TIP: When the phone is ringing, press
To turn off the ringer for all calls, press and hold
For details on ringer setting, see Setting your handset’s ringer on page 34.
SILENT
to turn off the ringer for the incoming call.
during standby. displays on the screen.
- 13 -
Page 18

Call
p
If the call is from line 1,
If the call is from line 2,
NOTE: Caller ID Service. You must subscribe to your telephone operators service.
TIP: Missed Call Alert. When a call is missed, your phone displays a missed call notification. Press OK for
more o
and the indicator on flash, press to answer.
and the indicator on flash, press to answer.
tions.
DURING A CALL
This section describes the features that are available during a call.
Making a second call on the same line
1. Press
2. Dial the number you want. The number displays on the screen and is dialed out.
if you are on line1 or press if you are on line 2. R displays on the screen.
Answering a second call on the same line
nd
2
NOTE:
Caller ID service, your phone will display the number of the second incoming call for a short period.while
During a call, your phone sounds a short beep periodically to notify you of an incoming call.
1. Press
Call waiting service. If you have subscribed to your telephone network operators Call Waiting
if the call is from line1 or press if the call is from line 2. You have put the first call on hold, and you are now
connected to the second call.
Toggling between two calls on the same line
1. Press
2. Select 2ND CALL to end the current call and connect to the other call. OR
3. Press OK.
OPTIONS
Select TOGGLE to put the current call on hold and connect to the other call.
.
Adjusting the earpiece volume
1. Press UP or
2. Press OK when finished.
DOWN
to adjust the volume during a call.
Muting the microphone
The mute feature allows you to speak to someone in the house privately.
1. Press
MUTE
during a call. The caller cannot hear you, but you can still hear the caller’s voice.
Un-muting the microphone
1. Press
UNMUTE
. You can now communicate with the caller.
Using handsfree
The handsfree feature lets you talk on the phone without holding onto the handset.
Use the speaker to involve everyone in the room in the conversation. Use the headset to talk privately with the caller.
Turning the speaker on/off
1. Press
2. Select SPEAKER.
3. Press OK.
OPTIONS
during a call.
- 14 -
Page 19

Using the headset
1. Plug the headset into the headset jack at the side of your handset.
DUAL LINE CALLS
Making a call on another line
While you are on a call, you can make a call on another line.
1. Press
2. Dial the number you wish to call. The number displays on the screen and is dialed out.
for line 1 or for line 2. Your call on the other line is placed on hold.
Answering a call on another line
While you are on a call, you can answer a call from another line.
1. Press
now connected to the caller from the other line.
if the call is from line1 or press if the call is from line 2. Your call on the other line is placed on hold. You are
Toggling between two calls on different lines
1. Press to talk on line 1 or to talk on line 2. The other line is placed on hold.
Call
- 15 -
Page 20

Intercom and Conference Calls
An intercom call is a call to another handset that shares the same base unit.
A conference call involves conversation between other handset(s) and outside caller(s).
TIP: Use UP and
CALLING ANOTHER HANDSET
NOTE: An intercom call can only involve 2 handsets.
DOWN
to navigate the menus.
1. Press
2. Select the handset you want.
3. Press OK. Wait for the other party to answer your call.
4. Press
TIP:
.
to cancel or end the intercom call.
To customize your intercom ringer, see Setting your handset’s ringer on page 34.
While you are on the phone
While talking on the phone, you can call another handset.
1. Press
2. Select the handset you want.
3. Press OK. Wait for the other party to answer your call.
during the call.
To return to the outside caller
You have to end the intercom call first.
1. Press
2. Select END INQUIRY.
3. Press OK.
TRANSFERRING A CALL
OPTIONS
.
1. Press during a call.
2. Select the handset you want. Press OK.
TIP: Quick Transfer. Press
within 30 seconds, the call will be directed back to your handset.
3. Press
after the other party answers your call. The outside call is now transferred to the other handset.
TRANSFR
. Your handset returns to standby. If the other party does not answer
MAKING A CONFERENCE CALL
TIP: Conference Options. During any kind of conference calls, you can access the OPTIONS menu for
other convenient functions and features.
- 16 -
Page 21

Intercom and Conference Calls
Making a dual line conference call
A dual line conference call is a call between you and 2 outside callers using both telephone lines on your phone.
You are on a call on both line 1 and 2, and you want to talk to both parties at the same time.
1. Press
2. Select CONFERENCE.
3. Press OK. You are now on a dual line conference call.
Making a 3-way conference call
A 3-way conference call is a call between you, an outside caller, and another handset user in your house.
NOTE: A 3-way conference call requires 2 handsets.
OPTIONS
while on the call on line 1 or line 2.
You are talking on the phone with an outside caller, and you want to involve another handset user in this conversation.
1. Press
2. Select the handset you want.
3. Press OK. Wait for the other party to answer your call.
4. Press
5. Select CONFERENCE.
6. Press OK. You are now on a 3-way conference call.
7. Press
during your call with the outside caller.
OPTIONS
after the other party picks up the call.
to end the conference call.
Making a 4-way conference call
A 4-way conference call is a call between you, 2 outside callers, and another handset user in the house.
A 4-way conference call requires 2 handsets.
NOTE:
You are on dual line conference call, and you want to involve another handset user in your house in this conversation.
1. Press
2. Select the handset you want.
3. Press OK. Wait for the other party to answer your call.
4. Press
5. Select CONFERENCE.
6. Press OK. You are now on a 4-way conference call.
7. Press
while on the dual line conference call.
OPTIONS
after the other party picks up the call.
to end the conference call.
- 17 -
Page 22

Text and Numbers
You can enter text and numbers for handset name, phonebook record, services record, text messaging, and others.
CHANGING THE LETTER CASE
The default setting is upper case.
1. Press
ENTERING TEXT AND NUMBERS
1. Find the key with the character you want.
2. Press it as many times as needed for the character to display on the screen.
TIP: Use
Figure 1: Upper case input table
Key Characters
0 0 . , : ; ? ! @ " ' ` %
1 space 1 $ £ € ¥ { } § ¡ ¿
2 A B C 2 Á À Ä Æ Ç
3 D E F 3 Ð É È
4 G H I 4 Í Ì
5 J K L 5
6 M N O 6 Ñ ó ò ö Ø Ω
7 P Q R S 7 ß
8 T U V 8 Ú Ù
9 W X Y Z 9 [ ] \ ^ | ~
* * # + - _ = ( ) < > / &
Figure 2: Lower case input table
Key Characters
0 0 . , : ; ? ! @ " ' ` %
1 space 1 $ £ € ¥ { } § ¡ ¿
2 a b c 2 á À ä æ ç
3 d e f 3 Ð É È Δ
4 g h i 4 Í Ì Γ
5 j k l 5
6 m n o 6 ñ ó ò ö ø Ω
7 p q r s 7 ß
8 t u v 8 Ú Ù Θ Ξ Π Φ Ψ
9 w x y z 9 [ ] \ ^ | ~
* * # + - _ = ( ) < > / &
ERASING TEXT AND NUMBERS
during editing. The next letter you enter will be in the alternate case.
LEFT
and
RIGHT
to move the cursor.
Δ
Γ
Λ К
Λ К
Θ Ξ Π Φ Ψ
Erasing a single character
1. Press
DELETE
to delete the character left of the cursor.
Erasing all characters
1. Press and hold
DELETE
to delete all the characters on screen.
- 18 -
Page 23

SMS Text Messaging (Australia only)
SMS, short messaging service, is a service for sending short text messages to other phones through a service centre. For details about
service centre, refer to Setting up SMS service centres on this page. At time of printing this user guide, SMS is only available in Australia
and only for calls made within the Telstra network.
SMS Service. Consult and subscribe from your service provider. SMS is supported on line 1 only.
NOTE:
TIP: SMS Menu Shortcut. Press and hold during standby. Use UP and
DOWN
to navigate the menus.
ACTIVATING SMS
If the SMS service is de-activated,
1. Press
2. Select SMS. Press OK.
3. Press
4. Enter the system PIN.
5. Press OK to confirm. SMS is activated.
MENU
ACTIVE
.
.
DEACTIVATING SMS
1. Press
2. Select SMS. Press OK.
3. Select SETTINGS. Press OK.
4. Select CLOSE SERVICE. Press OK. CONFIRM? is displayed.
5. Press
6. Enter the system PIN.
7. Press OK to confirm. SMS is deactivated.
MENU
.
YES
to confirm.
SETTING UP SMS SERVICE CENTRES
The text messages are sent and received through the SMS service centre. To assist in set up the service centre numbers have been
pre-programmed. These should not need to be changed.
SMS Centre 1 “183201983391”
SMS Centre 2 “01983391”
NOTE: SMS Service. If you normally have your Calling Number display blocked you must remove 1832 in
front of 01983391 in the SMS centre otherwise you can not send a text message. However you should be
aware that this will allow presentation of your phone number to the called party.
If for some reason the service center numbers are changed you will need to reenter the service centre number before you can start
sending and receiving messages. For the service centre number(s), consult your service provider.
Setting up the service centre
1. Press
2. Select SMS. Press OK.
3. Select SETTINGS. Press OK.
4. Select SERVICE CENTRE. Press OK.
5. Select SENDING or RECEIVING. Press OK.
Option What is it?
Sending The service centre for outgoing messages.
MENU
.
- 19 -
Page 24

SMS Text Messaging
Receiving The service centre for incoming messages.
6. Select a service centre. Press OK.
7. Enter the service centre number. Press
Repeat from step 5 to add more service centres.
Your phone supports up to 4 “sending” and 4 “receiving” service centres.
NOTE:
8. For the “sending” service centre, after you have entered the number for the centre, the DEFAULT SC menu will be
displayed.
Select a default sending service centre. Press OK.
All messages will be sent through the default service centre.
ABOUT MAILBOXES
Your phone supports 1 public mailbox and 9 private mailboxes. The public mailbox can be shared by everyone. The private mailboxes
are each protected by a customized password. Each mailbox (public or private) has an Inbox and Outbox.
What is it?
Inbox Store received messages.
Outbox Store saved (to be sent later) messages, sent messages, and messages with sending error.
Each mailbox has a name and sub-address. A sub-address is a 1-digit extension number that your caller adds to your telephone
number. It allows the caller to send you a text message directly to your personal mailbox. For example, Sam’s mailbox sub-address is
‘5’. If Tom wants to send a text message directly to Sam, then he has to add the digit ‘5’ to the phone number or specify the subaddress ‘5’ when sending the text message. To find out your mailbox sub-address, refer to Activating a private mailbox on page 20.
Sub-address Subscription. Consult and subscribe this service from your service provider.
NOTE:
SAVE
.
ORGANIZING THE PUBLIC MAILBOX
The public mailbox can be accessed by anyone using any of the handsets. You can change the sub-address and the access matrix.
Changing sub-address
You can change the public mailbox sub-address to an unassigned sub-address.
Changing the sub-address may affect SMS text message receiving.
NOTE:
1. Press
2. Select SMS. Press OK.
3. Select SETTINGS. Press OK.
4. Select MAILBOX. Press OK.
5. Enter the system PIN. Press OK to confirm.
6. Select the public mailbox. Press OK.
7. Select SUBADDRESS. Press OK.
8. Select the sub-address you want.
9. Press OK to confirm. The new setting is saved.
MENU
.
- 20 -
Page 25

SMS Text Messaging
Defining access matrix
The access matrix feature allows you to assign privileges and restrictions on selected handsets from accessing the public mailbox.
There are 2 access matrix options: on or off.
Option What is it?
On The selected handset cannot access the public mailbox.
Off The selected handset can access the public mailbox.
1. Press
2. Select SMS. Press OK.
3. Select SETTING. Press OK.
4. Select MAILBOX. Press OK.
5. Enter the system PIN. Press OK to confirm.
6. Select the public mailbox. Press OK.
7. Select ACCESS MATRIX. Press OK.
8. Select the handset to modify. Press OK.
9. Select the new setting.
10. Press OK to confirm. The new setting is saved.
ORGANIZING PRIVATE MAILBOX
A private mailbox is your personal mailbox. You can change the name and password.
Activating a private mailbox
1. Press
2. Select SMS. Press OK.
3. Select SETTINGS. Press OK.
4. Select MAILBOX. Press OK.
5. Enter the system PIN. Press OK to confirm.
6. Select a free mailbox. Press OK.
TIP: Sub-address. The digit in front of each mailbox is the sub-address. For example, 1-FREE.
7. Enter the name for the new mailbox. Press OK.
8. Enter a password (up to 8 digits) for the mailbox. Press OK.
9. Enter the password again for verification.
10. Press OK to confirm. The new mailbox is activated.
Logging in to a mailbox
Log in to your mailbox to access the supported functions. One handset can only log in to one private mailbox at a time. Log out from
the existing mailbox to access another one, refer to Logging out of a mailbox on page 21.
1. Press
2. Select SMS. Press OK.
3. Select PRIVATE. Press OK. UNKNOWN is displayed.
4. Press
5. Select the mailbox you want. Press OK.
6. Enter the mailbox password. Press OK to confirm.
Logging out of a mailbox
If you do not want others to access your mailbox, log out after using it.
1. Press
2. Select SMS. Press OK.
3. Select the mailbox you want to log out from. Press OK.
MENU
MENU
MENU
LOGIN
MENU
.
.
.
.
.
- 21 -
Page 26

SMS Text Messaging
g
g
p
4. Select LOGOUT. Press OK. CONFIRM? is displayed.
5. Press
Changing mailbox name
1. Press
2. Select SMS. Press OK.
3. Select SETTINGS. Press OK.
4. Select MAILBOX. Press OK.
5. Enter the system PIN. Press OK to confirm.
6. Select the mailbox you want. Press OK.
7. Select CHANGE NAME. Press OK.
8. Edit the name.
9. Press OK when finished. The new setting is saved.
Changing mailbox password
1. Press
2. Select SMS. Press OK.
3. Select the mailbox you have already logged in to. Press OK.
4. Select PROFILE. Press OK.
5. Select PASSWORD. Press OK.
6. Enter the new password (up to 8 digits). Press OK to confirm.
7. Enter the new password again for verification.
8. Press OK to confirm. The new password for the mailbox is saved.
Closing a mailbox
You can permanently close a mailbox if you no longer want to use it anymore.
1. Press
2. Select SMS. Press OK.
3. Select SETTINGS. Press OK.
4. Select MAILBOX. Press OK.
5. Enter the system PIN. Press OK to confirm.
6. Select the mailbox to close. Press OK.
7. Select CLOSE MAILBOX. Press OK. CONFIRM? is displayed.
8. Press OK to confirm. The mailbox is closed.
NOTE: After closing a mailbox, all messages in the mailbox will be deleted and cannot be recovered.
YES
to confirm. You have logged out from the mailbox.
MENU
.
MENU
.
MENU
.
SETTING NEW MESSAGE ALERT
When you received a new text message, your phone displays a new SMS notification. Press OK for more options.
NOTE: Private Mailbox SMS Alert. You will only receive alert from the private mailbox that you are currently
ed in to.
lo
NOTE: Public Mailbox SMS Alert. You will only receive alert from the public mailbox if you are not currently logged
rivate mailbox.
in to a
Your phone can also give you an audio alert when a new text message is received.
1. Press
2. Select SMS. Press OK.
3. Select SETTINGS. Press OK.
4. Select ALERT TONE. Press OK.
MENU
.
- 22 -
Page 27

5. Select the new setting.
and
Y
6. Press OK to confirm. The new setting is saved.
READING AND RETRIEVING MESSAGES
1. Select INBOX after you log in to a mailbox.
2. Press
DETAILS
to view the entire message.
RETURNING A CALL TO THE SENDER
1. Press or while reading a message in detail then select and confirm REPLY of OPTION. Your call will be connected
to the sender.
COMPOSING AND SENDING MESSAGES
NOTE: Incoming Call. If there is an incoming call when you are composing a message, your phone will
automatically save the draft in the outbox. You can retrieve the draft after answering the call.
our phone can only save the first 160 characters of a long message in a draft. For backup, you need to save
the entire message manually before an incoming call comes in.
SMS Text Messaging
Composing messages
A single text message can have up to 160 characters. If your message is longer than 160 characters, it is considered a long message
and maybe handled differently by your service provider. A long message can have up to 612 characters. For details, consult your
service provider. There may be a cost difference on sending long messages.
1. Press
2. Select SMS. Press OK.
3. Select and log in to the mailbox that you want to send the message from.
4. Select COMPOSE.
TIP:
fax number to send your message as an email or fax.
5. Enter your message.
NOTE: Text and Number Editing. See Text
TIP:
functions. Your phone might not support all options.
Select SAVE to send your message later.
Select LANGUAGE to change the input language.
Select TEMPLATE to insert a pre-programmed message.
Select EXIT COMPOSE to cancel composing.
MENU
.
Send as E-mail or Fax. Before composing your message, press
Numbers on page 17.
Options while composing. While composing your message, press
INSERT
to insert an email address or
OPTIONS
to access more
6. Press
OPTIONS
when you finish writing the message.
7. Select SEND. Press OK.
8. Enter the number. Press OK. Your message is sent. If you have subscribed for extra SMS services, follow the on-screen
instruction.
Extra SMS Services. Your service provider may offer extra services such as status report and
NOTE:
message sending expiry time. Consult and subscribe these services from your service provider.
- 23 -
Page 28

SMS Text Messaging
Modifying a template message
Your phone comes with 5 pre-programmed template messages. You can insert these messages while you are composing. You can
also edit these messages.
1. Press
2. Select SMS. Press OK.
3. Select TEMPLATE. Press OK.
4. Select the template message you want.
5. Press
6. Press
7. Press
NOTE:
MENU
.
DETAILS
EDIT
SAVE
After reset, modified templates will not be restored back to the factory pre-programmed ones.
to view the entire template.
. Start editing.
when finished.
Replying a message
1. Press
2. Select REPLY. Press OK.
3. Enter your message.
4. Press
5. Select SEND. Press OK.
6. Edit the number if necessary. Press
OPTIONS
OPTIONS
the on-screen instruction.
while reading the message.
when you finish writing the message.
SEND
. Your message is sent. If you have subscribed for extra SMS services, follow
Forwarding a message
1. Press
2. Select FORWARD. Press OK.
3. Enter the recipient’s number. Press
OPTIONS
on-screen instruction.
while reading the message.
SEND
. Your message is sent. If you have subscribed for extra SMS services, follow the
Copying a message
You can send an extra copy of a message from one mailbox to the other.
1. Press
2. Select COPY TO. Press OK.
3. Select the mailbox you want to copy to.
4. Press OK. Your message is copied.
OPTIONS
while reading the message.
Moving a message
You can move a message from one mailbox to the other. The moved message will be deleted from the original mailbox.
1. Press
2. Select MOVE TO. Press OK.
3. Select the mailbox you want to move to.
4. Press OK. Your message is moved.
DELETING A MESSAGE
1. Press
2. Select DELETE. Press OK. CONFIRM? is displayed.
3. Press
OPTIONS
OPTIONS
YES
while reading the message.
while reading the message.
to confirm. The message is deleted.
- 24 -
Page 29

SMS Text Messaging
DELETING ALL MESSAGES
1. Press
2. Select DELETE ALL. Press OK. CONFIRM? is displayed.
3. Press
CHECKING THE MAILBOX MEMORY STATUS
Your phone keeps track of the number of messages you have stored on the phone. You can check the memory status and find out how
many messages you can still receive and store.
1. Press
2. Select SMS. Press OK.
3. Select MEMORY STATUS. Press OK. The status is displayed.
4. Press OK when finished.
OPTIONS
YES
MENU
while reading any of the messages in the mailbox.
to confirm. All messages are deleted.
.
- 25 -
Page 30

Voicemail Indication and Notifications
Voicemail indication and notifications are voicemail-related services. These services are provided by your service provider. For details
and subscription, consult your service provider.
TIP: Use UP and
VOICEMAIL INDICATION
Voicemail indication is a visual voicemail alert. On this phone, you see an envelope icon when there is a voicemail waiting in your
mailbox(es). The envelope
on page 42.
Retrieving voicemail(s)
To retrieve your voicemail(s), consult your service provider.
Clearing the voicemail indicator
After checking your voicemail(s), your service provider will clear the voicemail indicator or if need be you can clear it manually from
the menu.
1. Press
2. Select CALL LOG. Press OK.
3. Select RESET. Press OK.
4. Select VMWI. Press OK. CONFIRM? is displayed.
5. Press
NOTIFICATIONS
Notification is an enhancement to the voicemail indication service. Notification provides a visual voicemail alert and the caller number.
Reviewing and retrieving notification(s)
1. Press
2. Select CALL LOG. Press OK.
3. Select NOTIFICATION. Press OK.
4. Select the record you want.
DOWN
to navigate the menus.
icon may also appear if you have received other new messages. For details, see New message indication
MENU
.
YES
to confirm. The voicemail indicator is cleared.
MENU
.
5. Press
or to retrieve the message(s). Follow the instruction from the service centre.
Deleting a notification record
1. Press
2. Select CALL LOG. Press OK.
3. Select NOTIFICATION. Press OK.
4. Select the record you want to delete.
5. Press
6. Press
MENU
.
DELETE
. CONFIRM? is displayed.
YES
to confirm. The record is deleted.
Deleting all notification records
1. Press
2. Select CALL LOG. Press OK.
3. Select RESET. Press OK.
4. Select NOTIFICATION. Press OK. CONFIRM? is displayed.
5. Press
MENU
.
YES
to confirm. All records are deleted.
- 26 -
Page 31

Phonebook
Your phone has 2 phonebooks providing you with convenience and privacy. Each phonebook record can have a name of up to 15
characters long and a number of up to 32 digits long.
What is this? Stored records
Public It is a shared phonebook stored in the base.
All handsets sharing the same base unit can
access the public phonebook.
Private It is a personal phonebook stored on each
handset. Each handset has its own private
phonebook.
Use
UP
and
DOWN
TIP:
to navigate the menus.
VIEWING THE PHONEBOOK
1. Press
2. Select the phonebook you want – Private or Public. Press OK.
3. Select VIEW RECORD. Press OK.
4. Select the record you want, and press
NAMES
to enter the phonebook menu.
DETAILS
to view the information of the record.
Searching a record
You can search the phonebook by scrolling or by searching the first character.
Searching by scrolling
1. While at the phonebook, press UP or
DOWN
to scroll.
Searching by the first character
1. While at the phonebook, press the digit key that contains the character that you want to search.
During a call
You can access the private phonebook during a call.
1. Press
2. Select PHONEBOOK. Press OK.
OPTIONS
during a call.
CALLING FROM THE PHONEBOOK
You can make a call directly from the phonebook while you are viewing it.
Calling directly from the phonebook
See Calling from your phonebook on page 13.
During a call
You can access the private phonebook during a call and make another call.
1. Press
2. Select PHONEBOOK. Press OK.
3. Select the record you want.
OPTIONS
during a call.
Up to 50
Up to100
4. Press
for line 1 or for line 2. Your call on the other line is placed on hold.
- 27 -
Page 32

Call Log
g
g
t
You can save information such as an account number, password, etc. as a phonebook record. For
TIP:
example, when you are prompted to enter the password during telephone banking, you can simply select the
record, and send out the number on the same line.
NOTE: 2nd Call Service. Consult and subscribe from your service provider.
Editing before calling
You can make changes, such as inserting a PABX prefix or international code, before dialing out a record.
1. Press
2. Select USE NUMBER. Press OK.
3. Edit the number.
4. Press
TIP: Press
ADDING A RECORD
NOTE: Memory Full. If your phonebook is full, a notification displays. Delete unnecessary records before
addin
1. Press
2. Select the phonebook you want – Private or Public. Press OK.
3. Select NEW ENTRY. Press OK.
4. Enter the name. Press OK.
NOTE:
NOTE:
5. Enter the number. Press OK.
TIP: Pause. Press and hold to insert a pause.
6. Press
TIP: VIP Melody. If you have assigned a VIP melody for a private phonebook record, the selected melody
will be played when you receive a call from this caller. You can tell who is calling when the phone rings.
This feature only works if you have Caller ID service.
OPTIONS
new ones.
NAMES
Text and Number Editin
Duplicate Name. Phonebook records with identical names cannot be saved.
For the public phonebook, your new record is saved.
For the private phonebook, go to step 6.
LEFT
while viewing the details of a phonebook record.
to dial out the call on line 1 or to dial out on line 2.
DIAL
to auto-select a free line to make the call.
to enter the phonebook menu.
or
. See Tex
RIGHT
to select a VIP melody for the record.
and Numbers on page 17.
7. Press OK. Your new record is saved.
- 28 -
Page 33

Call Log
Copying a record
You can copy a private phonebook record to the public phonebook and vice versa.
1. Press
2. Select TO PRIVATE or TO PUBLIC. Press OK.
3. Edit the name if necessary. Press OK.
4. Edit the number if necessary. Press OK.
5. Press
6. Press OK. Your record is copied.
EDITING A RECORD
1. Press
2. Select EDIT. Press OK.
3. Edit the name. Press OK.
4. Edit the number. Press OK.
5. Press
6. Press OK. Your edited record is saved.
DELETING A RECORD
1. Press
2. Select DELETE. Press OK. CONFIRM? is displayed.
3. Press
DELETING ALL RECORDS
1. Press
2. Select the phonebook you want – Private or Public. Press OK.
3. Select DELETE ALL. Press OK. CONFIRM? is displayed.
4. Press
USING SPEED DIAL
Spend less time dialing! Speed dialing gives you the convenience of dialing a number in your private phonebook by pressing a single
key. This is a private phonebook feature only.
Assigning a speed dial key
The digit keys [4] to [9] can each be used as a one touch speed dial key.
1. Press
2. Select PRIVATE. Press OK.
3. Select QUICK DIAL. Press OK. The top row displays the key currently selected.
4. Press
5. If the key is EMPTY, press
6. Select the phonebook record for the speed dial key.
7. Press
8. Press OK. The speed dial key is programmed.
OPTIONS
If copying to the public phonebook, your record is copied.
If copying to the private phonebook, go to step 5.
LEFT
OPTIONS
For the public phonebook, your edited record is saved.
For the private phonebook, go to step 5.
LEFT
OPTIONS
YES
NAMES
YES
NAMES
UP
If a phonebook record is already assigned to the key, press
DETAILS
while viewing the details of a phonebook record.
or
RIGHT
to select a VIP melody for the record.
while viewing the details of a phonebook record.
or
RIGHT
to select a VIP melody for the record.
while viewing the details of a phonebook record.
to confirm. The record is deleted.
to enter the phonebook menu.
to confirm. All records are deleted.
to enter the phonebook menu.
or
DOWN
to select a speed dial key you want.
CHANGE
.
.
OPTIONS
. Select CHANGE, and then press OK.
- 29 -
Page 34

Call Log
Making a call
After assigning a speed dial key, you can start making calls using speed dial.
1. Press and hold the assigned key during standby. The number displays on the screen and is dialed out on a free line.
Cancelling a speed dial key
If you no longer wish to use a speed dial key, you can cancel the key.
1. Press
2. Select DELETE. Press OK. CONFIRM? is displayed.
3. Press
CHECKING THE MEMORY STATUS
Your phone keeps track of the number of records you have stored on the phone. You can check the memory status and find out how
many records you can still store.
1. Press
2. Select the phonebook you want – Private or Public. Press OK.
3. Select MEMORY STATUS. Press OK. The status is displayed.
4. Press OK when finished.
OPTIONS
YES
NAMES
while viewing the selected speed dial key.
to confirm. The speed dial key is cancelled.
to enter the phonebook menu.
- 30 -
Page 35

Call Log
g
The call log stores the call history of all the missed, received, and dialed calls.
Calls What is this? Stored records
Missed Calls that you received but did not answer. Up to 70
Received Calls that you received and answered. Up to 30
Dialed Calls that you have made. Up to 10
The call history includes information of the caller name, number, call time, and date.
The call log also saves a call duration summary for the last call, each individual call log (received, dialed), and all calls.
TIP: Use UP and
VIEWING THE CALL RECORDS
1. Press
2. Select CALL LOG. Press OK.
3. Select the call log you want. Press OK.
4. Select the call record you want. Press
TIP: Call Log Shortcut.
Missed Call Log. Press
MISSED CALLS.
Dialed Call Lo
MAKING A CALL
MENU
DOWN
to navigate the menus.
.
UP
or
DOWN
. Press
LEFT
or
DETAILS
during standby to enter the MESSAGE menu, and then select
RIGHT
during standby.
to view the details of the record.
Call Log
Returning a call
To return a call from the missed or received call logs, see Calling from the call log on page 13.
Redialing a call
To make a call that you have made previously, see Calling from the dialed list on page 13.
Editing before calling
You can make changes, such as inserting a PABX prefix or international code, before dialing out a record.
1. Press
2. Select USE NUMBER. Press OK.
3. Edit the number.
4. Press
TIP: Press
OPTIONS
while viewing the details of a call record.
to dial out the call on line 1 or to dial out on line 2.
DIAL
to auto-select a free line to make the call.
Sending a text message
1. Press
2. Select SEND SMS. Press OK.
OPTIONS
For details on composing a text message, refer to Composing messages on page 23.
while viewing the details of a call record.
- 31 -
Page 36

Call Log
SAVING A CALL RECORD TO YOUR PHONEBOOK
1. Press
2. Select TO PRIVATE or TO PUBLIC. Press OK.
3. Edit the name if necessary. Press OK.
4. Edit the number if necessary. Press OK.
5. Press
6. Press OK. Your record is saved.
DELETING A CALL RECORD
1. Press
2. Select DELETE. Press OK. CONFIRM? is displayed.
3. Press
DELETING ALL RECORDS
1. Press
2. Select CALL LOG. Press OK.
3. Select RESET. Press OK.
4. Select the call log you want. CONFIRM? is displayed.
5. Press
CALL TIMER
The call time is the duration of the calls you have made and received. It helps you keep track of how long you have talked on the phone.
The call durations for the last call, each individual call log (received, dialed), and all calls are saved.
Reviewing the call timer
1. Press
2. Select CALL LOG. Press OK.
3. Select CALL TIMERS. Press OK.
4. Select the call log you want. Press OK.
Resetting the call timer
1. Press
2. Select CALL LOG. Press OK.
3. Select CALL TIMERS. Press OK.
4. Select RESET ALL. Press OK. CONFIRM? is displayed.
5. Press
LOG OPTION
You can customize your call log to tailor to your needs. You can choose to save the call history for missed and received calls (LOG ALL)
or missed calls only (MISSED ONLY).
1. Press
2. Select CALL LOG. Press OK.
3. Select LOG OPTION. Press OK.
4. Select the option you want. Press OK.
OPTIONS
If saving to the public phonebook, your record is saved.
If saving to the private phonebook, go to step 5.
LEFT
OPTIONS
YES
MENU
YES
MENU
MENU
YES
MENU
while viewing the details of a call record.
or
RIGHT
to select a VIP melody for the record.
while viewing the details of a call record.
to confirm. The record is deleted.
.
to confirm. All records are deleted.
.
.
to confirm. The call timers for all the call logs are cleared.
.
- 32 -
Page 37

Services Directory
t
Help is only a “key-press” away.
The services directory stores up to 20 service records. Your service provider can store some commonly used service commands, such
as call forwarding, call centre, voicemails, on your phone. For details consult your service provider.
Each service record can have a name of up to 15 characters long and a number of up to 32 digits long.
TIP: Use UP and
VIEWING THE DIRECTORY
1. Press .
2. Select VIEW. Press OK.
3. Select the service record you want. Press
CALLING FROM THE DIRECTORY
1. Press .
2. Select VIEW. Press OK.
3. Select the service record you want.
DOWN
to navigate the menus.
DETAILS
for more information.
4. Press
TIP: Service Record Speed Dial. Digit keys [1] and [2] are assigned speed dial keys for service records 1
and 2 respectively. Press and hold
to dial out the call on line 1 or to dial out on line 2.
or during standby to dial out service record 1 or 2.
ADDING A RECORD
You can add other commonly used service numbers in your phone.
1. Press
2. Select VIEW. Press OK.
3. Select an EMPTY service record. Press
4. Press
5. Enter the name. Press OK.
NOTE: Text and Number Editing. See Tex
6. Enter the number.
7. Press OK. Your new record is saved.
TIP: Pause. Press and hold to insert a pause.
EDIT
.
DETAILS
.
and Numbers on page 17.
.
- 33 -
Page 38

Services Directory
p
EDITING A RECORD
Service records
NOTE:
DELETING A RECORD
DELETING ALL RECORDS
1. Press
2. Select EDIT. Press OK.
3. Edit the name. Press OK.
4. Edit the number.
5. Press OK. Your edited record is saved.
NOTE: Service records pre-set by the factory cannot be deleted.
1. Press
2. Select DELETE. Press OK. CONFIRM? is displayed.
3. Press
OPTIONS
OPTIONS
YES
to confirm. The record is deleted.
re-set by the factory cannot be edited.
while viewing the details of a service record.
while viewing the details of a service record.
1. Press .
2. Select RESET. Press OK. CONFIRM? is displayed.
3. Press
NOTE: Service records pre-set by the factory cannot be deleted.
YES
to confirm. All records are deleted.
- 34 -
Page 39

Custom Options
Make this your handset – change the look and sound to suit your needs and tastes. From the display to sound, this section shows you
how to set your preference.
MENU
MENU
MENU
DOWN
to navigate the menus.
.
.
.
TIP: Use UP and
PERSONALIZING YOUR PHONE’S DISPLAY
Naming your handset
Every handset can have its own name. It displays on the screen during standby.
1. Press
2. Select SETTINGS. Press OK.
3. Select HANDSET NAME. Press OK.
4. Edit the name.
5. Press OK when finished. The new setting is saved.
Setting your language
This section only applies to model(s) with multiple language support. This menu is suppressed in model(s) with single language
support.
Language is the text you see on the screen.
1. Press
2. Select SETTINGS. Press OK.
3. Select LANGUAGE. Press OK.
4. Select the new setting.
5. Press OK when finished. The new setting is saved.
Adjusting LCD contrast
Contrast is the intensity of the text and background colour displayed on the screen. Adjusting the contrast changes the darkness of the
text and background colour.
1. Press
2. Select SETTINGS. Press OK.
3. Select CONTRAST. Press OK.
4. Select the new setting. You see the new contrast while scrolling.
5. Press OK when finished. The new setting is saved.
PERSONALIZING YOUR PHONE’S SOUNDS
Setting your handset’s ringer
Your handset has 3 ringers: line 1 ringer, line 2 ringer, intercom ringer. You can change the melody and volume of each ringer.
1. Press
2. Select SETTINGS. Press OK.
3. Select SOUNDS. Press OK.
4. Select the ringer you want.
5. Press
6. Press
7. Press
8. Press OK when finished. The new setting is saved.
MENU
.
LEFT
or
RIGHT
DOWN
to set the next item.
LEFT
or
RIGHT
to select the volume level.
to select the melody.
- 35 -
Page 40

Custom Options
Setting the key tone
Key tone is the sound you hear when you press a key on your handset.
1. Press
2. Select SETTINGS. Press OK.
3. Select SOUNDS. Press OK.
4. Select KEY TONE. Press OK.
5. Select the new setting.
6. Press OK when finished. The new setting is saved.
Setting the handset tones
Handset tones will sound upon a successful or unsuccessful operation.
1. Press
2. Select SETTINGS. Press OK.
3. Select SOUNDS. Press OK.
4. Select HANDSET TONE. Press OK.
5. Select the new setting.
6. Press OK when finished. The new setting is saved.
Enhancing the audio quality
Your phone has an equalizer just like your home stereo system. The equalizer improves the receiver’s sound quality by altering the
treble or bass setting.
1. Press
2. Select SETTINGS. Press OK.
3. Select SOUNDS. Press OK.
4. Select EQUALIZER. Press OK.
5. Select the new setting.
6. Press OK when finished. The new setting is saved.
MENU
MENU
MENU
.
.
.
- 36 -
Page 41

Your Digital Assistant
Your handset is not only a phone, but your best assistant. From the alarm clock to the countdown timer, it can assist you in many ways.
Use
UP
and
DOWN
TIP:
THE ALARM CLOCK
Use your phone as an alarm clock to wake you up from your sleep. You can have different alarm settings for each handset.
Setting the alarm clock
1. Press
2. Select EXTRAS. Press OK.
3. Select ALARM CLOCK. Press OK.
4. Select ON. Press OK.
5. Press
6. Press
7. Press OK when finished. The alarm clock is set. You see an alarm icon during standby.
MENU
LEFT
DOWN
or
Turning off the alarm clock
When the alarm clock rings
1. Press
NOTE:
minutes. The alarm clock will snooze for 5 times only.
STOP
Press
SNOOZE
If you do not press any key after the alarm clock rings for 1 minute, it will snooze and ring again in 10
to navigate the menus.
.
RIGHT
to select the hour/minute.
to set the next item.
to turn off the alarm clock OR
. The alarm clock will ring again in 10 minutes.
Before the alarm clock rings
1. Press
2. Select EXTRAS. Press OK.
3. Select ALARM CLOCK. Press OK.
4. Select OFF. Press OK.
THE STOPWATCH
The stopwatch allows you to measure the exact timing of an event.
MENU
.
Starting the stopwatch
1. Press
2. Select EXTRAS. Press OK.
3. Select STOPWATCH. Press OK.
4. Press
TIP:
Press
Press
Press
Press
Press
MENU
.
START
to start the stopwatch.
PAUSE
to stop the stopwatch temporarily.
RESUME
STOP
RESET
CANCEL
to restart the stopwatch from the previous time.
to stop the stopwatch.
to set the stopwatch to 000:00:00:0.
to exit from the stopwatch.
- 37 -
Page 42

Your Digital Assistant
THE COUNTDOWN TIMER
The timer keeps track of the time and alerts you when the time ends.
Setting the timer
1. Press
2. Select EXTRAS. Press OK.
3. Select TIMER. Press OK.
4. Select ON. Press OK.
5. Press
6. Press
7. Press OK when finished. The timer starts counting.
Turning off the timer
When the timer expires
The handset rings when the timer expires. To turn off the timer,
1. Press
NOTE: If you do not turn off the timer, it will turn off after 1 minute.
Before the timer expires
1. Press
2. Select EXTRAS. Press OK.
3. Select TIMER. Press OK. TURN IT OFF? is displayed.
4. Press
MENU
.
LEFT
or
RIGHT
to select the hour/minute/second.
DOWN
to set the next item.
STOP
.
MENU
.
YES
. The timer is turned off.
- 38 -
Page 43

Calling Features
Your phone supports a number of call-related features to help you handle and manage your calls more effectively and conveniently.
Use
UP
and
DOWN
TIP:
AUTO ANSWER
Auto answer enables you to answer an incoming call by simply picking up the handset from the charging cradle. You do not need to
press a key to answer the call.
Activating/Deactivating auto answer
1. Press
2. Select SETTINGS. Press OK.
3. Select CALL SERVICES. Press OK.
4. Select AUTO ANSWER. Press OK.
5. Select the new setting.
6. Press OK. The new setting is saved.
DO NOT DISTURB
“Do not disturb” turns off all the ringers of your handset. Your handset will not ring when it receives a call.
MENU
Activating/Deactivating do not disturb
1. Press
2. Select SETTINGS. Press OK.
3. Select CALL SERVICES. Press OK.
4. Select DO NOT DISTURB. Press OK.
5. Select the new setting.
6. Press OK. The new setting is saved.
TIP: Do Not Disturb Shortcut. Press and hold during standby.
RECALL SELECTION
Recall is a signal that needs to be sent when using some of the calling features such as making or answering a second call. Your
phone supports different recall signals. You can make changes depending on the requirements. Your phone shall already be set up for
use in your country. For details, consult your service provider.
MENU
Selecting recall duration
1. Press
2. Select ADVANCED. Press OK.
3. Select RECALL. Press OK.
4. Select the new setting.
5. Press OK. The new setting is saved.
PAUSE SELECTION
A pause is a break you can enter when making a call. A pause is used for calls such as PABX and operator services. Your phone
supports different pause durations. For details, consult your service provider
MENU
Selecting pause duration
1. Press
2. Select ADVANCED. Press OK.
MENU
to navigate the menus.
.
.
.
.
- 39 -
Page 44

Calling Features
3. Select PAUSE. Press OK.
4. Select the new setting.
5. Press OK. The new setting is saved.
PREFIX INSERTION
The prefix insertion feature automatically adds a prefix before a number that you have defined. Your phone checks if the number you
have dialed matches with the number you have defined in the menu. If it matches, the prefix you have defined will be added. If it doesn’t
match, the prefix will not be added.
For example, you set the prefix “604” and the number “555”. When you make a call “5551212”, “604” will be added before the number,
and then “6045551212” will be dialed out.
You can program up to 3 prefix/number combinations.
Activating prefix insertion
1. Press
2. Select ADVANCED. Press OK.
3. Select PREFIX. Press OK.
4. Enter the system PIN. Press OK.
5. Select the prefix you want to set.
6. Press
7. Enter the prefix (up to 8 digits) you want to insert. Press
8. Enter the number (up to 8 digits) for checking.
TIP: Leave the number blank if you want the prefix to be inserted to all outgoing calls.
9. Press OK when finished. The new setting is saved.
Deactivating prefix insertion
1. Press
2. Select ADVANCED. Press OK.
3. Select PREFIX. Press OK.
4. Enter the system PIN. Press OK.
5. Press
6. Press OK when finished. The new setting is saved.
PABX PREFIX
If you are connecting your phone to a PABX, you may need to enter an access code (e.g. 0) in order to get an outside line. You may
also need to enter a pause in the dialing sequence to allow time for the PABX to pick up an outside line.
The PABX prefix feature on this phone inserts and dials the PABX access code (up to 8 digits) and a pause before each call.
Setting up the PABX prefix
1. Press
2. Select ADVANCED. Press OK.
3. Select PABX. Press OK.
4. Enter the system PIN 0000. Press OK.
5. Press
6. Enter the PABX access code. Then Press and hold
7. Press OK when finished. The new setting is saved.
MENU
LEFT
MENU
LEFT
MENU
LEFT
.
or
.
or
.
or
RIGHT
to select ON. Press
RIGHT
to select OFF.
RIGHT
to select ON. Press
DOWN
DOWN
.
DOWN
.
.
to enter a pause. P displays on the screen.
- 40 -
Page 45

Deactivating the PABX prefix
1. Press
2. Select ADVANCED. Press OK.
3. Select PABX. Press OK.
4. Enter the system PIN. Press OK.
5. Press
6. Press OK when finished. The new setting is saved.
CALL BARRING
The call barring feature allows you to restrict or block selected handset(s) from dialing out certain numbers.
NOTE: The call barring feature does not affect receiving incoming calls, making emergency calls or
intercom calls.
Your phone supports 4 call barring options.
Option What is it?
Off Call barring is deactivated.
All All calls are blocked except emergency number(s).
Exempt All calls are blocked except the numbers defined and emergency number(s).
Bar Only the defined number is blocked.
MENU
LEFT
.
or
RIGHT
to select OFF.
Activating call barring
1. Press
2. Select ADVANCED. Press OK.
3. Select CALL BARRING. Press OK.
4. Enter the system PIN. Press OK.
5. Select the handset you want to block. Press OK.
6. Press
7. Enter the number (up to 5 digits) for the EXEMPT or BAR option only.
8. Press OK when finished. The new setting is saved.
MENU
LEFT
.
or
RIGHT
to select the new setting. Press
DOWN
.
Deactivating call barring
1. Press
2. Select ADVANCED. Press OK.
3. Select CALL BARRING. Press OK.
4. Enter the system PIN. Press OK.
5. Select the handset you want to deactivate. Press OK.
6. Press
7. Press OK when finished. The new setting is saved.
MENU
LEFT
.
or
RIGHT
to select OFF.
Calling Features
- 41 -
Page 46

Extra Features
Discover and explore the additional features your phone offers! Find out how these features can benefit you and help you make the
most from your phone.
TIP: Use UP and
DIRECT PAGING
Direct paging works like a one-way walkie-talkie phone. It allows you to talk to another handset user by a single press on a key.
Defining a target handset
You can program a handset that you always call. After programming, you can call this handset directly by a single press on a key.
1. Press and hold
2. Select the target handset. Press OK.
Making a direct page
You can talk to the other handset user after the connection is established. The other handset user can hear you, but the user cannot talk
to you directly. The other handset user can make a direct page and talk to you after ending the current page.
1. Press
2. Press
CALL CAMPING
When you are trying to make a call and the line is occupied by another handset, you can ask your phone to notify you when the line
becomes free.
Activating call camping
1. When you are trying to make a call and the line is busy, wait for a few seconds until “CALL CAMPING?” is displayed.
2. Press
When the line is free, your handset rings and displays “CAMPING CALL”.
3. Press OK to make a call OR
Press NO to cancel if you do not want to make a call now.
KEYPAD LOCK
You can lock the keypad to prevent accidental presses on the handset while you are carrying it around.
Locking the keypad
1. Press and hold . The keypad is locked, and is displayed.
Unlocking the keypad
1. Press
2. Press OK to confirm. The keypad is unlocked.
TIP: Keypad Unlock Shortcut. Press and hold .
MISSING HANDSET(S)
DOWN
to navigate the menus.
DIRECT PAGE
DIRECT PAGE
YES
to camp on the line.
UNLOCK
. Start talking after the connection is established.
to end the direct page.
. UNLOCK? is displayed.
.
1. Press on the base unit. All the handsets connected to this base unit ring.
2. Press
Press
on the base unit again to stop paging. All the handsets stop ringing OR
STOP
on each handset to stop the paging of each handset.
- 42 -
Page 47

Extra Features
NEW MESSAGE INDICATION
Your phone notifies you with an envelope icon when you have received a new missed call, text (SMS) message, voicemail or
notification.
Reviewing the indication
1. When you see , press UP or
you the type and number of new messages you have received.
MESSAGE
11: MISSED CALLS
07: SMS
01: NOTIFICATION
03: VMWI
OK EXIT
For details on retrieving these messages, refer to the respective sections.
DOWN
during standby to enter the new message screen. The new message screen shows
- 43 -
Page 48

The System
Use
UP
and
DOWN
TIP:
REVIEWING/SELECTING YOUR COUNTRY
The country setting of your phone has been set during the initial set up of your phone. You can review the current country setting on
your phone.
1. Press
2. Select SYSTEM. Press OK.
3. Select COUNTRY SETTINGS. Press OK.
4. Press OK when finished.
If you want to make changes to the country setting, you have to first reset your phone (refer to Resetting to default settings on page 46).
For instruction on selecting country after reset, refer to Selecting your country on page 9.
MENU
REGISTERING YOUR HANDSET(S) WITH ADDITIONAL BASE
This section shows you how to register your handset to additional base unit(s). If your handset displays NOT REG, refer to Registering your
handset on page 9.
1. Press
2. Select SYSTEM. Press OK.
3. Select REGISTER. Press OK.
4. Select the base number you want. Press OK. This base number will be assigned to the base unit you are about to register
5. Enter the system PIN. Use
6. Press OK to confirm. Your handset starts searching for the base.
7. Press
NOTE: Each handset can register up to 4 base units. After registering 4 base units, your handset
registration memory is full. When you register to an additional base unit, your new registration will replace
an old one.
MENU
to.
PAGE
completed within 30 seconds.
to navigate the menus.
.
.
DELETE
to make correction.
on the base unit for 4 seconds. The base unit sounds 2 short beeps. The registration process shall be
SELECTING A BASE UNIT
You can switch your handset between different base units if your handset has registered to these base units. For your convenience, you
can program the handset to automatically connect to the closest base unit. You can also program the handset to only connect to a
fixed base unit you have specified.
1. Press
2. Select SYSTEM. Press OK.
3. Select SELECT BASE. Press OK.
4. Select the base unit you want or select AUTO if you want your handset to automatically connect to the closet base unit.
5. Press OK. The new setting is saved.
MENU
.
DELETING A HANDSET
Use one handset to delete (de-register) another handset that shares the same base unit.
1. Press
2. Select SYSTEM. Press OK.
3. Select DELETE HANDSET. Press OK.
4. Select the handset you want to delete. Press OK.
MENU
.
- 44 -
Page 49

The System
5. Enter the system PIN. Use
6. Press OK. The handset is deleted.
DELETE
to make correction.
DEFINING LINE MATRIX
The line matrix feature allows you to assign privileges and restrictions on selected handsets from making and receiving calls.
Your phone supports 5 line matrix options.
Option What is it?
Line 1 In Line 1 response on receiving calls.
Line 2 In Line 2 response on receiving calls.
Line 1 Out Line 1 privilege on making calls.
Line 2 Out Line 2 privilege on making calls.
Ring Count This is the number of rings before a handset will ring and/or can answer a call.
This is used for Line 1 In and Line 2 In matrix option.
1. Press
2. Select SYSTEM. Press OK.
3. Select LINE MATRIX. Press OK.
4. Enter the system PIN. Press OK to confirm. Use
5. Select the line matrix option. Press OK.
MENU
.
DELETE
to make correction.
After selecting the option, refer to the respective sub-sections below to finish the operation.
Assigning line 1 or line 2 In setting
1. Select the handset you want to set. Press OK.
2. Select the option setting.
Setting What is it?
Blocked The handset will not ring and cannot answer calls until a certain number of rings have
completed (defined in the ring count setting below).
Normal The handset has no restriction on answering calls.
Interception The handset can answer calls anytime; however, the handset will not ring until a certain
number of rings have completed (defined in the ring count setting below).
3. Press OK to confirm. The new setting is saved.
Caller ID. If line 1 or line 2 is set to BLOCKED or INTERCEPTION, your phone may not be able to
NOTE:
receive/display Caller ID depending on your ring count setting.
Assigning line 1 or line 2 Out
Select the handset you want to set. Press OK.
4. Select the option setting.
Setting What is it?
Blocked The handset can only make emergency calls.
Normal The handset has no restriction on making calls.
5. Press OK to confirm. The new setting is saved.
Assigning ring count setting
1. Select LINE 1 or LINE 2. Press OK.
- 45 -
Page 50

The System
pag
2. Select the number of rings.
3. Press OK to confirm. The new setting is saved.
CHANGING THE SYSTEM PIN
The system PIN is used for registering, deleting handsets, and protecting the access rights to some of the other menus. The default
system PIN is 0000. You can personalize the PIN for greater security.
1. Press
2. Select SYSTEM. Press OK.
3. Select CHANGE PIN. Press OK.
4. Enter the system PIN. Press OK to confirm. Use
5. Enter the new system PIN. Press OK.
6. Enter the new system PIN again for verification.
7. Press OK. The new setting is saved.
NOTE:
manufacturer for assistance.
MENU
.
DELETE
to make correction.
Forgotten PIN. Write down your PIN and save it for future use. If you have forgotten the PIN, call your
RESETTING TO DEFAULT SETTINGS
The default settings are the original factory settings of your phone. You can reset your phone settings to factory default.
1. Press
2. Select SYSTEM. Press OK.
3. Select RESET. Press OK.
4. Enter the system PIN. Press OK to confirm. Use
5. Press
NOTE: After reset, your handset returns to the “Hello” screen if your model supports multiple country
settings, and you must configure your country settings before using your phone, refer to Greeting you with
“HELLO” on
To find out what settings are being reset, see Default Settings on page 46.
MENU
.
YES
to confirm. All settings have reset.
e 9.
DELETE
to make correction. CONFIRM? is displayed.
- 46 -
Page 51

Appendix
DEFAULT SETTINGS
These are the factory pre-programmed settings of your phone.
General Setting
Language English Handset Name* Unchanged
Date Format DD/MM/YY Time Format 24 hours
Date Pre-set Date Time 00:00
Auto Answer On Do Not Disturb Off
Dial Mode Tone LCD Contrast Medium
Recall Duration Recall 1 Pause Selection Pause 1
Prefix Off Prefix and numbers Empty
PABX Off PABX Number Empty
Area Code Removal Off Area Code number Empty
Alarm Clock Off Stopwatch Off
Countdown Timer Off Operator Services Unchanged
Language English Handset Name* Unchanged
Date Format DD/MM/YY Time Format 24 hours
Sounds Setting
Line 1 Ring Melody Melody 1 Line 1 Ring Volume Level 3
Line 2 Ring Melody Melody 2 Line 2 Ring Volume Level 3
Intercom Ring Melody Melody 3 Intercom Ring Volume Level 3
Key Beep On Confirmation/Parking Tone On
Receiver Volume Medium
Call Log Setting
Message Waiting Indicator Reset Call Log Options Unchanged
Missed Call Log Unchanged Dialed Call Log Unchanged
Received Call Log Unchanged Notification Unchanged
Last Call Timer Reset Dialed Call Timer Reset
Received Call Timer Reset All Calls Timer Reset
System Setting
Line Matrix for LINE 1 IN Normal Line Matrix for LINE 2 IN Normal
Line Matrix for LINE 1 OUT Normal Line Matrix for LINE 2 OUT Normal
Ring Count for Line 1 3 Ring Count for Line 2 3
PIN Code 0000 Base Selection Auto
* This setting is not restored after reset.
- 47 -
Page 52

Appendix
TROUBLESHOOTING
Problem Tip
No dial tone
Signal icon flashing
No parking tone
Handset on the
charger does not
charge
No display
Bad audio (crackles,
echo, etc.)
Handset does not ring
Caller ID does not
display
Cannot make/answer a
nd
call
2
• Check all the phone line and power adaptor connections.
The handset may be out of range of the base. Move closer to the base.
•
• The battery capacity may be low. Charge battery.
• The handset may be out of range. Move closer.
• If the handset displays NOT REG, it is un-registered. Register the handset. See page 9.
• The handset may not be placed properly. Try again.
Charging contacts may be dirty. Clean contacts with a damp cloth.
•
• Turn on the handset tone. See page 35.
• Switch on the handset’s power. See page 10.
• The battery may be defective. Purchase new battery from your dealer.
• Check that the battery is inserted correctly.
Make sure the handset is placed properly on the charger. The battery icon is animated while charging.
•
• Check that the battery is charged.
• Check the connections.
The handset may be nearly out of range. Move closer.
•
• The phone base may be to close to an electrical appliance. Move the base unit to a different location.
• The phone base may be to close to thick concrete walls. Move the base unit to a different location.
• Check that the handset ringer is turned on. See page 35.
• Check that Do Not Disturb is turned off. See page 39.
Too many phones may be sharing the same phone line. Disconnect some of the phones.
•
• Caller ID service may not be activated. Check with your service provider.
• The caller’s information may be withheld or is unavailable.
nd
• 2
call service may not be activated. Check with your service provider.
• Check that the recall selection is correct. See page 38.
NOTES FOR OPERATION IN NEW ZEALAND
- 48 -
Page 53

Appendix
The grant of a Telepermit for any item of terminal equipment indicates only that Telecom has accepted that the item complies with the
minimum conditions for connection to its network. It indicates no endorsement of the product by Telecom, nor does it provide any sort
of warranty. Above all, it provides no assurance that any item will work correctly in all respects with another item of Telepermitted
equipment of a different make or model, nor does it imply that any product is compatible with all of Telecom’s network services. This
device may be subject to ringing or bell tinkle when certain other devices are connected to the same line. If this occurs, the problem
should not be referred to the Telecom Faults service.
This equipment shall not be set to make automatic calls to the Telecom “111” Emergency Service. This equipment may not provide for
the effective hand-over of a call to another device connected to the same line.
REN (RN for New Zealand)
The REN (Ringer Equivalence Number) or (RN) is of significance only if you wish to connect more than 1 telephone to your telephone
line. A standard telephone line has a maximum REN capacity of 3 (RN of 5). It is possible to connect 3(5) devices with a REN of 1 (RN
of 1) with no degradation to the product’s performance. Exceeding this limit may cause the volume of the ringer in any phone to
decrease or not ring at all.
Caller ID
Customers using non Telecom toll services should not use the dial back feature for local calls as this will incur a charge only the 7 digit
number should be dialled. Some of the CID services listed may not be available in New Zealand.
This telephone is not designed for making emergency telephone calls when the power fails. Make alternative arrangements for access
to emergency services.
WARRANTY
(a) Warranty. Oricom warrants that the product is free from defects in materials and workmanship for a period of
12 months effective from the date of purchase. This warranty in no way affects your statutory warranty under
the Trade Practices Act 1974 or any other similar legislation.
Card as it contains full and additional details of the warranty, limitat ion o f warranty and condition s for re ceiving
the warranty services during the warranty period. The Warranty Card is located in the package. If you cannot
locate the Warranty Card, please contact our Customer Support Service on 1300 889 785.
It is important that you read the Warranty
(b)
Exclusion and limitation of liability.
Oricom will not be in breach of a warranty or condition expressly
stated in this User Guide or the Warranty Card or implied by the Trade Practices Act and excludes any liability
arising under any statutory or common law for damages or any other remedy if the damage occurs as a result
of:
(i) failure by you to follow the instructions in the User Guide for the installation and proper functioning of the
product;
(ii) negligence on your part or misuse by you of the product;
(iii) any un-controlled external cause to the phone not functioning including but not limited to electricity failure,
lighting, over voltage;
(iv) non adherence by you to the warnings in the User Guide and the User Guide genera lly; and
(v) modification to the product or services carried out to the product by anyone other than Oricom or on
Oricom’s behalf.
Oricom will not be liable for consequential losses including loss of profits arising from a cause of action in
contract, tort or any other statutory or common law (except where a statute or any law prohibits this exclusion).
The warranty does not extend to damage caused by misuse, negligence, excessive voltage, faults on the
telephone line or lightning. This warranty in no way affects your statutory rights. Full details of the warranty are
contained in the enclosed warranty card.
- 49 -
Page 54

Appendix
A
A
CUSTOMER SUPPORT
If you feel this product is not working correctly please consult the user guide and ensure that you are using the product
in accordance with the instructions. Remove all extra telephone equipment and connect only this telephone directly to
the telephone socket. If the fault is still present, connect another telephone (if available) to the telephone socket. The
results will show you whether the fault lies with this unit or with the telephone line.
If the product is working correctly the fault is on the telephone line. Please contact your network operator for
assistance.
To order spare parts additional handsets, replacement batteries and in case of any technical issues you may have with
product please consult our website for further information or send us an email for a prompt response to your enquiry.
In the unlikely event of a fault developing, please contact us for assistance. If the product is then found to be faulty you will be
asked to return it directly to us with a copy of the purchase receipt.
ustralia
Oricom International Pty Ltd
Locked bag 658
South Windsor, NSW 2756
Customer support
Email: support@oricom.com.au
Web: www.oricom.com.au
Fax: (02) 4574 8898
Ph: 1300 889 785
New Zealand
tlas Gentech (NZ) Limited
Private Bag 14927,
Panmure, Auckland
Customer support
Email: support@atlasgentech.co.nz
Web: www.atlasgentech.co.nz
Fax: (09) 574 2722
Ph: 0900 50 025 (Toll Call)
- 50 -
 Loading...