

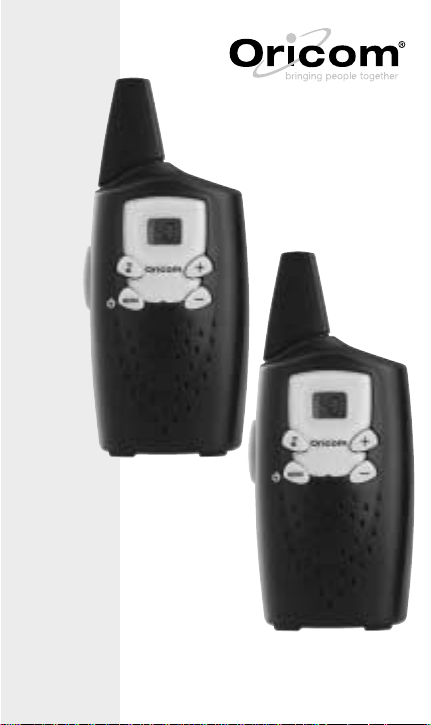
Page 1

Stay in touch with friends and
family for FREE with Oricom
Highly sophisticated: You can communicate when
you're around the home or out and about enjoying
sport and leisure activities such as cycling, fishing,
hiking, skiing, camping and more.
Long range: With 500mW of power you can expect
up to 3km range depending on terrain and
environmental conditions.
Free communication: No call costs.
No licence required: Start using the Oricom
PMR555 straight away.
Highly compact: Lightweight and small, it easily
fits in your pocket or bag, or clip it on your belt with
the clips included.
Smart features: Advanced features include 40 UHF
channels, up to 12 hours talk-time, channel scan,
digital volume control and Roger beep confirmation
tone.
Channel scan: Lets you easily find your group’s
channel by searching all possible channels.
12-month warranty
Each pair requires a total of six AAA batteries (not
supplied).
Page 2
User Guide
Oricom PMR555 UHF
Two-Way UHF Radios
Page 3
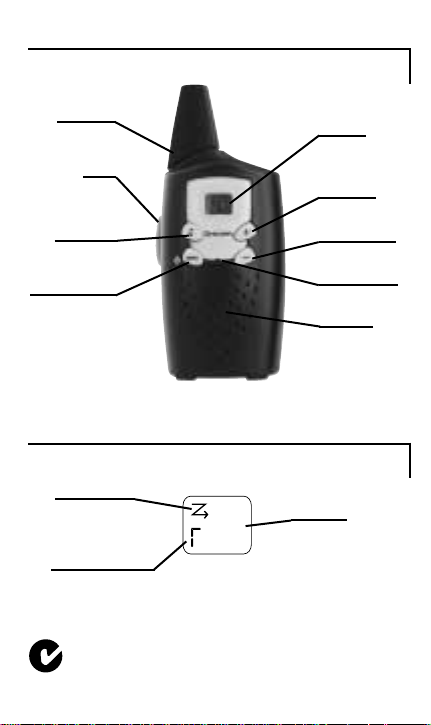
Your Oricom PMR555 display
Your Oricom PMR555 radio controls
Your Oricom PMR555 radio controls
Your Oricom PMR555 display
Complies with all relevant Australian and New Zealand
approval requirements including radio communications
(Electromagnetic Radiation Human Exposure) standard
2003.
N13134
Antenna
PTT
On/Off/Menu
Microphone
Speaker
Menu down
Menu up
Display
Call tone
Scan mode
Repeater mode
Channel
3
Page 4

Use and care
Exposure to Radio Frequency
Safety and general information
Safety and general information
Exposure to Radio Frequency (RF) energy
Your radio contains both a receiver and a transmitter.
When it is turned on it receives and transmits RF
energy. Your Oricom unit is designed to comply with
local regulatory requirements concerning exposure of
human beings to RF energy (Specific Absorption Rate
Data (SAR)).
Use and care
• This unit is not waterproof; do not immerse in water.
• If the unit gets wet turn it off, remove the batteries and
dry it with a soft cloth.
• Do not use it until it is completely dry.
1
Page 5

Installing the batteries
Installing the batteries
Each radio uses three AAA alkaline batteries (not supplied).
To avoid damage never mix old and new batteries.
1. Ensure the radio is turned off.
2. At the base of the battery door press down and
gently slide the door away from the unit.
3. Insert the batteries
observing the correct
polarity as marked inside
the battery compartment.
4. Replace the battery cover.
2
Press and slide
away from unit
Page 6

Attaching the belt clip (included)
Attaching the belt clip (2 included)
Hook the belt clip into the notch at
the top of the radio and slide
it down until it clicks into place.
To remove, squeeze the release
latch together and slide the clip up
and away from the radio.
3
Page 7
Using your Oricom PMR555
Using your Oricom PMR555
Turning your radio on and off
To turn on, press and hold until a channel number
appears and the radio beeps.
To turn off, press and hold until the display
goes blank.
Adjusting the volume
Press to increase or to decrease the volume.
The volume level icon v is displayed.
Select the desired volume level 1-15.
Selecting the channel
The channel is the frequency your radio uses to
transmit and receive.
1. Briefly press and release it - a confirmation tone
will sound and the current channel number will flash.
2. Press or to select a new channel.
3. Press PTT to confirm - a confirmation tone will sound.
Roger beep
The Roger beep tone is transmitted by your radio when
you finish transmission. In the same way as saying
"Roger” or “over", it lets others know you are finished
talking. You will hear this through the speaker when you
release the PTT button.
This feature can be turned on and off. For the
Roger beep function to be disabled, press and
together when turning the radio on. To enable the Roger
beep function reverse the procedure.
4
Page 8

Talking and listening
Always listen for activity on the selected channel before talking.
1. When the selected channel is clear, press and hold
the PTT button. Hold the radio upright 5cm from
your mouth, pointing it away from your head. Speak
directly and clearly into the microphone. Do not
cover the microphone while talking.
2. When you are finished talking, release the PTT button
and listen for a reply.
Note: If the PTT is held down for longer than 60 seconds
a tone will be heard, the unit will stop transmitting and
return to standby mode.
Scanning function
This feature allows you to scan all available channels
and stops on an active channel.
1. Press two or three times (when the channel is
on 1-8) to enter the scanning mode.
2. Press or to select on the display to turn
the scanning function on.
Note: When the radio detects channel activity it stops
scanning and you can hear the transmission. To
respond, press PTT and transmit within 5 seconds.
3. To turn scan off, press three or four times (when
the channel is on 1-8) to enter scanning mode.
4. Press or to select on the display to turn
the scan function off.
Note: If scanning stops on a channel you don’t want to
listen to, briefly press or to resume scanning
for the next active channel.
Monitor mode
This feature allows you to listen for weak signals on the
current channel.
5
Page 9

1. Press three or four times (when the channel
is on 1-8) to enter monitor mode.
2. Press or to adjust the volume up or down.
Sending a call tone
A call tone alerts others in your group that you want to talk.
To send a call tone to other radios in your group, press
.
Note: The Australian UHF CB Radio Standard restricts
tone calling to 3 seconds. This unit will only transmit for
a maximum 3 seconds in any 60 seconds.
Note: Channels 5 and 35 are disabled.
Duplex mode (range extender)
Repeater stations re-transmit your signal over a wider
area giving you extended range depending on the
location, height and availability of the local repeater
station.
Your Oricom PMR555 radio supports duplex mode on
channels 1-8 only. In duplex mode, the units support
the use of a repeater in your area. If the repeater
channel in your area is channel 1, when you are in
duplex mode the transmit channel will be channel 31.
To enter duplex mode select the repeater channel
number in your area (1-8) then press or on
that channel until is displayed beside the channel
number (1-8). You are now in repeater mode.
For more information on the locations of repeater sites
in Australia and New Zealand visit our website.
Low battery alert
Beeps will be heard when the batteries are low . Change
them as described on page 2.
6
Page 10

UHF channels and frequencies
Channel Frequency Channel Frequency
1* 476.425 MHz 20 476.900 MHz
2* 476.450 MHz 21 476.925 MHz
3* 476.475 MHz 24 477.000 MHz
4* 476.500 MHz 25 477.025 MHz
5* 476.525 MHz 26 477.050 MHz
6* 476.550 MHz 27 477.075 MHz
7* 476.575 MHz 28 477.100 MHz
8* 476.600 MHz 29 477.125 MHz
9 476.625 MHz 30 477.150 MHz
10 476.650 MHz 31* 477.175 MHz
11 476.675 MHz 32* 477.200 MHz
12 476.700 MHz 33* 477.225 MHz
13 476.725 MHz 34* 477.250 MHz
14 476.750 MHz 35* 477.275 MHz
15 476.775 MHz 36* 477.300 MHz
16 476.800 MHz 37* 477.325 MHz
17 476.825 MHz 38* 477.350 MHz
18 476.850 MHz 39 477.375 MHz
19 476.875 MHz 40 477.400 MHz
UHF channels and frequencies
IMPORTANT NOTE
Channels 5 and 35 are emergency channels. Channel
11 is a calling channel. Channels 22 and 23 are for
Telemetry and T elecommand use; voice communications
are not allowed on these channels by law .
* Repeater access channels
7
Page 11

Warranty information
Warranty information
This product is covered by a 12-month warranty against
defective workmanship or parts. The warranty does not
extend to damage caused by misuse, negligence,
water ingress, battery leakage or lightning. This
guarantee in no way affects your statutory rights. Full
details of the warranty are contained in the enclosed
warranty card.
If you feel this product is not working correctly please
consult the user guide and ensure that you are using
the product in accordance with the instructions.
For assistance with technical issues please consult our
website for further information or send us an email for a
prompt response to your enquiry. In the unlikely event
of a fault developing, please contact us for assistance.
If the product is then found to be faulty you will be
asked to return it directly to us with a copy of the
purchase receipt.
8
Page 12

Contact us
Contact us
Australia
Oricom International Pty Ltd
PO Box 5681
South Windsor NSW 2756
Australia
Customer support
Email: support@oricom.com.au
Web: www.oricom.com.au
Fax: (02) 4572 0939
Phone: 1300 889 785
New Zealand
Atlas Gentech (NZ) Limited
Private Bag 14927
Panmure Auckland
New Zealand
Customer support
Email: support@atlasgentech.co.nz
Web: www.atlasgentech.co.nz
Fax: (09) 574 2722
9
 Loading...