

Page 1
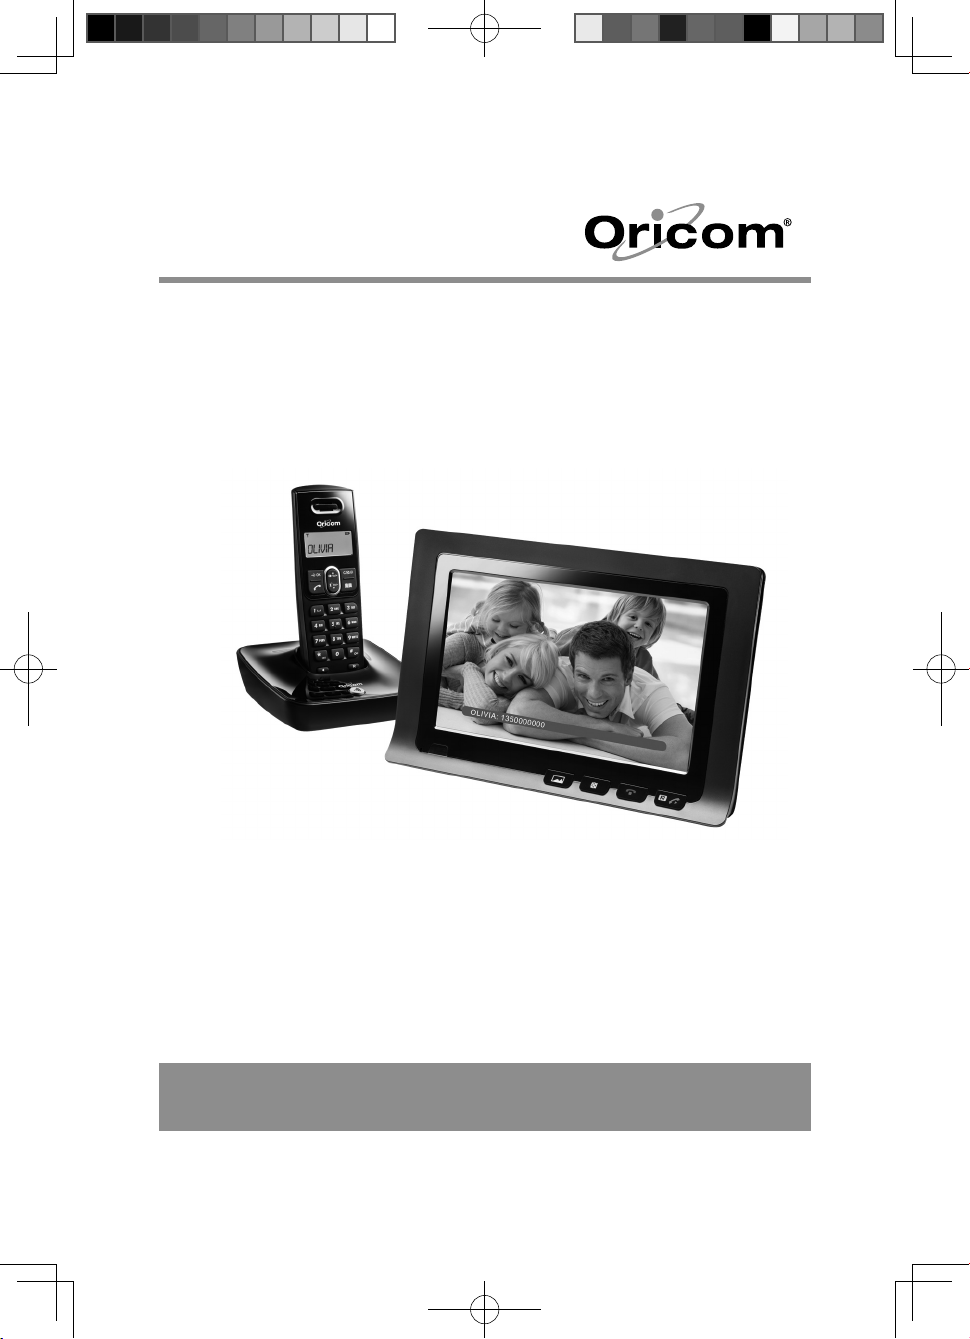
PIX2000
User Guide
Keep this user guide for future reference.
PIX2000 User Guide.indd 3PIX2000 User Guide.indd 3 2009-6-30 17:33:292009-6-30 17:33:29
Page 2

PIX2000 User Guide.indd 章节1:2PIX2000 User Guide.indd 章节1:2 2009-6-30 17:33:302009-6-30 17:33:30
Page 3

Table of contents
Safety Information and Warnings ...........................................2
Getting Started ......................................................................5
Handset and Base Layouts .....................................................7
Photo frame and remote control Layouts ................................9
Operation and setup of the cordless handset .......................13
Redial Function ....................................................................17
Caller ID Service ..................................................................19
Phone Book .........................................................................22
Menu Operation ...................................................................24
Operation and setup of the picture frame .............................32
Operation during an incoming call ........................................53
Troubleshooting ...................................................................59
Warranty Information ...........................................................62
1
PIX2000 User Guide.indd 章节2:1PIX2000 User Guide.indd 章节2:1 2009-6-30 17:33:302009-6-30 17:33:30
Page 4

Safety Information and Warnings
Safety Information and Warnings
IMPORTANT
• Avoid exposure of this telephone to moisture or liquid.
• To prevent electric shock, do not open the handset or base cabinet.
• Avoid metallic contact (e.g. metal clips, keys) between the battery
contacts and charging conductors.
• There is a slight chance that the telephone could be damaged by an
electrical storm. It is recommended that users unplug the phone from
the mains supply and telephone socket during a storm.
• Do not use the handset in an explosive hazard area such as where
there is gas leaking.
• Follow the local regulations regarding the disposal of your packing
materials, exhausted batteries and used phone. Wherever possible,
recycle those materials.
• We advise that this phone should not be used near intensive care
medical equipment or by persons with pacemakers.
• Clean with a dry, soft, lint-free cloth. Never use cleaning agents,
particularly aggressive solvents.
• Because the phone works by sending radio signals between base station
and handset, wearers of hearing aids may experience interference in the
form of a humming noise.
• Your phone can interfere with electrical equipment such as answering
machines, TV and radio sets, clock radios and computers if placed too
close. It is recommended that you position the base unit at least one
metre from such appliances.
• This telephone complies with applicable safety requirements for
exposure to radio waves (EMR). The mean power of this telephone
does not exceed 20mW limit at which point testing is required.
• The earpiece of the handset may attract small metal objects such as
staples and pins. Care should be taken when placing the handset near
these items.
2
PIX2000 User Guide.indd 章节2:2PIX2000 User Guide.indd 章节2:2 2009-6-30 17:33:302009-6-30 17:33:30
Page 5
Safety Information and Warnings
• This telephone is not designed for making emergency telephone calls
when the mains power fails.
• Always have a corded phone available to be able to make and receive
calls to emergency services if the mains power fails.
• Do not use your telephone during an electrical storm thunderstorm as
it is possible to get an electric shock.
• Refer to information contained in White pages directory.
• This phone is designed for connection to a PSTN telephone line or an
analogue extension port of a PBX system. If you connect this device to
a digital extension of a PBX, damage may result to the PBX.
Only use the AC/DC adaptors provided with the photo
CAUTION
frame. Details of AC/DC Adaptor listed below:
For Photo Frame adaptor
Model no. KSS12_060_1500S
Input 100-240V~, 50/60Hz, 0.35A
Output: 6V
1500mA
For Base adaptor
Model No.: KG35-6-250D
Manufacturer: Kings
Input: 240V AC / 50 Hz
Output: 6 V DC, 250mA
3
PIX2000 User Guide.indd 章节2:3PIX2000 User Guide.indd 章节2:3 2009-6-30 17:33:302009-6-30 17:33:30
Page 6
Safety Information and Warnings
DO NOT USE STANDARD/ALKALINE BATTERIES IN THIS
WARNING
PRODUCT, AS THERE IS A RISK OF EXPLOSION AND/OR
INJURY. USE ONLY NI-MH RECHARGEABLE BATTERIES
AS SPECIFIED IN THIS USER GUIDE. CONTACT ORICOM
FOR REPLACEMENT BATTERIES.
RISK OF EXPLOSION IF BATTERY IS REPLACED BY AN
INCORRECT TYPE.
Never use non-rechargeable batteries. Use
recommended type supplied with this product.
• Never use alkaline or lithium batteries.
• Do not dispose of the batteries in a re, as they can
explode.
• Do not open or mutilate the battery. Released
electrolyte is corrosive and can cause damage to the
eyes or skin. It can be toxic if swallowed.
• Avoid contact with metal objects when handling the
battery. These objects could short out the batteries or
cause the conductor to overheat resulting in burns.
• Do not attempt to recharge the battery cell by heating
it. Sudden release of battery electrolyte can cause
burns or irritation to the eyes or skin.
• Observe the proper polarity, or direction, of any
battery. Reverse insertion of the battery cell can result
in leakage or explosion.
• Remove the batteries if you do not plan to use the
product for several months at a time.
• Follow the local regulations regarding the disposal of
your packing materials, exhausted batteries and used
phone. Wherever possible, recycle those materials.
4
PIX2000 User Guide.indd 章节2:4PIX2000 User Guide.indd 章节2:4 2009-6-30 17:33:302009-6-30 17:33:30
Page 7

Getting Started
Getting Started
Pack Contents
The pack should contain the following items:
Cordless Phone Base Unit & AC adaptor
Cordless Phone Handset
Phone Line cord
Digital Picture Frame & AC adaptor
Handset Rechargeable Batteries
If any of these items are missing, please contact the retailer where you
purchased the product from.
Adding additional handsets
The PIX2000 is GAP compatible. Additional GAP compatible handsets
may be registered to the PIX2000 see registration.
Please note GAP compatibility only ensures the ability to answer and
make calls, not all PIX2000 features may be available to additional
handsets.
Important:
DO YOU HAVE BROADBAND/ADSL?
If you do, you must connect an in line lter (not supplied) between
the telephone socket and your PIX2000 base to ensure that your
broadband and PIX2000 will work properly. If you do not install
the lter you will experience interference on the PIX2000 and your
Broadband may suffer dropouts. Please refer to the user guide of the
in line lter for installation.
5
PIX2000 User Guide.indd 章节2:5PIX2000 User Guide.indd 章节2:5 2009-6-30 17:33:302009-6-30 17:33:30
Page 8

Getting Started
Installation of the Telephone Base and handset
1. Connect the mains adaptor (supplied) to the socket on the back of the
base unit and to the wall mains supply.
2. Connect the telephone cord to the phone socket on the back of the
base unit and into the wall phone socket.
3. Insert 2 rechargeable Ni-MH AAA batteries (included), observing the
correct polarity, into the battery compartment on the handset. Slide the
battery door rmly into place.
4. Place the handset on the charging cradle and charge the batteries for
a full 14 hours before using it for the rst time.
Note:
It may take some time for the cordless handset to power up, and it
may get warm during initial charge. This is normal.
Tip!
It is good practice to put the cordless handset on the charging cradle
when it is not in use to ensure that the handset is always fully charged.
Installation of the Photo Frame
1. Insert the supplied power adaptor into the socket on the bottom of the
Photo Frame.
6
PIX2000 User Guide.indd 章节2:6PIX2000 User Guide.indd 章节2:6 2009-6-30 17:33:302009-6-30 17:33:30
Page 9
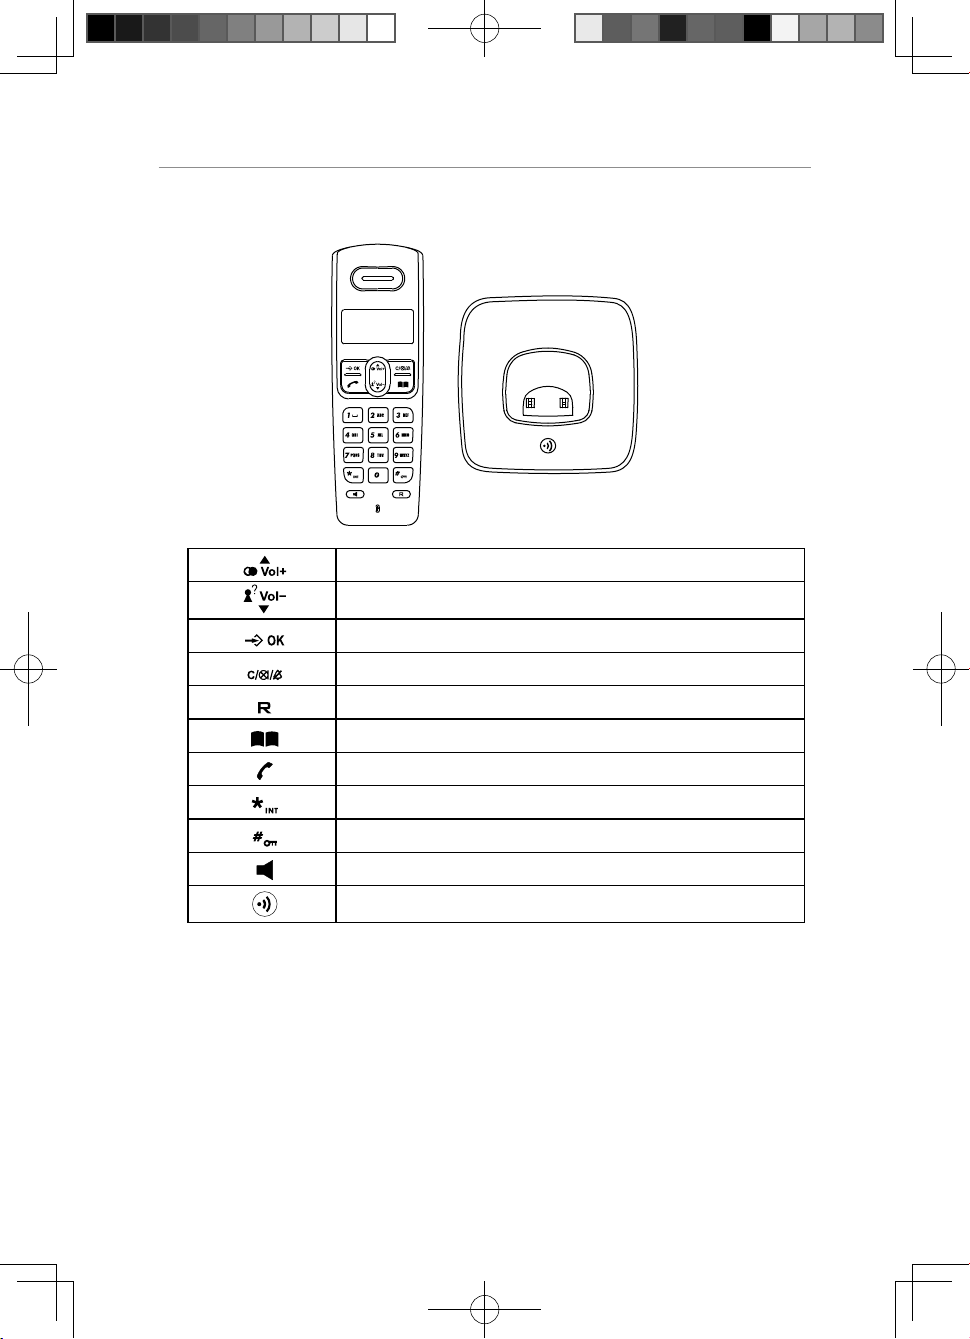
Handset and Base Layouts
Redial / Up / Increase volume key
Caller ID / Down / Decrease volume key
Menu / OK key
Mute / Cancel / Ring off key
Recall key
Phone book key
Talk on / Off key
Asterisk / Intercom key
Hash / Keypad lock key
Speaker Key
Paging key
Handset and Base Layouts
7
PIX2000 User Guide.indd 章节2:7PIX2000 User Guide.indd 章节2:7 2009-6-30 17:33:312009-6-30 17:33:31
Page 10
Handset and Base Layouts
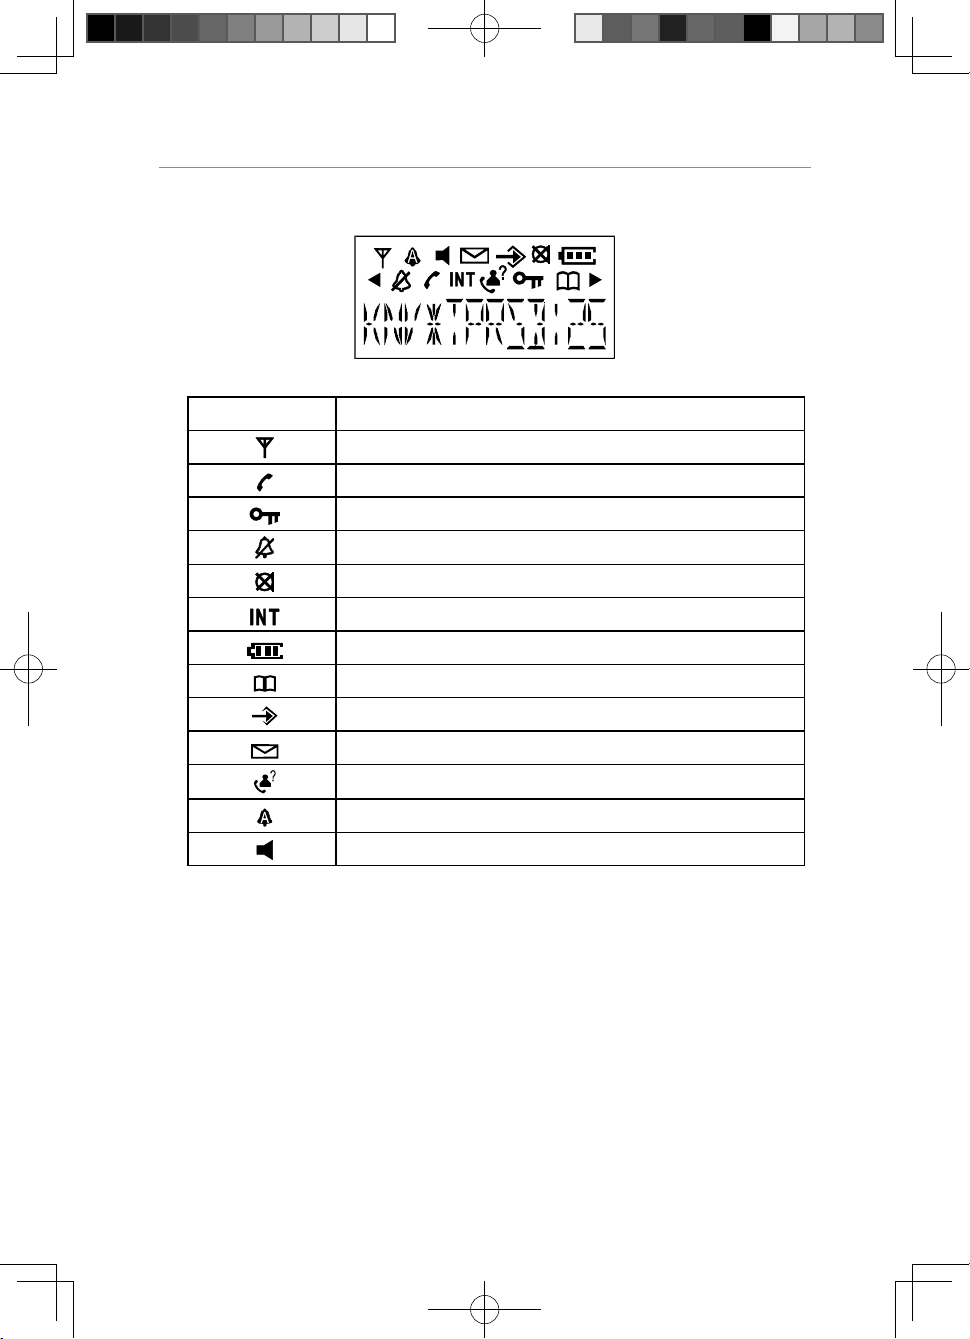
LCD Display
Icon Description
Aerial icon
Phone icon
Key lock icon
No ring icon
Microphone mute icon
Intercom call indicator
Battery level indicator
Phonebook icon
Menu icon
Voice mail waiting indicator (VMWI icon)
Caller ID icon
Alarm icon
Speaker icon
8
PIX2000 User Guide.indd 章节2:8PIX2000 User Guide.indd 章节2:8 2009-6-30 17:33:312009-6-30 17:33:31
Page 11
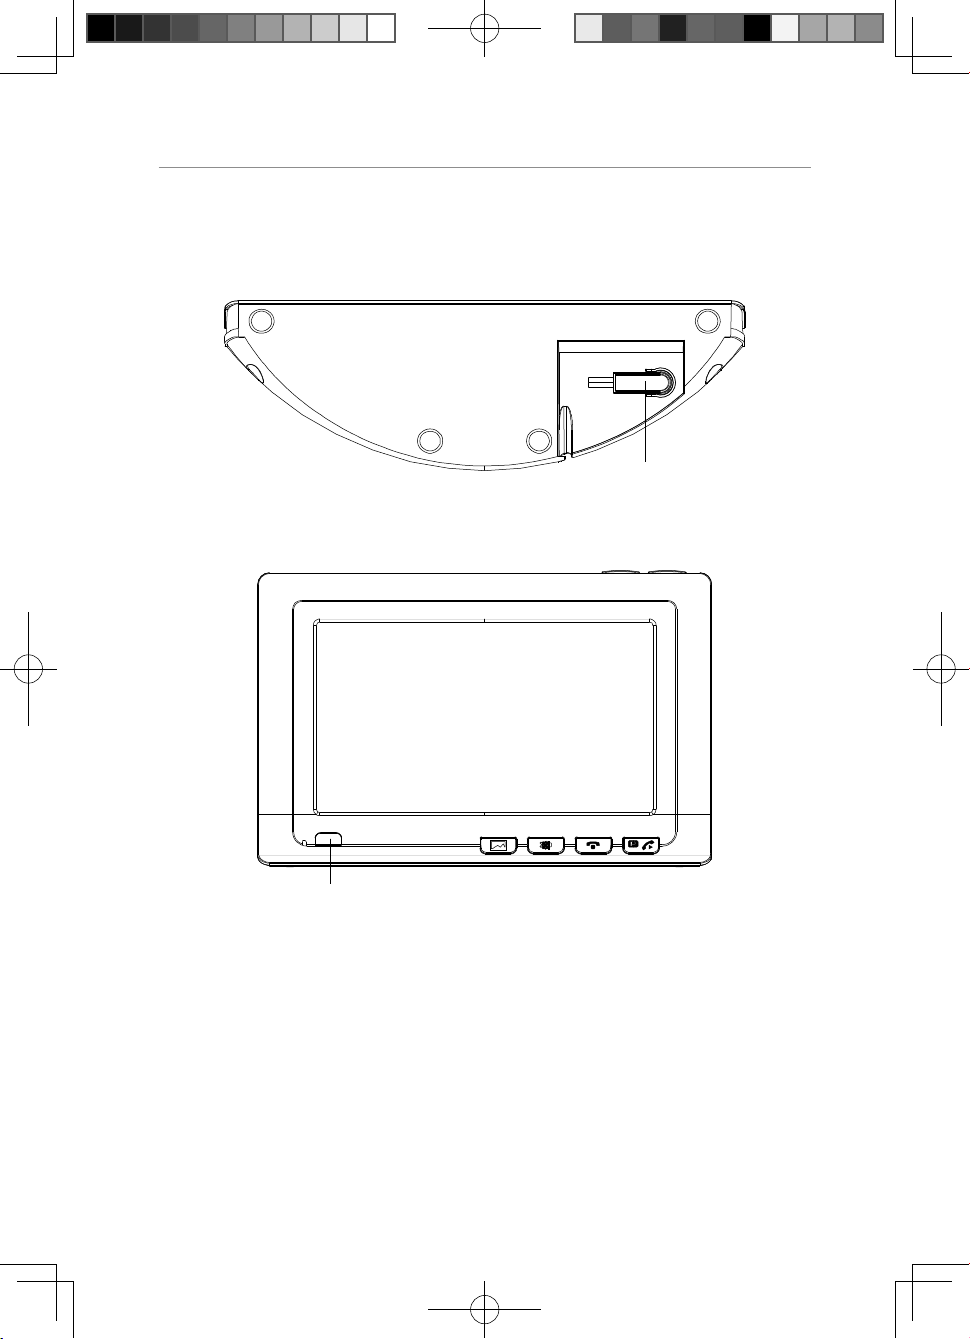
Photo frame and remote control Layouts
Photo frame and remote control Layouts
Bottom Panel:
Power inlet
Front Panel:
IR window
9
PIX2000 User Guide.indd 章节2:9PIX2000 User Guide.indd 章节2:9 2009-6-30 17:33:312009-6-30 17:33:31
Page 12
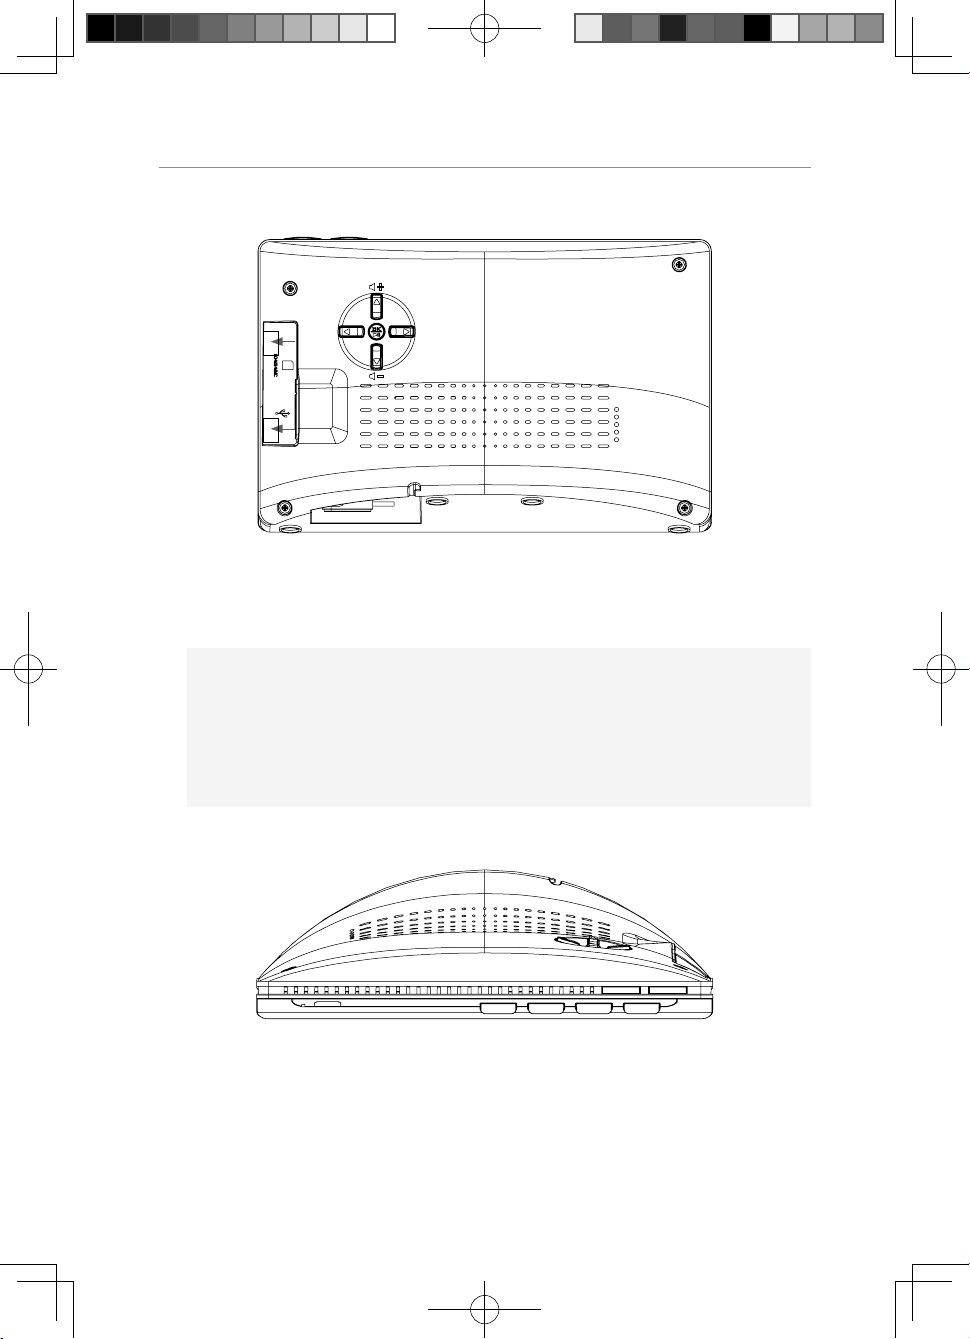
Photo frame and remote control Layouts
Back Panel:
2
1
1. USB connection jack: Connect to USB drive external memory
2. SD (Secure Digital) / MMC (MutiMedia Card) / MS Duo / MS Pro card
slot
Note:
1. USB port is only for connection with USB drive. Connection to PC
will damage the unit.
2. Performance is not guaranteed when connected with other USB
devices like Cell phones, MP3 player.
Top Panel:
10
PIX2000 User Guide.indd 章节2:10PIX2000 User Guide.indd 章节2:10 2009-6-30 17:33:312009-6-30 17:33:31
Page 13
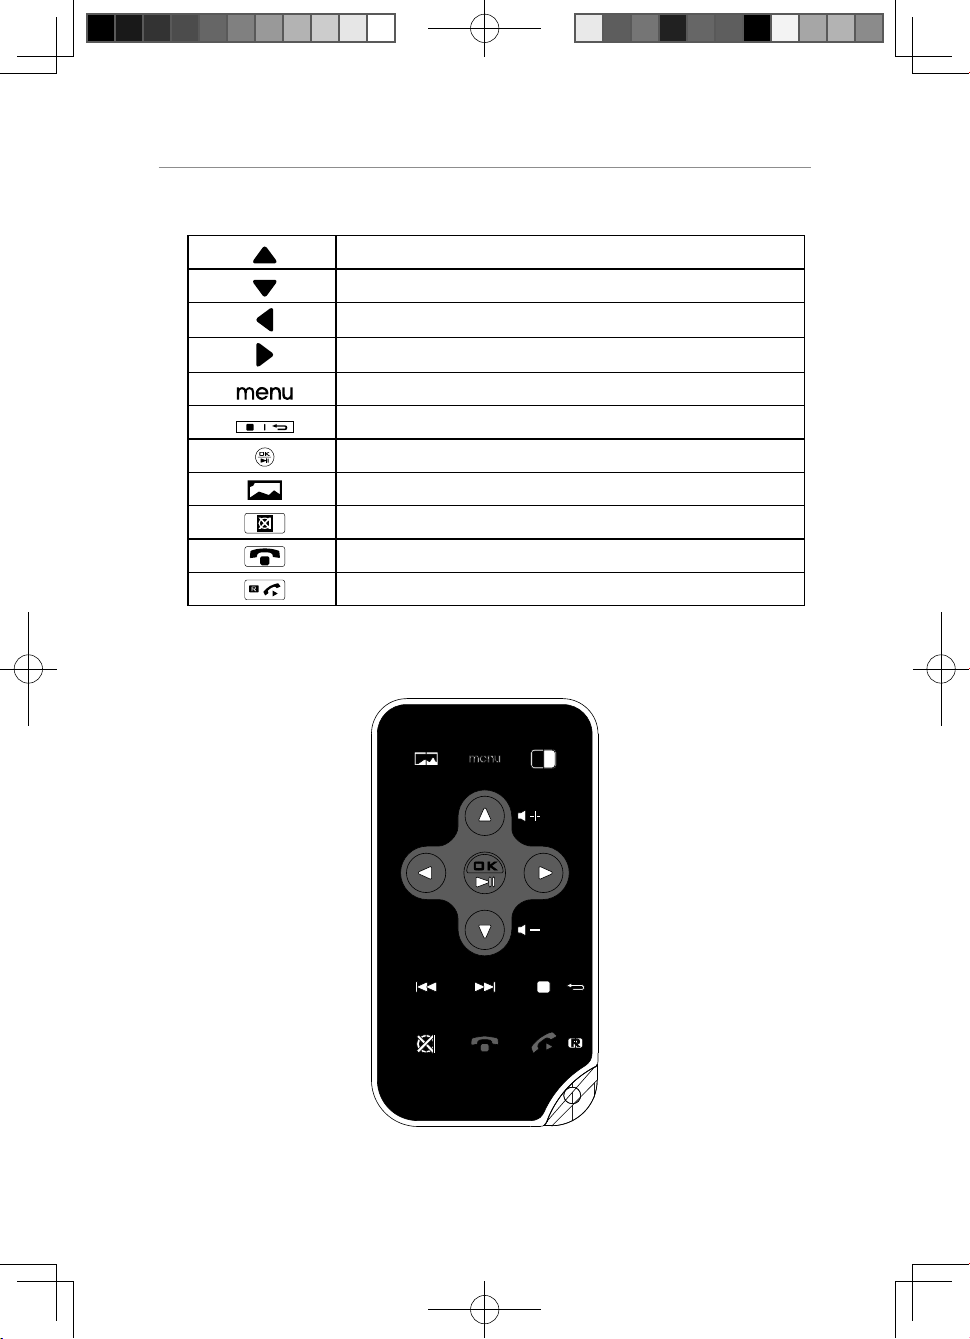
Photo frame and remote control Layouts
Photo frame Key Descriptions:
Up / VOL+ / ip horizontal
Down/ VOL- / ip vertical
Left or Previous photo during photo playback
Right or Next photo during photo playback
Return to Menu Selection Screen
Stop / Return
Ok / Pause
Shortcut key for immediate photo playback
Mute
Phone off
Phone on or Recall
Remote control Key Descriptions:
11
PIX2000 User Guide.indd 章节2:11PIX2000 User Guide.indd 章节2:11 2009-6-30 17:33:312009-6-30 17:33:31
Page 14
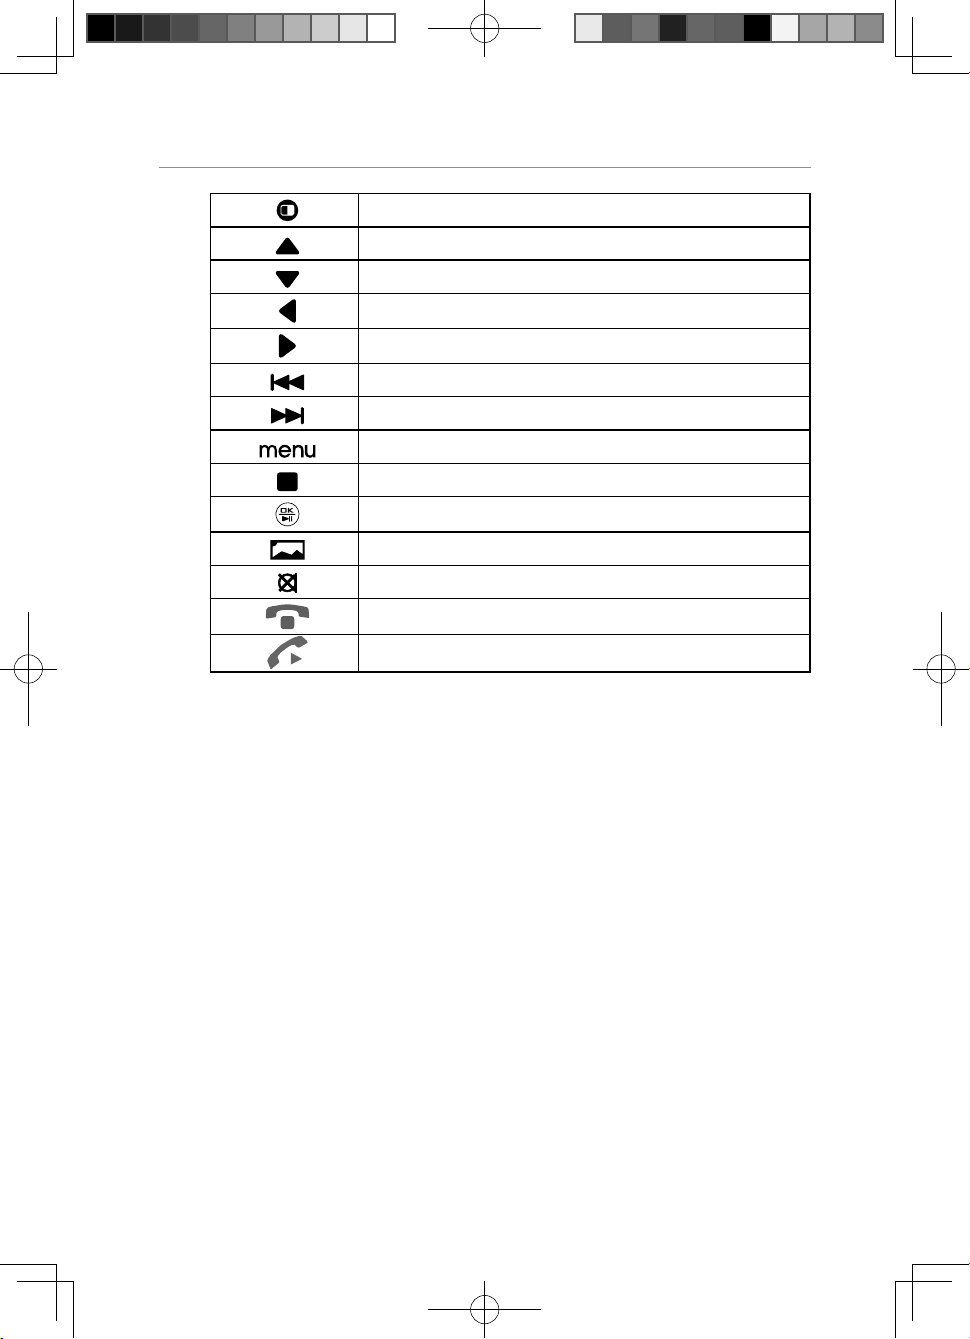
Photo frame and remote control Layouts
Toggle DIM Mode
Up / VOL+ / ip horizontal
Down / VOL- / ip vertical
Left / left-rotation
Right / right-rotation
Next picture during photo playback / next page
Previous picture during photo playback / previous page
Return to Menu Selection Screen
Stop / Return
Ok / Pause
Shortcut key for immediate photo playback
Mute the MIC
Phone off
Phone on
12
PIX2000 User Guide.indd 章节2:12PIX2000 User Guide.indd 章节2:12 2009-6-30 17:33:322009-6-30 17:33:32
Page 15

Operation and setup of the cordless handset
Operation and setup of the cordless handset
How to make a Call
1. Press the or key, wait for a dial tone, then dial the desired
number.
2. After finishing the conversation, press key
handset into the charger.
The talk timer will be shown for about 2 seconds before returning to
standby mode.
Pre-dialling
1. When the handset is in standby mode, input the desired number.
2. Press
3. Press the
4. After finishing the conversation, press
handset into the charger.
The talk timer will be shown for about 2 seconds before returning to
standby mode.
key to cancel the wrong digit, input the correct digit again.
or key, the number will automatically dial out.
or place the cordless
key or place the cordless
How to Adjust the Receiver or Speaker Volume.
While the phone is in talk mode, press or key on the handset
to adjust the receiver or speaker volume of the handset. There are 5
possible volume selections for handset speaker and recveiver. The display
will show the current volume level during adjusting.
How To Answer a Call
When the phone rings, the icon will ash and the LCD on the handset
will show “CALL”. If you have subscribed to Caller ID service from your
network service provider, the incoming call information will be shown.
1. Press the
2. After finishing the conversation, press
handset into the charger.
PIX2000 User Guide.indd 章节2:13PIX2000 User Guide.indd 章节2:13 2009-6-30 17:33:322009-6-30 17:33:32
or key to answer a call.
key or place the cordless
13
Page 16

Operation and setup of the cordless handset
Auto Answer
If you set the “AUTO TALK” to on you just need to pick up the cordless
handset from the charger to answer the call directly, needn’t press
key.
Handset Speakerphone
Press key to activate or deactivate the handset speaker.
Dialling from the Phone Book
Press button when in standby mode, the rst entry in the phone book
appears.
Note:
If there is no record in the phone book, “PB EMPTY” will display.
or
1. Press
book.
2. Press
3. After finishing the conversation, press
handset into the charger to terminate the call.
or key to select the required record from the phone
or key to dial the number.
key or place the cordless
Intercom
You can make an intercom any two handsets (if you have more than one
handset).
1. When the handset is in standby mode, press and hold INT key, “INTNUMBER?” will be shown, input the called handset number.
2. The called handset will ring and the LCD will show the calling
handset’s name and number.
3. Press
or key in the called handset to answer.
Call Transfer
The function allows you to transfer an external call from a handset to
another handset.
14
PIX2000 User Guide.indd 章节2:14PIX2000 User Guide.indd 章节2:14 2009-6-30 17:33:322009-6-30 17:33:32
Page 17

Operation and setup of the cordless handset
1. With the caller on line, press and hold INT key on the calling unit and
input the called unit number. The line will put on hold and the caller will
hear hold music.
2. After the called unit answers the call, the intercom will begin between
the calling unit and called unit.
3. If you want to transfer the call to the called unit, only need to end the
call at the calling unit. The call will be automatically transferred to the
called unit.
Note:
If the called unit doesn’t answer the intercom call within
30seconds, the calling unit will return to the talk mode with the
caller.
Call waiting (Australia only)
You can use the recall function to answer a second call while you are on
the phone. However this service needs to be turned on. For example, to
turn on Telstra’s Call Waiting service:
1. Press [
[
2. You will hear a service tone then press [
] on the cordless handset to wait for dial tone then press
] [4] [3] [#].
] again.
Take two different calls at the same time
During a call, you will hear two loud beeps periodically to notify you of
another incoming call. If you wish to answer this call,
1. Press [ ] key. You will hear a dial tone.
2. Press [ 2 ] to put the current call on hold and talk with the second
caller.
3. Repeat steps 1-2 to swap between the two callers.
Three-way Conference call
You may have a 3-way conference call using the intercom and an open
line.
15
PIX2000 User Guide.indd 章节2:15PIX2000 User Guide.indd 章节2:15 2009-6-30 17:33:322009-6-30 17:33:32
Page 18

Operation and setup of the cordless handset
1. With the caller on line, press INT key on the calling unit and input the
called unit number. The line will put on hold and the caller will hear
hold music.
2. After the called unit answers the call, the intercom will begin between
the calling unit and called unit.
3. Press
key on the handset to enter menu, then press or
key to select “CONFERENCE”, press key on the handset to
con rm. The three-way conference will begin among the calling unit,
the called unit and the caller.
Note:
Only the calling unit can operate the “CONFERENCE”.
Muting the Ringer volume
Press and hold key in standby mode to activate or deactivate the
handset Ringer. The
icon turns on or off.
Muting the Microphone
Press key to switch the microphone on or off during a call. The
icon turns on or off.
Paging the Handset
If a handset has been misplaced, it is possible to call all the handsets.
Short press the Page key on the base station.
To stop the page call:
Short press any key on the handset or press page key brie y on the
base.
Switching the Key Lock On/Off
Press and hold key to activate or deactivate the key lock. The icon
turns on or off.
16
PIX2000 User Guide.indd 章节2:16PIX2000 User Guide.indd 章节2:16 2009-6-30 17:33:322009-6-30 17:33:32
Page 19
Redial Function
Redial Function
The last 10 numbers you dialled are stored in handset redial memory.
Review and Dial Redial Record
1. When the handset is in standby, press key to display the last
redial record. If the redial record is empty, “EMPTY” will be shown.
2. Press
3. The telephone number will automatically dial out.
Save Redial Number
1. When the handset is in standby mode, press key.
2. Press
3. Press
NUMBER”, press
be shown, press
desired name.
You must input the name, otherwise the record can’t be saved.
4. Press key to save.
or key to select the desired redial number.
or key to select the desired redial number.
key to enter menu, press or key to select “SAVE
key on the handset, the selected number will
key, “ENTER NAME” will be shown and input the
Delete a Single Redial Record
1. When the cordless handset is in standby mode, press key.
2. Press
3. Press
“DELETE?”, press
4. Press
PIX2000 User Guide.indd 章节2:17PIX2000 User Guide.indd 章节2:17 2009-6-30 17:33:332009-6-30 17:33:33
or key to select the desired redial number.
key to enter menu, press or key to select
key, “CONFIRM?” will be shown.
key to con rm.
17
Page 20
Redial Function
Delete All Redial Records
1. When the handset is in standby mode, press key.
2. Press
3. Press
“DELETE ALL?”, press
4. Press
Note:
During redial function operating, if you want to return to the upper
layer menu, press
or key to select the desired redial number.
key to enter menu, press or key to select
key, “CONFIRM?” will be shown.
key to con rm.
key.
18
PIX2000 User Guide.indd 章节2:18PIX2000 User Guide.indd 章节2:18 2009-6-30 17:33:332009-6-30 17:33:33
Page 21

Caller ID Service
Caller ID Service
The caller’s information will be displayed and recorded if you have
subscribed to Caller ID service from your telephone network service
provider.
When the telephone rings, the caller’s information will be displayed on
the handset LCD display. This information includes the phone number.
The handset can store up to 20 calls for later review (up to 16 digits
and 16 characters for each record). When the memory is full, a new call
automatically replaces the oldest call in the memory.
Note:
If the caller’s information includes Date/Time, the Date/Time will be
stored with the record.
If the callers number is the same as the number in the phonebook
memory, the matched name stored in the phonebook memory will be
displayed.
The handset will prompt you if there is an unanswered call.
When the handset is in standby mode, “
other display information.
If you have reviewed all the missed calls from the handset, the “
will disappear.
” will be displayed prior to
” icon
Note:
1. If you have reviewed all the missed calls from one handset, the
” icon will still remain on other handsets.
“
2. Press * key to toggle between name and number.
Review Caller ID Record
1. When the handset is in standby mode, press key to display the
information for the last call received.
2. Press
3. When you scroll to the end, “--(GO BACK)--” will be shown.
PIX2000 User Guide.indd 章节2:19PIX2000 User Guide.indd 章节2:19 2009-6-30 17:33:332009-6-30 17:33:33
or key to review all call records.
19
Page 22

Caller ID Service
Note:
1. The “
” icon will turn on if the call is a missed call.
2. “EMPTY” will be displayed for 2 seconds and return to standby
mode if you have not received any call.
Edit and Dial Call Record
You can edit the call record so as to dial back.
1. When the handset is in standby mode, press
2. Press
3. Press
4. Press
5. To insert a digit using the keypad at a desired location. To delete a digit
before the cursor, press
6. After editing, take telephone line with the handset, the number will be
automatically dialled out.
or key to select the desired record.
key to enter menu.
or key to select “SELECT”, press key.
key.
key.
Note:
You may edit the number and make the call, but the edited number
cannot be saved in this option.
Save Call Record
1. When the handset is in standby mode, press key.
2. Press
3. Press
4. Press
The selected number will be shown, press
will be shown and input the desired name. You must input the name,
otherwise the record can’t be saved.
5. Press
or key to select the desired record.
key to enter menu.
or key to select “SAVE NUMBER”, press key.
key, “ENTER NAME”
key to save.
20
PIX2000 User Guide.indd 章节2:20PIX2000 User Guide.indd 章节2:20 2009-6-30 17:33:332009-6-30 17:33:33
Page 23

Delete a Single Call Record
1. When the handset is in standby mode, press key.
2. Press or key to select the desired record.
3. Press
4. Press
key to enter menu.
or key to select “DELETE?”, press key,
“CONFIRM?” will be shown.
5. Press key to con rm.
Delete All Call Record
1. When the handset is in standby mode, press key.
2. Press
3. Press
4. Press
“CONFIRM?” will be shown.
5. Press
or key to select the desired record.
key to enter menu.
or key to select “DELETE ALL?”, press key,
key to con rm.
Caller ID Service
21
PIX2000 User Guide.indd 章节2:21PIX2000 User Guide.indd 章节2:21 2009-6-30 17:33:332009-6-30 17:33:33
Page 24

Phone Book
Phone Book
The telephone can store up to 25 entries in the phone book with name
and call number. When the function is supported by the telephone
network service provider and the caller, the handset displays the name of
the caller (when stored in the phone book).
Store Entries
1. Press key to access phone book memory.
2. Press
3. Press
4. Enter number (max. 16 digits) and press
5. Enter name (max. 16 characters) and press
Note:
1. When the capacity is full, MEMORY FULL will display.
2. Any incorrect input can be deleted by pressing key.
Select Entries
key to access phone book menu.
or key to select ADD NEW and press key.
key when nished
key when nished.
Press key to access phone book memory.
1. Press
2. Press
to select the submenu “SELECT”.
3. Press
number and make the call, but the edited number cannot be saved in
this option.
or key to scroll.
key to select a desired entry, and then press or
key to select the telephone number, you may edit the
Edit Entries
Press key to access phone book memory.
1. Press
2. Press
to select the submenu “EDIT”.
22
PIX2000 User Guide.indd 章节2:22PIX2000 User Guide.indd 章节2:22 2009-6-30 17:33:332009-6-30 17:33:33
or key to scroll.
key to select a desired entry, and then press or
Page 25

Phone Book
3. Press
to start Number edition and press key again to start
Name edition.
4. Press
key to con rm.
Note:
Press key to delete any incorrect input.
Delete Entries
Press key to access phone book memory.
1. Press
2. Press
or key to scroll.
key to select a desired entry, and then press or
to select the submenu “DELETE ?”.
3. Press
4. Press
key to delete the entry.
key again to con rm.
Delete All Entries
Press key to access phone book memory.
1. Press
2. Press
to select the submenu “DELETE ALL?”.
3. Press key to delete the entry.
4. Press
or key to scroll.
key to select a desired entry, and then press or
key again to con rm.
23
PIX2000 User Guide.indd 章节2:23PIX2000 User Guide.indd 章节2:23 2009-6-30 17:33:332009-6-30 17:33:33
Page 26

Menu Operation
Menu Operation
Handset Settings
Ring Melody
You may select one of the 10 available ringer tones for your incoming
calls alert tone.
1. Press
2. Press
3. Press
4. Press
melody will sound.
5. Press
Ring Volume
You may select one of the 5 available volumes for your incoming call alert
tone. The ringer can be disabled by pressing
standby mode.
1. Press key.
2. Press
3. Press
4. Press
volume will sound.
5. Press
key.
or key to select “SETUP HS” and press key.
or key to select “RING MELODY” and press key.
or key to select the desired ring melody, the selected
key to con rm the setting.
key for 1.5 seconds in
or key to select “SETUP HS” and press key.
or key to select “RING VOLUME” and press key.
or key to select the desired ring volume, the selected
key to con rm the setting.
TONES
Low Battery
You may set the warning beep to “ON” when your cordless handset
battery is low, to alert you to charge the battery.
1. Press
2. Press
24
PIX2000 User Guide.indd 章节2:24PIX2000 User Guide.indd 章节2:24 2009-6-30 17:33:332009-6-30 17:33:33
key.
or key to select “SETUP HS” and press key.
Page 27

Menu Operation
3. Press
4. Press
5. Press
6. Press
or key to select “TONES” and press key.
or key to select “LOW BATTERY” and press key.
or key to select “ON” or “OFF”.
key to con rm the setting.
No Coverage
You may set the warning beep to “ON” or “OFF” when the cordless
handset is out of range.
1. Press
2. Press
3. Press
4. Press
5. Press
6. Press
key.
or key to select “SETUP HS” and press key.
or key to select “TONES” and press key.
or key to select “NO COVERAGE” and press key.
or key to select “ON” or “OFF”.
key to con rm the setting.
Key Tone
You may set the key tone to “ON” or “OFF” when you press the keypad.
1. Press
2. Press
3. Press
4. Press
5. Press
6. Press
key.
or key to select “SETUP HS” and press key.
or key to select “TONES” and press key.
or key to select “KEY TONE” and press key.
or key to select “ON” or “OFF”.
key to con rm the setting.
Auto Talk
This option allows you to pick up the cordless handset from the charger
to answer the call directly when you receive an incoming call no need
press
1. Press
2. Press
3. Press
PIX2000 User Guide.indd 章节2:25PIX2000 User Guide.indd 章节2:25 2009-6-30 17:33:342009-6-30 17:33:34
or key.
key.
or key to select “SETUP HS” and press key.
or key to select “AUTO TALK” and press key.
25
Page 28

Menu Operation
4. Press or key to select “ON” or “OFF”.
5. Press
key to con rm the setting.
Alarm
1. Press
2. Press
3. Press
4. Press
key.
or key to select SETUP HS and press key.
or key to select ALARM and press key.
or key to select “ON” or “OFF”.
5. Enter HH:MM in 24 hour format
6. Press
key to con rm.
Note:
When the Alarm time is reached, “ALARM ON” will blink and the
alarm sound will stop after around 1 minute.
Handset Name
You can set the cordless handset name that you like.
1. Press
2. Press
3. Press
4. Press
key.
or key to select “SETUP HS” and press key.
or key to select “NAME” and press key.
key to delete the current name.
5. Input the desired name using number key.
6. Press
key to con rm the setting.
Language
Your cordless handset has different display language, the name of each
language setting is always spelt in its own language.
1. Press
2. Press
3. Press
4. Press
5. Press
26
PIX2000 User Guide.indd 章节2:26PIX2000 User Guide.indd 章节2:26 2009-6-30 17:33:342009-6-30 17:33:34
key.
or key to select “SETUP HS” and press key.
or key to select “LANGUAGE” and press key.
or key to select Language.
key to con rm the setting.
Page 29

Menu Operation
Reset Handset
This option allows you to restore the cordless handset to the default
setting.
1. Press
2. Press
3. Press
key.
or key to select “SETUP HS” and press key.
or key to select “RESET” and press key, the LCD
will display “RESET?”.
4. Press
key to con rm the setting.
Base Setting
Change PIN
The PIN prevents un-wanted changes. The default setting is “0000”. You
may change the PIN. If you change the PIN, please note the change and
keep it in a safe place.
1. Press
2. Press
3. Press
the LCD will show “ENTER PIN”.
4. Press number keys to input the old PIN code and press
LCD will show “NEW PIN”, prompting you to input a new PIN code.
5. Input the desired new PIN code and press key, the LCD will show
“REPEAT PIN”, prompting you to input the new PIN code again.
6. Input the new PIN code again and press
setting.
key.
or key to select “SETUP BS” and press key.
or key to select “CHANGE PIN” and press key,
key, the
key to confirm the
Note:
1. The PIN code must be 4 digits.
2. “Wrong PIN” will be shown if the old PIN code you input is wrong,
and then return to step 4.
3. If the new PIN code that you input two times is different, the
change will fail, the display will return to step 5.
27
PIX2000 User Guide.indd 章节2:27PIX2000 User Guide.indd 章节2:27 2009-6-30 17:33:342009-6-30 17:33:34
Page 30

Menu Operation
Ringer Melody (external / internal)
You may select one base ring tone for your incoming call tone.
1. Press
2. Press
3. Press
4. Press
key.
or key to select SETUP BS and press key.
or key to select RING MELODY and press key.
or key to select the desired ring melody, the selected
melody will sound.
5. Press key to con rm the setting.
Ringing Volume
You may select one of the 5 available volumes for your incoming call
tone.
1. Press
2. Press
3. Press
4. Press
key.
or key to select “SETUP BS” and press key.
or key to select “RING VOLUME” and press key.
or key to select the desired ring volume, the selected
volume will be sounded.
5. Press key to con rm the setting.
Recall Time
You may select Recall time according to your needs.
1. Press
2. Press
3. Press
4. Press
5. Press
key.
or key to select “SETUP BS” and press key.
or key to select “RECALL TIME” and press key.
or key to select the desired Recall time.
key to con rm the setting.
VMWI
If you have subscribed to a voice messaging service, the
icon will
display on the handset to alert you if you have a messages waiting.
To turn Visual Message Waiting Indication (VMWI) off
28
PIX2000 User Guide.indd 章节2:28PIX2000 User Guide.indd 章节2:28 2009-6-30 17:33:342009-6-30 17:33:34
Page 31

Menu Operation
1. Press key.
2. Press
3. Press
or key to select “SETUP BS” and press key.
or key to select “VMWI” and press key. “VMWI
OFF?” will display.
4. Press
key to con rm the setting.
Reset Base
This option allows you to restore the base and Date/Time to the default
setting.
1. Press
2. Press
3. Press
key.
or key to select “SETUP BS” and press key.
or key to select “RESET” and press key, the LCD
will display “ENTER PIN”.
4. Input the correct PIN code using the number key, press key to con rm,
and the LCD will display “RESET?”
5. Press
key to con rm the setting.
Date / Time
You can set the Date/Time displayed in standby mode.
1. Press
2. Press
key.
or key to select “DATE/TIME” and press key.
3. Input the correct last two digits of year (range: 00-99) using number
key, press
key to con rm the setting and enter month and date
setting.
4. Input the correct month and date, the format is: date / month (date
range: 01-30/31, month range: 01-12), press key to confirm the
setting and enter time setting.
5. Input the correct time, the format is: hour/minute (hour range: 00-23,
minute range: 00-59).
6. Press
PIX2000 User Guide.indd 章节2:29PIX2000 User Guide.indd 章节2:29 2009-6-30 17:33:342009-6-30 17:33:34
key to con rm the setting.
29
Page 32

Menu Operation
Note:
If the value you input is over the range during setting, you can’t enter
the next setting, please enter the correct setting again.
Registration
Register new handsets on the pix2000 base
The handset which comes with this pack is already registered to the
base. If you buy new handsets. You need to register them before use.
Up to 6 cordless handsets can be registered to one base.
1. Press
2. Press
3. Press
Press
will display “ENTER PIN”.
4. Input the correct PIN code and press
cordless handset, the LCD will display “SEARCHING”.
5. Press and hold the page key for about 15 seconds.
key.
or key to select “REGISTRATION” and press key.
or key to select “REGISTER” and press key,
or key to select a base and press key, the LCD
key to begin to register the
Note:
1. “SUCCESSFUL” will be show on the handset LCD display if the
handset is registered to the base. Cordless handset number will be
shown after it returns to standby mode.
2. “FAIL” will show on the handset LCD display if the cordless handset
failed to register to the base, register the handset again.
Select Base
This option allows you to select a base.
1. Press
2. Press
3. Press
key.
or key to select “REGISTRATION” and press key.
or key to select “SEL BASE” and press key, Press
or key to select a speci c base or Auto.
30
PIX2000 User Guide.indd 章节2:30PIX2000 User Guide.indd 章节2:30 2009-6-30 17:33:342009-6-30 17:33:34
Page 33

Menu Operation
4. Press key to con rm the setting.
Remove Handset
This option allows you to remove the registered cordless handset from
the base.
1. Press
2. Press
3. Press
key.
or key to select “REGISTRATION” and press key.
or key to select “REMOVE HS” and press key,
the LCD will display “ENTER PIN”.
4. Input the correct PIN code and press key.
5. Press
remove and press
or key to select the cordless handset you want to
key, the LCD will display “SAVED”.
Note:
1. The removed handset LCD will show “SEARCHING”. You must
register it again before using it.
2. If the PIN code you input is wrong, “WRONG PIN” will be shown on
cordless handset LCD.
31
PIX2000 User Guide.indd 章节2:31PIX2000 User Guide.indd 章节2:31 2009-6-30 17:33:352009-6-30 17:33:35
Page 34

Operation and setup of the picture frame
Operation and setup of the picture frame.
DIM Mode
DIM Mode: You can press the button to change the LCD brightness to
very dim for use in dark rooms.
Exit DIM Mode: In DIM mode, you can press
digital photo frame to normal brightness and contrast.
Note:
In DIM mode, all the functions operate as normal.
Main Menu Screen:
When the power is switched on, the main menu screen will be displayed.
You can press the
When the Photo Frame is linked to the base the screen will show the
following:
key at any time to enter the main menu screen.
button to change the
Note:
The number “1” indicates the handset number. It can be 1 to 6.
32
PIX2000 User Guide.indd 章节2:32PIX2000 User Guide.indd 章节2:32 2009-6-30 17:33:352009-6-30 17:33:35
Page 35

Operation and setup of the picture frame
When the Photo Frame is out of range the following will be displayed:
When the Photo Frame is not registered the display will show the
following:
33
PIX2000 User Guide.indd 章节2:33PIX2000 User Guide.indd 章节2:33 2009-6-30 17:33:352009-6-30 17:33:35
Page 36

Operation and setup of the picture frame
View photo
Select [Photo] icon using the navigator key and press on the photo
frame or on the remote control to enter photo application, or press the
button to enter photo application.
If you set “Auto-play” to “ON”, it will enter the slide show mode
automatically; if you set “Auto-play” to “OFF”, it will enter the le manager
or thumbnail mode. If there are no photos, it will return to main menu.
Photo frame buttons:
• : Return to main menu screen
•
: Con rm to play or to pause the picture.
•
: Previous photo
•
: Next photo
•
Remote control buttons:
: Stop to play the picture.
•
•
•
•
•
•
•
•
•
: Return to main menu screen
: Previous photo / Previous page
: Next photo / Next page
: Flip horizontal
: Flip vertical
: Left rotation
: Right rotation
: Con rm to play or to pause the picture.
: Stop to play the picture.
Note:
The le folder structure should not exceed: 6 levels of folders or 150
folders or 1300 files. Otherwise an external memory reading error
may occur.
34
PIX2000 User Guide.indd 章节2:34PIX2000 User Guide.indd 章节2:34 2009-6-30 17:33:352009-6-30 17:33:35
Page 37

Operation and setup of the picture frame
Show Calendar and set:
Select [Calendar] icon using the navigator key in the main menu and
press
Display Calendar or set and the LCD screen will show below:
There are three selections, using the navigator key select and press
on the photo frame or on the remote control to proceed.
• Display: Display the current calendar.
• Set Date: Set the current date using the navigation keys
• Exit: Exit Calendar Application.
on the photo frame or on the remote control to proceed, it will
35
PIX2000 User Guide.indd 章节2:35PIX2000 User Guide.indd 章节2:35 2009-6-30 17:33:352009-6-30 17:33:35
Page 38

Operation and setup of the picture frame
Display screen of calendar
During calendar display screen, you can press or buttons to scroll
through the month or press
or button to scroll the year.
Show time and set
Select [Clock] icon using the navigator key in the main menu and press
on the photo frame or on the remote control to proceed, the LCD
screen will show below:
36
PIX2000 User Guide.indd 章节2:36PIX2000 User Guide.indd 章节2:36 2009-6-30 17:33:352009-6-30 17:33:35
Page 39

Operation and setup of the picture frame
There are three options:
• Display
• Set Time
• Exit
Display:
• Clock: Display clock only as shown below:
• Clock & Calendar: Display clock with calendar:
37
PIX2000 User Guide.indd 章节2:37PIX2000 User Guide.indd 章节2:37 2009-6-30 17:33:362009-6-30 17:33:36
Page 40

Operation and setup of the picture frame
Set time:
You can use the navigation keys to change the time.
Exit: Exit Clock Application.
Alarm Menu
Select [Alarm] icon using the navigator key in the main menu and press
on the photo frame or on the remote control to proceed, the LCD
screen will show below:
There are three options:
• Enable
• Set Time
• Exit
Enable:
• On: Enable alarm function
• Off: Disable alarm function
Set time:
You can set the alarm time using the navigation keys:
38
PIX2000 User Guide.indd 章节2:38PIX2000 User Guide.indd 章节2:38 2009-6-30 17:33:362009-6-30 17:33:36
Page 41

Operation and setup of the picture frame
Exit: Exit Alarm Application.
During Alarm operation:
If set to on, and the alarm and the time is reached, a polyphonic tone will
ring and the following screen will be shown:
User can press any key to exit the alarm mode and end the alarm tone or
it will turn off automatically after 5 minutes of continuous alert.
39
PIX2000 User Guide.indd 章节2:39PIX2000 User Guide.indd 章节2:39 2009-6-30 17:33:362009-6-30 17:33:36
Page 42

Operation and setup of the picture frame
Note:
- When the photo frame is on a call or during registration, the alarm
will be delayed.
- Upon exiting the alarm screen, the main menu screen will appear.
Setup Menu
Select [Setup] icon using the navigator key in the main menu and press
on the photo frame or on the remote control to proceed, the LCD
screen will show below:
There are 5 options:
: Photo Setting
: Auto-Play
: Display setup
: Custom setup
: Exit
Using the navigator key, select and press
on the photo frame or on
the remote control, you will be able to setup the following functions.
40
PIX2000 User Guide.indd 章节2:40PIX2000 User Guide.indd 章节2:40 2009-6-30 17:33:362009-6-30 17:33:36
Page 43

Operation and setup of the picture frame
Menu Structure:
1st layer 2nd layer 3rd layer
Photo Setting
- 5 sec
- 10 sec
- 15 sec
Interval Time
Transition Effect
Show Type
Browse
Auto-Play
Photo
- 30 sec
- 1 min
- 3 min
- Off
- No Effect
- Blind Vertical
- Blind Horizontal
- Colour Ration Vertical
- Colour Ration Horizontal
- Block 1
- Block 2
- Block 3
- Block 4
- Block 5
- Block 6
- Block 7
- Block 8
- Block 9
- Fade In Fade Out
- Random
- Fit Screen
- Full Screen
- Thumbnail
- File Manager
- ON
- OFF
41
PIX2000 User Guide.indd 章节2:41PIX2000 User Guide.indd 章节2:41 2009-6-30 17:33:362009-6-30 17:33:36
Page 44

Operation and setup of the picture frame
Display setup
Contrast -7 … 0 …+7
Brightness -7 … 0 …+7
Saturation -7 … 0 …+7
Custom setup
Language
Style
Repeat Mode
Factory default - Con rmed
Exit
- English
- Francais
- Deutsch
- Italiano
- Espanol
- Portugues
- Nederlands
- Style1
- Style2
- Style3
- Style4
- Off
- One
- Folder
- All
Photo setting:
• Interval time: The time during playing photos, there are various
selections.
• Transition Effect: The format for playing photos. There are 14 effects
and totally 16 selections.
• Show Type: The type of photo display. There are 2 selections: full screen
and t screen.
• Browse: The display format for managing photos. There are 2
selections: le manager or thumbnail.
- File Manager Mode: If you set the browse method to le manager,
42
PIX2000 User Guide.indd 章节2:42PIX2000 User Guide.indd 章节2:42 2009-6-30 17:33:362009-6-30 17:33:36
Page 45

Operation and setup of the picture frame
when you are playing photos, press
on the photo frame or
on the remote control, the following screen will be shown. On the left
side, the selected photo will be shown:
- Thumbnail: If you set the browse method to thumbnail, when you are
playing photos, press
on the photo frame or on the remote
control, the following screen will be shown:
Rotate photos during thumbnail mode:
Step1: Select [Rotate] icon using the navigator key and press
on the
photo frame or on the remote control to proceed.
43
PIX2000 User Guide.indd 章节2:43PIX2000 User Guide.indd 章节2:43 2009-6-30 17:33:372009-6-30 17:33:37
Page 46

Operation and setup of the picture frame
Step2: Select one photo by navigator key and press
on the photo
frame or on the remote control to rotate the selected photo.
Auto-Play setting:
• Photo: If it is set to “ON”, when user select the Photo feature in the
main menu, it will enter the slide show mode automatically. If you set
it to “OFF”, it will enter thumbnail or le manager mode for viewing the
photo.
Display Setup:
• Contrast: You can set the contrast of LCD
• Brightness: You can set the brightness of LCD
• Saturation: You can set the saturation of LCD
Custom setup:
• Language: You can set the language of the menu.
• Style: There are 4 selections:
• Repeat Mode: For showing photos.
- Off: turn off the repeat mode
- One: repeat playing the selected photos once
- Folder: repeat all the photos in this le folder
- All: Repeat all the photos.
• Factory default: All the settings return to default settings.
Exit: Exit the Setup Application.
Phonebook Menu
The photo frame can store up to 40 entries in the phonebook with name,
number and picture.
Select [Phonebook] icon using the navigator key in the main menu and
press
Note:
Only JPEG les can be added into the phonebook.
44
PIX2000 User Guide.indd 章节2:44PIX2000 User Guide.indd 章节2:44 2009-6-30 17:33:372009-6-30 17:33:37
on the photo frame or on the remote control to proceed.
Page 47

Operation and setup of the picture frame
After entering Phonebook application the screen shows:
There are three options:
• Review: review the phonebook record
• Add: add new entry into phonebook
• Exit: return to main menu
Phonebook Review Menu
Select [Review] using the navigator key and press
on the photo frame
or on the remote control to proceed, the LCD screen will show below:
45
PIX2000 User Guide.indd 章节2:45PIX2000 User Guide.indd 章节2:45 2009-6-30 17:33:372009-6-30 17:33:37
Page 48

Operation and setup of the picture frame
There are four selections:
• Edit: edit the selected entry.
• Delete: delete the selected entry.
• Delete All: delete all entries.
• Return: return to Phonebook application screen.
Edit Menu
Step1: Select one entry during phonebook review screen and press
on the photo frame or on the remote control.
Step2: Select [Edit] using the navigator key and press
on the photo
frame or on the remote control to proceed.
Step3: Select digits or characters using the navigator key and press
on
the photo frame or on the remote control to input name or number.
Step4: Select [Save] using the navigator key and press on the photo
frame or on the remote control to proceed.
Step5: Press the
button on the photo frame or on the remote control
to select one photo.
Step6: Select [Save] icon using the navigator key and press
on the
photo frame or on the remote control to con rm.
Note:
If there is no external memory, Step5 and Step6 will not appear.
Delete record
Step1: Select one entry during phonebook review screen and press
on the photo frame or on the remote control.
Step2: Select [Delete] using the navigator key and press
on the photo
frame or on the remote control to proceed.
Step3: Select [OK] using the navigator key and press
on the photo
frame or on the remote control to con rm.
Delete All records
Step1: Select one entry during phonebook review screen and press
46
PIX2000 User Guide.indd 章节2:46PIX2000 User Guide.indd 章节2:46 2009-6-30 17:33:372009-6-30 17:33:37
Page 49

Operation and setup of the picture frame
on the photo frame or on the remote control.
Step2: Select [Delete All] using the navigator key and press
photo frame or on the remote control to proceed.
Step3: Select [OK] using the navigator key and press
on the photo
frame or on the remote control to con rm.
Add phonebook menu
Step1: Select [Add] icon using the navigator key and press on the
photo frame or on the remote control to proceed.
Step2: Select digits or characters using the navigator key and press
on the photo frame or on the remote control to input name or
number.
Step3: Select [Save] using the navigator key and press
on the photo
frame or on the remote control to proceed.
Step4: Press
button on the photo frame or on the remote control to
select one photo.
Step5: Select [Save] icon using the navigator key and press
photo frame or on the remote control to con rm.
Note:
If there is no external memory, Step4 and Step5 will not appear.
on the
on the
Dial out from phonebook
During phonebook review screen, you can select one entry using the
navigation key, and then pressing
on the photo frame or on the
remote control to dial out the selected number. During the call, you can
press
on the photo frame or on the remote control to end the call.
Call log Menu
The photo frame can store up to 30 call logs. Select [Call Log] icon using
the navigator key in the main menu and press
on the remote control to proceed. The following screen will be shown.
PIX2000 User Guide.indd 章节2:47PIX2000 User Guide.indd 章节2:47 2009-6-30 17:33:372009-6-30 17:33:37
on the photo frame or
47
Page 50

Operation and setup of the picture frame
There are four options:
• All Calls: including all missed and received calls
• Missed calls: not answered calls (including Call-waiting CID)
• Received calls: answered calls (including Call-waiting CID)
• Exit:
The photo frame can’t save the logs for calls without CID.
If you select [All Calls] or [Missed calls], [Received calls] and press
on the photo frame or on the remote control, the LCD screen will show
below.
48
PIX2000 User Guide.indd 章节2:48PIX2000 User Guide.indd 章节2:48 2009-6-30 17:33:372009-6-30 17:33:37
Page 51

There are four options:
• Add: save the call log to phonebook
• Delete: delete the selected call log
• Delete All: delete all call logs
• Return: return to Call log screen.
Add call log to phonebook
Operation and setup of the picture frame
Step1: Select one log during call log review screen and press
the photo frame or on the remote control during call log review
screen.
Step2: Select [Add] using the navigator key and press
on the photo
frame or on the remote control to proceed.
Step3: Select digits or characters using the navigator key and press
on the photo frame or on the remote control to input number or
name.
Step4: Select [Save] icon using the navigator key and press
photo frame or on the remote control to proceed.
Step5: Select one photo using the navigator key and press on the
photo frame or on the remote control to proceed.
Step6: Select [Save] icon using the navigator key and press
photo frame or on the remote control to con rm.
Note:
If there is no external memory, Step5 and Step6 will not appear.
Delete one call log
Step1: Select one log during call log review screen and press
photo frame or on the remote control during call log review screen.
on
on the
on the
on the
Step2: Select [Delete] icon using the navigator key and press
on the
photo frame or on the remote control to proceed.
Step3: Select [OK] using the navigator key and press on the photo
frame or on the remote control to con rm.
49
PIX2000 User Guide.indd 章节2:49PIX2000 User Guide.indd 章节2:49 2009-6-30 17:33:382009-6-30 17:33:38
Page 52

Operation and setup of the picture frame
Delete All call logs
Step1: Select one log during call log review screen and press
the photo frame or on the remote control during call log review
screen.
Step2: Select [Delete All] icon using the navigator key and press
the photo frame or on the remote control to proceed.
Step3: Select [OK] using the navigator key and press on the photo
frame or on the remote control to con rm.
Dial out from Call Log
During Call log review screen, you can select one entry using the
navigation key, and then pressing on the photo frame or on the
remote control to dial out the selected number. During the call, you can
press
on the photo frame or on the remote control to end the call.
Phone Setup Menu
Select [Phone Setup] icon using the navigator key in the main menu and
press
There are ve options;
• Registration: link with cordless system
• Ringer Pattern: select ringer pattern
• Ringer Loudness: select current loudness
• Show Miss Call:
• Exit: Return to main menu.
on the photo frame or on the remote control to proceed.
on
on
50
PIX2000 User Guide.indd 章节2:50PIX2000 User Guide.indd 章节2:50 2009-6-30 17:33:382009-6-30 17:33:38
Page 53

Registration
Operation and setup of the picture frame
Step1: Select [Registration] icon using the navigator key and press
the photo frame or on the remote control to proceed.
Step2: Select digits using the navigator key and press on the photo
frame or on the remote control to input PIN.
Note:
The default PIN is “0000” and the PIN code must be 4 digits.
Step3: Press and hold the
Step4: Select [Save] icon using the navigator key and press
key on the base for about 15 seconds.
on the
photo frame or on the remote control to proceed, the LCD screen
will show “Searching…”
If the Photo Frame registration succeeds, the LCD screen will show “OK”.
Ringer Pattern
Step1: Select [Ringer Pattern] icon using the navigator key and press
on the photo frame or on the remote control to proceed.
Step2: Select desired ring pattern using the navigator key and press
on the photo frame or on the remote control to con rm.
on
51
PIX2000 User Guide.indd 章节2:51PIX2000 User Guide.indd 章节2:51 2009-6-30 17:33:382009-6-30 17:33:38
Page 54

Operation and setup of the picture frame
Ringer Loudness
Step1: Select [Ringer Loudness] icon using the navigator key and press
on the photo frame or on the remote control to proceed.
Step2: Select desired ring loudness using the navigator key and press
on the photo frame or on the remote control to con rm.
Show Miss Call
This selection can enable the appearance of the Missed Call screen alert
upon a missed call. (See section 11.5) To enable or disable this feature:
Step1: Select [Show Miss Call] icon using the navigator key and press
on the photo frame or on the remote control to proceed.
Step2: Select “On” or “Off” by navigator key and press
on the photo
frame or on the remote control to con rm.
52
PIX2000 User Guide.indd 章节2:52PIX2000 User Guide.indd 章节2:52 2009-6-30 17:33:382009-6-30 17:33:38
Page 55

Operation during an incoming call
Operation during an incoming call
LCD display during a call
The Photo Frame will stop any existing operations during an incoming
call, the photo frame will return to its previous operation after the call
ends.
Case 1: Incomming call where the number matches with a phonebook
entry, the displayed name will be in the phonebook instead of just
the number. The LCD screen will show below.
53
PIX2000 User Guide.indd 章节2:53PIX2000 User Guide.indd 章节2:53 2009-6-30 17:33:382009-6-30 17:33:38
Page 56

Operation during an incoming call
Case 2: Incomming call which the number does not match with the
phonebook, the unknown picture and the number will be shown
Case 3: If the caller ID name is absent or somehow unavailable, the LCD
will show below.
54
PIX2000 User Guide.indd 章节2:54PIX2000 User Guide.indd 章节2:54 2009-6-30 17:33:382009-6-30 17:33:38
Page 57

Operation during an incoming call
Case 4: If there is an external call without caller ID, the LCD will show
below.
Case 5: If there is an internal call, the LCD will show below.
55
PIX2000 User Guide.indd 章节2:55PIX2000 User Guide.indd 章节2:55 2009-6-30 17:33:392009-6-30 17:33:39
Page 58

Operation during an incoming call
Answering call
If there is an external call, you can press on the photo frame or
on the remote control to answer the call, the LCD screen will show as
below.
You can press on the photo frame or on the remote control to mute the
MIC, the LCD screen will show as below:
If there is an external call without CID or an internal call, after answering
the call, the LCD screen will show below.
56
PIX2000 User Guide.indd 章节2:56PIX2000 User Guide.indd 章节2:56 2009-6-30 17:33:392009-6-30 17:33:39
Page 59

Operation during an incoming call
You can press or to adjust the speakerphone volume during a call,
and can press
on the photo frame or on the remote control to end
the call.
Call Transfer
You can transfer an external call from a handset to the photo frame.
When the handset initiates the transfer, the LCD screen will show as if it
is being intercom.
Note:
- The photo frame can’t initiate call transfer.
- This function may not be provided when used with other bases or
handsets.
Call Waiting
If there is another incoming call while you are talking on the phone, the
LCD will show the information of the second call.
1. You can press on the photo frame or on the remote control to
answer the second call, and then the rst call will be on hold.
2. You can press
swap caller1 and caller2.
PIX2000 User Guide.indd 章节2:57PIX2000 User Guide.indd 章节2:57 2009-6-30 17:33:392009-6-30 17:33:39
on the photo frame or on the remote control
57
Page 60

Operation during an incoming call
Note:
For the call-log handling in call-waiting case:
• Unanswered the second call: logged in missed call list
• Answered the second call: logged in received call list
• Calls without CID will not be logged
Missed calls Display
If you set “Show Miss Call” to “On”, when there are missed calls, the
following screen will be shown.
You can press to see the details, and press to exit.
If You set “Show Miss Call” to “Off”, when there are missed calls, the
Missed call screen will not be shown, and the digital photo frame will
continue the previous state.
58
PIX2000 User Guide.indd 章节2:58PIX2000 User Guide.indd 章节2:58 2009-6-30 17:33:392009-6-30 17:33:39
Page 61

Troubleshooting
Problem Possible cause(s) Solution(s)
Troubleshooting
No dial tone on
the cordless
handset.
Antenna symbol
is ashing.
No beep when
the cordless
handset is
placed on the
charger.
1. The base unit is not
properly connected.
2. Too far from the base unit.
3. Battery charge is low.
4. Incorrect battery polarity.
5. Re-register handset.
1. The handset is not
registered. If the handset
is unregistered, it displays
UNREGISTERED.
2. The handset is out of
range.
3. The product is not properly
connected.
1. The handset is not placed
properly on the charger.
2. Charging contacts are
dirty.
3. No power connection to
base unit.
4. The handset’s power is
turned off.
1. Check CONNECTION to
power and telephone line.
2. Move handset CLOSER to
base unit.
3. CHARGE battery.
4. RE-INSERT batteries and
check + and
.
5. Handset not registered.
1. REGISTER the handset.
2. Move CLOSER to the base
unit.
3. Check power
CONNECTION to the base.
1. Lift handset off the
charger carefully and
REPOSITION correctly.
2. CLEAN charging contacts
with a clean and dry cloth.
3. Check power
CONNECTION to the base.
4. CHECK batteries.
Handset
charged for
24 hours but
Battery icon
remains empty.
1. Handset battery is
defective or faulty.
2. Handset is not placed
properly on the charger.
3. Battery installed incorrectly.
4. The product is not properly
connected.
PIX2000 User Guide.indd 章节2:59PIX2000 User Guide.indd 章节2:59 2009-6-30 17:33:392009-6-30 17:33:39
1. REPLACE with new AAA
rechargeable Ni-MH
batteries.
2. CHECK to make sure the
battery icon is scrolling.
3. RE-INSERT batteries and
check + and
.
4. Check power
CONNECTION to the base.
59
Page 62

Troubleshooting
Problem Possible cause(s) Solution(s)
No symbol on
the display.
Can’t transfer a
call.
Bad audio
quality
(crackles,echo,
etc.).
Caller ID does
not work.
Phone does not
ring when a call
comes in.
1. Battery is empty.
2. The product is not properly
connected.
1. Handset is busy.
2. Handset is out of range.
3. Wrong handset number.
1. CHARGE battery.
2. Make sure your product is
properly PLUGGED-IN.
1. Check ALL handsets and
END all calls.
2. Move handset CLOSER to
base unit.
3. Check HANDSET
NUMBER.
1. Interference from nearby
electrical appliance.
2. Base unit is installed in a
room with thick walls.
3. The handset is too far from
the base unit.
4. If you have Broadband/
ADSL you need a in line
lter (not supplied).
1. Try a different connection
point, one that is away
from other electrical
appliances.
2. Install the base unit in a
DIFFERENT room OR use
EXTENSION leads.
3. Move CLOSER to the base
unit.
4. Ensure a in-line ADSL
lter is installed on all
phone sockets between
wall plate and your phone.
Service not activated. Check your SUBSCRIPTION
with the SERVICE provider.
1. The ringer is off.
2. Too many phones are
sharing the same phone
line.
3. Base unit not plugged in.
1. Turn ON the ringer.
2. Disconnect some of the
phones from the phone
line.
3. Check base unit
CONNECTIONS.
Keypad does
Keypad may be locked. UNLOCK the keypad.
not work.
Busy tone + in
use light on.
1. Other handset may still be
connected.
2. Check power supply
connection.
60
PIX2000 User Guide.indd 章节2:60PIX2000 User Guide.indd 章节2:60 2009-6-30 17:33:392009-6-30 17:33:39
1. Check ALL handsets and
END all calls.
2. Check CONNECTIONS to
wall and base.
Page 63

Problem Possible cause(s) Solution(s)
Troubleshooting
Handset
registration fails
continuously.
Cannot make/
answer a 2nd
call
The maximum number of
handsets may already be
registered.
2nd call service can be
activated.
Delete un-used handset and
try again.
Check with your service
provider. Check the recall
selection is correct.
61
PIX2000 User Guide.indd 章节2:61PIX2000 User Guide.indd 章节2:61 2009-6-30 17:33:402009-6-30 17:33:40
Page 64

Warranty Information
Warranty Information (Australia)
(a) Warranty
Oricom warrants that the product is free from defects in materials
and workmanship for a period of 12 months effective from the date
of purchase. This warranty in no way affects your statutory warranty
under the Trade Practices Act 1974 or any other similar legislation.
It is important that you read the Warranty Card as it contains full and
additional details of the warranty, limitation of warranty and conditions for
receiving the warranty services during the warranty period. The Warranty
Card is located in the package. If you cannot locate the Warranty Card,
please contact our Customer Support Service on 1300 880 785.
(b) Exclusion and limitation of liability.
Oricom will not be in breach of a warranty or condition expressly stated
in this User Guide or the Warranty Card or implied by the Trade Practices
Act and excludes any liability arising under any statutory or common law
for damages or any other remedy if the damage occurs as a result of:
(i) Failure by you to follow the instructions in the User Guide for the
installation and proper functioning of the product;
(ii) Negligence on your part or misuse by you of the product;
(iii) A ny un-controlled external cause to the phone not functioning
including but not limited to electricity failure, lighting, over voltage;
(iv) Non adherence by you to the warnings in the User Guide and the User
Guide generally; and
(v) Modi cation to the product or services carried out to the product by
anyone other than Oricom or on Oricom's behalf.
Oricom will not be liable for consequential losses including loss of pro ts
arising from a cause of action in contract, tort or any other statutory or
common law (except where a statute or any law prohibits this exclusion).
The warranty does not extend to damage caused by misuse, negligence,
excessive voltage, faults on the telephone line or lightning. This warranty
in no way affects your statutory rights. Full details of the warranty are
contained in the enclosed warranty card.
62
PIX2000 User Guide.indd 章节2:62PIX2000 User Guide.indd 章节2:62 2009-6-30 17:33:402009-6-30 17:33:40
Page 65

Warranty Information
Notes for operation in New Zealand
The grant of a Telepermit for any item of terminal equipment indicates
only that Telecom has accepted that the item complies with the minimum
conditions for connection to its network. It indicates no endorsement of the
product by Telecom, nor does it provide any sort of warranty. Above all, it
provides no assurance that any item will work correctly in all respects with
another item of Telepermitted equipment of a different make or model, nor
does it imply that any product is compatible with all of Telecom’s network
services. This device may be subject to ringing or bell tinkle when certain
other devices are connected to the same line. If this occurs, the problem
should not be referred to the Telecom Faults service.
This equipment shall not be set to make automatic calls to the Telecom “111”
Emergency Service.
This equipment may not provide for the effective hand-over of a call to
another device connected to the same line.
63
PIX2000 User Guide.indd 章节2:63PIX2000 User Guide.indd 章节2:63 2009-6-30 17:33:402009-6-30 17:33:40
Page 66

Warranty Information
REN (RN for New Zealand)
The REN (Ringer Equivalence Number) or (RN) is of signi cance only if you
wish to connect more than 1 telephone to your telephone line. A standard
telephone line has a maximum REN capacity of 3 (RN of 5). It is possible
to connect 3 (5) devices with a REN of 1 (RN of 1) with no degradation to
the product’s performance. Exceeding this limit may cause the volume of
the ringer in any phone to decrease or not ring at all.
Caller ID
Customers using non Telecom toll services should not use the dial back
feature for local calls as this will incur a charge only the 7 digit number
should be dialled. Some of the CID services listed may not be available in
New Zealand.
This telephone is not designed for making emergency telephone calls
when the power fails. Make alternative arrangements for access to
emergency services.
64
PIX2000 User Guide.indd 章节2:64PIX2000 User Guide.indd 章节2:64 2009-6-30 17:33:402009-6-30 17:33:40
Page 67

Australia
Oricom International Pty Ltd
Locked Bag 658
South Windsor, NSW 2756
Customer Support
Email: support@oricom.com.au
Web: Australia www.oricom.com.au
New Zealand www.oricom.co.nz
Phone: (02) 4574 8888
Fax: (02) 4574 8898
PIX2000 User Guide.indd 2PIX2000 User Guide.indd 2 2009-6-30 17:33:262009-6-30 17:33:26
 Loading...