

Page 1
MI45 User guide
TABLE OF CONTENTS
Safety information.................................... ...........3
Pack contents......................................................4
LCD Display on the Handset.............................................................5
Basic Steps to Install.........................................................................6
Battery Level Indication.....................................................................6
Charging the Handset...................................................................... . 6
Registration of handset......................................7
During Standby.................................................................................8
Changing Handset Name..................................................................8
Additional handset for use with
Oricom M120 and M140 DECT
cordless phones
Safety information
Avoid exposure of this telephone to moisture or liquid.
•
To prevent electric shock, do not open the handset or base
•
cabinet.
• Avoid metallic contact (e.g. metal clips, keys) between the battery
contacts and charging conductors.
• Do not use the handset in an explosive hazard area such as
where there is gas leaking.
• Never use non-rechargeable batteries; use recommended type
supplied with this hone. Ni-MH batteries must be disposed of in
accordance with applicable waste disposal regulations.
• We advise that this phone should not be used near intensive care
medical equipment or by persons with pacemakers.
• Clean with a dry, soft, lint-free cloth. Never use cleaning agents,
particularly aggressive solvents.
• Because the phone works by sending radio signals between base
station and handset, wearers of hearing aids may experience
interference in the form of a humming noise.
Your phone can interfere with electrical equipment such as
•
answering machines, TV and radio sets, clock radios and
computers if placed too close. It is recommended that you
position the base unit at least one metre from such appliances
CAUTION
This telephone is not designed for making emergency telephone
calls when the mains power fails. Always have a corded
telephone available to be able to make and receive calls to
emergency services.
Do not use your telephone during an electrical storm
thunderstorm as it is possible to get an electric shock. Refer to
information contained in Telstra White pages directory.
3 of 10
.
Notes for operation in New Zealand..................9
Warranty Information........................................10
2 of 10
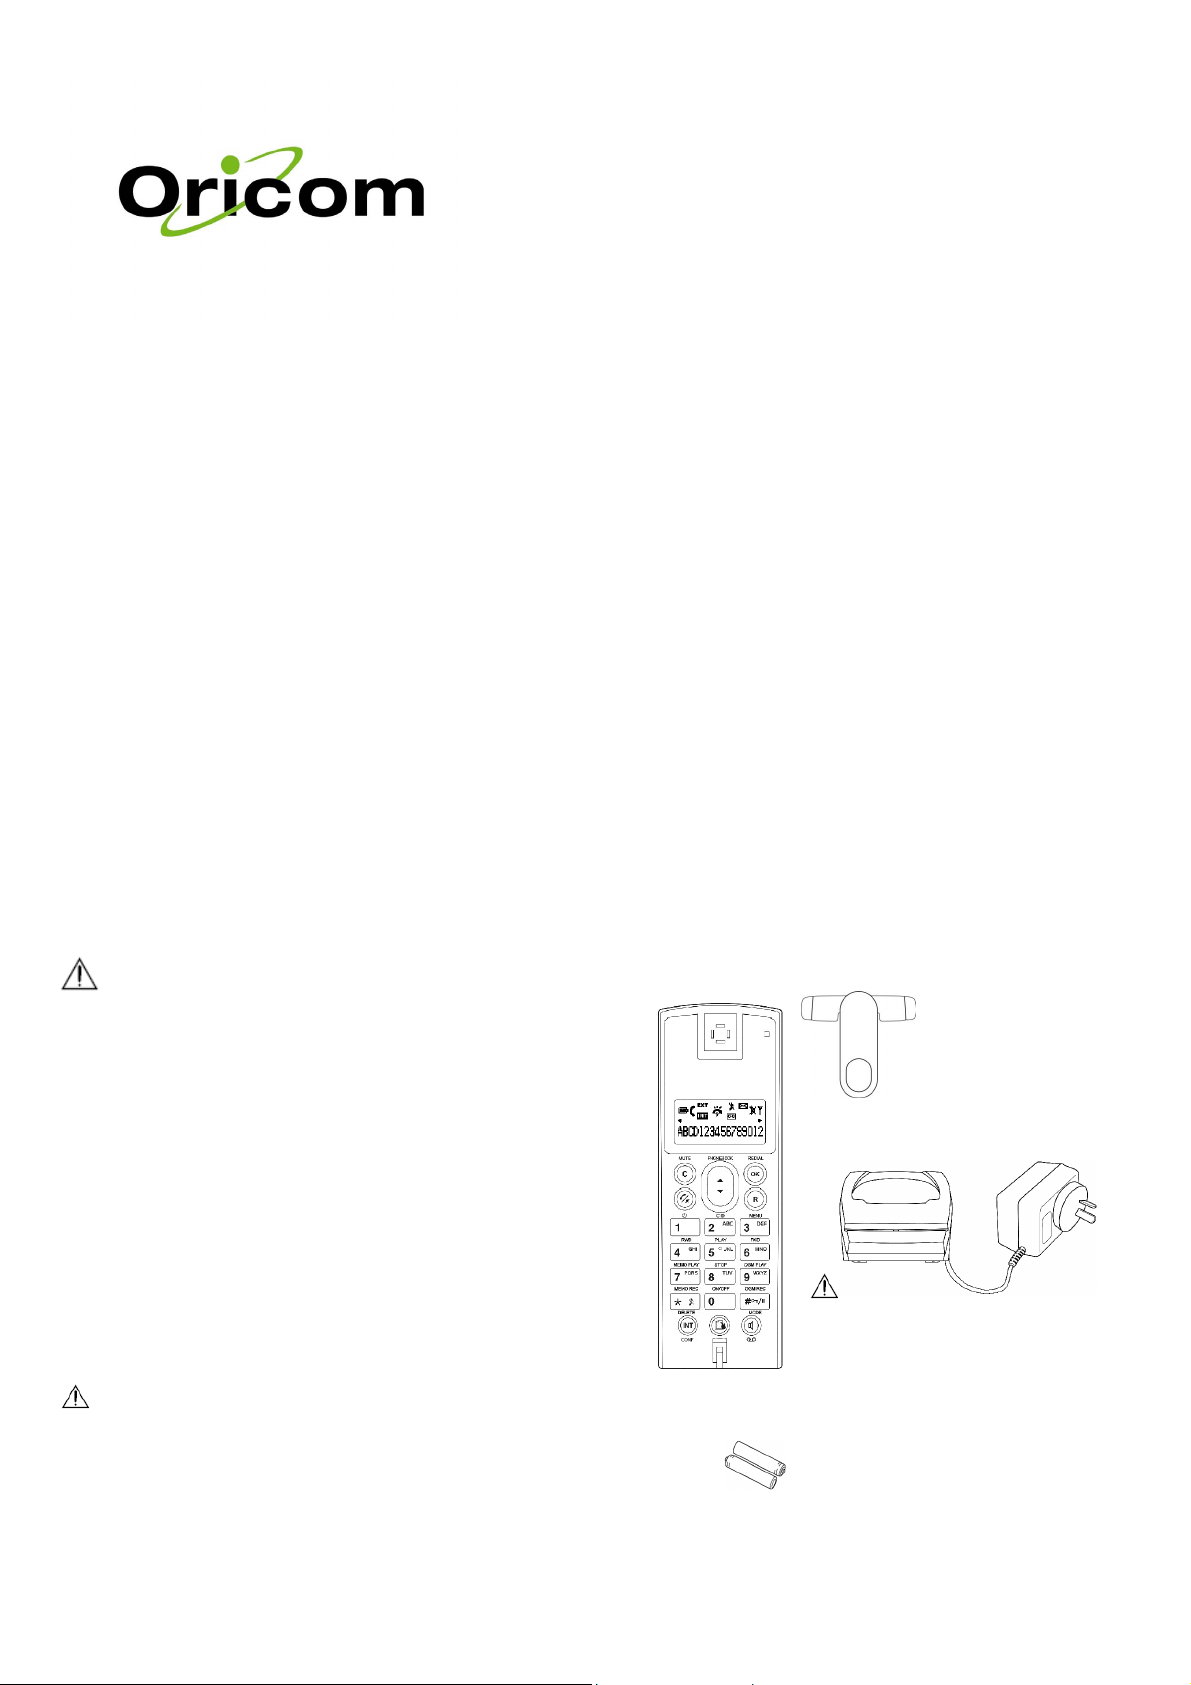
Pack contents
This package should contain the following:
Handset Belt Clip This User guide
Charger and inbuilt power adaptor
Use only the mains adapter supplied with this
phone. Incorrect adapter polarity or voltage
can seriously damage the unit.
Adapter Model No.:
Input: 240 VAC 50 Hz, Output: 9 VDC 150 mA
2 X Rechargeable Batteries – Ni-MH, 1.2V 650mAh AAA size (HR 10/44)
If any of these items are missing, please contact the retailer were you
purchased the product from.
4 of 10
Page 2
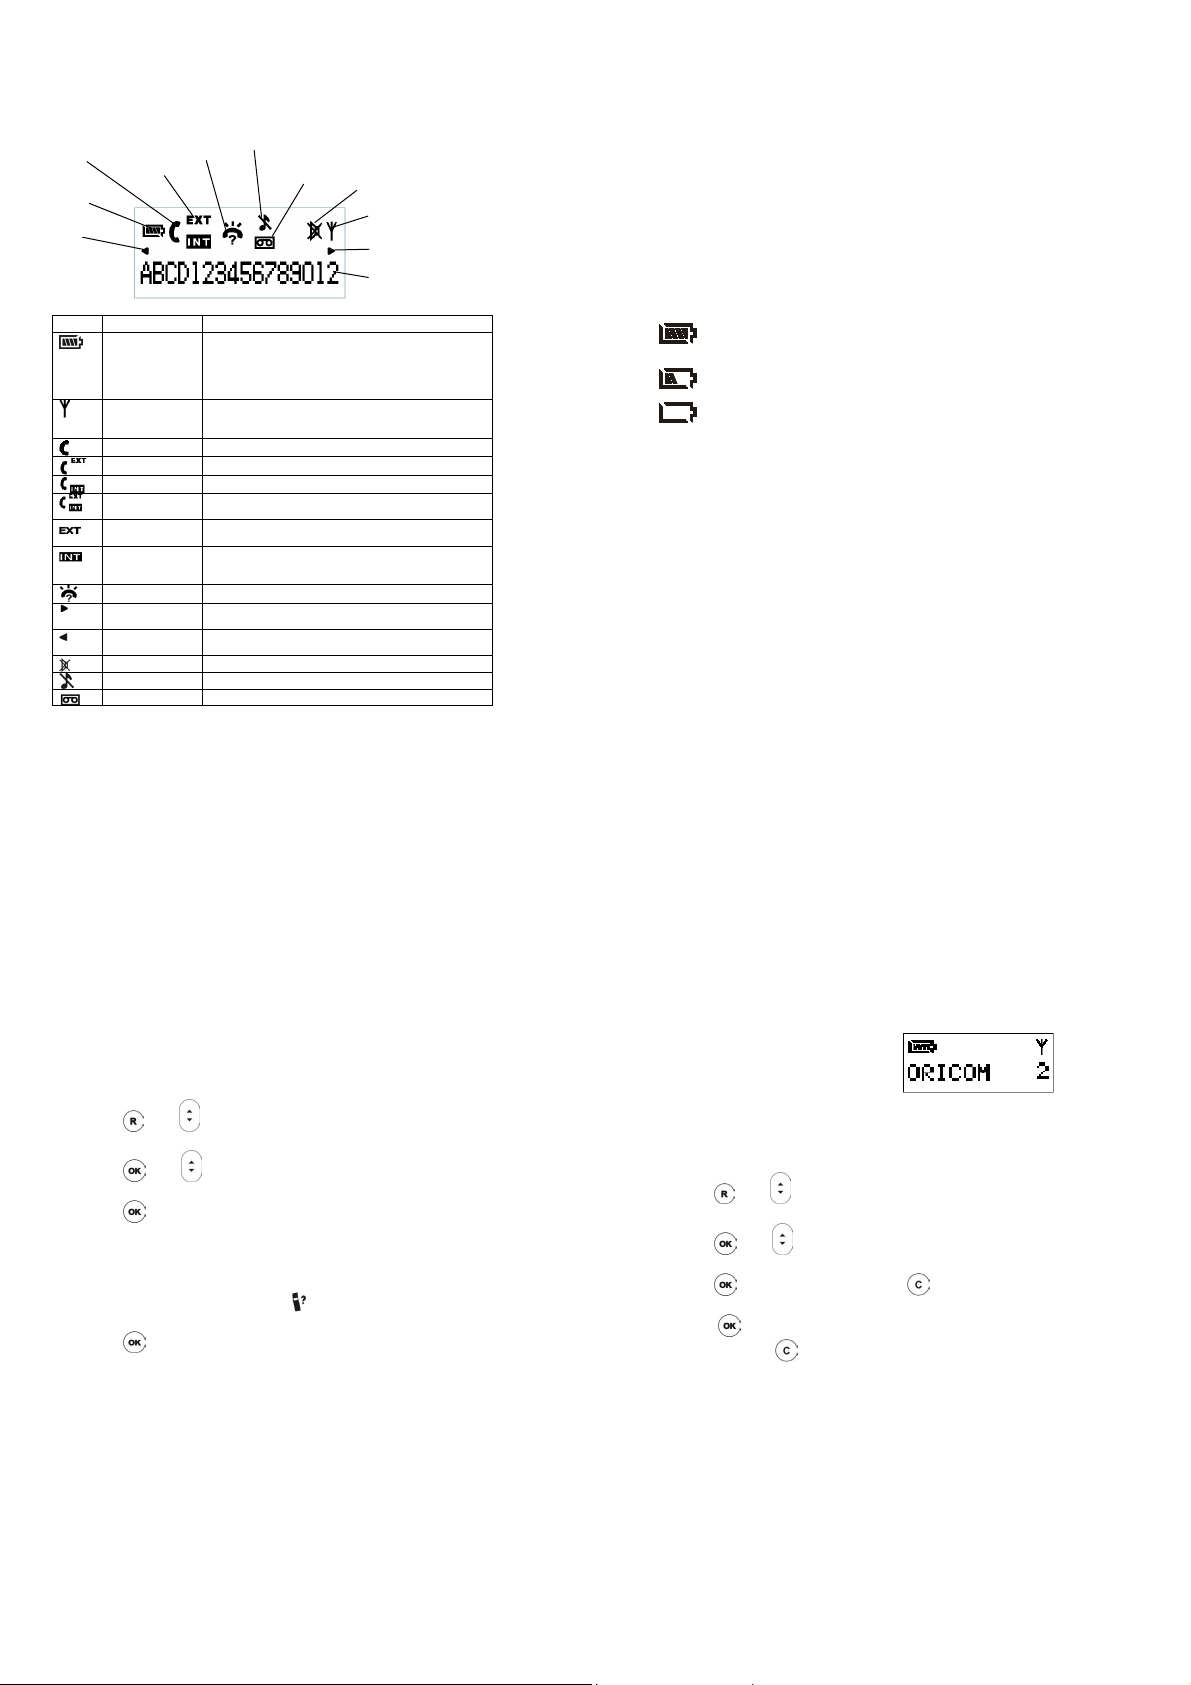
LCD Display on the Handset
Phone On
Battery
Left Scroll
Icon Name Description
External /
Internal /
Conference
Battery
Signal Indicator Steadily – signal linkage between handset and base is
Off Hook Display during off hook.
Calling External User is calling outside.
Calling Internal User is making an intercom call
Conference User is talking with one external and another internal
External Call Blinking – there is a call from outside.
Intercom Blinking – there is an intercom call.
New CID New callers number Caller ID (CID) received.
Right Scroll
Left Scroll The number displayed contains more than 16 digits and
Mute Handset microphone is muted during off hook.
Ringer Off The handset ringer is turned off.
Answer Machine The answering machine is on.
Ringer Off
New CID
• Animated when charging.
When the battery indicator displays 4 blocks, the
•
battery is fully charged.
• When the battery indicator displays no block, the
battery is almost empty, and requires charging.
established.
Blinking – no signal linkage with any base.
user.
Steady – Line is engaged.
– when being paged.
Steady – Line is engaged.
The number displayed contains more than 16 digits and
the first 16 digits are displayed.
the rightmost digits are displayed.
5 of 10
Answering
Machine On
Mute
Signal Indicator
Right Scroll
Digits Display
Basic Steps to Install
1. Plugs the mains adapter to the wall mains supply.
2. Insert the 2 rechargeable Ni-MH AAA batteries (included),
observing their polarity, into the battery compartment on the
handset.
3. Slide the battery door firmly into place.
4. Place the handset on the charger and let the batteries charge for
a full 24 hours before using for the first time.
5. Register the handset to the base unit (Refer to Registration
Section for details).
Battery Level Indication
Charging the Handset
When the handset is placed on the base cradle to charge the handset
batteries, a charging tone, if set to ON, will be emitted from the
handset’s speaker. (Refer to Alert Tone Section). During charging,
the charge LED on the base unit will be steadily lit. The battery icon
will be scrolling to indicate that the batteries are being charged.
Get into the habit of putting the handset on the base unit to charge
when it is not in use to ensure the handset is always fully charged
The Battery icon is always displayed when the
handset is on. When charging, the battery icon will
be scrolling to indicate that the batteries are being
charged. When fully charged, four bars are
displayed. The scrolling will stop.
When an empty battery icon is displayed, place the
handset on the base cradle to recharge the
batteries. If low battery level happens during offhook, a series of short beeps will be heard from the
speaker of the handset.
6 of 10
Registration of handset
This handset is designed to operate with the Oricom M120 and the
M140 base units. You can then answer calls from any handset,
Intercom between handsets and transfer calls between handsets.
Each additional handset you want to use on the base must be
registered with the base unit in order to operate. Additional base units
can be purchased to extend the coverage of your system.
To register handset to base:
. Use to scroll through the menu until the display
Press
•
reads SYSTEM.
• Press
reads REGISTER.
• Press
Enter the number of the base unit you wish to register using the
•
keypad.
The handset will read PIN?
•
• Enter the PIN number (default is 0000).
Press and hold the PAGE button
•
hear 2 beeps.
• Press
while it searches for the base unit (where ‘X’ is the number of the
base you are registering to).
Once a connection has been made, the handset name and
•
number (the next available number if the number of handsets
already registered with the base is less than 5) will be shown on
the display.
If the handset registration failed, the display will show
•
NOT REG. Repeat process above.
As the Oricom M145 is GAP (Generic Access profile) compatible
you can register with another manufacturer’s base unit. To do this,
follow that manufacturer’s instructions. If the handset is registered
with another manufacturer’s base unit, some of the features may
not be available.
. Use to scroll through the menu until the display
. The display will read BS 1 2 3 4.
on the base unit until you
on the handset. The handset will read SEARCH BS X
7 of 10
During Standby
When the phone is not in standby mode the LCD displays the phone
Handset name, the handset no, the battery icon and the Signal
indicator. You can change the handset name if you wish, see below.
Changing Handset Name
If you choose to you may change the handset name that is displayed
in standby mode.
. Use to scroll through the menu until the display
Press
•
reads DISPLAY.
• Press
•
• Press
• Press and hold
Important information
. Use to scroll through the menu until the display
reads LABEL.
Press
. Use the numeric keys and to enter the name for
the handset (max 10 characters).
to confirm the name entered and exit to LABEL.
will exit to standby.
• For detailed operation of the handset after registration, refer
to your M120 or M140 instruction manual.
• Some of the symbols on this handset refer to the answering
system feature on the M140. If you will use this handset on
the M120 base these symbols can be ignored. As the M120
has no answering system.
8 of 10
Page 3

A
A
Notes for operation in New Zealand
The grant of a Telepermit for any item of terminal equipment indicates
only that Telecom has accepted that the item complies with the
minimum conditions for connection to its network. It indicates no
endorsement of the product by Telecom, nor does it provide any sort
of warranty. Above all, it provides no assurance that any item will
work correctly in all respects with another item of Telepermitted
equipment of a different make or model, nor does it imply that any
product is compatible with all of Telecom’s network services. This
device may be subject to ringing or bell tinkle when certain other
devices are connected to the same line. If this occurs, the problem
should not be referred to the Telecom Faults service.
This equipment shall not be set to make automatic calls to the
Telecom “111” Emergency Service. This equipment may not provide
for the effective hand-over of a call to another device connected to the
same line.
REN (RN for New Zealand)
The REN (Ringer Equivalence Number) or (RN) is of significance only
if you wish to connect more than 1 telephone to your telephone line. A
standard telephone line has a maximum REN capacity of 3 (RN of 5).
It is possible to connect 3(5) devices with a REN of 1 (RN of 1) with
no degradation to the product’s performance. Exceeding this limit may
cause the volume of the ringer in any phone to decrease or not ring at
all.
Caller ID
Customers using non Telecom toll services should not use the dial
back feature for local calls as this will incur a charge only the 7 digit
number should be dialed. Some of the CID services listed may not be
available in New Zealand
9 of 10
Warranty Information
This product is covered by a 12 months warranty against defective
workmanship or parts. The warranty does not extend to damage
caused by misuse, negligence, excessive voltage, faults on the
telephone line or lightning. This guarantee in no way affects your
statutory rights. Full details of the warranty are contained in the
enclosed warranty card.
If you feel this product is not working correctly please consult the user
guide and ensure that you are using the product in accordance with
the instructions.
Remove all extra telephone equipment and connect only this
telephone directly to the telephone socket. If the fault is still present,
connect another telephone (if available) to the telephone socket. The
results will show you whether the fault lies with this unit or with the
telephone line. If the product is working correctly the fault is on the
telephone line. Please contact your network operator for assistance
In the unlikely event of a fault developing, please contact us for
assistance. If the product is then found to be faulty you will be
asked to return it directly to us with a copy of the purchase
receipt.
To orders spare parts additional handsets, replacement batteries and
in case of any technical issues you may have with product please
consult our website for further information or send us an email for a
prompt response to your enquiry.
ustralia
Oricom International Pty Ltd
ABN 46 086 116 369
PO Box 5681
South Windsor, NSW 2756
Customer support
Email: support@oricom.com.au
Web: www.oricom.com.au
Fax: (02) 4572 0939
Ph: 1300 889 785
New Zealand
tlas Gentech (NZ) Limited
Private Bag 14927,
Panmure, Auckland
Customer support
Email:
support@atlasgentech.co.nz
Web: www.atlasgentech.co.nz
Fax: (09) 574 2722
Ph: 0900 50 025 (Toll Call)
10 of 10
 Loading...