

Page 1
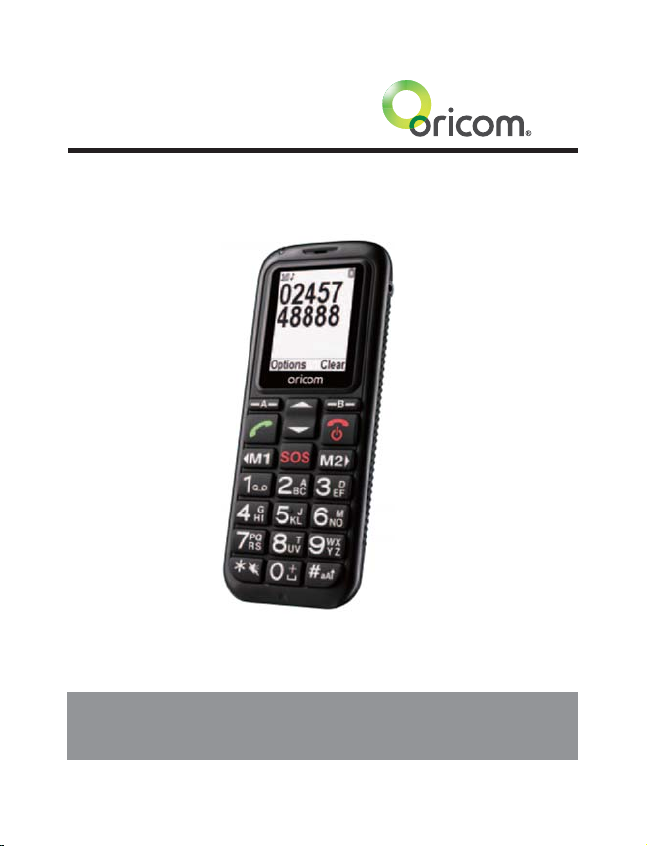
Mobile Phone
Operating Instructions
ezy120 GSM Mobile Phone with
Emergency Call Function
Page 2

Page 3

Table of contents
Safety Information and Warnings ................................... 4
Getting Started .............................................................. 9
Your Oricom phone and controls .................................. 19
Telephone Operation ....................................................24
Call Functions .............................................................. 32
Emergency Call Function.............................................. 37
Emergency Call Function, Examples ............................. 40
Starting/Ending the Emergency Call Function ............... 44
Phone Book ................................................................. 45
Call List .......................................................................52
SMS − Text Messages ................................................ 54
Voice Mail ....................................................................57
Network services ......................................................... 59
Settings ....................................................................... 62
Advanced Settings ....................................................... 70
Troubleshooting ........................................................... 75
Technical Properties..................................................... 78
SAR Information ........................................................... 79
Guarantee .................................................................... 80
Index ........................................................................... 83
3
Page 4

Safety Information and Warnings
1 Safety Information and Warnings
It is very important that you read the User Guide
carefully as it contains detailed information on set up
and operational issues which you will need to be aware
of to ensure the mobile operates properly. If you are not
clear about how to use the phone or have any queries
on any issue, please contact our Australian Customer
Support helpline on 02 45748888.
The following is a list of some of the important issues
and important warnings which you need to be aware of.
This is not a summary of all the important issues and
you must still read the User Guide in full.
Risk of suffocation!
Keep packaging materials and protective foils
out of reach of children.
Intended use
This telephone is designed for use when connected to
a mobile phone network. Any other use is considered
unintended use. Unauthorised modication is not
permitted. Under no circumstances open the device or
complete any repair work yourself. Repairs to this device
may only be completed by qualied service personnel.
4
Page 5

Safety Information and Warnings
YOU SHOULD NEVER RELY SOLEY ON ANY MOBILE PHONE
FOR ESSENTIAL COMMUNICATIONS SUCH AS MEDICAL
EMERGENCIES.
Areas of use
t Do not use the phone in prohibited areas such as on
aircraft, in a petrol station in hospitals, or near to fuel
and other amable liquids, chemicals or blasting areas.
t When using this phone in a motor vehicle do
not carry or store ammable liquids, gasses or
explosives in the same compartment as this phone.
t Prevent exposure to smoke, dust, vibration,
chemicals,
is not waterproof; therefore, keep it dry at all times. Water
damage is not covered under warranty.
t Never leave this device exposed to direct sunlight inside
a motor vehicle. Temperatures inside the vehicle on a hot
day are extreme and damage to the phone may result
which is not covered by warranty.
t Only use original accessories and batteries supplied with
this product. Never attempt to connect other products.
t Never attempt to connect incompatible products.
t All mobile communication equipment is subject to
interference which may impair its performance.
moisture, heat and direct sunlight. The phone
5
Page 6

Safety Information and Warnings
t Keep the phone and accessories out of the reach of children.
t The SIM card can be removed. Caution! Small children
can swallow them.
t The earpiece of the handset may attract small metal
objects such as staples and pins. Care should be taken
when placing the handset near these items.
t The ringing tone is issued via the loudspeaker. Take an
incoming call rst and then hold the phone to your ear.
This prevents any possible hearing damage.
t You should not use your mobile phone whilst driving
a motor vehicle. At all times obey all local trafc
laws regarding mobile phone usage whilst driving
a motor vehicle. Always keep your hands free to
operate the vehicle safely.
t If you use this phone in a motor vehicle that has
air bags installed. Do not place this phone or other
objects in the area over the air bag or the air bag
deployment area. If the air bag inates serious injury
could result.
Warning when used with implanted medical devices
t Manufactures of medical devices recommend that
users with implanted heart pacemakers. Always
maintain a distance of at least 15.3cm between
the phone and the pacemaker to prevent any
6
Page 7

Safety Information and Warnings
possible interference. If you have had a pacemaker
implanted, do not carry the phone in a breast pocket
when switched on. Always hold the phone to the ear
furthest away from the pacemaker during calls.
Switch the phone off immediately if you notice or
suspect any adverse effects.
t Ensure you read and follow the directions from the
manufacturer of the implanted medical device.
If you have any questions about using your phone
with an implanted medical device, consult your
health care provider.
Use with a hearing device
t This phone is hearing aid compatible. If you
wear a hearing aid, however, please contact your
Audiologist or the hearing aid manufacturer to
inquire about any possible impairments through
mobile communication equipment.
Emergency calls
t This phone uses radio signals and network service
providers networks and user programed functions.
It is not possible to guarantee a reliable connection.
You should never rely on this or any other wireless
radio device for essential communications in the
case of medical emergencies.
7
Page 8
Safety Information and Warnings
AC power adaptor
Attention: Only use the AC power adaptor
supplied. As other power supplies could damage
the phone.
Rechargeable batteries
Attention: Never dispose of batteries into a re.
Only use batteries of the same type.
Environment
At the end of its service life, in order to dispose
of your device, take it to a collection point if
provided by your local public waste authorities
(e.g. recycling centre). The adjacent symbol indicates
that the device must not be disposed of in normal
domestic waste!
Batteries must be disposed of in
accordance with local regulations or
at the appropriate collection points if provided by the public
waste authorities.
Packaging materials all cardboard and paper
packaging should be sent for recycling in accordance
with local waste regulations.
8
Page 9

Getting Started
2 Getting Started
Safety information
Attention: It is essential to read the Safety
Information in Chapter 1 before starting up.
Checking the package contents
The package contains:
1 Mobile phone
1 desktop charging unit
1 Li−ion battery
1 Operating manual
1 Charging cable
Barcode labels on the phone
The barcode label printed inside the phone contains the
IMEI number and the serial number. Do not remove it.
Phone security
Every mobile phone has a unique 15-digit electronic
serial number, known as the International Mobile
Equipment Identity (IMEI) number.
Record your phone’s IMEI number in case your phone is
lost or stolen.
On the bottom of the box there is a large label. Remove
one of the IMEI labels and stick it in the space below.
9
Page 10

Getting Started
You can verify your IMEI number by dialling *#06# on
your mobile phone.
If your phone is lost or stolen:
Notify your network carrier and the police immediately.
Tell them your IMEI number and any other identifying
features on your phone. Your network carrier can use
this number to block your phone from all networks
in Australia once you report the phone lost or stolen,
making it useless to any thief. Importantly, this also
ensures you’re not paying for any calls made by the
thief. If the handset is subsequently found, the IMEI
block can be easily removed – as long as you can prove
you’re the original, legal owner of the phone.
Passwords
This mobile phone provides the option of using
passwords. After activating the passwords, unauthorised
users cannot access the data stored on the phone. If the
option is activated, access to certain functions, e.g. the
phone book, is only possible after entering the correct
password.
10
Page 11

Getting Started
PIN & PIN2 codes
The PIN (Personal Identity Number) and PIN2 codes are
4 to 8-digit numbers. The PIN and PIN2 codes are given
to you, together with the SIM card, by your network
provider.
PUK & PUK2 codes
The PUK (Personal Unblocking Key) and PUK2 codes
are 4 to 8-digit numbers. These are only necessary if
you enter the PIN code for the SIM card incorrectly three
times in succession and the SIM card is blocked. The
PUK and PUK2 codes are given to you, together with the
SIM card, by your network provider.
Installing the SIM card
Risk of swallowing small objects!
The SIM card can be removed.
Small children can swallow them.
Switch the phone off.
Pay attention that the SIM card is not bent or
scratched. Prevent any contact with water, dirt
or electrical charges.
11
Page 12
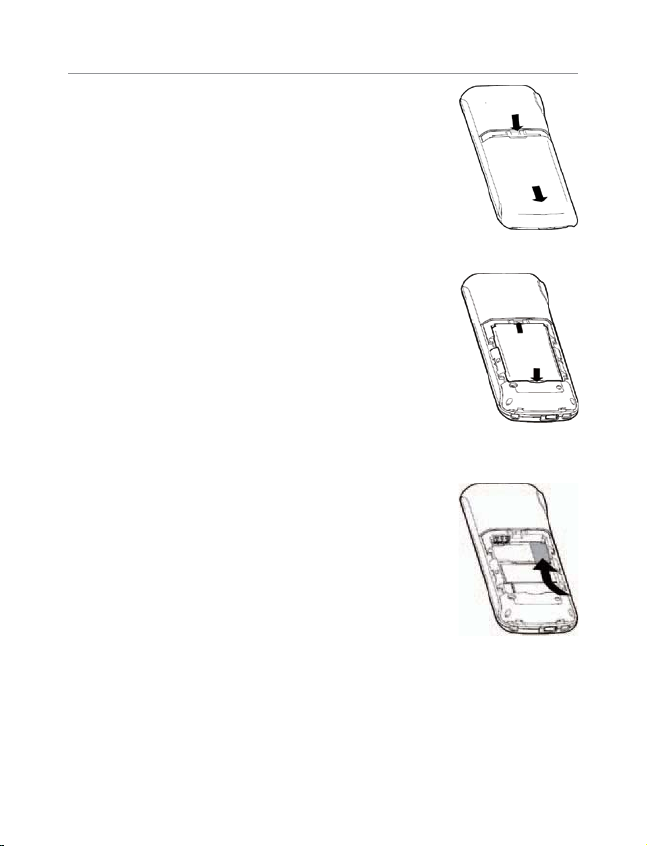
Getting Started
Slide off the mobile phone’s
battery compartment cover
towards the bottom using a little
force.
If there is already a battery
inside, remove it.
Slide the SIM card with the gold
coloured contacts facing down in
the moulded SIM card holder.
12
Page 13
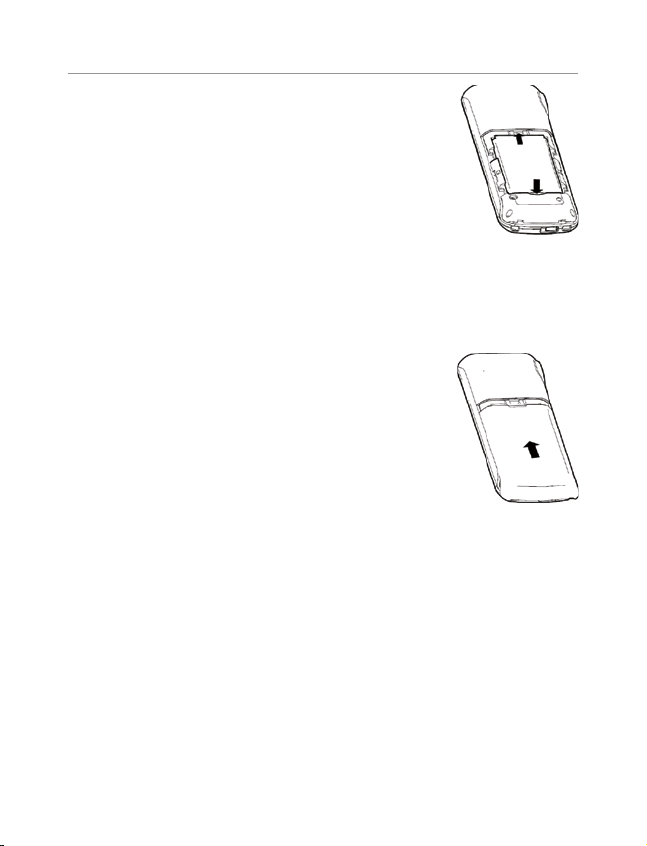
Insert the battery. The gold
coloured contacts on the
battery must face towards
the top left.
Press lightly on the bottom
end of the battery until it
snaps into place.
Replace the battery
compartment cover back on
the phone. Slide the battery
compartment cover upwards
until it snaps in to place.
Getting Started
13
Page 14
Getting Started
Charging the battery
Before starting to charge the battery, ensure
that it has been installed properly.
Do not remove the battery while it is being
charged. This could damage the phone.
When charging the battery for the rst time, it
should be charged for at least 4 hours. Batteries
only reach their full capacity after several
complete charge/discharge cycles.
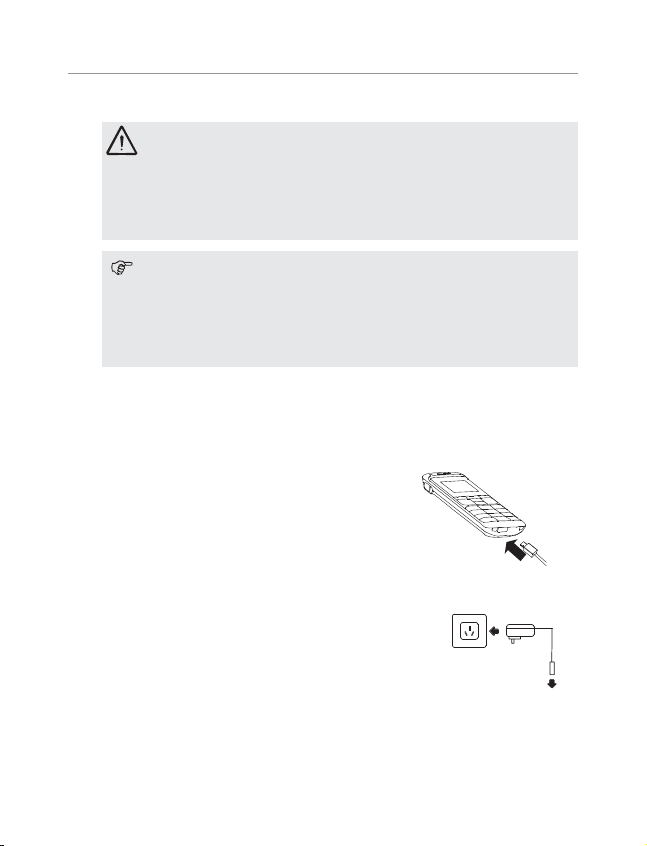
Charging via the mini USB port
Plug the charging unit in the mini
USB port.
Connect the charging unit as
illustrated in the diagram. For safety
reasons, only use the optional Oricom
approved charging unit.
Mains power
outlet
14
Page 15
Getting Started
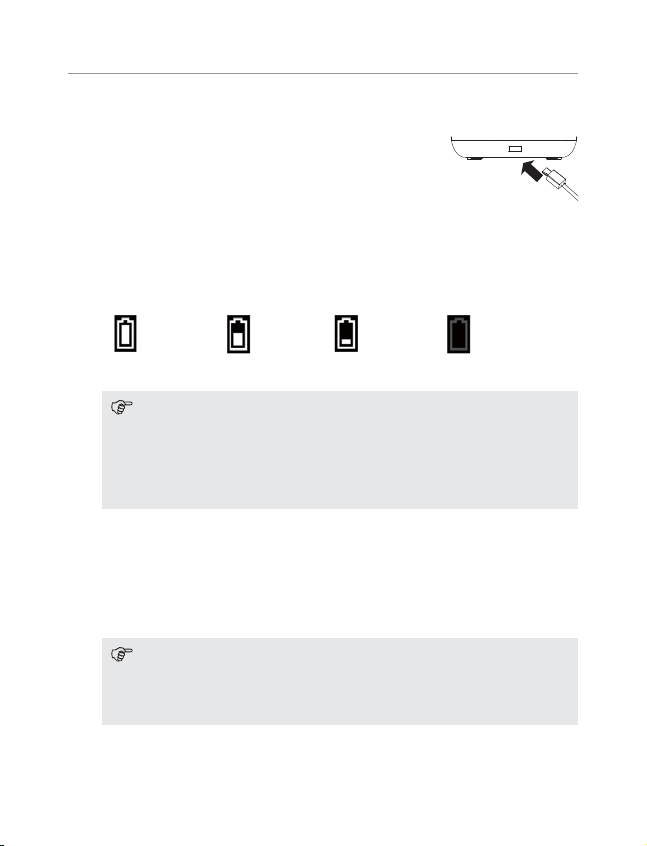
Charging via the optional desktop charger
Plug the connector on the AC adaptor
cable in the mini USB port on the desk
top charger. Place the phone into the
charging cradle.
The current battery charge status is shown in the
display as follows:
Full Half empty Low Empty
It may take a few seconds before the phone
indicates the charging process.
You can use the phone during the charging
process.
You can also charge the phone via a PC. To do this,
connect the phone to the PC using an approved mini
USB cable. The charging process takes longer via the
PC than when using the charging unit.
Only use the mini USB cable approved by
Oricom. The terms of guarantee are void if a
different cable is used.
15
Page 16
Getting Started
Battery status warning
When the battery charge is low, a warning message
appears in the display.
Charge the battery.
In cases where the battery charge is extremely low, it
is possible that the back-lighting no longer works and
certain functions are no longer available.
Charge the battery.
When the battery charge drops below the minimum
status, the phone switches off automatically.
Warnings on battery usage
Only use batteries, cables and charging units approved
by Oricom, otherwise the battery could be damaged.
Do not short circuit the battery. Always leave the battery
in the phone to avoid accidentally short circuiting the
battery contacts.
16
Page 17
Getting Started
Keep the battery contacts clean and free of dust and dirt.
The battery can be charged/discharged hundreds of
times but its service life is limited. Replace the battery
when the battery no longer holds sufcient charge
for normal use. The maximum talk time is up to 120
minutes and standby time is up to 170 hours.
Switching the mobile phone off and on
Press and hold the button for 3 seconds to switch
the phone on or off.
Setting the display language
Select the language required.
1. During standby mode, press
setup menu.
2. Use the i/j button to select Setting. Press
to conrm.
3. Use the i/j button to select General Setting,
press
4. Use the i/j button to select Language, press
5. Use the i/j button to select desired language,
press
to conrm.
to conrm.
to conrm.
to enter the
Setting the time and date
17
Page 18

Getting Started
1. During standby mode, press to enter the
setup menu.
2. Use the i/j button to select Setting. Press
to conrm.
3. Use the i/j button to select General setting.
4. Use the i/j button to select Time & Date, press
to conrm.
Set Format
5. Use the i/j button to select either Date or Time
Format, press
button to select and press
time format to 24Hr or 12 Hr, and select the date
format.
Set time and date
6. Use the i/j button to select Set Time/Date,
press
to conrm. Use keypad to input the
time, minute, date, month and year. Press
conrm.
7. After setting the time and date, press
the settings.
to conrm. Use the i/j
to conrm. Set
to
to save
18
Page 19
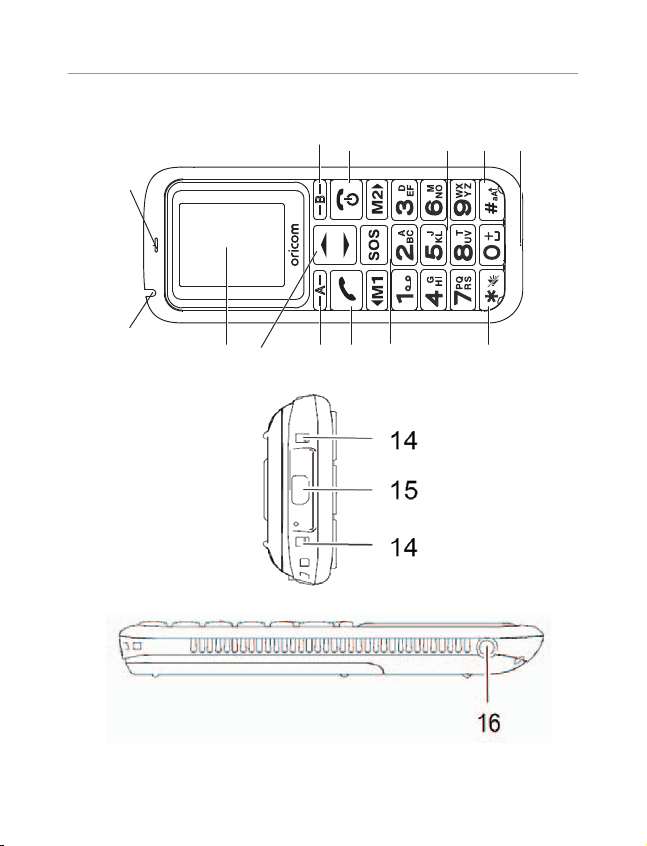
Your Oricom phone and controls
13
3 Your Oricom phone and controls
9
10
2
A B
11
12
1
3
4
6
5
7
8
19
Page 20

Your Oricom phone and controls
1 LED
2 Earpiece
3 Display
4 Navigation keys (scroll up/down)
5 Softkey, left
6 Call key
7 One−touch dialling keys
8 Star key / Ringer On/Off − Silent Mode
9 Softkey, right
10 On/Off key / End call key
11 Keypad
12 Hash key
13 Microphone
14 Charge contacts
15 Mini USB socket
16 Headset socket (Headset not supplied)
20
Page 21
Your Oricom phone and controls
1 LED Indicates the phone operating status.
The LED will stay on while charging
and will ash to alert the user, no
signal or network detected.
2 Earpiece The voice of the caller can be heard
here when no headset is being worn
or the handsfree equipment has not
been installed, activated and the
device set to Handsfree mode.
3 Display
4 i j Navigation keys
5
6
The information which appears in
the display guides you through the
menu structure which helps operate
the mobile phone.
Navigate through the menu settings
t4DSPMMUIFNFOVBOEPQFO*OCPY
t4DSPMMUIFNFOVBOEPQFOUFYU
Softkey, left
The softkeys are assigned different
functions in the various menus.
Call key
Take a call or dial a number. Redial.
21
Page 22
Your Oricom phone and controls
7 M1 SOS M2 One−touch dialling keys
A phone number can be assigned
to each one−touch dialling key and
then dialled directly by pressing and
holding the respective button.
8 Star key Enter special characters.
Ringer On / Off − Silent Mode
B
9
10 On/Off button / On-hook button
11 Keypad Enter phone numbers and names or
12 Hash key
13 Microphone Is activated during a call.
14 Charging contacts
22
Softkey, right
The softkeys are assigned different
functions in the various menus.
Switch the mobile phone on and off.
Cancel the current process.
End or reject a call.
write a text.
Activate the key lock.
Switch between upper/lower case
and numbers.
The phone is charged via these
contacts when in the charging unit.
Page 23
Your Oricom phone and controls
15 Mini USB socket
For connecting the power adapter
plug.
16 Headset socket You can connect an optional
headset (Part No: KESP-5185-P).
The earpiece, loudspeaker and
microphone are deactivated. You can
only hear and speak via the headset.
There is no guarantee that headsets from other
manufacturers will work properly.
call.
Damage to the headset or mobile phone cannot
be ruled out.
Buttons with special functions
In Standby mode, hold the button to set Silent
activated or General activated.
During an incoming call, hold the
the "No Alert" call setting for this call only.
In standby mode, hold the
button to activate the
keypad lock function.
Press and hold 1, a connection is established to your
mailbox and you can play messages recorded.
button to activate
23
Page 24
Telephone Operation
4 Telephone Operation
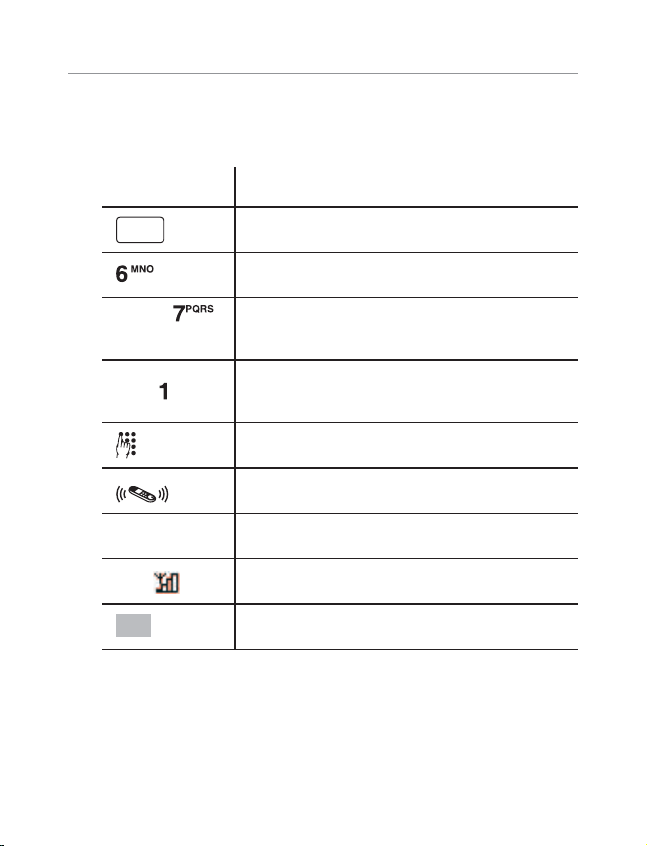
Description of operating sequences in the manual
Display Description
Displays the contour of buttons
Press the button depicted briey
2 sec.
Hold
Option Represents text in the display
e.g.
Ok Press the softkey
24
Press the button depicted for 2
seconds
Press and hold down the button
depicted
Enter digits or letters
Mobile phone rings
Indicates icons in the display
Page 25
Telephone Operation
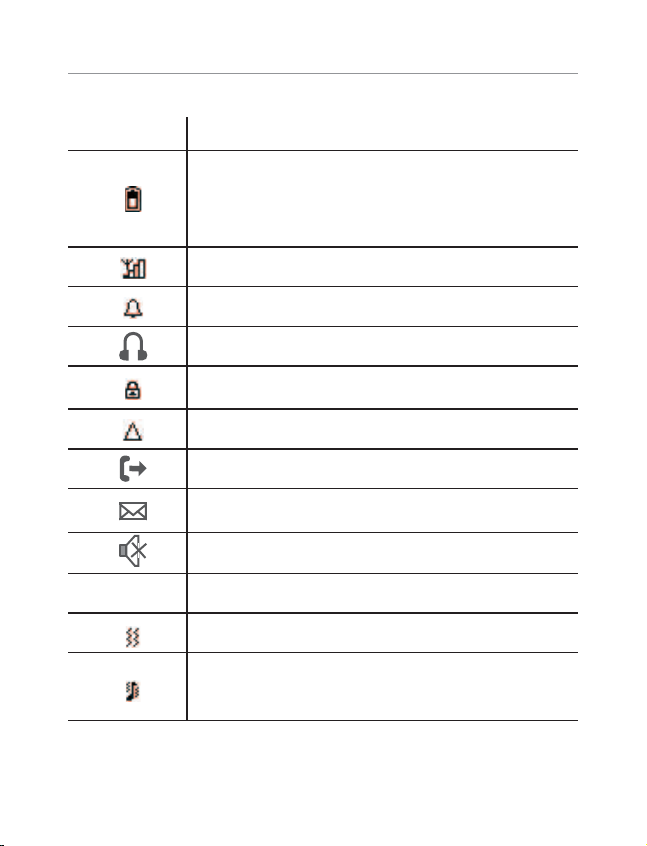
Icons and texts in the handset display
Icon Description
Displays the battery capacity.
Running-through segments, the battery is
being charged.
Signal strength of the phone connection
Alarm1 and/or Alarm2 are activated
A headset is connected
The key lock function is activated
A roaming1 call is in progress
A call is currently being made
A new message has been received
The microphone is deactivated (muted)
Ringing tone only is activated
Vibration alert only is activated
Vibration alert is activated rst, then ringing
tone
25
Page 26

Telephone Operation
Roaming calls: Outgoing or incoming international calls
subject to special charges.
SMS: Short Message Service = Service for sending text
messages.
Standby mode
All descriptions in this operating manual assume that
the mobile phone is in Standby mode. The system
switches to Standby mode by pressing the
several times if necessary. It may be necessary to
deactivate the key lock function.
Energy-save mode
When the phone has been in Standby mode for some
time, it automatically switches to energy-save mode.
The display no longer lights up. Press any button to
reactivate Standby mode.
button
26
Page 27

Telephone Operation
Direct Memory M1, M2 and SOS
You can program your most often dialed numbers
directly to memory keys M1, M2 and SOS in the
advanced options menu under Contacts. Once the
required number has been programed, you can dial the
number by pressing and holding the M1, M2 and SOS
button.
A B
Button In Standby mode In a menu
M1 Open the main menu Various functions
M2
Initiate release of the key
lock function
Various functions
27
Page 28

Telephone Operation
28
Page 29

Telephone Operation
Navigating in the menu
All the functions can be accessed via the various menus.
Menu Open the main menu
i/j Select the submenu required
Ok Open the submenu
i/j
Ok Open the function
i/j Ok Select the setting required
Use the digit keys to enter numbers
(softkey) Conrm the entries
B
(softkey) Move one level back
Select the function required
or letters
Cancel programming and return to
Standby mode
Entering Data
The digit keys are also labelled with letters for the entry
of text.
The phone provides various methods by which text
can be entered. These are used when entering or
editing contacts in the phone book, when searching for
names in the phone book and when writing SMS text
messages.
29
Page 30

Call Functions
5 Call Functions
Taking a call
When receiving a call, the callers number will be
displayed on the screen. If the callers number matches
a number already stored in the phone book, the name
of the caller will appear.
To answer the call, press the
set the "Answer mode" to "Any key answer" you can
answer the incoming call by pressing any button on the
key board except for the
Answer a second call
If you receive a second call while on the phone, the
phone will give a beep alert and the name or number of
the caller will be displayed. You can either:
1. Press the
will be put on hold)
2. Press the
3. Press
If you take a second call, the previous call will be
put on hold. To "Swap" between calls, press
button to answer the call (the rst call
button to reject the call
to open the option list.
button. If you have
button.
B
.
30
Page 31

Call Functions
Rejecting a call
Briey press the button to reject the call.
If the "Call divert" feature is turned on, the in coming
call will be diverted to your voice mail box or another
number where you can be reached or receive your
messages.
Ending a call
Briey press the button to hang-up the call.
Making a call
1. Use the keypad to enter the phone number.
B
2. Press
entering a phone number.
Note; if you wish to dial an international number,
long press the 0 button to enter the "+" sign for
international prex.
3. Press the
Call list
Your mobile phone stores the last numbers dialled
(redialling), calls received and missed calls in a call list.
1. Press the
2. Use the i/j buttons to select the entry and press
the
to correct any errors pressed while
button to dial the phone number.
button to open the call list.
button to dial the number.
31
Page 32

Call Functions
Dialling numbers from the phone book
You must have already stored phone numbers in the
phone book.
1. During standby mode, press
stored phone list will appear.
2. Use the i/j buttons to select the entry and press
button to dial the number.
the
Or by using the ALPHA numeric buttons, you can quickly
search for a name. (e.g. to nd names starting with "K",
press the "5" button 2 times, the letter "K" will appear
and the phone will display the phone book entries
starting with "K".
1. Use the i/j buttons to select the relevant number.
2. Press the
button to dial the number.
Quick dialling
You must have already assigned phone numbers to the
one-touch buttons.
Press and hold the one- touch dialling buttons (M1, M2
or SOS) to dial the number.
Setting the receiver volume
The volume can be adjusted during a call.
Press the i/j buttons to select the required volume
during a call.
Talk time display
B
"Contacts" - the
The duration of a call is displayed during a call in hours,
minutes and seconds.
32
Page 33
Call Functions
Handsfree
This function is used to listen to the caller via the loudspeaker.
1. When "H-Free" is shown on the display, the
handsfree mode is activated.
2. When "Normal" is shown on the display, the
handsfree mode is deactivated.
Muting the microphone in the handset
The microphone in the handset can be activated and
deactivated during a telephone conversation.
1. During a call, press
2. Use the i/j buttons to select Mute, press
to select Mute or Unmute.
Keypad lock
The keypad lock is intended to prevent functions being
triggered unintentionally.
1. Press and hold
keypad lock function.
Calls can still be taken in the normal way even
when the keypad lock function is activated.
for 3 seconds to activate the
to open the menu.
2. Press
B
and then the button to activate the
keypad unlock function.
33
Page 34
Call Functions
Deactivating the ringing melody
The ringing melody can be deactivated.
In standby mode, press and hold the
seconds to activate or deactivate the ringing melody.
Options during a call
Whilst on a call, press to open the menu.
This menu provides access to functions which can be
performed during a call:
Hold Option
1. Use the i/j buttons to select Hold, press
to conrm and put the current call on hold.
When a call is placed on hold, the menu option
changes to "Unhold".
2. To retrieve the call placed on hold, use the i/j
button to select Unhold, and press
the call.
Handsfree Option
1. Use the i/j buttons to select H-Free, press
to conrm and set the handsfree mode to on or off.
Phone book obtion
Use
buttons to select Contacts then press
Contact Options list. Scroll the Contact options list by
using the i/j buttons for operation.
34
to open the menu options. Use the i/j
button for 3
to resume
to open
Page 35

Emergency Call Function
6 SOS Emergency Call Function
The EZY120 is equipped with an SOS Emergency
button. You can program the number you wish to call in
case of an emergency, like the number of your doctor or
family member.
How the SOS feature works:
1. In standby mode when the SOS button is pressed
for 1 second an SOS emergency call will be
triggered. (the 1 second period is to prevent a false
alarm)
2. Once the SOS has been triggered, the phone will
give out a load ring (Siren) for 3 seconds.
3. The programmed number will automatically be
dialled immediately after the Siren has stopped.
4. Once the call has been acknowledged by the other
party, the phone will turn to hands free mode and
communication will commence as normal.
Entering/Deleting emergency call numbers
Proceed as follows to dene an entry in the phone book
as an emergency call number.
Each number you want to define as an
emergency call number must already be stored
in the phone book.
35
Page 36
Emergency Call Function
1. During standby mode, press to enter the
main menu.
2. Use the i/j buttons to select Contacts, press
to conrm.
3. Use the i/j buttons to select Advance, press
to conrm.
4. Use the i/j buttons to select M1 M2 SOS, press
to conrm.
5. Use the i/j buttons to select which emergency
button you want to program, press
and enter the required number, then press
conrm your entry.
to conrm
to
36
Page 37
Phone Book
9 Phone Book
Up to 200 entries (names with several related phone
numbers) can be stored in the phone book.
t Always enter the area code with all the phone
numbers.
t When the memory capacity is used up, the
corresponding message appears when an attempt
is made to store another entry. Before new entries
can be stored, old entries must be deleted.
t The phone book entries are arranged alphabetically.
To skip directly to a required phone book entry,
press the corresponding rst letter. To search for the
entries manually, use the i/j buttons.
Your network service provider can state how
many entries you can store on your SIM card.
t Entries which you have stored on the SIM card are
identied by the
icon preceding the name.
37
Page 38

Phone Book
Entering names
The digit keys are also labelled with letters for the entry
of names. Press the corresponding button the respective
number of times to enter letters.
1. During entering, press 0 to enter a space.
B
2. Press
to delete the incorrect entry.
3. Use the i/j buttons to move the cursor or to
scroll.
Creating phone book entries
1. During standby mode, press to enter the
main menu.
2. Use the i/j buttons to select Contacts. Press
to conrm.
3. Use the i/j buttons to select New Contact, press
to conrm.
4. Use the i/j buttons to select Save to SIM or Save
to Phone, press
5. Use the keypad to enter the Name and Number and
press
to conrm.
Complete any further information regarding this name
according to the procedure described. When all the
necessary information has been entered:
Press
to save the entries, press
the entries.
38
to conrm.
B
to reject
Page 39

Phone Book
Modifying, deleting phone book entries
1. During standby mode, press to enter the
main menu.
2. Use the i/j buttons to select Contacts, press
to conrm.
3. Use the i/j buttons to select View Contacts, press
to conrm.
After searching the name or number, press
conrm. The following functions are available:
Select View to view the entry.
Select Call to call the number.
Select Delete to delete the number.
Select Copy to copy the entry from SIM to phone or
Phone to SIM.
Select Send SMS to send a text message.
Use the i/j buttons to select the above functions and
press
to conrm.
Editing or deleting all entries
1. During standby mode, press to enter the
main menu.
2. Use the i/j buttons to select Contacts, press
to conrm.
to
39
Page 40

Phone Book
3. Use the i/j buttons to select Advanced or Copy
All, press
to conrm.
Select Delete All to delete all the entries from the SIM or
phone.
Select Copy All to copy all the entries from the SIM or
phone.
Groups
You can assign the entries to various groups. Groups
can be displayed or hidden in order to have a better
overview of the phone book. The groups can be
allocated different ringing melodies.
Assigning an entry to a group
1. During standby mode, press
main menu.
2. Use the i/j buttons to select Contacts, press
to conrm.
3. Use the i/j buttons to select View Groups, press
to conrm.
4. Use the i/j buttons to select either Family,
Friends, Ofce, press
5. If there are no entries in the Family List, only the
Add member option is available.
to enter the
to conrm.
40
Page 41

Phone Book
6. Press to select options, use the i/j buttons
to select Add member from the phone book and
press
list.
If there are entries available in the Member List, press
to select options. The following options Call, Send
SMS, View, Add member, Remove member and Copy to
SIM are then available.
Changing the group name and tone
1. During standby mode, press
main menu.
2. Use the i/j buttons to select Contacts, press
to conrm.
3. Use the i/j buttons to select View Groups, press
4. Use the i/j buttons to select Family, use the
i/j
conrm.
5. Use the keypad to edit the group name, or
6. Use the i/j buttons to select the ring tone, press
different ringing tone and press
to conrm and add it to the member
to enter the
to conrm.
buttons to select Rename. press
to conrm. Use the i/j buttons to select a
to conrm.
to
41
Page 42

Call List
10 Call List
The mobile phone is equipped with a call list.
Your mobile phone stores the last phone numbers
dialled, taken and received but missed.
If one of the phone numbers received matches
an entry in the phone book, the associated
name appears.
Dialling from the call list
1. Press the
2. Use the i/j buttons to select an entry and press
the
Displaying list details
1. Press the
2. Use the i/j buttons to select an entry and press
The following functions are available:
Select Delete to delete the entry,
Select Save number to save the entry on the SIM or phone.
Select Call to dial the entry.
Select Send SMS to send a text message to the calls
list.
Use the i/j buttons to select the above options and
press
button to open the call list.
button to dial the number.
button to open the call list.
to conrm.
to conrm.
42
Page 43

SMS − Text Messages
11 SMS − Text Messages
Writing an SMS text
A text message can contain up to 612
characters, including spaces.
1. During standby mode, press
main menu.
2. Use the i/j buttons to select Message, press
to conrm.
3. Use the i/j buttons to select Write Message,
press
4. Use keypad to enter the text.
Press
functions:
1. Select Send, press
keypad to enter the number or select from the
phone book, press
the SMS text.
2. Select Save, press
saved in the “Outbox” folder.
3. Select Send To Many and press
The message can be sent to several recipients
selected from the phone book.
to conrm.
, use the i/j buttons to select the following
to conrm, and use
to conrm and send out
to conrm, the SMS text is
to enter the
to conrm.
43
Page 44

SMS − Text Messages
SMS text messages sent and received
Texts received are indicated by a ringing tone
which you have set. "New Message!" appears in
the display. Press the "OK" to display the message.
SMS texts received are stored in the "Inbox" folder.
SMS texts sent are saved in the "Outbox" folder as are
the drafts.
Editing stored texts
1. During standby mode, press
main menu.
2. Use the i/j buttons to select Messages, press
to conrm.
3. Use the i/j buttons to select Sent Message /
Inbox, press
to conrm.
4. Use the i/j buttons to select the SMS text and
press
5. Press
to conrm and view the SMS text.
, use the i/j buttons to select the
following functions:
Select Reply to reply to the number from which the text
was sent.
Select Forward to forward the text to a different number.
Select Call to call the number from which the text was sent.
Select Save number from which the text was sent.
Select Delete to delete the SMS text.
Select Delete All to delete all the SMS text.
to enter the
44
Page 45

Voice Mail
12 Voice Mail
It is possible that not all functions described are
supported by every network service provider.
Therefore, please contact your local mobile
phone network service provider for details. Fees
and charges may apply for network services.
1
In order to use the "Voice Mail"
feature, the relevant
phone number must be programmed in your mobile
phone. Normally, this has already been set up by your
network service provider.
Setting up the Voice Mail feature
1. During standby mode, press to enter the
main menu.
2. Use the i/j buttons to select Contacts, press
to conrm.
3. Use the i/j buttons to select Special Numbers,
press
4. Use the i/j buttons to select Voice Mail and
press
5. Use the i/j buttons to select Connect to Voice
Mail and press
to conrm.
to conrm.
to conrm and start editing.
If a number is already available, it appears
instead of "Empty".
45
Page 46

Voice Mail
6. Use keypad to enter or edit the Voice Mail number
and press
to conrm and save it.
The following functions are available in the "Voice Mail"
menu.
Select Delete and press
to conrm, the Voice Mail
number is deleted.
Select Connect to Voice Mail and press
to
conrm, the Voice Mail number is dialled.
Voice Mail, also referred to as mailbox (answering
machine in mobile telecommunication network)
Playing the Voice Mail messages
Navigate to the "Connect to Voice Mail" menu option, as
previously described, and press and hold the 1 button,
a connection is established to your "Voice Mail" and you
can play messages recorded
46
Page 47

Network services
13 Network services
It is possible that not all functions described are
supported by every network service provider.
Therefore, please contact your local mobile
phone network service provider for details. Fees
and charges may apply for network services.
Navigating to the "Call Setting" menu.
1. During standby mode, press
main menu.
2. Use the i/j buttons to select Settings, press
to conrm.
3. Use the i/j buttons to select Call Setup, press
to conrm.
to enter the
Forwarding calls
The following functions enable incoming calls to be
transferred to other phone numbers.
Navigate to the "Call Setting" menu as previously
described.
1. Use the i/j buttons to select Call Divert, press
to conrm.
2. Use the i/j buttons to select the setting for
which calls should be redirected: All Voice Calls, If
Unreachable, If No Answer, If Busy, press
conrm.
to
47
Page 48

Network services
3. Use the i/j buttons to select Activate and press
to conrm, use keypad to enter the number
or select from the phone book. Press
conrm, the call forwarding function is then active.
4. Use the i/j buttons to select Deactivate and
press
to conrm. The corresponding call
transfer is deactivated
5. Select Check Status and press
to conrm
and display the current setting.
Call barring
The following function is used to restrict calls which can
be received and made.
Navigate to the "Call Setting" menu as previously
described.
Use the i/j buttons to select Call Barring, press
to conrm.
to
48
Page 49

Network services
Changing the network password
This service must be requested from the network
provider. The provider then makes the corresponding
numeric code available.
Navigate to the "Call Setting" menu.
1. Use the i/j buttons to select Call Barring, press
to conrm.
2. Use the i/j buttons to select Change Password,
press
to conrm.
Call waiting
You will hear a Beep informing you that another call has
been received while the current call is in progress.
Navigate to the "Call Setting" menu.
Use the i/j buttons to select Call Waiting, press
to conrm.
Automatic redialling
When this function is activated, redialling is initiated
automatically if the number dialled is "engaged".
Navigate to the "Call Setting" menu.
Use the i/j buttons to select Auto Redial, press
to conrm.
49
Page 50
Settings
14 Settings
One−touch dialling buttons
It is possible to assign phone numbers to the one-touch
dialling buttons M1, M2 or SOS which are then dialled
directly by pressing and holding the corresponding
button.
Each number you want to dene as a one-touch
dialling number must be stored in the phone
book.
Assigning a phone number to a one-touch dialling button:
1. During standby mode, press
main menu.
2. Use the i/j buttons to select Set
SOS, press
3. Use the i/j buttons to select M2 Call Number,
press
4. Use the i/j buttons to select the following
options, press
Select View to display the number.
Select From Phonebook to select and save a phone
number from the phone book.
Select Delete to delete the number assigned.
to conrm.
to conrm.
to conrm.
to enter the
M1/M2/
50
Page 51
Set Alarm
1. In the Tools menu, use the i/j buttons to select
Alarm, press
2. Use keypad to enter the time, press
conrm.
to conrm.
Security settings
This menu is used to dene which functions on the
phone or SIM card should be protected by a password/
PIN. The PIN and password can be changed.
PIN and PIN2 are supplied together with the SIM
card. Further information is available from your
SIM card provider.
Settings
to
1. During standby mode, press
main menu.
2. Use the i/j buttons to select Setting, press
conrm.
3. Use the i/j buttons to select General, press
to conrm.
4. Use the i/j buttons to select Security, press
to conrm.
The default setting for the password is 1122. If
this lock is active, you can only open the main
menu by entering the password.
to enter the
to
51
Page 52
Settings
SIM Lock
The password is supplied together with the SIM
card. If you deactivate the SIM lock, you need
not enter the PIN after switching the mobile
phone on.
It is recommended to leave the SIM lock on to
prevent unauthorized persons from using the
mobile phone.
Phone Lock
The default setting for the password is 1122.
If this lock is active, you must first enter the
password for the phone lock after switching the
mobile phone on and then enter the PIN.
Change Password Change the passwords/PIN
Phone settings
Navigate to the "Settings" menu.
1. Use the i/j buttons to select Display, press
to conrm.
2. Use the i/j buttons to select options, press
to conrm.
Select Idle Display to edit the Date/Time and Wallpaper
to be displayed when the phone is idle mode.
52
Page 53

Settings
Select Backlight to allow the expiration time of the LCD
backlight. Shorten the backlight switch off time will save
your battery and provide longer standby time.
Select Background Color to select different background
color, either white or light blue according to your own
preference.
Sound settings
Use this menu to adapt the phone’s ringing tones to
your own personal needs.
Navigate to the "Settings" menu.
1. Use the i/j button to select Sound, press
to conrm.
2. Use the i/j button to select options, press
to conrm.
Select Ringtones for various alert ringing signals. Alert
tone including incoming calls, incoming SMS and key
tone.
Select Volume for various alert ringing signals. Volume
of the receiver, ring tone and key tone.
53
Page 54

Settings
Select Alert Type to select whether you are alerted of
incoming calls via a ringing tone or vibration.
Call Setup
Use this menu to set your own personal needs.
Navigate to the "Settings" menu.
1. Use the i/j button to select Call Setup, press
to conrm.
2. Use the i/j button to select options, press
to conrm.
Call Setup Options;
Call divert - Divert all calls, or if you are busy, or if you
are out of reach.
Setup call barring - allows you to limit the use of your
phone to specic calls.
Call waiting - allows you to turn on or off the call
waiting. if you have turned the call waiting on you will
be able to pick up a second incoming call during a
conversation and put the original call on hold.
Auto redial - if you have turned this feature on, the
phone will automatically redial up to 10 times if the
number you dialed is busy.
Caller ID display - you can choose to display your own
number when you make a outgoing call.
54
Page 55

Network settings
Navigate to the "Settings" menu.
1. Use the i/j button to select network settings,
press
to conrm.
2. Use the i/j button to select set your preferred
network settings to either automatic or manual,
press
to conrm.
This feature is very useful when you are using your
mobile outside your service providers coverage zone.
Default settings
This allows the phone to be reset to its default (factory)
settings.
Navigate to the "Settings" menu.
Use the i/j button to select Factory default, press
to conrm.
The default password is 0000.
Settings
55
Page 56

Advanced Settings
15 Advanced Settings
SMS − Text Messages
It is possible that not all functions described are
supported by every provider. Therefore, please
contact your local mobile phone network service
provider for details.
SMS service center
Normally, this has already been set up by your
network service provider.
Navigate to the "Message Settings" menu.
1. Use the i/j buttons to select SMS centre number,
press
2. Use keypad to enter or edit the MSC number and
press
to conrm.
to conrm.
Validity
You can use this feature to dene how long an attempt
should be made to deliver a message which you have
sent.
Navigate to the "Message" menu.
1. Use the i/j buttons to select Message Settings,
press
to conrm.
56
Page 57
Advanced Settings
2. Use the i/j buttons to select Validity period,
press
3. Use the i/j buttons to select Maximum, press
to conrm.
to conrm.
Settings
Delivery report
Select "Delivery Report − On" to receive the
corresponding delivery conrmation report that a
message sent has been delivered.
1. Use the i/j buttons to select Message Settings,
press
2. Use the i/j buttons to select Delivery Report,
press
3. Press
to switch it on or off.
to conrm.
to conrm.
to conrm and use the i/
j
Memory status
Navigate to the "Message" menu.
Use the i/j buttons to select Delivery Report, press
to conrm.
buttons
The memory locations occupied and free on the
mobile phone and SIM card are displayed.
57
Page 58

Advanced Settings
SIM Toolkit
Your mobile phone supports the SIM Toolkit1.
You receive information on: using STK, charge
rates, data and offers from your network service
provider.
1. During standby mode, press
main menu.
Use the i/j buttons to select SIM Toolkit, press
2.
to conrm.
to enter the
Broadcast messages
You mobile phone supports receiving broadcast2 messages.
You receive information on: broadcast
messages, charge rates, data and offers are
from your network service provider.
1. During standby mode, press
main menu.
2. Use the i/j buttons to select Messages, press
to conrm.
3. Use the i/j buttons to select Message Settings,
press
4. Use the i/j buttons to select Broadcast Message,
press
58
to conrm.
to conrm.
to enter the
Page 59

Advanced Settings
Sim Toolkit (STK)
The SIM Application Toolkit (commonly referred to as STK)
is a standard of the GSM system which enables the SIM to
initiate actions which can be used for various value added
services.
Broadcast, also referred to as CB = Cell Broadcast
(information services from your telephone network service
provider)
Network setting
Automatic mode selection: This menu can be used
to select mobile telecommunication networks other
than your own mobile network provider. However, the
corresponding agreements must have been concluded.
Manual mode networks: You can select the mobile
telecommunication networks prescribed on the SIM
card and edit them. Use the i/j buttons to change
the priority.
It is possible that not all functions described are
supported by every provider. Therefore, please
contact your local mobile network service phone
provider for details. They may contain services
which are subject to charges.
59
Page 60

Advanced Settings
1. During standby mode, press to enter the
main menu.
2. Use the i/j buttons to select Settings, press
to conrm.
3. Use the i/j buttons to select Network Settings,
press
4. Use the i/j buttons to select Automatic Mode or
Manual Mode, press
to conrm.
to conrm.
60
Page 61

16 Troubleshooting
Problems and solutions
Problems Solutions
The mobile phone can
not be switched on.
The display is "locked"
when the mobile phone
is switched on.
No signal quality is
displayed.
Troubleshooting
− Insert battery, charge
and try again.
− Enter the PUK to
"unlock" the SIM card.
Contact your network
service provider.
− No network connection.
The mobile phone is in
a location where there
is no network service.
Move to a different
location or contact
your network service
provider.
61
Page 62

Troubleshooting
Keypad does not function
or only functions very
slowly.
A message appears in
the display for some
functions, indicating
execution/use is not
possible.
No display during the
charging process.
− The operating speed of
the display is reduced
in the case of low
temperatures. This is
normal. Use the phone
in a warmer location.
− Many functions can
only be used after
the respective service
has been applied for.
Contact your network
service provider for
more details.
− The battery status
is very low or the
mobile phone is being
operated outside
the recommended
temperature range
(0º − 45 ºC). Wait a
few minutes or move
the phone to a warmer
location. Start the
charging process again.
62
Page 63

Troubleshooting
No connection to the
mobile telecommunication
network.
The "Insert SIM" message
appears in the display.
The battery cannot be
charged or is empty
within a short time.
− Contact your network
service provider.
− Ensure that the SIM
card has been installed
correctly. Contact
your network service
provider, if necessary.
− Battery is defect.
− Place the phone
correctly in the
charging unit or
connect the charging
unit properly. Clean the
contact surfaces on
the mobile phone and
charging unit with a
soft, dry cloth.
− Charge the mobile for
4 hours.
63
Page 64

Technical Properties
16 Technical Properties
Technical data
Feature Value
Standard GSM
Dimensions 52.5 X 128 x 15.5mm
Weight < 100 g incl. battery
Power supply Output: Mini-USB 5 V,
Battery 3.7 V, 750 mAh
Standby time Up to 150 hours
Max. talk time Up to 120 minutes
Display 1.77" TFT,
SMS Standard SMS
Permissible ambient
temperature
Permissible relative
humidity
1
. 900, 1800 MHz
Dual-band
(W x H x D)
500mA
Resolution: 128 x 128
0°C to 40°C
30% to 75%
GSM = Standard for mobile phones.
64
Page 65

SAR Information
17 This oricom mobile phone meets the
guidelines for exposure to radio waves
The Australian safety standard for electromagnetic emissions (EME) is
set by the Australian Radiation Protection and Nuclear Safety Agency
(ARPANSA) and regulated by the Australian Communications and Media
Authority (ACMA).
These requirements are set out in the Radio Communications Act 1992
and the Radiocommunications (Electromagnetic Radiation - Human
Exposure) Standard 2003.
All the applicable safety standards related to radio frequency emissions
were complied with during the development of this mobile phone.
The limit values are based on scientic directives and include a safety
margin in order to guarantee the safety of all persons regardless of age
and state of health.
SAR (Specic Absorption Rate) is a unit of measurement used in
the standard and it measures the amount of radio frequency energy
absorbed by the body when using a mobile phone. SAR values are
measured using standardized methods by which the mobile phone
works in all the frequency bands used with the highest energy level.
Although the SAR values of various phone models can differ, all the
models were developed to maintain the relevant directives on radio
frequency emissions. The following information applies to residents
of countries which, as with Australiasia, have adopted the SAR limit
value recommended by the ICNIRP (International Commission on
Non−lonizing Radiation Protection) which lies at 2W/Kg (averaged from
10 gram tissue):
The highest SAR value measured, averaged over 10g tissue, was <
0.526 W/kg for this mobile phone measured at the ear.
The Highest SAR measured, averaged over 10g tissue, was 0.87 mW/g
for this mobile phone for the 900MHz band measured at the body.
The Highest SAR measured, averaged over 10g tissue, was 1.15 mW/g
for this mobile phone for the 1800MHz band measured at the body.
65
Page 66

Guarantee
Warranty Terms and Conditions (Australia)
Oricom makes no other warranties or conditions, express or implied,
including as to acceptable quality and tness for a particular purpose,
except as stated in this Warranty. Any implied warranties that may be
imposed by law are limited in duration to the Warranty Period. Oricom
warrants that the product is free from defects in materials or workmanship
during the Warranty Period. This Warranty does not extend to any product
from which the serial number has been removed or was purchased outside
of Australia.
This warranty in no way affects your statutory warranty rights under the
Competition and Consumer Act 2010 or any other similar legislation.
The Warranty Period will be 1 year from the date of purchase of the
product evidenced by your dated sales receipt. You are required to provide
proof of purchase as a condition of receiving warranty services. You are
entitled to a replacement product or repair of the product according to the
terms and conditions of this document if your product is found to be faulty
within the Warranty Period. This Warranty extends to the original purchaser
only and is not transferable. Batteries or Battery Packs (if supplied) with
this product are covered under this warranty for a period of 90 days.
Products distributed by Oricom are manufactured using new materials or
new and used materials equivalent to new in performance and reliability.
Spare parts may be new or equivalent to new. Spare parts are warranted
to be free from defects in material or workmanship for thirty (30) days or
for the remainder of the Warranty Period of the Oricom branded product in
which they are installed, whichever is longer. During the Warranty Period,
Oricom will where possible repair and if not replace the faulty product or
part thereof. All component parts removed under this Warranty become
the property of Oricom. In the unlikely event that your Oricom product has
a recurring failure, Oricom may, subject to the Competition and Consumer
Act 2010, at its discretion, elect to provide you with a replacement product
of its choosing that is at least equivalent to your product in performance.
Oricom does not warrant that the operation of the product will be
uninterrupted or error free.
66
Page 67

Guarantee
Oricom is not responsible for damage that occurs as a result of your failure
to follow the instructions that came with the product. These terms and
conditions together with any specic terms and conditions contained in the
user guide to the product purchased constitute the complete and exclusive
agreement between you and Oricom regarding the product. No change
to the conditions of this Warranty is valid unless it is made in writing and
signed by an authorised representative of Oricom.
Oricom will not be in breach of a warranty expressly set out in this User
Guide or under the Competition and Consumer Act 2010 and excludes
any liability for damages or any other remedy arising under any other
legislation or the common law if the damage occurs as a result of:
1 failure by you to adhere to the warnings and follow the instructions
set out in this user guide for the proper installation and use of the
product;
2 negligence on your part or misuse by you of the product;
3 an uncontrollable external cause which results in the product not
functioning including but not limited to power failure, lightning or over
voltage; and
4 modication to the product or services carried out on the production
by anyone other than Oricom or Oricom!/s authorised service
provider.
Oricom will not be liable for any damages caused by the product or the
failure of the product to perform, including any lost prots or savings or
special, incidental or consequential damages. Oricom is not liable for any
claim made by a third party or made by you on behalf
of a third party. This limitation of liability applies whether damages are
sought, or a claim made, under this Warranty or as a tort claim (including
negligence and strict product liability), a contract claim or any other claim.
However, this limitation of liability will not apply to claims for personal
injury. Nothing in this Warranty excludes, restricts or modies any
condition, warranty, right or remedy which pursuant to the Competition
and Consumer Act 2010 applies to this Warranty and which may not be so
excluded, restricted or modied. For warranties that cannot be excluded,
restricted or modied, Oricom limits the remedies available to those
specied in the relevant legislation.
67
Page 68

Customer Support
Customer Support
If you have any problems setting up or using this product you will nd usefull tips and information in the Troubleshooting section of this user guide as
well as “Frequently Asked Questions” on our website www.oricom.com.au.
If you have further questions about using the product after reviewing
the resources above or would like to purchase replacement parts or
accessories please call our Customer Support Team. Our dedicated local
support team are more likely to be able to help you than the retailer where
you made your purchase.
Please retain your purchase receipt and attach to the back page of this
user guide as you will need to produce this if warranty service is required.
Take a few moments to register your product online: www.oricom.com
Australia
Oricom International Pty Ltd
Locked Bag 658
South Windsor, NSW 2756
Australia
Email: support@oricom.com.au
Phone: 1800 81 81 81
(Monday to Friday 8am to 6pm AEST)
Web: www.oricom.com.au
Fax: (02) 4574 8898
New Zealand
Email: support@oricom.co.nz
Phone: 0800 674 266
(Monday to Friday 8am to 6pm AEST)
Web: www.oricom.co.nz
.au
 Loading...