

Page 1
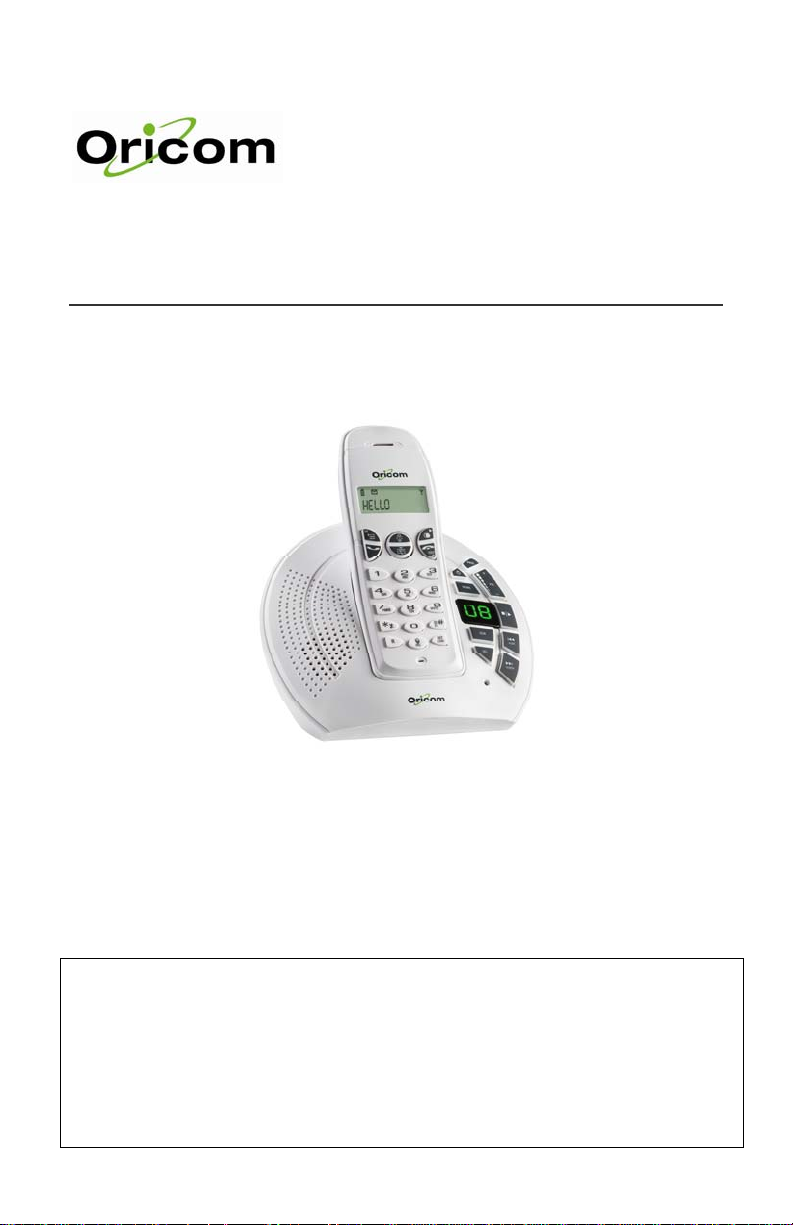
ECO600 Series
User Guide
Keep this user guide for future reference
WARNING
DO NOT USE STANDARD/ALKALINE BATTERIES IN THIS PRODUCT, AS THERE IS A
RISK OF EXPLOSION AND/OR INJURY. USE ONLY Ni-MH RECHARGEABLE BATTERIES
AS SPECIFICED IN THIS USER GUIDE. CONTACT ORICOM FO R REPLA CEMENT
BATTERIES.
Page 2

Environment and Safety
Table of Contents
1 Environment & Safety ..................................................................................2
2 What’s in the Box?.......................................................................................4
3 Welcome...................................................................................................4
4 About your phone .......................................................................................5
5 Getting Started........................................................................................... 8
6 Call........................................................................................................ 10
7 Multi-Handset operation ............................................................................. 13
8 Text and Numbers..................................................................................... 14
9 Phonebook .............................................................................................. 15
10 Call Log................................................................................................... 17
11 Custom Options ........................................................................................ 18
12 Calling Features........................................................................................ 19
13 Extra Features.......................................................................................... 19
14 The System.............................................................................................. 20
15 The Answering Machine.............................................................................. 23
16 Appendix ................................................................................................ 27
17 Notes for operation in N ew Zea land............................................................... 28
18 Warranty (Australia)...................................................................................28
19 Customer Support ..................................................................................... 29
Environment & Safety
Power requirements
This product requires an e lectrica l suppl y of 220-2 40 volts, single- phase alterna ting cur rent,
excluding IT installations defined in standard EN 60950.
CAUTION: The electrical network is classified as dangerous acco rding to cr iteria in
the standard EN 60950. The only way to po wer do wn this product is by
unplugging the power supply from the electrical outlet. Ensure the electrical
outlet is located close to the apparatu s an d is a lway s easily accessible.
CAUTION: Use only the mains adaptor supplied with this eq uipmen t. Incorre ct
adaptor polarity or voltage can seriously damage the unit.
AC Adaptor Base
Input: 240V AC 50Hz
Output: 9V DC 500mA
AC Adaptor charger
Input: 240V AC 50Hz
Output: 6V DC 150mA
2
Page 3

Environment and Safety
Battery requirements
Each handset requires two rechargeable Ni-MH batteries, size AAA 1.2V 650mAh (HR10/44).
WARNING: RISK OF EXPLOSION IF BATTERY IS REPLA CED BY A N INCORRECT
TYPE. Never use non-rechargeable batteries. Use recommend ed ty pe supplied
with this product.
• Never use Alkaline or lithium batteries.
• Do not dispose of the batteries in a fire, as they can explode.
• Do not open or mutilate the battery. Released electrolyte is corrosive and can cause damage to
the eyes or skin. It can be toxic if swallowed.
• Avoid contact with metal objects when handling the battery. These objects could short out the
batteries or cause the conductor to overheat resulting in burns.
• Do not attempt to recharge the battery cell by heating it. Sudden release of battery electrolyte can
cause burns or irritation to the eyes or skin.
• Observe the proper polarity, or direction, of any battery. Reverse insertion of the battery cell can
result in leakage or explosion.
• Remove the batteries if you do not plan to use the product for several months at a time.
Warnings
• Avoid exposure of this telephone to moisture or liquid.
• To prevent electric shock, do not open the handset or base cabinet.
• Avoid metallic contact (e.g. metal clips, keys) between the battery contacts and charging
conductors.
• Do not use the handset in an explosive hazard area such as where there is gas leaking.
• Do not use your telephone during an electrical thunderstorm as it is possible to get an electric
shock. Refer to information contained in the White Pages Directory.
• As there is a slight chance that the telephone could be damaged by an electrical storm, it is
recommended that users unplug the phone from the mains supply and telephone socket during an
electrical storm .
• Follow the local regulations regarding the disposal of your packing materials, exhausted batteries
and used phone. Wherever possible, recycle those materials.
• We advise that this phone should not be used near intensive care medical equipment or by
persons with pacemakers.
• Clean with a dry, soft, lint-free cloth. Never use cleaning agents, particularly aggressive solvents.
• Because the phone works by sending radio signals between base station and handset, wearers of
hearing aids may experience interference in the form of a humming noise.
• Your phone can interfere with electrical equipment such as answering machines, TV and radio
sets, clock radios and computers if placed too close. It is recommended that you position the base
unit at least one metre from such appliances.
• This telephone complies with applicable safety requirements for exposure to radio waves (EMR).
The mean power of this telephone does not exceed 20mW limit at which point testing is required.
• The earpiece of the handset may attract small metal objects such as staples and pins. Care
should be taken when placing the handset near these items.
• This telephone is not designed for making emergency telephone calls when the mains power fails.
Always have a corded phone available to be able to make and receive calls to emergency
services if the mains power fails.
• Privacy of communications may not be ensured when using this telephone.
Environmental
• The Ni-MH batteries supplied with this product may be able to be recycled once they are
unable to recharge during normal operation. Always observe your loca l Council /S tate
regulations regarding the disposa l of your pa ckaging materials, exhausted batteries, and old
equipment. Always recycle where possible.
3
Page 4

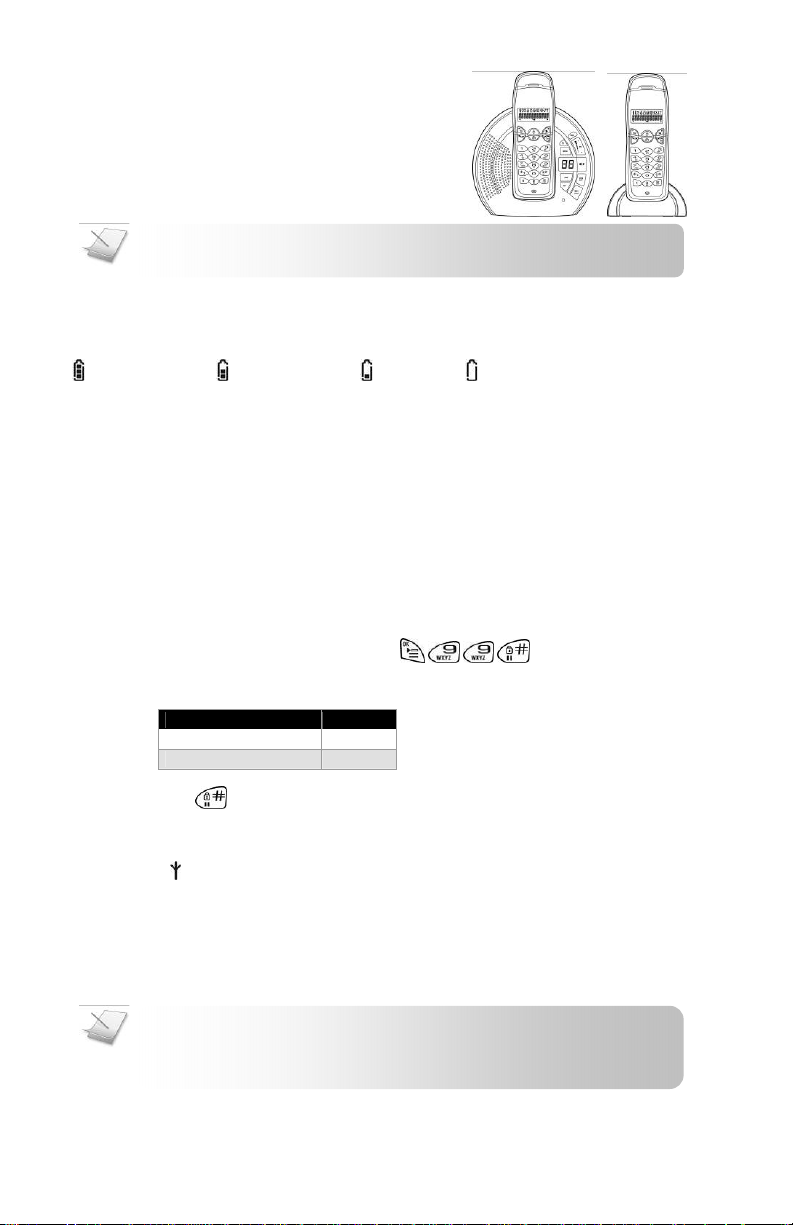
About Your Phone
What’s in the Box?
Pack Contents
Depending on the model you have purchased the pack should contain the following items:-
ECO600-1 ECO600-2 ECO600-3
Number of Base units 1 1 1
Number of cordless handsets 1 2 3
Number of charging pods 0 1 2
Number of AC adaptors 1 1 1
Number of phone line cords 1 1 1
User guide and (Warranty card AUS only) 1 1 1
Handset Rechargeable AAA
Ni-MH Batteries (1.2V 650mAh)
If any of these items are missing, please contact the retailer where you purchased the product
from.
You may expand your ECO600 by adding more handsets (ECO6050HS). These may be
purchased separately from the retailer where you purchased the product from, or direct from
Oricom (Australia). The ECO600 can accommodate a total of 4 cordless handsets.
2 4 6
Welcome
This user guide provides you with info rmati on and in struct ion you need to ge t the mos t from your
phone.
HOW TO USE THIS USER GUIDE?
The following symbols are u se d to alert you on im porta nt in form ation .
• Warning: Critical information for
preventing personal injury.
• Caution: Critical inf ormat ion for preve nting
damage to the product.
• Tip: Information for easier operation.
• Note: Explanatory o r critic al info rmati on
for carrying out an operation correctly.
NEED MORE HELP?
• See the Troubleshooting section in this user gu ide on page 27 .
• Visit our online helpline: www.oricom.com.au
4
Page 5
About your phone
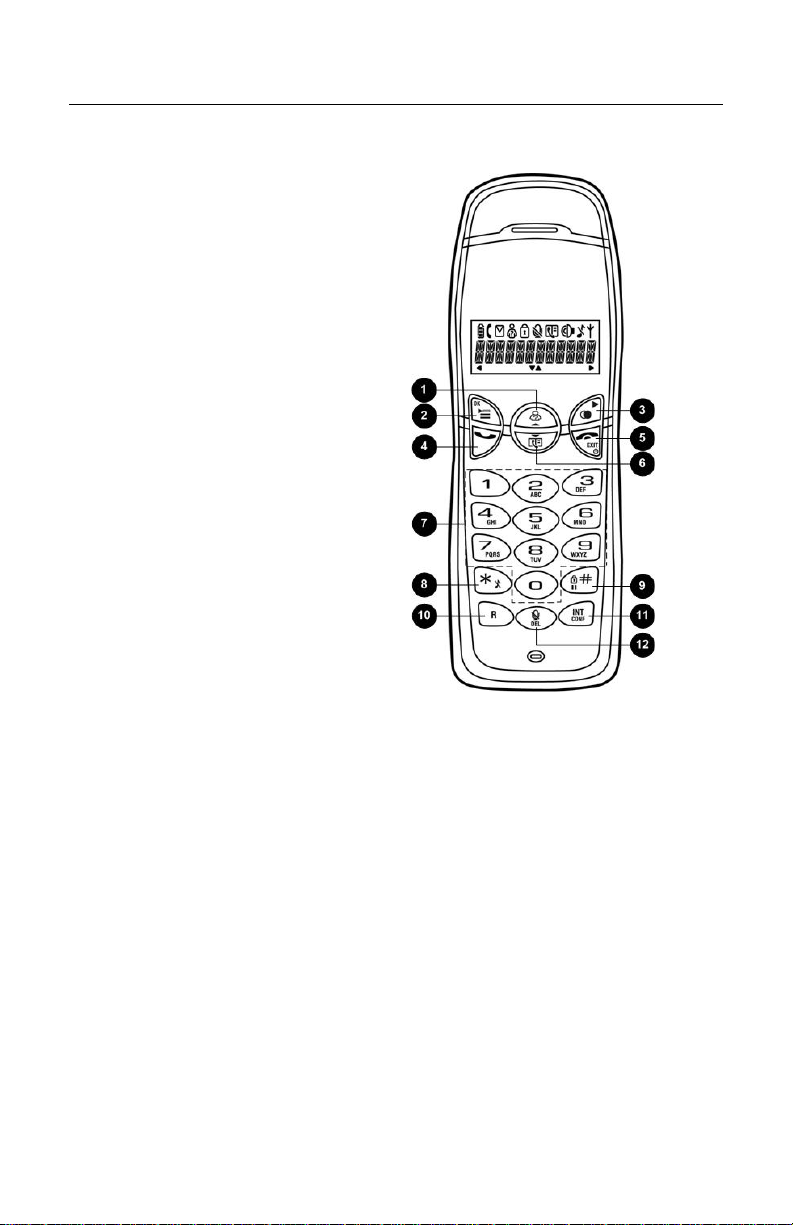
THE HANDSET
1 Up Navigation & Call Log k ey
Scroll up menu items
Increase ringer and receiver volume
Enter incoming call log
2 Menu & OK key
Access main menu
Confirm selection/operat ion
3 Redial & More key
Enter redial log
View more record information
4 Talk key
Make and receive calls
5 End & On/Off key
End current call
Exit menu/operation
Turn handset on/off
6 Down Navigation & Phonebook key
Scroll down menu items
Reduce ringer and receiver volum e
Enter phonebook record review
7 Digit keys
Dial digits
Enter characters
8 Star & Ringer Off key
Dial *
Turn ringer on/off
9 Hash, Ke ylock, & Pause key
Dial #
Enter a pause
Lock/unlock keypad
10 Recall key
Send a recall signal
11 Intercom key
Make intercom call
Start conference call
About Your Phone
12 Mute & Delete key
Mute/un-mute microphone
Delete character or dig it
5
Page 6
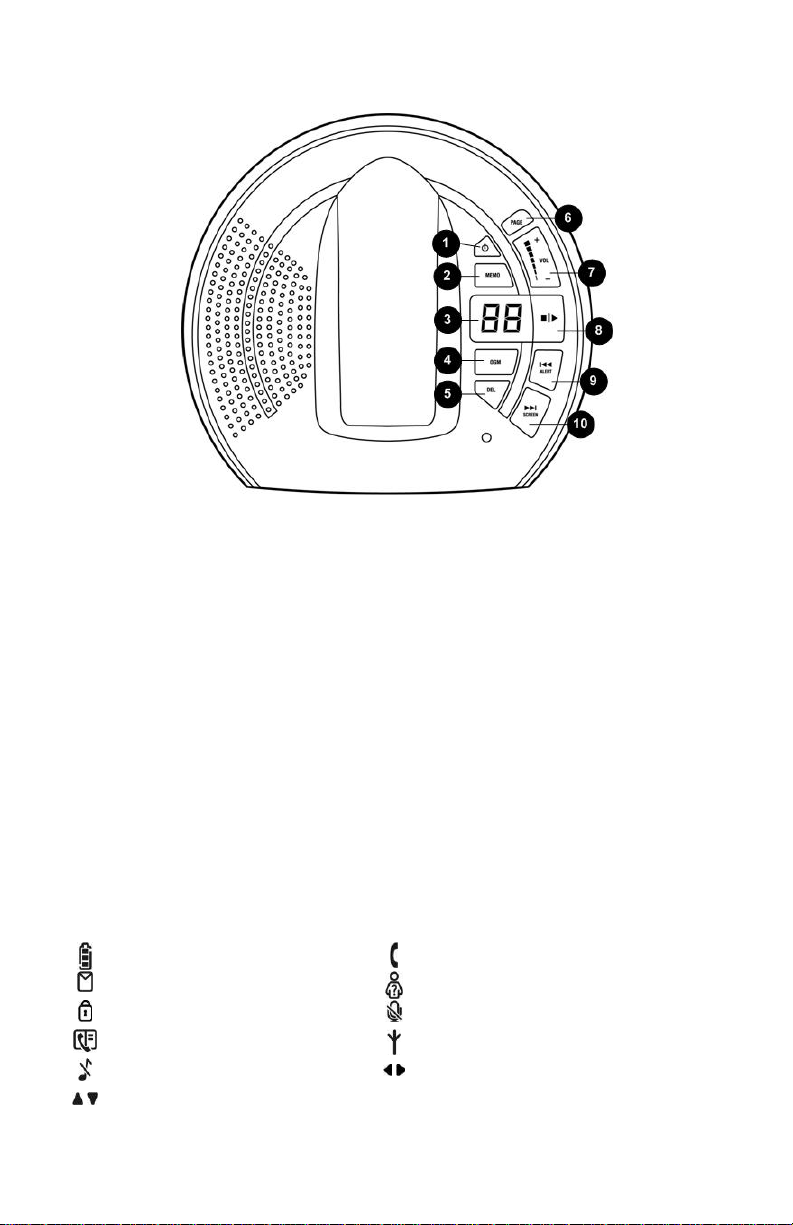
THE BASE
About Your Phone
1
Answering Machine On/Off key
Use to turn the answering ma chine
on/off
2
Memo key
Use to playback memo
6 Page key
Find handset(s)
Enter registration mode
7
Volume key
Use to change the speaker volume
Use to record memo
3
Answering Machine Display
Display message number and status
8
Stop & Play key
Use to play messages
Use to stop an operation
4
OGM key
Use to playback OGM
Use to record OGM
9
Rewind & Alert key
Use to skip backward during playback
Use to turn message alert on/off
5
Delete key
Use to delete messages
10
Forward & Screen key
Use to skip forward during playback
Use to turn call screening on/off
THE ICONS
Each icon gives you a visual message of what is happening on your handset.
Battery level
Voicemail indicato r
Key lock
Phonebook
Ringer off
Up/Down arrows
Call in progress
Caller ID indicator
Microphone Mute
Signal strength
Left/Right arrows
6
Page 7

About Your Phone
THE MENUS
Your phone offers a variety of features and functions grouped in the menus.
Browsing the menus
The main menu includes the Phon ebook, Di splay, Sound, Settings, and S ystem menus.
• Press to enter th e ma in menu .
• Press to enter the inco ming call log.
• Press to enter the phonebook.
• Press to en ter th e re dial log.
TIP: Use or to navigate the menus.
TIP: Quick Exit. Press and hold to exit from any menu instantly. Al l
unconfirmed changes will not be saved.
Taking a glance at the menus
PHONEBOOK DISPLAY
Add Record
Edit Record
Delete
Delete All
SYSTEM INCOMING
Register
Select Base
Delete HS
Change PIN
Low RF Power
Reset
Handset Name
Save
Delete
Delete All
SOUND
Handset
Base
Key Tones
Tones
REDIAL
Save
Delete
SETTINGS
Ans Machine
Auto Answer
Recall
7
Page 8
Getting Started
:
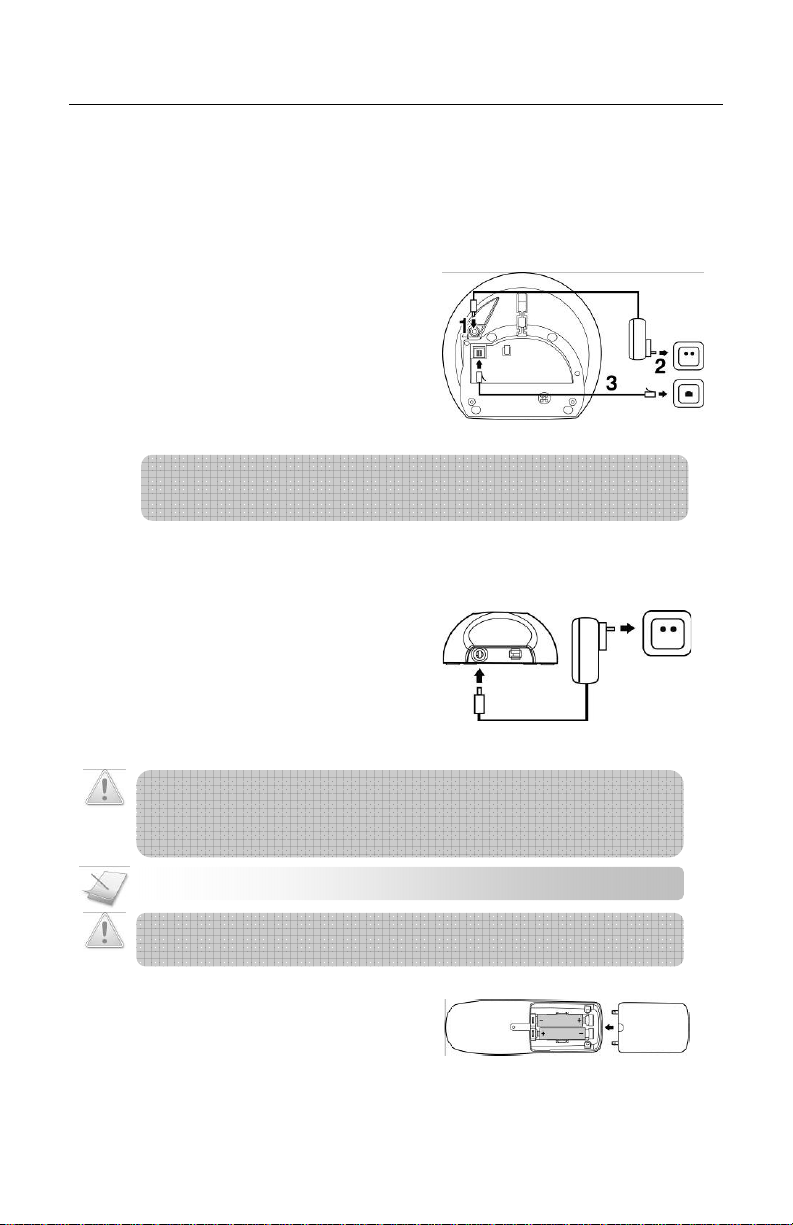
CONNECTING YOUR PHONE
1. Connect the output plug of the mains
adaptor to the bottom of the base
unit.
2. Connect the mains ada ptor to a
standard wall outlet.
3. Connect the telephone line cord to
the phone socket at the bottom of
the base unit and the wall phone
socket.
Note: In Australia some phone wall so ckets
are the old “non modular” style. If you
have this type of wall socke t you will need
to purchase a modular converter plug (not
supplied).These can be obtained from
electronic stores.
IMPORTANT NOTE: DO YOU HAVE BROADBAND? If you do y ou must connect an in-line filter (not
supplied) between the telephone socket and your ECO600 phone base to ensure that your broadband
and phone work properly . E nsure al l phone so ckets in us e have the ir own in-l ine fil ter.
CONNECTING YOUR CHARGER
* For multi-pack customer only
1. Connect the power adap tor of the
charger to a standard wall outlet.
Call
CHARGING YOUR HANDSET
WARNING: RISK OF EXPLOSION IF BATTERY IS REPLA CED BY A N INCORRECT
TYPE. Never use non-rechargeable batteries. Use recommend ed ty pe supplied
with this product. Ni-MH batteries must be disposed of in accordan ce with the
applicable waste disposal regulations.
NOTE
Charge the handset(s) for 14 hours before initial use!
CAUTION: Check the batteries polarity when inserting the batteries. Incorrect polarity may
damage the product.
1. Place the 2 rechargeable batteries
(included) into the ba ttery
compartment.
2. Slide the battery door firmly into
place.
8
Page 9
3. Place the handse t on the ba se un it o r
:
charger for charging.
Call
NOTE
Handset may get warm during initial charge. This is normal. The handset
may take a few seconds to power up.
CHECKING THE BATTERY LEVEL
The battery icon displays the current battery level.
= 100% full = 60% full = 30% full = Empty requires char ging.
If you are on the phone while the battery is nearly flat, you will hear warning tones. Your call may be cut off
shortly after the warning.
WHAT IS STANDBY MODE?
Your phone is in standby mode when it is idle. The standby screen displays the handset name and
number, the signal icon, and the ba ttery ic on.
SETTING YOUR PHONE’S COUNTRY
If you have bought this phone in New Zealand you will need to select your country in order for it to work
properly according to your country’s standards. If you are in Australia you can skip this instruction as the
phone factory default is Australia.
1. After the phone is fully charged press during standby mode.
2. Enter the country code.
Country Code
AUSTRALIA 23
NEW ZEALAND 168
3. Press . Your phone is now ready to use.
CHECKING THE SIGNAL STRENGTH
The signal icon displays the link status between your handset and the base unit. A steady icon
means your handset and the base unit are linked. A flashing icon means your handse t and the base
unit are not linked.
If you move too far away from the base unit while you are on the phone, you will hear warning tones
notifying you that your handset is almost out of range – lost link. Take your handset closer to the base
unit or your call may be cut of f short ly afte r the wa rning.
NOTE: If your handset has lost the link with the base, you will not be able to make
or receive calls. You will also not be able to carry out many of the phone functions
and features.
9
Page 10

SWITCHING YOUR HANDSET ON/OFF
:
:
:
:
If you go on vacation you may prefer to turn off your handset to conserve powe r.
Switching off your handset
1. Press and hold . The handset’s screen turns off.
Switching on your handset
1. Press . The handset may take a few seconds to power up.
NOTE
Your handset cannot make or receive calls if the base power is
disconnected or the handset is turned off.
Call
TIP: Use or to navigate the menus.
MAKING A CALL
This section describes the different ways to make a call.
NOTE
Signal Strength. Check the signal strength before making a call and
during a call. For detai ls, see Checki ng t he si gnal stren gth on page 9.
1. Press .
2. Dial the phone number. The number displays on the screen and is dialed out.
NOTE
Call Timer. During a call, the call timer displays the talk time of your
current call.
NOTE
Low Battery. During a call, you will hear warning tones if your handset
is almost out of power. Charge your handset as soon as possible. Placing the
handset on the base cradle or charger will end the call.
Call
Pre-dialing
Pre-dialing lets you view and make changes to th e number befo re making the call.
3. Enter the phone number. The number displays on the screen. You can make changes
before dialing out.
TIP: Press to erase a digit.
Press and hold to enter a pause. P disp lays on the screen.
4. Press to dial out the call.
10
Page 11

Redialing the last number
5. Press .
6. Press . The last dialed number displays on the screen and is dialed out.
Calling from your phonebook
For details on the phonebook, see Phonebook on page 15.
1. Press .
2. Select the phonebook record you want.
3. Press to dial out the call.
Calling from the incoming call log
You can return a call from the incoming (received or missed) call log.
1. Press .
2. Select the record you want.
3. Press to dial out the call.
ENDING A CALL
1. Press OR place the handset on the base cradle or charger.
ANSWERING A CALL
When you receive a call, your phone rings. Press to answer the call.
Call
TIP: Silent Ringer. When the phone is ringing, press to turn off the ringer.
NOTE: Caller ID Service. Consult and subscribe from your service provider.
TIP: Missed Call Alert. When a call is missed, your phone displays . Press
to view the missed calls.
Turning off the ringer
You can turn off the ringer for al l incomin g calls .
2. Press and hold durin g st andb y. displays on the screen. For details on the ringer
setting, see page 18.
Adjusting the earpiece volume
1. Press or to a djust the v olume dur ing a ca ll. Press to confirm.
Muting the microphone
The mute feature allow s yo u to spea k to s omeon e in th e house pr ivatel y.
1. Press during a call. The caller cannot hear you, but you can still hear the caller’s
voice.
Press again to un-mute the microphone. You can now communicate with the
caller.
11
Page 12

Call
Missing handset(s)
You can page or locate a missin g hands et by pres sing th e page button on the ba se unit.
2. Press on the base unit. All the handsets connected to this base unit will ring.
3. Press on the base unit again to stop paging. All the handsets stop ringing OR
Press any key on the handset to stop the paging.
Caller ID
IF YOU SUBSCRIBE TO YOUR SERVICE PROVIDERS CALLER ID SERVICE WHEN THE PHONE RINGS
AND CALLER INFORMATION IS RECEIVED, THE DISPLAY WILL SHOW THE FIRST 12 DIGITS OF
THE CALLERS NUMBER. IF THERE IS AN IDENTICAL PHONE NUMBER STORED IN THE
PHONEBOOK, THAT PHONEBOOK NAME WILL BE DISPLAYED INSTEAD OF THE CALLER’S
NUMBER. YOUR PHONE AUTOMATICALLY STORES THE LAST 20 INCOMING CALLS
INFORMATION. EACH RECORD HOLDS UP TO 20 DIGITS.
CALL WAITING
You can use the recall button to answer a second call while you are on the phone. However this service
will need to be turned on. For example to turn on Telstra’s Call Waiting service:
1. Press wait for dial tone then Press 43
2. You will hear a service tone then Press.
Take two different calls at the same time
If you have subscribed to your te lephon e network ope rator s Call Wai ting Cal ler ID se rvice, yo ur phone
will display the number of the secon d incoming call for around 2 0 seconds while you are talki ng on
the phone.
During a call, you will hear two loud beeps periodically to notify you of another incoming call. If you
wish to answer this call:
1. When the handset receives a second call, the number of the caller appears on the display. It
will display for 20 seconds or until you press a key on the phone. Press listen for dial
tone then Press 2 to pu t the cur rent call on hold and talk wi th the sec ond calle r.
2. Subsequent presses of listen for dial tone then Press 2 will toggle you between these 2
callers.
12
Page 13

Call
:
:
Multi-Handset operation
YOU CAN USE THESE USEFUL FEATURES IF YOU HAVE 2 OR MORE HANDSETS REGISTERED TO
THE BASE.
CALLING ANOTHER HANDSET (INTERCOM CALL).
NOTE
An intercom call can onl y invol ve 2 hand sets tha t share the sa me base .
1. Press .
2. Press the target handset number.
3. Wait for the other party to answer your call.
4. Press to cancel or end the intercom call.
While you are on the phone
While talking on the phone, you can call an other handset.
1. Press during the call.
2. Press the target handset number. Wait for the other party to answer your call.
To toggle between the calls
1. Press to switch between the outside call and the in tercom call.
TRANSFERRING A CALL
1. Press during a call.
2. Press the target handset number.
3. Press after the other party answers your call. The outside call is now transferred to
the other handset.
MAKING A 3-WAY CONFERENCE CALL
A 3-way conference call is a call between you, an outside caller, and another handset user in your
house.
NOTE
A 3-way conference call requi res 2 handse ts that shar e the same base
You are talking on the phone with an outside caller, and you want to involve another handset user in
this conversation.
1. Press during your call with the outsi de cal ler.
2. Press the target handset number. Wait for the other party to answer your call.
3. Press and hold for 2 seconds. You are now on a 3-wa y co nferen ce c all.
4. Press to end the conference call.
13
Page 14

Text and Numbers
You can enter text and numbers for handset name, phonebook record, and othe rs.
ENTERING TEXT AND NUMBERS
1. Find the key with the chara cter you want.
2. Press it as many times as needed for the character to display on the screen.
Figure 1: Input table
Key Characters
0
1 space
2
3
4
5
6
7
8
9
0
1
A B C 2
D E F 3
G H I 4
J K L 5
M N O 6
P Q R S 7
T U V 8
W X Y Z 9
ERASING TEXT AND NUMBERS
Erasing a single character
1. Press to delete the character left of th e curso r.
Erasing all characters
1. Press and hold to delete all the characters on screen.
14
Page 15

:
:
:
Phonebook
Each handset has a phonebook that can store up to 20 records. Each phonebook record can have a
name of up to 12 chara cters long and a num ber of u p to 20 d igits long.
TIP: Use or to navigate the menus.
VIEWING THE PHONEBOOK
1. Press .
2. If you want to view the details of the record, press .
Searching a record
You can search the phonebook by scrolling or by searching the first character.
Searching by scrolling
1. While at the phonebook, press or to scroll.
Searching by the first character
1. While at the phonebook, press the digit key that contains the character that you want
to search.
CALLING FROM THE PHONEBOOK
2. Press .
3. Select the phonebook record you want.
4. Press to dial out the call.
NOTE
2nd Call Service. You can make a second call whilst on a call. Consult the
instructions provided by your telephone service provider.
ADDING A RECORD
NOTE
Memory Full. If your phonebook is full, a notific ation disp lays. Delet e
unnecessary records before adding new ones.
1. Press .
2. Select PHONEBOOK Æ ADD RECORD. Press .
3. Enter the name. Pr ess .
NOTE
Text and Number Editing. See Text and Numbers on page 14.
4. Enter the numbe r.
15
Page 16

:
NOTE
Duplicate Number. Phonebook records with identical name and/or
number cannot be saved.
TIP: Pause. Press and hold to insert a pause.
5. Press to confirm. Your new record is saved.
EDITING A RECORD
1. Press .
2. Select PHONEBOOK Æ EDIT RECORD. Press .
3. Select the re cor d yo u wan t to e dit . Pr ess .
4. Edit the name if necessary. Press .
5. Edit the number if necessary.
6. Press to confirm. Your record is saved.
DELETING A RECORD
1. Press .
2. Select PHONEBOOK Æ DELETE. Press .
3. Select th e recor d you want to delete. Press twice. The handset displays a
confirmation request.
4. Press to confirm. The record is deleted.
DELETING ALL RECORDS
1. Press .
2. Select PHONEBOOK Æ DELETE A LL. Press . The handset displays a
confirmation request.
3. Press to confirm. All records are deleted.
16
Page 17

:
Call Log
The call log stores the call history of all the incoming (missed or received), and dialed calls.
The call history includes information of the caller name, number, call time, and date.
VIEWING THE CALL RECORDS
MAKING A CALL FROM THE CALL LOG
Returning a call
To return a call from the inco ming call log, se e PAGE 11
Calls What is this? Stored records
Incoming Calls that you received. Up to 20
Dialed Calls that you have made. 1
TIP: Use or to navigate the menus.
TIP
New Call Icon. When you are viewing the incoming call log, you will se e the
new call icon flashing if the call record you selected is a new missed call.
1. Press to view th e in comin g call log OR
Press to view th e di aled c all log.
2. Select the re cor d you wan t. If you w ant to view the det ails of th e re cord, pre ss for
more information.
SAVING A CALL RECORD TO YOUR PHONEBOOK
1. Press after selecting a call record.
2. Select SAVE. P ress .
3. Edit the name if necessary. Press .
4. Edit the number if necessary.
5. Press . Your record is saved.
DELETING A CALL RECORD
1. Press after selecting a call record.
2. Select DELETE . Press . The handset displays a confirmation request.
3. Press to confirm. The record is deleted.
DELETING ALL INCOMING CALL RECORDS
1. Press after entering the incoming call log.
2. Select DELETE A LL. Press . The handset displays a confirmation request.
3. Press to confirm. All records are deleted.
17
Page 18

Custom Options
Make this your handset – change the look and sound to suit your needs and tastes.
Naming your handset
Every handset can have its own name. It displays on the screen during standby.
1. Press .
2. Select DISPLAY Æ HANDSET NAME. Press .
3. Edit the name. Use to make correction.
4. Press to confirm. The new setting is saved.
Setting your phone’s ringer melody and volume
1. Press .
2. Select SOUND Æ HANDSET( or BASE)Æ MELODY(or VOLUME). Press .
3. Select the me lody you w ant. P ress to confirm. The new setting is saved.
Setting your handset’s ringer volume
4. Press .
5. Select SOUND Æ HANDSET Æ VOLUME. Press .
6. Select the volu me level. Pres s to confirm. The new setting is saved.
Setting the key tone
Key tone is the sound you hear when you press a key on your handset.
1. Press .
2. Select SOUND Æ KEY TONES. Press .
3. Select the new setting. Press to confirm. The new setting is saved.
Setting the handset tones
Handset tones will sound upon a successful or unsuccessful operation.
1. Press .
2. Select SOUND Æ TONES. Press .
3. Select the new setting. Press to confirm. The new setting is saved.
18
Page 19

The System
:
Calling Features
Your phone supports a number of call-related features to help you handle and manage your calls.
AUTO ANSWER
Auto answer enables you to answe r an incomin g call by simply picking up the handset from the
charging cradle. You do not nee d to pre ss a key to an swer the ca ll.
Activating/Deactivating auto answer
1. Press .
2. Select SETTINGS Æ AUTO A NSWER. Press .
3. Select the new setting. Press to confirm. The new setting is saved.
RECALL SELECTION
You can use the Recall button on your telepho ne when using y our netw ork operator’s service s
such as call waiting etc. A subscrip tion may apply for these services contact your netw ork
operator for more information. If this is not w orking correct ly change the setting using the
instruction below:
Selecting recall duration
1. Press .
2. Select SETTINGS Æ RECALL. Press .
3. Select the new setting. Recall 1= Australia, Recall 2 = New Zealand. P ress to
confirm. The new setting is saved.
Extra Features
Discover and explore the additional features your phone offers! Find out how these features can
benefit you and help you make the most from your phone.
TIP: Use or to navigate the menus.
KEYPAD LOCK
You can lock the keypad to prevent accidental presses on the han dset while you are c arrying it
around.
Locking the keypad
1. Press and hold . The keypad is locked. KEY LOCKED is displayed.
NOTE
Making Calls. You will not be able to make any calls including
emergency calls when the keypad is locked.
Unlocking the keypad
1. Press and hold . The keypad is unlocked.
19
Page 20

The System
:
:
:
VOICEMAIL INDICATION
NOTE
Voicemail Indication Service. Consult and subscribe f rom y our servi ce
providers service.
Voicemail indication is a visual voicemail alert. On the ECO600, you see an envelope icon when
there is a voicemail w aitin g in you r se rvice provi ders mailbo x(es ).
Retrieving voicemail(s)
To retrieve your voicemail( s), consul t your se rvice p roviders in struc tions.
Clearing the voicemail indicator
After checking your voicemail (s), the voicema il indica tor will be cleared automatically afte r
receiving a signal from the network . If you wan t to, you can also clear the vo icemail indicato r
manually if it fails to reset.
1. Reset th e power of the base un it (Unplu g the powe r adaptor of the ba se unit. Wait for
30 seconds. Plug in the power adaptor again.) The voicemail indicator will be cleared.
The System
TIP: Use or to navigate the menus.
REGISTERING YOUR HANDSET
Registration allows communication between your base unit and handset(s). If your handset is not
registered, you will not be able to make a call or use some of the functio ns an d feature s on the
phone.
NOTE
Your handset is already registered when you buy 1-4 handset packs.
If your handset displays UNREGISTERED, follow the steps below to register your handset.
1. Press PAGE on the ba se u nit f or 4 se con ds.
2. Press on the handset.
3. Select SYSTEM Æ REGISTER. Press .
4. Enter the system PIN (Pre-set: 0000). Press OK.
5. Press 1 to select the base number you want. Your handset starts searching for the base.
Registration shall be completed within 30 seconds. If regis tration is successful , the signal
icon displays steadily. If registration failed, repeat the above procedure.
NOTE
Your base can register up to 4 handsets. After registering 4 handsets,
your base unit registra tion memo ry is ful l. If you attem pt to re gister an
additional handset, registration will not be successful.
20
Page 21

The System
:
:
DELETING A HANDSET
Use one handset to delete (de-register) another handset that shares the same base unit.
1. Press .
2. Select SYSTEM Æ DELETE HS. Press .
3. Select the handset (number) you want to delete. Press .
TIP
Handset Number. The handset number displays beside the handset name
during standby.
4. Enter the system PIN. Use to make correction.
5. Press . The handset is deleted.
CHANGING THE SYSTEM PIN
The system PIN is used for registering, deleting handsets, and protecting the access rights to some of
the other menus. The pre-set system PIN is 0000. You can personalize the PIN for greater security.
1. Press .
2. Select SYSTEM Æ CHANGE PIN. Press .
3. Enter the system PIN. Press to confirm. Use to make correction.
4. Enter the new system PIN. Press .
5. Enter the new system PIN again for verification.
6. Press . The new setting is saved.
NOTE
Forgotten PIN. Write down your PIN and save it for future use. If you
have forgotten the PIN, call your manufacturer for assistance.
21
Page 22

The System
:
RESETTING TO FACTORY DEFAULT SETTINGS
You can reset your phone settin gs to t he factor y defaul t.
1. Press .
2. Select SYSTEM Æ RESET. Press .
3. Enter the system PIN. Press to confirm all settings have reset.
NOTE
After reset, your handset ’s power sw itche s off. It will switch back on in a
few seconds after updating all the settings.
To find out what settings are being reset, see below.
DEFAULT (PRE-PROGRAMMED) SETTINGS
General Setting
Language English Handset Name Reset
Auto Answer Off
Recall Duration Recall 1
Sounds Setting
Handset Melody Melody 3 Handset Ringer Vo lume Level 5
Base Melody Melody 1 Base Ringer Volume Level 3
Handset Key Tones On Receiver Volume Level 2
Handset Tones On
Call Log Setting
Incoming Call Log Unchanged Dialed Call Log Unchanged
Message Waiting Indicator Reset
System Setting
Base Selection Auto PIN Code 0000
Answering Machine Setting
Answer Machine Status On Ring Delay
Message Alert On Call Screening On
RA PIN Code 000 Answering Machine Language
Speaker Volume
22
Page 23

The Answering Machine
:
:
The Answering Machine
When first switched on, your answering machine is ready to be used. Your answering machine is set
to answer and record mode. Th e answer ing machin e give s you clea r visual messages on its dis play.
You can also record memos and acce ss the ans wering m achine remo tely.
SWITCHING THE ANSWERING MACHINE ON/OFF
1. Press during standby.
Once switched on, your answering machine wi ll answer i ncoming call s after a cer tain number of r ings
depending on the ring delay se tting, s ee Setting ring delay on page 25.
OUTGOING MESSAGES (OGM)
OGM is the message your caller hears when the answering machine picks up the call. You r answerin g
machine comes with two pre -reco rded O GM: Answe r and Re cord mod e, and An swer Only mo de. It is
always set to answer and reco rd mo de.
Setting the default OGM
These are the pre-recorded OGM.
Answer and record
This allows the caller to leave a mes sage fo r you. You ca n also reco rd you r own O GM fo r
answer and record mode. “He llo, yo ur call cann ot be taken at t he momen t, so please
leave your message after the tone.”
Answer only
This does not allow the caller to leave a message for you. Your answering machine
switches to answer only mode if its memory is full. “Hello, we’re sorry your call cannot
be taken at the moment, and you c an not leave a mes sage, so ple ase c all l ater. ”
Recording an OGM
The maximum length of the OGM is 40 seconds. After recording, your new OGM will replace the old one.
1. Press for 2 seconds.
2. Start reco rding aft er the beep.
TIP
For better audio quality, speak into the microphone of the base unit when
recording.
3. Press to stop recording or recording will stop after 40 seconds. The recorded OGM
Listening to the current OGM
will play back automatically for review.
TIP
If you want to restore the pre-recorded OGM, simply delete your current
OGM.
1. Press .
2. Press to stop OGM playback or it will stop when the OGM is fin ishe d.
23
Page 24

The Answering Machine
:
:
:
Deleting an OGM
1. Press while listening to the OGM. The pre-recorded OGM is restored.
NOTE
The pre-recorded OGM cannot be deleted.
INCOMING MESSAGES (ICM)
Each message can be up to 2 minutes long. When you have received new messages on your answering
machine, its display will keep flashing the number of new messages received. If you pick up your phone
when the caller is leaving a message, the recording will stop, and you can talk to the caller in person.
NOTE
Playing ICM
ICM will be played back in the sequence they were recorded.
1. Press . New messages start playing.
During playback, you can perform any of the fo llowing f unction.
• Adjust the volume. Press to increase and decrease the speaker’s volume.
• Skip backward.
• During message playback, press to replay the message from the beginn ing.
Memory Full. Your answering machine display s FU. It will au tomatic ally
switch to answer only mode. You nee d to delete some mes sages to allow for
more messages to be recorded.
• During the first second of the cu rrent mes sage, pre ss to play the previous message.
• Skip forward. Press to skip to the next message.
.
• Stop playback. Press
• Delete current message. Press
NOTE
Deleted message(s) cannot be recovered.
.
Deleting an ICM
1. Press during message playback. The current message is dele ted.
Deleting all old ICM
1. Press for 2 seconds. The answering machine sounds 2 beeps.
2. Press again within 5 seconds. All old messages are perm anentl y delete d.
MEMO
A memo is a message you can leave f or o ther u sers of your phone.
Recording a memo
You can record one memo (up to 2 minutes long) . Delete the old memo before reco rding a ne w one.
24
Page 25

The Answering Machine
:
:
:
o
1. Press for 2 seconds.
2. Start reco rding aft er the beep.
TIP
For better audio quality, spe ak into the m icrophon e of the base unit when
recording.
3. Press to stop recording or reco rding wil l stop af ter 2 mi nutes. The reco rded me mo
will play back automatically for review.
Playing the memo
1. Press during standby.
2. Press to stop playback or it will stop when the memo is finished.
TIP
The memo will also playback when you are listening t
Deleting the memo
1. Press during memo playback. The memo is deleted.
NOTE
Deleted memo cannot be rec overe d.
CALL SCREENING
Call screening allows you to hear the caller while they are is leaving a message. You can then
decide if you want to talk to the caller directly.
the ICM.
1. Press during standby.
The answering machine emits one beep for On, and two beeps for Off.
MESSAGE ALERT
Message alert gives you an indication that you have new message(s) saved in the answering
machine. You will hear a short beep periodically.
1. Press during standby.
The answering machine emits one beep for On, and two beeps for Off.
ADJUSTING THE PLAYBACK VOLUME
You can adjust the volume of call screening and message playback.
1. Press to increase or decrease the volume.
SETTING RING DELAY
Ring delay is the number of rings your phone will ring before the answering machine picks up the call.
This setting only applies when your answe ring ma chine is sw itched on. Y ou can chan ge this se tting to
2 – 7 rings or toll saver.
25
Page 26

The Answering Machine
:
:
p
:
:
1. Press on the handset.
2. Select SETTINGS Æ ANS MACHINE Æ RING DELAY. Press .
3. Select the new setting. Press . The new setting is saved.
TIP
Toll Saver. Toll saver is a cost effective way to manage your mes sages
when accessing your answer ing mach ine remo tely. When tol l saver i s selec ted,
your answering machine wi ll pick up the call after 2 rin gs if you have new
messages or 4 rings if you have no new message.
REMOTE ACCESS
You can operate your answering machine when you are away from home by calling your phone from a
touch tone phone and enterin g a 3-di git remote acce ss PIN code.
Changing your remote access code
The remote access PIN code is used for operating your answering machine remotely. The pre-set RA
PIN code is 000. Yo u can per sonal ize the R A PIN co de for grea ter secu rity.
NOTE: The REMOTE ACCESS (RA) PIN is different from your 4-digit system PIN.
1. Press on the handset.
2. Select SETTINGS Æ ANS MACHINE Æ RA PIN CODE. Press .
3. Enter your current RA PIN code (Pre-set: 000). Press .
4. Enter a new 3-digit RA PIN code. Press .
5. Enter the new 3-digit RA PIN code again for verification.
6. Press . The new setting is saved.
Accessing your ANSWERING SYSTEM remote ly
1. Make a call to your phone.
2. Press * when OGM starts playing.
3. Enter your RA PIN code. You now have access to your answering machine.
NOTE
You have 3 tries to enter the correct remote access PIN code before your
hone hangs up.
4. Press a key to carry out a function. See the Remote Access Commands Tables in the
Appendix for a list of available functi ons.
TIP
Press 5 to stop the current operation and re-start from the beginning.
NOTE
Your phone will hang up automatically if no key is pressed for 8 seconds.
26
Page 27

The Answering Machine
Appendix
REMOTE ACCESS COMMANDS
Table 1: Commands at the remote me nu Table 2: Commands during mes sage pl ayback
Key Function Key Function
2 To play messages 1 To play previous message
4 To play Memo 2 To repeat current message
5 To stop an operation 3 To play next message
6 To play OGM 5 To stop message playback
7 To record Memo 0 To delete current message
8 To switch the answering machine
on/off
9 To record OGM
0 Press twice to delete all old messages
Troubleshooting
Problem(s) Tip(s)
No dial tone
Signal icon flashing
Registration fails
continuously
No parking tone
Handset on the charger
does not charge
No display
Bad audio (crackles,
echo, etc.)
Handset does not ring
Caller ID does not
display number
Cannot make/answer a
2nd call
• Check your phone connections.
• The handset may be out of range. Move closer to the base.
• The battery capacity may be low. Charge battery.
• The handset may be out of range. Move closer to the base.
• If the handset displays UNREGISTERED, register the handset. See page
20.
• Your base memory may be full. Delete any un-used handsets and try again.
See page 21.
• The handset may not be placed properly on the cradle. Try again.
• Charging contacts may be dirty. Disconnect the power supply first and then
clean contacts with a damp cloth.
• Turn on the handset tone. See page 18.
• The batteries may be defective. Purchase new batteries from your dealer.
• Check that the batteries are inserted correctly.
• Make sure the handset is placed properly on the charger. The battery icon
animates while charging.
• Check that the batteries are charged.
• Check the power and phone connections.
• If you have Broadband installed you MUST install high quality line filters (not
supplied) on all phone sockets. This is not a problem with your phone.
• The handset may be nearly out of range. Move closer to the base unit.
• The phone may be interfered by nearby electrical appliances. Move the base
unit.
• The phone may be at a location with thick walls. Move the base unit.
• Check that the handset ringer is turned on. See page 18.
• Caller ID service may not be activated. Check with your service provider.
• The caller’s information may be withheld or is unavailable.
• 2nd call service may not be activated. Check with your service provider.
• Check that the recall selection is correct. See page 19.
• Check that the correct country has been selected. See page 9.
27
Page 28

Notes for operation in New Zealand
The grant of a Telepermit for any item of terminal equipment indicates only that Telecom has
accepted that the item complies with the minimum conditions for connection to its network. It
indicates no endorsement of the product by Telecom, nor does it provide any sort of warranty.
Above all, it provides no assurance that any item will work correctly in all respects with another
item of Telepermitted equipment of a different make or model, nor does it imply that any product
is compatible with all of Telecom’s network services. This device may be subject to ringing or bell
tinkle when certain other devices are connected to the same line. If this occurs, the problem
should not be referred to the Telecom Faults service.
This equipment shall not be set to make automatic calls to the Telecom “111” Emergency Service.
This equipment may not provide for the effective hand-over of a call to another device connected
to the same line.
REN (RN for New Zealand)
The REN (Ringer Equivalence Number) or (RN) is of significance only if you wish to connect
more than 1 telephone to your telephone line. A standard telephone line has a maximum REN
capacity of 3 (RN of 5). It is possible to connect 3(5) devices with a REN of 1 (RN of 1) with no
degradation to the product’s performance. Exceeding this limit may cause the volume of the
ringer in any phone to decrease or not ring at all.
Caller ID
Customers using non Telecom toll services should not use the dial back feature for local calls as
this will incur a charge only the 7 digit number should be dialled. Some of the CID services listed
may not be available in New Zealand.
This telephone is not designed for making emergency telephone calls when the power fails.
Make alternative arrangements for access to emergency services.
Warranty (Australia)
(a) Warranty Oricom International Pty Ltd (Oricom) warrants that the product is free from
defects in materials and workmanship for a period of 12 months effective from the date of
purchase. This warranty in no way affects your statutory warranty under the Trade Practices Act
1974 or any other similar legislation. It is important that you read the Warranty Card as it
contains full and additional details of the warranty, limitation of warranty and conditions for
receiving the warranty services during the warranty period. The Warranty Card is located in the
package.
(b) Exclusion and limitation of liability. Oricom will not be in breach of a warranty or condition
expressly stated in this User Guide or the Warranty Card or implied by the Trade Practices Act
and excludes any liability arising under any statutory or common law for damages or any other
remedy if the damage occurs as a result of:
(i) Failure by you to follow the instructions in the User Guide for the installation and proper
functioning of the product;
(ii) Negligence on your part or misuse by you of the product;
(iii) Any un-controlled external cause to the phone not functioning including but not limited to
electricity failure, lighting, over voltage;
(iv) Non adherence by you to the warnings in the User Guide and the User Guide generally; and
(v) Modification to the product or services carried out to the product by anyone other than Oricom
or on Oricom’s behalf.
Oricom will not be liable for consequential losses including loss of profits arising from a cause of
action in contract, tort or any other statutory or common law (except where a statute or any law
prohibits this exclusion). The warranty does not extend to damage caused by misuse, negligence,
excessive voltage, faults on the telephone line or lightning. This warranty in no way affects your
statutory rights. Full details of the warranty are contained in the enclosed warranty card.
28
Page 29

Customer Support
If you feel this product is not working correctly please consult the user guide and ensure that you
are using the product in accordance with the instructions. Remove all extra telephone equipment
and connect only this telephone directly to the telephone socket. If the fault is still present,
connect another telephone (if available) to the telephone socket. The results will show you
whether the fault lies with this unit or with the telephone line.
If the product is working correctly the fault is on the telephone line. Please contact your network
operator for assistance.
To order spare parts additional handsets, replacement batteries and in case of any technical
issues you may have with product please consult our website for further information or send us
an email for a prompt response to your enquiry.
In the unlikely event of a fault developing, please contact us for assistance. If the product is then
found to be faulty you will be asked to return it directly to us with a copy of the purchase receipt.
Australia
Oricom International Pty Ltd
Locked Bag 658
South Windsor, NSW 2756
Customer support
Email: support@oricom.com.au
Web: www.oricom.com.au
Fax: (02) 4574 8898
Ph: (02) 454 8888 or
1300 889 785 (for the cost of a local
call (excludes calls from mobiles)
New Zealand
Atlas Gentech (NZ) Limited
Private Bag 14927,
Panmure, Auckland
Customer support
Email:support@atlasgentech.co.nz
Web: www.atlasgentech.co.nz
Fax: (09) 574 2722
Ph: 0900 50 025 (Toll Call)
29
 Loading...