

Page 1

Oricom eco5200 Series
Cordless phone with integrated
answering system
USER GUIDE
Keep this user guide
for future reference.
!
WARNING
DO NOT USE STANDARD/ALKALINE BATTERIES IN THIS PRODUCT, AS
THERE IS A RISK OF EXPLOSION AND/OR INJURY.
USE ONLY Ni-MH RECHARGEABLE BATTERIES AS SPECIFIED IN THIS
USER GUIDE. CONTACT ORICOM FOR REPLACEMENT BATTERIES.
Page 2

CONTENTS
Installation and Charger
………………
Pack contents
……………………………
Purchasing additional handsets
………
Your cordless handset
…………………
Understanding the cordless handset
display
…………………………………
Your eco5200 base unit
…………………
Bottom
……………………………………
During standby
…………………………
Answering an incoming call
……………
Making an external call
………………
Mute feature
……………………………
Recall feature
…………………………
Pause feature when using on a PABX
Handsfree mode
………………………
Volume adjustment (with base unit)
Volume adjustment (with handset)
CONTENTS
WARNINGS AND SAFETY INFORMATION ………………………………… 1
Important ……………………………… 1
Getting Started ………………………………………………………………… 2
Installation and Charger
Warning ………………………………… 3
Pack contents
Purchasing additional handsets
Your cordless handset
……………………………44
………………22
………44
…………………55
Understanding the cordless handset
display
…………………………………66
Your eco5200 base unit
Bottom
……………………………………88
…………………77
Basic Operation ………………………………………………………………… 9
During standby
Cordless handset's LCD display ………9
Answering an incoming call
With cordless handset ………………… 9
With base unit ………………………… 9
Making an external call
With cordless handset ……………… 10
With base unit ……………………… 10
Mute feature
Recall feature
Call waiting …………………………… 11
…………………………99
……………99
………………1100
……………………………1100
…………………………1111
Take two different calls at the same
time ………………………………… 11
Recall function when connected to a
PABX ……………………………… 12
Pause feature when using on a PABX 1122
Handsfree mode
Volume adjustment (with base unit) 1133
Speaker volume control …………… 13
Ringer volume control ……………… 13
Volume adjustment (with handset) … …1133
Handset volume control …………… 13
………………………1122
Page 3

CONTENTS
Redial the last number
………………
Store the last number dialled
………
Delete last number dialled
…………
Add new records
………………………
Review / Edit / Dial stored Phonebook
records
………………………………
Delete one record
……………………
Handset ringer adjustment
…………
Multi-handset Operation
……………
Cordless handset keypad lock
……
Registration
……………………………
Language setting
……………………
Handset name
…………………………
Reset
……………………………………
Review Caller ID records
……………
Store a CID number
…………………
Delete one or all CID record(s)
……
Caller ID Operation …………………………………………………………… 14
Review Caller ID records
Store a CID number
……………1144
…………………1144
Delete one or all CID record(s)
……1155
LNR Function (Last Number Redial) ………………………………………… 16
Redial the last number
Store the last number dialled
………………1166
………1717
Delete last number dialled
…………1717
Phonebook ……………………………………………………………………… 18
Add new records
Review / Edit / Dial stored Phonebook
records
………………………1188
………………………………1818
Delete one record
……………………1919
Cordless Handset Operation ………………………………………………… 20
Handset ringer adjustment
Handset ringer melody ……………… 20
Handset ringer volume ……………… 20
Handset ringer On / Off …………… 20
Multi-handset Operation
Intercom function …………………… 21
Call transfer between cordless
handsets …………………………… 22
Transfer a speakerphone call from the
base unit to the cordless handset 22
…………2200
……………2211
Conference calls …………………… 22
Cordless handset keypad lock
Registration
Register new handsets on the eco5200
base ………………………………… 23
Remove handsets …………………… 24
Language setting
Handset name
Reset
……………………………2233
……………………2244
…………………………2255
……………………………………2255
……2233
Page 4

CONTENTS
Answering machine On / Off
………
Day/Time setting
………………………
Answering machine Ring delay Setting
Answering machine PIN number Setting
OGM (Outgoing Messages)
…………
ICM (Incoming Messages)
…………
Memo
……………………………………
Delete messages
………………………
Memory full
……………………………
Remote control
………………………
Call screening
…………………………
Cordless handset detection
…………
Toll saver
………………………………
Remote turn-on
………………………
Troubleshooting
………………………
Product Specifi cations
………………
Warranty Information
…………………
Notes for operation in New Zealand
Answering Machine Operation ……………………………………………… 26
Answering machine On / Off
Day/Time setting
Answering machine Ring delay Setting 2277
Answering machine PIN number Setting 2277
OGM (Outgoing Messages)
OGM setting ………………………… 28
Record OGM ………………………… 28
Play OGM …………………………… 29
OGM play to line …………………… 29
ICM (Incoming Messages)
………………………2266
………2266
…………2828
…………3300
Record ICM ………………………… 30
Play ICM ……………………………… 30
Memo
……………………………………3311
Record memo ……………………… 31
Play memo …………………………… 31
Delete messages
Delete one message………………… 31
Delete all messages ………………… 32
Memory full
………………………3311
……………………………3322
Advanced Answering System ………………………………………………… 33
Remote control
Access the answering machine
remotely …………………………… 33
Remote operation keys …………… 34
………………………3333
Call screening
Cordless handset detection
Toll saver
Remote turn-on
…………………………3344
………………………………3355
………………………3355
…………3344
Customer Support ……………………………………………………………… 36
Appendix ………………………………………………………………………… 37
Troubleshooting
Product Specifi cations
Warranty Information
………………………3737
………………3939
…………………4400
Notes for operation in New Zealand 4411
REN (RN for New Zealand) ………… 41
Caller ID ……………………………… 41
Page 5

WARNINGS AND SAFETY INFORMATION
WARNINGS AND SAFETY INFORMATION
Avoid exposure of this telephone to moisture or liquid.
To prevent electric shock, do not open the handset or base cabinet.
Do not use the handset in an explosive hazard area such as where there is gas leaking.
Do not use your telephone during an electrical thunderstorm as it is possible to get an electric
shock. Refer to information contained in the White Pages Directory.
As there is a slight chance that the telephone could be damaged by an electrical storm, it is
recommended that users unplug the phone from the mains supply and telephone socket during
an electrical storm.
We advise that this phone should not be used near intensive care medical equipment or by
persons with pacemakers.
Because the phone works by sending radio signals between base station and handset, wearers
of hearing aids may experience interference in the form of a humming noise.
Your phone can interfere with electrical equipment such as answering machines, TV and radio
sets, clock radios and computers if placed too close. It is recommended that you position the
base unit at least one metre from such appliances.
This telephone complies with applicable safety requirements for exposure to radio waves
(EMR). The mean power of this telephone does not exceed 20mW limit at which point testing is
required.
The earpiece of the handset may attract small metal objects such as staples and pins. Care
should be taken when placing the handset near these items.
This telephone is not designed for making emergency telephone calls when the mains power
fails. Always have a corded phone available to be able to make calls to emergency services if
the mains power fails.
Privacy of communications may not be ensured when using this telephone.
Clean with a dry, soft, lint-free cloth. Never use cleaning agents, particularly aggressive
solvents.
• This phone is designed for connection to a PSTN telephone line or an analogue extension port of
a PBX system. If you connect this device to a digital extension of a PBX system, damage may
result to the PBX.
CAUTION
Use only the mains adaptors supplied with
this product. Incorrect adaptor polarity or
voltage can seriously damage the unit.
1
Adaptor for base:
Input:100~240VAC 50Hz/60Hz 150mA
Output: 6.5VDC 400mA
Adaptor for Charger:
Input:100~240VAC 50Hz/60Hz 100mA
Output: 6.5VDC 200mA
Page 6

GETTING STARTED
Installation and Charger
Getting Started
Installation and Charger
. Connect the mains adaptor (supplied) to the socket on the back of the base unit
1
and to the wall mains supply.
. Connect the telephone cord to the phone socket on the back of the base unit and
2
into the wall phone socket.
Important: DO YOU HAVE BOADBAND/ADSL?
If you do, you must connect an in line fi lter (not supplied) between the telephone socket and
your eco5200 base to ensure that your broadband and eco5200 will work properly. If you
do not install the fi lter you will experience interference on the eco5200 and your Broadband
may suffer dropouts. Please refer to the user guide of the in line fi lter for installation.
In Australia some phone wall sockets are the old non modular style. If you have
Note:
3
this type of wall socket you will need to purchase a “modular converter plug” (not
supplied). These can be obtained from electronic stores.
. Insert 2 rechargeable Ni-MH AAA batteries (included), ob-
serving the correct polarity, into the battery compartment on
the handset. Slide the battery door fi rmly into place.
. Place the handset on the charging cradle and charge the bat-
4
teries for a full 15 hours before using it for the fi rst time.
Note: It may take some time for the cordless handset to
power up, and it may get warm during initial charge. This is normal.
Tip!
It is good practice to put the cordless handset on the charging cradle when it is not in
use to ensure that the handset is always fully charged.
2
Page 7

GETTING STARTED
WARNING
RISK OF EXPLOSION IF BATTERY IS REPLACED BY AN INCORRECT TYPE.
Never use non-rechargeable batteries. Use recommended type supplied with this
product.
Never use alkaline or lithium batteries.
Do not dispose of the batteries in a fi re, as they can explode.
Do not open or mutilate the battery. Released electrolyte is corrosive and can cause
damage to the eyes or skin. It can be toxic if swallowed.
Avoid contact with metal objects when handling the battery. These objects could short
out the batteries or cause the conductor to overheat resulting in burns.
Do not attempt to recharge the battery cell by heating it. Sudden release of battery
electrolyte can cause burns or irritation to the eyes or skin.
Observe the proper polarity, or direction, of any battery. Reverse insertion of the
battery cell can result in leakage or explosion.
Remove the batteries if you do not plan to use the product for several months at a
time.
Follow the local regulations regarding the disposal of your packing materials, exhausted
batteries and used phone. Wherever possible, recycle those materials.
3
Page 8

GETTING STARTED
Pack contents
Purchasing additional handsets
Pack contents
Depending on the model you have purchased this pack should contain the following
items:
If any of these are missing, please contact Oricom directly.
eco5200-1 eco5200-2 eco5200-3
Base units 1 1 1
Cordless handsets 1 2 3
Charging cradle and power adaptor 1 1 2
Power adaptor 1 1 2
Line cord 1 1 1
User guide 1 1 1
Handset Rechargeable AAA
Ni-MH Batteries (1.2V 600mAh)
Purchasing additional handsets
You may expand your eco5200 by adding more handsets (eco5250WH). These can
be purchased separately from the retailer where you purchased the product, or directly
from Oricom (Australia). The eco5200 can accommodate a total of 4 cordless handsets.
246
4
Page 9
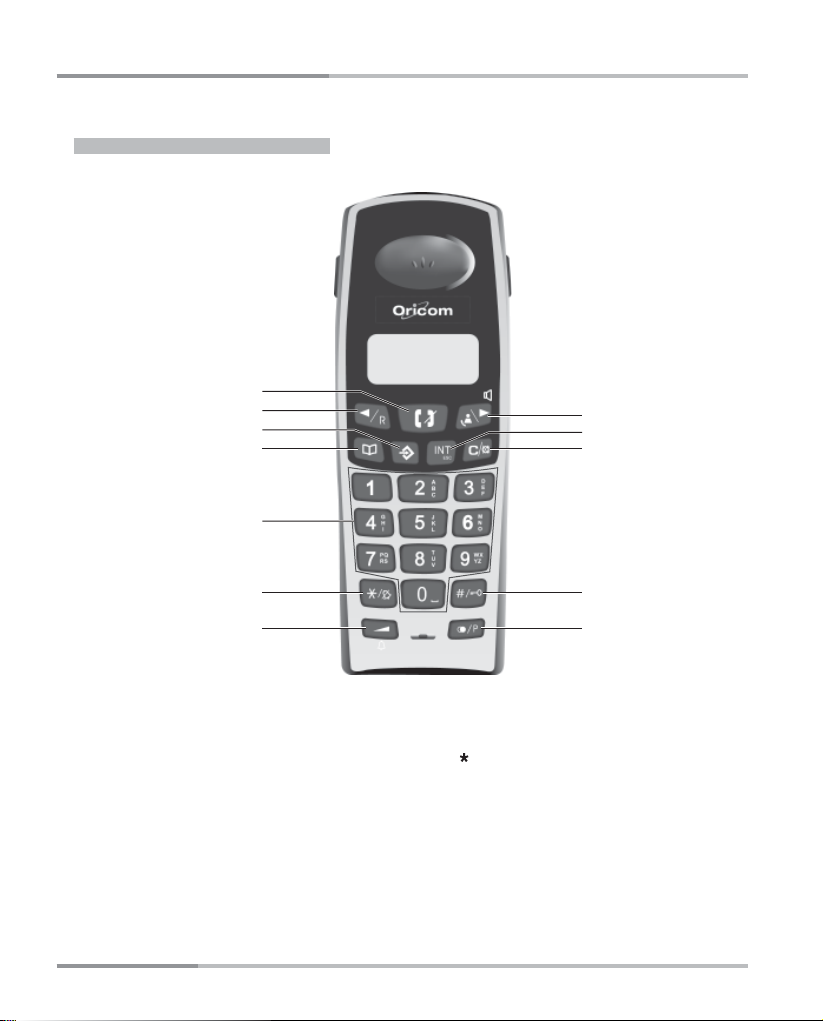
Your cordless handset
Your cordless handset
1
2
3
4
8
5
6
7
9
10
1. Talk
2. Left / Recall
3. Menu
4. Phonebook
5. Right / CID (Caller ID) / Handsfree
6. Intercom
7. Delete / Mute
5
11
12
8. Numeric keys
9. / Ringer Off (On)
10. Ringer Melody / Ringer Volume /
Receiver Volume
11. # / Keypad lock
12. LNR (Last Number Redial) /
Pause / Long (Short) fl ash
Page 10
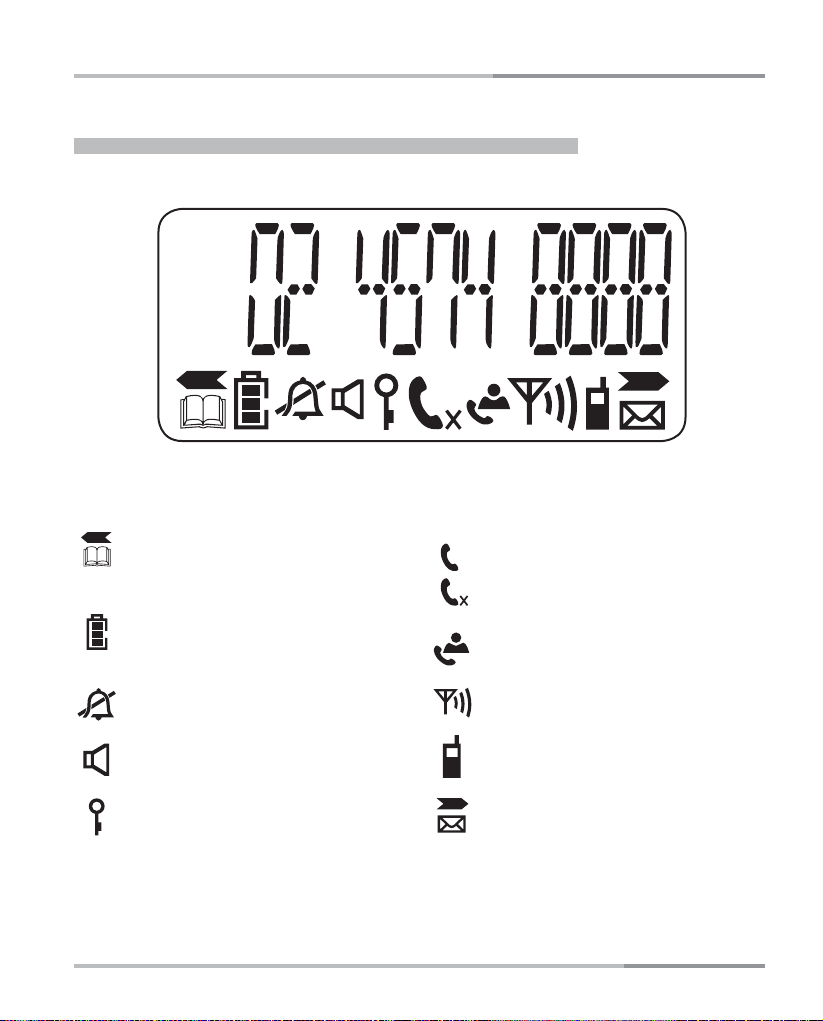
Understanding the cordless handset display
Understanding the cordless handset display
Left Arrow / Phonebook records
are being reviewed
Battery level
(3 bars fully charged)
Ringer is turned off
Speakerphone on
Keypad lock
Connected to telephone line.
Flashes when there is an incoming call
X appears: microphone muted
Caller display
Antenna in range / out of range
Intercom call to another handset
Right Arrow / Message waiting
6
Page 11
Your eco5200 base unit
Your eco5200 base unit
1
2
3
4
ANS MEMO
56 7 8910 1211 13 14
16
FULL
X
R
P
15
1. Battery charge/Call Light
2. Message Full Light
3. Play/Pause
Play MEMO/ICM Message; Pause
playback.
4. Message/Power Light
5. Rewind/OGM(ANS)
Recording/Play OGM, Repeat Message,
Press twice for Skip to previous Message
6. Time
Set Day, Hour, Minute
7. Stop / On/Off / ESC
Stop action; Activating/Deactivating the
7
answering machine; Exit the current
operation mode
8. Delete
9. Forward/MEMO
Recording MEMO, Skip to next Message
10. Page
Base page handset and call transfer
11. Speaker Volume Down
12. Recall
13. Speakerphone key
14. Speaker Volume Up
15. Last Number Redial (LNR)/Pause
16. Numeric keys & , # keys
Page 12
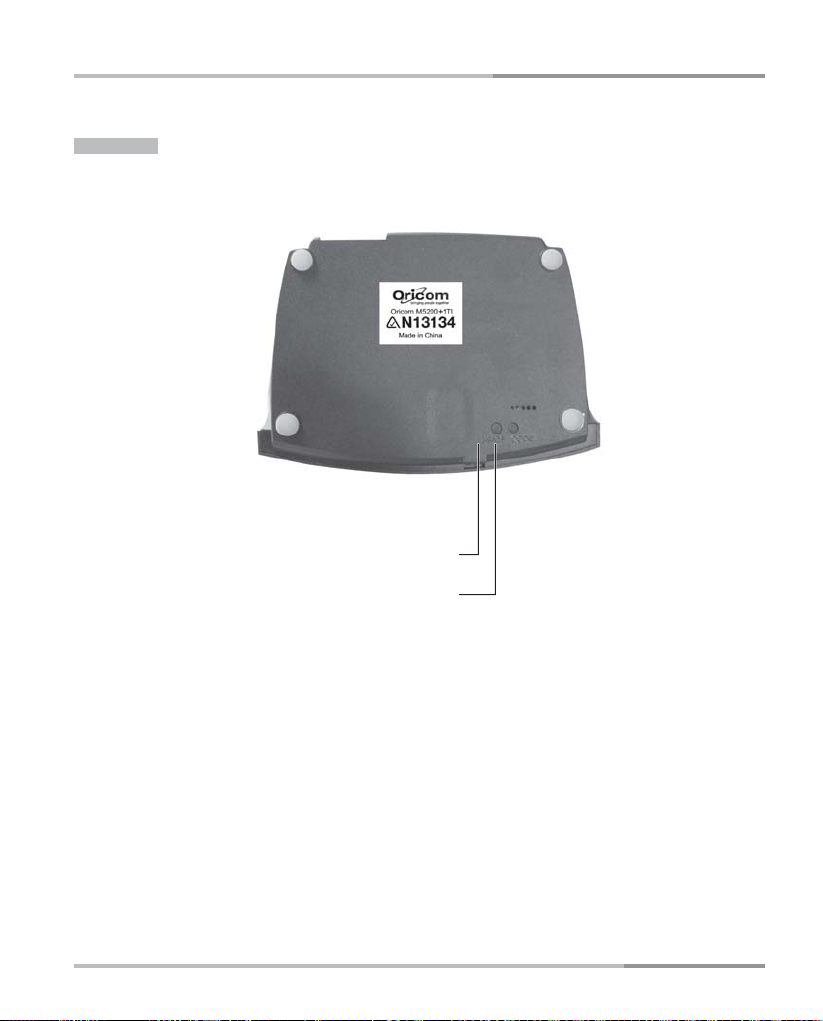
Bottom
Bottom
GETTING STARTED
2-9/GS (Answering Machine Rings)
CODE (Answering Machine PIN)
8
Page 13

BASIC OPERATION
During standby
Answering an incoming call
Basic Operation
During standby
Note: If the power is not connected to the base unit.
The cordless handset CANNOT operate.
Cordless handset's LCD display
HANDSET 1 : Handset number
: Current battery level
: A constant signal icon indicates the
cordless handset is linked to the base unit. When signal icon is
fl ashing the handset needs to be re-registered (see page 23).
Answering an incoming call
With cordless handset
When there is an incoming call, the phone rings and fl ashes on the display. If a CID
record is received,
function allows you to answer a call by simply lifting the handset from the base when it
is ringing.
fl ashes and the caller information is displayed. The auto answer
1. Press key to answer the call if hansdet is off the base.
2. Press key again to end the call.
HANDSET
With base unit
When there is an incoming call,
1. Press key to answer the call.
2. Press key again to end the call.
9
Page 14

BASIC OPERATION
Making an external call
Mute feature
Making an external call
With cordless handset
Normal dialling
1. Press key.
2. Enter a telephone number. If you enter more than 14 digits, you only see the last 14
digits on the display.
3. Press key to end the call.
Pre-dialling
1. Enter a telephone number.
2. When necessary, press to erase the digit individually.
3. Press key to dial.
4. Press key to end the call.
With base unit
1. Press key.
2. Enter a telephone number.
3. Press key to end the call.
Mute feature
Place a call on hold so that caller will NOT be able to hear you but you can still hear
the caller.
During talking mode,
1. Press key on the handset to mute the call, is shown on the display.
2. Press key again to resume the call.
10
Page 15

BASIC OPERATION
Recall feature
Recall feature
Recall feature can be used when you are using some services provided by your
network operators such as “call waiting”, etc. A subscription may apply for these
services, contact your network operator for more information.
While you are talking on the phone, press
the cordless handset to send a Recall.
Call waiting (Australia only)
You can use the recall function to answer a second call while you are on the phone.
However this service needs to be turned on. For example, to turn on Telstra’s Call
Waiting service:
R key on the base unit or key on
1. Press on the base unit or on the cordless handset to wait for dial tone
then press 4 3 # .
2. You will hear a service tone then press or mentioned above.
Take two different calls at the same time
During a call, you will hear two loud beeps periodically to notify you of another
incoming call. If you wish to answer this call,
1. Press R key. You will hear a dial tone.
2. Press 2 to put the current call on hold and talk with the second caller.
3. Repeat steps 1-2 to swap between the two callers.
Recall settings are: Australia (100ms, SHORT) and New Zealand (600ms LONG).
If this feature does not work correctly, check the country option. To change the Recall
settings, press and hold
“LONG” and “SHORT” on the display.
/P key on the cordless handset to switch between
11
Page 16

BASIC OPERATION
Pause feature when using on a PABX
Handsfree mode
Recall function when connected to a PABX
If you have connected your telephone to a PABX, you can use all the facilities such as
call transfer, automatic recall, etc. The
Pause feature when using on a PABX
R key provides access to these facilities.
Note: The pause function described in this section is only necessary when the eco5200
is used on older PABX’s.
With some PABX's, there is a short pause between the code for the outside line (usually
0 or 9) and obtaining dial tone. A pause needs to be entered manually and stored in the
phone book so that the numbers are not dialled too quickly.
When storing numbers in memory, you can include the outside line access digit (e.g. ‘9’
or ‘0’) with each phone number. LNR function or memory dial may not work when using
your telephone on a PABX. Insert a pause between the OUTSIDE LINE DIGIT & the
TELEPHONE NUMBER.
1. Press the numeric keys to enter the OUTSIDE LINE DIGIT.
2. Press /P key to insert a pause.
3. Press the numeric keys to enter the TELEPHONE NUMBER.
Handsfree mode
During talking mode,
1. Press key to switch to speakerphone mode.
2. Press key again to cancel this feature.
Or
During standby mode,
1. Press and hold key to switch to speakerphone mode.
2. Press key again to cancel this feature.
12
Page 17

BASIC OPERATION
Volume adjustment (with base unit)
Volume adjustment (with handset)
Volume adjustment (with base unit)
Speaker volume control
During speakerphone mode,
1. Press or key to adjust the Speaker volume level: Step 1(lowest) to
Step 8 (hightest).
2. The unit automatically returns to the previous talking mode 2 seconds after pressing
the last key.
Ringer volume control
During incoming call,
1. Press or to adjust the ringer volume level: 5 steps.
2. The unit automatically returns to the previous mode 2 seconds after pressing the
last key.
Volume adjustment (with handset)
Handset volume control
During handset talking mode,
1. Press key.
2. Press or key to adjust the handset volume level: Volume 1 to
Volume 5.
3. The unit automatically returns to the previous talking mode 2 seconds after
pressing the last key.
13
Page 18

CALLER ID OPERATION
Review Caller ID records
Store a CID number
Caller ID Operation
If you subscribe to your telephone operators service (charges may apply), numbers
of the incoming calls will be displayed on the screen and stored in the call log (please
consult your telephone service provider for details).
The eco5200 series can store the last 30 calls including: the record number, date/
time, and phone number (up to 23 digits for the cordless handset).
When you have new/unanswered calls,
on the cordless handset. If a call has been answered, then the call is set to old call.
This function in only available for handset.
Review Caller ID records
During standby mode,
1. Press key to display the latest call name.
2. Press key to view the call number.
3. Press key again to see the Date/Time when the call was received.
Store a CID number
icon fl ashes on the base and fl ashes
You can save a CID record into the Phonebook/Direct memory provided that it
contains a valid phone number and the Phonebook/Direct memory is not full.
While you are viewing the CID record that you wish to save,
1. Press key. The display on the right is
shown.
NAME ?
2. Press the numeric keys to edit the Name.
3. Press key to complete editing the Name and proceed to edit the Number.
14
Page 19

CALLER ID OPERATION
Delete one or all CID record(s)
4. Press the numeric keys to edit the Phone number.
5. Press key to confi rm.
The record is now saved into the phonebook. Then it goes back to the call log.
Delete one or all CID record(s)
Delete one CID record
While you are viewing the CID record that you wish to delete,
1. Press key.
2. Press key to confi rm. The display shows previous CID record.
Delete all viewed CID records
While you are viewing any CID record,
1. Press and hold key.
2. Press key to confi rm. The display shows unviewed CID records.
Note: If there are no more CID records, a message “EMPTY” is displayed.
15
Page 20

LNR FUNCTION
Redial the last number
LNR Function (Last Number Redial)
This function in only available for handset.
Redial the last number
Your cordless handset stores the last 3 external numbers dialled, up to 25 digits per number.
If the number exceeds 25 digits, the fi rst 25 digits will be stored to memory.
During standby mode,
1. Press /P key.
2. When necessary, press /P key again until you have selected your desired
number.
3. Press key to dial.
Or
1. Press key.
2. Press /P key to redial the last number.
16
Page 21

LNR FUNCTION
Store the last number dialled
Delete last number dialled
Store the last number dialled
While you are viewing a previously dialled number that you wish to save,
1. Press key. The display on the right is
shown.
NAME ?
2. Press the numeric keys to enter the Name. If you
made a mistake, press key to edit it.
3. Press key to complete editing the Name and proceed to edit the Number.
4. Press the numeric keys to edit the Phone number when necessary.
5. Press key to confi rm.
The record is now saved into the phonebook. Then it goes back to standby mode.
Delete last number dialled
While you are viewing a previously dialled number that you wish to delete,
1. Press key. The display on the right is
shown.
DELETE ?
2. Press key to confi rm. The display will show
the previous LNR record.
Note: If there are no more LNR records, a message “EMPTY” is displayed.
17
Page 22

PHONEBOOK
Add new records
Review / Edit / Dial stored Phonebook records
Phonebook
This function is only available on the handset.
Add new records
You can store up to 50 phonebook records in each handset. Each record can contain
up to 25 digits per number and 14 characters per name.
During standby mode,
NAME ?
1. Press and hold key. The display on the
right is shown.
2. Press the numeric keys to enter the Name. If you made a mistake, press X key
to edit it. Press and hold key to delete the entire name.
3. Press key to complete editing the Name and proceed to edit the Number.
4. Press the numeric keys to edit the Number. Press key for further editing
when necessary.
5. Press key to confi rm.
The record is now saved into the Phonebook. Then it goes back to standby mode.
Repeat step 1 to 5 to add another record.
Review / Edit / Dial stored Phonebook records
During standby mode,
1. Press key.
2. Press or to browse stored records.
3. Press key to dial the number.
18
Page 23

PHONEBOOK
Delete one record
While you are viewing the record that you wish to edit,
1. Press and hold key. The display on the
right is shown.
_
John
2. Press key to erase the last character,
or press and hold key to erase the entire characters.
3. Press key to complete editing the Name and proceed to edit the Number.
4. Press key to erase the last digit, or press and hold key to erase the
entire digits.
5. Press key to confi rm. Then it goes back to standby mode.
Delete one record
While you are viewing the record that you wish to delete,
1. Press key. A confi rmation message “DELETE?” is displayed.
2. Press key to confi rm and show the previous record.
19
Page 24

CORDLESS HANDSET OPERATION
Handset ringer adjustment
Cordless Handset Operation
Handset ringer adjustment
Handset ringer melody
During standby mode,
1. Press and hold key.
fl ashes and the current melody option appears.
2. Press or key to select the melody option (1 to 9 for adjustment).
3. Press key to confi rm.
Handset ringer volume
During standby mode,
1. Press key. Display shows the current
volume level.
2. Press or key to select the volume level.
There are 6 levels for adjustment: 1(lowest) to 5 (highest) and “ringer off”.
3. Press key again to confi rm.
MELODY 3
VOLUME 3
Handset ringer On / Off
During standby mode, press and hold [ ] key to
switch between ringer On/Off.
appears whenever the ringer is Off.
HANDSET
1
20
Page 25

CORDLESS HANDSET OPERATION
Multi-handset Operation
Multi-handset Operation
Your eco5200 series phone can have up to 4 handsets registered to the base unit.
Each handset has its own number HS-1, HS-2, HS-3 and HS-4 shown on the left-hand
side of the display. With 2 or more handsets you can:
• Make intercom calls while on an external call
• Switch between an external call and intercom call
• Transfer an external call from one handset to another
• Set a 3-way conference call between yourself, an external call and intercom call
Note:
•
A maximum of 1x external call and 2x intercom calls can take place at the same time.
• If you make an external call + another handset is on line = result in a busy tone.
• You can make an intercom call when the other handset is in progress.
Intercom function
To make an intercom call,
1. Press INT key, during standby mode.
The display on the right is shown.
2. Key the handset number (1, 2, 3, or 4) you wish
to call.
When there is an intercom call, the display on the right is shown.
1. Press or INT key to answer the intercom call.
2. Press or INT key again to end the call.
Depicts Handset-2 calling
21
Page 26

CORDLESS HANDSET OPERATION
Call transfer between cordless handsets
When there is an incoming external call,
1. Press INT key. The display on the right is shown.
2. Key the handset number (1, 2, 3, or 4) you wish
to transfer.
3. Press key to exit Intercom mode and return to standby mode.
Transfer a speakerphone call from the base unit to the cordless handset
If there is an incoming external call,
1. Press key on the base unit.
2. Press on the cordless handset to pick up the call.
3. Press key again to cancel the call transfer.
Conference calls
This function allows 3 parties (yourself + external call + intercom call ) to be
connected at the same time.
When there is an incoming external call,
1. Press INT key. The display on the right is shown.
2. Key the handset number (1, 2, 3, or 4) you wish
to invite to the conference.
3. Press key to pick up the call.
4. Press and hold INT key to go into the 3-way conference mode.
5. Press INT key to go back to Intercom mode.
6. Press key to exit Intercom mode and return to standby mode.
22
Page 27

CORDLESS HANDSET OPERATION
Cordless handset keypad lock
Registration
Cordless handset keypad lock
During standby mode,
1. Press and hold key to lock the keypad.
HANDSET
1
2. To release keypad lock, press and hold
key for 3 seconds.
Note: When the keypad is locked, key and INT key can be used to answer
an external or intercom call.
Registration
Register new handsets on the eco5200 base
The handsets which come in the same pack are already registered to the base. If you
buy new handsets. You need to register them before use.
1. Charge the batteries (for 15 hours).
2. Register the handset (to the base unit).
Each handset can register to four base at a time. Each base can register up to 4
handsets.
During standby mode,
1. Press key.
REGISTER
2. Press or key to select
“REGISTER” from the display.
BS ?
3. Press key. The display on the right is shown.
4. Press 1 on the handset to verify base station.
5. Press key to confi rm.
6. Press and hold key. The base is now in the registration mode.
7. Press the numeric keys to enter the default PIN (0000).
23
Page 28

CORDLESS HANDSET OPERATION
Language setting
8. Press key to confi rm and return to standby mode.
9. LCD screen will display HS 1,2,3 or 4 and antenna icon will not fl ash.
Note: If the base is full and cannot add any more handsets, you will hear a tone.
See the next section to remove a handset.
Remove handsets
During standby mode,
1. Press key.
REMOVE HS
2. Press or key to select “REMOVE
HS” from the display.
3. Press key to confi rm. The display on the
right is shown.
PIN ?
4. Enter the default value 0000.
5. Press key to confi rm and the display on
the right is shown.
REMOVE HS ?
6. Press the numeric keys (1-4) to enter the
handset number.
7. Press key to confi rm and return to standby mode.
Language setting
To select the display language,
1. Press key during standby mode.
2. Press or key to select
“LANGUAGE” from the display.
LANGUAGE
3. Press key to enter the mode.
4. Press or key to select Language options on the display.
5. Press key to confi rm and return to standby mode.
24
Page 29

CORDLESS HANDSET OPERATION
Reset
Handset name
Handset name
During standby mode,
1. Press key.
2. Press or key to select “NAME”
from the display.
NAME
3. Press key to enter the mode.
4. Press and hold key to erase the existing handset name.
5. Press the numeric keys to enter the new handset name.
6. Press key to confi rm.
Reset
During standby mode,
1. Press key.
2. Press or key to select “RESET”
RESET
from the display.
3. Press key to enter the mode. The display
on the right is shown.
PIN ?
4. Press the numeric keys to enter the PIN.
5. Press key to confi rm.
25
Page 30

ANSWERING MACHINE OPERATION
Answering machine On / Off
Day/Time setting
Answering Machine Operation
Answering machine On / Off
During standby mode,
1. Press and hold key to switch the answering machine off.
“Answering off” will be heard followed by two short beeps.
Note: During Off mode, the answering machine is set to Announcement Two mode
automatically. It will answer the call after 12 rings, and then switch to remote
control mode. This feature can not be turned off.
During Off mode,
1. Press and hold key to switch the answering machine on.
“Answering on, Announcement One” will be heard followed by a short beep.
Day/Time setting
Default day and time – Sunday, 12:30
1. Press and hold key for 2 seconds. The voice prompt “Set day” will be heard.
2. Press
heard.
ANS
or
3. Press key to confi rm and go to next setting. The voice prompt “Set hour” will
be heard.
4. Press
heard.
ANS
or
5. Press key to confi rm and go to next setting. The voice prompt “Set minute”
will be heard.
6. Press
be heard.
ANS
or
7. Press key to confi rm setting and go back to standby or off mode.
MEMO
key to select day. Voice prompt at each selection will be
MEMO
key to select hours. Voice prompt at each selection will be
MEMO
key to select minutes. Voice prompt at each selection will
26
Page 31

ANSWERING MACHINE OPERATION
Answering machine Ring delay Setting
Answering machine PIN number Setting
Answering machine Ring delay Setting
This setting is used to set the ring times.
Default number of ring -3
1. Press and hold 2-9/GS key (bottom of base) for 2 seconds.
“Set rings” will be heard followed by a short beep, after a pause then prompt
current rings.
2. Press
ANS
or
MEMO
key to select item. Voice prompt at each selection will be
heard. There are 2-9 and TS mode (Toll saver) for you to select.
3. Press 2-9/GS key to confi rm setting and go back to standby or off mode.
Answering machine PIN number Setting
Default code - 000
1. Press and hold CODE key (bottom of base) for 2 seconds. “Set security code”
can be heard followed by a short beep, after a pause then prompt the fi rst code.
2. Press
ANS
or
MEMO
key to select the fi rst digit. Voice prompt at each selection
will be heard.
3. Press CODE key located on the bottom of the base (see page 8) to confi rm
setting and go to next setting. The voice prompt will be heard.
4. Press
ANS
or
MEMO
key to select the second digit. Voice prompt at each
selection will be heard.
5. Press CODE key to confi rm setting and go to next setting. The voice prompt will
be heard.
6. Press
ANS
or
MEMO
key to select the third digit. Voice prompt at each
selection will be heard.
7. Press CODE key to confi rm setting and go back to standby or off mode.
Note:
Press key any time or 5 seconds without any operation will quit setting
mode and will go back to standby or off mode. All settings are unchanged.
27
Page 32

ANSWERING MACHINE OPERATION
OGM (Outgoing Messages)
OGM (Outgoing Messages)
eco5200 has two OGM message modes:
OGM1 (Announcement One) mode:
Callers can hear a pre-recorded message “Please leave a message after the beep”
and the unit records the caller's message.
OGM2 (Announcement Two) mode:
Callers can hear the other pre-recorded message “Please call later”. Under this mode,
the caller will NOT have the opportunity to leave a message.
You can also record your own personalized greeting (from 3 seconds to 120 seconds).
Note: The default setting is OGM1 (Announcement One).
OGM setting
Press
Record OGM
key to switch between OGM1 and OGM2.
1. Press key to select OGM1 mode or OGM2 mode.
2. Press and hold
ANS
key until you hear a long beep and see light fl ash.
3. Speak into the microphone (15cm from the base unit’s microphone).
4. Press key to stop recording, the machine will play back recording for
review.
5. To recall the default OGM press X during OGM playback.
Note: If the OGM is less than 3 seconds, it is not valid. The machine will stop
automatically after 2 minutes.
28
Page 33

ANSWERING MACHINE OPERATION
Play OGM
During standby mode,
1. Press
ANS
key to play the OGM.
2. Press key to stop playing and return to standby mode.
OGM play to line
If an incoming call ring exceeds the number of rings set (Refer to “Answering
machine Ring delay Setting” on P27), the answering machine will pick up the call
and play the OGM message.
29
Page 34

ANSWERING MACHINE OPERATION
ICM (Incoming Messages)
ICM (Incoming Messages)
Record ICM
During OGM 1 mode, the machine can record callers’ messages.
During recording mode, the
The machine will stop automatically after recording 2 minutes.
Or you can stop recording by pressing key.
light will fl ash.
Note: The CID number is displayed if you have subscribed to that service.
The Message recording time is from 3 seconds to 120 seconds.
Play ICM
Incoming messages are played back in the sequence they were recorded. Day and
time of the recording is announced before each message.
When there are new messages, only new messages are played back. Old messages
can be played back only when all new messages have been played back.
Answer / Message light fl ashes when new messages are waiting. To play messages:
1. Press key.
2. To pause, press key.
3. Press key to resume.
MEMO
ANS
key during message playing.
ANS
key twice.
key.
4. To replay the current message, press
5. To replay the previous message, press
6. To skip to next message, press
7. Press key to stop playing.
Note: No announcement will be played back, if the day/time is not set properly.
30
Page 35

ANSWERING MACHINE OPERATION
Memo
Delete messages
Memo
Record memo
You can record memos for other users of the unit to hear. The maximum recording
time is 2 minutes.
During standby mode,
1. Press and hold
MEMO
key until you hear a long beep.
2. Speak into the microphone after the beep.
3. Press key to stop recording or recording will stop after 2 minutes.
The recorded memo will playback automatically for review.
Play memo
The memo is played back together with the incoming messages (ICM).
1. Press key during standby mode.
2. Press key to stop playback or it will stop when the memo is fi nished.
For “Pause/Skip forward/backward” during playing, refer to the operation of “Play
ICM” on P30.
Delete messages
Delete one message
While you are listening to a message,
1. Press and hold X key until you hear a long beep, and then “message erased”
will be heard.
2. Press key to exit.
31
Page 36

ANSWERING MACHINE OPERATION
Memory full
Delete all messages
While the unit is in standby mode, you can delete all the old messages but not new
messages.
Press and hold
will be heard. It means that the old messages will be deleted, but the new messages
will not be deleted.
X key until you hear a long beep, and then “All message erased”
Remember to delete messages!
To avoid exceeding the memory storage capacity, always delete messages after
listening.
Note: The unit will NOT delete the messages you have NOT listened to.
Memory full
Memory will be full in the following 2 cases:
1. During Memo/OGM/ICM recording, the unit becomes full.
2. The memory is full and somebody is trying to record new Memo/OGM/ICM message.
In both the above situations, the unit will prompt “Answering Machine Full”.
OGM mode will change to OGM 2 automatically after Memory full.
32
Page 37

ADVANCED ANSWERING SYSTEM
Remote control
Advanced Answering System
Remote control
You can access your answering machine when you are away by using any touch tone
phone. You have to enter the Security PIN to access the answering machine. The default
PIN is 321 (Refer to “Answering machine PIN Number Setting” on P27).
Access the answering machine remotely
1. Place a call to your answering machine.
When the answering machine answers the call, it will play the OGM.
2. To skip the OGM, press key.
3. Enter the 3-digit Security PIN after you hear a beep.
4. Press a numeric key to carry out the desired function. For example, press the numeric
key 2 to check your message remotely.
Note:
● You have three attempts to enter the correct PIN or the answering machine will drop
the line.
● The connection will be cut off after 10 seconds if no numeric key is pressed.
●
The message is paused and lasts for 30 seconds. Press 2 key to resume playback.
Otherwise, the connection will be cut off automatically after 30 seconds.
● During remote playback, the machine will stop for 10 seconds every 168 seconds and
wait for users to respond. If no response received, the machine will stop operation
and drop the line.
33
Page 38

ADVANCED ANSWERING SYSTEM
Call screening
Cordless handset detection
Remote operation keys
Keys on remote phone keypad Operation
1
1 press twice
2
3
4
5
6
7
8
9
0
*
#
Call screening
Replay the current message
Skip back to the previous message
Play new messages /Pause during playing messages
Skip forward to the next message
Playback OGM
Record a new OGM
Stop playback or recording
Delete the current message
Switch the machine off
Switch the machine on / Switch between OGM1 or OGM2
Delete all old messages
Skip announcement during playback
Recording MEMO
Call screening function allows you to hear the caller before you pick up the call whilst the
eco5200 is recording incoming messages.
You can screen incoming calls by waiting for the caller to begin leaving their message,
then pick up the handset, and press
key to talk to the caller. The answering
machine automatically stops recording when you activate the handset or pick up an
extension phone. This function cannot be turned off. If you do not want to hear the
caller you can turn down the base speaker volume (see page 10). To listen to your
messages you will need to turn up the volume again.
Cordless handset detection
The answering machine can detect the cordless handset while recording messages. It
automatically stops recording when you pick up the call using the cordless handset.
Note: The message recorded before you pick up the call will be deleted.
34
Page 39

ADVANCED ANSWERING SYSTEM
Toll saver
Remote turn-on
Toll saver
Toll saver option is useful when using the remote access feature. You can see whether
there are new messages or not in your answering machine from a remote location.
If your answering machine rings 5 times before answering your call, it means there
are NO new messages.
If your answering machine rings 2 times before answering your call, it means there
are new messages.
You can set the number of times the answering machine would ring before it answers
the call. (Refer to “Answering machine Ring delay Setting” on P27)
This only applies when the answering machine is turned on.
Remote turn-on
Remote wake-up function allows you to turn on your answering machine remotely,
1. Place a call to your answering machine.
If the answering machine is off, it will answer your call after 12 rings.
2. To skip the OGM, press key.
3. Enter the 3-digit Security PIN after you hear a beep.
4. Press Numeric key 9 to switch your machine on.
35
Page 40

CUSTOMER SUPPORT
APPENDIX
Customer Support
If you feel this product is not working correctly please consult the user guide and ensure that you are using the product in accordance with the instructions. Remove all
extra telephone equipment and connect only this telephone directly to the telephone
socket. If the fault is still present, connect another telephone (if available) to the telephone socket. The results will show you whether the fault lies with this unit or with the
telephone line.
If the product is working correctly the fault is on the telephone line. Please contact your
network operator for assistance.
To order spare parts additional handsets, replacement batteries and in case of any
technical issues you may have with this product please consult our website for further
information or send us an email for a prompt response to your enquiry.
In the unlikely event of a fault developing, please contact us for assistance. If the product is then found to be faulty you will be asked to return it directly to us with a copy of
the purchase receipt.
36
Page 41

APPENDIX
Troubleshooting
Appendix
Troubleshooting
Problem Possible cause(s) Solution(s)
No dial tone on
the cordless
handset.
Antenna
symbol is
fl ashing.
No beep when
the cordless
handset is
placed on the
charger.
Handset charged
for 24 hours but
Battery icon
remains empty.
No symbol on
the display.
Bad audio
quality
(crackles,echo,
etc.).
1. The base unit is not properly connected.
2. Too far from the base unit.
3. Battery charge is low.
4. Incorrect battery polarity.
5. Re-register handset (see Page 23).
1. The handset is not registered. If the
handset is unregistered, it displays
UNREGISTERED.
2. The handset is out of range.
1. The handset is not placed properly on
the charger.
2. Charging contacts are dirty.
3. The handset tone is turned off.
4. The handset’s power is turned off.
1. Handset battery is defective or faulty.
2. Handset is not placed properly on the
charger.
3. Battery installed incorrectly.
1. Battery is empty.
2. The product is not properly connected.
1.
Interference from nearby electrical appliance.
2. Base unit is installed in a room with thick
walls.
3. The handset is too far from the base unit.
4. If you have Broadband/ADSL you need a in
line fi lter (not supplied).
1. Check CONNECTION to power and telephone line.
2. Move handset CLOSER to base unit.
3. CHARGE battery.
4. RE-INSERT batteries and check + and
5. Handset not registered.
1. REGISTER the handset.
2. Move CLOSER to the base unit.
1. Lift handset off the charger and carefully
REPOSITION correctly.
2. CLEAN charging contacts with a clean and dry cloth.
3. Turn ON the handset tone from the Sounds Menu.
4. CHECK batteries.
1. REPLACE with new AAA rechargeable Ni-MH
batteries.
2. CHECK to make sure the battery icon is scrolling.
3. RE-INSERT batteries and check + and .
1. CHARGE battery.
2. Make sure your product is properly PLUGGED-IN.
1. Try a different connection point, one that is away
from other electrical appliances.
2. Install the base unit in a DIFFERENT room OR
use EXTENSION leads.
3. Move CLOSER to the base unit.
4. Ensure a in-line ADSL fi lter is installed on all
phone sockets between wall plate and your phone.
.
Caller ID does
not work.
37
Service not activated. Check your SUBSCRIPTION with the SERVICE
provider.
Page 42

Problem Possible cause(s) Solution(s)
APPENDIX
Phone does
not ring when a
call comes in.
Keypad does
not work.
Busy tone +
in use light on.
Can’t transfer a
call.
Answering
machine won’t
record.
Remote
operation
doesn’t work.
1. The ringer is off.
2. Too many phones are sharing the same
phone line.
3. Base unit not plugged in.
Keypad may be locked. UNLOCK the keypad.
1. Other handset may still be connected.
2. Check power supply connection.
1. Handset is busy.
2. Handset is out of range.
3. Wrong handset number.
1. Message limit exceeded.
2. Machine not switched on.
3. OGM2 selected.
1. Incorrect security PIN.
2. Some cordless and mobile handsets do
not generate continuous tones.
3. Pausing too long between key press.
1. Turn ON the ringer.
2. REMOVE some of the phones from the phone line.
3. Check base unit CONNECTIONS.
1. Check ALL handsets and END all calls.
2. Check CONNECTIONS to wall and base.
1. Check ALL handsets and END all calls.
2. Move handset CLOSER to base unit.
3. Check HANDSET NUMBER.
1. DELETE old messages.
2. SWITCH-ON the answering machine.
3. Can only record with OGM1, CHANGE to OGM1.
1. CHECK security PIN.
2. Need to use a TONE-DIALLING phone.
3. Key in the digits within the 10 seconds limit.
Note: If none of the above solutions help, reset your phone by disconnecting the mains
power from the base and removing batteries from handset/s. Reconnect after 15
minutes.
Alternatively please contact Customer Service on 1300 889 785.
38
Page 43

APPENDIX
Product Specifi cations
Product Specifi cations
Phone – Oricom eco5200 Specifi cations
Frequency range 1.88-1.897 GHz (bandwidth=20MHz)
Channel bandwidth 1.728 MH
Operating range Up to 300m outdoors, up to 50m indoors
Standby time Up to 100 hours
Talk time Up to 11 hours
Temperature time Operating 0ºC to 40ºC
Storage -20ºC to 60ºC
Compatibility Only GAP compatible DECT phones
Multiple handset capability Up to 4 handsets per base
Multiple bases Up to 4 bases per handset
Ringer melodies 5 music and 4 monotone
Included Accessories
Battery charge time 15 hours
Rechargeable batteries AAA Ni-MH 1.2V 600mAh
Mains power supply for base unit Input: 100~240VAC, 50Hz/60Hz 150mA, Output:6.5VDC,400mA
Mains power supply for charger Input: 100~240VAC, 50Hz/60Hz 100mA, Output:6.5VDC,200mA
Answering Machine
Memory
Redial memory Max 5 phone numbers
Recording time At least 11 minutes
Up to 50 phone numbers (Up to 24 digits per Number and 16
characters per Name)
39
Page 44

APPENDIX
Warranty Information
Warranty Information
(a) Warranty (Australia).
Oricom warrants that the product is free from defects in materials and workmanship
for a period of 12 months effective from the date of purchase. This warranty in no
way affects your statutory warranty under the Trade Practices Act 1974 or any other
similar legislation. It is important that you read the Warranty Card as it contains
full and additional details of the warranty, limitation of warranty and conditions for
receiving the warranty services during the warranty period. The Warranty Card is
located in the package. If you cannot locate the Warranty Card, please contact our
Customer Support Service on 1300 889 785.
(b) Exclusion and limitation of liability.
Oricom will not be in breach of a warranty or condition expressly stated in this User
Guide or the Warranty Card or implied by the Trade Practices Act and excludes any
liability arising under any statutory or common law for damages or any other remedy
if the damage occurs as a result of:
(i) failure by you to follow the instructions in the User Guide for the installation and
proper functioning of the product;
(ii) negligence on your part or misuse by you of the product;
(iii) any un-controlled external cause to the phone not functioning including but not
limited to electricity failure, lighting, over voltage;
(iv) non adherence by you to the warnings in the User Guide and the User Guide
generally;
(v) modifi cation to the product or services carried out to the product by anyone
other than Oricom or on Oricom’s behalf.
Oricom will not be liable for consequential losses including loss of profi ts arising
from a cause of action in contract, tort or any other statutory or common law (except
where a statute or any law prohibits this exclusion). The warranty does not extend to
damage caused by misuse, negligence, excessive voltage, faults on the telephone line
or lightning. This warranty in no way affects your statutory rights. Full details of the
warranty are contained in the enclosed warranty card.
40
Page 45

APPENDIX
Notes for operation in New Zealand
Notes for operation in New Zealand
The grant of a Telepermit for any item of terminal equipment indicates only that Telecom
has accepted that the item complies with the minimum conditions for connection to its
network. It indicates no endorsement of the product by Telecom, nor does it provide any
sort of warranty. Above all, it provides no assurance that any item will work correctly
in all respects with another item of Telepermitted equipment of a different make or
model, nor does it imply that any product is compatible with all of Telecom’s network
services. This device may be subject to ringing or bell tinkle when certain other devices
are connected to the same line. If this occurs, the problem should not be referred to the
Telecom Faults service.
This equipment shall not be set to make automatic calls to the Telecom “111” Emergency
Service. This equipment may not provide for the effective hand-over of a call to another
device connected to the same line.
REN (RN for New Zealand)
The REN (Ringer Equivalence Number) or (RN) is of signifi cance only if you wish to
connect more than 1 telephone to your telephone line. A standard telephone line has a
maximum REN capacity of 3 (RN of 5). It is possible to connect 3(5) devices with a REN
of 1 (RN of 1) with no degradation to the product’s performance. Exceeding this limit
may cause the volume of the ringer in any phone to decrease or not ring at all.
Caller ID
Customers using non Telecom toll services should not use the dial back feature for local
calls as this will incur a charge only the 7 digit number should be dialled. Some of the
CID services listed may not be available in New Zealand.
This telephone is not designed for making emergency telephone calls when the power
fails. Make alternative arrangements for access to emergency services.
41
Page 46

Customer Support
Australia
Oricom International Pty Ltd
Locked Bag 658,
South Windsor NSW 2756, Australia
Email: support@oricom.com.au
Web: www.oricom.com.au
Fax: (02) 4574 8898
Ph: 1300 889 785
To view the full Oricom range, please visit the Oricom website:
www.oricom.com.au
New Zealand
Atlas Gentech (NZ) Limited
Private Bag 14927, Panmure,
Auckland
Email: support@atlasgentech.co.nz
Web: www.atlasgentech.co.nz
Fax: (09) 574 2722
Ph: 0900 50 025 (Toll Call)
 Loading...