

Page 1
Caller Back from Caller ID Memory
1. With the handset for the phone connected to the Caller
ID unit on the base, repeatedly press
desired number.
2. Press CALL BACK once. The Caller ID unit automatically
redials the number and
Note: If you pick up the handset before pressing CALL
REPLACE HANDSETREPLACE HANDSET
BACK,
REPLACE HANDSET
REPLACE HANDSETREPLACE HANDSET
handset than the number will be redialed and
CALLCALL
CALL
will appear.
CALLCALL
PICK UP CALLPICK UP CALL
PICK UP CALL
PICK UP CALLPICK UP CALL
will appear. Replace the
or to find the
appears.
PICK UPPICK UP
PICK UP
PICK UPPICK UP
Notes for operation in New Zealand
The grant of a Telepermit for any item of terminal equipment indicates
only that Telecom has accepted that the item complies with the
minimum conditions for connection to its network. It indicates no
endorsement of the product by Telecom, nor does it provide any sort
of warranty. Above all, it provides no assurance that any item will
work correctly in all respects with another item of Telepermitted
equipment of a different make or model, nor does it imply that any
product is compatible with all of Telecom’s network services.
Telepermitted equipment only may be connected to the Phone Jack.
The Phone Jack is not specifically designed for 3-wire-connected
equipment. 3-wire-connected equipment might not respond to
incoming ringing when attached to this socket.
REN (RN for New Zealand)
The REN (Ringer Equivalence Number) or (RN) is of significance only
if you wish to connect more than 1 telephone to your telephone line. A
standard telephone line has a maximum REN capacity of 3 (RN of 5).
6789
Front Side
It is possible to connect 3(5) devices with a REN of 1 (RN of 1) with no
degradation to the product’s performance. Exceeding this limit may
cause the volume of the ringer in any phone to decrease or not ring at
all
Note that some telephones are NOT compatible with this unit and
dialling errors may result if the two devices are used together in other
than quiet conditions. The Telecom Faults Service is NOT to be called
should such problems arise. In such cases, it is recommended that
the prefix and wanted number are dialled manually.
Caller Display - Customers Using Another
Company’s Toll Services
Some customers use another company’s toll services and have their
line set up so that their chosen carrier’s access code is automatically
inserted by the Telecom exchange. If you use such a service, and
you dial automatically from this device, your local calls will also be
passed to the other carrier because the telephone automatically inserts
a “0” and the local area code. A toll charge may be incurred. Check
with the carrier concerned. If you recognise the telephone number
that appears on the display as definitely being a local, non-cellular
number then you should ignore the “0” prefix and the local area code
digit and simply dial the caller’s 7-digit number. This will avoid the
possibility of incurring a toll charge for a local call.
Manual insertion of dialling prefixes (eg 0197)
This unit will only work in conjunction with a tone signalling (DTMF)
telephone, but some telephones may not be compatible. Since noise
or speech from the telephone can upset dialling from this unit, errors
may result if the devices are used together in other than quiet conditions
Where it is necessary to dial prefix digits, such as a Caller Display
override code (“0196” or “0197”), this unit will have to be used in
conjunction with an associated tone signalling (DTMF) telephone.
Troubleshooting
If you feel this product is not working correctly please consult the user
guide and ensure that you are using the product in accordance with
the instructions.
Remove all extra telephone equipment and connect only this telephone
directly to the telephone socket.
If the fault is still present, connect another telephone (if available) to
the telephone socket. The results will show you whether the fault lies
with this product or with the telephone line. If this product is working
correctly the fault is on the telephone line. Please contact your network
operator for assistance
In the case of technical problems with this product please consult our
website for further information or send us an email for a prompt
response to your enquiry.
Cleaning and care
The surface of the case can be cleaned with a dry, soft, lint-free cloth.
Never use cleaning agents, particularly aggressive solvents.
Warranty Information
This product is covered by a 12 month warranty against defective
workmanship or parts, effective from the date of purchase.
The warranty does not extend to damage caused by misuse,
negligence, excessive voltage, faults on the telephone line or lightning.
This warranty in no way affects your statutory rights. Full details of the
warranty are contained in the enclosed warranty card.
Technical support
In the unlikely event of a fault during this period, please consult our
website for assistance or send us an email for a prompt response to
your enquiry. If the product is then found to be faulty you will be asked
to return it directly to us with a copy of the purchase receipt.
For further information about the Oricom range of products please
visit our website.
Australia
Oricom International Pty Ltd
ABN 46 086 116 369
PO Unit 5681
South Windsor, NSW 2756
Customer support
Email: support@oricom.com.au
Web: www.oricom.com.au
Fax: (02) 4572 0939
Ph: 1300 889 785
New Zealand
Atlas Gentech (NZ) Ltd,
Private Bag 14927,
Panmure,
Auckland
Customer support
Email: support@atlasgentech.co.nz
Web: www.atlasgentech.co.nz
Fax: (09) 574 2722
Ph: 0900 50 025 (Toll Call)
LIBA25YY
Caller ID unit CID99
User Guide
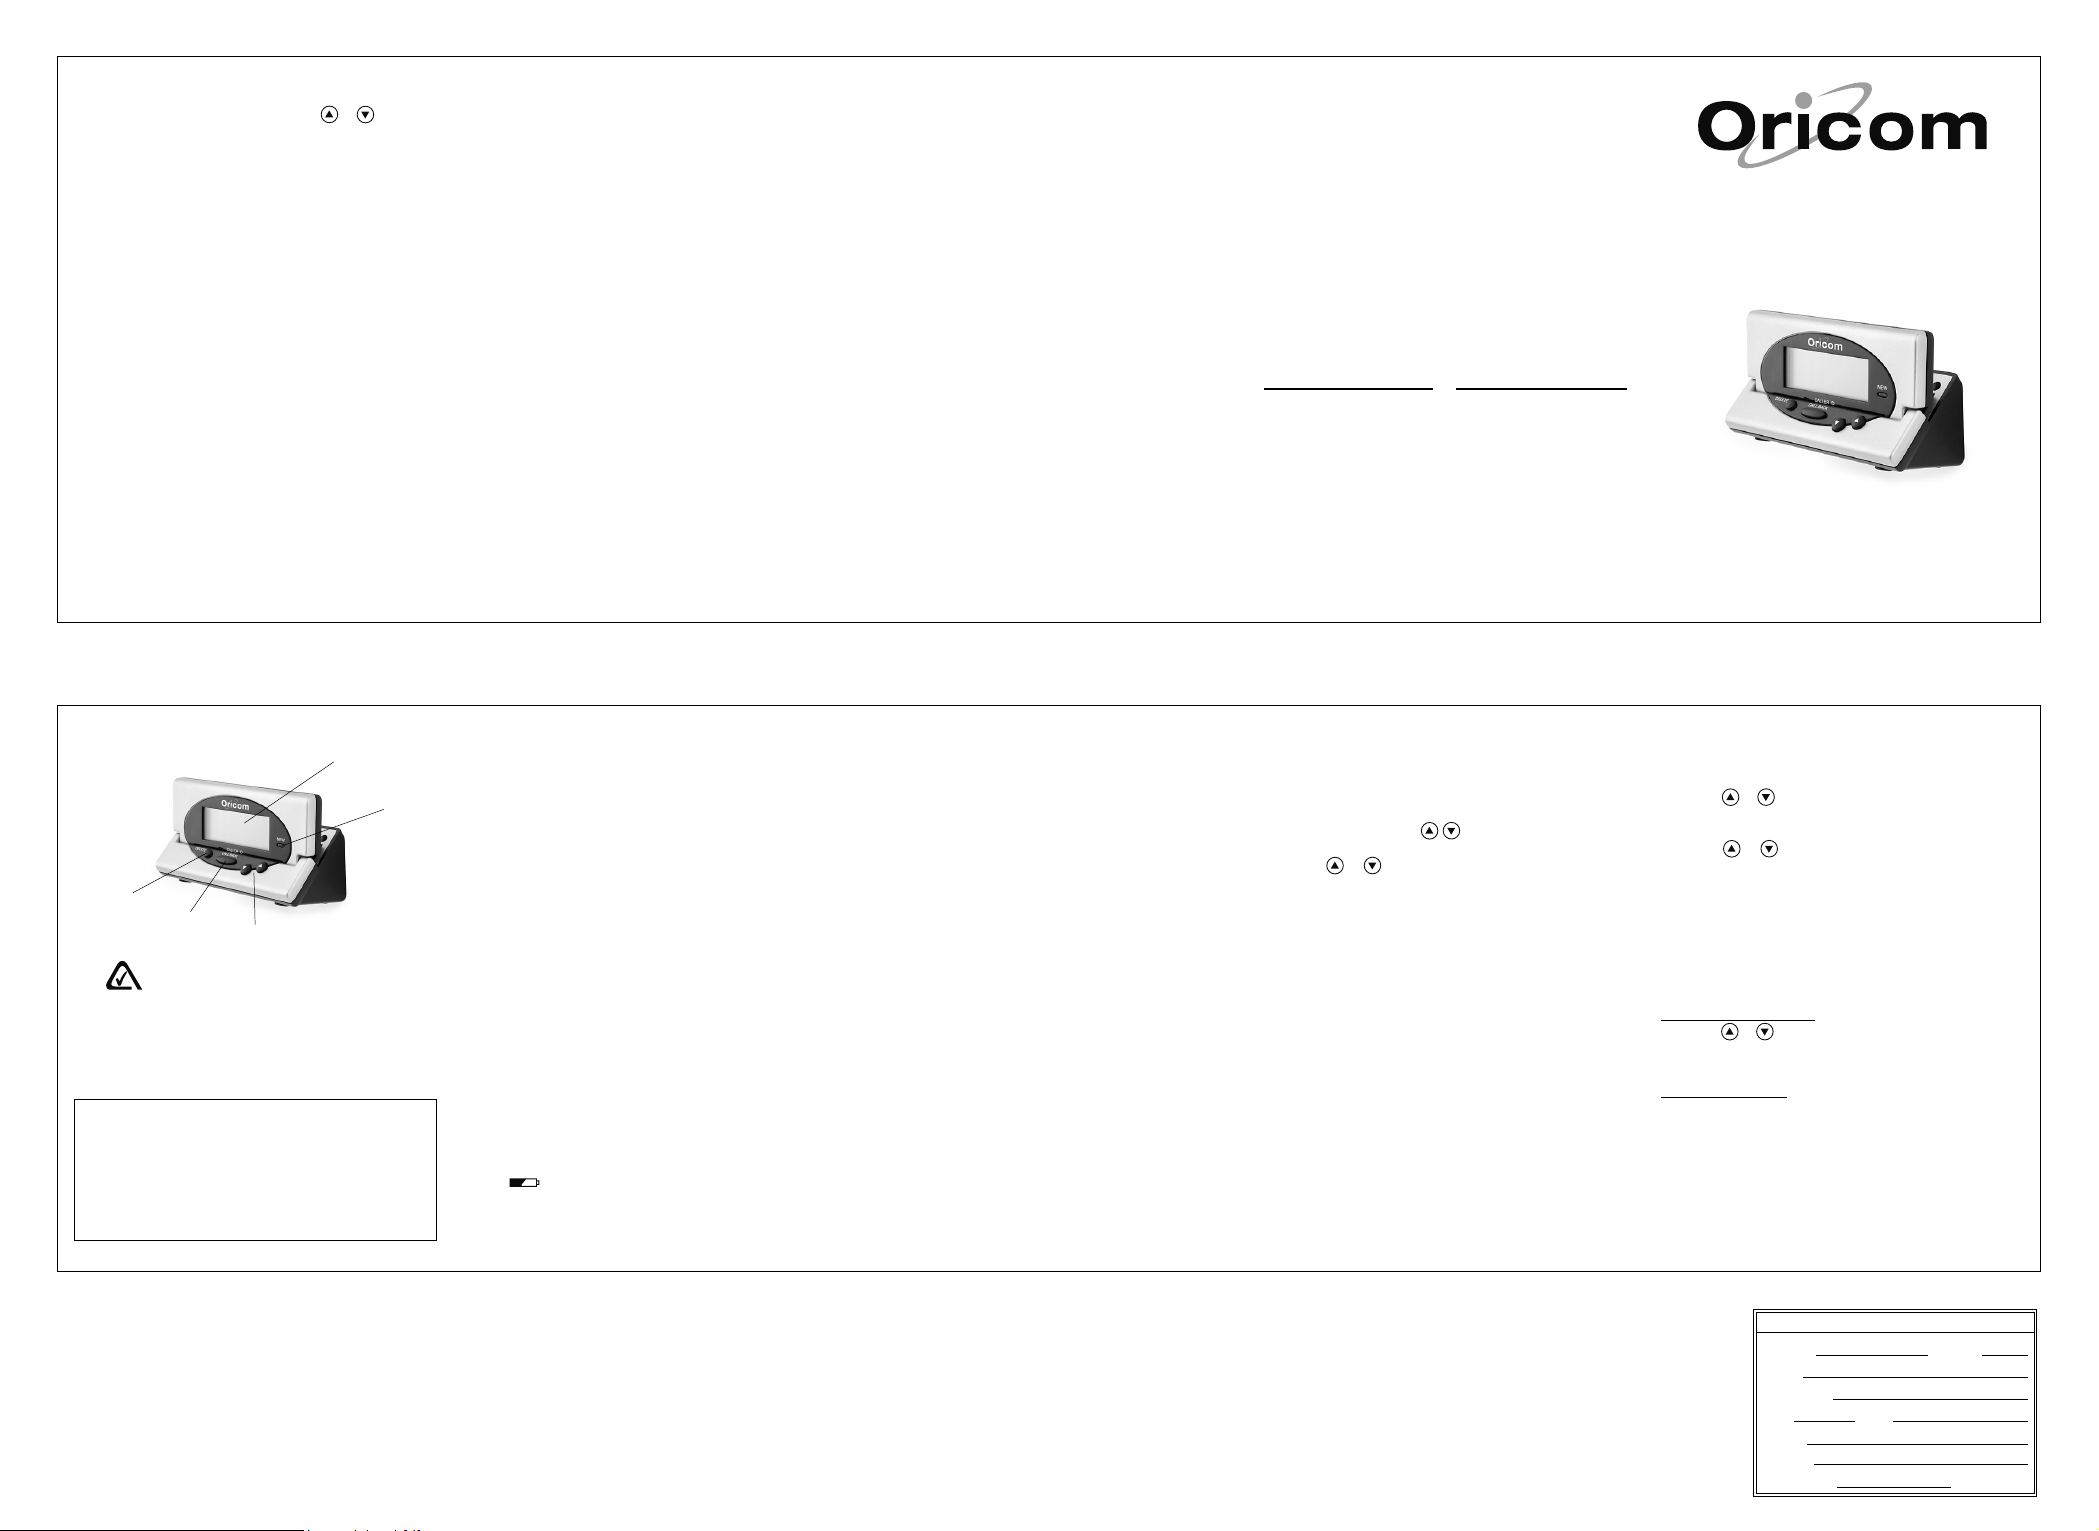
Location of controls Important!
1
2
5
4
The A-Tick symbol shows this product complies with
all current Australian ACA standards.
1 Large Display
2 New call record
3 Scroll up and Down
4 Call back button
5 Delete button
Warnings
• Never remove the battery cover without
disconnecting the telephone from the telephone
line.
• Do not burn or immerse batteries in water.
• Do not mix old and new batteries, different types
of batteries (standard, alkaline, or rechargeable),
or rechargeable batteries of different capacities.
3
12345
Important!
To use this unit you must be in an area where Caller ID service
is provided by your telephone network operator and have a
subscription to the service. When you subscribe to this
service, between the first and second rings, the telephone
company sends the caller’s telephone number and the call’s
date and time.
The Caller ID unit receives and displays this information for
each call and updates the display with the current date and
time. Your Caller ID unit saves up to 99 call records, and then
replaces the oldest call record with each new one.
Installing Batteries
You need three AAA batter ies (supplied) to power and protect
the Caller ID unit’s memory during a power failure.
1. Ensure unit is not connected to the telephone line.
2. Use a flat-blade screwdriver to lift the compartment door
on the bottom of the Caller ID unit.
2. Insert the 3 AAA batter ies (supplied) into the compartment
as indicated by the polarity symbols (+ and –) marked
inside.
3. Replace the battery cover and snap it closed.
When the first call comes in, the time and date are
automatically set from the Caller ID information provided by
your phone company.
When
appears or the display dims, replace the batteries.
When you replace the batteries, do not press any buttons on
the Caller ID unit after you remove the old batteries. Doing so
could erase all stored information.
Connecting to a Phone
1. Disconnect the telephone line cord from the modular
phone jack on the wall and plug it into the PHONE JACK
on the back of the Caller ID unit.
2. Plug the Caller ID unit’s pre-wired telephone line cord
into the modular phone jack on the wall.
Connecting to an Answering Machine
Be sure to set your answering machine to answer after two
or more rings, so the Caller ID unit has time to record the call
information.
1. Plug one end of another line cord (not supplied) into
PHONE JACK.
2. Plug the other end of the line cord into the answering
machine’s line jack.
3. Plug the telephone line of your telephone into the
answering machine’s phone jack.
Positioning the Caller ID Unit
You can set the Caller ID unit flat on a desk, shelf or table, or
mount the Caller ID unit on a wall. You need two screws (not
supplied) with heads larger than the keyhole slots on the
bottom of the base.
1. Drill two holes 38 mm apart at the mounting location.
2. Insert screws into the holes, letting the heads protrude
about 3mm from the mounting surface.
Back Side
3. Align the keyhole slots on the bottom of the base with the
screws and slide the Caller ID unit down until it is secure.
4. Lift the Caller ID unit’s screen to adjust it to the desired
angle.
Adjusting the Display Contrast
1. Press and hold down at the same time until
CONTRASTCONTRAST
CONTRAST and 1 2 3 4 5 appear, and 3 flashes.
CONTRASTCONTRAST
2. Press
3. Press DELETE to confirm.
Note: If no keys are pressed for 15 seconds, the Caller ID
unit exits setup.
or to select the contrast level (from 1 – 5).
LCDLCD
LCD
LCDLCD
CALLER ID OPERATION
Receiving Calls
During an incoming call, NEW appears and the red New Call
light flashes while the phone is ringing. The number of new
and total calls will be displayed. The New Call light flashes
slowly, until all calls are reviewed.
•The caller’s phone number with the call time and date will
appear.
•
If an incorrect, invalid or incomplete signal is received,
- LINE ERROR -- LINE ERROR -
- LINE ERROR - appears.
- LINE ERROR -- LINE ERROR -
•
If number is unlisted,
the call time and date.
•
If the number is not available,
appears with the call time and date.
•
For long distance calls,
- WITHHELD CALL -- WITHHELD CALL -
- WITHHELD CALL - appears with
- WITHHELD CALL -- WITHHELD CALL -
- UNAVAILABLE -- UNAVAILABLE -
- UNAVAILABLE -
- UNAVAILABLE -- UNAVAILABLE -
LONG DISTANCELONG DISTANCE
LONG DISTANCE appears.
LONG DISTANCELONG DISTANCE
Reviewing Call Records
Each call record includes the time and date of the call, the
call number (determined by the order in which the calls are
received), the caller’s telephone number.
1. Press
2. Press
Note:
• If
• If you receive a call from a number previously stored in
or to review the calls. Once you have viewed
END OF NEW CALLEND OF NEW CALL
all the new calls,
view all the saved calls,
END OF NEW CALL appears. After you
END OF NEW CALLEND OF NEW CALL
END OF LISTEND OF LIST
END OF LIST appears.
or to view them again.
END OF LISTEND OF LIST
RPT appears, you have multiple new calls from the
same number.
memory, the old record’s data is replaced with the new
call’s time and date, and
NEW appears.
Deleting Call Records
Deleting a Single Record
1. Press or until you see the record you want to delete.
2. Press DELETE twice to delete the record. The remaining
call records are renumbered automatically.
Deleting All Records
1. After reviewing all new messages, press and hold
DELETE for about 3 seconds.
appears.
ERASEERASE
ALLALL
2.
While
ERASE
ERASEERASE
--
NO CALLSNO CALLS
-
NO CALLS
--
NO CALLSNO CALLS
To cancel deletion,
ERASE ALL CALLS?ERASE ALL CALLS?
seconds,
ERASE ALL CALLS? disappears.
ERASE ALL CALLS?ERASE ALL CALLS?
CALLS?CALLS?
ALL
CALLS?
ALLALL
CALLS?CALLS?
--
- appears.
--
do not press any buttons. After about 20
LIB LIB
Part No.:
LIB
LIB LIB
Oricom CID99 (Aust/NZ) Oricom CID99 (Aust/NZ)
Model:
Oricom CID99 (Aust/NZ)
Oricom CID99 (Aust/NZ) Oricom CID99 (Aust/NZ)
Description:
1 : 1 1 : 1
Scale:
1 : 1 Size:
1 : 1 1 : 1
Colour: Print:
70 gsm wood fr70 gsm wood fr
Material:
70 gsm wood fr
70 gsm wood fr70 gsm wood fr
Release Date:
ERASE ALL CALLS?ERASE ALL CALLS?
ERASE ALL CALLS?
ERASE ALL CALLS?ERASE ALL CALLS?
appears, press DELETE again.
0202
02
Primatronix Ltd.
A25YY A25YY
A25YY Rev.:
A25YY A25YY
Manual (1 page) – English Manual (1 page) – English
Manual (1 page) – English
Manual (1 page) – English Manual (1 page) – English
350 x 100 350 x 100
350 x 100 mm
350 x 100 350 x 100
BlackBlack
Black Background:
BlackBlack
ee paperee paper
ee paper
ee paperee paper
0202
2 2
2
2 2
WhiteWhite
White
WhiteWhite
Charis Lo
1010
/
10
1010
 Loading...