

Oricom C1000 1.8 GHz Owner's Manual

Owner’s Manual
Oricom C1000
1.8 GHz DECT Wireless Conference Phone
2
TABLE OF CONTENTS
IMPORTANT SAFETY INFORMATION...............................................................4
GETTING STARTED ...........................................................................................7
Contents Of Pack........................ ... ... .... ... .... ... .... ... ... .... ... .... ... ... ....... .... ..7
Oricom C1000 DECT Wireless Conference Phone..................... ... ... .... ..8
LCD Display on the POD.......................................................................10
Phone Key.............................................................................................11
Basic Steps For Installation...................................................................12
Charging the POD....................................................................... ..........12
To Ensure Better Performance..............................................................12
BASIC OPERATIONS........................................................................................13
Standby.................................................................................................13
Answering Calls.....................................................................................13
Making Calls............................ ... .... ... .... ... .... ... .... ... ... .... ... .... ... ....... ... ....14
Traditional Dialing.....................................................................14
Predialing .................................................................................15
Redialing...............................................................................................16
Traditional Dialing.....................................................................16
Predialing .................................................................................16
Phonebook Dialing................................................................................18
Traditional Dialing.....................................................................18
Predialing .................................................................................20
Services Dialing.....................................................................................21
Service Centre Quick Access................................................................22
Things you can do during a call.............................................................23
Adjust Speaker Volume......................... ...................................23
Mute Call..................................................................................23
Change Dial Tone.....................................................................24
Send Flash Signal ................................. ...................................24
Dialing Extra Digits...................................................................24
Dialing from Phonebook Record...............................................25
Displaying User Phone Number................................................26
Ringer Volume.......................................................................................27
Adjusting Ringer Volume..........................................................27
Ringer On/Off Shortcut.............................................................27
Storing Numbers in the Phonebook.......................................................28

3
Programming.................................................................... .....................29
Start Programming ............................. ......................................29
Ringer Melody ..........................................................................30
Recall Duration.........................................................................31
Users Phone Number................................ ... .... ... .... ... .... ...... ....32
Network Services Number........................................................33
Service Centre Number............................................................34
Returning to factory Default Setting ..........................................35
Additional Features ...............................................................................36
Call Recording................................. ... ... ....... .... ... .... ... ... .... ... ....36
Out of Range Warning..............................................................36
Paging.......... ......................................... ...................................36
Low Battery ..............................................................................37
QUICK REFERENCE GUIDE ............................................................................38
TROUBLE SHOOTING........................ .... ... ... .... ... .... ... ... .... ....... ... .... ... .... ... ... ....40
TECHNICAL DATA............................................................................................40
FACTORY DEFAULT VALUES..........................................................................40
WALL – MOUNTING..........................................................................................41
Warranty Information..........................................................................................42
4
IMPORTANT SAFETY INFORMATION
Please read the safety instructions before first use of this product.
• Read and understand all instructions.
•
Follow all warnings and instructions marked on the product.
• Unplug this product from the power socket before cleaning. Do not use
liquid cleaners or aerosol cleaners. Use a damp cloth for cleaning.
• Do not use this product near water, for example, near a bathtub, washbowl,
kitchen sink, or laundry tub, in a wet basement, or near a swimming pool.
• Do not place this product on an unstable cart, stand, or table. The product
may fall, causing serious damage to the product.
• Slots and openings in the cabinet and the back or bottom are provided for
ventilation, to protect it from overheating, these openings must not be
blocked or covered.
•
This product should never be placed near or over a radiator or heat register.
This product should not be placed in a built-in installation unless proper
ventilation is provided.
• Use only the he type of power source indicated on the marking label of the
power adaptors. If you are not sure of the type of power supply to your
building, consult your local power company.
• Do not overload wall outlets and extension cords as this can result in the
risk of fire or electric shock.
• Never push objects of any kind into this product through cabinet slots as
they may touch dangerous voltage points or short out parts that could
result in a risk of fire or electric shock. Never spill liquid of any kind on the
product.
• To reduce the risk of electric shock, do not disassemble this product. Take
the product to a qualified serviceman when it requires repair work or
service. Opening or removing covers may expose you to dangerous
voltages or other risks. Incorrect reassembly can cause electric shock
during subsequent use.
• Unplug this product from the wall outlet and remove battery and refer
servicing to qualified service personnel under the following conditions:
a. When the power supply cord or plug is damaged or frayed.
b. If liquid has been spilled into the product.
c. If the product does not operate normally by following the operating
instructions.
d. If the product has been dropped or the cabinet has been damaged.
e. If the product exhibits a distinct change in performance.

5
•
Do not use your telephone during an electrical storm thunderstorm as it is
possible to get an electric shock. Refer to information contained in Telstra
White pages directory.
•
Do not use this product to report a gas leak in the vicinity of the leak.
• Do not use this product near intensive care medical equipment or by
persons with pacemakers.
• Due to the radio signals between base station and POD, wearers of
hearing aids may experience interference in the form of a humming noise.
• This product can interfere with electrical equipment such as answering
machines, TV sets, radios, computers and microwave ovens if placed too
close.
•
This telephone is not designed for making emergency telephone calls
when the mains power fails. Always have a corded telephone available to
be able to make and receive calls to emergency services.
• To reduce the risk of fire or injury to persons, read and follow these
instructions:
BATTERIES
•
Disconnect the product from wall outlet when replacing the battery pack.
• Use only the battery pack type listed in the Owner’s Manual. Do not use
lithium batteries.
• Do not dispose of the battery pack in a fire, as they can explode. Check
with local codes for battery disposal regulations.
• Do not open or mutilate the battery pack. Released electrolyte is corrosive
and can cause damage to the eyes or skin. It can be toxic if swallowed.
• Avoid contact with rings, bracelets, keys or other metal objects when
handling the battery pack. These objects could short out the batteries or
cause the conductor to overheat resulting in burns.
• Do not attempt to recharge the battery pack by heating it. Sudden release
of battery electrolyte can cause burns or irritation to the eyes or skin.
6
• Observe the proper polarity, or direction, of any battery. Reverse insertion
of the battery pack can cause charging, and can result in leakage or
explosion.
• Remove the battery pack if you do not plan to use the product for several
months at a time. The batteries could leak over that time.
• Discard any “dead” battery packs as soon as possible because they are
likely to leak into the product.
• Do not store this product or the battery pack in a high temperature area.
Battery packs stored in a freezer or refrigerator should be protected from
condensation during storage and defrosting. Battery packs should be
stabilized at room temperature before using.
•
Your battery pack is rechargeable and can be recycled once it outlives its
usefulness. Depending upon your local and state law, it might be illegal to
dispose of this battery into a municipal waste system. Check with your
local solid waste company for more information on your recycling options
for the battery pack.
SAVE THESE INSTRUCTIONS FOR
FUTURE REFERENCE

7
GETTING STARTED
Contents Of Pack
This package should contain the following:
Base
POD
Base Adaptor
Charging Adaptor for POD
Battery
Telephone Line cord and plug
User’s Guide
If any of these items are missing, please contact the dealer were you purchased
this product.
8
Oricom C1000 DECT Wireless Conference Phone
POD
Redial / Program
Press to dial last number
dialed.
Press and hold to access
programming functions
Recall
Press to send recall signal
during a call
Clear / Number
During dialing/programming, press to clear previous digit; or
press and hold to delete the entire string of numbers.
Press once to exit programming/phonebook/redial review.
Press and hold to exit to Standby from programming mode.
Press to display your own phone number when the phone is
Phone Book
Press for phonebook dialing
during a call.
Press and hold to program
phonebook entries and for
phonebook dialing
Service
Press to access network service
number
Volume control
Press increase/decrease ringer volume.
Press to increase/decrease speaker
volume during a call.
Phone
Press to seize the line or to
hang up at the end of a call
Mute
Press to mute or un-mute
the microphones during a
9
Base
Page button
Press to page POD if you want to find the
misplaced POD.
In Use LED
Flashes during incoming call and
steadily lit when the phone is in use.
Power LED
Steadily lit when power is connected to
the base.
Record Jack
For call recording.
10
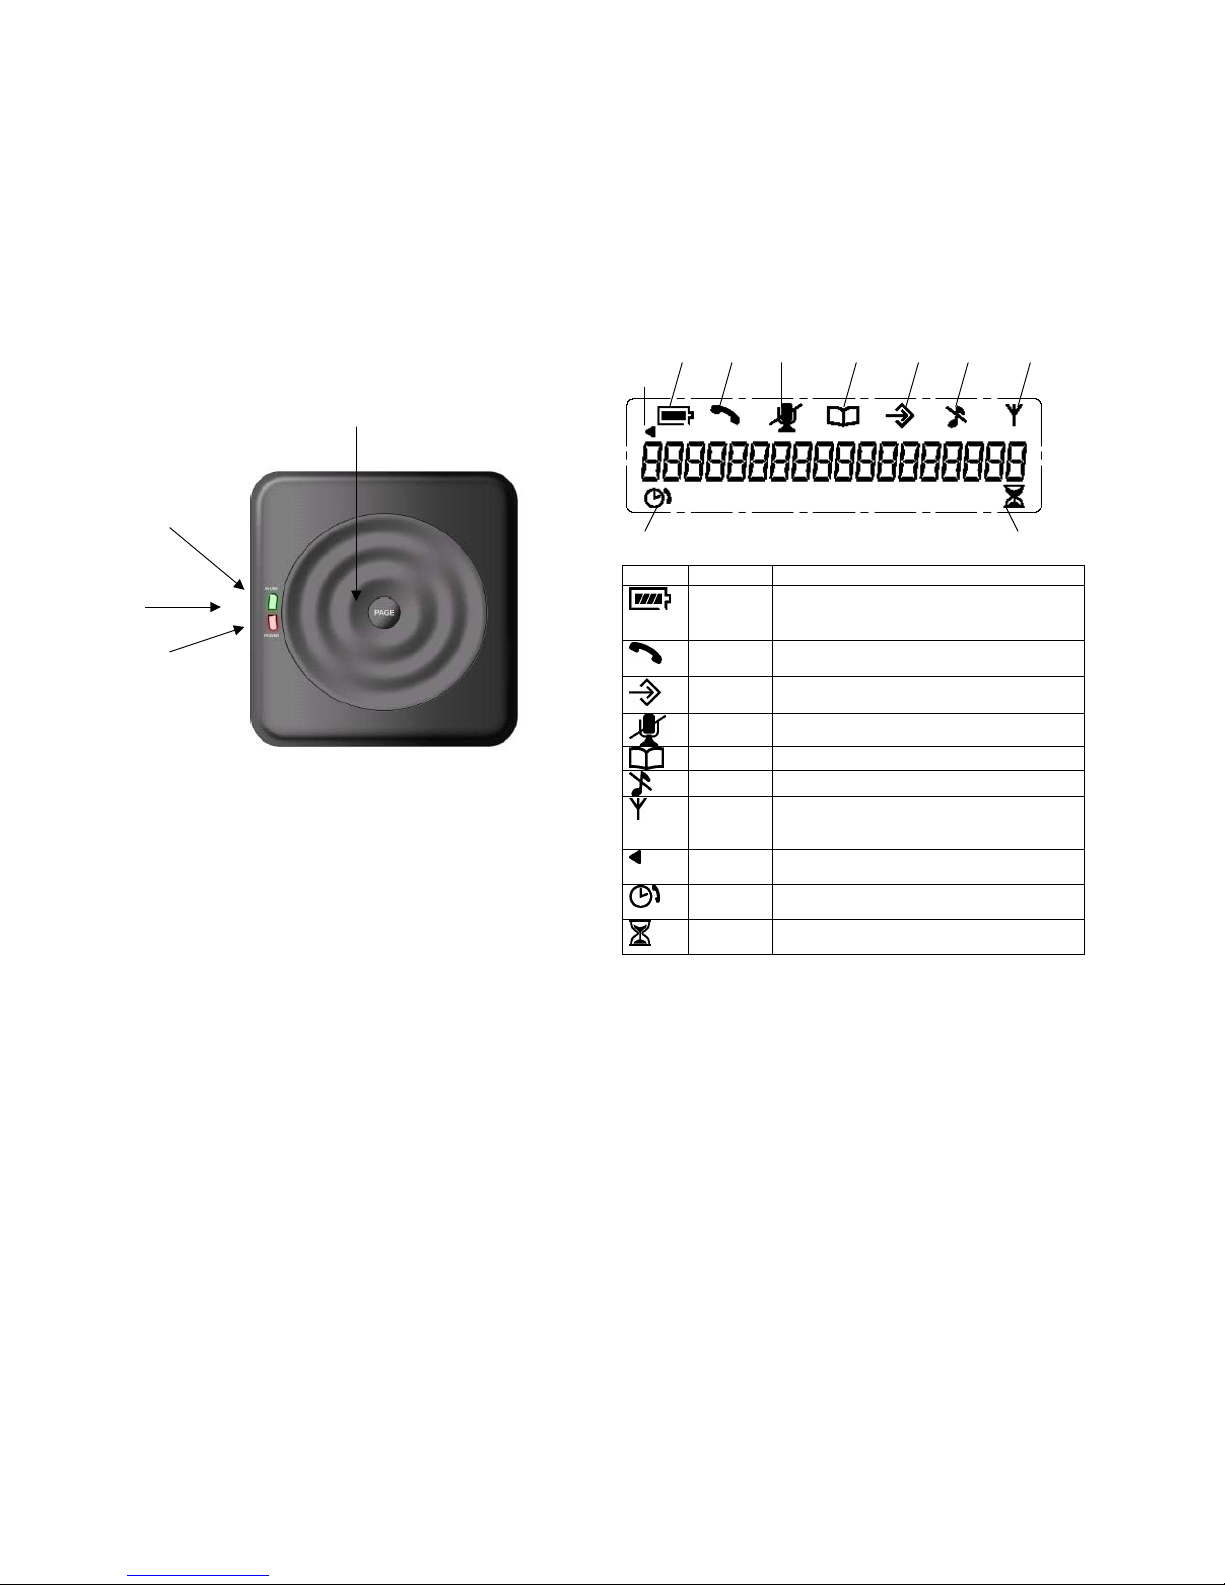
LCD Display on the POD
Icon Name Description
Battery
• stays on to indicate battery level
• flashes when batteries require charging
• animates during charging
Phone
•
flashes according to the cadence during ringing
• turns on during Phone mode
Program
• turns on during Programming mode
• turn on during Phonebook Programming mode
Mute
• turns on for muted call during Phone mode
Phonebook
•
turns on when in Phonebook
Ringer Off
• turns on when ringer is turned off
Signal
• turns on when radio signal from base detected
• flashes when portable part is too far from the
base or when the base is not powered on.
Scroll
•
turns on when the number displ ayed contains
more than 18 digits
Clock
• turns on whenever call elapse timer is
displayed
Hour glass
• turns on whenever talk time remaining counter
is displayed
Battery Phone Mute Phonebook Program
Ringer
Off
Signal
Clock Hour glass
Scroll

11
Phone Key
Key Function Key
Phone Book
Service
Recall
Recall
Redial / Program
Clear / Number
Up
Down
Phone On/Off
Mute
Ringer On/Off
Dial Tone
Pause
12
Basic Steps For Installation
1. Set up the base and POD on a flat, stable surface.
2. Connect the output plug of the base adaptor to the
socket on the
bottom of the base unit and the adaptor to the main wall outlet. The power
LED on the base should become steadily lit.
3. Connect one end of the telephone line to the
socket on the bottom of
the base unit and the other end to the wall phone socket.
4. Remove the battery cover on the base of the pod and insert the battery pack
(supplied with the unit), observing the correct orientation of the plug with the
connector. Relocate the battery compartment door.
5. Connect the output plug of the POD adaptor to the
socket on the top
of the POD unit and the power adaptor to power socket. Allow the battery to
charge for at least 15 hours before first use.
CAUTION
Use only the power adaptors supplied with this product. Incorrect adaptor
polarity or voltage can seriously damage the unit.
For Base: For POD:
Input: 240 VAC 50 Hz Input: 240 VAC 50 Hz
Output: 7 VDC 400 mA Output: 12 VDC 500 mA
Polarity: Center positive Polarity: Center positive
CAUTION
RISK OF EXPLOSION IF BATTERY IS REPLACED BY AN INCORRECT TYPE.
Refer to the original type supplied with this telephone. Ni-MH batteries must be
disposed of in accordance with applicable waste disposal regulations.
Charging the POD
If the battery icon flashes or the LED’s on the POD flashes RED periodically
during phone mode, the battery pack needs recharging. Connect the POD to the
AC adaptor plugged to the main wall outlet to start charging.
Note: POD shall take 30 seconds to power up when the adaptor is connected to
a flat battery pack.
To Ensure Better Performance
1. Locate the conference telephone in a quiet environment.
2. Position the POD within 30 metres of the base unit.
3. Do not use the POD with the other phone in a single room.
4. Do not m ove th e POD during a call.

13
BASIC OPERATIONS
Standby
• When the phone is not in use, the
POWER LED on the base is
turned on and the LCD on the
POD displays your phone number,
if programmed.
Answering Calls
When there is an incoming call, the GREEN LEDs on the base and the POD
blink and the
icon flashes on the display. The speaker on the POD rings
the selected melody.
• Press any key to answer except
‘+’ and ‘-‘keys.
•
The call timer and clock icon are
displayed. The call timer starts
with MM:SS (minute and second).
•
The talk time remaining counter
and hour glass icon are also
displayed. The talk timer starts
with HH:MM (hour and minute).
Note:
1. The call timer displays the time elapsed on the current active call.
2. The talk time remaining counter displays the estimated remaining in use
time at the current battery level before the batteries become empty. If for
any reason the talk time remaining counter displays 00-00 for a prolonged
period of time or is severely inaccurate, charge the POD for a full 15
hours and the counter should reset.
3. When POD is being charged during talk mode, no talk timer will be
displayed. “-- --“ is shown on the display.
14
Making Calls
You can make a call by
• pressing PHONE key and then dialing phone number;
•
dialing phone number and then pressing PHONE key;
• redialing the last number you dialed;
• dialing the number in phone book.
Traditional Dialing
The phone line is seized before the phone number is entered. The phone
number cannot be edited or verified before dialing.
• Press PHONE key.
(The Phone icon turns on and
your phone number turns off.)
•
Dial the number. Digits are
displayed.
(Pressing * and # shall display “
”
and “
” respectively.)
• Call timer and talk time remaining
counter icons are displayed a
while after the last key press.
• To end the call, press PHONE
key.
Note: If more than 18 digits are dialed, only the last 18 digits
shall be displayed. The Scroll icon shall turn on.
No limit on the number of digits being dialed out.
 Loading...