

Page 1
For ages
9andup
Page 2

Introduction
Welcome to the world of computer audio production! The Wav DJ will allow you to explore your
audio creativity without the inconvenience of over-complicated features or a confusing interface.
You can create almost anything with the Wav DJ. The basic functions let you play the role of a radio DJ.
You can real time mix a variety of sound sources such as a CD, General MIDI instruments generated
by the PC sound card, wav sound effects and your own voice. You can record all this as a high quality wav file.
When you get used to the real time functions you might want to experiment with the editing capabilities.
Using the Edit Screens you can produce a piece of music, add sound effects and change it as much as
you want to get it just right. You can alter melodies, rhythms, volumes and pans or change the
whole structure just like a record producer. When you have finished you can play the whole thing back,
sing along to it and record it as a wav file. The Wav DJ console is designed to work exclusively
with the Wav DJ software so that you can have the hands-on studio-feel right on your desktop.
The Wav DJ software is windows based giving you all the functions within one application.
The top part of the window contains the Control Panel. This section has the most common controls and
allows you to change between the different screens. There are four screens altogether, one for mixing,
one for sequencing (editing), one for changing the sound effects set-up and one for altering the styles.
Each screen has its own chapter in the manual. If you are new to audio applications you will find that
everything is very easy to learn. Try experimenting with the Mixer applications and you’ll find that you will be
producing professional sounding audio in no time. Let your imagination flow and have fun!
Page 3
Table of ContentsTable of Contents
1
4
7
8
12
14
17
Chapter 1
Set-up and Installation
Chapter 2
The Console Interface
Chapter 3
The Control Panel
Chapter 4
The Mixer Screen
Chapter 5
The Sound Effects Screen
Chapter 6
The Style Screen
Chapter 7
The Edit Screen
27
Appendix A
Wav DJ Terminology
28
Appendix B
Troubleshooting
31
Appendix C
General MIDI
26
34
Appendix D
License Agreement and Limited Warranty
Chapter 9
The Web Page
25
Chapter 8
Tips
Page 4
1
Chapter 1Chapter 1
Set-up and Installation
Leads
Connect the Wav DJ console to the PC with the leads provided before you start up the
computer. There are two sets of leads that need to be connected to the PC before you
turn the power on.
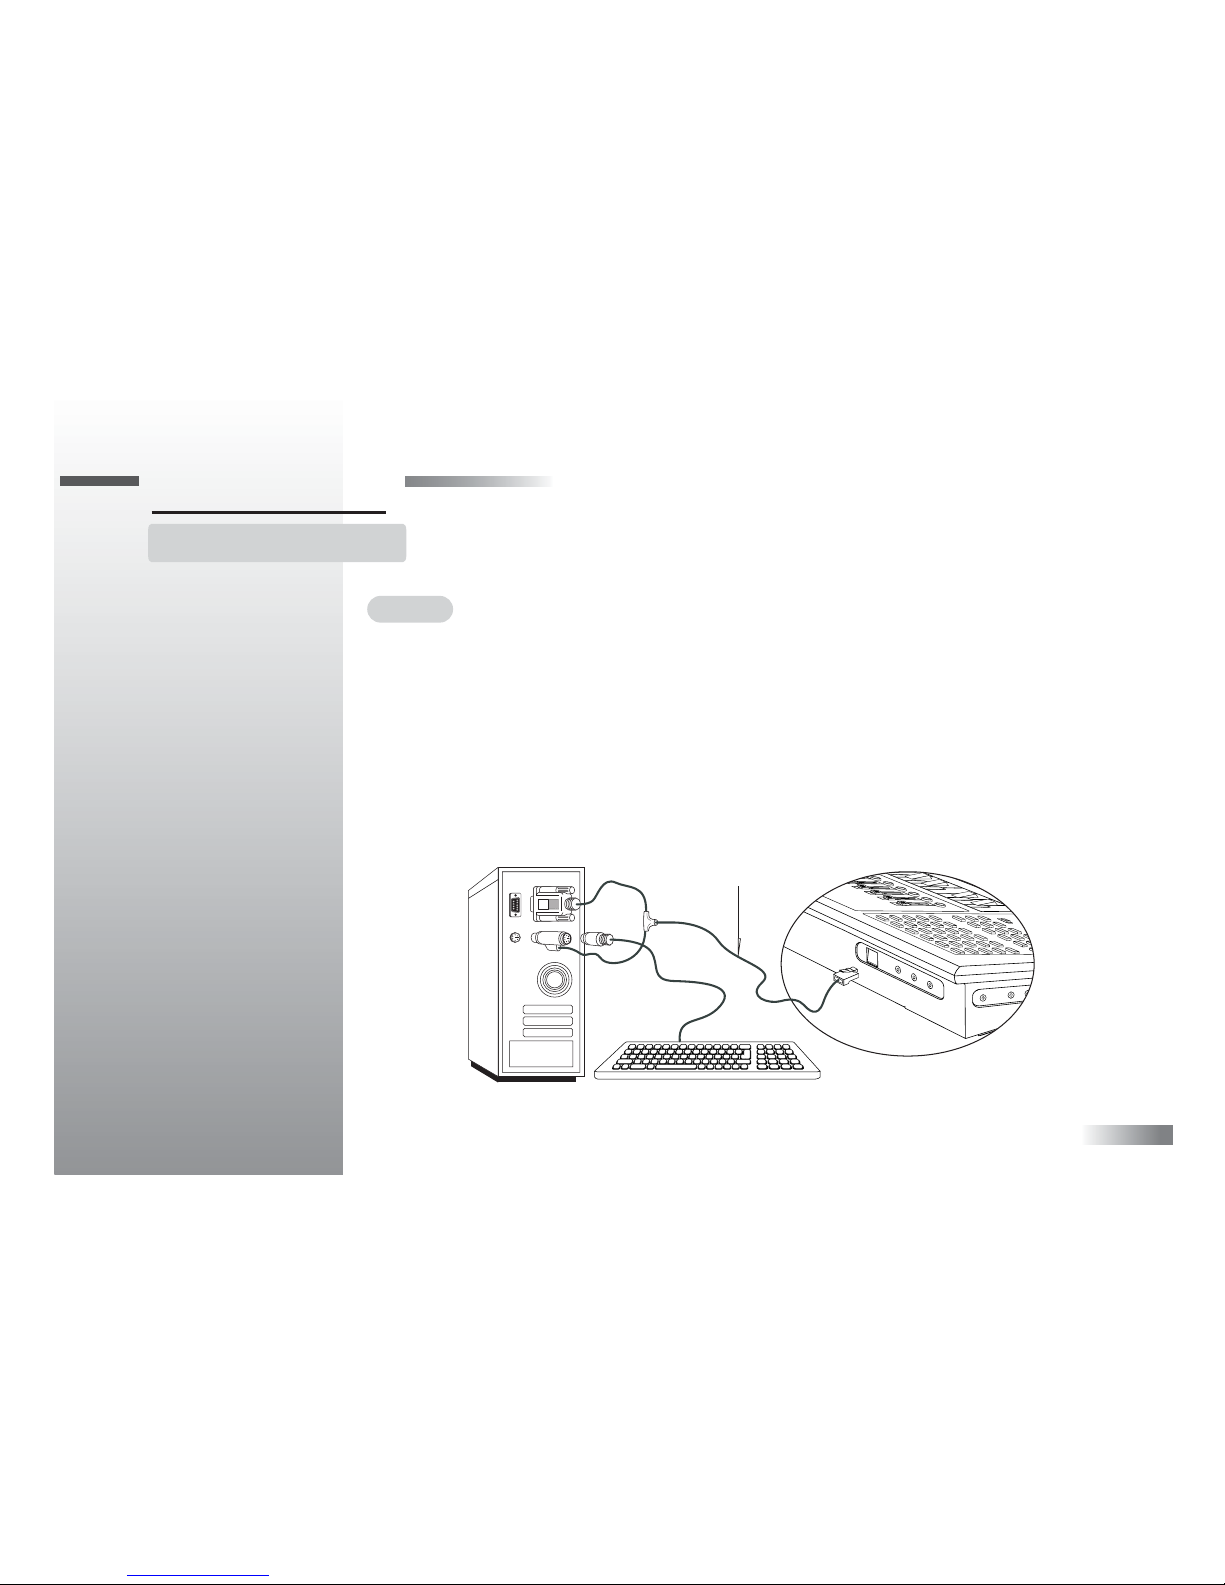
Lead A is the power and communication lead. Lead B is the audio connection lead.
Lead A connects to the rear of the Wav DJ console at the opening with the sliding door.
Lift up the door and insert the modular jack with the release tab facing upwards as shown.
Lead A
Page 5

2
The other end of lead A has two connectors attached to it. The PS/2 connector goes into
the keyboard port. This connector is double ended. The front part with the longer metal
casing goes into the PC. You can re-plug the keyboard into the rear of the connector as
shown. Be careful to line up the pins on the lead with the holes in the socket and do not
force the lead into place.
The larger connector on the PC end of lead A goes into the Com port. Push it in gently
and secure it with the screw pegs.
Lead B connects to the rear of the Wav DJ console. Match the colors of the connectors
to the colors of the ports: Mic = red, Line In = blue, Audio = green. The other end of
lead B connects to the computer sound card. The red lead connects to the microphone-in,
the blue lead connects to the Line In and the green lead connects to the audio out.
Headset Connections
The Wav DJ headset combines high quality headphones with a convenient hands-free
microphone on a moveable stem. There are two connectors attached to the headset lead
that connect to the side of the console. The red connector goes to the port marked
"Mic 1". The green connector goes to the port marked "Audio Out 1".If you do not want
to use the headphones you can connect the Audio Out socket to external speakers like
PC multimedia speakers.
Additional Connections
There are some extra ports on the side of the console for optional external devices.
If you have another set of headphones and a microphone you can connect these to the
ports marked "Audio Out 2" and "Mic 2". A second microphone is very useful for
recording interviews.
Page 6

3
The Line In connector on the side of the Wav DJ console can be used for an external audio source that has a Line Out
on it, like an MP3 player. Make sure that you purchase the correct stereo connection lead if one does not come with
the player.
Installation Procedure
Before you install or run the Wav DJ program we recommend that you set your computer display to a resolution of
at least 800 x 600 and at least 16 bit color. Click the right mouse button on the desktop and select "Properties".
Click the "Settings" tab and you will find the screen resolution and color options.
Insert the CD-ROM into the CD-ROM drive. The installation should start automatically but if it does not, double
click the setup.exe file in the CD-ROM folder. The onscreen instructions will take you through the rest of the set-up.
The installation process will put a shortcut in your Startup Menu. Before you start the program make sure that the
console is correctly connected and is turned on. If it is not then you will get the message "Cable Error or Console
Not Ready". If the console is plugged in, check the connections and unplug the modular jack and plug it back in to
reset the console. Turn the console on and click the OK button on the error message.
The Wav DJ software requires DirectX 8.0 in order to run properly. DirectX is included in the installation
process but if you want to get the full version visit the Microsoft web site at www.microsoft.com/directx
Safety Precautions
Although the Wav DJ console uses relatively low power, caution should be taken as with all electrical appliances. Do not
spill liquids on the console.
Do not let a young child play with the headset. The soft covering for the microphone could be harmful if swallowed.
To avoid hearing damage do not use headphones at very high volumes.
Page 7
Chapter 2Chapter 2
The Console Interface: An Overview
4
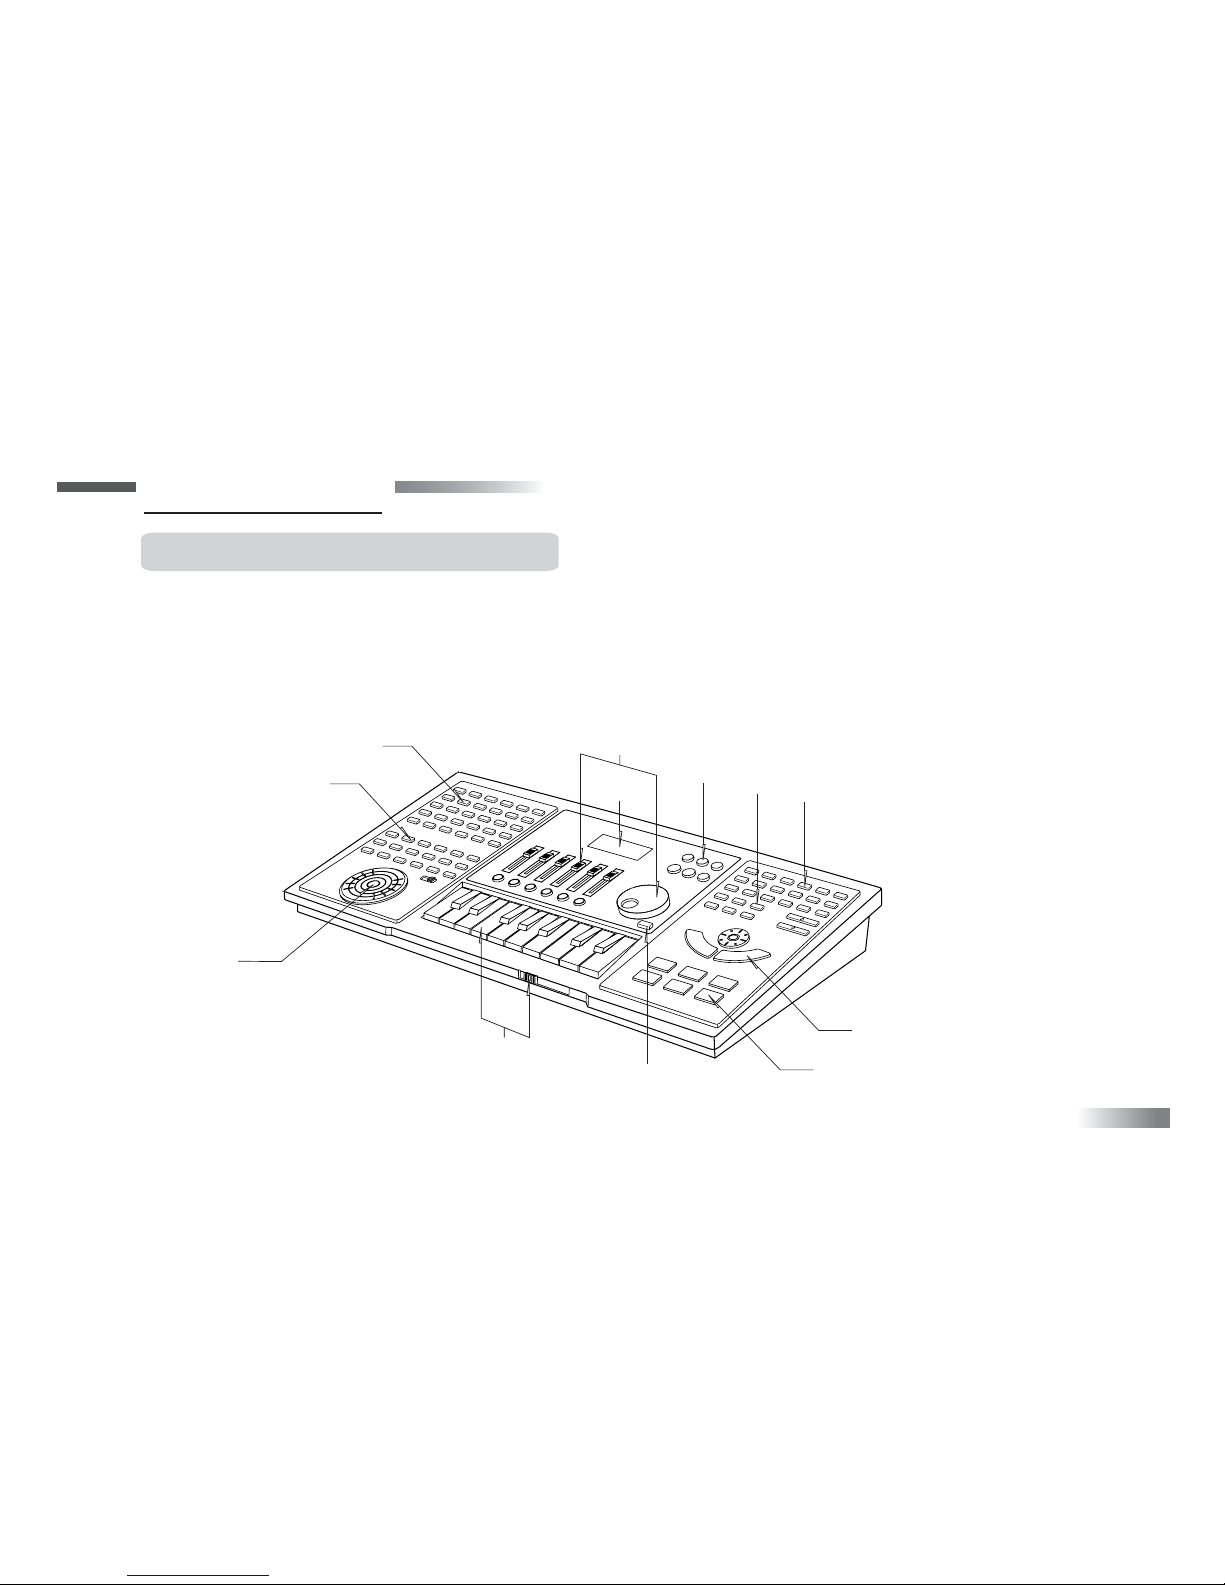
The Wav DJ console provides you with all the buttons and controls you need to have complete control over all of the
Wav DJ software’s functions. These controls are arranged in groups according to their functions.
Many of the buttons have different functions depending on which screen is currently active. Look at the chapters on the
different screens to find out more information.
1
6
4
5
10
9
11
12
7
8
3
2
Page 8

5
1. Wav Effects Buttons
These control the wav sound effects. Holding a button down for a short while will change the sound effects group.
Pressing and releasing the button will trigger playback of the sound effect currently assigned to that button.
2. Keyboard Instrument Buttons
You can decide which General MIDI instrument you want to play on the keyboard by pressing the buttons marked
Channel (1 to 16). The instruments assigned to channels 1 to 16 depend on the current Style List. See Chapter 6 for more
information about the Styles.
The FX button assigns the last wav sound effect that was played to the keyboard so that it can be triggered by the keyboard keys.
The Silence/Delete button will send a command to stop any wav file playback. It is also used while editing to delete a note
or insert a silence command. (See Chapter 7.)
3. Effects Wheel and Switch
The effects wheel has two functions depending on the position of the switch. In the Scratch position the wheel will trigger
the playback of a record scratch sound. In the Pitch Bend mode the wheel will send MIDI pitch bend messages that affect
the pitch of the General MIDI instrument note being played on the keyboard. Play a note and hold it and then move the
wheel to see what happens. The pitch bend effect works best on instruments with a long sustain, like string instruments.
4. The LCD Screen
The screen gives a graphic depiction of the state of the mixer and master volume controls. It also shows the how long the
Wav DJ console has been running. Remember to take regular breaks while working at a computer for any length of time.
5. Transport Controls
The buttons here are mainly used during editing. They also control wav file and song playback and wav file recording.
See the chapters on the Mixer and Edit windows for more details.
Page 9

6
6. Mixer and Volume Controls
The large volume knob controls the master volume level of any sound produced by the Wav DJ. The mixer sliders control
the volume of the different sound sources. The track buttons underneath the sliders turn the sound output of those sources
on and off. The light behind the buttons lights up to indicate that the track is on.
7. Power Button
The console is turned on and off using this button.
8. Piano Keyboard and Octave Slider
The piano keyboard allows you to play one of the General MIDI instruments. Although the keyboard has only 17 keys you
can access the full range of MIDI notes by sliding the octave slider on the front of the console. Some notes will overlap in
different octave settings.
9. Style and Rhythm Controls
You can change the Style by pressing one of the 12 style buttons. A style is made up of a group of 16 General MIDI
instruments (assigned to the Keyboard Instrument Buttons), and 6 pre-set rhythms. A rhythm is a small drum loop. These
are started and stopped by pressing one of the numbered rhythm buttons. The speed of the song or rhythm can be altered
using the tempo buttons. If you use a rhythm button in the Edit window then you will paste a rhythm into the block you are
editing.
10. File and Edit Buttons
The file buttons affect different file types depending on the currently active screen. The edit buttons are used during song editing.
11. Cursor Control Buttons
These buttons are an easy to use alternative to the mouse. All of the screens require the use of the mouse cursor.
12. Drum Buttons
The drum buttons trigger the most commonly used General MIDI drum sounds.
Page 10
Chapter 3
7
Chapter 3
The Control Panel
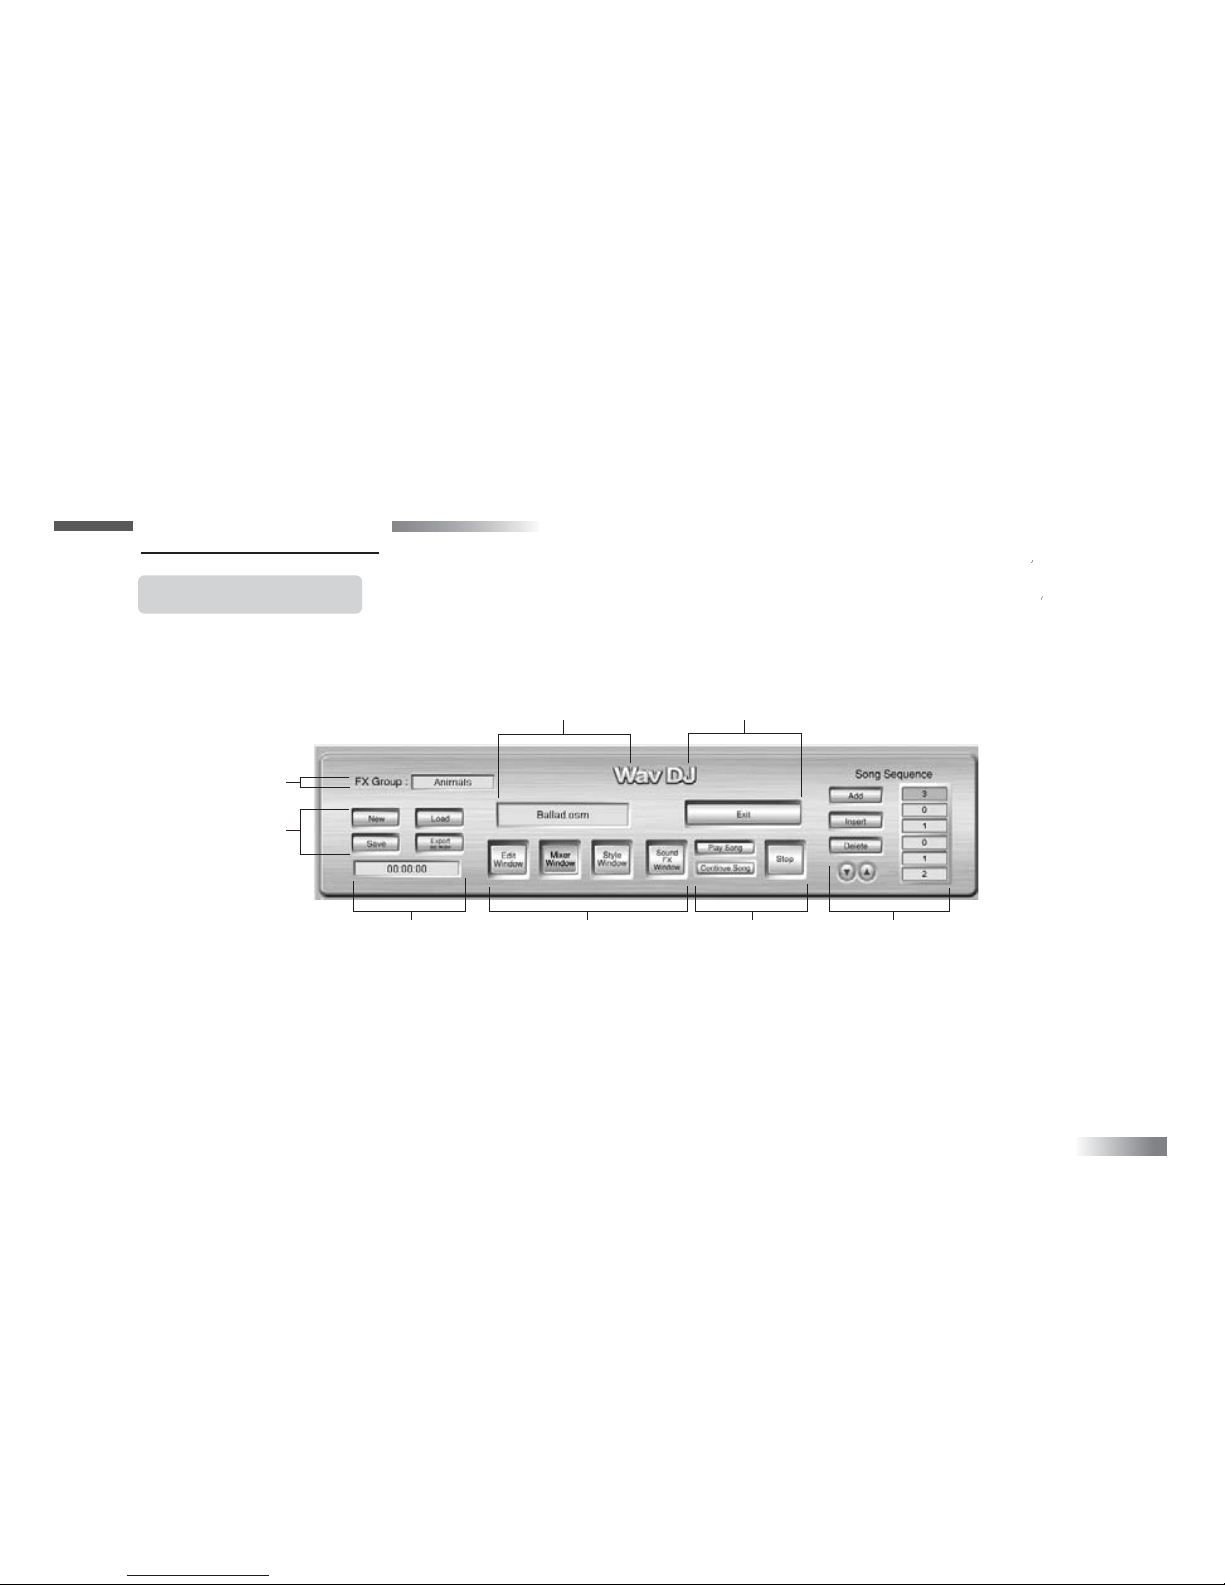
All of the screens in the Wav DJ software share a common control panel that sits at the top of the window. This panel
contains the buttons that allow you to navigate through the screens. It also contains buttons that are common to all the
different screens. The control panel buttons are activated by clicking the left mouse button (or console equivalent),
on them.
1. This indicates the sound effects group that has been selected.
2. The Export as Wav button will convert the song format into a wav file. The process works in real time so you can listen
to the song as it is converted into a wav file. A song must be loaded before you can use this function. When you click
this button you will be asked to give the wav file a name.
NOTE: You can also convert the song into a wav file using the Mixer screen. However, the Export as Wav button allows
you to convert the song only, without recording any of the other sound sources at the same time.
3. This shows the song playback time.
1
2
45
3
6
7 8
Page 11
Chapter 4Chapter 4
The Mixer Screen
The action of the console buttons described in
this chapter refers to the actions that are performed
when the Mixer Screen is active (onscreen).
The Mixer Screen is the one you use to mix
together different sound sources in real time.
8
4. This shows the name of the current song if one is loaded.
5. The Exit button will quit the Wav DJ program.
6. The four main screens are selectable by clicking on these buttons.
7. The Play Song button will start playback of the currently loaded song from the beginning. The Continue Song button
will start playback of the currently loaded song from the point where it was last stopped .
8. The Song Sequence shows the order that the blocks of the song are played in. You can change this order using the
buttons here. The Add button will add the song block that is currently being edited onto the end of the sequence.
The Insert button will add that block into the sequence at the point indicated by the position highlight bar.
The Delete button will remove the block number that is highlighted from the song sequence. The up and down arrows
will scroll through the song sequence list.
Using these buttons it is possible to put the song blocks into any order. You can repeat any block as often as you like.
Creating re-mixes is easy by changing the order of the song sequence.
1
24
5
6
3
7
Page 12

9
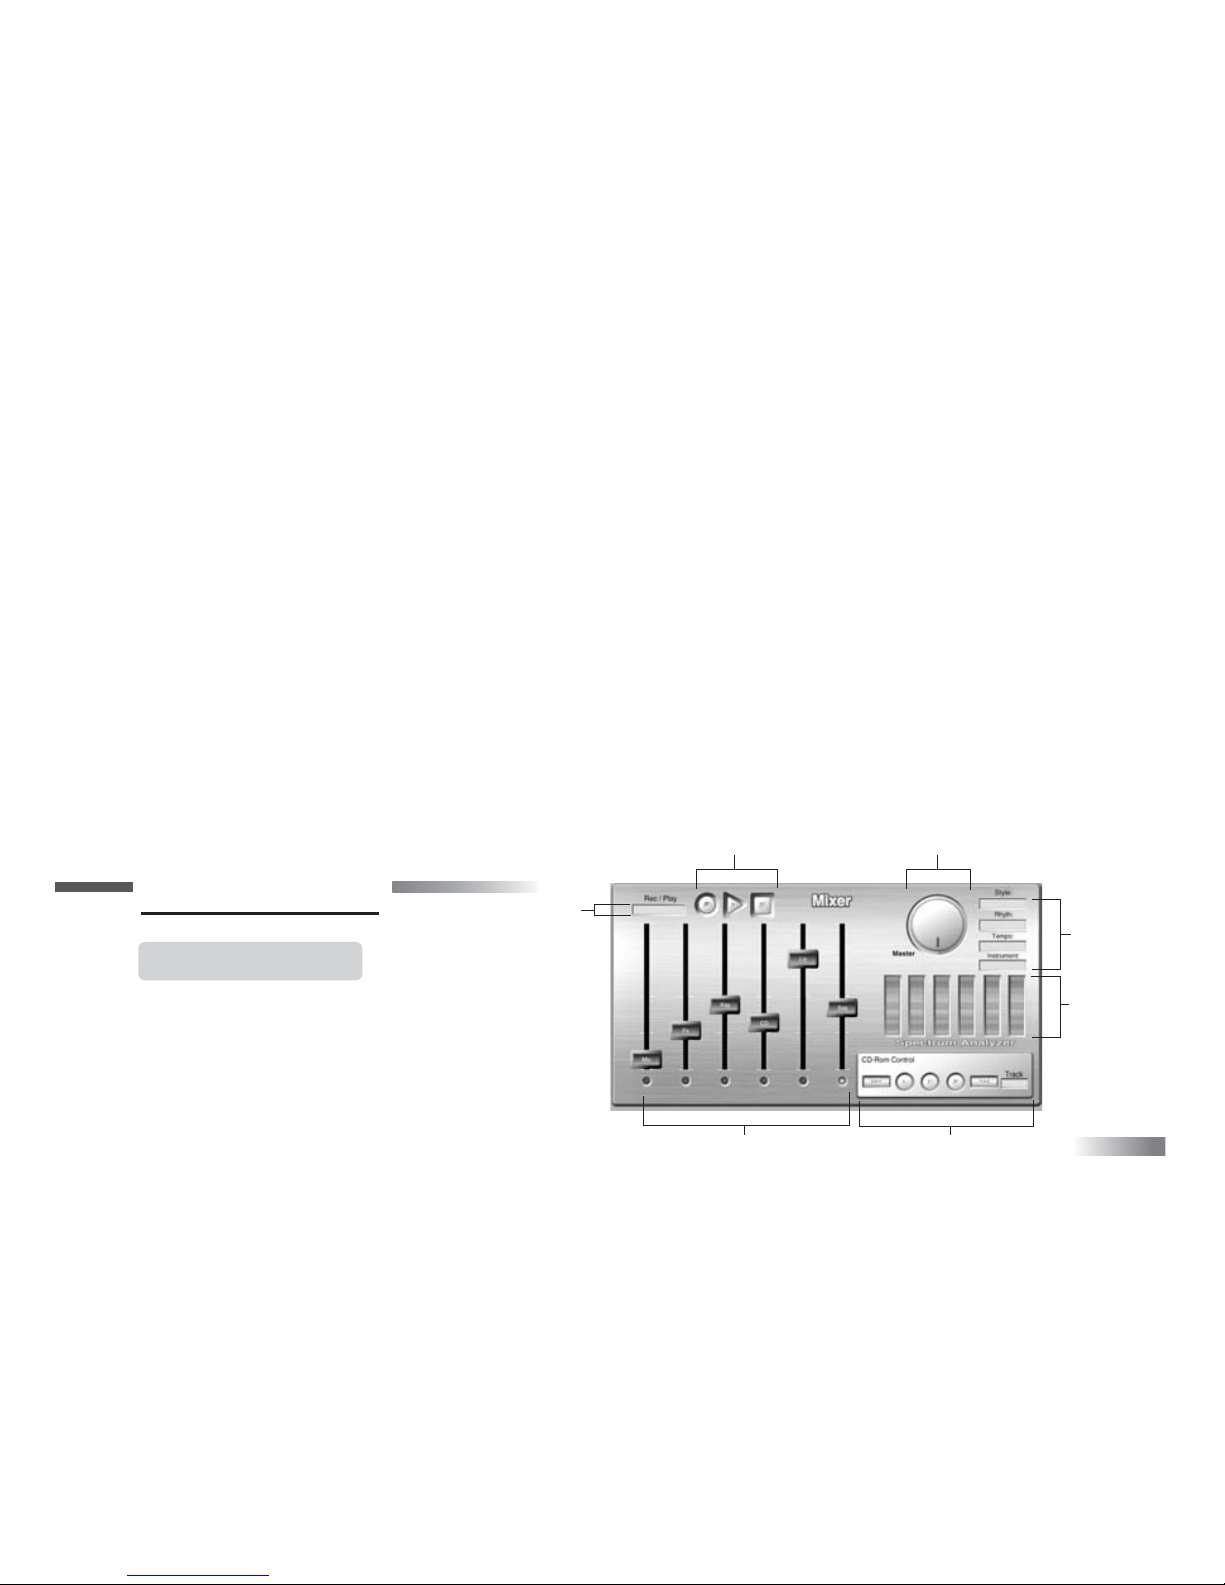
From here you have control over the volume levels of the different mixer tracks, and control over the CD-ROM. You
can make wav file recordings of the mixed sound sources and play back wav files from this screen.
The six sound sources are (from left to right on the sliders): the microphone; wav sound effects; a General MIDI
instrument; an audio CD in the CD-ROM drive; an external Line-In and the sequencer for playback of a song.
There are many different types of audio you can produce here.
1. This indicates the total time that a wav file has been recording or playing.
2. These buttons control the creation and playback of wav files. When you click on the record button on the screen or
press the record button on the console the program will start recording any sounds the Wav DJ is producing as a
wav file.
NOTE: If you run out of space on your hard drive while recording then the recording will automatically stop.
When you click on the Play button an open file dialogue box will appear. You can then select a wav file to listen to.
You can use this button to listen to your recordings.
When you click on the Stop button or press the stop button on the console, the Wav DJ will stop all wav file recording
or playback. If it was recording you will then be asked to give the wav file a name.
3. The sliders control the volume levels of the six sound sources. This part of the window shows the positions of the
console sliders.
Each of these sound sources can be turned off or on, regardless of the slider position, with the illuminated rubber button
underneath the slider. The button lights up when the track is on or "active".
Page 13

10
Microphone
The headset microphone that comes with the Wav DJ allows you to add your own voice to the mix. You could sing along
to some music or perform a radio style chat show with the second microphone connection. If you have a second
microphone plugged into the console then the slider will control the volume of both microphone inputs together.
NOTE: Due to PC hardware limitations the sound card will not accept an input from the microphone and the Line-In at the
same time. When you turn on the Microphone track the Line In track will turn off automatically.
FX
The wav sound effects are controlled by the Wav Effects buttons on the console. The buttons are marked with the sound
effect group names. Holding the button down will change the group. Pressing and releasing the button will trigger the
sound effect to play back. You can add all sorts of sound effects to your mix using these buttons.
Keyboard
This slider controls the volume of the General MIDI instrument sounds played by the keyboard and the drum pads.
CD-ROM
You can put an audio CD into your CD-ROM drive and control the playback level with the slider.
Line-In
There is a socket for a Line-In jack on the side of the Wav DJ console. You can plug in any external audio source that has
a Line Out output on it.
NOTE: The sound card will not accept an input from the microphone and the Line-In at the same time. When you turn on
the Line In track the Microphone track will turn off automatically.
Page 14

11
Sequencer
This controls the level of the song playback or the rhythms.
NOTE: you cannot play a song at the same time as you play a rhythm. Song playback is controlled with the Play Song
and Stop button in the Control Panel. When you press the Play Block button in the console and the Mixer Window is
active the Wav DJ will play the block currently highlighted in the Song Sequence box.
4. This shows the current master volume setting. The master volume dial on the console controls the maximum output
volume of all the sound produced by the Wav DJ. The circle around the outside of the screen dial is a real time display
of the overall output level of the Wav DJ.
5. These fields show the current style, the name of the rhythm that was last played or is playing, the tempo of the rhythm
or song, and the name of the General MIDI instrument currently assigned to the keyboard. You can change the tempo
of a rhythm while it is playing but you cannot change the tempo of the song.
6. The spectrum analyzer shows the output levels of different frequencies. Low frequency sounds are shown on the left
and the higher pitched sounds are shown towards the right.
7. The CD-ROM is controlled with the mouse. All the buttons for doing this are in this area of the screen. Reading from
left to right the buttons allow you to move back one track, play a track, pause, stop and move forward one track.
A Note About Mixing
With a bit of practice you will be able to balance all the levels smoothly, bringing them up as necessary and fading them
out gently. However, a good mix is not just about getting the relative volume levels correct. Using the level indicator
you can check to see if the sound source is too high. If the master level indicator is always in the red then the volume is
probably set too high. This could cause the output to sound distorted. To avoid the distortion, reduce the volume levels
of the tracks or the master volume to keep the level indicator in the green.
Page 15

12
Chapter 5Chapter 5
The Sound Effects Screen
1
3
2
Page 16

The action of the console buttons described in this chapter refers to the actions that are performed when the Sound
Effects Screen is active (onscreen).
When you press one of the wav effects buttons on the console the Wav DJ software will play the wav file that is
assigned to that button. You can use this window to change the sound effects that are assigned to those buttons.
1. This section represents the 30 different sound effects groups as shown on the console. When you click on one of the
sound effects group names or change the group with the console buttons, the filenames of the effects will appear on
the boxes on the right hand side of the screen.
2. The filename boxes show you which wav file will be played by the corresponding console button. If you click on
one of the sound effects boxes an open file requester will pop up. If you choose a wav file it will be assigned to the
corresponding console button.
You can assign the same effect to more than one button and group. Make sure that you do not move or delete the
file later or the button will not be able to trigger the sound effect.
3. The discard changes button will change the sound effects set-up back to how it was before you started editing it.
When you exit the Sound Effects screen you will be asked if you want to save any changes that have been made.
They will be lost when you exit unless you save them.
13
Page 17

The action of the console buttons described in this chapter refers to the actions that are performed when the Style Screen
is active(onscreen). A style is made up of two elements: a set of six rhythms and a group of 16 General MIDI instruments.
Chapter 6Chapter 6
Style Screen
14
1
2
5
4
3
Page 18

Altogether there are 128 General MIDI instruments not including the drums. The Wav DJ software will allow you to
use 16 channels of MIDI instruments at any one time. These 16 instruments are assigned to the keyboard instrument
buttons on the console. They are also used as the 16 MIDI channels of the song. You can quickly change the selection
of 16 instruments using the style buttons on the console.
The Wav DJ comes with 12 pre-set styles that are all user configurable. Using the Style Window you can choose
which 16 General MIDI instruments you would like to use in each style and you can edit the rhythms.
1. This box is the style selector. There are 12 styles altogether. If you press the Music Style button on the console or
click on the style boxes in this area you will change the selected style.
2. Each style uses a different list of MIDI instruments.
This shows which General MIDI instruments are
assigned to the 16 MIDI channels.
If you want a different General MIDI instrument to
appear on a particular channel then you can change
it here. Click on the channel that you would like to
change and a scrolling text box containing the
complete list of General MIDI instruments will
appear in the right hand box. Scroll through the list
and click on the instrument you want for that channel.
It is now assigned to that channel.
NOTE:You cannot change the instrument in Channel 10,
the drums are always assigned to that channel.
15
Page 19

16
3. When you have finished editing the style you can save your changes by clicking on the Save button. If you change to a
different window before you have saved you will be asked if you would like to save. Any unsaved changes to a style
will remain in effect until you exit the program or click the Return to Default button.
The Return to Default button will reset any changes you have made to the original settings. This affects only the
currently displayed instrument list and rhythm. This means that all your other rhythms and styles will not be changed.
4. These are the six rhythm buttons. By clicking on these you can select the rhythm that you want to edit or listen to.
5. This is the rhythm display where you can edit the rhythms. This is very similar to channel 10 of a block in the
Edit Window. The small drum icons show where a drum sound will be played in the rhythm. The length of the drum
pattern can be changed using the up and down buttons next to the length display. The rhythm can be played and stopped
using the Play and Stop buttons. The position/edit indicator can be moved using the left and right arrows on the right
hand side of the box. The button with a check on it will open the rhythm display up for editing.
When it is open the check button changes to a cross that will make the rhythm display small again if you click on it.
For more information about editing rhythms see Chapter 7: The Edit Window.
Page 20

Chapter 7Chapter 7
17
The Edit Screen
The action of the console buttons described in this chapter refers to the actions that are performed when the Edit Screen
is active (onscreen).
The Basics of Editing
What the Edit Screen Does
This screen is used to perform all the sequencing (editing) functions of the Wav DJ software. This screen gives you a
visual display of the music so that you can see the audio events and change them on the screen easily. Audio events are
represented by the different icons as explained below.
The Edit Screen is used to produce blocks. Each block is a small part of a full song that contains a sequence of notes on
different instruments. A block normally forms one musical sequence that is complete in itself, like a verse or a chorus.
This can be arranged in a sequence with other blocks to form a complete song. (Compositions made using a sequencer are
usually called songs even if they do not actually have any singing in them
!)
What Is a Block?
A block is divided into note boxes formed by the columns and rows. Audio events are displayed in the note boxes.
Each column represents a time interval. The length of this interval depends on the tempo, which is measured in beats per
minute (BPM). One beat is defined as four columns so that each column can be thought of as a sixteenth note (semi-quaver).
If the tempo is high then less time passes before the PC moves onto the next column to process the music data there.
The rows in a block are the different channels. Each channel is a "path" for a different sound. There are 16 MIDI instrument
channels and up to 10 audio channels. A piano sound could come through one of the MIDI channels and a guitar through
another channel. All the channels play together so that all the different "paths" make up the full arrangement.
Page 21

18
What Happens When a Song is Played?
When a song is played in the Edit Screen the program looks at the contents of each column in turn and outputs sound from
each channel. When the end of the block is reached it looks at the song sequence to find out which block is next.
2
4
8
9
10
53 6
7
1
Page 22

1. This shows the number of the block that is currently being displayed. The number of the block is not related to its
position in the song sequence , it is simply the "name" of the block. A song can have 256 blocks (0 to 255). The song
sequence list can have up to 512 blocks in it, (includes repetitions).
2. You can change the length of the block by clicking on the arrows here. The number refers to the number of columns in
the block.
3. These are the block control buttons. You can play the currently displayed block in a loop without listening to the rest of
the song by clicking the Play Block button or the console equivalent. The Stop button stops all song playback.
4. These buttons are for navigating through the blocks (Next Block and Previous Block) and for creating and deleting blocks.
When you create a new block it will have the same properties as the current block (length, tempo, instrument list etc.).
It will use the next available block number.
5. You can cut, copy and paste blocks, or the channel that is highlighted, using these buttons. If you paste a block or a
channel onto a shorter block or channel you will lose the last columns. You cannot paste the contents of a wav effects
channel into a MIDI channel and vice versa.
6. The arrow buttons move the highlight bars in the block. The block has two highlight bars, one for the rows and one for
the columns. The row highlight bar shows which channel is currently being edited and which MIDI instrument is
currently assigned to the keyboard. The column highlight bar shows where the playback or editing is currently going on.
When you change the keyboard instrument on the console the row highlight bar automatically moves to the
corresponding channel. It is also possible to move the highlight bars by clicking on the channel instrument name or the
column number with the mouse.
The High Res and Low Res buttons change the block display between detailed (high resolution) and simplified
(low resolution). High resolution shows more of what is going on in the block. Low resolution is used when you want
19
Page 23

(low resolution).High resolution shows more of what is going on in the block.Low resolution is used when you want
to display the information boxes like the chord edit or drum edit boxes. (See below).
NOTE: The high-resolution display does not show the note names while it is playing, only when it is stationary.
7. When Edit is turned on anything you play on the console will be written into the block. When Edit is turned off you will
not be able to write or delete any notes in the block or make any adjustments to the parameters like the volume, block
length and tempo etc. It is often very useful to play the block with Edit turned off to try out different ideas over the top.
You can write things into the block while the block is playing or while it is stationary. If you hold a keyboard note or
chord down while the block is playing the note will be held until you release it and it will appear in the corresponding
number of note boxes. If you play notes into the note boxes while the block is stationary then the notes will be played
back as individual notes, giving a staccato effect, instead of one long note.
Certain editing operations will not take effect while the block is playing. If you alter the channel volume levels while
the block is playing, these changes will only be heard when you stop the block and then start it playing again.
Wav sound effects can be played into the block using the Wav Effects buttons on the console. When you press a
Wav Effects button a new channel is created with the name of the sound effect in that channel. Each time you press the
same Wav Effect button it will appear in the same chanel.
You can use the FX button in the Keyboard Instrument buttons to help you edit. When you press this button the channel
highlight bar will jump to the effects channels. You can scroll through the FX channels by repeatedly pressing the
FX button. If you want to play a Wav Effect repeatedly in one channel without creating new channels you can press the
FX button to get to the channel you want and then use the keyboard to write the events into the block.
The Silence/Delete button on the console is used to delete notes in a block or to insert a silence command in a sound
effects channel. To delete a note, make sure Edit is turned on. Position the highlight bars over the note using the arrow
buttons and press the Silence/Delete button.
20
Page 24

21
If you press the Silence/Delete button while the highlight bars are in an FX channel you will get a choice
of actions. A box will pop up asking if you want to delete the whole FX channel, delete the event (note),
or insert a Silence icon. The Silence icon tells the program to silence any wav sound effect that is
currently playing. This is useful if you have a long sound effect but only want to play the start of it.
8. Each block can have a different tempo. You can change the tempo with the buttons here or the console buttons.
Maximum tempo = 300. Minimum tempo = 4.
9. This shows the current style. Each song uses one style (instrument list) for all the blocks. When you create a new song
it will automatically use the instrument list of the current style. If you want to change the list after you have created the
song you can do so by pressing a style button on the console when the Edit Screen is active. A dialogue box will ask you
to confirm your action.
NOTE: If you create a song using a certain style you can edit that style in the Style Screen and it will not affect the Song
style. Only when you go back to the Edit Screen and press the Style button again will it change the Song instrument list.
10. This is the main block display area.
11. The names of the General MIDI instruments and sound
effects are displayed here. The channel numbers are
displayed next to the names.
12. Each channel can have a different volume relative to the
rest of the channels. These volumes can be changed
separately in each block. To alter the volume click and
hold the left mouse button on the volume knob and drag
it round.
1311 12
Page 25

22
13. This is the main block area where all the audio events are displayed. General MIDI events are shown
with this pattern.
The name of the note played is displayed in the box. Chords are displayed differently (see below).
Drum events are displayed using this icon.
The effects icon is used to show which note box a wav sound effect is played in.
Advanced Editing Features
These features give you greater control over the music and can be used when you are familiar with the basic features.
These pop-up boxes can only be displayed in the low resolution edit screen and not when the song or block is playing.
The Chord Edit Box
It is possible to play chords on MIDI channels. A chord is displayed in the
note box using the name of the lowest note on the chord next to the chord icon.
If you want to see all the notes in the chord you can click on the note box with
the right mouse button. This will bring up the chord edit box.
The box shows a full piano keyboard. The notes in the chord are represented
by the highlighted keys. You can turn the notes on and off by clicking on them
with the left mouse button.
Chords entered while the block is playing will appear in the note boxes as long
as you hold the keys down. If you enter a chord while the block is stationary
you can do it one note at a time. Each time you press a new key the note is
added into the chord in the note box. Chords may have up to 10 notes in them.
Page 26

23
The chord edit box is closed with the small button marked with an X at the top right hand corner of the box.
Note Parameters Box
It is possible to have greater control over the MIDI notes by using the note parameters box. Click the left mouse button
on a note in a note box to bring up the note parameters box. There are four editable parameters . All values are altered
by clicking on the little arrows next to the number.
The note length value is the percentage of the length of the
note box that the note will play for. A value of 99 or 100
means that the note will sound for the full duration of the
note box (defined by the tempo). A note length of 99
indicates that the note stops at the end of the note box.
If the next note box has the same note in it then the notes
will sound individually giving a staccato sound. A note
length of 100 indicates that the note continues into the next
note box, producing a longer sounding note. If the value is
less than 100 the note will stop playing before the column
highlight bar has moved on to the next column.
The volume is the relative volume of the note. The volume can be altered from 0 to 127 (maximum).
The Pan value is the stereo panning of the note. This can be changed from L63 (all sound comes from the left speaker),
through 0 (the sound is centered) to R63 (all sound comes from the right speaker).
Pitch bend can be played in using the Effects Wheel in the Pitch Bend position. Play a note and hold the key down.
If you move the wheel at the same time the pitch of the note can be varied. The value can also be altered here
between -127 (one tone down), and 127 (one tone up).
Page 27

24
Drum Edit Box
Drum rhythms are made up from many different drum instrument sounds. Often more than one sound is played at a time.
The normal block display uses the drum icon in a note box where a drum event takes place. To see exactly which drum
sound(s) is being played in that note box click the right mouse button on the drum icon to open up the drum edit box.
The drum edit box shows all the General MIDI drum instrument sounds in a list. You can now see which drum sounds
are played in which columns, represented by the drum icons. You can enter a drum note by clicking the left mouse button
in the box. You can delete a drum note with the Silence/Delete button on the console.
Clicking the left mouse button on a drum note in the drum edit box will bring up the drum note parameters box.
This is the same as the normal note parameters box except that you can only alter the note volume and the pan setting.
NOTE: If you press one of the rhythm buttons while you are using the Edit Screen you will be asked if you want to paste
the rhythm into the block. If you do so it will overwrite anything that is already in channel 10 (the drum channel).
The rhythm will be pasted over and over until it fills the whole length of the block.
Page 28

25
Chapter 8Chapter 8
Tips
Using a Click Track
If you have tune going through your head that you want to record it is helpful to start by laying down a "click track".
This is simple drum track that uses only one drum sound playing once on every quarter (crotchet) note. Open up the
drum editor and write a note into every fourth note box using a sound like the claves or the closed hi-hat. When you
play the block you can adjust the tempo while listening to the click track. You can then record the melody using the
click track as a metronome.
Singing Over Your Song
When you have written a song you might want to add your voice over the top of it. Go back to the Mixer Screen and
play the song using the buttons in the control panel. Try singing the first verse and record it, keep an eye on the levels
as you do this. Stop the recording and listen back to it using the play button on the mixer Screen, to see if you are
happy with the levels. When you are happy with the sound, record it all the way through.
Burning a CD
The Wav DJ outputs the same quality of wav files that CDs use. If you have a CD writer and the appropriate software
you can put your wav files onto an audio CD for your friends.
Page 29

26
Chapter 9Chapter 9
A dedicated web page for Wav DJ users is available at www.wavdj.com. This page is an ideal way to keep in touch
with other Wav DJ users and exchange the compositions produced using the Wav DJ.
As an owner of a Wav DJ you are automatically a member of the user’s group. Members are given storage space
on our server for Wav DJ creations, access to the message board and other exclusive features.
To access the member’s page you will need to log on using your User ID number and User Code number.
These numbers are printed on a sticker on the back page of this manual. Simply go to the web site and follow the
instructions.
The site is best viewed using Internet Explorer 4.0 or above or Netscape Navigator 3.0 or above.
The Web Page
www.wavdj.com
Page 30

27
Appendix A: Wav DJ TerminologyAppendix A: Wav DJ Terminology
A block is a part of a song. It is a sequence (pattern) of notes played on different instruments. A block is made up
of 16 MIDI channels and up to 10 wav channels. You might like to think of a block as a verse or chorus.
Blocks are arranged in the song sequence to make up a song.
A channel is part of a song. Each different sound in a song, (the sound could be a MIDI instrument or a wav file),
comes from a different channel. When a sound is assigned to a channel every block in the song will use that
channel assignment.
The control panel is the part of the software screen display that is always at the top of the window for all the
different screens.
The Edit screen controls all the sequencing aspects of the Wav DJ software.
You can export the song format as a wav file. Exporting converts one file format into a different one and saves it.
FX is short for sound effects.
The level refers to the actual output power levels of a sound source as opposed to the volume setting that
determines the maximum output level possible.
A mixer is used to combine different sound sources in real time. The result is sometimes called a mix.
If you change the pan of a channel you change the stereo volume balance.
Pitch bend is a MIDI message. When a note is played on a General MIDI instrument the pitch can be altered
using the effects wheel in the pitch bend position. Moving the wheel will cause the pitch of the note to change.
A rhythm is a short pattern of music played only on MIDI channel 10, the drum channel.
A sequence is a pattern of notes or a pattern of blocks.
Block
Channel
Control Panel
Edit
Export
FX
Levels
Mixer
Pan
Pitch Bend
Rhythm
Sequence
Page 31

28
Sequencer
Song
Spectrum
Analyzer
Style
Track
Wav
A sequencer is a type of music editor. It is a tool for writing music in an electronic form. The sequencer sends
messages to other instruments, telling them how to perform the music. You can control the sequencer using the
Edit Screen.
A song is made up of a set of different sound sources arranged in channels. The song is divided into smaller
sections of time called blocks, which are arranged in order in the song sequence.
The spectrum analyzer gives a visual display of the sound output of the Wav DJ. It shows the output levels at
different frequencies, from low-pitched sounds to high-pitched sounds.
A style is a combination of a General MIDI instrument list (16 channels) and a set of six rhythms.
They are grouped according to the type of music.
A track is a part of a mix. Each different sound source has its own track. Different tracks are combined to
form a mix.
A wav file is an audio file format used mainly on the PC.
Appendix B: TroubleshootingAppendix B: Troubleshooting
While we make every effort to test as many different computer configurations as possible we cannot check every possible
combination of hardware. Before contacting an authorized service center at 1-800-853-8883, please check the following:
General Check
Making sure that DirectX 8.0 is installed properly solves many possible problems.
Please see the ReadMe file on the Wav DJ CD for updates and changes to the manual or specifications.
Page 32

29
No sound is produced:
1) Are the channel volumes and the master volume turned up on the console, and are the channels turned on? Please refer to
the chapter on the Mixer Window.
2) Check all the cable connections as described in the chapter on setting up the console.
3) Check that your PC can play wav sounds: Exit the Wav DJ program and test your speakers by going to the Control Panel
in the Start Menu Settings area. Double click the Sounds and Multimedia icon. You can use the play function to listen to
a system sound from here.
4) If you still cannot hear anything make sure that your sound card is connected and that the sound card drivers are properly
installed. Please refer to your sound card manual.
I cannot play MIDI sounds (keyboard and drum instruments and parts of the song):
Check that your sound card drivers are correctly installed. Please refer to your sound card manual when troubleshooting
sound problems.
The microphone does not work:
1) Make sure that the microphone volume slider is turned up and that the track is turned on. Remember that the microphone
and the Line In tracks cannot be turned on together.
2) Check the connection leads.
I get feedback when using the microphone:
If you are using the PC speakers to monitor the sound output you might experience loud unpleasant noises. To reduce the
chances of this happening make sure that the speaker volume is not too high when you use the microphone and increase the
distance between the microphone and the speakers.
After I exit the program my sound settings have been altered:
When the Wav DJ software runs it scans the system mixer settings and stores them. When the software is running the mixer
settings will be changed as you make changes. The original system settings are restored when you exit. If you reboot the PC
or it crashes before you exit then the system settings will not be restored.
Page 33

30
or it crashes before you exit then the system settings will not be restored.
My screen display is corrupted or suffers various problems:
Make sure that your display configuration is set to at least VGA 800*600 and at least 16-bit color.
The program will not respond to the console:
1) Make sure that the leads are connected securely and that the console is turned on before you start the Wav DJ program.
2) It is possible that your serial port has been disabled. Please refer to your motherboard manual to check this setting.
I cannot play some of the wav files when I press the sound effects buttons:
Make sure that the wav files associated with the Wav Effects buttons have not been deleted or moved. You can reassign the
files using the Sound FX screen. If you cannot find the files you can re-install the Wav DJ program. Remember to first
uninstall the current program using the Control Panel Add/Remove programs function.
I cannot record a wav file or I am having problems saving songs:
Check that you have enough hard drive space.
On the Edit Screen: I cannot edit a song or change volume or other parameter settings:
Make sure that Edit is turned on.
Please see the Wav DJ web page at www.wavdj.com for further Frequently Asked Questions and advice updates.
Developing learning and multimedia products is a responsibility that we at Oregon Scientific take very seriously.
We make every effort to ensure the accuracy and appropriateness of the information that forms the value of our products.
However, errors sometimes occur. It is important for you to know that we stand behind our products and we encourage you
to call our Consumer Services Department at 1-800-853-8883 with any problems and/or suggestions that you might have.
Our service representative will be happy to help you.
In an effort to continually improve our products, the actual screen display may differ slightly from the pictures shown in
the manual.
In an environment prone to electrostatic discharge, the product may malfunction and require the user to reset the product.
Page 34

Appendix C: General MIDIAppendix C: General MIDI
MIDI stands for Musical Instrument Digital Interface. It is a universally recognized format for electronic instruments
sequencers and computers to exchange musical data. MIDI data does not contain any audio information, it contains the
instructions that tell the instrument how to perform the music.
General MIDI was designed to standardize the way that some of this data is exchanged. Although the MIDI format is
universal, the way it is used is not, so a song written for one MIDI synthesizer might use the wrong instruments when played
back on another synthesizer. The General MIDI standard sets out a list of instruments so that any song will sound the same
when played back on a different General MIDI compatible instrument. When you select an instrument in a style you can
select from the list of General MIDI instruments. When you write a rhythm on the drum channel you can use any of the
General MIDI percussion instruments. The lists are printed below for easy reference.
General MIDI Instrument List
1. Acoustic Grand Piano
2. Bright Acoustic Piano
3. Electric Grand Piano
4. Honky Tonk Piano
5. Electric Piano 1
6. Electric Piano 2
7. Harpsichord
8. Clavinet
9. Celesta
10. Glockenspiel
31
11. Music Box
12. Vibraphone
13. Marimba
14. Xylophone
15. Tubular Bells
16. Dulcimer
17. Drawbar Organ
18. Percussive Organ
19. Rock Organ
20. Church Organ
31. Distortion Guitar
32. Guitar Harmonics
33. Acoustic Bass
34. Electric Bass Finger
35. Electric Bass Pick
36. Fretless Bass
37. Slap Bass 1
38. Slap Bass 2
39. Synth Bass 1
40. Synth Bass 2
21. Reed Organ
22. Accordion
23. Harmonica
24. Tango Accordion
25. Acoustic Guitar Nylon
26. Acoustic Guitar Steel
27. Electric Guitar Jazz
28. Electric Guitar Clean
29. Electric Guitar Mute
30. Overdriven Guitar
Page 35

32
107. Shamisen
108. Koto
109. Kalimba
110. Bagpipe
111. Fiddle
112. Shanai
113. Tinkle Bell
114. Agogo
115. Steel Drums
116. Woodblock
117. Taiko Drum
118. Melodic Tom
119. Synth Drum
120. Reverse Cymbal
121. Guitar Fret Noise
122. Breath Noise
123. Seashore
124. Bird Tweet
125. Telephone Ring
126. Helicopter
127. Applause
128. Gunshot
41. Violin
42. Viola
43. Cello
44. Contrabass
45. Tremolo Strings
46. Pizzicato Strings
47. Orchestral Harp
48. Timpani
49. String Ensemble 1
50. String Ensemble 2
51. Synthstrings 1
52. Synthstrings 2
53. Choir aahs
54. Voice oohs
55. Synth Voice
56. Orchestra Hit
57. Trumpet
58. Trombone
59. Tuba
60. Muted Trumpet
61. French Horn
62. Brass Section
63. Synthbrass 1
64. Synthbrass 2
65. Soprano Sax
66. Alto Sax
67. Tenor Sax
68. Baritone Sax
69. Oboe
70. English Horn
71. Bassoon
72. Clarinet
73. Piccolo
74. Flute
75. Recorder
76. Pan Flute
77. Blown Bottle
78. Shakuhachi
79. Whistle
80. Ocarina
81. Square
82. Sawtooth
83. Calliope
84. Chiff
85. Charang
86. Voice
87. Fifths
88. Bass Lead
89. New Age
90. Warm
91. Polysynth
92. Choir
93. Bowed
94. Metallic
95. Halo
96. Sweep
97. Rain
98. Soundtrack
99. Crystal
100. Atmosphere
101. Brightness
102. Goblins
103. Echoes
104. Sci-Fi
105. Sitar
106. Banjo
Page 36

General MIDI Drum Instruments
1. Acoustic Bass Drum
2. Bass Drum 1
3. Side Stick
4. Acoustic Snare
5. Hand Clap
6. Electric Snare
7. Low Floor Tom
8. Closed Hi Hat
9. High Floor Tom
10. Pedal Hi Hat
11. Low Tom
12. Open Hi Hat
33
13. Low Mid Tom
14. Hi Mid Tom
15. Crash Cymbal 1
16. High Tom
17. Ride Cymbal 1
18. Chinese Cymbal
19. Ride Bell
20. Tambourine
21. Splash Cymbal
22. Cowbell
23. Crash Cymbal 2
24. Vibraslap
25. Ride Cymbal 2
26. Hi Bongo
27. Low Bongo
28. Mute Hi Conga
29. Open Hi Conga
30. Low Conga
31. High Timbale
32. Low Timbale
33. High Agogo
34. Low Agogo
35. Cabasa
36. Maracas
37. Short Whistle
38. Long Whistle
39. Short Guiro
40. Long Guiro
41. Claves
42. Hi Wood Block
43. Low Wood Block
44. Mute Cuica
45. Open Cuica
46. Mute Triangle
47. Open Triangle
Page 37

Appendix D:
License Agreement and Limited Warranty
Appendix D:
License Agreement and Limited Warranty
PLEASE READ THIS LICENSE AGREEMENT CAREFULLY BEFORE USING THE PRODUCT. THIS DOCUMENT
IS AN AGREEMENT BETWEEN YOU AND OREGON SCIENTIFIC INTERNATIONAL LTD. THE SOFTWARE IS
LICENSED TO YOU ONLY ON THE CONDITION THAT YOU ACCEPT ALL THE TERMS IN THE LICENSE. BY
USING THE SOFTWARE YOU ARE AGREEING TO BE BOUND BY THE TERMS OF THE LICENSE AND ALL
APPLICABLE COPYRIGHT LAWS. IF YOU DO NOT AGREE TO ABIDE BY THESE TERMS PLEASE RETURN
THE UNUSED SOFTWARE AND ALL PACKAGING WITH THE ORIGINAL, DATED SALES RECEIPT FOR A
FULL REFUND, WITHIN 90 DAYS OF PURCHASE.
The term "Software" refers to the original software and whole or partial copies of it and any or all audio, textual or pictorial
content that forms a part of the software with which this license agreement is provided. The term "Company" refers to
Oregon Scientific International Ltd.
1. Ownership and License.
The Company grants you a non-exclusive license for the Software. The Software is
licensed to you and not sold. You own the CD-ROM on which the Software is recorded but the Company retains title to the
Software and all related documentation. Your rights to use the Software are specified in this Agreement and the Company
retains all rights not expressly granted to you in this Agreement.
2. Use of the Software.
You are granted the following rights to the Software:
(a)
You may install and use the Software on only one computer at any one time.
34
Page 38

35
(b) You may make and keep one copy of the Software for backup purposes only.
(c) You may transfer all your rights to the Software to another party provided that:
1) you transfer this Agreement, the complete Software and any or all documentation provided with the Software to the
other party;
2) you destroy all copies of the Software in your possession; and 3) the other party reads and agrees to be bound by the
terms of the License Agreement. It is your responsibility to ensure that in the event of a License transfer all of these
conditions are met. The rights granted to you by this License Agreement are then terminated with respect to you and
transferred to the other party, who, in order to be a valid user of the Software is then subject to all the terms and
conditions of this License Agreement.
3. Prohibited Uses.
You may NOT do any of the following:
(a) Use, copy or transfer the Software or accompanying documentation except as provided in this License Agreement.
(b) Use any backup copy of the Software except to replace the original in the event that it is destroyed or becomes defective.
(c) Alter, de-compile, disassemble or otherwise reverse engineer the Software.
(d) Create derivative works from the Software or documentation.
(e) Rent, lease or sublicense the Software.
(f) Upload or transmit the Software, in whole or part, to any network or multi-user computer system regardless of purpose.
(g) Include the Software in any commercial products intended for manufacture, distribution or sale
(h) Remove or obscure any copyright or trademark notices in the Software or documentation.
4. Termination.
You may terminate this License Agreement at any time by destroying and disposing of the software and all related
documentation. Your license will terminate automatically without any notice from the Company if you fail to comply with
the provisions of the License Agreement. Your license will terminate if you transfer the Software according to the terms
in paragraph 2. (c). Upon termination you shall destroy all copies of the Software and any accompanying documentation in
Page 39

36
your possession. All provisions of this Agreement as to warranties, limitation of liability, remedies or damages shall survive
termination.
5. Copyright.
The Company holds valid copyright in the Software. Nothing in this agreement constitutes a waiver of any rights under
U.S. or U.K. copyright laws or any other U.S. federal or state law or any other U.K. law. The laws applicable are
determined by the country where the product is used.
6. Miscellaneous.
This Agreement shall be governed by the laws of the country where the product is used. If any part of this Agreement is
found to be unlawful, void, or for any reason unenforceable then that part shall be severed from, and in no way shall affect,
the validity or enforceability of the remaining provisions of the Agreement.
7. Limited Warranty and Disclaimer of Warranty.
For a period of 90 days from the date on which you purchased the product accompanying this Agreement, Oregon Scientific
warrants that the media on which the Software is supplied will be free from defects in material or workmanship under normal
use. If the Software fails to conform to this warranty, you may, as your sole and exclusive remedy, obtain a replacement free
of charge if you return the defective Software with the original, dated sales receipt. The Company does not warrant that the
Software or its functions will meet your requirements, nor that the use thereof will be free from interruption or error.
EXCEPT FOR THE EXPRESS WARRANTY SET FORTH IN PARAGRAPH 7, THE COMPANY DISCLAIMS ALL
WARRANTIES, EXPRESS OR IMPLIED, INCLUDING AND WITHOUT LIMITATION, THE IMPLIED WARRANTIES
OF MERCHANTABILITY AND FITNESS FOR A PARTICULAR PURPOSE. EXCEPT FOR THE EXPRESS
WARRANTY SET FORTH IN PARAGRAPH 7, THE COMPANY DOES NOT WARRANT, GUARANTEE OR MAKE
ANY REPRESENTATION REGARDING THE USE OR THE RESULTS OF THE USE OF THE SOFTWARE IN TERMS
OF ITS CORRECTNESS, ACCURACY, RELIABILITY, OR OTHERWISE.
Page 40

1
37
IN NO EVENT SHALL THE COMPANY OR ITS EMPLOYEES BE LIABLE FOR ANY INCIDENTAL, INDIRECT,
SPECIAL OR CONSEQUENTIAL DAMAGES ARISING OUT OF, OR IN CONNECTION WITH, THE LICENSE
GRANTED UNDER THIS AGREEMENT; INCLUDING AND WITHOUT LIMITATION, LOSS OF USE, LOSS OF
DATE, LOSS OF INCOME OR PROFIT, OR OTHER LOSS SUSTAINED AS A RESULT OF INJURY TO ANY
PERSON, OR LOSS OF OR DAMAGE TO PROPERTY, OR CLAIMS OF THIRD PARTIES, EVEN IF THE COMPANY
OR AN AUTHORIZED REPRESENTATIVE OF THE COMPANY HAS BEEN ADVISED OF THE POSSIBILITY OF
SUCH DAMAGES. IN NO EVENT SHALL LIABILITY OF THE COMPANY FOR DAMAGES WITH RESPECT TO
THE SOFTWARE EXCEED THE AMOUNTS ACTUALLY PAID BY YOU, IF ANY, FOR THE SOFTWARE.
SOME JURISDICTIONS DO NOT ALLOW THE LIMITATION OF IMPLIED WARRANTIES OR LIABILITY FOR
INCIDENTAL, INDIRECT, SPECIAL OR CONSEQUENTIAL DAMAGES, SO THE ABOVE LIMITATIONS MAY
NOT ALWAYS APPLY.
8. Acknowledgement.
You acknowledge that you have read this agreement, understand it and agree to be bound by its terms and conditions.
You also agree that this Agreement is the complete and exclusive statement of the agreement between you and the company
and supersedes all proposals or prior endorsements, oral or written, and any other communications between you and the
company or any representative of the company relating to the subject matter of this Agreement.
Windows and Direct X are trademarks or registered trademarks of Microsoft Corporation. Pentium is a registered trademark
of Intel Corporation.
Page 41

This device complies with Part 15 of the FCC Rules. Operation is subject to the following two conditions:
(1) This device may not cause harmful interference, and (2) This device must accept any interference received, including intererence
that may undesired operation.
Warning: Changes or modifications to this unit not expressly approved by the party responsible for compliance could void the user's
authority to operate the equipment.
NOTE:
This equipment has been tested and found to comply with the limits for a Class B digital device, pursuant to Part 15 of the FCC
Rules. These limits are designed to provide reasonable protection against harmful interference in a residential installation. This
equipment generates, uses, and can radiate radio frequency energy and, if not installed and used in accordance with the instructions,
may cause harmful interference to radio communications. However, there is no guarantee that interference will not occur in a
particular installation. If this equipment does cause harmful interference to radio or television reception, which can be determined by
turning the equipment off and on, the user is encouraged to try to correct the interference by one or more of the following measures:
• Reorient or relocate the receiving antenna.
• Increase the separation between the equipment and receiver.
• Connect the equipment into an outlet on a circuit different from that to which the receiver is connected.
• Consult the dealer or an experienced radio TV technician for help.
" This Class B digital apparatus complies with Canadian ICES-003."
" Cet appareil numérique de la class B est conforme à la norme NMB-003 du Canada"
Product name: Wav DJ Model No.: VM-108 Item No.: 17015
Oregon Scientific, Inc.
19861 SW 95th Place Tualatin, OR 97062
Tel: 503 639 8883 Fax: 503 684 8883
Email: info@oscientific.com
Look for us on the World Wide Web!
http://www.oregonscientific.com
 Loading...