

Page 1

VR383SX3 En Manl F R3(V1.0) OP 12/18/04, 10:50 AM1
¶´ƒ
Model: VR383SX3
User Manual
Manuale d'uso
Manuel d'utilisation
Page 2

EN
Digital Voice Recorder with Laser Pointer (VR383SX3)
USER MANUAL
TABLE OF CONTENTS
Introduction .................................................................................... 1
Brief Description ........................................................................ 1
Safety Notes .............................................................................. 2
Other Notices ............................................................................ 3
Key Features .................................................................................. 4
Front .......................................................................................... 4
Back .......................................................................................... 5
LCD Displays ............................................................................ 6
Clock Mode ............................................................................... 6
Recorder Mode ......................................................................... 6
Getting Started ............................................................................... 7
Package Contents ..................................................................... 7
Installing the Batteries ............................................................... 7
Using the Digital Voice Recorder ................................................. 8
Clock ......................................................................................... 8
Setting the Date and Time......................................................... 8
Changing the Alarm Time .......................................................... 8
Turning Alarm Setting On or Off ................................................ 9
Turning Off Ringing Alarm ......................................................... 9
FM Radio (87.5 to 108MHz) .................................................... 10
Using the Radio ....................................................................... 10
Setting Radio Stations ............................................................. 10
Recorder ................................................................................. 11
Recording Messages .............................................................. 11
Marking Indexes while Recording ........................................... 11
“FULL” Displayed On-Screen .................................................. 12
Playing Back Messages .......................................................... 13
Functions During playback ...................................................... 13
VR383SX3 En Manl C R3(V1.0) OP 12/18/04, 10:50 AM1
¶´ƒ
Page 3

Playing Back Indexed Messages ............................................ 14
Section Repeat Playback ........................................................ 14
EN
Introduction Scanning ............................................................. 15
Erasing Messages ................................................................... 15
Voice Recorder Settings.............................................................. 16
Changing Voice Recorder Settings ......................................... 16
FILE Setting (Current Folder) .................................................. 16
MODE Setting (Recording Quality) ......................................... 16
MIC Setting (Microphone Sensitivity) ...................................... 17
VOX Setting (Voice Activated Recording) ............................... 17
BEEP Setting (Beep Tone) ...................................................... 17
Laser Pointer ................................................................................ 17
Using the Laser Pointer ........................................................... 17
Locking the Laser .................................................................... 18
Other Features ............................................................................. 18
Locking Recorder Button ......................................................... 18
Resetting the Unit .................................................................... 18
Using the Reset Hole .............................................................. 18
Full Reset ................................................................................ 19
Connecting to an External Earphone ...................................... 19
Connecting to an External Microphone ................................... 19
Troubleshooting ........................................................................... 19
Specifications ............................................................................... 22
About Oregon Scientific .............................................................. 23
Caution .................................................................................... 23
FCC Statement ....................................................................... 24
Laser Safety ............................................................................ 24
Ver. 1.0
VR383SX3 En Manl C R3(V1.0) OP 12/18/04, 10:50 AM2
¶´ƒ
Page 4
INTRODUCTION
BRIEF DESCRIPTION
Thank you for selecting the Oregon Scientific™ Digital Voice Recorder
with Laser Pointer as your personal voice-recording product of choice.
The VR383SX3 is small in size and easy to use, making it ideal to
bring along for voice memos, conversations, and discussion recordings. It
is integrated with a laser pointer that can be used as a pointing tool for
business and academic presentations. The device allows you to record
up to 198 messages with a total duration of 136 minutes and the ability
to organize recordings into 2 separate folders. The messages remain
intact even when batteries are removed because of the non-volatile
memory employed. Other features of the product include:
• Index marking
Helps you to search for the desired section in a message.
• Section repeat playback
Lets you listen to a section of a message repeatedly.
• MIC sensitivity control (Hi or Lo)
Maintains good recording quality independent of voice loudness.
• Voice activated recording (VOX)
Starts and stops recording automatically by detecting voice
activity.
• Scan playback (first 5 sec. for each message)
Helps you to search for the desired message.
• Laser Pointer
Use as a pointing tool for meetings or presentations.
• Alarm clock
Shows daily alarm time.
• Radio
Built in FM radio function with 30 presets.
• Non-Volatile Memory
Safe storage for all your recorded messages.
EN
VR383SX3 En Manl R3(V1.0) OP 12/18/04, 10:49 AM1
¶´ƒ
1
Page 5

SAFETY NOTES
EN
To ensure that you use your voice recorder correctly, read these Safety
Notes and your User Manual carefully beforehand. The warnings given
here provide important safety information and should be observed at
all times.
GENERAL WARNINGS
• Do not attempt to repair the voice recorder yourself. Contact the
retailer or our customer service department if your product requires
servicing.
• Take precautions when handling all battery types. They can cause
injuries, burns, or property damage as a result of contact with
conducting materials, heat, corrosive materials or explosives.
• The voice recorder is a precision instrument. Never attempt to take
this device apart. There is a serious danger of powerful electric
shocks.
• Do not immerse the voice recorder in water.
• Do not, under any circumstances, touch the exposed electronic
circuitry of the voice recorder, as there is a danger of electric shock
should it become exposed.
• Take special care when handling a damaged LCD display, as the
liquid crystals can be harmful to your health.
• Do not use or store the voice recorder in locations that may adversely
affect the product such as rain, snow, desert, and magnetic fields.
• Do not use this device in aircrafts or hospitals. The use of the voice
recorder can cause malfunctions in the control devices of other
equipment.
• Do not subject the voice recorder to impact or shock while recording.
VR383SX3 En Manl R3(V1.0) OP 12/18/04, 10:49 AM2
¶´ƒ
2
Page 6
Cleaning your Voice Recorder
Cleaning
Monitor Clean with a soft, dry cloth.
Body Clean with a damp cloth; dry immediately.
• Do not use benzene, thinner, or similar cleaning agents to clean
your voice recorder, as these may cause permanent damage not
covered by the warranty.
• Do not scratch hard objects against the LCD screen as it is easily
damaged.
Storing your Voice Recorder
• Remove the batteries before storing the voice recorder for long
periods of time. Then, remove the device from the pouch and keep
it in a well-ventilated place in order to prevent molding.
• Check all major functions when the voice recorder is unused for a
long period of time. This is to ensure the full operation of the device.
• Maintain a regular internal testing and cleaning of your voice recorder.
OTHER NOTICES
Statement of Responsibility
Oregon Scientific assumes no responsibility for any incidental losses
(such as the costs of recording or the loss of income from recording)
incurred as a result of faults with this product.
Oregon Scientific will not be held liable for any bodily injury, death,
property damages or any other claims of whatever nature resulting
from the misuse or negligence of the VR product, whether intentional or
unintentional. The product is designed with safety features such as
the Laser Lock switch in order to protect the consumer from the potential
dangers associated with the laser pointer. Oregon Scientific will not be
responsible for any deviations in the usage of the device from those
specified in the user instructions or any unapproved alterations or
repairs of the product.
3
EN
VR383SX3 En Manl R3(V1.0) OP 12/18/04, 10:49 AM3
¶´ƒ
Page 7

Notes on Copyright
Voices or sounds recorded using your voice recorder cannot be used
EN
in ways that infringe copyright laws without the consent of the owner,
unless intended only for personal use. Note that some restrictions
apply to the recording of performances, entertainments and exhibits,
even when intended purely for personal use. Users are also asked to
note that the transfer of memory containing data protected under copyright
laws is only permissible within the restrictions imposed.
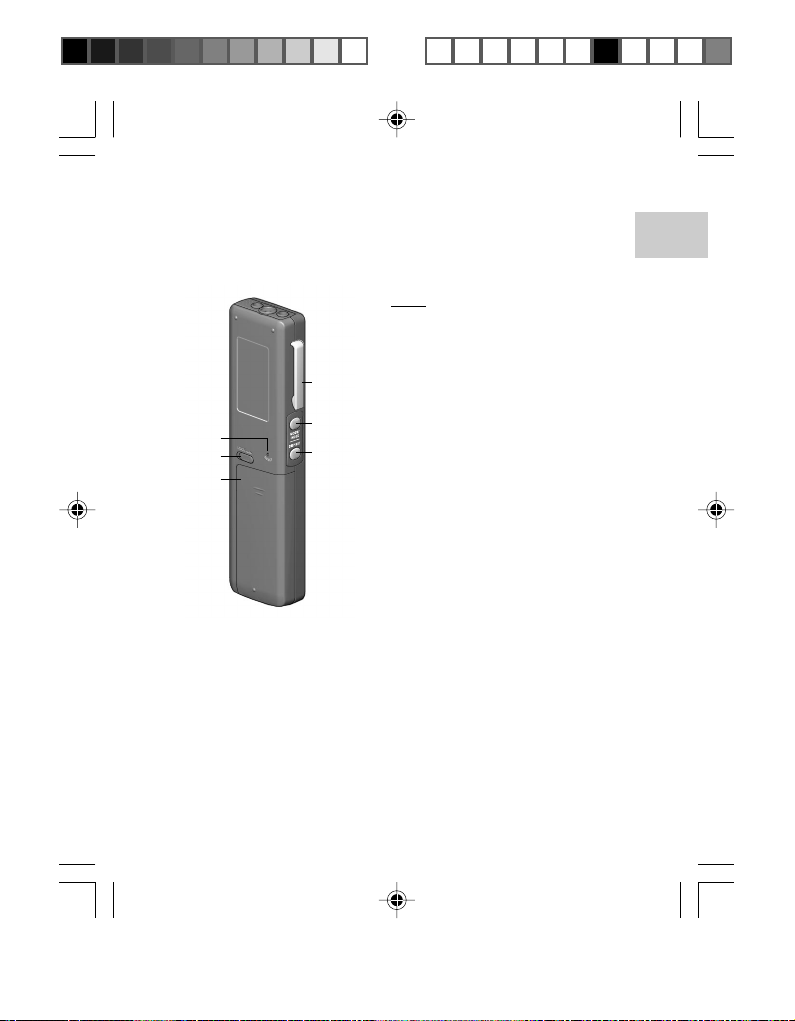
KEY FEATURES
1
2
3
4
5
6
7
8
9
10
11
12
13
14
15
FRONT
1. Microphone Connector
Accepts external condenser
microphone (sold separately)
2. Stereo Earphone Connector
3. Laser Beam Emitter
4. LCD Status Display
Shows various statuses.
5. REC Button
Starts or stops recordings.
6. LASER Button
Emits laser beam for pointing purposes.
7. Speaker
8. Built-in microphone
9. ERASE Button
Erases a message.
10. REVIEW Button
Replay message or skip to previous
message during playback.
Skips to / search previous station in
Radio mode.
11. PLAY / STOP Button
Plays a current message.
12. SKIP Button
Skips to next message during playback.
Skip to / search next station in Radio mode.
13. VOL+ / VOL – Buttons
Adjusts settings / volume output.
VR383SX3 En Manl R3(V1.0) OP 12/18/04, 10:49 AM4
¶´ƒ
4
Page 8
14. BUTTON LOCK Switch
Locks all control buttons to prevent
activation.
15. LASER LOCK Switch
Locks LASER button to prevent activation.
BACK
1. RESET Hole
Returns all settings to default value.
2. BATTERY LOCK Switch
Locks Battery Door to prevent it from
4
1
2
3
5
6
sliding off.
3. Battery Compartment
Stores batteries.
4. Pocket Clip
5. MODE / INDEX Button
• MODE: Selects operation mode.
• INDEX:
- During recording, marks index.
- During playback, marks index
6. DISP / SET Button
for repeating.
• DISP: Selects information shown
on LCD.
• SET: Enters and confirms various
settings.
EN
VR383SX3 En Manl R3(V1.0) OP 12/18/04, 10:49 AM5
¶´ƒ
5
Page 9
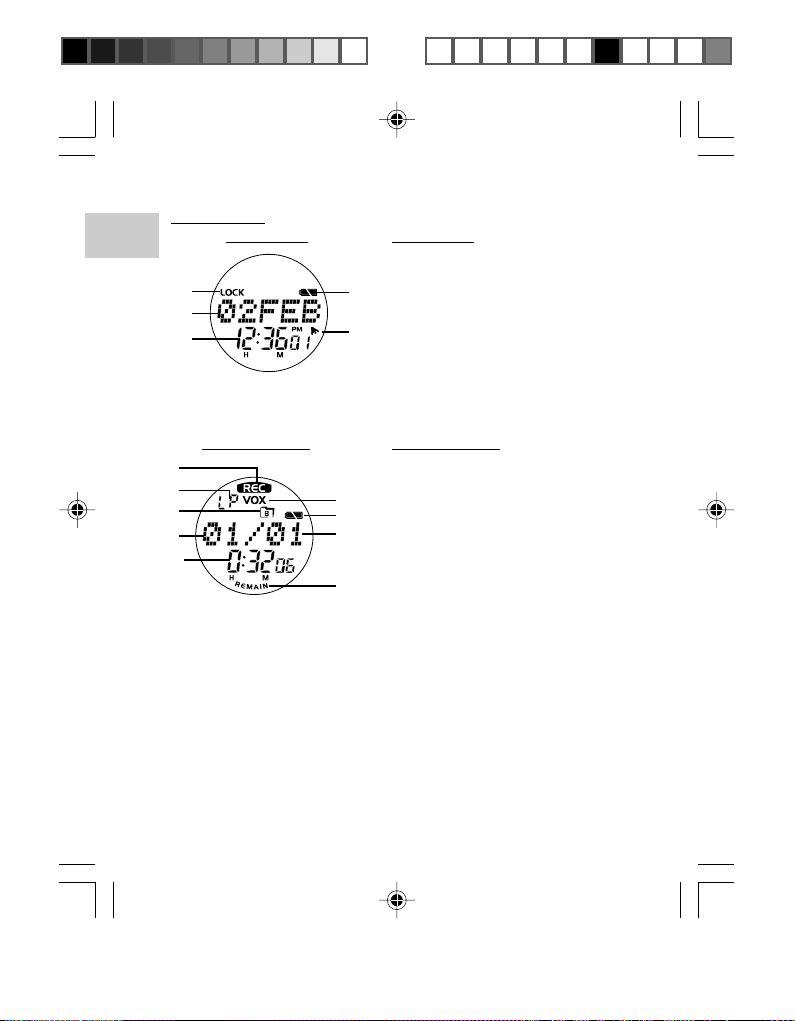
LCD DISPLAYS :
EN
1
2
3
RECORDER MODE
6
7
8
9
10
CLOCK MODE
CLOCK MODE
1. Lock Status
Displays status of BUTTON LOCK.
2. Date Display
5
Displays date (day/month or year).
3. Time Display
Displays time (in HH:MM:SS, AM/PM
4
format).
4. Alarm Icon
Indicates whether the alarm is enabled
or disabled.
5. Battery Level Indicator
Displays the current level of battery usage.
RECORDER MODE
6. REC Icon
Message is recording when REC icon is
11
12
13
14
flashing.
7. Recording Quality Icon Indicates quality
and type of messages recorded.
8. Current Folder Icon
Current folder in which messages are
stored (Folder A or B).
9. Current Message
Shows the current message’s number.
10.Recording Time
Shows the amount of recording time
elapsed.
11.Voice Activated Recording Indicator
Voice Activated Recording enabled /
disabled.
12.Battery Level Indicator
Displays the current level of battery usage.
13.Total Number of Messages Stored
Total number of messages stored within
current folder.
14.Remaining Recording Time
If “REMAIN” is displayed, Recording
Time displays the total remaining
recording time left on the device.
6
VR383SX3 En Manl R3(V1.0) OP 12/18/04, 10:49 AM6
¶´ƒ
Page 10

GETTING STARTED
PACKAGE CONTENTS
When you unpack your voice recorder, make sure to keep all the
packing materials in a safe place, in case you need to later transport
the device or return it for servicing.
In the box, you will find:
• VR383SX3 Voice Recorder with Laser Pointer
• 2 x AAA-sized batteries
• Carrying Pouch
• Earphone (stereo)
• User Manual
INSTALLING THE BATTERIES
Your voice recorder is shipped with two AAA-sized batteries.
1
2
3
1. Switch the Battery Compartment Lock to the left and remove
the battery door.
2. Insert the two AAA batteries into the compartment, making sure
to align them correctly with the battery graphics inside.
3. Place the battery door back on and switch the lock to the right.
4. The voice recorder automatically prompts you to change the date
and time if installation is successful.
NOTE: The switch must be locked to the right before being able to
access the buttons and using the recorder's functions.
EN
VR383SX3 En Manl R3(V1.0) OP 12/18/04, 10:49 AM7
¶´ƒ
7
Page 11

USING THE DIGITAL VOICE RECORDER
EN
Your voice recorder has three operation modes: Clock Mode, Radio
Mode, and Recorder Mode.
CLOCK
Setting the Date and Time
1. Press and hold DISP / SET, the hour display will begin flashing.
1. Normal Clock Operation 2. Change the Hour 3. Change the Minute
4. Change the Year 5. Change the Month 6. Change the Date
7. Return to normal
Clock Operation
2. Use Vol + / Vol - to toggle value.
3. Press DISP / SET to confirm value and begin editing next setting.
4. Repeat steps 2 and 3 for Minute, Year, Month, and Day settings.
Changing the Alarm Time
NOTE: Press MODE / INDEX to enter Alarm from Clock mode.
VR383SX3 En Manl R3(V1.0) OP 12/18/04, 10:49 AM8
¶´ƒ
Press &
hold DISP/SET
Press
DISP/SET
Press DISP/SET
Press DISP/SET
8
Press
DISP/SET
Press
DISP/SET
Page 12

To set alarm time:
1. Press and hold DISP / SET until hour value begins flashing.
EN
Mode
Press &
hold DISP/SET
3. Change the Alarm’s Hour
1. Normal Clock Operation
4. Change the Alarm’s
Minute
DISP/SET
DISP/SET
Press
2. Alarm Mode
Press DISP/SET
Press
5. Return to Alarm
2. Use Vol + / Vol - to toggle value
3. Press DISP / SET to confirm value
Turning Alarm Setting On or Off
Press MODE/
Clock
INDEX
Press MODE/
INDEX
Alarm
Press VOL+ /
VOL- to turn
alarm setting
NOTE: The alarm setting is automatically turned on when the alarm
time has been changed.
Turning Off Ringing Alarm
When the alarm sounds, press any button (except the LASER button)
to stop the ringing. It will also automatically stop after 30 seconds.
NOTE: If the voice recorder is in Recorder Mode, the alarm will not
sound even if it is enabled. Instead, the Alarm Indicator will blink for
30 seconds or until any button is pressed.
9
VR383SX3 En Manl R3(V1.0) OP 12/18/04, 10:49 AM9
¶´ƒ
Page 13

FM RADIO (87.5 TO 108MHz)
EN
This product is equipped with a built-in FM Radio system for your
entertainment.
Using the Radio
1. In Clock Mode press MODE / INDEX twice to select Radio Mode,
then press [PLAY] to confirm entering radio channel mode.
2. Use Vol + / Vol - to adjust the volume.
3. Press SKIP to go next preset station.
4. Press PREVIEW to return previous preset station.
5. Press REC to start recording.
Setting Radio Stations
The FM Radio has 30 channels to select from. These can be set
manually or automatically as follows;
1. Press DISP / SET while in Radio mode. The channel number
will disappear.
2. Use SKIP or REVIEW to toggle through frequencies (87.5MHz
to 108MHz). Press and hold SKIP or REVIEW to scan to next
available frequency.
3. Press and hold DISP / SET until “SAVE?” is displayed.
4. Use SKIP or REVIEW to toggle through channel numbers.
5. Press DISP / SET to assign channel number to selected
frequency. Alternatively, press MODE / INDEX to abort save.
NOTE: Listen to the radio using the stereo earphone provided. The
earphone (antenna) must be plugged into the unit so that radio
channels can be received normally. FM scanning reception may vary
in different areas.
VR383SX3 En Manl R3(V1.0) OP 12/18/04, 10:49 AM10
¶´ƒ
10
Page 14

RECORDER
Recording Messages
Press REC in any mode to begin recording. Date and time of recording
will be displayed briefly followed by the elapsed recording time.
Wait 3
Press REC
seconds
3. Current message’s
elapsed recording
time is displayed.
1. Press REC in any mode to
start recording messages.
4. Recording ends.
“BUSY” displayed
while storing message.
second
2. Date and time of
recording is displayed.
Wait 1
5. Message is stored.
Device returns to
Recorder Mode.
Press REC to end recording, "BUSY" will be displayed while message is
stored.
NOTE: To view the remaining recording time left, press DISP / SET
while recording. The word “REMAIN” will appear on-screen with the
remaining recording time displayed.
Marking Indexes while Recording
Indexes may be added to messages while recording so that you can
search and listen to specific portions of a message easily. Up to a
total of 99 indexes may be marked in messages in the same folder.
A single message may also have multiple indexes. To mark an index:
Press MODE / INDEX during recording to insert an index. "INDEX",
then number of indexes in the message will appear briefly on the LCD.
EN
VR383SX3 En Manl R3(V1.0) OP 12/18/04, 10:49 AM11
¶´ƒ
11
Page 15

EN
1. Message recording in
progress.
4. Device returns to message
recording
Press
MODE / INDEX
2. Index is inserted into
recording.
Wait 1 second
Wait 1
second
3. Current number of indexes in
message displayed right after.
Repeat as many times as desired during recording to mark additional
indexes.
“FULL” Displayed On-Screen
In the following circumstances, the word “FULL” will be displayed:
• Pressing REC when the memory is already full.
• Pressing REC when the current folder already has 99 stored
messages.
• During recording, the memory is used up.
• Pressing MODE / INDEX during recording when there are
already 99 indexes saved in the current folder.
NOTE: Delete messages or indexes to make extra room for recording
or indexing.
12
VR383SX3 En Manl R3(V1.0) OP 12/18/04, 10:49 AM12
¶´ƒ
Page 16

Playing Back Messages
When the unit is in Recorder Mode, and the device is not recording,
the LCD screen will show the current message that you are accessing. It
will also display the total number of messages stored in the current
folder. To play back the messages:
1. Press SKIP to access the next message stored. Press REVIEW
to access the previous message stored.
2. When you have selected a message, press PLAY to start the
playback.
Functions During Playback
During the playback of messages, the voice recorder can perform a
number of different functions:
Functions Descriptions
Display Remaining Playback Time Press DISP / SET during playback.
Adjust Volume Press VOL+ or VOL-.
Replay Current Message Press REVIEW.
Skip to Previous Message Press REVIEW twice.
Skip to Next Message Press SKIP.
Scanning Forward through Press and hold SKIP.
Current Message
Scanning Backwards through Press and hold REVIEW.
Current Message
EN
VR383SX3 En Manl R3(V1.0) OP 12/18/04, 10:49 AM13
¶´ƒ
13
Page 17

Playing Back Indexed Messages
EN
During the playback of an indexed message, the functions will differ
slightly from normal:
Function Description
Skip to Previous Index Press REVIEW during the 1st second of
the current message’s playback. If the
current index is at the beginning of a
message, pressing REVIEW will playback
the message from the start.
Replay Current Index Press REVIEW after a second of playback.
Skip to Next Index Press SKIP.
Section Repeat Playback
When a message is playing back, you can choose to repeat a selected
section of the message.
Press MODE / INDEX to mark the start of the section and press
again to mark the end of the section.
The selected section will loop automatically.
1.Device plays back
a message.
4.Selected section is
automatically looped
repeatedly.
VR383SX3 En Manl R3(V1.0) OP 12/18/04, 10:49 AM14
¶´ƒ
Press
MODE / INDEX
2.Start of the section to
be repeated is marked.
Press
MODE / INDEX
5.Section repeat stopped.
Device continues
normal playback.
Wait 1 second
14
Press
MODE / INDEX
3.End of the section to be
repeated is marked.
Page 18

Press MODE / INDEX to return to normal playback.
Introduction Scanning
You can scan the first 5 seconds of all recorded messages within the
current folder. When the unit is in Recorder Mode, and the device is
not in playback or recording:
Press and hold PLAY to enter Introduction Scan Mode. The first five
seconds of every message in the selected folder will be played.
Press PLAY to resume normal playback of a desired message.
Erasing Messages
When the unit is in Recorder Mode, and the device is not in playback
or recording, you can choose to erase the messages stored:
Use SKIP / REVIEW to toggle through messages in folder.
Press ERASE to delete selected message. "ERASE" will begin flashing
on the LCD display.
Press Press
EN
1. Recorder Mode.
Press SKIP / REVIEW
to choose message.
4. Message erased. Device
returns to Recorder Mode.
Press ERASE again to confirm deletion.
VR383SX3 En Manl R3(V1.0) OP 12/18/04, 10:49 AM15
¶´ƒ
2. “ERASE” and
currently selected
message blinks.
Wait 1 second
15
3. “BUSY” displayed while
message is erased.
Page 19

VOICE RECORDER SETTINGS
EN
Your voice recorder has five different settings that can be configured:
NOTE: Underlined options are product default options.
Setting Description Options
FILE Currently active folder selected. Folder A / Folder B
MODE Different recording quality and SP (Standard Play) /
recording capacity. EP (Extended Play) /
LP (Long Play)
MIC Adjust sensitivity of microphone. Hi / Lo
VOX Enable/disable voice detection. On / Off
BEEP Button press confirmation tone. On / Off
Changing Voice Recorder Settings
Press and hold DISP / SET while in Recorder Mode.
Use Vol + / Vol - to adjust settings for each of the options listed below.
Press DISP / SET to confirm each selection.
FILE Setting (Current Folder)
Choose the current folder (Folder A or Folder B). Each can carry up to
99 messages and indexes.
MODE Setting (Recording Quality)
You can choose between three different recording quality options.
Option Description Recording Quality Length of Recording Time
SP Standard Play High 84 minutes
EP Extended Play Medium 102 minutes
LP Long Play Low 136 minutes
16
VR383SX3 En Manl R3(V1.0) OP 12/18/04, 10:49 AM16
¶´ƒ
Page 20

MIC Setting (Microphone Sensitivity)
You can choose between two different microphone sensitivity options.
Option Description
Hi High sensitivity - clearer & louder recording, more susceptible
to noises & distortions.
Lo Low sensitivity - lower volume in recording, less susceptible
to noises & distortions.
VOX Setting (Voice Activated Recording)
This setting pauses a recording automatically when no noise is detected
for 2 seconds. The recording resumes when voice is detected again.
BEEP Setting (Beep Tone)
The beep tone setting, if enabled, causes the unit to beep whenever a
button is pressed (excluding the LASER button).
LASER POINTER
Your voice recorder is integrated with a laser pointer that can emit red
laser beam for pointing purposes.
USING THE LASER POINTER
Take extreme precaution to protect your eyes while using the laser
pointer. Do not look at the laser pointer directly when the laser
beam is emitting, as this can permanently damage your eyes.
Point the laser away from you and any other people at all times.
NOTE: It is advisable to lock the laser when the function is currently
not in use.
To activate the laser pointer, press and hold the LASER button.
EN
VR383SX3 En Manl R3(V1.0) OP 12/18/04, 10:49 AM17
¶´ƒ
17
Page 21

LOCKING THE LASER
EN
The LASER LOCK switch can be used to
prevent the accidental activation of the laser
beam. When locked, the LASER button is
disabled, and the laser beam cannot be
emitted. Simply slide the switch position
to lock or unlock the laser.
OTHER FEATURES
LOCKING RECORDER BUTTONS
This feature disables all recorder buttons, thus
preventing the accidental recording, playback,
and erasing of messages. Simply slide the switch
position to lock or unlock the recorder buttons.
NOTE: The LASER button is still active when
the recorder buttons are locked. The LASER
LOCK switch is separate from this function and
is the only way to lock the LASER button.
RESETTING THE UNIT
Using the RESET Hole
Your voice recorder may need to be reset if the device is not functioning
properly. Use a blunt stylus and press into the RESET Hole to return
the device to default values.
NOTE: Recorded messages are not erased after the RESET Hole
has been pressed.
VR383SX3 En Manl R3(V1.0) OP 12/18/04, 10:49 AM18
¶´ƒ
18
Page 22

Full Reset
You may need to perform a FULL RESET if the unit does not function
properly even after the RESET Hole has been pressed. To perform a
FULL RESET, press and hold the ERASE button while using the blunt
stylus to press into the RESET hole.
NOTE: Recorded messages are COMPLETELY erased from all folders
after a Full Reset.
CONNECTING TO AN EXTERNAL EARPHONE
Using the earphone to listen to very loud
messages may cause permanent ear
damage. Only use the earphone during
Playback Mode, and lower the volume of
the recorder before listening.
CONNECTING TO AN EXTERNAL MICROPHONE
NOTE: The external microphone must be a
condenser type. Other types of microphones will
not work with your voice recorder.
TROUBLESHOOTING
This section includes a list of frequently asked questions for problems
you may encounter with your voice recorder. If your voice recorder is
not operating as you think it should, check here before arranging
for servicing.
EN
VR383SX3 En Manl R3(V1.0) OP 12/18/04, 10:49 AM19
¶´ƒ
19
Page 23

Problem Symptom Check This Remedy
EN
No
Power
The voice
recorder cannot
be turned on.
Batteries are
exhausted.
Batteries are
inserted incorrectly.
Buttons
Do Not
Work
Pressing voice
recorder
buttons yield
Voice recorder
buttons are locked.
no responses.
Pressing LASER
button yields
LASER button is
locked.
no response
No
Sounds
Playing back
messages
yield no sound.
Volume is not
turned up.
Earphone is
plugged in but
not used.
No Alarm
Alarm does not
Alarm is disabled.
sound.
The device is in
Recorder Mode.
External
Microphone
No sound is
recorded with
the external
External
microphone not
plugged in.
microphone.
Condenser type
external microphone not used.
20
Replace with new
batteries.
Insert the batteries
correctly.
Unlock the LOCK
switch.
Unlock the LASER
LOCK switch.
Press VOL+
during playback.
Disconnect the
earphone from the
device, or listen
via the earphone.
Turn on the alarm
setting.
Return to Clock
Mode by pressing
MODE/INDEX.
Plug in fully the
externall
microphone to
the Microphone
Connector.
Plug in a
condenser type
external
microphone.
VR383SX3 En Manl R3(V1.0) OP 12/18/04, 10:49 AM20
¶´ƒ
Page 24

Continued:
Problem Symptom Check This Remedy
Cannot
Record
Messages
The word
“FULL” is
displayed on
the LCD screen.
The maximum
amount of 99
messages has
been reached within
the current folder.
The storage
capacity of the
Erase some
messages or
choose another
folder with fewer
messages.
Erase some
messages.
recorder has been
filled.
Cannot
Mark
Indexes
The word
“FULL” is
displayed on
the LCD screen.
The maximum
amount of 99 messages has been
reached within the
current folder.
Erase messages
with indexes from
the current folder,
or select another
folder with fewer
indexes.
Word
Shown
on LCD
Screen.
Device
Not
Operable
The word
“DOOR” is
displayed on
the LCD screen.
The word
“BATT” is
displayed on
Battery compartment not closed
and locked.
New batteries ars
required.
Close the battery
compartment and
lock it with the
Compartment Lock.
Replace current
batteries with
fresh ones.
the LCD screen.
Operation
Not
Normal
Certain
functions do
not perform.
Device requires
reset.
Reset the unit with a
blunt stylus pressed
against the RESET
Hole. Perform a
FULL RESET if
necessary (all
stored messages
will be lost).
21
EN
VR383SX3 En Manl R3(V1.0) OP 12/18/04, 10:49 AM21
¶´ƒ
Page 25

SPECIFICATIONS
EN
Type Description
Recording Medium Non-volatile flash memory
Recording Time Standard Play (SP): 84 min.
Extended Play (EP): 102 min.
Long Play (LP): 136 min.
FM Radio Frequency 87.5 ~ 108MHz
Radio Preset Channels 30
Volume level Step 0 to 7
Speaker 20mm diameter
Maximum Power 100mW
Earphone Jack 3.5mm diameter
Microphone Jack 3.5mm diameter
8Ω
2KΩ
Laser Pointer Red in color, approx. 10 mm in visual projection
Battery Type 2x AAA 1.5V Alkaline Battery
Battery Life Approx. 40 hours of continuous recording.
Approx. 10 hours of continuous playback*
Size 32mm(W) x 124.5mm(L) x 16mm(T)
Weight 44g without battery
* At default step 5 volume, room temperature.
NOTE: Design and specifications are subject to change without notice.
VR383SX3 En Manl R3(V1.0) OP 12/18/04, 10:49 AM22
¶´ƒ
22
Page 26

ABOUT OREGON SCIENTIFIC
Visit our website (www.oregonscientific.com) to learn more about Oregon Scientific
products such as digital cameras; MP3 players; children's electronic learning
products and games; projection clocks; health and fitness gear; weather stations;
and digital and conference phones. The website also includes contact information
for our customer care department in case you need to reach us, as well as frequently
asked questions and customer downloads.
We hope you will find all the information you need on our website, however if you'd
like to contact the Oregon Scientific Customer Care department directly, please
visit:
www2.oregonscientific.com/service/support
OR
Call 949-608-2848 in the US.
For international enquiries, please visit:
www2.oregonscientific.com/about/international/default.asp
EN
CAUTION
In case of electrostatic discharge, the product may not function properly and requires
manual reset. Upon reset, messages recorded will remain intact. If a message is
being recorded, the message will be discarded.
VR383SX3 En Manl R3(V1.0) OP 12/18/04, 10:49 AM23
¶´ƒ
23
Page 27

FCC STATEMENT
EN
This equipment has been tested and found to comply with the limits
for a Class B digital device, pursuant to Part 15 of the FCC Rules.
These limits are designed to provide reasonable protection against
harmful interference in a residential installation. This equipment
generates, uses, and can radiate radio frequency energy and, if not
installed and used in accordance with the instructions, may cause
harmful interference to radio communications.
However, there is no guarantee that interference will not occur in a
particular installation. If this equipment does cause harmful interference
to radio or television reception, which can be determined by turning
the equipment off and on, the user is encouraged to try to correct the
interference by one or more of the following measures:
• Reorient or relocate the receiving antenna.
• Increase the separation between the equipment and receiver.
Changes or modifications not expressly approved by Oregon Scientific
for compliance could void the warranty and your authority to use this
equipment.
LASER SAFETY
Complies with 21 CRF 1040.10
VR383SX3 En Manl R3(V1.0) OP 12/18/04, 10:49 AM24
¶´ƒ
24
Page 28

© 2005 Oregon Scientific. All rights reserved.
086-002906-107
VR383SX3 En Manl B R3(V1.0) OP 12/18/04, 10:50 AM1
¶´ƒ
 Loading...