

Page 1
TABLE OF CONTENTS
Introduction .................................................................... 2
Product overview ........................................................... 2
Getting started ............................................................... 3
Installing the batteries ................................................ 3
Set up ........................................................................ 4
Wall mount ............................................................ 4
Table stand ........................................................... 5
Ground anchor ...................................................... 5
Reset ............................................................................. 7
Background information ................................................. 7
UV index bar chart display ............................................. 8
User settings .................................................................. 8
Setting skin type and SPF ......................................... 8
UV index display ............................................................ 9
Main unit information display ................................... 10
View current and past UV values ............................. 10
Troubleshooting ........................................................... 11
Specifications .............................................................. 11
Safety and care ........................................................... 12
About Oregon Scientific ............................................... 12
EN
1
UVR138 English r8 10/15/03, 11:24 PM1
Page 2
EN
INTRODUCTION
Congratulations on your selection of the Oregon Scientific
UVR 138 Ultra-Violet (UV) Sensor. This sensor records the
UV levels radiated by the sun and transmits that data to an
indoor weather station. When used together with a main
unit weather station, readings taken from this sensor can
provide information about UV trends and maximum sun
exposure times before the skin starts to burn.
This UV sensor is compatible with new Oregon Scientific
weather stations, such as:
• BAR998HG
• BAR321HG
In this box you will find:
• UVR138 remote Ultra Violet sensor
• User guide
•Wall mount
• Ground anchor
•4 UM-3 (AA) 1.5V alkaline batteries
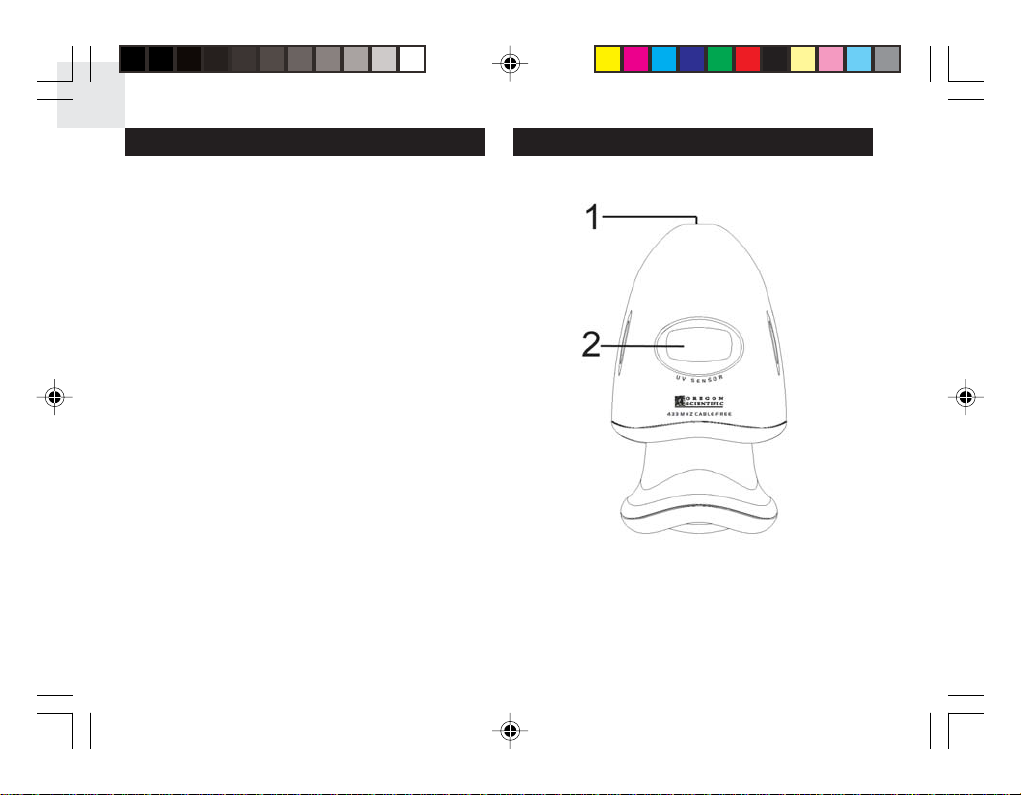
PRODUCT OVERVIEW
FRONT VIEW
1. UV sensor.
2. LCD screen.
2
UVR138 English r8 10/15/03, 11:24 PM2
Page 3

BOTTOM VIEW
1. RESET button.
2. Battery compartment.
LCD
GETTING STARTED
The UVR 138 records Ultra Violet light levels and then
transmits this data to a main (indoor) unit. It is splash proof
and should be placed in an area with maximum exposure
to the sun.
NOTE
The sensor range is up to 100 meters (328 feet)
with no obstructions, but if the main unit has a shorter range
than the sensor, you may have to move the sensor closer
for reception.
INSTALLING THE BATTERIES
1. Place remote unit as close as possible to the main
unit, no more than 100 meters (328 feet) away.
2. Unscrew the top of the sensor.
3. Remove the battery compartment covers.
4. Insert the batteries. Match the polarity, as shown on
the battery compartment.
5. Replace the battery compartment lid. Press RESET
and secure.
EN
1. Ultra Violet Index (UVI).
2. Umbrella icon shows when UV levels get dangerously
high.
3. Low battery indicator.
4. UV Index icon.
5. UV level indication.
UVR138 English r8 10/15/03, 11:24 PM3
NOTE
Replace the batteries whenever the low battery
icon appears:
on the main unit UV index display.
•
•
on the UVR138 LCD screen.
3
Page 4

EN
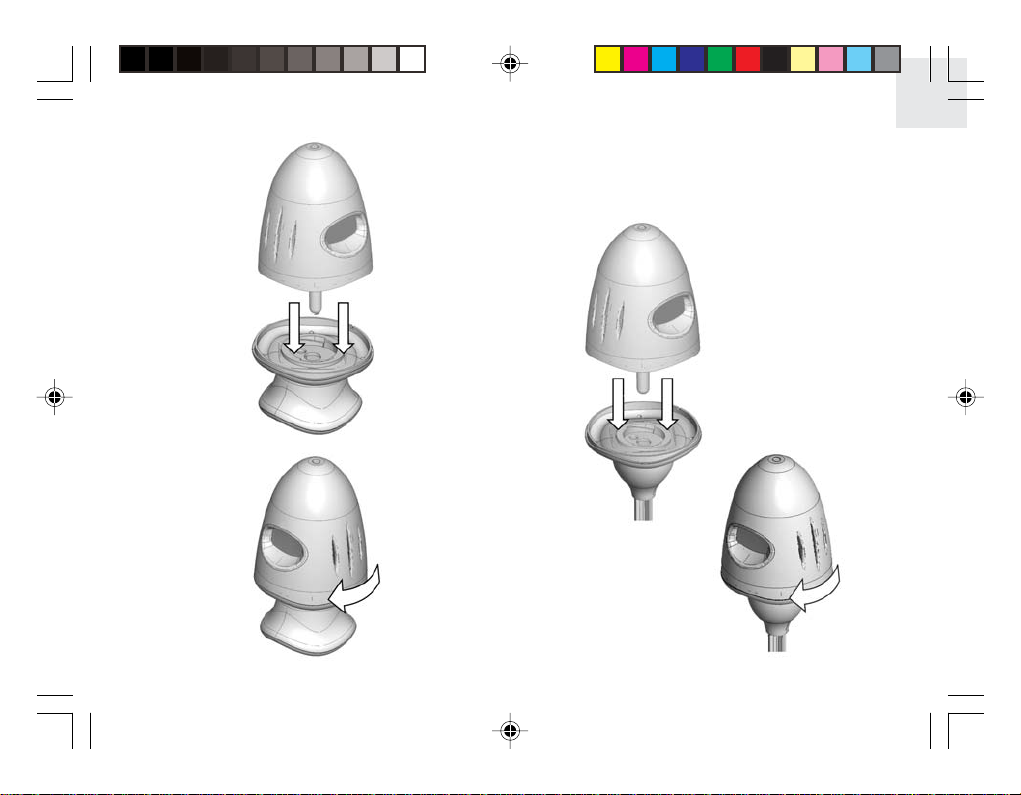
SET UP
(WALL MOUNT)
Use this fixture to attach the UV sensor to a vertical wall.
First make sure the surface is smooth and flat. Fix the mount
to the wall by inserting each of the four screws through the
screw holes on the flat surface of the mount and into the
wall. Make sure the LCD screen faces away from the wall.
4
UVR138 English r8 10/15/03, 11:24 PM4
Page 5
(
TABLE STAND
)
(
GROUND ANCHOR
)
EN
Use this fixture to anchor the UV sensor into soft ground
e.g. soil or sand. For maximum safety, insert the anchor
into the ground slowly and carefully.
5
UVR138 English r8 10/15/03, 11:24 PM5
Page 6

EN
Position the sensor using the wall mount, table stand, or
ground anchor options. For best results:
• Place in a location with maximum exposure to
the sun.
• Place the sensor away from electrical or mechanical
objects.
• Place the sensor away from moisture.
• Do not place the sensor more than 100 meters
(
328 feet) from the main (indoor) unit.
• Position the sensor so that it faces the main (indoor
unit. Minimize obstructions such as doors, walls, and
furniture.
The sensor range is up to 100 meters (328 feet) with no
obstructions, but if the main unit has a shorter range than
the sensor, you may have to move the sensor closer for
reception. You may need to experiment with various
locations to get the best reception.
This icon will blink on the main unit UV value
display box when it searches for the sensor.
It stops blinking when the sensor has been found.
NOTE
Once the batteries are in place, the sensor will
transmit signals every 40 seconds. It will take over an hour
before all measurements on the main unit are displayed
(e.g. UVI history) because some measurements are hourly
averages.
6
)
UVR138 English r8 10/15/03, 11:24 PM6
Page 7

RESET
The RESET button is located near the battery compartment.
Press it whenever you change the batteries, or whenever
performance is not behaving as expected (e.g., unable to
establish radio frequency link with the main unit). This will
return all settings to default values, and you will lose all
stored information.
BACKGROUND INFORMATION
NOTE
The following settings and information only apply
if you have an Oregon Scientific compatible weather station.
On the main unit weather station, UV readings are recorded
and interpreted in two areas of the display:
1. UV bar chart display.
2. The UV value display.
Based on readings transmitted from the sensor, the main
unit can calculate maximum sun exposure times before
the skin starts to burn. Each calculation can be customized
for a specific user (1-4). Calculations are updated every
time a new UV reading is received from the sensor. This
calculation is based on three factors:
• SKIN TYPE (user-selectable)
• SPF (user-selectable)
• UV DATA (collected by sensor)
SPF (Sun Protection Factor)
Individuals react differently to sun exposure. The SPF
indicates the level of protection needed when time is spent
under the sun. The selectable SPF range is between
1-50 and relates to how susceptible you are to getting
sunburn. Enter an SPF setting that corresponds to the SPF
protection you choose for your sunscreen products.
• 1-11 (low protection)
• 12-29 (moderate protection)
• 30-50 (high protection)
For example, if your skin is sensitive and you get sun burnt
easily, you will need a lot of protection from the sun’s UV
rays. In this case you should use a sunscreen with an SPF
rating of 30-50 for maximum safety, then input the
respective SPF in the main unit setting for accurate
calculation.
7
EN
UVR138 English r8 10/15/03, 11:24 PM7
Page 8

EN
UV INDEX BAR CHART DISPLAY
The UV index bar chart shows ultra violet level patterns
taken over ten hours. Ultra violet level readings are taken
hourly, averaged, and then displayed as an index.
Measurements are displayed in 2-hour increments
(-10, -8, -6, -4, -2, 0).
For example, (-10) indicates the average hourly reading
taken ten hours ago, (0) is the most current average.
Readings will show approximately one hour after you setup
the sensor.
USER SETTINGS
Under the same exposure to the sun, individuals will react
differently. To account for this difference, settings can be
customized for up to 4 users. This way, information is
tailored to each individual for more accurate results. For
example, if there is a mum, dad, sister, and brother in a
house, you can assign a user number to each person such
as mum (1), dad (2), sister (3), and brother (4).
SETTING SKIN TYPE AND SPF
1. Press SELECT to choose UV mode.
1. Current (0) / ten hours ago (-10).
2. UVI \ Hr the average UVI index for a given hour.
3. indicates that you are in UV mode.
4. UV bar chart display is active.
If the
icon is not visible on the main unit bar
NOTE
chart display box, press MODE to enter the bar chart
display.
UVR138 English r8 10/15/03, 11:24 PM8
2. If the icon is not visible on the main unit UV
display box, press MODE to enter UV mode.
8
Page 9

3. Press CHANNEL repeatedly to display UV exposure
time and to select a user profile (1-4).
4. Press and hold MODE for two seconds, skin type
settings will blink.
5. Press UP or DOWN to select skin type.
Skin
Type
Tan Burn
1 Never Always Red Blue
2 Sometimes Always Blond Blue/Green
3 Always Rarely Brown Gray/Brown
4 Always Never Black Brown
Hair
color
Eye color
7. Select SPF value by pressing UP or DOWN (Choose
the same value as you would for your sunscreen
products).
8. Press MODE to confirm.
UV INDEX DISPLAY
The Ultra Violet index is based on the World Health
Organization (WHO) recommended UV exposure levels,
and should serve only as a guideline. If UV levels reach
dangerous levels of 11 or higher, the index will start to flash.
UV Index Level Icon Display
0 ~ 2 Low
EN
6. Press MODE to confirm, the SPF setting will blink.
SPF Level of protection
1-11
12-29
30-50
UVR138 English r8 10/15/03, 11:24 PM9
Low
Medium
High
3 ~ 5 Medium
6 ~ 7 High
8 ~ 10 Very High
9
Page 10

EN
UV Index Level Icon Display
11 ~ 25 Extremely High
Over 25 Over Range
4. Press CHANNEL repeatedly to switch between
users (1-4).
CAUTION: UV exposure times are updated each time the
sensor transmits new readings to the main unit. Calculations
do not take into account how long you have already been
exposed to the sun, so it is important to note that the
displayed exposure times will not accurately reflect how
much longer you can stay under the sun if you have already
been exposed for some time.
MAIN UNIT INFORMATION DISPLAY
1. Press SELECT to choose UV mode.
2. Press MODE to enter UV display
.
3. Press CHANNEL to display UVI Exposure time.
UVR138 English r8 10/15/03, 11:24 PM10
VIEW CURRENT AND PAST UVI VALUES
Current and past UVI values can be recalled by pressing
the HISTORY button.
The number displayed in the top right box indicates the
time the UV index was taken. For example, the average
UV index recorded ten hours ago is indicated by a (-10),
the most current average is (0). The values monitored range
from (-10 to 0).
NOTE
If no keys are pressed within 10 seconds, the value
displayed will revert to the most current index (0).
10
Page 11

TROUBLESHOOTING
Symptom Remedy
(----) “LOST LINK”
is displayed
Main unit cannot locate
remote unit:
icon blinks
UV sensor readings
seem too low
On the main unit press and hold
CHANNEL and MEMORY in UV
mode to manually force a UV
sensor search
Wait 2 hours so main unit can
collect enough data for an average
Press the remote sensor RESET
button
Check batteries
Make sure they are not too far
apart
Press the remote sensor RESET
button
Make sure the sensor is not in the
shade. Place in an area with
maximum exposure to the sun
Make sure UV sensor isn’t
covered by dirt. Use a damp cloth
to gently wipe the surface of the
UV sensor clean
SPECIFICATIONS
Main unit with stand: 141 x 80 ø mm
Wall-mount: 80 ø x 73 mm
Ground anchor: 80 ø x 340 mm
Weight: 250 grams/ 0.55 lbs
Operating temperature range: -20 ºC to 60 ºC
UV Index range: 1-25
RF frequency: 433MHz
Transmission range: Up to 100 meters (328 feet)
Transmission cycle: 40 seconds
Channel: 1
Power: 4 UM-3 (AA) 1.5V
11
(5.55 x 3.15 inches)
(3.15 x 2.87 inches)
(3.15 x 13.39 inches)
(without battery)
(-4 ºF to 140 ºF)
with no obstructions
alkaline batteries
EN
UVR138 English r8 10/15/03, 11:24 PM11
Page 12

EN
SAFETY AND CARE
This product is designed to give you years of service
if handled properly. Observe the following guidelines:
• Clean the unit with a damp cloth and mild detergent.
Avoid dropping the unit or placing it in a high-traffic
location.
• Never immerse the unit in water. This can cause
electrical shock and damage the unit.
• Do not subject the main unit to extreme force, shock,
or fluctuations in humidity.
• Do not tamper with the internal components.
• Do not mix new and old batteries or batteries of
different types. Do not use rechargeable batteries with
this product.
• Remove the batteries if storing this product for a long
period of time.
• Do not scratch the LCD display.
• Do not make any changes or modifications to this
product. Unauthorized changes may void your right
to use the product.
• The technical specifications for this product and the
contents of the user guide are subject to change
without notice.
• Images not drawn to scale.
ABOUT OREGON SCIENTIFIC
Visit our website (www.oregonscientific.co.uk) to learn
more about other Oregon ScientificTM products such as
digital cameras, projection clocks, health and fitness gear,
and weather stations. The website also includes contact
information for our customer service department, in case
you need to reach us.
12
UVR138 English r8 10/15/03, 11:24 PM12
Page 13

EC-DECLARATION OF CONFORMITY
This product contains the approved transmitter module
TX 01 and complies with the essential requirements of
Article 3 of the R&TTE 1999/5/EC Directives,if used for its
intended use and that the following standard(s) has/have been
applied:
Efficient use of radio frequency spectrum
(Article 3.2 of the R&TTE Directive)
applied standard(s): EN 300 220-1(2,3):1997
Electromagnetic compatibility
(Article 3.1.b of the R&TTE Directive)
applied standard(s): ETS 300 683:1997
Safety of information technology equipment
(Article 3.1.a of the R&TTE directive)
applied standard(s): EN 60950:1997
Additional information:
The product is therefore conform with the Low Voltage
Directive 73/23/EC, the EMC Directive 89/336/EC and
R&TTE Directive 1999/5/EC (appendix II) and carries the
respective CE marking.
VS-Villingen / Germany August 2001
Gerhard Preis
R&TTE Representative of manufacturer
COUNTRIES RTTE APPROVAL COMPLIED
All EC Countries, Switzerland
and Norway
13
EN
CH
N
UVR138 English r8 10/15/03, 11:24 PM13
 Loading...