

Page 1
TRACKER
Digital Compass Watch
Model: RA122
USER MANUAL
INTRODUCTION
Thank you for selecting the Oregon Scientific™ TRACKER
Digital Compass Watch (RA122). The RA122 has been
designed for the urban professional who enjoys an active
lifestyle. Equipped with real-time clock, stopwatch, backlight
and keypad lock functions, this versatile watch can be used
in the urban jungle while the built in compass makes it the
perfect companion when venturing into the great outdoors.
IMPORTANT
• The measurement functions built into the RA122 are
not meant to substitute professional measurement
or industrial precision devices. Values produced
by this device should be considered as reasonable
representations only.
• When engaging in mountain climbing or other activities
in which losing your way can create a dangerous or lifethreatening situation, always be sure to use a second
compass to confirm direction readings.
• Oregon Scientific™ assumes no responsibility for
any loss, or any claims by third parties that may arise
through the use of this device.
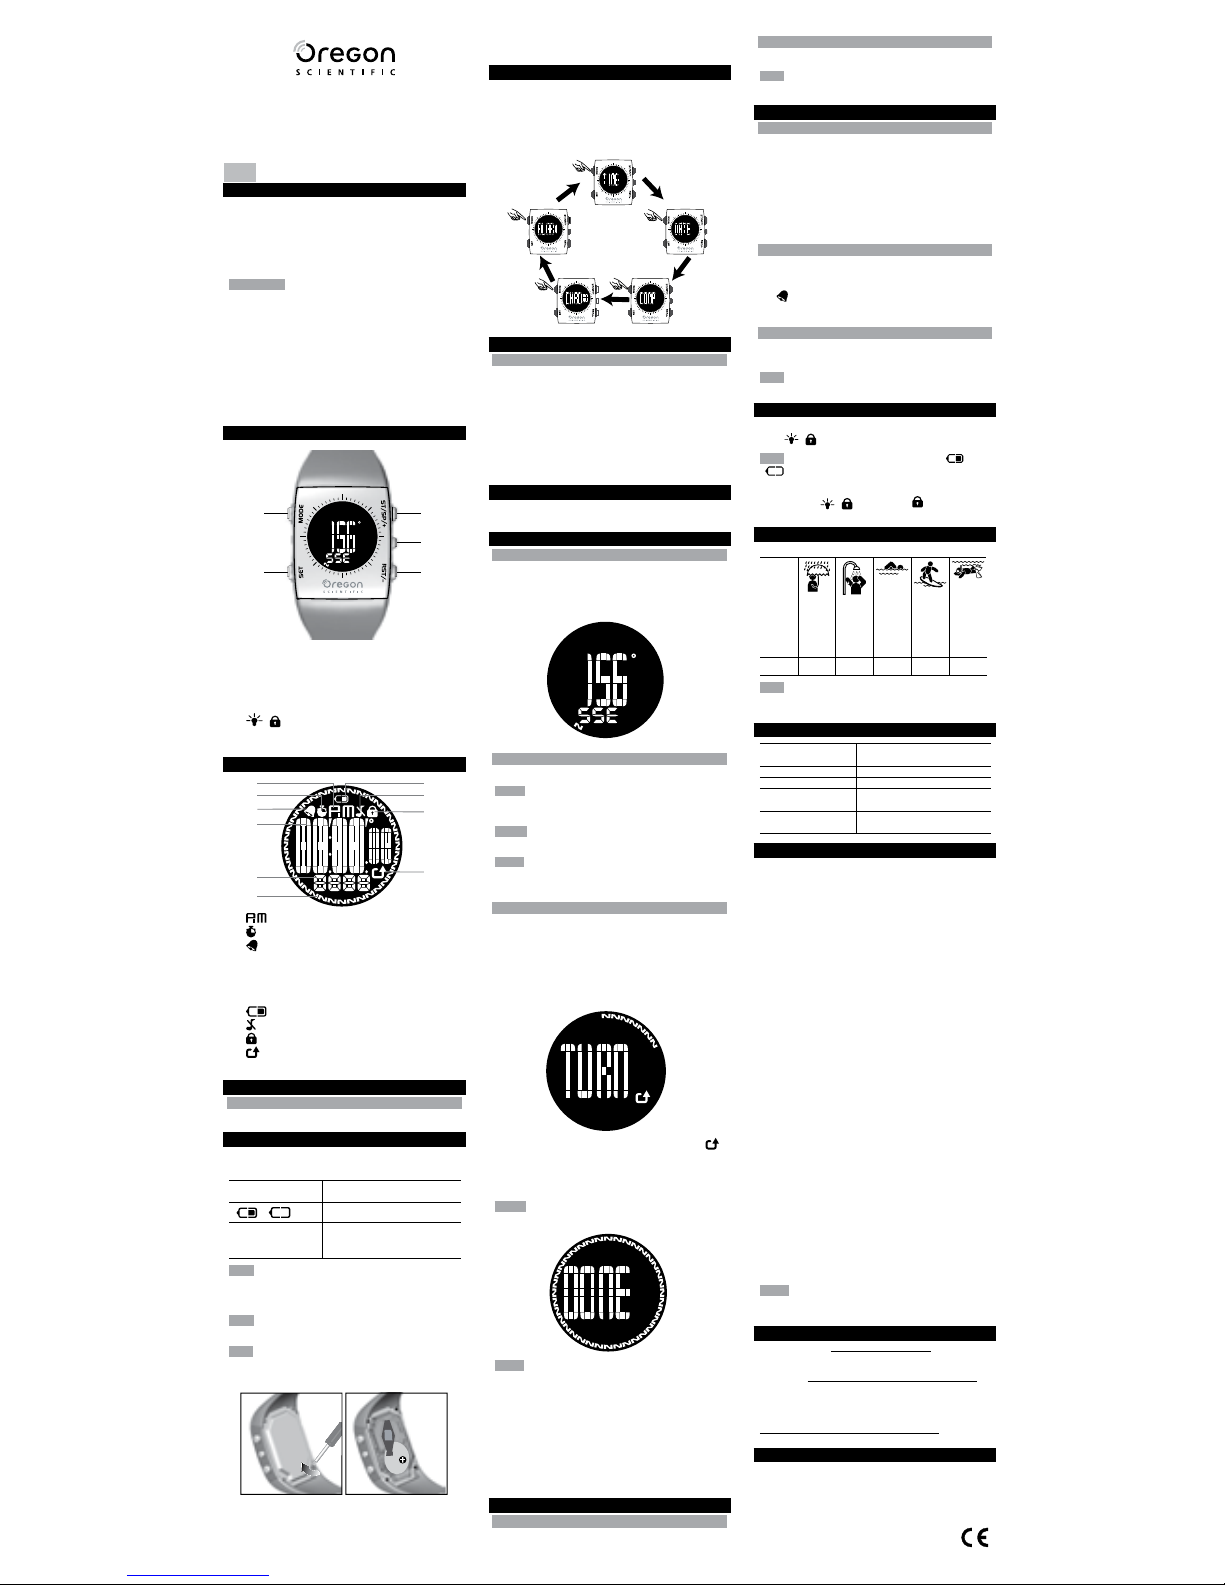
CONTROL BUTTONS
1
2
3
5
4
1. MODE: Switch to another display; quick exit during any
setting mode
2. SET: Enter setting mode; confirm setting value; begin
compass calibration
3. ST / SP/ + : Increase value of the setting; Start / stop
stopwatch.
4.
/ : Activate backlight; lock keypad
5. RST / - : decrease value of the setting; Reset
stopwatch
LCD
1
2
3
4
5
6
8
7
9
10
1. : 12 hour clock
2.
Indicates stop watch is displayed or running
3.
Indicates alarm is on
4. Displays clock / calendar, stop watch; compass bearing,
alarm time or mode banners
5. Displays cardinal / ordinal direction
6. Compass segments: shows north; calibration status
7.
: Indicates battery power is low
8.
Indicates beep tone is turned OFF
9.
Indicates keypad is locked
10.
Indicates direction to turn during compass
calibration
GETTING STARTED
TURN ON DEVICE (FIRST-TIME USE ONLY)
Press any key for 2 seconds to activate the LCD display.
BATTERY REPLACEMENT
RA122 uses 1 x CR2032 3V battery, which has already been
installed. See below for battery warnings.
LOW BATTERY
ICON
DESCRIPTION
or
The battery is low.
- - -
Appears when the battery is too
low to operate. “- - -“ is shown
instead of compass values.
NOTE While the low battery icon is displayed, compass
function, compass calibration, alarm beeping and backlight
are disabled. It will return to normal once battery has been
replaced.
NOTE When battery is replaced it is important to re-calibrate
the compass magnetic sensor. (See “Compass” section)
NOTE If you need to replace the battery, we highly recommend
you contact the retailer or our customer service department.
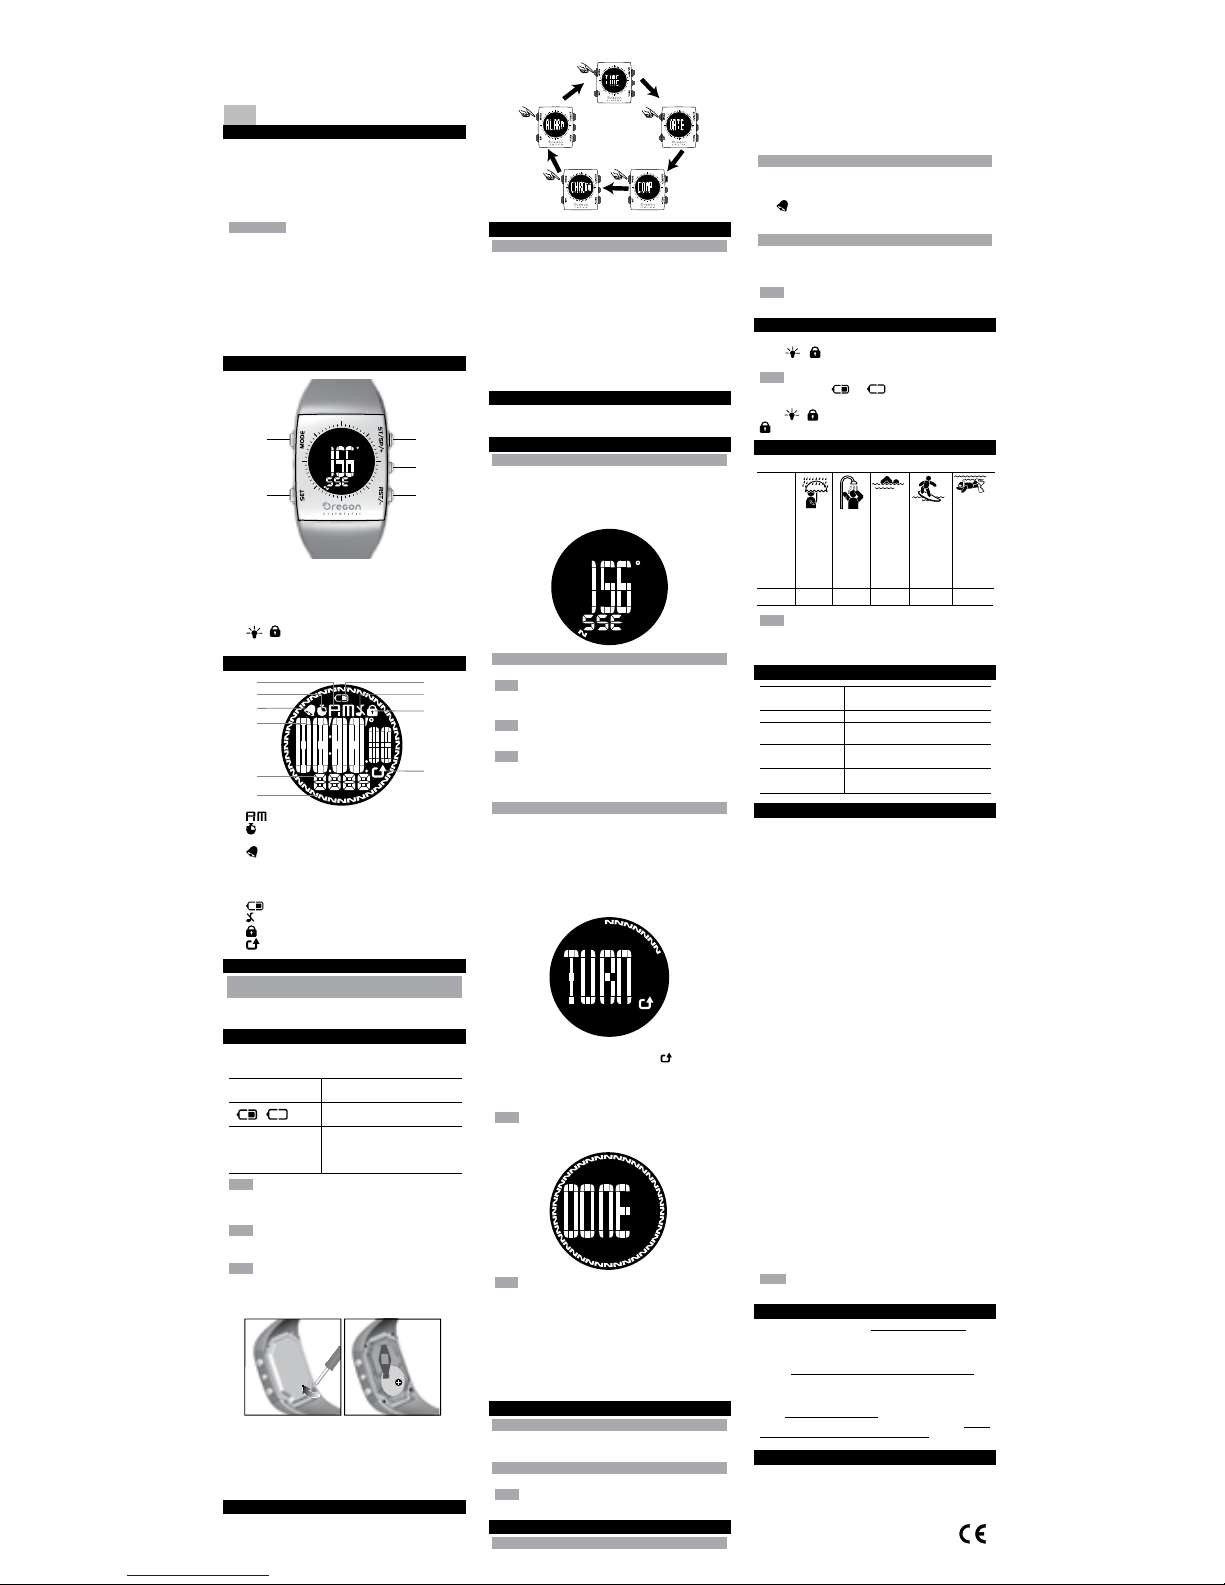
To replace the battery:
1. Use a small Phillips screwdriver to remove battery
compartment lid. Once opened, please keep the screws
in a safe place to avoid losing them.
2. Remove the old battery and insert the new one, matching
the polarities.
3. Replace the lid by screwing it back into place using a
Phillips screwdriver.
OPERATING MODES
Press MODE to switch between:
• Time Mode
• Date Mode
• Compass Mode
• Chrono (Stopwatch) Mode
• Alarm Mode
TIME MODE
TO SET TIME AND DATE
1. Press MODE to navigate to Time Mode.
2. Press and hold SET to enter settings.
3. Press ST / SP / + or RST / - to change values of the
setting. Press and hold ST / SP / + or RST / - to rapidly
change values.
4. Press SET to confirm and move to the next setting.
Repeat steps 3-4 for each setting option. The setting
options are as follows: 12 / 24-hour time; hour; minute;
year; day-month / month-day; month; day; beep on/off.
5. Press MODE anytime to confirm and exit settings.
DATE MODE
This mode is used for viewing the current date. Press MODE
to navigate to Date Mode.
COMPASS MODE
ABOUT THE COMPASS
The compass shows the bearing in degrees due North
together with 16 cardinal / ordinal directions. The outer
circumference of the display consists of 36 segments that
graphically show the bearing. N indicates North as shown
below.
TO VIEW COMPASS
• Press MODE to navigate to Compass Mode.
NOTE The compass display is active for 30 seconds at a
time. After this, the display will automatically return to time
display.
NOTE Always take bearings in the open air, not inside
buildings, tents, caves, or other shelters.
NOTE Compass readings should be performed away from
magnetic materials. Avoid large magnetic objects, power
lines, loudspeakers, electric motors etc.
COMPASS SENSOR CALIBRATION
There is a start-up calibration guide when the watch is turned
on the first time, or after battery replacement. User can also
calibrate the compass by following the steps below.
To calibrate the compass sensor:
1. Press MODE to navigate to Compass Mode.
2. Press and hold SET to begin calibration of the
compass.
3. Rotate the watch counter clockwise (as per arrow )
at the same speed as the moving segments around the
circumference of the display. The rotation will be finished
once you have performed 1¼ turns and return to compass
display.
NOTE DONE indicates calibration has been successfully
completed. Repeat steps 2-3 again if FAIL is displayed.
NOTE The compass should be calibrated:
• Before you use it for the first time.
• When the battery is replaced.
• When changing environments. Different environments
(populated / outdoor) have varying magnetic fields
affecting the compass reading.
• Whenever it is exposed to strong magnetic sources,
extreme cold, or you suspect that other environmental
conditions have affected the compass readings.
• If you notice that the compass is not showing the
direction correctly.
STOPWATCH MODE
TO START STOPWATCH
1. Press MODE to navigate to Chrono Mode.
2. Press ST / SP / + to start / stop stopwatch.
TO RESET STOPWATCH
Press RST / - to reset stopwatch.
NOTE Stopwatch can be reset to 00:00:00 only if it has been
stopped or paused.
ALARM MODE
TO SET ALARM
1. Press MODE to navigate to Alarm Mode.
2. Press and hold SET to enter settings.
3. Press ST / SP / + or RST / - to change values of the
setting. Press and hold ST / SP / + or RST / - to rapidly
change values.
4. Press SET to confirm and move to the next setting.
Repeat steps 3-4 for each setting option. The setting
options are as follows: hour; minute.
5. Press MODE anytime to confirm and exit settings.
TO ACTIVATE / DEACTIVATE ALARM
1. Press MODE to navigate to Alarm Mode.
2. Press ST / SP / + or RST / - to activate / deactivate
alarm.
3.
Indicates that the alarm has been activated.
4. Press MODE to confirm and exit.
TO SILENCE ALARM
When the alarm clock is activated, it will sound at the set time
every day. Press any button to stop the alarm for that day.
NOTE The alarm clock is still active and will set off again the
following day.
BACKLIGHT AND KEYPAD LOCK
To activate backlight:
Press
/ to turn backlight On for 5 seconds.
NOTE The backlight function will not operate if “
” or
“
” is displayed.
To toggle keypad lock On or Off:
Press and hold
/ for 2 seconds. indicates keypad
is locked.
USE IN THE WATER
The RA122 is water-resistant up to 30 meters (98 feet).
NOTE Set the watch before exposing it to excessive water.
Pressing the keys while in the water or during heavy
rainstorms may cause water to enter the watch.
SPECIFICATIONS
Real time clock
12/24 hour with hour / minute /
second
Stopwatch 00:00:00 to 59:59:59 (hr:min:sec)
Power 1 x CR2032 3V batteries
Operating
temperature
0°C to 40°C
(32°F to 104°F)
Storage
temperature
-20°C to 60°C
(-4°F to 140°F)
PRECAUTIONS
To ensure you use your product correctly and safely, read
these warnings and the entire user manual before using the
product:
• Use a soft, slightly moistened cloth. Do not use abrasive
or corrosive cleaning agents, as these may cause
damage. Use luke warm water and mild soap to clean
the watch. Never use the products in hot water or store
them when wet.
• Do not subject the product to excessive force, shock,
dust, temperature changes, or humidity. Never expose
the product to direct sunlight for extended periods. Such
treatment may result in malfunction.
• Do not tamper with the internal components. Doing
so will terminate the product warranty and may cause
damage. The main unit contains no user-serviceable
parts.
• Do not scratch hard objects against the LCD display as
this may cause damage.
• Take precautions when handling all battery types.
• Remove the batteries whenever you are planning to
store the product for a long period of time.
• When replacing batteries, use new batteries as specified
in this user manual.
• The product is a precision instrument. Never attempt
to take this device apart. Contact the retailer or our
customer service department if the product requires
servicing.
• Do not touch the exposed electronic circuitry, as there is
a danger of electric shock.
• Check all major functions if the device has not been
used for a long time. Maintain regular internal testing
and cleaning of your device. Have your watch serviced
by an approved service center annually.
• When disposing of this product, do so in accordance
with your local waste disposal regulations.
• Due to printing limitations, the displays shown in this
manual may differ from the actual display.
• The contents of this manual may not be reproduced
without the permission of the manufacturer.
NOTE The technical specifications for this product and the
contents of the user manual are subject to change without
notice.
ABOUT OREGON SCIENTIFIC
Visit our website (www.oregonscientific.com) to learn more
about Oregon Scientific products. If you’re in the US and
would like to contact our Customer Care department directly,
please visit: www2.oregonscientific.com/service/support
OR
Call 1-800-853-8883.
For international inquiries, please visit:
www2.oregonscientific.com/about/international
EU-DECLARATION OF CONFORMITY
Hereby, Oregon Scientific, declares that this TRACKER
Digital Compass Watch (Model RA122) is in compliance with
EMC directive 89/336/CE. A copy of the signed and dated
Declaration of Conformity is available on request via our
Oregon Scientific Customer Service.
EN
RAIN
SPLASHES
ETC
OK
SHOWERING
(WARM/
COOL
WATER
ONLY)
NO
LIGHT
SWIMMING
/ SHALLOW
WATER
NO
SHALLOW
DIVING/
SURFING/
WATER
SPORTS
NO
SNORKELING
/ DEEP
WATER
DIVING
NO
30M /
98 FEET
TRACKER
Orologio Bussola Digitale
Modello: RA122
MANUALE PER L’UTENTE
INTRODUZIONE
Grazie per aver scelto TRACKER Orologio bussola digitale
di Oregon Scientific™(RA122). Il modello RA122 è stato
progettato per chi ama il design e pratica uno stile di vita
attivo. Dotato di orologio, retroilluminazione e blocco dei
tasti, questo versatile orologio può essere usato nella
giungla metropolitana, mentre la bussola incorporata lo
rende il compagno ideale per le uscite all’aperto.
IMPORTANTE
• Le funzioni di rilevazione dell’unità RA122 non sostituiscono
quelle di dispositivi professionali e industriali di misurazione
o di precisione. I valori rilevati da questo orologio devono
essere considerati puramente indicativi.
• Quando si effettuano scalate o si praticano altre attività in cui
smarrirsi può dare luogo a situazioni rischiose e di pericolo,
utilizzare sempre una seconda bussola per confermare il
rilevamento delle direzioni.
• Oregon Scientific™ declina ogni responsabilità per qualsiasi
perdita o per eventuali richieste di danni da parte di terzi che
possano sorgere dall’uso di questo orologio.
PULSANTI DI CONTROLLO
1
2
3
5
4
1. MODE: consente di passare ad un’altra visualizzazione e di
abbandonare rapidamente una modalità di impostazione
2. SET: consente di accedere alla modalità di impostazione,
di confermare il valore dell’impostazione e di avviare la
calibrazione della bussola
3. ST / SP / + : consente di aumentare il valore
dell’impostazione e di avviare/interrompere il cronometro
4.
/ : consente di attivare la retroilluminazione e il
blocco dei tasti
5. RST / - : consente di diminuire il valore dell’impostazione
e di azzerare il cronometro
LCD
1
2
3
4
5
6
8
7
9
10
1. : orologio in formato 12 ore
2.
indica che il cronometro viene visualizzato o che è in
funzione
3. indica che la sveglia è attiva
4. Visualizza orologio / calendario, cronometro, rilevamento
della bussola, ora della sveglia o banner della modalità
5. Visualizza la direzione con punto cardinale o ordinale
6. Segmenti della bussola: indica il nord e lo stato della
calibrazione
7. indica che la batteria è in esaurimento
8.
indica che il segnale acustico è disattivato
9.
indica che il blocco dei tasti è attivo
10. indica la direzione da dare durante la calibrazione della
bussola
OPERAZIONI PRELIMINARI
ACCENSIONE DEL DISPOSITIVO (SOLO LA PRIMA VOLTA)
Per attivare il display LCD, premere un tasto qualsiasi per
2 secondi.
SOSTITUZIONE DELLE BATTERIE
L’unità RA122 funziona con 1 batteria da 3 V di tipo CR2032,
già inserita. Cfr. Fate riferimento alla tabella sottostante per le
informazioni relative alla batteria.
ICONA BATTERIA
IN ESAURIMENTO
DESCRIZIONE
or
La batteria è in esaurimento.
- - -
Appare quando la carica è troppo
debole per mettere in funzione
l’unità. “- -” viene visualizzato al
posto dei valori della bussola.
NOTA Mentre viene visualizzata l’icona della batteria in
esaurimento, la funzione di bussola, di calibrazione della
bussola, il segnale acustico della sveglia e la retroilluminazione
sono disattivati. La visualizzazione ritornerà alla normalità
dopo aver sostituito la batteria.
NOTA Quando la batteria viene sostituita, è importante
ricalibrare il sensore magnetico della bussola. (Cfr. paragrafo
“Bussola”)
NOTA Se è necessario sostituire la batteria, si consiglia
di contattare il proprio rivenditore o il nostro servizio di
assistenza clienti.
Sostituzione delle batterie:
1. Con un piccolo cacciavite Phillips, togliere la copertura
del vano batterie. Una volta aperto, mettere le viti in un
luogo sicuro per evitare di perderle.
2. Togliere la batteria vecchia ed inserire quella nuova
rispettando le polarità.
3. Riavvitare la copertura con il cacciavite Phillips.
MODALITÀ DI FUNZIONAMENTO
Premere MODE per scorrere tra:
• Modalità Ora
• Modalità Data
• Modalità Bussola
• Modalità Chrono (cronometro)
• Modalità Sveglia
MODALITÀ ORA
IMPOSTAZIONE DI ORA E DATA
1. Premere MODE per navigare fino alla Modalità Ora.
2. Tenere premuto SET per accedere alle impostazioni.
3. Premere ST / SP / + o RST/ - per cambiare i valori
dell’impostazione. Tenere premuto ST /SP / + o RST /
- per modificare rapidamente i valori.
4. Premere SET per confermare e passare all’impostazione
successiva. Ripetere i punti 3-4 per ciascuna opzione di
impostazione. Le opzioni di impostazione sono: formato
ora 12 / 24, ore, minuti, anno, giorno-mese / mese-giorno,
mese, giorno, segnale acustico attivato/disattivato.
5. Premere MODE per confermare e abbandonare le
impostazioni in qualsiasi momento.
MODALITÀ DATA
Questa modalità viene usata per visualizzare la data
corrente. Premere MODE per passare alla Modalità Data.
MODALITÀ BUSSOLA
INFORMAZIONI SULLA BUSSOLA
La bussola indica la posizione in gradi rispetto al nord, e
16 direzioni con punti cardinali/ordinali. La circonferenza
esterna del display consta di 36 segmenti che indicano
graficamente la propria posizione. N indica il nord, come
mostrato qui sotto.
VISUALIZZAZIONE DELLA BUSSOLA
• Premere MODE per passare alla Modalità Bussola.
NOTA
La visualizzazione della bussola rimane attiva per
30 secondi alla volta. Successivamente, la visualizzazione
tornerà automaticamente a quella dell’ora.
NOTA
Eseguire sempre il rilevamento della posizione all’aperto,
non all’interno di edifici, tende, grotte o altri luoghi chiusi.
NOTA
I rilevamenti della bussola devono essere eseguiti
lontano da materiali magnetici. Evitare grandi oggetti
magnetici, linee elettriche, altoparlanti, motori elettrici etc.
CALIBRAZIONE DEL SENSORE DELLA BUSSOLA
La prima volta che l’orologio viene acceso, o dopo la
sostituzione della batteria, seguire questi semplici passi per la
calibrazione.
Calibrazione del sensore della bussola:
1. Premere MODE per passare alla Modalità Bussola.
2. Tenere premuto SET per avviare la calibrazione della
bussola.
3. Ruotare l’orologio in senso antiorario (seguendo la
direzione della freccia
) alla stessa velocità dei
segmenti che si muovono intorno alla circonferenza
del display. La rotazione terminerà dopo 1¼ di giro e
riapparirà la visualizzazione della bussola.
NOTA
La scritta DONE indica che la calibrazione è stata
completata con successo. Se appare la scritta FAIL, ripetere
nuovamente i passaggi 2-3.
NOTA È necessario calibrare la bussola:
• Prima di utilizzarla per la prima volta.
• Dopo la sostituzione della batteria.
• Quando si cambia ambiente. Ambienti diversi (abitati /
all’aperto) hanno campi magnetici diversi che condizionano
il rilevamento della bussola.
• Ogni volta che viene esposta a forti sorgenti
elettromagnetiche, freddo estremo, o se si sospettano
altre condizioni ambientali che potrebbero influenzarne
le rilevazioni.
• Se ci si rende conto che la bussola non sta indicando la
direzione corretta.
MODALITÀ CRONOMETRO
AVVIO DEL CRONOMETRO
1. Premere MODE per passare alla Modalità Chrono.
2. Premere ST / SP / + per avviare e interrompere il
cronometro.
AZZERAMENTO DEL CRONOMETRO
Premere RST / - per azzerare il cronometro.
NOTA Il cronometro può essere riportato a 00:00:00 solo se
è stato interrotto o messo in pausa.
MODALITÀ SVEGLIA
IMPOSTAZIONE DELLA SVEGLIA
1. Premere MODE per passare alla Modalità Sveglia.
2. Tenere premuto SET per accedere alle impostazioni.
3. Premere ST / SP / + o RST/ - per cambiare i valori
dell’impostazione.
Tenere premuto ST /SP / + o RST / - per
modificare rapidamente i valori.
4. Premere SET per confermare e passare all’impostazione
successiva. Ripetere i passaggi 3-4 per ciascuna
opzione di impostazione. Le opzioni di impostazione
sono: ore, minuti.
5. Premere MODE per confermare e abbandonare le
impostazioni in qualsiasi momento.
IT
1
2
3
5
4
1
2
3
4
5
6
8
7
9
10
1
2
3
5
4
1
2
3
4
5
6
8
7
9
10
Page 2
TRACKER
Reloj con Brújula Digital
Modelo: RA122
MANUAL DE USUARIO
INTRODUCCIÓN
Gracias por elegir el TRACKER Reloj con Brújula Digital
(RA122) de Oregon Scientific
TM
. El RA122 ha sido diseñado
para el profesional urbano con un estilo de vida activo.
Dispone de reloj a tiempo real, cronómetro, retroiluminación
y bloqueo de botones. Este reloj tan versátil se puede
utilizar en la jungla urbana, mientras que la brújula que lleva
incorporada lo convierte en el perfecto compañero para
recorrer el ancho mundo.
IMPORTANTE
• Las funciones de medición del RA122 no están pensadas
para sustituir mediciones profesionales ni dispositivos
de precisión industrial. Los valores procedentes de
este reloj deben considerarse únicamente indicaciones
razonables.
• Si realiza escalada o hace alguna otra actividad en
que perderse puede provocar una situación peligrosa,
asegúrese de confirmar las lecturas con una segunda
brújula.
• Oregon Scientific™ no asume ninguna responsabilidad
por pérdidas ni reclamaciones de terceros derivadas del
uso de este reloj.
BOTONES DE CONTROL
1
2
3
5
4
1. MODE: Pasar a otra pantalla; salir rápidamente durante
cualquier modo de ajuste
2. SET: Acceder al modo de configuración; confirmar
ajuste; iniciar calibración de la brújula
3. ST / SP / +: Incrementar valor del ajuste; Iniciar / detener
cronómetro
4.
/ : Activar retroiluminación; Bloqueo de botones
5. RST / -: Reducir valor del ajuste; Reiniciar cronómetro
LCD
1
2
3
4
5
6
8
7
9
10
1. : Reloj de 12 horas
2.
Indica que el cronómetro se muestra o está en
marcha
3.
Indica que la alarma está activada
4. Indica reloj/calendario, cronómetro, brújula, hora de la
alarma o modo anuncios
5. Muestra dirección cardinal / ordinal
6. Segmentos de brújula: muestra norte; estado de calibración
7.
Indica que la pila se está acabando
8.
Indica que el pitido está desactivado
9.
Indica que los botones están bloqueados
10.
Indica dirección para iniciar calibración de brújula
PARA EMPEZAR
PARA PONER EN MARCHA EL DISPOSITIVO (SÓLO LA
PRIMERA VEZ QUE SE USA)
Pulse cualquier botón durante 2 segundos para activar la
pantalla LCD.
CÓMO REEMPLAZAR LA PILA
El RA122 funciona con 1 pila CR2032 que ya lleva instalada.
Consulte la tabla que aparece bajo estas líneas para ver el
significado de los iconos de la pila.
ICONO DE PILA
GASTADA
DESCRIPCIÓN
o
La pila del dispositivo está casi
gastada.
- - -
Aparece cuando la pila está
demasiado gastada para operar.
Se muestra “- -” en lugar de los
valores de brújula.
NOTA Mientras se muestra el icono de pila casi gastada,
la función de brújula, la calibración de brújula y la
retroiluminación estarán desactivadas. Una vez cambie la
pila, volverá a la normalidad.
NOTA Una vez colocada la pila nueva, es importante volver
a calibrar el sensor magnético de la brújula. (Consulte la
sección “Brújula”)
NOTA Le recomendamos que se ponga en contacto con el
vendedor o el departamento de atención al público si tiene
que cambiar la pila.
Para reemplazar la pila:
1. Use un destornillador Phillips pequeño para retirar la
cubierta del compartimiento para pila. Una vez abierto,
guarde los tornillos para no perderlos.
2. Retire la pila vieja e introduzca la nueva cuidando de
que las polaridades sean las adecuadas.
3. Vuelva a colocar la tapa y fíjela con los tornillos usando
un destornillador.
MODOS DE OPERACIÓN
Pulse MODE para alternar entre:
• Modo Hora
• Modo Fecha
• Modo Brújula
ES
• Modo Crono (Cronómetro)
• Modo de Alarma
MODO HORA
PARA AJUSTAR FECHA Y HORA
1. Pulse MODO para navegar al Modo Hora.
2. Pulse SET y manténgalo pulsado para entrar en
configuración.
3. Pulse ST / SP / + o RST / - para modificar los valores
del ajuste. Pulse ST / SP / + o RST / - y manténgalo
pulsado para cambiar rápidamente los valores.
4. Pulse SET para confirmar y pasar al siguiente. Repita
los pasos 3-4 para cada opción de configuración. Las
opciones de configuración son las siguientes: formato
de 12 ó 24 horas, hora, minuto, año, día-mes / mes-día,
mes; día, pitido on/off.
5. Pulse MODE en cualquier momento para confirmar y salir.
MODO FECHA
Este modo sirve para ver la fecha actual. Pulse MODO para
navegar por el Modo Fecha.
MODO BRÚJULA
ACERCA DE LA BRÚJULA
La brújula muestra la situación en grados hacia el norte
con 16 direcciones cardinales / ordinales. La circunferencia
exterior de la pantalla consiste en 36 segmentos que
muestran gráficamente su situación. N indica Norte, tal y
como se muestra a continuación.
CÓMO VER LA BRÚJULA
• Pulse MODE para acceder al Modo Brújula.
NOTA La pantalla de brújula estará activa durante 30
segundos cada vez. Después de esto la pantalla volverá al
modo hora.
NOTA Tome las situaciones siempre al aire libre, y no dentro
de edificios, tiendas, cuevas u otros refugios.
NOTA Las lecturas de la brújula no deben hacerse en las
inmediaciones de materiales magnéticos. Evite los objetos
grandes y pesados, las líneas de alta tensión, los altavoces,
motores eléctricos, etc.
CALIBRACIÓN DEL SENSOR DE LA BRÚJULA
Hay una guía de calibración de inicio para cuando el reloj se
utiliza por primera vez, o si se le cambia la pila. El usuario
también puede calibrar la brújula siguiendo los pasos que
vienen a continuación.
Para calibrar el sensor de la brújula:
1. Pulse MODE para acceder al Modo Brújula.
2. Pulse SET y manténgalo pulsado para iniciar la
calibración de la brújula.
3. Haga girar el contador del reloj en la dirección de las
agujas del reloj (siguiendo la flecha
) a la misma
velocidad que los segmentos móviles alrededor de la
circunferencia de la pantalla. La rotación finalizará en
cuanto haya dado una vuelta y cuarto, y vuelve a la
pantalla de la brújula.
NOTA Cuando aparezca DONE, significará que la calibración
ha sido completada con éxito. Si la conexión falla y aparece
FAIL, repita los pasos 2-3.
NOTA Debería calibrar la brújula:
• Antes de usarlo por primera vez.
• Cuando se cambia la pila.
• Si cambia de entorno. Distintos entornos (poblaciones /
campo abierto) tienen distintos campos magnéticos que
afectan las lecturas de la brújula.
• Siempre que esté expuesto a campos magnéticos fuertes,
frío intenso o si sospecha que alguna otra condición del
entorno ha afectado a las lecturas de la brújula.
• Si se da cuenta de que la brújula no muestra
correctamente la dirección.
MODO DE CRONÓMETRO
CÓMO DETENER EL CRONÓMETRO
1. Pulse MODO para navegar por el Modo Cronómetro.
2. Pulse ST/SP/+ para iniciar/detener el cronómetro.
PARA REINICIAR EL CRONÓMETRO
Pulse RST / - para reiniciar el cronómetro.
NOTA El cronómetro se puede reiniciar a 00:00:00 sólo si ha
estado detenido o parado.
MODO DE ALARMA
CONFIGURACIÓN DE LA ALARMA
1. Pulse MODO para navegar por el Modo de Alarma.
2. Pulse SET y manténgalo pulsado para entrar en
configuración.
3. Pulse ST / SP / + o RST / - para modificar los valores
del ajuste. Pulse ST / SP / + o RST / - y manténgalo
pulsado para cambiar rápidamente los valores.
4. Pulse SET para confirmar y pasar al siguiente. Repita los
pasos 3-4 para cada opción de configuración. Las opciones
de configuración son las siguientes: hora; minuto.
5. Pulse MODE en cualquier momento para confirmar y salir.
PARA ACTIVAR O DESACTIVAR LA ALARMA
1. Pulse MODO para navegar por el Modo de Alarma.
2. Pulse ST / SP / + o RST / - para activar o desactivar la
alarma.
3.
indica que la alarma está activada.
4. Pulse MODE para confirmar y salir.
PARA SILENCIAR LA ALARMA
Cuando la alarma esté activada, sonará todos los días a la
hora configurada. Pulse cualquier botón para que la alarma
no vuelva a sonar ese día.
NOTA El despertador sigue activo y volverá a sonar a la
misma hora el día siguiente.
RETROILUMINACIÓN Y BLOQUEO DEL TECLADO
Para activar la función de retroiluminación:
Pulse
/ para encender la retroiluminación durante
5 segundos.
NOTA La función de retroiluminación no se activará si la
pantalla muestra “
”o “ ”.
Para activar / desactivar el bloqueo de botones:
Pulse
/ y manténgalo pulsado durante 2 segundos.
aparecerá si el bloqueo de botones está activo.
USO EN EL AGUA
El RA122 es resistente al agua a hasta 30 metros (98 pies).
NOTA configure el reloj antes de exponerlo a demasiada
agua. No pulse los botones que existen en el agua o si
llueve mucho, puesto que podría provocar que entre agua
en el reloj.
FICHA TÉCNICA
Reloj con hora
real
formato de 12 ó 24 horas, hora,
minuto y segundo
Cronómetro 00:00:00 a 99:59:59 (h:min:sec)
Alimentación
Funciona con 1 x pila
CR2032 de 3V
Temperatura de
funcionamiento
0°C a 40°C (32°F a 104°F)
Temperatura de
almacenamiento
-20°C a 60°C (-4°F a 140°F)
PRECAUCIONES
Pasa asegurarse que usa su producto correctamente y
sin correr riesgos, lea estos avisos y el manual de usuario
entero antes de utilizar el producto.
• Limpie el producto con un paño suave ligeramente
humedecido. No use detergentes abrasivos ni corrosivos,
porque podrían causar daños a la unidad. Use agua tibia
y un jabón suave para limpiar el reloj detenidamente
después de cada sesión. No sumerja nunca los productos
en agua caliente ni los guarde mojados.
• No exponga el producto a demasiada fuerza, descargas,
polvo, fluctuaciones de temperatura o humedad. En
ningún caso exponga el producto a la luz directa del sol
durante periodos largos de tiempo. De hacerlo podría
provocar que el producto se estropeara.
• No manipule los componentes internos. De hacerlo
anulará la garantía de la unidad y podría causar daños.
La unidad principal contiene componentes que el
usuario no debe manipular.
• No raye la pantalla LCD con objetos duros, porque
podría causar daños.
• Tenga cuidado cuando manipule las pilas de cualquier
tipo.
• Retire las pilas si va a guardar el producto por un largo
periodo de tiempo.
• Al reemplazar las pilas, introduzca pilas nuevas siguiendo
las especificaciones de este manual de usuario.
• Este producto es un instrumento de precisión. Nunca
intente desmontarlo, Si necesita reparación, póngase
en contacto con el proveedor o nuestro departamento
de atención al cliente.
• No toque los circuitos del dispositivo, ya que existe un
peligro de descarga eléctrica.
• Compruebe todas las funciones principales si el
dispositivo no se usa durante un largo periodo de tiempo.
Compruebe y limpie regularmente la parte interior de
su dispositivo. Asegúrese de que su reloj sea revisado
cada año por un centro de servicio autorizado.
• Cuando deseche este producto, asegúrese de que no
vaya a parar a la basura general, sino separadamente
para que pueda ser reciclado.
• Debido a limitaciones de imprenta, las imágenes que
se muestran en este manual pueden diferir de las
imágenes reales.
• Los contenidos de este manual no pueden reproducirse
sin permiso del fabricante.
NOTA La ficha técnica de este producto y los contenidos de
este manual de usuario pueden cambiarse sin aviso.
SOBRE OREGON SCIENTIFIC
Visite nuestra página web (www.oregonscientific.com) para
conocer más sobre los productos de Oregon Scientific.
Si está en EE.UU y quiere contactar directamente con
nuestro Departamento de Atención al Cliente, por favor
visite www2.oregonscientific.com/service/support.asp o
llame al 1-800-853-8883.
Si está en España y quiere contactar directamente con
nuestro Departamento de Atención al Cliente, por favor
visite www.oregonscientific.es o llame al 902 338 368.
Para consultas internacionales, por favor visite www2.
oregonscientific.com/about/international.asp.
EU - DECLARACIÓN DE CONFORMIDAD
Por medio de la presente, Oregon Scientific declara que
el TRACKER Reloj con Brújula Digital (Modelo: RA122)
cumple con la Directiva 89/336/CE del EMC. Tiene a su
disposición una copia firmada y sellada de la Declaración
de Conformidad, solicítela al Departamento de Atención al
Cliente de Oregon Scientific.
SALPICADURAS DE
LLUVIA
ETC
OK
DUCHA
(CALIENTE/
FRÍA)
NO
NADAR EN
AGUAS
POCO
PROFUNDAS
BUCEO EN
AGUAS POCO
PROFUNDAS /
DEPORTES
ACUÁTICOS /
SURFING
NO
HACER
SNORKEL /
SUBMARINISMO / EN
AGUAS
PROFUNDAS
30M / 98 PIES
NO NO
TRACKER
Relógio com Bússola Digital
Modelo: RA122
MANUAL DO USUÁRIO
INTRODUÇÃO
Agradecemos a preferência pelo TRACKER Relógio com
Bússola Digital Oregon Scientific™ (RA122). O RA122 foi
desenvolvido para profissionais urbanos que apreciam um
estilo de vida ativo. Equipado com as funções de relógio,
cronômetro, luz de fundo e bloqueio dos botões, este versátil
relógio pode ser usado dentro da cidade, enquanto a bússola
embutida o torna a perfeita companhia ao aventurar-se em
locais mais distantes.
IMPORTANTE
• As funções de medição embutidas no RA122 não
devem substituir os dispositivos de medição profissional
ou de precisão industrial. Os valores produzidos por
este relógio devem ser considerados apenas como
representações razoáveis.
• Quando você for praticar alpinismo ou outras atividades
em que perder o caminho pode criar uma situação
perigosa ou de ameaça à vida, sempre use uma
segunda bússola para confirmar as leituras de direção.
• A Oregon Scientific™ não se responsabiliza por
qualquer perda ou reclamação de terceiros que possa
surgir a partir do uso deste relógio.
BOTÕES DE CONTROLE
1
2
3
5
4
1. MODE: alterna para outro canal; sai rapidamente de
qualquer modo de ajuste
2. SET: entra no modo de ajuste; confirma o valor de
ajuste; inicia a calibragem da bússola
3. ST / SP/ + : aumenta o valor do ajuste; inicia / pára o
cronômetro
4.
/ : ativa a luz de fundo; bloqueia os botões
5. RST / - : diminui o valor do ajuste; zera o cronômetro
LCD
1
2
3
4
5
6
8
7
9
10
1. : relógio de 12 horas
2.
indica que o cronômetro está sendo exibido e
correndo
3.
indica que o alarme está ativado
4. Exibe o relógio / calendário, cronômetro; direção da
bússola, hora do alarme ou indicadores de modo
5. Exibe a direção cardeal / colateral
6. Segmentos da bússola: mostra o norte; status da
calibragem
7.
indica que a bateria está fraca
8.
indica que o bipe sonoro está desligado
9.
indica que os botões estão bloqueados
10.
indica a direção para virar durante a calibragem da
bússola
PRIMEIROS PASSOS
LIGAR O DISPOSITIVO (PRIMEIRO USO APENAS)
Pressione qualquer botão por 2 segundos para ativar o
LCD.
SUBSTITUIÇÃO DE BATERIA
O RA122 usa 1 bateria CR2032 de 3 V já instalada. Consulte
os avisos de bateria a seguir.
ÍCONE DE
BATERIA FRACA
DESCRIÇÃO
ou
A bateria está fraca.
- - -
Exibido quando a bateria está
muito fraca para operar. “- - -“ é
exibido em vez dos valores da
bússola.
NOTA Enquanto o ícone de bateria fraca estiver sendo
exibido, a função da bússola, a calibragem da bússola, o
alarme sonoro e a luz de fundo ficarão desativados. Isso
voltará ao normal depois que a bateria tiver sido substituída.
NOTA Quando a bateria é substituída, é importante calibrar
novamente o sensor magnético da bússola. (Consulte a
seção “Bússola”.)
NOTA Se você precisar substituir a bateria, é altamente
recomendado entrar em contato com o revendedor ou com
nosso departamento de atendimento ao cliente.
Para substituir a bateria:
1. Use uma chave de fenda Phillips pequena para remover
a tampa do compartimento da bateria. Uma vez aberta,
guarde os parafusos em local seguro para evitar que
eles sejam perdidos.
2. Remova a antiga bateria e insira a nova, combinando as
polaridades.
3. Recoloque a tampa parafusando-a de volta no local
usando a chave de fenda Phillips.
POR
MODOS DE OPERAÇÃO
Pressione MODE para alternar entre:
• Modo Hora
• Modo Data
• Modo Bússola
• Modo Cronômetro (Chrono)
• Modo Alarme
MODO HORA
PARA AJUSTAR A HORA E A DATA
1. Pressione MODE para navegar até o Modo Hora.
2. Pressione e segure SET para entrar no modo de ajuste.
3. Pressione ST / SP / + ou RST / - para alterar os valores
de ajuste. Pressione e segure ST / SP / + ou RST / -
para alterar rapidamente os valores.
4. Pressione SET para confirmar e mover para o próximo
ajuste. Repita as etapas 3-4 para cada opção de ajuste.
As opções de ajuste são as seguintes: formato de 12 /
24 horas; horas; minutos; ano; dia-mês / mês-dia; mês;
dia; bipe ativado/desativado.
5. Pressione MODE a qualquer momento para confirmar e
sair dos ajustes.
MODO DATA
Este modo é usado para visualizar a data atual. Pressione
MODE para navegar até o Modo Data.
MODO BÚSSOLA
SOBRE A BÚSSOLA
A bússola mostra a indicação em graus ao Norte junto com
16 direções cardeais/colaterais. A circunferência externa do
display consiste em 36 segmentos que mostram a posição
no gráfico. N indica Norte, conforme abaixo.
PARA VISUALIZAR A BÚSSOLA
• Pressione MODE para navegar até o Modo Bússola.
NOTA O visor da bússola fica ativo por 30 segundos nesse
momento. Depois disso, o visor voltará automaticamente
para o modo Hora.
NOTA Sempre tire as indicações ao ar livre, não dentro de
edifícios, tendas, cavernas ou outros abrigos.
NOTA As leituras da bússola devem ser executadas longe
de materiais magnéticos. Evite objetos magnéticos grandes,
linhas de força, alto-falantes, motores elétricos, etc.
CALIBRAGEM DO SENSOR DA BÚSSOLA
Há um guia de calibragem de inicialização quando o relógio
é ligado pela primeira vez ou após a substituição da bateria.
O usuário também pode calibrar a bússola seguindo as
etapas abaixo.
Para calibrar o sensor da bússola:
1. Pressione MODE para navegar até o Modo Bússola.
2. Pressione e segure SET para iniciar a calibragem da
bússola.
3. Gire o contador do relógio no sentido horário (seguindo
a seta
) na mesma velocidade dos segmentos em
movimento ao redor da circunferência do visor. A
rotação será concluída depois que você tiver executado
1¼ voltas e retornar ao visor da bússola.
NOTA DONE indica que a calibragem foi concluída com
êxito. Repita as etapas 2-3 novamente se FAIL for exibido.
NOTA A bússola deve ser calibrada:
• Antes que você a utilize pela primeira vez.
• Quando a bateria for substituída.
• Ao mudar de ambiente. Quando diferentes ambientes
(populado / exterior) têm vários campos magnéticos que
afetam a leitura da bússola.
• Sempre que for exposta a fontes magnéticas fortes, frio
extremo ou suspeitar que outras condições ambientes
tenham afetado as leituras da bússola.
• Se você perceber que a bússola não está mostrando a
direção corretamente.
MODO CRONÔMETRO
PARA INICIAR O CRONÔMETRO
1. Pressione MODE para navegar até o Modo
Cronômetro.
2. Pressione ST / SP / + para iniciar / parar o cronômetro.
PARA ZERAR O CRONÔMETRO
Pressione RST / - para zerar o cronômetro.
NOTA O cronômetro pode ser zerado apenas se estiver
parado ou pausado.
1
2
3
5
4
1
2
3
4
5
6
8
7
9
10
1
2
3
5
4
1
2
3
4
5
6
8
7
9
10
Page 3

TRACKER
Digitale Kompassuhr
Modell: RA122
BEDIENUNGSANLEITUNG
EINLEITUNG
Wir danken Ihnen, dass Sie sich für die TRACKER
Digitale Kompassuhr von Oregon Scientific™ (RA122)
entschieden haben. Die RA122 wurde für den berufstätigen
Großstadtmenschen entworfen, der einen aktiven
Lebensstil genießt. Diese vielseitige Armbanduhr ist mit
einer Echtzeituhr, Stoppuhr, Hintergrundbeleuchtung und
Tastensperre ausgestattet und kann im Großstadtdschungel
verwendet werden; der integrierte Kompass macht sie zu
einem perfekten Begleiter, wenn Sie sich in die freie Natur
begeben.
WICHTIG
• Die in der RA122 integrierten Messfunktionen sind nicht dafür
vorgesehen, fachliche Messinstrumente oder industrielle
Präzisionsgeräte zu ersetzen. Die von dieser Uhr erzeugten
Werte sollten nur als Richtwerte angesehen werden.
• Wenn Sie sich mit Bergsteigen oder ähnlichen Aktivitäten
beschäftigen, bei denen ein Verlust der Orientierung
zu einer gefährlichen oder lebensbedrohlichen Lage
führen kann, achten Sie stets darauf, dass Sie einen
zweiten Kompass mit sich führen, mit dem Sie Ihre
Richtungsanzeigen bestätigen können.
• Oregon Scientific™ übernimmt keine Haftung für
Verluste oder andere Ansprüche Dritter, die durch die
Verwendung dieser Uhr entstehen könnten.
BEDIENTASTEN
1
2
3
5
4
1. MODE: Auf andere Anzeige wechseln; rasches Beenden
eines beliebigen Einstellungsmodus
2. SET: Einstellungsmodus aufrufen; Einstellungswert
bestätigen; Kompasskalibrierung starten
3. ST / SP/ + : Wert der Einstellung einhöhen; Stoppuhr
starten / beenden
4.
/ : Hintergrundbeleuchtung aktivieren; Tasten sperren
5. RST / - : Wert der Einstellung verringern; Stoppuhr
zurücksetzen
LCD-ANZEIGE
1
2
3
4
5
6
8
7
9
10
1. : 12-Stundenuhr
2.
Gibt an, dass die Stoppuhr angezeigt oder ausgeführt
wird
3.
Gibt an, dass der Alarm aktiviert ist
4. Uhr / Kalender, Stoppuhr anzeigen; Kompasspeilung,
Alarmzeit oder Modusbanner
5. Haupt- / Nebenhimmelsrichtung anzeigen
6. Kompasssegmente: Norden anzeigen; Kalibrierungsstatus
7.
Gibt an, dass die Ladung der Batterie niedrig ist
8.
Gibt an, dass der Signalton ausgeschaltet ist
9.
Gibt an, dass die Tasten gesperrt sind
10.
Gibt die zu drehende Richtung bei Kalibrierung des
Kompass an
ERSTE SCHRITTE
GERÄT EINSCHALTEN (NUR BEI ERSTMALIGER
INBETRIEBNAHME)
Drücken Sie 2 Sekunden lang eine beliebige Taste, um die
LCD-Anzeige zu aktivieren.
BATTERIEWECHSEL
Die RA122 benötigt 1 Batterie des Typs CR2032, 3V, die
bereits im Gerät installiert ist. Die Batteriewarnanzeigen
werden nachstehend erläutert.
SYMBOL FÜR
SCHWACHE BATTERIE
BESCHREIBUNG
oder
Die Ladung der Batterie ist
niedrig.
- - -
Erscheint, wenn die Ladung
der Batterie für den Betrieb
zu niedrig ist. “- - -“ wird
anstelle der Kompasswerte
angezeigt.
HINWEIS Während das Symbol für die schwache Batterie
angezeigt wird, sind die Kompassfunktion, die Kalibrierung,
die Alarmsignalisierung und die Hintergrundbeleuchtung
deaktiviert. Das Gerät nimmt den regulären Betrieb wieder
auf, wenn die Batterie ersetzt wird.
HINWEIS Wenn die Batterie ausgetauscht wird, ist es
unbedingt erforderlich, den magnetischen Sensor des
Kompass neu zu kalibrieren. (Siehe Abschnitt “Kompass”)
HINWEIS Wenn Sie die Batterie austauschen müssen,
empfehlen wir dringend, sich an Ihren Fachhändler oder
unsere Kundendienststelle zu wenden.
So wechseln Sie die Batterie:
1. Öffnen Sie den Batteriefachdeckel mit einem kleinen
Kreuzschraubenzieher. Bewahren Sie die Schrauben
nach Öffnung an einem sicheren Ort auf, damit sie nicht
verlorengehen.
2. Entnehmen Sie die alte Batterie, legen Sie die neue ein und
achten Sie auf die Übereinstimmung der Polaritäten.
3. Bringen Sie den Deckel mit dem Kreuzschaubenzieher
wieder an.
DE
BETRIEBSMODI
Drücken Sie auf MODE, um zwischen folgenden Modi
umzuschalten:
• Uhrzeitmodus
• Datumsmodus
• Kompassmodus
• Chronomodus (Stoppuhr)
• Alarmmodus
UHRZEITMODUS
SO STELLEN SIE ZEIT UND DATUM EIN
1. Drücken Sie auf MODE, um zum Uhrzeitmodus zu
navigieren.
2. Halten Sie SET gedrückt, um die Einstellungen aufzurufen.
3. Drücken Sie auf ST / SP / + oder RST / -, um die Werte
der Einstellung zu ändern. Halten Sie ST / SP / + oder
RST / - gedrückt, um die Werte rasch zu ändern.
4. Drücken Sie auf SET, um die Einstellung zu bestätigen und
zur nächsten überzugehen. Wiederholen Sie die Schritte
3-4 für jede Einstellungsoption. Die Einstellungsoptionen
lauten wie folgt: 12- / 24-Stundenzeit; Stunde; Minute; Jahr;
Tag-Monat / Monat-Tag; Monat; Tag; Signalton Ein/Aus.
5. Drücken Sie zu einem beliebigen Zeitpunkt auf MODE,
um die Einstellungen zu bestätigen und zu beenden.
DATUMSMODUS
Dieser Modus wird verwendet, um das aktuelle Datum.
Drücken Sie auf MODE, um zum Datumsmodus zu
navigieren.
KOMPASSMODUS
ÜBER DEN KOMPASS
Der Kompass zeigt neben der Peilung in Grad in nördlicher
Richtung 16 Haupt- / Nebenhimmelsrichtungen an. Der äußere
Kreis der Anzeige besteht aus 36 Segmenten, die die Peilung
grafisch darstellen. N gibt Norden an (siehe unten).
11
SO ZEIGEN SIE DEN KOMPASS AN
• Drücken Sie auf MODE, um zum Kompassmodus zu
navigieren.
HINWEIS Die Kompassanzeige ist jeweils 30 Sekunden
lang aktiviert. Anschließend kehrt die Anzeige automatisch
zur Uhrzeit zurück.
HINWEIS Führen Sie die Peilungen stets im Freien und
nicht innerhalb von Gebäuden, Zelten, Höhlen oder anderen
Unterständen durch.
HINWEIS Die Kompassmessungen sollten entfernt von
magnetischen Gegenständen vorgenommen werden.
Vermeiden Sie große magnetische Objekte, Stromleitungen,
Lautsprecher, Elektromotoren, usw.
KALIBRIERUNG DES KOMPASS-SENSOR
Es ist eine Start-Kalibrierungshilfe vorhanden, wenn die Uhr
zum ersten Mal eingeschaltet oder die Batterie ausgetauscht
wird. Der Benutzer kann den Kompass auch anhand der
nachfolgenden Schritte kalibrieren.
So kalibrieren Sie den Kompass-Sensor:
1. Drücken Sie auf MODE, um zum Kompassmodus zu
navigieren.
2. Halten Sie SET gedrückt, um mit der Kalibrierung des
Kompass zu beginnen.
3. Drehen Sie die Uhr mit der gleichen Geschwindigkeit
gegen den Uhrzeigersinn (wie der Pfeil ), mit der
sich die Segmente im äußeren Kreis der Anzeige
bewegen. Die Drehung ist beendet, wenn Sie 1¼
Umdrehungen vorgenommen haben und das Gerät zur
Kompassanzeige zurückkehrt.
HINWEIS DONE gibt an, dass die Kalibrierung erfolgreich
beendet wurde. Wiederholen Sie die Schritte 2-3 erneut,
wenn die Anzeige FAIL erscheint.
HINWEIS Der Kompass sollte kalibriert werden:
• Vor der ersten Inbetriebnahme.
• Wenn die Batterien ersetzt werden.
• Wenn sich die Umgebung ändert. Unterschiedliche
Umgebungen (bevölkert / Freiland) weisen verschiedene
Magnetfelder auf, die die Messwerte des Kompass
beeinflussen.
• Jedesmal, wenn er starken Magnetfeldern oder extremer
Kälte ausgesetzt war bzw. bei vermuteter Beeinträchtigung
der Messwerte durch sonstige Umwelteinflüsse.
• Wenn Sie feststellen, dass die Richtungsanzeige des
Kompass nicht korrekt ist.
STOPPUHR-MODUS
SO STARTEN SIE DIE STOPPUHR
1. Drücken Sie auf MODE, um zum Chronomodus zu
navigieren.
2. Drücken Sie auf ST / SP / +, um die Stoppuhr zu starten
/ zu beenden.
SO SETZEN SIE DIE STOPPUHR ZURÜCK
Drücken Sie auf RST / -, um die Stoppuhr zurückzusetzen.
HINWEIS Die Stoppuhr kann nur auf 00:00:00 zurückgesetzt
werden, wenn sie beendet oder unterbrochen wurde.
ALARMMODUS
SO STELLEN SIE DEN ALARM EIN
1. Drücken Sie auf MODE, um zum Alarmmodus zu
navigieren.
2. Halten Sie SET gedrückt, um die Einstellungen aufzurufen.
3. Drücken Sie auf ST / SP / + oder RST / -, um die Werte
der Einstellung zu ändern. Halten Sie ST / SP / + oder
RST / - gedrückt, um die Werte rasch zu ändern.
4. Drücken Sie auf SET, um die Einstellung zu bestätigen und
zur nächsten überzugehen. Wiederholen Sie die Schritte
3-4 für jede Einstellungsoption. Die Einstellungsoptionen
lauten wie folgt: Stunde; Minute.
5. Drücken Sie zu einem beliebigen Zeitpunkt auf MODE,
um die Einstellungen zu bestätigen und zu beenden.
SO AKTIVIEREN / DEAKTIVIEREN SIE DEN ALARM
1. Drücken Sie auf MODE, um zum Alarmmodus zu
navigieren.
2. Drücken Sie auf ST / SP / + oder RST / -, um den Alarm
zu aktivieren / zu deaktivieren.
3.
gibt an, dass der Alarm aktiviert wurde.
4. Drücken Sie zur Bestätigung und zum Beenden auf
MODE.
SO SCHALTEN SIE DEN ALARM STUMM
Wenn die Alarmuhr aktiviert ist, ertönt sie täglich zur
eingestellten Zeit. Drücken Sie auf eine beliebige Taste, um
den Alarm für den aktuellen Tag zu beenden.
HINWEIS Die Alarmuhr ist nach wie vor aktiv und wird am
darauffolgenden Tag erneut ausgelöst.
HINTERGRUNDBELEUCHTUNG UND
TASTENSPERRE
So aktivieren Sie die Hintergrundbeleuchtung:
Drücken Sie auf
/ , um die Hintergrundbeleuchtung
5 Sekunden lang einzuschalten.
HINWEIS Die Hintergrundbeleuchtung funktioniert nicht,
wenn “
” oder “ ” angezeigt wird.
So schalten Sie die Tastensperre ein oder aus:
Halten Sie
/ 2 Sekunden lang gedrückt. gibt an,
dass die Tasten gesperrt sind.
VERWENDUNG IM WASSER
Die RA122 ist bis zu 30 m wasserfest.
HINWEIS Stellen Sie die Uhr ein, bevor Sie sie im Wasser
tragen. Wenn die Tasten im Wasser oder bei heftigem Regen
gedrückt werden, kann Wasser in die Uhr gelangen.
TECHNISCHE DATEN
Echtzeituhr
12-/24-Stunden mit Stunde /
Minute / Sekunde
Stoppuhr
00:00:00 bis 99:59:59 (Std:Min:
Sek)
Stromversorgung 1 Batterie CR2032 3V
Betriebstemperatur 0 °C bis 40 °C (32 °F bis 104 °F)
Lagertemperatur -20 °C bis 60 °C (-4 °F bis 140 °F)
VORSICHTSMASSNAHMEN
Um sicherzustellen, dass Sie Ihr Produkt richtig und sicher
verwenden, lesen Sie bitte diese Warnhinweise und die
gesamte Bedienungsanleitung vor Inbetriebnahme des
Geräts durch:
• Verwenden Sie ein weiches, leicht feuchtes Tuch.
Nehmen Sie keine scheuernden oder ätzenden
Reinigungsmittel, da diese das Gerät beschädigen
können. Verwenden Sie das Produkt niemals in heißem
Wasser und lagern Sie es nicht in feuchtem Zustand.
• Setzen Sie das Gerät keiner übermäßigen
Gewalteinwirkung und keinen Stößen aus, und halten
Sie es von Staub, Temperaturschwankungen oder
Feuchtigkeit sowie längerer, direkter Sonnenbestrahlung
fern, da dies zu Funktionsstörungen führen kann.
• Nehmen Sie keine Änderungen an den internen
Komponenten des Geräts vor. Dies kann zu einem Verlust
der Garantie führen und eine Beschädigung des Geräts
verursachen. Das Hauptgerät enthält keine Teile, die vom
Benutzer selbst repariert werden dürfen.
• Kratzen Sie nicht mit harten Gegenständen an der LCD-
Anzeige, da diese beschädigt werden könnte.
• Seien Sie vorsichtig beim Umgang mit allen
Batterietypen.
• Entfernen Sie alle Batterien, wenn Sie das Produkt über
einen längeren Zeitraum lagern möchten.
• Verwenden Sie beim Batteriewechsel nur neue Batterien,
wie in dieser Bedienungsanleitung angegeben.
• Dieses Produkt ist ein Präzisionsgerät. Versuchen Sie
niemals, das Gerät zu zerlegen. Wenden Sie sich bitte
an Ihren Händler oder unsere Kundendienststelle, falls
das Produkt eine Wartung erfordert.
• Berühren Sie keine ungeschützten, elektronischen
Schaltungen, da sonst die Gefahr eines elektrischen
Schlags besteht.
• Überprüfen Sie alle Hauptfunktionen des Geräts, wenn
dieses längere Zeit nicht benutzt wurde. Sorgen Sie für
eine regelmäßige Kontrolle und Reinigung Ihres Geräts.
Lassen Sie Ihre Uhr jährlich bei einer zugelassenen
Service-Zentrale warten.
• Entsorgen Sie das Produkt nicht im allgemeinen
Hausmüll, sondern ausschließlich in den dafür
vorgesehenen kommunalen Sammelstellen, die Sie bei
Ihrer Gemeinde erfragen können.
• Aufgrund der technischen Druckeinschränkungen
können sich die in dieser Anleitung dargestellten
Abbildungen vom Original unterscheiden.
• Der Inhalt dieser Anleitung darf nicht ohne Genehmigung
des Herstellers vervielfältigt werden.
HINWEIS Die technischen Daten für dieses Produkt
und der Inhalt der Bedienungsanleitung können ohne
Benachrichtigung geändert werden.
ÜBER OREGON SCIENTIFIC
Besuchen Sie unsere Website www.oregonscientific.de und
erfahren Sie mehr über unsere Oregon Scientific-Produkte.
Auf der Website finden Sie auch Informationen, wie Sie
im Bedarfsfall unseren Kundendienst erreichen und Daten
herunterladen können.
Für internationale Anfragen besuchen Sie bitte unsere
Website:
www2.oregonscientific.com/about/international.asp.
EU-KONFORMITÄTSERKLÄRUNG
Hiermit erklärt Oregon Scientific, dass TRACKER Digitale
Kompassuhr (Modell: RA122) mit der EMC Richtlinie 89/336/
CE übereinstimmt. Eine Kopie der unterschriebenen und mit
Datum versehenen Konformitätserklärung erhalten Sie auf
Anfrage über unseren Oregon Scientific Kundendienst.
REGENS
PRITZER
USW.
OK
TAUCHEN IN
FLACHEM
WASSER/
SURFEN/
WASSER SPORT
NEIN
SCHNORC
HELN
IN TIEFEM
WASSER
TAUCHE
NEIN
30M
NEIN
DUSCHEN
(NUR
WARMES/
KALTES
WASSER)
NEIN
LEICHTES
SCHWIMMEN
/ FLACHEM
WASSER
Page 4

TRACKER
Montre Boussole Numérique
Modèle : RA122
MANUEL DE L’UTILISATEUR
INTRODUCTION
Nous vous remercions d’avoir choisi la TRACKER Montre
Boussole Numérique (RA122) de Oregon Scientific. Le
modèle RA122 a été conçu à l’attention des professionnels
urbains au style de vie actif. Equipée d’une horloge, des
fonctions de rétro-éclairage et de verrouillage des touches,
cette montre polyvalente est parfaite pour la jungle urbaine
; sans oublier sa boussole intégrée qui fait d’elle un
compagnon idéal pour vos aventures en extérieur.
IMPORTANT
• Les fonctions de mesure de l’appareil RA122 ne doivent
pas se substituer aux dispositifs de précision industriels
ni aux mesures effectuées par des professionnels.
Les relevés enregistrés par cette montre doivent être
considérés uniquement comme des représentations
plus ou moins précises.
• Pour vos excursions de randonnée en montagne ou pour
d’autres activités, où perdre le sens de l’orientation peut
s’avérer dangereux, assurez-vous d’utiliser une deuxième
boussole pour confirmer les relevés d’orientation.
• Oregon Scientific ™ ne peut être tenu responsable de la
perte de l’appareil ni des réclamations de tierces parties
relatives à son utilisation.
TOUCHES DE COMMANDE
1
2
3
5
4
1. MODE : Permet de passer à un autre mode, de sortir
rapidement du mode de réglage
2. SET : Permet d’entrer dans le mode réglage ; de confirmer la
valeur d’un réglage et d’initier l’étalonnage de la boussole
3. ST/SP/ + : Permet d’augmenter la valeur d’un réglage,
de lancer/arrêter le chronomètre
4.
/ : Active le rétro-éclairage et le verrouillage des
touches
5. RST / - : Permet de diminuer la valeur d’un réglage, de
réinitialiser le chronomètre
ECRAN LCD
1
2
3
4
5
6
8
7
9
10
1. : Horloge format 12 H
2.
Indique si le chronomètre s’affiche ou est en
fonctionnement
3.
Indique que l’alarme est activée
4. Affiche l’horloge / calendrier, le chronomètre, le relèvement,
l’heure de l’alarme ou les bannières des modes
5. Affiche les points cardinaux / ordinaux
6. Segments de la boussole : indique le Nord, statut de
l’étalonnage
7.
Indique que la pile est faible
8.
Indique le bip est désactivé
9.
Indique que les touches sont verrouillées
10.
Indique la direction où tourner lors de l’étalonnage
de la boussole
AU COMMENCEMENT
METTRE EN MARCHE L’APPAREIL (UNIQUEMENT
LORS DE LA PREMIÈRE UTILISATION)
Appuyez sur n’importe quel bouton pendant 2 secondes
pour activer l’écran LCD.
REMPLACER LA PILE
Le modèle RA122 fonctionne avec une pile CR2032, d’ores
et déjà installée. Voir ci-dessous pour toute recommandation
relative à la pile.
ICONE DE FAIBLESSE
DES PILES
DESCRIPTION
ou
La pile de la montre est
faible.
- - -
S’affiche lorsque la pile est trop
faible. “- -” s’affiche à la place
des valeurs de la boussole.
REMARQUE Si l’icône de faiblesse des piles s’affiche, les
fonctions de la boussole, d’étalonnage de la boussole, de
bip de l’alarme et du rétro-éclairage sont désactivées. Elles
reviendront en mode normal une fois les piles remplacées.
REMARQUE Lorsque l’on remplace les piles, il est important
d’étalonner à nouveau le capteur magnétique. (Voir section
« Boussole »)
REMARQUE Si vous devez remplacer la pile, nous vous
recommandons de contacter le distributeur ou le service
clientèle.
Pour remplacer la pile :
1. Utilisez un petit tournevis pour retirer le couvercle du
compartiment des piles. Une fois ouvert, placez les vis
dans un endroit où vous êtes certain de les récupérer.
2. Remplacez la pile usagée et insérez la nouvelle en
respectant les signes de polarité.
3. Replacez le couvercle en serrant les vis à l’aide du tournevis.
MODES DE FONCTIONNEMENT
Appuyez sur MODE pour alterner entre :
FR
• Mode Heure
• Mode Date
• Mode Boussole
• Mode Chronomètre (CHRONO)
• Mode Alarme
MODE HEURE
POUR RÉGLER L’HEURE ET LA DATE
1. Appuyez sur MODE pour naviguer dans le Mode Heure.
2. Appuyez et maintenez la touche SET pour avoir accès
aux réglages.
3. Appuyez sur ST / SP / + ou RST / - pour modifier les
réglages. Appuyez et maintenez ST / SP / + ou RST / -
pour modifier rapidement les valeurs.
4. Appuyez sur SET pour confirmer le réglage et passer au
suivant. Recommencez les étapes 3 et 4 pour chaque
option de réglage. Les options de réglage se présentent de
la manière suivante : Heure : format 12 ou 24 h ; heure ;
minute ; année ; jour-mois / mois-jour ; mois ; jour ; bip on/off.
5. Appuyez sur MODE pour confirmer et sortir.
MODE DATE
Utilisez ce mode pour visualiser la date actuelle. Appuyez
sur MODE pour naviguer dans le Mode Date.
MODE BOUSSOLE
A PROPOS DE LA BOUSSOLE
La boussole vous indique le relèvement du nord
géographique et les 16 points cardinaux / ordinaux. La
circonférence extérieure consiste en 36 segments qui
affichent graphiquement votre emplacement. N indique le
Nord comme indiqué ci-dessous.
VISUALISER LA BOUSSOLE
• Appuyez sur MODE pour naviguer dans le Mode
Boussole.
REMARQUE L’affichage de la boussole est actif pendant
30 secondes à chaque fois. Après cela, l’affichage revient
automatiquement à l‘affichage de l’heure.
REMARQUE Mesurez toujours le relèvement à l’extérieur
et non à l’intérieur d’immeubles, de tentes, caves ou autres
abris.
REMARQUE Eloignez la boussole des autres matériels
magnétiques. Evitez les objets magnétiques volumineux, lignes
électriques, les hauts parleurs, les moteurs électriques etc...
ETALONNAGE DU CAPTEUR DE LA BOUSSOLE
Vous trouverez lors de la première mise en service ou après
avoir remplacé la pile un guide de démarrage de l’étalonnage.
L’utilisateur peut également étalonner la boussole en suivant
les étapes suivantes :
Etalonner le capteur de la boussole :
1. Appuyez sur MODE pour naviguer dans le Mode
Boussole.
2. Appuyez et maintenez la touche SET pour débuter le
calibrage de la boussole.
3. Tournez la montre dans le sens inverse des aiguilles
d’une montre (en suivant la flèche
) à la même
vitesse que les segments en mouvement situés autour
de la circonférence de l’écran. Arrêtez de tourner à 1 ¼
tours, et l’affichage revient au mode boussole.
REMARQUE DONE (TERMINE) indique que l’étalonnage a
été effectué avec succès. Recommencez les étapes 2-3 si
FAIL (ECHEC) s’affiche.
REMARQUE La boussole devrait être une nouvelle fois
étalonnée :
• Avant la première utilisation.
• Lorsque les piles sont remplacées.
• En changeant d’environnements Les environnements
différents (peuplés/extérieurs) ont des champs magnétiques
différents affectant les lectures de la boussole.
• Lorsque l’appareil est exposé à de fortes sources
magnétiques, au froid extrême ou lorsque vous avez
le sentiment que d’autres conditions climatiques ont
affecté les relevés de la boussole.
• Si vous remarquez que la boussole n’indique pas
correctement la direction.
MODE CHRONOMETRE
ACTIVER LE CHRONOMETRE
1. Appuyez sur MODE pour naviguer dans le Mode
Chronomètre.
2. Appuyez sur ST / SP / + pour mettre en marche le
chronomètre.
REINITIALISER LE CHRONOMETRE
Appuyez sur RST / - pour réinitialiser le chronomètre.
REMARQUE
Vous pouvez seulement réinitialiser le chronomètre
à 00:00:00 si vous l’avez arrêté ou mis en pause.
MODE ALARME
REGLER L’ALARME
1. Appuyez sur MODE pour naviguer dans le Mode Alarme.
2. Appuyez et maintenez la touche SET pour avoir accès
aux réglages.
3. Appuyez sur ST / SP / + ou RST / - pour modifier les
réglages. Appuyez et maintenez ST / SP / + ou RST / -
pour modifier rapidement les valeurs.
4. Appuyez sur SET pour confirmer le réglage et passer au
suivant. Recommencez les étapes 3 et 4 pour chaque
option de réglage. Les options de réglage se présentent
de la manière suivante : heure, minute.
5. Appuyez sur MODE pour confirmer et sortir.
POUR ACTIVER/ DÉSACTIVER L’ALARME
1. Appuyez sur MODE pour naviguer dans le Mode Alarme.
2. Appuyez sur ST / SP / + ou sur RST / - pour activer ou
désactiver l’alarme.
3.
indique que l’alarme est activée.
4. Appuyez sur MODE pour confirmer et sortir.
COUPER LE SON DE L’ALARME
Lorsque l’alarme est activée, elle sonnera chaque jour
à l’heure préprogrammée. Appuyez sur n’importe quelle
touche pour arrêter l’alarme.
REMARQUE L’alarme est encore activée et se déclenchera
à nouveau le jour suivant.
RETRO-ECLAIRAGE ET VERROUILLAGE
DES TOUCHES
Pour activer le rétro-éclairage :
Appuyez sur
/ pendant 5 secondes, pour activer le
rétro-éclairage.
REMARQUE La fonction rétro-éclairage ne fonctionnera pas
si “
”ou “ ”sont affichés.
Pour alterner entre le verrouillage ou le déverrouillage
des touches :
Appuyez et maintenez
/ pendant 2 secondes.
indique que les boutons sont verrouillés.
UTILISATION DANS L’EAU
La montre boussole RA122 est étanche, jusqu’à 30 mètres
de profondeur (98 pieds).
NOTE Réglez la montre avant de l’exposer à un volume d’eau
trop important. Appuyer sur les touches lorsque vous êtes
dans l’eau ou lorsque vous êtes exposé à de fortes pluies peut
provoquer des infiltrations d’eau à l’intérieur de la montre.
CARACTERISTIQUES
Horloge en temps
réel
12 ou 24 h avec heure / minute
/ seconde
Chronomètre 00:00:00 to 99:59:59 (hr:min:sec)
Alimentation 1 pile CR2032 3 V
Température
de fonctionnement
0°C à 40°C
(32°F à 104°F)
Température
de rangement
-20°C à 60°C
(-40°F à 140°F)
PRECAUTIONS
Pour vous assurer d’utiliser correctement et en toute sécurité
ce produit, veuillez lire les mises en garde et l’ensemble de
ce manuel avant toute utilisation :
• Utilisez un tissu doux. Ne pas utiliser de produits de
nettoyage abrasifs ou corrosifs pouvant endommager
l’appareil. Nettoyez la montre avec de l’eau tiède
et un savon non agressif après chaque séance
d’entraînement. Ne jamais utiliser d’eau chaude et ne
pas le ranger s’il est toujours humide.
• Ne pas soumettre le produit à une force excessive, au
choc, à la poussière, aux changements de températures
ou à l’humidité. Ne pas exposer longtemps ce produit au
soleil. De telles actions peuvent endommager l’appareil.
• Ne pas trafiquer les composants internes. Cela pourrait
annuler votre garantie et endommager l’appareil.
L’appareil principal est composé de parties non
accessibles aux utilisateurs.
• Ne pas érafler l’écran LCD avec des objets durs, il
pourra être endommagé.
• Soyez prudent lors de la manipulation des piles.
• Retirez les piles à chaque fois que vous rangez le
produit pour une période indéterminée.
• Lors du changement de piles, veuillez utiliser des piles
neuves comme indiqué dans ce manuel.
• Ce produit est un instrument de précision. Ne jamais le
démonter. Veuillez contacter votre revendeur ou le service
après-vente si le produit nécessite une réparation.
• Ne jamais toucher les circuits électriques, et ce pour
éviter toute électrocution.
• Vérifiez toutes les fonctions importances si l’appareil n’a
pas été utilisé depuis un moment. Testez et nettoyez
régulièrement l’appareil. Faîtes réviser une fois par an
votre montre par un service d’entretien autorisé.
• Quand vous désirez vous débarrassez de ce produit,
jetez le selon les lois relatives aux déchets de votre pays
de résidence.
• En raison des limitations d’impressions, les images de ce
manuel peuvent être différentes de l’affichage actuel.
• Le contenu du présent manuel ne peut être reproduit
sans la permission du fabriquant.
REMARQUE Les caractéristiques techniques de ce
produit et le contenu de ce manuel peuvent être soumis à
modifications sans préavis.
À PROPOS D’OREGON SCIENTIFIC
Pour plus d‘informations sur les produits Oregon Scientific
France, rendez-vous sur notre site:www.oregonscientific.fr.
Si vous êtes aux Etats-Unis, vous pouvez contacter notre
support consommateur directement sur le site:
www2.oregonscientific.com/service/support.asp
OU par téléphone au: 1-800-853-8883
Pour des renseignements internationaux, rendez vous sur le
site: www2.oregonscientific.com/about/international.asp.
EUROPE - DÉCLARATION DE CONFORMITÉ
Par la présente, Oregon Scientific déclare que TRACKER
Montre Boussole Numérique (Modèle: RA122) est conforme
à la directive européenne 89/336/CE. Une copie signée
et datée de la déclaration de conformité est disponible sur
demande auprès de notre Service Client.
PLUIE
ECLABOUS
SURES
ETC
OK
DOUCHE
(EAU TIEDE
ET FROIDE)
NON
NATATION /
EAU PEU
PROFONDE)
PLONGEON
EN EAU PEU
PROFONDE
SURF / SPORTS
NAUTIQUES
NON
PLONGEE
AVEC TUBA
EAU
PROFONDE
NON
30 M
/ 98 PIEDS
NON
TRACKER
Digitale Kompassuhr
Modell: RA122
BEDIENUNGSANLEITUNG
EINLEITUNG
Wir danken Ihnen, dass Sie sich für die TRACKER
Digitale Kompassuhr von Oregon Scientific™ (RA122)
entschieden haben. Die RA122 wurde für den berufstätigen
Großstadtmenschen entworfen, der einen aktiven
Lebensstil genießt. Diese vielseitige Armbanduhr ist mit
einer Echtzeituhr, Stoppuhr, Hintergrundbeleuchtung und
Tastensperre ausgestattet und kann im Großstadtdschungel
verwendet werden; der integrierte Kompass macht sie zu
einem perfekten Begleiter, wenn Sie sich in die freie Natur
begeben.
WICHTIG
• Die in der RA122 integrierten Messfunktionen sind nicht dafür
vorgesehen, fachliche Messinstrumente oder industrielle
Präzisionsgeräte zu ersetzen. Die von dieser Uhr erzeugten
Werte sollten nur als Richtwerte angesehen werden.
• Wenn Sie sich mit Bergsteigen oder ähnlichen Aktivitäten
beschäftigen, bei denen ein Verlust der Orientierung
zu einer gefährlichen oder lebensbedrohlichen Lage
führen kann, achten Sie stets darauf, dass Sie einen
zweiten Kompass mit sich führen, mit dem Sie Ihre
Richtungsanzeigen bestätigen können.
• Oregon Scientific™ übernimmt keine Haftung für
Verluste oder andere Ansprüche Dritter, die durch die
Verwendung dieser Uhr entstehen könnten.
BEDIENTASTEN
1
2
3
5
4
1. MODE: Auf andere Anzeige wechseln; rasches Beenden
eines beliebigen Einstellungsmodus
2. SET: Einstellungsmodus aufrufen; Einstellungswert
bestätigen; Kompasskalibrierung starten
3. ST / SP/ + : Wert der Einstellung einhöhen; Stoppuhr
starten / beenden
4.
/ : Hintergrundbeleuchtung aktivieren; Tasten sperren
5. RST / - : Wert der Einstellung verringern; Stoppuhr
zurücksetzen
LCD-ANZEIGE
1
2
3
4
5
6
8
7
9
10
1. : 12-Stundenuhr
2.
Gibt an, dass die Stoppuhr angezeigt oder ausgeführt
wird
3.
Gibt an, dass der Alarm aktiviert ist
4. Uhr / Kalender, Stoppuhr anzeigen; Kompasspeilung,
Alarmzeit oder Modusbanner
5. Haupt- / Nebenhimmelsrichtung anzeigen
6. Kompasssegmente: Norden anzeigen; Kalibrierungsstatus
7.
Gibt an, dass die Ladung der Batterie niedrig ist
8.
Gibt an, dass der Signalton ausgeschaltet ist
9.
Gibt an, dass die Tasten gesperrt sind
10.
Gibt die zu drehende Richtung bei Kalibrierung des
Kompass an
ERSTE SCHRITTE
GERÄT EINSCHALTEN (NUR BEI ERSTMALIGER
INBETRIEBNAHME)
Drücken Sie 2 Sekunden lang eine beliebige Taste, um die
LCD-Anzeige zu aktivieren.
BATTERIEWECHSEL
Die RA122 benötigt 1 Batterie des Typs CR2032, 3V, die
bereits im Gerät installiert ist. Die Batteriewarnanzeigen
werden nachstehend erläutert.
SYMBOL FÜR
SCHWACHE BATTERIE
BESCHREIBUNG
oder
Die Ladung der Batterie ist
niedrig.
- - -
Erscheint, wenn die Ladung
der Batterie für den Betrieb
zu niedrig ist. “- - -“ wird
anstelle der Kompasswerte
angezeigt.
HINWEIS Während das Symbol für die schwache Batterie
angezeigt wird, sind die Kompassfunktion, die Kalibrierung,
die Alarmsignalisierung und die Hintergrundbeleuchtung
deaktiviert. Das Gerät nimmt den regulären Betrieb wieder
auf, wenn die Batterie ersetzt wird.
HINWEIS Wenn die Batterie ausgetauscht wird, ist es
unbedingt erforderlich, den magnetischen Sensor des
Kompass neu zu kalibrieren. (Siehe Abschnitt “Kompass”)
HINWEIS Wenn Sie die Batterie austauschen müssen,
empfehlen wir dringend, sich an Ihren Fachhändler oder
unsere Kundendienststelle zu wenden.
So wechseln Sie die Batterie:
1. Öffnen Sie den Batteriefachdeckel mit einem kleinen
Kreuzschraubenzieher. Bewahren Sie die Schrauben
nach Öffnung an einem sicheren Ort auf, damit sie nicht
verlorengehen.
2. Entnehmen Sie die alte Batterie, legen Sie die neue ein und
achten Sie auf die Übereinstimmung der Polaritäten.
3. Bringen Sie den Deckel mit dem Kreuzschaubenzieher
wieder an.
DE
BETRIEBSMODI
Drücken Sie auf MODE, um zwischen folgenden Modi
umzuschalten:
• Uhrzeitmodus
• Datumsmodus
• Kompassmodus
• Chronomodus (Stoppuhr)
• Alarmmodus
UHRZEITMODUS
SO STELLEN SIE ZEIT UND DATUM EIN
1. Drücken Sie auf MODE, um zum Uhrzeitmodus zu
navigieren.
2. Halten Sie SET gedrückt, um die Einstellungen aufzurufen.
3. Drücken Sie auf ST / SP / + oder RST / -, um die Werte
der Einstellung zu ändern. Halten Sie ST / SP / + oder
RST / - gedrückt, um die Werte rasch zu ändern.
4. Drücken Sie auf SET, um die Einstellung zu bestätigen und
zur nächsten überzugehen. Wiederholen Sie die Schritte
3-4 für jede Einstellungsoption. Die Einstellungsoptionen
lauten wie folgt: 12- / 24-Stundenzeit; Stunde; Minute; Jahr;
Tag-Monat / Monat-Tag; Monat; Tag; Signalton Ein/Aus.
5. Drücken Sie zu einem beliebigen Zeitpunkt auf MODE,
um die Einstellungen zu bestätigen und zu beenden.
DATUMSMODUS
Dieser Modus wird verwendet, um das aktuelle Datum.
Drücken Sie auf MODE, um zum Datumsmodus zu
navigieren.
KOMPASSMODUS
ÜBER DEN KOMPASS
Der Kompass zeigt neben der Peilung in Grad in nördlicher
Richtung 16 Haupt- / Nebenhimmelsrichtungen an. Der äußere
Kreis der Anzeige besteht aus 36 Segmenten, die die Peilung
grafisch darstellen. N gibt Norden an (siehe unten).
11
SO ZEIGEN SIE DEN KOMPASS AN
• Drücken Sie auf MODE, um zum Kompassmodus zu
navigieren.
HINWEIS Die Kompassanzeige ist jeweils 30 Sekunden
lang aktiviert. Anschließend kehrt die Anzeige automatisch
zur Uhrzeit zurück.
HINWEIS Führen Sie die Peilungen stets im Freien und
nicht innerhalb von Gebäuden, Zelten, Höhlen oder anderen
Unterständen durch.
HINWEIS Die Kompassmessungen sollten entfernt von
magnetischen Gegenständen vorgenommen werden.
Vermeiden Sie große magnetische Objekte, Stromleitungen,
Lautsprecher, Elektromotoren, usw.
KALIBRIERUNG DES KOMPASS-SENSOR
Es ist eine Start-Kalibrierungshilfe vorhanden, wenn die Uhr
zum ersten Mal eingeschaltet oder die Batterie ausgetauscht
wird. Der Benutzer kann den Kompass auch anhand der
nachfolgenden Schritte kalibrieren.
So kalibrieren Sie den Kompass-Sensor:
1. Drücken Sie auf MODE, um zum Kompassmodus zu
navigieren.
2. Halten Sie SET gedrückt, um mit der Kalibrierung des
Kompass zu beginnen.
3. Drehen Sie die Uhr mit der gleichen Geschwindigkeit
gegen den Uhrzeigersinn (wie der Pfeil ), mit der
sich die Segmente im äußeren Kreis der Anzeige
bewegen. Die Drehung ist beendet, wenn Sie 1¼
Umdrehungen vorgenommen haben und das Gerät zur
Kompassanzeige zurückkehrt.
HINWEIS DONE gibt an, dass die Kalibrierung erfolgreich
beendet wurde. Wiederholen Sie die Schritte 2-3 erneut,
wenn die Anzeige FAIL erscheint.
HINWEIS Der Kompass sollte kalibriert werden:
• Vor der ersten Inbetriebnahme.
• Wenn die Batterien ersetzt werden.
• Wenn sich die Umgebung ändert. Unterschiedliche
Umgebungen (bevölkert / Freiland) weisen verschiedene
Magnetfelder auf, die die Messwerte des Kompass
beeinflussen.
• Jedesmal, wenn er starken Magnetfeldern oder extremer
Kälte ausgesetzt war bzw. bei vermuteter Beeinträchtigung
der Messwerte durch sonstige Umwelteinflüsse.
• Wenn Sie feststellen, dass die Richtungsanzeige des
Kompass nicht korrekt ist.
STOPPUHR-MODUS
SO STARTEN SIE DIE STOPPUHR
1. Drücken Sie auf MODE, um zum Chronomodus zu
navigieren.
2. Drücken Sie auf ST / SP / +, um die Stoppuhr zu starten
/ zu beenden.
SO SETZEN SIE DIE STOPPUHR ZURÜCK
Drücken Sie auf RST / -, um die Stoppuhr zurückzusetzen.
HINWEIS Die Stoppuhr kann nur auf 00:00:00 zurückgesetzt
werden, wenn sie beendet oder unterbrochen wurde.
Page 5

TRACKER
Orologio Bussola Digitale
Modello: RA122
MANUALE PER L’UTENTE
INTRODUZIONE
Grazie per aver scelto TRACKER Orologio bussola digitale
di Oregon Scientific™(RA122). Il modello RA122 è stato
progettato per chi ama il design e pratica uno stile di vita
attivo. Dotato di orologio, retroilluminazione e blocco dei
tasti, questo versatile orologio può essere usato nella
giungla metropolitana, mentre la bussola incorporata lo
rende il compagno ideale per le uscite all’aperto.
IMPORTANTE
• Le funzioni di rilevazione dell’unità RA122 non sostituiscono
quelle di dispositivi professionali e industriali di misurazione
o di precisione. I valori rilevati da questo orologio devono
essere considerati puramente indicativi.
• Quando si effettuano scalate o si praticano altre attività in cui
smarrirsi può dare luogo a situazioni rischiose e di pericolo,
utilizzare sempre una seconda bussola per confermare il
rilevamento delle direzioni.
• Oregon Scientific™ declina ogni responsabilità per qualsiasi
perdita o per eventuali richieste di danni da parte di terzi che
possano sorgere dall’uso di questo orologio.
PULSANTI DI CONTROLLO
1
2
3
5
4
1. MODE: consente di passare ad un’altra visualizzazione e di
abbandonare rapidamente una modalità di impostazione
2. SET: consente di accedere alla modalità di impostazione,
di confermare il valore dell’impostazione e di avviare la
calibrazione della bussola
3. ST / SP / + : consente di aumentare il valore
dell’impostazione e di avviare/interrompere il cronometro
4.
/ : consente di attivare la retroilluminazione e il
blocco dei tasti
5. RST / - : consente di diminuire il valore dell’impostazione
e di azzerare il cronometro
LCD
1
2
3
4
5
6
8
7
9
10
1. : orologio in formato 12 ore
2.
indica che il cronometro viene visualizzato o che è in
funzione
3. indica che la sveglia è attiva
4. Visualizza orologio / calendario, cronometro, rilevamento
della bussola, ora della sveglia o banner della modalità
5. Visualizza la direzione con punto cardinale o ordinale
6. Segmenti della bussola: indica il nord e lo stato della
calibrazione
7. indica che la batteria è in esaurimento
8.
indica che il segnale acustico è disattivato
9.
indica che il blocco dei tasti è attivo
10. indica la direzione da dare durante la calibrazione della
bussola
OPERAZIONI PRELIMINARI
ACCENSIONE DEL DISPOSITIVO (SOLO LA PRIMA VOLTA)
Per attivare il display LCD, premere un tasto qualsiasi per
2 secondi.
SOSTITUZIONE DELLE BATTERIE
L’unità RA122 funziona con 1 batteria da 3 V di tipo CR2032,
già inserita. Cfr. Fate riferimento alla tabella sottostante per le
informazioni relative alla batteria.
ICONA BATTERIA
IN ESAURIMENTO
DESCRIZIONE
or
La batteria è in esaurimento.
- - -
Appare quando la carica è troppo
debole per mettere in funzione
l’unità. “- -” viene visualizzato al
posto dei valori della bussola.
NOTA Mentre viene visualizzata l’icona della batteria in
esaurimento, la funzione di bussola, di calibrazione della
bussola, il segnale acustico della sveglia e la retroilluminazione
sono disattivati. La visualizzazione ritornerà alla normalità
dopo aver sostituito la batteria.
NOTA Quando la batteria viene sostituita, è importante
ricalibrare il sensore magnetico della bussola. (Cfr. paragrafo
“Bussola”)
NOTA Se è necessario sostituire la batteria, si consiglia
di contattare il proprio rivenditore o il nostro servizio di
assistenza clienti.
Sostituzione delle batterie:
1. Con un piccolo cacciavite Phillips, togliere la copertura
del vano batterie. Una volta aperto, mettere le viti in un
luogo sicuro per evitare di perderle.
2. Togliere la batteria vecchia ed inserire quella nuova
rispettando le polarità.
3. Riavvitare la copertura con il cacciavite Phillips.
MODALITÀ DI FUNZIONAMENTO
Premere MODE per scorrere tra:
• Modalità Ora
• Modalità Data
• Modalità Bussola
• Modalità Chrono (cronometro)
• Modalità Sveglia
MODALITÀ ORA
IMPOSTAZIONE DI ORA E DATA
1. Premere MODE per navigare fino alla Modalità Ora.
2. Tenere premuto SET per accedere alle impostazioni.
3. Premere ST / SP / + o RST/ - per cambiare i valori
dell’impostazione. Tenere premuto ST /SP / + o RST /
- per modificare rapidamente i valori.
4. Premere SET per confermare e passare all’impostazione
successiva. Ripetere i punti 3-4 per ciascuna opzione di
impostazione. Le opzioni di impostazione sono: formato
ora 12 / 24, ore, minuti, anno, giorno-mese / mese-giorno,
mese, giorno, segnale acustico attivato/disattivato.
5. Premere MODE per confermare e abbandonare le
impostazioni in qualsiasi momento.
MODALITÀ DATA
Questa modalità viene usata per visualizzare la data
corrente. Premere MODE per passare alla Modalità Data.
MODALITÀ BUSSOLA
INFORMAZIONI SULLA BUSSOLA
La bussola indica la posizione in gradi rispetto al nord, e
16 direzioni con punti cardinali/ordinali. La circonferenza
esterna del display consta di 36 segmenti che indicano
graficamente la propria posizione. N indica il nord, come
mostrato qui sotto.
VISUALIZZAZIONE DELLA BUSSOLA
• Premere MODE per passare alla Modalità Bussola.
NOTA
La visualizzazione della bussola rimane attiva per
30 secondi alla volta. Successivamente, la visualizzazione
tornerà automaticamente a quella dell’ora.
NOTA
Eseguire sempre il rilevamento della posizione all’aperto,
non all’interno di edifici, tende, grotte o altri luoghi chiusi.
NOTA
I rilevamenti della bussola devono essere eseguiti
lontano da materiali magnetici. Evitare grandi oggetti
magnetici, linee elettriche, altoparlanti, motori elettrici etc.
CALIBRAZIONE DEL SENSORE DELLA BUSSOLA
La prima volta che l’orologio viene acceso, o dopo la
sostituzione della batteria, seguire questi semplici passi per la
calibrazione.
Calibrazione del sensore della bussola:
1. Premere MODE per passare alla Modalità Bussola.
2. Tenere premuto SET per avviare la calibrazione della
bussola.
3. Ruotare l’orologio in senso antiorario (seguendo la
direzione della freccia
) alla stessa velocità dei
segmenti che si muovono intorno alla circonferenza
del display. La rotazione terminerà dopo 1¼ di giro e
riapparirà la visualizzazione della bussola.
NOTA
La scritta DONE indica che la calibrazione è stata
completata con successo. Se appare la scritta FAIL, ripetere
nuovamente i passaggi 2-3.
NOTA È necessario calibrare la bussola:
• Prima di utilizzarla per la prima volta.
• Dopo la sostituzione della batteria.
• Quando si cambia ambiente. Ambienti diversi (abitati /
all’aperto) hanno campi magnetici diversi che condizionano
il rilevamento della bussola.
• Ogni volta che viene esposta a forti sorgenti
elettromagnetiche, freddo estremo, o se si sospettano
altre condizioni ambientali che potrebbero influenzarne
le rilevazioni.
• Se ci si rende conto che la bussola non sta indicando la
direzione corretta.
MODALITÀ CRONOMETRO
AVVIO DEL CRONOMETRO
1. Premere MODE per passare alla Modalità Chrono.
2. Premere ST / SP / + per avviare e interrompere il
cronometro.
AZZERAMENTO DEL CRONOMETRO
Premere RST / - per azzerare il cronometro.
NOTA Il cronometro può essere riportato a 00:00:00 solo se
è stato interrotto o messo in pausa.
MODALITÀ SVEGLIA
IMPOSTAZIONE DELLA SVEGLIA
1. Premere MODE per passare alla Modalità Sveglia.
2. Tenere premuto SET per accedere alle impostazioni.
3. Premere ST / SP / + o RST/ - per cambiare i valori
dell’impostazione.
Tenere premuto ST /SP / + o RST / - per
modificare rapidamente i valori.
4. Premere SET per confermare e passare all’impostazione
successiva. Ripetere i passaggi 3-4 per ciascuna
opzione di impostazione. Le opzioni di impostazione
sono: ore, minuti.
5. Premere MODE per confermare e abbandonare le
impostazioni in qualsiasi momento.
ATTIVAZIONE / DISATTIVAZIONE DELLA SVEGLIA
1. Premere MODE per passare alla Modalità Sveglia.
2. Premere ST / SP / + o RST / - per attivare o disattivare
la sveglia.
3. indica che la sveglia è attiva.
4. Premere MODE per confermare e uscire.
SILENZIAMENTO DELLA SVEGLIA
Quando la sveglia è attiva, suonerà ogni giorno all’ora
impostata. Premere un tasto qualsiasi per interrompere la
sveglia per il giorno corrente.
NOTA
La sveglia è ancora attiva e suonerà nuovamente il
giorno successivo.
RETROILLUMINAZIONE E BLOCCO DEI TASTI
Attivazione della retroilluminazione:
Premere
/ per attivare la retroilluminazione per 5
secondi.
NOTA La retroilluminazione non funziona se sul display sono
visualizzate le icone“
”o “ ”.
Attivazione / disattivazione del blocco dei tasti:
Tenere premuto
/ per 2 secondi. L’icona indica
che i tasti sono bloccati.
USO IN ACQUA
L’orologio RA122 è resistente all’acqua fino a 30 metri.
NOTA
Impostare l’orologio prima di esporlo ad acqua
eccessiva. Se i pulsanti vengono premuti mentre si è in acqua
o durante forti temporali, l’acqua potrebbe entrare nell’unità.
SPECIFICHE
Formato orologio
12/24 ore con ore / minuti
/ secondi
Cronometro
Da 00:00:00 a 99:59:59
(ore:min:sec)
Alimentazione 1 batteria CR2032 da 3 V
Temperatura di esercizio da 0°C a 40°C
Temperatura di stoccaggio da -20°C a 60°C
AVVERTENZE
Per utilizzare il prodotto in modo sicuro e corretto, leggere
queste avvertenze e tutto il manuale prima dell’uso.
• Utilizzare un panno morbido, leggermente inumidito.
Non utilizzare prodotti di pulizia abrasivi o corrosivi, in
quanto potrebbero causare danni. Non utilizzare mai i
prodotti in acqua calda né riporli se bagnati.
• Non sottoporre il prodotto a forza eccessiva, urti,
polvere, variazioni di temperatura o umidità. Non esporre
il prodotto a luce solare diretta per lunghi periodi. Un
simile trattamento può comportare il malfunzionamento
del prodotto.
• Non manomettere i componenti interni. In questo modo si
invalida la garanzia del prodotto e si possono provocare
danni. L’unità principale non contiene componenti che
possono essere riparati dall’utente.
• Non graffiare il display LCD con oggetti duri in quanto si
potrebbero causare danni.
• Manipolare le batterie con attenzione.
• Togliere le batterie ogni volta che si prevede di lasciare
inutilizzato il prodotto per un lungo periodo di tempo.
• Al momento della sostituzione delle batterie, utilizzare
batterie nuove come indicato in questo manuale per
l’utente.
• Il prodotto è uno strumento di precisione. Non tentare
mai di aprirlo. Contattare il proprio rivenditore o il nostro
servizio clienti se il prodotto necessita di riparazioni.
• Non toccare il circuito elettrico esposto, poiché questo
può provocare scosse elettriche.
• Controllare tutte le funzioni più importanti se il prodotto
non è stato utilizzato per un lungo periodo di tempo.
Controllare e pulire l’apparecchio regolarmente.
• Al momento dello smaltimento di questo prodotto, agire
in conformità con i regolamenti locali sullo smaltimento
dei rifiuti.
• A causa di limitazioni di stampa, le immagini di questo
manuale possono differire dalla realtà.
• Il contenuto di questo manuale non può essere
ristampato senza l’autorizzazione del fabbricante.
NOTA Le specifiche tecniche del prodotto e il contenuto del
manuale per l’utente possono essere modificati senza preavviso.
INFORMAZIONI AGLI UTENTI DEI PRODOTTI DI
TIPO “DOMESTICO”
INFORMAZIONE AGLI UTENTI
ai sensi dell’art. 13 del Decreto Legislativo 25 luglio 2005,
n. 151”Attuazione delle Direttive 2002/95/CE, 2002/96/
CE e 2003/108/CE, relative alla riduzione dell’uso di
sostanze pericolose nelle apparecchiature elettriche ed
elettroniche, nonché allo smaltimento dei rifiuti”
Il simbolo del cassonetto barrato riportato sull’apparecchiatura
o sulla sua confezione indica che il prodotto alla fine della
propria vita utile deve essere raccolto separatamente dagli
altri rifiuti.
L’utente dovrà, pertanto, conferire l’apparecchiatura giunta
a fine vita agli idonei centri di raccolta differenziata dei
rifiuti elettronici ed elettrotecnici, oppure riconsegnarla
al rivenditore al momento dell’acquisto di una nuova
apparecchiatura di tipo equivalente, in ragione di uno a uno.
L’adeguata raccolta differenziata per l’avvio successivo
dell’apparecchiatura dismessa al riciclaggio, al trattamento
e allo smaltimento ambientalmente compatibile contribuisce
ad evitare possibili effetti negativi sull’ambiente e sulla
salute e favorisce il reimpiego e/o riciclo dei materiali di cui è
composta l’apparecchiatura.
Lo smaltimento abusivo del prodotto da parte dell’utente
comporta l’applicazione delle sanzioni amministrative previste
dalla normativa vigente
INFORMAZIONI SU OREGON SCIENTIFIC
Per avere maggiori informazioni sui nuovi prodotti Oregon
Scientific visita il nostro sito internet www.oregonscientific.it,
dove potrai trovare tutte le informazioni di cui hai bisogno.
Per ricerche di tipo internazionale puoi visitare invece il sito
www2.oregonscientific.com/about/international.asp.
DICHIARAZIONE DI CONFORMITA’ UE
Oregon Scientific dichiara che questo prodotto (Modello: RA122)
è conforme alla direttiva EMC 89/336/CE. Una copia firmata
e datata della Dichiarazione di Conformità è disponibile, su
richiesta, tramite il servizio clienti della Oregon Scientific.
IT
PIOGGIA
SPRUZZI
ETC
SI
DOCCIA
NO
NUOTATE
NON
IMPEGNATIVE
/ ACQUA
BASSA
TUFFI
IN ACQUA
BASSA /
SURF/SPORT
ACQUATICI
NO
IMMERSIONI
/ TUFFI IN
ACQUA
PROFONDA
NO
30M / 98
PIEDI
NO
TRACKER
Montre Boussole Numérique
Modèle : RA122
MANUEL DE L’UTILISATEUR
INTRODUCTION
Nous vous remercions d’avoir choisi la TRACKER Montre
Boussole Numérique (RA122) de Oregon Scientific. Le
modèle RA122 a été conçu à l’attention des professionnels
urbains au style de vie actif. Equipée d’une horloge, des
fonctions de rétro-éclairage et de verrouillage des touches,
cette montre polyvalente est parfaite pour la jungle urbaine
; sans oublier sa boussole intégrée qui fait d’elle un
compagnon idéal pour vos aventures en extérieur.
IMPORTANT
• Les fonctions de mesure de l’appareil RA122 ne doivent
pas se substituer aux dispositifs de précision industriels
ni aux mesures effectuées par des professionnels.
Les relevés enregistrés par cette montre doivent être
considérés uniquement comme des représentations
plus ou moins précises.
• Pour vos excursions de randonnée en montagne ou pour
d’autres activités, où perdre le sens de l’orientation peut
s’avérer dangereux, assurez-vous d’utiliser une deuxième
boussole pour confirmer les relevés d’orientation.
• Oregon Scientific ™ ne peut être tenu responsable de la
perte de l’appareil ni des réclamations de tierces parties
relatives à son utilisation.
TOUCHES DE COMMANDE
1
2
3
5
4
1. MODE : Permet de passer à un autre mode, de sortir
rapidement du mode de réglage
2. SET : Permet d’entrer dans le mode réglage ; de confirmer la
valeur d’un réglage et d’initier l’étalonnage de la boussole
3. ST/SP/ + : Permet d’augmenter la valeur d’un réglage,
de lancer/arrêter le chronomètre
4.
/ : Active le rétro-éclairage et le verrouillage des
touches
5. RST / - : Permet de diminuer la valeur d’un réglage, de
réinitialiser le chronomètre
ECRAN LCD
1
2
3
4
5
6
8
7
9
10
1. : Horloge format 12 H
2.
Indique si le chronomètre s’affiche ou est en
fonctionnement
3.
Indique que l’alarme est activée
4. Affiche l’horloge / calendrier, le chronomètre, le relèvement,
l’heure de l’alarme ou les bannières des modes
5. Affiche les points cardinaux / ordinaux
6. Segments de la boussole : indique le Nord, statut de
l’étalonnage
7.
Indique que la pile est faible
8.
Indique le bip est désactivé
9.
Indique que les touches sont verrouillées
10.
Indique la direction où tourner lors de l’étalonnage
de la boussole
AU COMMENCEMENT
METTRE EN MARCHE L’APPAREIL (UNIQUEMENT
LORS DE LA PREMIÈRE UTILISATION)
Appuyez sur n’importe quel bouton pendant 2 secondes
pour activer l’écran LCD.
REMPLACER LA PILE
Le modèle RA122 fonctionne avec une pile CR2032, d’ores
et déjà installée. Voir ci-dessous pour toute recommandation
relative à la pile.
ICONE DE FAIBLESSE
DES PILES
DESCRIPTION
ou
La pile de la montre est
faible.
- - -
S’affiche lorsque la pile est trop
faible. “- -” s’affiche à la place
des valeurs de la boussole.
REMARQUE Si l’icône de faiblesse des piles s’affiche, les
fonctions de la boussole, d’étalonnage de la boussole, de
bip de l’alarme et du rétro-éclairage sont désactivées. Elles
reviendront en mode normal une fois les piles remplacées.
REMARQUE Lorsque l’on remplace les piles, il est important
d’étalonner à nouveau le capteur magnétique. (Voir section
« Boussole »)
REMARQUE Si vous devez remplacer la pile, nous vous
recommandons de contacter le distributeur ou le service
clientèle.
Pour remplacer la pile :
1. Utilisez un petit tournevis pour retirer le couvercle du
compartiment des piles. Une fois ouvert, placez les vis
dans un endroit où vous êtes certain de les récupérer.
2. Remplacez la pile usagée et insérez la nouvelle en
respectant les signes de polarité.
3. Replacez le couvercle en serrant les vis à l’aide du tournevis.
MODES DE FONCTIONNEMENT
Appuyez sur MODE pour alterner entre :
FR
• Mode Heure
• Mode Date
• Mode Boussole
• Mode Chronomètre (CHRONO)
• Mode Alarme
MODE HEURE
POUR RÉGLER L’HEURE ET LA DATE
1. Appuyez sur MODE pour naviguer dans le Mode Heure.
2. Appuyez et maintenez la touche SET pour avoir accès
aux réglages.
3. Appuyez sur ST / SP / + ou RST / - pour modifier les
réglages. Appuyez et maintenez ST / SP / + ou RST / -
pour modifier rapidement les valeurs.
4. Appuyez sur SET pour confirmer le réglage et passer au
suivant. Recommencez les étapes 3 et 4 pour chaque
option de réglage. Les options de réglage se présentent de
la manière suivante : Heure : format 12 ou 24 h ; heure ;
minute ; année ; jour-mois / mois-jour ; mois ; jour ; bip on/off.
5. Appuyez sur MODE pour confirmer et sortir.
MODE DATE
Utilisez ce mode pour visualiser la date actuelle. Appuyez
sur MODE pour naviguer dans le Mode Date.
MODE BOUSSOLE
A PROPOS DE LA BOUSSOLE
La boussole vous indique le relèvement du nord
géographique et les 16 points cardinaux / ordinaux. La
circonférence extérieure consiste en 36 segments qui
affichent graphiquement votre emplacement. N indique le
Nord comme indiqué ci-dessous.
VISUALISER LA BOUSSOLE
• Appuyez sur MODE pour naviguer dans le Mode
Boussole.
REMARQUE L’affichage de la boussole est actif pendant
30 secondes à chaque fois. Après cela, l’affichage revient
automatiquement à l‘affichage de l’heure.
REMARQUE Mesurez toujours le relèvement à l’extérieur
et non à l’intérieur d’immeubles, de tentes, caves ou autres
abris.
REMARQUE Eloignez la boussole des autres matériels
magnétiques. Evitez les objets magnétiques volumineux, lignes
électriques, les hauts parleurs, les moteurs électriques etc...
ETALONNAGE DU CAPTEUR DE LA BOUSSOLE
Vous trouverez lors de la première mise en service ou après
avoir remplacé la pile un guide de démarrage de l’étalonnage.
L’utilisateur peut également étalonner la boussole en suivant
les étapes suivantes :
Etalonner le capteur de la boussole :
1. Appuyez sur MODE pour naviguer dans le Mode
Boussole.
2. Appuyez et maintenez la touche SET pour débuter le
calibrage de la boussole.
3. Tournez la montre dans le sens inverse des aiguilles
d’une montre (en suivant la flèche
vitesse que les segments en mouvement situés autour
de la circonférence de l’écran. Arrêtez de tourner à 1 ¼
tours, et l’affichage revient au mode boussole.
REMARQUE DONE (TERMINE) indique que l’étalonnage a
été effectué avec succès. Recommencez les étapes 2-3 si
FAIL (ECHEC) s’affiche.
REMARQUE La boussole devrait être une nouvelle fois
étalonnée :
• Avant la première utilisation.
• Lorsque les piles sont remplacées.
• En changeant d’environnements Les environnements
différents (peuplés/extérieurs) ont des champs magnétiques
différents affectant les lectures de la boussole.
• Lorsque l’appareil est exposé à de fortes sources
magnétiques, au froid extrême ou lorsque vous avez
le sentiment que d’autres conditions climatiques ont
affecté les relevés de la boussole.
• Si vous remarquez que la boussole n’indique pas
correctement la direction.
MODE CHRONOMETRE
ACTIVER LE CHRONOMETRE
1. Appuyez sur MODE pour naviguer dans le Mode
Chronomètre.
2. Appuyez sur ST / SP / + pour mettre en marche le
chronomètre.
1
2
3
5
4
1
2
3
4
5
6
8
7
9
10
Page 6

TRACKER
Digitaal Kompashorloge
Model: RA122
HANDLEIDING
INTRODUCTIE
Dank u dat u voor het Oregon Scientific TRACKER
Digitaal Kompashorloge (RA122) gekozen hebt. De
RA122 is ontworpen voor de mensen die er graag een
actieve levensstijl op na houden. Dit veelzijdige horloge
is voorzien van een klok, chronometer, schermverlichting
en toetsblokkering, en is zowel in de stedelijke jungle als
daarbuiten de perfecte metgezel.
BELANGRIJK
• De in de RA122 ingebouwde meetfuncties zijn niet
bedoeld om professionele of industriële meetapparatuur
te vervangen. De door dit horloge berekende waarden
moeten gezien worden als een redelijke benadering van
de werkelijke waarden.
• Als u gaat bergwandelen of andere activiteiten
onderneemt waarin verdwaald raken een gevaarlijke
of levensbedreigende situatie kan veroorzaken, neem
dan altijd een tweede kompas mee om de metingen te
verifiëren.
• Oregon Scientific™ is niet verantwoordelijk voor enige
verliezen, of claims van derden, voortkomend uit het
gebruik van dit horloge.
BESTURINGKNOPPEN
1
2
3
5
4
1. MODE: Wisselen van scherm; snel instellingsmodus
verlaten
2. SET: Instellingsmodus openen; instelling bevestigen;
kompas ijken
3. ST / SP / + : Waarde van instelling verhogen; Starten /
stoppen chronometer
4.
/ : Schermverlichting activeren; Toetsblokkering
activeren
5. RST / -: waarde van instelling verlagen; Chronometer
resetten
LCD-SCHERM
1
2
3
4
5
6
8
7
9
10
1. : 12-uurs klokformaat
2.
Geeft aan dat de chronometer loopt, of wordt
weergegeven
3.
Geeft aan dat het alarm aan is
4. Geeft klok / kalender, chronometer weer; kompasrichting,
alarmtijd of modusbanners
5. Geeft kardinale / ordinale richting weer
6. Kompassegment: toont het noorden; ijkstatus
7.
Geeft aan dat de batterij leeg raakt
8.
Geeft aan dat de pieptoon uit staat
9.
Geeft aan dat toetsblokkering actief is
10.
Geeft aan welke richting u op moet draaien tijdens
het ijken van het kompas
STARTEN
HET HORLOGE AANZETTEN (ALLEEN EERSTE KEER)
Druk op een willekeurige knop gedurende 2 seconden om
het scherm te activeren.
BATTERIJEN VERVANGEN
RA122 gebruikt 1 x CR2032 3V batterij, die al in het apparaat
zit. Zie de hieronder voor batterijwaarschuwingen.
BATTERIJINDICATOR
BESCHRIJVING
of
Batterij raakt leeg.
- - -
Verschijnt wanneer de batterij te
leeg is om te kunnen gebruiken.
“- -” verschijnt op het scherm in
plaats van de kompaswaarden.
NB Als het batterij-icoon wordt weergegeven, zijn de functies
kompas, kompas ijken, alarm zoemer en schermverlichting
niet beschikbaar. Zodra de batterij vervangen is, wordt dit
weer normaal.
NB Wanneer u de batterij vervangen hebt, moet u de
magnetische kompassensor opnieuw ijken. (Zie sectie
“Kompas”)
NB Wanneer de batterij vervangen moet worden, raden u
aan om contact op te nemen met uw verkooppunt of onze
klantenservice.
Om de batterij te vervangen:
1. Gebruik een kruiskopschroevendraaier om het klepje
van het batterijvak te verwijderen. Zorg dat u de
schroeven niet verliest terwijl het batterij vak open is.
2. Verwijder de oude batterij en plaats de nieuwe met de
polariteit zoals aangegeven.
3. Of het klepje weer terug met de kruiskopschroevendraa
ier.
NL
BEDIENINGSMODI
Druk MODE om te schakelen tussen:
• Tijdmodus
• Datummodus
• Kompasmodus
• Chronometermodus
• Alarmmodus
KLOKMODUS
OM TIJD EN DATUM IN TE STELLEN
1. Druk MODE om naar de Tijdmodus te gaan.
2. Houd SET ingedrukt om in te stellen.
3. Druk ST / SP / + of RST / - om de instellingen te wijzigen.
Houd ST / SP / + of RST / - ingedrukt om de waarden
sneller te wijzigen.
4. Druk op SET om te bevestigen en verder te gaan
met de volgende instelling. Herhaal stappen 3-4 voor
elke volgende instelling. De instellingsopties zijn de
volgende: 12 / 24-uur formaat; uren; minuten; jaar; dagmaand / maand-dag; maand; dag; zoemer aan/uit.
5. Druk op MODE om te bevestigen en de instellingsmodus
te verlaten.
DATUMMODUS
Deze modus kunt u gebruiken om de huidige datum. Druk
MODE om naar de Datummodus te gaan.
KOMPASMODUS
OVER HET KOMPAS
Het kompas toont de richting in graden vanaf het noorden,
alsmede 16 kardinale / ordinale punten. De buitenste rand
van het scherm bestaat uit 36 segmenten die de richting
grafisch weergeven. N geeft het noorden aan, zoals
hieronder weergegeven.
OM HET KOMPAS TE BEKIJKEN
• Druk MODE om naar de Kompasmodus te gaan.
NB
Het kompasscherm is gedurende 30 seconden te zien.
Hierna zal het scherm automatisch terugkeren naar de
tijdweergave.
NB controleer altijd uw richting in de buitenlucht, niet in
gebouwen, tenten, grotten, etc.
NB Het aflezen van het kompas moet uit de buurt van
magnetische materialen gebeuren. Blijf uit de buurt van
magnetische objecten, hoogspanningskabels, luidsprekers,
elektrische motoren, etc.
KOMPASSENSOR IJKEN
Dit is een startlijst voor het ijken van het horloge als u het voor
het eerst aanzet, of nadat u de batterijen vervangen hebt.
De gebruiker kan het kompas ook ijken door onderstaande
stappen te volgen.
Om de kompassensor te ijken:
1. Druk MODE om naar de Kompasmodus te gaan.
2. Houd SET ingedrukt om het ijken van het kompas te
beginnen.
3. Draai het horloge tegen de klok in (volgens de pijl )
met dezelfde snelheid als de bewegende segmenten op
het scherm. De rotatie is afgelopen zodra u 1¼ draai
heeft gemaakt, en het horloge zal terug keren naar het
kompasscherm.
NOTE DONE geeft aan dat het ijken met succes voltooid
is. Herhaal stappen 2-3 als opnieuw als FAIL wordt
weergegeven.
NB Het kompas dient geijkt te worden:
• Vóór het eerste gebruik.
• Na het vervangen van de batterijen.
• Wanneer u van omgeving verandert. Verschillende
omgevingen (bewoond / natuur) hebben andere magnetische
velden die de kompasgegevens beïnvloeden.
• Wanneer het horloge wordt blootgesteld aan sterke
magnetische bronnen, extreme koude, of wanneer
u vermoedt dat andere omgevingscondities de
kompasmetingen hebben beïnvloed.
• Als u merkt dat het kompas niet meer de juiste richting
aangeeft.
CHRONOMETERMODUS
OM DE CHRONOMETER TE STARTEN
1. Druk MODE om naar de Chronometermodus te gaan.
2. Druk ST / SP / + om de chronometer te starten.
OM DE CHRONOMETER OP NUL TE ZETTEN
Druk op RST / - om de chronometer op nul te zetten.
NB De Chronometer kan alleen op 00:00:00 gezet worden
als hij gestopt of gepauzeerd is.
ALARMMODUS
OM HET ALARM IN TE STELLEN
1. Druk MODE om naar de Alarmmodus te gaan.
2. Houd SET ingedrukt om in te stellen.
3. Druk ST / SP / + of RST / - om de instellingen te wijzigen.
Houd ST / SP / + of RST / - ingedrukt om de waarden
sneller te wijzigen.
4. Druk op SET om te bevestigen en verder te gaan
met de volgende instelling. Herhaal stappen 3-4 voor
elke volgende instelling. De instellingsopties zijn de
volgende: Uur; minuut.
5. Druk op MODE om te bevestigen en de instellingsmodus
te verlaten.
OM HET ALARM TE ACTIVEREN / DEACTIVEREN
1. Druk MODE om naar de Alarmmodus te gaan.
2. Druk ST / SP / + of RST / - om het alarm te activeren /
deactiveren.
3.
geeft aan dat het alarm geactiveerd is.
4. Druk op MODE om te bevestigen.
OM HET ALARM UIT TE ZETTEN
Wanneer de wekker geactiveerd is, gaat hij elke dag om de
zelfde tijd af. Druk een willekeurige knop om het alarm voor
die dag uit te zetten.
NB Het alarm is nog actief en zal de volgende dag weer
af gaan.
SCHERMVERLICHTING EN TOETSBLOKKERING
Om schermverlichting te activeren:
Druk op
/ om de schermverlichting gedurende 5
seconden Aan te zetten.
NB De schermverlichting zal niet werken als “
” of
“
” wordt weergegeven.
Toetsblokkering Aan of Uit zetten:
Houd
/ 2 seconden ingedrukt. verschijnt wanneer
de toetsenblokkering actief is.
GEBRUIK IN HET WATER
Het RA122 horloge is waterdicht tot 30 meter (98 voet).
NB
Stel het horloge in alvorens het bloot te stellen aan grote
hoeveelheden water. Als u de knoppen gebruikt tijdens
hevige regen of in het water, dan is het mogelijk dat er water
naar binnen komt.
SPECIFICATIES
Klok
12/24-uurs formaat met uren /
minuten /seconden
Chronometer
00:00:00 tot 99:59:59
(uur:min:sec)
Voeding 1 x CR2032 3V batterij
Gebruikstemperatuur 0°C tot 40°C (32°F tot 104°F)
Opslagtemperatuur
-20°C tot 60°C
(-4°F tot 140°F)
WAARSCHUWINGEN
Om er zeker van te zijn dat dit product goed en veilig werkt,
leest u deze waarschuwingen en de hele handleiding goed
door alvorens dit product te gebruiken:
• Gebruik een zachte, licht-vochtige doek. Gebruik geen
krassende of bijtende reinigingsmiddelen, want deze
kunnen schade veroorzaken. Gebruik lauw water en
milde zeep om het horloge na elke trainingssessie
grondig te reinigen. Gebruik nooit heet water bij het
schoonmaken en berg deze producten nooit nat op.
• Stel het product niet bloot aan extreme klappen,
schokken, stof, temperatuurschommelingen of
vochtigheid. Stel het product nooit te lang bloot aan
direct zonlicht. Dit kan fouten veroorzaken.
• Laat de interne componenten met rust. Doet u dit niet
dan zal de garantie vervallen en kan schade ontstaan.
Het apparaat bevat geen door de gebruiker te repareren
onderdelen.
• Kras niet met harde voorwerpen langs het LCD scherm,
want het kan beschadigd raken.
• Let op bij het behandelen van alle typen batterijen.
• Verwijder de batterijen als u het product voor langere tijd
op gaat bergen.
• Wanneer u de batterijen vervangt, gebruik dan alleen
nieuwe batterijen zoals aangegeven in deze handleiding.
• Dit product is een precisie-instrument. Probeer dit
apparaat nooit uit elkaar te halen. Neem contact op
met uw verkoper of onze klantenservice als het product
gerepareerd moet worden.
• Raak de elektronische circuits niet aan, want dit kan
elektrische schokken veroorzaken.
• Controleer eerst alle belangrijke functies van het
apparaat als het gedurende lange tijd niet gebruikt
is. Test uw apparaat regelmatig en houd het goed
schoon. Laat uw horloge jaarlijks onderhouden door
gekwalificeerd personeel.
• Waneer u dit apparaat weg doet, houd dan de plaatselijke
reglementen aangaande vuilverwerking in acht.
• Wegens drukbeperkingen kan het in deze handleiding
weergegeven scherm afwijken van het daadwerkelijke
scherm.
• De in houd van deze handleiding mag niet worden
vermenigvuldigd zonder toestemming van de fabrikant.
NB De technische specificaties van dit product en de inhoud
van de handleiding zijn zonder voorafgaande waarschuwing
aan veranderingen onderhevig.
OVER OREGON SCIENTIFIC
Bezoek onze website (www.oregonscientific.com) om meer
te weten over uw nieuwe product en andere Oregon Scientific
producten zoals digitale fototoestellen, gezondheids- en
fitnessuitrusting en weerstations. Op deze website vindt u
tevens de informatie over onze klantendienst, voor het geval
u ons wenst te contacteren.
EU CONFORMITEITS VERKLARING
Hierbij verklaart Oregon Scientific dat TRACKER Digitaal
Kompashorloge (Model: RA122) in overeenstemming is
met EMC richtlijn 89/336/CE. Een kopie van de getekende
en gedateerde Conformiteits verklaring is op verzoek
beschikbaar via onze Oregon Scientific klanten service.
ONDIEP
DUIKEN/
SURFEN/
IN DIEPER
WATER
NEE
SNORKELEN
IN DIEPER
WATER
NEE
NEE
30M /
90 VOET
DOUCHE
(WARM/
KOUD
NEE
LICHT
DUIKEN /
SURFEN
ONDIEP
WATER
REGEN
SPETTERS
ETC
OK
TRACKER
Digital Kompassklocka
Modell: RA122
BRUKSANVISNING
INTRODUKTION
Tack för att du valt en Oregon Scientific TRACKER Digital
Kompassklocka (RA122). RA122 är framtagen för stadsbon
som älskar en aktiv livsstil. Utrustad med klocka, stoppur,
bakgrundsbelysning och knapplås. Denna mångsidiga
klocka kan användas i storstadsdjungeln då den inbyggda
kompassen är den perfekta kompanjonen när man skall
utforska naturen.
VIKTIGT
• De inbyggda mätfunktionerna i RA122 är inte avsedda
att ersätta professionella mätinstrument eller industriella
precisionsverktyg. Värden producerade av detta kompassur
ska betraktas som ungefärliga.
• Vid bergsklättring eller andra aktiviteter i vilka det kan
medföra livsfara om du går vilse, försäkra dig då om att
du alltid har en andra kompass med dig för att verifiera
kompassriktningen.
• Oregon Scientific™ tar inget ansvar för någon form
av förlust, eller krav från tredje part på grund av detta
kompassur.
KONTROLLKNAPPAR
1
2
3
5
4
1. MODE: Växla till en annan display; snabbavsluta
inställningsläge
2. SET: Gå in i inställningsläge; bekräfta inställning,
påbörja kompasskalibrering
3. ST / SP/ + : Öka inställningsvärde, start / stopp stoppur
4.
/ : Aktivera bakgrundsbelysning; aktivera
knapplås
5. RST / -: Minska inställningsvärde, nollställ stoppur
LCD
1
2
3
4
5
6
8
7
9
10
1. : 12 timmars klocka
2.
Stoppuret är igång eller visas
3.
Indikerar att alarmet är på
4. Visar klocka / datum, stoppur, kompassbäring, alarmtid
eller modeikoner
5. Visar kardinal / ordinal riktning
6. Kompassegment: visar norr; kalibreringsstatus
7. : Batterinivån börjar bli låg
8.
Indikerar att pipton är Från
9.
Indikerar knapplås PÅ
10.
Indikerar rörelseriktning vid kompasskalibrering
ATT KOMMA IGÅNG
SLÅ IGÅNG ENHETEN (ENDAST VID FÖRSTA
ANVÄNDNINGEN)
Tryck på valfri tangent i 2 sekunder för att aktivera LCD
Displayen.
BATTERIBYTE
RA122 använder 1 x CR2032 3V batteri, som redan är
installerat. Se tabellen nedan för batterivarningar.
IKON FÖR LÅG
BATTERINIVÅ
BESKRIVNING
eller
Batteriet är svagt
- - -
Visas när batterinivån är för
låg för drift. “- - -“ visas istället
för kompassvärden.
NOTERA När ikonen för svagt batteri visas kan inte kompass,
kompasskalibrering, alarmpip och bakgrundsbelysning
användas. Värdena återgår till normala så snart batterierna
har bytts ut.
NOTERA När du bytt batteri är det viktigt att du kalibrerar
kompassensorn. (Se “Kompass” sektionen)
NOTERA Om du behöver byta batteri rekommenderar vi att
du kontaktar din återförsäljare.
För att byta batteriet:
1. Använd en liten Phillips skruvmejsel för att öppna
batteriluckan. Var försiktig med skruvarna efter öppning,
så att de ej försvinner.
2. Plocka ur de gamla batterierna och sätt i nya.
OBSERVERA polariteten.
3. Återmontera luckan och sätt tillbaka skruvarna.
ARBETSLÄGEN
Tryck MODE för att växla mellan:
• Tidsläge
• Datumläge
• Kompassläge
• Stoppursläge
• Alarmläge
TIDSLÄGE
ATT STÄLLA IN TID OCH DATUM
1. Tryck MODE för att gå till Tidsläget.
2. Tryck och håll inne SET för att gå till inställningsläget.
3. Tryck ST / SP / + eller RST / - för att ändra
inställningsvärden. Tryck och håll inne ST / SP / + eller
RST / - för att snabbställa värdena.
4. Tryck SET för att verkställa och gå till nästa inställning.
Upprepa steg 3-4 för varje inställning. Inställningsföljden
är: 12 / 24-timmar; timme; minut; år; dag-månad /
månad-dag; månad; dag, pip on/off.
5. Tryck MODE för att bekräfta och avsluta.
DATUMLÄGE
Detta läge används för att visa aktuellt datum. Tryck MODE
för att växla till Datumläget.
KOMPASSLÄGE
OM KOMPASSEN
Kompassen visar bäringen i grader tillsammans med 16
kardinal / ordinalpunkter. Den yttre ringen på displayen består
av 36 segment som grafiskt visar bäringen. N indikerar Norr
vilket visas nedan.
ATT AVLÄSA KOMPASSEN
• Tryck MODE för att gå till Kompassläget.
NOTERA Kompassen är aktiv 30 sekunder åt gången.
Därefter går displayen tillbaka till tidsläget.
NOTERA Använd endast kompassen utomhus och inte inne
i byggnader, tält, grottor eller andra skydd.
NOTERA Kompassmätningar bör göras avskilt från
magnetiska material. Undvik stora magnetiska föremål,
kraftledningar, högtalare, elmotorer mm.
KALIBRERING AV KOMPASSENSORN
Det finns en start-upp kalibreringsguide när klockan tas i
bruk för första gången eller efter batteribyte. Du kan också
kalibrera kompassen genom att följa nedanstående steg.
För att kalibrera kompassensorn:
1. Tryck MODE för att gå till Kompassläget.
2. Tryck och håll inne SET för att påbörja kalibrering av
kompassen.
3. Rotera klockan moturs (som pilen visar ) i samma
hastighet som segmenten tänds i displayen. Rotationen
är klar när du har roterat 1¼ varv och återgått till
kompassvisning.
NOTERA DONE indikerar att kalibreringen har lyckats.
Upprepa steg 2-3 igen om FAIL visas.
NOTERA Kompassen skall kalibreras:
• Innan du använder den för första gången.
• När du bytt batteri.
• I ny omgivning. Olika omgivningar (mycket folk / i naturen)
har olika magnetfält som påverkar kompassutslaget.
• När den har utsatts för starka magnetfält, extremt kallt
väder eller då du misstänker att andra förhållanden har
påverkat kompassens avläsningar.
• Om du upptäcker att kompassen inte visar rätt riktning.
STOPPURSLÄGE
ATT STARTA STOPPURET
1. Tryck MODE för att gå till Stoppursläget.
2. Tryck ST / SP / + för att starta / stoppa stoppuret.
ATT NOLLSTÄLLA STOPPURET
Tryck RST/- för att nollställa stoppuret.
NOTERA Stoppuret kan endast nollställas till 00:00:00 om
det stoppats eller pausats.
ALARMLÄGE
ALARMINSTÄLLNING
1. Tryck MODE för att gå till Alarmläget.
2. Tryck och håll inne SET för att gå till inställningsläget.
3. Tryck ST / SP / + eller RST / - för att ändra
inställningsvärden. Tryck och håll inne ST / SP / + eller
RST / - för att snabbställa värdena.
4. Tryck SET för att verkställa och gå till nästa inställning.
Upprepa steg 3-4 för varje inställning. Inställningsföljden
är: timme, minut.
SWE
Page 7

TRACKER
Relógio com Bússola Digital
Modelo: RA122
MANUAL DO USUÁRIO
INTRODUÇÃO
Agradecemos a preferência pelo TRACKER Relógio com
Bússola Digital Oregon Scientific™ (RA122). O RA122 foi
desenvolvido para profissionais urbanos que apreciam um
estilo de vida ativo. Equipado com as funções de relógio,
cronômetro, luz de fundo e bloqueio dos botões, este versátil
relógio pode ser usado dentro da cidade, enquanto a bússola
embutida o torna a perfeita companhia ao aventurar-se em
locais mais distantes.
IMPORTANTE
• As funções de medição embutidas no RA122 não
devem substituir os dispositivos de medição profissional
ou de precisão industrial. Os valores produzidos por
este relógio devem ser considerados apenas como
representações razoáveis.
• Quando você for praticar alpinismo ou outras atividades
em que perder o caminho pode criar uma situação
perigosa ou de ameaça à vida, sempre use uma
segunda bússola para confirmar as leituras de direção.
• A Oregon Scientific™ não se responsabiliza por
qualquer perda ou reclamação de terceiros que possa
surgir a partir do uso deste relógio.
BOTÕES DE CONTROLE
1
2
3
5
4
1. MODE: alterna para outro canal; sai rapidamente de
qualquer modo de ajuste
2. SET: entra no modo de ajuste; confirma o valor de
ajuste; inicia a calibragem da bússola
3. ST / SP/ + : aumenta o valor do ajuste; inicia / pára o
cronômetro
4.
/ : ativa a luz de fundo; bloqueia os botões
5. RST / - : diminui o valor do ajuste; zera o cronômetro
LCD
1
2
3
4
5
6
8
7
9
10
1. : relógio de 12 horas
2.
indica que o cronômetro está sendo exibido e
correndo
3.
indica que o alarme está ativado
4. Exibe o relógio / calendário, cronômetro; direção da
bússola, hora do alarme ou indicadores de modo
5. Exibe a direção cardeal / colateral
6. Segmentos da bússola: mostra o norte; status da
calibragem
7.
indica que a bateria está fraca
8.
indica que o bipe sonoro está desligado
9.
indica que os botões estão bloqueados
10.
indica a direção para virar durante a calibragem da
bússola
PRIMEIROS PASSOS
LIGAR O DISPOSITIVO (PRIMEIRO USO APENAS)
Pressione qualquer botão por 2 segundos para ativar o
LCD.
SUBSTITUIÇÃO DE BATERIA
O RA122 usa 1 bateria CR2032 de 3 V já instalada. Consulte
os avisos de bateria a seguir.
ÍCONE DE
BATERIA FRACA
DESCRIÇÃO
ou
A bateria está fraca.
- - -
Exibido quando a bateria está
muito fraca para operar. “- - -“ é
exibido em vez dos valores da
bússola.
NOTA Enquanto o ícone de bateria fraca estiver sendo
exibido, a função da bússola, a calibragem da bússola, o
alarme sonoro e a luz de fundo ficarão desativados. Isso
voltará ao normal depois que a bateria tiver sido substituída.
NOTA Quando a bateria é substituída, é importante calibrar
novamente o sensor magnético da bússola. (Consulte a
seção “Bússola”.)
NOTA Se você precisar substituir a bateria, é altamente
recomendado entrar em contato com o revendedor ou com
nosso departamento de atendimento ao cliente.
Para substituir a bateria:
1. Use uma chave de fenda Phillips pequena para remover
a tampa do compartimento da bateria. Uma vez aberta,
guarde os parafusos em local seguro para evitar que
eles sejam perdidos.
2. Remova a antiga bateria e insira a nova, combinando as
polaridades.
3. Recoloque a tampa parafusando-a de volta no local
usando a chave de fenda Phillips.
POR
MODOS DE OPERAÇÃO
Pressione MODE para alternar entre:
• Modo Hora
• Modo Data
• Modo Bússola
• Modo Cronômetro (Chrono)
• Modo Alarme
MODO HORA
PARA AJUSTAR A HORA E A DATA
1. Pressione MODE para navegar até o Modo Hora.
2. Pressione e segure SET para entrar no modo de ajuste.
3. Pressione ST / SP / + ou RST / - para alterar os valores
de ajuste. Pressione e segure ST / SP / + ou RST / -
para alterar rapidamente os valores.
4. Pressione SET para confirmar e mover para o próximo
ajuste. Repita as etapas 3-4 para cada opção de ajuste.
As opções de ajuste são as seguintes: formato de 12 /
24 horas; horas; minutos; ano; dia-mês / mês-dia; mês;
dia; bipe ativado/desativado.
5. Pressione MODE a qualquer momento para confirmar e
sair dos ajustes.
MODO DATA
Este modo é usado para visualizar a data atual. Pressione
MODE para navegar até o Modo Data.
MODO BÚSSOLA
SOBRE A BÚSSOLA
A bússola mostra a indicação em graus ao Norte junto com
16 direções cardeais/colaterais. A circunferência externa do
display consiste em 36 segmentos que mostram a posição
no gráfico. N indica Norte, conforme abaixo.
PARA VISUALIZAR A BÚSSOLA
• Pressione MODE para navegar até o Modo Bússola.
NOTA O visor da bússola fica ativo por 30 segundos nesse
momento. Depois disso, o visor voltará automaticamente
para o modo Hora.
NOTA Sempre tire as indicações ao ar livre, não dentro de
edifícios, tendas, cavernas ou outros abrigos.
NOTA As leituras da bússola devem ser executadas longe
de materiais magnéticos. Evite objetos magnéticos grandes,
linhas de força, alto-falantes, motores elétricos, etc.
CALIBRAGEM DO SENSOR DA BÚSSOLA
Há um guia de calibragem de inicialização quando o relógio
é ligado pela primeira vez ou após a substituição da bateria.
O usuário também pode calibrar a bússola seguindo as
etapas abaixo.
Para calibrar o sensor da bússola:
1. Pressione MODE para navegar até o Modo Bússola.
2. Pressione e segure SET para iniciar a calibragem da
bússola.
3. Gire o contador do relógio no sentido horário (seguindo
a seta
) na mesma velocidade dos segmentos em
movimento ao redor da circunferência do visor. A
rotação será concluída depois que você tiver executado
1¼ voltas e retornar ao visor da bússola.
NOTA DONE indica que a calibragem foi concluída com
êxito. Repita as etapas 2-3 novamente se FAIL for exibido.
NOTA A bússola deve ser calibrada:
• Antes que você a utilize pela primeira vez.
• Quando a bateria for substituída.
• Ao mudar de ambiente. Quando diferentes ambientes
(populado / exterior) têm vários campos magnéticos que
afetam a leitura da bússola.
• Sempre que for exposta a fontes magnéticas fortes, frio
extremo ou suspeitar que outras condições ambientes
tenham afetado as leituras da bússola.
• Se você perceber que a bússola não está mostrando a
direção corretamente.
MODO CRONÔMETRO
PARA INICIAR O CRONÔMETRO
1. Pressione MODE para navegar até o Modo
Cronômetro.
2. Pressione ST / SP / + para iniciar / parar o cronômetro.
PARA ZERAR O CRONÔMETRO
Pressione RST / - para zerar o cronômetro.
NOTA O cronômetro pode ser zerado apenas se estiver
parado ou pausado.
MODO ALARME
PARA DEFINIR O ALARME
1. Pressione MODE para navegar até o Modo Alarme.
2. Pressione e segure SET para entrar no modo de
ajuste.
3. Pressione ST / SP / + ou RST / - para alterar os valores
de ajuste. Pressione e segure ST / SP / + ou RST / -
para alterar rapidamente os valores.
4. Pressione SET para confirmar e mover para o próximo
ajuste. Repita as etapas 3-4 para cada opção de ajuste.
As opções de ajuste são as seguintes: horas; minutos.
5. Pressione MODE a qualquer momento para confirmar e
sair dos ajustes.
PARA ATIVAR / DESATIVAR O ALARME
1. Pressione MODE para navegar até o Modo Alarme.
2. Pressione ST / SP / + ou RST / - para ativar / desativar
o alarme.
3.
indica que o alarme foi ativado.
4. Pressione MODE para confirmar e sair.
PARA SILENCIAR O ALARME
Quando o relógio do alarme estiver ativado, ele soará na
hora definida todo dia. Pressione qualquer botão para parar
o alarme para esse dia.
NOTA O relógio do alarme ainda está ativo e será desativado
novamente no dia seguinte.
LUZ DE FUNDO E BLOQUEIO DOS BOTÕES
Para ativar a luz de fundo:
Pressione
/ para ativar a luz de fundo por 5
segundos.
NOTA A função de luz de fundo não poderá ser operada se
“
”o “ ” estiverem sendo exibidos.
Para ativar/desativar o bloqueio dos botões:
Pressione e segure
/ por 2 segundos. indica que
os botões estão bloqueados.
UTILIZAÇÃO NA ÁGUA
O RA122 é à prova d’água até 30 metros (98 pés).
NOTA Ajuste o relógio antes de expô-lo à água excessiva.
Pressionar os botões na água ou durante tempestades com
chuva pode fazer com que a água entre no relógio.
ESPECIFICAÇÕES
Relógio de tempo
real
12/24 horas com hora / minuto /
segundo
Cronômetro 00:00:00 a 99:59:59 (h:min:s)
Energia 1 bateria CR2032 de 3V
Temperatura
operacional
0°C a 40°C
(32°F a 104°F)
Temperatura de
armazenamento
-20°C a 60°C
(-4°F a 140°F)
PRECAUÇÕES
Para garantir o uso correto e seguro de seu aparelho, leia
estes avisos e todo o manual antes de usar o produto:
• Utilize um pano macio e umedecido para limpar o
aparelho. Não utilize produtos de limpeza abrasivos
nem corrosivos, pois podem causar danos. Utilize água
morna e sabão neutro para limpar completamente o
relógio após cada sessão de treino. Nunca use os
produtos em água quente nem guarde-os quando
estiverem molhados.
• Não submeta o produto a força em excesso, choque,
poeira, mudanças de temperatura, nem umidade.
Nunca exponha o produto a luz solar direta durante
longos períodos. Esse tipo de tratamento pode causar
mau funcionamento.
• Não viole os componentes internos. A não observação
desta regra anulará a garantia do produto, podendo
causar danos. A unidade principal não possui peças que
possam ser reparadas pelo usuário.
• Não arranhe objetos duros contra a tela LCD, pois pode
causar danos.
• Tome as devidas precauções ao manusear qualquer
tipo de pilha.
• Retire as pilhas do aparelho caso tenha a intenção de
guardá-lo por um longo tempo.
• As pilhas esgotadas devem ser substituídas por novas,
conforme especificado neste manual.
• Este produto é um instrumento de precisão. Nunca
tente desmontá-lo. Contate o revendedor ou nosso
departamento de assistência ao cliente caso seja
necessário repará-lo.
• Não toque no circuito eletrônico exposto, pois há risco
de choque elétrico.
• Verifique as principais funções caso o aparelho não
tenha sido usado por um longo tempo. Teste e limpe o
produto regularmente.
• Os materiais utilizados nos produtos Oregon podem
ser reutilizados e reciclados após o fim de sua vida útil.
Encaminhe os produtos a serem descartados aos locais
de coleta apropriados, atentando para as legislações
locais.
• Devido ao limites de impressão, as imagens exibidas
neste manual podem diferir do real.
• O conteúdo deste manual não pode ser reproduzido
sem a autorização do fabricante.
NOTA As especificações técnicas deste produto e o
conteúdo do manual do usuário estão sujeitos a alteração
sem aviso prévio.
SOBRE A OREGON SCIENTIFIC
Visite nosso site (www.oregonscientific.com.br) para saber
mais sobre os produtos Oregon Scientific.
Caso você necessite de mais informações ou tenha dúvidas,
entre em contato com o nosso Serviço de Atendimento ao
Consumidor através do telefone (11) 5095-2329 ou e-mail
sac@oregonscientific.com.br.
CE – DECLARAÇÃO DE CONFORMIDADE
A Oregon Scientific declara que este TRACKER Relógio
com Bússola Digital (Modelo: RA122) está de acordo com
a EMC diretiva 89/336/CE. Uma cópia assinada e datada
da Declaração de Conformidade está disponível para
requisições através do nosso SAC.
Luz
nataçáo
/ água
rasa
Mergulho
raso /
Superficial /
Desportos
aquáticos
Não
30M / 98 Pés
Não
Ducha
( Água
morna/fria
Apenas)
Não
Chuva
Respingos
etc
OK
Snorkeling
Mergulho
Em águas
profundas
Não
TRACKER
Digitaal Kompashorloge
Model: RA122
HANDLEIDING
INTRODUCTIE
Dank u dat u voor het Oregon Scientific TRACKER
Digitaal Kompashorloge (RA122) gekozen hebt. De
RA122 is ontworpen voor de mensen die er graag een
actieve levensstijl op na houden. Dit veelzijdige horloge
is voorzien van een klok, chronometer, schermverlichting
en toetsblokkering, en is zowel in de stedelijke jungle als
daarbuiten de perfecte metgezel.
BELANGRIJK
• De in de RA122 ingebouwde meetfuncties zijn niet
bedoeld om professionele of industriële meetapparatuur
te vervangen. De door dit horloge berekende waarden
moeten gezien worden als een redelijke benadering van
de werkelijke waarden.
• Als u gaat bergwandelen of andere activiteiten
onderneemt waarin verdwaald raken een gevaarlijke
of levensbedreigende situatie kan veroorzaken, neem
dan altijd een tweede kompas mee om de metingen te
verifiëren.
• Oregon Scientific™ is niet verantwoordelijk voor enige
verliezen, of claims van derden, voortkomend uit het
gebruik van dit horloge.
BESTURINGKNOPPEN
1
2
3
5
4
1. MODE: Wisselen van scherm; snel instellingsmodus
verlaten
2. SET: Instellingsmodus openen; instelling bevestigen;
kompas ijken
3. ST / SP / + : Waarde van instelling verhogen; Starten /
stoppen chronometer
4.
/ : Schermverlichting activeren; Toetsblokkering
activeren
5. RST / -: waarde van instelling verlagen; Chronometer
resetten
LCD-SCHERM
1
2
3
4
5
6
8
7
9
10
1. : 12-uurs klokformaat
2.
Geeft aan dat de chronometer loopt, of wordt
weergegeven
3.
Geeft aan dat het alarm aan is
4. Geeft klok / kalender, chronometer weer; kompasrichting,
alarmtijd of modusbanners
5. Geeft kardinale / ordinale richting weer
6. Kompassegment: toont het noorden; ijkstatus
7.
Geeft aan dat de batterij leeg raakt
8.
Geeft aan dat de pieptoon uit staat
9.
Geeft aan dat toetsblokkering actief is
10.
Geeft aan welke richting u op moet draaien tijdens
het ijken van het kompas
STARTEN
HET HORLOGE AANZETTEN (ALLEEN EERSTE KEER)
Druk op een willekeurige knop gedurende 2 seconden om
het scherm te activeren.
BATTERIJEN VERVANGEN
RA122 gebruikt 1 x CR2032 3V batterij, die al in het apparaat
zit. Zie de hieronder voor batterijwaarschuwingen.
BATTERIJ-
INDICATOR
BESCHRIJVING
of
Batterij raakt leeg.
- - -
Verschijnt wanneer de batterij te
leeg is om te kunnen gebruiken.
“- -” verschijnt op het scherm in
plaats van de kompaswaarden.
NB Als het batterij-icoon wordt weergegeven, zijn de functies
kompas, kompas ijken, alarm zoemer en schermverlichting
niet beschikbaar. Zodra de batterij vervangen is, wordt dit
weer normaal.
NB Wanneer u de batterij vervangen hebt, moet u de
magnetische kompassensor opnieuw ijken. (Zie sectie
“Kompas”)
NB Wanneer de batterij vervangen moet worden, raden u
aan om contact op te nemen met uw verkooppunt of onze
klantenservice.
Om de batterij te vervangen:
1. Gebruik een kruiskopschroevendraaier om het klepje
van het batterijvak te verwijderen. Zorg dat u de
schroeven niet verliest terwijl het batterij vak open is.
2. Verwijder de oude batterij en plaats de nieuwe met de
polariteit zoals aangegeven.
3. Of het klepje weer terug met de kruiskopschroevendraa
ier.
NL
BEDIENINGSMODI
Druk MODE om te schakelen tussen:
• Tijdmodus
• Datummodus
• Kompasmodus
• Chronometermodus
• Alarmmodus
KLOKMODUS
OM TIJD EN DATUM IN TE STELLEN
1. Druk MODE om naar de Tijdmodus te gaan.
2. Houd SET ingedrukt om in te stellen.
3. Druk ST / SP / + of RST / - om de instellingen te wijzigen.
Houd ST / SP / + of RST / - ingedrukt om de waarden
sneller te wijzigen.
4. Druk op SET om te bevestigen en verder te gaan
met de volgende instelling. Herhaal stappen 3-4 voor
elke volgende instelling. De instellingsopties zijn de
volgende: 12 / 24-uur formaat; uren; minuten; jaar; dag-
maand / maand-dag; maand; dag; zoemer aan/uit.
5. Druk op MODE om te bevestigen en de instellingsmodus
te verlaten.
DATUMMODUS
Deze modus kunt u gebruiken om de huidige datum. Druk
MODE om naar de Datummodus te gaan.
KOMPASMODUS
OVER HET KOMPAS
Het kompas toont de richting in graden vanaf het noorden,
alsmede 16 kardinale / ordinale punten. De buitenste rand
van het scherm bestaat uit 36 segmenten die de richting
grafisch weergeven. N geeft het noorden aan, zoals
hieronder weergegeven.
OM HET KOMPAS TE BEKIJKEN
• Druk MODE om naar de Kompasmodus te gaan.
NB
Het kompasscherm is gedurende 30 seconden te zien.
Hierna zal het scherm automatisch terugkeren naar de
tijdweergave.
NB controleer altijd uw richting in de buitenlucht, niet in
gebouwen, tenten, grotten, etc.
NB Het aflezen van het kompas moet uit de buurt van
magnetische materialen gebeuren. Blijf uit de buurt van
magnetische objecten, hoogspanningskabels, luidsprekers,
elektrische motoren, etc.
KOMPASSENSOR IJKEN
Dit is een startlijst voor het ijken van het horloge als u het voor
het eerst aanzet, of nadat u de batterijen vervangen hebt.
De gebruiker kan het kompas ook ijken door onderstaande
stappen te volgen.
Om de kompassensor te ijken:
1. Druk MODE om naar de Kompasmodus te gaan.
2. Houd SET ingedrukt om het ijken van het kompas te
beginnen.
3. Draai het horloge tegen de klok in (volgens de pijl )
met dezelfde snelheid als de bewegende segmenten op
het scherm. De rotatie is afgelopen zodra u 1¼ draai
heeft gemaakt, en het horloge zal terug keren naar het
kompasscherm.
NOTE DONE geeft aan dat het ijken met succes voltooid
is. Herhaal stappen 2-3 als opnieuw als FAIL wordt
weergegeven.
NB Het kompas dient geijkt te worden:
• Vóór het eerste gebruik.
• Na het vervangen van de batterijen.
• Wanneer u van omgeving verandert. Verschillende
omgevingen (bewoond / natuur) hebben andere magnetische
velden die de kompasgegevens beïnvloeden.
• Wanneer het horloge wordt blootgesteld aan sterke
magnetische bronnen, extreme koude, of wanneer
u vermoedt dat andere omgevingscondities de
kompasmetingen hebben beïnvloed.
• Als u merkt dat het kompas niet meer de juiste richting
aangeeft.
CHRONOMETERMODUS
OM DE CHRONOMETER TE STARTEN
1. Druk MODE om naar de Chronometermodus te gaan.
2. Druk ST / SP / + om de chronometer te starten.
OM DE CHRONOMETER OP NUL TE ZETTEN
Druk op RST / - om de chronometer op nul te zetten.
1
2
3
5
4
1
2
3
4
5
6
8
7
9
10
Page 8

TRACKER
Digital Kompassklocka
Modell: RA122
BRUKSANVISNING
INTRODUKTION
Tack för att du valt en Oregon Scientific TRACKER Digital
Kompassklocka (RA122). RA122 är framtagen för stadsbon
som älskar en aktiv livsstil. Utrustad med klocka, stoppur,
bakgrundsbelysning och knapplås. Denna mångsidiga
klocka kan användas i storstadsdjungeln då den inbyggda
kompassen är den perfekta kompanjonen när man skall
utforska naturen.
VIKTIGT
• De inbyggda mätfunktionerna i RA122 är inte avsedda
att ersätta professionella mätinstrument eller industriella
precisionsverktyg. Värden producerade av detta kompassur
ska betraktas som ungefärliga.
• Vid bergsklättring eller andra aktiviteter i vilka det kan
medföra livsfara om du går vilse, försäkra dig då om att
du alltid har en andra kompass med dig för att verifiera
kompassriktningen.
• Oregon Scientific™ tar inget ansvar för någon form
av förlust, eller krav från tredje part på grund av detta
kompassur.
KONTROLLKNAPPAR
1
2
3
5
4
1. MODE: Växla till en annan display; snabbavsluta
inställningsläge
2. SET: Gå in i inställningsläge; bekräfta inställning,
påbörja kompasskalibrering
3. ST / SP/ + : Öka inställningsvärde, start / stopp stoppur
4.
/ : Aktivera bakgrundsbelysning; aktivera
knapplås
5. RST / -: Minska inställningsvärde, nollställ stoppur
LCD
1
2
3
4
5
6
8
7
9
10
1. : 12 timmars klocka
2.
Stoppuret är igång eller visas
3.
Indikerar att alarmet är på
4. Visar klocka / datum, stoppur, kompassbäring, alarmtid
eller modeikoner
5. Visar kardinal / ordinal riktning
6. Kompassegment: visar norr; kalibreringsstatus
7.
: Batterinivån börjar bli låg
8.
Indikerar att pipton är Från
9.
Indikerar knapplås PÅ
10.
Indikerar rörelseriktning vid kompasskalibrering
ATT KOMMA IGÅNG
SLÅ IGÅNG ENHETEN (ENDAST VID FÖRSTA
ANVÄNDNINGEN)
Tryck på valfri tangent i 2 sekunder för att aktivera LCD
Displayen.
BATTERIBYTE
RA122 använder 1 x CR2032 3V batteri, som redan är
installerat. Se tabellen nedan för batterivarningar.
IKON FÖR LÅG
BATTERINIVÅ
BESKRIVNING
eller
Batteriet är svagt
- - -
Visas när batterinivån är för
låg för drift. “- - -“ visas istället
för kompassvärden.
NOTERA När ikonen för svagt batteri visas kan inte kompass,
kompasskalibrering, alarmpip och bakgrundsbelysning
användas. Värdena återgår till normala så snart batterierna
har bytts ut.
NOTERA När du bytt batteri är det viktigt att du kalibrerar
kompassensorn. (Se “Kompass” sektionen)
NOTERA Om du behöver byta batteri rekommenderar vi att
du kontaktar din återförsäljare.
För att byta batteriet:
1. Använd en liten Phillips skruvmejsel för att öppna
batteriluckan. Var försiktig med skruvarna efter öppning,
så att de ej försvinner.
2. Plocka ur de gamla batterierna och sätt i nya.
OBSERVERA polariteten.
3. Återmontera luckan och sätt tillbaka skruvarna.
ARBETSLÄGEN
Tryck MODE för att växla mellan:
• Tidsläge
• Datumläge
• Kompassläge
• Stoppursläge
• Alarmläge
TIDSLÄGE
ATT STÄLLA IN TID OCH DATUM
1. Tryck MODE för att gå till Tidsläget.
2. Tryck och håll inne SET för att gå till inställningsläget.
3. Tryck ST / SP / + eller RST / - för att ändra
inställningsvärden. Tryck och håll inne ST / SP / + eller
RST / - för att snabbställa värdena.
4. Tryck SET för att verkställa och gå till nästa inställning.
Upprepa steg 3-4 för varje inställning. Inställningsföljden
är: 12 / 24-timmar; timme; minut; år; dag-månad /
månad-dag; månad; dag, pip on/off.
5. Tryck MODE för att bekräfta och avsluta.
DATUMLÄGE
Detta läge används för att visa aktuellt datum. Tryck MODE
för att växla till Datumläget.
KOMPASSLÄGE
OM KOMPASSEN
Kompassen visar bäringen i grader tillsammans med 16
kardinal / ordinalpunkter. Den yttre ringen på displayen består
av 36 segment som grafiskt visar bäringen. N indikerar Norr
vilket visas nedan.
ATT AVLÄSA KOMPASSEN
• Tryck MODE för att gå till Kompassläget.
NOTERA Kompassen är aktiv 30 sekunder åt gången.
Därefter går displayen tillbaka till tidsläget.
NOTERA Använd endast kompassen utomhus och inte inne
i byggnader, tält, grottor eller andra skydd.
NOTERA Kompassmätningar bör göras avskilt från
magnetiska material. Undvik stora magnetiska föremål,
kraftledningar, högtalare, elmotorer mm.
KALIBRERING AV KOMPASSENSORN
Det finns en start-upp kalibreringsguide när klockan tas i
bruk för första gången eller efter batteribyte. Du kan också
kalibrera kompassen genom att följa nedanstående steg.
För att kalibrera kompassensorn:
1. Tryck MODE för att gå till Kompassläget.
2. Tryck och håll inne SET för att påbörja kalibrering av
kompassen.
3. Rotera klockan moturs (som pilen visar ) i samma
hastighet som segmenten tänds i displayen. Rotationen
är klar när du har roterat 1¼ varv och återgått till
kompassvisning.
NOTERA DONE indikerar att kalibreringen har lyckats.
Upprepa steg 2-3 igen om FAIL visas.
NOTERA Kompassen skall kalibreras:
• Innan du använder den för första gången.
• När du bytt batteri.
• I ny omgivning. Olika omgivningar (mycket folk / i naturen)
har olika magnetfält som påverkar kompassutslaget.
• När den har utsatts för starka magnetfält, extremt kallt
väder eller då du misstänker att andra förhållanden har
påverkat kompassens avläsningar.
• Om du upptäcker att kompassen inte visar rätt riktning.
STOPPURSLÄGE
ATT STARTA STOPPURET
1. Tryck MODE för att gå till Stoppursläget.
2. Tryck ST / SP / + för att starta / stoppa stoppuret.
ATT NOLLSTÄLLA STOPPURET
Tryck RST/- för att nollställa stoppuret.
NOTERA Stoppuret kan endast nollställas till 00:00:00 om
det stoppats eller pausats.
ALARMLÄGE
ALARMINSTÄLLNING
1. Tryck MODE för att gå till Alarmläget.
2. Tryck och håll inne SET för att gå till inställningsläget.
3. Tryck ST / SP / + eller RST / - för att ändra
inställningsvärden. Tryck och håll inne ST / SP / + eller
RST / - för att snabbställa värdena.
4. Tryck SET för att verkställa och gå till nästa inställning.
Upprepa steg 3-4 för varje inställning. Inställningsföljden
är: timme, minut.
5. Tryck MODE för att bekräfta och avsluta.
FÖR ATT AKTIVERA / AVAKTIVERA ALARMET
1. Tryck MODE för att gå till Alarmläget.
2. Tryck ST / SP / + eller RST / - för att aktivera eller
inaktivera alarmet.
3.
indikerar att alarmet är aktiverat.
4. Tryck MODE för att bekräfta och avsluta.
FÖR ATT STÄNGA AV ALARMET
När alarmet är aktiverat kommer det att gå igång vid inställd
tid varenda dag. Tryck på valfri knapp för att stoppa alarmet
för dagen.
NOTERA Alarmet är fortfarande aktivt och kommer att gå
igång nästa dag vid samma tidpunkt.
BAKGRUNDSBELYSNING & KNAPPLÅS
Att aktivera bakgrundsbelysning:
Tryck
/ för att tända belysningen i 5 sek.
NOTERA Bakgrundsbelysningen fungerar ej om “
”
eller “
” visas.
För att växla knapplåset PÅ eller AV:
Tryck och håll inne
/ i 2 sek. indikerar att
tangentlåset är PÅ.
ANVÄNDNING I VATTEN
RA122 är vattenskyddad ner till 30 meter.
NOTERA Ställ in enheten innan du utsätter den för vatten. Att
använda knapparna under vatten eller i kraftiga regnoväder
kan orsaka att vatten kommer in i produkten.
SPECIFIKATIONER
Realtidsklocka
12/24-timmars val med timme
/ minut / sekund
Stoppur 00:00:00 till 99:59:59 (tt:mm:ss)
Drift 1 x CR2032 3V batteri
Arbetstemperatur 0°C till 40°C (32°F till 104°F)
Förvaringstemperatur -20°C till 60°C (-4°F till 140°F)
FÖRSIKTIGHETSÅTGÄRDER
För att vara säker på att du använder din produkt säkert och
korrekt, bör du läsa följande information samt den kompletta
bruksanvisningen innan du använder produkten.
• Använd en mjuk, lätt fuktad trasa. Använd inte
repande eller frätande rengöringsmedel då dessa kan
orsaka skada. Rengör klockan noggrant eftervarje
träningstillfälle. Använd aldrig produkterna i hett vatten
och förvara dem inte fuktiga.
• Utsätt inte produkten för extrema krafter, stötar, damm
eller kraftiga variationer i temperatur eller luftfuktighet.
Utsätt inte produkten för direkt solljus under längre
perioder. Sådan behandling kan orsaka tekniska fel.
• Mixtra inte med interna komponenter. Om det händer
upphör garantin på produkten och kan dessutom orsaka
skada. Produkten innehåller inga reparerbara delar.
• Använd inget hårt material mot displayen eftersom det
kan skada ytan.
• Försiktighetsåtgärder vid handhavande av alla
batterityper.
• Plocka ur batterierna om produkten skall förvaras under
en längre period.
• Använd endast nya batterier enligt specifikationerna i
denna bruksanvisning.
• Produkten är ett precisionsinstrument. Försök aldrig
att plocka isär produkten. Kontakta återförsäljaren eller
ditt närmaste servicekontor om din produkt behöver
service.
• Vidrör inte under några omständigheter blottade
elektroniska kretsar på produkten, eftersom det finns
risk för elektriska stötar.
• Kontrollera alla huvudfunktioner om produkten har varit
oanvänd under en längre tid. Utför regelbundet provning
och rengöring av produkten. Få din klocka servad av ett
auktoriserat servicecenter årligen.
• Förbrukad produkt måste sorteras som specialavfall
på avsedd miljöstation och får inte slängas som vanligt
restavfall.
• Av trycktekniska skäl, kan displaybilderna i denna
manual skilja sig från dem i verkligheten.
• Innehållet i denna manual får ej kopieras utan
tillverkarens medgivande.
NOTERA De tekniska specifikationerna och innehållet
i denna manual kan komma att ändras utan vidare
upplysning.
OM OREGON SCIENTIFIC
Besök vår hemsida (www.oregonscientific.se) för att se
mer av våra produkter såsom digitalkameror; MP3 spelare;
projektionsklockor; hälsoprodukter; väderstationer; DECTtelefoner och konferenstelefoner.
Hemsidan innehåller också information för våra kunder i de
fall ni behöver ta kontakt med oss eller behöver ladda ner
information.Vi hoppas du hittar all information du behöver på
vår hemsida och om du vill komma i kontakt med Oregon
Scientific kundkontakt besöker du vår lokala hemsida www.
oregonscientific.se eller www.oregonscientific.com för att
finna telefonnummer till respektive supportavdelning.
EU-FÖRSÄKRAN OM ÖVERENSSTÄMMELSE
Oregon Scientific intygar härmed att TRACKER Digital
Kompassklocka (Modell: RA122) överensstämmer med EMC
direktivet 89/336/CE. En signerad kopia av “DECLARATION
OF CONFORMITY” kan erhållas vid hänvändelse till
OREGON SCIENTIFIC servicecenter.
YTDYKNING/
SURFING /
VATTENSPORT
NEJ
SNORKLING /
DJUPVATTENDYKNING
NEJ
30M / 98fot
DUSCH
(ENDAST
VARMT
/ KALLT
VATTEN)
NEJ
LÄTT
SIMNING /
GRUNT
VATTEN
REGNSTÄNK
MM
NEJ
OK
SWE
© 2008 Oregon Scientific. All rights reserved.
086L005336-010
 Loading...