

Page 1

Oregon Scientific™ Slim Dual Band RF
Travel Clock (RM928N)
User Manual
TABLE OF CONTENTS
Introduction ......................................................................2
Key features .....................................................................2
Front view ......................................................................2
Top view ........................................................................2
Back view ......................................................................3
LCD display symbols .....................................................3
Safety and care instructions ........................................... 4
Safety precautions ......................................................... 4
Caring for your product .................................................. 4
Getting started .................................................................4
Unpacking the product...................................................4
Batteries ........................................................................4
Using the pouch as table stand .....................................5
Basic Displays..................................................................5
Indoor temperature display ............................................ 5
nd
time display ..............................................................5
2
Toggling between displays ............................................6
Radio reception ................................................................ 6
Radio reception description ...........................................6
Enabling/disabling radio reception.................................6
EU / UK reception .......................................................... 7
Setting the clock manually..............................................7
Alarm functions................................................................8
Basic functions .............................................................. 8
Alarm displays ...............................................................8
Adjusting the alarm time ................................................9
Additional Functions .......................................................9
Reset hole .....................................................................9
Backlight intensity level .................................................9
Key lock .........................................................................10
Specifications...................................................................10
Additional resources .......................................................10
Troubleshooting guide ....................................................11
EC-Declaration of conformity .........................................12
1
EN
Page 2
EN
INTRODUCTION
KEY FEATURES
Thank you for selecting the Oregon Scientific™ Slim Dual Band
RF Travel Clock as your product of choice. This device is
designed to give you many years of reliable service, including
the following conveniences:
• Ultra-slim, near credit card size (only 7mm)
• Radio-Controlled Calendar Clock
• Indoor Temperature Display
• Dual 2-minute Crescendo Alarm
In addition to providing step-by-step instructions for this product,
this manual contains important safety and care information.
Read the manual thoroughly, and keep it in a safe place in case
you need to refer to it.
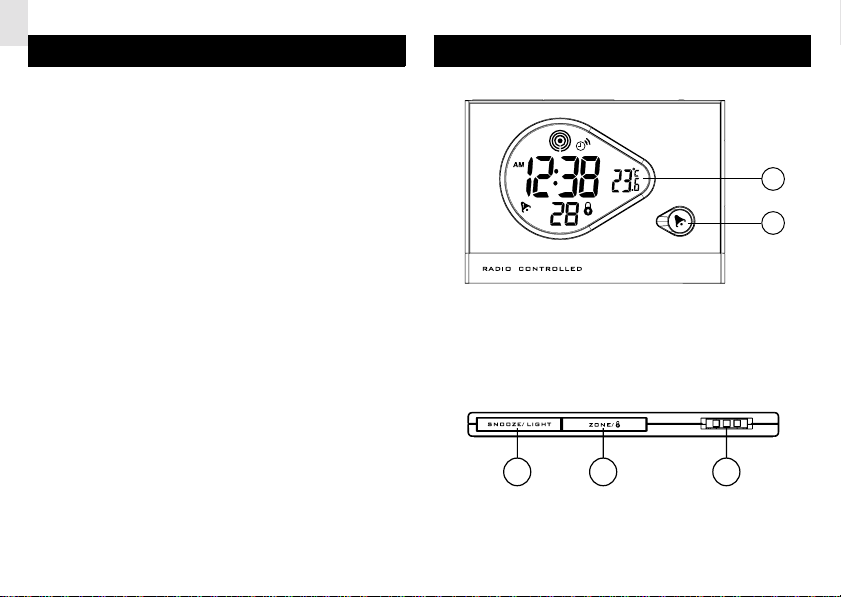
FRONT
A. LCD Display
B. Alarm Button
Display and adjusts alarm time
TOP
C D E
C. Snooze / Light Button
i) Activates the snooze function
ii) Adjusts the backlight setting
2
A
B
Page 3
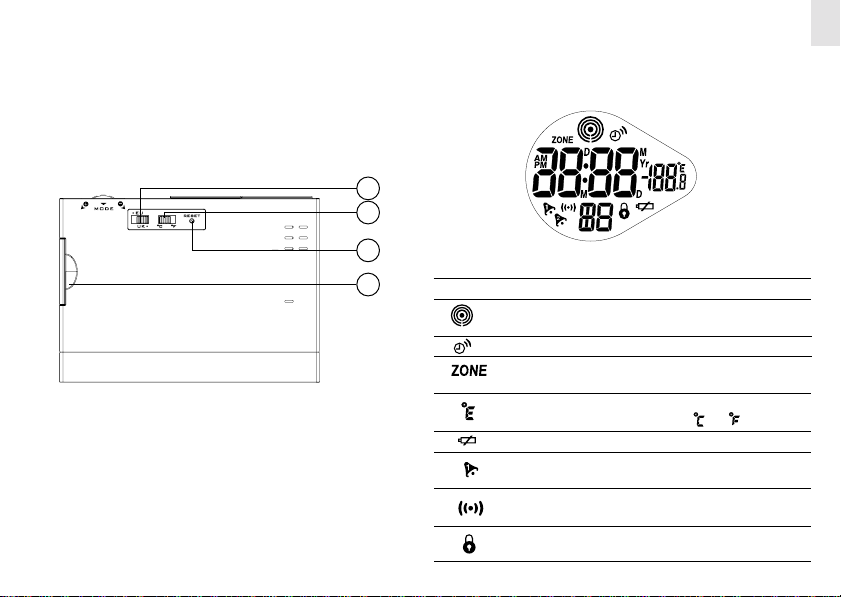
D. Zone / Lock Button
i) Changes to 2nd time zone displays
ii) Enables/Disables key lock function
E. Mode/ UP/ DOWN Switch
i) Adjusts settings, values, and toggle between
displays
BACK
I. Battery Compartment
The unit uses 1 piece of CR2032 3V Lithium button
cell battery for power
EN
LCD DISPLAY
F
G
H
F. EU/UK Switch
Switch between receiving radio reception from UK or
Germany (EU)
G.Temperature Switch
Switches between Celcius and Fahrenheit
temperature displays
H. Reset Hole
Returns all settings to default values
I
ICON NAME DESCRIPTION
Radio Reception
Signal
Hourly Chime
nd
2
Time Display
Temperature unit
Low Battery
Alarm–on
Alarm Time
Indicator
Key Lock
Indicates the condition of
radio reception.
Unit rings hourly.
The 2nd Time Display is
shown on the LCD.
Temperature is displayed
either in or .
Appears when power is low.
Appears when alarm is
activated.
Appears when alarm time is
displayed.
Appears when keys are
locked
3
Page 4
EN
SAFETY AND CARE INSTRUCTIONS
SAFETY
Please observe the following safety precautions when setting
up and using this product.
• LCD panel – The LCD panel is made of glass, and may break
if the unit is dropped or impacted.
• Heat sources – Keep the product away from heat sources
such as radiators, stoves, heaters, and other heat-generating
products.
• Water and moisture – Do not use the product in or near water
or in high moisture areas such as a bathroom.
GETTING STARTED
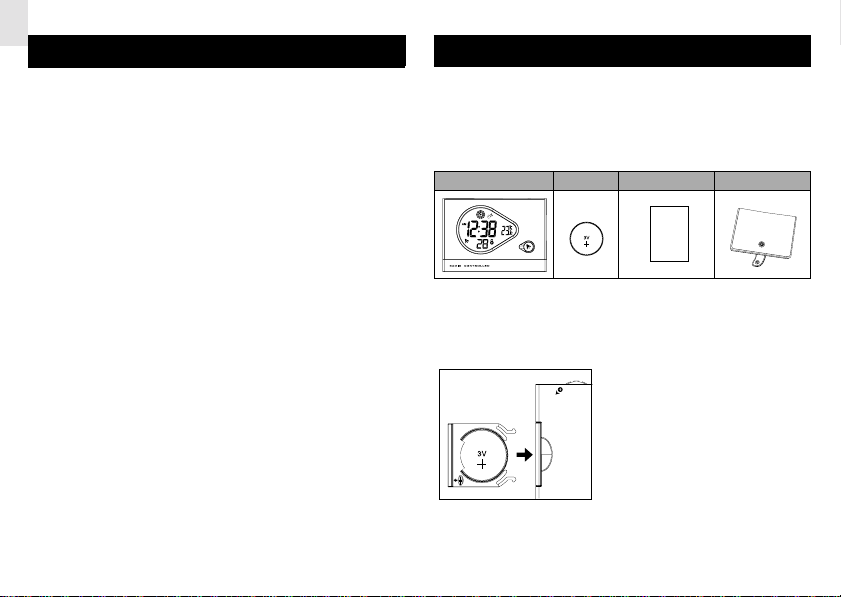
UNPACKING THE PRODUCT
When you unpack your clock, make sure to keep all the packing
materials in a safe place, in case you need to later transport or
return it for servicing. In the box, you will find:
Main unit Battery User manual Pouch
manual
CARE
To ensure you receive the maximum benefit from using this
product, please observe the following guidelines.
• Cleaning – Use a damp cloth. Do not use liquid cleaning
agents, benzene, thinner, or aerosols.
• Ventilation – The vents and other openings are designed for
ventilation, and should not be blocked or covered. Blocking
the vents can cause the product to overheat, and can damage
the unit.
• Repair – Do not attempt to repair the product or modify the
circuitry by yourself. Voltages are contained inside the unit.
Contact the retailer or a qualified repairman if the product
requires servicing. Only use replacement parts that are
recommended by the manufacturer.
• Do not scratch hard objects against the LCD display as
this may cause damage.
BATTERIES
To load the battery:
4
Instructions
1. Locate the battery
compartment.
2. Install the battery. Observe
the polarities.
Warning:
Incorrect installation may
damage the product.
Page 5

NOTE Replace the battery whenever the weak battery
mark ( ) is shown, the display is dim, or the display does
not illuminate when the power is on.
Contact your local waste disposal authority for instructions
on how to dispose of used batteries. Used batteries can be
harmful to the environment, and should not be thrown out
with household trash.
USING THE POUCH AS A TABLE STAND
Apart from holding your clock, the included pouch can be
fashioned into a table stand as well.
BASIC DISPLAYS
INDOOR TEMPERATURE DISPLAY
Soon after battery installation, the unit immediately reads and
displays the surrounding indoor temperature. You can choose
between displaying the temperature in Celsius or Fahrenheit by
sliding the °C/ °F switch on the back of the unit.
EN
1. Unclasp the pouch.
2. Fold the pouch backwards and
attach the clasp backwards as
shown.
3. Insert the travel clock snugly
into the lining of the newlymade stand.
ND
TIME DISPLAY
2
Press Zone/ to display the 2
along with the time of the 2
CLOCK MANUALLY section for more information on how to set
this time display.
nd
Time Display. will appear,
nd
city. Refer to SETTING THE
Press
Mode
Switch
Press Zone /
To return to normal time display, press the Mode Switch.
5
Page 6

EN
TOGGLING BETWEEN DISPLAYS
For normal display, toggle between displaying seconds, dayof-week, or current date and month by pressing the Mode
Switch.
NOTE For the 2nd time Display, press Zone / to toggle
between displays.
RADIO RECEPTION
This product is designed to synchronize its calendar clock
automatically once it is brought within range of the radio signal.
When the unit is receiving the signal, the Radio Reception
symbol with start to blink. Generally, complete reception takes
around 2 to 10 minutes, depending on the strength of the signal.
The clock automatically searches for radio signal 3 times daily.
RADIO RECEPTION DESCRIPTION
RADIO RECEPTION DESCRIPTION
Strong reception of radio clock
signal.
Weak reception of radio clock
signal.
No reception of the radio clock
signal.
Receiving the radio clock signal.
Radio Reception is disabled.
NOTE Reception can be affected by a number of factors. For
best reception, place the device away from metal objects and
electrical appliances. Other causes for signal interference
include electrical transmission tower, steel reinforced
construction, and metal siding. Reception is ideal when placed
near a window.
Even though there are areas that may have more difficulty in
receiving a signal, the travel clock contains accurate quartz
movement and will retain precise timing if the signal is missed
on a rare occasion.
ENABLING/DISABLING RADIO RECEPTION
To manually disable the reception of the RF signal, hold the
DOWN- / UP+ / MODE switch in the DOWN- position for 2
seconds until the Radio Reception symbol completely
disappears.
6
Page 7

To enable the reception again, hold the DOWN- / UP+ / MODE
switch in the UP+ position for 2 seconds. The Radio Reception
symbol will blink and the unit will search for the RF signal
automatically.
Diagram Instructions
1.Press and hold the Mode Switch
for 2 seconds.
EN
EU / UK RECEPTION
Your travel clock automatically synchronizes the current time
and date when it is brought within range of the radio signal
MSF60 generated from Rugby, England (UK) or DCF77
generated from Frankfurt, Germany (EU) for Central Europe.
You can choose between the two radio signals by switching the
EU/UK switch. You have to reset the unit by pressing RESET
after changing the radio signals.
SETTING THE CLOCK MANUALLY
To adjust the clock and settings manually without automatic RF
synchronization, remember to disable the Radio Reception
first. Press + or – on the Mode Switch to adjust the values of
each setting.
nd
2.Adjust the time-zone for a 2
This will set the time and date for
the 2nd Time Display. Press
city.
Mode Switch when done.
nd
NOTE The 2
calculated using the time-zone
offset. As such, this 2
cannot be directly set like the
Time Display is
nd
time display
Normal time display.
3. Choose between 12-hour or 24hour time format. Press Mode Switch
when done.
4.Adjust the current hour. Press Mode
Switch when done.
5. Adjust the current minute. Press
Mode Switch when done.
6.Adjust the current year. Press Mode
Switch when done.
7
Page 8

EN
7. Choose the calendar display format
(Day/Month or Month/Day). Press
Mode Switch when done.
8. Adjust the current month. Press
Mode Switch when done.
9. Adjust the current day. Press Mode
Switch when done.
10.Choose the language displayed
for the day-of-week. Press Mode
Switch when done.
Language Options:
ALARM FUNCTIONS
BASIC FUNCTIONS
Your product also has a 2-minute crescendo alarm function.
When the alarm goes off:
• Press Snooze/Light to mute the alarm. The alarm will
sound again after 8 minutes.
• Press any other key to turn off the alarm.
English, German, French,
Italian, Spanish
11. Choose to enable/disable the hourly
chime. When Hourly Chime is on,
a beep sound will be given out at
the beginning of each hour. Press
Mode Switch to return to normal
clock display.
ALARM DISPLAYS
This device comes with dual configurable alarms:
Diagram
8
Instructions
1. Press the ALARM
button during normal
operation.
Page 9

#1
#2
2. indicates that the 1st
alarm display is now shown.
Press + or – on the Mode
Switch to toggle the 1st
alarm on (Figure #1) or off
(Figure #2).
3. Press ALARM to display
nd
alarm . Toggle
the 2
the alarm on or off using +
ADDITIONAL FUNCTIONS
RESET HOLE
If the clock behaves strangely or stops responding, insert and
press a blunt stylus into the clock’s Reset Hole. The clock will
then be reset to its original factory setting.
EN
or – on the Mode Switch.
4. Press the Mode Switch
anytime to exit alarm
mode.
ADJUSTING THE ALARM TIME
To adjust the Alarm Time, make sure that or alarm displ ays
first.
Diagram Instructions
1.Press and hold ALARM button.
Adjust the hour. Press ALARM
again when done.
2. Adjust the minute. Press ALARM
when done.
BACKLIGHT INTENSITY LEVEL
Press and hold Snooze/Light to select the Backlight Intensity
level (Lo or Hi). Then, press + or – on the Mode Switch to toggle
between the two settings.
NOTE Choose “Lo” to conserve batteries during the daylight,
while “Hi” is best during nighttime when additional backlight
intensity is needed.
9
Page 10

EN
KEY LOCK
Press and hold Zone / to lock or unlock all keys on the unit.
This can be used to prevent the accidental pressing of buttons.
SPECIFICATIONS
Dimensions:
Width x Height x Depth 92 x 66 x 7 mm
Weight 44 g
Radio frequency:
System DCF77 or MSF60
Display:
Time format 24-Hour or 12-Hour AM/PM
Date format DD-MM or MM-DD
Day-of-week display In English, French, German,
Clock accuracy +/-0.5 second per day
Alarm:
Alarm Duration 2 minutes
(user-selectable)
(user-selectable)
(user-selectable)
Spanish, and Italian
(when RF is disabled)
Power:
Power supply 1 x CR2032 Lithium button
cell battery
Operating environment:
Operation temperature -5.0°C to +50.0°C
Temperature resolution 0.1°C
Temperature unit °C/ °F (user-selectable)
ADDITIONAL RESOURCES
Visit our website (www.oregonscientific.com) to learn more
about your product and other Oregon Scientific™ products
such as digital cameras, hand-held organizers, alarm clocks,
and weather stations. The website also includes contact
information for our customer service department, in case you
need to reach us.
10
Page 11

TROUBLESHOOTING GUIDE
This section includes a list of frequently asked questions for problems you may encounter. If your device is not operating as you
think it should, check here before arranging for servicing.
Problem Symptom Check This Remedy
Measurement does not seem
accurate.
Clock time is not correctly set.
No Alarm
Operation Not Normal
Displayed temperature data are
different from other measuring
instruments.
No radio signal reception.
Alarm does not sound.
Certain functions do not
perform.
The measurement method is
different.
The areas under evaluation are
different or are influenced by
climate.
Electromagnetic interference or
objects are barring reception.
Orientation or placement of main
unit is not optimum for receiving
radio signal.
Alarm is disabled.
Device requires reset.
11
The temperature resolution for
different products may also be
different.
Place the 2 instruments very
closely for a time period (no less
than 30 minutes), avoiding direct
light and air movements.
Place the main unit far away
from PCs, phones, and other
electronic equipment and near
a windowsill. Wait for at least 72
hours.
Turn on the alarm setting.
Reset the unit with a blunt stylus
pressed against the RESET
Hole.
EN
Page 12

EN
EC-DECLARATION OF CONFORMITY
This product complies with the essential requirements of Article
3 of the R&TTE 1999/5/EC Directives, if used for its intended
use and that the following standard(s) has/have been applied:
Efficient use of radio frequency spectrum
(Article 3.2 of the R&TTE Directive)
applied standard(s) N / A
Electromagnetic compatibility
(Article 3.1.b of the R&TTE Directive)
applied standard(s) ETS 300 683:1997
Safety of information technology equipment
(Article 3.1.a of the R&TTE directive)
applied standard(s) EN 60950:1997
Additional information:
The product therefore conforms with the Low Voltage Directive
73/23/EC, the EMC Directive 89/336/EC and R&TTE Directive
1999/5/EC (appendix II) and carries the respective CE marking.
Carmelo Cubito
Agrate Briznaza (MI) / Italy January 2004
EC Representative of Manufacturer
RTTE Compliant Countries :
All EC countries, Switzerland CH
And Norway N
© 2004 Oregon Scientific. All rights reserved.
12
 Loading...