

Radio Controlled
Projection Clock
MODEL : RM813P / RM813PU (UK Version)
Instruction Manual
INTRODUCTION
Congratulations on your purchase of the RF Projection Clock
(RM813P/RM813PU).
The RM813P/RM813PU is a multifunctional radio-controlled
clock. It can automatically synchronize its current time and date
when brought within an approximate 1500 km radius of the radio
signal DCF77 generated from Frankfurt, Germany (the UK version
from MSF Rugby, England).
To facilitate night time reading, the unit comes with a projector that
can cast large, clear clock-time figures onto flat surfaces in dark. It
also has a guiding light at the back of the unit.
MAIN FEATURES
GB
1

GB
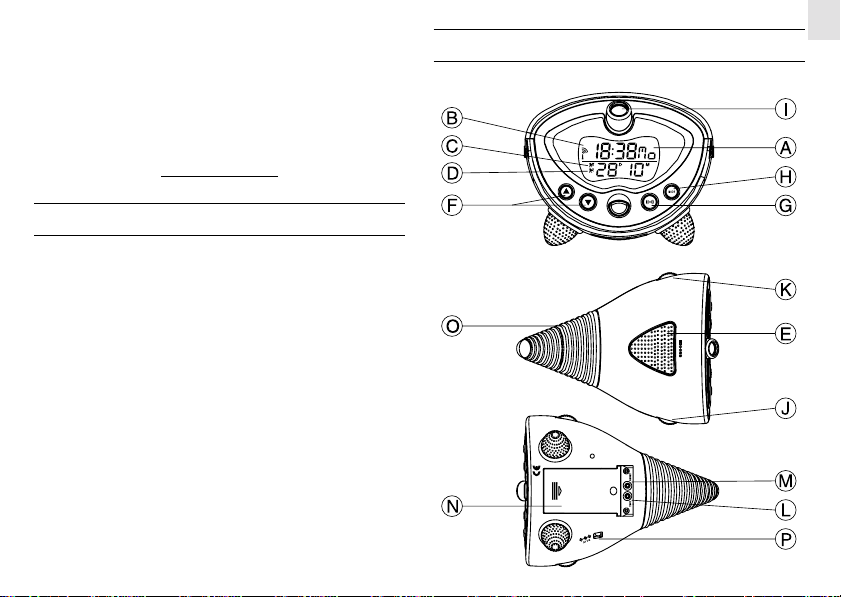
A Two-line display
Displays the current time and calendar or alarm time
B[
] Radio reception signal
Indicates the condition of radio reception
C[ ] Alarm icon
Appears when weekday alarm is activated
] Alarm icon
D[
Appears when single alarm is activated
SNOOZE
] button
E[
Enables the snooze function when an alarm goes off or activates
the projector for five seconds
F Up [
] and Down [ ] buttons
Increases or decreases the value of a setting
] button
G[
Sets the time for the two alarms
H[
] button
MODE
Toggles the display modes and confirms entry in clock setting
mode
I Projector
For projecting the current time on the wall or ceiling
J[
PROJECTION ON
Used with the power adapter to enable extended use of the
] switch
projector
K[
LIGHT ON
Used with power adapter to enable extended use of the guiding
] switch
light
L[
] button
TEST
To turn on the guiding light as long as it is pressed and held
M[
] button
RESET
Resets the unit by returning all settings to factory default
values
N Battery compartment
Accommodates two (2) UM-3 or “AA” size batteries
O Guiding light
P AC adapter jack
BATTERY INSTALLATION
The unit uses two (2) UM-3 or “AA” size 1.5V batteries.
To insert batteries:
1. Slide the battery door in the direction of the arrow.
2. Insert the batteries strictly according to the polarities shown
therein.
3. Replace the battery compartment door.
4. Press the [RESET] button.
When the low battery indicator [ ] is shown on the display,
replace with fresh batteries.
2

Note: Under normal circumstances, the batteries are good for 1
year. However, the battery life can be reduced vastly by frequent
use of the projector or snooze function.
If not disposed of properly batteries can be harmful.
Protect the environment by taking exhausted batteries
to authorized disposal stations.
Note: Make sure the voltage is correct.
Once the power adapter is in place, you can select to turn on the
projector for longer time (such as throughout the night) by sliding
the [
PROJECTION ON
To turn off the projector, slide the switch back.
switch on the side of the unit to the back.
]
GB
HOW TO USE THE PROJECTOR
Press [
SNOOZE
approximately 5 seconds.
Note: Make sure the [
front.
] and the projection will be activated for
PROJECTION ON
] switch is switched to the
HOW TO USE THE PROJECTOR
WITH POWER ADAPTER
RM813P/RM813PU comes with an AC power adapter. Use of the
AC power adapter is required for continuous time projection.
To install the adapter:
1. Insert adapter into jack at the bottom of the unit.
2. Plug the adapter into an electrical wall outlet.
Note that this switch can only be used with the power
adapter installed. For momentary projection, use the
[
SNOOZE
].
ABOUT RADIO RECEPTION
RM813P/RM813PU is designed to synchronize its calendar clock
automatically once it is brought within range of the Frankfurt
DCF77 radio signal (MSF60 for UK version).
When RM813P/RM813PU is within range, the radio-controlled
mechanism will override all manual setting unless radio reception
is being deactivated.
When the unit is receiving signal, the Radio Reception symbol
[
] will start to blink. Generally, complete reception takes
around 2 to 10 minutes depending on the strength of the radio
signal.
To disable the reception of RF signal manually, press and hold the
] button for 2 seconds until the Radio Reception symbol
[
disappear.
To enable the reception again, press and hold the [
2 seconds. The Radio Reception symbol will blink and the unit
will search for RF signal automatically.
3
] button for
 Loading...