

Page 1

1
GB
OUTBREAKER
USER’S MANU AL
MODEL: RA201
CONTENT
Table of figures..................................................................................................................................................................................... 3
Legends................................................................................................................................................................................................ 3
Introduction.......................................................................................................................................................................................... 4
SECTION 1: ATTENTION!................................................................................................................................................................ . 4
Note on compliance................................................................................................................................................................. 5
Control buttons & icons........................................................................................................................................................... 5
Control buttons........................................................................................................................................................................ 5
Icons........................................................................................................................................................................................ 5
Battery information.................................................................................................................................................................. 6
To replace the battery............................................................................................................................................................... 6
General operation..................................................................................................................................................................... 7
Operating modes...................................................................................................................................................................... 7
SECTION 2:Calendar clock mode, zone time and unit of measurement............................................................................................... 8
How to set the calendar clock................................................................................................................................................... 8
How to set the zone time.......................................................................................................................................................... 9
How to set the unit of measurement......................................................................................................................................... 9
How to set the daily alarm........................................................................................................................................................ 9
Page 2

2
GB
Chronometer............................................................................................................................................................................. 10
SECTION 3: Altimeter-Barometer mode............................................................................................................................................... 11
Information Shown in Altimeter................................................................................................................................................ 11
How to set the altitude.............................................................................................................................................................. 11
How to set the resolution of altitude......................................................................................................................................... 12
How to set the altitude alarm.................................................................................................................................................... 12
How to set the weather forecast icon......................................................................................................................................... 13
Sea level pressure display.......................................................................................................................................................... 14
How to set the sea level pressure............................................................................................................................................... 15
SECTION 4: Sailing timer mode.................................................................................................. .......................................................... 15
Information shown in sailing timer mode.................................................................................................................................. 15
sailing timer.............................................................................................................................................................................. 15
TIMER 1 – Chronometer........................................................................................................................................................... 16
Recall LAP Memory for TIMER 1............................................................................................................................................ 17
Delete the LAP Memory for TIMER 1...................................................................................................................................... 17
TIMER 2 – 10 MIN Sailing timer / TIMER 3 – 6 MIN Sailing timer........................................................................................ 18
The Thermometer..................................................................................................................................................................... 19
The back light.......................................................................................................................................................................... 19
Key lock function..................................................................................................................................................................... 20
Maintenance and disposal........................................................................................................................................................ 20
Trobuble shooting guide........................................................................................................................................................... 21
Technical specification.............................................................................................................................................................. 22
Page 3

3
GB
TABLE OF FIGURES
Fig. 1 : t oggle bewtween various mode............................................................................................................................................ 7
Fig. 2 : toggle information in calendar clock mode............................................................................... ........................................... 8
Fig. 3 : set calendar clock................................................................................................................................................................ 8
Fig. 3a : set zone time....................................................................................................................................................................... 8
Fig. 3b : set the unit of measurement................................................................................................................................................. 8
Fig. 3c : set daily alarm..................................................................................................................................................................... 10
Fig. 3d : set the countdown timer....................................................................................................................................................... 10
Fig. 4 : toggle information in altimeter mode.................................................................................................................................. 11
Fig. 4a : set the altitude..................................................................................................................................................................... 12
Fig. 4b : set the resolution of altitude................................................................................................................................................ 12
Fig. 4c : set the altitude alarm........................................................................................................................................................... 13
Fig. 4d : set the weather forecast icon............................................................................................................................................... 14
Fig. 4e : call out the sea level history and bar graph.......................................................................................................................... 14
Fig. 4f : set the sea level pressure..................................................................................................................................................... 14
Fig. 5 : toggle information in sailing timer mode................................................................................ ............................................ 15
Fig. 5a : toggle timer 1, timer 2, timer 3........................................................................................................................................... 15
Fig. 5b : timer 1 operation................................................................................................................................................................ 16
Fig. 5c : recall the lap memory for timer 1....................................................................................................................................... 17
Fig. 5d : delete one memory group................................................................................................................................................... 18
Fig. 5e : delete all memory groups................................................................................................................................................... 18
Fig. 5f : timer 2 and timer 3 display mode....................................................................................................................................... 19
LEGENDS
BOLD – Press
BOLD – Press and hold for 2 seconds
[add – flashing
icon] – fast advance
Page 4

4
GB
INTRODUCTION
Congratulations on your purchasing the OUTBREAKER RA201.
Your RA201 is a precision device for an activ e life style . RA201 is
equipped with Sailing Timer , Altimeter, Barometer , Weather forecast,
Thermometer, Chronometer , Calendar Clock and EL back light.
The RA201 the advanced Bar-compensation - technology. With this
advanced technology the RA201 is able to distinguish the pressure
change due to barometric change or altitude change. Using this
advanced Bar-compensation technology the performance of the
RA201 on the altitude reading and weather forecast will be much
more reliable.
SECTION 1 ATTENTION!
READ THIS USER’S MANUAL
THOROUGHLY.
• The RA201 is not meant to substitute professional measurement
devices for skydiving, hang gliding, paragliding, gyrocopter
riding, flying small aircrafts or industrial precision.
• This unit employs a semiconductor pressure sensor that could be
affected by the temperature change. While taking the altitude
measurement, ensure that the unit is not exposed to sudden
temperature changes.
• It is recommended to calibrate the altitude or sea level pressure
regularly to maintain the accuracy of the watch.
• The manufacturer and its suppliers hold no responsibility to any
party or any type of claim arising from the use of this product.
• The content of this manual is subject to change without further notice.
• The technical specifications of this product are subject to change
without further notice.
• Due to printing limitation, the displays shown in this manual
may differ from the actual display.
• The content of this manual should not be reproduced without the
permission of the manufacturer or their representative.
• If irregularity exist, press and hold MODE, SELECT, LAP and
SET key simultaneously for 2 seconds to reset the watch.
Page 5
5
GB
NOTE ON COMPLIANCE
Oregon Scientific OUTBREAKER conforms to the required EMC
Directive 89/336/EC and carries the respective CE marking.
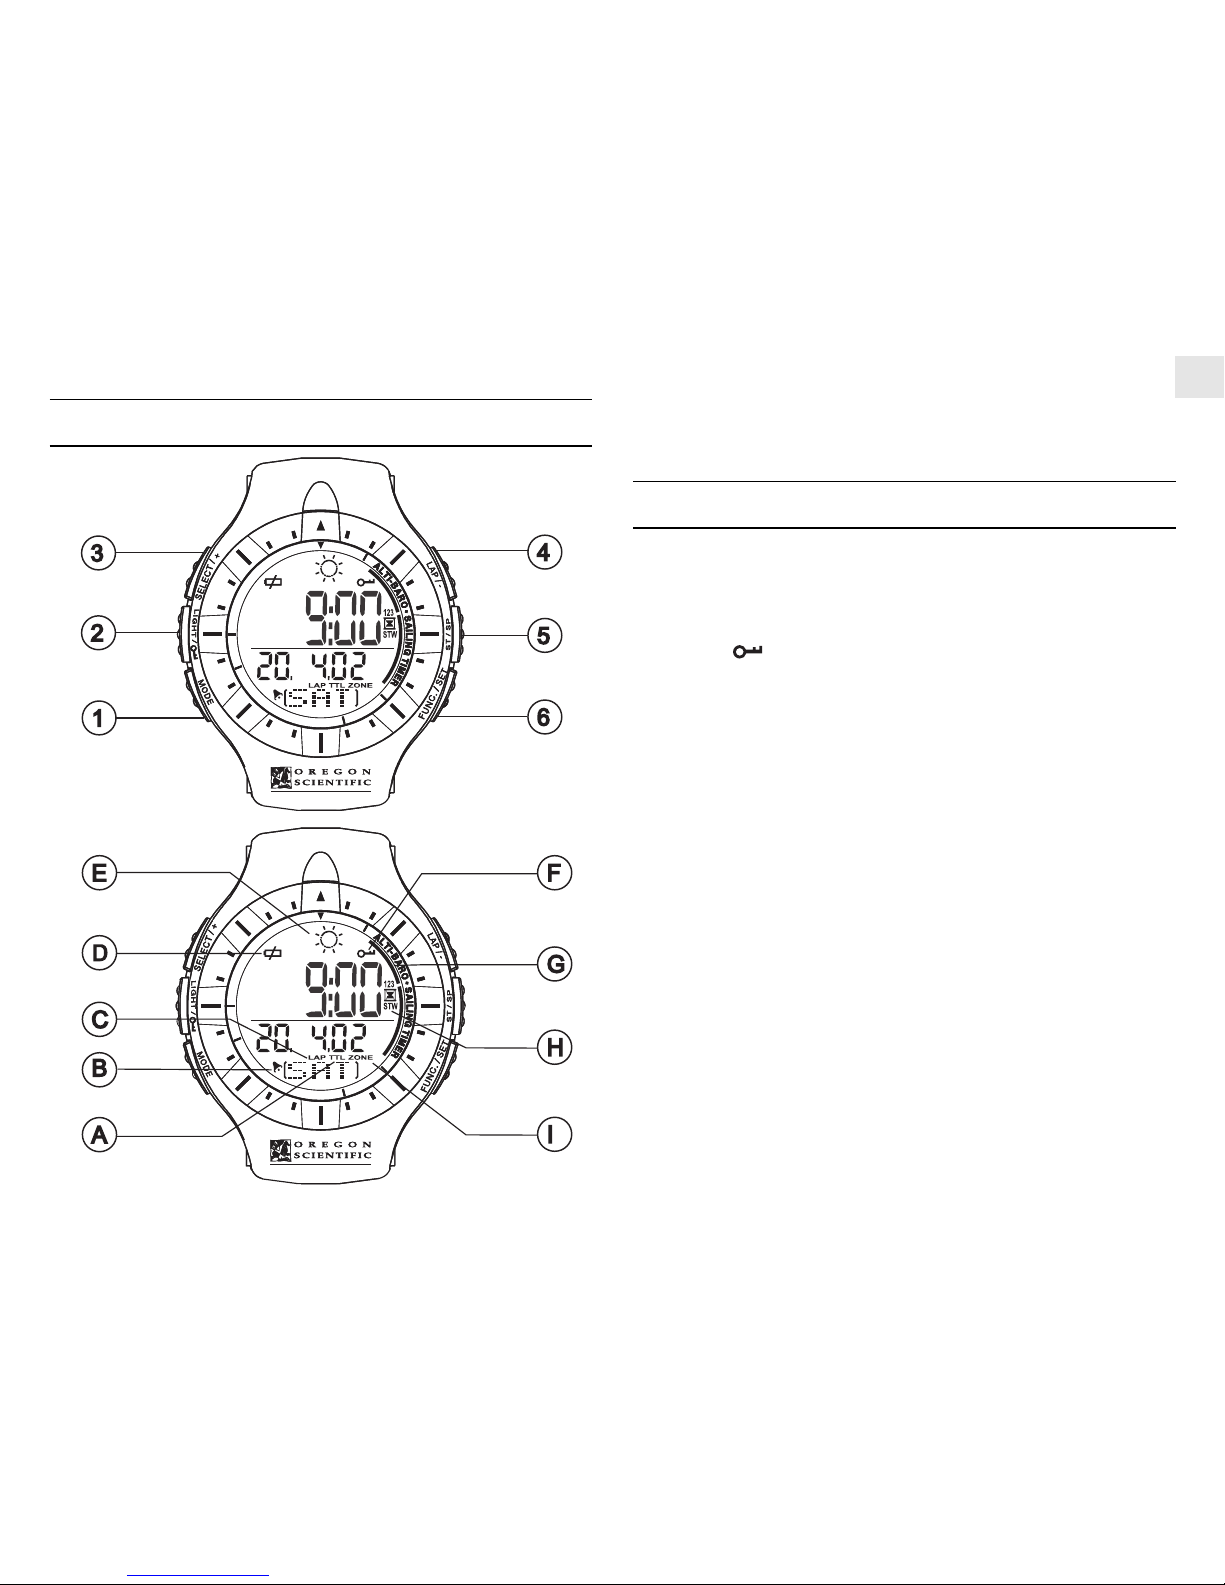
CONTROL BUTTONS & ICONS
CONTROL BUTTONS
1. MODE
T oggle among clock, altimeter-barometer and sailing timer mode
2. LIGHT/
Turn on the backlight or hold to activate/release the key lock
function
3. SELECT/+
Select the information in various modes or increase a value w hile
setting
4. LAP/-
Mark a LAP for the chronometer in the sailing timer or decrease
a value while setting or turns the daily alarm on/off
5. ST/SP
Start or stop the chronometer.
6. FUNC/SET
Select the function in various modes
ICONS
A. T otal time icon to indicate the total time running for the memory
group in Timer 1
B. Daily alarm icon to indicate the on/off status of the daily alarm
C. LAP memory icon to indicate the LAP memory for TIMER 1
Page 6

6
GB
D. Low battery icon to indicate the battery power is lo w (no display
if battery level is too low)
E. W eather icon to indicate the weather forecast
F. Key lock icon to indicate the lock/release status of the key lock
G. Status bar to indicate the mode of the watch
H. TIMER 1, TIMER 2 & TIMER 3 indicator to indicate which
timer is in use
I. Zone time icon
Hints:
a) A status bar shows on the display whether RA201 is in
altimeter-barometer or sailing timer mode.
b) Press and hold +/- for 2 seconds for fast increment or decrement
in setting the values.
c) In all setting modes, if left idle for 30 sec, the watch will
automatically switch back to the previous mode
When RA201 is worn on wrist, the temperature measured could be
affected by the body heat. T o acquire an accurate temperature reading,
remove the RA201 from wrist and wait for about 15 minutes before
taking the reading. The larger the temperature difference, the longer
the temperature settling time.
BATTERY INFORMATION
RA201 uses a CR2032 3V lithium battery . The maximum expected battery
life is approximately 12 months. When the battery of RA201 is running
low , the low-battery indicator [
] will light up, the backlight function
will be deactivated in order to sa ve the battery power .
Note:
• Heavy use of the EL backlight, altitude alarm and sailing timer
will reduce the battery service life significantly.
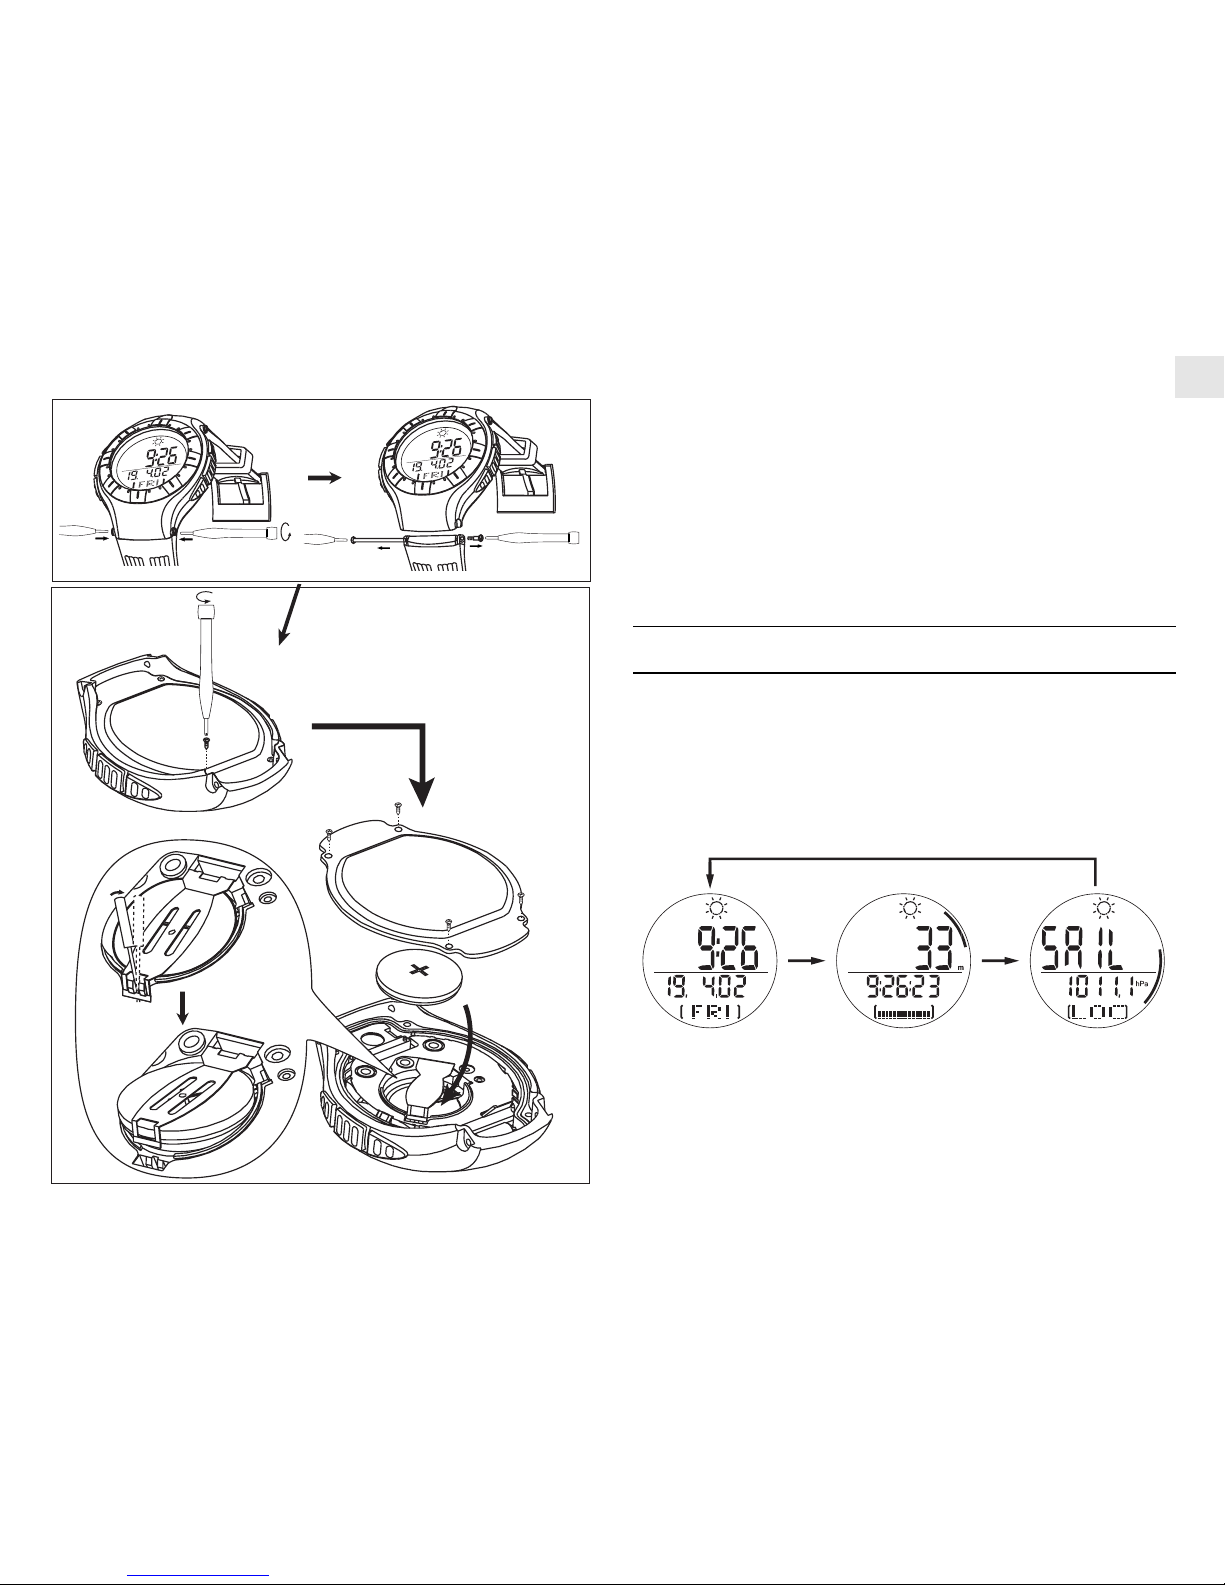
TO REPLACE THE BATTERY
Note:
It is recommended to have the battery replaced by your Oregon
Scientific dealer. Non-experienced user should take extreme care
in order to maintain water resistance.
1. Screw out the pin connecting the bracelets and watch using two
small screwdriv ers.
2. Remove the four screws to open the rear metal plate of the watch.
3. Use a small tool to open the contact plate mount on the battery.
Ensure all surfaces are clean and dry.
4. Remove the old battery carefully. A v oid bending the contact plate.
5. Place the new battery inside the compartment with +ve side facing
up. Ensure the battery contact plate is mount back to the battery .
6. Close the rear metal plate of the watch and connect back the
bracelets and the watch. Ensure that the o-ring is in its position.
Page 7
7
GB
Note:
• It is recommended to hav e the battery replaced by your Orego n
Scientific dealer .non-exper ienced user should take e xtreme care
in order to maintain water resistance .
GENERAL OPERATION
OPERATING MODES
RA201 has three operating modes for calendar clock,
altimeter-barometer and sailing timer. Press MODE to
toggle between these three operating modes.
Refer to Fig 1 to toggle among the operating modes.
MODE
MODE
CLOCK
MODE
ALTIMETER-
BAROMETER MODE
SAILING
TIMER MODE
MODE
Fig.1
C
R
2
0
3
2
C
R
2
0
3
2
C
R
2
0
3
2
Page 8

8
GB
SECTION 2 CALEND AR CLOCK
MODE, ZONE TIME AND UNIT OF
MEASUREMENT
INFORMATION SHOWN IN CALENDAR
CLOCK MODE
Six information can be shown in calendar clock: date, seconds, zone
time, daily alarm, chronometer and temperature. Press SELECT to
access the information one by one. Refer to Fig 2 to toggle between
the information in calendar clock mode.
HOW TO SET THE CALENDAR CLOCK
1. Press and hold SET for two seconds in either clock-date or
clock-second display to enter the calendar clock setting
mode.
2. Press SET to toggle the field in the calendar clock setting mode.
The order of field follows: 12/24hr format, hour, minute, year,
month, date, zone time and unit of measurement.
3. Press +/- to increase or decrease the values or change the setting.
4. Press SET to confirm the setting and toggle to next field and
then quit the setting mode.
Refer to Fig 3 to set the calendar clock.
SELECT
Date
Temperature Chronometer Alarm
Second Zone time
SELECT
SELECT SELECT
SELECT SELECT
Fig.2
Fig.3
Fig.3b
Fig.3a
12hr/24hr Set hour Set minute
Set month
Set year
Set day
SET
SET
SET
SET
SET
SETSETSET
Set zone time
Set unit
+ / -
+-+-+-
+-+-+-+-
SET
Page 9

9
GB
Notes:
a) 24hr format will follow with date-month for the calendar display;
12hr format will follow with am/pm display and month-date for
the calendar date display.
b) Press and hold +/- function is not available for selecting the 12hr/
24hr format.
HO W T O SET THE ZONE TIME
Zone time can be set in the sequence of setting the calendar clock.
1. Press and hold the SET for two seconds in either clock-date or
clock-second display to enter the calendar clock setting mode.
2. Press SET to toggle to the zone time the setting mode.
3. Press +/- to tune forward or backward the zone hour.
4. Press SET to confirm the setting and toggle to next field and
then quit the setting mode.
Refer to Fig 3a to set the zone time.
Note:
a) Zone hour can be set within a range of +/- 23 hour.
HO W TO SET THE UNIT OF
MEASUREMENT
RA201 is equipped with two sets of unit of measurement: metric or
imperial. It can be set in the sequence of setting the calendar clock.
1. Press and hold the SET for two seconds in either clock-date or
clock-second display to enter the calendar clock setting mode.
2. Press SET to toggle to the unit of measurement setting mode.
3. Press +/- to select the unit of measurement.
4. Press SET to confirm the setting and quit the setting mode.
Refer to Fig 3b to set the unit of measurement.
Notes:
a) Metric unit set in
O
C, m & hPa; Imperial unit set inOF , ft & inHg.
b) Press and hold +/- function is not available for selecting the unit
of measurement.
HO W TO SET THE DAILY ALARM
1. a) Press LAP/- to toggle the daily alarm on/off in clock-alarm
display.
b) Press and hold SET for two seconds in clock-alarm display to
enter the alarm time setting mode.
2. Press SET to toggle between the hour and minute setting.
3. Press +/- to increase or decrease the values.
4. Press SET to confirm the setting and toggle to next field and
then quit the setting mode.
Page 10

10
GB
Refer to Fig 3c to set daily alarm.
Notes:
a) The alarm will be activated automatically once the alarm time
has been altered.
b) The alarm will alert for 1 minute. Press any key to stop the alarm.
CHRONOMETER
It could be used as a stopwatch as well as a countdown timer.
Use as a stopwatch:
1. Press ST/SP to start or stop the stopwatch in cloc k-chronometer display.
2. Press and hold SET for two seconds to reset the stopwatch.
Use as a countdown timer:
1. Press and hold SET for two seconds to set the time for the
countdown timer in clock-chronometer display.
2. Press SET to toggle between the hour , minute and second setting.
3. Press +/- to increase or decrease the values.
4. Press SET to confirm the setting and toggle to next field and
then quit the setting mode.
5. Press ST/SP to start or stop the chronometer in clock-chronometer
display after setting.
6. Press and hold SET for two seconds to reset the timer.
Refer to Fig 3d to set the countdown timer.
Alarm on/off
Set hour Set minute
SET
Fig.3c
SET
SET
-
+-+-
Set hour
Set minute Set Second
SET
Fig.3d
SET
SET
SET
+-+-+-
Page 11

11
GB
Notes:
a) This chronometer works independently with the chronometer in
sailing timer mode.
b) This chronometer can run simultaneously with the sailing timer.
c) If the chronometer is used as a timer, after reset it will go back to
set time in the timer mode. The chronometer could be used as a
stopwatch unless the time display shows 00:00:00.
d) After the countdown timer count to 00:00:00, it will start count
up as a stopwatch automatically.
SECTION 3 ALTIMETER-
BAROMETER MODE
RA201 is equipped with an intelligent barometer that determines
altitude by the built-in sensor with the advanced Bar-compensation
technology , the sensor can also distinguish the differences between
pressure caused by changes in physical altitudes or pressure caused
by weather conditions. This smart distinction eliminates
discrepancies and makes the altimeter reading more accurate than
most of the average devices available on the market.
INFORMATION SHOWN IN ALTIMETER
Five information can be shown in altimeter: clock, altimeter alarm,
temperature, local pressure, and sea level pressure. Press SELECT
to access the information one by one. Refer to Fig 4 to toggle between
the information in altimeter mode.
Note:
• There is a bar graph at the bottom of the display showing the
altitude history . It will be updated every minute.
HO W TO SET THE ALTITUDE
1. Press and hold SET for two seconds in altitude-clock display to
enter the altitude setting mode.
2. Press SET to toggle between the altitude and resolution setting.
3. Press +/- to increase or decrease the values.
4. Press SET to confirm the setting and toggle to next field and
then quit the setting mode.
Altitude alarm
Sea level pressure
Temperature
Local pressure
SELECT SELECT
SELECT
SELECTSELECT
Fig.4
Page 12

12
GB
Refer to Fig 4a to set the altitude.
Notes:
a) The correct local altitude could be found from a topographical
map.
b) Setting the altitude affects the sea level pressure displayed.
c) The altitude can be calibrated by setting the sea level pressure.
For details please refer to section HOW TO SET THE SEA
LEVEL PRESSURE.
HO W TO SET THE RESOLUTION OF
ALTITUDE
Resolution of altitude can be set in the sequence of setting the altitude.
Either 1m (3ft) or 3m (10ft) can be selected for the resolution. The
altitude will be updated according to the resolution selected.
1. Press and hold SET for two seconds in altitude-clock display to
enter the altitude setting mode.
2. Press SET to toggle to the resolution of altitude setting mode.
3. Press +/- to select the desired resolution (1m/3m or 3ft/10ft)
4. Press SET to confirm the setting and quit the setting mode.
Refer to Fig 4b to set the resolution of altitude.
Note:
• Press and hold +/- function is not available for select the resolution
of altitude.
HO W T O SET THE ALTITUDE ALARM
RA201 is equipped with an altitude alarm. Either ascending or
descending altitude alarm could be selected. the ascending altitude
alarm will be turned on whenever the set altitude is reached during
ascending from an ascending path. The descending alarm will be
turned on whenever the set altitude is reached during descending
from a descending path.
1. Press and hold SET for two seconds in altitude-altitude alarm
display to enter the altitude alarm setting mode.
2. Press +/- to select either ascending or descending altitude alarm.
Set altitude
Set resolution
SET
SET
Fig.4a
Fig.4b
SET
+ / -
+-
Page 13

13
GB
3. Press SET to confirm the setting and toggle to set the altitude.
4. Press +/- to set the altitude for the altitude alarm.
5. Press SET to confirm the setting and then quit the setting mode.
OR
1. Press LAP/- to turn the altitude alarm on/off.
Refer to Fig 4c to set the altitude alarm.
Notes:
a) Press any key to stop the alarm sound, however, if the set value
is reached again, the alarm will be re-activated with respect to
the status.
b) Setting the altitude affects the sea level pressure displayed.
HO W T O SET THE WEATHER FORECAST
ICON
Apart from determining the altitude, barometer also forecasts the
weather for the forthcoming 12 to 24 hours based on barometric
pressure changes. The effective range is 30 to 50 km. To have a
faster response of the weather forecast, it is suggested to set the
weather forecast icon to match the current weather.
The forecast will automatically be displayed in one of the four icons:
1. Press and hold SET for two seconds in altitude-local pressure
display to enter the weather forecast icon setting mode.
2. Press +/- to select the desired weather forecast icon.
3. Press SET to confirm the setting and then quit the setting mode.
Set acsending/descending alarm
Set altimeter alarm on/off
Set altitude
SET + / -
SET
SET
-
Fig.4c
+-
Indicator
displays
on the unit
Forecast Sunny Slightly cloudy Cloudy Rainy
Page 14

14
GB
Refer to Fig 4d to set the weather forecast icon.
Notes:
a) Since the weather forecast can be affected by oceanic or
continental weather phenomena, the forecast could be less
accurate. The manufacturer is not responsible for any
inconveniences caused by faulty weather forecast.
b) The weather forecast is meant for the next 12 to 24 hours. It may
not necessarily reflect the current situation.
SEA LEVEL PRESSURE DISPLAY
In the sea level pressure display there are two functions tha t can be
called out from the RA201: sea level pressure history memory and
bar graph of the history.
1. Press FUNC in altitude-sea level pressure display.
2. Press +/- to select the sea le vel pressure history memory to display .
3. Press FUNC to toggle to the sea level bar graph to display.
4. Press FUNC to go back to the altitude-sea level pressure display .
Refer to Fig 4e to call out the sea level history and bar graph
functions.
Notes:
a) The history recalled can be selected from –1 hour to –24 hour.
b) If left idle for 30 seconds in these functions, the watch will resume
back to the altitude-sea level pressure display.
c) After changing the battery “--” will be shown as no data kept in
the sea level pressure history memory and bar graph will be clear
(see diagram below). The history and the bar graph will be updated
hourly after one hour.
Sea level pressure history
Sea level pressure bar graph
Set sea level pressure
FUNC
FUNC
FUNC
SET
Fig.4f
Fig.4e
SET
+-
Set weather forecast icon
SET
SET
Fig.4d
+-
Page 15

15
GB
HOW TO SET THE SEA LEVEL PRESSURE
When you first use the RA201, please calibrate the sea level pressure.
Once the sea level pressure is calibrated, the altitude will
automatically calibrate to the reference altitude using the built-in
auto-calibration function.
1. Press and hold SET for two seconds in altitude-sea level pressure
display to enter the sea level pressure mode.
2. Press +/- to increase or decrease the values.
3. Press SET to confirm the setting and then quit the setting mode.
Refer to Fig 4f to set the sea level pressure.
Note:
• The current sea level pressure can be obtained fr om most of the
newspapers, local news and radio weather reports or through the
internet weather station.
• It is necessary to re-calibrate the sea level pressure and altitude
again once the product is placed in a pressurized cabinet such as
an airplane.
SECTION 4 SAILING TIMER MODE
INFORMATION SHOWN IN SAILING
TIMER MODE
Four information can be shown in sailing timer: local pressure, clock,
altitude and temperature. Press SELECT to access the information
one by one. Refer to Fig 5 to toggle between the information in
sailing timer mode.
SAILING TIMER
RA201 is equipped with three sailing timers: TIMER 1 –
chronometer with 99 laps memory; TIMER 2 – 10 minutes pre-set
timer; & TIMER 3 – 6 minutes pre-set timer .
No sea level pressure history No sea le vel pressure bar graph
Clock
Timer 2-10 min
sailing timer
Timer 3-6 min
sailing timer
Timer 1 -Chronometer
Altitude
Temperature
Local pressure
SELECT
SELECT
Fig.5
Fig.5a
SELECT
FUNC
FUNC
FUNC
FUNC
SELECT
Page 16

16
GB
1. Press FUNC from any one of the display modes: sail-local
pressure, sail-clock, sail-altitude and sail-temperature to access
to the sailing timer.
2. Either TIMER 1 [
] or [ ], TIMER 2 [ ] and TIMER 3
[ ] can then be toggled to select by pressing FUNC. Refer to
Fig 5a to toggle between the three sailing timers.
Notes:
a) This chronometer works independently with the chronometer in
calendar clock mode.
b) This chronometer can run simultaneously with the chronometer
in calendar clock mode.
c) If the chronometer is used as a timer, after reset it will go back to
set time in the timer mode. The chronometer can be used as a
stopwatch only when the time shows 00:00:00
d) In the Sailing timer mode, only one of the timers, either TIMER
1, TIMER 2 or TIMER 3, can be run at a time.
e) Whenever re-entering the SAILING TIMER mode while the
watch in Sailing Timer mode is running it will automatically rev ert
to the last running timer .
TIMER 1 – Chronometer
Timer 1 can be used as a stopwatch with 99 laps memory function
as well as a countdown timer.
Use as a stopwatch:
1. Press ST/SP to start the stopwatch.
2. Press LAP to mark a lap memory.
3. Press ST/SP to stop the stopwatch.
4. Press and hold SET for two seconds to reset the stopwatch.
Use as a countdown timer:
1. Press and hold SET for two seconds to set the time for the
countdown timer.
2. Press SET to toggle between hour, minute and second setting.
3. Press +/- to increase or decrease the values.
4. Press SET to confirm the setting and toggle to next field.
5. Press ST/SP to start or stop the chronometer in clock-chronometer
display after setting.
6. Press and hold SET for two seconds to reset the timer.
Refer to Fig 5b for TIMER 1 operation.
Notes:
a) When countdown time reaches the last 5 minutes to last minute ,
short double beeping sound every minute.
b) At every 10 seconds during the last minute, there will be a short
double beeping sound.
Set hour Set minute Set second
Countdown timer
Stopwatch
Fig.5b
SETSET
SET
SET
SET
SET
+-
ST/SP
ST/SP
+-+-
Page 17

17
GB
c) At every second during the last ten seconds, there will be a short
beeping sound.
d) At the completion of the countdown, there will be a long beeping
sound for indication.
e) After completion of the countdown it will automatically activate
the stopwatch.
f) The maximum countdown time and stopwatch range will be
99:59:59.
g) The set time will be resumed after the timer is stopped and reset.
h) There are a total of 99 memory groups for the stopwatch; to be
used between a maximum of 99 memory groups or a maximum
of 99 lap memories or a combination of both.
i) While the stopwatch is working, every press on ST/SP button it
will be counted as one memory group and automatically stored
in the memory.
j) Once the LAP memories are used up, the chronometer still work
but without LAP memory function.
k) At the bottom of the display a running icon shows the status.
l) The latest memory group will be named as “M 1”.
Recall LAP Memory for TIMER 1
1. Press SELECT in TIMER 1 mode after it is reset to 00:00:00 to
enter the LAP memory recall mode (recall can only be activated
when timer is not working).
2. Press +/- to toggle between memory groups. In the first display,
the date and time stamp will be shown for the starting time for
that corresponding memory group.
3. Press FUNC to recall the corresponding total (TTL) time.
4. Press +/- to scroll among the LAP memory.
5. Press FUNC to go back to TIMER 1.
Refer to Fig 5c to recall the LAP memory for TIMER 1.
Note:
• If left idle for 30 sec, it will go back to TIMER 1.
Delete the LAP Memory for TIMER 1
The LAP memory group(s) can be deleted. It can either delete one
particular LAP memory group or delete all LAP memory groups.
Delete one LAP memory group
1. Press SELECT in TIMER 1 mode after it is reset to 00:00:00 to
enter the LAP memory recall mode.
2. Press +/- to select the particular memory group to be deleted.
3. Press and hold FUNC for 2 seconds in that particular group to
enter the LAP memory delete mode.
4. Press and hold FUNC for 2 seconds to confirm deletion of the
particular memory group. “donE” will be shown on the display
after the deletion.
5. Press FUNC twice to quit to TIMER 1.
Date & time stamp Memory group's total time
Lap time for
memory group
Fig.5c
SELECT
FUNC
FUNC
+ / -
+- +-
Page 18

18
GB
Notes:
a) If left idle for 30 sec, it will go back to TIMER 1.
b) To cancel the deletion of the LAP memory group, press FUNC
to go back to the LAP memory recall mode.
c) If no memory group records exists, “--” will be shown on the display.
Refer to Fig 5d to delete one LAP memory group for TIMER 1.
Delete all LAP memory groups
1. Press SELECT in TIMER 1 mode after it is reset to 00:00:00 to
enter the LAP memory recall mode.
2. Press and hold FUNC for 2 seconds to enter the LAP memory
delete mode.
3. Press SELECT to select deleting all LAP memories.
4. Press and hold FUNC for 2 seconds to confirm the deletion of
all the LAP memories. “donE” followed by “--” will be shown
on the display after the deletion.
5. Press FUNC to quit to TIMER 1.
Refer to Fig 5e to delete all LAP memory groups for TIMER 1.
Notes:
a) If left idle for 30 sec, it will go back to TIMER 1.
b) To cancel the deletion of the LAP memory groups, press FUNC
to go back to the LAP memory recall mode.
TIMER 2 – 10 MIN SAILING TIMER/TIMER 3 – 6 MIN
SAILING TIMER
RA201 has two pre-set sailing timers: TIMER 2: 10 min sailing
timer and TIMER 3: 6 min sailing timer . These sailing timers function
as a countdown timer but with countdown time fixed at 10 minutes
and 6 minutes and the timer minute can be increased or decreased
while the timer is running.
1. Press FUNC from an y display mode: sail-local pressure, sail-clock,
sail-altitude and sail-temperature to access to the sailing timer .
2. Press FUNC toggle to TIMER 1, TIMER 2 or TIMER 3.
3. Press ST/SP to start or stop the timer once either TIMER 2 or
TIMER 3 is selected.
4. Press +/- to increase or decrease the full counting minute while
the timer is running.
5. Press SP to stop the timer.
6. Press and hold SET for 2 seconds to reset the TIMER to the
initial pre-set value.
Fig.5d
Fig.5e
SELECT
2 sec
SET SET
2 sec
FUNC
SET
Page 19

19
GB
Refer to Fig 5f for TIMER 2 and TIMER 3 display mode.
Notes:
a) During count down the timer minute can be increased or decreased
to the full counting minute.
b) When reaching every full minute there will be a short double
beeping sound.
c) When countdown time reaches 5 minutes, there will be short
double beeping sound for 5 sec.
d) When countdown time reaches the last minute, there will be
continuous beeping with 1 second on and 1 second off cycle.
e) For the last 5 seconds of the countdown there will be a
continuously beeping sound.
f) At the completion of the countdown there will be a long beeping
sound for indication.
g) After completion of the countdown, it will automatically activate
the stopwatch.
h) The maximum stopwatch range will be 99:59:59.
i) When the timer or stopwatch stops or after a reset, it will resume
to 10 minutes for timer 2 or 6 minutes for timer 3.
j) At the bottom of the display a running icon shows the status.
THE THERMOMETER
RA201 is equipped with a thermometer. Please refer to section
CALENDAR CLOCK MODE, ZONE TIME AND UNIT OF MEASUREMENT; INFORMATION SHOWN IN ALTIMETER; and
INFORMATION SHOWN IN SAILING TIMER MODE.
Notes:
• When RA201 is worn on wrist, the temperature measured could
be affected by the body heat. To acquire an accurate temperature
reading, remove RA201 from the wrist and wait at least for 15
minutes before taking the reading.
THE BACK LIGHT
Press LIGHT to turn on the backlight for five seconds.
Notes:
a) When the backlight is ON, any key press will keep it ON for an
additional five seconds.
b) The backlight will not switch on when the battery level is too
low. This indicates a need to change the battery.
c) If [ ] appears, the backlight function will deactivate in order
to save the battery power.
Timer 1 -Chronometer
Timer 2 - 10 min
sailing timer
Timer 3 - 6 min
sailing timer
Fig.5f
FUNC
ST/SP
SET
FUNC
FUNC FUNC
+-+-
ST/SP
SET
Page 20

20
GB
KEY LOCK FUNCTION
RA201 is equipped with a key lock function. This function protects
against any unintended key press . Only EL backlight can function
normally while key lock is activated.
Press and hold LIGHT/
for two seconds to activate/release the
key lock function.
Note:
a) After key lock function is activated, only LIGHT key can function
normally.
MAINTENANCE AND DISPOSAL
• The watch is water resistant but it is not recommended to make
any watch setting while exposed to excessive water or under water .
Pressing the keys while in the water or during hea vy rainstorms
may cause water to enter into the unit.
• Batteries can be harmful if not disposed properly. Protect the
environment by taking e xhausted batteries to authorized disposal
stations.
• Do not clean the unit with alcohol containing detergents, abrasive
or corrosive materials. Abrasi ve cleaning agents may scratch the
plastic parts and corrode the electronic circuit.
• Do not expose the unit to excessive force, shock, dust and
temperature or humidity. Such treatment may result in
malfunction, shorter electronic life span, damaged batteries, or
distorted parts.
• Do not tamper with the unit’s internal components. Doing so
will terminate the unit’s warranty and may cause damage. The
unit contains no user-serviceable parts.
Page 21

21
GB
TROUBLE SHOOTING GUIDE
TROUBLE POSSIBLE
CAUSE
REMEDY
Different altitude was
found for same location
in different days.
This is caused by the
pressure changes due to
the activities instead of
the actual sea level
pressure change.
Recalibrate the altitude
by setting the sea level
pressure.
The bar graph of the
altitude was kept at a
high level.
The altitude exceeds the
upper limit of the display
range of the bar graph.
The display range will
be readjusted for the
next update.
No bar graph was
observed within the
altitude mode.
(1) Battery has been
changed.
(2) The watch has been reset.
(3) The altitude inferior to
the lower limit of the
display range of the bar
graph.
(1-2) Leave the watch for
one minute and the
altitude record will
start to update again.
(3) The display range will
be readjusted for the
next update.
The sea level pressure
or the altitude does not
reflect the actual value.
(1) The watch has been kept
in a pressurized
environment for a period
of time.
(2) This is caused by the
pressure changes due to
the activities instead of
the actual sea level
pressure change.
Re-calibrate the sea
level pressure and
altitude .
The bar graph of the
sea level pressure was
kept at a high level.
The sea level pressure
exceeds the upper limit
of the display range of
the bar graph.
The display range will be
readjusted for the next up-
date.
After changing the unit
of measurement, the
historical readings of
the sea level memories
were shown constant.
The watch displays
default values because
there were no updated
data captured.
The sea level memories
will be resumed to the
memorized values once
the sea level pressure has
been updated.
No memory records
and bar graph for the
sea level pressure.
(1) Battery has been
changed.
(2) The watch has been
reset.
(3) The sea level pressure
is inferior to the lower
limit of the display
range of the bar graph.
(1-2) Leave the watch for
one hour till the sea
level pressure starts
to update again.
(3) The display range
will be readjusted for
the next updated.
W eather forecast icon
never changes.
The barometer changes
were covered by the
activities changes.
Reset the weather forecast
icon to match with the
current weather in order
to speed up the responce.
LAP memory is not
functioning in TIMER
1.
(1) LAP memory is full.
(2) Memory group
record is full.
Delete the memory
group(s) to release the
memory space for LAP
function.
No key function when
key pressed.
Key lock function has
been activated.
Release the key lock
function.
No back light when EL
back light key is
pressed.
Battery level is too low to
activate the backlight.
Replace the old battery
with a new one.
Cannot start the Timer
in SAILING TIMER
mode.
TIMER 1, TIMER 2 or
TIMER 3 is running.
Stop the running timer
and reset the TIMER.
Start the desired TIMER
accordingly.
Temperature shown is
higher than the actual
temperature.
The thermometer detected
the body heat instead of
the actual temperature.
Take the watch off the wrist
of leave it on open area for
at least
15 minutes.
Page 22

22
GB
TECHNICAL SPECIFICATION
CALENDAR CLOCK
Time : 12hr with am/pm indication
or 24hr
Date : MM.DD or DD.MM
Year : 2001 – 2099 (auto-calendar)
Zone time : (+)23 – (-)23 hours
Chronometer : 99:59:59 (hr:min:sec)
Alarm : 1 minute daily alarm
THERMOMETER
Measuring range : -10.0...60.0
O
C (14.0...140 OF)
Resolution : 0.1
O
C (0.2 OF)
Accuracy : +/-1
O
C (+/-2 OF)
AL TIMETER
Altitude display : 410...9,010m
(–1,345...29,553ft)
Altitude setting : -400...9,000m
(–1,312...29,520ft)
Resolution : 1m or 3m (3ft or 10ft)
Accuracy : +/-10m (+/-30ft)
Alarm : 1 altitude alarm
BAROMETER
Local air pressure display : 299.0...1101.0 hPa
(8.83...32.51 inHg)
Local air pressure resolution : 0.1 hPa (0.01 inHg)
Sea level pressure display : 900...1100 hPa
(26.58...32.48 inHg)
Sea level pressure setting : 900...1100 hPa
(26.58...32.48 inHg)
Sea level pressure resolution : 1 hPa (0.03 inHg)
Accuracy : +/-3 hPa (+/-0.1 inHg)
Weather forecast indication : sunny, slightly cloudy,
cloudy, and rainy
TIMER 1
Chronometer : 99:59:59 (hr:min:sec)
Memory : 99 memory groups and 99 LAP
memories sharing among the
99 memory groups
TIMER 2
Countdown timer : 00:10:00 (hr:min:sec)
Stopwatch : 99:59:59 (hr:min:sec)
TIMER 3
Countdown timer : 00:06:00 (hr:min:sec)
Stopwatch : 99:59:59 (hr:min:sec)
Page 23

23
GB
POWER SOURCE
W atch : 1 X CR2032 3V lithium battery
OTHERS
Operation temperature : -10...60
O
C (14...140 OF)
Storage temperature : -20...70.0
O
C (-4.0...158 OF)
Water resistance : not actuating keys to
50m (160ft)
 Loading...