

Page 1

EN
User Manual
Model: OS5851L-BR
Manual de Instruções
Modelo OS5851L-BR
086L004968-026
1/75
REV:1
Page 2

EN
INTRODUCTION .............................................................................................................1
GETTING STARTED .......................................................................................................3
Checking package contents .....................................................................................
3
Modular jack .............................................................................................................
3
Installation tips ..........................................................................................................
3
Battery setup .............................................................................................................
4
Connecting the base unit and charging the handset .................................................
4
Telephone line connection .........................................................................................
4
Tone/pulse setting .....................................................................................................
5
Register handsets to the main base before use ........................................................
5
NAMES AND CONTROLS .............................................................................................. 6
Handset ..................................................................................................................... 6
Base unit ...................................................................................................................
7
INITIAL PROGRAMMING ...............................................................................................8
Language setting .......................................................................................................
8
Area code setting ......................................................................................................
8
Ringer tone ................................................................................................................
8
Tone/pulse setting .....................................................................................................
8
Resetting to default ...................................................................................................
9
BASICS ...........................................................................................................................9
Receiving a call .........................................................................................................
9
Making a call .............................................................................................................
9
Volume adjustment ...................................................................................................
10
Ringer switch ............................................................................................................
10
Pre-dialing ................................................................................................................ 10
Changing the pre-dial number ..................................................................................
10
Redialing ..................................................................................................................10
Fast redialing ............................................................................................................
10
FLASH key ...............................................................................................................
10
CH (Channel)/DEL key .............................................................................................
11
* TONE key ..............................................................................................................
11
Handset locator (paging function) ............................................................................ 11
MUTE key ................................................................................................................
11
Low battery warning ................................................................................................
11
TABLE OF CONTENTS
086L004968-026
2/75
REV:1
Page 3

EN
CALLER ID FEATURES ................................................................................................12
Caller ID ..................................................................................................................
12
Caller ID list ..............................................................................................................
12
Reviewing Caller ID list ...........................................................................................
12
Formatting Caller ID numbers ..................................................................................
12
Storing Caller ID entries in the directory ..................................................................
13
Dialing a Caller ID number .......................................................................................
13
Deleting entries from the Caller list ..........................................................................
13
Deleting the displayed entry .....................................................................................
13
Deleting all entries ....................................................................................................
13
DIRECTORY ................................................................................................................... 14
Storing a number in the directory .............................................................................
14
Replacing a directory entry with a Caller ID entry ....................................................
15
Changing a stored number .......................................................................................
15
Making calls from the directory ................................................................................
15
Reviewing and deleting directory contents ...............................................................
15
Chain dialing from the directory ...............................................................................
15
DIGITAL ANSWERING MACHINE ................................................................................16
Switch the answering machine on/off .......................................................................
16
Play the messages from the mailboxes ...................................................................
16
Delete a message ....................................................................................................
17
Delete all old messages in a mailbox .......................................................................
17
Record a memo note ................................................................................................
17
Record an announcement ........................................................................................
17
Play an announcement ............................................................................................
18
Delete an announcement .........................................................................................
18
Menu Options ...........................................................................................................
18
View the menu options .............................................................................................
18
Set the announcement on/off ...................................................................................
19
Record the announce only message ........................................................................
20
Set the ring delay .....................................................................................................
20
Set the time ..............................................................................................................
20
Hear the current time ...............................................................................................
21
Adjust the volume level ............................................................................................
21
Setup the remote access code .................................................................................
21
Remotely access the answering machine ................................................................
21
CHANGING THE BATTERY ..........................................................................................22
086L004968-026
3/75
REV:1
Page 4
EN
The exclamation point within the triangle is a warning sign alerting you
of important instructions accompanying the product.
Oregon Scientic and the Oregon Scientic logo are registered trademarks of Oregon
Scientic Corporation and are used under License from Oregon Scientic Corporation.
POWER FAILURE .......................................................................................................... 23
HEADSET JACK AND BELT CLIP ................................................................................23
LIGHT SIGNALS ............................................................................................................24
LCD SCREEN MESSAGES ...........................................................................................24
SOUND SIGNALS ..........................................................................................................25
TROUBLESHOOTING ...................................................................................................25
MAINTENANCE .............................................................................................................29
MAXIMIZE BATTERY PERFORMANCE .......................................................................30
086L004968-026
4/75
REV:1
Page 5

1
EN
Congratulations on your purchase of this Oregon Scientic cordless telephone.
Your Oregon Scientic 5.8 GHz cordless telephone is a ne-quality home communications
product. It is carefully designed and produced by a world leader of consumer and industrial
electronic equipment. With proper maintenance and care, it will provide you with years of
enjoyment and convenience.
Main Features
5.8 GHz Technology
Superior Range – The use of 5.8 GHz frequency band for signal transmission
between base and handset means greater communication
range compared to conventional 43 - 49 MHz cordless
telephones.
Ultra-Low Noise – The high frequency communication also has signicantly
reduced noise level.
40-Channel Auto Scan – Your new telephone uses one of 40 channels in the 5.8 GHz
frequency band. It automatically selects a clear channel every
time you receive or place a call on the handset.
Digital Answering Machine (DAM) system
3 Mailboxes – Callers can select to leave message on one of three mail-
boxes for personalized message access.
User selectable Ring delay – Set the answer machine to pick up after the toll saver
beep, 2, 4, 6 or 8 rings.
Remote Access – The remote access feature allows you to access your
messages from any location, just dial your number and
enter your access code.
Other features
INTRODUCTION
• Caller ID on handset
• Compatible with Caller ID
• 40 Caller ID list
• 3-line trilingual display with
backlight LCD screen
• Digital Answering Machine 10 to
13 minutes recording time with
maximum 50 messages and 2 user-
programmable outgoing messages
• Programmable clock for message
time and day
• 8 level volume control
• Two user messages (answer and
record / answer only)
• Remote access from external
telephone
• Dial back from Caller ID list
• 3 ringer tones
• 10 memory call log
• Tone & pulse dialing compatible
086L004968-026
5/75
REV:1
Page 6

2
EN
IMPORTANT: To use all of the features of this telephone, you must subscribe to either the
standard Caller ID Service from your telephone company.
086L004968-026
6/75
REV:1
Page 7
3
EN
MODULAR JACK
You need an RJ11 type modular phone jack. If you do not have a modular jack, call your
local phone company to nd out how to get one installed.
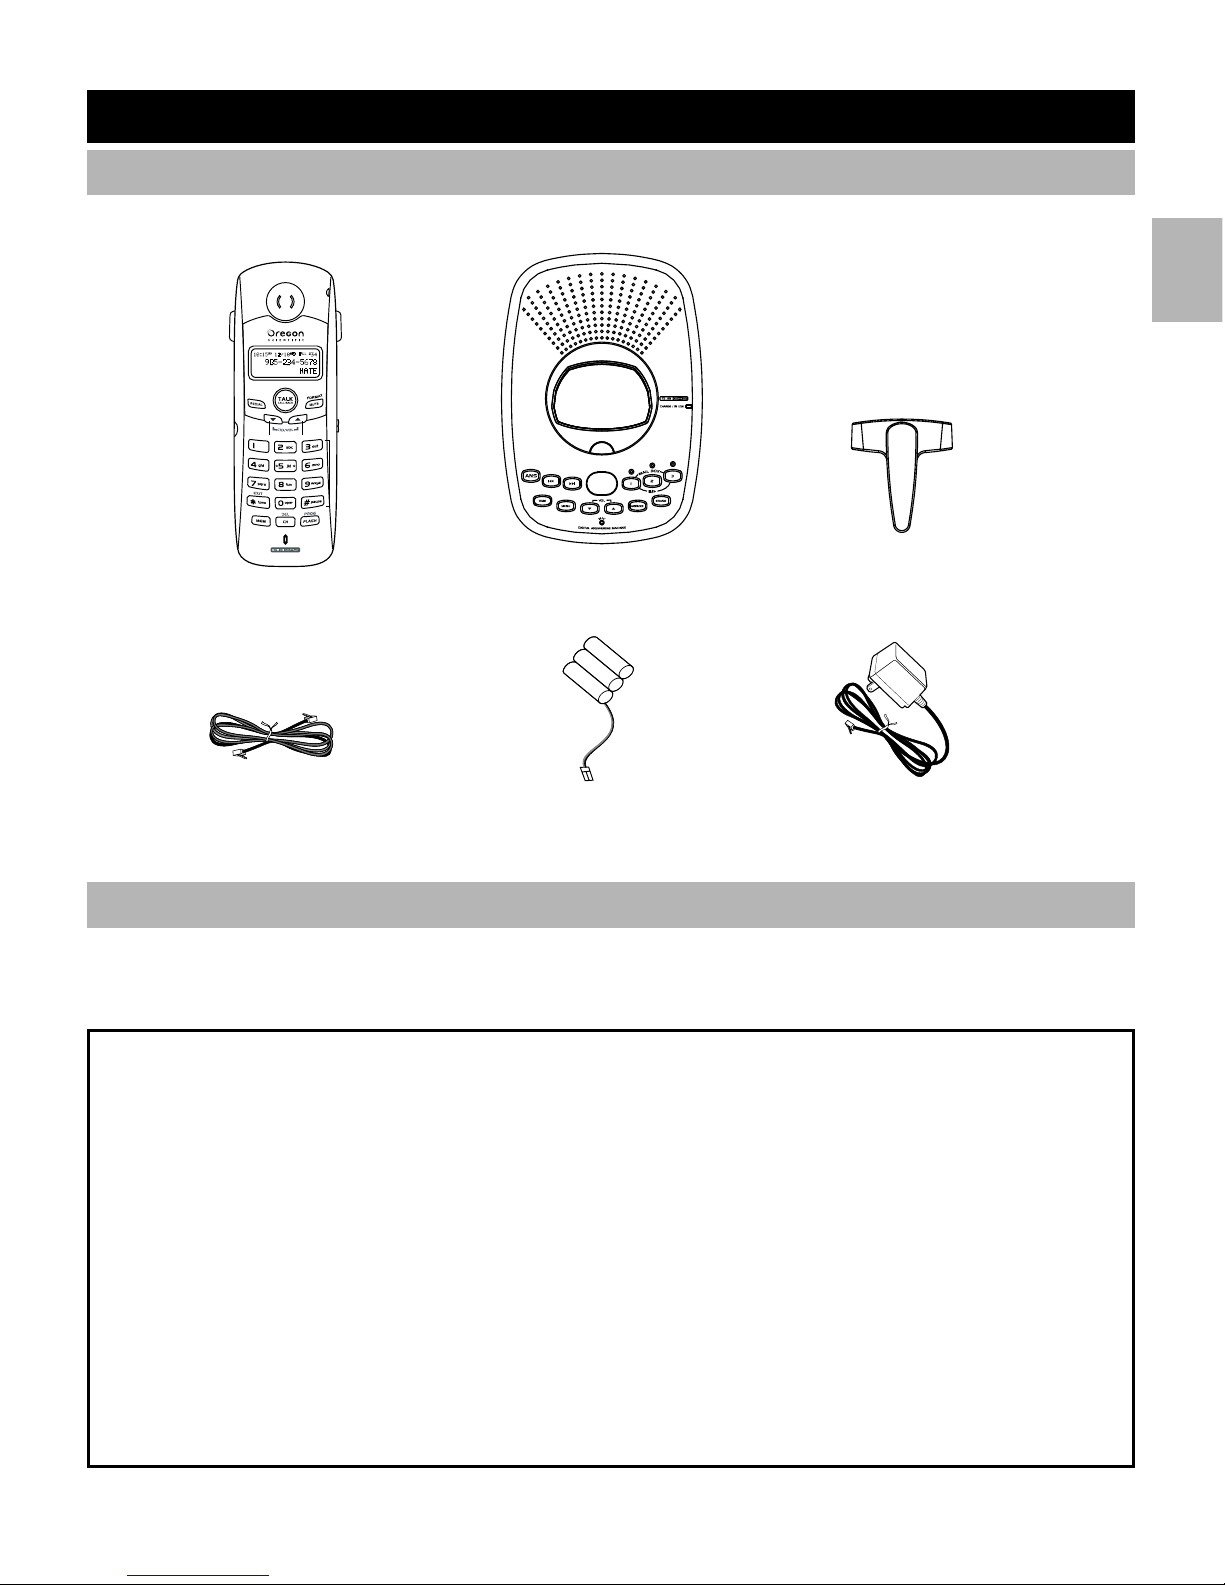
CHECKING PACKAGE CONTENTS
Make sure your package includes the items shown here.
GETTING STARTED
Installation tips
Some cordless telephones operate at frequencies that may cause interference to nearby
TVs, microwave ovens, and VCRs. To minimize or prevent such interference, the base of
the cordless telephone should not be placed near or on top of a TV, microwave oven, or
VCR. If such interference continues, move the cordless telephone farther away from these
appliances.
Certain other communications devices may also use the 5.8 GHz frequency for
communication and if not set properly these devices may interfere with each other
and/or your new telephone. If you are concerned with interference, please refer to
the owner’s manual for these devices on how to properly set channels to avoid interfer
ence. Typical devices that may use the 5.8 GHz frequency for communication include wire
less audio/video senders, wireless computer networks, multi-handset cordless telephone
systems, and some long-range cordless telephone systems.
AC Adaptors
Telephone
line cord
O
N
/
O
F
F
Handset Belt clipsBase unit
Batteries
086L004968-026
7/75
REV:1
Page 8
4
EN
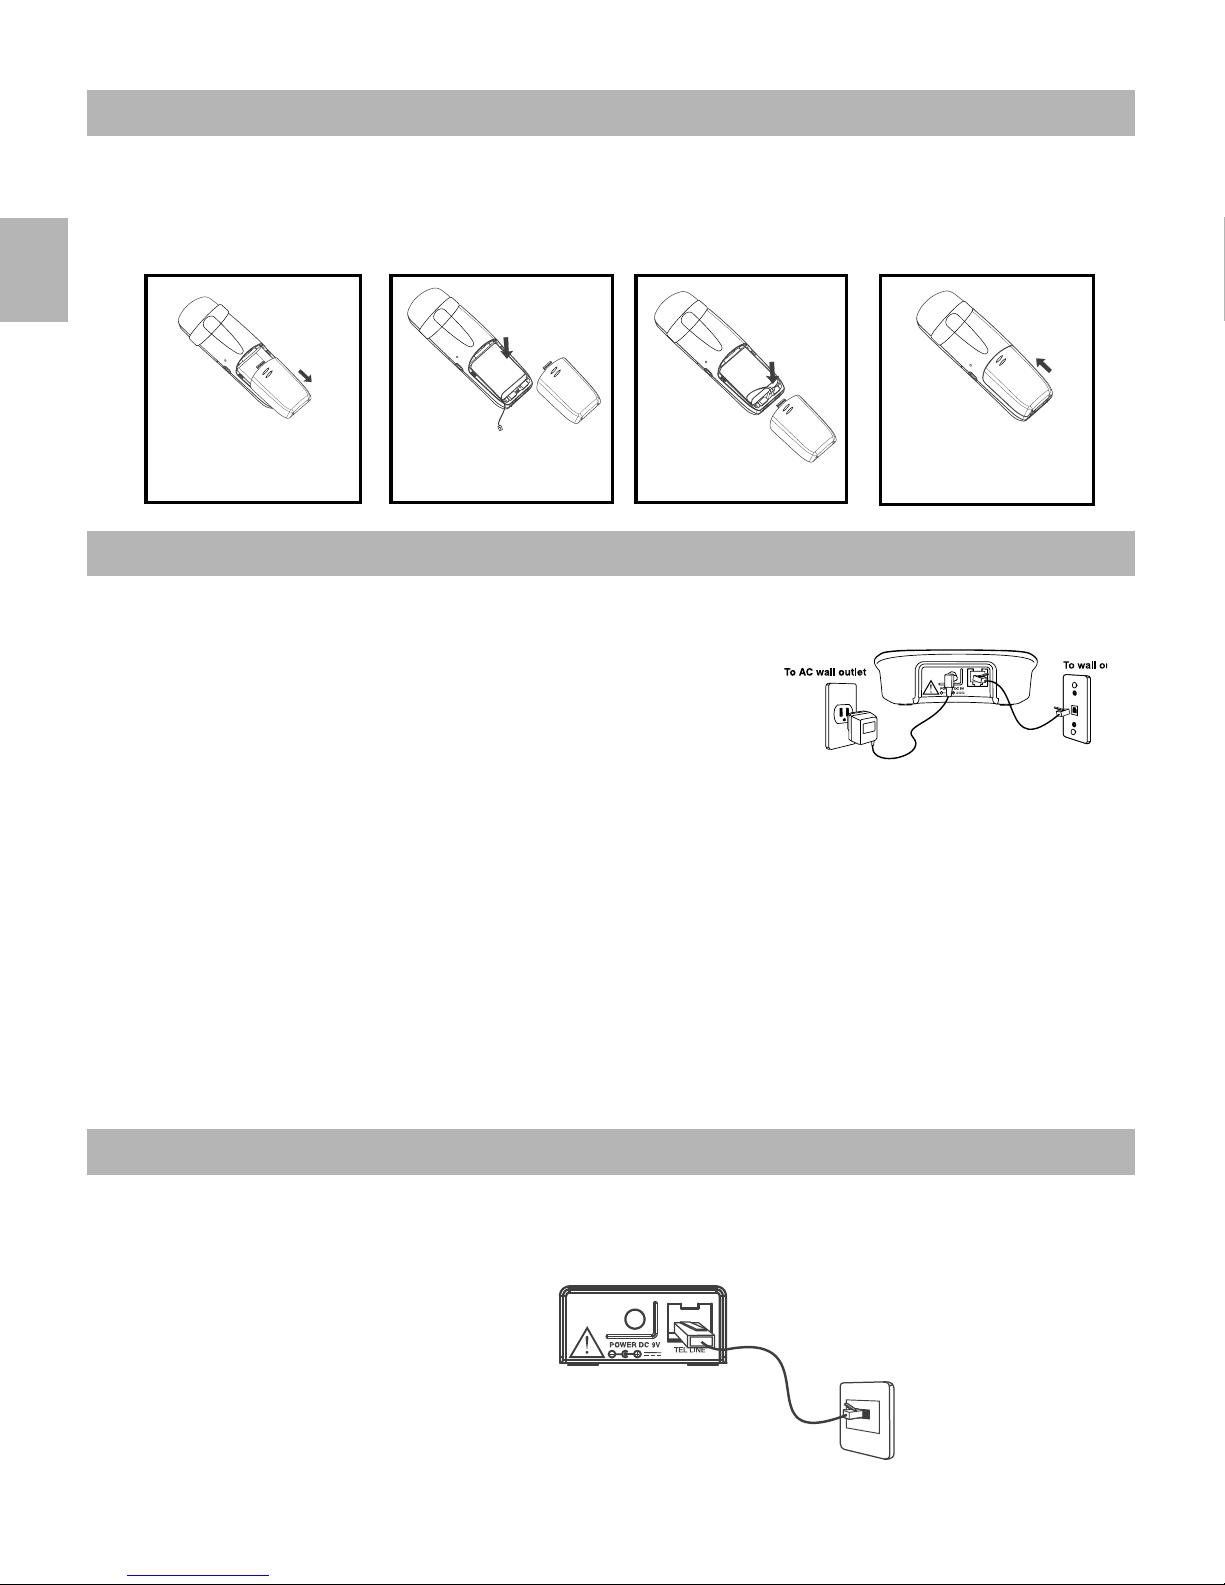
1. Remove the battery compartment cover on the handset, insert the battery, plug the
cord into the jack (inside the compartment) and replace the cover.
2. Set the handset
RINGER switch to ON, and place handset in the base.
1. Plug the AC adaptor into the power
DC 9V jack on the back of the base. Plug the
other end into a wall outlet.
2. Set the base on a desk or tabletop and place one
handset in the base unit.
3. Make sure that the
CHARGE/IN USE LED
illuminates.
Note: • Charge your handset at least 12 hours before plugging into the phone
line.
• Charge the handset for 12 continuous hours prior to rst use.
The initial battery charge is important for best performance.
• It is normal for the handset and base to get warm when the handset is
charging in the base.
Caution: Use only the Oregon Scientic AC adaptor that is supplied with this
phone. Using another AC adaptor may damage the phone.
Slide down the
battery cover
Place the battery
in the slot
Plug the wire into
the jack
Slide up the
battery cover
BATTERY SETUP
CONNECTING THE BASE UNIT AND CHARGING THE HANDSET
TELEPHONE LINE CONNECTION
Once the handset battery is fully charged, connect the telephone line cord to the TEL LINE
jack on the back of the base. Plug the other end into a telephone outlet.
086L004968-026
8/75
REV:1
Page 9

5
EN
TONE/PULSE SETTING
1. If you have Pulse (rotary) service, you will need to set the dial mode to pulse. If you
have Touch-Tone service, do nothing as your phone has been set to Tone prior to
shipment. If you do not know which type of service you have, contact your local
telephone company.
2. To change to Pulse or Tone service, See
Tone/pulse setting, page 8.
REGISTER HANDSETS TO THE MAIN BASE BEFORE USE
Your cordless phone uses a digital security system to provide protection against false ringing, unauthorized access and charges to your phone line. When you place the handset in
the main base, the handset will automatically register to the base.
Note:
If the handset’s battery becomes very low, the handset must be recharged for
12 hours and re-registered to the main base unit.
086L004968-026
9/75
REV:1
Page 10

6
EN
HANDSET
NAMES AND CONTROLS
1. Belt clip
2.
REDIAL key
3. Headset jack
4.
MEM (memory) key
5.
CH (channel)/DEL key
6.
FLASH/PROG (program) key
7. Charging contacts
8. Incoming call/in use LED
9. Earpiece
10. LCD screen
11.
TALK key (also used to end a call)
12.
MUTE/FORMAT key (MUTE/FORMAT/
TRANSFER key)
13. Ringer switch
14.
CID/VOL (volume) up/down key
15. Keypad (0-9)
16. *
TONE/EXIT key
17.
# PAUSE key
18. Microphone
086L004968-026
10/75
REV:1
Page 11

7
EN
NAMES AND CONTROLS
1.
/ : previous / next message
2.
ANS: power answering machine on / off
3.
TIME: time display
4.
MENU: display menu / conrm
5. Microphone
6. LED line status and voice message
indicator
7.
1 / 2 / 3: mailbox buttons
8.
ERASE: delete messages
9.
ANNOUNCE: outgoing message
10. / volume decrease / increase;
select up / down
O
N
/
O
F
F
1
6
7
8
9
10
2
3
4
5
BASE UNIT
086L004968-026
11/75
REV:1
Page 12

8
EN
INITIAL PROGRAMMING
Before using this telephone, 4 initial settings must be completed on the handset: Language, Area code (this is required to use Caller ID service from your telephone company),
Ringer tone, and Tone/Pulse setting.
LANGUAGE SETTING
1. Make sure the phone is OFF (not in TALK mode).
2. Press
FLASH/PROG until “ 1 ENG 2 POR 3 ESP ” shows on screen.
3. Press
CID/VOL or , or the number keys (1 – 3) to select the desired language.
4. Press
FLASH/PROG to store selection. You will hear a conrmation tone.
AREA CODE SETTING
For proper Caller ID operation, you must program your area code.
1. Make sure the phone is OFF (not in TALK mode).
2. Press
FLASH/PROG repeatedly until “AREA CODE - - - ” shows on screen.
3. Enter your area code using the number keys. To change a digit, press CH/DEL
and then re-enter the number.
4. Press
FLASH/PROG to store selection. You will hear a conrmation tone.
RINGER TONE
1. Make sure the phone is OFF (not in TALK mode).
2. Press FLASH/PROG repeatedly until “RINGER TONE 1” shows on screen.
3. Press
CID/VOL or , or press the number keys 1-3 to select the desired ringer
tone.
4. Press
FLASH/PROG to store selection. You will hear a conrmation tone.
TONE/PULSE SETTING
1. Make sure the phone is off (not in TALK mode).
2. Press FLASH/PROG repeatedly until “ 1TONE 2 PULSE ” shows on screen.
3. Press
CID/VOL or , or press the number keys 1-2 to select TONE or PULSE.
4. Press
FLASH/PROG to store selection. You will hear a conrmation tone.
086L004968-026
12/75
REV:1
Page 13

9
EN
BASICS
Channel No. Call Timer Volume Level
Telephone Number
RESETTING TO DEFAULT
You can reset the phone programming to the initial factory default settings. The default set-
tings are:
Language Portuguese
Area Code - - -
Ringer Tone 1
Tone/Pulse Setting Tone
1. Make sure the phone is OFF (not in TALK mode).
2. Press
FLASH/PROG repeatedly until “DEFAULT 1 NO” shows on screen.
3. Press
CID or , or the 1 or 2 keys to select your choice between “1 NO” and “2
YES” for Default Settings”
4. Press
FLASH/PROG again to conrm. You will hear a conrmation tone.
RECEIVING A CALL
When receiving an incoming call, the LED on the handset ashes, and the handset will
show caller information. *
Note: A subscription is required from your local phone company to receive Caller ID
information on your phone. See Caller ID Features, page 12.
1. Press
TALK to answer the call.
Note:
If handset is in the base cradle, remove it from base before pressing the TALK
key.
2. Press
TALK to end your call.
Note: If you replace the handset to the base cradle or charger cradle, the handset
automatically hangs up.
MAKING A CALL
1. Press TALK.
Note: If handset is in the base cradle,
remove it from base before pressing
the
TALK key.
2. Dial the phone number.
3. Press
TALK to end your call.
086L004968-026
13/75
REV:1
Page 14

10
EN
VOLUME ADJUSTMENT
The VOLUME key adjusts the volume level of the earpiece. There are 4 volume levels.
1. Make sure the phone is in
TALK mode.
2. Press the
CID/VOL or key on the handset.
RINGER SWITCH
The RINGER switch must be on for the handset to ring during incoming calls.
PRE-DIALING (UP TO 32 DIGITS)
1. Make sure the phone is OFF (not in TALK mode).
2. Enter the telephone number. The number is displayed as you enter it.
3. Press
TALK.
Note: Pressing *TONE will exit pre-dialing.
CHANGING THE PRE-DIAL NUMBER
1. Make sure the phone is OFF.
2. Enter the telephone number.
3. Press
CH/DEL to delete digits one by one.
4. Re-enter the number.
REDIALING
1. Make sure the phone is OFF.
2. Press
TALK.
3. Press
REDIAL to redial the last number (up to 32 digits).
FAST REDIALING
1. Press TALK, (if you are not already in TALK mode).
2. Enter the telephone number you want to dial.
3. If the line is busy, press
REDIAL. The phone will drop the line for two seconds and
redial again.
FLASH KEY
Use the FLASH/PROG key to activate custom calling services.
086L004968-026
14/75
REV:1
Page 15

11
EN
CH (CHANNEL)/DEL KEY
While talking, you might need to manually change the channel to get rid of static. Press
the
CH/DEL key to switch to a clear channel.
* TONE KEY
This feature enables Pulse service phone users to access touch-tone services offered by
banks, credit card companies, etc.
1. Dial the desired number.
2. Press
*TONE after your call is answered.
3. Follow the voice instructions to complete your desired action.
4. Hang up when nished. The phone returns to Pulse service.
HANDSET LOCATOR (PAGING FUNCTION)
This feature helps to locate a misplaced handset.
1. Press
PAGE on the base, the screen shows “PAGING”. The handset beeps
continuously for about 2 minutes or until you press any key on the handset.
2. To stop the paging, do one of the following:
• Press
PAGE on the base.
• Press
TALK, this will enter talk mode.
• Press any button on the handset.
Note:
You can still page the handset with the ringer off.
MUTE KEY
To have a private, off-line conversation, use the MUTE feature. The caller on the other end
of the line cannot hear you, but you can still hear them.
To mute the microphone:
1. Press
MUTE/FORMAT in TALK mode. The screen shows “MUTE”.
2. Press
MUTE/FORMAT again to return to your phone conversation.
LOW BATTERY WARNING
1. If the battery is low and the phone is in TALK mode, a warning tone consisting of 2
short beeps will sound from the handset and the LED will ash every 15 seconds.
“LOW BATTERY” shows on screen.
2. If the battery is low and the phone is in STANDBY mode, the LED on handset will
ash every 15 seconds, and “LOW BATTERY” shows on screen.
086L004968-026
15/75
REV:1
Page 16

12
EN
This phone receives and displays incoming call information transmitted by your local
phone company, provided you subscribe to Caller . This information can include the phone
number and/or the name, date and time. The phone can store up to 40 calls for later
review.
CALLER ID LIST
The incoming caller information transmitted from the phone company is received by your
phone between the rst and second ring and stored in the Caller ID list. If you answer a
call before the second ring the caller information may not be stored.
When the Caller ID list memory is full, a new call automatically replaces the oldest call in
memory. NEW appears on screen for calls received that have not been reviewed.
REVIEWING CALLER ID LIST
As calls are received and stored, the Caller ID list is updated to let you know how many
calls have been received.
1. Press
CID/VOL to scroll through the Caller ID list from the most recent to the
oldest.
2. Press
CID/VOL to scroll through the Caller ID list from the oldest to the most
recent.
3. Press
TONE/EXIT to return to Standby Mode anytime.
Note: 1. If area code is programmed (for example 416), the whole number
(
41-6222-55555) including area code will be shown on the screen during a call com
ing from this area. When reviewed later, the area code will not be shown (i.e. LCD
shows
222-5555 only). 2. You may also transfer Caller ID entries to the directory.
See
Storing caller ID entries in directory below.
FORMAT CALLER ID NUMBERS
The MUTE/FORMAT key lets you select how many digits of the number are displayed.
• Press
MUTE/FORMAT once to add the area code (Note: The programmed area code
must match the Caller ID area code).
• Press
MUTE/FORMAT again to cut 1 plus the area code.
• Press
MUTE/FORMAT four times to go back to the 7-digit number.
CALLER ID FEATURES
086L004968-026
16/75
REV:1
Page 17

13
EN
STORING CALLER ID ENTRIES IN THE DIRECTORY
Before storing a caller ID number, make sure the number appears in proper digits for your
dialing area. If not, change it using the MUTE/FORMAT key.
Note: If a specic memory entry is longer than 15 digits, the last 15 digits show on the
screen.
1. Use the
CID/VOL or key to select desired Caller ID entry.
2. Press
MEM key, “MEMO # --” shows on the top right corner of screen.
3. Select the desired memory location by pressing the number keys (0-9).
4. If the memory location already contains name and number information,
“REPLACE MEMO?” will show on screen. Press
MEM again if you want to replace
the information and save. Press
*TONE/EXIT button to return unit to standby mode
without saving.
5. If the selected memory location is empty, you will hear a conrmation tone when the
new memory record is saved.
Note: If the selected CID record contains non-digit characters, or the number is more than
24 digits, the unit will not store the record.
DIALING A CALLER ID NUMBER
1. Make sure the phone is OFF (not in TALK mode).
2. Use
CID or to scroll to the desire Caller ID entry.
3. Use
MUTE/FORMAT key to display the phone number in proper digits if necessary.
4.
Press
TALK.The number dials automatically.
DELETING ENTRIES FROM THE CALLER LIST
Use CH/DEL to erase the entry currently shown on screen or all entries.
DELETING THE DISPLAYED ENTRY
1. Make sure the phone is OFF (not in TALK mode).
2. Use the
CID/VOL or keys to nd the entry you want to delete.
3. While the entry is displayed, press
CH/DEL. “DELETE?” shows on screen.
4. Press
CH/DEL again to delete the entry. Conrmation tone sounds and LCD shows
“DELETED” for 2 seconds.
DELETING ALL ENTRIES
1. Make sure the phone is OFF (not in TALK mode).
2. Use the
CID/VOL or keys to display any entry.
086L004968-026
17/75
REV:1
Page 18
14
EN
DIRECTORY
Key Press 1 2 3 4 5 6 7 8 9
1
st
– 5th press A D G J M P T W
2
nd
– 6th press
–
B E H K N Q U X
3
rd
– 7th press * C F I L O R V Y
4
th
– 8th press ! ( ) $ ’ ; S ? Z
3. Press and hold CH/DEL, until “DELETE ALL?” shows on screen.
4. Press
CH/DEL again to conrm. “NO CALLS” shows on screen.
You can store up to 10 names (up to 15 characters) and numbers (up to 24 digits) in the
directory for quick dialing. If a number exceeds 24 digits, you can program it in parts, and
then chain dial the number.
STORE A NUMBER IN THE DIRECTORY
To program a number to memory:
1. Make sure the phone is OFF (not in TALK Mode).
2. Press
MEM key to start the Memory Programming Mode. “MEMO # --” shows on the
screen.
3. Select the desired memory location (0 – 9) or use the
CID/VOL or keys to nd
an empty memory location.
4. Press the
MEM key again. The screen shows “ENTER NAME”.
5. Use the digit keys to enter the name. The cursor advances 1 space after each key
press. Within 1 second, you can press the same key again to select another
character. If you make a mistake, press
CH/DEL to delete previous characters one by
one.
6. Press
MEM again to save the name. “ENTER TEL NUMBR” shows on screen.
7. Use the digit keys to enter the desired telephone number. If you make a mistake,
press
CH/DEL to delete previous digits one by one, then enter the correct digits. If
you wish to add a pause, press
PAUSE two times at the desired location. Be sure
to press it twice, or you will enter a # (number sign) and not a pause. Each pause
counts as 1 digit in the dialing sequence. Or you can store redial number in the
directory by pressing
REDIAL (Note If the redial number is longer than 24 digits, it
cannot be stored into the memory.).
8. Press
MEM again to store the number to memory. If you are replacing a number,
“REPLACE MEMO?” shows on screen. Press
MEM again to conrm, or press
086L004968-026
18/75
REV:1
Page 19

15
EN
REPLACING A DIRECTORY ENTRY WITH A CALLER ID ENTRY
Use the same procedure as for storing Caller ID entries in the directory
CHANGING A STORED NUMBER
Use the same procedure as for storing a number in the directory
MAKING CALLS FROM THE DIRECTORY
1. Make sure the phone is ON by pressing TALK.
2. Press
MEM.
3. Press the number
(0 - 9) for the desired memory location. The number dials
automatically.
Or:
1. Make sure the phone is OFF (not in TALK mode).
2. Press
MEM.
3. Press the number (0-9) or use
CID/VOL or to select the desired number.
4. Press
TALK, the number will be dialed automatically.
REVIEWING AND DELETING DIRECTORY CONTENTS
1. Make sure the phone is OFF (not in TALK mode).
2. Press
MEM.
3. Use
CID/VOL or to scroll through the directory until the desired name/number
is shown, or use the number pad to select a memory location. The selected telephone
number and name show on screen.
4. While the entry is displayed, press
CH/DEL to delete the entry. The screen shows
“DELETE?”
5. Press
CH/DEL again to delete the entry. “DELETED” shows on screen.
CHAIN DIALING FROM THE DIRECTORY
Use this feature to make calls that require a sequence of numbers such as using a calling
card for a frequently called long distance number. You can dial each part of the sequence
from a different entry of the directory. The following example shows how you can use chain
dialing to make a call through a long distance service:
*
TONE/EXIT to return to standby mode.
9. To view your directory, press
MEM and use CID/VOL or or the number (0-9) to
scroll.
086L004968-026
19/75
REV:1
Page 20
16
EN
DIGITAL ANSWERING MACHINE
The Number for: Memory Location
Long distance access number 7
Authorization code 8
Frequently called long distance number 9
1. Make sure the phone is in TALK mode.
2. Press
MEM and then press 7.
3. When you hear the access tone, press
MEM and then press 8.
4. At the next access tone, press
MEM and then 9.
Tip: Wait for the access tones before pressing the next memory key, or your call
might not go through.
The digital answering machine has three mailboxes with up to 13 minutes recording time
and can store up to 50 messages. All recordings can be up to one minute long.
SWITCH THE ANSWERING MACHINE ON/OFF
1. Press ANS to display the current setting. The voice prompt will announce “Answering
machine is on / off” and
/ is displayed.
2. Press
ANS to toggle the answering machine on/off. The voice prompt and display will
conrm the status.
Note:
• The unit automatically returns to standby mode when no input is made.
• If there have new messages in the mailboxes, the number of messages will be
displayed.
PLAY THE MESSAGES FROM THE MAILBOXES
The digital answering machine can record messages in three separate mailboxes. Memo
notes can also be recorded in the mailboxes.
1. In standby mode, press the mailbox button (1, 2 or 3) to select the desired mailbox.
The voice prompt will announced the number of messages.
2. Then, the machine will play back the messages from the selected mailbox.
3. At any point during the message playback, press
or to play the previous or
next message.
4. Press MENU to nish and exit to standby mode.
086L004968-026
20/75
REV:1
Page 21

17
EN
Note:
• If there are no new messages the old messages will be played.
• If there are any new messages in the mailbox, the number of new messages will be
displayed.
DELETE A MESSAGE
During message playback, press ERASE to delete. The voice prompt will say “One message is deleted” and play the next message.
DELETE ALL OLD MESSAGES IN A MAILBOX
1. During standby mode, press ERASE. The voice prompt will ask you to select a
mailbox.
2. Press the mailbox button (
1, 2 or 3) to select the mailbox.
3. The voice prompt will say “All old messages in mailbox 1/2/3 are deleted” when all
messages are deleted.
RECORD A MEMO NOTE
You can record a memo note directly into a mailbox for a friend or family member to access with their other messages.
1. In standby mode, press
MENU.
2. Press a mailbox button (
1, 2 or 3) to select the mailbox where the memo will be
stored. The voice prompt will say “Start recording after the beep” and a beep will
sound to indicate recording has started.
3. Record the memo. The recording time (in seconds) will show.
4. Press
MENU to conrm the memo and to exit to standby mode.
Note: The recording will stop automatically if the memory is full. When the memory is full
the ring delay will default to 10 rings and the Announce Only function will be automatically
activated.
RECORD AN ANNOUNCEMENT
The default announcement played to incoming callers can be replaced by a personalized
message (Outgoing Message 1). If the callers do not select the mailbox, messages will
automatically be saved in mailbox 1. To select a different mailbox callers can dial * during
the announcement and wait for the voice prompt.A second message (Outgoing Message
2) can be recorded for callers when the Announce only function is activated (for more
information see Record the announce only message page 20).
1. In standby mode, press
MENU then press ANNOUNCE. The voice prompt will say
086L004968-026
21/75
REV:1
Page 22

18
EN
“Start recording after the beep” and a beep will sound to indicate recording has
started.
2. Record your message. The recording time (in seconds) will show.
3. Press
MENU to stop recording. The recorded message will play.
TIP: When recording your message, remind callers to select a mailbox (by dialing *1, *2 or
*3) before leaving their message. For example: “This is the Smith’s residence, we are not
at home to take your call. To leave a message for John, please dial star one and wait for
the beep. To leave a message for Mary, dial star two. For Tom, please dial star three. We
will get back to you as soon as possible.”
PLAY AN ANNOUNCEMENT
1. In standby mode, press ANNOUNCE to play the announcement back.
2. Press
MENU to stop playing and to exit to standby mode.
DELETE AN ANNOUNCEMENT
1. Press ANNOUNCE to play the announcement
2. Press
ERASE to delete the announcement. The voice prompt will say “User
announcement has been deleted”. The default announcement will now be played.
MENU OPTIONS
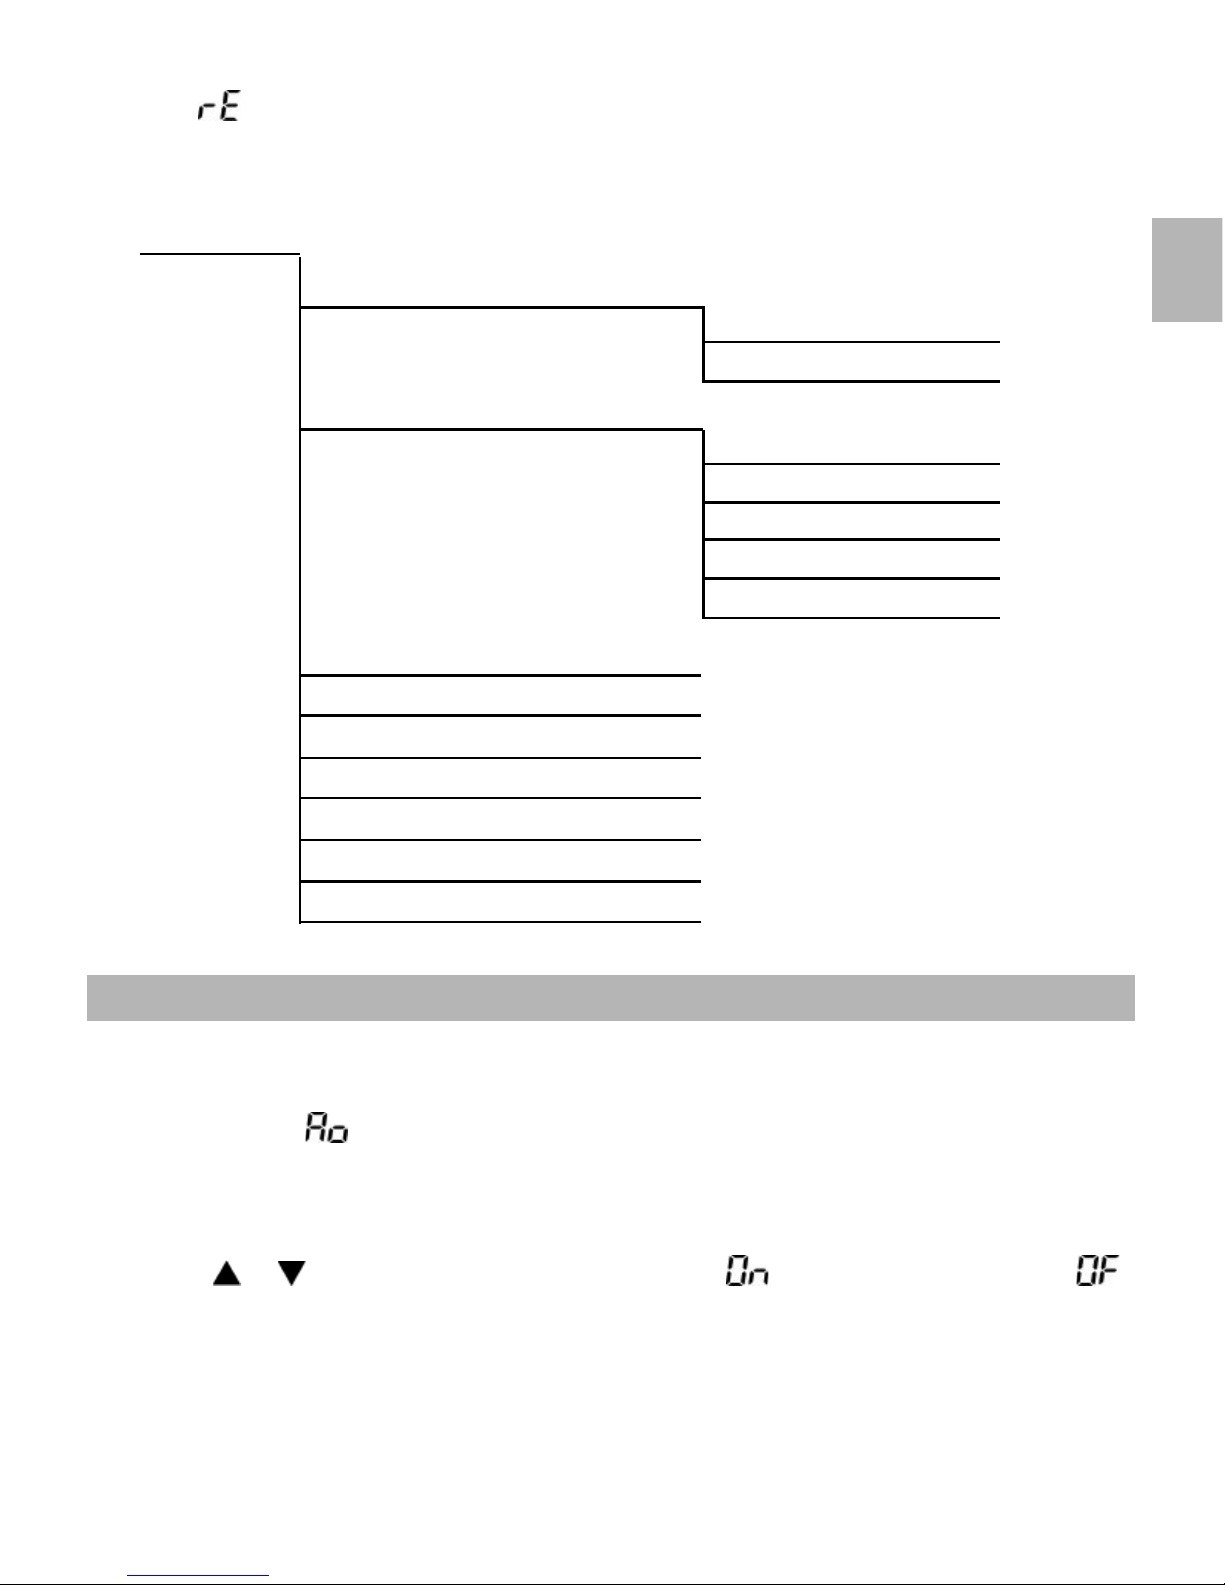
The digital answering machine menu allows you to set the following:
• Announce only
• Ring delay
• Remote access code
• Time
• Outgoing messages 1 and 2
• Voice memo in mailbox 1, 2 or 3
VIEW THE MENU OPTIONS
1. Press MENU to enter the menu. The voice prompt will explain how to navigate
through the menu.
2. Press
or to navigate to the desired submenu. The voice prompt will announce
the selected menu and the following will show on the display:
•
: Announce only
•
: Ring delay
•
: Remote access code
•
: Time
086L004968-026
22/75
REV:1
Page 23
19
EN
•
: Record memos or outgoing messages
3. Press
MENU to enter and continue the setup of the option.
The menu options are:
SET ANNOUNCE ONLY ON/OFF
When the Announce Only function is on, the machine will play a recorded outgoing
message to callers but they will not be able to leave a message.
1. Press
MENU. will display and the voice prompt will explain how to select
submenus.
2. Press
MENU again. The voice prompt will read the current setting: “Answer and
record” or “Announce only”.
3. Press
or to toggle between “Announce Only”( )and “Answer and record” ( ).
4. Press
MENU to conrm and exit to standby mode. A beep will sound to indicate the
setting is conrmed.
<MENU>
Announce Only
Ring delay
Answer and record
Announce only
Toll Saver
2
4
6
8
Remote Access code
Time
Record Outgoing Message 1
Record Outgoing Message 2
Record Mailbox 1 Memo
Record Mailbox 2 Memo
Record Mailbox 3 Memo
086L004968-026
23/75
REV:1
Page 24

20
EN
RECORD THE ANNOUNCE ONLY MESSAGE
A special announcement (Outgoing message 2) can be recorded for callers when the
Announce Only function is on.
1. Press
MENU and use or to navigate to the Record Outgoing Message 2
submenu. The voice prompt will say “Select to record outgoing message 2” and
will show.
2. Press
MENU. The voice prompt will say “Start recording after the beep” and a beep
will sound to indicate recording has started.
3. Record the desired announcement. The recording time (in seconds) will show.
4. Press
MENU to stop recording. The recorded message will play.
SET THE RING DELAY
The Ring Delay function allows you to set the number of rings before the machine answers
a call.
1. Press
MENU and use or to navigate to the ring delay submenu. The voice
prompt will say “Set number of rings” and will show.
2. Press
MENU to enter the sub-menu. The voice prompt will announce the current
setting.
3. Press
or to set TS (Toll Saver: the call is answered after the short toll ring), 2, 4,
6 or 8 rings.
4. Press
MENU to conrm and exit to standby mode. A beep will sound to indicate the
setting is conrmed.
SET THE TIME
1. Press MENU, then press TIME. The voice prompt will read the current time and day
and will be displayed.
2. The setting for day will ash. (01 indicates Monday, 02 Tuesday etc.)
3. Press
or to change the setting. The voice prompt will announce the new value.
4. Press
MENU to conrm.
5.
Repeat steps 3 and 4 to set the remaining settings:
•Hour: 00 to 23 hours.
•Hour Format: 24hr.
•Minute: 00 to 59 minutes.
086L004968-026
24/75
REV:1
Page 25

21
EN
HEAR THE CURRENT TIME
Press TIME to hear the current time. The voice prompt will announce the day and time.
ADJUST THE VOLUME LEVEL
During announcement or messages playback, press or to increase or decrease the
volume.
Note: In Standby mode, the volume level (0 to 7) will be displayed.
SETUP THE REMOTE ACCESS CODE
The remote access function allows you to remotely check your messages from any
external line. To retrieve the messages you need to enter a 4-digit remote access code.
1. Press
MENU and use or to navigate to the remote access code submenu. The
voice prompt will say “Set remote access code” and will show.
2. Press
MENU, the voice prompt will announce the current code and the rst 2 digits (‘00’
to ‘99’) of the code will show with one digit blinking.
3. Press
or to set the value of the blinking digit.
4. Press
MENU to conrm. Repeat steps 2 and 3 to set the other digits of the access
code. When the four digits are dened, the voice prompt will conrm the access code
set.
5. Press
MENU to conrm and exit to standby mode.
Note: The default remote access code is 0000.
REMOTELY ACCESS THE ANSWERING MACHINE
1. Dial your number and wait for the answering machine to pick up.
2. While the announcement message is playing, dial # followed by the remote access
code.
3. To listen to your messages, dial the number of the mailbox (1, 2 or 3). For other
remote functions, please refer to the table below.
086L004968-026
25/75
REV:1
Page 26

22
EN
Battery replacement and handling
When the operating time becomes short even after a battery is recharged, please replace
the battery.
With normal usage, your battery should last about one year.
For a replacement battery, please contact your place of purchase or www.oregonscientic.
com.br
Caution:
• Use only the specied battery type (Ni-MH 3.6V, 600mAh).
• Do not remove the battery from the handset to charge it.
• Never throw the battery into a re, disassemble it, or heat it.
• Do not remove or damage the battery casing.
CHANGING THE BATTERY
Function
Play mailbox messages
Play previous message
Stop message
Play next message
Delete current message
Record Memo
Record announcement
Toggle answering machine on or off
Toggle “Announce only” on or off
Go on-hooked to standby
Help desk
Command
Dial 1, 2 or 3, to select and play message in
mailbox 1, 2 or 3.
During message playback, dial 4
During message playback, dial 5 to stop.During
message recording, dial 5 to stop.
During message playback, dial 6
During message playback, dial 7
During remote access standby, dial 8 and then
1, 2 or 3 to record memo in the corresponding
mailbox.
Dial 9 to record announcement. After recording,
the announcement is played back.
During remote access standby, dial 0
During remote access standby, Dial #
Timeout
Press * after entering the remote access code
Note: If using a cell phone to remotely access the Digital Answering Machine, you may
need to congure your cell phone’s dial tone duration. Please see I cannot access the
Digital Answering Machine from a remote line page 29.
086L004968-026
26/75
REV:1
Page 27

23
EN
When power is off, you will not be able to make or receive calls with the telephone.
After a power outage, place the handset in the base for about 20 seconds to reset the
digital security code.
POWER FAILURE
HEADSET JACK AND BELT CLIP
Headset connection
(Headset not included)
For hands free conversation, connect the headset (not
included) to the HEADSET jack. The handset earpiece and
microphone are disabled when the headset is connected.
Press
TALK to answer or place a call while using the
headset.
Belt clip installation
• Attach the belt clip by inserting the sides of the belt clip
into the slots.
• Snap the ends of the belt clip into place.
• Remove battery if storing the phone for over 30 days.
Make sure the telephone is off before you replace the battery.
1. Slide off the battery compartment cover.
2. Disconnect the battery plug from the jack in the compartment and remove the battery
pack.
3. Insert the new battery pack and connect the cord into the jack.
Note: Please refer to the pictures on page 7, “Battery setup” for guide.
4. Put the battery compartment cover back on.
5. Place handset on the base to charge for 12 hours.
Note: If the handset battery is removed for more than 5 minutes, the directory memory
and caller ID memory will be erased.
Charge the handset battery for 12 continuous hours prior to rst use. The initial bat
tery charge is important for best performance.
Caution: To reduce the risk of re or personal injury, use a NI-MH 3.6 V, 600mAh battery.
086L004968-026
27/75
REV:1
Page 28

24
EN
LCD SCREEN MESSAGES
The following indicators show the status of a message or of the phone.
BLOCKED NUMBER/
NAME/CALLER
EMPTY
ERROR
ENTER NAME
ENTER TEL NUMBR
DELETE ALL?
DELETE?
END OF LIST
HANDSET 1
INCOMPLETE DATA
The person is calling from a number that has been blocked from
transmission.
There is no record stored to the selected directory location.
Caller information has been interrupted during transmission or the
phone is excessively noisy.
Prompt telling you to enter name in directory.
Prompt to enter the telephone number for directory.
Prompt asking you if you want to erase all Caller ID information.
Prompt asking you if you want to erase the current Caller ID entry
or a directory entry that is shown on screen.
Indicates that there is no additional information in Caller ID list.
This handset is handset 1.
The telephone provider did not send all Caller ID information
because the signal was weak or the call was interrupted.
LIGHT SIGNALS
The charge/in use & incoming call/in use indicator will change under the following
conditions.
CHARGE/IN USE LED on the base
INCOMING CALL/IN USE LED on the handset
Talking Lit steadily
Paging Flashes every 1 second
Low battery Flashes every 15 seconds
Incoming call Flashes in same pattern as telephone ring
Talking Lit steadily
Charging Lit steadily
Incoming call Flashes in same pattern as telephone ring
Paging Flashes every 0.5 second
Voice mail Flashes every 1 second
086L004968-026
28/75
REV:1
Page 29

25
EN
SOUND SIGNALS
A long warbling tone Signals an incoming call
Single Tone A key is pressed
Three short beeps Error tone
Two long beeps Conrmation tone
One short beep and one long beep Page signal
Three beeps every 2 seconds Transfer signal
Two short beeps every 15 seconds Low battery warning
CALLER ID
No display
• Is battery fully charged? Try replacing the battery.
• Make sure that the base is connected to a non-switched AC outlet.
Disconnect the base from the plug and plug it in again.
• Did you order Caller ID service from your local telephone company?
The display will not work unless you do this.
Caller ID error message
• The phone displays this message if it detects anything other than valid Caller ID
information during the silent period after the rst ring. This message indicates
either the presence of noise on the line, or that an invalid message has been sent
from the telephone company.
TROUBLESHOOTING
NEW CALL
NO CALLS
NO DATA
REPT
UNKNOWN NUMBER/
NAME/CALLER
PAGING
RINGER=OFF
Indicates call or calls have not been reviewed.
There are no Caller ID records stored to memory.
No Caller ID information was received.
Repeat call.
The incoming call is from an area not serviced by Caller ID, or the
information was not sent.
Someone has pressed the PAGE key on the base.
Ringer ON/OFF switch on the right side is set to OFF.
086L004968-026
29/75
REV:1
Page 30

26
EN
The Handset does not display the Caller ID information
• Check with your local telephone company to ensure that the Caller ID is subscribed
to and is functioning properly.
Telephone Numbers are not being correctly dialed from the Caller ID memory
• Ensure that the number displayed is in the correct format and that if the area
code and/or a "1" are included in the dialing process.
My handset(s) have static noise
• Try re-registering the handset to the base unit as described in the manual.
TELEPHONE
No dial tone
Check installation:
- Is the base power cord connected to a working outlet?
- Is the telephone line cord connected to the base unit and the wall jack?
• Disconnect the base from the wall jack and connect another phone to the same
jack. If there is no dial tone in the second phone, the problem might be your wiring
or local service.
• Is the handset out of range of the base?
• Make sure the battery is properly charged (12 continuous hours).
• Is the battery pack installed correctly?
• Did the handset beep when you pressed
TALK? Did the CHARGE/IN USE
indicator come on? The battery may need to be charged.
Dial tone is OK, but cannot dial out
• Make sure the
TONE/PULSE dialing mode is set to TONE or PULSE according to
your phone service.
Handset does not ring
• Make sure the
RINGER switch on the handset is turned to ON.
• You may have too many extension phones on your line. Try unplugging some
phones.
• See solutions for
No dial tone.
You experience static, noise, or fading in and out
• Change channels.
• Is handset out of range? Move closer to the base.
• If you hear 3 short beeps when you press
TALK, you are out of range.
• Does the base need to be relocated?
086L004968-026
30/75
REV:1
Page 31

27
EN
• Charge battery.
• Make sure base is not plugged into an outlet with another household appliance.
Phone beeps
• Place handset in base for a minimum of 20 seconds to reset the security code. If
that does not work, charge battery for 12 continuous hours.
• Clean charging contacts on handset and base with a soft cloth or an eraser.
• See solutions for
No dial tone.
• Replace battery.
Dialing from Memory
• Did you program the directory keys correctly?
• Did you follow proper dialing sequence?
• Make sure the TONE/PULSE dialing mode is set to TONE or PULSE according to
your phone service.
• Did you reprogram directory after a power outage or battery replacement?
No dial tone/phone will not dial out
• Check that the AC power adapter is plugged into a working AC power outlet.
• Check all telephone cord connections or try another wall jack
• Do a basic reset of the phone: Disconnect the phone from the wall and remove the
battery for 30 minutes and then re-install as instructed by the manual.
• Try other phones in the house to ensure it is not a line problem with the telephone
company.
• Was the battery charged for at least 12 - 15 hours?
• Is the "LOW BATTERY INDICATOR" on?
Can’t hear the ring signal
• Check the ringer volume controls; verify that the switch is not set to "Off".
• Check that the AC power adapter is plugged into a working AC power outlet.
• Check all telephone cord connections or try another wall jack.
Can’t receive or make phone calls
• Check if the phone is set to the correct type of service, either Tone or Pulse
• Check that the AC power adapter is plugged into a working AC power outlet.
• Check all telephone cord connections or try another wall jack
• Check to make sure that the Battery is properly installed and connected
086L004968-026
31/75
REV:1
Page 32

28
EN
There are continuous short beeps instead of a dial tone when the handset is far from the
base.
• The beeps are a warning that you are too far away from the base. Move closer to
the base.
The Charge Light will not come on when the handset is placed in the base unit.
• Check to ensure sure that the AC Adapter is plugged into the base unit and an
operating wall outlet.
• Ensure sure that the handset is properly seated in the base unit
• Ensure that the rechargeable battery pack is properly connected in the handset.
The Caller’s voice is too low or quiet.
• Adjust the receiver Volume Control on the handset to a higher setting
Telephone Numbers are not being correctly dialed from the Caller ID memory.
• Ensure that the number displayed is in the correct format and that if the area code
and/or a "1" are included in the dialing process.
I have misplaced my Handset.
1. Press
Page on the base. If the handset is within range, a triple beep will sound for
50 seconds.
2. Place the handset back into the base or press the
CH key on the handset, or press
any other handset key twice, to stop the page/nd feature.
I am having difculty in placing and/or receiving calls.
• If you experience difculty with placing or receiving calls, a lost security code may
be the cause of the problem. When this occurs, the handset can no longer
communicate with the base. Reset by placing the handset on the base for 5-10
seconds.
• If that does not work, unplug the AC adapter from the wall outlet. Disconnect the
handset battery for 5-10 seconds and then reconnect. Place the handset back on
the base and then replug the AC adapter.
Causes of poor reception
• Aluminum siding.
• Foil backing on insulation.
• Heating ducts and other metal construction can shield radio signals.
• You are too close to appliances such as microwaves, stoves, computers, etc.
• Atmospheric conditions, such as strong storms.
• Base is installed in the basement or lower oor of the house.
• Base is plugged into an AC outlet with other electronic devices.
086L004968-026
32/75
REV:1
Page 33

29
EN
• Baby monitor is using the same frequency.
• Handset battery is low.
• You are out of range of the base.
The Digital Answering Machine will not turn on
• Check the power supply is connected.
• Conrm the answering machine status (
/ ) by pressing ANS.
The Digital Answering Machine is not recording incoming or outgoing messages
• The memory may be full (“FL” will show on the display). Delete messages from
your mailboxes.
• If the machine will not record incoming messages, check to make sure the
Announce Only function is not activated.
I cannot access the Digital Answering Machine from a remote line
• Make sure the remote access code number is correct.
• Make sure you dial # and enter the access code before the recording beep sounds.
• If you are using a cell phone, the key dial tone duration may not be long enough to
trigger the machine’s settings. For certain cell phone models, settings might need
to be changed (consult your cell phone’s user manual for more information).
To keep your telephone working and looking good, follow these guidelines:
• Avoid putting the phone near heating appliances and devices that generate
electrical noise (for example, motors or uorescent lamps).
• Do not expose to direct sunlight or moisture.
• Avoid dropping the phone, and other rough treatment to the phone.
• Clean the phone with a soft cloth.
• Never use a strong cleaning agent or abrasive powder because this will damage
the nish.
• Periodically clean the charge contacts on the handset and base with a clean pencil
eraser.
• Retain the original packaging and your original sales receipt in case you need to
ship the phone at a later date.
MAINTENANCE
086L004968-026
33/75
REV:1
Page 34

30
EN
TECHNICAL INFORMATION
REN Number:
The Ringer Equivalence Number (REN) assigned to each terminal’s device provides an
indication of the maximum number of terminals allowed to be connected to a telephone
interface.
The REN number of this phone is located on the bottom of the base unit. The termination
on an interface may consist of any combination of device subject only to the requirement
that the sum of the Ringer Equivalence Numbers of all the devices does not exceed 5.
CAUTION
This product is intended for use in Brazil only. Sale or use in other countries may violate
local laws.
The freedom that your cordless telephone can offer is fully dependent on the performance
of the rechargeable battery in the handset. To maximize the battery performance, follow
these guidelines:
Charge it for a full 12 hours
Before initial use of your new battery, charge it for 12 hours continuously. The proper initial
charging is very important to maximize the battery performance.
Keep the contacts clean
You can never fully recharge the battery if the contacts are dirty. Clean all the contacts two at the bottom of the handset and two in the base cradle - periodically. Use a clean
pencil eraser or superne steelwool to clean the charging contacts. Avoid touching the
cabinet area of the phone, or scratches may occur.
Refresh battery
If your battery seems to need recharging more often than usual, it may have lost part of its
charging capacity. To bring back its full capacity, try “refreshing” the battery:
1. First discharge the battery by leaving the handset in TALK mode until Battery Low
indication turns on. (Disconnect the base from the telephone line, so that your line is
not busy all the time.)
2. Then charge it for 12 continuous hours.
3. Repeat the above once more. As your OS5851L-BR product use a Ni-MH battery you
are free to leave your handset in the base charger for as long as you like, without
effecting the performance of the battery life.
MAXIMIZE BATTERY PERFORMANCE
086L004968-026
34/75
REV:1
Page 35

31
EN
Cordless telephones use radio frequencies to allow mobility. This affects the performance
of your phone.
1. NOISE
Electrical pulse noise is present in most homes at one time or another. This is most intense
during electrical storms. Certain kinds of electrical equipment, such as light dimmers, uorescent bulbs, motors, fans, etc., also generate pulse noise.
Because radio frequencies are susceptible to this, you may on occasion hear pulse noise
through the handset. This is usually only a minor annoyance and should not be interpreted
as a defect of the phone.
2. RANGE
Because radio frequencies are used, the location of the base station can affect the operating range of the phone. Try several locations and choose the one that gives the clearest
signal to the handset. (Turning in a circle while holding the handset may also increase the
operating range.)
3. INTERFERENCE
Electronic circuits activate a relay to connect the unit to your telephone line. These electronic circuits operate in the radio frequency spectrum. While several protection circuits
are used to prevent unwanted signals, there may be periods when these unwanted signals
enter the base station. You may hear a click or hear the relay activate when you are not
using the cordless handset. If this occurs frequently, you can minimize or eliminate the
problem by lowering the height of the base station or relocating the base station. It may
also be helpful to change the operating channel and/or the security code setting.
Operation is subject to the following two conditions: (1) this device may not cause interference, and (2) this device must accept any interference, including interference that may
cause undesired operation of the device.
NOTICE:
Privacy of communications may not be ensured when using this telephone. Other devices,
including other cordless telephones, may interfere with the operation of this cordless telephone or cause noise during operation. Units without coded access may be accessed by
other radio communication systems. Cordless telephones must not cause interference to
any licensed radio service.
The Industry Canada Label identies certied equipment. This certication means that the
equipment meets certain telecommunications network protective, operational and safety
requirements. The ministry does not guarantee that the equipment will operate to the user’
s satisfaction.
Before installing this equipment, users should ensure that it is permissible to be connected
to the facilities of the local telecommunications company. The equipment must also be
installed using an acceptable method of construction. In some cases, the company’s
086L004968-026
35/75
REV:1
Page 36

32
EN
inside wiring associated with single-line individual service may be extended by means of a
certied connector assembly (telephone extension cord). The customer should be aware
that compliance with the above conditions may not prevent degradation of service in some
situations.
Repairs to certied equipment should be made by an authorized Canadian maintenance
facility designated by the supplier. Any repairs or alterations made by the user to this
equipment, or equipment malfunctions, may give the telecommunications company cause
to request that the user disconnect the equipment.
The user should ensure for his own protection that the electrical ground connections of the
power utility, telephone lines and internal metallic water pipe system, if present, are connected together. This precaution may be particularly important in rural areas.
CAUTION
Users should not attempt to make such connections themselves, but should contact the
appropriate electrical inspection authority, or electrician, as appropriate.
The exclamation point within an equilateral triangle is intended to alert the user to the
presence of important operating and maintenance (servicing) instructions in the literature
accompanying the product.
This symbol on the product is used to identify the following important information. Use only
with specied Oregon Scientic power adaptor.
NOTICE: This equipment meets the applicable Industry Canada Terminal Equipment Technical Specications. This is conrmed by the registration number. The abbreviation, IC,
before registration number signies that registration was performed based on a Declaration of Conformity indicating
that Industry Canada technical specications were met. It does not imply that Industry
Canada approved the equipment.
086L004968-026
36/75
REV:1
Page 37

POR
INTRODUÇÂO ................................................................................................................1
INICIAR ...........................................................................................................................3
Vericaçãodoconteúdodacaixa
.............................................................................3
Tomadamodular
.......................................................................................................3
DicasdeInstalação
................................................................................................... 3
Instalaçãodabateria
................................................................................................. 4
Conexãodabaseecarregamentodoaparelho
........................................................ 4
Conexãodalinhatelefônica
...................................................................................... 4
EscolhaTom/Pulso
....................................................................................................5
Registrodosaparelhosnabaseprincipalantesdouso
........................................... 5
NOMES E CONTROLES
................................................................................................6
Aparelho .................................................................................................................... 6
Base .......................................................................................................................... 7
PROGRAMAÇÂO INICIAL
.............................................................................................8
Escolhadoidioma
..................................................................................................... 8
Escolhadocódigodeárea
........................................................................................ 8
Campainha ................................................................................................................ 8
AjusteTom/Pulso
......................................................................................................9
Voltaràpredeniçãodefábrica
................................................................................. 9
SERVIÇOS BÁSICOS
..................................................................................................... 9
Receberchamada
..................................................................................................... 9
Realizarchamada
....................................................................................................10
Ajustedovolume
...................................................................................................... 10
Botãodacampainha
................................................................................................10
Pré-discagem
.......................................................................................................... 10
Alteraronúmerodapré-discagem
........................................................................... 10
Rediscagem ............................................................................................................. 11
Rediscagemrápida
.................................................................................................. 11
TeclaFLASH
............................................................................................................ 11
TeclaCH(Canal)/DEL
.............................................................................................. 11
*TeclaTONE
............................................................................................................. 11
LocalizadodoAparelho(funçãopage)
..................................................................... 11
TeclaMUTE
............................................................................................................ 12
Alertadebateriabaixa
.............................................................................................12
IDENTIFICADOR DE CHAMADAS
...............................................................................12
Agendadeendereçostelefônicos
........................................................................... 12
Revisãodalistadechamadasidenticadas
............................................................13
TABLE OF CONTENTS
086L004968-026
37/75
REV:1
Page 38

POR
Formataçãodosnúmerostelefônicosidenticados ................................................. 13
Armazenamentodaschamadasidenticadas
.........................................................13
Discagemparaumnúmeroidenticado
................................................................... 14
Apagaritensdaagendadetelefonesidenticados
................................................. 14
Apagaritemexibido
.................................................................................................14
Apagartodosositens
..............................................................................................14
AGENDA TELEFÔNICA
................................................................................................14
Registrarumnúmeronaagenda
.............................................................................15
Substituirumnúmerodaagendaporumnúmeroidenticado
................................ 16
Alterarumnúmeroarmazenado
..............................................................................16
Fazerchamadasapartirdaagenda
........................................................................16
Revisareapagarconteúdodaagenda
.................................................................... 16
Discagememcadeiaapartirdaagenda
.................................................................17
SECRETÁRIA ELETRÔNICA DIGITAL
.........................................................................17
Ligaredesligarasecretáriaeletrônica
................................................................... 17
Ouvirmensagenscontidasnascaixaspostais
....................................................... 18
Apagarumamensagem
.......................................................................................... 18
Apagartodasamensagensantigasdacaixa
......................................................... 18
Gravarrecado
......................................................................................................... 18
Gravarsaudação
.....................................................................................................19
Reproduzirsaudação
.............................................................................................. 19
Apagarsaudação
.................................................................................................... 19
OpçõesdoMenu
..................................................................................................... 19
Visualizarasopçõesdomenu
................................................................................20
Ligaredesligarapenassaudação
.......................................................................... 21
Gravarapenassaudação
........................................................................................ 21
Estabeleceronúmerodetoquesdacampainha
.....................................................21
Ajustedahora
.........................................................................................................22
Ouvirahoracerta
....................................................................................................22
Ajustedovolume
.....................................................................................................22
Estabelecercódigodoacessoremoto
.................................................................... 22
Acessoremotoàsecretáriaeletrônica
.................................................................... 23
SUBSTITUIÇÃO DA BATERIA
...................................................................................... 24
FALTA DE ENERGIA ELÉTRICA
..................................................................................25
TOMADA DO CONJUNTO FONE-MICROFONE, E CLIPE DE CINTO
....................... 25
SINAIS DE LUZ
..............................................................................................................25
MENSAGENS NA TELA DE LCD
.................................................................................. 26
SINAIS DE SOM
............................................................................................................27
086L004968-026
38/75
REV:1
Page 39

POR
Umpontodeexclamaçãoinseridoemumtriânguloéumsinalquechamaa
atençãoparaasinstruçõesimportantesqueacompanhamoproduto.
AOregonScienticeologotipodaOregonScienticsãomarcasregistradasda
OregonScientic,Inc.,utilizadossoblicençadaOregonScientic,Inc.
RESOLUÇÃO DE PROBLEMAS
................................................................................... 27
MANUTENÇÃO .............................................................................................................. 32
MAXIMIZANDO O DESEMPENHO DA BATERIA
.........................................................33
INFORMAÇÕES TÉCNICAS
.........................................................................................33
086L004968-026
39/75
REV:1
Page 40

1
POR
INTRODUCTION
Parabéns por adquirir o telefone sem o da Oregon Scientic. Seu telefone sem o
Oregon Scientic 5.8 GHz é um produto de comunicação de alta qualidade para seu lar.
Foi cuidadosamente projetado e produzido por um líder mundial de equipamento
eletrônico industrial e de consumo. Com manutenção e cuidados adequados, vai
proporcionar anos de prazer e utilidade.
PRINCIPAIS CARACTERÍSTICAS
Tecnologia 5.8GHz — A utilização de uma faixa de freqüência de 5.8GHz para
transmissão do sinal entre a base e o aparelho signica maior faixa de comunicação em
comparação com os telefones sem o tradicionais, de 43-49 MHz.
RUÍDO ULTRA-REDUZIDO
— comunicação em alta freqüência também possui nível de
ruído signicativamente reduzido.
40 CANAIS SELECIONADOS AUTOMATICAMENTE
— Seu novo telefone usa um dos
40 canais na faixa de freqüência de 5.8 GHz. Ele seleciona automaticamente um canal
livre todas as vezes que você recebe ou faz uma chamada pelo aparelho.
SISTEMA DIGITAL DE SECRETÁRIA ELETRÔNICA
3 Caixas Postais — As pessoas que telefonam podem escolher deixar uma mensagem
em uma das caixas postais de acesso personalizado.
Número de toques da campainha estabelecido pelo usuário — Ajuste a secretária
eletrônica para atender a chamada depois de 2, 4, 6 ou 8 toques.
Acesso remoto
— O recurso de acesso remoto lhe permite acessar suas mensagens
a partir de qualquer local, discando seu número de telefone e digitando seu código de
acesso.
Outras características
• Identidade de quem ligou, no aparelho
• Compatível com identicação de chamadas
• Lista de 40 nomes/números de quem telefonou
• Mostrador trilíngüe com 3 linhas, luz e tela de LCD
• Secretária eletrônica com 10 a 13 minutos de tempo de gravação, com um máximo de
50 mensagens e duas saudações programáveis do usuário.
• Relógio programável para data e hora da mensagem.
• Oito níveis de controle de volume
086L004968-026
40/75
REV:1
Page 41

2
POR
• Duas mensagens do usuário (responder e gravar/apenas responder)
• Acesso remoto através de telefone externo
• Responder à chamada diretamente da lista de chamadas identicadas
• Três toques diferentes
• Memória para armazenar 10 números de telefone para discagem rápida
• Compatível com os sistemas Tom e Pulso.
IMPORTANTE:
Para utilizar todas os recursos deste telefone, você precisa assinar o
serviço padrão de identicação de chamadas ou o serviço de identicação de chamadas
de sua companhia telefônica. Para saber quem está telefonando enquanto está ao
telefone, é necessário assinar o Serviço de Identicação de Chamadas.
086L004968-026
41/75
REV:1
Page 42

3
POR
TOMADA MODULAR
Você precisará de uma tomada telefônica do tipo modular usado no Brasil. Se você
não tiver tomada modular, ligue para sua companhia telefônica local para saber como
instalar uma.
CHECAR O CONTEÚDO DA CAIXA
Certique-se de que a caixa inclui os itens apresentados abaixo
INICIAR
Dicas de Instalação
Alguns telefones sem o operam em freqüências que podem apresentar interferências em
aparelhos de televisão, fornos de microondas e vídeo cassetes próximos. Para minimizar
ou evitar tais interferências, a base do telefone sem o não deve ser colocada nas proximidades ou sobre um aparelho de televisão, forno de microondas ou vídeo cassete. Se a
interferência persistir, ponha o telefone o mais distante possível desses aparelhos;
Outros aparelhos de comunicação também podem utilizar a freqüência de 5.8 GHz e se
não estiverem bem ajustados poderá haver interferência mútua. Se estiver preocupado
com interferências, consulte o manual do proprietário desses aparelhos para ajustar corretamente os canais a m de evitá-las. Os aparelhos que geralmente utilizam a freqüência
5.8 GHz para comunicação são emissores sem o de áudio/vídeo, computadores sem o
conectados em redes, sistemas de telefone sem o com múltiplos aparelhos e alguns sistemas de telefonia sem o de longo alcance.
Adaptador ACFio telefônico
O
N
/
O
F
F
Aparelho
Clipe para cinto
Base
Bateria
086L004968-026
42/75
REV:1
Page 43

4
POR
1. Retirar a tampa do compartimento da bateria localizado no aparelho, inserir a bat-
eria, ligar o o à tomada (dentro do compartimento) e recolocar a tampa.
2. Ajustar o botão da campainha do aparelho para a posição ON e colocar o aparelho
na base.
1. Ligar o adaptador à tomada DC 9V localizada na parte
de posterior de base. Ligar a outra ponta à tomada elétrica, na parede.
2. Colocar a base sobre uma escrivaninha ou mesa e
encaixar o aparelho na base.
3. Certique-se de que a lâmpada do
LED (CHARGE/IN USE - carregando/em uso) está acesa.
Nota: •
Carregue seu aparelho por no mínimo
12 horas antes de conectá-lo à linha telefônica
• Carregue seu aparelho por no mínimo 12 horas
contínuas ante de usá-lo pela primeira vez
• É normal o aparelho e a base esquentarem enquanto
o aparelho está sendo carregado na base.
Cuidado:
Use apenas o adaptador Oregon Scientic fornecido
com o telefone. O uso de outro adaptador poderá danicar o aparelho.
Fazer deslizar a
tampa da bateria
Inserir a bateria no
compartimento
Ligar o o
à tomada
Recolocar a
tampa
INSTALAÇÃO DA BATERIA
CONEXÃO DA BASE E CARREGAMENTO DO O APARELHO
CONEXÃO DA LINHA TELEFÔNICA
Com a bateria do aparelho totalmente carregada, conectar o o telefônico à tomada TEL LINE localizada na
parte posterior da base.
086L004968-026
43/75
REV:1
Page 44

5
POR
AJUSTE TOM/PULSO
1. Se seu serviço telefônico usa o sistema de pulso será necessário ajustar o botão
para o modo pulso
2. Se seu serviço telefônico usa o sistema de tom não será necessário fazer nada pois
seu telefone foi previamente ajustado para esse sistema. No caso de não saber o tipo
de serviço utilizado, entre em contato com a companhia telefônica local.
REGISTRO DOS APARELHOS NA BASE PRINCIPAL, ANTES DO USO
Seu telefone sem o utiliza um sistema digital de segurança que fornece proteção contra
falsas chamadas, acesso e cobranças não autorizados em sua conta telefônica. Ao
encaixar o telefone na base principal, o aparelho fará automaticamente o registro na base.
Nota: Se a bateria estiver muito baixa, o aparelho deve ser recarregado durante 12
horas e registrado novamente na base principal.
086L004968-026
44/75
REV:1
Page 45

6
POR
APARELHO
NOMES E CONTROLES
1. Clipe para cinto
2. Tecla REDISCAR
3. Saída para fone de ouvido
4. Tecla MEM
(memória)
5. Tecla
CH (canal)/DEL
6. Tecla FLASH/PROG
7. Contatos para carga
8. Alerta chamada/em uso
9. Fone
10. Tela de LCD
11. Tecla TALK (falar), também utilizada
para encerrar a chamada
12. Tecla MUTE /FORMAT (Mudo/
formatar)
13. Tecla da campainha
14. Tecla
CID/VOL (volume)
15. Painel (0-9)
16. Tecla *TONE/EXIT
(Tom/Sair)
17. Tecla PAUSE
(Pausa)
18. Microfone
086L004968-026
45/75
REV:1
Page 46

7
POR
NOMES E CONTROLES
1.
/ : mensagem anterior/
próxima mensagem
2. ANS
: Tecla para ligar e desligar
3. TIME
: exibe a hora
4. MENU
: exibe menu/conrma
5. Microfone
6. LED mostra estado da linha,
indicativo de mensagem de voz
7.
1/ 2/ 3/ botões da caixa de
mensagens
8. ERASE
: apaga as mensagens
9. ANNOUNCE
: saudação
10.
/ volume: para aumentar
ou diminuir
O
N
/
O
F
F
1
6
7
8
9
10
2
3
4
5
BASE
086L004968-026
46/75
REV:1
Page 47

8
POR
PROGRAMAÇÃO INICIAL
Antes de usar o telefone é necessário realizar 4 ajustes iniciais no aparelho. Idioma,
código de área (necessário para utilizar o serviço de identicação de chamadas de sua
companhia telefônica), campainha e ajuste tom ou pulso.
AJUSTE DO IDIOMA
1. Certique-se de que o telefone está OFF (desligado), não no modo TALK (falar)
2. Aperte a tecla FLASH/PROG
até surgir ► 1 ENG 2 FRA 3 ESP” na tela.
3. Aperte a tecla
CID/VOL ▲ ou ▼ ou as teclas de número (1-3) para selecionar o
idioma desejado.
4. Aperte a tecla FLASH/PROG
para conrmar a escolha. Será ouvido um som de
conrmação.
AJUSTE DO CÓDIGO DE ÁREA
Para utilizar o serviço de identicação de chamadas, é necessário programar seu código
de área.
1. Certique-se de que o telefone está OFF
(desligado), não no modo TALK (falar)
2. Aperte repetidamente a tecla FLASH/PROG
até aparecer “AREA CODE” na tela
3. Digite o número de seu código de área, com três dígitos, usando as teclas numéricas.
Para alterar um número, aperte CH/DEL e digite o número correto.
4. Aperte FLASH/PROG
para conrmar a escolha. Você ouvirá um sinal sonoro de
conrmação.
AJUSTE DO TOQUE DA CAMPAINHA
1. Certique-se de que o telefone está OFF (desligado), não no modo TALK (falar)
2. Aperte repetidamente a tecla FLASH/PROG
até aparecer “RINGER TONE ► 1” na
tela
3. Aperte a tecla
CID/VOL ▲ ou ▼ ou as teclas de número (1-3) para selecionar o
toque desejado.
4. Aperte FLASH/PROG
para conrmar a escolha. Você ouvirá um sinal sonoro de
conrmação.
086L004968-026
47/75
REV:1
Page 48

9
POR
RECURSOS BÁSICOS
AJUSTE TOM/PULSO
1. Certique-se de que o telefone está OFF (desligado), não no modo TALK (falar)
2. Aperte repetidamente a tecla FLASH/PROG
até aparecer “ ► 1 TONE 2 PULSE” na
tela
3. Aperte a tecla
CID/VOL ▲ou ▼ou as teclas de número (1-3) para selecionar TOM ou
PULSO
4. Aperte FLASH/PROG
para conrmar a escolha. Você ouvirá um sinal sonoro de
conrmação.
VOLTAR À PREDEFINIÇÃO DE FÁBRICA
Você poderá ajustar seu telefone para voltar à predenição isto é:
Idioma Português
Código de área - - Toque da campainha 1
Ajuste Tom/Pulso Tom
1. Certique-se de que o telefone está OFF
(desligado), não no modo TALK (falar)
2. Aperte repetidamente a tecla FLASH/PROG até aparecer “DEFAULT ► 1 NO” na tela
3. Aperte a tecla CID▲ou▼, ou as teclas de número 1 ou 2 para selecionar “1 Não“ ou “2
Sim” para voltar ao padrão original
4. Aperte a tecla FLASH/PROG
para conrmar a escolha. Você ouvirá um sinal sonoro
de conrmação.
RECEBER CHAMADAS
Ao receber uma chamada, o LED, alerta de chamada, acenderá e o aparelho exibirá a
informação sobre quem chama.
*Nota: É necessário adquirir o serviço de identicação de chamada de sua companhia
telefônica . Ver Identicação de chamada, página 12.
1. Aperte a tecla TALK para atender o telefone
Nota: Se o aparelho estiver encaixado na base, retire-o antes de apertar a tecla
TALK
2. Aperte a tecla TALK
para desligar.
Nota: O aparelho desliga automaticamente ao ser recolocado na base ou no
carregador da base.
086L004968-026
48/75
REV:1
Page 49

10
POR
número do canal duração da
chamada
nível do volume
número do telefone
REALIZAR CHAMADA
1. Aperte a tecla TALK
Nota: Se o aparelho estiver
encaixado na base, retire-o
antes de apertar a tecla TALK
2. Disque o número do telefone
com o qual quer falar
3. Aperte a tecla TALK para
encerrar a chamada
AJUSTE DO VOLUME
A tecla Volume ajusta o nível de volume do fone. Há 4 níveis de volume.
1. Certique-se de que o telefone está no modo TALK
(falar)
2. Aperte a tecla
CID/VOL ▲ ou ▼ no aparelho
TOQUE DA CAMPAINHA
A tecla RINGER deve estar ativa para o aparelho tocar quando houver uma chamada
telefônica.
PRÉ-DISCAGEM (ATÉ 32 DÍGITOS)
1. Certique-se de que o telefone está OFF (desligado), não no modo TALK (falar)
2. Digite o número do telefone. Esse número será exibido na tela.
3. Aperte a tecla TALK
Nota: Ao apertar *TONE, a pré-discagem será anulada.
ALTERAR O NÚMERO DA PRÉ-DISCAGEM
1. Certique-se de que o telefone está OFF (desligado)
2. Digite o número do telefone.
3. Aperte a tecla CH/DEL
para apagar os dígitos, um a um.
4. Digite novamente o número do telefone.
086L004968-026
49/75
REV:1
Page 50

11
POR
REDISCAGEM
1. Certique-se de que o telefone está OFF (desligado)
2. Digite o número do telefone com o qual quer falar
3. Aperte REDIAL
para discar novamente o último número (até 32 dígitos)
REDISCAGEM RÁPIDA
1. Aperte TALK (se não estiver no modo TALK)
2. Digite o número do telefone.
3. Se a linha estiver ocupada, aperte a tecla REDIAL
(rediscagem). O telefone desligará
durante 2 segundos e discará novamente
TECLA FLASH
Use a Tecla FLASH/PROG para ativar os serviços personalizados de chamada.
TECLA CH(CANAL)/DEL
Durante um telefonema, é possível alterar manualmente o canal para evitar estática.
Aperte a tecla CH/DEL para procurar um canal limpo.
*TECLA TONE
Este recurso permite que os usuários do sistema de pulso possam acessar os serviços de
tom oferecidos por bancos, empresas de cartão de crédito, etc.
1. Disque o número desejado.
2. Aperte *TONE
após sua chamada ser atendida.
3. Siga as instruções gravadas para completar a ação desejada.
4. Desligue o aparelho quando terminar. O telefone retorna automaticamente ao sistema
de pulso.
LOCALIZADOR DO TELEFONE (FUNÇÃO PAGING)
Este recurso ajuda a localizar o aparelho.
1. Aperte a tecla PAGE
na base. A tecla exibirá a palavra “PAGING”. O aparelho emitirá
sinais sonoros contínuos durante dois minutos ou até que seja apertada qualquer
tecla do aparelho.
2. Para interromper a função PAGE
, realizar uma das ações a seguir:
• Apertar a tecla
Page, na base.
086L004968-026
50/75
REV:1
Page 51

12
POR
• Apertar a tecla TALK, no aparelho.
• Apertar qualquer tecla do aparelho.
Nota: É possível ativar essa função, mesmo que a campainha do aparelho esteja
desligada.
TECLA MUTE
Para conversar de maneira privada e fora da linha, use a tecla MUTE. O interlocutor não
poderá ouvi-lo, mas você continuará a ouvir sua voz.
Para ativar essa função
1. Aperte a tecla MUTE/FORMAT
enquanto estiver no modo TALK. A palavra MUTE
aparecerá na tela.
2. Aperte a novamente tecla MUTE/FORMAT
para voltar à sua conversação ao telefone.
ALERTA DE BATERIA BAIXA
1. Se a bateria estiver com pouca carga e o telefone estiver no modo TALK, o aparelho
emitirá um som de alerta consistindo de dois sinais sonoros curtos, e a luz piscará a
cada 15 segundos. Na tela surgirá a mensagem ”LOW BATTERY“.
2. Se a bateria estiver com pouca carga e o telefone estiver no modo TALK, o LED
piscará a cada 15 segundos e a mensagem “LOW BATTERY” surgirá na tela.
IDENTIFICADOR DE CHAMADAS
Este telefone recebe e exibe informações sobre chamadas transmitidas por sua
companhia telefônica local, desde que haja adesão aos serviços de identicação de
chamadas. Essa informação poderá incluir o número do telefone. O telefone armazena
até 40 chamadas para exame posterior.
AGENDA DE CHAMADAS IDENTIFICADAS
As informações transmitidas pela companhia telefônica são recebidas por seu aparelho
entre o primeiro e o segundo toque e armazenadas em uma lista de chamadas
identicadas. Se o telefone for atendido antes do segundo toque, essas informações não
poderão ser armazenadas.
Quando a memória usada para a agenda de chamadas identicadas estiver completa,
uma nova chamada substituirá automaticamente a mais antiga da lista. A tela exibirá a
palavra NEW (nova) para chamadas não revistas.
086L004968-026
51/75
REV:1
Page 52

13
POR
REVISANDO A AGENDA DE CHAMADAS IDENTIFICADAS
À medida em que as chamadas são recebidas e armazenadas, a lista de chamadas
identicadas é atualizada para que se saiba quantas chamadas foram recebidas.
1. Aperte a tecla
CID/VOL ▼ para visualizar a listade chamadas identicadas, a partir
da mais recente.
2. Aperte a tecla
CID/VOL ▲ seta para cima, para revisar a lista de chamadas
identicadas, a partir da mais antiga
3. Aperte a tecla TONE/EXIT
para voltar ao modo de espera (Standby)
Nota: 1) Se o código de área estiver programado, (por exemplo, 416) o número todo
será exibido na tela durante a chamada recebida dessa área, inclusive o código (ex.
416-2225555). Durante a revisão, o código de área não será exibido (isto é, a tela
de LCD mostrará apenas 2225555). 2) Também é possível transferir o registro da
chamada identicada para a agenda.
Ver
Armazenar chamadas identicadas abaixo.
FORMATAÇÃO DOS NÚMEROS TELEFÔNICOS IDENTIFICADOS
A tecla MUTE/FORMAT lhe permite escolher quantos dígitos do número serão exibidos.
• Aperte MUTE/FORMAT
uma vez para acrescentar o código de área. O código
programado deverá ser idêntico ao do número identicado.
• Aperte MUTE/FORMAT
novamente para acrescentar 1, mais o código de área.
• Aperte MUTE/FORMAT
pela terceira vez para voltar para o número de sete dígitos
ARMAZENAR CHAMADAS IDENTIFICADAS
Antes de armazenar um número identicado, certique-se de que o número exibido tem
os dígitos corretos em sua área de discagem. Se isso não acontecer, altere-o usando a
tecla MUTE/FORMAT.
Nota: Se o número tiver mais de 15 dígitos, só os últimos quinze aparecerão na tela.
1. Use
CID/VOL ▲ ou ▼ para fazer a seleção
2. Aperte a tecla MEM
. No canto superior direito da tela aparece “MEMO # --“.
3. Selecione a localização desejada da memória pressionando as teclas (0-9)
4. Se o local já contiver nome e número, aparecerá “REPLACE MEMO?” Pressione
MEM
novamente se quiser substituir a informação e gravá-la. Aperte o botão TONE/
EXIT
para voltar ao modo de espera sem gravar.
5. Se o local estiver vazio, você ouvirá um sinal sonoro de conrmação quando a nova
086L004968-026
52/75
REV:1
Page 53

14
POR
memória for gravada..
Nota: O aparelho não armazenará o registro se o CID contiver caracteres sem dígitos ou
se o número tiver mais de 24 dígitos
DISCAGEM PARA UM NÚMERO IDENTIFICADO
1. Certique-se de que o telefone está OFF (desligado), não no modo TALK (falar)
2. Use a tecla
CID ▲ou▼ para selecionar o número identicado que deseja
3. Use a tecla MUTE/FORMAT
para exibir o número do telefone com o número de
dígitos corretos, se necessário.
4. Aperte a tecla TALK
. O numero será discado automaticamente
APAGAR ITENS DA LISTA DE TELEFONES IDENTIFICADOS
Use a tecla CH/DEL e as setas para apagar o número exibido na tela
APAGAR ITEM EXIBIDO
1. Certique-se de que o telefone está OFF (desligado), não no modo TALK (falar)
2. Use a tecla
CID/VOL ▲ ou ▼ para selecionar o número de telefone que deseja
apagar.
3. Enquanto o número está na tela, aperte a tecla CH/DEL
. Na tela, surgirá “DELETE?”
(apagar?).
4. Aperte a tecla CH/DEL
novamente para apagar o registro. Será ouvido um som de
conrmação e a tela exibira a palavra “DELETED” (apagado) durante 2 segundos.
APAGAR TODOS OS ITENS
1. Certique-se de que o telefone está OFF (desligado), não no modo TALK (falar)
2. Use a tecla
CID/VOL ▲ou▼ para exibir qualquer item
3. Aperte e segure a tela CH/DEL
até a tela exibir a pergunta “DELETE ALL?” (apagar
tudo)
4. Aperte novamente a tecla CH/DEL
. A tela exibirá a mensagem “NO CALLS” (nenhuma
chamada).
AGENDA
É possível armazenar até 10 nomes (com um máximo de 15 caracteres) e números (com
até 24 dígitos) na agenda de discagem rápida. Se um número exceder o limite de 24
dígitos pode-se programá-lo em partes, e discar esse número em cadeia.
086L004968-026
53/75
REV:1
Page 54

15
POR
REGISTRAR UM NÚMERO NA AGENDA
Para gravar um número na memória,
1. Certique-se de que o telefone está OFF
(desligado), não no modo TALK (falar)
2. Aperte a tecla MEM para iniciar o Modo de Programação da Memória. A tecla exibirá:
“MEMO#-”
3. Selecione a localização na memória (0-9) ou use a tecla
CID/VOL ▲ ou▼ para
encontrar um local vazio.
4. Aperte a tecla MEM
novamente. A tela exibira “ENTER NAME” (registrar nome?).
5. Utilize as teclas digitais para registrar o nome. O cursor avança um espaço após o
registro de cada letra. Depois de 1 segundo, a mesma tecla pode ser pressionada
outra vez para selecionar outro caractere. Se cometer um engano, aperte a tecla
CH/DEL
para apagar os caracteres anteriores, um a um.
Apertando 1 2 3 4 5 6 7 8 9
a Tecla
1 - 5 vezes A D G J M P T W
2 - 6 vezes - B E H K N Q U X
3 - 7 vezes * C F I L O R V Y
4 - 8 vezes ! ( ) $ ‘ ; S ? Z
6. Aperte a tecla MEM
novamente para salvar o nome. Na tela, aparecerá “ENTER
TEL NUMBER (registre o número do telefone).
7. Use as teclas digitais para registrar o número do telefone desejado. Se cometer
um engano, aperte a tecla CH/DEL para apagar os dígitos anteriores, um a um.
Em seguida, registre os dígitos corretos. Se desejar acrescentar um espaço, aperte
a tecla PAUSE duas vezes no local desejado. Lembre-se de apertar essa tecla
duas vezes, caso contrário será registrado o símbolo # (sinal de número) e não um
espaço. Cada espaço conta como 1 dígito na seqüência de discagem. Um número
de rediscagem também pode ser registrado na agenda apertando-se a tecla REDIAL
(Nota: Não é possível registrar na memória um número de rediscagem contendo mais
de 24 dígitos).
8. Aperte MEM
mais uma vez para registrar o número na memória. Se estiver
substituindo um número, a tela exibirá “REPLACE MEMO?”. Aperte novamente a
tecla MEM para conrmar ou pressione a tecla *TONE/EXIT para retornar ao modo
de espera.
086L004968-026
54/75
REV:1
Page 55

16
POR
9. Para visualizar a agenda, aperte a tecla MEM e use CID/VOL ▲ou▼ ou os números
de 0 a 9 para visualizar um por um
SUBSTITUIR UM NÚMERO DA AGENDA POR UM NÚMERO IDENTIFICADO
Use o mesmo procedimento utilizado para Armazenar chamadas identicadas
ALTERAR UM NÚMERO ARMAZENADO
Use o mesmo procedimento utilizado para Registrar um número na agenda
FAZER LIGAÇÕES A PARTIR DA AGENDA
1. Certique-se de que aparelho está ligado, apertando a tecla TALK
2. Aperte a tecla MEM
3. Aperte um número (0-9) para selecionar a localização na memória. O número será
discado automaticamente.
Ou:
1. Certique-se de que o telefone está OFF
(desligado), não no modo TALK (falar)
2. Aperte a tecla MEM
3. Aperte um número (0-9) ou use a tecla
CID/VOL ▲ ou▼ para selecionar o número
desejado.
4. Aperte a tecla TALK
e o número será discado automaticamente
REVISAR E APAGAR CONTEÚDO DA AGENDA
1. Certique-se de que o telefone está OFF (desligado), não no modo TALK (falar)
2. Aperte a tecla
CID/VOL ▲ ou ▼ até que o número desejado seja exibido, ouuse
as teclas numéricas para selecionar o local, na memória. O número e o nome
selecionados aparecerão na tela.
3. Enquanto esses dados estiverem na tela, aperte a tecla CH/DEL
para apagá-los. Na
tela, surgirá a pergunta “DELETE?” (apagar?).
4. Aperte CH/DEL novamente para apagar os dados. A tela exibirá a mensagem
“DELETE” (apagar).
5. Aperte CH/DEL
novamente para apagar os dados. A tela exibirá a mensagem
“DELETED” (apagado).
086L004968-026
55/75
REV:1
Page 56

17
POR
DISCAGEM EM CADEIA A PARTIR DA AGENDA
Utilize essa função para fazer ligações que exijam uma seqüência de números, a exemplo
de um cartão de chamada ou um número utilizado com freqüência em ligações de longa
distância. É possível discar cada uma das partes da seqüência a partir de um registro
diferente, na agenda. O exemplo seguinte demonstra como usar a discagem em cadeia
para fazer uma ligação através de um serviço de longa distância.
Número para: Localização na memória
Número de acesso à ligação de longa distância 7
Código da autorização 8
Número chamado com freqüência 9
1. Certique-se de que aparelho está ligado, apertando a tecla TALK
2. Aperte a tecla MEM, em seguida aperte o número 7
3. Ao ouvir o som de acesso, aperte MEM
, depois o número 8
4. Ao som de acesso seguinte, aperte MEM
, depois o número 9
Dica: Espere pelos sons de acesso antes de apertar a próxima tecla de memória,
caso contrário sua ligação não será completada.
SECRETÁRIA ELETRÔNICA DIGITAL
A secretária eletrônica digital possui três caixas postais com até 13 minutos de tempo
de gravação, podendo armazenar até 50 mensagens. Todas as gravações poderão ter a
duração de até um minuto.
LIGAR E DESLIGAR A SECRETÁRIA ELETRÔNICA
1. Aperte a tecla ANS para exibir a programação. Uma voz anunciará: “A secretária
eletrônica está ligada/desligada, e a tela exibirá on ou off.
2. Aperte a tecla ANS
para alterar o estado de ligada ou desligada. A voz e a tela
conrmarão do estado da máquina.
Nota:
• A máquina volta automaticamente para o modo de espera se nenhum dado for
registrado
• Se houver mensagens nas caixas postais, o número de mensagens será exibido na
tela.
086L004968-026
56/75
REV:1
Page 57

18
POR
OUVIR MENSAGENS CONTIDAS NAS CAIXAS POSTAIS
A secretária eletrônica digital pode gravar mensagens em três caixas postais separadas.
Também é possível gravar recados nessas caixas.
1. Em modo de espera, aperte as teclas 1, 2 ou 3 para selecionar a caixa postal
desejada.Uma voz anunciará o número de mensagens.
2. Em seguida, a máquina reproduzirá as mensagens da caixa postal selecionada.
3. Em qualquer ponto da reprodução, use as setas para reproduzir a mensagem anterior
ou a seguinte.
4. Aperte a tecla MENU
para terminar e sair do modo de espera.
Nota:
• Se não houver novas mensagens, as antigas serão reproduzidas.
• Se houver mensagens novas na caixa postal, será exibido o número de novas
mensagens.
APAGAR UMA MENSAGEM
Durante a reprodução da mensagem, aperte a tecla ERASE para apagá-la. Uma voz
anunciará “mensagem apagada” e a máquina reproduzirá a mensagem seguinte.
APAGAR TODAS AS MENSAGENS ANTIGAS DA CAIXA
1. Em modo de espera, aperte a tecla ERASE. Uma voz lhe pedirá para selecionar uma
caixa postal.
2. Aperte a tecla da caixa postal desejada (1, 2 ou 3) para selecioná-la.
3. A voz dirá “Todas as mensagens da caixa postal 1/ 2/ 3 foram apagadas, quando isso
acontecer.
GRAVAR RECADO
Pode-se gravar um recado diretamente na caixa postal, para um amigo ou um membro da
família acessar com suas próprias mensagens.
1. No modo de espera, aperte a tecla MENU
2. Aperte a tecla 1, 2 ou 3 para selecionar a caixa postal desejada onde será gravado
o recado. Uma voz irá dizer “Comece a gravar após o sinal” e amáquina emitirá um
sinal para indicar o início da gravação.
3. Grave a nota. A tela exibirá o tempo de gravação (em segundos).
4. Aperte a tecla MENU
para conrmar a gravação e sair do modo de espera.
086L004968-026
57/75
REV:1
Page 58

19
POR
Nota: A gravação será interrompida automaticamente se a memória estiver completa.
Nesse caso, o número de toques voltará ao padrão de 10 e a função “Apenas saudação”
será automaticamente ativada.
GRAVAR SAUDAÇÃO
A saudação padrão, tocada quando a máquina atende uma chamada, pode ser
substituída por uma mensagem personalizada (Mensagem 1). Se a pessoa que liga deixar
de selecionar uma caixa postal, as mensagens serão gravadas automaticamente na caixa
postal 1. Para escolher uma caixa postal diferente, o interlocutor poderá discar * durante a
saudação e esperar o alerta da voz. Uma segunda mensagem (Mensagem 2) poderá ser
gravada quando a função Apenas Saudação for ativada (para maiores informações, ver
Gravar apenas saudação.
1. No modo de espera, aperte a tecla MENU
e, em seguida, ANNOUNCE. Uma voz dirá
“Comece a gravar após o sinal” e um sinal soará para indicar o início da gravação.
2. Grave sua mensagem. Será exibido o tempo de gravação, em segundos
3. Aperte a tecla MENU
para interromper a gravação. A mensagem gravada será
reproduzida.
DICA
: Ao gravar sua mensagem, lembre os interlocutores que devem selecionar uma
das caixas postais discando *1, *2 ou *3 antes de deixar sua mensagem. Por exemplo:
“Residência dos Smith. Não estamos no momento. Para deixar sua mensagem para John,
por favor, disque estrela 1 e espere pelo sinal. Para deixar uma mensagem para Mary,
disque estrela 2. Para Tom, disque estrela três, Ligaremos assim que possível”.
TOCAR SAUDAÇÃO
1. No modo de espera, aperte a tecla ANNOUNCE para voltar a tocar a saudação
2. Aperte a tecla MENU
para interromper a reprodução e sair do modo de espera.
APAGAR SAUDAÇÃO
1. Aperte a tecla ANNOUNCE para tocar a saudação
2. Aperte a tecla ERASE
para apagar a saudação. Uma voz dirá: “A saudação do
usuário foi apagada”. A saudação padrão, programada pela fábrica, será tocada.
OPÇÕES DO MENU
O menu da secretária digital lhe permite o seguinte:
• Apenas saudação
• Número de toques da campainha para atender chamada
086L004968-026
58/75
REV:1
Page 59

20
POR
• Código para acesso remoto
• Hora
• Mensagens de saudação 1 e 2
• Recado de voz para as caixas postais 1, 2 ou 3.
VER AS OPÇÕES DO MENU.
1. Aperte a tecla MENU para entrar no menu. Uma voz irá explicar como navegar pelo
menu.
2. Utilizar as teclas ▲ ou ▼ para navegar pelo submenu desejado.Uma voz irá anunciar
o menu selecionado e a tela exibirá o seguinte:
• : Apenas saudação
• : Número de toques da campainha
• : Código para acesso remoto
• : Hora
• : Gravar recados ou saudações
3. Aperte a tecla MENU para entrar e continuar a conguração da opção.
As opções são:
<MENU>
Apenas saudação
Atender e gravar
Apenas atender
Número de toques da campainha
Toque curto
2
4
6
8
Código de acesso remoto
Hora
Gravar saudação 1
Gravar saudação 2
Gravar recado caixa postal 1
Gravar recado caixa postal 2
Gravar recado caixa posta 3
086L004968-026
59/75
REV:1
Page 60

21
POR
LIGAR E DESLIGAR APENAS SAUDAÇÃO
Quando a função apenas saudação estiver ligada, a máquina tocará a saudação para os
interlocutores, mas estes não poderão deixar uma mensagem.
1. Aperte a tecla MENU
. tela, aparecerá Ao e uma voz irá explicar como selecionar
os sub-menus.
2. Aperte novamente a tecla MENU
. A voz dirá qual a conguração daquele momento:
“Atender e gravar” ou “Apenas saudação”.
3. Pressione ▲▼ para escolher entre “Apenas saudação” (
) ou “Atender e gravar”
( ).
4. Aperte a tecla MENU
para conrmar e sair do modo de espera. Um sinal soará para
indicar que a conguração foi conrmada.
GRAVAR APENAS SAUDAÇÃO
Poderá ser gravada uma mensagem especial (saudação 2) quando a função Apenas
Saudação estiver ativa.
1. Aperte a tecla MENU
e use ▲▼ para navegar pelo submenu 2, Gravar Apenas
Saudação. Uma voz dirá: “Escolha gravar mensagem 2” e a tela exibira
2. Aperte a tecla MENU. A voz dirá: “Comece a gravar depois do sinal”. A máquina
emitirá um sinal para indicar o início da gravação.
3. Grave sua saudação. Será exibido tempo o de gravação, em segundos.
4. Aperte a tecla MENU
para terminar a gravação. A mensagem gravada será
reproduzida.
ESTABELECER NÚMERO DE TOQUES DA CAMPAINHA
A função Número de toques da campainha lhe permite estabelecer quantas vezes a
campainha soará antes da máquina atender um chamado.
1. Aperte a tecla MENU
e use ▲▼ para navegar no submenu Número de toques da
campainha. Uma voz lhe dirá: “Estabeleça o número de toques” e a tela exibirá .
2. Aperte a tecla MENU
para entrar no submenu. A voz lhe dirá a conguração atual.
3. Use as setas para selecionar TS (Toll Saver, a chamada será atendida após um toque
curto), 2, 4, 6 ou 8 toques.
4. Aperte a tecla MENU
para conrmar sua escolha e sair do modo de espera. Será
ouvido um sinal para indicar que a conguração foi conrmada.
086L004968-026
60/75
REV:1
Page 61

22
POR
AJUSTAR O HORÁRIO
1. Aperte a tecla MENU, em seguida, a tecla TIME. A voz dirá o horário atual e o dia e
a hora serão exbidos na tela.
2. O ajuste para o dia irá piscar. (01 indica segunda-feira, 02 terça feira, e assim Por
diante.
3. Use ▲▼ para alterar os dados. A voz anunciará os novos valores.
4. Aperte a tecla MENU
para conrmar.
5. Repita os passos 3 e 4 para os novos ajustes.
• Hora: 00 a 23 horas.
• Formato da hora 24 horas.
• Minutos: 00 a 59 minutos.
OUVIR A HORA CERTA
Aperte a tecla TIME para ouvir a hora certa. Uma voz lhe dirá o dia e a hora.
AJUSTE DO VOLUME
Durante a reprodução da saudação ou das mensagens, use as setas para aumentar ou
diminuir o volume
Nota: No modo de espera, a tela exibirá o nível do volume (de 0 a 7)
ESTABELECER CÓDIGO DO ACESSO REMOTO
A função acesso remoto lhe permite checar as mensagens a partir de qualquer linha
externa. Para ouvir as mensagens desse modo, você precisa criar um código de quatro
dígitos.
1. Aperte a tecla MENU
e use ▲▼ para navegar pelo submenu de código de acesso
remoto. Uma voz lhe dirá “Digite o código de acesso remoto”, e a tela exibirá .
2. Aperte a tecla MENU
. A voz anunciará o código atual e os primeiros dois dígitos
(‘00 a 99) do código aparecerão, com um dígito piscando
3. Use ▲▼ para escolher o valor do dígito que pisca.
4. Aperte a tecla MENU
para conrmar. Repita os passos 2 e 3 para escolher os outros
dígitos do código de acesso. Quando os quatro dígitos estiverem denidos, a voz
conrmará o código de acesso escolhido.
5. Aperte a tecla MENU
para conrmar e para sair do modo de espera.
086L004968-026
61/75
REV:1
Page 62

23
POR
Nota:O código de acesso remoto padrão, estabelecido pela fábrica, é 0000.
ACESSO REMOTO À SECRETÁRIA ELETRÔNICA
1. Disque o número de seu telefone e espere que a secretária eletrônica atenda a
chamada.
2. Enquanto a saudação estiver sendo reproduzida, disque #, seguido pelo código de
acesso remoto.
3. Para ouvir suas mensagens, disque o número da caixa postal escolhida (1,2 ou3).
Para outras funções remotas, favor se referir à tabela abaixo.
Função
Reproduzir mensagens da caixa
postal
Reproduzir a mensagem anterior
Interromper a mensagem
Tocar a mensagem seguinte
Apagar mensagem
Gravar Recado
Gravar saudação
Ligar ou desligar a máquina
Ligar e desligar a função “apenas
mensagem”
Continuar em modo de espera
Ajuda
Comando
Discar 1, 2 ou 3 para selecionar e reproduzira
mensagem da caixa postal 1, 2 ou 3.
Durante a reprodução da mensagem, disque 4
Durante a reprodução da mensagem, disque 5
para interrompê-la.
Durante a gravação da mensagem, disque 5
para interrompê-la
Durante a reprodução da mensagem, disque 6
Durante a reprodução da mensagem, disque 7.
Durante o acesso remoto, em modo de espera,
discar 8.
Em seguida, discar 1, 2 ou 3 para gravar um
recado na caixa postal correspondente.
Discar 9 para gravar saudação. Depois da
gravação, a máquina a reproduzirá.
Durante o acesso remoto, em modo de espera,
discar 0.
Durante o acesso remoto, em modo espera,
disque #
Timeout
Aperte * depois de digitar o código de acesso
remoto
086L004968-026
62/75
REV:1
Page 63

24
POR
Nota: Ao utilizar um telefone celular para acessar a Secretária Eletrônica Digital, talvez
seja necessário congurar a duração da discagem desse celular. Favor ver. Não consigo
acessar a secretária eletrônica a partir de uma linha externa na página 32.
SUBSTITUIÇÃO DA BATERIA
Substituição e manuseio da bateria
Se a bateria descarregar em pouco tempo, mesmo após ter sido recarregada, favor
troque-a.
Em condições normais de uso, sua bateria deve durar cerca de um ano.
Para substituir a bateria, favor entrar em contato com seu fornecedor ou com
www.oregonscientic.com.br
Atenção
• Use apenas baterias do tipo especicado (Ni-MH 3.6V, 600mAh)
• Não retire a bateria do aparelho para recarregá-la.
• Jamais jogue a bateria no fogo, não a desmonte ou aqueça
• Não retire ou cause dano à embalagem da bateria.
• Retire a bateria se for guardar o aparelho por mais de 30 dias.
Certique-se de que o telefone está desligado antes de substituir a bateria
1. Retire a tampa do compartimento da bateria, deslizando-a
2. Desconecte o plug da bateria da tomada do compartimento e retire o pacote.
3. Insira o novo pacote e ligue o o à tomada.
Nota: Para maiores esclarecimentos, favor examinar a ilustração da página 7,
“Instalação da bateria”,
4. Coloque a tampa do compartimento da bateria.
5. Encaixe o aparelho na base e carregue-o por 12 horas.
Nota:Se a bateria do aparelho for removida por mais de 5 minutos, os dados
armazenados na memória da agenda e do identicador de chamadas serão apagados.
Atenção: Para reduzir o risco de fogo ou danos pessoais, use uma bateria Ni-MH 3.6V,
600mAh
Número para substituição da peça: 001-800369-30105
086L004968-026
63/75
REV:1
Page 64

25
POR
FALTA DE ENERGIA ELÉTRICA
Se houver falta de energia elétrica não será possível fazer nem receber chamadas pelo
telefone.Após um episódio de falta de energia elétrica, coloque o aparelho na base por
cerca de 20 segundos para voltar a registrar o código digital de segurança.
FONE DE OUVIDO E CLIPE DE CINTO
Conexão do fone de ouvido (não incluso)
Para manter as mãos livres durante uma conversa,ligue o
fone de ouvido (não incluso) ao plugue no aparelho.
O fone e o microfone do aparelho serão desativados durante
essa conexão.
Aperte a tecla TALK para atender ou fazer um telefonema ao
usar esse conjunto.
Instalação do Clipe de cinto
• Encaixe o Clipe de cinto inserindo suas laterais nas
fendas.
• Coloque as pontas do Clipe de cinto no local correto.
SINAIS DE LUZ
Os indicadores carregar/em uso & recebendo chamada/em uso mudarão nas seguintes
condições:
CARREGAR/EM USO na base
Falando Aceso constantemente
Carregando Aceso constantemente
Chamada a ser recebida Pisca no mesmo ritmo do toque do telefone
Função Page Pisca a cada 0.5 segundo
Mensagem de voz Pisca a dada 1 segundo
086L004968-026
64/75
REV:1
Page 65

26
POR
CHAMADA A SER RECEBIDA/EM USO no
Falando aceso constantemente
Função page Pisca a cada 1 segundo
Bateria baixa Pisca a cada 15 segundos
Chamada a ser recebida Pisca no mesmo ritmo do toque do telefone
MENSAGENS NA TELA DE LCD
Os seguintes indicadores mostram o status de uma mensagem ou do telefone
BLOCKED
NUMBER/NAME/CALLER
EMPTY
ERROR
ENTER NAME
ENTER TEL NUMBER
DELETE ALL?
DELETE
FIM DA LISTA
HANDSET 1
INCOMPLETE DATA
MESSAGE WAITING
A pessoa está chamando de um telefone que foi
bloqueado para transmissão
Não há registros armazenados na agenda selecionada
As informações sobre o interlocutor foram interrompidas
durante a transmissão, ou o telefone está excessivamente
barulhento
Voz lhe diz para registrar o nome na agenda
Voz lhe diz para registrar o número do telefone na agenda
Voz lhe pergunta se deseja apagar todas as informações
Voz lhe pergunta se deseja apagar o registro de
identicação do interlocutor ou de um registro que consta
da agenda, exibido na tela
Indica que não há informações adicionais na lista de
identicações
Esse aparelho é o de n° 1
O provedor do telefone não envidou informações sobre o
interlocutor porque o sinal estava fraco ou a ligação foi
interrompida
Interlocutor deixou uma mensagem (para poder utilizar
este serviço é necessário assinar o serviço de mensagem
de voz oferecido por sua companhia telefônica)
086L004968-026
65/75
REV:1
Page 66

27
POR
NEW CALL
NO CALLS
NO DATA
REPT
UNKNWON
NUMBER/NAME/CALLER
PAGING
RINGER=OFF
Indica que uma ou várias chamadas não foram
examinadas
Não há registro de identicação de chamadas
armazenadas na memória
Não foi recebida nenhuma informação sobre a
identicação do interlocutor
Repetir a ligação
A chamada é proveniente de uma área não abrangida
pelo serviço de identicação de chamadas ou a
informação não foi enviada
A tecla Page foi pressionada na base
O botão da campainha, localizado do lado direito do
aparelho foi posicionado em OFF (desligado)
SINAIS SONOROS
Um sinal longo Indica que alguém está chamando
Um sinal único Uma tecla está pressionada
Três sinais curtos Erro
Dois sinais longos Conrmação
Um sinal curto e outro longo Sinal que a função Page foi ativada
Dois sinais curtos a cada 15 segundos Alerta de bateria baixa
PROBLEMAS
IDENTIFICAÇÃO DA CHAMADA
Nada na tela
• Bateria não totalmente carregada. Tente substituir a bateria.
• Certique-se de que a base está conectada à tomada.
Desconecte a base da tomada e ligue novamente.
• Você assinou o serviço de identicação de chamadas de sua companhia telefônica
local?
086L004968-026
66/75
REV:1
Page 67

28
POR
A tela não funcionará a menos que o faça.
Mensagem de erro na identicação da chamada
• O telefone exibe essa mensagem quando detecta uma informação inválida.
A informação sobre a identicação é processada durante o período de silêncio
após o primeiro toque. Essa mensagem indica a presença de ruído na linha ou que
uma mensagem inválida foi enviada pela companhia telefônica.
O aparelho não exibe a informação da identicação da chamada
• Verique se o serviço de identicação de chamada foi adquirido de sua companhia
telefônica local, e se está funcionando corretamente.
O serviço de identicação de chamada foi adquirido e tem funcionamento correto
• Se o telefone for atendido logo após o primeiro toque, a informação sobre a
chamada pode não estar completa para ser recebida pelo seu telefone Oregon
Scientic.
Os números de telefone não são discados corretamente a partir da memória para as
chamadas identicadas.
• Certique-se de que o número exibido está no formato correto e de que o código
de área e/ou o número 1 foi incluído no processo de discagem
Meu aparelho tem ruído de estática
• Tente registrar novamente o aparelho na base OS5851, tal como descrito neste
manual.
TELEFONE
Sem ruído de discagem
- A base está conectada à tomada? A tomada está funcionando?
- O o elétrico está conectado à tomada?
• Desconecte a base da tomada telefônica da parede e ligue outro telefone na
mesma tomada.
Se não houver ruído de discagem, o problema pode ser da ação ou do serviço
local
• O aparelho está além do alcance da base?
• Certique-se de que a bateria foi carregada de modo correto (12 horas seguidas).
• O pacote da bateria foi instalado corretamente?
086L004968-026
67/75
REV:1
Page 68

29
POR
• A aparelho emitiu um sinal quando a tecla TALK foi pressionada? O indicador
CHARGE/IN USE surgiu na tela? A bateria talvez precise ser substituída.
O ruído de discagem está normal, mas não é possível completar a ligação
• Certique-se de que o modo de discagem TONE ou PULSE foi selecionado
corretamente, de acordo com seu serviço telefônico.
O aparelho não toca
• Certique-se de que o botão da campainha está ligado, ON.
• Talvez haja muitas extensões em sua linha. Tente desligar alguns telefones.
• Ver soluções para
sem ruído de discagem.
Há estática, ruídos ou o som oscila
• Troque de canal
• O aparelho está fora do alcance? Chegue mais perto da base.
• Se ouvir 3 sinais curtos ao pressionar a tecla TALK, o aparelho está fora do
alcance da base.
• A base precisa ser colocada em outro local?
• Carregue a bateria.
• Certique-se de que a base não está ligada a um tomada com outra função.
O telefone emite sinais sonoros
• Coloque o aparelho na base durante um mínimo de 20 segundos para registrar.
novamente o código de segurança. Se isso não funcionar, carregue a bateria
durante 12 horas seguidas.
• Limpe os contatos do carregador, no aparelho e na base. Use um tecido macio ou
uma borracha.
• Ver soluções para Sem ruído de discagem
.
Ligando a partir da memória
• A programação das teclas da agenda foi feita de modo correto?
• A seqüência correta foi observada?
• Certique-se de que o modo TONE/PULSE foi escolhido corretamente, de acordo
com seu serviço telefônico.
• A agenda foi reprogramada depois de uma falha no fornecimento de energia
elétrica ou da substituição da bateria?
086L004968-026
68/75
REV:1
Page 69

30
POR
A lâmpada indicando Charge/In use continua a piscar com o aparelho na base
Se sua companhia telefônica lhe fornece o serviço de mensagem de voz e se este foi
adquirido, a lâmpada indicando Charge/In use pisca quando o telefone está sendo usado
para indicar que há uma mensagem à espera. Deixará de piscar quando a mensagem for
ouvida.
Sem sinal de discagem/telefone não funciona
• Verique se o adaptador AC está conectado a uma tomada em perfeito
funcionamento.
• Verique todas as conexões do telefone. Desconecte o aparelho da parede e
retire a bateria durante 30 minutos. Em seguida, instale-a novamente segundo as
instruções do manual.
• Verique os outros telefones da casa para se certicar de que não há um problema
com a companhia telefônica.
• O alerta de “INDICAÇÂO DE BATERIA BAIXA” está ligado?
Não ouço o toque do telefone
• Verique os controles de volume, certique-se de que o botão não está desligado.
• Verique se o adaptador AC está bem conectado à tomada de energia elétrica.
• Verique todas as conexões do telefone ou tente ligá-lo em outra tomada.
Não consigo receber ou fazer chamadas
• Verique se foi escolhido o tipo correto de serviço, tomou pulso.
• Verique se o adaptador AC está ligado a uma tomada elétrica em perfeito
funcionamento.
• Verique todas as conexões do telefone ou tente ligá-lo em outra tomada.
• Verique e certique-se de que a bateria foi instalada e conectada corretamente.
Há sinais curtos e contínuos, não o sinal de discagem quando o aparelho está
longe da base.
• Esses são sinais de alerta, avisando que o aparelho está longe demais da base.
Aproxime-se da base.
A luz indicativa de que o aparelho está sendo carregado não acende quando este
está encaixado na base.
• Certique-se de que o adaptador AC está ligado à base e à uma tomada elétrica
em perfeito funcionamento.
• Certique-se de que o aparelho está bem encaixado na base.
086L004968-026
69/75
REV:1
Page 70

31
POR
• Certique-se de que o pacote da bateria recarregável foi conectado de modo
correto, no aparelho.
A voz do interlocutor está muito baixa ou inaudível
• Ajuste o Controle de Volume do aparelho para um volume mais alto.
Os números de telefone não estão sendo discados corretamente a partir da
memória dos números identicados.
• Certique-se de que o número exibido tem o formato correto e de que o código da
área e/ou o número 1 estão incluídos no processo de discagem.
Não sei onde deixei o aparelho.
1. Aperte a tecla PAGE
, na base. Se o aparelho estiver dentro do alcance, um triplo
sinal soará durante 50 segundos.
2. Recoloque o aparelho na base ou aperte a tecla
CH, no aparelho, ou aperte duas
vezes qualquer tecla do aparelho para sair da função page.
Diculdade em fazer e/ou receber chamadas
• Se houver diculdade para fazer ou receber chamadas, a causa do problema
pode ser a perda do código de segurança. Quando isso ocorre, o aparelho não se
comunica com a base. Para registrar novamente o código, coloque o aparelho na
base durante 5 a 10 segundos.
• Se esse procedimento não surtir efeito, desconecte o adaptador AC da tomada da
parede. Desconecte a bateria do aparelho durante 5 a 10 segundos e, em seguida
refaça a conexão. Recoloque o aparelho na base e ligue novamente o adaptador
AC na tomada.
Causas de má recepção
• Proximidade de alumínio
• isolamento revestido de metal
• Dutos de aquecimento e outras construções metálicas podem bloquear sinais de
rádio
• Proximidade de aparelhos como microondas, fornos, computadores, etc.
• Condições atmosféricas, tais como tempestades fortes.
• Base instalada no porão ou no piso mais baixo da residência.
• Base conectada a uma tomada elétrica com outros aparelhos eletrônicos.
• Monitores de bebês usando a mesma freqüência.
• Bateria com pouca carga, no aparelho
• Distância da base além de sua faixa.
086L004968-026
70/75
REV:1
Page 71

32
POR
Secretária eletrônica digital não liga
• Verique se há alimentação de corrente elétrica.
• Conrme o status da máquina (
/ ) apertando a tecla ANS.
Secretária eletrônica digital não grava mensagens recebidas
• A memória pode estar completa (a tela exibe “FL”). Apague as mensagens de suas
caixas postais.
• Se a máquina não grava as mensagens recebidas, verique se a função “Apenas
Saudação” não está ativa.
Impossibilidade de acessar a secretária eletrônica digital a partir de linha remota.
• Certique-se de que o código de acesso remoto está correto.
• Não deixe de digitar # e o código de acesso antes de ouvir o sinal para gravar.
• Se utilizar um telefone celular, a duração da discagem pode não sucientemente
longa para disparar as congurações da máquina. Em certos modelos de celular,as
congurações podem ser alteradas (consulte o manual do usuário de seucelular
para maiores informações).
MANUTENÇÃO
Para o bom funcionamento do telefone e para mantê-lo sempre com bom aspecto, devese observar as seguintes instruções:
• Evite colocar o telefone nas proximidades de aquecedores ou aparelhos que
emitam ruído elétrico (por exemplo, motores ou lâmpadas uorescentes).
• Não o exponha à luz direta do sol, nem à umidade.
• Evite derrubar o telefone e submetê-lo a tratamento descuidado.
• Limpe o aparelho com um tecido macio.
• Nunca use um produto de limpeza forte ou pó abrasivo pois isso danicará
oacabamento
• Limpe periodicamente os contatos do carregador, tanto no telefone quanto na
base, usando um lápis borracha bem limpo.
• Guarde a embalagem original e o recibo de compra no caso de precisar enviar o
aparelho pelo correio, mais tarde.
086L004968-026
71/75
REV:1
Page 72

33
POR
MAXIMIZE O DESEMPENHO DA BATERIA
A liberdade que seu telefone sem o lhe oferece depende totalmente do desempenho da
bateria recarregável que ca no aparelho telefônico. Para maximizar seu desempenho,
siga as instruções a seguir:
Carregue-a durante 12 horas completas
Antes de utilizar o aparelho pela primeira vez, carregue a bateria durante 12 horas
seguidas. A carga inicial adequada é muito importante para maximizar o desempenho da
bateria.
Mantenha os contatos limpos
A bateria jamais cará totalmente carregada se os contatos estiverem sujos. Limpe todos
os contatos periodicamente— dois embaixo do aparelho telefônico e dois na base. Use
um lápis borracha limpo, ou uma esponja de aço ultra na para limpar os contatos do
carregador. Evite tocar essa área do telefone ou podem ocorrer arranhões.
Revigorar a bateria
Se sua bateria parece precisar ser recarregada com maior freqüência do que o normal,
talvez tenha perdido parte de sua capacidade de recarga. Para fazê-la voltar à sua
capacidade total, tente “revigorar” a bateria.
1. Primeiro, deixe a bateria descarregar, deixando o aparelho no modo TALK até a
surgir o alerta de bateria baixa. (Desconecte a base da linha telefônica para que sua
linha não dê sinal de ocupado o tempo todo).
2. Em seguida, deixe a bateria recarregar durante 12 horas seguidas.
3. Repita os dois passos anteriores. Enquanto seu produto OS5851 utilizar a bateria
Ni-MH, não há problema em deixar o aparelho encaixado na base pelotempo que
desejar, pois isso não afetará a tempo de vida da bateria.
INFORMAÇÕES TÉCNICAS
Número REN
O Número de Equivalência da Campainha atribuído a cada dispositivo do terminal é uma
indicação do número máximo de terminais que podem ser ligados à interface do telefone.
O número REN deste telefone encontra-se na parte inferior da base. A terminação na
interface pode consistir em qualquer combinação do dispositivos, contanto que seu
número total não exceda 5.
ATENÇÂO
Este produto foi fabricado apenas para ser usado nos Estados Unidos e Canadá. A venda
ou utilização em outros países pode violar leis locais.
086L004968-026
72/75
REV:1
Page 73

34
POR
Os telefones sem o usam freqüências de rádio para lhes permitir mobilidade. Esse fato
pode afetar o desempenho do seu aparelho.
1. RUÍDO
Ruídos de pulsos elétricos estão presentes na maioria das casas. Isso é mais intenso
durante tempestades elétricas. Certos tipos de equipamentos elétricos, como aparelhos
para diminuir a intensidade da luz, lâmpadas uorescentes, motores, ventiladores, etc,
também geram ruído de pulso elétrico.
Como as freqüências de rádio são suscetíveis a isso, ocasionalmente esse ruído poderá
ser ouvido através do aparelho telefônico. Em geral, esse é um aborrecimento passageiro
e não deve ser interpretado como defeito do telefone.
2. FAIXA
Como são utilizadas freqüências de rádio, a localização da base pode afetar a faixa
de operação do telefone. Tente vários locais e escolha o que lhe propicia o sinal mais
claro. (Andar em círculos enquanto segura o telefone também pode aumentar a faixa de
operação)
3. INTERFERÊNCIA
Os circuitos eletrônicos ativam um relê para conectar o aparelho à linha telefônica.
Esses circuitos eletrônicos operam no espectro da freqüência de rádio. Apesar de serem
utilizados vários circuitos para prevenir sinais indesejáveis, pode haver períodos em
que esses sinais invadem a estação da base. Com o telefone sem o inativo, poderá
ser ouvido um clique ou o ruído da ativação do relê. Se isso ocorrer com freqüência, é
possível minimizar o problema abaixando a altura da localização da base. Mudar o canal
de operação e/ou o código de segurança também poderão ajudar.
A operação está sujeita às duas condições seguintes: (1) o aparelho não deve causar
interferência, e (2) o aparelho deve aceitar qualquer interferência, inclusive a que pode
causar a operação indesejada do aparelho.
NOTA
A privacidade da comunicação não pode ser garantida ao usar este telefone. Outros
aparelhos, inclusive outros telefones sem o podem interferir ou causar ruído nas
operações. Aparelhos sem código de acesso podem ser invadidos por outros sistemas
de comunicação de rádio. Telefones sem o não devem causar interferência a qualquer
serviço de rádio licenciado.
O Industry Canada Label identica os equipamentos certicados. Essa certicação
signica que o equipamento obedece certos padrões de proteção, segurança e operação
das redes de telecomunicações. O ministério não garante que o equipamento funcionará
de acordo com a expectativa do usuário. O equipamento também deverá se instalado
086L004968-026
73/75
REV:1
Page 74

35
POR
através de um método aceitável. Em alguns casos, o cabeamento interior da companhia
responsável pela linha individual poder ser ampliado através de uma extensão telefônica.
O usuário deve estar ciente de que a observação das condições acima não previnem a
degradação do serviço em certas circunstâncias.
Reparos ao equipamento certicado devem ser realizados por uma rma canadense
autorizada, designada pelo fornecedor. Quaisquer consertos ou alterações feitas por
usuário deste equipamento ou mal funcionamento do equipamento podem fazer com que
a companhia de telecomunicações solicite que o usuário desconecte o equipamento.
O usuário deverá garantir, para sua própria proteção, que as conexões elétricas, os
cabos telefônicos e as instalações hidráulicas internas, metálicas, se presentes, estejam
conectadas juntas. Essa precaução pode ser particularmente importante nas áreas rurais.
ATENÇÃO
Os usuários não devem tentar fazer essas conexões pessoalmente. Devem entrar em
contato com a autoridade responsável para inspeção elétrica ou com um eletricista, de
acordo com o caso.
Um ponto de exclamação inserido em um triângulo eqüilátero serve para alertar o usuário
da presença de importantes instruções sobre operação e manutenção na literatura que
acompanha o produto.
No produto, esse símbolo é utilizado para identicar a seguinte informação importante:
Utilize apenas o adaptador OS especicado.
NOTA
Este equipamento está de acordo com as especicações aplicáveis, estabelecidas pela
Canada Terminal Equipment Technical Specications. Esse fato é conrmado pelo número
do registro. A abreviatura IC, antes do número do registro, signica que este foi realizado
com base na Declaração de Conformidade e indica foram observadas as especicações
do Industry Canada. Isso não implica que o Industry Canada aprovou o equipamento.
Homologação Anatel
Este produto está homologado pela ANATEL, de acordo com os procedimentos regulamentados pela resolução 242/2000, e atende aos requisitos técnicos aplicados. Para
maiores informações consulte o site da ANATEL.
http://www.anatel.gov.br
086L004968-026
74/75
REV:1
Page 75

EN
© 2007 Oregon Scientic. All rights reserved.
086L004968-026 Rev.1
086L004968-026
75/75
REV:1
 Loading...