

Page 1

Model: MP 120
User Manual
Manuale d'uso
Manuel d'utilisation
MP120 Eng Cover R3 7/23/04, 4:35 AM1
Page 2
CONTENTS
DIGITAL MP3 PLAYER (MP120)
USER MANUAL
Introduction ................................................................................. 1
Features ................................................................................. 1
Accessories ............................................................................ 1
Product Overview ....................................................................... 2
Front ....................................................................................... 2
Back ....................................................................................... 2
Attaching / Detaching the Earphones ..................................... 2
Ways to Use the Clip .............................................................. 3
Getting Started ............................................................................ 4
Driver Software Installation (Win 98SE Users Only) .............. 4
Connecting the Player to Your Computer / Charging the Battery .... 5
File Transfer ................................................................................. 5
Disconnecting Player from Computer .................................... 6
Power On / Off ............................................................................. 6
Power On ............................................................................... 6
Power Off ............................................................................... 7
Modes ........................................................................................... 7
Music ...................................................................................... 7
Radio (FM 87.5MHz~108MHz) .............................................. 8
Menu Navigation ......................................................................... 9
Hold (Button Hold) ................................................................ 10
Music / FM ............................................................................ 11
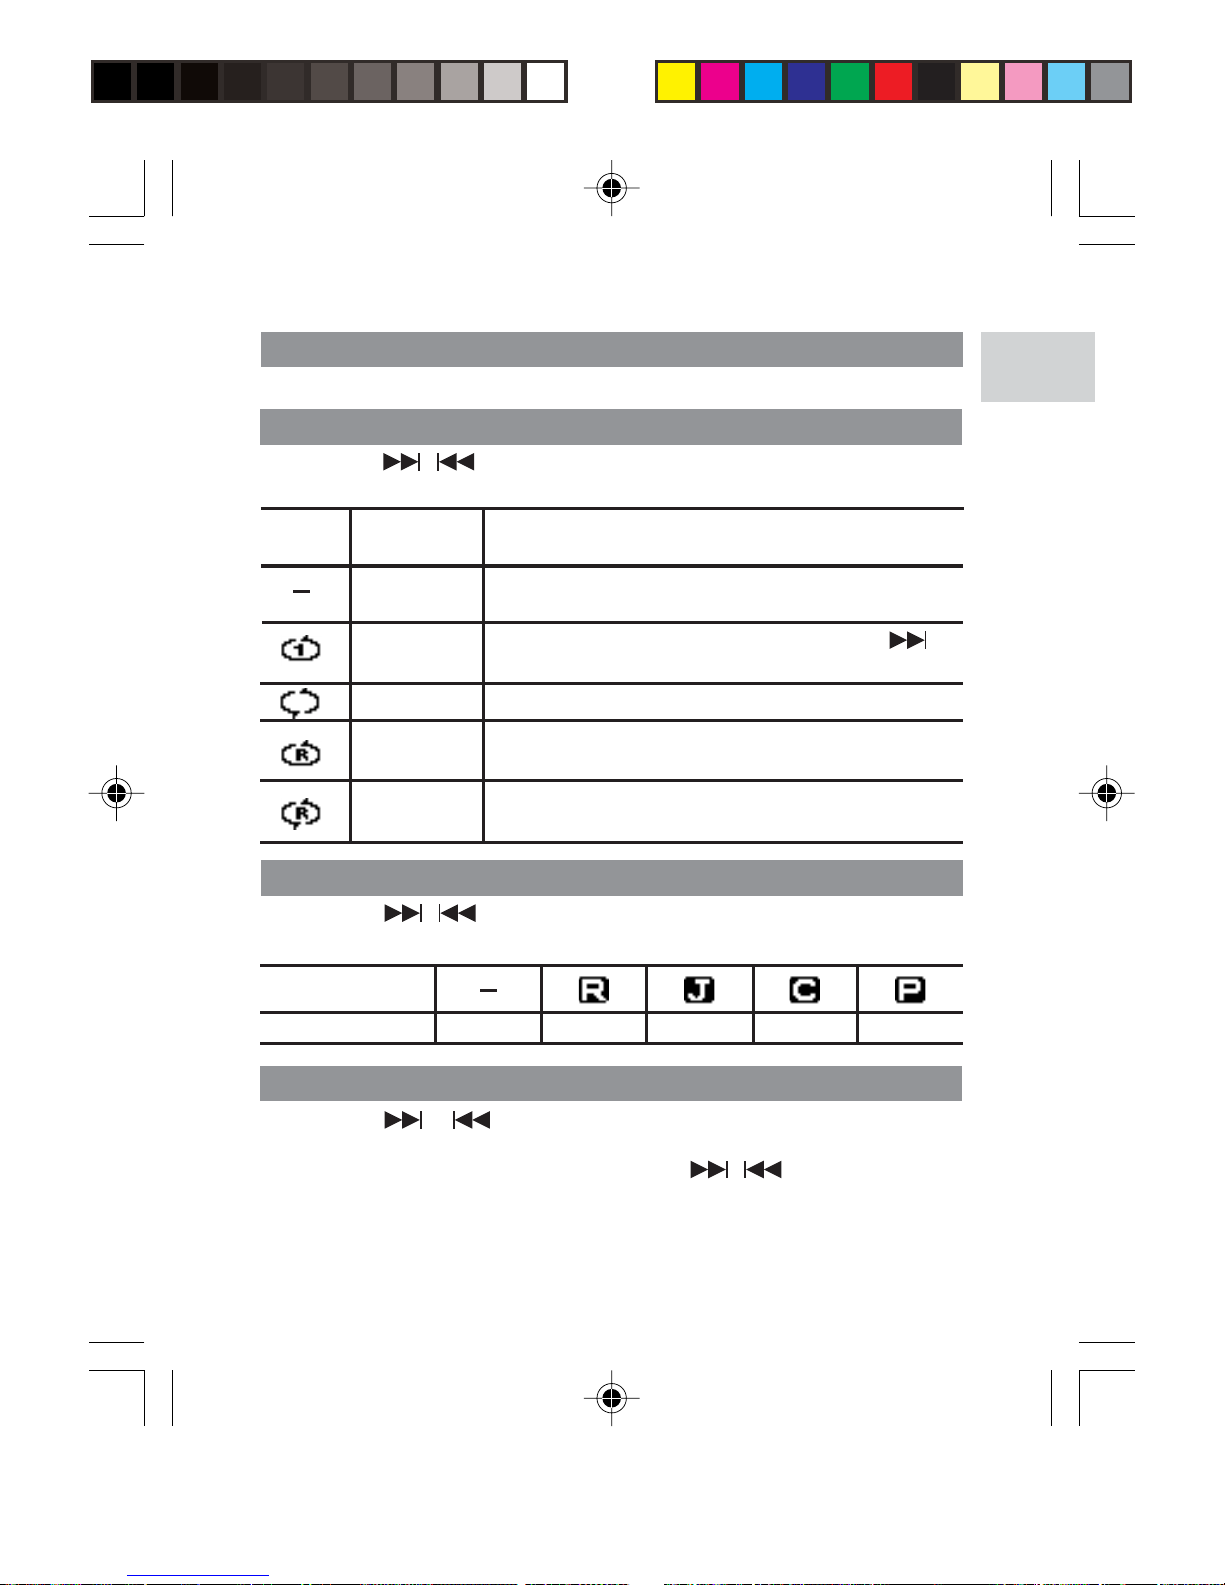
RPT (Repeat) ....................................................................... 11
EQ (Equalizer) ...................................................................... 11
DEL (Deleting Files) ............................................................. 11
DISP (Display) ...................................................................... 12
MEM (Memory) .................................................................... 12
SET (Settings) ...................................................................... 13
Reset .......................................................................................... 13
EN
MP120 Eng contents R3 7/23/04, 4:35 AM1
Page 3
EN
Upgrading Firmware ................................................................. 14
Formatting Your Player (Windows Only) ................................ 15
Copyright ................................................................................... 15
Safety and Care ......................................................................... 15
General ................................................................................ 16
Water .................................................................................... 16
Troubleshooting ........................................................................ 17
Hardware .............................................................................. 17
Software ............................................................................... 17
Caution ....................................................................................... 18
Technical Specifications .......................................................... 18
About Oregon Scientific ........................................................... 19
FCC Statement .......................................................................... 19
MP120 Eng contents R3 7/23/04, 4:35 AM2
Page 4
1
EN
INTRODUCTION
Congratulations on your selection of the Oregon ScientificTM MP120.
This rugged yet compact sized Digital MP3 Player combines various
playback and audio enhancing features into a water and shock resistant
design that you can conveniently take along wherever you go, even
up to 1 meter underwater. This full-featured player supports a variety
of audio formats and can store up to 512MB of song tracks and other
data that can easily be transferred to and from a computer using a
high speed USB connection.
FEATURES
•Waterproof / shock resistant casing
• IPX7 standard (waterproof to a depth of 1 meter for 30 minutes,
equivalent to JIS7 standard)
• ISO1413 shock resistant standard
• FM radio with option to save 30 preset FM channels
• Support for MP3 and WMA audio formats, ID3 Tagging
• Multi-format support for mass data storage
• Built-in 128MB, 256MB or 512MB Flash memory (refer to
indication on packing)
• Built-in rechargeable battery
•5 preset equalizer and 5 preset playback modes
• Firmware upgradeable
• 6-language menu and filename support
• USB 1.1 and USB 2.0 (Full and High Speed) connectivity
•Waterproof earphone
ACCESSORIES
• CD-ROM
•Waterproof earphones with 2 earbuds
• Carrying pouch
• USB cable
MP120 Eng R3 7/23/04, 4:46 AM1
Page 5
EN
2
1
4
5
6
7
2
3
PRODUCT OVERVIEW
FRONT
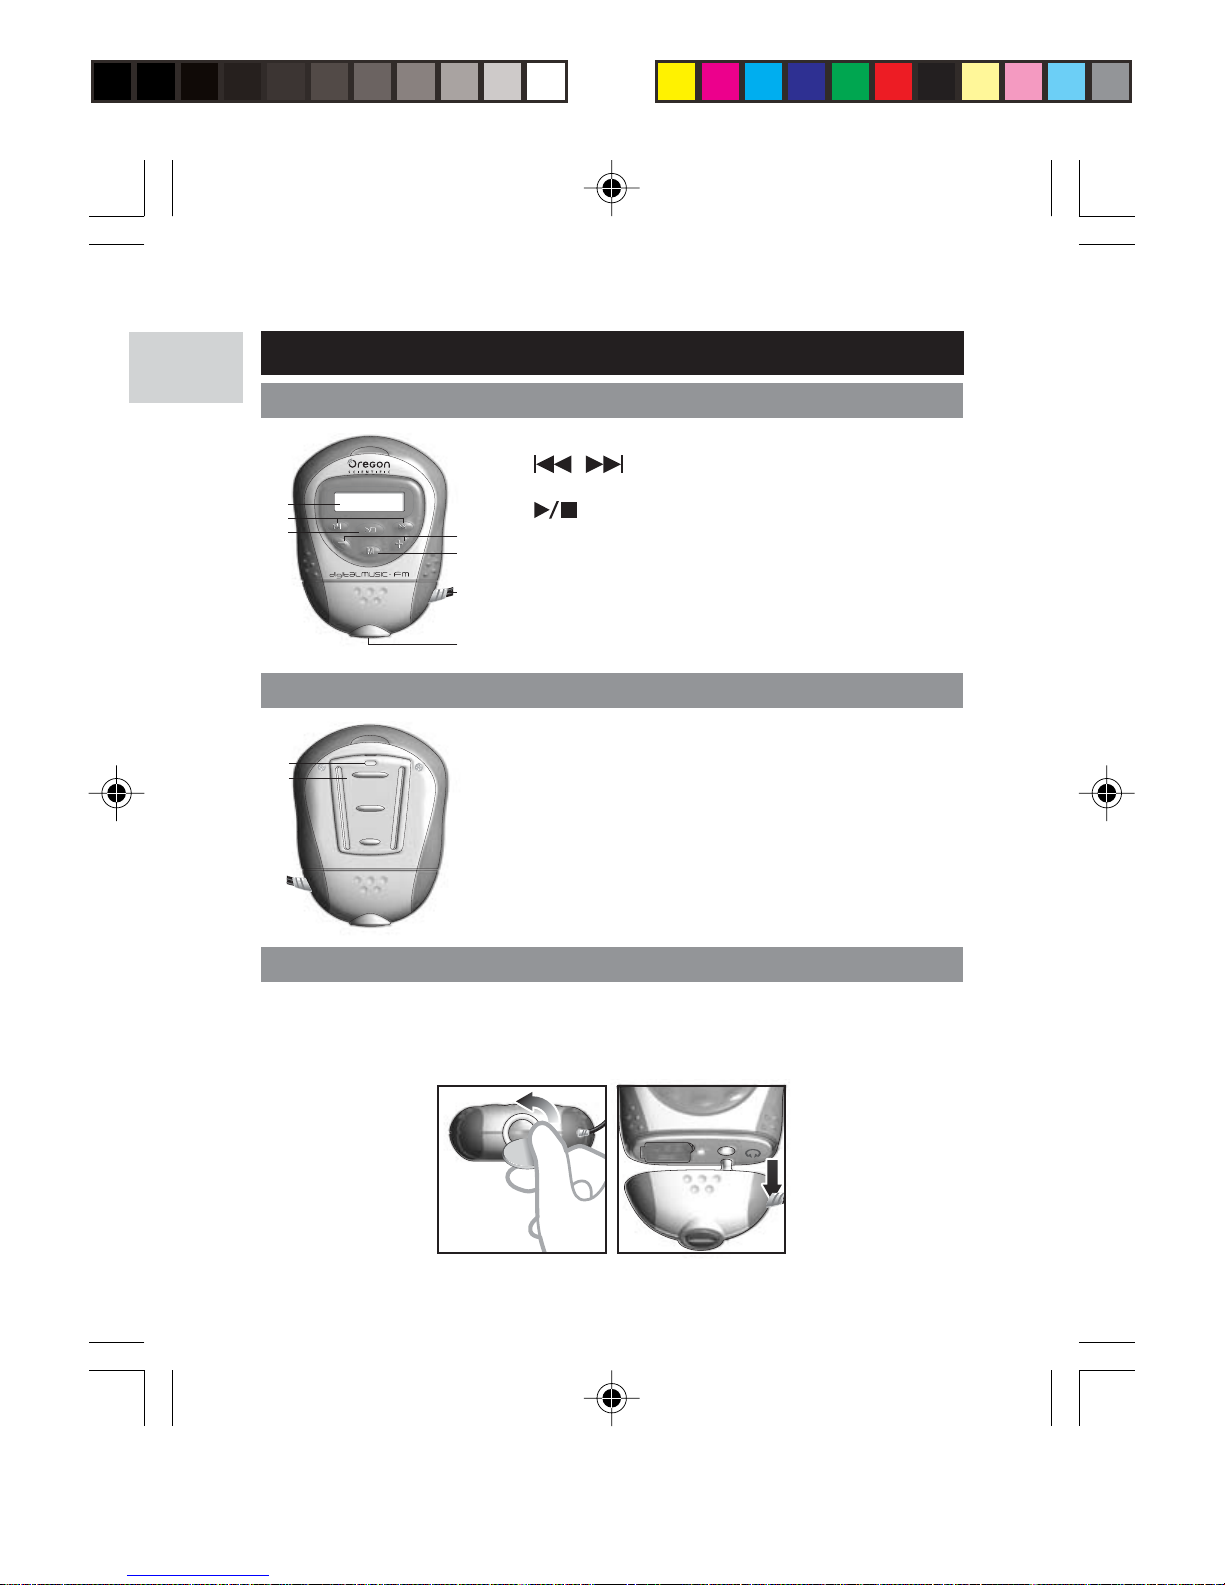
1. LCD display
2. /
: Review previous track / back to the previ
ous option and skip to the next track or next option
3.
: Start and pause playback / stop playback /
power on or off / exit menu settings
4. - / +: Decrease and increase playback volume
5. M: Enter menu settings / confirm selection
6. Waterproof earphones
7. Screw: Unscrew to access USB port, earphone jack,
reset button
BACK
1
2
1. Strap loop
2. Belt clip
ATTACHING / DETACHING THE EARPHONES
The player's waterproof earphones attached to the device allow you
listen to tracks while in water. If you need to access the USB connector,
reset the device, or choose to use separate earphones, detach as
shown.
MP120 Eng R3 7/23/04, 4:46 AM2
Page 6
3
EN
1. To detach the player's bottom casing from the main unit, use a
coin to turn the screw in a counterclockwise motion. Once the
screw is loosened, pull the bottom half out.
2. To reattach the bottom casing back onto the main unit, use a
coin to turn the screw in a clockwise motion until it is firmly secured
and locked into position to ensure that water will not seep into
the device.
NOTE: To listen to music more clearly, attach earphone covers
(earbuds) onto the earphones. If needed, you may use a pair of
scissors to cut the earbuds until they fit firmly into your ears.
NOTE: You can attach your own earphones to listen to music but
the player will not be water resistant. You may use normal earphones
(not included) when the water resistant capability is not needed.
NOTE: Never immerse the unit in water if the bottom protective
screw casing is removed. This can cause electrical shock and
damage the unit.
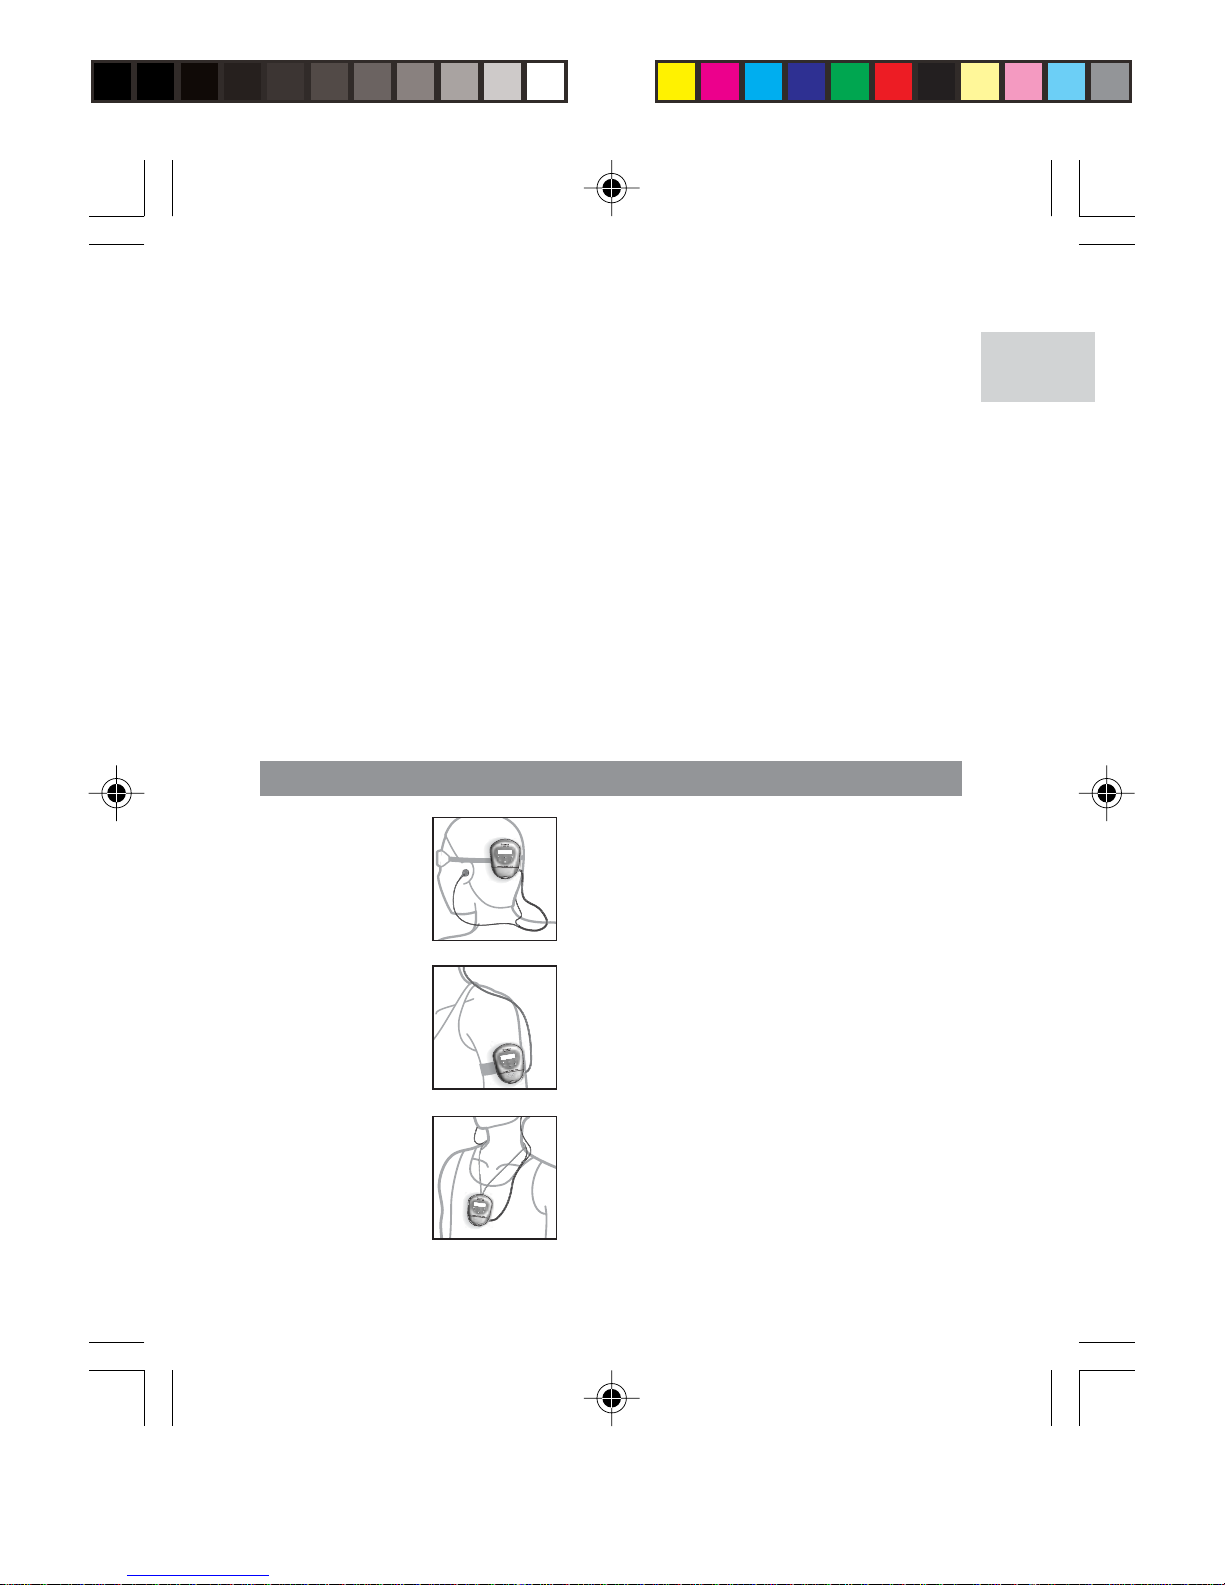
WAYS TO USE THE CLIP
Attach it to swimming
goggles (not included).
Attach it to the arm
belt (not included).
Not recommend for
use under water.
Wear it like a necklace
using a strap
(not included).
MP120 Eng R3 7/23/04, 4:46 AM3
Page 7
EN
4
GETTING STARTED
IMPORTANT: Please read the section on SAFETY AND CARE
carefully before using the player.
Check to make sure your computer meets the following minimum
system requirements:
• Intel® Pentium® 133MHz or faster
• CD-ROM drive
• USB 1.1 port or USB 2.0 support
• 10MB free hard disk space
• Microsoft® Windows® 98SE, Me, 2000, or XP
• Mac OS 9.0 or above
DRIVER SOFTWARE INSTALLATION
(WIN 98SE USERS ONLY)
WINDOWS 98SE
Installing the MP120 driver software will allow your computer to
recognize your MP3 player each time it is connected to the computer.
1. Insert the MP120 CD-ROM into your computer. If the installer
does not automatically begin, please refer to the troubleshooting
section for help.
2. Follow the onscreen instructions.
3. Restart your computer.
WINDOWS ME, 2000, XP
When you connect your MP3 player to your PC, it will appear as a
removable drive (i.e., Removable Disk (H:)).
MACINTOSH OS 9.0 OR ABOVE
When you connect your MP3 player to your Macintosh, it will appear
as a drive icon on the desktop (i.e., Untitled).
MP120 Eng R3 7/23/04, 4:46 AM4
Page 8
5
EN
CONNECTING THE PLAYER TO YOUR COMPUTER /
CHARGING THE BATTERY
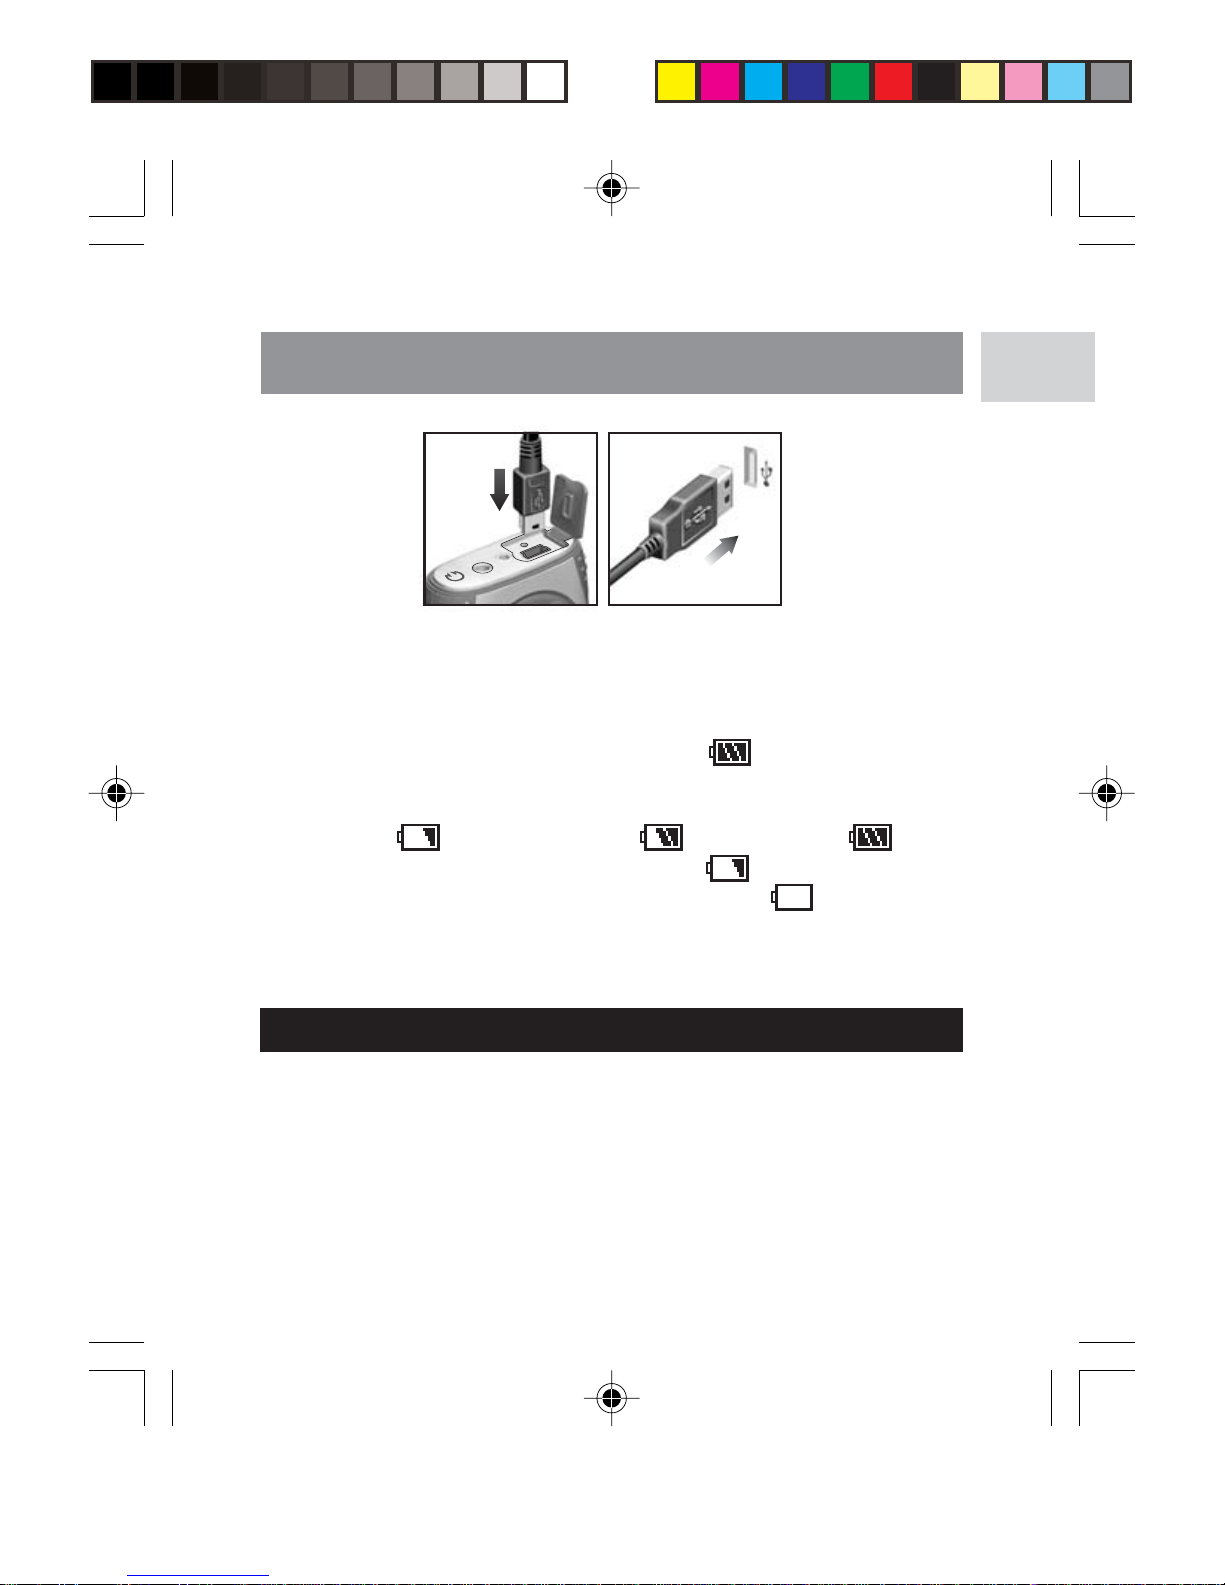
To connect the player to your computer using the supplied USB cable:
NOTE: Make sure you turn off the player before connecting to the PC.
Once connected the player's built-in battery will automatically begin
charging. "READY" will show on the LCD.
When the battery is fully charged after approximately 2-3 hours on a
continuous charge, the battery icon shows
. Please disconnect
the player when charging is finished unless you are transferring files.
The battery status indicators are as follows:
NOTE: When the low battery indicator shows
, recharge the battery
as soon as possible. When the battery icon shows , this indicates
the battery is about to run out of power within a few seconds minutes.
NOTE: Charging time may vary depending on the computer's USB
usage status.
FILE TRANSFER
After connecting your MP3 player to the computer, the computer will
detect and identify the device as a removable storage drive, allowing
you to drag and drop all forms of data files between your computer
and your player.
1. Double click the My Computer icon.
2. Double click the drive letter (i.e. Removable Disk (H:)) of your
player assigned by the computer.
PC USB
Low Medium Full
MP120 Eng R3 7/23/04, 4:46 AM5
Page 9
EN
6
3. Drag and drop the file(s) you wish to copy from your computer
onto your player.
NOTE: You will not be able to view or play any of the stored data
unless it is one of the supported MP3 (MPEG-1, Audio Layer 3)
or WMA (Windows Media Audio) audio formats.
CAUTION: To prevent data loss before unplugging your player from
the computer, wait at least 15 seconds to make sure the file transfer is
complete.
DISCONNECTING PLAYER FROM COMPUTER
WINDOWS 98SE
1. Double click the My Computer icon.
2. Right click the removable drive letter your player has been
assigned.
3. Click "Eject" from list before disconnecting.
WINDOWS ME, 2000, XP
1. Click the "Stop USB Mass Storage Device" icon on the
Windows taskbar at the bottom right of the monitor.
2. Click your player drive letter to stop the device before
disconnecting.
MACINTOSH OS 9.0 OR ABOVE
Drag and drop the "Untitled" icon from Mac desktop to the "Trash"
icon to eject the player before disconnecting.
POWER ON / OFF
POWER ON
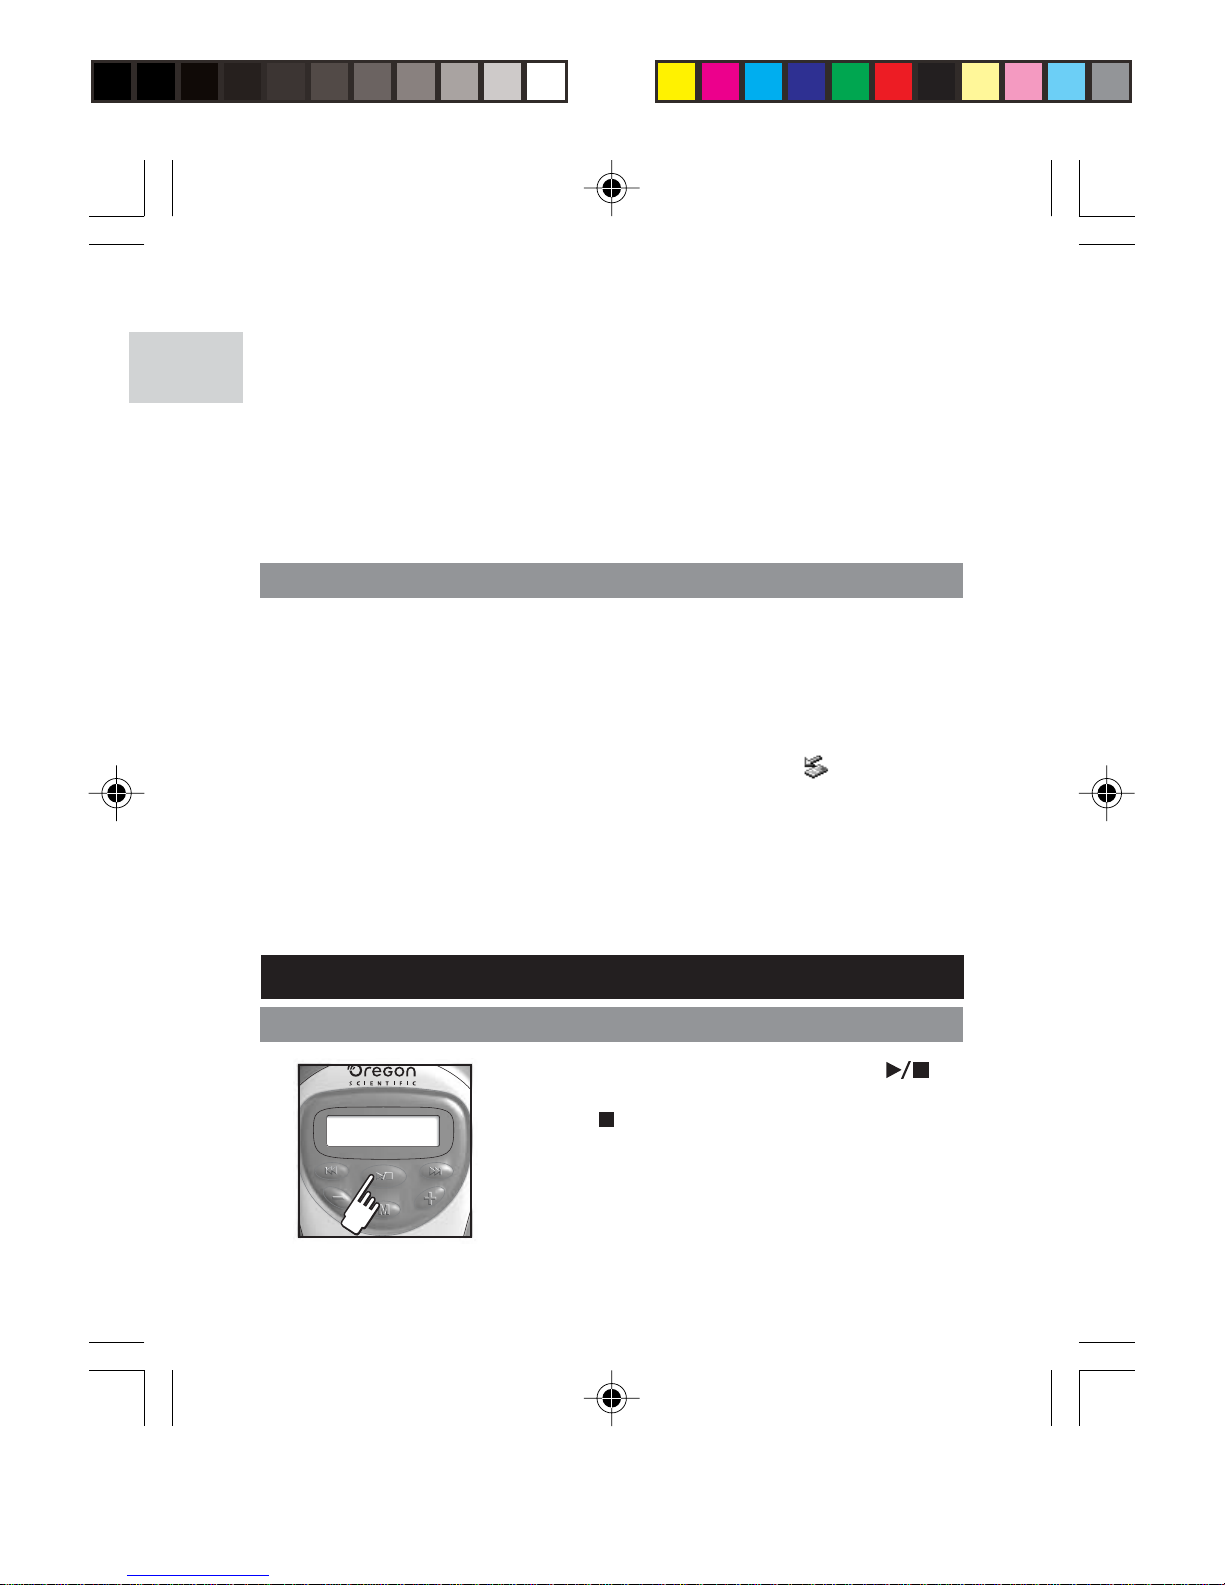
To turn the power on, press and hold
for
2 seconds. The unit will enter STOP status
with the
icon displayed.
NOTE: In STOP status, a power saving
feature will cause your MP3 player to
automatically shut off if no key is pressed for
1 minute.
MP120 Eng R3 7/23/04, 4:46 AM6
Page 10
7
EN
POWER OFF
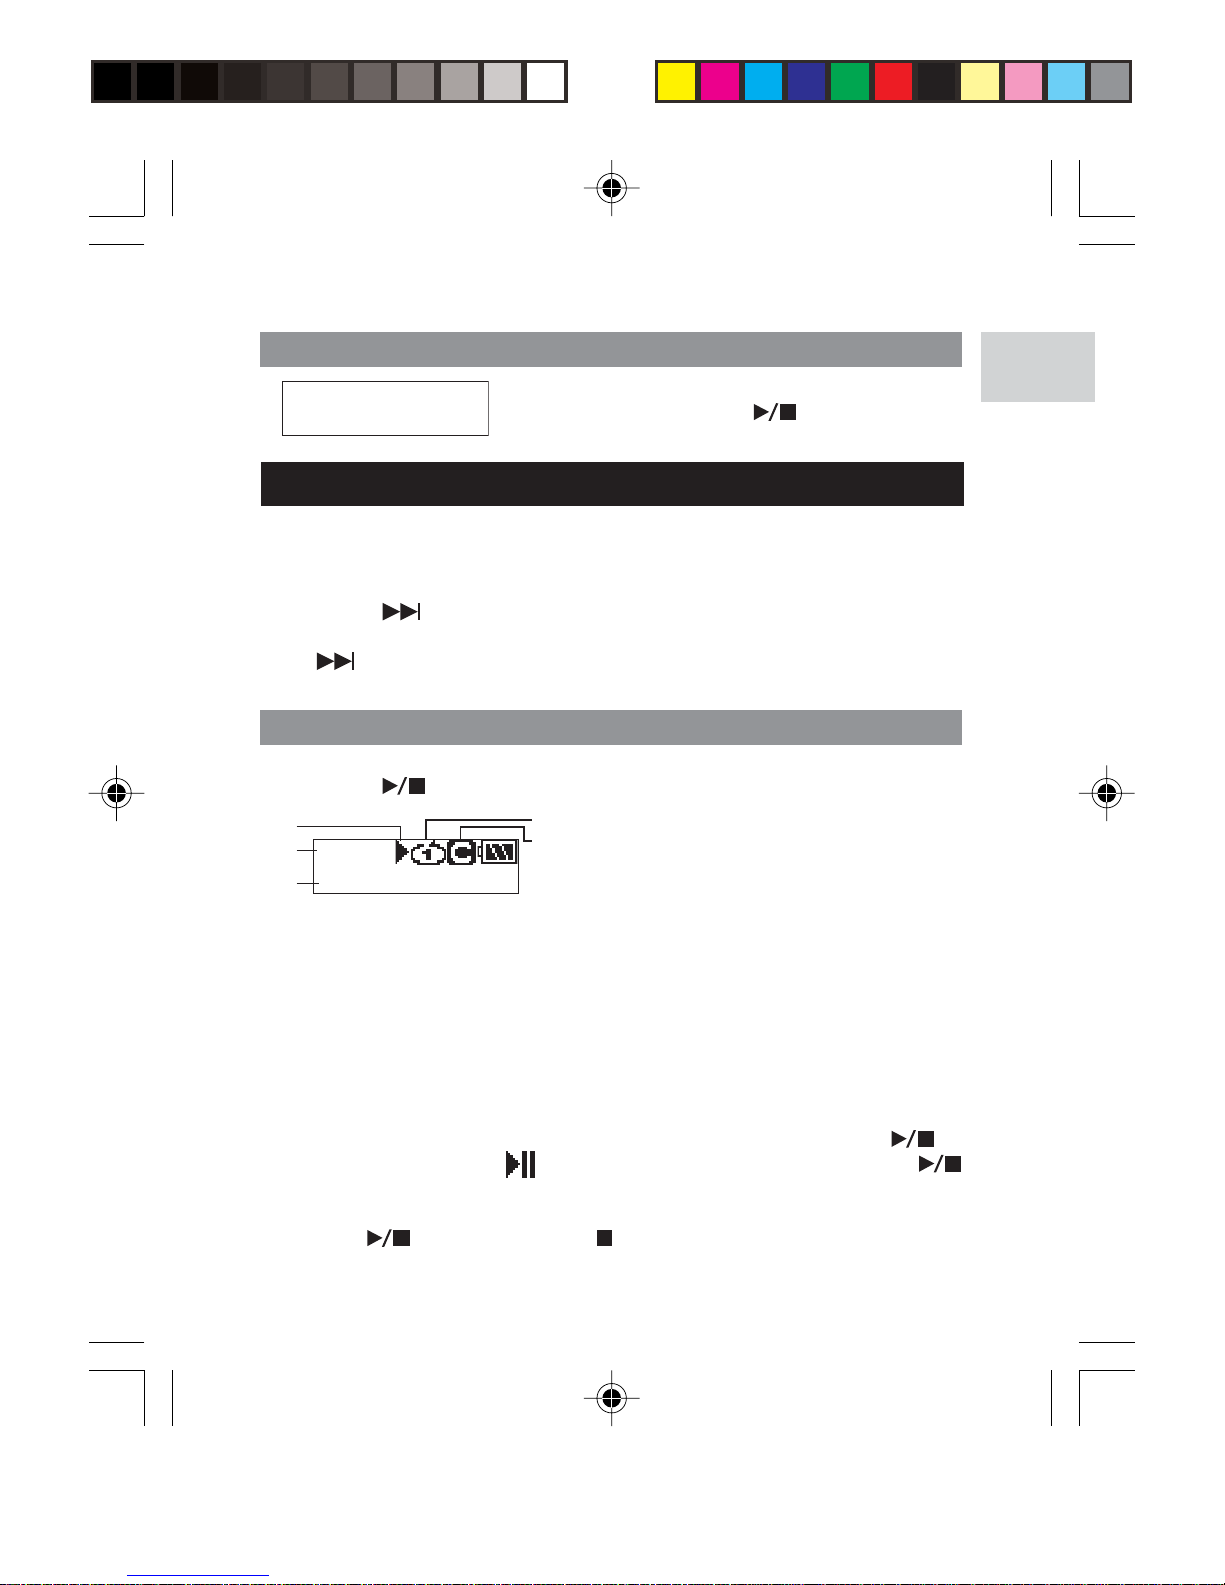
To turn the power off when the player is in STOP
status, press and hold
a few seconds
until after the "Good Bye" screen appears.
Good Bye
MODES
There are 2 main modes to choose from: MUSIC and FM. When the
player turns on it defaults to MUSIC mode (STOP status).
1. To access FM mode, press M for a few seconds.
2. Press
to scroll to "FM", then press M to select it.
3. Press and hold M to go back to the main menu screen and press
to scroll to "MUSIC". Then press M to select it to access
MUSIC mode.
MUSIC
PLAY
1. Press to start playback.
My Music.mp3
0:00:02
4
5
1
2
3
1. Playback icon
2. Track number / Time elapsed or
remaining
3. Track name
4. RPT icon
5. Equalizer icon
TIP: See section on MENU NAVIGATION for information about how to:
• Display elapsed or remaining track time by changing the "TIME"
setting.
• Change the speed a track name is displayed under the "SCROLL"
section option.
STOP / PAUSE
1. When the player is playing back a music track, press
to
pause the track,
will appear on the display. Press
again to continue playback.
2. When the MP3 player is in playback or pause mode, press and
hold to stop the song. will appear on the display.
MP120 Eng R3 7/23/04, 4:46 AM7
Page 11
EN
8
NOTE: When your player has stopped playing a track, you will not be
able to resume playback from the last track position.
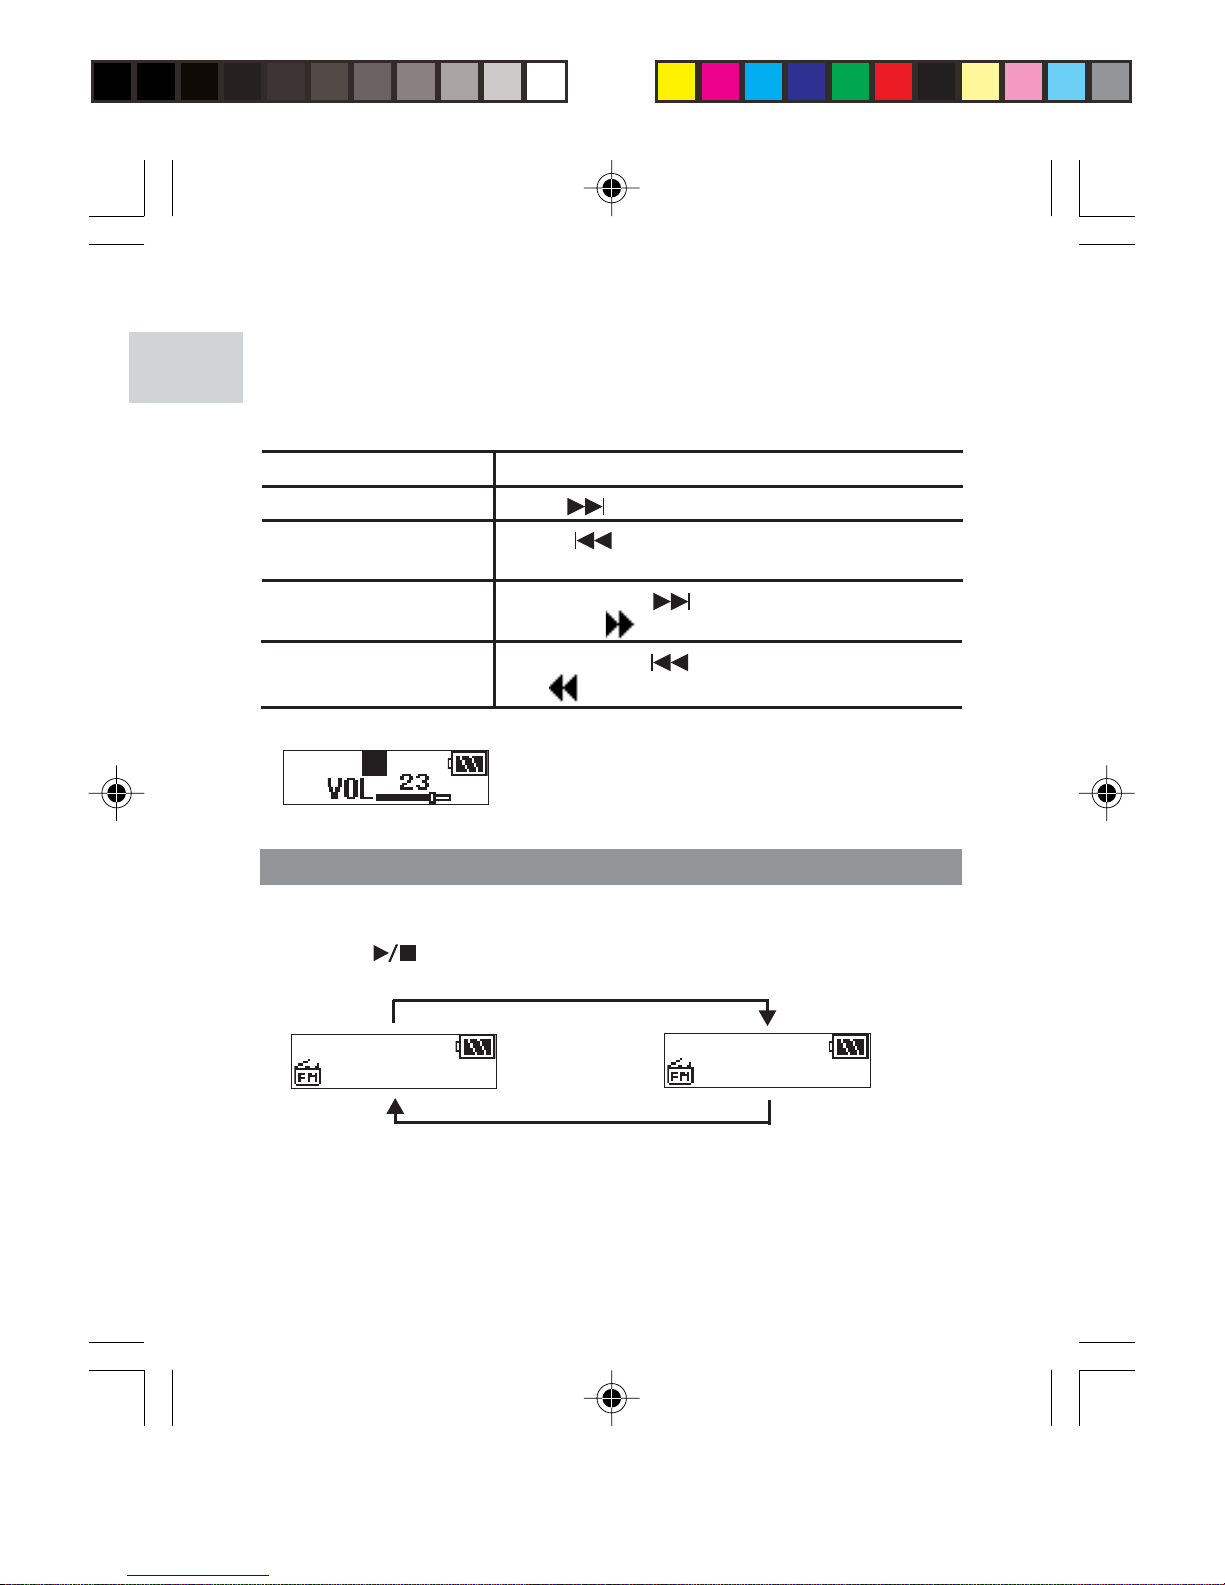
SKIP / FAST FORWARD / REWIND
You can skip tracks or fast forward / rewind the current track.
ACTION BUTTON PRESS
Skip forward Press
repeatedly to skip to the next track.
Skip backwards
Press
repeatedly to skip back to the
previous track.
Fast Forward
Press and hold
to fast-forward the current
track. The
icon will appear on the display.
Rewind
Press and hold
to rewind the current track.
The icon will appear on the display.
VOLUME
TIP: Press and hold a volume button to rapidly change levels.
• Press + to increase volume.
• Press - to decrease volume.
002
Press
to switch between "SCAN" and "PRESET" mode.
"SCAN" mode "PRESET" mode
RADIO (FM 87.5MHZ~108MHZ)
While in RADIO mode, you can listen to the radio channels you preset
into the device.
98.6MHz
Channel 01
98.6MHz
NOTE: During the first time you access FM mode, the player will do a
one-time auto-select of radio channels and save them in sequential
order. While auto saving channels, the buttons are locked.
NOTE: The MP120's FM radio function does not work under water
because it cannot receive signals while immersed in water.
MP120 Eng R3 7/23/04, 4:46 AM8
Page 12
9
EN
SCAN / PRESET CHANNELS
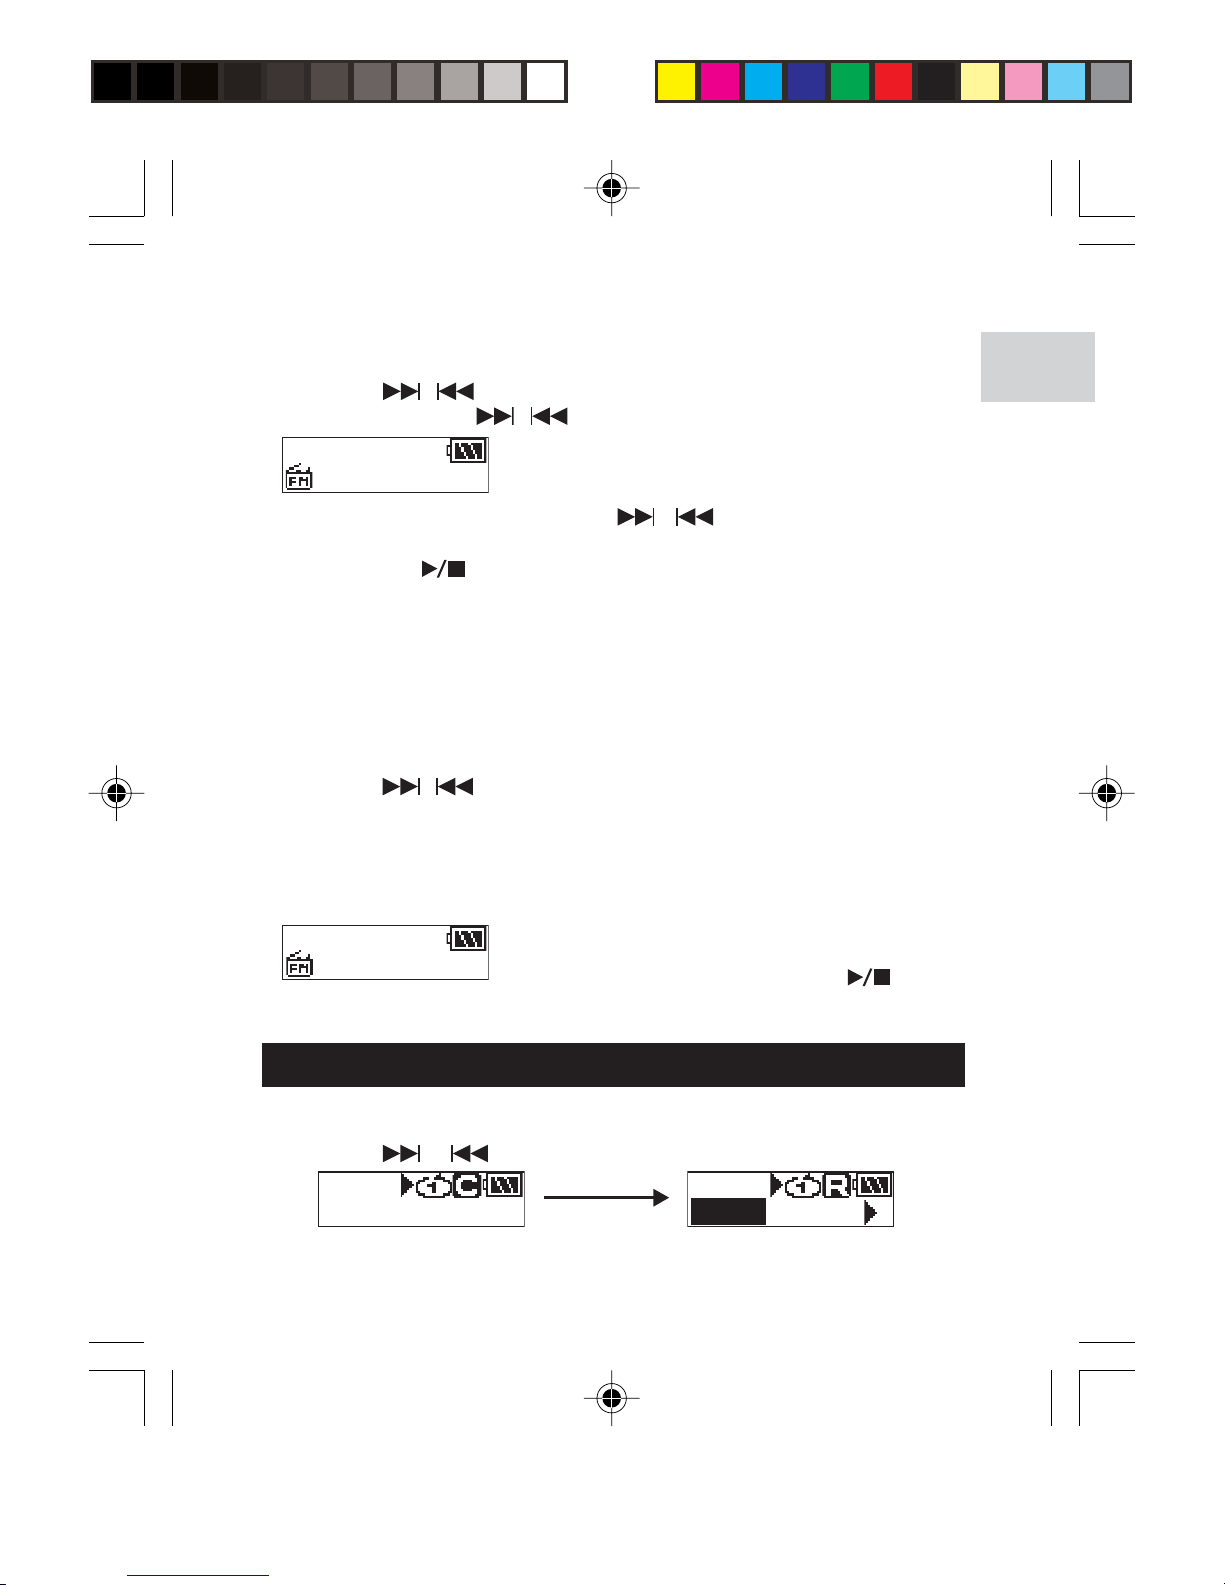
1. Enter "SCAN" status.
2. Press
/
repeatedly to search for a station manually, OR
press and hold
/
to search automatically.
5. OR press to exit current screen without saving.
6. To confirm a preset channel, press M. The channel number will
be displayed. Up to 30 channels can be preset / saved.
NOTE: FM scanning reception may vary in different areas. The
earphones function as a radio antenna and must be plugged into the
unit during frequency scanning.
LISTENING TO PRESET CHANNELS
1. Enter "PRESET" status.
2. Press
/
to move to the next or previous preset channels
(01 / 30~30 / 30).
DELETE PRESET CHANNELS
1. Enter "PRESET" status,
2. Press M once to ready a radio channel for deletion.
3. If a radio station is being searched and
stops to identify a channel to preset, press
M to save the channel.
4. Press
/
repeatedly to select a
desired channel (Ch 01 to 30).
Preset Ch01?
98.6MHz
3. Press [PREV] or [NEXT] to select a
desired channel number for delete.
4. Press M to confirm or press to exit
deletion. The radio frequency of deleted
channel would be reset to 87.5MHz.
Delete Ch01?
98.6MHz
MENU NAVIGATION
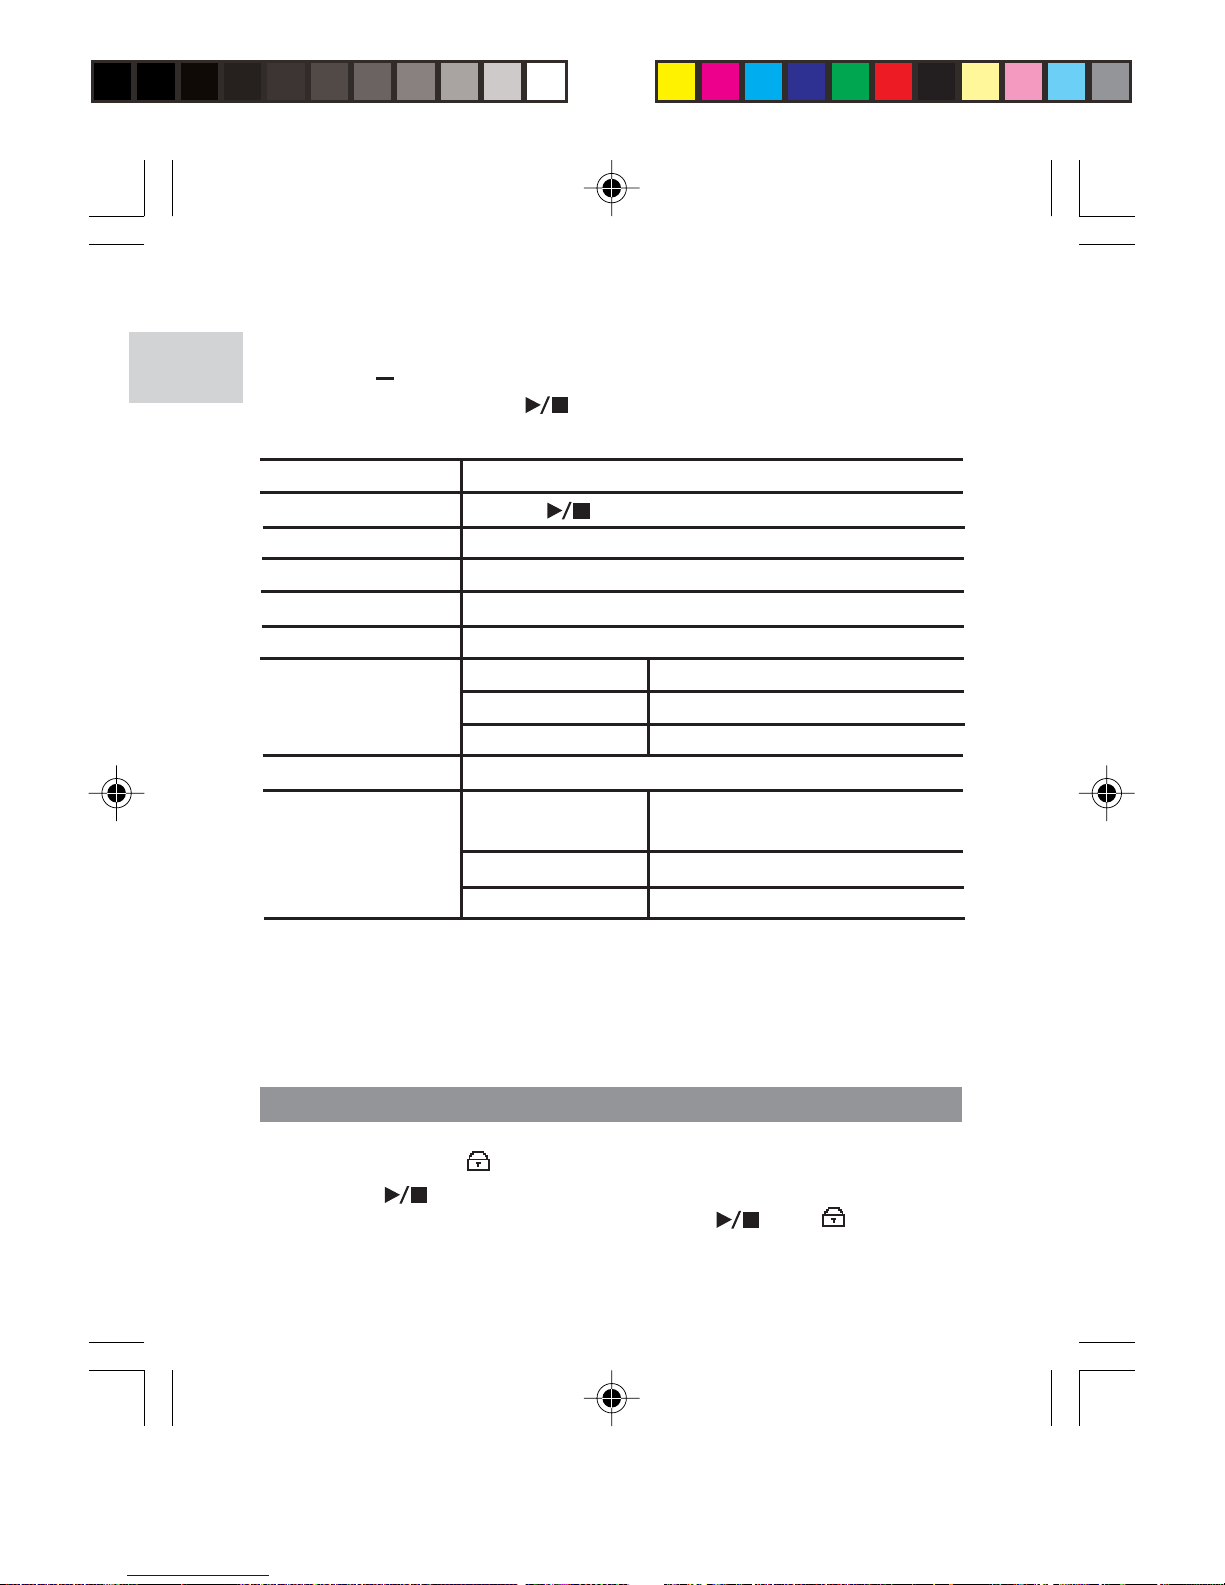
All settings are accessible through the main menu and sub-menus:
1. Press and hold M until the menu settings screen shows.
2. Press
or
to scroll through the list of menu options.
My Music.mp3
0:00:02
2.FM
0:00:15
1 HOLD
MP120 Eng R3 7/23/04, 4:46 AM9
Page 13
EN
10
MAIN MENU MENU OPTION / SUB-MENUS
Press to Hold On
MUSIC / FM
EQ
Normal, One, All, Ran, RPT Ran.
Normal, Rock, Jazz, Classical, Pop.
One / All
BACKLIT
DISP
LANG
English, French, German,
Italian, Spanish, Portuguese
TIME Elapse / Remain
TAG Off / On
CONTRAST
MEM
HOLD
RPT
SET
Off, 3s, 7s, 15s
1 to 10
Total, Free, Ver.
3. Press M to select the desired option.
TIP: Press
to revert back to screen that was last accessed without
saving an option or press
to revert back to current mode without
saving op.
DEL
SCROLL Off, 1, 2, 3, 4
NOTE: With the exception of HOLD and MUSIC from the main menu,
all other menu settings such as RPT, EQ, DEL, etc., are not accessible
while in FM mode.
NOTE: If no key is pressed for 5 seconds during menu navigation, the
player will return to the screen last accessed.
HOLD (BUTTON HOLD)
The button hold function locks your player to prevent any buttons from
being pressed. The indicator will show when buttons are locked.
1. Press activate.
2. To unlock all buttons, press M and then . The disappears
from the screen.
MP120 Eng R3 7/23/04, 4:46 AM10
Page 14
11
EN
RPT (REPEAT)
1. Press
/
to select the desired repeat option.
2. Press M to confirm selection.
All Play all tracks once repeatedly.
Ran
RPT Ran
All tracks are randomly selected and played
back once.
All tracks are randomly selected then played
back once repeatedly.
ICON RPT
PATTERN
Normal
DESCRIPTION
All tracks are played once from the first track
to the last track.
One
Repeat the current track. You can press
to
skip to the next track.
EQ (EQUALIZER)
1. Press
/
to select the desired EQ setting.
2. Press M to confirm selection.
ICON
EQ SETTING Normal Rock Jazz Classical POP
DEL (DELETING FILES)
1. Press
or
to select "One" or "All".
2. Press M to confirm a selection.
3. If you chose to delete 1 track, press
/
to choose a track
for deletion.
4. Press M to delete the file. "File deleted" and the free memory
will be displayed to confirm that the file has been erased.
MUSIC / FM
See section on MODES for more information on "MUSIC" and "FM".
MP120 Eng R3 7/23/04, 4:46 AM11
Page 15
EN
12
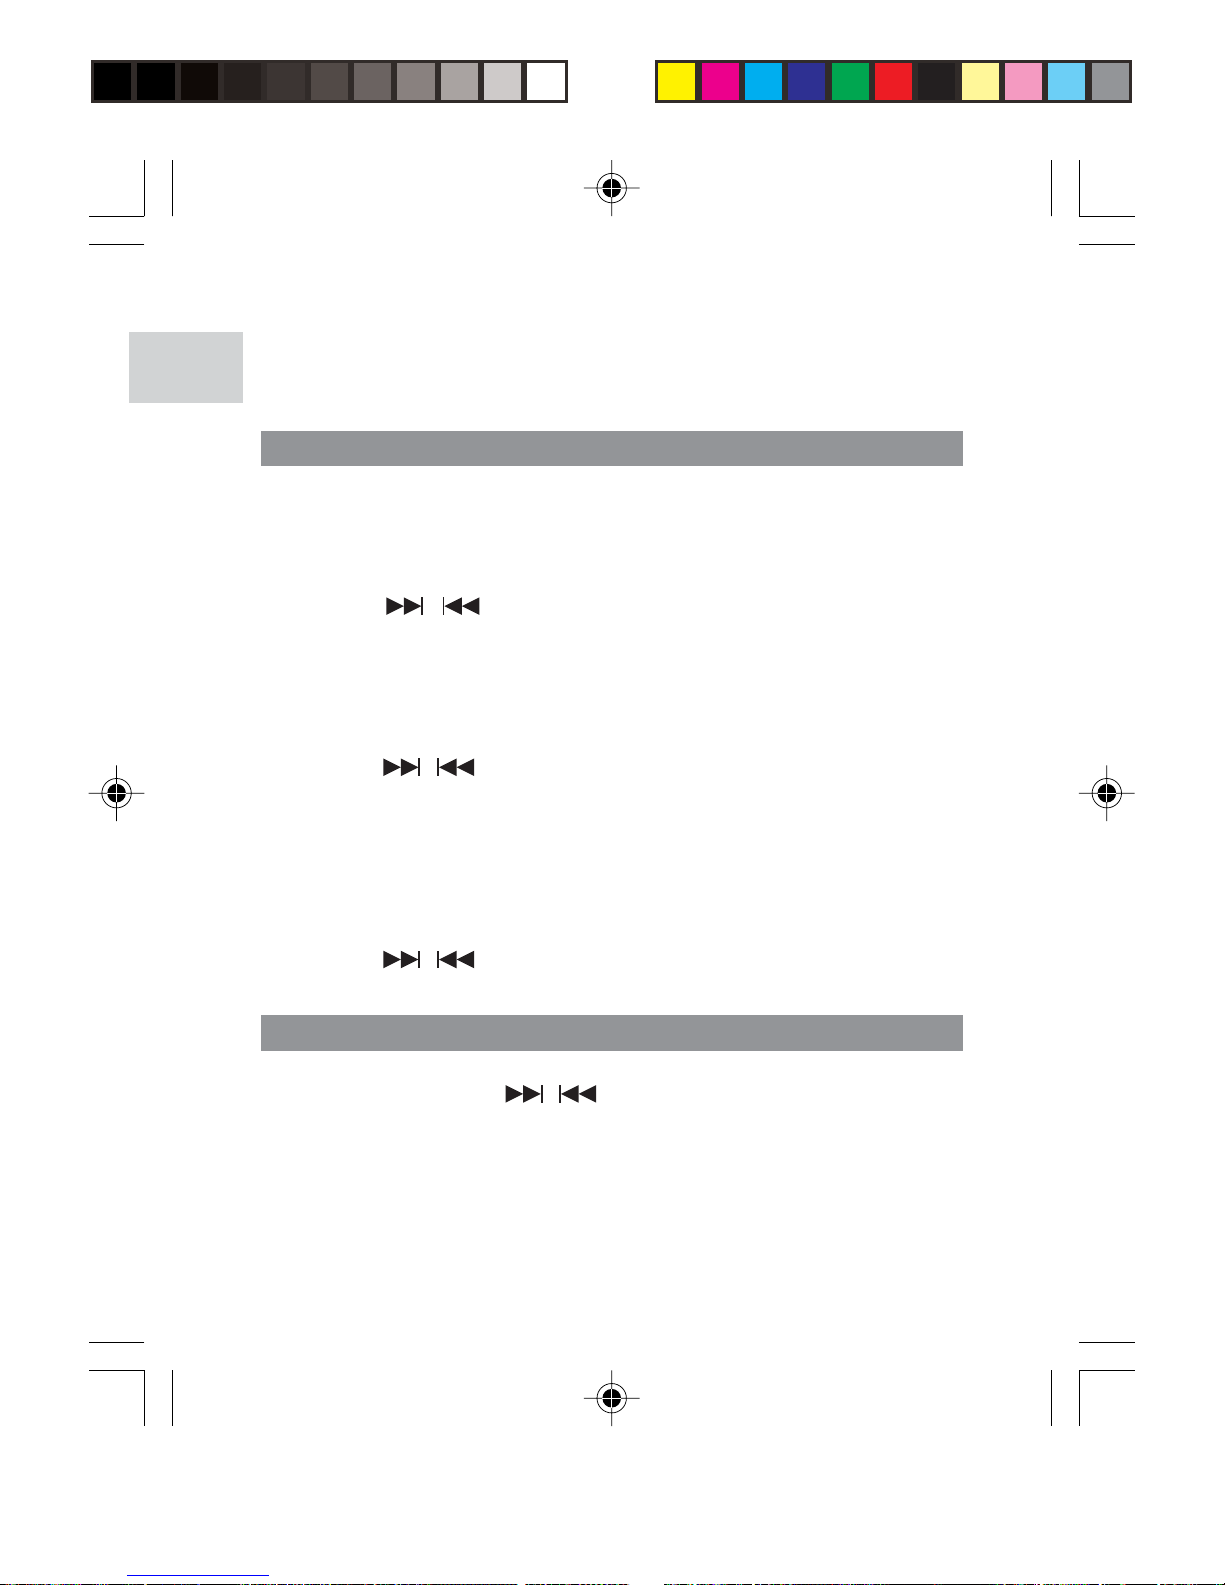
DISP (DISPLAY)
BACKLIT
With the backlight feature activated, the display will light up each time
a button is pressed. You can also set how long you want the backlight
to stay on for.
1. Press
/
to choose between "Off, 3s, 7s, 15s" second
durations.
2. Press M to confirm a selection.
CONTRAST
To increase contrast settings so you can read the display more clearly
in bright lighting conditions:
1. Press
/
to choose contrast settings between 00-10.
2. Press M to confirm your selection.
NOTE: High contrast settings may lower battery life.
SCROLL
If you have track information that is too long to fit onto the display, it
will scroll through so you can read text that is left off the screen.
1. Press
/
to scroll between "Off, 1, 2, 3, 4" speed levels.
2. Press M to confirm your selection.
MEM (MEMORY)
To check the status of your player's total or available memory, or
firmware version, press
/
to scroll between "Total" and "Free"
memory, and "Ver" (firmware version).
NOTE: The memory status display takes both audio and multi-file
formats, and some system files into account when displaying the
memory status.
5. If you chose to delete all tracks, press M to confirm. " File deleted"
will be displayed to confirm the deletion.
NOTE: Once files are deleted they cannot be retrieved.
MP120 Eng R3 7/23/04, 4:46 AM12
Page 16
13
EN
SET (SETTINGS)
LANG (LANGUAGE)
To set the display menu information in English, French, German, Italian,
Spanish, or Portuguese:
1. Press
/
repeatedly to scroll through the different language
options.
2. Press M to select and confirm selection.
TIME
To switch between "Elapse" or "Remain" play time display settings:
1. Press
/
to choose between "Elapse" or "Remain" time
display settings.
2. Press M to select and confirm selection.
TAG (TAG INFORMATION)
Your player supports ID3v1 and ID3v2 Tag information. This format
allows the player to represent track information such as identifying
track title and artist name.
1. Press
/
to scroll to "Off or "On".
2. Press M to activate.
NOTE: If the track contains both ID3v1 and ID3v2, only the ID3v2
information will be displayed during playback.
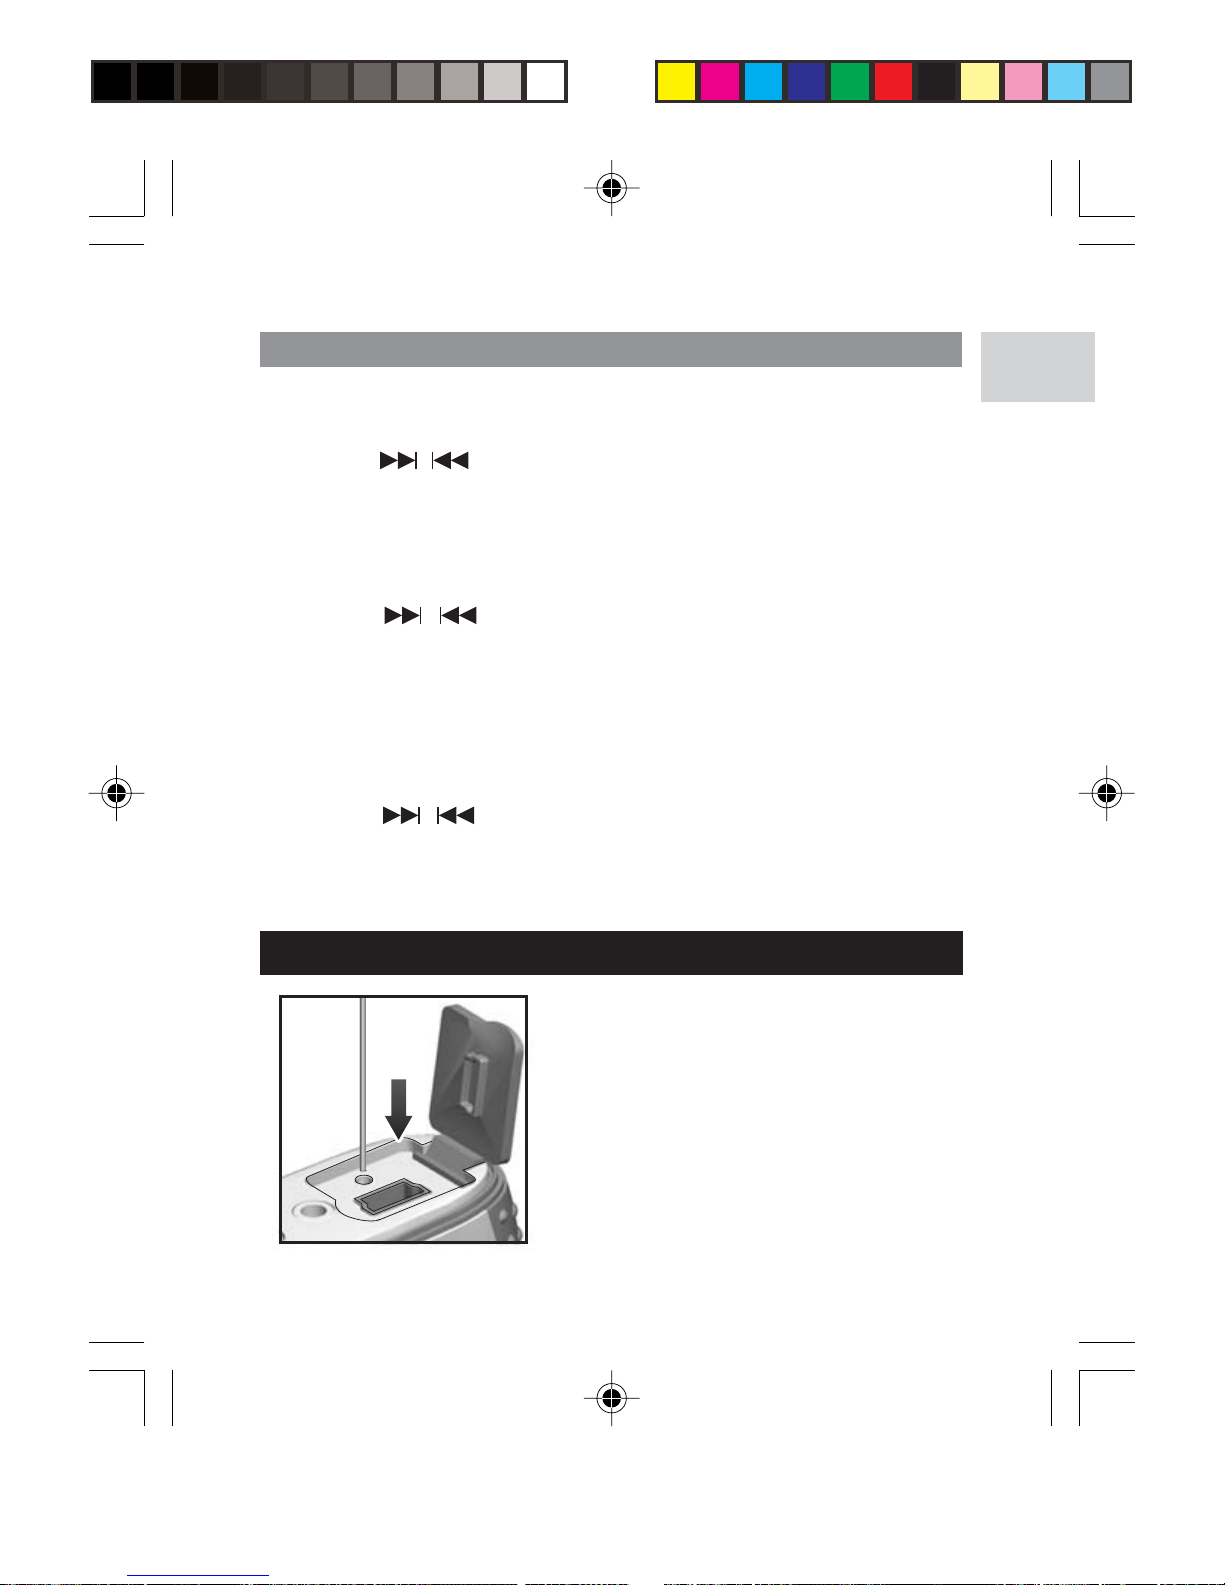
RESET
To reset the player, When the power is
on, use a blunt narrow-tip stylus or
ballpoint pen to press and hold RESET
until the power turns off. Turn the power
on to begin operation again.
NOTE: Resetting the unit will not erase
stored data, but all settings will return to
default values.
MP120 Eng R3 7/23/04, 4:46 AM13
Page 17
EN
14
UPGRADING FIRMWARE (WINDOWS USERS ONLY)
Upgrading your MP120 MP3 player with the latest firmware ensures
the device provides optimal playback performance:
1. Go to the Oregon Scientific website (www.oregonscientific.com)
to download the MP120 firmware update (.zip file).
2. Unzip the file into the directory recommended by Windows and install
the software by double-clicking "setup.exe".
NOTE: If this is not the first time you are performing a firmware upgrade,
please uninstall the old version before installing the new firmware update.
3. After the firmware has been installed, restart your computer.
4. After the PC has finished booting up, connect your MP3 player
to the PC via the USB cable.
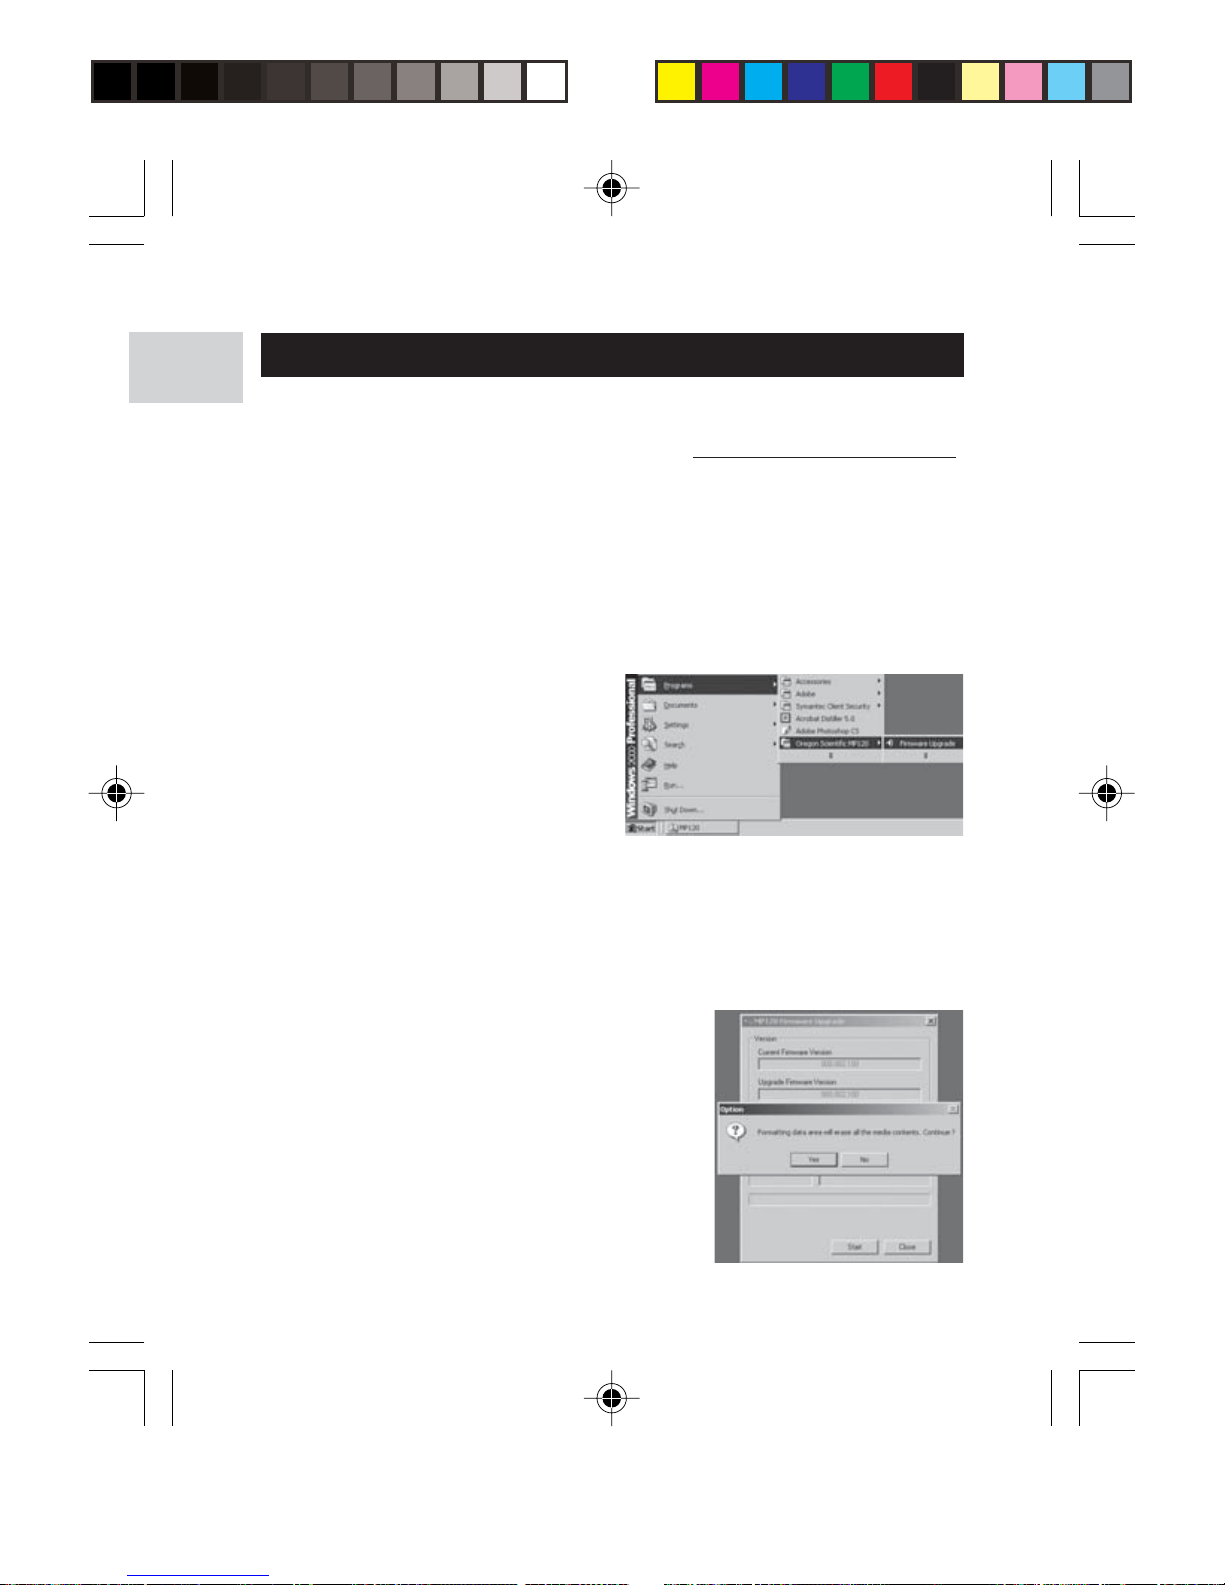
5. Run the software by going
to Start>Programs>
Oregon Scientific
MP120>Firmware
Upgrade.
8. OR, you are given the option to format
your MP3 player before the firmware
upgrade. Check the Format Data Area
box and then click the Start button. All
data stored in the MP3 player is erased
and the firmware upgrade process
begins.
6. The current and updated firmware version is displayed in a window.
Click the Start button to begin the firmware upgrade process.
7. If a window pops up with the prompt, "Application has detected
that firmware download will result in formatting the data area.
Formatting data area will erase the media contents," cancel the
upgrade process and back up the data stored on player onto
your computer first. Then restart the process again.
MP120 Eng R3 7/23/04, 4:46 AM14
Page 18
15
EN
FORMATTING YOUR PLAYER (WINDOWS ONLY)
After formatting your player all stored information will be lost and your
settings will return to default values.
1. In Windows Explorer, select the drive letter of your player
assigned by the computer.
2. Ensure you have selected the right drive (i.e. Removable Disk).
Right-click your mouse button and select the FORMAT option.
3. If there is an option to select File System, select the FAT format
option.
NOTE: The formatting player option is not supported on Macintosh
systems.
COPYRIGHT
Voices or sounds recorded cannot be used in ways that infringe
copyright laws. Note that some restrictions apply to the recording of
performances, entertainments and exhibits, even when intended purely
for personal use.
Users are also asked to note that the transfer of memory containing
data or MP3 files protected under copyright laws are only permissible
within the restrictions imposed.
9. Click the Close button to close the software once the process is
completed.
10. Unplug the MP3 player from the computer.
NOTE: The firmware upgrade through the Macintosh computer is not
supported.
SAFETY AND CARE
This product is designed to give you years of service if handled properly.
Observe the following guidelines:
MP120 Eng R3 7/23/04, 4:46 AM15
Page 19
EN
16
GENERAL
• Clean the unit with a damp cloth and fresh, clean water after
each use.
•Avoid dropping the unit or placing it in a high-traffic location.
• Do not subject the main unit to extreme force, shock, or
fluctuations in humidity.
• Do not tamper with the internal components.
• Do not scratch the LCD display.
• Do not make any changes or modifications to this product.
• Unauthorized changes may void your right to use the product.
• The technical specifications for this product and the contents of
the user guide are subject to change without notice.
• Images not drawn to scale.
• Keep your player away from any strong magnetic fields. Exposure
to magnetic fields may cause the memory to get erased or even
damaged.
• Do not use excessive force when handling the player.
• Keep your player in a dry, well-ventilated place to prevent it from
molding.
• Do not use the device and turn up the volume too high where
hearing will be impaired, such as driving, walking across a street,
or cycling.
WATER
• After each use, briefly rinse off the entire unit with fresh, clean water.
Shake out any water blocking the earphone's earbud opening.
• Never immerse the unit in water if the bottom protective screw
casing is removed. This can cause electrical shock and damage
the unit.
• Never use an electric dryer to dry the earphones or MP3 player.
• Do not use your MP3 player while skin-, scuba- or springboard
diving.
• Do not try and force water into the audio tubing of the earphone
headset.
• Do not use your MP3 player below 1 meter and for more than
30 minutes at a time.
MP120 Eng R3 7/23/04, 4:46 AM16
Page 20
17
EN
TROUBLESHOOTING
HARDWARE
Music skips tracks.
The music file may be corrupt or an unsupported format. First check
to make sure it is a supported format. If the format is correct, delete
the file and transfer the music from your PC to player again.
The player will not start or shuts off soon after it starts.
Check the battery level and make sure it is fully charged.
The buttons do not work.
The button hold feature may be on. See section "Button Hold" for
more information.
The player is not functioning normally.
The player may need to be reset. See section "Reset" for more
information.
No sound is coming out of the headphones.
Check to make sure they are plugged in correctly and the volume is
turned up. Check the earphone's earbud openings to ensure that water,
sand or other substances are not blocking them.
Your computer does not locate your player.
Check to make sure the USB cable is connected properly. If you are
using Win98, make sure you have installed the driver software.
Cannot store any more files on the player.
The memory may be full. Delete files to make some room.
SOFTWARE
The MP120 Software does not automatically begin when you insert
the CD. You may need to start the installation process manually.
1. Double click the "My Computer" icon on the Windows desktop.
2. Double Click the drive that contains the CD-ROM.
3. Follow the on screen instructions to complete the installation
process.
NOTE: Do not attach the player to your PC until after the software has
been installed.
MP120 Eng R3 7/23/04, 4:46 AM17
Page 21
EN
18
CAUTION
In case of electrostatic discharge, the product may not function properly
and will require a manual reset. After resetting the unit, data stored
will remain intact; if a message was being recorded, it will be lost.
TECHNICAL SPECIFICATIONS
Immersion Resistance: IPX7 / JIS7 standard
(Water will not enter the
enclosure when unit is immersed
in a container of standard
temperature still tap water to a
depth of 1 meter for
approximately 30 minutes)
Shock Resistance: ISO 1413 standard
Built-in Flash Memory: 128MB / 256MB / 512MB
(refer to indication on packing)
Maximum Number of Tracks: 256
Dimensions: 68.5mm (L) x 52mm (W) x 20mm (T)
Weight: 55g
LCD Dimensions: 24mm (L) x 7mm (W)
FM Radio Frequency: 87.5~108MHz
Radio Preset Channels: 30
Volume Level: 0-30
Earphone Out: 5mW max / channel (32ohm)
Frequency Range: 20Hz~20000Hz
Signal to Noise Ratio: > 90dB (earphones)
Language Display: Six-language filename and menu
display (English, French, German,
Italian, Spanish, Portuguese)
Battery: Built-in lithium polymer rechargeable
battery (3.7V, 230mAH)
Battery Life*: 10 hours of continuous playback
time
MP3 to PC Connection: USB 1.1 or USB 2.0
(Full or High Speed)
MP120 Eng R3 7/23/04, 4:46 AM18
Page 22
19
EN
ABOUT OREGON SCIENTIFIC
Visit our website (www.oregonscientific.com) to learn more about
Oregon Scientific products such as digital cameras; MP3 players;
children's electronic learning products and games; projection clocks;
health and fitness gear; weather stations; and digital and conference
phones. The website also includes contact information for our customer
care department in case you need to reach us, as well as frequently
asked questions and customer downloads.
We hope you will find all the information you need on our website, however
if you'd like to contact the Oregon Scientific Customer Care department
directly, please visit www2.oregonscientific.com/service/support or call
949-608-2848 in the US. For international enquiries, please visit
www2.oregonscientific.com/about/international/default.asp.
Supported Playback Formats: MP3 (up to 320kbps)
WMA (up to 192kbps)
Player Firmware: Upgradeable via
www.oregonscientific.com
*Time under normal operating conditions (normal room temperature,
MP3 128kbps, volume level 20). Various factors can affect battery life,
including backlight, volume, contrast setting, and fast-forward /
rewinding and shuffling of tracks.
FCC STATEMENT
This device complies with Part 15 of the FCC Rules. Operation is
subject to the following two conditions:(1) This device may not cause
harmful interference, and (2) This device must accept any interference
received, including interference that may cause undesired operation.
This equipment has been tested and found to comply with the limits
for a Class B digital device, pursuant to Part 15 of the FCC Rules.
These limits are designed to provide reasonable protection against
harmful interference in a residential installation. This equipment
generates, uses and can radiate radio frequency energy and, if not
installed and used in accordance with the instructions, may cause
harmful interference to radio communications.
MP120 Eng R3 7/23/04, 4:46 AM19
Page 23
EN
20
Tested To Comply
With FCC Standards
FOR HOME OR OFFICE USE
Oregon Scientific
MP 120
However, there is no guarantee that interference will not occur in a
particular installation. If this equipment does cause harmful interference
to radio or television reception, which can be determined by turning
the equipment off and on, the user is encouraged to try to correct the
interference by one or more of the following measures:
Reorient or relocate the receiving antenna.
Increase the separation between the equipment and receiver.
Connect the equipment into an outlet on a circuit different from that to
which the receiver is connected.
Consult the dealer or an experienced radio / TV technician for help.
CAUTION: Modification-The FCC requires the user to be notified that
any changes or modifications made to this device that are not expressly
approved by Oregon Scientific, Inc. may void the user 's authority to
operate the equipment.
Interface cable-Use the shielded cable sold or provided by
OregonScientific, Inc. for your equipment. Using other interface
cable may exceed the limits of Class B Part 15 of the FCC rules.
Legal Company Name: Oregon Scientific, Inc.
Address: 19861 SW 95th Place, Tualatin, Oregon 97062, USA
Phone, Fax: (1) 800-853-8883, (1) 503-684-8883
MP120 Eng R3 7/23/04, 4:46 AM20
Page 24
© 2004 Oregon Scientific. All rights reserved.
086-003398-022
MP120 Eng Back R3 7/23/04, 4:35 AM1
 Loading...