

Page 1
EN
1
CONTENTS
Introduction ............................................................... 2
Packaging Contents
................................................. 2
Communications set ............................................ 2
Wind sensor ......................................................... 2
Temperature & humidity sensor ........................... 3
Rain gauge .......................................................... 3
Accessories - Sensors
............................................. 3
Overview .................................................................... 4
Internet-connected hub ........................................ 4
Weather sensor receiver ...................................... 4
Wind sensor ......................................................... 4
Outdoor temperature / humidity sensor ............... 5
Rain gauge .......................................................... 5
Getting Started
.......................................................... 5
Set up remote wind sensor .................................. 5
Set up remote temperature / humidity sensor ...... 6
Set up rain gauge ................................................ 6
Set up weather sensor receiver ........................... 6
Internet-connected hub installation ...................... 7
Download application ........................................... 7
Register a weather station ................................... 7
Verify Connection
..................................................... 8
Mounting / Placing of sensors
................................ 8
Wind sensor ......................................................... 8
Temperature & humidity sensor ........................... 9
Rain gauge .......................................................... 9
View Readings on PC
............................................. 10
Reset ........................................................................ 10
Specications .........................................................10
Weather sensor receiver .................................... 10
Indoor barometer ............................................... 10
Remote wind sensor unit ................................... 10
Outdoor temperature & humidity unit
Relativetemperature .......................................... 10
Relative humidity ............................................... 11
RF transmission ................................................. 11
Remote rain gauge ............................................ 11
Precautions ............................................................. 11
About Oregon Scientic ........................................ 12
EU-Declaration of Conformity
...............................12
FCC Statement
........................................................ 12
Anywhere Weather Kit
Model: LW301/LW301U/LW301A
Anywhere Weather Kit Basic
Model: LW302/LW302U/LW302A
USER MANUAL
LW301_UM_EN_R8.indd 1 2012/8/14 3:05:30 PM
Page 2
EN
2
INTRODUCTION
LW301/302
Thank you for selecting the Oregon Scientic™ Anywhere
Weather Kit (LW301) or Kit Basic (LW302). Either one can
collect weather data via a weather sensor receiver from
different accessorial sensors, and then send the data
back to Oregon Scientic Internet server via Internet-
connected hub through Internet. It also provides a solution
for the user to have a weather station connection that can
be remote accessed from their mobile device, such as
smartphone or tablet PC.
NOTE Please keep this manual handy as you use
your new product. It contains practical step-by-step
instructions, as well as technical specifications and
warnings you should know about.
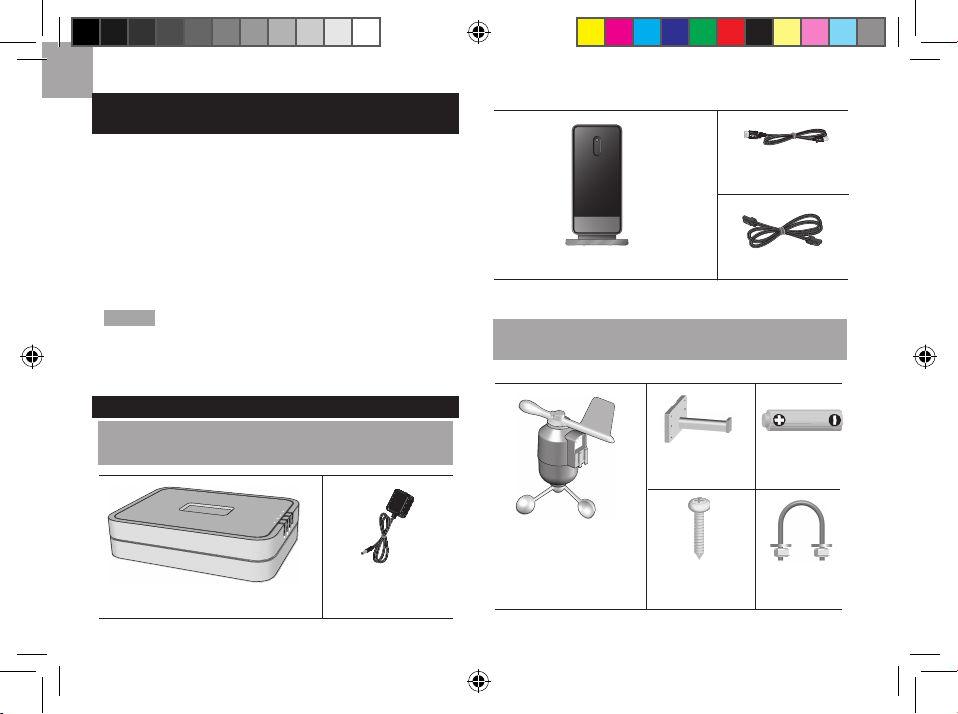
PACKAGING CONTENTS
COMMUNICATIONS SET
LW301/302
WIND SENSOR
LW301
1 x Internet-connected hub
1 x Weather sensor receiver
1 x Power adapter
(May vary in
different countries)
1 x receiver
connection cable
1 x LAN cable
1 x sensor
connector
2 x AA UM-3
1.5V batteries
4 x Screws
(Type A)
1 x Round
U- bolt
1 x Wind Sensor
(WGR800)
(1 x Wind Vane above
and
1 x Anemometer below)
LW301_UM_EN_R8.indd 2 2012/8/14 3:05:44 PM
Page 3
EN
3
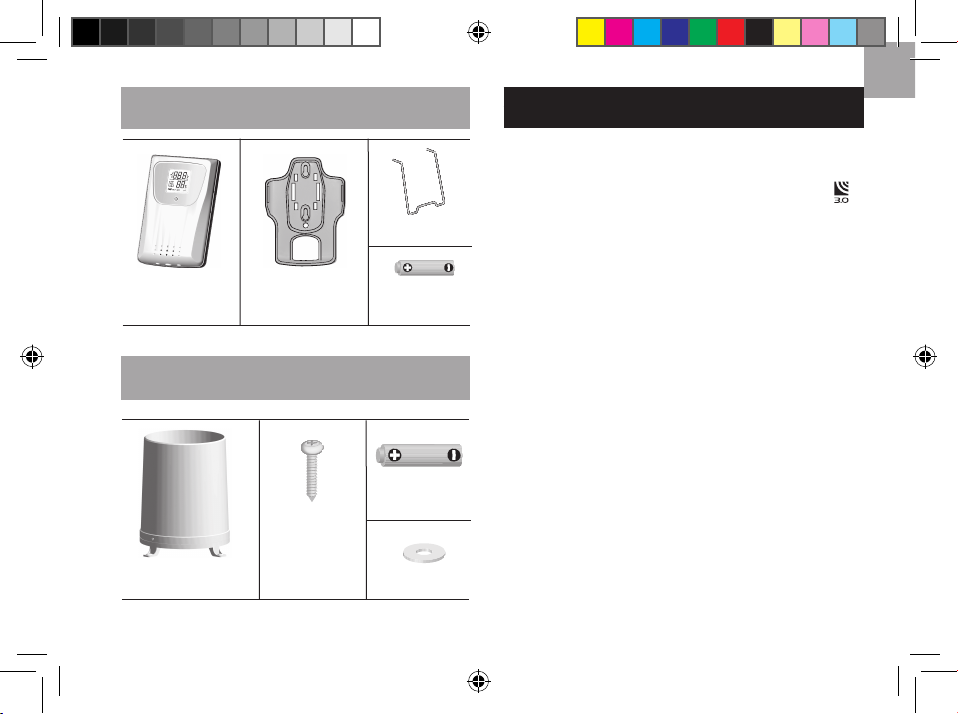
TEMPERATURE & HUMIDITY SENSOR
LW301/302
RAIN GAUGE
LW301
ACCESSORIES – SENSORS
LW301/302
You can expand the system by adding up to 8 sensors
at any one time to capture outdoor temperature and
relative humidity in various locations.
Optional wireless remote sensors with this logo
such as those listed below are also compatible with the
weather sensor receiver. For more information of these
sensors, please contact your local retailer.*
• THGN801 (Wireless Temp. & Humidity Sensor)
• THGR/THGN800 (Thermometer & Humidity Sensor
with 3 Channels
• THGR/THGN810 (Thermometer & Humidity Sensor
with 10 Channels
• UVN800 (Ultra-violet Index Sensor)
• PCR800 (Wireless Rain Gauge)
• THWR800 (Wireless Floating Temperature Sensor)
* Features and accessories will not be available in
all countries.
2 x AAA UM-4
1.5V battery
1 x wall mount
bracket
1 x Temperature /
Humidity Sensor
(THGR800)
1 x Table stand
2 x AA UM-3
1.5V batteries
4 x Screws
(Type C)
1 x Rain Collector
(PCR800)
6 x Washers
LW301_UM_EN_R8.indd 3 2012/8/14 3:06:02 PM
Page 4
EN
4
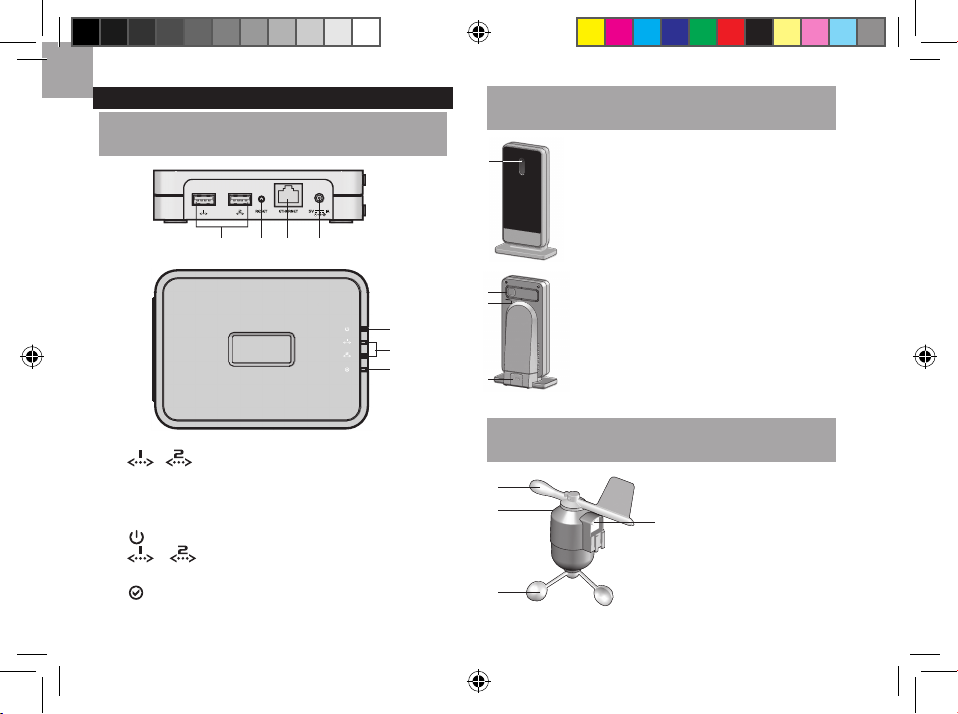
OVERVIEW
INTERNET-CONNECTED HUB
LW301/302
4
321
5
6
7
1. / Receiver connection socket (1 or 2)
2. RESET
hole: return to default settings
3.
ETHERNET socket: connect LAN cable
4. Power adaptor socket
5.
: power indicator
6.
/ indicators: Receiver connection cable
(1 or 2) is plugged
7.
: data is being transferred
WEATHER SENSOR RECEIVER
LW301/302
WIND SENSOR
LW301
1
2
3
4
1
1
2
3
S
E
A
R
C
H
Front View:
1. Wind direction
2. Wind vane casing
3. Anemometer
4. Solar power socket
1.
LED status indicator: Blinks during
search; continuous light indicates a
successful connection
1. SEARCH:
Initiate search for remote sensors
2. RESET: return to default settings
3.
USB socket: Upload records to
Internet-connected hub
Back View:
LW301_UM_EN_R8.indd 4 2012/8/14 3:06:08 PM
Page 5

EN
5
OUTDOOR TEMPERATURE / HUMIDITY SENSOR
LW301/302
RAIN GAUGE
LW301
GETTING STARTED
The provided sensors are battery operated. Each is capable
of transmitting data to the weather sensor receiver wirelessly
within an approximate operating range of 100 meters (328 feet).
NOTE
• Use disposable alkaline batteries for longer usage
and consumer grade lithium batteries in temperatures
below freezing. Do not use rechargeable batteries.
• Batteries should not be exposed to excessive heat
such as sunshine or re.
SET UP REMOTE WIND SENSOR
LW301
The wind sensor takes wind speed and direction readings.
To insert batteries:
1
2
1.
Unscrew the anemometer from the wind sensor carefully.
2. Insert batteries matching the polarities (+ / -) and replace the
anemometer. Press RESET after each battery change.
6
3
4
5
C F
2
1
6
3
4
5
C
F
1. LCD screen
2. LED status indicator
3.
RESET hole
4. °C / °F
:
select temperature unit
5.
CHANNEL switch
6. Battery compartment
1
2
3
4
5
1. Rain gauge
2. Battery compartment
3.
RESET
4. Funnel
5. Balance indicator
LW301_UM_EN_R8.indd 5 2012/8/14 3:06:13 PM
Page 6

EN
6
SET UP REMOTE TEMPERATURE / HUMIDITY SENSOR
LW301/302
1. Slide to open the battery compartment cover.
2. Slide channel switch to select a channel (1, 2, 3).
Ensure you use a different channel for each sensor.
3. Place the batteries in the compartment following the
polarity label +/-.
4. Press
RESET after each battery change.
5. Align the cover at against the battery compartment,
then slide it until it clicks into place to lock the cover.
NOTE Ensure to set at least one sensor to be channel
one, the data of channel one will be shown on LIVE page
in the application (page 8).
SET UP RAIN GAUGE
LW301
The rain gauge collects rain and takes rainfall readings.
SET UP WEATHER SENSOR RECEIVER
LW301/302
For continuous use, connect the weather sensor receiver
to Internet-connected hub using receiver connection
cable provided.
1. Using provided LAN cable, connect one end to the
ETHERNET socket on the Internet-connected hub
and the other end to the router.
2. Using provided receiver connection cable, connect one
end to the receiver connection socket
(1 or 2) on the Internet-connected hub
and the other end into the USB socket
on the weather sensor receiver. on the
weather sensor receiver.
3. Plug the large end of the power adapter into a power
outlet not controlled by a wall switch. Plug the small
end of the power adapter into the power socket on
the Internet-connected hub.
4. Once connected, the weather sensor receiver will
send the data to the Internet-connected hub via
receiver connection cable.
LED Light Meaning
Continuously on Connection successful
Fast blink Searching
Slow blink Lost link
Protracted blink No device found
1. Remove screws and slide the cover
off in an upwards motion.
2. Place the batteries in the compartment
following the polarity label +/-. Press
RESET after each battery change.
3. Remove the bre tape.
LW301_UM_EN_R8.indd 6 2012/8/14 3:06:15 PM
Page 7

EN
7
INTERNET-CONNECTED HUB INSTALLATION
LW301/302
Connect the Internet-connected hub to be a system
as shown belo w. If you purcha sed model LW302
produc t and wan t to add mor e weat her sen sor s,
please contact your local retailer or visit our website at
www.oregonscientic.com.
NOTE The power adapter of the Internet-connected hub
is intended to be correctly oriented in a vertical position.
The prongs are not designed to hold the plug in place if it is
plugged into a ceiling, under-the-table or cabinet outlet.
NOTE If the network you use is restricted, please contact
the technical staff of that organization for support.
DOWNLOAD APPLICATION
LW301/302
1. Download the ‘Anywhere weather’
application from your device, such
as smartphone or tablet PC. The
application is available in Apple App
Store (iOS version) or Google Play
Store (android version).
2. For your rst time use, tap
REGISTER to ll out the elds and
select DONE.
3. After registration, enter email
address and password again then
tap LOGIN.
REGISTER A WEATHER STATION
LW301/302
1. Once you login to the application,
the below display is shown. Click +
to register a weather station.
Internet-connected Hub
Weather
Sensor Receiver
Power Adapter
Rain Gauge
Wind Sensor
T & H Sensor
Router
Your Internet
Connection
LW301_UM_EN_R8.indd 7 2012/8/14 3:06:22 PM
Page 8

EN
8
2. On REG . STAT ION page, fil l out
all elds (you can nd MAC ADDR.
and REG CODE at the bottom of the
Internet-connected hub).
3. Th e map dis plays your loc ation .
You can make a zoom by simply
tap- and-drag the map by your two
ngers at a time. Once you nd out the
specic location for your new station,
press and hold until a red pin appears on
the map. (Tap the red pin again, you can
see New Station message pops up).
Tap DONE to conrm the selection.
4. Once succ essful,
LIVE page wit h
real- time weather data will pop up.
If applicat ion fails to con nect to a
station, the display goe s bac k to
REG. STATION page agai n.
NOTE The default temperature and humidity data on
LIVE page is from your channel 1 of temperature and
humidity sensor.
NOTE The weather icon represents the weather situation
for the next 12 hours, not the real-time situation.
NOTE Please save a copy of your MAC ADDR. and
REG CODE for preventing the label faded or damaged
that cannot be recognized for registration in the future.
VERIFY CONNECTION
LW301/302
Before proceeding to install sensors outside, please verify
communication and transfer of data.
Enter MY WEATHER page, then tap HISTORY prole.
To search for a sensor:
Press and hold SEARCH (located at the back of the
weather sensor receiver).
NOTE Unit will search only for already registered sensor
or new sensor reset within last 30 minutes. To register a
new sensor, reset sensor prior to search.
TIP The transmission range may vary depending on
many factors. Sensors should be positioned in an open
area away from trees or other obstructions. Relocate your
sensor to various locations to have better reception.
MOUNTING / PLACING OF SENSORS
WIND SENSOR
LW301
Secure the sensor connector in the desired location:
a. Align the back of the sensor
connector to an existing pole.
Secure in place by inserting the
ends of the U-bolt into the holes on
the sensor connector and securing
it with washers and bolts.
a
b
LW301_UM_EN_R8.indd 8 2012/8/14 3:06:27 PM
Page 9

EN
9
OR
b. Insert 4 type A screws into the
holes of the sensor connector.
Screw rmly into place, i.e. fence.
Align the wind vane at against the
small end of the sensor connector,
and then slide it until it clicks into
place to lock the cover.
IMPORTANT Ensure that the wind
sensor is pointing north to enable it to
record accurate readings.
TEMPERATURE & HUMIDITY SENSOR
LW301/302
TIP Ideal placements for the sensor
would be in any loc ation on the
exterior of the home at a height of not
more than 1.5 m (5 ft) and which can
shield it from direct sunlight or wet
conditions for an accurate reading.
Secure the sensor in the desired
location using the wall mount bracket
or table stand.
RAIN GAUGE
LW301
The rain gaug e should be moun ted hori zontally about
1 meter (3 feet) from the ground in an open area away from
trees or other obstructions to allow rain to fall naturally for an
accurate reading.
To ensure a level plane:
Put a few drops of water on the cross
at the base of the funnel to check the
horizontal level.
Water will pool to the centre of the cross
when the rain gauge is level.
If water remains on 1-4, the gauge is
not horizontal.
If necessa ry, adjust the lev el usi ng
the screw.
NOTE For best results, ensure the base
is horizontal to allow maximum drainage
of any collected rain.
TIP Erase all testing data from application
before formal use.
b
150cm(5ft)
1
23
4
1
23
4
LW301_UM_EN_R8.indd 9 2012/8/14 3:06:42 PM
Page 10

EN
10
VIEW READINGS ON SERVER
LW301/302
For your convenience, data is uploaded onto our weather
server. User can go to www.oregonscientic.com to check
the data.
RESET
LW301/302
Press RESET to return to the default settings.
SPECIFICATIONS
WEATHER SENSOR RECEIVER
Dimensions 149 x 198 x 47 mm
(L x W x H) (5.9 x 7.8 x 1.9 inches)
Weight 510 g (1.12 lbs) without battery
INDOOR BAROMETER
Barometer unit mb/hPa, inHg and mmHg
Measuring range 700 – 1050mb/hPa
Accuracy +/- 10 mb/hPa
Resolution 1mb (0.0 inHg)
Altitude setting
Sea level
User setting for compensation
Weather display
Sunny, Clear night, Partly Cloudy,
Cloudy, Cloudy at night, and Rainy
REMOTE WIND SENSOR UNIT
Dimensions 178 x 76 x 214 mm
(L x W x H) (7 x 3 x 8.4 inches)
Weight 100 g (0.22 lbs) without battery
Wind speed unit m/s, kph, mph, knots
Speed accuracy
2 m/s ~ 10 m/s (+/- 3 m/s)
10 m/s ~ 56 m/s (+/- 10%)
Direction accuracy 16 positions
Transmission of
wind speed signal
Approx. every 14 seconds
Memory Max speed gust
Battery 2 x UM-3 (AA) 1.5V batteries
OUTDOOR TEMPERATURE & HUMIDITY UNIT
RELATIVE TEMPERATURE
Dimensions 115 x 87 x 118 mm
(L x W x H) (4.5 x 3.4 x 4.6 inches)
Weight 130 g (0.286 lbs) without battery
Temp. unit °C / °F
Displayed range -50°C to 70°C (-58°F to 158°F)
Operating range -30°C to 60°C (-4°F to 140°F)
Accuracy
-20°C – 0°C: +/- 2°C (+/- 4.0°F)
0°C - 40°C: +/- 1°C (+/- 2.0°F)
40°C - 50°C: +/- 2°C (+/- 4.0°F)
50°C - 60°C: +/- 3°C (+/- 6.0°F)
LW301_UM_EN_R8.indd 10 2012/8/14 3:06:44 PM
Page 11

EN
11
Comfort 20°C to 25°C (68°F to 77°F)
Memory
Current, Min and Max temp.
Dew Point w/ Max and Min
Wind chill temp. and min
RELATIVE HUMIDITY
Displayed range 2% to 98%
Operating range 25% to 90%
Resolution 1%
Accuracy
25% - 40%: +/- 7%
40% - 80%: +/- 5%
80% - 90%: +/- 7%
Comfort 40% to 70%
Memory Current, Min and Max
Battery 2 x UM- 4 (AAA) 1.5V batteries
RF TRANSMISSION
RF frequency 433MHz
Range
Up to 100 meters (328 feet) with
no obstructions
Transmission Approx. every 60 seconds
No. of Channel
1 for Wind/ Rain/ UV and 8 for
Temp. / Humidity
REMOTE RAIN GAUGE
Dimensions 107 x 87 x 56 mm
(L x W x H) (4.2 x 3.4 x 2.2 inches)
Weight 134 g (0.3 lbs) without battery
Rainfall unit Mm/hr and in/hr
Range 0 mm/hr – 999 mm/hr
Resolution 1 mm/hr
Accuracy
< 15 mm/hr: +/- 1 mm
15 mm to 9999 mm: +/- 7%
Memory
Past 24hrs, hourly and accumulated
from last memory reset
Battery 2 x UM-3 (AA) 1.5V
PRECAUTIONS
• Do not subject the unit to excessive force, shock,
dust, temperature or humidity.
• Do not cover the ventilation holes with any items such
as newspapers, curtains etc.
• Do not immerse the unit in water. If you spill liquid
over it, dry it immediately with a soft, lint-free cloth.
• Do not clean the unit with abrasive or corrosive materials.
• Do not tamper with the unit’s internal components.
This invalidates the warranty.
• Only use fre sh batt eries. Do not mix new a nd
old ba tteries .
LW301_UM_EN_R8.indd 11 2012/8/14 3:06:44 PM
Page 12

EN
12
• Images shown in this manual may differ from the
actual display.
• When disposing of this product, ensure it is collected
separately for special treatment.
• Placement of this product on certain types of wood
may result in damage to its nish for which Oregon
Scientic will not be responsible. Consult the furniture
manufacturer's care instructions for information.
• The contents of this manual may not be reproduced
without the permission of the manufacturer.
• Do not dispose old batteries as unsorted municipal
waste. Collection of such waste separately for special
treatment is necessary.
• Please note that some units are equipped with a
battery safety strip. Remove the strip from the battery
compartment before rst use.
NOTE The technical specications for this product and
the contents of the user manual are subject to change
without notice.
ABOUT OREGON SCIENTIFIC
Visit our website (www.oregonscientic.com) to learn
more about Oregon Scientic products.
For any enquiry, please contact our Customer Services
at (info@oregonscientic.com).
EU-DECLARATION OF CONFORMITY
Hereby, Oregon Scientifi c, declares that Anywhere
Weather Kit (model: LW301) or Anywhere Weather Kit
Basic (model: LW302) is in compliance with the essential
requirements and other relevant provisions of Directive
1999/5/EC. A copy of the signed and dated Declaration
of Conformity is available on request via our Oregon
Scientic Customer Service.
FCC STATEMENT
This device complies with Part 15 of the FCC Rules.
Operation is subject to the following two conditions:
(1) This device may not cause harmful interference,
and (2) This device must acce pt any inte rfer ence
re cei ved, inclu din g int erfer enc e that may cause
undesired operation.
WARNING Changes or modications not expressly
approved by the party responsible for compliance could
void the user’s authority to operate the equipment.
COUNTRIES RTTE APPROVED COMPLIED
All EU countries, Switzerland CH
and Norway N
LW301_UM_EN_R8.indd 12 2012/8/14 3:06:45 PM
Page 13

EN
13
NOTE This equipment has been tested and found
to comply with the limits for a Class B digital device,
pursuant to Part 15 of the FCC Rules. These limits
are designed to provide reasonable protection against
harmful interference in a residential installation.
This equipment generates, uses and can radiate radio
frequency energ y and, if not installed and used in
accordance with the instructions, may cause harmful
interference to radio communications. However, there is
no guarantee that interference will not occur in a particular
ins tall atio n. If this equipment does cause har mful
interference to radio or television reception, which can
be determined by turning the equipment off and on, the
user is encouraged to try to correct the interference by
one or more of the following measures:
Reorient or relocate the receiving antenna.
In cre ase th e sep ara tion bet ween the equipment
and receiver.
Connect the equipment into an outlet on a circuit different
from that to which the receiver is connected.
Consult the dealer or an experienced radio / TV technician
for help.
DECLARATION OF CONFORMITY
The following information is not to be used as contact for
support or sales. Please call our customer service number
(listed on our website at www.oregonscientic.com), or on
the warranty card for this product) for all inquiries instead.
We
Name: Oregon Scientic, Inc.
Address: 19861 SW 95
th
Ave.,Tualatin,
Oregon 97062 USA
Telephone No.: 1-800-853-8883
declare that the product
Product No. & Name: LW301/LW301U/LW301A
(Anywhere Weather Kit)
LW302/LW302U/LW302A
(Anywhere Weather Kit Basic)
Manufacturer: IDT Technology Limited
Address: Block C, 9/F, Kaiser Estate,
Phase 1,41 Man Yue St.,
Hung Hom, Kowloon,
Hong Kong
is in conformity with Part 15 of the FCC Rules. Operation is
subject to the following two conditions: 1) This device may
not cause harmful interference, and 2) This device must
accept any interference received, including interference that
may cause undesired operation.
LW301_UM_EN_R8.indd 13 2012/8/14 3:06:45 PM
 Loading...