

Page 1

Multi digital clock radio with soothing sounds
MODEL: BARM123A
USER'S MANUAL
GB
INTRODUCTION
BARM123A is a multi-functional device with:
- Digital-tuning AM/FM Radio
- Auto-synchronizing Radio Controlled Clock by radio signal
from the U.S. Atomic Clock
- Indoor and Remote Thermometer with memories for Maximum
and Minimum readings
- Weather Forecaster with Pressure Trend Indicator
- Soothing Sounds with a choice of 6 natural sounds
PACKAGE
In the package you will find the following items:
- 1 x Main Unit (BARM123A)
- 1 x Remote Thermo Sensor (THR268) with wall mount bracket
& table stand
- 1 x Detachable Vibrating Alarm
- 1 x 8 V AC/DC Adapter
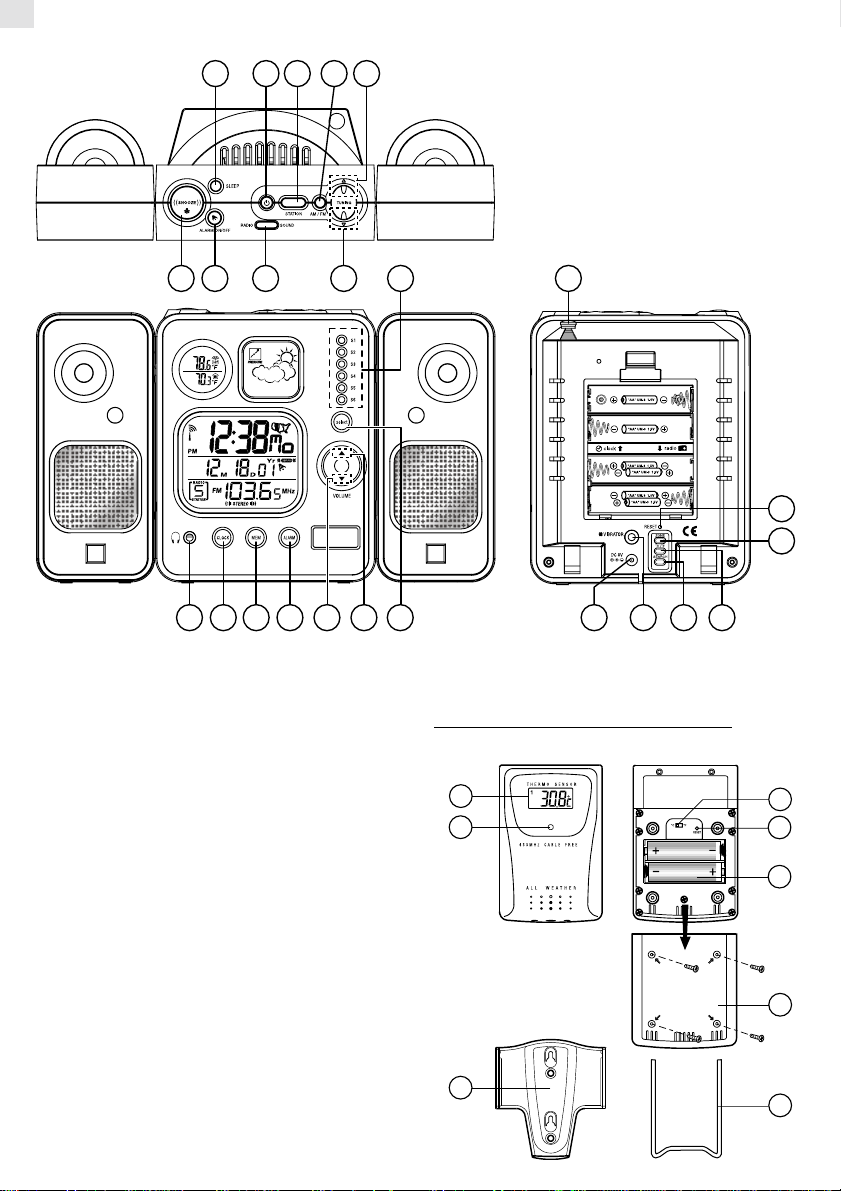
KEYS CONFIGURATION & FEATURES
MAIN UNIT (BARM123A)
TOP KEY PANEL
T1. [SNOOZE/LIGHT] button
- Press to activate the EL back-light of the LCD Display for 5
seconds
- Press to stop the alarm sound and activate the 8-minute Snooze
function
T2. [SLEEP] button
- Press to turn on the Radio and activate the Sleep Timer function
- Press to select the sleep-timer (auto-off) feature for 15, 30, 60,
90 or 120 minutes
T3. [ALARM ON/OFF
- Press to select between Alarm-On and Alarm-Off status in the
corresponding Alarm-time display mode
T4. [POWER
- Press to turn on and off the Radio/Soothing Sounds Function
T5. [RADIO/SOUND] button
- Press to toggle between Radio or Soothing Sounds Function
when Power is On
T6. [STATION] button
- Press to switch among the 8 preset radio stations in the respective
AM/FM Radio band when the Radio is On
- Press and hold for 2 seconds to enter the preset radio station
setting mode when Radio is On
] button
] button
T7. [AM/FM] button
- Press to toggle between AM or FM radio band
T8. [TUNING ▲] button
- Press to increase the frequency setting when Radio is On
- Press and hold for 2 seconds to trigger radio auto-search function when Radio is On
T9. [TUNING ▼] button
- Press to decrease the frequency setting when Radio is On
- Press and hold for 2 seconds to trigger radio auto-search function when Radio is On
FRONT KEY PANEL
F1. [ALARM] button
- Press to change to Alarm-time display mode from other display
modes
- Press to toggle between Alarm 1 and Alarm 2 in the Alarm-time
display mode
- Press and hold for more than 2 seconds to enter the setting modes
of alarm time and alarm-sound mode
F2. [CLOCK] button
- Press to toggle between the calendar clock display modes
- Press to change back to Calendar display mode in the Alarmtime display mode
- Press and hold for more than 2 seconds to enter setting modes
for 12-/24-hour display format, Hour, Minute, display language
of week-of-day, calendar display format (mm:dd:yy or
dd:mm:yy), year, month and day
F3. [VOLUME ▲] button
- Press to increase the volume when Radio or Soothing Sounds is
On (8-step volume settings)
- Press to increase the values in the setting modes
- Press to toggle between “Beep Alarm” or “Radio Alarm” mode
in the corresponding alarm-time setting mode
- Press and hold for 2 seconds to activate the auto-reception of
radio signal for RF clock manually when Radio or Soothing
Sounds is off
F4. [VOLUME ▼] button
- Press to decrease the volume when Radio or Soothing Sounds
is On (8-step volume settings)
- Press to decrease the values in the setting modes
- Press to toggle between “Beep Alarm” or “Radio Alarm” mode
in the corresponding alarm-time setting mode
- Press and hold for 2 seconds to deactivate the auto-reception of
radio signal for RF clock manually when Radio or Soothing
Sounds is off
F5. [SELECT] button
- Press to toggle among the 6 natural Sounds modes when
Soothing Sounds is On
1
Page 2
GB
T2T9T4 T6 T7 T8
T1 T3
F1F6F2F7 R7 R2 R1R6F4 F3 F5
F6. [MEM] button
- Press to toggle among the current, maximum and minimum
indoor and remote temperature records
- Press and hold for 2 seconds to clear the maximum or minimum
temperature records
F7. Headset Jack
- Connection Jack for optional headset (not included)
F8. LED
REAR KEY PANEL
R1.[°C / °F]
- Press to select °C or °F temperature display unit
R2.[SEARCH] button
- Press and hold for 2 seconds to activate search for remote thermo
signal from sensor
R3.[RESET] button
- Press to reset all values to their default settings
R4.[ZONE]
- Press to toggle ammg the 4 US time-zones: Pacific (P), Mountain
(M), Central (C) or Eastern (E)
R5.Extendable Antenna
- External Antenna for FM Radio
R6.Power Adapter Connector
- Connection Jack for AC power adapter
F8 R5T5
R7.Vibrator Jack
- Connection jack for Wake-Up Vibrator
REMOTE THERMO UNIT (THR268)
S1
S2
S7
2
R3
R4
S3
S4
S5
S6
S8
Page 3
S1. LCD
Displays the current temperature monitored by the remote unit
S2. LED INDICATOR
Flashes when the remote unit transmits a reading
°C/°F SLIDE SWITCH
S3.
Selects between Centigrade (°C) and Fahrenheit (°F)
S4. RESET BUTTON
Returns all settings to default values
S5. BATTERY COMPARTMENT
Accommodates two UM-3 or AA size batteries
S6. BATTERY DOOR
S7. WALL-MOUNT HOLDER
Supports the remote unit in wall-mounting
S8. REMOVABLE TABLE STAND
For standing the remote unit on a flat surface
POWER REQUIREMENTS
The main unit operates on six (6) pieces of AA-sized or UM-3 1.5V
batteries (alkaline batteries reecommended). The clock, radio and
remote thermometer have separate low battery indicators. Change
the batteries accordingly when the respective indicator lights up.
Low Battery Indicator for Clock
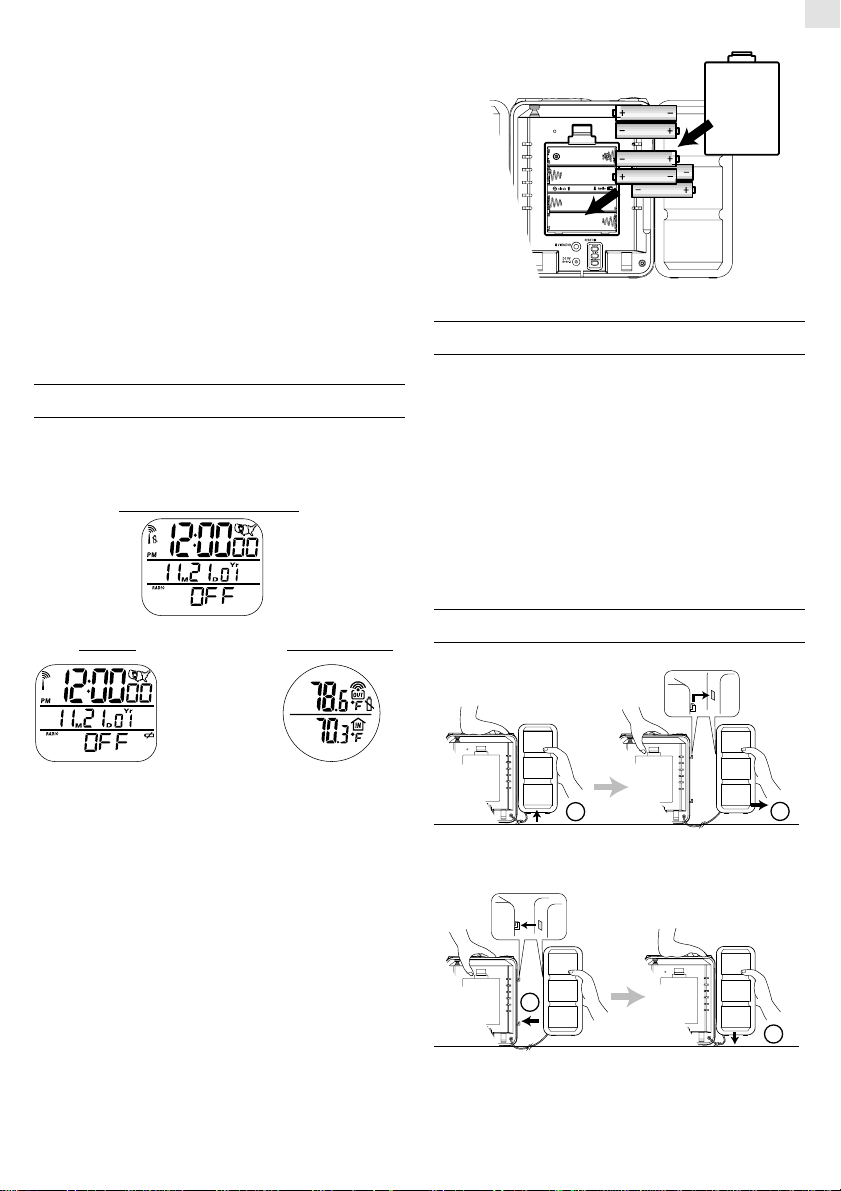
MAIN UNIT: BATTERY INSTALLATION
To install batteries into the main unit:
1. Press the door tab and click open the battery door at the back of
the main unit.
2. Install six (6) pieces of AA-sized or UM-3 1.5V batteries by
following the polarities shown inside the battery compartment.
For proper functioning it is advised to install batteries first into
the lower compartment and then into the upper one (Please note
that if batteries are already installed into the unit, first pull out
and remove the insulation tape in the remote sensor [marked 1].
After that pull out and remove the insulation tapes in the lower
compartment [marked 2] and then the one in the upper one
[marked 3] as well).
3. Replace the battery door and press [RESET].
GB
For Radio For Remote Sensor
An 8V AC Power Adapter is included. To connect, plug it into the
power adapter connector and the other end to a wall socket. If you
wish to turn on the radio for a long period, please use the adapter for
power supply.
For the Remote Thermo Sensor THR268, it operates on two (2)
pieces of AA-sized or UM-3 1.5V batteries. When its power level
is low, the low battery indicator will be shown. In that case, change
the batteries accordingly.
If not properly disposed of batteries can be harmful. Protect the
environment by taking exhausted batteries to authorized disposal
stations.
Note: Two (2) pieces of batteries should be installed in the upper
battery compartment while the other four (4) pieces in the lower
one. Please note that when adapter is connected, there is no need
to insert batteries into the lower battery compartment but two (2)
pieces of batteries are still required to be installed in the upper
compartment for clock operations.
NOTE ON DETACHABLE SPEAKER
1
Slide up Pull out
1
Push In Slide Down
3
2
2
Page 4

GB
FEATURES
Section I — Radio-Controlled Digital
Calendar Clock
ABOUT RADIO RECEPTION
After battery installation, the main unit will automatically
synchronize its time and date with the radio signal from the U.S.
Atomic Clock when it is within reception range of the signal.
When the main unit is receiving radio signal, the reception icon will
start to blink. The reception icon will show either strong or weak
reception depending on the strength of the radio signal. A complete
reception generally takes about two to ten minutes.
When the reception is complete the reception icon will stop blinking.
The reception icon will show as “
successful reception.
For best reception, place the unit away from other equipment that
emit radio frequency or microwave signals such as TVs, radios,
PCs or microwave ovens. Other causes for signal interference
include electrical power transmission tower and/or steel reinforced
concrete construction.
HOW TO ENABLE OR DISABLE
AUTO-RECEPTION
To disable the automatic reception of radio signal, press and hold
[VOLUME ▼] for 2 seconds. The reception icon will disappear
and the unit will stop receiving the radio signal.
To activate the signal reception again, press and hold
[VOLUME ▲] for 2 seconds. The reception icon will appear again
and start blinking to indicate auto reception of radio signal.
DISPLAY MODES SELECTION
Press [CLOCK] in the normal display mode to scroll through the 2
calendar clock display modes:
“ for no reception or “ “ for
1.
Hour – Minute – Second
Month – Date – Year
Hour – Minute – Weekday
2.
Month – Date – Year
SETTING THE CLOCK AND CALENDAR
MANUALLY
When the automatic radio reception is disabled, the main unit can
be set manually. Set the Clock and Calendar by following the
procedures below:
1. Press and hold [CLOCK] for 2 seconds. The “12-hr” or “24-
hr” display will start flashing.
2. Select the display format by using [VOLUME ▲] or
[VOLUME ▼]. Press [CLOCK] to confirm the entry.
3. The Hour digits will start flashing. Enter the hour by using
[VOLUME ▲] or [VOLUME ▼]. Press [CLOCK] to confirm
the entry.
4. Follow the same procedures to set the minutes, display languages
for day-of-week, “mm:dd” or “dd:mm” calendar display format,
year, month and day.
5. Press [CLOCK] to save the changes and exit the setting mode.
If changes are made after the minute adjustment, the value of
seconds will be reset and start from zero.
6. For the day-of-week you can select among 5 languages —English (E), French (F), German (D), Italian (I) and Spanish (S).
Language
4
Langues
Sprache
Lingue
Idiomas
Lingua
English
Anglais
Englisch
Inglese
Inglés
Inglês
French
Français
Französisch
Francese
Francés
Francês
German
Allemand
Deutsch
Tedesco
Alemán
Alemão
Italian
Italian
Italienisch
Italiano
Italiano
Italíano
Spanish
Espagnol
Spanisch
Spagnolo
Español
Espanhol
Day-of-the-week Affichage du jour Wochentaganzeige
Giorno della settimana
Monday
Lundi Mardi
Montag
Dienstag Mittwoch
Lunedí
Lunes Martes
Segunda Terça Quarta Quinta Sexta Sábado
Día de la semana Dia de Semana
Tuesday Wednesday Thursday
Mercredi
Martedí Mercoledí Glovedí Venerdí
Miércoles Jueves Viernes SábadoDomingo
Friday
Jeudi
Vendredi
DonnerstagFreitag
Saturday
Sunday
SamediDimanche
Samstag Sonntag
SabatoDomenica
Domingo
Page 5

Press [ZONE] to toggle among the 4 US time-zones: Pacific, Mountain, Central or Eastern.
DISPLAYING AND SETTING THE ALARM
This unit is equipped with 2 daily alarms. To view the preset alarm
time(s), press [ALARM] to toggle between ALARM 1 and ALARM
2 display modes.
To set the corresponding alarm time(s), follow the instructions below:
1. Press and hold [ALARM] for 2 seconds in ALARM 1 or
ALARM 2 display mode. The display will enter the
corresponding alarm setting mode and the hours will blink.
2. Enter the hour by using [VOLUME ▲] or [VOLUME ▼].
Press [ALARM] to confirm the entry.
3. The Minutes will then blink.
4. Enter the minutes by using [VOLUME ▲] or [VOLUME ▼].
Press [ALARM] to confirm the entry.
5. The beep alarm or radio alarm icon will blink.
6. Select the alarm-sounding mode by using [VOLUME ▲] or
[VOLUME ▼].
In Beep alarm mode, a 2-minute crescendo alarm will be turned
on when the alarm time is up. In Radio alarm mode, when
alarm time is up, the radio will be turned on and remained on
for 2 hours until it is manually deactivated. In Vibrating Alarm
mode, the Vibrating alarm will be turned on for 2 minutes when
the alarm time is up. Press [ALARM] to confirm the entry.
Note: When the Vibrating alarm is connected to the unit, the
Vibrating alarm mode will be automatically selected and the
Vibration icon will light up.
matically turned on and the Radio Station Number will flash.
Select the radio station by using [STATION]. Please note that
in this Radio Alarm mode, manual tuning cannot be used to set
the station. Press [ALARM] to confirm the entry.
8. The Volume will then flash. Again, select the radio volume by
using [VOLUME ▲] or [VOLUME ▼]. Press [ALARM] to
confirm the entry and exit the setting mode. Press [POWER
] to turn off the radio.
9. The respective Alarm settings will be updated once any value is
changed in the above setting modes.
To enable/disable the alarm, press [ALARM ON/OFF
the main unit is in such Alarm display mode
( ON ) ( OFF )
When [SNOOZE] is pressed to stop the alarm sound (only when
Beep Alarm or Vibration Alarm mode is selected), the unit will
re-alarm again after 8 minutes. To disable the snooze function, press
[ALARM] or [ALARM ON/OFF
Please note that when Radio or Soothing Sounds is on while Beep
Alarm goes off at the same time, the Radio/Soothing Sounds will
be temporarily stopped until the Beep Alarm has been turned off.
].
] when
Section II — Digitally-tuned
AM/FM Radio
HOW TO USE THE RADIO
Before you start — All radio functions can only be operated when
Radio is powered on.
To turn on the radio/ soothing sounds, press [ POWER
[RADIO/SOUND] to select Radio or Soothing Sounds function.
If Radio is selected, the radio will be turned on at the last preset
radio station and volume.
]. Press
GB
7. If Radio alarm mode is being chosen, the radio will be auto-
To change the radio frequency, press [AM/FM] to select the radio
band. Then use [TUNING ▲] or [TUNING ▼] to locate the desired
radio frequency. Press once and the value will advance by 1 step.
Press and hold to enter the Radio Channel auto-search function.
To change the volume, use [VOLUME ▲] or [VOLUME ▼] to
increase or decrease the volume.
To toggle among the programmed stations, press [STATION].
5
Page 6

GB
To turn off the radio, press [ POWER ] to do so or [RADIO/
SOUND] to switch to Soothing Sounds function.
AUTO-SEARCH FUNCTION
The unit is equipped with an Auto-Search function and can
automatically search for the next clear channel. To activate this
function, press and hold [TUNING ▲] or [TUNING ▼] for 2
seconds and automatically the value of the frequency will keep
increasing or decreasing until a clear channel is found. Once this
function is activated, you can release and stop pressing the button.
HOW TO PROGRAM A PRESET STATION
This unit allows you to program up to 8 FM and 8 AM radio stations
in the memory. To do so:
1. First press [AM/FM] to select the AM or FM frequency.
2. Select a station number by pressing [STATION].
3. Locate the desired radio frequency by using [TUNING ▲] or
[TUNING ▼].
4. Press and hold [STATION] for 2 seconds to confirm and exit
the setting mode.
HOW TO USE THE SLEEP (AUTO-OFF)
FUNCTION
With this Sleep function, the radio or the Soothing Sounds will be
automatically switched off after a pre-set period of time.
1. To set the sleep function, press [SLEEP]. “120 MIN” will be
displayed when the function is activated and SLEEP icon will
flash.
REMOTE UNIT — BATTERY INSTALLATION AND SETTING UP
1. Place both units as close as possible to each other.
2. Remove the screws on the battery door of the remote unit.
3. Select the units of measurement for the temperature display on
the °C/°F slide switch.
4. Install 2 batteries (UM-3 or "AA" size 1.5V) strictly according
to the polarities shown.
5. Insert batteries or press the reset button of the main unit.
6. Replace the battery compartment door and secure its screws.
7. Position the remote sensor and main unit within effective
transmission range, which in usual circumstances, is 80 meters
or 240feet.
Though the sensor is weather resistant, and is meant for use outside, it should be placed away from direct sunlight, rain, or snow.
Note: The effective range may be limited by building materials and
the position of either the main unit or remote sensors. Try various
set-up arrangements for best result.
2. Press [RADIO/SOUND] to choose radio or Soothing Sounds
Function.
3. Press [SLEEP] again to select the period of time (15, 30, 60, 90
or 120 minutes).
4. Wait for about 5 seconds and the sleep function will be activated
automatically.
NOTE ON RADIO ALARM
When the Radio Alarm is turned on, the Radio will be turned on for
2 hours. You can intervene by setting the time period for the Sleep
function by pressing [SLEEP] or simply turn off the radio at any
time.
Section III — Indoor-Remote
Thermometer with Weather Forecast
DISPLAY OF INDOOR TEMPERATURE
Once batteries are installed into the main unit, it will start to detect
the indoor temperature and the data will be displayed in the Indoor
Temperature Window.
WALL-MOUNTING OR TABLE STANDING
Wall-mount Table Stand
HOW TO CHECK REMOTE
TEMPERATURE
Once batteries are installed into the remote Thermo Sensor, it will
start to transmit temperature data at an approximately 40-second
intervals. Such data transmission is indicated by the blinking LED
on the remote Thermo Sensor. Upon successful reception of the
remote thermo signals the data received will be automatically
displayed and updated at a 40-second intervals on the Outdoor
Temperature Window.
6
Page 7

If no signals are received, blank “—-“ will be displayed. Press and
hold [SEARCH] for 2 seconds to activate search for the remote
thermo signal from the sensor.
If that fails, check if the remote thermo sensor is still in place. Try
repositioning the units as they may be having temperature transmission block as a result of interference.
Note: Failure of reception of remote signals may be due to the following reasons:
1. Battery power of the units is too low.
Suggested Solution: Replace with fresh batteries if necessary.
2. Batteries may freeze when the temperature falls below the
freezing point. Frozen batteries will have a lower voltage and
therefore result in a shorter transmission range.
Suggested Solution: Shorten the transmission range by
repositioning the units.
3. Transmission path is blocked with obstacles and interference
from the surroundings.
Suggested Solution: Shorten the distance (e.g., move the main
unit closer to the window) or relocate the units when necessary.
MAXIMUM AND MINIMUM
TEMPERATURE
The maximum and minimum indoor-remote temperatures recorded
will be automatically stored in memory. Press [MEM] to toggle
among the current, maximum and minimum indoor and remote temperature records. The respective “MAX” or “MIN” indicator will
be shown.
sunny partly cloudy cloudy
rainy snow
Section IV — Soothing Sounds
This unit is also featured with a Soothing Sounds function which
can give out relaxing sounds continuously to mask the noise in the
surroundings. There are 6 nature-simulating sounds which you can
choose from: (1) Bird sounds, (2) Wind sounds, (3) River sounds,
(4) Rain Drop sounds (5) Waterfall sounds and (6) Ocean Wave
sounds.
To turn on the Soothing Sounds, press [POWER
[RADIO/SOUND] to select Soothing Sounds function. Press
[SELECT] to toggle among the 6 different sounds. The respective
LED will also light up to indicate the selected sound.
To adjust the volume, use [VOLUME ▲] or [VOLUME ▼] to
increase or decrease the volume.
To turn off the Soothing Sounds, press [POWER
[RADIO/SOUND] to switch to Radio function.
]. Press
] to do so or
GB
To clear the memory, press and hold [MEM] for 2 seconds when
the maximum or minimum record is being displayed. The memory
will be erased and replaced with current temperature until a new
maximum or minimum reading has been recorded.
If the temperature readings recorded are lower or higher the
measuring range, “LLL” or “HHH” will be displayed respectively.
PRESSURE TREND
This unit gives a barometric pressure trend for the last hour.
Arrow
Indicator
Pressure
Trend Rising Steady Falling
WEATHER FORECAST
BARM123A detects barometric pressure changes and displays
weather symbols including sunny, partly cloudy, cloudy, rainy and
snow that indicate weather forecasts for the next 12 to 24 hours.
The radius of the forecast is approximately 30 – 50 km or 18-30
miles.
Section VI — Others
BACKLIGHT
To turn on the EL backlight of the LCD Display, press [SNOOZE/
LIGHT] to turn it on for 5 seconds.
HOW TO RESET THE UNIT
Press [RESET] only in the following circumstances:
1. To enhance synchronization of signals after battery replacement
2. To reset the settings when the unit is malfunctioning
When [RESET] is pressed, all settings will return to the default
values and memory records will be erased.
PRECAUTIONS
This unit is engineered to give you years of satisfactory service if
handled with care.
1. Do not immerse the unit into water.
2. Do note clean the unit with abrasive or corrosive materials.
3. Do not subject the unit to snow or excessive force, shock, dust,
temperature or humidity.
4. Do not tamper with the unit’s interal components.
5. Do not mix new and old batteries or batteries of different
specifications.
7
Page 8

GB
To maintain good performances, do not use the units in places which
are extremely hot, cold, dusty or humid. In particular, keep the
units away from:
- High Humidity areas (e.g., bathroom)
- Extreme hot areas (e.g., near a heater)
- Areas exposed to direct sunlight
Note on Listening with the headphones
A headphone jack is provided so that you can listen to the radio or
sound soother by plugging a headphone into the jack. Remember
to listen at a moderate volume to avoid hearing damage.
SPECIFICATIONS
RADIO-CONTROLLED CALENDAR CLOCK
Display format : 12- or 24-hour
Calendar : Month/Date/Year or Date/Month/Year
Alarm : Dual daily alarm in the following modes:
Day of Week in 5 languages:
English/ French/ German/ Italian and Spanish
(i) Crescendo Beep Alarm with 8-minute
Snooze function; or
(ii) Radio Alarm; or
(iii) Vibrating Alarm with 8-minute Snooze
function
DIGITAL RADIO
AM band Frequency : 540 – 1710 kHz
FM band Frequency : 88 – 108.0 MHz
Station : 8 memories for AM/ 8 memories for FM
TEMPERATURE MEASUREMENT
Main Unit
Indoor Temperature Measuring Range
Temperature Resolution : 0.1°C (0.2°F)
Remote Unit
Remote Temperature Measuring Range
Temperature Resolution : 0.1°C (0.2°F)
RF Transmission Frequency : 433 MHz
Temperature Sensing Cycle : Approx. 40 seconds
:-5°C to +50°C
(+23°F to +122°F)
: -20°C to + 60°C
(-4°F to +140°F)
POWER
Main Unit : 6 pcs of AA-sized or “UM-3”
Remote Thermo Unit : 2 pcs of AA-sized or “UM-3”
1.5 V batteries
8 V AC Adapter
1.5 V batteries
WEIGHT
Main Unit : 80.5 gm or 2.8 ounces
Remote Thermo Unit : 66 gm or 2.3 ounces
Vibrating Alarm : 122.5 gm or 4.3 ounces
(without battery)
(without battery)
DIMENSIONS
Main Unit : 235 x 68 x 140mm
Remote Thermo Unit : 70 x 21 x 105mm
Vibrating Alarm : 88 x 92 mm or 3.46"x3.62"
or 9.25"x2.67"x5.5"
(LxWxT)
or 2.7"x.82"x4.1"
(LxWxT)
(Dia x T)
NOTE ON COMPLIANCE
FCC:
NOTE: This equipment has been tested and found to comply with
the limits for a Class B digital device, pursuant to Part 15 of the
FCC Rules. These limits are designed to provide reasonable
protection against harmful interference in a residential installation.
This equipment generates, uses and can radiate radio frequency
energy and, if not installed and used in accordance with the
instructions, may cause harmful interference to radio
communications.
However, there is no guarantee that interference will not occur in a
particular installation. If this equipment does cause harmful
interference to radio or television reception, which can be
determined by turning the equipment off and on, the user is
encouraged to try to correct the interference by one or more of the
following measures:
■ Reorient or relocate the receiving antenna.
■ Increase the separation between the equipment and receiver.
■ Connect the equipment into an outlet on a circuit different from
that to which the receiver is connected.
■ Consult the dealer or an experienced radio/TV technician for
help.
Company Name: Oregon Scientific, Inc.
Address: 19861 SW 95th Place, Tualatin, Oregon 97062, USA
Telephone Number: (503)-639-8883
Website address: www.oregonscientific.com
Name and model number of the product:
Digital Clock Radio BARM123A
CUSTOMER ASSISTANCE
Should you require assistance regarding this product and its
operation, please contact our customer care department at 1-800853-8883 or via email at helpme@oscientific.com.
WARRANTY
This product is warranted to be free of manufacturing defects for a
period of 3 months from date of retail purchase. Defective product
should be directed to the place of retail purchase for exchange.
Should this not be possible, contact our customer care department
for assistance and a return material authorization. No returns may
be made without a return authorization. Warranty exchanges require proof of date of purchase (purchase receipt showing date,
place and product purchased).
This warranty does not cover product subjected to abuse, misuse,
accidental damage or tampering.
8
Page 9

CAUTION
- The content of this manual is subject to change without further notices
- Due to printing limitation the displays shown in the manual
may differ from the actual display
- The contents of this manual may not be reproduced without
the permission of the manufacturer
GB
9
 Loading...