

Page 1

Metal Weather Station
Model: BAR908HG / BAR908HGU / BAR908HGA
User Manual
Page 2

Metal Weather Station
Model: BAR908HG / BAR908HGU /
BAR908HGA
User Manual
CONTENTS
Product Overvi
Front View .....................................................................3
Back View ..................................................................... 4
LCD Display .................................................................. 5
Remote Sensor ............................................................. 7
Getting Started ................................................................ 9
Batteries ....................................................................... 9
AC Adaptor (Main Unit) ................................................. 9
Change Settings ........................................................... 9
Remote Sensor ................................................................ 9
Set Up Thermo / Hygro Sensor ....................................9
Sensor Data Transmission ......................................... 10
Search for Sensor ....................................................... 10
Clock and Calendar ....................................................... 11
Radio-Controlled Clock ............................................... 11
Turn Radio-Controlled Clock ON / OFF ...................... 12
Set Clock .................................................................... 12
Switch Clock Display .................................................. 12
Alarms ............................................................................ 12
ew .......................................................... 3
Set Daily Alarm ........................................................... 12
Set Pre-Alarm ............................................................. 13
Activate Alarm ............................................................. 13
Snooze ....................................................................... 13
Barometer ...................................................................... 13
View Barometer Area .................................................. 13
Select Measurement Unit ........................................... 14
View Barometer History .............................................. 14
Bar Chart Display ....................................................... 14
Set Altitude ................................................................. 14
Weather Forecast ..........................................................14
Weather Forecast Icons ..............................................14
UV Measurement ........................................................... 15
New Additional UV Features ....................................... 15
Temperature and Humidity ........................................... 16
View Temperature and Humidity Area ........................16
Select Measurement Unit ........................................... 16
Select Sensor Channel ............................................... 16
Minimum / Maximum Records .................................... 16
Temperature and Humidity Trend ...............................16
Comfort Zone .............................................................. 17
Heat Index .................................................................. 17
Reset System ................................................................. 17
Precautions .................................................................... 17
Troubleshooting ............................................................
1
EN
18
Page 3

EN
Specifications ................................................................ 18
About Oregon Scientific ............................................... 20
EU-Declaration of Conformity ..................................... 20
FCC Statement ............................................................... 20
Declaration of Conformity ........................................... 21
2
Page 4
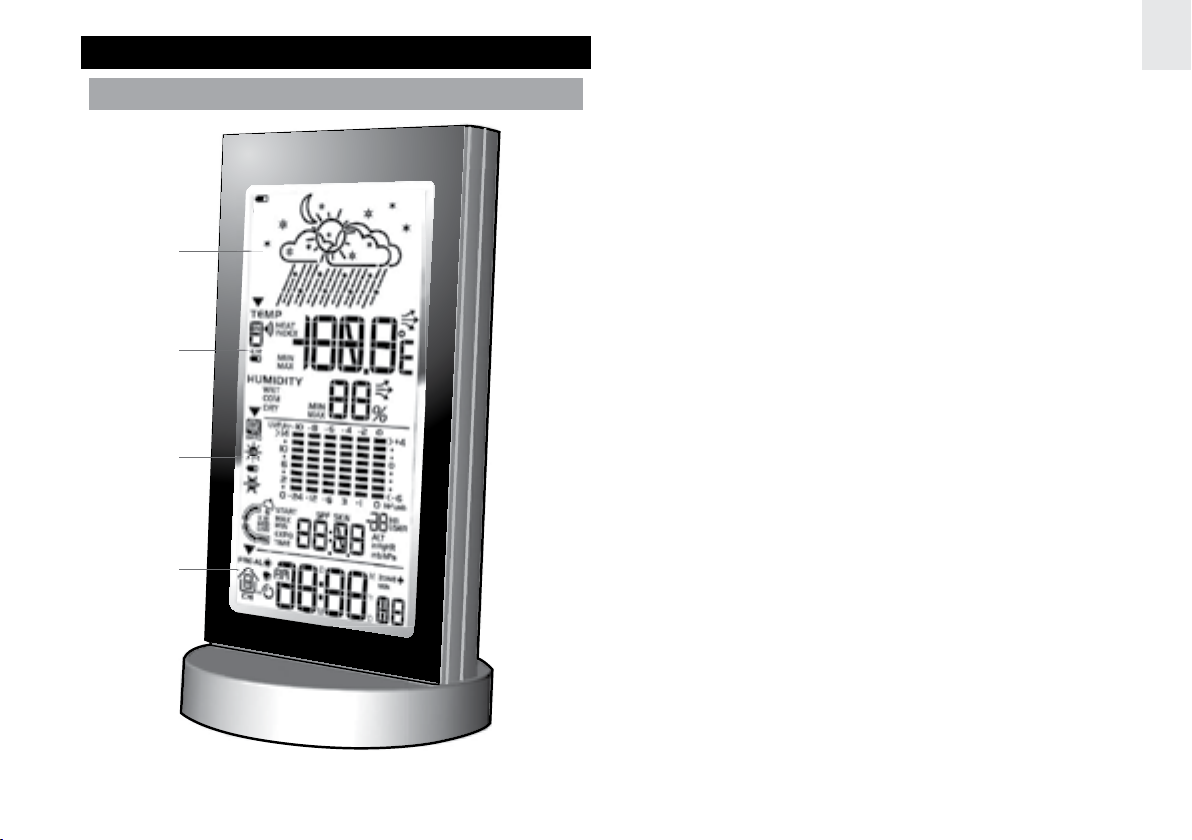
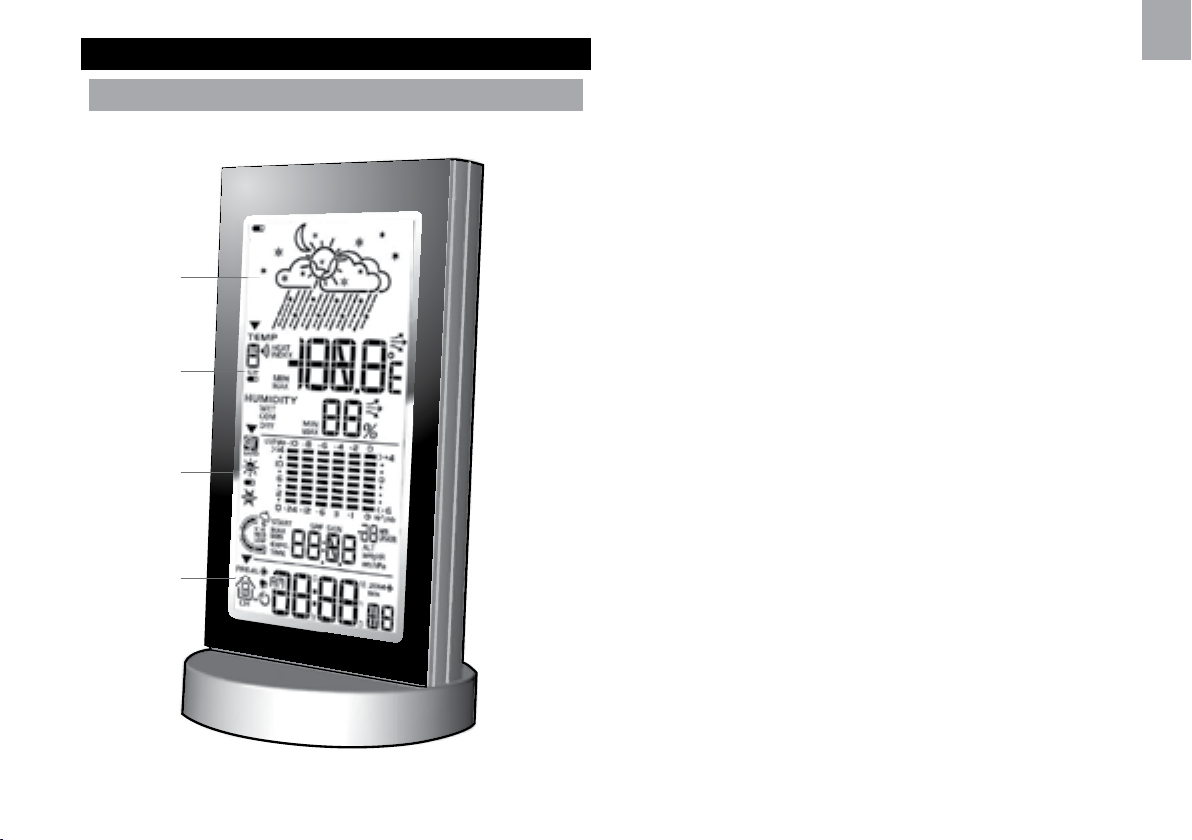
PRODUCT OVERVIEW
FRONT VIEW
1
2
3
4
1. Weather Forecast Area: Animated weather forecast
2. Temperature / Humidity / Comfort Zone Area:
Readings and trend lines; comfort zone; sensor
channel number
3. UVI / Barometer Area: UV level and barometric
pressure bar chart; UV Index and barometric
readings
4. Clock / Alarm / Calendar Area: Radio-controlled
clock; alarms; calendar
EN
3
Page 5
EN
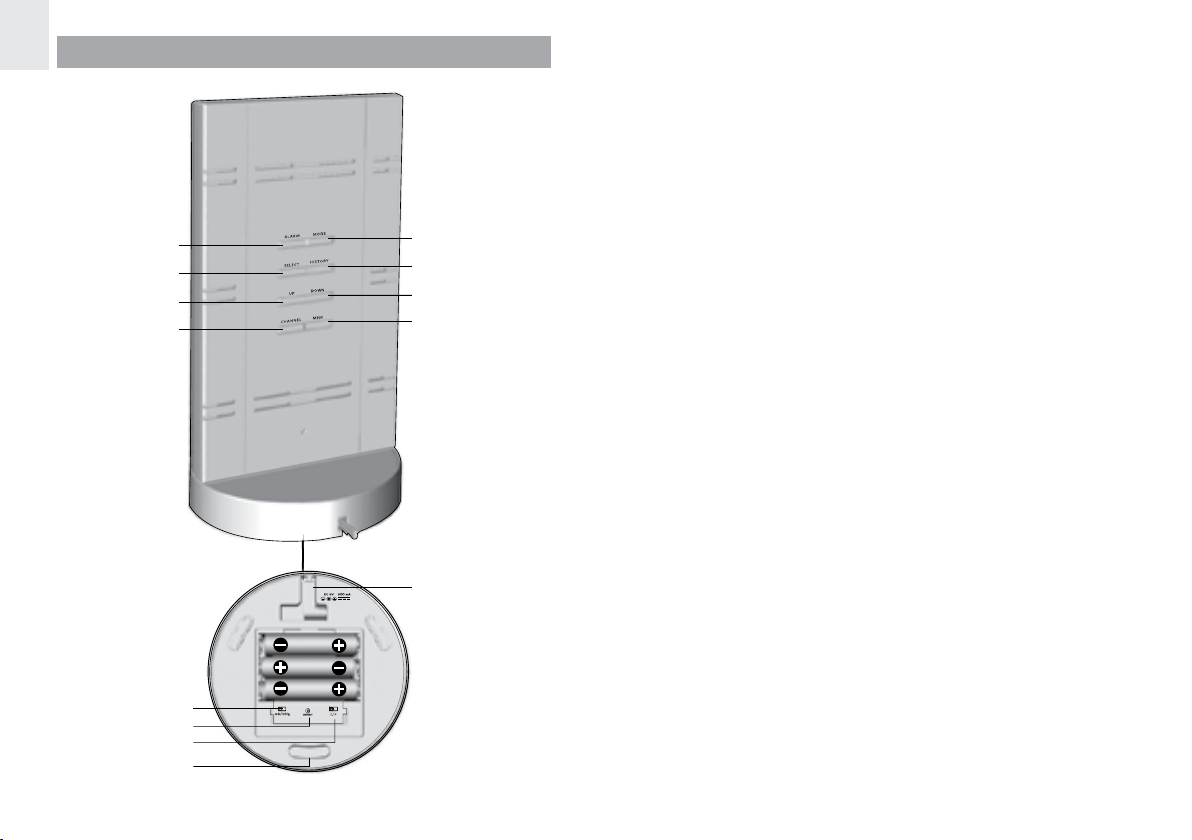
BACK VIEW
1. ALARM: View alarm status; set alarm
2. SELECT: Switch Areas
3. UP: Increase setting / activate radio-controlled clock
4. CHANNEL: Switch remote sensor display
5. MODE: Change settings / display
6. HISTORY: View historical barometer and UV
1
2
3
4
5
6
7
8
readings
7. DOWN: Decrease setting / deactivate radiocontrolled clock
8. MEM: View current, maximum and minimum
temperature / humidity / UV readings
9. AC adaptor socket
10. mb / inHg switch
11. RESET button
12. °C / °F switch
13. SNOOZE: Activate 8-minute snooze
9
10
11
12
13
4
Page 6
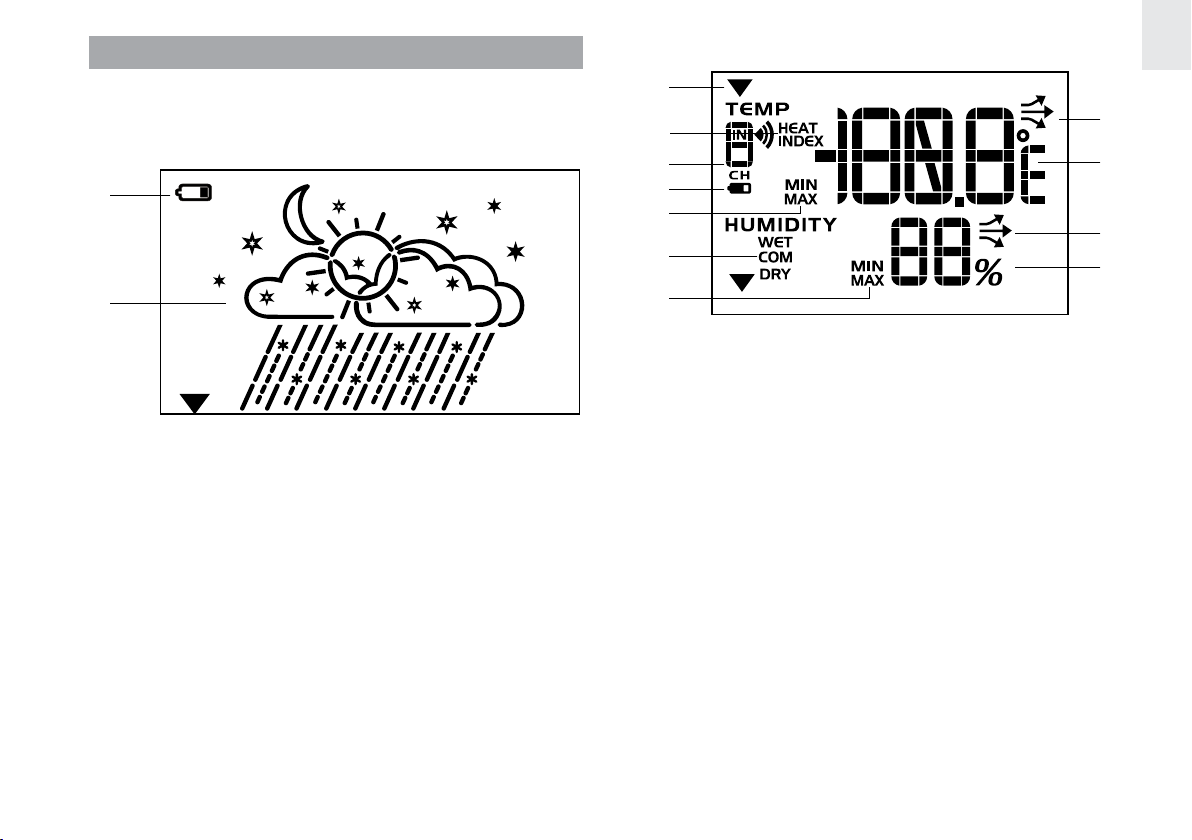
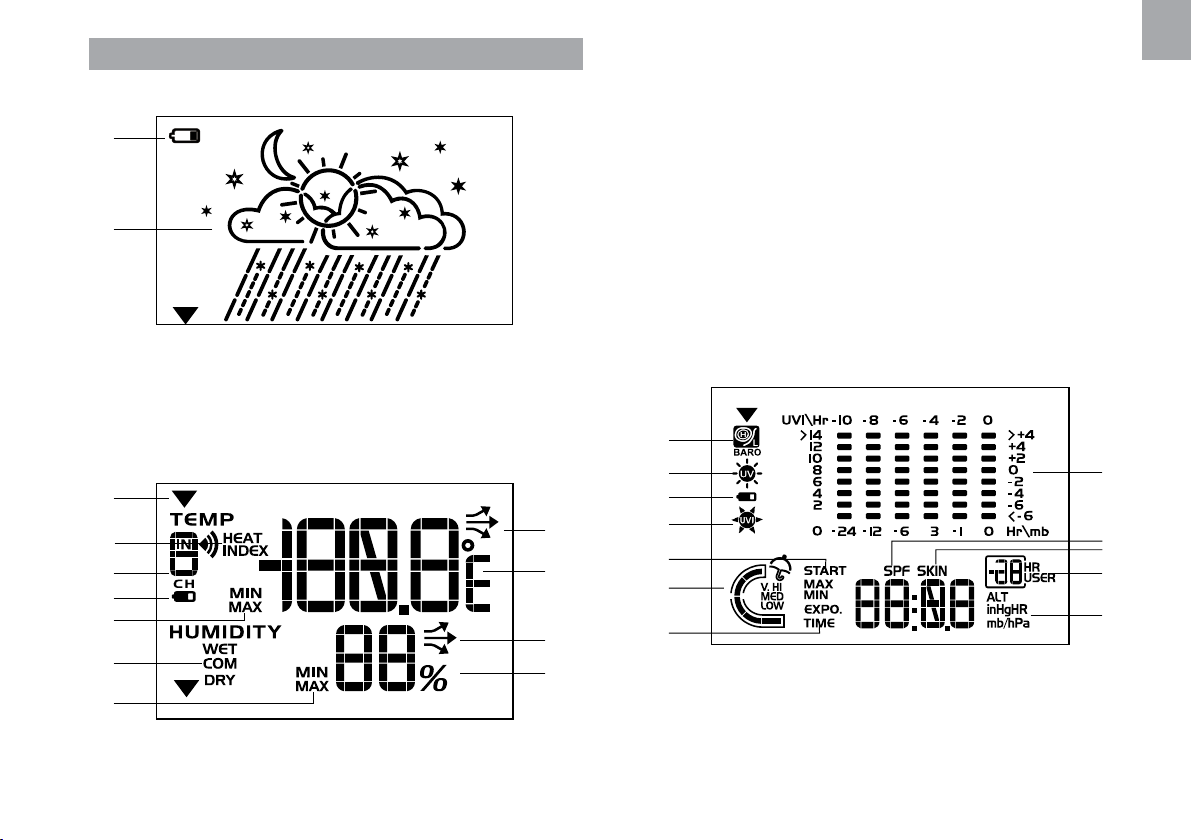
LCD DISPLAY
Weather Forecast Area
1
2
1. Low battery icon for main unit
2. Weather display
Temperature / Humidity / Comfort Zone Area
1
2
3
4
5
6
7
1. Selected Area icon
2. Heat Index
3. Indoor / Outdoor channel number (IN, 1-5) / reception
status
4. Low battery icon for remote sensor
5. MAX / MIN temperature
6. Comfort levels
7. MAX / MIN humidity
8. Temperature trend
9. Temperature - °C / °F
10. Humidity trend
11. Humidity
EN
8
9
10
11
5
Page 7
EN
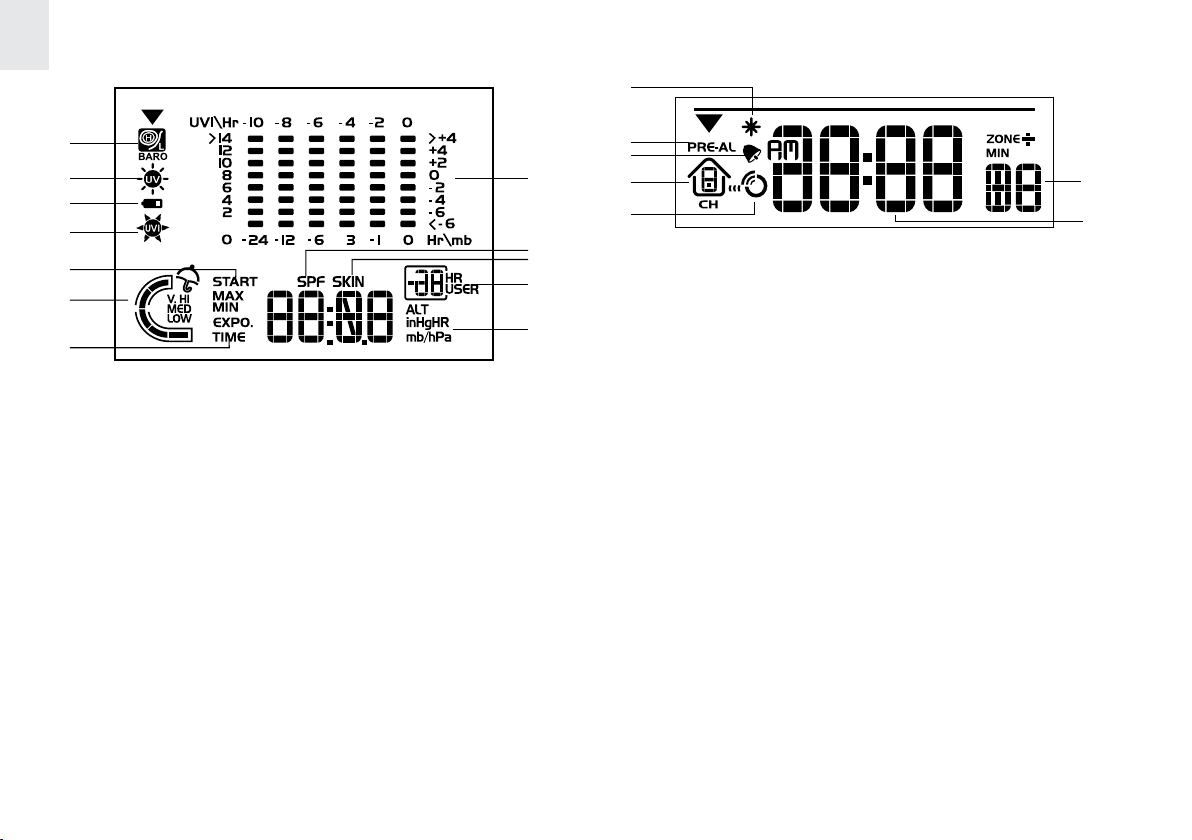
UVI / Barometer Area
Clock / Alarm / Calendar Area
1
1
2
3
4
5
6
7
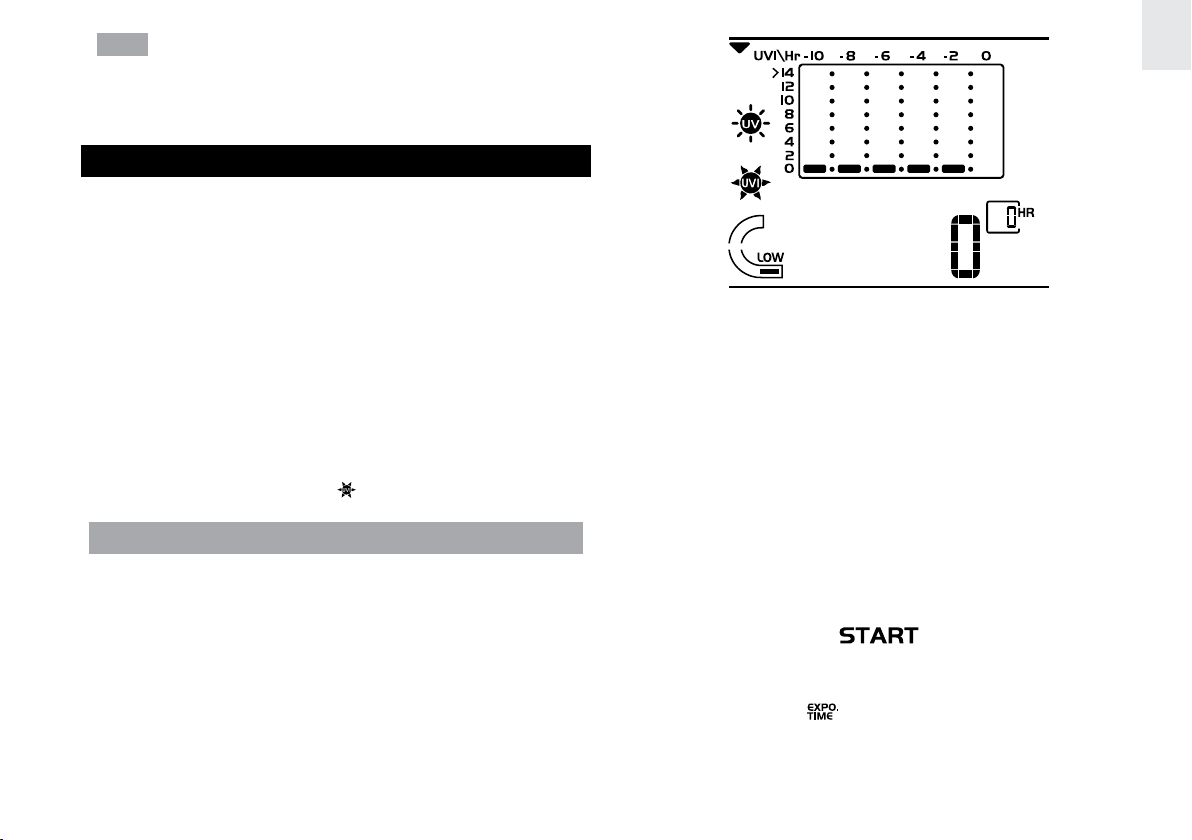
1. Barometric pressure is showing
2. UV is showing
3. Low battery icon for UV sensor
4. UVI value is showing
5. UV exposure time countdown has started
6. UV index level
7. UV exposure time for user
8. Barometer / UV chart
9. SPF applied to user for UV exposure
10. User skin type for UV exposure
11. User number (for UV Mode) or hour history for UV /
Barometric pressure reading
12. Altitude / barometric pressure / UVI reading
8
9
10
11
12
2
D
3
4
5
1. Pre-Alarm is set
2. Pre-Alarm display / Pre-Alarm setting
3. Daily Alarm is set
4. Channel with RF clock reception is locked
5. RF clock reception icon
6. Offset time-zone
7. Time / date / calendar
M
M
Yr
6
D
7
6
Page 8
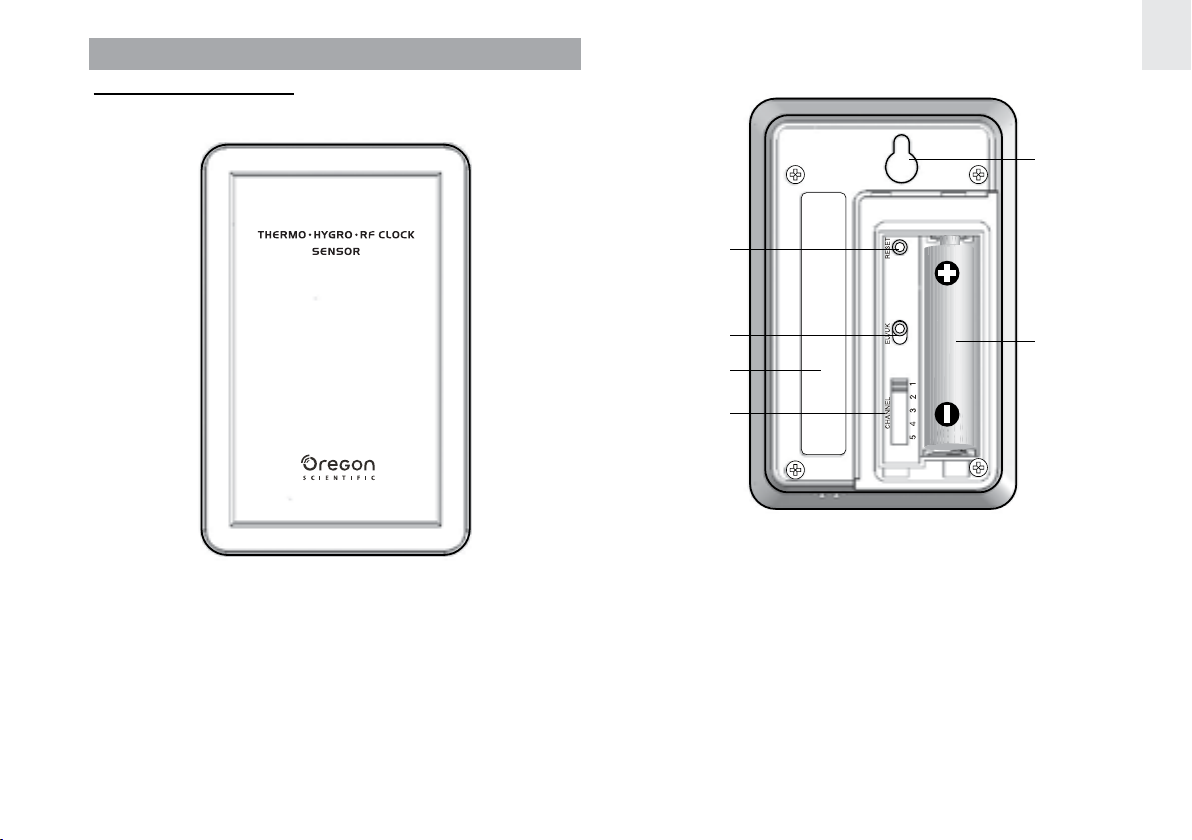
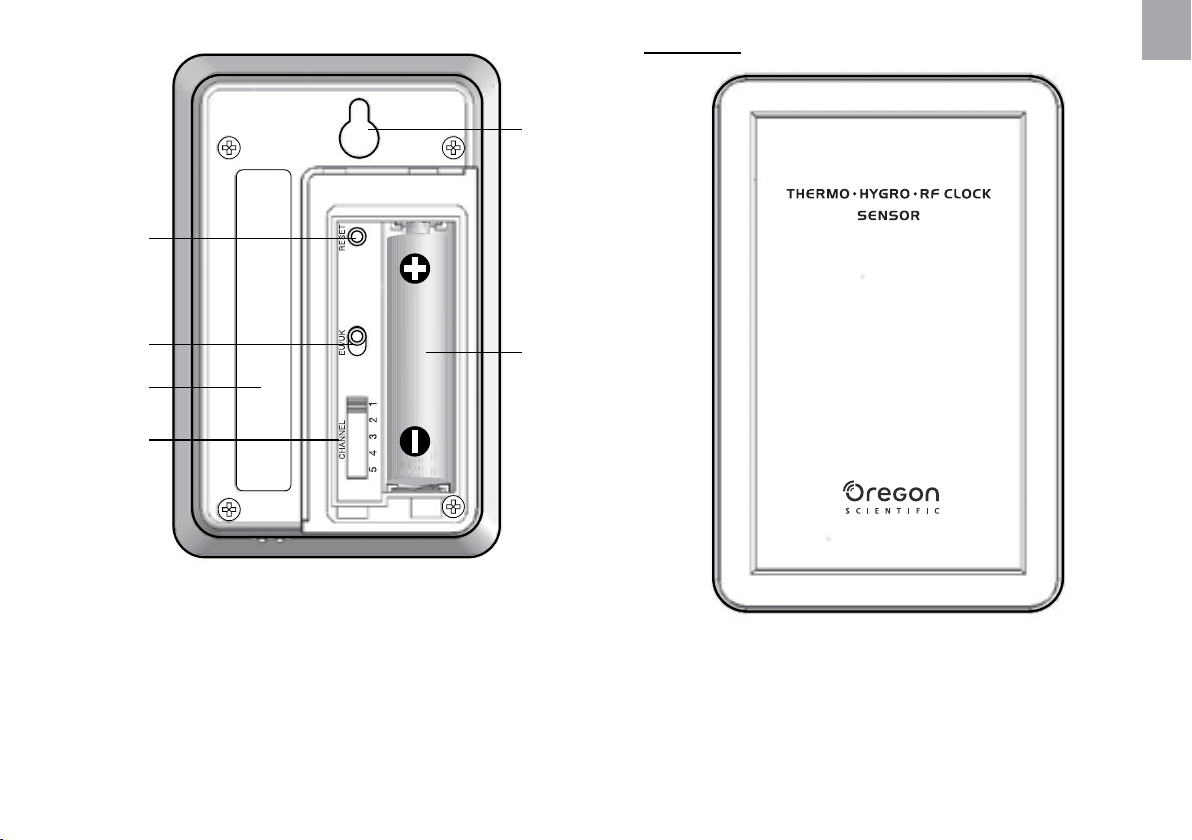
REMOTE SENSOR
RTGN318 / RTGN318D
EN
5
1
2
3
4
1. RESET
2. EU / UK radio signal format switch (RTGN318D only)
3. Double sided adhesive tape
4. CHANNEL switch (1-5)
5. Wall mount
6. Battery compartment
7
6
Page 9
EN
4
5
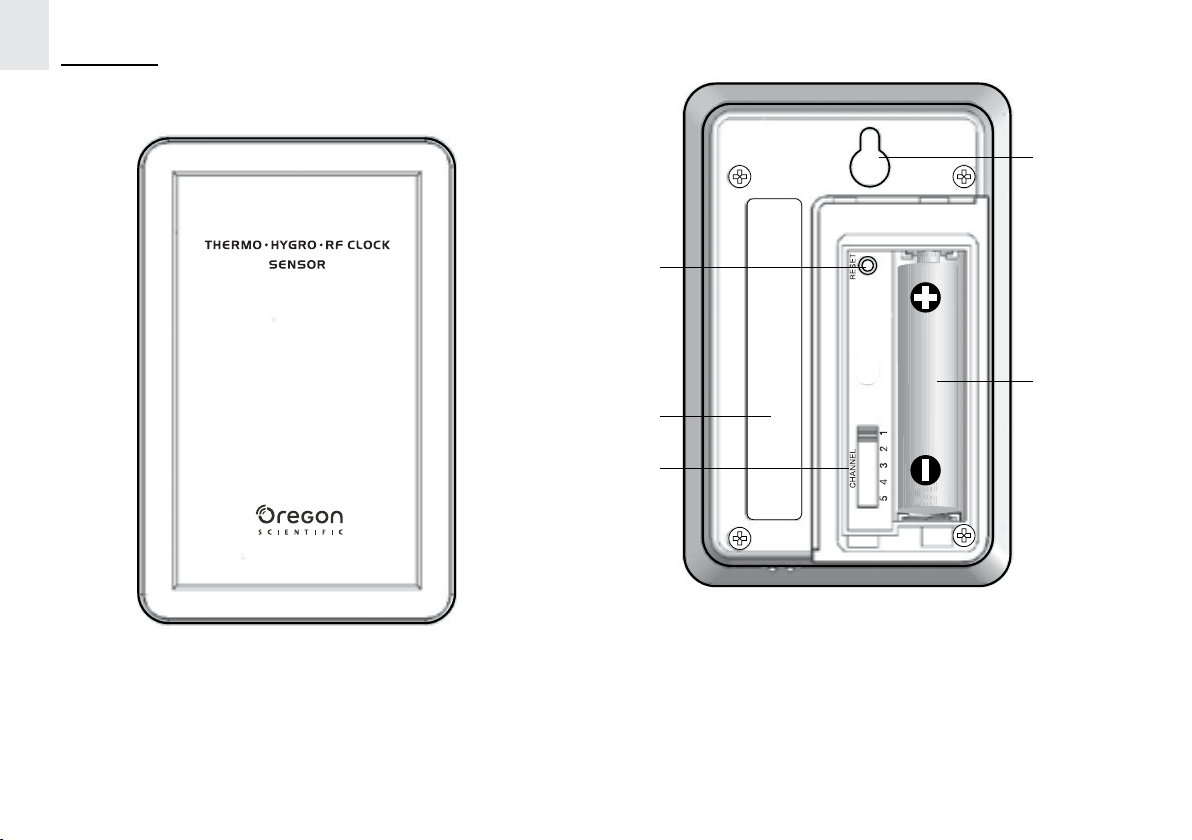
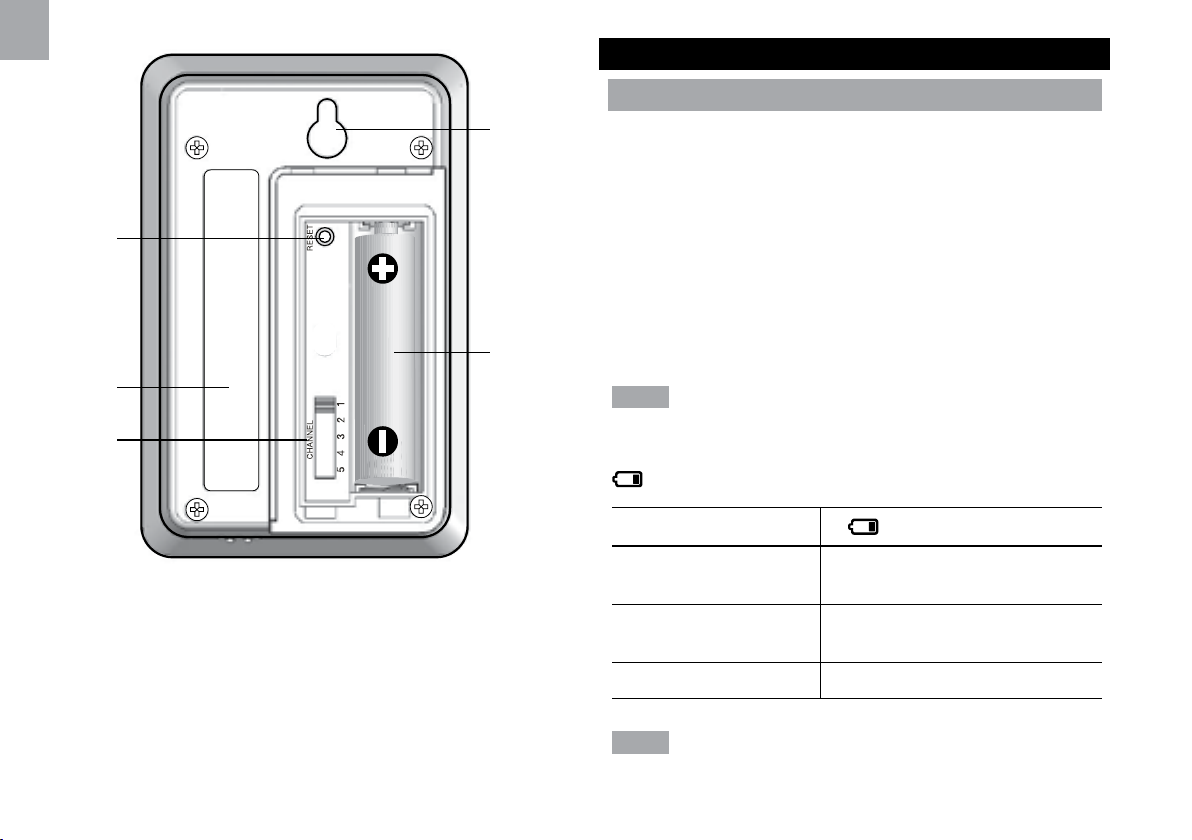
RTGN318A
1
2
3
1. RESET
2. Double sided adhesive tape
3. CHANNEL switch (1-5)
4. Wall mount
5. Battery compartment
8
Page 10

GETTING STARTED
BATTERIES
Batteries are supplied with this product:
• Main unit 3 x UM-4 (AAA) 1.5V
• Remote unit 1 x UM-3 (AA) 1.5V
Insert batteries before first use, matching the polarity as
shown in the battery compartment. For best results, install
batteries in the remote sensor before the main unit. Press
RESET after each battery change.
NOTE
Do not use rechargeable batteries. Batteries should
not be exposed to excessive heat such as sunshine or fire.
shows when batteries are low.
UNIT
Main Weather Forecast Area
Remote Temperature / Humidity Area
UV Sensor UVI / Barometric Pressure Area
NOTE It is recommended that you use alkaline batteries
with this product for longer performance.
LOCATION
AC ADAPTOR (MAIN UNIT)
The batteries serve as a back-up power supply. For
continuous use, please install the AC adaptor at the base
of the unit.
Make sure the adaptor is not obstructed and the adaptor
socket is easily accessible to the unit.
To be completely disconnected from the power input, the
adaptor should be disconnected from the main unit.
NOTE
The main unit and adaptor should not be exposed
to wet conditions. No objects filled with liquid, such as
vases, should be placed on the main unit and adaptor.
CHANGE SETTINGS
1. Press SELECT to switch between Areas.
indicates the selected Area.
2. Most Areas have alternate display options
(for example, Clock / Alarm or Barometer / UVI).
Press MODE to switch options, or ALARM to
switch between clock and alarm.
3. Press and hold MODE for 2 seconds to enter setting
mode.
4. Press UP or DOWN to change settings.
5. Press MODE to confirm.
REMOTE SENSOR
This product is shipped with RTGN318 / RTGN318D /
RTGN318A Thermo / Hygro Sensor. The main unit can
collect data from up to 6 sensors (5 Thermo / Hygro Sensors
and 1 UV Sensor). (Additional sensors are sold separately.
Visit www.oregonscientific.com for additional sensors.)
The RTGN318 / RTGN318D / RTGN318A Sensor collects
temperature and humidity readings, and signals from official
time-keeping organizations for the radio-controlled clock.
SET UP THERMO / HYGRO SENSOR
1. Open the battery compartment.
9
EN
Page 11

EN
2. Insert the batteries.
3. Set the channel and radio signal format (RTGN318D
only). The switches are located in the battery
compartment.
SWITCH OPTION
signal transmission.
NOTE The transmission range may vary and is subject to
the receiving range of the main unit.
You may need to experiment with various locations to get
the best results.
Channel If you are using more
than one sensor, select a
different channel for each
sensor.
Radio Signal
Format
4. Press RESET.
5. Close the battery compartment.
For best results:
• Insert the batteries and select the unit, channel, and
radio signal format before you mount the sensor.
• Place the sensor out of direct sunlight and
• Do not place the sensor more than 70 metres
(230 feet) from the main (indoor) unit.
• Position the sensor so that it faces the main
(indoor) unit, minimizing obstructions such as
doors, walls, and furniture.
• Place the sensor in a location with a clear view to
the sky, away from metallic or electronic objects.
• Position the sensor close to the main unit during
cold winter months as below-freezing
temperatures may affect battery performance and
EU (DCF) / UK (MSF)
(RTGN318D only)
moisture.
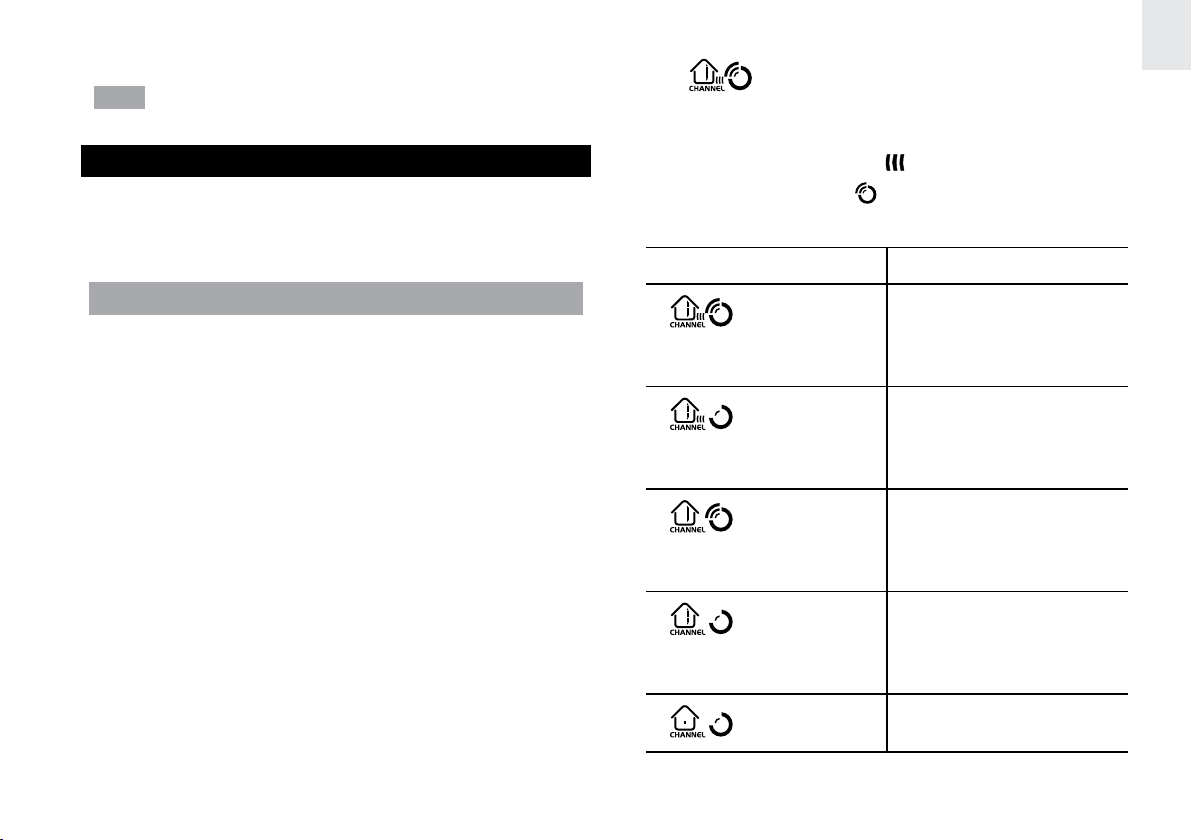
SENSOR DATA TRANSMISSION
Data is sent from the sensor(s) every 60 Seconds. The
reception icon shown in the Temperature / Humidity Area
indicates the status.
ICON DESCRIPTION
Main unit is searching
for sensors.
At least 1 channel has
been found.
Sensor 1 is sending
data. (The number
shows which sensor is
selected.)
--- shows in
Temperature /
Humidity Area
The selected sensor
cannot be found. Search
for the sensor or check
batteries.
SEARCH FOR SENSOR
To search for a Thermo / Hygro sensor, press SELECT to
navigate to the Temperature / Humidity Area.
10
will show
Page 12
next to the Area. Then, simultaneously press and hold MEM
and CHANNEL for 2 seconds.
If the sensor is still not found, check the
NOTE
batteries.
CLOCK AND CALENDAR
This product tracks the time and date based on radiocontrolled signals from the RTGN318 / RTGN318D /
RTGN318A remote sensor, or manual settings that you
enter.
Once complete, the reception icon will stop blinking.
The
2 factors:
• Connection between the main unit and the sensor
that collects RF signals (
• RF signal reception (
How these signals work together:
ICON MEANING
icon shown in the Clock Area indicates
)
)
EN
RADIO-CONTROLLED CLOCK
The time and date are automatically updated by radio-
controlled clock signals from official time-keeping
organizations. The signals are collected by the remote
sensor RTGN318 / RTGN318D / RTGN318A.
• BAR908HG (RTGN318):
DCF-77 signal: within 1500 km (932 miles) of Frankfurt,
Germany.
• BAR908HGU (RTGN318D):
Slide EU / UK to select the signal received.
EU: DCF-77 signal: within 1500 km (932 miles) of Frankfurt,
Germany.
UK: MSF-60 signal: within 1500 km (932 miles) of Anthorn,
England.
• BAR908HGA (RTGN318A):
WWVB-60 signal: within 3200 km (2000 miles) of Fort
Collins,Colorado.
Initial reception takes 2-10 minutes, and is initiated when
you first set up the unit, and whenever you press RESET.
The unit has contact
with the sensor and
has synchronized the
time.
The unit has contact
with the sensor but
the time has not been
synchronized.
The unit has lost
contact with the remote
sensor but the time is
synchronized.
The unit has lost
contact with the remote
sensor and the time is
not synchronized.
The unit cannot reach
the remote sensor.
11
Page 13
EN
TURN RADIO-CONTROLLED CLOCK ON / OFF
If you wish to manually set the clock, you must first
disable the radio-controlled feature. To do this, navigate
to the Clock / Alarm Area. Then, press and hold DOWN
on the main unit for 2 seconds. To enable it, navigate
to the Clock / Alarm Area, then press and hold UP for
2 seconds.
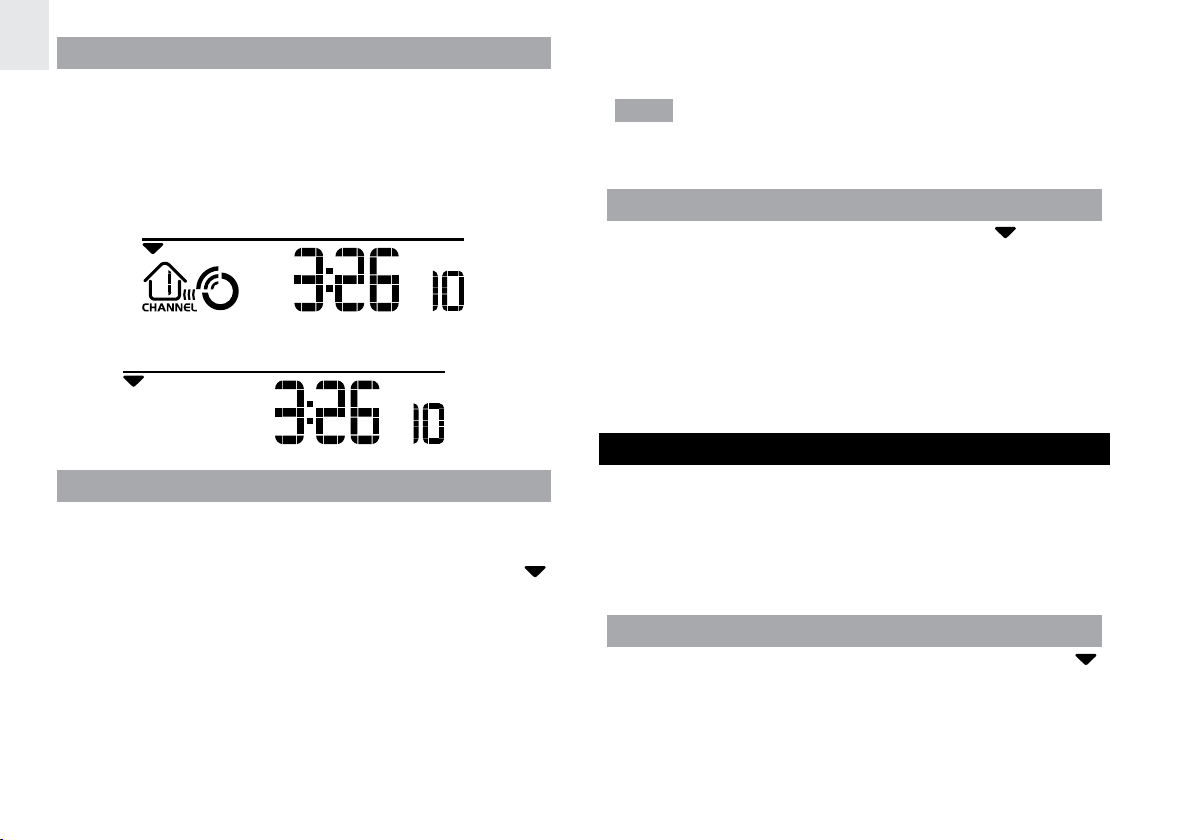
RF clock enabled:
RF clock disabled:
SET
SET CLOCK
You only need to do this if you have disabled the radiocontrolled clock, or if you are too far from a RF signal.
1. Press SELECT to navigate to the Clock Area.
will show next to the Area.
2. Press and hold MODE for 2 seconds.
3. Select the time zone offset hour (+ / -23 hours),
12 / 24 hour format, hour, minute, year, date / month
format, month, date and display language.
4. Press UP or DOWN to change the setting.
5. Press MODE to confirm.
BAR908HGA: Select the time zone: (0) Pacific, (+1)
Mountain, (+2) Central or (+3) Eastern.
NOTE The language options are (E) English,
(F) French, (D) German, (I) Italian, and (S) Spanish. The
language you select determines the weekday display.
SWITCH CLOCK DISPLAY
Press SELECT to navigate to the Clock Area.
next to the Area.
Press MODE to toggle between:
• Clock with seconds
• Clock with day
• Clock with time-zone offset
• Calendar
will show
ALARMS
This product has 2 alarms: The Daily Alarm and a
Pre-Alarm for snowy weather. The Daily Alarm can be set
to go off at the same time every day. The Pre-Alarm sounds
only when the Daily Alarm is activated and the recorded
temperature from Channel 1 Sensor falls to 2°C (35.6°F)
or below.
SET DAILY ALARM
1. Press SELECT to navigate to the Clock Area.
will show next to the Area.
2. Press ALARM to view the alarm. (AL will show
at the top.)
3. Press and hold ALARM for 2 seconds.
12
Page 14

4. Select the hour and minute. Press UP or DOWN to
change settings.
5. Press ALARM to confirm.
6. The Daily Alarm icon
will appear when the alarm
is set.
SET PRE-ALARM
The Pre-Alarm can be set to sound 15, 30, 45, or 60 minutes
before the Daily Alarm. It will sound whenever the recorded
temperature from Channel 1 Sensor falls to 2°C (35.6°F)
or below.
For example, if you set the alarm to 7:00 AM, and the PreAlarm to 45 minutes, the Pre-Alarm will sound at 6:15 AM
provided the outdoor temperature at Channel 1 Sensor is
2°C or below.
1. Set up and activate the Daily Alarm.
2. Press ALARM to switch to Pre-Alarm view. (PRE-AL
will show at the top.)
3. Press and hold ALARM for 2 seconds.
4. Press UP or DOWN to select 15, 30, 45 or
60 minutes. This is the amount of time the Pre-Alarm
will sound BEFORE the Daily Alarm. The Pre-Alarm
is automatically activated when you select a time.
5. Press ALARM to confirm.
shows when the Pre-Alarm is set.
NOTE The Daily Alarm will NOT function until the next day if
the Pre-Alarm has been triggered. Also, if you deactivate the
Daily Alarm, the Pre-Alarm is automatically deactivated.
ACTIVATE ALARM
Navigate to the Clock Area, then press ALARM to switch to
Daily Alarm or Pre-Alarm view. To activate or deactivate the
alarm, press UP or DOWN.
When the alarm time is reached, the backlight will be
on for 8 seconds and crescendo alarm will sound for
2 minutes. Press any key (except snooze) to silence the
alarm. It will sound at the same time the next day.
SNOOZE
Press SNOOZE to temporarily disable the alarm for 8
minutes.
or will blink while snooze is on.
BAROMETER
This product tracks fluctuations in barometric pressure
to provide the weather forecast, and the current and past
24 hours barometric pressure history measurements are
recorded by the main (indoor) unit.
VIEW BAROMETER AREA
Press SELECT to navigate to the Barometer Area.
is NOT shown, press MODE.
If
Barometric data is shown in 2 areas at the bottom of the
display. The upper area shows a 24-hour bar chart. The low
area shows current and historical readings.
SELECT MEASUREMENT UNIT
EN
13
Page 15

EN
SELECT MEASUREMENT UNIT
Slide the mb / inHg switch (in the clock battery compartment),
to change the display unit.
VIEW BAROMETER HISTORY
Navigate to the Barometer Area. Then press HISTORY
repeatedly to scroll through the measurements. The
number shown in the HR box indicates how long ago each
measurement was taken (e.g. 2 hours ago, 3 hours ago,
etc.).
2. Press and hold HISTORY for 2 seconds.
3. Press UP or DOWN to set the altitude in 10-metre
increments (-100m to 2500m).
4. Press HISTORY to confirm.
WEATHER FORECAST
This product forecasts the next 12 to 24 hours of weather
within a 30-50 km (19-31 mile) radius. The forecast is based
on barometric pressure trend readings.
The top area shows an animated icon indicating the
forecasted weather.
WEATHER FORECAST ICONS
ICON DESCRIPTION
Clear
Day / Night
Partly cloudy
BAR CHART DISPLAY
The bar chart visually shows atmospheric changes from the
current hour (0) to 24 hours prior (-24).
SET ALTITUDE
Set the altitude to match how far above or below sea level
you are living. This ensures that the barometric pressure
readings are accurate.
1. Navigate to the Barometer Area.
Day / Night
Cloudy
Rainy
Snowy
14
Page 16
NOTE The night time icon displays from 6 PM to 6 AM.
When the Channel 1 sensor records a temperature
of 2°C (35.6°F) or lower, the RAINY icon becomes
SNOWY.
UV MEASUREMENT
The UVR128 Ultra-Violet Radiation Sensor is available as an
optional item for BAR908HG / BAR908HGU / BAR908HGA.
The UV sensor gives you the following information at your
fingertips:
• 10-hour Ultra-Violet Index (UVI) record.
• Automatic calculation of acceptable UV exposure
times based on pre-set user profiles (4 users
maximum).
• UVI Danger Alert when UV Index reaches unsafe
levels.
UV data is shown in the same area as the Barometer. Press
SELECT to navigate to the Barometer Area, then press
MODE to display the UV icon
and data.
NEW ADDITIONAL UV FEATURES
UV EXPOSURE TIME COUNTDOWN
To set the exposure time countdown you need to set the
Skin Type and Sun Protection Factor (SPF) as follows:
1. Press SELECT to navigate to the Barometer Area,
then press MODE to select the UV display.
2. Press CHANNEL to select user 1-4.
3. Press and hold MODE for 2 seconds to enter the
Skin Type Setting Mode of the selected user.
4. Press UP or DOWN to choose 1 of the 4 skin type
settings. Then press MODE to confirm and enter the
SPF Set Up Mode.
5. Press UP or DOWN to increase or decrease the SPF
value. Then press MODE to confirm and enter the
UV Exposure Time Countdown Setting Mode.
6. Press UP or DOWN to enable or disable countdown.
Press MODE to exit the UV Exposure Time
Countdown Mode and start the exposure time
countdown. The remaining user UV exposure time
will display and the
7. When the countdown has reached “0”, an alarm will
sound for 2 minutes. Press any button to turn the
alarm off. The
if you have stopped the alarm sound.
icon will flash for 2 minutes even
will flash.
EN
15
Page 17
EN
MAXIMUM / MINIMUM MEMORY FOR UVI
To view the maximum and minimum memory for UVI:
1. Press SELECT to navigate to the Barometer Area.
2. Press MODE to select the UV display.
3. Press MEM to show maximum, minimum and
current UVI readings.
4. Press and hold MEM for 2 seconds to clear the
UVI memory.
NOTE The UV sensor must be activated before you try and
set the additional features.
TEMPERATURE AND HUMIDITY
The weather station can display the following information
from any of the 5 remote sensors:
• Current, minimum, and maximum temperatures
and relative humidity percentages.
• Comfort level indicator and trend line (rising,
falling, or steady).
Data is collected and displayed approximately every
60 seconds.
SELECT SENSOR CHANNEL
Press CHANNEL to switch between sensors 1-5.
• To auto-scan between sensors, press and hold
CHANNEL for 2 seconds. Each sensor’s data will
be displayed for 3 seconds.
• To end auto-scan, press CHANNEL or MEM
with the Temperature / Humidity Area selected.
NOTE If you select a sensor that collects only temperature
data, the humidity will not be shown.
MINIMUM / MAXIMUM RECORDS
• Press MEM repeatedly to view current,
maximum and minimum records for the selected
sensor.
• To clear the records, press and hold MEM
for 2 seconds. A beep will sound to confirm that
the memory has been cleared.
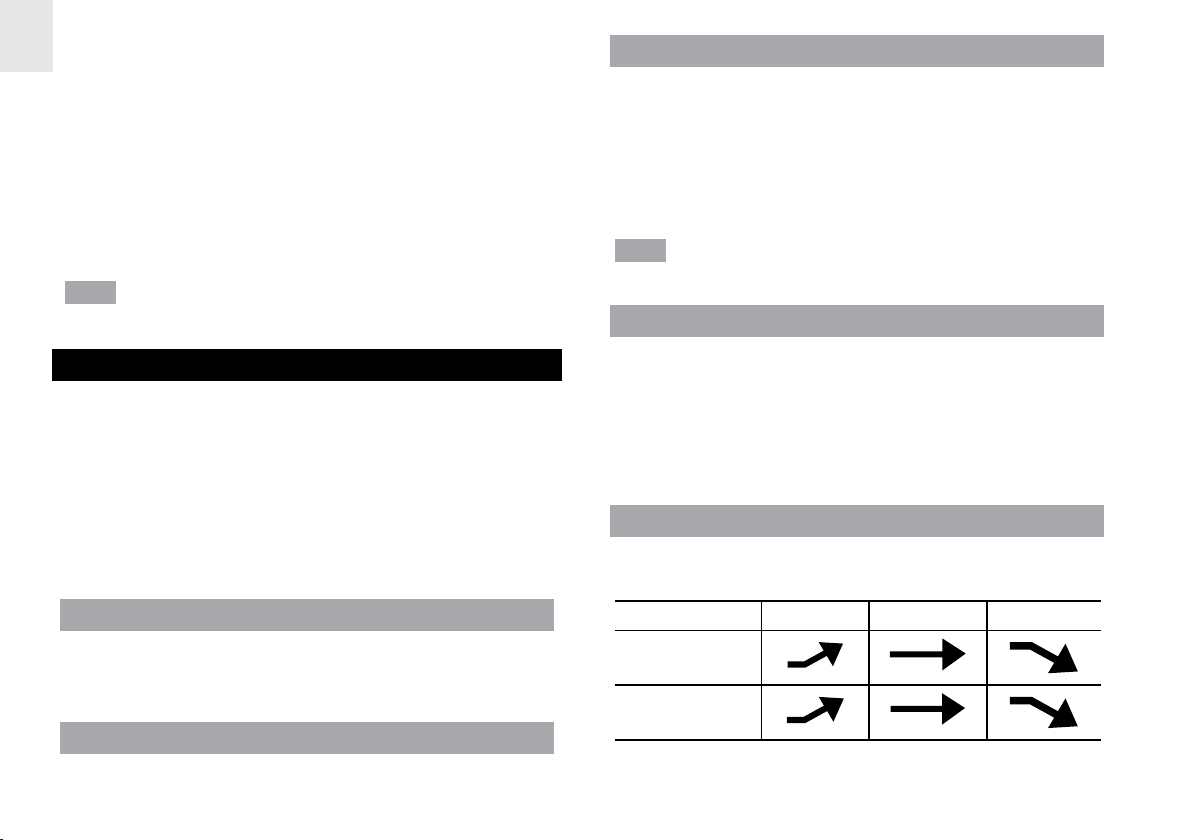
TEMPERATURE AND HUMIDITY TREND
The trend lines are shown next to the temperature and
humidity readings.
VIEW TEMPERATURE AND HUMIDITY AREA
Press SELECT to navigate to the Temperature and Humidity
Areas.
Temperature data is given at the top; Humidity is below.
SELECT MEASUREMENT UNIT
Slide the °C / °F switch (inside the clock battery
compartment), to the setting you want.
TREND RISING STEADY FALLING
TEMPERATURE
HUMIDITY
16
Page 18
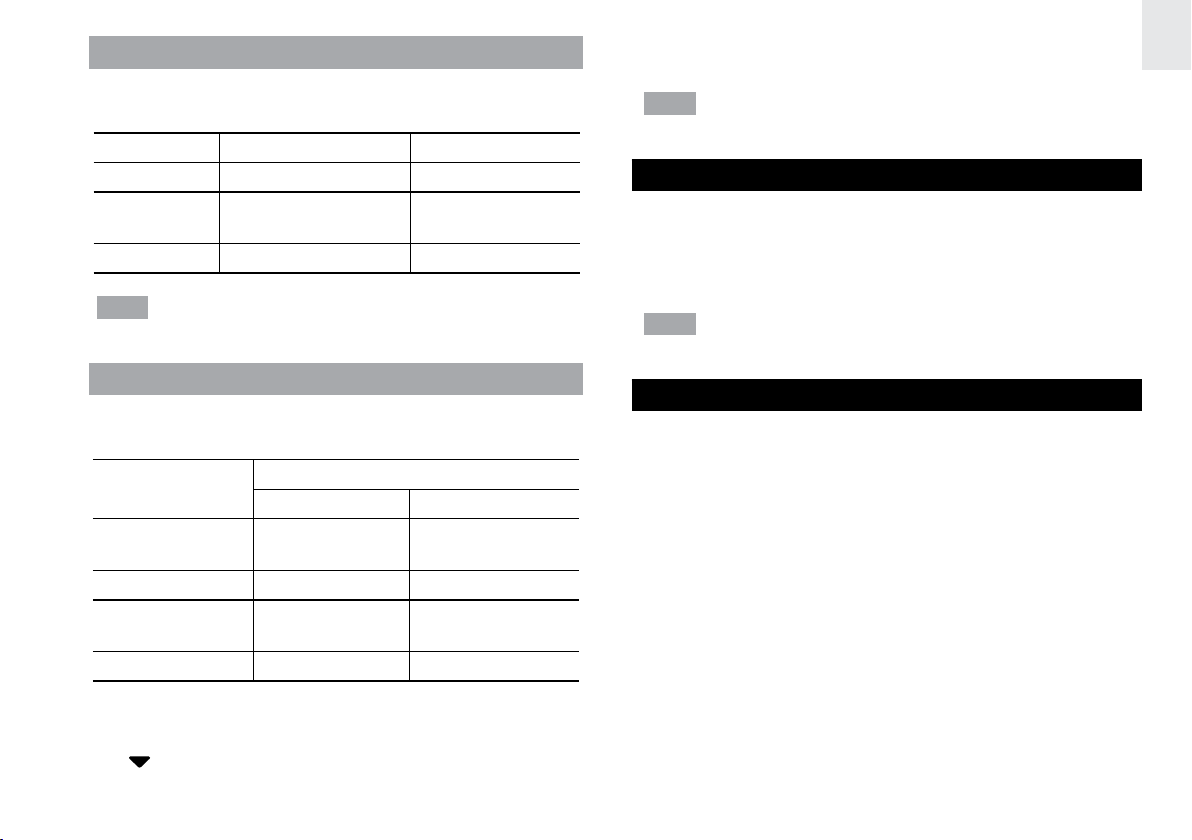
COMFORT ZONE
The Comfort Zone indicates how comfortable the climate is,
based on current temperature and humidity measurements.
ZONE TEMPERATURE HUMIDITY
WET Any >70%
COM
DRY Any <40%
NOTE
This information is shown in the Humidity Area
20-25°C
(68-77°F)
40-70%
when the current measurement is displayed.
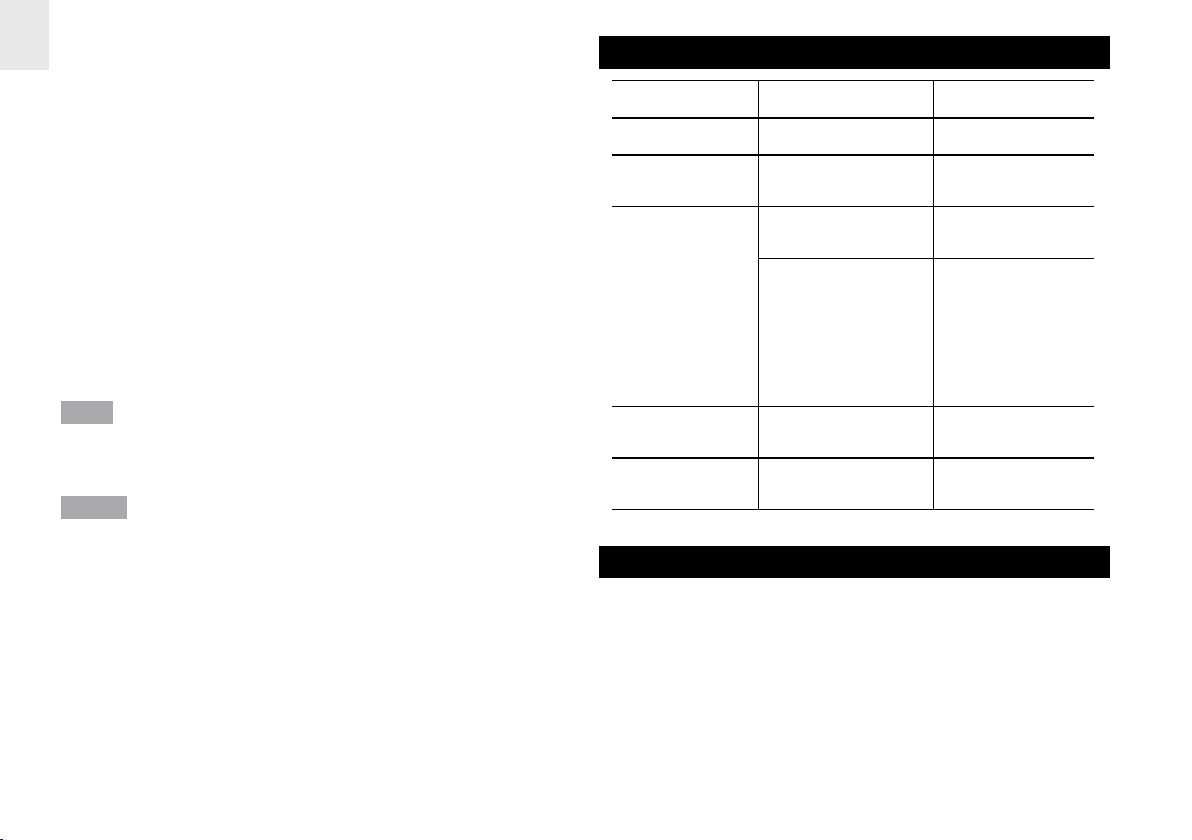
HEAT INDEX
The Heat Index advises 4 levels of warning if the temperature
is high.
DANGER
CATEGORY
Extreme
Danger
Danger 40.5-54.4 105-130
Extreme
Caution
Caution 26.6-32.2 80-90
To display the Heat Index:
1. Press SELECT to navigate to the Temperature Area.
will show next to the Area.
2. Press MODE to reach the Heat Index display.
TEMPERATURE
°C °F
>54.5 >130
32.2-40.5 90-105
3. Press CHANNEL to select the desired channel.
NOTE If the temperature is below 26°C / 80°F, or the desired
channel is not working, the Heat Index will display “NA”.
RESET SYSTEM
The RESET button is located at the bottom of the unit.
Press RESET when you change the batteries and whenever
performance is not behaving as expected (for example,
unable to establish radio frequency link with remote unit or
radio-controlled clock).
NOTE When you press RESET, all settings will return to
default value, and you will lose all stored information.
PRECAUTIONS
• Do not subject the unit to excessive force, shock, dust,
temperature or humidity.
• Do not cover the ventilation holes with any items such
as newspapers, curtains etc.
• Do not immerse the unit in water. If you spill liquid
over it, dry it immediately with a soft, lint-free cloth.
• Do not clean the unit with abrasive or corrosive
materials.
• Do not tamper with the unit’s internal components.
This invalidates the warranty.
• Only use fresh batteries. Do not mix new and old
batteries.
• Images shown in this manual may differ from the actual
display.
• When disposing of this product, ensure it is collected
17
EN
Page 19
EN
separately for special treatment and not as normal
household waste.
• Placement of this product on certain types of wood
may result in damage to its finish for which Oregon
Scientific will not be responsible. Consult the furniture
manufacturer’s care instructions for information.
• The contents of this manual may not be reproduced
without the permission of the manufacturer.
• Do not dispose old batteries as unsorted municipal
waste. Collection of such waste separately for special
treatment is necessary.
• Please note that some units are equipped with a
battery safety strip. Remove the strip from the battery
compartment before first use.
NOTE The technical specifications for this product and the
contents of the user manual are subject to change without
notice.
NOTE Features and accessories will not be available in all
countries. For more information, please contact your local
retailer.
TROUBLESHOOTING
PROBLEM SYMPTOM REMEDY
Barometer Strange readings Set altitude/unit
Calendar
Clock
Temperature
Remote sensor
Strange date /
month
Cannot adjust
clock
Cannot auto-synch
Shows “LLL” or
“HHH”
Cannot locate
remote sensor
Change
language
Disable radiocontrolled clock
1. Adjust
batteries
2. Press RESET
3. Manually
activate radiocontrolled clock
Temperature is
out-of-range
Check batteries
SPECIFICATIONS
Main Unit Dimensions
L x W x H 175 x 93 x 93 mm
(6.89 x 3.66 x 3.66 in)
Weight 336 g (11.85 oz)
without battery
Remote Unit Dimensions
L x W x H 117 x 80 x 171 mm
18
Page 20

Weight 80 g (2.82 oz)
without battery
(4.61 x 3.15 x 6.73 in)
partly cloudy (day /
night), cloudy, rainy,
snowy
EN
Temperature
Unit °C or °F
Indoor Range -5 °C to 50 °C
(23 °F to 122 °F)
Outdoor Range -20 °C to 60 °C
(-4 °F to 140 °F)
Resolution 0.1 °C (0.2° F)
Comfort 20 °C to 25 °C
(68 °F to 77 °F)
Memory Min / Max
Relative Humidity
Range 25% to 95%
Resolution 1%
Comfort 40% to 70%
Memory Min / max
Barometer
Unit mb / hPa or inHg
Resolution 1 mb (0.03 inHg)
Altitude -100 to 2500 m
(-328 to 2734 ft)
Display Sunny (day / night),
Remote Unit
RF frequency 433 MHz
Range Up to 70 m (230 ft) with
no obstructions
Transmission Approx. every 1 minute
Channel No. 1, 2, 3, 4 or 5
Unit °C or °F
Radio-Controlled Clock
Synchronization Auto or disabled
Clock display HH:MM:SS
Hour format 12hr AM/PM
24hr
Calendar DD / MM or MM / DD;
Day of the week in 1 of
5 languages (E, G, F, I, S)
Alarm Daily & Pre-Alarm;
2-minute crescendo
Snooze 8-minute snooze
Power
Main Unit
Power adapter 6V AC adapter
19
Page 21

EN
Batteries 3 x UM-4 (AAA) 1.5V
Thermo / Hygro Remote Unit
Batteries 1 x UM-3 (AA) 1.5V
NOTE It is recommended that you use alkaline batteries
with this product for longer performance.
ABOUT OREGON SCIENTIFIC
Visit our website (www.oregonscientific.com) to learn more
about Oregon Scientific products.
If you’re in the US and would like to contact our Customer
Care department directly, please visit:
www2.oregonscientific.com/service/support.asp
For international inquiries, please visit:
www2.oregonscientific.com/about/international.asp
EU-DECLARATION OF CONFORMITY
Hereby, Oregon Scientific, declares that this Metal Weather
Station (BAR908HG / BAR908HGU / BAR908HGA) is
in compliance with the essential requirements and other
relevant provisions of Directive 1999/5/EC. A copy of the
signed and dated Declaration of Conformity is available on
request via our Oregon Scientific Customer Service.
COUNTRIES RTTE APPROVAL COMPLIED
All EU countries, Switzerland
and Norway
CH
N
FCC STATEMENT
This device complies with Part 15 of the FCC Rules.
Operation is subject to the following two conditions: (1) This
device may not cause harmful interference, and (2) This
device must accept any interference received, including
interference that may cause undesired operation.
WARNING Changes or modifications not expressly
approved by the party responsible for compliance could void
the user’s authority to operate the equipment.
NOTE This equipment has been tested and found to comply
with the limits for a Class B digital device, pursuant to Part
15 of the FCC Rules. These limits are designed to provide
reasonable protection against harmful interference in a
residential installation.
20
Page 22

This equipment generates, uses and can radiate radio
frequency energy and, if not installed and used in accordance
with the instructions, may cause harmful interference to
radio communications. However, there is no guarantee
that interference will not occur in a particular installation.
If this equipment does cause harmful interference to radio
or television reception, which can be determined by turning
the equipment off and on, the user is encouraged to try
to correct the interference by one or more of the following
measures:
• Reorient or relocate the receiving antenna.
• Increase the separation between the equipment and
receiver.
• Connect the equipment into an outlet on a circuit
different from that to which the receiver is connected.
• Consult the dealer or an experienced radio / TV
technician for help.
DECLARATION OF CONFORMITY
The following information is not to be used as contact
for support or sales. Please visit our website at www2.
oregonscientific.com/service for all enquiries.
We
Name: Oregon Scientific, Inc.
Address: 19861 SW 95th Ave.,Tualatin,
Oregon 97062 USA
Telephone No.: 1-800-853-8883
declare that the product
Product No.: BAR908HG / BAR908HGU /
BAR908HGA
Product Name: Metal Weather Station
Manufacturer: IDT Technology Limited
Address: Block C, 9/F, Kaiser Estate,
Phase 1, 41 Man Yue St., Hung Hom,
Kowloon,
Hong Kong
is in conformity with Part 15 of the FCC Rules. Operation is
subject to the following two conditions: 1) This device may
not cause harmful interference. 2) This device must accept
any interference received, including interference that may
cause undesired operation.
EN
21
Page 23

Estación Meteorológica Metal
Modelo: BAR908HG / BAR908HGU /
BAR908HGA
MANUAL DEL USUARIO
ÍNDICE
Vista del Producto ........................................................... 3
Vista Frontal ..................................................................3
Vista Trasera .................................................................4
Display LCD .................................................................. 5
Sensor Remoto ............................................................. 6
Empezando ...................................................................... 8
Pilas .............................................................................. 8
Adaptador AC (Unidad Principal) .................................. 9
Cambiar la Configuración ............................................. 9
Sensor Remoto ................................................................ 9
Configurar el sensor Thermo/ higrómetro.....................9
Trasmisión de Datos al Sensor ...................................10
Buscar un Sensor ....................................................... 10
Reloj y Calendario ......................................................... 10
Reloj Radio Controlado .............................................. 11
Cambiando la Recepción de la Radio ON / OFF ........ 11
Configurar el Reloj ...................................................... 12
Cambiar el Display del Reloj ..................................... 12
Alarma ............................................................................ 12
Configurar la Alarma Diaria ........................................12
Configurar la Alarma Predefinida ................................ 13
Activar la Alarma .........................................................13
Snooze ....................................................................... 13
Barometro ...................................................................... 13
Ver el Área del Barometro ..........................................13
Seleccionar Unidad de Medida ................................... 14
Ver el Histórico del Barómetro .................................... 14
Display Gráfico de Barras ........................................... 14
Adjuste de la Altitud .................................................... 14
Previsión del Tiempo ....................................................14
Iconos De La Previsión Del Tiempo ...........................14
Medidas del UV .............................................................. 15
Nuevas Funciones Adicionales UV ............................. 15
Temperatura y Humedad .............................................. 16
Ver el Área de Temperatura y Humedad .................... 16
Seleccionar Unidad de Medida ................................... 16
Seleccionar el Canal del Sensor ................................ 16
Registros Máximos / Mínimos .................................... 16
Tendencias de la Temperatura y Humedad ................ 17
Zona de Confort .......................................................... 17
Índice de Calor ........................................................... 17
Reseteando el Sistema ................................................. 17
1
ES
Page 24

ES
Precaución ..................................................................... 18
Solución de Problemas ................................................. 18
Especificaciones ........................................................... 19
Sobre Oregon Scientific ............................................... 20
EU-Declaración de Conformidad ................................. 20
2
Page 25
VISTA DEL PRODUCTO
VISTA FRONTAL
1
2
3
4
1. Área de la Previsión Meteorológica: Previsión
Meteorológica Animada
2. Área de Temperatura / Humedad / Zona de Confort:
Lectura y líneas de tendencia, zona de confort; número
de canal del sensor
3. Área del Barómetro / UVI: El nivel del UV y el gráfico
de barras de la presión barométrica; Índice UV y
lecturas barométricas
4. Área del Reloj / Alarma / Calendario: Reloj; alarmas;
calendario radio controlado
ES
3
Page 26

ES
VISTA TRASERA
1. ALARM : Ver el estatus de la alarma; configurar la
alarma
2. SELECT: Cambiar de Área
3. UP: Aumentar la configuración / Activar el Reloj Radio
controlado
4. CHANNEL: Cambiar el display del sensor remoto
1
2
3
4
5
6
7
8
5. MODE: Cambiar la Configuración / display
6. HISTORY: Ver el histórico de las lecturas UV y
barométricas
7. DOWN: Disminuir la configuración/ desactivar el reloj
radio controlado
8. MEM: Ver la temperatura actual, máxima y mínima /
humedad / lecturas UV
9. Clavija del Adaptador AC
10. Interruptor mb / Hg
11. Botón RESET
12. Interruptor °C / °F
13. SNOOZE: Activar 8 minutos de snooze
9
10
11
12
13
4
Page 27
DISPLAY LCD
Área de la Previsión Meteorológi
1
2
3. Interior y exterior número de Canal (IN, 1-5) / estado de
la recepción
4. Icono de pilas gastadas para el sensor remoto
5. Temperatura MAX / MIN
6. Niveles de Confort
7. Humedad MAX / MIN
8. Tendencia de la temperatura
9. Temperatura – °C / °F
10. Tendencia de la humedad
11. Humedad
ES
1. Icono de pila gastada de la unidad principal
2. Display del Tiempo
Área de Temperatura / Humedad / Zona de Confort
1
2
3
4
5
6
7
1. Icono de área seleccionada
2. Índice de Calor
8
9
10
11
Área del Barómetro / UVI
1
2
3
4
5
6
7
1. Se está mostrando la presión barométrica
2. Se está mostrando UV
3. Icono de pilas gastadas para el sensor UV
4. Se está mostrando el valor UVI
5. La cuenta atrás del tiempo de exposición ha comenzado
5
8
9
10
11
12
Page 28

ES
6. Índice del nivel UV
7. Tiempo de exposición UV para el usuario
8. Barómetro / Gráfico UV
9. SPF aplicada al usuario para la exposición UV
10. Tipo de piel para la exposición UV del usuario
11. Nº de horas de nuestro histórico para las lecturas UV /
Presión Barométrica ( para el modo UV )
12. Altitud / presión barométrica / lecturas UVI
Área del Reloj / Alarma / Calendario
1
SENSOR REMOTO
RTGN318 / RTGN318D
2
D
3
4
5
1. Alarma predefinida configurada
2. Display de la alarma predefinida/ configuración de la
alarma predefinida
3. Alarma diaria configurada
4. El canal de recepción del Reloj RF está bloqueado
5. Icono de recepción del Reloj RF
6. Zona Horaria
7. Hora / fecha / calendario
M
M
Yr
6
D
7
6
Page 29
RTGN318A
ES
5
1
2
6
3
4
1. RESET
2. Interruptor del formato de la señal de radio EU / UK
(Sólo RTGN318D)
3. Cinta adhesiva de doble cara
4. Interruptor CHANNEL para selección de canal (1-5)
5. Soporte para pared
6. Compartimiento de las Pilas
7
Page 30
ES
EMPEZANDO
PILAS
4
Las pilas se suministran con este producto:
• Unidad Principal 3 x UM-4 (AAA) 1.5V
• Unidad Remota 1 x UM-3 (AA) 1.5V
1
5
2
3
1. RESET
2. Cinta adhesiva de doble cara
3. Interruptor CHANNEL para selección de canal (1-5)
4. Soporte para pared
5. Compartimiento de las Pilas
Inserte las pilas antes del primer uso haciendo coincidir
la polaridad tal y como se muestra en el compartimiento.
Para obtener mejores resultados instale las pilas del control
remoto antes que las de la unidad principal. Por favor pulse
RESET después de cada cambio de pilas.
NOTA No use pilas recargables.No exponga las pilas a
calor excesivo, como la luz del sol o una llama.
Se mostrará cuando las pilas estén gastadas.
UNIDAD
Principal Área de Previsión
Remoto
Sensor UV Área del Barómetro / UVI
LOCALIZACIÓN
Meteorológica
Área de Temperatura /
Humedad
NOTA Se recomienda que use pilas alcalinas con este
producto para una duración prolongada.
8
Page 31

ADAPTADOR AC (UNIDAD PRINCIAL)
Las pilas se usan a modo energía alternativa. Para un uso
continuado, por favor instale el adaptador AC en la base
de la unidad.
Asegúrese de que el adaptador no tenga obstáculos y que
la toma del adaptador sea bien accesible a la unidad.
SENSOR REMOTO
ES
Este producto está equipado con el sensor Termo /
higrómetro RTGN318 / RTGN318D / RTGN318A. Los
datos pueden ser recogidos por hasta 6 sensores ( 5
termo/ higrómetro sensores y 1 sensor UV ). ( Los sensores
adicionales se venden por separado. Por favor contacte con
su proveedor para más información. )
Para desconectar completamente la entrada de energía,
desconecte el adaptador de la unidad principal.
NOTA La unidad principal y el adaptador no deberían
exponerse a entornos húmedos. No coloque ningún objeto
lleno de líquido (como por ejemplo un jarrón) encima de la
unidad principal ni del adaptador.
CAMBIAR LA CONFIGURACIÓN
1. Pulse SELECT para cambiar entre las áreas. Indica
el área seleccionada.
2. La mayoría de las arreas tiene distintos displays
disponibles ( por ejemplo, Reloj / Alarma o Barómetro /
UVI). Pulse MODE para cambiar de opción o ALARM
para cambiar entre reloj y alarma.
3. Mantenga pulsado MODE durante 2 segundos para
entrar en el modo configuración.
4. Pulse UP o DOWN para cambiar la configuración.
5. Pulse MODE para confirmar.
El sensor RTGN318 / RTGN318D / RTGN318A recoge
información de la temperatura, humedad y señales por
radio control de las organizaciones oficiales encargadas de
guardar la hora precisa.
CONFIGURAR EL SENSOR TERMO/ HIGRÓMETRO
1. Abra el compartimiento de las pilas del sensor
remoto.
2. Inserte las pilas.
3. Configure el canal. El Interruptor está situado en el
compartimiento de las Pilas.
INTERRUPTOR OPCIÓN
Canal Si está usando más de un
sensor seleccione un canal
diferente para cada sensor
Formato Señal
de Radio
4. Pulse RESET.
5. Cierre el compartimiento de las pilas.
EU (DCF) / UK (MSF) (Sólo
RTGN318D)
9
Page 32

ES
Para obtener mejores resultados:
• Inserte las pilas y seleccione la unidad, canal y señal
de radio antes montar el sensor.
• Coloque el sensor lejos de la luz solar directa y de
humedad.
• No coloque el sensor a más de 70 metros (230 pies) de
la unidad (interior ) principal.
• Coloque el sensor frente a la unidad principal,
minimizando obstrucciones como puertas, paredes o
muebles.
• Coloque el sensor en un lugar con una vista clara del
cielo y lejos de objetos metálicos o electrónicos.
• Posicione el sensor cerca de la unidad principal durante
los meses fríos de invierno ya que las temperaturas
menores de cero pueden afectar a las pilas y a la
transmisión de la señal.
NOTA El rango de trasmisión puede variar y está sujeto al
rango de recepción de la unidad principal.
Puede que tenga que probar con varias localizaciones
hasta obtener los mejores resultados.
TRASMISIÓN DE DATOS AL SENSOR
Los sensor(es) envían información a la unidad principal cada
60 segundos. El icono de recepción del área de temperatura /
humedad muestra su estatus.
ICONO DESCRIPCIÓN
La unidad principal
está buscando
sensores.
Al menos un canal ha
sido encontrado.
El Sensor 1 está
mandando información.
(el número muestra el
sensor seleccionado.)
Se muestra --- en el
área de Temp /
Humedad
El sensor
seleccionado no
puede encontrarse.
Busque el sensor o
cambie las pilas.
BUSCAR UN SENSOR
Para buscar un Termo / higrómetro sensor pulse SELECT
para navegar hasta el área de temperatura / humedad.
aparecerá a lado de área. Luego, al mismo tiempo mantenga
pulsado MEM y CHANNEL durante 2 segundos.
NOTA Si sigue sin poder encontrar el sensor, compruebe
las pilas.
RELOJ Y CALENDARIO
Este producto busca la hora y la fecha en las señales radio
controladas desde el sensor remoto RTGN318 / RTGN318D/
RTGN318A o el que introduzca manualmente.
10
Page 33

RELOJ RADIO CONTROLADO
Este reloj puede sincronizar automáticamente la fecha y
la hora con las organizaciones oficiales. Las señales son
recogidas por el sensor remoto RTGN318 / RTGN318D /
RTGN318A.
• BAR908HG (RTGN318):
Señal DCF-77: a 1500 m (932 millas) de Frankfurt,
Alemania.
Como funcionan estas señales juntos:
ICONO SIGNIFICADO
La unidad ha contactado con
el sensor y ha sincronizado
la hora.
La unidad ha contactado con
el sensor pero la hora no ha
sido sincronizada.
ES
• BAR908HGU (RTGN318D):
Deslice el interruptor EU / UK para elegir la señal.
UE: señal DCF-77: a 1500 m (932 millas) de Frankfurt,
Alemania.
Reino Unido: señal MSF-60: a 1500 m (932 millas) de
Anthorn, Inglaterra.
• BAR908HGA (RTGN318A):
Señal WWVB-60: a 3200 m (2000 millas) de Fort Collins,
Colorado.
La recepción inicial lleva de 2 a 10 minutos y se inicia
cuando configura la unidad por primera vez y siempre que
pulse RESET. Una vez completado, el icono de recepción
dejará de parpadear.
Los iconos
factores:
• Las conexiones entre la unidad principal y el sensor
que recoge la señal RF (
• Señal de recepción RF (
mostrados en el área del reloj indican 2
)
)
La unidad ha perdido
contacto con el sensor
remoto pero la hora está
sincronizada.
La unidad ha perdido
contacto con el sensor
remoto pero la hora no está
sincronizada.
La unidad no puede alcanzar
el sensor remoto.
CAMBIANDO LA RECEPCIÓN DE LA RADIO ON / OFF
Si desea configurar el reloj manualmente primero debe
deshabilitar la función de radio control. Para hacer esto,
navegue hasta el área del reloj / alarma. Luego mantenga
pulsado DOWN en la unidad principal durante 2 segundos.
Para habilitarla navegue hasta el área del reloj / alarma.
Luego mantenga pulsado UP durante 2 segundos.
11
Page 34

ES
Reloj RF habilitado:
Reloj RF Deshabilitado:
NOTA Se puede elegir entre los siguientes idiomas,
Inglés(E), Francés(F), Alemán(D), Italiano(I) y Español(S).
El idioma que seleccione determinará el display de los días
de la semana.
CAMBIAR EL DISPLAY DEL RELOJ
Pulse SELECT para navegar hasta el área del reloj.
aparecerá a lado de área.
Pulse MODE para cambiar entre:
• Reloj con Segundos
• Reloj con el Día
• Reloj con la Zona Horaria
• Calendario
CONFIGURAR EL RELOJ
Sólo necesita hacer esto si ha deshabilitado el reloj radio
controlado, o si está lejos de una señal RF.
1. Pulse SELECT para navegar hasta el área del reloj.
2. Mantenga pulsado MODE durante 2 segundos.
3. Seleccione su zona horaria (+ / -23 horas), formato de
4. Pulse UP o DOWN para cambiar la configuración.
5. Pulse MODE para confirmar.
BAR908HGA: Elija la zona horaria: (0) Pacífico, (+1)
Montaña, (+2) Central o (+3) Este.
aparecerá a lado de área.
hora12 / 24, hora, minuto, año, fecha / formato del mes,
mes, día y el idioma del display.
ALARMA
Este producto tiene 2 alarmas: Una alarma diaria y una
alarma predefinida para tiempo con nieve. La alarma diaria
puede ser configurada para sonar a la misma hora todos los
días. La alarma predefinida sonará cuando la alarma diaria
esté activada y la temperatura grabada en el sensor del
Canal 1 baje de 2°C (35.6 °F).
CONFIGURAR LA ALARMA DIARIA
1. Pulse SELECT para navegar hasta el área del reloj.
aparecerá a lado de área.
2. Pulse ALARM para ver la alarma. (Se mostrará AL en
la parte de arriba.)
3. Mantenga pulsado ALARM durante 2 segundos.
4. Seleccione la hora y el minuto. Pulse UP o DOWN
para cambiar la configuración.
12
Page 35

5. Pulse ALARM para confirmar.
6. El icono de la alarma diaria
alarma esté configurada.
aparecerá cuando la
CONFIGURAR LA ALARMA PREDEFINIDA
La alarma predefinida puede configurarse para que suene
15, 30, 45, o 60 minutos antes de la alarma diaria. Sonará
cuando la temperatura grabada en el sensor del Canal 1
baje de 2 °C (35.6 °F).
Por ejemplo, si configura la alarma a las 7:00 AM, y la alarma
predefinida a 45 minutos, la alarma predefinida sonará a las
6:15 AM si la información sobre la temperatura exterior del
sensor del Canal 1 es de 2°C o menos.
1. Configure y active la alarma diaria.
2. Pulse ALARM para cambiar a la vista de la alarma
predefinida. (Se mostrara PRE-AL en la parte de
arriba.)
3. Mantenga pulsado ALARM durante 2 segundos.
4. Pulse UP o DOWN para seleccionar 15, 30, 45 o
60 minutos. Esto es el tiempo en que la alarma
predefinida sonara ANTES que la alarma diaria. La
alarma predefinida se activa automáticamente cuando
selecciona una hora.
5. Pulse ALARM para confirmar.
Se muestra cuando la alarma predefinida este activa.
NOTA La alarma diaria NO funcionará hasta el próximo
día si la alarma predefinida ha sido activada. Además si
desactiva la alarma diaria se desactivará al predefinida.
ACTIVAR LA ALARMA
Navegue hasta el área del reloj, luego pulse ALARM para
cambiar de la vista de la alarma diaria la vista del la alarma
predefinida. Para activar o desactivar la alarma pulse UP
o DOWN.
Cuando se llegue a la hora de la alarma, la pantalla se
encenderá 8 segundos y la alarma ira sonando en volumen
creciente durante 2 minutos. Pulse cualquier botón (menos
snooze) para silenciar la alarma. Sonará a la misma hora
el próximo día.
SNOOZE
Pulse SNOOZE para deshabilitar temporalmente la alarma
durante 8 minutos.
esté funcionando.
o parpadearán mientas snooze
BAROMETRO
Este producto sigue las fluctuaciones en la presión
barométrica para ofrecer previsiones meteorológicas. La
presión barométrica de las últimas 24 horas es almacenada
por la unidad (interior ) principal.
VER EL ÁREA DEL BAROMETRO
Pulse SELECT para navegar al área Barométrica.
NO se muestra, pulse MODE.
Si
Los datos barométricos se muestran en 2 áreas en la
parte inferior del display. En la parte superior se muestra
un gráfico de barras de 24 horas. En la parte inferior se
muestra la lectura actual y el histórico.
13
ES
Page 36

ES
SELECCIONAR UNIDAD DE MEDIDA
Deslice el interruptor mb / Hg (en el compartimiento de
las pilas del reloj), para cambiar el formato de medida en
el display.
VER EL HISTÓRICO DEL BARÓMETRO
Navegue hasta el área del Barómetro. Luego pulse
HISTORY repetidamente para pasar por las medidas. El
número mostrado en la caja HR indica hace cuanto tiempo
fue tomada cada medida (ej., hace 2 horas, hace 3 horas,
etc.).
DISPLAY GRÁFICO DE BARRAS
El gráfico de barras muestra visualmente los cambios
atmosféricos desde la hora actual (0) a las 24 horas
anteriores (-24).
AJUSTE DE LA ALTITUD
Configure la altitud dependiendo de a que altura esté
viviendo en relación con se el nivel del mar. Esto asegurará
que las lecturas barométricas sean más precisas.
1. Navegue hasta el área del Barómetro.
2. Pulse HISTORY durante 2 segundos.
3. Pulse UP o DOWN para configurar la altitud
incrementando en saltos de 10 (de -100m a 2500m).
4. Pulse HISTORY para confirmar.
PREVISIÓN DEL TIEMPO
Este producto predice la previsión meteorológica de las
próximas 12 a 24 horas de un radio de 30-50 km (19-31
millas). La previsión está basada en las tendencias de las
lecturas de la presión barométrica.
El área superior muestra un icono animado indicando la
previsión del tiempo.
ICONOS DE LA PREVISIÓN DEL TIEMPO
ICONO DESCRIPCIÓN
Despejado
Día / Noche
Parcialmente nublado
Día / Noche
Nublado
14
Page 37

Lluvia
Nieve
NOTA El icono de noche aparecerá de 6 PM a 6 AM.
Cuando el sensor del canal 1 recoja una temperatura de
2°C (35.6 °F) o menos, el incono de LLUVIA se convertirá
en NEVANDO.
MEDIDAS DEL UV
El sensor de Radiación Ultra Violeta UVR128 viene está
disponible opcionalmente con el BAR908HG / BAR9 08HGU /
BAR908HGA. El sensor UV le da la siguiente información:
• Grabación del índice Ultra Violeta de 10 horas.
• Cálculo automático de la exposición aceptable de UV
basada en los perfiles preconfigurados por el
usuario ( 4 usuario máximo ).
• Alerta de Peligro de UVI cuando el índice alcance
niveles perjudiciales para la salud.
Los datos UV se muestran en el mismo área que los
barométricos. Pulse SELECT para navegar al área del
Barómetro y pulse MODE para ver el icono UV
datos.
y los
NUEVAS FUNCIONES ADICIONALES UV
CUENTA ATRÁS DEL TIEMPO DE EXPOSICIÓN UV
Para configurar la cuanta atrás del tiempo de exposición
debe introducir el tipo de piel y el factor de protección solar
de la siguiente manera:
1. Pulse SELECT para navegar al área del Barómetro,
luego pulse MODE para seleccionar el display UV.
2. Pulse CHANNEL para seleccionar el usuario 1-4.
3. Mantenga pulsado MODE durante 2 segundos para
introducir el tipo de piel del usuario seleccionado.
4. Pulse UP o DOWN para elegir 1 de los 4 tipos de piel.
Luego pulse MODE para confirmar e introducir el modo
SPF.
5. Pulse UP o DOWN para aumentar o disminuir el valor
SPF. Luego pulse MODE para confirmar y pasar al
modo de configuración de la cuenta atrás del tiempo
de exposición UV.
6. Pulse UP o DOWN para habilitar o deshabilitar la
cuenta atrás. Pulse MODE para salir del display del
modo de tiempo restante de exposición y empezar con
la cuenta atrás de exposición. La exposición NV del
usuario se mostrará en el display y el icono
15
parpadeará.
ES
Page 38

ES
7. Cuando la cuenta atrás haya alcanzado “0”, una
alarma sonará 2 minutos. Pulse cualquier botón para
apagar la alarma. El icono parpadeará 2 minutos
aunque haya dejado de sonar la alarma.
VER EL ÁREA DE TEMPERATURA Y HUMEDAD
Pulse SELECT para navegar al área de temperatura y
humedad.
MEMORIA MÁXIMA / MÍNIMA DEL UVI
Para ver la memoria máxima y mínima del UVI:
1. Pulse SELECT para navegar al área del Barómetro.
2. Pulse MODE para seleccionar el display UV.
3. Pulse MEM para ver las lecturas máximas, mínimas y
actual.
4. Mantenga pulsado MEM durante 2 segundos para
borrar la memoria.
NOTA Es sensor UV debe ser activado antes de que intente
configurar las funciones adicionales.
TEMPERATURA Y HUMEDAD
La Estación Meteorológica puede mostrar la siguiente
información recogida de cualquiera de los 5 sensores
remotos:
• Temperatura mínima, máxima y actual y porcentajes
de humedad relativa.
• Indicador de niveles de Confort y líneas de tendencias
(aumento, caída, o quieta).
Los datos se recogen y muestran aproximadamente cada
60 segundos.
Los datos de la temperatura se dan en la parte superior, la
humedad en la inferior.
SELECCIONAR UNIDAD DE MEDIDA
Deslice el interruptor °C / °F (en el compartimiento de las
pilas del reloj), al formato que desee.
SELECCIONAR EL CANAL DEL SENSOR
Pulse CHANNEL para cambiar entre los sensores 1-5.
• Para explorar automáticamente los sensores,
mantenga pulsado CHANNEL durante 2 segundos.
Los datos de cada sensor se mostrarán durante 3
segundos.
• Para parar la exploración, pulse CHANNEL o MEM
con el área de temperatura / humedad seleccionado.
NOTA Si selecciona un sensor que sólo recoge la
temperatura, la humedad no se mostrará.
REGISTROS MÁXIMOS / MÍNIMOS
• Pulse MEM repetidamente para ver los registros
máximos, mínimos y actual del sensor seleccionado.
• Mantenga pulsado MEM durante 2 segundos para
borrar la memoria. Sonará un pitido para conformar
que los datos se han borrado.
16
Page 39

TENDECIAS DE LA TEMPERATURA Y LA HUMEDAD
Las líneas de las tendencias se muestran a lado de las
lecturas del la temperatura y la humedad.
TENDENCIA AUMENTO QUIETA CAIDA
TEMPERATURA
HUMEDAD
ZONA DE CONFORT
La zona de confort indica lo agradable que es el clima
basándose en las medidas de la temperatura y la
humedad.
ZONA TEMPERATURA HUMEDAD
MOJADO Cualquiera >70%
CONFORTABLE 20-25°C
40-70%
(68-77°F)
SECO Cualquiera <40%
NOTA Esta información se muestra en el área de humedad
cuando se muestre la medida actual.
ÍNDICE DE CALOR
El índice de calor tiene 4 avisos para indicar que la
temperatura es alta.
CATEGORÍA
DEL AVISO
Extremo
Peligro
Peligro 40.5-54.4 105-130
Precaución
Extrema
Precaución 26.6-32.2 80-90
TEMPERATURA
°C °F
>54.5 >130
32.2-40.5 90-105
Para ver el índice de calor:
1. Pulse SELECT para navegar al área de temperatura.
aparecerá a lado de área.
2. Pulse MODE para llegar al display de índice de
calor.
3. Pulse CHANNEL para seleccionar el canal deseado.
NOTA Si las temperaturas son de menos de 26°C / 80°F,
o el canal deseado no está funcionando, el índice de calor
mostrará “NA”.
RESETEANDO EL SISTEMA
El Botón RESET está situado en la parte de abajo de la
unidad. Pulse RESET cuando cambia las pilas siempre
que no este funcionando de forma correcta ( por ejemplo,
cuando no pueda establecer conexión con la unidad remota
o el reloj radio controlado ).
NOTA Cuando pulsa RESET, toda la configuración volverá
a los valores por defecto y perderá toda la información
almacenada.
17
ES
Page 40

ES
PRECAUCIÓN
• No exponga el producto a fuerza extrema ,descargas,
polvo, fluctuaciones de temperatura o humedad.
• No cubra los orificios de ventilación con objetos como
periódicos, cortinas, etc.
• No sumerja el dispositivo en agua. Si se vertiera
líquido en la unidad, límpiela con un paño suave y sin
electricidad estática.
• No limpie la unidad con materiales abrasivos o
corrosivos.
• No manipule los componentes internos. De hacerlo se
invalidaría la garantía.
• Use siempre pilas nuevas. No mezcle pilas viejas con
pilas nuevas.
• Las imágenes de esta guía para el usuario puede ser
distintas al producto en sí.
• Cuando elimine este producto, asegúrese de que no
vaya a parar a la basura general, sino separadamente
para recibir un tratamiento especial.
• La colocación de este producto encima de ciertos tipos
de madera puede provocar daños a sus acabados.
Oregon Scientific no se responsabilizará de dichos
daños. Consulte las instrucciones de cuidado del
fabricante para obtener más información.
• Los contenidos de este manual no pueden reproducirse
sin permiso del fabricante.
• No elimine las pilas gastadas con la basura normal.
Es necesario desecharlas separadamente para poder
tratarlas.
• Tenga en cuenta que algunas unidades disponen de una cinta
de seguridad para las pilas. Retire la cinta del compartimento
para pilas antes de usarlo por primera vez.
NOTA La ficha técnica de este producto y los contenidos
de este manual de usuario pueden cambiarse previo
aviso.
NOTA
disponibles en todos los países.Sírvase ponerse en contacto
con su distribuidor local si desea más información.
No todas las funciones y accesorios estarán
SOLUCIÓN DE PROBLEMAS
PROBLEMAS SINTOMA REMEDIO
Barómetro Lecturas Raras Ajuste altitud /
unidad
Calendario día / mes Extraño Cambiar el idioma
Reloj No puede ajustar
el reloj
No Sincroniza
automáticamente
Temperatura Muestra “LLL” o
“HHH”
Sensor
Remoto
No localiza el
sensor remoto
No puede cambiar
de canal
Deshabilite el reloj
radio controlado
1. Ajuste las Pilas
2. Pulse RESET
3. Active
Manualmente el
radio control
Temperatura fuera
de rango
Comprobar las pilas
Comprobar
sensores. Sólo hay
un sensor
funcionando
18
Page 41

ESPECIFICACIONES
Dimensiones de la Unidad Principal
L x W x H 175 x 93 x 93 mm
(6.89 x 3.66 x 3.66 pulgadas)
Peso 336 g. (11.85 libras) sin pilas
Dimensiones de la Unidad Remota
L x W x H 117 x 80 x 171 mm
(4.61 x 3.15 x 6.73 pulgadas)
Peso 80 g. (2.82 libras) sin pilas
Temperatura
Unidad °C o °F
Rango Exterior -5 °C a 50 °C
(23 °F a 122 °F)
Rango Interior -20 °C a 60 °C
(-4 °F a 140 °F)
Resolución 0.1 °C (0.2° F)
Confort 20 °C a 25 °C
(68 °F a 77 °F)
Memoria Min / Max
Confort 40% a 70%
Memoria Min / max
Barómetro
Unidad mb / hPa o inHg
Rango 500 a 1050 mb
(20.67 a 31.01 inHg)
Resolución 1 mb (0.03 inHg)
Altitud -100 a 2500 m
(-328 a 2734 pies)
Display Soleado (día /noche),
parcialmente nublado
(día / noche), nublado,
lluvia, nevado
Unidad Remota
Frecuencia RF 433 MHz
Rango Hasta 70 m
(230 pies) sin obstrucciones
Trasmisión Aprox. Cada 1 minuto
Nº Canal. 1, 2, 3, 4 o 5
Unidad °C o °F
ES
Humedad Relativa
Rango 25% a 95%
Resolución 1%
Reloj Radio Controlado
Sincronización Auto o Deshabilitado
19
Page 42

ES
Display de Reloj HH:MM:SS
Formato de la hora 12hr AM / PM
24hr
Calendario DD/MM o MM/DD;
Día de la semana en
1 de 5 idiomas (E, G, F, I, S)
Alarma Diaria & Predefinida;
2 minutos en volumen
creciente
Snooze Snooze de 8 minutos
Alimentación
Unidad Principal
Adaptador de Corriente Adaptador AC 6V
Pilas 3 x UM-4 (AAA) 1,5V
Unidad Remota Termo / higrómetro
Pila 1 x UM-3 (AA) 1,5V
SOBRE OREGON SCIENTIFIC
Visite nuestra página web (www.oregonscientific.com) para
conocer más sobre los productos de Oregon Scientific. Si
está en EE.UU y quiere contactar directamente con nuestro
Departamento de Atención al Cliente, por favor visite www2.
oregonscientific.com/service/support.asp.
Si está en España y quiere contactar directamente con
nuestro Departamento de Atención al Cliente, por favor
visite www.oregonscientific.es o llame al 902 338 368.
Para consultas internacionales, por favor visite www2.
oregonscientific.com/about/international.asp.
EU - DECLARACIÓN DE CONFORMIDAD
Por medio de la presente Oregon Scientific declara que
el Estación Meteorológica Metal (Modelo: BAR908HG /
BAR908HGU / BAR908HGA) cumple con los requisitos
esenciales y cualesquiera otras disposiciones aplicables
o exigibles de la Directiva 1999/5/CE. Tiene a su
disposición una copia firmada y sellada de la Declaración
de Conformidad, solicítela al Departamento de Atención al
Cliente de Oregon Scientific PAÍSES.
NOTA Se recomienda que use pilas alcalinas con este
producto para una duración prolongada.
PAÍSES BAJO LA DIRECTIVA RTTE
Todos los países de la UE, Suiza
y Noruega
20
CH
N
Page 43

Wetterstation im Metal-Format
Modell: BAR908HG / BAR908HGU /
BAR908HGA
BEDIENUNGSANLEITUNG
INHALT
Produktübersicht ............................................................. 3
Vorderansicht ................................................................ 3
Rückansicht .................................................................. 4
LCD-Display ................................................................. 5
Funksendeeinheit...... ................................................... 6
Erste Schritte ................................................................... 8
Batterien ....................................................................... 8
Netzadapter (Empfangseinheit) .................................... 9
Ändern von Einstellungen ............................................. 9
Funksendeeinheit ............................................................ 9
Einrichten des Temperatur/
Luftfeuchtigkeitsmessers .............................................. 9
Übertragung von Daten der Funksendeeinheit ........... 10
Suche nach Funksendeeinheit ................................... 10
Uhr und Kalender .......................................................... 11
Funkuhr ...................................................................... 11
Ein-und Ausschalten der Funkuhr ..............................12
Stellen der Uhr ............................................................ 12
Umstellen der Zeitanzeige .......................................... 12
Weckalarmfunktionen ................................................... 12
Einstellen des normalen Weckalarms .........................13
Einstellen des Voralarms ............................................ 13
Aktivieren der Weckalarmfunktion .............................. 13
Schlummerfunktion ..................................................... 14
Barometer ...................................................................... 14
Anzeige des Barometerbereichs ................................ 14
Auswahl der Maßeinheit ............................................. 14
Anzeige der Luftdruckentwicklung .............................. 14
Balkendiagrammanzeige ............................................ 14
Höhe einstellen ........................................................... 14
Wettervorhersage .......................................................... 15
Wettervorhersagesymbole .......................................... 15
UV-Messung ................................................................... 15
Neue Zusatzfunktionen ............................................... 15
Temperatur und Luftfeuchtigkeit ................................. 16
Anzeigebereich für Temperatur und
Luftfeuchtigkeit ........................................................... 17
Auswahl der Maßeinheit ............................................. 17
Auswahl des Kanals für die Funksendeeinheit ........... 17
Aufzeichnung der Minimal- / Maximalwerte ................ 17
Temperatur- und Luftfeuchtigkeitstendenzen ............. 17
Komfortzone ............................................................... 17
Hitzeindex ................................................................... 18
DE
1
Page 44

DE
System zurücksetzen ............................................. 18
Vorsichtsmaßnahmen ............................................ 18
Fehlersuche und Abhilfe ........................................ 19
Technische Angaben .............................................. 19
Über Oregon Scientific ........................................... 21
EU-Konformitätserklärung ..................................... 21
2
Page 45

PRODUKTÜBERSICHT
VORDERANSICHT
1
2
3
4
1. Wettervorhersagebereich:Animierte
Wettervorhersage
2. Temperatur / Luftfeuchtigkeits /
Komfortzonenbereich: Messwerte und Trends,
Komfortzone, Nummer der Funksendeeinheit
3. UVI / Barometerbereich: UV-Strahlungsniveau
und Luftdruck-Balkendiagramm, UV-Index und
Barometerwerte
4. Uhren / Weckalarm- / Kalenderbereich:
Funkgesteuerte Uhr, Weckfunktionen, Kalender
DE
3
Page 46

DE
RÜCKANSICHT
1. ALARM : Anzeige des Weckalarmstatus, Stellen
des Weckers
2. SELECT: Wechseln von Bereichen
3. UP: Erhöhen von Ei nstellungswerten/Einschalten
der funkgesteuerten Uhr
4. CHANNEL: Umschalten der Funksendeeinheitsanzeige
1
2
3
4
5
6
7
8
5. MODE: Änderung von Einstellungen/Display
6. HISTORY: Anzeige der Entwicklung von Barometer -
und UV - Messungen
7. DOWN: Vermindern von Einstellungswerten/
Ausschalten der funkgesteuerten Uhr
8. MEM: Anzeige der aktuellen bzw. maximalen
9. Netzadapteranschluss
10. mb / inHg : Schalter
11. RESET:Taste
12. °C / °F : Schalter
13. SNOOZE: Aktivierung der achtminütigen
Schlummerfunktion
9
10
11
12
13
4
Page 47

LCD-DISPLAY
Wettervorhersagebereich
1
2
3. Innen / Außen Kanalnummer (IN, 1-5) /
Empfangsstatus
4. Batteriewechselanzeige für Funksendeeinheit
5. MAX / MIN Temperatur
6. Komfortzonen
7. MAX / MIN-Luftfeuchtigkeit
8. Temperaturtrend
9. Temperatur - °C / °F
10. Luftfeuchtigkeitstrend
11. Luftfeuchtigkeit
DE
1. Batteriewechselanzeige für Empfangseinheit
2. Wetteranzeige
Temperatur / Luftfeuchtigkeits / Komfortzonenbereich
1
2
3
4
5
6
7
1. Symbol für Bereichsauswahl
2. Hitzeindex
8
9
10
11
UVI / Barometerbereich
1
2
3
4
5
6
7
1. Anzeige des Luftdrucks
2. Anzeige der UV-Strahlung
3. Batteriewechselanzeige für UV-Sensor
4. Anzeige des UVI-Werts
5. Countdown für UV-Strahleneinwirkungszeit gestartet
5
8
9
10
11
12
Page 48

DE
6. Höhe des UV-Indexes
7. UV-Strahleneinwirkungszeit für Benutzer
8. Barometer / UV-Diagramm
9. Sonnenschutzfaktor (SPF) für Benutzer zu UVStrahleneinwirkungszeit hinzugerechnet
10. Benutzer-Hauttyp für UV-Strahleneinwirkungszeit
11. Benutzernummer (für UV-Modus) oder stündliche
Entwicklung für UV- / Luftdruckmesswerte
12. Höhe / Luftdruck/UVI-Messwerte
Uhren- / Weckalarm- / Kalenderbereich
1
FUNKSENDEEINHEIT
RTGN318 / RTGN318D
2
D
3
4
5
1. Voralarmfunktion aktiviert
2. Voralarmanzeige / -einstellung
3. Wecker gestellt
4. Kanal für Zeitsignalempfang gesperrt
5. Zeitsignal-Empfangsindikator
6. Zeitzonenabgleich
7. Uhrzeit / Datum / Kalender
M
M
Yr
6
D
7
6
Page 49

RTGN318A
DE
5
1
2
6
3
4
1. RESET
2. EU/UK-Funkzeitsignalformat-Wahlschalter (nur RTGN318D)
3. Doppelseitiges Klebeband
4. CHANNEL-Kanalwahlschalter (1-5)
5. Wandbefestigung
6. Batteriefach
7
Page 50

DE
ERSTE SCHRITTE
BATTERIEN
4
1
5
2
Im Lieferumfang dieses Produkts sind Batterien enthalten.
• Empfangseinheit 3 x UM-4 (AAA) 1,5 V
• Funksendeeinheit 1 x UM-3 (AA) 1,5 V
Legen Sie die Batterien vor der ersten Verwendung ein.
Beachten Sie dabei die innen im Batteriefach angezeigte
Polarität (+ und -). Um ein optimales Ergebnis zu erzielen,
legen Sie die Batterien in die Funksendeeinheit ein, bevor
Sie die Batterien in die Empfangseinheit einlegen. Betätigen
Sie nach jedem Batteriewechsel die RESET-Taste.
HINWEIS Verwenden Sie keine wiederaufladbaren
Batterien.Setzen Sie die Batterien keiner übermäßigen
Hitze aus, wie z.B. durch Sonnenbestrahlung oder
3
Feuer.
wird angezeigt, wenn die Batterien fast leer sind.
1. RESET
2. Doppelseitiges Klebeband
3. CHANNEL-Kanalwahlschalter (1-5)
4. Wandbefestigung
5. Batteriefach
EINHEIT
Empfangseinheit Wettervorhersagebereich
Funksendeeinheit Temperatur /
UV-Sensor UVI / Barometerbereich
ORT
Luftfeuchtigkeitsbereich
HINWEIS Um eine längere Batterielebensdauer zu
gewährleisten, wird für dieses Produkt die Verwendung
von Alkali-Batterien empfohlen.
8
Page 51

NETZADAPTER (EMPFANGSEINHEIT)
Die Batterien dienen der Stromversorgung bei Stromausfall.
Verbinden Sie für den kontinuierlichen Gebrauch das
Netzteil am entsprechenden Anschluss unten am Gerät.
Stellen Sie sicher, dass der Netzadapter durch keine
Gegenstände blockiert wird, und dass die Steckdose für das
Gerät leicht zugänglich ist.
Um den Adapter vollständig vom Netzeingang zu trennen,
sollte dieser von der Basiseinheit entfernt werden.
HINWEIS Die Basiseinheit und der Netzadapter sollten nicht
in feuchten Umgebungen platziert werden. Es dürfen keine
mit Flüssigkeiten gefüllte Gegenstände, wie Blumenvasen,
auf die Basiseinheit oder den Netzadapter gestellt werden.
ÄNDERN VON EINSTELLUNGEN
1. Betätigen Sie SELECT, um zwischen Bereichen zu
wechseln.
wurde.
2. Für die meisten Bereiche gibt es verschiedene
Anzeigeoptionen (z. B. Uhrzeit / Wecker oder
Barometer / UVI). Betätigen Sie MODE, um zwischen
den Optionen, oder ALARM um zwischen Uhr
und Weckalarm zu wechseln.
3. MODE zwei Sekunden betätigen und halten, um den
Einstellungsmodus aufzurufen.
4. UP oder DOWN betätigen, um die Einstellungen zu.
5. MODE betätigen, um den Vorgang zu bestätigen.
zeigt an, welcher Bereich gewählt
FUNKSENDEEINHEIT
DE
Das Produkt wird mit einem Temperatur/
Luftfeuchtigkeitsmesser des Typs RTGN318 / RTGN318D/
RTGN318A ausgeliefert. Die Empfangseinheit kann
Daten von bis zu sechs Sensoren (5 Temperatur
Luftfeuchtigkeitsmesser und 1 UV-Sensor) sammeln.
(Zusätzliche Sensoren sind separat erhältlich. Weitere
Informationen erhalten Sie vom Händler vor Ort.)
Die Funksendeeinheit RTGN318 / RTGN318D / RTGN318A
erfasst Temperatur- und Luftfeuchtigkeitswerte sowie
offizielle Zeitsignale für die Funkuhr.
EINRICHTEN DES TEMPERATUR /
LUFTFEUCHTIGKEITSMESSERS
1. Öffnen Sie das Batteriefach.
2. Legen Sie die Batterien ein.
3. Stellen Sie Kanal und Funkzeitsignalformat (nur
RTGN318D) ein. Die Schalter befinden sich innen im
Batteriefach.
SCHALTER OPTION
Channel Wenn Sie mehr als einen
Bewegungsmelder wählen,
müssen Sie für jeden
Melder einen anderen Kanal wählen
Funkzeitsignalformat EU (DCF) / GB (MSF)
(nur RTGN318D)
4. Betätigen Sie die RESET-Taste.
5. Schließen Sie das Batteriefach.
9
Page 52

DE
Bedingungen für den optimalen Betrieb:
• Legen Sie vor der Positionierung der
Funksendeeinheit die Batterien ein und wählen
Sie Einheit, Kanal und Funkzeitsignalformat aus.
• Setzen Sie die Funksendeeinheit nicht direkter
Sonneneinstrahlung und Feuchtigkeit aus.
• Stellen Sie die Funksendeeinheit nicht weiter als
70 Meter von der Empfangseinheit (innen) entfernt auf.
• Stellen Sie die Funksendeeinheit so auf, dass sie
auf die Empfangseinheit (innen) ausgerichtet aus
und sich keine Hindernisse wie Türen, Mauern
oder Möbel im Funkweg befinden.
• Stellen Sie die Funksendeeinheit an einem Ort
mit freiem Blick auf den Himmel und in
ausreichender Entfernung von metallischen oder
elektronischen Objekten auf.
• Stellen Sie die Funksendeeinheit in den kalten
Wintermonaten in der Nähe der Empfangseinheit
auf, da Temperaturen unter Null sich negativ auf
Batterieleistung und Funksignalübertragung
auswirken können.
HINWEIS Die Sendereichweite kann variieren und
hängt von der Empfangsreichweite der Empfangseinheit
ab. Probieren Sie verschiedene Standorte aus, um den
Empfang zu optimieren.
ÜBERTRAGUNG VON DATEN DER
FUNKSENDEEINHEIT
Die Funksendeeinheit(en) übertragen alle 60 Sekunden
Daten. Der im Temperatur Luftfeuchtigkeitsbereich
angezeigte Funksignal-Empfangsindikator gibt Aufschluss
über den jeweiligen Status.
SYMBOL BESCHREIBUNG
Empfangseinheit
sucht nach
Funksendeeinheiten.
Mindestens 1 Kanal
gefunden.
Funksendeeinheit
1 überträgt Daten. (Die
Nummer der gewählten
Funksendeeinheit wird
angezeigt.)
--- wird im Temperatur
Luftfeuchtigkeitsbereich
angezeigt
Die gewählte
Funksendeeinheit wird
nicht gefunden. Suchen
Sie die Einheit oder
überprüfen Sie die
Batterien.
SUCHE NACH FUNKSENDEEINHEIT
Um nach einem Temperatur Luftfeuchtigkeitsmesser zu
suchen, betätigen Sie SELECT, um zum Temperatur
Luftfeuchtigkeitsbereich zu wechseln. wird neben dem
Bereich angezeigt. Dann gleichzeitig zwei Sekunden lang
MEM und CHANNEL betätigen und halten.
HINWEIS Wird die Funksendeeinheit immer noch nicht
gefunden, überprüfen Sie die Batterien.
10
Page 53

UHR UND KALENDER
Dieses Produkt zeigt Uhrzeit und Datum entsprechend
einem von der RTGN318 / RTGN318D / RTGN318A
Funksendeeinheit empfangenen Funkzeitsignal oder
manuell von Ihnen getroffenen Einstellungen an.
FUNKUHR
Die Uhr führt eine automatische Synchronisierung mit
offiziellen Zeitsignalen. Die Signale werden von der
Funksendeeinheit RTGN318 / RTGN318D / RTGN318A.
• BAR908HG (RTGN318):
Signal DCF-77: innerhalb von 1500 km (932 Meilen) von
Frankfurt, Deutschland.
• BAR908HGU (RTGN318D):
Verschieben Sie den Schalter EU / UK , um das
Empfangssignal auszuwählen.
EU: Signal DCF-77: innerhalb von 1500 km (932 Meilen)
von Frankfurt, Deutschland.
UK: Signal MSF-60: innerhalb von 1500 km (932 Meilen)
von Anthorn, England.
• BAR908HGA (RTGN318A):
Signal WWVB-60: innerhalb von 3200 km (2000 Meilen) von
Fort Collins, Colorado.
Der Erstempfang nimmt 2-10 Minuten in Anspruch und wird
beim ersten Einrichten der Einheit oder nach jedem Betätigen
von RESET initiiert. Ist der Empfang abgeschlossen, blinkt
der Zeitsignal-Empfangsindikator nicht mehr auf.
Das im Uhrenbereich angezeigte Symbol
zwei Faktoren:
• Verbindung zwischen Empfangseinheit und
Funksendeeinheit, die das Zeitsignal empfängt (
• Zeitsignal-Empfangsindikator (
Zusammen haben die Symbole folgende Bedeutungen:
SYMBOL BEDEUTUNG
Die Empfangseinheit
steht im Kontakt mit der
Funksendeeinheit und hat
die Zeitsynchronisierung
durchgeführt.
Die Empfangseinheit
steht im Kontakt mit der
Funksendeeinheit, hat aber
keine Zeitsynchronisierung
durchgeführt.
Die Empfangseinheit steht
nicht im Kontakt mit der
Funksendeeinheit, hat aber
die Zeitsynchronisierung
durchgeführt
Die Empfangseinheit steht
nicht im Kontakt mit der
Funksendeeinheit und hat
keine Zeitsynchronisierung
durchgeführt
Die Empfangseinheit
kann die Verbindung zur
Funksendeeinheit nicht
herstellen.
)
11
steht für
)
DE
Page 54

DE
EIN- UND AUSSCHALTEN DER FUNKUHR
Wenn Sie die Uhr von Hand stellen möchten, müssen Sie
zunächst die Funkuhrfunktion deaktivieren. Wählen Sie zu
diesem Zweck den Uhren Weckalarmbereich. Betätigen
Sie dann DOWN an der Empfangseinheit und halten Sie
die Taste zwei Sekunden gedrückt. Um die Funktion zu
aktivieren, wählen Sie den Uhren Weckalarmbereich,
betätigen Sie UP und halten Sie die Taste zwei Sekunden
gedrückt.
Funkuhr aktiviert:
2. Betätigen Sie MODE und halten Sie die Taste zwei
Sekunden lang gedrückt.
3. Wählen Sie Zeitzonenabgleich (+ / - 23 Stunden),12 /
24 stündiges Anzeigeformat, Stunden, Minuten, Jahr,
Datums Monatsformat, Monat, Datum, Wochentag und
Display-Sprache.
4. UP oder DOWN betätigen, um die Einstellungen zu
ändern.
5. MODE betätigen, um den Vorgang zu bestätigen.
BAR908HGA: Wählen Sie die Zeitzone aus: (0) Pacific,
(+1) Mountain, (+2) Central oder (+3) Eastern.
HINWEIS Die Sprachoptionen sind (E) Englisch, (F)
Französisch, (D) Deutsch, (I) Italienisch und (S) Spanisch.
Die gewählte Sprache bestimmt die Wochentagsanzeige.
Funkuhr deaktiviert:
STELLEN DER UHR
Sie müssen die Uhr nur stellen, wenn Sie die Funkuhrfunktion
deaktiviert haben oder sich in zu großer Entfernung von den
Zeitsignalsendern befinden.
1. Betätigen Sie SELECT, um den Uhrenbereich zu
wählen. Neben dem Bereich wird
angezeigt.
UMSTELLEN DER ZEITANZEIGE
Betätigen Sie SELECT, um den Uhrenbereich zu wählen.
Neben dem Bereich wird angezeigt.
Durch Betätigen von MODE wechselt die Anzeige
zwischen:
• Uhrzeit mit Sekunden
• Uhrzeit mit Wochentag
• Uhrzeit mit Zeitzonenabgleich
• Kalender
WECKALARMFUNKTIONEN
Dieses Produkt weist zwei Weckalarmfunktionen auf:
Eine normale Weckalarmfunktion und einen Voralarm für
12
Page 55

Schneewetter. Die normale Weckalarmfunktion wird bei
Aktivierung jeden Tag um die gleiche Zeit ausgelöst.
Der Voralarm wird nur ausgelöst, wenn die normale
Weckfunktion aktiviert ist und die von der Funksendeeinheit
auf Kanal 1 übermittelte Temperatur auf 2°C oder tiefer
fällt.
EINSTELLEN DES NORMALEN WECKALARMS
1. Betätigen Sie SELECT, um den Uhrenbereich zu
wählen. Neben dem Bereich wird angezeigt.
2. Betätigen Sie ALARM, um die Weckalarmzeit
anzuzeigen. (Darüber wird AL angezeigt.)
3. Betätigen Sie ALARM und halten Sie die Taste zwei
Sekunden lang gedrückt.
4. Wählen Sie Stunden und Minuten. UP oder DOWN
betätigen, um die Einstellungen zu ändern.
5. Betätigen Sie ALARM, um den Vorgang zu bestätigen.
6. Nach dem Stellen des Weckalarms wird das Symbol für
den täglichen Weckalarm
angezeigt.
EINSTELLEN DES VORALARMS
Der Voralarm kann darauf eingestellt werden, 15, 30, 45
oder 60 Minuten vor dem normalen Weckalarm ausgelöst
zu werden. Dieser Alarm ertönt, sobald die von der
Funksendeeinheit auf Kanal 1 übermittelte Temperatur auf
2°C oder tiefer fällt.
Wenn Sie beispielsweise den normalen Weckalarm auf 7:00
Uhr und den Voralarm auf 45 Minuten stellen, ertönt der
Voralarm um 6:15 Uhr, sofern die auf Kanal 1 übermittelte
Außentemperatur 2°C oder tiefer beträgt.
1. Stellen Sie den normalen Alarmwecker und aktivieren
Sie ihn.
2. Betätigen Sie ALARM, um zur Voralarmanzeige zu
wechseln. (Darüber wird PRE-AL angezeigt.)
3. Betätigen Sie ALARM und halten Sie die Taste zwei
Sekunden lang gedrückt.
4. Betätigen Sie UP oder DOWN, um 15, 30, 45 oder 60
Minuten zu wählen. Dabei handelt es sich um die Zeit
in Minuten, die der Voralarm dem normalen Weckalarm
VORANGEHT. Sobald Sie einen Zeitraum ausgewählt
haben, ist der Voralarm automatisch aktiviert.
5. Betätigen Sie ALARM, um den Vorgang zu bestätigen.
wird bei aktiviertem Voralarm angezeigt.
HINWEIS Nach Auslösen des Voralarms wird der normale
Weckalarm erst wieder am nächsten Tag ausgelöst.
Außerdem wird der Voralarm bei Deaktivierung des
normalen Weckalarms automatisch mit deaktiviert.
AKTIVIEREN DER WECKALARMFUNKTION
Wechseln Sie zum Uhrenbereich und betätigen Sie
dann ALARM um die Anzeige des Weckalarms oder des
Voralarms einzublenden. Um die Weckalarmfunktion zu
aktivieren bzw. zu deaktivieren, drücken Sie UP oder
DOWN.
Bei Erreichen der Weckalarmzeit wird die
Hintergrundbeleuchtung 8 Sekunden lang eingeschaltet,
außerdem ertönt der zweiminütige Crescendo-Alarm. Sie
können den Weckalarm durch Betätigen jeder Taste (außer
der Taste für die Schlummerfunktion) beenden. Er ertönt
dann zur gleichen Zeit am nächsten Tag wieder.
13
DE
Page 56

DE
SCHLUMMERFUNKTION
Betätigen Sie SNOOZE, um den Weckalarm für 8 Minuten
zu unterbrechen. Bei aktivierter Schlummerfunktion blinkt
oder auf.
BAROMETER
Dieses Produkt zeichnet Luftdruckschwankungen auf,
um eine Wettervorhersage durchführen zu können.
Darüberhinaus werden die mit der Funksendeeinheit in
den jeweils vergangenen 24 Stunden durchgeführten
Luftdruckmessungen in der Empfangseinheit (innen)
festgehalten.
ANZEIGE DES BAROMETERBEREICHS
Betätigen Sie SELECT, um zum Barometerbereich zu
wechseln.
Wird
Die Luftdruckdaten werden in zwei Bereichen unten im
Display angezeigt. Der obere Bereich zeigt ein 24-StundenBalkendiagramm.
Der untere Bereich zeigt aktuelle und ältere Messwerte.
NICHT angezeigt, betätigen Sie MODE.
AUSWAHL DER MASSEINHEIT
Schieben Sie den Schalter mb / inHg (im Batteriefach der
Uhr) auf die gewünschte Maßeinheit.
ANZEIGE DER LUFTDRUCKENTWICKLUNG
Wechseln Sie zum Barometerbereich. Betätigen Sie dann
wiederholt HISTORY, um die Messwerte zu durchlaufen.
Die in im HR-Feld angezeigte Zahl zeigt an, wie alt die
Messungen jeweils sind (z. B. 2 Stunden, 3 Stunden etc.).
BALKENDIAGRAMMANZEIGE
Das Balkendiagramm bietet eine visuelle Darstellung der
Luftdruckentwicklung von der aktuellen Uhrzeit (0) bis 24
Stunden zurück (-24).
HÖHE EINSTELLEN
Stellen Sie die Höhe über dem Meeresboden ein, in
der Sie leben. Dadurch wird sichergestellt, dass die
Luftdruckmessungen den korrekten Wert ergeben.
1. Wechseln Sie zum Barometerbereich.
2. Betätigen Sie HISTORY und halten Sie die Taste zwei
Sekunden lang gedrückt.
3. Betätigen Sie UP oder DOWN, um die Höhe in
Schritten von 10 Metern einzustellen (-100 m bis 2500
m).
4. Betätigen Sie HISTORY, um den Vorgang zu
bestätigen.
14
Page 57

WETTERVORHERSAGE
Dieses Produkt führt eine Wettervorhersage für die nächsten
12 bis 24 Stunden im Umkreis von 30 - 50 km durch. Die
Vorhersage basiert auf Luftdruck-Trendmessungen.
Im oberen Bereich wird das vorhergesagte Wetter durch ein
animiertes Symbol angezeigt.
WETTERVORHERSAGESYMBOLE
SYMBOL BESCHREIBUNG
Klar
Tag / Nacht
Teilweise bedeckt
Tag / Nacht
Bedeckt
Regnerisch
Schnee
HINWEIS Das Nachtsymbol wird von 18.00 Uhr bis 06.00
Uhr angezeigt. Wenn die Funksendeeinheit eine Temperatur
von 2°C oder niedriger misst, wird das REGNERISCHSymbol zu SCHNEE.
UV-MESSUNG
Der Ultraviolettstrahlensensor UVR128 ist für die
Wetterstation BAR908HG / BAR908HGU / BAR908HGA
optional erhältlich. Der UV-Sensor stellt Ihnen die folgenden
Funktionen zur Verfügung:
• 10-Stunden-Aufzeichnung des Ultraviolettindexes
(UVI)
• Automatische Berechnung der zulässigen Strahleinein
wirkungsdauer auf der Grundlage von voreingestellten
Benutzerprofilen (maximal vier Benutzer)
• UVI-Gefahrenalarm beim Erreichen gefährlicher UVI-
Werte
Die UV-Daten werden im gleichen Bereich wie das
Barometer angezeigt. Betätigen Sie SELECT, um zum
Barometerbereich zu wechseln, dann MODE, um das UVSymbol
und die zugehörigen Daten anzuzeigen.
NEUE ZUSATZFUNKTIONEN
COUNTDOWN FÜR UV-STRAHLENEINWIRKUNGSZEIT
Um den Countdown für die UV-Strahleneinwirkungszeit
einzustellen, müssen Sie wie nachfolgend beschrieben
Hauttyp (“SKIN”) und Sonnenschutzfaktor (“SPF”)
eingeben.
1. Betätigen Sie SELECT, um zum Barometerbereich zu
wechseln, dann MODE, um das UV-Symbol und die
zugehörigen Daten anzuzeigen.
15
DE
Page 58

DE
2. Betätigen Sie CHANNEL, um Benutzer 1-4 zu wählen.
3. Betätigen Sie MODE und halten Sie die Taste zwei
Sekunden gedrückt, um den Hauttyp für den gewählten
Benutzer einzustellen.
4. Betätigen Sie UP oder DOWN, um einen von vier
Hauttypen auszuwählen. Betätigen Sie dann MODE, um
die Auswahl zu bestätigen, und mit der SPF-Einstellung
fortzufahren.
5. Betätigen Sie UP oder DOWN, um den SPF-Wert zu
erhöhen bzw. zu verringern. Betätigen Sie dann MODE,
um die Auswahl zu bestätigen und mit der Einstellung
des Countdowns für die UV-Strahleneinwirkungszeit
fortzufahren.
6. Betätigen Sie UP oder DOWN, um den Countdown
zu aktivieren bzw. zu deaktivieren. Betätigen
Sie MODE, um die Einstellung der verbliebenen
Strahleneinwirkungszeit für den Benutzer zu beenden
und den Countdown für die UV-Strahleneinwirkungszeit
zu starten. Die verbleibende UV-Strahleneinwirkungszeit
für den Benutzer wird angezeigt, außerdem blinkt das
Symbol
auf.
7. Sobald der Countdown “0” erreicht, ertönt ein
zweiminütiges Warnsignal. Sie können eine beliebige
Taste drücken, um den Alarm zu beenden. Das Symbol
blinkt zwei Minuten lang auf, auch wenn Sie den
Alarm ausgeschaltet haben.
MAXIMAL-/MINIMALWERTE FÜR UVI
So zeigen Sie die maximalen bzw. minimalen UVI-Werte
an:
1. Betätigen Sie SELECT, um zum Barometerbereich zu
wechseln.
2. Betätigen Sie MODE, um die UV-Anzeige zu wählen.
3. Betätigen Sie MEM, um maximale, minimale und
aktuelle UVI-Messwerte anzuzeigen.
4. Betätigen Sie MEM und halten Sie die Taste zwei
Sekunden gedrückt, um den UVI-Speicher zu löschen.
HINWEIS Vor dem Einstellen der Zusatzfunktionen muss
der UV-Sensor aktiviert werden.
TEMPERATUR UND LUFTFEUCHTIGKEIT
Die Wetterstation kann für jede der fünf Funksendeeinheiten
die folgenden Informationen anzeigen.
• Aktuelle, minimale und maximale Temperaturen und
relative Luftfeuchtigkeit (in Prozent)
• Komfortzonenindikator und Tendenzsymbole (steigend,
fallend oder gleichbleibend)
Die Daten werden ca. alle 60 Sekunden erfasst und
angezeigt.
16
Page 59

ANZEIGEBEREICH FÜR TEMPERATUR UND
LUFTFEUCHTIGKEIT
Betätigen Sie SELECT, um zum Temperatur-/
Luftfeuchtigkeitsbereich zu wechseln.
Die Temperaturdaten werden im oberen, die
Luftfeuchtigkeitsdaten im unteren Bereich angezeigt.
AUSWAHL DER MASSEINHEIT
Schieben Sie den °C / °F-Wahlschalter (innerhalb des
Batteriefachs) auf die gewünschte Stellung.
AUSWAHL DES KANALS FÜR DIE
FUNKSENDEEINHEIT
Betätigen Sie CHANNEL, um zwischen den
Funksendeeinheiten 1 bis 5 zu wählen.
• Um die Funksendeeinheiten automatisch abzutasten,
betätigen Sie CHANNEL und halten Sie die Taste zwei
Sekunden gedrückt. Die Daten jeder Funksendeeinheit
werden drei Sekunden lang gedrückt.
• Um die automatische Abtastung zu beenden, drücken
Sie, betätigen Sie bei gewähltem Temperatur-/
Luftfeuchtigkeitsbereich CHANNEL oder MEM.
• Um die Aufzeichnungen zu löschen, betätigen Sie MEM
und halten Sie die Taste zwei Sekunden lang gedrückt.
Das Löschen des Speichers wird durch einen Piepton
bestätigt.
TEMPERATUR- UND
LUFTFEUCHTIGKEITSTENDENZEN
Die Tendenzsymbole werden neben den Temperatur- und
Luftfeuchtigkeitsmesswerten angezeigt.
TENDENZ STEIGEND KONSTANT FALLEND
TEMPERATUR
LUFTFEUCHTIGKEIT
KOMFORTZONE
Mithilfe von Komfortzonen wird angezeigt, welche
Auswirkungen Temperatur und Luftfeuchtigkeit auf das
Wohlbefinden haben.
ZONE TEMPERATUR LUFTFEUCHTIGKEIT
WET Beliebig >70%
COM 20-25°C (68-77°F) 40-70%
DE
HINWEIS Wenn Sie eine Funksendeeinheit wählen,
die nur Temperaturdaten erfasst, werden keine
Luftfeuchtigkeitswerte angezeigt.
AUFZEICHNUNG DER MINIMAL-/ MAXIMALWERTE
• Betätigen Sie wiederholt MEM, um aktuelle, minimale
und maximale Werte für die gewählte Funksendeeinheit
anzuzeigen.
DRY Beliebig <40%
HINWEIS Diese Informationen werden im
Luftfeuchtigkeitsbereich zusammen mit dem aktuellen
Messwert angezeigt.
17
Page 60

DE
HITZEINDEX
Der Hitzeindex (“HEAT INDEX”) zeigt bei hohen
Temperaturen vier Warnstufen an.
GEFAHRENKATEGORIE
Extrem
gefährlich
Gefährlich 40.5-54.4 105-130
Höchste
Vorsicht
Achtung 26.6-32.2 80-90
TEMPERATUR
°C °F
>54.5 >130
32.2-40.5 90-105
So zeigen Sie den Hitzeindex an:
1. Betätigen Sie SELECT, um den Temperaturbereich zu
wählen. Neben dem Bereich wird
angezeigt.
2. Betätigen Sie MODE, um die Anzeige des Hitzeindex
aufzurufen.
3. Betätigen Sie CHANNEL, um den gewünschten Kanal
zu wählen.
HINWEIS Bei Temperaturen unter 26°C oder wenn der
gewählte Kanal nicht funktionsfähig ist, wird statt des
Hitzeindex “NA” angezeigt.
SYSTEM ZURÜCKSETZEN
Die RESET-Taste befindet sich auf der Unterseite des
Geräts. Betätigen Sie RESET jedes Mal, wenn Sie die
Batterien wechseln oder das Gerät unerwartet reagiert (z. B.
wenn die Funkverbindung zur Funksendeeinheit oder zum
Zeitsignal nicht hergestellt werden kann).
HINWEIS Durch Betätigen von RESET werden alle
Einstellungen auf die Standardwerte zurückgesetzt,
außerdem gehen alle gespeicherten Informationen
verloren.
VORSICHTSMASSNAHMEN
• Setzen Sie das Gerät keiner extremen Gewalteinwirkung
und keinen Stößen aus, und halten Sie es von übermäßigem
Staub, Hitze oder Feuchtigkeit fern.
• Sie dürfen die Belüftungsöffnungen nicht mit Gegenständen
abdecken, wie z.B. Zeitungen, Vorhänge, usw.
• Tauchen Sie das Gerät niemals in Wasser. Falls Sie
eine Flüssigkeit über das Gerät verschütten, trocknen
Sie es sofort mit einem weichen, faserfreien Tuch.
• Reinigen Sie das Gerät keinesfalls mit scheuernden
oder ätzenden Mitteln.
• Machen Sie sich nicht an den internen Komponenten
des Geräts zu schaffen, da dies zu einem Verlust der
Garantie führen kann.
• Verwenden Sie nur neue Batterien. Verwenden Sie
keinesfalls neue und alte Batterien gemeinsam.
• Die in dieser Anleitung dargestellten Abbildungen
können sich vom Original unterscheiden.
• Entsorgen Sie das Produkt nicht im allgemeinen
Hausmüll, sondern ausschließlich in den dafür
vorgesehenen, kommunalen Sammelstellen, die Sie
bei Ihrer Gemeinde erfragen können.
• Wenn dieses Produkt auf bestimmte Holzflächen gestellt
18
Page 61

wird, kann die Oberfläche beschädigt werden. Oregon
Scientific ist nicht haftbar für solche Beschädigungen.
Entsprechende Hinweise entnehmen Sie bitte der
Pflegeanleitung Ihres Möbelherstellers.
• Der Inhalt dieser Anleitung darf ohne Genehmigung des
Herstellers nicht vervielfältigt werden.
• Verbrauchte Batterien gehören nicht in den Hausmüll.
Bitte geben Sie sie bei einer Sammelstelle für
Altbatterien bzw. Sondermüll ab.
• Bitte beachten Sie, dass manche Geräte mit einem
Batterieunterbrechungsstreifen bestückt sind. Vor dem
ersten Gebrauch müssen Sie den Streifen aus dem
Batteriefach ziehen.
HINWEIS Die technischen Daten für dieses Produkt
und der Inhalt der Bedienungsanleitung können ohne
Benachrichtigung geändert werden.
Uhr
Temperatur
Funksendeeinheit
Uhr lässt sich
nicht stellen
Keine
automatische
Synchronisierung
möglich
Anzeige: “LLL”
oder “HHH”
Kanal kann nicht
geändert werden
DE
Funkuhr deaktivieren
1. Batterien
überprüfen
2.RESET drücken
3. Funkuhr manuell
aktivieren
Temperatur außerhalb
des anzeigbaren
Bereichs
Batterien überprüfen
Funksendeeinheiten
überprüfen. Evtl.
arbeitet nur eine
Funksendeeinheit
HINWEIS Eigenschaften und Zubehör nicht in allen
Ländern verfügbar. Weitere Informationen erhalten Sie von
Ihrem Fachhändler vor Ort.
FEHLERSUCHE UND ABHILFE
PROBLEM SYMPTOM ABHILFE
Barometer
Kalender
Ungewöhnliche
Messwerte
Ungewöhnlicher
Tag /Monat
Höhe einstellen /
Gerät zurücksetzen
Sprache ändern
TECHNISCHE ANGABEN
Abmessungen Empfangseinheit
L x B x H 175 x 93 x 93 mm
Gewicht 336 g ohne Batterie
Abmessungen Funksendeeinheit
L x B x H 117 x 80 x 171 mm
Gewicht 80 g ohne
Batterie
Temperatur
Maßeinheit °C oder °F
19
Page 62

DE
Messbereich innen -5 °C bis 50 °C
Messbereich außen -20 °C bis 60 °C
Messschritte 0,1 °C
Komfortbereich 20 °C bis 25 °C
Speicher Min / Max
Reichweite Bis zu 70m bei freier
Sicht
Übertragung ca. einmal pro Minute
Kanalnummern 1,2,3,4 oder 5
Maßeinheit °C oder °F
Relative Luftfeuchtigkeit
Messbereich 25% bis 95%
Messschritte 1%
Komfortbereich 40% bis 70%
Speicher Min / Max
Barometer
Maßeinheit mb/hPa oder inHg
Messbereich 500 bis 1050 mb
(20,67 bis 31,01 inHg)
Messschritte 1 mb (0,03 inHg)
Höhe -100 bis 2500 m
Anzeige Sonnig (Tag/Nacht),
teilweise bedeckt,
bedeckt (Tag / Nacht),
bedeckt, Regen, Schnee
Funksendeeinheit
Sendefrequenz 433 MHz
Funkuhr
Synchronisierung Automatisch oder
deaktiviert
Uhrenanzeige HH:MM:SS
Stundenformat 12-stündig AM/PM
24-stündig
Kalender TT / MM oder MM / TT;
Wochentag in einer von
5 Sprachen (E, G, F, I, S)
Weckalarm Normal & Voralarm;
zweiminütiges
Crescendo
Schlummerfunktion Achtminütige
Schlummerfunktion
Stromversorgung
Empfangseinheit
Netzadapter Netzadapter 6 V
20
Page 63

Batterien 3 x UM-4 (AAA) 1,5 V
Temperatur- / Luftfeuchtigkeitsmesser
Batterien 1 x UM-3 (AA) 1,5 V
HINWEIS Um eine längere Batterielebensdauer zu
gewährleisten, wird für dieses Produkt die Verwendung von
Alkali-Batterien empfohlen.
ÜBER OREGON SCIENTIFIC
Besuchen Sie unsere Website www.oregonscientific.de
und erfahren Sie mehr über unsere Oregon ScientificProdukte. Auf der Website finden Sie auch Informationen,
wie Sie im Bedarfsfall unseren Kundendienst erreichen und
Daten herunterladen können. Für internationale Anfragen
besuchen Sie bitte unsere Website: www2.oregonscientific.
com/about/international.
EU-KONFORMITÄTSERKLÄRUNG
DE
Hiermit erklärt Oregon Scientific, dass das Wetterstation
im Metal-Format (Modell: BAR908HG / BAR908HGU /
BAR908HGA) mit den grundlegenden Anforderungen und
anderen relevanten Vorschriften der Richtlinie 1999/5/ EG
übereinstimmt. Eine Kopie der unterschriebenen und mit
Datum versehenen Konformitätserklärung erhalten Sie auf
Anfrage über unseren Oregon Scientific Kundendienst.
KONFORM IN FOLGENDEN LÄNDERN
Alle Länder der EU, Schweiz CH
und Norwegen N
21
Page 64

Station Météo Métal
Modèle: BAR908HG / BAR908HGU /
BAR908HGA
Manuel de L’utilisateur
TABLE DES MATIERES
Vue d’ensemble de l’appareil . . . . . . . . . . . . . . . . . . . . . . . . . . . . . . . . . . . . . . . . . . 3
Vue de face ..................................................................3
Vue de derrière ............................................................. 4
Affichage LCD .............................................................. 5
Sonde sans fil
Mise en service ......... ....................................................... 8
Piles .............................................................................. 8
Adaptateur secteur (Appareil principal) ........................ 9
Changement de réglages ............................................. 9
Sonde sans fil ............ . . . . . . . . . . . . . . . . . . . . . . . . . . . . . . . . . . . . . . . . . . . . . . . . . . . . . . . 9
Installation de la sonde Thermo / Hygro ...................... 9
Transmission des données de la sonde ..................... 10
Recherche d’une sonde ............................................. 10
Heure et calendrier ........................................................ 10
Horloge radio pilotée .................................................. 10
Activer / désactiver le radio pilotage ........................... 11
Réglage de l’horloge ................................................... 12
Affichage commande horloge ..................................... 12
Alarmes ....................... . . . . . . . . . . . . . . . . . . . . . . . . . . . . . . . . . . . . . . . . . . . . . . . . . . . . 12
......................................................... 6
Réglage de l’alarme journalière .................................. 12
Réglage de la pré - alarme ......................................... 12
Activer l’Alarme ........................................................... 13
Répétition de réveil ..................................................... 13
Baromètre . . . . . . . . . . . . . . . . . .. .. .. .. .. .. .. .. .. .. .. .. .. .. .. .. .. .. .. .. .. .. .. .. .. .. .. 13
Zone de visualisation du baromètre ........................... 13
Sélection de l’unité de mesure ................................... 14
Historique du baromètre ............................................. 14
Affichage de l’histogramme ........................................ 14
Réglage de l’Altitude ................................................... 14
Prévisions Météo ........................................................... 14
Icônes des prévisions météo ...................................... 14
Mesure UV ......................................................................15
Fonctions UV .............................................................. 15
Température et humidité ... .. .. .. .. .. .. .. .. .. .. .. ...................... 16
Zone de visualisation des températures et humidités ..16
Sélection de l’unité de mesure ................................... 16
Sélection du canal de la sonde ................................... 16
Enregistrements Mini / Maxi ....................................... 16
Tendance de Température et Humidité ....................... 16
Niveau de confort ....................................................... 17
Indice de chaleur ........................................................ 17
Système de re - initialisation ........................................ 17
Précautions ....................................................................18
Résolution des problèmes ............................................ 18
1
FR
Page 65

FR
Caractéristiques ............................................................. 19
A Propos d’Oregon Scientific ....................................... 20
Europe - Déclaration de Conformité ............................ 20
2
Page 66

VUE D’ENSEMBLE DE L’APPAREIL
VUE DE FACE
1
2
3
4
1. Prévisions Météo: Prévisions météo animées
2. Température / Humidité / Niveau de Confort: Relevés
et courbes de tendances; niveau de confort; numéro
de canal de la sonde
3. UVI / Baromètre: Diagramme du niveau d’UV et de
la pression atmosphérique; Index d’UV et relevés
atmosphériques
4. Horloge / Alarme / Calendrier: Heure; alarmes;
calendrier radio-pilotés
FR
3
Page 67

FR
VUE DE DERRIERE
1. ALARM: Affichage de l’état de l’alarme; réglage
de l’alarme
2. SELECT: Change de zones
3. UP: Augmente le réglage / active la
pendule radio-pilotée
4. CHANNEL: Change l’affichage de la sonde
5. MODE: Changement des réglages et affichage
1
2
3
4
5
6
7
8
6. HISTORY: Affichage des relevés historiques de
la pression et des UV
7. DOWN: Diminue le réglage / désactive la
pendule radio-pilotée
8. MEM: Affichage du relevé des températures /
humidités et UV actuelles, minimales et maximales
9. Prise adaptateur secteur
10. Bouton mb / inHg
11. Bouton RESET
12. Commande °C / °F
13. SNOOZE : Déclenche la répétition de réveil pendant
8 minutes
9
10
11
12
13
4
Page 68

AFFICHAGE LCD
Prévisions Météo
1
2
statut de réception
4. Icône de piles faibles pour la sonde
5. Température Maximale et Minimale
6. Niveaux de confort
7. Humidité Maximale et Minimale
8. Tendance de la température
9. Température - °C / °F
10. Tendance de l’humidité
11. Humidité
FR
1. Icône de piles faibles de l’appareil principal
2. Affichage météo
Température / Humidité/ Niveau de Confort
1
2
3
4
5
6
7
1. Icône de la zone sélectionnée
2. Indice de chaleur
3. Numéro de canal intérieure et extérieure (IN, 1-5) /
8
9
10
11
UVI / Baromètre
1
2
3
4
5
6
7
1. Affichage de la pression baromètrique
2. Affichage des UV
3. Icône de piles faibles pour la sonde UV
4. Affichage de la valeur des UVI
5. Début du compte à rebours du temps d’exposition
5
aux UV
8
9
10
11
12
Page 69

FR
6. Niveau de l’index des UV
7. Temps d’exposition aux UV de l’utilisateur
8. Pression atmosphérique / diagramme des UV
9. SPF appliqué à l’utilisateur pour exposition aux UV
10. Type de peau de l’utilisateur pour exposition aux UV
11. Numéro de l’utilisateur (pour le Mode UV) ou
historique par heure pour le relevé des UV et de la
pression atmosphérique
12. Altitude / pression atmosphérique/ relevé UVI
Horloge / Alarme / Calendrier
1
SONDE SANS FIL
RTGN318 / RTGN318D
2
D
3
M
Yr
4
5
1. La Pré-Alarme est réglée
2. Affichage de la Pré - Alarme / Réglage de la Pré -
Alarme
3. Alarme journalière est réglée
4. Canal de l’horloge RF est bloqué
5. Icône de réception du radio pilotage
6. Fuseau horaire
7. Heure / date / calendrier
M
D
6
7
6
Page 70

RTGN318A
FR
5
1
2
6
3
4
1. RESET
2. Commande du format du signal radio EU / UK (modèle
RTGN318D uniquement)
3. Ruban adhésif double face
4. Commande CHANNEL (1-5)
5. Fixation murale
6. Logement des piles
7
Page 71

FR
4
5
MISE EN SERVICE
PILES
Les piles sont fournies avec cet appareil:
• Appareil Principal 3 x UM-4 (AAA) 1.5V
• Sonde sans fil 1 x UM-3 (AA) 1.5V
Insérer les piles avant la première utilisation, en tenant
1
compte des polarités comme indiqué dans le logement des
piles. Pour de meilleurs résultats, mettre les piles dans la
sonde avant l’appareil principal. Appuyer sur RESET après
chaque changement de piles.
NOTE Ne pas utiliser de piles rechargeables. N’exposez
2
pas les piles à une chaleur excessive comme les rayons
du soleil et le feu.
3
1. RESET
2. Ruban adhésif double face
3. Commande CHANNEL (1-5)
4. Fixation murale
5. Logement des piles
s’affichent quand les piles sont faibles.
APPAREIL EMPLACEMENT DE
L’ICONE
Principal Zone Prévisions Météo
Sonde Zone Température /
Humidité
Sonde UV Zone UVI / Pression
atmosphérique
NOTE Il est conseillé d’utiliser des piles alcaline avec cet
appareil pour une performance plus longue.
8
Page 72

ADAPTATEUR SECTEUR (APPAREIL PRINCIPAL)
Les piles servent d’alimentation de secours. Pour une
utilisation continue, veuillez installer un adaptateur en bas
de l’appareil.
Assurez-vous que l’adaptateur ne soit pas obstrué et que sa
prise soit facilement accessible à l’appareil.
Pour être totalement déconnecté de l’alimentation électrique,
l’adaptateur doit être déconnecté de l’appareil principal.
REMARQUE N’exposez pas l’adaptateur ni l’appareil
principal à l’humidité. Ne placez aucun récipient rempli d’eau
comme les vases sur l’appareil principal ou l’adaptateur.
CHANGEMENT DE REGLAGES
1. Appuyer sur SELECT pour passer d’une zone à une
autre.
2. La plupart des zones ont des options d’affichage alterné
(par exemple, Horloge / Alarme ou Baromètre / UVI).
Appuyer sur MODE pour changer d’options, ou sur
ALARM pour passer de l’horloge à l’alarme.
3. Appuyer pendant 2 secondes sur MODE pour
enregistrer le mode de réglage.
4. Appuyer sur UP ou DOWN pour changer de réglage.
5. Appuyer sur MODE pour confirmer.
indique la zone sélectionnée.
SONDE SANS FIL
Cet appareil est fourni avec la sonde thermo / hygro
RTGN318 / RTGN318D / RTGN318A. L’appareil principal
peut recueillir des données de 6 sondes maximum (5
sondes Thermo / Hygro et 1 sonde UV).(Des sondes
supplémentaires sont vendues séparément. Contacter votre
revendeur le plus proche pour plus d’informations).
La sonde RTGN318 / RTGN318D / RTGN318A recueille
les relevés de température et d’humidité et les signaux
d’organisations officielles de l’heure pour la pendule radio
- pilotée.
INSTALLATION DE LA SONDE THERMO / HYGRO
1. Ouvrir le logement des piles.
2. Insérer les piles.
3. Régler le format du canal et du signal radio (modèle
RTGN318D uniquement). Les commandes se trouvent
dans le logement des piles.
COMMANDE OPTION
Canal En cas d’utilisation de plus d’une
sonde, sélectionner un canal
différent pour chaque sonde.
Format du Signal
Radio
4. Appuyer sur RESET.
5. Fermer le logement des piles.
Pour de meilleurs résultats:
• Insérer les piles et sélectionner l’unité, le canal et le
format du signal radio avant d’installer la sonde.
• Ne pas exposer la sonde en plein soleil ou à
l’humidité.
• Ne pas mettre la sonde à plus de 70 mètres (230 feet)
de l’appareil principal (intérieur).
EU (DCF) / UK (MSF) (modèle
RTGN318D uniquement)
9
FR
Page 73

FR
• Mettre la sonde en face de l’appareil principal (intérieur),
en minimisant les obstructions tels que portes, murs et
meubles.
• Tourner la sonde vers le ciel, loin d’objets en métal ou
électroniques.
NOTE La distance de transmission peut varier et est sujette
à la distance de réception de l’appareil principal.
Essayer plusieurs endroits afin d’obtenir de meilleurs
résultats.
RECHERCHE D’UNE SONDE
Pour chercher une sonde Thermo / Hygro, appuyer sur
SELECT pour aller dans la zone Température / Humidité.
s’affichera à côté de la zone. Ensuite, appuyer
simultanément pendant 2 secondes sur MEM et
CHANNEL.
NOTE Si la sonde n’a toujours pas été trouvée, vérifier
les piles.
TRANSMISSION DES DONNEES DE LA SONDE
Les données sont envoyées des sondes toutes les 60
secondes. L’icône de réception affiché dans la zone de
Température / Humidité indique le statut.
ICONE DESCRIPTION
Recherche des sondes
par l’appareil principal.
Au moins 1 canal a
été trouvé.
Sonde 1 envoie des
données. (Le numéro
indique quelle sonde
est sélectionnée.)
--- s’affiche dans la
zone Température /
Humidité
La sonde sélectionnée
ne peut être trouvée.
Chercher la sonde ou
vérifier les piles.
HORLOGE ET CALENDRIER
Cet appareil indique l’heure et la date d’après des signaux
radio - pilotés reçus sur la sonde RTGN318 / RTGN318D /
RTGN318A, ou des réglages manuels que vous entrez.
HORLOGE RADIO-PILOTEE
L’heure et la date sont automatiquement mises à jour par des
signaux de l’horloge radio - pilotée. Les signaux sont recueillis
par la sonde RTGN318 / RTGN318D / RTGN318A.
• BAR908HG (RTGN318):
Signal DCF-77 : dans un rayon de 1500 Km (932 miles)
depuis Frankfort, Allemagne.
• BAR908HGU (RTGN318D):
Positionnez l’encoche EU / UK pour sélectionner le signal
à recevoir.
EU : Signal DCF-77 : dans un rayon de 1500 Km (932 miles)
depuis Frankfort, Allemagne.
10
Page 74

UK : Signal MSF-60 : dans un rayon de 1500 Km (932 miles)
depuis Anthorn, Angleterre.
• BAR908HGA (RTGN318A):
Signal WWVB-60 : dans un rayon de 3200 km (2000 miles)
de Fort Collins, Colorado.
La réception initiale met entre 2 et 10 minutes, et est amorcée
lorsque vous mettez en route l’appareil et à chaque fois que
vous appuyez sur RESET. Une fois complétée, l’icône de
réception arrêtera de clignoter.
L’
facteurs:
• Connexion entre l’appareil principal et la sonde qui
• Réception du signal RF (
Comment ces signaux fonctionnent ensemble:
icône affiché dans la zone Horloge indique 2
recueille les signaux RF (
ICONE DESCRIPTION
L’appareil est en contact avec
la sonde et a synchronisé
l’heure.
L’appareil est en contact avec
la sonde mais l’heure n’a pas
été synchronisée.
)
)
L’appareil a perdu contact
FR
avec la sonde et l’heure n’est
pas synchronisée.
L’appareil ne peut pas
atteindre la sonde.
ACTIVER / DESACTIVER LE RADIO PILOTAGE
Si vous désirez régler manuellement l’horloge, vous devez
d’abord désactiver la commande radio - pilotée.
Pour ce faire, aller dans la zone Horloge / Alarme. Ensuite,
appuyer pendant 2 secondes sur DOWN sur l’appareil
principal. Pour l’activer, aller dans la zone Horloge / Alarme,
ensuite appuyer pendant 2 secondes sur UP.
Radio pilotage activé:
Radio pilotage désactivé:
L’appareil a perdu contact
avec la sonde mais l’heure
est synchronisée.
11
Page 75

FR
REGLAGE DE L’HORLOGE
Seulement nécessaire si le radio pilotage est désactivé ou
si vous êtes trop loin du signal RF.
1. Appuyer sur SELECT pour aller dans la zone Horloge.
s’affichera à côté de la zone.
2. Appuyer pendant 2 secondes sur MODE.
3. Sélectionner un fuseau horaire (+ / -23 heures), format
12 / 24 heures, heure, minute, année, date / format
mensuel, mois, date, jour et affichage de la langue.
4. Appuyer sur UP ou DOWN pour changer le réglage.
5. Appuyer sur MODE pour confirmer.
BAR908HGA : Sélectionnez le fuseau horaire : Heure
Pacifique (0), des Montagnes (+1), Centrale (+2) ou de la
Côte Est (+3).
NOTE Les options de langues sont (E) Anglais, (F)
Français, (D) Allemand, (I) Italien, et (S) Espagnol. La langue
sélectionnée détermine l’affichage de la semaine.
AFFICHAGE COMMANDE HORLOGE
Appuyer sur SELECT pour aller dans la zone Horloge.
s’affichera à côté de la zone.
Appuyer sur MODE pour alterner entre:
• Heure avec secondes
• Heure avec jour
• Heure avec fuseau horaire
• Calendrier
ALARMES
Cet appareil a deux alarmes: L’Alarme Journalière et une
Pré - Alarme pour temps neigeux. L’alarme Journalière peut
être réglée pour sonner tous les jours à la même heure. La
Pré - Alarme ne sonne que lorsque l’Alarme Journalière est
activée et que la température enregistrée de la sonde du
Canal 1 tombe à 2°C (35.6 °F) ou en dessous.
REGLAGE DE L’ALARME JOURNALIERE
1. Appuyer sur SELECT pour aller dans la zone Horloge.
s’affichera à côté de la zone.
2. Appuyer sur ALARM pour voir l’alarme. (AL s’affichera
en haut).
3. Appuyer pendant 2 secondes sur ALARM.
4. Sélectionner l’heure et les minutes. Appuyer sur UP ou
DOWN pour changer les réglages.
5. Appuyer sur ALARM pour confirmer.
6. L’icône de l’Alarme
l’alarme sera réglée.
Journalière s’affichera lorsque
REGLAGE DE LA PRE-ALARME
La Pré-Alarme peut être réglée pour sonner 15, 30, 45, ou 60
minutes avant l’Alarme Journalière. Elle sonnera à chaque
fois que la température enregistrée de la sonde du Canal 1
tombera à 2°C (35.6°F) ou en dessous.
Par exemple, si vous réglez l’alarme pour 7:00 AM, et la
Pré - Alarme pour 45 minutes, la Pré - Alarme sonnera à
6:15 AM si la température extérieure sur la sonde du Canal
1 est de 2°C ou en dessous.
12
Page 76

1. Installer et activer l’Alarme Journalière.
2. Appuyer sur ALARM pour visionner la Pré - Alarme.
(PRE-AL s’affichera en haut).
3. Appuyer pendant 2 secondes sur ALARM.
4. Appuyer sur UP ou DOWN pour sélectionner 15, 30,
45 ou 60 minutes. Ceci est le temps qu’il faudra AVANT
que la Pré-Alarme ne se déclenche. La Pré- Alarme est
automatiquement activée lorsque vous sélectionnez un
temps.
5. Appuyer sur ALARM pour confirmer.
s’affichera lorsque la Pré-Alarme est réglée.
NOTE L’Alarme Journalière NE sonnera pas jusqu’au
lendemain si la Pré - Alarme a été déclenchée.
Egalement, si l’Alarme Journalière est désactivée, latPré - Alarme
est automatiquement désactivée.
ACTIVER L’ ALARME
Aller dans la zone Horloge, ensuite appuyer sur ALARM pour
visionner l’Alarme Journalière ou Pré - Alarme. Pour activer
ou désactiver l’alarme, appuyer sur UP ou DOWN.
Lorsque l’heure d’alarme est atteinte, le rétro éclairage
s’allume pendant 8 secondes et une alarme crescendo sonne
pendant 2 minutes. Appuyer sur n’importe quelle touche (sauf
répétition de réveil) pour arrêter l’alarme. Elle sonnera de
nouveau le lendemain à la même heure.
l’alarme pendant 8 minutes. ou clignotera lorsque la
fonction répétition de réveil est activée.
BAROMETRE
Cet appareil enregistre les fluctuations de la pression
atmosphérique pour fournir des prévisions météo, et les
mesures historiques de la pression atmosphérique actuelle
et des dernières 24 heures sont enregistrées par l’appareil
principal (intérieur).
ZONE DE VISUALISATION DU BAROMETRE
Appuyer sur SELECT pour aller dans la zone Baromètre.
Si ce n’est PAS indiqué, appuyer sur
Les données baromètriques sont indiquées dans 2 zones
en bas de l’affichage. La zone supérieure affiche un
histogramme sur 24 heures. La zone inférieure indique les
relevés historiques ou actuels.
MODE.
FR
REPETITION DE REVEIL
Appuyer sur SNOOZE pour temporairement désactiver
13
Page 77

FR
SELECTION DE L’UNITE DE MESURE
Abaisser la commande mb / inHg (dans le logement des
piles de la station), pour changer l’unité d’affichage.
La zone du haut affiche un icône animé montrant les
prévisions météo.
ICONES DES PREVISIONS METEO
HISTORIQUE DU BAROMETRE
Aller dans la zone Baromètre. Ensuite, appuyer plusieurs
fois sur HISTORY pour faire défiler les mesures. Le numéro
indiqué dans la boîte HR indique quand la mesure a été prise
(e.g. 2 heures avant, 3 heures avant, etc.).
AFFICHAGE DE L’HISTOGRAMME
L’histogramme indique visuellement les changements
atmosphériques de l’heure actuelle (0) aux 24 heures
précédentes (-24).
REGLAGE DE L’ ALTITUDE
Régler l’altitude où vous vivez par rapport au niveau de
la mer. Cela permettra d’obtenir des relevés précis de la
pression atmosphérique.
1. Aller dans la zone Baromètre.
2. Appuyer pendant 2 secondes sur HISTORY.
3. Appuyer sur UP ou DOWN pour régler l’altitude par
incrémentation de 10 mètres (- 100m à 2500m).
4. Appuyer sur HISTORY pour confirmer.
PREVISIONS METEO
Cet appareil prévoit la météo des prochaines 12 à 24 heures
dans un rayon de 30-50 km (19-31 mile). Les prévisions
sont basées sur les relevés de tendance de la pression
atmosphérique.
ICONE DESCRIPTION
Ensoleillé
Jour / Nuit
Partiellement nuageux
Jour / Nuit
Nuageux
Pluvieux
Neigeux
NOTE L’icône nocturne s’affiche de 6 PM à 6 AM. Lorsque la
sonde de canal 1 enregistre une température à 2°C (35.6°F)
ou en dessous, l’icône PLUVIEUX devient NEIGEUX.
14
Page 78

MESURE UV
La sonde de Radiation Ultra-Violet UVR128 est en option
pour le modèle BAR908HG / BAR908HGU / BAR908HGA.
La sonde UV vous fournit les informations suivantes:
• Enregistrement de l’Index Ultra-Violet sur 10 heures.
• Calculation automatique des temps acceptables
d’exposition aux UV basée sur des profils utilisateurs
pré-réglés (4 utilisateurs maximum).
• Alerte Danger UVI lorsque l’index UV atteint des niveaux
dangereux.
Les données d’UV sont indiquées au même endroit que le
Baromètre. Appuyer sur SELECT pour aller dans la zone
Baromètre, ensuite appuyer sur MODE pour afficher l’icône
UV et les données.
FONCTIONS UV
COMPTE A REBOURS DU TEMPS D’EXPOSITION D’UV
Pour régler le compte à rebours du temps d’exposition, il
faut régler le Facteur Protection Soleil (SPF) et le Type de
Peau comme suit:
1. Appuyer sur SELECT pour aller dans la zone Baromètre,
ensuite appuyer sur MODE pour choisir l’affichage de
l’UV.
2. Appuyer sur CHANNEL pour sélectionner entre
utilisateur 1 - 4.
3. Appuyer pendant 2 secondes sur MODE pour mettre
sur le Mode de Réglage Type de Peau de l’utilisateur
choisi.
4. Appuyer sur UP ou DOWN pour choisir parmi 4 réglages
de types de peau. Ensuite appuyer sur MODE pour
confirmer et entrer le Mode de Réglage SPF.
5. Appuyer sur UP ou DOWN pour augmenter ou réduire la
valeur SPF. Ensuite appuyer sur MODE pour confirmer
et entrer le Mode du Compte à rebours du Temps
d’Exposition aux UV.
6. Appuyer sur UP ou DOWN pour activer ou désactiver
le compte à rebours. Appuyer sur MODE pour sortir
du Mode Affichage du Temps Restant d’exposition de
l’Utilisateur et commencer le compte à rebours du temps
d’exposition. Le temps restant d’exposition aux UV de
l’utilisateur s’affiche et l’icône
7. Lorsque le compte à rebours atteint “0”, une alarme
sonne pendant 2 minutes. Appuyer sur n’importe quelle
clignote.
15
FR
Page 79

FR
touche pour éteindre l’alarme. l’icône clignote
pendant 2 minutes même si la sonnerie de l’alarme a
été éteinte.
MEMOIRE MAXIMALE / MINIMALE POUR UVI
Pour visionner la mémoire maximale et minimale pour
UVI:
1. Appuyer sur SELECT pour aller dans la zone
Baromètre.
2. Appuyer sur MODE pour choisir l’affichage UV.
3. Appuyer sur MEM pour montrer les lectures de UV
actuelles, maximales et minimales.
4. Appuyer pendant 2 secondes sur MEM pour effacer la
mémoire de UVI.
NOTE La sonde UV doit être activée avant d’essayer de
régler les commandes supplémentaires.
TEMPERATURE ET HUMIDITE
La station météo peut afficher les informations suivantes
venant d’une des 5 sondes:
• Températures actuelles, minimales et maximales et
humidité relative.
• Indicateur de niveau de Confort et courbe de tendance
(en hausse, en baisse, ou constant).
Les données sont recueillies et affichées environ toutes
les 60 secondes.
ZONE DE VISUALISATION DES TEMPERATURES ET
HUMIDITES
Appuyer sur SELECT pour aller dans la zone Température
et Humidité.
Les données de température sont indiquées en haut; celles
de l’humidité en bas.
SELECTION DE L’UNITE DE MESURE
Abaisser la commande °C / °F (dans le logement des piles
de la station) jusqu’au réglage désiré.
SELECTION DU CANAL DE LA SONDE
Appuyer sur CHANNEL pour passer entre les 5 sondes.
• Pour effectuer un balayage automatique entre les
sondes, appuyer pendant 2 secondes sur CHANNEL.
Les données de chaque sonde s’affichent pendant 3
secondes.
• Pour mettre fin au balayage automatique, appuyer sur
CHANNEL ou MEM.
NOTE Si vous choisissez une sonde qui ne recueille que les
données de température, l’humidité ne s’affichera pas.
ENREGISTREMENTS MINI / MAXI
• Appuyer plusieurs fois sur MEM pour visionner les
enregistrements actuels, maxi et mini pour la sonde
sélectionnée.
• Pour effacer les enregistrements, appuyer pendant 2
secondes sur MEM. Un signal sonore se fera entendre
pour confirmer que la mémoire a été effacée.
16
Page 80

TENDANCE DE TEMPERATURE ET HUMIDITE
Les courbes des tendances sont indiquées à côté des relevés
de température et d’humidité.
TENDANCE HAUSSE CONSTANT BAISSE
TEMPERATURE
CATEGORIE
DANGER
Danger
extrême
Danger 40.5-54.4 105-130
TEMPERATURE
°C °F
>54.5 >130
FR
HUMIDITE
NIVEAU DE CONFORT
Le niveau de Confort indique si l’environnement est
agréable, d’après les mesures de la température et l’humidité
actuelles.
NIVEAU TEMPERATURE HUMIDITE
HUMIDE toute >70%
COMFORTABLE 20-25°C
40-70%
(68-77°F)
SEC toute <40%
NOTE Cette information est indiquée dans la zone Humidité
lorsque la mesure actuelle est affichée.
INDICE DE CHALEUR
L’Indice de Chaleur conseille 4 niveaux d’avertissement si
la température est élevée.
Extrême
Prudence
Prudence 26.6-32.2 80-90
32.2-40.5 90-105
Pour afficher l’Indice de Chaleur:
1. Appuyer sur SELECT pour aller dans la zone
Température. s’affichera à côté de la zone.
2. Appuyer sur MODE pour atteindre l’affichage de l’Indice
de Chaleur.
3. Appuyer sur CHANNEL pour sélectionner le canal
désiré.
NOTE Si la température est en dessous de 26°C / 80°F,
ou que le canal désiré ne marche pas, l’Index de Chaleur
affichera “NA”.
SYSTEME DE RE-INITIALISATION
Le bouton RESET se trouve en bas de l’appareil. Appuyer
sur RESET quand vous changez les piles ou à chaque fois
que l’appareil ne marche pas comme prévu (par exemple,
incapable d’établir un lien fréquence radio avec la sonde ou
l’horloge radio pilotée).
17
Page 81

FR
NOTE Lorsque vous appuyez sur RESET, tous les réglages
retourneront à leur valeur par défaut, et vous perdrez toutes
les informations enregistrées.
PRÉCAUTIONS
• Ne pas soumettre le produit à une force excessive, au
choc, à la poussière, aux changements de température
ou à l’humidité.
• Ne pas couvrir les trous de ventilation avec des journaux,
rideaux etc.
• Ne pas immerger le produit dans l’eau. Si vous renversez
du liquide sur l’appareil, séchez-le immédiatement avec
un tissu doux.
• Ne pas nettoyer l’appareil avec des matériaux corrosifs
ou abrasifs.
• Ne pas trafiquer les composants internes. Cela
invalidera votre garantie.
• N’utilisez que des piles neuves. Ne pas mélanger des
piles neuves et usagées.
• Les images de ce manuel peuvent dif férer de l’aspect
réel du produit.
• Lorsque vous désirez vous débarrasser de ce produit,
assurez-vous qu’il soit collecté séparément pour un
traitement adapté.
• Le poser sur certaines surfaces en bois peut
endommager
• Le contenu du présent manuel ne peut être reproduit
sans la permission du fabriquant.
• Ne pas jeter les piles usagées dans les containers
municipaux non adaptés. Veuillez effectuer le tri de ces
ordures pour un traitement adapté si nécessaire.
• Veuillez remarquer que certains appareils sont
équipés d’une bande de sécurité. Retirez la bande
bande ducompartiment des piles avant la première
utilisation.
REMARQUE Les caractéristiques techniques de ce
produit et le contenu de ce manuel peuvent être soumis à
modifications sans préavis.
REMARQUE Caractéristiques et accessoires ne seront
pas valables pour tous les pays. Pour plus d’information,
contacter le détaillant le plus proche.
RÉSOLUTION DES PROBLÈMES
PROBLEME SYMPTOME REMEDE
Baromètre Relevés étranges Régler l’altitude / unité
Calendrier Date / mois étranges Vérifier la langue
Horloge Ne peut ajuster
l’heure
Ne peut pas
autosynchroniser
Température Indique “LLL” ou
“HHH”
Sonde Ne peut pas
localiser la sonde
Désactiver le radio
pilotage
1. Ajuster les piles
2. Appuyer sur
RESET
3. Activer
manuellement le radio
pilotage
Température est hors
de portée
Vérifier les piles
18
Page 82

DIMENSIONS DE L’APPAREIL PRINCIPAL
Dimensions de l’Appareil Principal
L x L x H 175 x 93 x 93 mm
(6.89 x 3.66 x 3.66 pouces)
Poids 336 g (11.85 onces) sans piles
Dimensions de la sonde
L x L x H 117 x 80 x 171 mm
(4.61 x 3.15 x 6.73 pouces)
Poids 80 g (2.82 onces) sans piles
Température
Unité °C ou °F
Plage de mesure à -5 °C à 50 °C
l’intérieur (23 °F à 122 °F)
Plage de mesure à -20 °C à 60 °C
l’extérieur (-4 °F à 140 °F)
Précision 0.1 °C (0.2 °F)
Confort 20 °C à 25 °C
(68 °F à 77 °F)
Mémoire Min / Max
Confort 40% à 70%
Mémoire Min / max
Baromètre
Unité mb / hPa ou inHg
Précision 1 mb (0.03 inHg)
Altitude -100 à 2500 m
(-328 à 2734 ft)
Affichage Ensoleillé (jour / nuit),
partiellement nuageux
(jour / nuit), nuageux,
pluvieux, neigeux
Sonde Thermo/ Hygro
Fréquence RF 433 MHz
Distance Jusqu’à 70 m
(230 ft) sans
obstructions
Transmission Approx. toutes les
minutes
Canal No. 1, 2, 3, 4 ou 5
Unité °C ou °F
FR
Humidité Relative
Plage de mesure 25% à 95%
Précision 1%
Horloge radio pilotée
Synchronisation Auto ou désactivée
19
Page 83

FR
Affichage heure HH:MM:SS
Format de l’heure 12h AM / PM
24h
Calendrier JJ / MM ou MM / JJ;
Jour de la semaine en
5 langues (E, G, F, I, S)
Alarme Alarme Quotidienne et
Pré-Alarme;
Crescendo pendant
2 minutes
Répétition Réveil Répétition réveil pendant
8 minutes
Alimentation
Appareil Principal
Adaptateur Adaptateur 6V AC
Piles 3 x UM-4 (AAA) 1.5V
À PROPOS D’OREGON SCIENTIFIC
Pour plus d‘informations sur les produits Oregon Scientific
France, rendez-vous sur notre site:
www.oregonscientific.fr.
Si vous êtes aux Etats-Unis, vous pouvez contacter notre
support consommateur directement sur le site:
www2.oregonscientific.com/service/support.asp
Pour des renseignements internationaux, rendez vous sur
le site: www2.oregonscientific.com/about/international.asp.
EUROPE - DECLARATION DE CONFORMITE
Par la présente Oregon Scientific déclare que l’appareil
Station Météo Métal Modèle:BAR908HG / BAR908HGU /
BAR908HGA est conforme aux exigences essentielles et
aux autres dispositions pertinentes de la directive 1999/5/CE.
Une copie signée et datée de la déclaration de conformité est
disponible sur demande auprès de notre Service Client.
Appareil Thermo / Hygro
Pile 1 x UM-3 (AA) 1.5V
NOTE Il est conseillé d’utiliser des piles alcaline avec cet
appareil pour une performance plus longue.
PAYS CONCERNÉS RTT&E
Tous les pays Européens, la Suisse CH
et la Norvège N
20
Page 84

Stazione meteorologica con
finiture in metallo
Modello: BAR908HG / BAR908HGU /
BAR908HGA
Manuale dell’utente
SOMMARIO
Caratteristiche del Prodotto ..... ..... ..... ..... ..... ..... ..... ..... . 3
Vista Frontale ................................................................3
Vista Posteriore ............................................................4
Display LCD .................................................................. 5
Sensore Remoto ......................................................... 6
Operazioni Preliminari . .... ... .... ... ... . ... ... . ... ... .... ... .... ... .... .. 8
Alimentazione ............................................................... 8
Adattatore CA (Unità principale) ................................... 9
Modifica delle Impostazioni .......................................... 9
Sensore Remoto ....... . . . . . . . . . . . . . . . . . . . . . . . . . . . . . . . . . . . . . . . . . . . . . . . . . . . . . . . 9
Configurazione del Sensore
termoigrometro ........................................................... 9
Trasmissione dei Dati dal Sensore ............................... 9
Ricerca di un Sensore ................................................ 10
Orologio e Calendario . . . . . . . . . . . . . . . . . . . . . . . . . . . . . . . . . . . . . . . . . . . . . . . . . . . 10
Orologio Radiocontrollato ........................................... 10
Attivazione / Disattivazione della funzione di
radiocontrollo ............................................................ 11
Impostazione dell’orologio .......................................... 12
Informazioni Visualizzabili Sul Display Dell’orologio ...12
Allarmi . .... .... ... . ... . ... .... .... ... . ... .... .... ... . ... . ... .... .... ... . ... .... ... 12
Impostazione dell’allarme Giornaliero ........................ 12
Impostazione del Preallarme ...................................... 13
Attivazione dell’allarme ............................................... 13
Funzione Snooze ........................................................ 13
Barometro . .... ... .... ... . ... ... . ... .... ... .... ... . ... ... . ... .... ... .... ... .... . 13
Visualizzazione della Sezione del Barometro .............13
Selezione dell’unità di Misura .................................... 14
Visualizzazione dei Valori Storici della Pression ......... 14
Rappresentazione grafica dello storico
della pressione barometrica ....................................... 14
Impostazione dell’altitudine ........................................ 14
Previsioni Meteorologiche ............................................ 14
Icone delle Previsioni Meteorologiche ........................ 14
Misurazione UV .............................................................. 15
Funzioni Aggiuntive UV ..............................................15
Temperatura e Umidità . . . . . . . . . . . . . . . . . . . . . . . . . . . . . . . . . . . . . . . . . . . . . . . . . . 16
Visualizzazione della Sezione dell’umidità e
della Temperatura ....................................................... 16
Selezione dell’unità di Misurazione ............................ 16
Selezione del Canale del Sensore ............................. 16
Valori Minimi e Massimi Memorizzati .......................... 17
Tendenza di Umidità e Temperatura ........................... 17
Indice di Comfort ........................................................ 17
1
IT
Page 85

IT
Indice di Calore ........................................................... 17
Funzione RESET ............... . . . . . . . . . . . . . . . . . . . . . . . . . . . . . . . . . . . . . . . . . . . . . 18
Avvertenze .....................................................................18
Risoluzione dei Problemi .............................................. 19
Specifiche ...................................................................... 19
Informazioni su Oregon Scientific ............................... 20
Dichiarazioni di Conformità UE . . . . . . . . . . . . . . . . . . . . . . . . . . . . . . . . . . . . 21
2
Page 86

CARATTERISTICHE DEL PRODOTTO
VISTA FRONTALE
1
2
3
4
1. Sezione previsioni meteorologiche: previsioni
meteorologiche rappresentate da simboli dotati di
movimenti cinetici
2. Sezione Temperatura / Umidità / Zona di comfort:
valori e tendenze della temperatura e dell’umidità
interne ed esterne, livello di comfort, numero di canale
del sensore
3. Sezione UVI / Barometro: grafico a barre della
pressione barometrica e del livello UV, valori dell’indice
UV e della pressione atmosferica
4. Sezione Calendario / Allarme / Orologio: orologio
radiocontrollato, allarme, calendario
IT
3
Page 87

IT
VISTA POSTERIORE
1. ALARM : per visualizzare lo stato dell’allarme e
impostare l’allarme
2. SELECT: per attivare le sezioni
3. UP: per aumentare il valore impostato / attivare la
funzione di radiocontrollo
4. CHANNEL: per selezionare il sensore remoto di
interesse
1
2
3
4
5
6
7
8
5. MODE: per cambiare le impostazioni / i dati visualizzati
sul display
6. HISTORY: per mostrare lo storico delle tendenze
barometriche e i valori UV
7. DOWN: per ridurre il valore impostato / disattivare la
funzione di radiocontrollo
8. MEM: per visualizzare i valori dei raggi UV, dell’umidità
e della temperatura corrente, massima e minima
9. Presa adattatore CA
10. Interruttore mb / inHg
11. Pulsante RESET
9
12. Interruttore °C / °F
13. SNOOZE: per attivare lo snooze da 8 minuti
10
11
12
13
4
Page 88

DISPLAY LCD
Sezione previsioni meteorologiche
1
2
3. Numero dettaglio informazioni su temperatura ed
umidità (interna o canali 1-5) / stato di ricezione
4. Icona di batteria in esaurimento per il sensore remoto
5. Temperatura MAX / MIN
6. Livello di comfort
7. Umidità MAX / MIN
8. Tendenze della temperatura
9. Unità di visualizzazione della temperatura: °C / °F
10. Tendenze umidità
11. Umidità
IT
1. Icona di batteria in esaurimento per l’unità principale
2. Previsioni meteorologiche
Sezione Temperatura / Umidità / Zona di comfort
1
2
3
4
5
6
7
1. Icona area selezionata
2. Indice di calore
8
9
10
11
Sezione UVI / Barometro
1
2
3
4
5
6
7
1. Compare se è visualizzata la pressione barometrica
2. Compare se è visualizzato il valore dei raggi UV
3. Icona di batteria in esaurimento per il sensore UV
4. Compare se è visualizzato il valore UVI
5
8
9
10
11
12
Page 89

IT
5. È stato avviato il conto alla rovescia per il tempo di
esposizione ai raggi UV
6. Livello indice UV
7. Periodo di esposizione ai raggi UV per l’utente
8. Grafico a barre barometro / UV
9. Fattore di protezione utilizzato per l’esposizione UV
10. Tipo di pelle dell’utente
11. Numero utente (per la modalità UV) o cronologia delle
ore per la lettura della pressione barometrica / UV
12. Valori UVI / pressione barometrica / altitudine
Sezione Orologio / Allarme / calendario
1
SENSORE REMOTO
RTGN318 / RTGN318D
2
D
3
M
Yr
4
5
1. Preallarme impostato
2. Display / impostazione preallarme
3. Allarme giornaliero impostato
4. Canale con ricezione orologio RF
5. Icona ricezione orologio RF
6. Differenza di orario per la visualizzazione di un secondo
fuso orario
7. Ora / Data / Calendario
M
D
6
7
6
Page 90

RTGN318A
IT
5
1
2
3
6
4
1. Foro per la funzione di RESET
2. Selettore per il segnale radio (EU / UK) di interesse
(solo per il sensore RTGN318D)
3. Nastro biadesivo
4. Interruttore CHANNEL (1-5)
5. Attacco per fissaggio a muro
6. Vano batterie
7
Page 91

IT
4
5
OPERAZIONI PRELIMINARI
BATTERIE
Le batterie vengono fornite in dotazione con il prodotto:
• Unità principale 3 x UM-4 (AAA) 1,5 V
• Unità remota 1 x UM-3 (AA) 1,5 V
Inserire le batterie prima di utilizzare il prodotto per la prima
1
volta, rispettando le polarità illustrate nel vano batterie. Per
risultati ottimali, installare le batterie nel sensore remoto dopo
averlo fatto nell’unità principale.
Premere RESET dopo ogni sostituzione delle batterie.
2
3
1. Foro per la funzione di RESET
2. Nastro biadesivo
3. Interruttore CHANNEL (1-5)
4. Attacco per fissaggio a muro
5. Vano batterie
NOTA Non utilizzare batterie ricaricabili. Non eporre le
batterie ad eccessive fonti di calore, quali sole o fiamme.
appare quando le batterie sono quasi esaurite.
UNITÀ
Principale Sezione previsioni
Remota Sezione Temperature /
Sensore UV Sezione pressione
UBICAZIONE
meteorologiche
Umidità
barometrica / UVI
NOTA Per prolungare le prestazioni si consiglia di utilizzare
con il prodotto batterie alcaline.
8
Page 92

ADATTATORE CA (UNITÀ PRINCIPALE)
Le batterie servono come back-up. Per un uso continuo,
si consiglia di collegare l’adattatore CA alla base dell’unità.
Verificare che l’adattatore non sia ostruito e che la relativa
presa sia facilmentte accessibile.
Per scollegare completamente l’adattatore dall’unità di
alimentazione, scollegarlo dall’unità principale.
NOTA Non esporre l’unità principale e l’adattatore a
condizioni di umidità. Non poggiare sull’unità principale e
sull’adattatore contenitori di liquidi, come bicchieri.
MODIFICA DELLE IMPOSTAZIONI
1. Premere SELECT per alternare la visualizzazione delle
sezioni. indica la sezione selezionata.
2. Quasi tutte le sezioni sono dotate di opzioni di
visualizzazione alternate, ad esempio Orologio / Allarme
oppure Barometro / UVI. Premere MODE per attivare le
opzioni, oppure ALARM per alternare la visualizzazione
dell’orologio e dell’allarme.
3. Tenere premuto MODE per 2 secondi per selezionare
la modalità di visualizzazione di interesse.
4. Per modificare i valori impostati, premere UP o
DOWN.
5. Per confermare la selezione, premere MODE.
SENSORE REMOTO
L’unità principale è in grado di rilevare i dati da un massimo di
6 sensori: 5 termoigrometri e 1 UV. Con il prodotto viene fornito
in dotazione il sensore termoigrometro RTGN318 / RTGN318D/
RTGN318A. È possibile acquistare separatamente altri
sensori.
Il sensore RTGN318 / RTGN318D / RTGN318A rileva i valori
della temperatura e dell’umidità e l’aggiornamento periodico
dell’orario e del calendario tramite segnale radio.
CONFIGURAZIONE DEL TERMOIGROMETRO
1. Aprire il coperchio del vano batterie.
2. Inserire le batterie.
3. Impostare il canale e il tipo di segnale radio (solo per
il sensore RTGN318D). Gli interruttori sono ubicati nel
vano batterie.
INTERRUTTORE OPZIONE
Canale Se si utilizzano più sensori,
selezionare un canale
diverso per ogni sensore.
Tipo di segnale
radio
4. Premere RESET.
5. Chiudere il coperchio del vano batterie.
Per risultati ottimali:
• Inserire le batterie e selezionare l’unità di visualizzazione
delle informazioni, il canale e il tipo di segnale radio
prima di installare il sensore.
• Collocare il sensore lontano dai raggi diretti del sole e
dall’umidità.
EU (DCF) / UK (MSF) (solo
per il sensore RTGN318D)
9
IT
Page 93

IT
• Non collocare il sensore a una distanza superiore a 70
metri (230 piedi) dall’unità principale (interno).
• Collocare il sensore in modo che sia rivolto verso l’unità
principale (interno), riducendo gli ostacoli come porte,
muri e mobili.
• Collocare il sensore in un luogo in cui abbia una buona
visibilità verso il cielo, lontano da oggetti metallici o
elettronici.
• Collocare il sensore più vicino all’unità principale durante
i mesi invernali, poiché temperature rigide sotto lo
zero possono influire negativamente sulla durata della
batteria e sulla trasmissione del segnale.
NOTA L’intervallo di trasmissione può variare ed è soggetto
all’intervallo di ricezione dell’unità principale.
Potrebbe essere necessario cambiare più volte la posizione
per ottenere i migliori risultati.
TRASMISSIONE DEI DATI DAL SENSORE
I dati vengono inviati dal sensore o dai sensori ogni
minuto circa. L’icona di ricezione visualizzata nella sezione
Temperatura / Umidità mostra lo stato di trasmissione.
ICONA DESCRIZIONE
Il sensore 1 sta inviando i
dati. Il numero mostra il
sensore selezionato.
--- visualizzato nella
sezione della
temperatura / umidità
Impossibile trovare il
sensore selezionato.
Avviare una ricerca del
sensore o controllare le
batterie.
RICERCA DI UN SENSORE
Per avviare la ricerca di un sensore termoigrometro,
premere SELECT in modo da accedere alla sezione della
temperatura / umidità.
sezione. Tenere premuti contemporaneamente i pulsanti
MEM e CHANNEL per 2 secondi.
verrà visualizzato accanto alla
NOTA Se il sensore non viene trovato, verificare le
batterie.
OROLOGIO E CALENDARIO
L’unità aggiorna le informazioni relative ad ora e calendario
in base ai segnali inviati dal sensore remoto RTGN318/
RTGN318D / RTGN318A, oppure alle impostazioni
specificate manualmente.
L’unità principale sta
cercando i sensori.
È stato trovato almeno 1
sensore.
OROLOGIO RADIOCONTROLLATO
L’ora e la data visualizzati sul display dell’unità principale
vengono aggiornate automaticamente tramite i segnali ricevuti
dal segnale di radiocontrollo attraverso il sensore remoto
RTGN318 / RTGN318D / RTGN318A. In particolare:
10
Page 94

• BAR908HG (RTGN318):
Segnale DCF-77: entro 1500 km da Francoforte,
Germania.
• BAR908HGU (RTGN318D):
Spostare la levetta EU / UK per selezionare il segnale da
ricevere.
EU: segnale DCF-77: entro 1500 km da Francoforte,
Germania.
UK: segnale MSF-60: entro 1500 km da Anthorn,
Inghilterra.
• BAR908HGA (RTGN318A):
Segnale WWVB-60: entro 3200 km da Fort Collins,
Colorado.
Per la ricezione iniziale possono essere necessari da 2 a 10
minuti. La ricezione viene attivata quando si configura per la
prima volta l’unità oppure ogni volta che si preme il pulsante
RESET. Al termine di queste operazioni, l’icona di ricezione
smetterà di lampeggiare.
L’icona
2 fattori:
• Connessione tra l’unità principale e il sensore che rileva
i segnali RF (
• Ricezione del segnale RF (
Come i segnali interagiscono tra di loro:
visualizzata nella sezione dell’orologio indica
)
)
IT
ICONA SIGNIFICATO
L’unità è connessa con
il sensore e l’ora è stata
sincronizzata.
L’unità è connessa con il
sensore ma l’ora non è stata
sincronizzata.
L’unità non è connessa con
il sensore remoto ma l’ora è
sincronizzata.
L’unità ha perso la
connessione con il sensore
remoto e l’ora non è
sincronizzata.
L’unità non riesce a stabilire
una connessione con il
sensore remoto.
ATTIVAZIONE / DISATTIVAZIONE
DELLA FUNZIONE DI RADIOCONTROLLO
Per impostare manualmente l’orologio, è innanzitutto
necessario disabilitare la funzione di radiocontrollo. A questo
scopo, accedere alla sezione dell’orologio / allarme e tenere
premuto per 2 secondi il pulsante DOWN nell’unità principale.
Viceversa, per attivare la funzione di radiocontrollo accedere
alla sezione dell’orologio / allarme e tenere premuto per 2
secondi il pulsante UP.
Orologio RF abilitato:
11
Page 95

IT
Orologio RF disabilitato:
IMPOSTAZIONE DELL’OROLOGIO
È necessario impostare manualmente l’orologio se è stata
disattivata la funzione di radiocontrollo, oppure se non è
possibile ricevere un segnale RF perché troppo distante.
1. Premere SELECT per accedere alla sezione dell’orologio.
verrà visualizzato accanto alla sezione.
2. Tenere premuto il pulsante MODE per 2 secondi.
3. Selezionare la differenza di fuso orario (+ / -23 ore), il
formato dell’ora (12 / 24 ore), l’ora, i minuti, l’anno, il
formato della data e del mese, il mese, la data, il giorno
e la propria lingua.
4. Per modificare le impostazioni, premere il pulsante UP
o DOWN.
5. Per confermare la selezione, premere MODE.
BAR908HGA: Selezionare la zona relativa al fuso orario: (0)
Pacific, (+1) Mountain, (+2) Central oppure (+3) Eastern.
NOTA Sono disponibili le lingue (E) Inglese, (F) Francese,
(D) Tedesco, (I) Italiano e (S) Spagnolo. Il giorno della
settimana viene visualizzato nella lingua selezionata.
INFORMAZIONI VISUALIZZABILI SUL DISPLAY
DELL’OROLOGIO
Premere SELECT per accedere alla sezione dell’orologio.
verrà visualizzato accanto alla sezione.
Premere MODE per alternare sul display le visualizzazioni:
• Orologio con secondi
• Orologio con il giorno della settimana
• Orologio con offset dell’ora
• Calendario
ALLARMI
L’unità dispone di due allarmi: un allarme giornaliero e un
preallarme in caso di previsione di precipitazioni nevose.
È possibile impostare l’allarme giornaliero di modo che si
attivi tutti i giorni alla stessa ora. Il preallarme suona solo
quando è attivato l’allarme giornaliero, il barometro prevede
pioggia e la temperatura registrata dal sensore del canale 1
raggiunge il valore 2 °C (35,6 °F) o inferiore.
IMPOSTAZIONE DELL’ALLARME GIORNALIERO
1. Premere SELECT per accedere alla sezione dell’orologio.
verrà visualizzato accanto alla sezione.
2. Premere ALARM per visualizzare l’allarme. (Il simbolo
AL verrà visualizzato nella parte superiore).
3. Tenere premuto ALARM per 2 secondi.
4. Selezionare l’ora e i minuti. Premere UP o DOWN per
12
Page 96

modificare le impostazioni.
5. Premere ALARM per confermare la selezione.
6. Dopo aver impostato l’allarme verrà visualizzata l’icona
dell’allarme giornaliero
.
IMPOSTAZIONE DEL PREALLARME
È possibile impostare il preallarme affinché suoni 15, 30, 45 o
60 minuti prima dell’allarme giornaliero. Il preallarme suonerà
quando il barometro prevede pioggia e la temperatura
registrata dal sensore del canale 1 raggiunge il valore 2°C
(35,6°F) o inferiore.
Se ad esempio si imposta l’allarme alle 7:00 AM e il
preallarme 45 minuti prima, il preallarme suonerà alle
6:15 AM.
1. Impostare e attivare l’allarme giornaliero.
2. Premere ALARM per attivare la visualizzazione del
preallarme. (Nella parte superiore della sezione verrà
visualizzato PRE-AL.)
3. Tenere premuto ALARM per 2 secondi.
4. Premere UP o DOWN per selezionare 15, 30, 45 o 60
minuti, ovvero l’arco di tempo in cui il preallarme suonerà
PRIMA dell’allarme giornaliero. Il preallarme si attiva
automaticamente quando si seleziona un’ora.
5. Premere ALARM per confermare la selezione.
viene visualizzato quando è impostato il preallarme.
NOTA Se è stato attivato il preallarme, l’allarme giornaliero
NON funzionerà fino al giorno successivo. Inoltre, se si
disattiva l’allarme giornaliero, viene automaticamente
disattivato anche il preallarme.
ATTIVAZIONE DELL’ALLARME
Accedere alla sezione dell’orologio, quindi premere ALARM
per attivare la visualizzazione dell’allarme giornaliero o del
preallarme. Per attivare o disattivare l’allarme, premere
UP o DOWN.
Quando si raggiunge l’ora dell’allarme, la retroilluminazione
si accenderà per 8 secondi e l’allarme in crescendo suonerà
per 2 minuti. Per disattivare il suono dell’allarme, premere
qualsiasi tasto, tranne snooze. L’allarme suonerà di nuovo
il giorno successivo alla stessa ora.
FUNZIONE SNOOZE
Premere SNOOZE per disabilitare temporaneamente
l’allarme per 8 minuti. L’icona
quando la modalità Snooze è attiva.
o lampeggerà sul display
BAROMETRO
L’unità tiene traccia delle variazioni nella pressione
barometrica per fornire le previsioni meteorologiche. Lo
storico delle misurazioni delle pressioni barometriche
delle ultime 24 ore e il valore vengono registrati nell’unità
principale (interno).
VISUALIZZAZIONE DELLA SEZIONE DEL
BAROMETRO
Premere SELECT per accedere alla sezione del
barometro.
Se l’icona
I dati barometrici vengono visualizzati nelle due sezioni nella
parte inferiore del display: la sezione superiore mostra un
NON viene visualizzata, premere MODE.
13
IT
Page 97

IT
grafico a barre delle ultime 24 ore, mentre la sezione inferiore
mostra le misurazioni correnti e cronologiche.
IMPOSTAZIONE DELL’ALTITUDINE
Impostare l’altitudine sul valore al di sopra o al di sotto del
livello mare in cui ci si trova per migliorare l’accuratezza delle
misurazioni della pressione barometrica.
1. Accedere alla sezione del barometro.
2. Tenere premuto HISTORY per 2 secondi.
3. Premere UP o DOWN per impostare l’altitudine in
incrementi di 10 metri (da –100 m a 2.500 m).
4. Premere HISTORY per confermare la selezione.
SELEZIONE DELL’UNITÀ DI MISURA
Per modificare l’unità di visualizzazione sul display,
impostare il selettore posto nel vano batterie dell’orologio
su mb / inHg.
VISUALIZZAZIONE DEI VALORI STORICI DELLA
PRESSIONE
Accedere alla sezione del barometro, quindi premere
ripetutamente il pulsante HISTORY per scorrere le
misurazioni. Il numero visualizzato nella casella HR indica
il tempo trascorso dalla rilevazione della misurazione, ad
esempio 2 ore fa, 3 ore fa, ecc...
RAPPRESENTAZIONE GRAFICA
DELLO STORICO DELLA PRESSIONE
BAROMETRICA
Il grafico a barre mostra graficamente i cambiamenti rilevati
nella pressione atmosferica tra l’ora corrente (0) e le 24 ore
precedenti (-24).
PREVISIONI METEOROLOGICHE
L’unità è in grado di prevedere le condizioni meteorologiche
delle successive 12 - 24 ore entro un raggio di 30-50 km
(19-31 miglia). Tali previsioni si basano sulle misurazioni
delle oscillazioni della pressione barometrica.
Nella sezione superiore viene visualizzata un’icona animata
che indica il tempo previsto.
ICONE DELLE PREVISIONI METEOROLOGICHE
ICONA DESCRIZIONE
Sereno
Giorno / Notte
Parzialmente nuvoloso
Giorno / Notte
14
Page 98

Nuvoloso
Pioggia
Neve
NOTA L’icona relativa alle ore notturne viene visualizzata
dalle 6 PM alle 6 AM. Quando il sensore del canale 1 rileva
una temperatura di 2 °C (35,6 °F) o inferiore, l’icona cambia
da pioggia a neve.
MISURAZIONE UV
Il sensore dei raggi ultravioletti UVR 128 è disponibile
opzionalmente nel modello BAR908HG / BAR908HGU/
BAR908HGA. Il sensore UV fornisce le informazioni
seguenti:
• Rilevazione dell’indice dei raggi ultravioletti (UVI) ogni
10 ore.
• Calcolo automatico del periodo più adeguato per
l’esposizione ai raggi UV in base ai profili utente pre-
impostati, per un massimo di 4 ore.
• Avviso di pericolo di esposizione ai raggi UV quando
l’indice UV raggiunge livelli pericolosi.
I dati UV vengono visualizzati nella stessa sezione del
barometro. Premere SELECT per accedere alla sezione del
barometro, quindi premere MODE per visualizzare l’icona
e i dati.
UV
FUNZIONI AGGIUNTIVE UV
IT
CONTO ALLA ROVESCIA DEL TEMPO DI ESPOSIZIONE
UV
Per impostare il conto alla rovescia del tempo di esposizione,
è innanzitutto necessario specificare il tipo di pelle (fenotipo)
e il fattore di protezione dal sole (SPF) utilizzato nel modo
seguente:
1. Premere SELECT per accedere alla sezione del
barometro, quindi premere MODE per selezionare la
visualizzazione UV.
2. Premere CHANNEL per selezionare l’utente: 1-4.
3. Tenere premuto MODE per 2 secondi per attivare la
modalità dell’impostazione del tipo di pelle dell’utente
selezionato.
4. Premere UP o DOWN per scegliere 1 delle 4
impostazioni relative ai tipi di pelle disponibili. Quindi
premere MODE per confermare la selezione e attivare
la modalità dell’impostazione SPF.
5. Premere UP o DOWN per aumentare o diminuire il
valore SPF. Quindi premere MODE per confermare la
15
Page 99

IT
selezione e attivare la modalità d’impostazione del conto
alla rovescia del periodo di esposizione ai raggi UV.
6. Premere UP o DOWN per abilitare o disabilitare il
conto alla rovescia. Premere MODE per uscire dalla
visualizzazione del tempo di esposizione rimanente
per l’utente e avviare il conto alla rovescia del tempo di
esposizione. Verrà visualizzato il tempo di esposizione
ai raggi UV rimanente per l’utente e l’icona
lampeggerà.
7. Quando il conto alla rovescia raggiunge il valore
“0”, suonerà un allarme per 2 minuti. Premere un
pulsante qualsiasi per disattivare l’allarme. L’icona
lampeggerà per 2 minuti anche se è stato disattivato il
suono dell’allarme.
MEMORIZZAZIONI UVI MASSIME E MINIME
Per visualizzare le memorizzazioni UVI massime e
minime:
1. Premere SELECT per accedere alla sezione del
barometro.
2. Premere MODE per selezionare la visualizzazione UVI.
3. Premere MEM per mostrare le memorizzazioni UVI
massima, minima e corrente.
4. Tenere premuto MEM per 2 secondi per cancellare i
valori UVI in memoria.
NOTA Per impostare le funzioni aggiuntive, è innanzitutto
necessario attivare il sensore UV (opzionale) e fare
riferimento al manuale dello stesso.
TEMPERATURA E UMIDITÀ
La stazione meteorologica può visualizzare le informazioni
seguenti relative a uno dei 5 sensori remoti:
• Temperature massime, minime e correnti e percentuali
di umidità relativa.
• Indicatore del livello di comfort e tendenze: in aumento,
in diminuzione o stazionaria.
I dati vengono rilevati e aggiornati ogni 60 secondi circa.
VISUALIZZAZIONE DELLA SEZIONE
DELL’UMIDITÀ E DELLA TEMPERATURA
Premere SELECT per accedere alle sezioni della temperatura
e dell’umidità.
I dati della temperatura vengono visualizzati nella parte
superiore, mentre quelli dell’umidità nella parte inferiore.
SELEZIONE DELL’UNITÀ DI MISURAZIONE
Impostare l’interruttore °C / °F all’interno del vano batterie,
sul valore desiderato.
SELEZIONE DEL CANALE DEL SENSORE
Premere CHANNEL per attivare il sensore desiderato
impostando un valore compreso tra 1 e 5.
• Per visualizzare con rotazione automatica le informazioni
rilevate dai sensori, tenere premuto CHANNEL per 2
secondi. I dati di ogni sensore verranno visualizzati per
3 secondi.
• Per interrompere la visualizzazione automatica a
rotazione, premere CHANNEL o MEM attivando la
16
Page 100

sezione temperatura / umidità.
IT
ZONA TEMPERATURA UMIDITÀ
NOTA Se si seleziona un sensore che raccoglie solo i dati
della temperatura, l’umidità non verrà visualizzata.
VALORI MINIMI E MASSIMI MEMORIZZATI
• Premere ripetutamente MEM per visualizzare le
registrazioni massima, minima e corrente del sensore
selezionato.
• Per cancellare le registrazioni, tenere premuto MEM per
2 secondi. Dopo che la memoria è stata cancellata, verrà
emesso un segnale acustico (beep) di conferma.
TENDENZA DI UMIDITÀ E TEMPERATURA
Le linee delle tendenze vengono visualizzate accanto alle
misurazioni della temperatura e dell’umidità.
TENDENZA
TEMPERATURA
UMIDITÀ
IN
AUMENTO
STAZIONARIA
IN
DIMINUZIONE
INDICE DI COMFORT
La zona di comfort indica quanto è confortevole la situazione
climatica, in base alle misurazioni dell’umidità e della
temperatura correnti.
UMIDO Qualsiasi >70%
C O N F O R
20-25°C(68-77°F) 40-70%
TEVOLE
SECCO Qualsiasi <40%
NESSUN
< 20°C o >25°C 40-70%
COMMENTO
NOTA Queste informazioni vengono mostrate nella sezione
dell’umidità quando è visualizzata la misurazione corrente.
INDICE DI CALORE
L’indice di calore mostra uno dei 4 livelli di avvertimento
disponibili quando la temperatura è alta.
CATEOGORIA
PERICOLO
Massimo
pericolo
Pericolo 40.5-54.4 105-130
Massima
attenzione
Attenzione 26.6-32.2 80-90
TEMPERATURA
°C °F
>54.5 >130
32.2-40.5 90-105
17
 Loading...