

Page 1
TRAVEL ALARM CLOCK
WITH BACKLIGHT
AND NIGHT FINDER
Model AS-688NE
A)
findernight
B)
night
finder
FIG.1
C)
D)
FIG.2
E)
F)
FIG.3
FIG.4
FIG.5
NIGH T FIND ER
RESET
J
FIG.6
FIG.7
ENGLISH
- Thank you for your purchase of this Clock.
- In order to optimize its function, be sure to read this manual
carefully and keep it for future reference.
INSTRUCTION MANUAL
FEATURES
- Unique Night Finder
- View the current time and alarm time simultaneously.
- Wake gently! The audible alarm initially sounds with a series
of beeps at a low level, and gradually increases in volume.
- Eight minute snooze function activates with unique Lite
Touch feature.
- Bright blue HiGlo
easy night-time viewing and flashes when the alarm goes off.
- Protective hinged cover keeps buttons from resetting in transit
and also acts as a table-top stand.
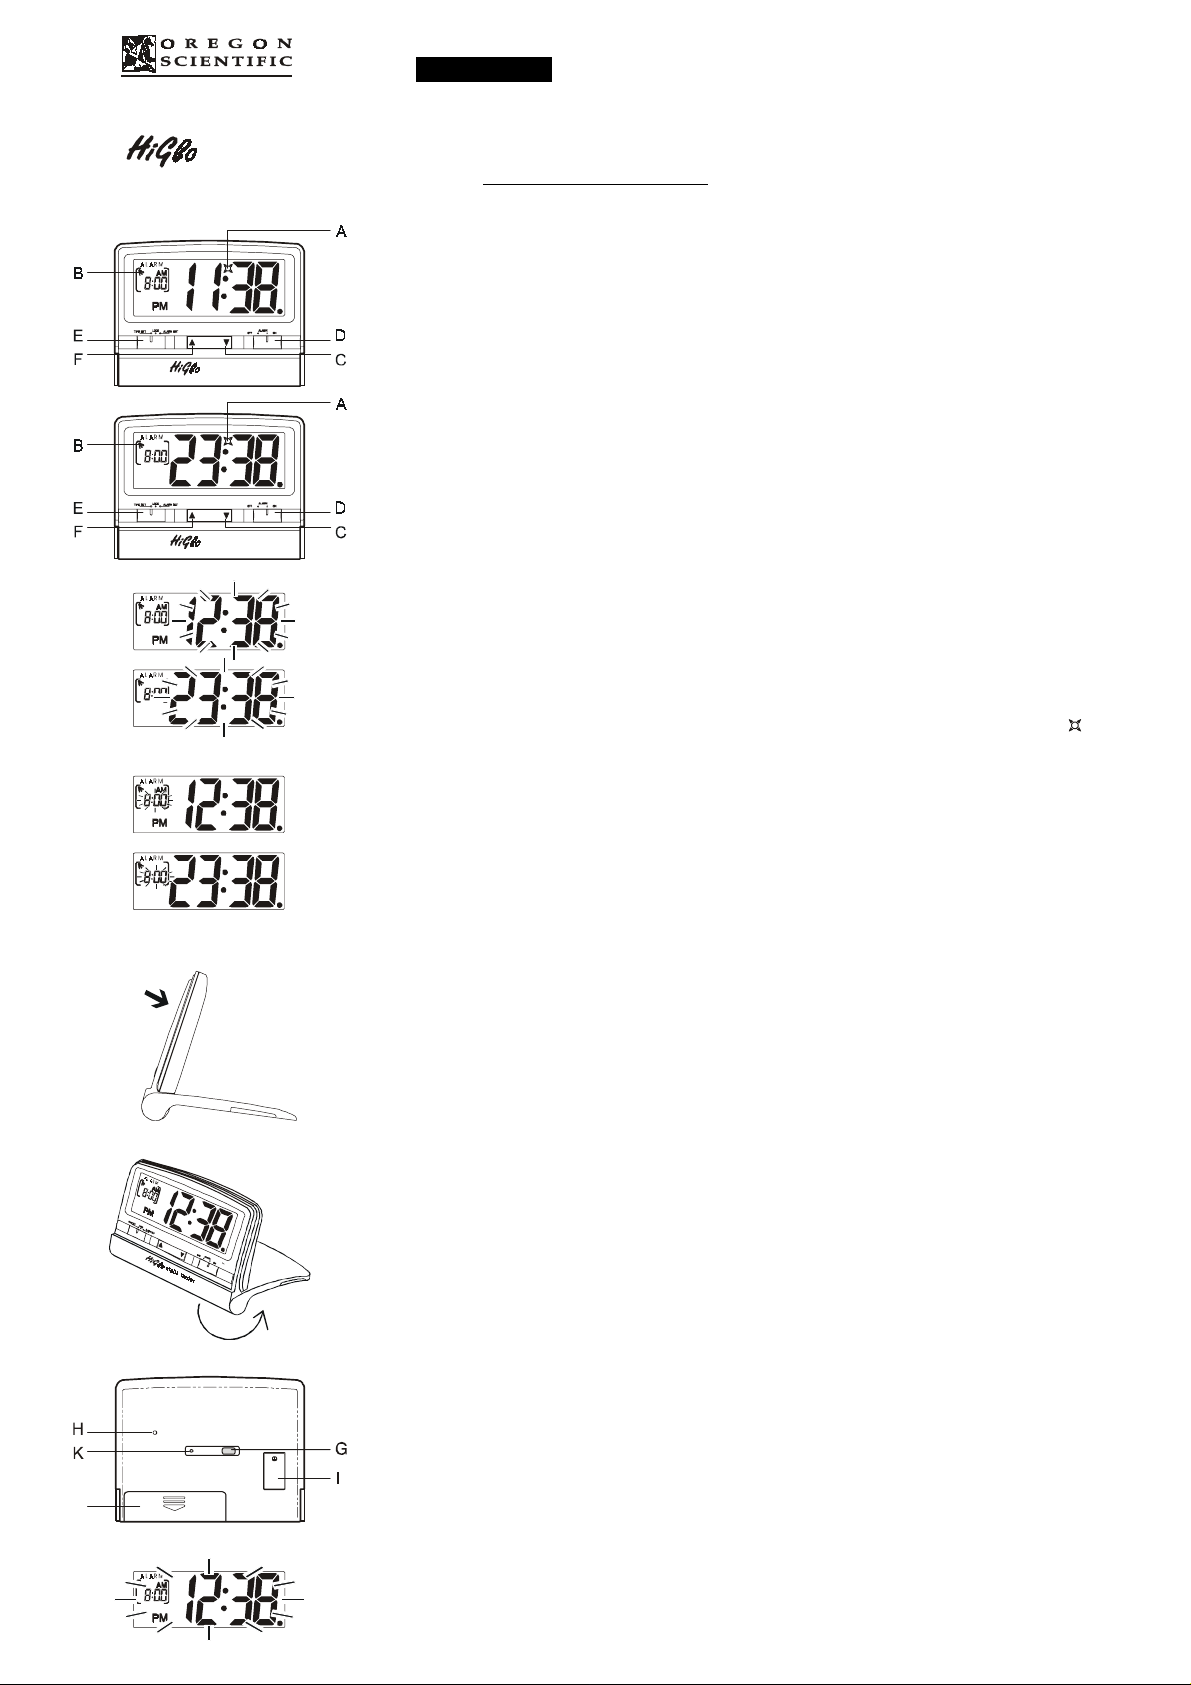
DESCRIPTION OF PARTS
A. Night Finder indicator
B. Alarm ON/OFF indicator
C. Down button
D. ALARM ON/OFF switch
E. TIME SET/LOCK/ALARM SET switch
F. Up button
A) 12 hour display
B) 24 hour display
[ SEE FIG. 1 ]
INSTALLING AND REPLACING BATTERY
The unit uses two pieces of AAA Alkaline battery for backlight
and one piece of LR44 button cell for clock.
If the display backlight becomes dim, remove the exhausted
AAA batteries and follow these steps to replace them:
1. Slide the battery door “J” in the direction of the arrow.
2. Insert the AAA battery as indicated by the polarity symbols (+
and -) marked inside the battery compartment.
3. Replace the battery compartment door.
If the display becomes dim, remove the exhausted LR44 button
cell battery and follow these steps to replace it:
1. Use a philips type screw driver to unscrew the battery hatch “I”
and open it.
2. Remove the exhausted LR44 battery and insert fresh battery
as indicated by the polarity symbols marked inside the battery compartment.
3. Replace the battery hatch and fasten the lock-screw with a
screw driver.
TABLE STANDING
To use the cover as a stand, rotate the hinged cover over the back
of the clock.
[ SEE FIG. 5 ]
HOW TO SET THE CLOCK TIME
1. Lift the cover to reveal the setting buttons.
2. Slide the[TIME SET/LOCK/ALARM SET] switch to the
TIME SET position. The time on the top of display flashes
[SEE FIG.2]:
C) 12 hour display
D) 24 hour display
3. Press the[UP] or[DOWN] arrow button to increase/decrease
the setting in one minute increments until the desired hour
and minute are dis-played. Press and hold the [UP] or [DOWN]
button for faster setting.
4. When the correct time is displayed, slide the [TIME SET/
LOCK/ALARM SET] switch to the LOCK position. The time
display stops flashing and the time is set.
HOW TO SET THE ALARM TIME
1. Slide the [TIME SET/LOCK/ALARM SET] switch to the
ALARM SET position. The alarm time at the bottom of the
display flashes [SEE FIG.3]:
E) 12 hour display
F) 24 hour display
2. Press the[UP] or[DOWN] arrow button to increase/decrease
the setting in one minute increments until the desired hour and
minute are displayed. Press and hold the [UP] or [DOWN]
button for faster setting.
TM
feature to locate the clock in the dark.
TM
backlight illuminates the display for
3. Slide the [TIME SET/LOCK/ALARM SET] switch to the
LOCK position. The alarm time display stops flashing and
the alarm time is set.
IMPORTANT: After your alarm time has been set, you MUST
slide the [ALARM ON/OFF] switch to the ON position to activate
the alarm.
ABOUT THE ALARM
1. Slide the [ALARM ON/OFF] switch to the ON position. An
alarm ON/ OFF indicator is displayed on the LCD display.
Now the alarm will sound at the programmed time.
2. The alarm wakes you gently with a series of beeps that gradually increase in volume.
3. To silence the alarm slide the [ALARM ON/OFF] switch to the
OFF position. The alarm indicator disappears from the display and the alarm is deactivated.
Note:
Remember, you must slide the [ALARM ON/OFF] switch to the
ON position to use again. However, for your convenience, the
alarm will automatically shut off after one minute and will sound
again at the same time the next day.
HOW TO USE THE SNOOZE
The Lite Touch feature enables you to activate the 8 minute
snooze by gently rocking the alarm backwards on its stand with
the touch of your fingers.
[ SEE FIG. 4 ]
LITE TOUCH HiGlo
Using the Lite Touch feature, the display backlight will be
activate for three seconds so you can see the display in the dark.
The light then automatically turns off.
[ SEE FIG. 4 ]
TM
BACKLIGHT
UNIQUE NightfinderTM FUNCTION
Press the [NIGHT FINDER] button once and [ ] appears on the
display.The display backlight flashes every few seconds.
Note: The Nightfinder
environment. You may not be able to see the flashing display
under normal light conditions.
G.Night Finder button
H. Buzzer
I. Battery hatch for clock
J. Battery cover for backlight
K.Reset button
[SEE FIG.6 & FIG.7]
IMPORTANT: The Nightfinder
unfamiliar enviroment, such as hotel room, so as not to drain the
battery. Under constant use conditions, the battery life will be
reduced significantly.
TM
feature is intended for use in a very dark
TM
should only be used in an
THE RESET FUNCTION
If your clock doesn’t work properly, you can use a pin object to
push the [RESET] button once to reset the unit. After reset you
need to set the clock and alarm times again.
MAINTENANCE
The following suggestions will help you care for the Travel
Alarm Clock so you can enjoy it for years.
1. Keep the Clock dry. If it gets wet, wipe it dry immediately,
liquids might contain minerals that can corrode the electronic
circuits.
2. Use and store the Clock only in normal temperature
environments.Temperature extremes can shorten the life of
electronic devices, damage batteries, and distort or melt plastic parts.
3. Handle the Clock gently and carefully. Dropping it can damage circuit boards and cause the Travel Alarm Clock to work
improperly.
4. Keep the Clock away from dust and dirt, which can cause
premature wear of parts.
5. Wipe the Clock with a damp cloth occasionally to keep it
looking new. Do not use harsh chemicals, cleaning solvents,
or strong detergents to clean the Clock.
6. Use only fresh batteries of the required size and type. Always
remove old or weak batteries. They can leak chemicals that can
destroy electronic circuits.
7. Modifying or tampering with the Clock’s internal components
can cause a malfunction and might invalidate is warranty.
Page 2

SPECIFICATIONS
Operation temperature : 0°Cto50°C(32°Ftol22°F)
Accuracy : +/- 0.5 seconds per day
Power Source : Two pcs.UM-4 or ‘AAA’ size Alka
Dimension : 82x108x15 mm/3.23 x 4.25 x 0.6 inch
Weight : 92 gms / 3.3 ounces (without battery)
line batteries (excluded)
one pc. LR44 button cell battery (in
cluded)
(H x W x D)
CAUTION
— The content of this manual is subject to change without
further notice.
— Due to printing limitation, the displays shown in this
manual may differ from the actual display.
— The contents of this manual may not be reproduced
without the permission of the manufacturer.
CUSTOMER ASSISTANCE
Should you require assistance regarding this product and its
operation, please contact our customer care department at
541-868-8205 or via email at helpme@oscientific.com.
WARRANTY
This product is warranted to be free of manufacturing defects for
a period of 90 days from date of retail purchase. Defective product
should be directed to the place of retail purchase for exchange.
Should this not be possible, contact our customer care department
for assistance and a return material authorization. No returns may
be made without a return authorization. Please retain your retail
receipt as you may be asked to provide a copy of it for proof of
date purchased.
This warranty does not cover product subjected to abuse, misuse,
accidental damage or tampering. Upon return of the defective
product, Oregon Scientific will at its discretion, replace the
product with either a new or a tested reconditioned product.
Should the product be out of warranty, the consumer may purchase
directly from Oregon Scientific a replacement at reasonable cost
plus shipping and handling.
086-001794-
 Loading...