

Page 1

Bike pod
Model: AD202
The AD202 bike pod is equipped with the latest
2.4GHz ANT+ Sports System to achieve reliable
transmission linkage with other devices.
PACKAGE ITEMS
The package should include the following items:
• 1 x AD202 bike pod and cushion
• 1 x magnet (plastic base)
• 1 x magnet (with screw)
• 6 x nylon cable ties
• 1 x CR2032 3V lithium batteries (already
installed in bike pod)
SELECT MEASURMENT MODE
This bike pod measures speed and cadence. First
decide what you wish to measure as the
positioning of the bike pod depends on the chosen
measurement mode.
To select measurement mode (speed / cadence):
1. Use a coin to open the battery compartment lid
by turning it anticlockwise.
2. Remove the battery.
3. Slide switch to select SPEED or CADENCE
(refer to markings on the unit).
4. Put battery back into place.
5. Secure the lid by turning clockwise.
6. Insert sensor into the provided cushion to help
achieve a better grip on the bicycle.
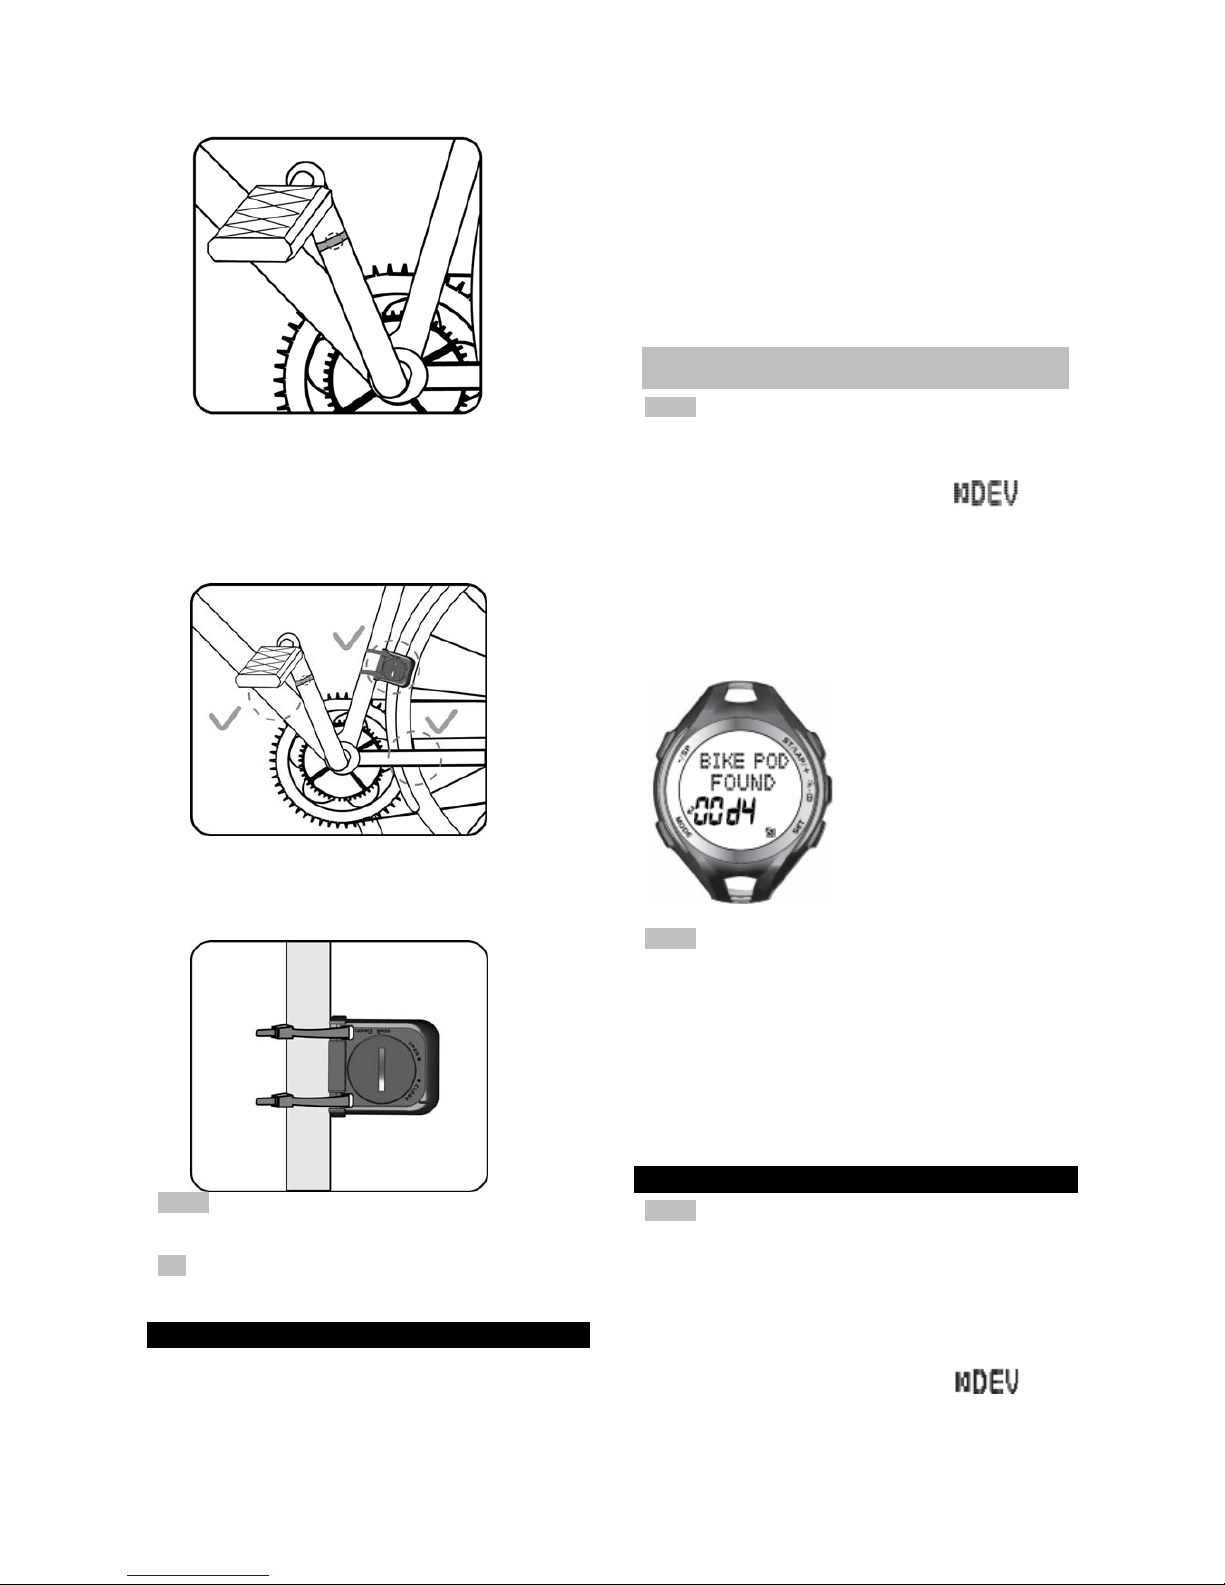
INSTALLING THE BIKE POD
SPEED
1. Position sensor onto one side of the bicycle fork,
with logo visible.
2. Thread a nylon cable tie through each of the
holes on the sensor. Loop cable tie around the
bicycle fork, then thread the end through the
opening and past the ratchet. Pull to secure
into place.
TIP Cut away unnecessary cable tie to avoid it
being caught in the wheel while in motion.
3. Unscrew magnet and press slot onto spoke,
with flat magnet surface facing sensor.
4. Using the alignment notch as a guide, position
magnet so that it will pass the sensor at the
correct position. Screw into place.
NOTE Improper alignment may affects sensor’s
performance.
CADENCE
1. Choose the crank arm which is not on the same
side as the chain ring. Place magnet (with
plastic base) onto the crank arm of the pedal,
making sure the magnet faces the chain ring.
Page 2
2. Thread a nylon cable tie through each of the
holes on the sensor. Loop cable tie around the
crank arm then thread the end through the
opening and past the ratchet. Pull to secure
into place.
3. Using the alignment notch as a guide, position
sensor on any bar which is along the ma gn et ’s
path.
4. With the battery compartment facing the
magnet, thread a nylon cable tie through each
hole on the sensor. Loop cable tie around the
bar then thread the end through the opening
and past the ratchet. Pull to se cure into place.
NOTE Improper alignment may affects sensor’s
performance.
TIP Cut away unnecessary cable tie to avoid it
being caught in the wheel while in motion.
PAIRING DEVICE
The AD202 can be paired with your heart rate
monitor (watch) or sports accessory to provide
speed / cadence readings. The bike pod has a
maximum transmission range of about 62.5
centimeters (25 inches).
To pair with Oregon Scientific heart rate monitors
that use the 2.4GHz ANT+ Sports System, please
refer to below pairing instructions.
To pair with sports accessories or heart rate
monitors of another make, please refer to
manufacturer’s instructions.
PAIR WITH OREGON SCIENTIFIC SPORTS
ACCESSORIES / HEART RATE MONITORS
NOTE While pairing, make sure to stay away from
other devices and move the device to pair close to
the watch.
1. Press MODE repeatedly to select
. The
watch will show how many and which devices
are paired (if any). If no device is paired, the
watch will show “0 DEVICE PAIRED”.
2. Press SET to enter “PAIR DEVICE?”. Press
SET to start pairing.
When the bike pod is paired successfully, the watch
will display
NOTE If pairing is weak and unstable:
• Shorten the distance between the device and
watch.
• Re-adjust the position of the device.
• Check the batteries. Replace them when
necessary.
If the watch is already paired with a bike pod, you
have to first delete the bike pod before you are able
to pair with another bike pod.
INPUT BIKE WHEEL SIZE
NOTE The watch will not show “WHEEL SIZE” if no
bike pod is paired.
If your watch is paired with bike pod, the watch will
prompt you to input the wheel size values. Go
directly to step 5.
For normal setting procedure, start with step 1.
1. Press MODE repeatedly to select
.
2. Press SET.
Page 3

3. Press ST/LAP/+ repeatedly to select “WHEEL
SIZE”.
4. Press SET.
5. Input the bike wheel size by pressing ST/LAP/+
to increase values or -/SP to decrease values.
6. Press SET to confirm.
BIKE WHEEL SIZE
Match the ETRTO or wheel size diameter printed
on the wheel with the wheel size setting at the right
hand column of the table below. Input the relevant
wheel size setting number after bike pod is paired.
ETRTO Wheel size
diameter
(inches)
Wheel size
setting (mm)
25-559 26 x 1.0 1884
23-571 650 x 23C 1909
35-559 26 x 1.50 1947
37-622 700 x 35C 1958
47-559 26 x 1.95 2022
20-622 700 x 20C 2051
52-559 26 x 2.0 2054
23-622 700 x 23C 2070
25-622 700 x 25C 2080
28-622 700 x 28 2101
32-622 700 x 32C 2126
42-622 700 x 40C 2189
47-622 700 x 47C 2220
NOTE Wheel sizes on this table are for reference
only as wheel size depends on the wheel type and
air pressure.
REMOVE PAIRED DEVICE
NOTE The watch will not show “DEVICE REMOVE”
if no device is paired.
1. Press MODE repeatedly to select
.
2. Press SET.
3. Press ST/LAP/+ repeatedly to select “DEVICE
REMOVE?”.
4. Press SET.
5. Press ST/LAP/+ to select which device to
delete.
6. Press SET to confirm selection.
REPLACE BATTERY
If the watch indicates sensor battery is low, replace
batteries promptly as it may affect the accuracy of
the readings.
To replace the sensor battery:
1. Use a coin to open the battery compartment lid
by turning it anticlockwise.
2. Remove the old battery and insert a new
CR2032, 3V lithium battery.
3. Secure the lid by turning the coin clockwise.
IMPORTANT Remember to pair device after every
battery replacement or reset.
CARE INSTRUCTIONS
• Do not wrap the sensor in a wet towel nor with
other wet materials.
• Do not place or wash the sensor under runnin g
water, instead clean it with a wet cloth.
• Do not store the sensor in a hot (about 50°C)
and humid (about 90%) environment.
WATER RESISTANCE
The AD202 is water-resistant up to 10 meters (32.8
feet). Not recommended to use for swimming.
RAIN
SPLASHES ETC
SHOWERING (WARM
/ COOL
WATER
ONLY)
LIGHT
SWIMMING
/ SHALLOW
WATER
SHALLOW
DIVING /
SURFING /
WATER
SPORTS
SNORKELING / DEEP
WATER
DIVING
10M /
32.8
FT
OK NO NO NO NO
NOTE Ensure the battery compartment is secured
and intact before exposing to excessive wate r.
SPECIFICATIONS
Power 1 x CR2032 3V lithium
battery
Operating temperature 5˚C to 40˚C (41˚F to
104˚F)
Storage temperature -20˚C to 60˚C (-4˚F to
140˚F)
PRECAUTIONS
To ensure you use your product correctly and safely,
read these warnings and the entire user manual
before using the product:
• Use a soft, slightly moistened cloth. Do not use
abrasive or corrosive cleaning agents, as these
may cause damage. Never use the products in
hot water or store them when wet.
• Do not subject the product to excessive force,
shock, dust, temperature changes, or humidity.
Never expose the product to direct sunlight for
extended periods. Such treatment may result in
malfunction.
• Do not tamper with the internal components.
Doing so will terminate the product warranty
and may cause damage. The main unit
contains no user-serviceable parts.
Page 4

• Do not scratch hard objects against the LCD
display as this may cause damage.
• Take precautions when handling all battery
types.
• Remove the batteries whenever you are
planning to store the product for a long period
of time.
• When replacing batteries, use new batteries as
specified in this user manual.
• The product is a precision instrument. Never
attempt to take this device apart. Contact the
retailer or our customer service department if
the product requires servicing.
• Do not touch the exposed electronic circuitry,
as there is a danger of electric shock.
• Check all major functions if the device has not
been used for a long time. Maintain regular
internal testing and cleaning of your device.
Have your watch serviced by an approved
service center annually.
• When disposing of this product, ensure it is
collected separately for special treatment and
not as normal household waste.
• Due to printing limitations, the displays shown
in this manual may differ from the actual display.
• The contents of this manual may not be
reproduced without the permission of the
manufacturer.
NOTE The technical specifications for this product
and the contents of the user manual are subject to
change without notice.
NOTE Features and accessories will not be
available in all countries. For more information,
please contact your local retailer.
ABOUT OREGON SCIENTIFIC
Visit our website (www.oregonscientific.com) to
learn more about Oregon Scientific products.
If you're in the US and would like to contact our
Customer Care department directly, please visit:
www2.oregonscientific.com/service/support.asp
For international inquiries, please visit:
www2.oregonscientific.com/about/international.asp
FCC / IC STATEMENT
This device complies with Part 15 of the FCC Rules.
Operation is subject to the following two conditions:
(1) This device may not cause harmful interference,
and (2) This device must accept any interference
received, including interference that may cause
undesired operation.
WARNING Changes or modifications not expressly
approved by the party responsible for compliance
could void the user's authority to operate the
equipment.
NOTE This equipment has been tested and found
to comply with the limits for a Class B digital device,
pursuant to Part 15 of the FCC Rules. These limits
are designed to provide reasonable protection
against harmful interference in a residential
installation.
This equipment generates, uses and can radiate
radio frequency energy and, if not installed and
used in accordance with the instructions , ma y
cause harmful interference to radio communications.
However, there is no guarantee that interference
will not occur in a particular installation. If this
equipment does cause harmful interference to radio
or television reception, which can be determined by
turning the equipment off and on, the user is
encouraged to try to correct the interference by one
or more of the following measures:
Reorient or relocate the receiving antenna.
Increase the separation between the equipment
and receiver.
Connect the equipment into an outlet on a circuit
different from that to which the receiver is
connected.
Consult the dealer or an experienced radio / TV
technician for help.
DECLARATION OF CONFORMITY
The following information is not to be used as
contact for support or sales. Please visit our
website at www2.oregonscientific.com/service
for
all enquiries.
We
Name: Oregon Scientific, Inc.
Address: 19861 SW 95th Ave.,Tualatin,
Oregon 97062 USA
Telephone No.: 1-800-853-8883
declare that the product
Product No.: AD202
Product Name: Bike pod
Manufacturer: IDT Technology Limited
Address: Block C, 9/F, Kaiser Estate,
Phase 1, 41 Man Yue St.,
Hung Hom, Kowloon,
Hong Kong
is in conformity with Part 15 of the FCC Rules.
Operation is subject to the following two conditions:
1) This device may not cause harmful interference.
2) This device must accept any interference
received, including interference that may cause
undesired operation.
 Loading...