

Page 1
XL® Classic
Limited Edition
User Manual
For use with model UK2200/UK220 0PC
IMPORTANT: READ CAREFULLY
BEFORE AS SEMBLY AND USE.
oreck.com
IMAGE S MAY DIFFER F ROM ACT UAL PROD UCT.
© 2016 TEC HTRONI C FLOORC ARE TECH NOLOGY LIM ITED #964A00091 • ID117864-R0
Page 2

32
Table of Contents
Important Safety Instructions 4
Vacuum Introduction 6
Technical Specifications 7
Operation 8
Assembling Your Vacuum 8
Using Your Vacuum 9
Maintenance 10
Changing the Filtration Bag 10
Adjusting or Replacing Brushroll 11
Checking & Replacing Brushroll Belt 12
Clearing Blockages 13
Troubleshooting 14
Service 14
Warrant y 15
Spanish 16
French 30
Thank you for purchasing
an Oreck® product.
Please register your product to initiate warranty, ser vice plans and
expert advice on whole-home cleaning: online at Oreck.com or call
1.800.989.3535 (U.S) or 1.888.676.7325 (Canada) to register by phone.
Only Certified Oreck
®
accessories, parts and filtration bags should be
used with this product. Oreck cannot guarantee optimal performance
with the use of non-Oreck component s. Damage to this product
caused by the installation or use of non-Oreck components shall not
be covered under and is excluded from this warranty.
To ensure accessories, parts and filtration bags are genuine,
customers should purchase through a Factory Authorized Dealer or
through oreck.com.
Page 3

54
IMPORTANT SAFETY INSTRUCTIONS
SAVE THESE INSTRUCTIONS!
IMPORTANT: READ CAREFULLY BEFORE ASSEMBLY AND USE. THIS
PRODUCT IS INTENDED FOR HOUSEHOLD USE ONLY. IF USED COMMERCIALLY OR
WITH NON-ORECK® FILTRATION BAGS AND COMPONENTS, WARRANTY IS VOID.
WHEN USING AN ELECTRICAL APPLIANCE, BASIC PRECAUTIONS SHOULD
ALWAYS BE FOLLOWED, INCLUDING THE FOLLOWING: READ ALL
INSTRUCTIONS BEFORE USING THIS APPLIANCE.
WARNING: TO REDUCE THE RISK OF FIRE, ELECTRIC SHOCK OR INJURY:
• Fully a ssemble before op erating.
• Ope rate vacuum only a t voltage specifi ed on data plate on bo ttom of cleaner.
• Do not leave va cuum when plugged in . Unplug from outle t when not in use and bef ore cleaning or ser vicing.
• Do no t use outdoors or on w et surfaces.
• Do not allow to be us ed as a toy. Not intended f or use by children age 12 and un der. Close supervisio n is
necess ary when used n ear children. To avoid injury o r damage,keep childre n away from produ ct, and do not
allow children t o place fingers or oth er objects into any o penings.
• Use only as des cribed in this manual. Us e only manufactu rer’s recommende d attachmen ts and product s.
• Do not use wit h damaged power co rd or plug. If vacuum is no t working as it should , has been dropped ,
damaged, l eft outdoors , or dropped into wa ter, have the produc t inspected by an A uthorized Or eck® Service
Center p rior to continuing us e. Call 1-800-9 89-353 5 for the neares t service cent er or visit our websit e at
www.oreck.com.
• Do not pull or carr y by power cor d, use cord as handle, clo se a door on cord, or pull c ord around sharp ed ges or
corner s. Do not run vacuum o ver cord. Keep cor d away from heat ed surfaces.
• Do no t unplug by pulling on cord. To unplu g, grasp the plug, not t he cord.
• Do no t handle plug or vacuum wi th wet hands.
• Do not put any ob jects into openin gs. Do not use with an y opening blocked; ke ep free of dust, lint , hair, and
anyth ing that may reduc e air flow.
• Keep hair, loose clot hing, fingers, and all par ts of body awa y from openings and m oving parts. B rushroll
continue s to operate whe n in the upright posit ion.
• Turn of f all controls befor e unplugging.
• Use extr a care when cleaning o n stairs. Do not plac e vacuum on stairs or f urniture, as it may r esult in injury or
damage.
• Do not use to pick u p flammable or combus tible liquids, such as gasolin e, or fine wood sandings o r use in areas
where th ey may be presen t.
• Do not pick up any thing that is burni ng or smoking, such as cig arettes, mat ches,
or hot ashes .
• Do no t use without filtr ation bag in place.
CAUTION: TO REDUCE THE RISK OF DAMAGE:
• Avoid pi cking up hard, sharp o bjects with this p roduct, as the y may cause damage.
• Store appr opriately indoor s in a dry place. Do no t expose machine to f reezing temper atures.
• Brushroll con tinues to rotat e while product is tur ned on and handle is in th e upright position . To avoid damage
to carpe t, rugs and floorin g, avoid tipping vacuu m or setting it on fu rniture, fringe d area rugs or carp eted stairs.
• With brush roll on, do not allow cleaner t o sit in one location fo r an extended per iod of time, as damage to fl oor
can resul t.
WARNING: TO REDUCE THE RISK OF ELECTRIC SHOCK, THE CHARGER HAS A
POLARIZED PLUG (ONE BLADE IS WIDER THAN THE OTHER). THIS PLUG WILL FIT
IN A POLARIZED OUTLET ONLY ONE WAY. IF THE PLUG DOES NOT FIT FULLY IN THE
OUTLET, REVERSE THE PLUG. IF IT STILL DOES NOT FIT, CONTACT A QUALIFIED
ELECTRICIAN TO INSTALL THE PROPER OUTLET. DO NOT CHANGE THE PLUG IN
ANY WAY.
Any oth er servicing sho uld be done by an auth orized servi ce represent ative. Call 1-80 0-989 -3535 for th e nearest
servi ce center or visit our w ebsite at www.o reck.com.
WARNING: THIS PRODUCT CONTAINS CHEMICALS, KNOWN TO THE STATE OF
CALIFORNIA TO CAUSE CANCER AND BIRTH DEFECTS OR OTHER REPRODUCTIVE
HARM. WASH HANDS AFTER USING.
Page 4
76
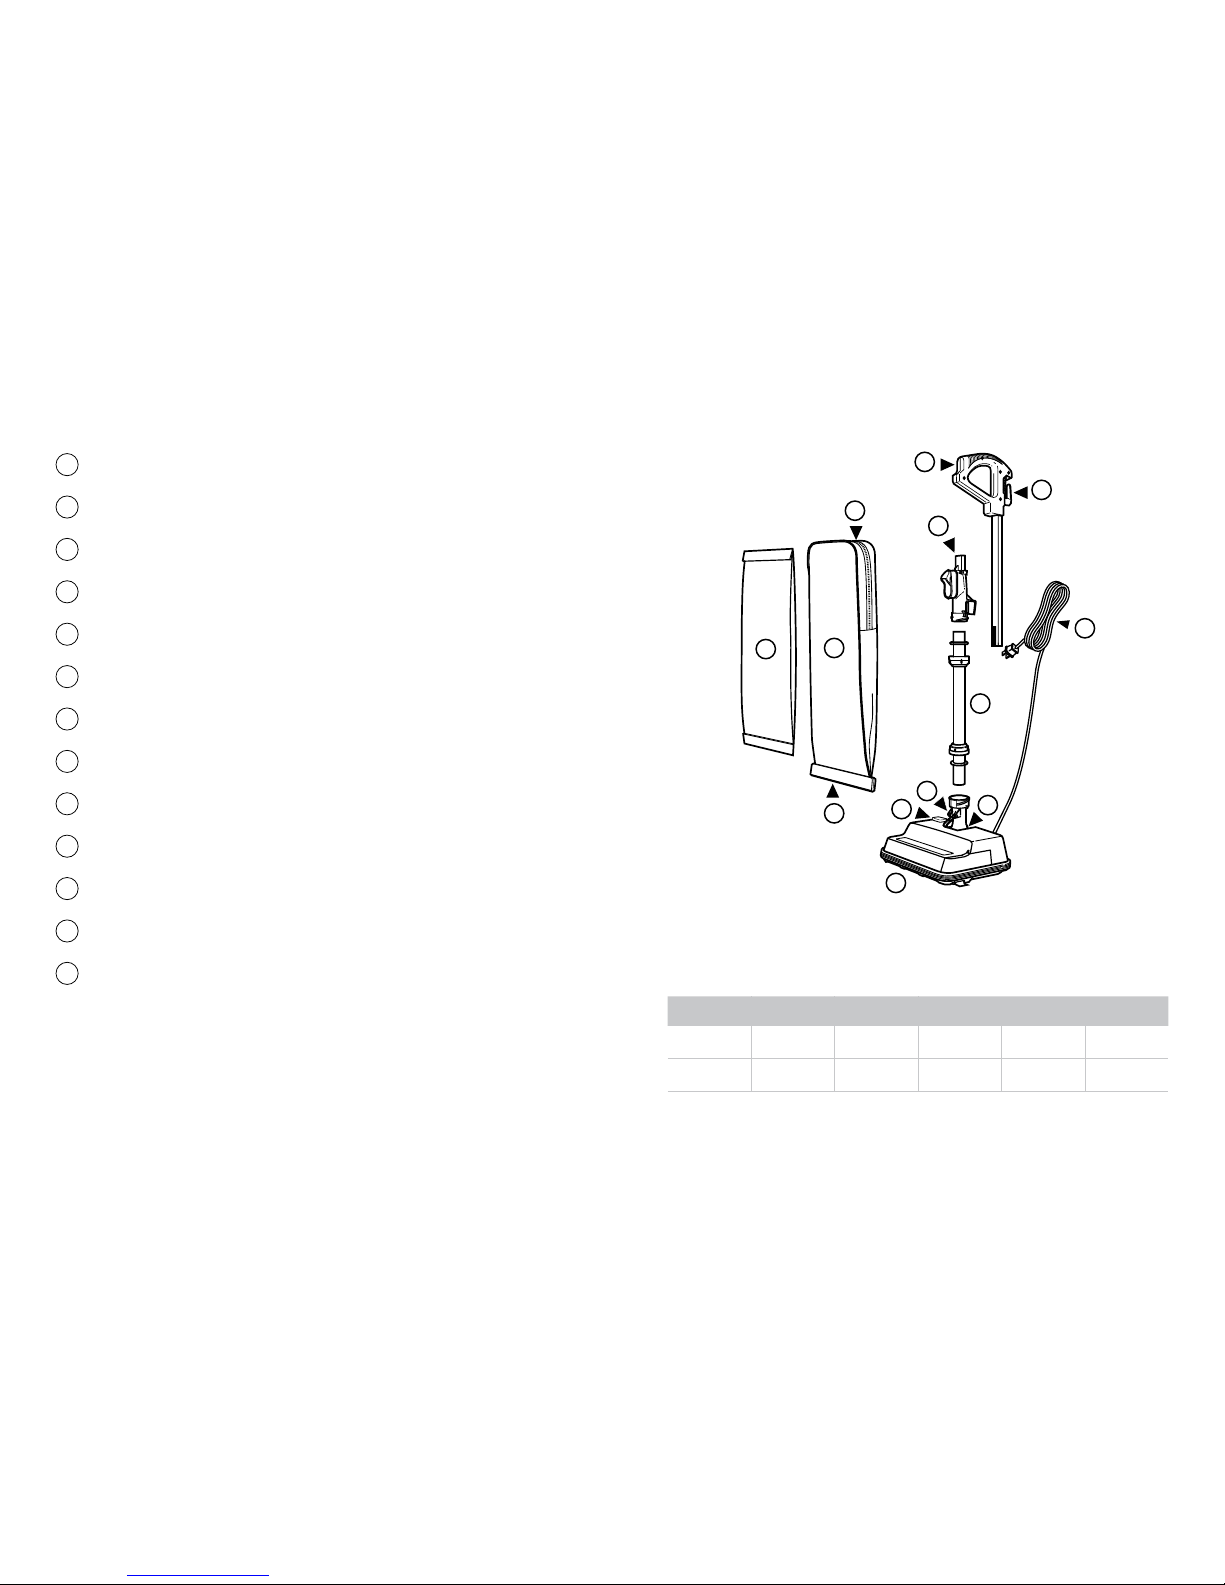
Vacuum Introduction
A
Ergonomic Handle
B
Lo wer Tube
C
Power Head
D
Filtration Bag Case
E
Filtration Bag
F
Power Cord
G
Case Clasp
H
Support Bar
I
Security Zipper
J
On/Of f Control
K
Power Cord Release Hook
L
Filtration Bag Port
M
Fan Housing
Technical Specifications
Name Voltage Current Wattage Cord Length Weight
UK2200 120V 4A 480W 25 ft. 9 lbs.
UK2200PC 120V 4A 480W 25 ft. 9 lbs.
A
B
C
D
E
F
G
H
I
J
K
L
M
Page 5
98
Operation: Assembling Your Oreck
®
Operation: Using Your Oreck
®
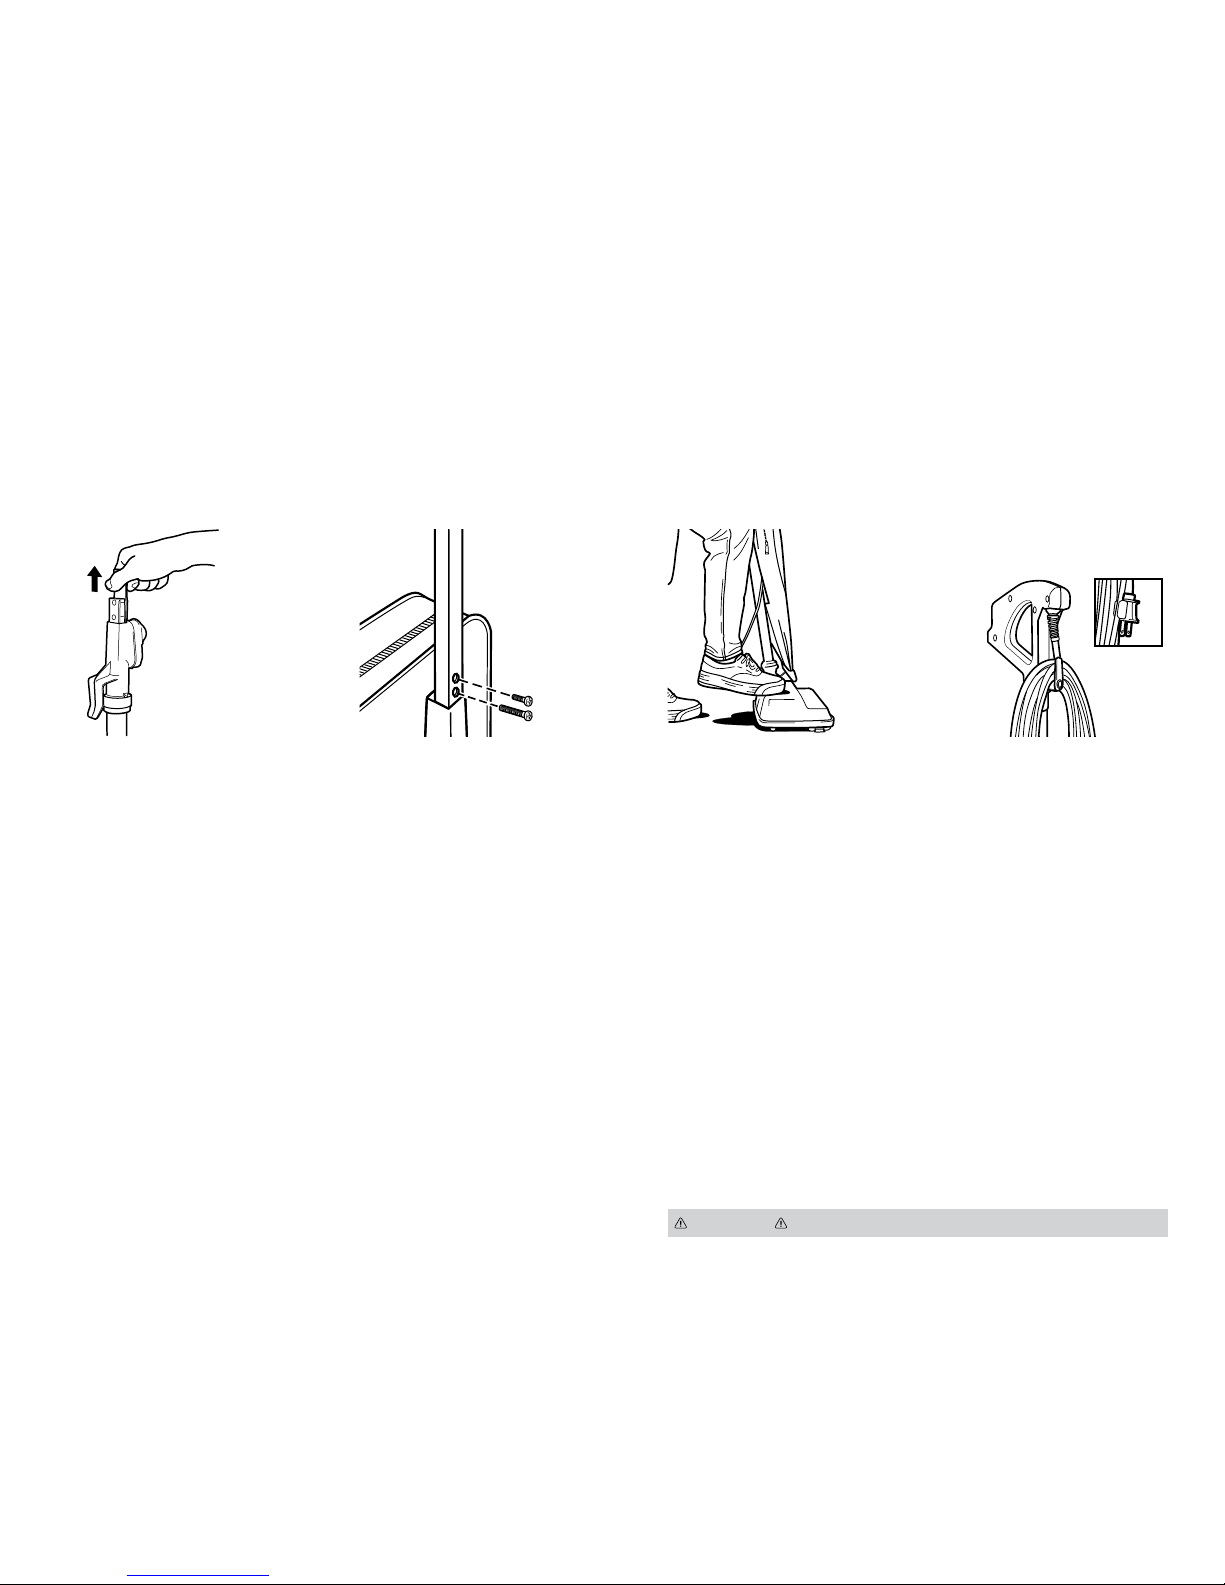
1
Positi on Lock - Place foot o n power
head and lean handle back gently to
release lo ck for vacuum use. Return
handle to th e full upright position t o
engage loc k. The handle should be
rotated to center b efore returning
to upright p osition. Note: Do not
operat e the unit while in the upright
and locked p osition. Do not let the
unit run while in any one stat ionary
position f or any period of time. Keep
the unit mov ing while in operation.
2
Easy Power Cord Storage -
Wrap power cord aroun d power cord
release ho ok and cord hook
on handle. Us e power cord to secure
plug.
1
Remove t wo screws from t he
filtration bag port. Remove cardboard
insert b y pulling upward.
2
Slide upper ha ndle section over
matching s ection of the filtration
bag por t. Insert shor t screw into top
hole and long s crew into the bot tom
hole then tig hten firmly until handl e
is secure.
NOTE: Please read “Important Safet y Instructions” before use.
CAUTION NOT TO BE US ED TO GROOM A PE T.
Page 6
10 11
Maintenance: Changing the Filtration Bag
SaniSeal® OPERATION : Your Oreck
®
vacuum includes a filtration bag equipped with the
SaniSeal® System. SaniSeal® automatically locks in allergens, dir t and debris each time you change
the bag.
IMPORTANT NOTE: To keep your vacuum running at optimal performance, make sure to
change the filtration bag when the contents reach the MAXIMUM FILL LINE. Overloading may
result in loss of air flow suction and decreased per formance.
118
ENFONCEZ JUSQU’À
ENTENDRE UN BRUIT
PRESIONE HASTA
ESCUCHAR UN
CHASQUIDO DE SUJECIÓN
CAUTION VERY FI NE MATERIALS , SUCH AS FACE POW DER OR CORNSTA RCH MAY SEAL THE F ILTRATION
BAG AND CA USE IT TO BURST E VEN THOUGH I T IS ONLY PARTIAL LY FULL. CHANGE O FTEN WHEN
CLEANING THIS TYPE OF MATERIAL.
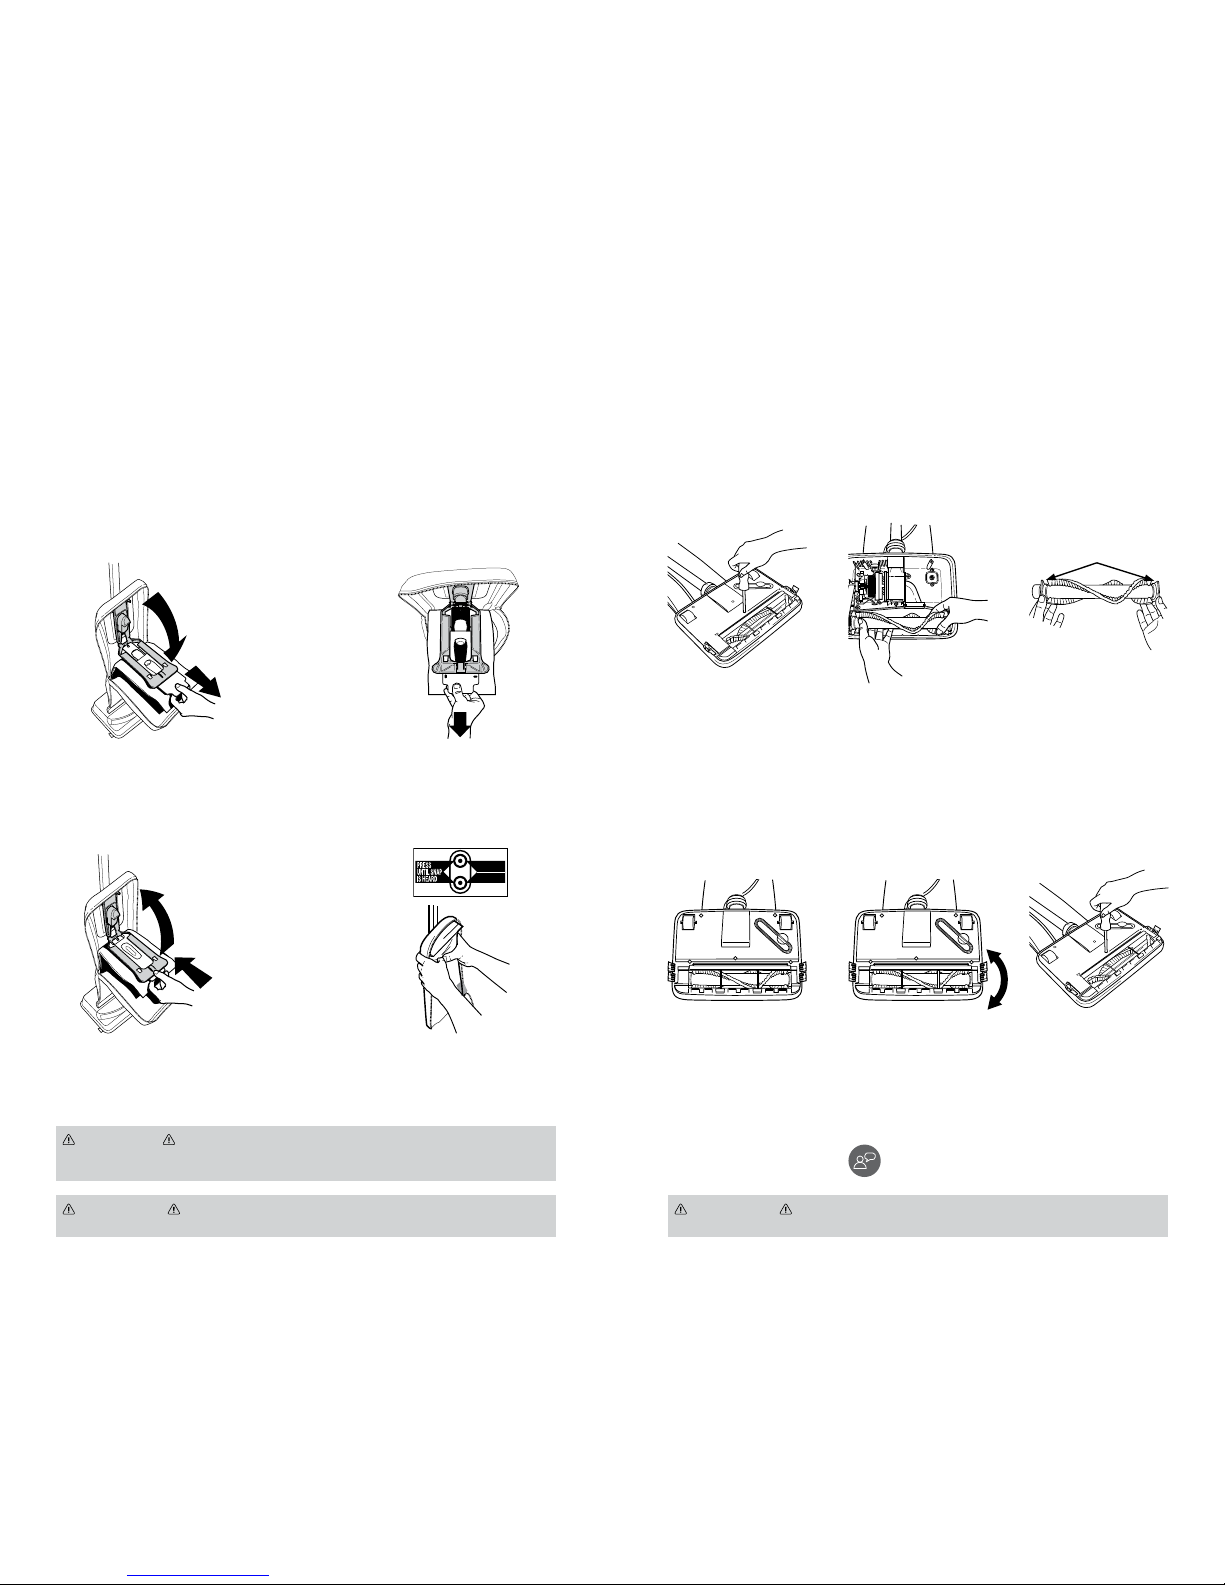
1
Unzip the Filtration Bag Case
completely. Pull the cardboard
collar to release bag dock door
from filtration bag por t. Bag dock
door will hinge downward.
3
Slide the cardboard collar
completely onto bag dock door.
2
Gently pull cardboard collar
upward out of the bag
dock. SaniSeal® will close
automatically.
4
Firmly push bag dock door with
both thumbs on indication points
until it snaps. Zip up the filtration
bag case completely.
WARNING
TO REDUC E THE RISK OF PERSON AL INJURY, UNPLUG BEF ORE CLEANING OR SERVICING. DO NOT USE
VACUUM WI THOUT FILTRAT ION BAG IN PLAC E.
Maintenance: Adjusting or Replacing Brushroll
NOTE: Your Oreck® unit comes with the brushroll assembled in the “NE W” position (multiple
notches showing on top edge). A s the brushroll wears it can be adjusted for longer life.
NOTE: When rotating the black endcaps on the brushroll, make sure both endcap settings are the
same and face up when you inser t the brushroll.
1
Lay the unit flat
to access the
power head nozzle.
Remove the 5 screws
to take off the
baseplate from the
power head.
4
Reassemble the
brushroll belt.
Reference the
Maintenance Section
on Checking and
Replacing the Brushroll
Belt for details.
2
Remove the brushroll
belt and brushroll from
the holding channels
inside of the power
head nozzle.
5
Manually spin the
brushroll to see that it
tur ns fre ely.
3
When worn, rotate both
plastic black endcaps at
the ends of the brushroll
to show a single notch
“OLD” position. Insert
back into the holding
channels of the power
head nozzle.
6
Replace the 5 screws
to secure the
baseplate to the power
head nozzle.
CONTACT OUR CUSTOMER CARE LINE
1-800-989-3535 (Mon- Fri 7 a.m. – 7 p.m . CST; Sat 8 a.m. – 4: 30 p.m. CS T)
WARNING
TO REDUCE THE RISK OF ELECTRIC SHOCK AND INJURY FROM MOVING PARTS - UNPLUG BEFORE
CLEANING OR SERVICING.
Page 7

1312
WARNING
TO REDUCE THE RISK OF ELECTRIC SHOCK AND INJURY FROM MOVING PARTS - UNPLUG BEFORE
CLEANING OR SERVICING.
CAUTION
TO REDUCE THE RISK OF ELECTRIC SHOCK AND INJURY FROM MOVING PARTS - UNPLUG
BEFORE SERVICING.
Maintenance: Checking & Replacing
Brushroll Belt
Maintenance: Clearing Blockages
1
Remove the service
door by removing
the hold down screw
located on side of
power head.
1
An overloaded
filtration bag may
cause dirt and debris
to back up into the air
flow system. Open the
bag dock and check
for visible clogs at the
bag port.
Change filtration bag
if contents have
reached the
MAX IMUM FILL LINE.
4
Loop the new belt over
the motor shaft. Place
the opposite end of the
belt on the brushroll
pulley.
2
Slide the door for ward
by prying open with a
screwdriver or coin.
2
Also, check for
blockages in the
power head nozzle.
If you can’t reach the
blockage, remove
the baseplate.
5
Rotate the brush roll
three (3) complete
revolutions to ensure
that no par t of the belt
is overhanging the end
of the motor shaft.
4
Twis t lower
tube connector
counterclockwise
and slide up. Pull the
lower tube (A) out of
the fan housing. Once
removed, check for
blockage.
3
Remove the brushroll
belt from the motor
shaft and brushroll
pulley.
3
If blockage is not in
the power head nozzle,
remove the lower tube.
Unhook the case clasp
releasing the filtration
bag case.
6
Replace the door
by sliding it into the
groove at the bottom
of the housing. Replace
the hold down screw.
5
If the lower tube is
not blocked, look into
the fan housing (B) for
blockage. Be sure to
reassemble lower tube
and tighten the lower
tube connector before
continuing use.
LUBRICATION
The motor and brushroll are equipped with bearings which contain sufficient lubrication for their
lifetime. The addition of lubricant could cause damage. Do not add lubricant to motor or brushroll.
LUBRICATION
The motor and brushroll are equipped with bearings which contain sufficient lubrication for their
lifetime. The addition of lubricant could cause damage. Do not add lubricant to motor or brushroll.
Page 8

1514
Troubleshooting
Service
If appliance is not working as it should, has been dropped, damaged, lef t outdoors, or dropped into
water, take it to a service center prior to continuing use.
Service problems can of ten be solved easily at home. Use this guide to help you troubleshoot.
For any other service problems, contact our Customer Care Line at 1-800-9 89-3535
(Mon-Fri 7 a.m. – 7 p.m. CST; Sat 8 a.m. – 4:30 p.m. CST).
Annual Ser vice Tune-ups will keep your Oreck® vacuum operating at optimal performance for
years to come. Oreck® Clean Home Centers and Oreck® Authorized Retail Dealers offer customized
maintenance, expert repair and specialized service to ensure the best cleaning experience at
every use. Reference your Product Tune-up and Service Agreement for details and to find your
nearest location.
Problem Possible Cause Possible Solution
Vacuum doe sn’t run. 1. Power Cor d 1. Plug in power co rd.
2. On/O ff Control
2. Push foo t control down
to turn “ON .”
3. No volta ge in the wall outlet 3. Chec k fuse or breaker in th e home.
4. Blown f use or tripped bre aker
4. Replace f use or reset brea ker in the
home.
Vacuum won ’t pick up
or there i s low suction.
1. Filtratio n Bag
1. Make sure b ag is installed corre ctly
and replac e once contents r each
MAX IMUM FILL LIN E.
2. Power H ead nozzle
2. Check no zzle for clog and repl ace
brushro ll if worn.
3. Brushr oll Belt 3. Replace b elt if broken.
Dust es caping from
vacuum.
1. Filtratio n Bag
1. Make sure b ag is installed corre ctly
and replac e if contents hav e
reache d MAXIMUM F ILL LINE.
Brushroll won’t run. 1. Brushroll B elt 1. Replace belt i f worn or broken.
2. Brushroll 2. Check br ushroll for obstr uctions.
Warranty
TTI Floor Care North America (ORECK) gives you the following limited warranty for this product only if it was
originally pur chased and solel y used resident ially, not for resale, fro m Oreck or an Orec k Authorized R etail Dealer.
Oreck will repair or replace, free of charge, to the original purchaser, any part that is found to be defective in
material or workmanship within one (1) year following the date of purchase for all residential models. NOTE:
Warrant y is void if used in a commercial setting. This limited warranty does not cover the replacement of
expendable or consumable parts such as filters, cartridges, and other parts subject to normal wear unless they
are defec tive in material or w orkmanship.
This limited w arranty d oes not apply to an y part subjec ted to acciden t, abuse, comme rcial use, altera tion, misuse,
damage cau sed by an act of God, t he use of voltag es other than on t he data plate of thi s product or ser vice of this
produc t by other than Ore ck or a participat ing Factory Au thorized Ser vice Center.
Oreck does not authorize any person or representative to assume or grant any other warrant y obligation with
the sale of t his project.
The Ore ck limited warrant y is valid only if you retain proof of pur chase from Oreck o r an Oreck Authorized Retail
Dealer for t his product. I f you purchase t his product fr om any other sour ce, your purcha se is “AS IS,” which means
Oreck grants you no warranty, and t hat you, not Oreck assume the entire risk of the quality and per formance of
the prod uct, including the en tire cost of any nec essary ser vicing or repairs of an y defects.
The Ore ck liability for damage s to you for any cost s whatsoever ar ising out of this sta tement of limited war ranty
shall be limited to the amount paid for this product at the time of original purchase, and Oreck shall not be
liable for any direct, indirect, consequential or incidental damages arising out of the use or inability to use this
product. Some states do not allow the exclusion or limitation of incidental or consequential damages, so the
above limit ations or exclusions ma y not apply to you.
ALL EXPRESS AND IMPLIED WARRANTIES OTHER TH AN THE LIMITED WARRANTY SET FORTH ABOVE, FOR
THE PRO DUCT, INCLUDING IMP LIED WARRANTIES OF MER CHANTABILI TY AND FIT NESS FOR A PARTI CULAR
PURP OSE ARE EXP RESSLY DISCLA IMED.
This warr anty gives you sp ecific legal right s, and you may also have ot her rights, which va ry from stat e to state.
Notwithstanding the foregoing, no warranty provided herein or arising under any applicable law shall exceed
1 year in dura tion.
WARNING
TO REDUCE THE RISK OF ELECTRIC SHOCK AND INJURY FROM MOVING PARTS - UNPLUG BEFORE
CLEANING OR SERVICING.
Page 9

1716
Índice
Gracias por su compra del
product Oreck
®
Registr e su producto par a iniciar la garantía, los pla nes de servicio y el
asesor amiento de exper tos sobre la limpieza de t odo el hogar: en línea en
Oreck.com o comuníq uese al 1.800.989.3535 (EE. UU.) o al 1.888.676.7325
(Canadá) p ara realizar el regist ro por teléfono.
Solo los acc esorios, las piezas y la s bolsas de filtro origin ales de Oreck®
deben utiliz arse con esta as piradora. Oreck no p uede garantizar el
rendimient o óptimo con el uso de co mponentes que no se an de su marca.
Los daños a e ste producto, o casionados por la ins talación o uso de
compone ntes de otra marc a, no serán cubiert os conforme a es ta garantía
y serán exclu idos de ella.
Para ase gurarse de que los acc esorios, las piezas y l as bolsas de filtro
sean originales, compre solamente a través de un distribuidor autorizado
de fábric a o a través de oreck .com.
Instrucciones de seguridad importantes ................................................................... 18
Introducción a la aspiradora ......................................................................................... 20
Especificaciones técnicas............................................................................................ 21
Funcionamiento ................................................................................................................ 22
Armar la aspiradora ..................................................................................................... 22
Cómo usar la aspiradora .............................................................................................23
Mantenimiento ................................................................................................................. 24
Cambio de la bolsa de filtro ........................................................................................24
Ajuste o reemplazo del cepillo giratorio .....................................................................25
Inspección y reemplazo de la correa del cepillo giratorio ..........................................26
Limpieza de obstrucciones .......................................................................................... 27
Resolución de problemas ............................................................................................... 28
Servicio ........................................................................................................................28
Garantía .............................................................................................................................29
Page 10

1918
INSTRUCCIONES DE SEGURIDAD
IMPORTANTES
¡GUARDE ESTAS INSTRUCCIONES!
IMPORTANTE: LEA ESTE MANUAL CON ATENCIÓN ANTES DE ENSAMBLAR
Y USAR ESTE APARATO. ESTE PRODUCTO TIENE COMO FIN UN USO DOMÉSTICO
ÚNICAMENTE. SI SE UTILIZA CON FINES COMERCIALES O CON BOLSAS DE FILTRO Y
COMPONENTES QUE NO SON DE ORECK®, LA GARANTÍA SE ANULA.
CUANDO SE UTILIZAN APARATOS ELÉCTRICOS, SIEMPRE DEBEN SEGUIRSE
PRECAUCIONES BÁSICAS, INCLUIDAS LAS SIGUIENTES: LEA TODAS LAS
INSTRUCCIONES ANTES DE UTILIZAR ESTE APARATO.
ADVERTENCIA: PARA DISMINUIR EL RIESGO DE INCENDIO, DESCARGA
ELÉCTRICA O LESIONES:
• Arme la aspir adora por co mpleto antes d e ponerla en fun cionamiento.
• Hágala funci onar únicamen te con el voltaj e especifica do en la placa de da tos que se encue ntra en la base d e la aspiradora .
• No des cuide la aspirad ora cuando es té enchufad a. Desenchúf elo del tomaco rriente cuan do no esté en uso y a ntes de su
limpieza o servicio de ma ntenimiento.
• No utilice la asp iradora en ex teriores o en s uperficies m ojadas.
• Evit e que se la utilice c omo un juguete. L a unidad no tien e como fin el uso por p arte de niños d e 12 años o menos. Cua ndo se la
utilice ce rca de niños, se rá necesar io hacerlo bajo un a estrict a supervisió n. Para evit ar lesiones o daño s, mantenga a lo s niños
alejados de l producto y n o permita que in troduzcan l os dedos ni objet os en ninguna de la s abertura s del product .
• Utilíc ela únicament e según el uso des cripto en es te manual. Utilic e solamente lo s accesorio s y productos r ecomendad os por
el fabricante.
• No la ut ilice si el cable de alime ntación o el enc hufe están da ñados. Si la aspir adora no fun ciona como debe ría, si se ha caído,
dañado o dej ado a la intempe rie, o si se ha sumer gido en agua, lleve e ste produc to para que lo ins peccionen en u n Centro
técnico Oreck
®
autori zado antes de c ontinuar utiliz ándolo. Llame al 1- 800-9 89-35 35 para sabe r cuál es el centr o técnico más
cerca no o visite nues tro sitio web en w ww.oreck .com.
• No tire d el aparato po r el cable ni lo tran sporte de es ta manera ta mpoco; no use el c able como una ma nija, no cierre una
puert a sobre el cable n i lo enrosque alr ededor de bor des o esquinas filo sos. No pase la a spiradora po r encima del cable .
Manten ga el cable lejos de la s superficie s calientes.
• No lo desenc hufe tirando d el cable. Para de senchufar lo, agarre el enc hufe, no el cable .
• No manipule el en chufe ni la unidad c on las manos moja das.
• No colo que ningún objet o en las abertu ras. No utilice l a unidad si alguna de su s abertur as se encuentr a bloqueada.
Mantén gala libre de polv o, pelusas, cab ello y cualquier otr o elemento que pu eda disminuir el flujo d e aire.
• Evit e que el cabello, la r opa suelta, lo s dedos y cualquie r otra part e del cuerpo ent ren en conta cto con las abe rturas y las
piezas mó viles de la unidad. E l cepillo girato rio permane cerá girando mie ntras la unida d esté en posició n vertical.
• Apague todos los controles antes de desenchufar el aparato.
• Ex treme las pre cauciones cu ando utilice la as piradora par a limpiar escale ras. No coloque l a aspiradora s obre las escal eras o
sobre un m ueble, ya que pued en generars e lesiones o daño s.
• No utili ce el aparato p ara aspirar líqu idos combust ibles o inflamabl es, tales como g asolina o resto s de madera lijada , ni lo
utilice en á reas en las que dich os elementos p uedan esta r presentes .
• No aspir e nada que se enc uentre en com bustión o emit a humo, como cigar rillos, fósfo ros
o cenizas c alientes.
• No utilice la asp iradora si la bol sa de filtro no es tá colocada .
PRECAUCIÓN: PARA DISMINUIR EL RIESGO DE DAÑOS:
• Evite aspir ar objetos dur os y filosos con e ste produc to, ya que pueden d añarlo.
• Alma cénelo apropi adamente en in teriores, en un l ugar seco. No ex ponga la máquin a a temperat uras muy frías .
• El cepill o giratorio sigu e girando mient ras el produc to está ence ndido y la manija est á en posición ve rtical. Par a evitar daño s
en alfomb rados, tape tes y pisos, evi te inclinar la aspir adora o coloc arla sobre mue bles, flecos de al fombras o esc aleras
alfombradas.
• Cuan do el cepillo girato rio esté fun cionando, evit e dejar la aspirad ora apoyada e n un lugar por much o tiempo. Est o puede
dañar el sue lo.
ADVERTENCIA: PARA REDUCIR EL RIESGO DE DESCARGA ELÉCTRICA, EL
CARGADOR TIENE UN ENCHUFE POLARIZADO (UNA CLAVIJA ES MÁS ANCHA QUE
LA OTRA). ESTE ENCHUFE CABE EN UN TOMACORRIENTE POLARIZADO DE UNA SOLA
MANERA. SI NO E NCAJA POR COMPLETO EN EL T OMACORRIENTE, INVIERTA EL ENC HUFE.
SI AÚN NO ENCAJA, CONTACTE A UN ELECTRICISTA CUALIFICADO PARA QUE INSTALE
EL TOMACORRIENTE CORRESPONDIENTE. NO REALICE NINGÚN TIPO DE MODIFICACIÓN
EN EL ENCHUFE.
Todo otro se rvicio de man tenimiento de berá ser reali zado por pers onal técnico a utorizado . Llame al 1-80 0-989 -3535 pa ra saber
cuál es el ce ntro técnico m ás cercano o vis ite nuestro si tio web en ww w.oreck.com .
ADVERTENCIA: ESTE PRODUCTO CONTIENE QUÍMICOS RECONOCIDOS POR EL
ESTADO DE CALIFORNIA COMO CAUSANTES DE CÁNCER, DEFECTOS DE NACIMIENTO
U OTROS DAÑOS REPRODUCTIVOS. LÁVESE LAS MANOS LUEGO DE
UTILIZARLO.
Page 11

2120
Introducción a la aspiradora
A
Manija ergonómica
B
Tubo inferior
C
Cabezal d e potencia
D
Compar timiento de la bolsa de fil tro
E
Bolsa de filt ro
F
Cable de alimentación
G
Broche del com partimiento
H
Barra de a poyo
I
Cierre de slizante de segurida d
J
Control de Encendido / Apagado (On/Off)
K
Gancho sujetador del cable de alimentación
L
Puert o de la bolsa de filtro
M
Alojamiento del ventilador
Especificaciones técnicas
Nombre Voltaje Corriente Vatiaje Longitud del cable Peso
UK2200 120 V 4A 480W 25 ft. 9 lbs.
UK220 0PC 12 0V 4A 480W 25 f t. 9 lbs.
A
B
C
D
E
F
G
H
I
J
K
L
M
Page 12

2322
Funcionamiento: Cómo armar su Oreck
®
Funcionamiento: Cómo usar su Oreck
®
1
Posición con traba - Coloque su pie
sobre el cabe zal de potencia e i ncline la
manija haci a atrás lentam ente para liber ar
la traba y u sar la aspiradora. Regrese la
manija a la pos ición totalmen te vertical
para po ner la traba. La m anija debe
rotar se hacia el centro antes de regresarla
a la posició n vertical. No ta: No ponga
en funcionamiento l a aspiradora cu ando
esta se encuentre en posición ver tical
y bloquea da. No deje nunca la u nidad
funcionando cuando esté detenida e n
una posición. Manténgala en movimiento
mientras es té funcionand o.
2
Almace namiento fá cil del cable
de alimentación - Envuelva el cab le
de alimentación alrededor del gancho
sujetador de l cable de alimenta ción y
el gancho del cable en la ma nija. Use el
cable de alim entación par a asegurar el
enchufe.
1
Remuev a los dos tornillos d el puerto de la
bolsa de filt ro. Remueva el car tón metido
halándolo ha cia arriba.
2
Deslice la s ección de la manija su perior
sobre la s ección corre spondiente del
puerto de la b olsa de filtro. Ins erte el
tornillo cor to dentro del or ificio superior
y el tornillo la rgo dentro del orificio
inferior, a continuación, aprié telos hasta
que la manija qu ede bien sujetada.
NOTA : Antes de usar la unid ad, lea las “Instruc ciones de seguridad im portantes”.
PRECAUCIÓN LA UNIDA D NO DEBE UT ILIZARS E PARA ACIC ALAR MAS COTAS.
Page 13

2524
Mantenimiento: Cambio de la bolsa de filtro
Funcionamiento de SANISEAL
®
: La aspiradora Oreck® incluye una b olsa de filtro equipa da con
el sistema S aniSeal®. SaniSeal® atrapa a utomáticamen te alérgenos, residu os y suciedad cada vez q ue usted
cambia la bolsa.
NOTA I MPORTA NTE: Par a que la aspiradora se ma ntenga en un nivel ópt imo de funcionamient o,
asegúre se de cambiar la bolsa de fil tro cuando el conte nido alcance la LÍNE A DE LLENADO M ÁXIMO.
La sobre carga puede oc asionar pérdida de suc ción de flujo de aire y rendimient o disminuido.
118
ENFONCEZ JUSQU’À
ENTENDRE UN BRUIT
PRESIONE HASTA
ESCUCHAR UN
CHASQUIDO DE SUJECIÓN
PRECAUCIÓN LOS MATE RIALES DE MASIAD O FINOS, COM O EL MAQUIL LAJE FACI AL EN POLVO Y EL A LMIDÓN DE MA ÍZ,
PUEDE N SELLAR L A BOLSA DE FI LTRO Y HACER Q UE REVIEN TE, AUN CU ANDO ESTÉ S OLO PARCIA LMENTE
LLENA . CAMBIE L A BOLSA CON F RECUENC IA CUANDO A SPIRE EST E TIPO DE MATE RIALES.
1
Baje el cierr e deslizante por completo
del compartimiento de la b olsa de filtro.
Hale el collar de c artón para liberar la
puerta de almac enaje de la bolsa del
puerto de la bolsa de fil tro. La puert a
de almacenaj e de la bolsa se colgará
hacia abajo.
3
Deslice el c ollar de cartón
completamente hacia la puert a de
almacenamie nto de la bolsa.
2
Hale cuidad osamente el collar de
cartó n hacia arrib a para sacarlo
de la bolsa de almacen amiento.
SaniSeal® cerrará automátic amente.
4
Empuje firm emente la puert a de
almacenamiento de la bolsa coloc ando
ambos ded os pulgares sobre lo s
puntos indicadores hasta que cierre
de golpe. Cierre completamente el
compar timiento de la bolsa de filtro.
ADVERTENCIA
PARA DISM INUIR E L RIE SGO DE LE SIONE S FÍS ICAS , DESE NCHUF E LA UN IDAD AN TES D E LIMPI ARL A O REAL IZA RLE
UN SERV ICIO DE MAN TENIMIE NTO. NO UTI LICE LA AS PIRADORA S I LA BOLSA DE F ILTRO NO ESTÁ C OLOCADA .
Mantenimiento: Ajuste o reemplazo del cepillo
giratorio
NOTA : La unidad Oreck® viene con un c epillo giratorio armad o en la posición “NEW ” (NUEVO) (se muest ran
varias mue scas en el borde supe rior). A medida que el cepillo gi ratorio se desgas ta, puede ajustar se para que
dure más.
NOTA : Cuando gire los tapo nes negros del cepillo gir atorio, asegúres e de que la configuració n de ambos
tapone s sea la misma y estén hac ia arriba cuando intr oduzca el cepillo girat orio.
1
Coloq ue la unidad en
posición ho rizontal para
tener acc eso a la boquilla
del cabez al de potencia.
Ex traiga los 5 tornillos
para ret irar la placa base
del cabez al de potencia.
4
Vuelva a c olocar la correa
del cepillo giratorio.
Refiérase a la secció n de
mantenimiento ace rca de
revisión y reemp lazo de la
correa d el cepillo giratorio
para mayores detalles.
2
Remuev a la correa del
cepillo giratorio y el
cepillo giratorio de los
canales de sujeció n de la
la boquilla del ca bezal de
potencia.
5
Haga gir ar el cepillo
giratorio c on la mano
para ver si lo h ace sin
problemas.
3
Cuando esté desgastado,
gire ambos t apones plásticos
negros en l os extremos del
cepillo girator io para que
quede a la vis ta solo una
muesca e n la posición “OLD”
(VIEJO). Vue lva a colocar
el cepillo en los c arriles de
sujeción de la b oquilla del
cabezal de pot encia.
6
Reempl ace los 5 tornillos
para asegurar que la
placa bas e a la boquilla
del cabez al de potencia.
COMUNÍQUESE CON NUESTRA LÍNEA DE
ATENCIÓN AL CLIENTE
1-800-989-3535 (Mon-F ri 7 a.m. – 7 p.m. C ST; Sat 8 a.m. – 4:3 0 p.m. CST )
ADVERTENCIA
PARA RED UCIR EL RIE SGO DE EL ECTROC UCIÓN Y L ESIONE S CAUSADA S POR PART ES MÓVIL ES - DESE NCHUFE
LA ASPIRADORA ANTES DE LIMPIARLA O DARLE MANTENIMIENTO.
Page 14

2726
ADVERTENCIA
PARA RED UCIR EL RIE SGO DE EL ECTROC UCIÓN Y L ESIONE S CAUSADA S POR PART ES MÓVIL ES - DESE NCHUFE
LA ASPIRADORA ANTES DE LIMPIARLA O DARLE MANTENIMIENTO.
CUIDADO
PARA REDUCIR EL RIE SGO DE ELE CTROC UCIÓN Y LE SIONES P OR PARTES MÓVILES - DESENC HUFE LA AS PIRADORA
ANTES DE DARLE MANTENIMIENTO.
Mantenimiento: Revisión y Reemplazo
Correa del cepillo giratorio
Mantenimiento: Eliminación de elementos
obstructores
1
Para r emover la puert a
de servicio, remueva
el tornillo de suje ción
ubicado a un lado del
cabezal de p otencia.
1
Si la bolsa d e filtro está
sobrecargada, esto puede
ocasionar que la s uciedad
y los residuos regresen
al sistema de fluj o de
aire. Abr a la base de
acoplamien to de la bolsa
y busque obstrucciones
visibles en el puer to de
la bolsa.
Cambie la bol sa de filtro si
ha ha alcanz ado la LÍNEA
DE LLENADO MÁXIMO.
4
Dele una v uelta a la
nueva cor rea alrededor
del eje del moto r. Coloque
el lado opuesto de la
correa sobre l a polea del
cepillo giratorio.
2
Deslice la pue rta hacia
adelante, abriéndola
haciendo pala nca con un
desarmador o moneda.
2
También inspeccione si
hay obstrucciones en la
boquilla del ca bezal de
potencia. Si no pu ede
alcanzar la obst rucción,
remueva la placa bas e.
5
Gire el cepillo gir atorio
por (3) rev oluciones
completas para
asegurarse de que
ninguna par te de la correa
quede colgando sobre el
eje del motor.
4
Gire el con ector del
tubo infe rior en sentido
antihora rio y deslícelo
hacia arrib a. Hale el tubo
inferior(A ) y extráigalo
del alojamiento del
ventilador. Una vez
extra ído, verifique si est á
obstruido.
3
Ext raiga la correa del
cepillo gir atorio del eje
del motor y de la p olea del
cepillo giratorio.
3
Si la obst rucción no
está en la b oquilla del
cabezal de p otencia,
retire el t ubo inferior.
Desenganche el broche
del compartimiento, que
libera el c ompartimiento
de la bolsa de fil tro.
6
Reemplac e la puerta al
deslizarla h acia la grieta
en la part e inferior del
alojamiento. Reemplace
el tornillo de suje ción.
5
Si el tubo in ferior no
está obstruido, revise
el alojamiento del
ventilador(B). Cerciór ese
de volver a ar mar el
tubo infe rior y ajustar el
conector de este a ntes de
continuar con e l uso.
LUBRICACIÓN
El motor y el c epillo giratorio vienen e quipados con cojinete s de suficiente lubri cación para toda su v ida útil.
Laadición de lu bricante podría d añarlos. No agregu e lubricante al motor ni a l cepillo giratorio.
LUBRICACIÓN
El motor y el c epillo giratorio vienen e quipados con cojinete s de suficiente lubri cación para toda su v ida útil.
Laadición de lu bricante podría d añarlos. No agregu e lubricante al motor ni a l cepillo giratorio.
Page 15

2928
Resolución de problemas
Servicio
Si el aparat o no funciona como deb e, si se ha caído, dañado o deja do a la intemperie, o si se ha su mergido
enagua, llével o a un Centro técnic o antes de continuar us ándolo.
Los prob lemas de mantenimient o pueden resolver se fácilmente en el hog ar. Utilice est a guía como ayuda
deresoluci ón de problemas.
Por cualquier o tro problema de man tenimiento, comuníque se con nuestra L ínea de Atención al Client e
al1-800 -989-3 535 (Mon-Fr i 7 a.m. – 7 p.m. CST; Sat 8 a.m. – 4:3 0 p.m. CST).
Las pues tas a punto anuales de s ervicio harán que s u aspiradora Oreck® siga funcion ando de forma óptim a
durante lo s próximos años. Lo s Centros de limpiez a del hogar Oreck® y Distribuidores minoristas autorizados
Oreck® ofrece n mantenimiento per sonalizado, repar ación de expert os y servicio espe cializado para asegu rar la
mejor expe riencia de limpieza en ca da uso. Consulte su Pu esta a punto del pro ducto y Acuerdo d e servicio para
obtener m ás información yenc ontrar su ubicación m ás cercana.
Problema Causa posible Solución posible
La aspiradora no
funciona.
1. Cable de alime ntación 1. Enchufe e l cable de alimenta ción.
2. Cont rol de Encendid o / Apagado (On /Off)
2. Presi one con su pie el con trol hacia abajo
para encenderla “ON”.
3. No h ay voltaje en el to macorrient e
depared .
3. Revis e el fusible o el disyu ntor del hogar.
4. Fusible quemado o disyuntor activado.
4. Reemp lace el fusible o re stablezca el
disyunt or del hogar.
La aspiradora no aspira
o succiona poco.
1. Bolsa de filt ro
1. Ase gúrese de que la bo lsa esté bien
colocada y reemplácela cuand o el
contenido haya alcanzado la LÍNEA DE
LLENADO MÁXIMO.
2. Boquilla d el cabezal de po tencia
2. Verifiq ue que la boquilla no co ntenga
ningún elem ento obstr uctor y reempl ace el
cepillo gira torio si estu viera desgas tado.
3. Corr ea del cepillo girat orio 3. Reempl ace la correa si e stuviera r ota.
Sale pol vo de la
aspiradora.
1. Bolsa de filt ro
1. Ase gúrese de que la bo lsa esté
correctamente instalada y reemplácela
cuando ha ya alcanzado a l a LÍNEA DE
LLENADO MÁXIMO.
El cepillo giratorio no
funciona.
1. Correa d el cepillo girator io
1. Reemplac e la correa si es tuviera rot a
odesgas tada.
2. Cepillo gir atorio
2. Verifiq ue que el cepillo gira torio no
contenga elementos obstructores.
Garantía
TTI Floor Care North America (ORE CK) le otor ga la siguiente garan tía limitada sobre e ste producto únicamente si este se ha
adquirido originalmente de Oreck o un Distribuidor minorista autorizado de Oreck, si es exclusivamente de uso doméstico, y no
para su re venta.
Oreck re parará o reemplazará gratuitamente a b eneficio del comprador original to da pieza que r esulte def ectuos a, en sus
materi ales o por su mano de obr a, dentro de un (1) año sigu iente a la fecha de c ompra, en el caso de t odos los modelo s de uso
domést ico. NOTA: La gar antía quedará anu lada si se utiliza la unid ad en un context o comercial. La pr esente garan tía limitada
no cubre la s ustitución de pie zas fungibles o con sumibles, tales co mo filtros, cart uchos y demás piez as sujetas a un desg aste
normal, s alvo que result aran defect uosos en sus ma teriales o por la ma no de obra.
Esta ga rantía limitad a no se aplica a ningun a pieza que se hay a sometido a usos d esmedidos o com erciales, alte raciones, uso s
indebido s, uso de voltaje di ferente al est ablecido en la pla ca de datos de es te producto , o que haya sufri do accidentes o d años
causad os por actos de l a naturalez a, o sobre la que se h aya realizado u n servicio in dependient e de Oreck o de un Ce ntro técnic o
autorizado de fábrica involucrado.
Oreck no a utoriza a ninguna p ersona o repre sentante a que as uma u otorgue ningu na otra obligació n de garantía con la ve nta
de este producto.
La garantía limitad a de Oreck únicame nte será válida si se c onserva el comp robante de compra de Orec k o de un Distribuidor
minorist a autorizado de O reck respect o de este produc to. Si adquiere este product o de cualquier otra fuente, su compra será
conside rada “EN EL ESTAD O EN QUE SE ENCUE NTRA”, es decir que Ore ck no le otorgará nin guna garantía y us ted, no Oreck,
asumirá el r iesgo tota l por la calidad y el r endimiento d e este prod ucto, con in clusión del cos to total de to da repara ción o serv icio
neces arios por cualqui er falla.
La resp onsabilidad de Or eck por daños y po r todo gasto que su rja de esta decl aración de garan tía limitada qued ará restrin gida
al monto ab onado por este producto al momento de su c ompra original, y Ore ck no será responsable de ningún daño direc to,
indirecto, emergente o inciden tal que surja del uso o de la imposibilidad de uso de este producto. En algunos estados, la
exclusión d e los daños emer gentes o incid entales no es tá permitid a, de modo que la exc lusión o limitació n preceden tes pueden
no serle ap licables.
QUEDAN EXPRESAMENTE RECHAZADAS TODAS LAS GARANTÍAS EXPRESAS E IMPLÍCITAS DIFERENTES DE LA GARANTÍA
LIMITADA ESTABL ECIDA AN TERIORMENTE RESPEC TO DE EST E PRODUC TO, CON INC LUSIÓN DE L AS GARANTÍAS
IMPLÍ CITAS DE APT ITUD PAR A LA VENTA O AD ECUACIÓN A F INES ESPEC ÍFICOS.
Esta ga rantía le otor ga derechos le gales especí ficos. También pued e tener otros d erechos, que v arían según el es tado.
Sin perjuic io de lo anterior, ningu na garantía aqu í provista o qu e surja de alguna ley a plicable super ará el 1 año de duraci ón.
ADVERTENCIA
PARA RED UCIR EL RIE SGO DE EL ECTROC UCIÓN Y L ESIONE S CAUSADA S POR PART ES MÓVIL ES - DESE NCHUFE
LA ASPIRADORA ANTES DE LIMPIARLA O DARLE MANTENIMIENTO.
Page 16

3130
Table des matières
Merci d’avoir acheté
un produit OreckMD!
Veuillez enregis trer votre pro duit pour valider vos gar anties, program mes
d’entreti en et avis d’expert p our le nettoyage c omplet de la maison :
en ligne à l’adres se oreck.com ou par téléphone a u 1 80 0 989-3535 (É.- U.)
ou au 1 88 8 676-73 25 (Canada).
Ce produi t n’accepte q ue les accessoire s, pièces et sacs de filt ration certi fiés
OreckMD. Oreck ne p eut garantir la per formance optim ale de l’appareil s’il est
utilisé ave c des composant s d’autres m arques. Les domma ges subis par ce
produit du s à l’installation ou à l’utilis ation de composan ts autres que ceu x
d’Oreck n e sont pas couver ts par la présen te garantie et en son t exclus.
Les client s doivent acheter le urs accessoires , pièces et sacs de filt ration
chez un dét aillant autorisé par ticipant ou en ligne à l’adre sse oreck.com p our
s’assurer d’obtenir des pièces authentiques.
Consignes de sécurité importantes .....................................................................32
Caractéristiques de votre aspirateur ..................................................................34
Spécifications techniques ...................................................................................35
Fonctionnement ....................................................................................................... 36
Assemblage de votre aspirateur .........................................................................36
Utilisation de votre aspirateur ............................................................................37
Entretien ....................................................................................................................38
Remplacement du sac de filtration .....................................................................38
Ajustement ou remplacement du rouleau-brosse ..............................................39
Vérification et remplacement Courroie du rouleau-brosse ................................40
Dégagement des débris ...................................................................................... 41
Dépannage ................................................................................................................42
Service .................................................................................................................42
Garantie .....................................................................................................................43
Page 17

3332
CONSIGNES DE SÉCURITÉ IMPORTANTES
CONSERVEZ CES INSTRUCTIONS!
IMPORTANT : LISEZ ATTENTIVEMENT AVANT L’ASSEMBLAGE ET L’UTILISATION.
CET APPAREIL EST DESTINÉ UNIQUEMENT À UN USAGE DOMESTIQUE. LA GARANTIE
SERA ANNULÉE SI CET APPAREIL EST UTILISÉ À DES FINS COMMERCIALES OU AVEC
DES SACS DE FILTRATION ET DES COMPOSANTS AUTRES QUE CEUX D’ORECKMD.
LORSQUE VOUS UTILISEZ DES APPAREILS ÉLECTRIQUES, VEUILLEZ TOUJOURS
RESPECTER ENTRE AUTRES LES CONSIGNES DE SÉCURITÉ ÉLÉMENTAIRES
SUIVANTES: VEUILLEZ LIRE TOUTES LES INSTRUCTIONS AVANT
D’UTILISER CET APPAREIL.
AVERTISSEMENT: POUR RÉDUIRE LE RISQUE D’INCENDIE, DE DÉCHARGE
ÉLECTRIQUE, DE DOMMAGE OU DE BLESSURE:
• Assemble z entièrement l ’appareil avant de l ’utiliser.
• Faites seul ement foncti onner l’appareil à la t ension indiquée su r la plaque signalét ique située au bas d e l’appareil.
• Ne laisse z pas l’appareil br anché sans sur veillance. Débr anchez la fiche d e la prise de couran t dès la fin de l’utilisa tion
et avant l e nettoyage o u l’entretien.
• N’utilisez pas l ’appareil à l’extér ieur ni sur des sur faces humides.
• Ne perm ettez pas au x enfants de jou er avec l’appareil. C et appareil ne do it pas être utilis é par des enfant s de moins de
12ans. Exer cez une surv eillance étroit e lorsque l’appar eil est utilisé à pro ximité d’enfant s. Gardez l’appa reil hors de la
port ée des enfants e t ne laissez pas ce s derniers intr oduire leurs doig ts ou d’autres o bjets dans aucun e ouvertur e afin
d’éviter les blessures ou les bris.
• Utilise z l’appareil uniquem ent aux fins décr ites dans le pré sent guide. Utilis ez uniquement le s accessoire s et produits
recomm andés par le fab ricant.
• N’utilise z pas l’appareil lor sque le cordon ou l a fiche est endom magé. Cessez d ’utiliser l’appareil s ’il ne fonctionn e
pas comm e prévu, s’il a été é chappé sur le sol o u dans l’eau, s’il est en dommagé ou s’il a été l aissé à l’extérie ur et
apportez-le au centre de réparations autorisé Oreck
MD
avant de l ’utiliser à nouveau . Appelez au 1 80 0 989-35 35 pour
connaî tre le centre d e réparation s le plus près de chez v ous ou visitez le si te Internet à w ww.oreck .com.
• Ne tirez p as et ne transp ortez pas l’app areil par son cor don, n’utilisez pas le c ordon comme un e poignée, ne coinc ez
pas le cor don dans l’embrasu re d’une porte e t ne le tirez pas con tre des arête s ou des coins vifs . Ne faites pas ro uler
l’appareil s ur lecordon. Tenez le c ordon éloigné de s surfaces ch audes.
• Ne débranc hez pas l’appareil e n tirant le cordo n. Débranche z l’appareil en tena nt la fiche et non le co rdon.
• Ne manipulez p as la fiche ou l’appar eil avec des mains mo uillées.
• N’insé rez aucun objet d ans les ouvert ures. N’utilisez p as l’appareil si les o uverture s sont obstru ées. Assurez -vous
qu’elles sont e xemptes de pou ssière, de mouss e, de cheveux ou de t out ce qui pourr ait réduire le débi t d’air.
• Garde z les cheveux, l es vêtements a mples, les doigt s et toute autr e partie du cor ps à l’écar t des ouvertu res et des
pièces en m ouvement. L e rouleau-br osse continue d e tourner tant q ue l’appareil est en p osition ver ticale.
• Éteignez to utes les comma ndes avant de déb rancher l’appa reil.
• Redou blez de prudenc e lorsque vous u tilisez l’appareil da ns un escalier. Ne plac ez pas l’aspirate ur sur les marche s d’un
escalier o u sur un meuble, car ce la peut entraîn er des dommage s ou des blessure s.
• N’utilise z pas l’appareil pou r aspirer des liquid es inflammables o u combustibles c omme de l’essenc e et de la sciure de
bois, nidans d es endroits où d e telles substa nces peuvent ê tre présen tes.
• N’utilisez pa s l’appareil p our aspirer quoi que ce soi t qui brûle ou dégage de la f umée comme des cigar ettes,
des allumet tes oudes cendre s chaudes.
• N’utilisez pas l’aspira teur sans avoir inst allé le sac de filtratio n.
MISE EN GARDE: POUR RÉDUIRE LES RISQUES DE DOMMAGE:
• Évitez d’utilis er l’appareil pour rama sser des objets dur s ou aux arêtes tra nchantes, car ils po urraient
endommager l’appareil.
• Rangez l ’appareil adé quatement à l’int érieur et dans un endr oit sec. N’exposez p as l’appareil à des condi tions
de gel.
• Le roulea u-brosse con tinue de tourner lor sque l’appareil est en ma rche et que la poignée e st à la verticale. A fin
d’évi ter tout dommage au x tapis, aux carpe ttes et aux rev êtements de plan cher, évitez d’incline r l’appareil ou
de l’utiliser sur de s meubles, des carp ettes à frang es ou des escaliers r ecouverts d e tapis.
• Lorsq ue le rouleau-bro sse est en marche, n e laissez pas l’appareil t rop longtemps au mê me endroit, car vo us
risqueriez d’endommager le plancher.
AVERTISSEMENT: LE CHARGEUR EST MUNI D’UNE FICHE POLARISÉE (L’UNE
DES BROCHES EST PLUS LARGE QUE L’AUTRE) QUI RÉDUIT LE RISQUE DE DÉCHARGE
ÉLECTRIQUE. CETTE FICHE NE PEUT ÊTRE BRANCHÉE QUE DANS UN SEUL SENS À
UNE PRISE POLARISÉE. SI LA FICHE NE S’INSÈRE PAS ENTIÈREMENT DANS LA PRISE,
RETOURNEZ-LA. SI VOUS NE POUVEZ TOUJOURS PAS L’INSÉRER, COMMUNIQUEZ AVEC
UN ÉLECTRICIEN QUALIFIÉ POUR FAIRE INSTALLER UNE PRISE APPROPRIÉE. NE MODIFIEZ
LA FICHE EN AUCUN CAS.
Toute autr e tâche d’ent retien doit êt re confiée à u n représen tant de ser vice autor isé. Appele z au 1 800 989 -353 5 pour connaî tre
le centr e de réparatio ns le plus près de ch ez vous ou visite z le site Intern et www.ore ck.com.
AVERTISSEMENT: CE PRODUIT CONTIE NT DES PRODUITS CHIMIQUES RECONNUS
PAR L’ÉTAT DE LA CALIFORNIE COMME POUVANT CAUSER LE CANCER, DES ANOMALIES
CONGÉNITALES OU D’AUTRES DYSFONCTIONS DU SYSTÈME REPRODUCTEUR. BIEN
SE LAVER LES MAINS APRÈS L’UTILISATION.
Page 18

3534
Caractéristiques de votre aspirateur
A
Poignée ergonomique
B
Tube inférieur
C
Électrobrosse
D
Compartiment du sac de filtration
E
Sac de filtration
F
Cordon d’alimentation
G
Fermoir du compartimen t
H
Barre de s upport
I
Ferme ture à glissière de sûret é
J
Commande de marche/arrêt
K
Crochet délesteur de cordon d’alimentation
L
Orifice du s ac de filtration
M
Logemen t du ventilateur
Spécifications techniques
Nom Tensio n Courant Puissance Longueur du
cordon
Poids
UK2200 120 V 4A 480W 25 ft. 9 lbs.
UK220 0PC 120V 4A 4 80W 25 ft. 9 lbs.
A
B
C
D
E
F
G
H
I
J
K
L
M
Page 19

3736
Fonctionnement : Assemblage de votre
appareilOreck
MD
Fonctionnement : Utilisation de votre
appareilOreck
MD
1
Verrouillage de position - Placez
un pied sur l’ électrobrosse et inclinez
lentem ent la poignée ver s l’arrière
pour déclenc her le verrou et u tiliser
l’aspirateur. Redressez complètement l a
poignée à la ver ticale pour en clencher
le verro u. La poignée doi t être tournée
vers le ce ntre avant de la r emettre en
position ver ticale. Remar que : N’utilisez
pas l’appa reil lorsqu’il es t verrouillé
en position verticale. Ne laissez pa s
l’ap pareil en ma rche en positio n immobile.
Gardez toujo urs l’appareil en mo uvement
lorsqu’il es t en marche.
2
Rangem ent facile du co rdon
d’alimentation -
Enroulez le cordon d’alimentation autour
du croch et de dégagement et du crochet
du cordo n de la poignée. Bra nchez le
cordon d’alimentation dans une pris e de
courant sécuritaire.
1
Retire z les deux vis de l’orifi ce du sac de
filtration. Retirez l e porte-sa c en carton
en le tiran t vers le haut.
2
Glissez la p artie supérie ure de la poignée
sur la par tie corresp ondante de l’orifi ce
du sac de filt ration. Insér ez le vis court e
dans le tro u supérieur et la v is longue
dans le tro u inférieur puis serrez-le s
fermement jusqu’à ce que la po ignée soit
immobilisé e.
REMA RQUE: Veuillez lire les « Con signes de sécurité im portantes » a vant d’utiliser l’appareil.
MISE EN GARDE N’UTILISEZ PAS L’ASPIRATEUR POUR TOILETTER UN ANIMAL.
Page 20

3938
Entretien Remplacement du sac de filtration
FONCTIONNEMENT DE LA CARACTÉRISTIQUE SaniSeal
MD
: Votre aspira teur Oreck
MD
est équipé
d’un sac de filt ration du systèm e SaniSealMD. La caractéristique SaniSeal
MD
emprisonne automatiquement les
allergènes , poussières et débr is chaque fois que vous dev ez remplacer le sac de fil tration.
REMARQUE IMPORTANTE : Pour conse rver la perfor mance optimale de f onctionnement de v otre
aspirate ur, assurez- vous de remplacer le s ac de filtration lors que son contenu at teint la LIGNE MA XIMUM
DE REMP LISSAGE. Un rem plissage excessif p eut causer une per te d’aspiration et diminu er la performan ce
de l’appareil.
118
ENFONCEZ JUSQU’À
ENTENDRE UN BRUIT
PRESIONE HASTA
ESCUCHAR UN
CHASQUIDO DE SUJECIÓN
MISE EN GARDE DES MATIÈRE S TRÈS FIN ES, COMME DE L A POUDRE P OUR LE VISA GE OU DE LA FÉC ULE DE MAÏ S PEUVEN T
COLMAT ER LE SAC DE F ILTRATION E T LE FAIRE ÉC LATER, MÊ ME S’IL N’E ST PAS PLEI N. LORSQU E
L’APPAREIL ES T UTILIS É POUR ASPI RER DE TEL S PRODUIT S, REMPLA CEZ SOUV ENT DE SAC D E FILTRATIO N.
1
Ouvrez complètement la fermeture
à glissière du compar timent du
sac de filtration. Tire z le collet en
carto n pour pouvoir r etirer la porte
de la plateforme du sa c de filtration.
La por te de la plateforme du s ac
s’ouvrira ve rs le bas.
3
Glissez complètement le collet
de cart on sur la plateforme de p orte
du sac.
2
Tirez le ntement le collet de c arton vers
le haut et le sor tir de la plateforme
du sac. La caractéristique SaniSealMD
se désactivera automatiquement.
4
Poussez f ermement la por te de la
platefo rme du sac avec les deu x
pouces sur l es points de repères
jusqu’à ce q u’elle s’enclenche. Fermez
complètement la fermeture à glissière
du compar timent du sac de filt ration.
AVERTISSEMENT
DÉBRANCHEZ L’APPAREIL AVANT DE LE NETTOYER OU D’EN EFFECTUER L’ENTRETIEN AFIN DE RÉDUIRE
LE RISQ UE DE BLESS URES. N’U TILISE Z PAS L’ASPIRATEU R SANS AVOIR INS TALLÉ LE SA C DE FILTRATI ON.
Entretien Ajustement ou remplacement
du rouleau-brosse
REMA RQUE: Votre appareil OreckMD est équipé d ’un rouleau -brosse assembl é en position «NEW » (nou veau)
(de multiples e ncoches sur la bord ure supérieure). L’usure du roulea u-brosse peut ê tre compensée p ar un
ajustemen t afin de prolonger sa d urée de vie.
REMA RQUE: Lorsque v ous tournez les cap uchons noirs du roule au-brosse, assur ez-vous que le régla ge des
capucho ns est identique de ch aque côté et qu’ils sont dir igés vers le haut lor sque vous insérez le r ouleau-brosse.
1
Couchez l’appareil à
plat sur le sol p our
pouvoir ac céder à la
buse de l’électrobrosse.
Dévissez les cinq (5) vis
et retirez-les pour pouvoir
retirer la p laque de base
de l’électrobrosse.
4
Réinst allez la courroie du
rouleau-brosse. Consultez
l’article de vé rification
et remplacement de la
courroie d u rouleaubrosse au c hapitre
d’entretien.
2
Retire z la courroie du
rouleau-brosse e t le
rouleau-brosse des
rainures situées à
l’intérieur de l a buse de
l’électrobrosse.
5
Tournez manuellement
le rouleau-brosse pour
vous assurer qu’il tourne
librement.
3
Lorsqu’usées, tournez le
capuchon noir en plastique
de chaque extr émité
du rouleau-brosse pour
dévoiler une seule e ncoche
de positio n « OLD » (usé).
Réinsérez dans les rainures
de l’électrobrosse.
6
Réinst allez les cinq (5) vis
pour fixer f ermement la
plaque de base à b use de
l’électrobrosse.
COMMUNIQUEZ AVEC NOTRE SERVICE À
LA CLIENTÈLE AU
1-800-989-3535 (Mon-F ri 7 a.m. – 7 p.m. C ST; Sat 8 a.m. – 4:3 0 p.m. CST )
AVERTISSEMENT
DÉBRA NCHEZ L’APPARE IL AVANT DE LE NET TOYER OU D ’EN EFF ECTUER L’E NTRET IEN AFIN DE R ÉDUIRE
LE RISQ UE DE BLESS URES ET DE DÉ CHARGE ÉL ECTRIQ UE.
Page 21

4140
AVERTISSEMENT
DÉBRA NCHEZ L’APPARE IL AVANT DE LE NET TOYER OU D ’EN EFF ECTUER L’E NTRET IEN AFIN DE R ÉDUIRE
LE RISQ UE DE BLESS URES ET DE DÉ CHARGE ÉL ECTRIQ UE.
MISE EN GARDE
DÉBRANCHEZ L’APPAREIL AVANT D’EFFECTUER L’ENTRETIEN AFIN DE RÉDUIRE LE RISQUE DE BLESSURES
ET DE DÉC HARGE ÉL ECTRIQU E.
Entretien Vérification et remplacement
Courroie du rouleau-brosse
Entretien Dégagement des débris
1
Retire z la porte d’accès
pour entretien en
retirant l a vis de fixation
située sur le c ôté de
l’électrobrosse.
1
Un sac de fil tration satur é
peut pro voquer le retour
de la saleté e t des débris
vers le sy stème de débit
d’ai r. Ouvrez la pl ateforme
et assurez-vous qu’il n’y a
aucune obs truction visible
dans l’orifice.
Changez le sac de
filtration si so n contenu
atteint l a ligne de
remplissage ma ximum
(MAX IMUM FILL LIN E).
4
Enroul ez la courroie
neuve aut our de l’arbre
du moteur. Inst allez
l’extrémité opposée de
la courroie a utour de la
poulie du rouleau-brosse.
2
Ouvre z la porte vers
l’avant en y insé rant un
tournev is ou une pièce
de monnaie.
2
Assurez-vous également
que la buse de
l’électrobrosse est libre
de tout déb ris. Retirez la
plaque de base si vo us ne
pouvez pas atteindre les
débris bloqués.
5
Tournez la br osse sur trois
(3) tours complets pour
vous assurer qu’aucune
partie d e la courroie
n’entre en contact avec
l’ex tré mité d e l’arbre du
moteur.
4
Tournez le ra ccord du tube
inférieur ve rs la gauche
et glissez ve rs le haut.
Tirez le tub e inférieur (A)
pour le sort ir du logement
du ventilat eur. Une fois
retiré, assu rez-vous qu’il
n’y a aucune obstruction.
3
Retirez la c ourroie du
rouleau-brosse de l’arbre
du moteur et d e la poulie
du rouleau-brosse.
3
Si le bloca ge ne
provien t pas de la buse
de l’électrobrosse,
retirez le tube inférieur.
Décrochez le ferm oir du
compartim ent pour ouvrir
le compar timent du sac
de filtration.
6
Réinstalle z la porte
en l’insérant dans la
rainure située au b as du
logement. Réinstallez la
vis de fixa tion.
5
Si le tube in férieur n’est
pas obstrué, assurezvous que le log ement du
ventilateur (B) est libre de
débris. Assur ez-vous de
remont er le tube inférieur
et de serr er son raccord
avant de con tinuer
l’utilisat ion de l’appareil.
LUBRIFICATION
Le moteur e t le rouleau-bros se sont équipés de ro ulements qui contien nent suffisamm ent de lubrifiant
pour tout e leur durée de vie. L’ajout de lubrifian t pourrait causer d es dommages. N’ajoute z pas de lubrifiant
au moteur ni au r ouleau de brosses.
LUBRIFICATION
Le moteur e t le rouleau-bros se sont équipés de ro ulements qui contien nent suffisamm ent de lubrifiant
pour tout e leur durée de vie. L’ajout de lubrifian t pourrait causer d es dommages. N’ajoute z pas de lubrifiant
au moteur ni au r ouleau de brosses.
Page 22

4342
Dépannage
Service
Cessez d ’utiliser l’appa reil s’il ne fonctionne p as comme prévu, s’il a é té échappé sur le sol ou d ans l’eau, s’il est
endomma gé ou s’il a été laissé à l’extér ieur et apporte z-le au centre de rép arations.
Les prob lèmes d’entretien ou d e bris peuvent sou vent être résolus f acilement à la maison. Ut ilisez le présent
guide pour vo us aider.
Pour tout a utre problème, com muniquez avec notr e service à la client èle au 1 800 989- 3535
(Mon-F ri 7 a.m. – 7 p.m. CST; Sat 8 a.m. – 4: 30 p.m. CST).
Le ser vice de mises au point annu el de votre aspirat eur OreckMD assure un fo nctionnement et u ne performan ce
optimale po ur les années futur es. Les Clean Home C enters d’Orec kMD et les détaillants autorisés d’OreckMD
offr ent un entretien pe rsonnalisé, des rép arations effec tuées par des ex perts et un entr etien spécialisés pou r
vous assur er la meilleure expérien ce de nettoyag e, et ce, à chaque utilisat ion. Consultez la mise au p oint de
votre pr oduit et l’entente de se rvice pour conn aître tous les dé tails et trouver le cen tre le plus près de che z vous.
Problème Cause possible Solution possible
L’aspirateur ne
fonctionnepas.
1. Cordon d’alimentation 1. Branche z le cordon d’alimen tation.
2. Commande de marche/arrêt
2. Pouss ez la commande au p ied
à la positi on « ON » (en marche).
3. La pris e de courant n’est p as sous tension .
3. Vérifie z les fusibles ou le s disjoncteur s du
domicile.
4. Fusible g rillé ou disjoncte ur déclenché.
4. Rempla cez le fusible ou en clenchez le
disjonct eur du domicile.
L’aspirateur ne ramasse
pas les dé bris, ou la
puissance d’aspiration
est faible.
1. Sac de filtr ation
1. Ass urez-vous que l e sac est insta llé
correctement et remplacez-le lorsque le
niveau de r emplissage es t atteint.
2. Buse de l ’électrob rosse
2. Vérifie z si la buse est obs truée, et
remplac ez le rouleau- brosse s’il est u sé.
3. Courr oie du rouleau- brosse 3 . Remplacez la co urroie si elle est br isée.
La poussière s’échappe
de l’aspirateur.
1. Sac de filtr ation
1. Ass urez-vous que l e sac de filtrat ion est
installé c orrectem ent et remplac ez-le
s’il est plei n.
Le rouleau-brosse est
usé.
1. Courroie d u rouleau-br osse
1. Remplace z la courroie si elle e st usée ou
brisée.
2. Rouleau-brosse
2. Vérifie z que le rouleau- brosse n’est pas
obstrué.
Garantie
TTI F loor Care Nor th America (OR ECKMD) vous of fre la garantie lim itée ci-dess ous pour ce produi t uniquement s’il a é té acheté
initialem ent pour un usag e résidentiel, et n on pour la reven te, chez Oreck
MD
ou d’un déta illant OreckMD autorisé.
Oreck
MD
réparera ou rempla cera, sans frais pour l’acheteur initial, toute pièce comportant des vices de matériaux ou de
fabrication dans l’année suivant la date d’achat pour tous le s modèles résidentiels. REMARQUE : La garantie est nulle si
l’appareil e st utilisé à des fins commerciales. La présente garantie limitée n e couvre pas le rem placement des piè ces d’usure
ou des con sommables comm e les filtres, les c artouches e t toute autre p ièce sujette à l’us ure normale, sau f si elles présent ent
des vice s de matériaux o u de fabricatio n.
La prés ente garantie limitée n e couvre p as les pièce s ayant fait l’objet d’un accident, d’une u tilisation abusive, d’un us age
commer cial, de modific ations, d’une u tilisation in approprié e, de dommage s causés par u n cas de force m ajeure, d’une ut ilisation
de tension s autres que c elles indiquée s sur la plaque sign alétique de l’app areil ou d’un entr etien effe ctué par tou te person ne ne
faisant p as partie du pe rsonnel de Ore ck
MD
ou d’un cent re de servic e autorisé par ticipant.
Oreck
MD
n’autorise a ucune personn e et aucun repré sentant à assum er ou à accorder d ’autres obligatio ns de garantie liée s à la
vente de c et appareil.
La garantie limitée de Oreck
MD
est valide uniquement si vous conservez la pr euve d’achat de cet appareil OreckMD ou d’u n
détaillant autorisé O reck
MD
. Si vous achetez cet appareil aupr ès de toute autre sour ce, votre achat est « TEL QUEL», ce qui
signifie qu’Oreck
MD
ne vous of fre aucun e garantie e t que vous, et non OreckMD, assumez t ous les risques liés à la qualité et
à la performance de cet appar eil, y compris l’ensemble des c oûts rela tifs aux tâches d’entretien ou de r éparation en cas de
défectuosité.
La resp onsabilité de Or eck
MD
à votre en droit pour tous l es coûts, quels q u’ils soient, déc oulant de cett e déclaration d e garantie
limitée sera limitée au montant pa yé pour cet appareil au moment de l’acha t initial. Ore ck
MD
ne peut êt re tenue re sponsable
d’aucun dommage direc t, indirec t, immaté riel ou accidentel caus é par l’utilisa tion de cet ap pareil ou de l’ impossibili té de
l’utiliser. Cer tains Ét ats ne per metten t pas l’exclusion o u la limitatio n des dommag es consécu tifs. Par c onséquen t, les exclus ions
ou les limit ations précé dentes pour raient ne pas êt re applicables d ans votre cas .
TOUT E GARAN TIE EXP LICIT E OU IMPLIC ITE AUT RE QUE LA GA RANT IE LIMITÉ E PRÉSEN TÉE CI-DE SSUS POU R CET APPA REIL,
Y COMPR IS LES GA RANT IES IMPL ICITE S DE QUALITÉ MARCHANDE ET DE CON VENA NCE À UNE FIN PARTICULIÈRE, EST
EXPRESSÉMENT DÉCLINÉE.
La prés ente garan tie vous donne de s droits pré cis. Vous pouve z également av oir d’autres dr oits, lesque ls varient d’une p rovince
à l’au tre.
Nonobs tant ce qui précède, au cune garan tie fournie aux présentes ou découlant de tou te loi en vigueur ne peut dépasser
un(1)an.
AVERTISSEMENT
DÉBRA NCHEZ L’APPARE IL AVANT DE LE NET TOYER OU D ’EN EFF ECTUER L’E NTRET IEN AFIN DE R ÉDUIRE
LE RISQ UE DE BLESS URES ET DE DÉ CHARGE ÉL ECTRIQ UE.
 Loading...