

Page 1
User’s
®
®
MIN
MAX
Guide
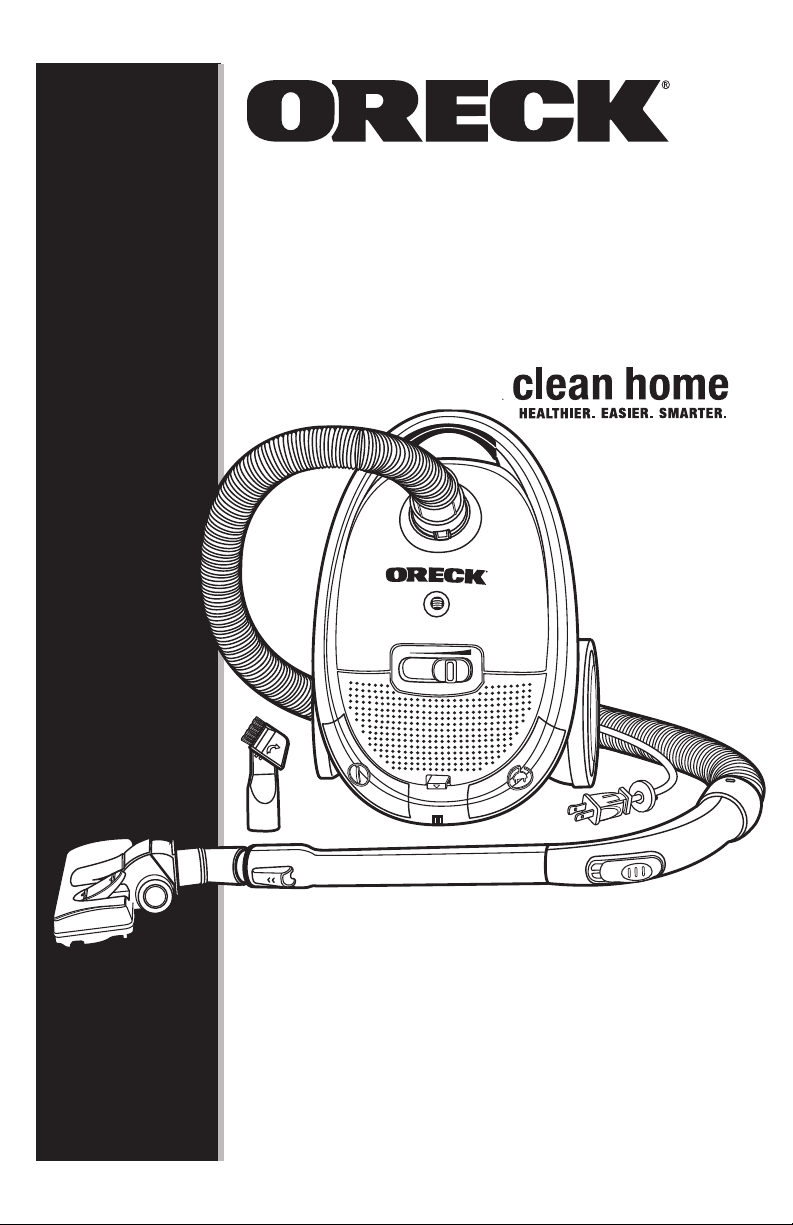
Oreck Quest
MC1000
™
Compact Canister
Important!
Read this manual carefully, and keep for future reference.
Page 2
Enjoy
Call
Thank You for purchasing an Oreck Quest™ Compact Canister!
This state of the art vacuum cleaner will help you have a
healthier clean home.
At Oreck we understand that our customers are unique and
expect superior service. To meet your needs, we offer
different customer service options to work with your lifestyle
and preferences.
Welcome to our Call. Click. Visit. customer service program.
To speak with an Oreck representative call:
USA: 1•800•989•3535
Canada: 1•888•676•7325
Click
Visit
On the web, point and click at: www.oreck.com
and click locate a store on the top right.
Visit us in person at one of nearly 450 store
locations. To find the nearest store, please call
888•oreck (1•888•673•2578).
2
Page 3

Contents
General Warnings . . . . . . . . . . . . . . . . . . . . . . . . . . . . . . . . . . . 4
Environment . . . . . . . . . . . . . . . . . . . . . . . . . . . . . . . . . . . 4
Operation . . . . . . . . . . . . . . . . . . . . . . . . . . . . . . . . . . . . . 4
Parts . . . . . . . . . . . . . . . . . . . . . . . . . . . . . . . . . . . . . . . . . . . . . 6
Product Components & Accessories . . . . . . . . . . . . . . . . 6
Assembly . . . . . . . . . . . . . . . . . . . . . . . . . . . . . . . . . . . . . . . . . 7
Assembling the Oreck Quest™ Compact Canister . . . . . 7
Use . . . . . . . . . . . . . . . . . . . . . . . . . . . . . . . . . . . . . . . . . . . . . . 8
Operating the Vacuum . . . . . . . . . . . . . . . . . . . . . . . . . . . 8
Maintenance . . . . . . . . . . . . . . . . . . . . . . . . . . . . . . . . . . . . . . . 9
Replacing the Disposable Filter Bag . . . . . . . . . . . . . . . . 9
Cleaning/Replacing the Motor Filter. . . . . . . . . . . . . . . .10
Cleaning/Replacing the Exhaust Filter . . . . . . . . . . . . . .11
Troubleshooting . . . . . . . . . . . . . . . . . . . . . . . . . . . . . . . . . . . .12
Replacement Parts . . . . . . . . . . . . . . . . . . . . . . . . . . . . . . . . . .13
Warranty . . . . . . . . . . . . . . . . . . . . . . . . . . . . . . . . . . . . . . . . . .14
3
Page 4

Safety
!
General Warnings
IMPORTANT SAFETY
INSTRUCTIONS
When using an electrical appliance, basic precautions should
always be followed, including the following:
Read all instructions before using this vacuum cleaner
WARNING! To reduce the risk of fire, electric shock, or injury:
• The vacuum is intended for household use only.
• Use the vacuum only as described in this manual.
• Use only manufacturer’s recommended attachments.
Environment
Use of the vacuum outdoors or on wet surfaces may result in
damage to the appliance and void the warranty. Do not use
outdoors or on wet surfaces.
Use of the vacuum on stairs may cause imbalance, slippage or
tumbling. Always check your balance and ensure your footing
when cleaning on stairs.
Use of the vacuum in an enclosed space containing flam-
mable, explosive materials or toxic vapors may result in an
unexpected spark or fire. Do not use the vacuum in such an
enclosed space. Always check exposed wiring and wire connections before use.
Operation
This appliance has powerful suction capability. Do not allow
it to be used as a toy and always maintain close attention when
used by or near children.
Loose clothing, jewelry and long hair may become entangled
in the suction of the vacuum and cause personal injury.
Always keep loose clothing, jewelry, fingers and all parts of
body away from openings.
Use of the vacuum with an opening blocked may reduce airflow. Keep all openings free of dust, lint, hair etc. Ensure the
filter bag assembly is in place before use.
Improper handling of the power cord may result in wiring,
connection damage and potential sparking or shock. Always
follow these instructions when handling the power cord:
4
Page 5

•
Do not pull or carry the vacuum by the cord
•
Do not use the cord as a handle
Do not unplug the vacuum by pulling on the cord
•
•
Do not close a door on the cord
Do not pull the cord around sharp edges or corners
•
Keep the cord away from heated surfaces
•
Do not run the vacuum or other appliance over
•
the cord
A damaged cord or plug may cause a spark, shock and fire.
Always grasp the plug, not the cord, when unplugging the
vacuum. If the supply cord is damaged, it must be replaced
by the manufacturer or its service agent or similarly qualified
person in order to avoid a hazard.
Always check the cord and plug before use. If appliance is
not working as it should, has been dropped, damaged, left
outdoors, or dropped into water, return it to a service center
or call customer service at: U.S.: 1-800-989-3535 Canada:
1-888-676-7325.
Do not use the machine without a motor protection filter
•
installed
If abnormal noise, smell, smoke or any other failure or breakage is found during the operation, you should turn off the
switch and unplug it. Then contact your service center for
repair. Do not attempt to repair by yourself.
Using the vacuum with wet hands and on wet surfaces may
result in unexpected shock, slippage and personal injury.
Do not handle the plug or appliance with wet hands or on
wet surfaces.
Vacuuming burning or smoking objects, flammable or combustible liquids and toxic material may result in a fire and
personal injury. Do not vacuum burning or smoking objects,
flammable or combustible liquids.
Unplugging the vacuum while the controls are ON may cause
sparking and fire. Turn OFF all controls before unplugging.
Do not leave appliance unattended when plugged in. Unplug
from outlet when not in use and before servicing.
SAVE THESE
INSTRUCTIONS
Residential Use Only
5
Page 6

MIN
MAX
Parts
Product Components
& Accessories
17
1
2
4
3
18
12
8
7
19
13
14
1. Intake
2. Top Cover
3. Variable Speed Slide Control
4. Bag Full Indicator
5. Cordwinder Pedal
6. Power Cord
7. Power ON/OFF Pedal
8. 2-in-1 Crevice Tool
9. Handle with Hose
10. Suction Control
6
11
5
11. Telescopic Wand
12. Bare Floor Adjustment
13. Disposable Filter Bag
14. Removable Bag Dock
15. Motor Filter Grill
16. Motor Filter
17. Exhaust Filter
18. Multi-Surface Floor Tool
19. Release Tab
6
9
10
15
16
Page 7

Assembly
3
Assembling the
Connect hose by firmly inserting end of hose into canister
1.
intake opening.
Firmly press handle nozzle into telescopic wand.
2.
Insert smaller end of telescopic wand into the multi-sur-
3.
face floor tool or 2-in-1 crevice tool.
Extend telescopic wand by pushing button on wand and
4.
pulling out to extend to desired length.
Oreck Quest™ Compact Canister
2
4
1
7
Page 8

MIN
MAX
2
MIN
MAX
Use
Important!
Make sure disposable filter bag is in place. DO NOT
operate the cleaner without a dust bag.
Operating the Vacuum
1. Pull plug from unit and insert into
4
wall outlet.
2. Press the ON/OFF pedal located at
the rear of the canister to turn on.
3. To adjust suction, use the suction
control on the handle.
4. To adjust the power of the motor,
use the variable slide control on top
of the unit.
5. The multi-surface floor tool is adjustable
for use on carpets (without brush).
Gently step on the bar floor adjustment
switch to engage brushes.
Note: Accessories can be used with the
telescopic wand or handle alone.
3
8
5
Page 9

Maintenance
!
Replacing Disposable Filter Bag
To keep your cleaner operating at maximum efficiency, change
the dust bag frequently or when the bag full indicator turns red.
Bag Removal:
1.
2.
WARNING!
Performing maintenance on the vacuum while
it is plugged into a wall outlet may result in
unexpected vacuum operation, shock and
personal injury. Always turn the vacuum OFF
and unplug before performing inspection and
maintenance.
If the power cord is damaged, replace it only by
the factory or maintenance center or similarly
qualified person.
Switch the unit off. Unplug unit from the wall outlet.
Open top cover by lifting the latch in front of the intake.
Remove disposable filter bag by raising up on the
3.
removable bag dock and lifting it out of the unit.
Gently pull bag cardboard collar upward out of the
4.
bag dock.
32
Locking Tab
9
Page 10

Bag Installation:
1.
Insert a new bag into dock by sliding cardboard collar
under clamps until bag is fully inserted.
Insert tab of bag dock into wall brackets until locking tab
2.
locks into place.
Cleaning/Replacing the Motor Filter:
Remove the bag dock to access the motor filter grill. Slide
1.
motor filter grill up and out of the unit.
Remove motor filter from grill.
2.
Wash motor filter with warm water without any additives.
3.
Reinstall the filter after it has had time to thoroughly dry.
Note: If the filter is damaged, it should be discarded and
replaced with a new filter.
Replace the dry filter over the tabs in the motor filter grill.
4.
1
2
3
10
Page 11

Cleaning/Replacing the Exhaust Filter:
Lift tab in perforated
1.
top cover to open.
Grasp handle on
2.
exhaust filter and lift
to remove.
Wash exhaust filter
3.
with warm water
without any additives. Reinstall the
filter after it has had
time to thoroughly dry.
1
2
3
Note: If the lter is damaged, it should be discarded and
replaced with a new lter.
11
Page 12

Trouble-
!
WARNING!
shooting
Unplug cord from electrical outlet before servicing.
SAVE SERVICE CALLS...CHECK THESE FIRST:
Is the disposable filter dust bag full?
•
Are pores of filter dust bag clogged with powder or line dust?
•
Is anything clogging the hose, wands, power nozzle & accessories?
•
Problem Possible Source Areas to Check
Cleaner
will not run
Cleaner does
not pick up
Not plugged in
properly.
No electricity in
wall outlet.
Hose not connected
to unit.
Filter bag is full.
Motor Filter is
blocked.
Hose, wand or
accessories are
clogged.
Suction control on
handle is open.
Be sure cleaner is
firmly plugged into
wall outlet.
Check electrical
source–fuse or circuit
breaker.
Connect hose.
Replace filter bag.
See “Replacing
Disposable Filter Bag”.
Clean and/or replace
filter. See “Cleaning/
Replacing the Motor
Filters”.
Clear obstruction.
Close suction control.
ALL OTHER SERVICING SHOULD BE DONE BY AN
ORECK AUTHORIZED SERVICE CENTER.
Customer Service
U.S.: 1-800-989-3535
Canada: 1-888-676-7325
Whenever calling, please be sure to have your model number
from data label.
12
Page 13

Accessories
Part Number
Replacement Disposable Filter Bags,
12 pack
PK12MC1000
(1) Advanced Exhaust Filter & (1)
Motor Filter
MC1000FILTS
13
Page 14

Warranty
ORECK MANUFACTURING COMPANY:
(Oreck Manufacturing Company gives you the following
limited warranty for this product only if it was originally
purchased for residential use, not resale, from Oreck, an Oreck
franchise or an Oreck Authorized Retail Dealer, it has not been
used for commercial use, and it has been used and maintained
in accordance with the product’s owner’s manual.)
Oreck will repair or replace, free of charge, to the original
purchaser, any part that is found to be defective in material or
workmanship within three (3) years of the date of purchase.
This limited warranty applies to normal domestic use. Any
commercial use of this product will void this limited warranty.
This limited warranty does not cover the replacement of
expendable or consumable parts such as carbon motor brushes,
edge brushes, drive belts, brushes, disposable bags, wheels,
lights, light bulbs and other parts subject to normal wear
unless they are defective in material or workmanship.
This limited warranty does not apply to any part subjected
to accident, abuse, commercial use, alteration, misuse,
damage caused by act of God, the use of voltages other than
indicated on the serial number displayed on this product
or service of this product by other than Oreck or an Oreck
Authorized Service Center. Oreck does not authorize any
person or representative to assume or grant any other warranty
obligation with the sale of this product.
Oreck’s limited warranty is valid only if you retain proof
of purchase from Oreck, an Oreck Franchise or an Oreck
Authorized Retail Dealer for this product. If you purchase
this product from any other source, your purchase is “AS IS,”
which means Oreck grants you no warranty, and that you, not
Oreck, assume the entire risk of the quality and performance
of this product, including the entire cost of any necessary
servicing or repairs of any defects.
Oreck’s liability for damages to you for any costs whatsoever
arising out of this statement of limited warranty shall be
limited to the amount paid for this product at the time of
original purchase, and Oreck shall not be liable for any direct,
indirect, consequential or incidental damages arising out of the
use or inability to use this product.
Some states do not allow the exclusion or limitation of
incidental or consequential damages, so the above limitation or
exclusion may not apply to you.
Page 15

ALL EXPRESS AND IMPLIED WARRANTIES FOR
THIS PRODUCT, INCLUDING IMPLIED WARRANTIES
OF MERCHANTABILITY AND FITNESS FOR A
PARTICULAR PURPOSE, ARE LIMITED IN DURATION
TO THE WARRANTY PERIOD, AND NO WARRANTIES,
WHETHER EXPRESS OR IMPLIED, WILL APPLY AFTER
THIS PERIOD.
Some states do not allow limitations on the duration of implied
warranties, so the above limitation may not apply to you.
This warranty gives you specific legal rights, and you may
also have other rights which vary from state to state.
15
Page 16

©2010 Oreck Holdings, LLC.
All rights reserved. All marks, text, logo’s, product configurations and registered trademarks are owned and used under the
authority of Oreck Holdings, LLC
27001-01 REV A 04/10 ECN R-9796
16
 Loading...