

Page 1
Magnesium
Upright Vacuum
Magnesium™ | Magnesium™ RS | Magnesium™ SW | Magnesium™ RF
User’s Manual
POWERFUL
LIGHTWEIGHT
EASY TO USE
MULTI-SURFACE
™
3 YEAR WARRANTY
Model no. OK2
Impor tant!
Re ad th is ma nua l car efu lly, a nd ke ep fo r fu tur e refer enc e.
Also Includes
The Ultimate Handheld
A portable, lightweight, and powerful
vacuum. Perfect for your difficult &
hard to reach cleaning needs.
Designed for maximum ease of use.
Page 2
Magnesium
Upright Vacuum
™
upright vacuum
Enjoy
Thank you for purchasing the Oreck Magnesium
cleaner. The inner bag is already installed. Simply install the handle
and you are ready to enjoy your new Oreck Magnesium Upright
Vacuum Cleaner.
Technical Specifications
Model no: OK2
Wattage: 400W
Voltage: 220-240V ~ 50Hz
Dust bag capacity: 8.8L
Cord length: 9m
Weight: 3.5kg
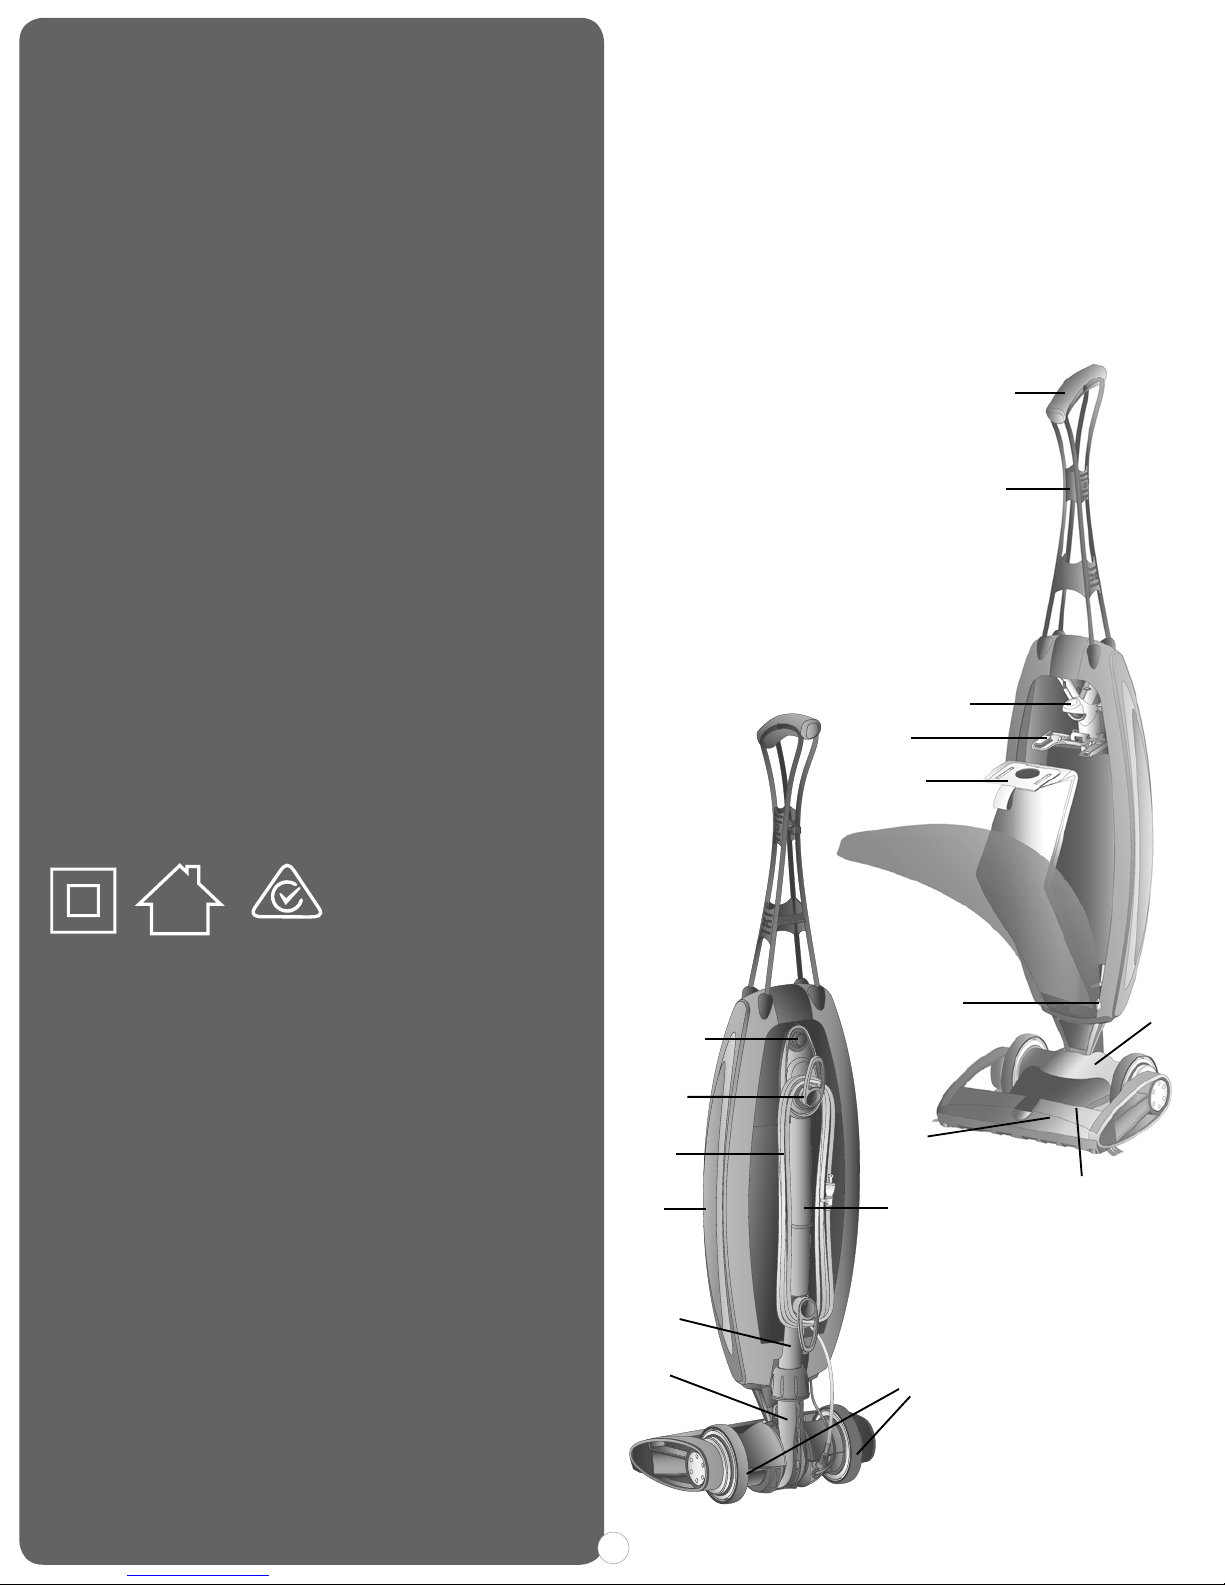
Parts
™
Demonstrative Illustration
1 Handle With Soft
Comfort Grip
2 High/Low/Off Switch
3 Cord Release
4 Magnesium
Handle
5 Connector
6 Bag Dock
™
7 Carry Handle
8 Zipper
9 Main Bumper
10 Power Cord
11 Lower Tube
12 Fan Housing
13 Rear Wheels
14 Cover
4
5
15 Outer Bag
16 Power Head
17 Inner Filter
Bag
1
To speak with an Oreck representative call
Australia: 1300 361 505
New Zealand: 0800 800 900
Regulatory Compliance Mark (RCM)
This product meets applicable
regulatory requirements.
Contents
Technical Specifications ...............................1
P a r t s ............................................................1
S a fe ty........................................................... 2
Ope r a t i o n ............................................... 3
15
10
6
17
8
2
3
9
16
7
11
14
Ope r a t i o n .......... ..................................... 5
Use & Mainten anc e
Ope r a t i o n ....... ............ ............................ 7
Trou blesh ootin g & Par ts
12
1
13
Page 3

General Warnings
!
IMPORTANT SAFETY INSTRUCTIONS
Th is va cuu m clea ner is inte nde d for ho use h old use on l y and NOT fo r com m e rc ial
or industrial use.
When using the vacuum cleaner basic safety precautions should always be
observed, including the following:
READ ALL INSTRUCTIONS BEFORE USING THIS VACUUM CLEANER
1. Only use the vacuum cleaner
indoors on dry surfaces.
2. Turn off th e on/of f swi tch on th e
vacuum cleaner controls before
disconnecting or connecting
from the mains supply.
3. Always unplug the vacuum
cleaner before changing the
inner bag and undergoing any
maintenance.
4. Children should be supervised
to ensure that they do not play
with the appliance.
5. This appliance is not intended
for use by children and persons
with reduced physical, sensory
or mental capabilities or lack of
experience and knowledge,
unless they have been given
supervision or instruction
concerni ng us e of th e appl ian ce
in a safe way and understands
the hazards involved. Children
should be supervised to ensure
th ey do not pl ay wit h t he appli ance.
6. Cleaning and maintenance shall
not be made by children.
7. The appliance should only be used
as described in this user guide.
8. Only ORECK recommended
at tach ment s sho uld be used with
this appliance.
9. Do not use this vacuum cleaner
if it ha s been drop p ed, da mag e d,
left outdoors or dropped into
water. Do not use this vacuum
cleaner with a damaged cord
or plug.
10. Do not pull or carry this
appliance by the cord. Do not
use the cord as a handle, close
a door on the cord or pull the
cord around sharp edges or
corners. Do not run the vacuum
cleaner over the cord. Keep the
cord away from heated surfaces.
11. Do not handle the plug or the
va cuu m cle aner with wet hands .
12. Keep hair, loose clothing, fingers
and all parts of the body away
from openings and moving
parts.
13. Do not vacuum any hot coals,
as h, ci garette butt s, match es or
any hot, smoking or burning
objects.
14. Do not vacuum any flammable
or combustible materials (lighter
fluid, petrol, kerosene etc.) or
us e in th e pre sence of expl osive
liquids or vapours.
15. Do not vacuum harmful or toxic
material (chlorine, bleach,
ammonia, drain cleaner etc.).
16. Do not vacuum hard or sharp
objec ts such as glass, nails,
screws, coins etc.
17. Do not vacuum plaster dust,
concrete dust or any other
building or vitreous materials.
18 . D o not va cuum flo ur, baki n g soda
or any other powder-based
carpet refresher or deodoriser.
19. Store the vacuum cleaner in a
cool, dry area.
20. Use only SAA approved 10amp
ex te nsi on co rds . Care shoul d be
taken to arrange the cord
so that the cord cannot be
tripped over.
21. Do not put any objects into
openings. Do not use with any
openings blocked and do not
restrict airflow. Keep all openings
free of dust, lint, hair or anything
that might reduce airflow.
22. Do not use the vacuum cleaner
without the inner bag in place.
23. Take extr a car e whe n pos iti onin g
the vacuum cleaner on the stairs.
24. Do not let the unit run while in
any stationary position for any
period of time. Keep the unit
moving while in operation. Do
no t operate the unit whil e in th e
upright and locked position.
WARNING: Always switch off and
un plug the vacuu m cle aner fro m the
electrical socket before assembling,
opening or emptying the dirt
container, or before connecting/
disconnecting the attachments.
CAUTION : Th e vac uum clean er is a
very powerful unit. Before plugging
the cord into the electrical socket,
make sure the switch is in the ‘off’
position.
IMPORTANT: If the in let , is bl ocked,
switch off the vacuum cleaner and
remove the blockage(s) before
re-starting the vacuum cleaner.
IMPORTANT: ORECK reco mmen ds
the use of Residual Current Device
Rating of 30mA or less.
IMPORTANT: It is very important
that the inner bag is replaced when
full to get maximum performance
from your vacuum cleaner. Only use
recommended Oreck disposable
inner bags.
NOTE: If the supply cord is damaged
it must be replaced by the
ma nufac tur er, or a sim ila rly qua lifi ed
person in order to avoid hazard, or
invalidating the warranty.
DAMAG E T O THE VACUU M C L EANER
CAUSED AS A DIRECT RESULT OF
NOT ADHERING TO THE GENERAL
SAFETY INFORMATION AND THE
INSTRUCTIONS IN THIS USER GUIDE
INVALIDATES THE WARRANTY
PLEASE KEEP THESE
INSTRUCTIONS FOR FUTURE
REFERENCE
2
Page 4
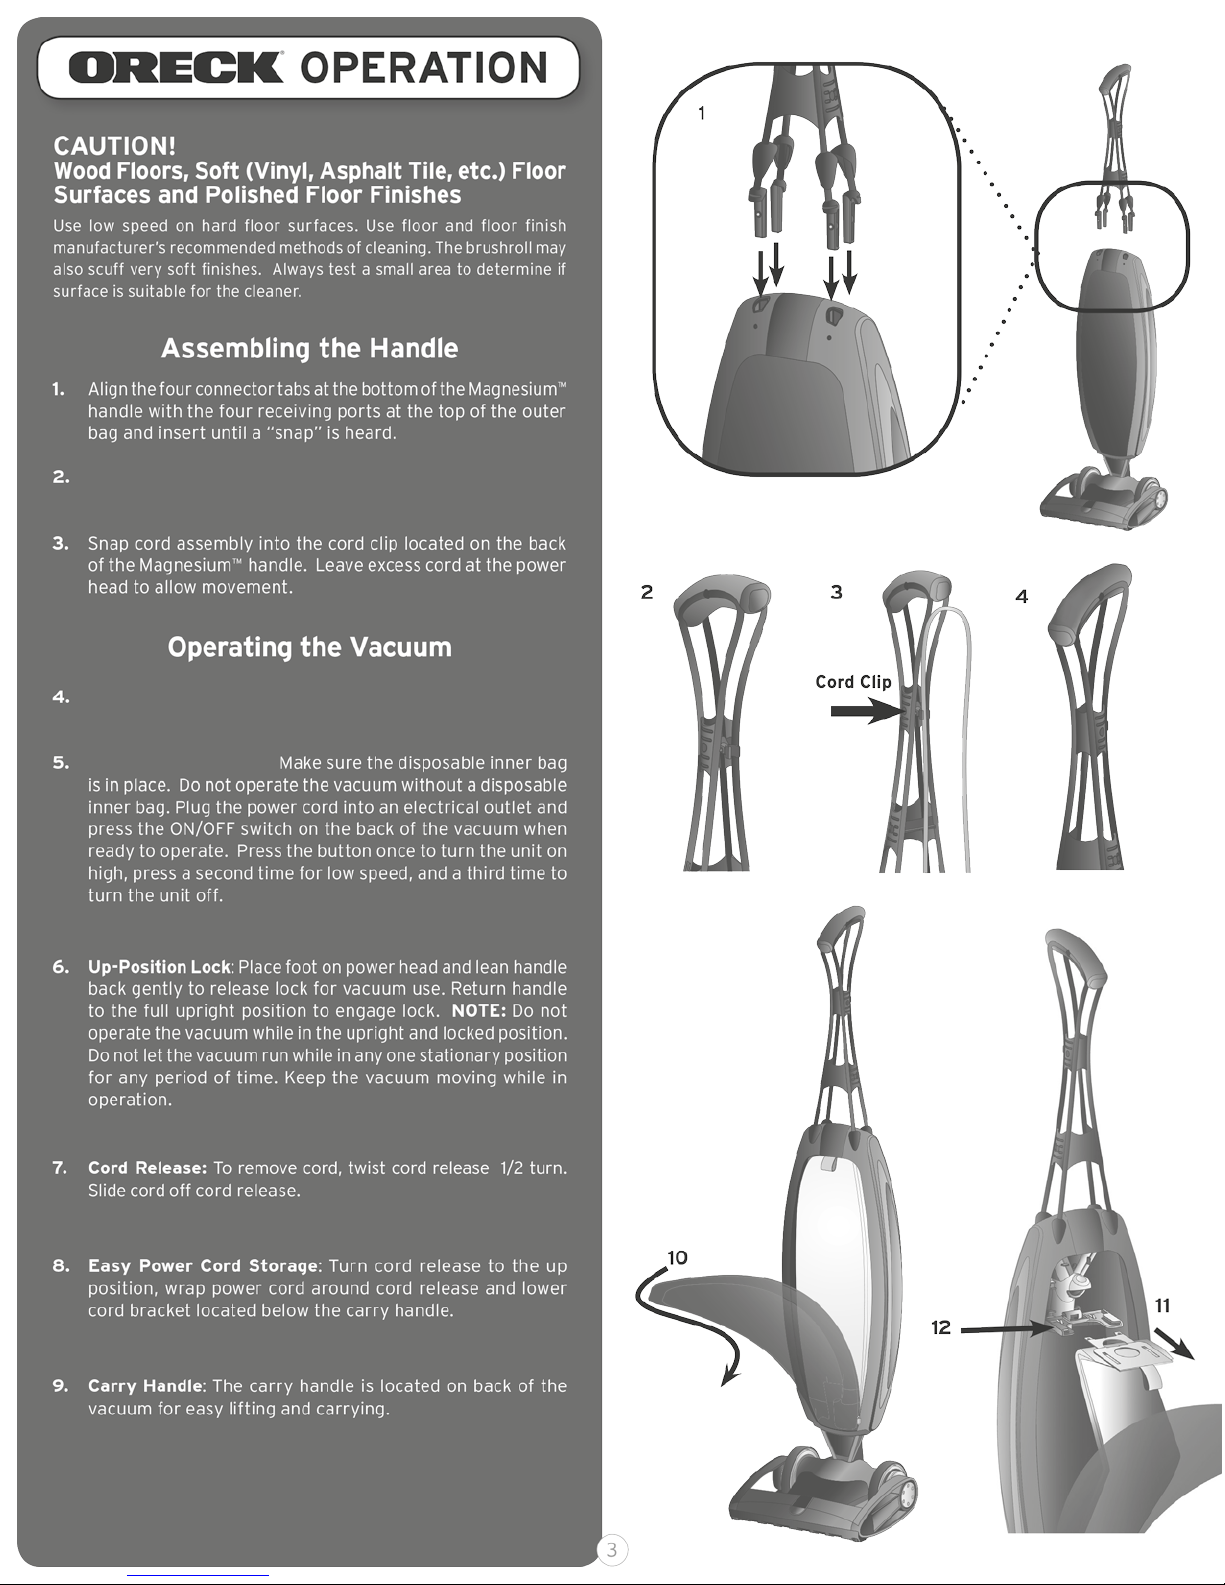
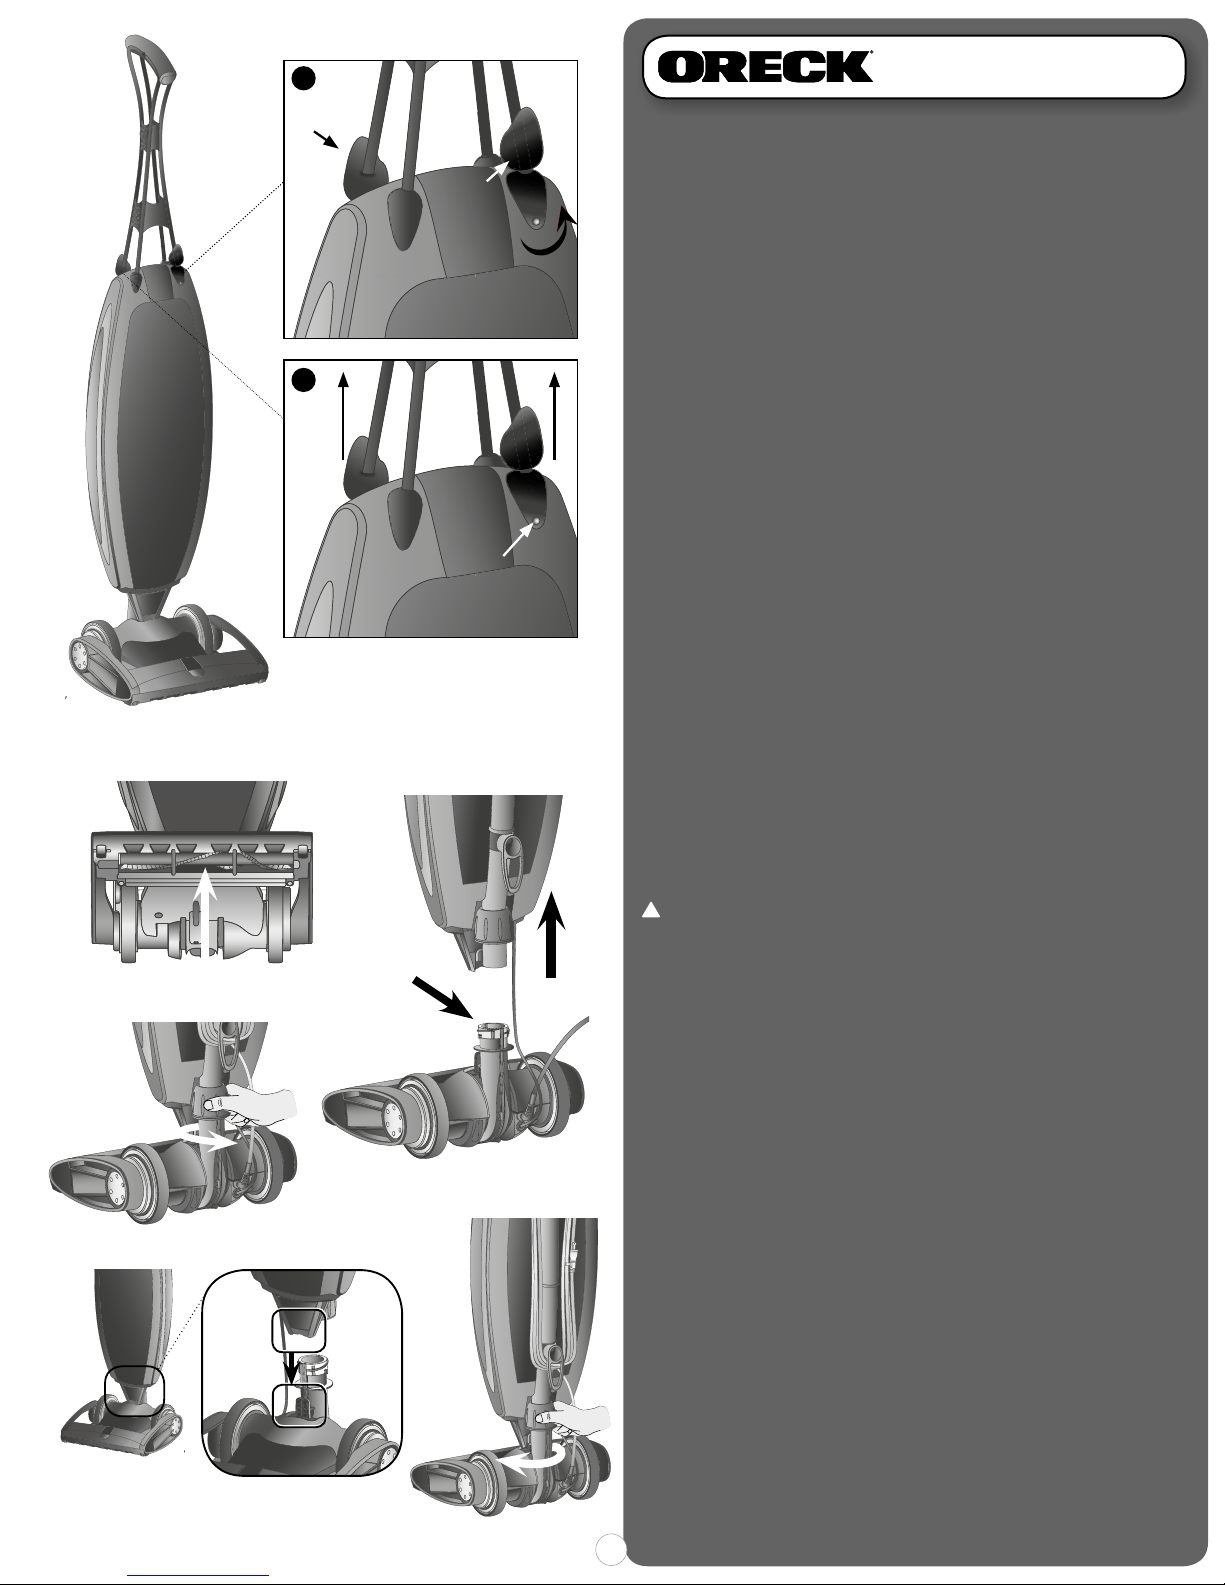
Pull on the handle to ensure it is secured into position.
Twist the cord release 1/2 turn, and carefully take all of the cord
off the machine.
Getting ready to vacuum:
Page 5
6
OPERATION
7
5
9
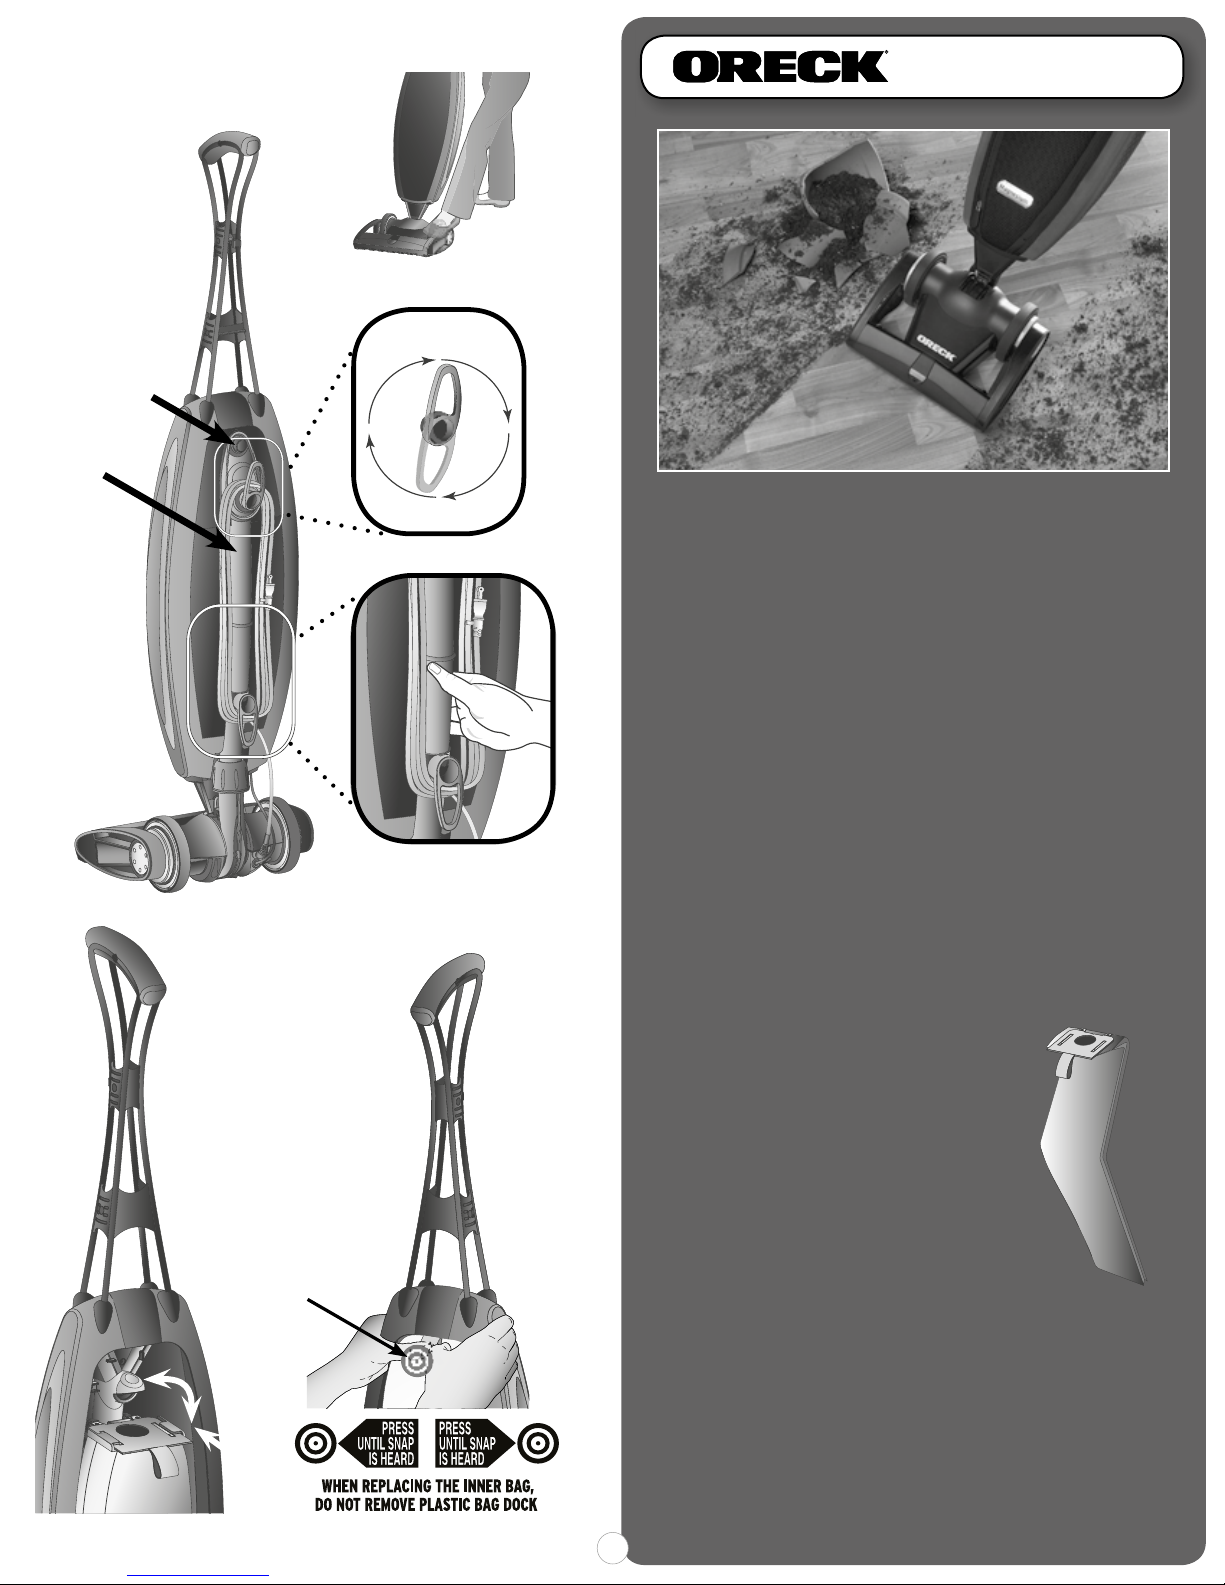
Inner Bag Removal
10. Unzip outer bag completely.
11. Pull tab on bag to release bag dock from connector.
Bag dock will hinge downward.
12.
The Saniseal® dust seal will close automatically.
.kcod gab morf drawtuo ralloc draobdrac gab llup yltneG
Lock the cardboard
onto the two tabs
on the bag dock
14
Inner Bag Installation
13. Lock the cardboard onto the two tabs on the bag dock.
Slide the cardboard collar completely onto bag dock.
14. Firmly push bag dock with both thumbs on indication
point until it snaps.
8
The performance of your new vacuum greatly depends upon
care and maintenance. The instructions in this manual will guide
you in performing basic care and maintenance. To ensure the
most satisfying years of service read the instructions and keep
them handy for future reference.
Inner Filter Bag
Your Oreck includes a HEPA Odour Fighting Inner
Bag. The disposable inner bag plays a very
important role in the efficiency of your ORECK
vacuum. The purpose of the disposable inner
bag is to trap dirt, but at the same time it must
be porous enough to allow air to pass through.
If the disposable inner bag becomes clogged,
no air can pass through the vacuum and
cleaning cannot take place, regardless of the
vacuum’s power.
To keep your upright vacuum operating at
maximum efficiency, change the disposable
inner bag frequently. DO NOT FILL ABOVE THE LINE INDICATED
ON THE DISPOSABLE INNER BAG.
13
Be sure the disposable inner bag is installed properly. NOTE: All
disposable inner bags are not the same. Oreck offers HEPA
bags. Your Oreck HEPA inner bags
with the ORECK Upright vacuum.
Oreck HEPA
of your
disposable inner bags will affect the cleaning ability
vacuum and could cause damage to it.
have been designed to be used
Using bags other than genuine
4
inner
Page 6

USE & MAINTENANCE
!
Simple Operating Tips
You’ll love the way your Oreck cleans under things and is SO
lightweight and easy to use. The following are a few simple
suggestions regarding its operation:
• When inserting a new disposable inner bag, first puff out
and OPEN the bag.
• When the disposable inner bag is full, replace it.
• Check the disposable inner bag at least once a month.
• Do not run the vacuum over the cord. The revolving
brushroll could damage the cord.
• Use caution when vacuuming over area rug edges and
fringe.
• If at any time the machine does not pick up properly or
makes an unusual noise, stop operation and service.
• Although your upright will pick up pins, paper clips, and
other small objects, it is recommended that these be
picked up from the floor before you vacuum. Failure to do
so may result in permanent damage to the motor suction
fan and its housing.
The Belt
The Oreck Magnesium™ is equipped with the Endurolife™ Belt,
which is designed for long life and doesn’t need changing.
Replacing the Brushroll
The brushroll is designed for long life. Should it ever become worn
or frayed, it can be replaced by an Oreck Authorized Service Center.
contact us on AU: 1300 361 505 / NZ: 0800 800 900
Squeaky Wheels
1. Gently slide a small screwdriver under the wheel and pry the
wheel upwards. It should be fairly easy to do.
2. Slide the wheel off the axle.
3. Use petroleum based lubricant, and apply a small amount to the
4. Slide the wheel back onto the axle.
5. Press wheel and axle back into slot in original position.
an Oreck approved
axle with a Q-tip, spreading evenly on the axle.
Removing the Battery
(Magnesium
1
2
A
™
RF & RS Only)
3
Motor Protection/Vacuum Shutdown
If the vacuum becomes overloaded (which could occur when a
large obstruction is sucked up or when vacuuming extremely
thick carpet), the electronics are designed to shut down the
vacuum. If this happens, the vacuum will automatically shut
off and the headlights will flash. To reset the vacuum, turn the
unit off, wait 5 seconds, and then turn it back on. If it shuts
down again there may be a large obstruction in the vacuum.
Se e “Stuffin g or Blockag e” for the step s on cl eari ng a blo ckag e.
WARNING: Unplug cord from electrical outlet before servicing.
Lubrication
The vacuum motor bearings are factory lubricated and sealed.
Further lubrication is not required.
Brushroll Maintenance
At least once a month, check for and remove
excessive lint, stri ng or hair from the revol ving
brushroll. Patented cleaning grooves on the
brushroll will allow easier cleaning. Wipe the
ou tside of the vac uum with a damp cl oth . Also
clean the connector deflector assembly area,
ba se of vacuum and fan hou sing area . If the re
is dust in the outer bag, vacuum it or shake it out. A little
preventative ma intenan ce will keep your up right vacuum loo king
new and will ensure continued cleaning effectiveness.
1.
Place a quarter in the grooves of the plastic bat tery ca p (A). Rotate
counterclockwise 90 degrees.
2. Pull plastic battery cap out. The silver round battery is located
inside.
3. Located at the top of the battery is a silver battery contact that
holds the battery in place. With the tip of a screwdriver, lift the
conta ct up an d away from th e battery. Once the cont act has clea red ,
the battery will spring forward for easy removal.
Installing the Battery
(Magnesium
1
1. Insert battery into battery compartment. (Use CR2032 Battery)
2. Align the plastic battery cap with grooves so that they are facing
a vertical position. Place a quarter in the grooves of the plastic
batte r y cap. Rotate clock wise 90 degrees to loc k the cap into place.
2
™
RF & RS Only)
Locked Position
5
Page 7
3
!
USE & MAINTENANCE
B
A
A
4
Pin
Pin
Note: The upper handle assembly is held in place by two spring
loaded pins. To remove the handle, both spring loaded pins must
be depressed at the same time.
1. Place the unit on a table so that the vacuum handle is at eye
2. .pu B & A srevoc rebbur pifl ,muucav eht fo tnorf eht gnicaF
3. Locate the silver-colored push pin under flaps A & B.
4.
NOTE: When button is depressed make sure to keep handle slightly
pulled up.
5. Rotate the vacuum 180 degrees and repeat steps 1-4 in flap B.
6. After depressing both silver-colored push pins in flaps A & B,
Disassembling the Handle
level.
Keep both flaps flipped upright.
Use a small household item such as a ballpoint pen, screwdriver,
or paper clip to depress the silver-colored push pin. While
keeping an upward pull on the handle, insert the tip of the
household item into the silver-colored push pin until you feel
a release.
the handle will release.
Stuffing or Blockage
IMPORTANT: On plush and new carpets, stuffing may accumulate
inside the intake tube and the lower tube assembly. This is due
to excessive fuzz and loose cuttings in the carpet. Stuffing could
accumulate during the first few cleanings until all the loose
material is removed. Due to the high efficiency of the vacuum,
many older carpets will cause stuffing when the vacuum is first
used on them. If your vacuum does not pick up properly, or makes
unusual noise and the outer bag does not fluff up or balloon open,
follow these steps:
WARNING: Unplug cord from electrical outlet before servicing.
10
7
9
8
11
7. Check for blockage at the mouth of the intake opening. If
there is blockage, remove it with long-nose pliers, a
screwdriver or coat hanger.
8. Twist lower collar counterclockwise to slide up. Pull tube
out of base. Check for blockage. If blockage is in
remove with a coat hanger.
9. If tube is not blocked, look into fan housing. Remove debris
with long-nose pliers, a screwdriver or coat hanger.
10.
Insert tube and push down until the tube is seated. Make
sure O-ring is in place against fan housing opening.
11.
To finish reassembly, replace and tighten collar clockwise
until collar locking tabs are locked in place.
NOTE: Many times blockage occurs due to a full disposable inner
bag causing dirt to travel back down the air flow system. When
that happens, the blockage will be at the top of the system,
starting in the area where the disposable inner bag connects to
the connector assembly. If the above actions do not correct the
problem, contact us on AU: 1300 361 505 / NZ: 0800 800 900
the tube,
6
Page 8

TROUBLESHOOTING & PARTS
Service problems that appear to be major can often be solved easily. You can be your own troubleshooter by reviewing this guide.
Problem Check What To Do
Vacuum will not run. • Not plugged in properly.
• No electricity in wall outlet.
• The Brushroll is blocked.
• Be sure power cord is firmly plugged into wall outlet.
• Check electrical source (fuse or circuit breaker).
• Clear blockage. Unit will reset. (See page 6.)
Vacuum does not
pick up.
Vacuum still does not
operate properly.
Unit stops and front
lights flash.
All accessories and replacement parts are sold separately. To order, call our customer service hotline
• Did the vacuum shutdown on very
dense material or large obstruction,
and did the lights flash?
• Disposable Inner Bag is full.
• Nozzle or intake piv
• Brush is worn.
• Bag tube clogged.
• Bag pores are clogged with fine dust.
• Impeller fan is broken.
• Brushroll is not even at both ends.
• Check all the above points. • Contact an Oreck authorised service agent.
• Jammed brushroll • Clear blockage. (See page 6 for instructions.)
Please have your model number from the data label on the bottom of the unit.
ot clogged.
• See steps on clearing an obstruction on page 6. Turn the unit off
and wait 5 seconds and vacuum will reset. You can also unplug
unit and vacuum will reset.
• Replace Disposable Inner Bag. (See page 4.)
• Clear blockage. (See page 6.)
• Contact us on AU: 1300 361 505 / NZ: 0800 800 900
• Clear blockage. (See page 6.)
• Change Disposable Inner Bag. (See page 4.)
• Contact us on AU: 1300 361 505 / NZ: 0800 800 900
• Contact us on AU: 1300 361 505 / NZ: 0800 800 900
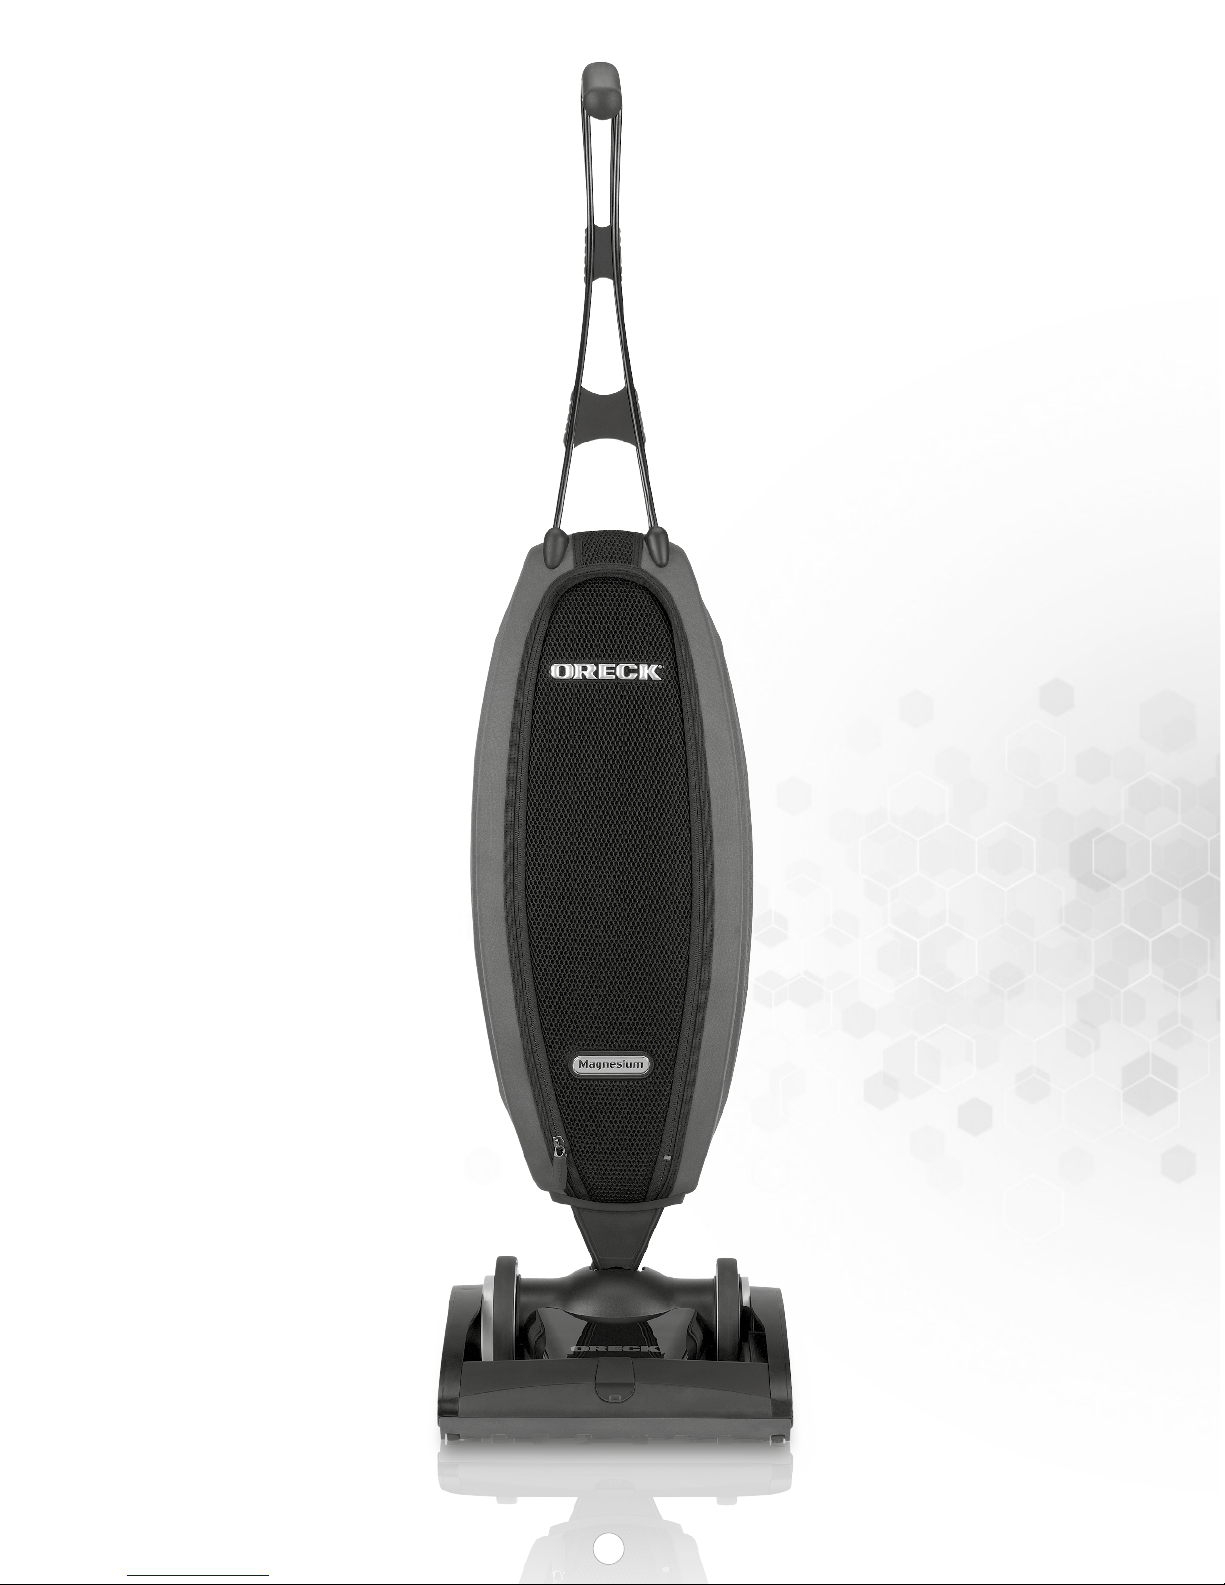
Introducing the Lightest,
Full-Powered Vacuum
7
Page 9
8
Page 10

TROUBLESHOOTING & PARTS
ANZ DISTRIBUTOR:
Techtronic Industries Australia Pty Ltd
31 Gilby Road
Mt Waverley VIC 3149
Australia
Australia: 1300 361 505
New Zealand: 0800 800 900
Should components need to be replaced which have not been described, please contact one of our authorised
Oreck warranty or service agents. For a list of authorised Oreck warranty service agents, please call us on:
Australia: 1300 361 505 / New Zealand: 0800 800 900
CONTACT DETAILS
9
Page 11

NOTES
10
Page 12

Call: AU: 1300 361 505 / NZ: 0800 800 900
Techtronic Industries Australia Pty Ltd
31 Gilby Road
Mt Waverley VIC 3149
Australia
 Loading...