

Page 1

Magnesium
Upright Vacuum
Magnesium™ | Magnesium™ RS | Magnesium™ SW | Magnesium™ RF
User’s Manual
POWERFUL
LIGHTWEIGHT
EASY TO USE
MULTI-SURFACE
™
Impor tant!
Re ad th is ma nua l car efu lly, a nd kee p for f utu re re fe re nc e.
Also Includes
The Ultimate Handheld
A portable, lightweight, and powerful
vacuum. Perfect for your difficult &
hard to reach cleaning needs.
Designed for maximum ease of use.
Page 2
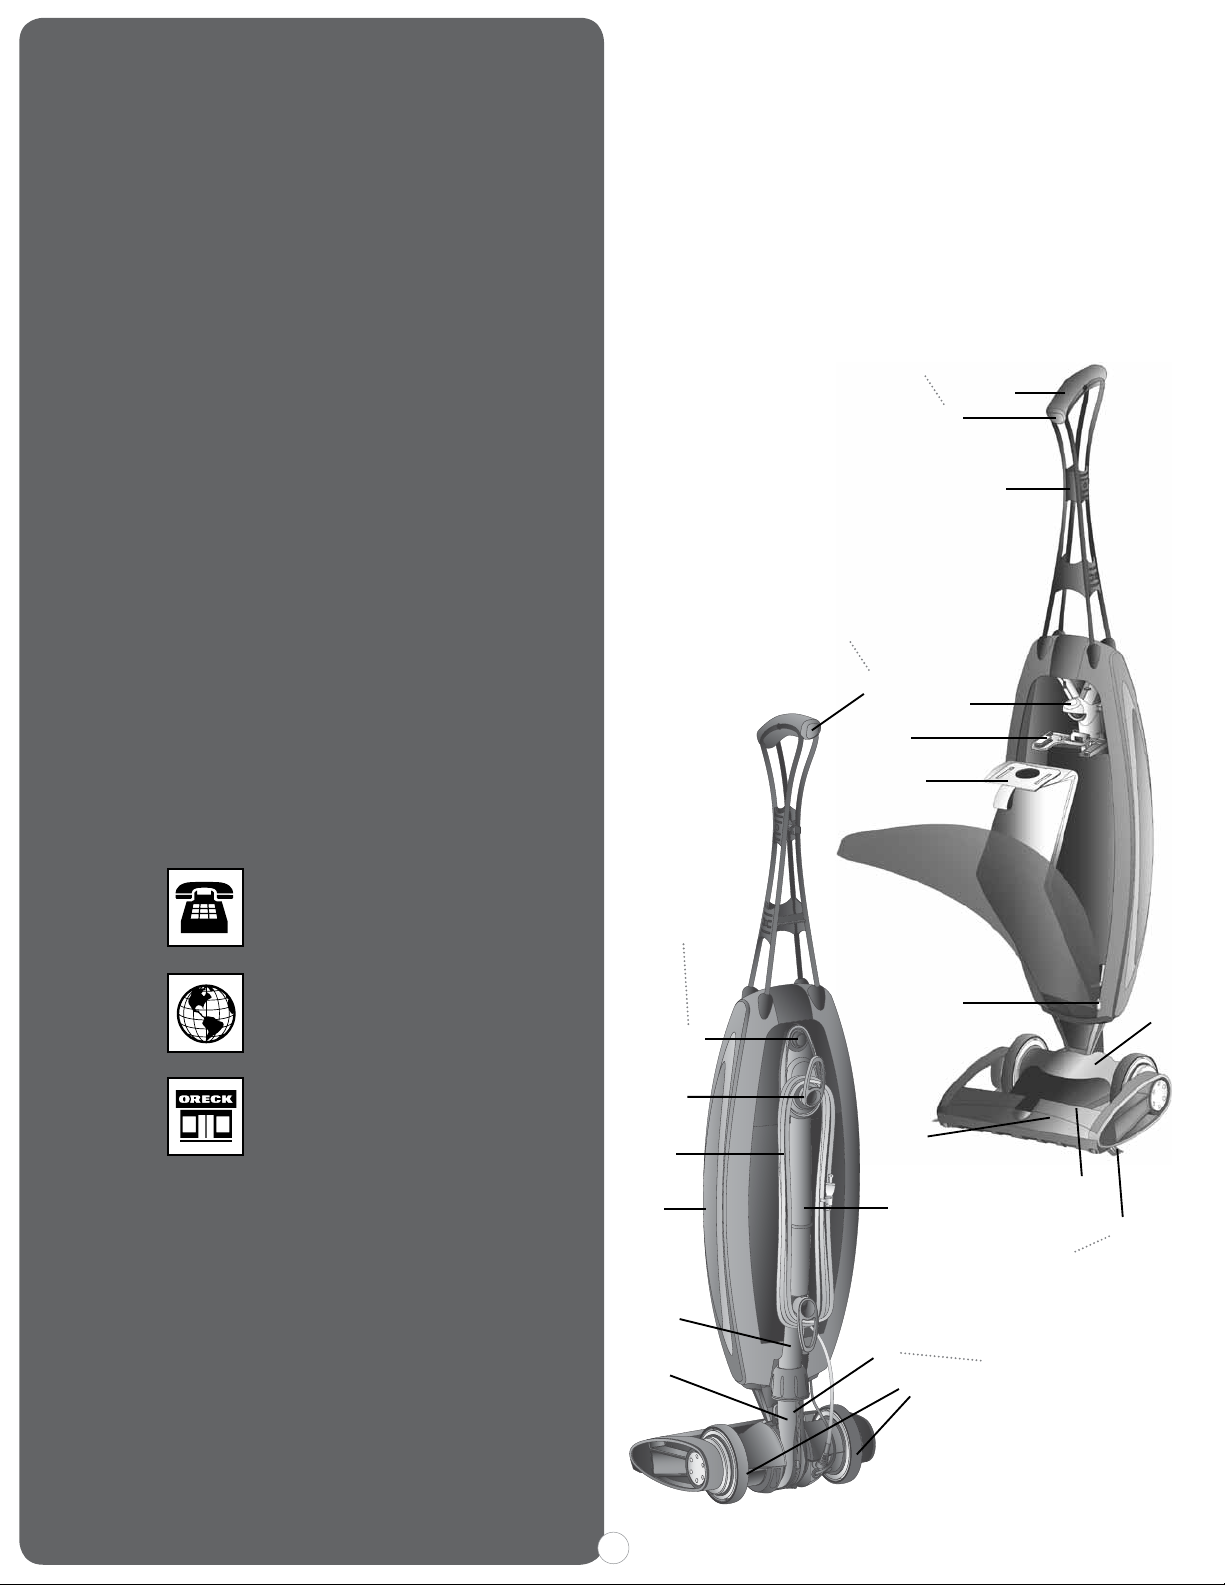
Magnesium
Upright Vacuum
Parts
™
1 Handle with soft
comfort grip
2 On/Off Switch
3 Cord Release
4 Magnesium™
Handle
5 Deflector
6 Bag Dock
7 Carry Handle
8 Zipper
9 Main Bumper
10 Power Cord
11 Lower Tube
12 Fan Housing
13 Rear Wheels
14 Cover
15 Outer Bag
16 Power Head
17 Inner Filter
Bag
18 Swivel
19 Edge Brushes
20 Battery Door
Enjoy
Thank you for purchasin g the Ore ck Magnesium™ upright vacuum
clea ner. The inn er bag is alrea dy installe d. Simply insta ll the handle
and you are ready to enjoy your new Oreck Magnesium Upright
Vacuum Cleaner.
Welcome to our Call. Click. Visit. customer service program.
To speak with an Oreck representative call or click using the
infromation below.
Call
USA: 1•800•989•3535
Canada: 1•888•676•7325
Magnesium
Magnesium
ONLY
Magnesium
Magnesium
™
&
™
SW
Magnesium
Magnesium
™
RX &
™
LX ONLY
20
™
6
17
™
RS &
RF ONLY
2
5
1
4
Click
www.oreck.com
Visit
Visit one of our many
Oreck store locations.
Contents
Parts............................................2
Safety....................................2
Operation..............................3
Use & Maintenance.................................................................5
Troubleshooting & Parts.........................................................6
French.................................7
Spanish...................................11
8
2
3
18
9
ONLY
ONLY
16
™
RS &
™
™
7
Magnesium
Magnesium
Magnesium
13
Magnesium
10
15
11
12
1
19
RF
RS &
™
RF
14
Page 3

!
!
The Federal Communications Commission Radio Frequency Interference Statement
includes the following:
NOTE: This equipment has been tested and found to comply with the limits for a
Cl as s B di gi ta l de vice, pursuant to Par t 15 of the FC C Ru le s. T he se lim it s ar e de si gn ed
to provide reasonable protections against harmful interference in a residential
installation.
This equipment generates, uses, and can radiate radio frequency energy and if not
in st al le d an d u se d in ac co rd an ce with the instr uct io ns , ma y ca us e ha rm fu l interfere nce
to radio communications.
However, there is no guarantee that interference will not occur in a particular
installation.
If this equipment does cause harmful interference to radio or television reception,
which can be determined by turning the equipment off and on, the user is encouraged
to try to correct the inter ference by one or more of the following measures:
• Reorient or relocate the receiving antenna.
• Increase the separation between the equipment and receiver.
• Connect the equipment into an outlet on a circuit different from that to which
the receiver is connected.
• Consult the dealer or an experienced radio/ TV technician for help.
This device complies with part 15 of the FCC (RSS-210) Rules.
Operation is subject to the following two conditions: (1) The device may not cause
harmful interference and (2) this device must accept any interference received,
including interference that may cause undesired operation.
An y ch an ge s or m od ifi ca ti on s in constr uct io n of thi s dev ice which
CAUTION!
IMPORTANT NOTE:
FCC Radiation Exposure Statement
Th is equ ip me nt com pl ie s wi th FCC ra diation ex po su re lim it s se t fo rt h an unc on trolled
environment.
This equipment should be installed and operated with minimum distance 20cm
between the radiator and your body. This transmitter must not be co-located or
operating in conjunction with any other antenna or transmitter.
Transmitter specification
*Carrier frequency: 434MHz *RF output power: -10dBm
ar e no t ex pr essly app rove d by the par ty re sp on si bl e fo r comp li an ce
could void the user ’s authori ty to operate the equip ment.
General Warnings
IMPORTANT SAFETY INSTRUCTIONS
When using an electrical appliance, basic precautions should always
be followed, including the following:
READ ALL INSTRUCTIONS BEFORE USING THIS VACUUM CLEANER
WARNING!: To reduce the risk of fire, electric shock, or injury:
•
Do not leave appliance unattended
when plugged in. Unplug from outlet
wh en not in us e an d be fo re ser vi ci ng .
•
Do not use outdoors or on wet
surfaces.
• Do not operate the unit while in the
upright and locked position.
Do not let the unit run while in any
•
one stationary position for any period
of time. Keep the unit movi ng whi le in
operation.
Do not all ow to be used as a toy. Close
•
attention is necessary when used near
children.
• Use only as described in this manual.
Use only manufacturer’s recommended
attachments.
Do not use with dama ge d co rd o r pl ug.
•
If app li an ce is no t workin g as it should ,
has been dropped, damaged, left
outdoors, or dropped into water,
return it to a service center or call
customer service at: US: 1-800-9893535 Canada: 1-888-676-7325
• Do not pull or carry by cord, use cord
as a han dl e, clo se doo r on cor d, or pu ll
cord around sharp edges or corners.
Keep cord away from heated surfaces.
•
• Do not run appliance over cord.
• Do not unplug by pulling on cord. To
unplug, grasp the plug, not the cord.
• Do not handle plug or appliance with
wet hands.
Always test a small area to determine
•
if surface is suitable for the cleaner.
CAUTION!
Wood Floors, Soft (Vinyl, Asphalt Tile, etc.) Floor
Surfaces and Polished Floor Finishes
Use low speed on hard floor surfaces. Use floor and floor finish
manufacturer’s recommended methods of cleaning. The brushroll may
al so scu ff ver y soft fin is he s. Do not ope ra te the vacuu m wh il e in the upright
and locked position. Do not let the vacuum run while in any one stationary
po si ti on for any per io d of time . Keep the vac uu m mo vi ng while in o peration.
SAVE THESE INSTRUCTIONS
Household Use Only
To redu ce the risk of e lectric sho ck , th is appliance
has a polarized plug (one blade is wider than the
othe r). T hi s plug will fit in a pol ar ized out le t on ly
on e way. If th e plug does not fit full y in the out le t,
reverse the plug. If it still does not fit, contact a
qualified electrician to install the proper outlet.
Do not alter the plug in any way.
• Do not put any object into openings.
Do not use with any opening blocked;
keep free of dust, lint, hair and
anything that may reduce air flow.
• Keep hair, loose clothing, fingers and
all parts of body away from openings
and moving parts.
• Do not use to pick up anything that is
burning or smoking, such as
cigarettes, matches, or hot ashes.
• Do not use without disposable inner
bag assembly in place.
Turn o ff al l co ntr ols b efo re unpl ugg in g.
•
•
Use extra care when cleaning on
stairs.
Do not use to pick up flammable or
•
combustible liquids, such as gasoline
or lighter fluid, or use in areas where
they may be present.
Do not use appliance in an enclosed
•
space where flammable, explosive or
toxic vapors are given off by oil base
paint, paint thinner, some mothproofing
substances, or in an area where
flammable dust is present.
• Do not pick up toxic material such as
chlorine bleach, drain cleaner,
gasoline, etc. with this appliance.
Use caution when vacuuming over
•
area rug edges and fringe.
Pr od uc t co nt ai ns che mi ca ls kno wn to
•
th e State of Ca li fo rn ia to caus e ca nc er
and birth defects or other reproductive
harm.
Page 4

OPERATION
Assembling the Handle
1.
Alig n the four conn ector tabs at the bo ttom of the Magnesium
handle with the four receiving ports at the top of the outer
bag and insert until a “snap” is heard.
2. Snap cord assembly into the cord clip located on the back of
the Magnesium™ handle. Leave excess cord at the power
head to allow movement.
3.
Remove the protector (My lar Tab) sh eet for the Magnesium™
RS and RF.
1
™
Operating the Oreck Magnesium
& Magnesium™ SW
Ma ke sure the disp osabl e inner bag is in place. Do not operate
the vacuum without a disposable inner bag. Plug the power
cord into an ele ctrical outle t and press the ON/OFF switch on
the back of the vacuum when ready to operate. Press the
button once to turn the unit on high, press a second time for
low speed, and a third time to turn the unit off.
4.
Up-Position Lock - Pla ce foot on power head and lean handle
back gently to release lock for vacuum use. Return handle to
the full upright position to engage lock. NOTE: D o not operate
the vacuum while in the upright and locked position. Do not
let the vacuum run while in any one stationary position for
any period of time. Keep the vacuum moving while in operation.
5.
Cord Release - To remove cord, twi st cord rel ease 1/2 turn. Slide
cord off cord release.
6.
Easy Power Cord Storage - Turn cord release to the up
position, wrap power cord around cord release and lower cord
bracket located below the carry handle.
7.
Carry Handle - The carry handle is located on back of the
vacuum for easy lifting and carrying.
™
2 3
Cord Clip
4
™
Operating the Oreck Magnesium
Make sure the disposable inner bag is in place.
Do not operate the vacuum without a disposable
inner bag. Plug the power cord into an electrical
outlet. Press the ON/OFF switch (top) on the
handle and the un it turns ON in high speed. Press
the Low Switch (bottom) to change to low speed
op eration. Press the High Switch (middle) to return to hig h speed
operation. Press ON/OFF switch (top) again to turn the unit off.
4.
Up-Position Lock - Pla ce foot on power head and lean handle
back gently to release lock for vacuum use. Return handle to
the full upright position to engage lock. NOTE: D o not operate
the vacuum while in the upright and locked position. Do not
let the vacuum run while in any one stationary position for
any period of time. Keep the vacuum moving while in operation.
5.
Cord Release - To remove cord, twi st cord rel ease 1/2 turn. Slide
cord off cord release.
RF & RS
8
9
10
3
Page 5

OPERATION
6.
Easy Power Cord Storage - Turn cord release to the up
position, wrap power cord around cord release and lower cord
bracket located below the carry handle.
5
7.
Carry Handle - The carry handle is located on back of the
vacuum for easy lifting and carrying.
Inner Bag Removal
7
8. Unzip outer bag completely.
9.
Pu ll tab on b ag to release bag dock from conn ector. Bag dock
door will hinge downward.
10.
Ge ntly pull bag cardboard collar outward fro m bag dock. The
Saniseal® dust seal will close automatically.
Inner Bag Installation
11. Slide the cardboard collar completely onto bag dock door.
12. Firmly push bag dock door with both thumbs on indication
point until it snaps.
The performance of your new vacuum greatly depends upon
care and maintenance. The instructions in this manual will
gu ide you in perform ing b asic care a nd maintenance. To obtain
the mo st satisfyi ng years of s ervice read the instructions and
keep them handy for future reference.
6
Inner Filter Bag
Your Oreck includes an HEPA Odor F ighting
In ner B ag. The disposable inner bag pl ays
a very important role in the efficiency of
your ORECK vacuum. The purpose of the
disposable inner bag is to trap dirt, but at
the same time it must be porous enough
to allow air to pass through. If the
disposable inner bag becomes clogged, no
air can pass through the vacuum and
cleaning cannot take place, regardless of
the vacuum’s power.
To keep your upright vacuum operating at
ma ximum efficiency, change the disp osable
inner bag frequently. DO NOT FILL ABOVE
12
11
THE LINE INDICATED ON THE
DISPOSABLE INNER BAG.
Be sure the disposable inner bag is installed properly. NOTE: All
disposable inner bags are not the same. Oreck offers HEPA and
no n-HEPA inner ba gs. Yo ur Oreck HEPA or non-H EPA inner ba gs
have bee n designed to be us ed with the ORECK Upright vacu um.
Using bags other than genuine Oreck HEPA or non-HEPA
disposable inner bags will affect the cleaning ability of your
vacuum and could cause damage to it.
 Loading...