

Page 1
SIMPLY AMAZING
®
USER’S GUIDE
TRAVEL
IRON/STEAMER
MODEL JP777
•IMPORTANT•
SAVE THIS BOOKLET!
Includes:
Important Safety Instructions
Warranty
Operating Instructions
REGISTER YOUR PRODUCT
ON THE WEB:
WWW.ORECK.COM
USA: 1-800-989-3535
CANADA: 1-888-676-7325
WWW.ORECK.COM
VISIT ONE OF OUR
OVER 750 LOCATIONS
Page 2

When using an electrical appliance, basic precautions
should always be followed, including the following:
READ ALL INSTRUCTIONS BEFORE USING THIS APPLIANCE
WARNING
To reduce the risk of fire,
electric shock, or injury:
IMPORTANT
SAFETY INSTRUCTIONS
• Use the Travel Iron/Steamer only for its intended use.
• This appliance is provided with a voltage selector, it can be used on
120 V/230 V main power. This appliance will be set at the factory at 120 volts.
Be sure dual voltage selector is in correct position before operating (refer to the
General Information Section).
• To protect against a risk of electric shock, do not immerse the iron in water or
other liquids.
• The iron should always be turned OFF before plugging or unplugging from
outlet. Never pull cord to disconnect from outlet; instead, grasp plug and pull
to disconnect.
• Do not allow cord to touch hot surfaces. Let iron cool completely before
storing. Loop cord loosely around iron when storing.
• Always disconnect appliance from electrical outlet when filling with water or
emptying and when not in use.
• To reduce the risk of contact with hot water emitting from steam
vents, test the steamer before each use by holding it away from the body
and pressing the steam button.
• Close supervision is necessary for any appliance being used by or near
children. Do not leave appliance unattended while plugged in.
• To avoid a circuit overload, do not operate another high wattage appliance on
the same circuit.
• Do not operate Travel Iron/Steamer with a damaged cord or if the appliance
has been dropped or damaged. To avoid the risk of electric shock,
do not disassemble. All repair work should be done by an authorized
Oreck Service Center.
• This appliance has a polarized plug (one blade is wider than the other). As a
safety feature, this plug will fit in a polarized outlet only one way. If the plug
does not fit fully in the outlet, reverse the plug. If it still does not fit, contact a
qualified electrician. Do not attempt to defeat this safety feature.
• Do not use attachments not intended or recommended for this appliance.
• Burns can occur from touching hot metal parts, hot water, or steam. Use
caution when you turn a steam iron upside down – there may be hot water in
the water tank.
• Before removing or attaching any accessories, unplug the appliance from the
electrical outlet and let it cool.
• Never iron or steam clothes while they are being worn.
1
Page 3

When using an electrical appliance, basic precautions
should always be followed, including the following:
READ ALL INSTRUCTIONS BEFORE USING THIS APPLIANCE
WARNING
To reduce the risk of fire,
electric shock, or injury:
• Never switch the dual voltage selector while the appliance is in use.
• This appliance was set at the factory to operate at 120 volts. Refer to the
General Information section of this manual for conversion to 230 volt operation.
• Empty water from the iron before storing it. Point the unit downward over a
sink and turn upside down to drain. Push steam button a few times and lightly
shake iron after use to ensure all water is drained. The remaining moisture will
evaporate if the unit is plugged in and heated for a few moments.
• If an extension cord is absolutely necessary, a 15-ampere cord should be
used. Cords rated for less amperage may overheat. Care should be taken to
arrange the cord so that it can not be pulled or tripped over.
SAVE THESE INSTRUCTIONS
Household Use Only
ALL SERVICING SHOULD BE DONE BY AN
AUTHORIZED ORECK SERVICE CENTER.
CUSTOMER SERVICE HOT LINE
US: 1-800-989-3535 Canada: 1-888-676-7325
2
IMPORTANT SAFETY
INSTRUCTIONS CONTINUED
Warranty
Oreck Corporation warrants the Travel Iron/Steamer (Model JP777) free from defects in
material and workmanship under normal, non-commercial use and service. Oreck will
remedy any such defects if they appear within one (1) year from date of purchase. This
warranty gives you specific legal rights, and you may have other rights, which vary, from
state to state.
Page 4
Assembly
Before Initial Use
1. Before each use, always remove the detachable lint remover and verify the voltage
rating on the appliance corresponds to the voltage in your home or hotel. Replace the
Lint Remover.
2. Some parts of the appliance have been slightly greased and as a result the unit may
smoke slightly when switched on for the first time. After a short while, however, this
will cease.
3. Normal tap water can be used, but if you live in a hard water area, using distilled
water is recommended to insure optimum performance of the unit.
4
5
2
3
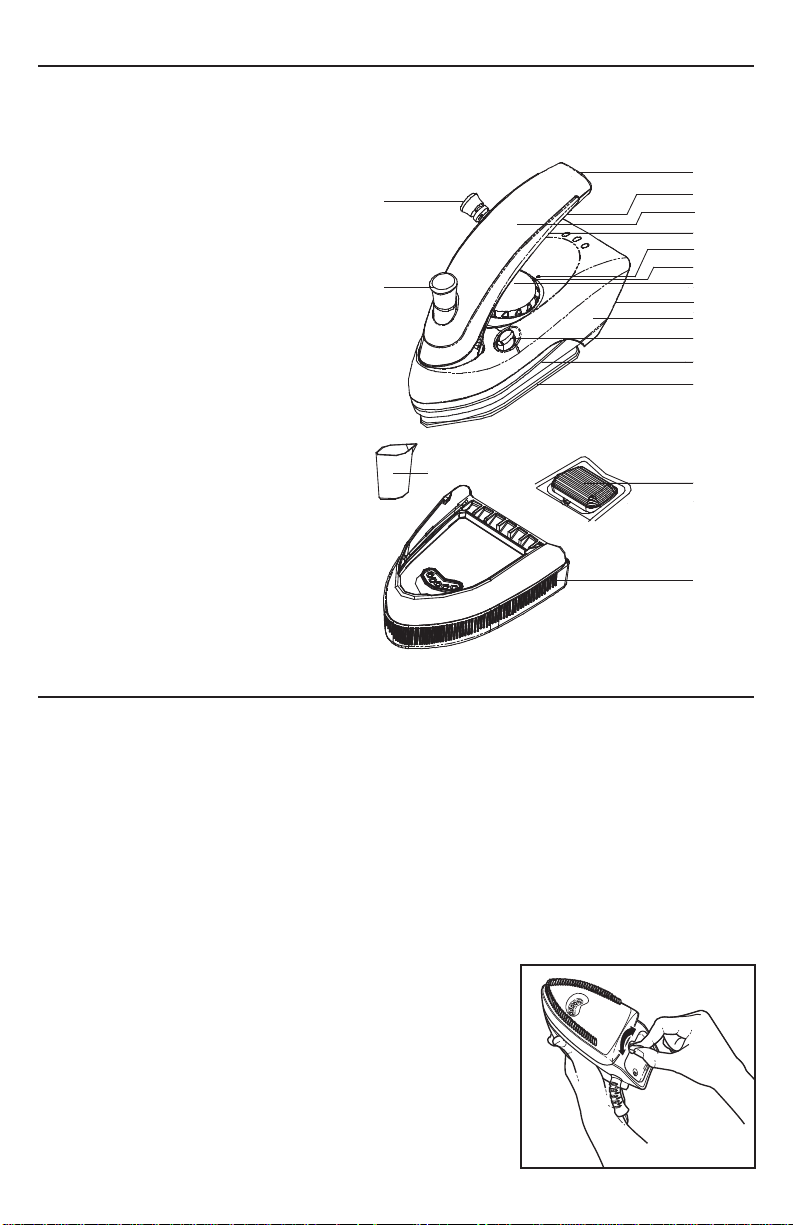
To assist you in identifying components of your Travel Iron/Steamer,
the parts have been numbered as follows:
1. Steam Burst Button
2. Cord Protector/Power Cord
3. Water Tank Release Button
4. Water Tank Lid
5. Detachable Handle Cover/Water Tank
6. Handle Base
7. Temperature Indication Point
8. LED Light
9. Temperature Control Knob
10. Voltage Selector
11. Housing
12. Handle Release Button
13. Base Plate
14. Soleplate
15. Detachable Lint Remover
16. Detachable Clothes Brush
17. Measuring Cup
General Information
3
(Fig. A)
Voltage Selection
This appliance is provided with a voltage selector. It can
be used on 120VAC or 230VAC main power. This appliance
will be set to the 120VAC setting at the factory. Before
operating this appliance, be sure the dual voltage selector
corresponds to the voltage in your home or hotel. To
change the voltage, turn the dual voltage selector located under the detachable lint remover with a coin (Fig. A).
2
1
17
3
4
5
6
7
8
9
10
11
12
13
14
15
16
Page 5

Filling with Water
1. Lift handle into position. Gently press the water tank
release button located at the end of the water tank and
remove the detachable handle cover/water tank (Fig. B).
2. Lift up the water tank plug and fill with water. Do not
overfill. To close the water tank plug, press it down firmly
then replace the water tank back in the original position
(press firmly until you hear a “click” sound).
Controlling the Temperature
Set the temperature control knob according to the following fabric settings:
• Synthetics •• Silk/Wool ••• Linen/Cotton
Note: Steam can only be produced when the temperature control knob is set on
the max (••• linen/cotton) setting.
Ironing Tips
1. Sort the articles to be ironed according to the fabric. Ironing instructions are usually
stitched onto an inside seam of the garment and these should be followed at all times.
Start by ironing the fabrics requiring the lowest heat setting.
2. If you are unsure of the fiber content of a garment, test a small area (a seam or inside
hem) before ironing.
3. When in doubt, start with low heat. If wrinkles remain, gradually increase heat to find
the setting that provides the best results without damaging the fabric.
4. Avoid ironing over zippers and rivets on jeans as they will scratch the soleplate.
General Information Continued
4
(Fig. B)
Operating Instructions for use as an Iron
Using as a Steam Burst Iron
1. Unwrap the cord and fill the iron with water. (Reference Filling with Water)
2. Plug the unit into a wall outlet. Set the temperature control knob to the max setting.
The LED light will illuminate.
3. When the LED light goes out, it means the iron reached the working temperature.
The LED light will come on and go out regularly during ironing to indicate that the
temperature control is working properly.
4. This setting can be used as a Steam Iron by pressing
the steam burst button. (During the first use or if there
has been an elapsed period of time since the last use,
you may have to press the steam burst button a few
times to initiate steam.)
5. Stand the iron in the heat rest position when rearranging
clothing and while not in use (Fig C).
WARNING: Never iron or steam clothes while they are being worn.
616
(Fig. C)
Page 6

Operating Instructions for use as a Steamer
WARNING: Before removing or attaching any accessories,
unplug the steamer from the electrical outlet and let it cool.
Never iron or steam clothes while they are being worn.
Attachments
Detachable Lint Remover (Fig. D)
1. Press down the tab to detach the lint remover.
2. Insert the tabs of the lint remover into the slots on the
backside of the appliance, then press down until lint remover
clicks into position.
Detachable Clothes Brush (Fig. E)
1. Unpack the detachable clothes brush package. Attach the
brush by sliding it down into place from the top, locking it
into position.
2. Remove the brush by pushing it up from the bottom.
Directions
1. Unwrap the cord and the fill the unit with water. (Reference Filling with Water)
Attach the Clothes Brush.
2. Plug the unit into a wall outlet. Set the temperature control knob to the max
(••• linen/cotton) setting. The LED light will illuminate.
3. When the LED light goes out, it means the steamer reached the working temperature.
The LED light will come on and go out regularly during steaming to indicate that the
temperature control is working properly.
4. Once the working temperature has been reached the steam burst button can be used.
Press the button firmly to deeply penetrate the fabric removing stubborn wrinkles and
creases. Note: There must be an interval of at least four (4) seconds between
each press of the steam burst button. (During the first use or if there has been an
elapsed period of time since the last use, you may have to
press the steam burst button a few times to initiate steam.)
5.
Stand the iron in the heat rest position when rearranging clothing
and while not in use (Fig F).
6. The Steamer can operate vertically or horizontally.
7.
Except nylon, acrylics and similar material, all kinds of clothing and
fabrics even hanging curtains and upholstery can be steamed.
(Fig. D)
(Fig. E)
(Fig. F)
5
Using as a Dry Iron
This iron can also be used without steam as a Dry Iron even if there is water inside the
water tank.
1. Unwrap the cord and plug the unit into a wall outlet. Set the temperature control knob
to the desired setting.
2. The LED light will illuminate. When the LED light goes out, it means the iron reached
the working temperature and it can be used as a Dry Iron. Make sure the steam
button is not pressed!
Page 7

Cleaning & Storing Instructions
TO CARE, CLEAN AND STORE
1. After use, unplug the Iron/Steamer and allow it to cool down.
2. Once the appliance has cooled, press the water tank release
button and remove the detachable handle/water tank.
3. Lift up the water tank plug and empty the water in the water
tank. Replace all parts to their original positions.
4. Allow the appliance to cool down completely before cleaning.
5. After each use, clean the appliance with a damp cloth and
wipe dry.
6. Press the handle lock button to storage position (Fig. G). Loop cord loosely around
Iron/Steamer when storing.
7. Do not disassemble or repair your Travel Iron/Steamer yourself, call Customer Service
at: US: 1-800-989-3535 Canada: 1-888-676-7325.
(Fig. G)
6
 Loading...