


Toddler Car Seat
This product meets or exceeds FMVSS213
Before You Begin |
4 |
Terms You Need to Know |
5 |
Your Child’s Safety Depends on You |
8 |
Product Information and Expiration Date |
10 |
Registering Your Car Seat and Recall Information |
11 |
|
|
Usage Recommendations |
12 |
Important Warnings |
13 |
Weight and Height Recommendations for Your Child |
17 |
Choosing a Vehicle Seating Location |
21 |
Choosing an Installation Method |
|
Overview |
26 |
Installing with the LATCH Anchorage System |
26 |
Installing with Vehicle Seat Belt |
32 |
Need Help Securing Your Car Seat? |
35 |
|
|
Installing the Car Seat Rear-facing |
36 |
Choosing Installation Options |
37 |
Installing the Car Seat on the Car Seat Base |
|
Overview |
38 |
Docking the Car Seat on the Car Seat Base |
39 |
Rotating and Removing the Car Seat from the Car Seat Base |
42 |
Installing the Car Seat without the Car Seat Base |
|
Overview |
44 |
Attaching the Side Impact Braces to the Seat, Rear-facing |
47 |
Removing the Side Impact Braces |
50 |
Installing the Car Seat: With LATCH |
51 |
Un-installing the Car Seat: With LATCH |
57 |
Installing the Car Seat: With Vehicle Seat Belt |
58 |
Un-installing the Car Seat: With Vehicle Seat Belt |
65 |
|
|
Installing the Car Seat Forward-facing |
66 |
Choosing Installation Options |
67 |
Installing the Car Seat |
|
Overview |
68 |
Attaching the Side Impact Braces to the Seat, Forward-facing |
71 |
Removing the Side Impact Braces |
74 |
Installing the Car Seat: With LATCH |
75 |
Un-installing the Car Seat: With LATCH |
80 |
Installing the Car Seat Base: With Vehicle Seat Belt |
81 |
Un-installing the Car Seat: With Vehicle Seat Belt |
86 |
Installing the Top Tether |
87 |
Un-installing the Top Tether |
89 |
Securing Your Child |
90 |
Sizing the Restraint Harness to Your Child |
91 |
Adjusting the Headrest |
98 |
Securing Your Child with the Restraint Harness |
100 |
Using and Traveling with Your Car Seat |
106 |
Terms You Need to Know: Stroller |
107 |
Using the Car Seat on the Stroller |
108 |
Terms You Need to Know: Rocker |
111 |
Using the Car Seat on the Rocker |
112 |
Using the Car Seat on an Aircraft |
113 |
Using the Sunshade |
115 |
Maintaining Your Car Seat |
118 |
Removing the Upholstery |
119 |
Cleaning the Upholstery |
121 |
Re-installing the Upholstery |
122 |
Other Cleaning Instructions |
124 |
Limited Customer Warranty (United States) |
126 |

4 |
Before You Begin |
|
|
Terms You Need to Know |
5 |
|
Your Child’s Safety Depends on You |
8 |
|
Product Information and Expiration Date |
10 |
You Begin |
Registering Your Car Seat and Recall Information |
11 |
|
|
|
Welcome to the Orbit Baby family! |
|
|
Before |
Congratulations on the purchase of your Orbit Baby Toddler Car Seat G2. |
|
|
||
Please take the time to read through this instruction manual carefully and make sure anyone else using the Orbit Baby Toddler Car Seat G2 reads it carefully as well.
This child restraint system conforms to all applicable Federal Motor Vehicle Safety Standards. This Restraint is Certified For Use in Motor Vehicles and Aircraft.
Sunshade Slot
Adjustable Headrest
Restraint Harness
Car Seat Shell
Side Impact Braces™
(Installed Rear-facing in Photo)
Brace Locking Knob
Brace Indicator
Front Access Panel
Terms You Need to Know |
5 |
Before You Begin
4 |
Not all photos in this manual include the most up-to-date product specifications. |
Note: The restraint harness is made up of the shoulder straps, crotch belt and adjuster strap. |
5 |

6 |
Terms You Need to Know |
Before You Begin
Top Tether
Rear Access
Panel
Carry Handles
Release Levers
LATCH Connectors
Forward-facing
Lock-off Clamp
LATCH storage pockets
Car Seat Base
(Not Included)
Adjustable Headrest
Shoulder Pads
Chest Clip
Upper Upholstery Panel
(Under Headrest, denoted by Red Dot)
Crotch Buckle
Crotch Pad
Lower Upholstery Panel
(Denoted by Blue Dot)
Adjuster Strap Lock
(Under Lower Upholstery Panel)
Adjuster Strap
7
Before You Begin
6 |
7 |

8 |
Your Child’s Safety Depends on You |
|
No child restraint system can guarantee protection from injury in every situation. |
|
However, proper use of the Orbit Baby Toddler Car Seat G2 reduces the |
|
risk of serious injury or death to your child. Your child’s safety depends on |
|
you installing and using this child restraint system correctly every time. This |
|
instruction manual guides you in detail through the following steps: |
|
Important Steps You Must Follow: |
Begin |
1. Register your Toddler Car Seat G2 with Orbit Baby and take note of |
of manfacture on page 10. Orbit Baby will help you keep track of safety |
|
|
the expiration date. For your records, enter the serial number and date |
You |
updates and product recalls when you register with us. |
|
|
Before |
2. Select a seating location in your car. An important overview of vehicle |
|
|
|
seating locations is in the Usage Recommendations section. There, you can |
|
find information about air bags and different types of vehicle seat belts. |
|
3. Securely install Toddler Car Seat G2. There are three ways to install the car |
|
seat: |
|
1. Rear-facing with the Orbit Baby car seat base following the instructions |
|
in your Infant Car Seat and Car Seat Base manual and the Installing the Car |
|
Seat on the Car Seat Base section of this manual. |
|
2. Rear-facing with the Side Impact Braces (without the Orbit Baby car |
|
seat base) following the instructions in the Installing the Car Seat without the |
|
Car Seat Base section in the blue portion of this manual. |
8 |
3. Forward-facing with the Side Impact Braces (without the Orbit Baby car |
|
|
|
|
seat base) following the instructions in the Installing the Car Seat section in the red portion of this manual.
The best choice for your child’s safety depends on your child’s weight and height: review the Usage Recommendations section of this manual.
Note: According to accident statistics, children have less chance of injury when properly restrained in rear vehicle seats. In addition, safety technicians and the American Academy of Pediatrics recommend keeping children rear-facing for as long as possible and at least until your child is
age 2. The switch to forward-facing will depend on your child’s age and size.
4.Secure your child. The sections in Securing Your Child provide you with instructions to secure and adjust the restraint harness to the proper fit for your child.
5.Maintenance and cleaning. The last section provides you with instructions to clean the Toddler Car Seat G2. This section also explains the limited customer warranty.
9
Before You Begin
9

10
Before You Begin
10
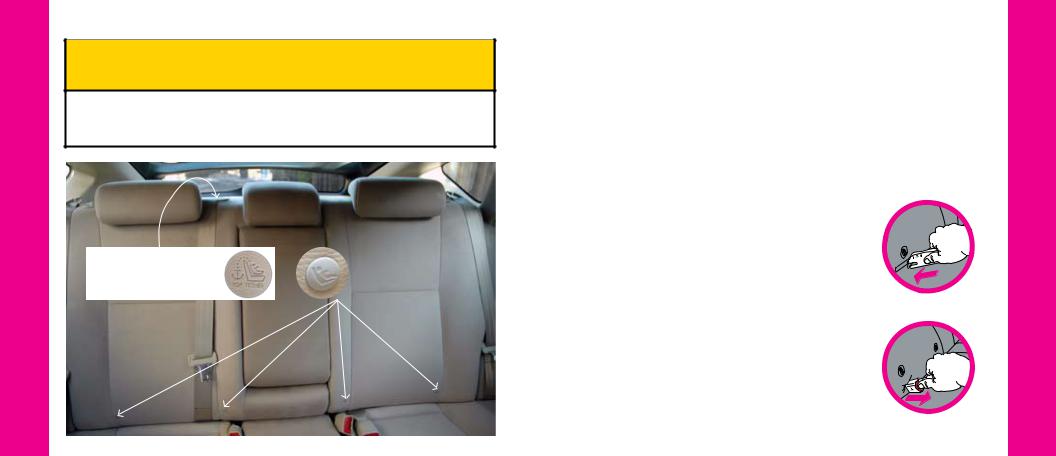
AProduct Information and Expiration Date
|
Storing your instruction manual: |
|
Store this instruction manual in the pocket of the |
|
rear access panel on the back of the car seat for |
|
future use (Photo A). |
|
Product information and expiration date |
B |
for your car seat: |
The product information label is located behind |
|
|
the rear access panel on the car seat (Photo B). |
|
DO NOT use the car seat after the expiration |
|
date, which can be found on the product |
|
information label. |
|
The product information label also shows its |
|
specific serial number and date manufactured. |
|
For your convenience and future reference, you |
|
can copy this information into the boxes below. |
Toddler Car Seat G2 - Model Number ORB827000
Serial Number |
Manufacture Date |
Expiration Date |
Registering Your Car Seat and Recall Information
Child restraints could be recalled for safety reasons. You must register this restraint to be reached in a recall. Send your name, address, email address if available (optional), and the restraint’s model and serial number and date manufactured to Orbit Baby at the address below or call the number below or register online at the address below.
For customers in the United States:
log onto: www.orbitbaby.com/register
or mail:
Orbit Baby, Inc, 8445 Central Ave., Newark, CA 94560 USA
or call:
1-877-672-2229
or e-mail: support@orbitbaby.com
For recall information in the United States:
•Call Orbit Baby Customer Service at 1-877-672-2229 or write to support@orbitbaby.com.
• Call the U.S. Government’s Vehicle Safety Hotline at 1-888-327-4236 (TTY: 1-800-424-9153).
•Visit the National Highway Traffic Safety Administration’s website at www.NHTSA.gov. 
11
Before You Begin
11

12 |
Usage Recommendations |
|
RecommendationsUsage |
Important Warnings |
13 |
|
Weight and Height Recommendations for Your Child |
17 |
||
|
|||
|
Choosing a Vehicle Seating Location |
21 |
|
|
Choosing an Installation Method |
|
|
|
Overview |
26 |
|
|
Installing with the LATCH Anchorage System |
26 |
|
|
Installing with Vehicle Seat Belt |
32 |
|
|
Need Help Securing Your Car Seat? |
35 |
|
|
|
|
Important Warnings
WARNING
Death or Serious Injury Can Occur
FAILURE TO FOLLOW THESE INSTRUCTIONS AND THE PRODUCT LABELS CAN RESULT IN SERIOUS INJURY OR DEATH TO YOUR CHILD.
To avoid serious injury or death, proper use is required. DO NOT let others install or use the car seat or car seat base without reading all the instructions first.
Keep this instruction manual for future use. Store it inside the rear access panel of the car seat. If the instruction manual is missing, visit www.orbitbaby. com/support to download a copy. U.S. customers can email support@ orbitbaby.com or call 1-877-ORB-BABY (1-877-672-2229) for a replacement.
13
Usage Recommendations
12 |
13 |

14
Usage Recommendations
14
Important Warnings cont’d
WARNING
Death or Serious Injury Can Occur
If using the car seat base, securely install it in the vehicle either with the vehicle’s LATCH anchorage system or the vehicle seat belt, and then lock the car seat onto the car seat base,
as shown in this manual. If installing the car seat without the car seat base, secure the car seat using the vehicle’s LATCH anchorage system or the vehicle seat belt, as shown in this manual. Always check the security of your car seat installation by pulling side to side, and front to back on the car seat base belt guides or the car seat near the belt path in use. The car seat base
or car seat should not move more than 1 in (2.5 cm) in any direction.
If not properly secured, your child can be injured in a vehicle even if you are not in a crash. Sudden braking and sharp turns can injure your child if the car seat or car seat base are not properly installed or if your child is not properly secured in the car seat.
Car seat and car seat base must be secured at all times, even when not occupied. The car seat and car seat base must be firmly secured to the vehicle by means of a LATCH or vehicle seat belt, as applicable for the type of system and the seating location in which the system is to be installed. Unsecured items can cause injury in a sharp turn, sudden stop, or crash.
WARNING
Death or Serious Injury Can Occur
Use the car seat only with children who weigh between 15-65 lbs (7-30 kg), whose ears are not visible above the top of the restraint, and who can be properly secured in the restraint harness. Ensure the restraint harness is properly sized and can be snugly adjusted to your child.
To prevent ejection or breathing difficulties, proper recline is required. When installing the car seat on the car seat base,
check the level of the car seat base, as shown in the car seat base manual. When installing the car seat without the car seat base, check the level of the car seat, as shown in this manual.
Never leave your child unattended in the car seat.
SUFFOCATION HAZARD: The car seat can roll over on soft surfaces and suffocate child. NEVER place the car seat on beds, sofas or other soft surfaces.
PROPERLY SECURE THE RESTRAINT HARNESS. Child MUST be secured properly by the restraint harness at all times, whenever the car seat is used in a vehicle or outside of a vehicle.
15
Usage Recommendations
15

16
Usage Recommendations
16
Important Warnings cont’d
WARNING
Death or Serious Injury Can Occur
STRANGULATION HAZARD: Your child can strangle in a loose restraint harness. Never leave a child in the car seat with straps loose or undone.
FALL HAZARD: Child’s movement can slide the car seat. NEVER place the car seat near edges of counter tops, tables, or other elevated surfaces.
Do not modify your car seat or car seat base. Only use products and accessories approved by Orbit Baby to ensure the safety of your child. Follow the accompanying instruction manuals for these products and accessories carefully. Contact Orbit Baby for replacement parts.
Do not allow any re-use of the car seat or car seat base after a motor vehicle collision of any kind. A collision can cause damage to the child restraint that you cannot see. Contact Orbit Baby regarding the After-Impact Exchange Program.
Do not use the car seat if any component is damaged, broken, or missing parts.
Do not use this car seat in a shopping cart.
Weight and Height Recommendations for Your Child
Use this car seat only with children who meet ALL the following requirements:
þ WEIGHT |
between 15-65 lbs (7-30 kgs), and |
þ HEIGHT |
such that the child’s ears are not visible above the |
|
top of the headrest when they are seated in the |
|
car seat, and |
þ HARNESS |
that can be snugly adjusted around your child. |
|
|
Discontinue use of the car seat when your
child grows beyond either the height or YES weight requirements listed above.
Please refer to the Securing Your |
|
Child section of this manual for more |
|
information about how your child should |
NO |
fit in the car seat. |
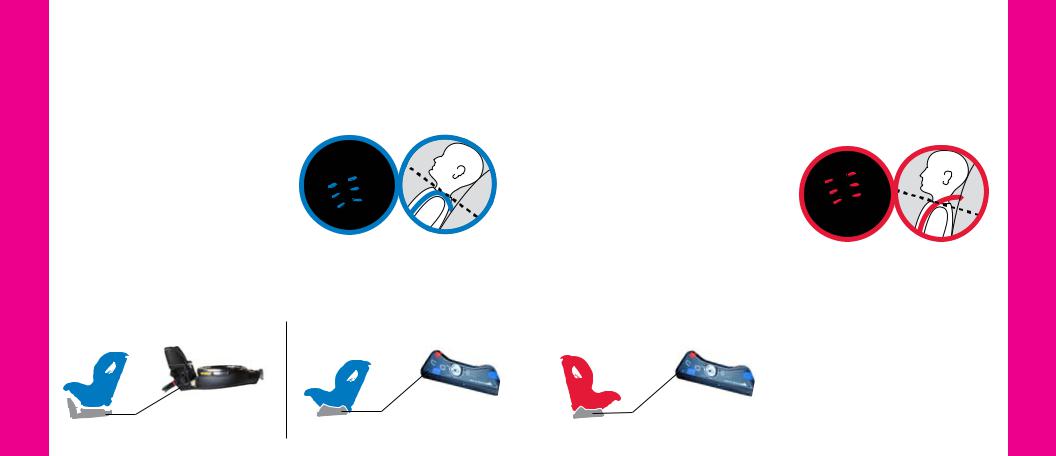
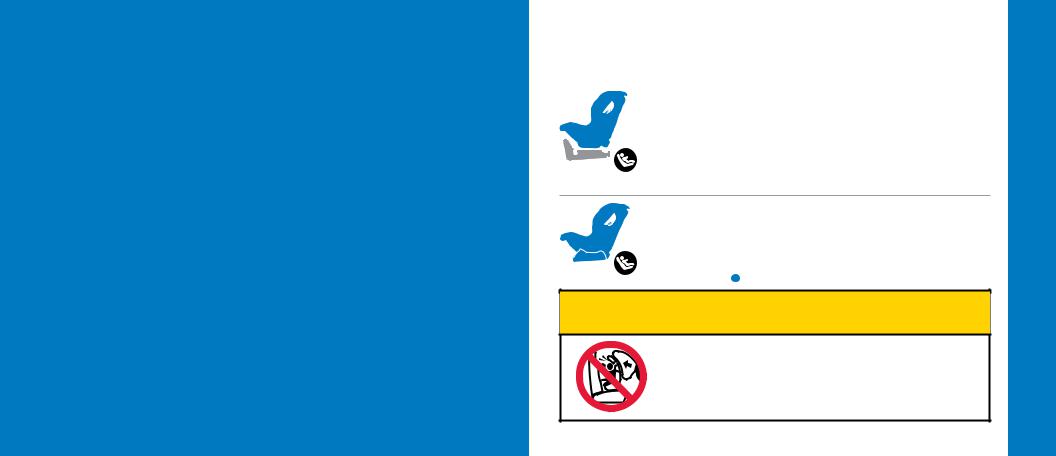
In this manual and on your Toddler Car Seat G2, rear-facing instructions and labeling are denoted in blue, while forward-facing instructions and labeling are in red.
17
Usage Recommendations
17
18
Usage Recommendations
18
Weight and Height Recommendations for Your Child cont’d
Only use the Orbit Baby Toddler Car Seat G2 according to the following usage recommendations:
Rear-facing 15-35 lbs (7-16 kg)
þKeep children rear-facing as long as possible.
þOnly use the three lowest sets of
harness slots for rear-facing |
|
|
installations. |
NO |
|
þ Harness slots must be below the |
||
YES |
||
child’s shoulders. |
||
|
Rear-facing Installation Modes: When used rear-facing, the Toddler Car Seat G2 can be docked on the Orbit Baby car seat base or installed by itself with the addition of the included Side Impact Braces.
Car Seat Base Installation |
Side Impact Brace Installation |
Orbit Baby |
Side Impact |
car seat base |
Braces |
(not included) |
(included) |
NOTE: Safety technicians and the American Academy of Pediatrics recommend keeping your child in a rear-facing position for as long as possible and at least until your child is age 2.
Forward-facing 25-65 lbs (11-30 kg)
þEars are not visible above the top of the restraint.
þ Only use the three higher sets |
|
of harness slots for forward-facing |
|
installations. |
YES |
|
|
þ Harness slots must be above the |
NO |
child’s shoulders. |
|
Forward-facing Installation: In the forward-facing orientation, the Toddler Car Seat G2 can only be used with the included Side Impact Braces. It is not possible to dock the Toddler Car Seat G2 into the Orbit Baby car seat base forward-facing.
Side Impact Brace Installation
Side Impact Braces (included)
19
Usage Recommendations
19
20
Usage Recommendations
20
Weight and Height Recommendations for Your Child cont’d
You will notice an overlap of the rearand forward-facing weight ranges. This is so that you have flexibility to make the transition when your child is ready.
Safety technicians and the American Academy of Pediatrics recommend keeping children in a rear-facing position for as long as possible and at least until your child is age 2, provided they still meet the requirements above.
Important Notice: The generation-one Orbit Baby car seat base has been updated to extend its usage for the Toddler Car Seat G2. You can only use your Orbit Baby generation-one Base with your Toddler Car Seat G2 if it has the Green Circular Seal shown below. All bases manufactured before 2/2008 must be updated by contacting Orbit Baby or visiting www.orbitbaby.com/ support/upgrade. All Car Seat Base G2s are updated and compatible with Toddler Car Seat G2.
|
Green |
|
No Green |
|||
Circular Seal |
|
Circular Seal |
||||
|
|
|
|
|
|
|
|
|
|
|
|
|
|
UPGRADED |
|
|
|
|
||
|
NOT UPGRADED |
|||||
for Toddler Car Seat G2 Use |
For Infant Car Seat |
|||||
|
|
|
|
use only. |
||
generation-one Base |
Car Seat Base G2 |
|
|
|
||
Choosing a Vehicle Seating Location
WARNING
Death or Serious Injury Can Occur
Do not place this car seat in a vehicle seating location with a front air bag.
Improper placement of the car seat in a vehicle will increase the risk of serious injury or death.
•Some seating positions in your vehicle may not be safe for this child restraint, especially those with side airbags. Check your vehicle owner’s manual.
•Some vehicles do not have any seating positions where a car seat can be installed securely.
WARNING
Death or Serious Injury Can Occur
DO NOT place rear-facing child seat on front seat with air bag. DEATH OR SERIOUS INJURY can occur. The back seat is the safest place for children 12 and under.
21
Usage Recommendations
21

22
Usage Recommendations
22
Choosing a Vehicle Seating Location cont’d
The Orbit Baby Toddler Car Seat G2 is certified for use with or without the Orbit Baby generation-one Base or Car Seat Base G2.
Installing the car seat rear-facing WITH the car seat base:
If you are installing the car seat with the car seat base, first install the base, and then lock the car seat on the base. You should choose a seating location in your vehicle with either:
1.a lower anchorage system, if your vehicle is equipped with the LATCH system. LATCH is a term used in the United States and stands for Lower Anchors and Tethers for Children.
2.a vehicle seat belt. If your vehicle does not have LATCH, you must install the car seat base in a seating location in your vehicle that has an acceptable vehicle seat belt.
Installing the car seat rear-facing WITHOUT the car seat base:
If you are installing the car seat without the car seat base, rear-facing, you must use Side Impact Braces and should choose a seating location in your vehicle with either:
1.a lower anchorage system, if your vehicle is equipped with the LATCH system. LATCH is a term used in the United States and stands for Lower Anchors and Tethers for Children.
2.a vehicle seat belt. If your vehicle does not have LATCH,
you must install the car seat base in a seating location in your vehicle that has an acceptable vehicle seat belt.
Installing the car seat forward-facing AND YOUR CHILD WEIGHS UP TO 40 lbs (18 kg):
If you are installing the car seat forward-facing, you must use Side Impact Braces and should choose a seating location in your vehicle with either:
1.a lower anchorage system, if your vehicle is equipped with the LATCH system. LATCH is a term used in the United States and stands for Lower Anchors and Tethers for Children.
2.a vehicle seat belt. If your vehicle does not have LATCH, you must install the car seat base in a seating location in your vehicle that has an acceptable vehicle seat belt.
Installing the car seat forward-facing AND YOUR CHILD WEIGHS MORE THAN 40 lbs (18 kg):
If you are installing the car seat forward-facing, you must use Side Impact Braces and should choose a seating location in your vehicle with:
1. a vehicle seat belt. You must install the car seat in a seating location in your vehicle that has an acceptable vehicle seat
belt.
According to accident statistics, children are safer when properly restrained in the rear seating position than in the front seating position of a vehicle. If you are not sure where to install this car seat in your vehicle, refer to your vehicle owner’s manual for seating locations recommended for car seat use and for specific instructions about child restraint use, or contact the vehicle manufacturer for guidance.
23
Usage Recommendations
23

24 |
A |
Choosing a Vehicle Seating Location cont’d |
|
|
|
||
|
|
General Guidelines: |
|
|
|
• Never secure this car seat rear-facing |
|
|
|
in a seating location with a front air bag |
|
|
|
(Figure A). Check your vehicle owner’s |
|
|
|
manual regarding all other air bag |
|
Recommendations |
|
locations and compatibility with child |
|
B |
restraints. |
||
|
|||
|
• Never secure the car seat in a vehicle |
||
|
|
||
|
|
seating location unless recommended |
|
|
|
by the vehicle owner’s manual. |
|
|
|
• Only install the car seat in forward- |
|
Usage |
|
facing vehicle seats. Never install the |
|
|
car seat in side-facing or rear-facing |
||
|
|
||
|
|
vehicle seats (Figure B & C). |
|
|
C |
• Never secure the car seat in vehicle |
|
|
|
seating locations where the vehicle |
|
|
|
seat back does not lock in an upright |
|
|
|
position. |
24
In addition, the center-rear seating location is considered the best location if ALL the following conditions are met:
þInstallation in this seating location is permitted by the vehicle manufacturer.
þLATCH belt or vehicle seat belt provides a secure installation and remains tightly adjusted around the car seat,
þThe vehicle seat contour allows the car seat to be properly leveled once installed,
þIf the vehicle seat back is adjustable, the vehicle seat back is locked into the upright position.
If all of these conditions are not met, install the car seat in a different seating location.
After you have chosen a seating location, follow the car seat information in your vehicle owner’s manual, and the instructions in this manual, for installation using LATCH or a vehicle seat belt. 
25
Usage Recommendations
25

26 |
|
Choosing an Installation Method: Overview |
|
Your car seat base can be installed with either LATCH or a vehicle seat belt. Your car |
|
|
seat can be installed without the car seat base using either LATCH or a vehicle seat belt. |
|
|
1. With the LATCH Anchorage System: |
|
|
|
See Installing with the LATCH Anchorage System. |
|
2. With Vehicle Seat Belt: |
|
Recommendations |
|
See Installing with Vehicle Seat Belt. |
Installing with the LATCH Anchorage System |
||
|
|
|
|
WARNING |
|
|
|
Death or Serious Injury Can Occur |
Usage |
|
Never attach two LATCH connectors to one LATCH anchorage |
|
in a vehicle, unless recommended by the vehicle owner’s |
|
|
|
|
|
|
manual for your vehicle. |
|
|
If the LATCH belt does not remain tight or the car seat base |
|
|
can move more than 1 in (2.5 cm) in any direction, do not use |
|
|
this seating location. Your child could be seriously injured in a |
|
|
sharp turn, sudden stop, or crash. |
|
|
Never use both the lower LATCH system and the vehicle seat |
|
|
belt system at the same time to secure the car seat base or |
26 |
|
Toddler Car Seat G2. |
|
|
|
|
|
|
Refer to your vehicle owner’s manual regarding requirements for using the vehicle’s LATCH anchorages with the car seat, or contact the vehicle manufacturer for guidance.
The LATCH anchorage system makes car seat installation in a vehicle easier, and does not use vehicle seat belts. LATCH stands for Lower Anchors and Tethers for Children.
All 2003 and newer model year vehicles are required to have built-in LATCH anchorage systems. Some manufacturers began including LATCH with their 2000 model year vehicles.
For convertible car seat installations, the applicable parts of the vehicle LATCH system are:
1.the two lower anchorages (horizontal bars) located in the vehicle seat bight between the seat back and the seat cushion. These anchorages
are typically indicated by the symbol to the right or the word, ISOFIX.
2.the top tether anchorage (horizontal bar) located either on the shelf behind the rear seat, on the back side of the rear seat, on the floor of the cargo area or on the ceiling behind the rear seat. These anchorages are typically
indicated by the symbol to the right.
27
Usage Recommendations
27
28
Usage Recommendations
Installing with the LATCH Anchorage System cont’d
WARNING
Death or Serious Injury Can Occur
LATCH connectors must be secured to the vehicle LATCH anchorages only. Connections to other vehicle components could result in an unsafe installation of the car seat.
Top tether anchorages |
Lower LATCH |
(behind seat) identified |
anchorages identified |
by this symbol |
by this symbol |
|
|
seat bight
This car seat can be installed on the car seat base or by itself using the LATCH belt and connectors and top tether. LATCH belt and connectors are included with the car seat base and can be found in their storage location in the car seat base upright. LATCH belt and connectors, and the top tether are also included with the car seat and can be found in their storage location in the rear access panel.
The following diagrams show how to properly install and remove the LATCH connectors included on the car seat base and car seat.
To Secure:
•Slide LATCH connector completely onto the vehicle LATCH anchorage. You should hear a CLICK when
the connector locks onto the LATCH anchorage.
• Check that the LATCH connector is locked onto the vehicle LATCH anchorage by pulling out on it.
To Remove:
•Press and hold the red release button on the LATCH
connector.
• Slide LATCH connector off the LATCH anchorage.
29
Usage Recommendations
28 |
29 |

30
Usage Recommendations
Close-up of typical Lower LATCH symbol, found just above the vehicle seat crease where the LATCH anchorage is located.
Installing with the LATCH Anchorage System cont’d
Pay careful attention to the type of LATCH anchors and vehicle seat belts that are
in your vehicle; some cargo anchors that are unsafe to use with child restraints look the same as LATCH anchors. Read your vehicle owner’s manual for LATCH anchorage locations.
Only install the car seat with LATCH anchors if using a vehicle seating location that is recommended by the vehicle manufacturer. For rear-center seating positions that have a center-to-center LATCH anchor spacing between 11 and 20 inches (280 mm and 500 mm) (See Figure A), only use if recommended by the vehicle manufacturer.
31
The following diagram shows how to properly route the top tether when installing the car seat forward-facing. The top tether should not be used when installing the car seat rear-facing.
To Secure: |
Recommendations |
|
|
||
• Remove the top tether from the rear access panel on the car seat. Route |
|
|
it through the opening at the top of the panel and close the panel using the |
|
|
black clip. |
|
|
• Determine the shortest path from the car seat to the anchorage and route |
|
|
the tether along this path. This may involve raising the headrest so the |
Usage |
|
tether travels directly over the top of the seat. |
||
|
||
• Connect the top tether’s snap hook to the vehicle anchorage. You should |
|
|
hear a CLICK when the connector locks onto the anchorage. |
|
|
• Check that the top tether is secured onto the anchorage by pulling up on it. |
|
|
• Tighten the top tether by pulling on the adjustment loop. |
|
To Remove:
•Release tension on the tether by pressing the grey adjustment button.
•Unhook the tether’s snap hook from the vehicle anchorage and store the tether in the rear access panel.
30 |
Figure A |
31 |
32 Installing with Vehicle Seat Belt
|
WARNING |
|
|
Death or Serious Injury Can Occur |
|
|
Some vehicle seat belts are not safe to use with the car seat. |
|
Recommendations |
The vehicle seat belt must hold the car seat tightly at all times. |
|
If the vehicle seat belt does not remain tight or the car seat |
||
|
||
|
can move more than 1 in (2.5 cm) in any direction, do not use |
|
|
this seating location. Your child could be seriously injured in a |
|
|
sharp turn, sudden stop, or crash. If the car seat is loose, move |
|
|
to another seating location and re-install. |
|
Usage |
|
|
Refer to your vehicle owner’s manual for specific instructions on which |
seat belts in your vehicle can be safely used with your car seat, or contact the vehicle manufacturer for guidance.
There are many types of vehicle seat belts. You must determine if your vehicle seat belts are compatible with the car seat.
32
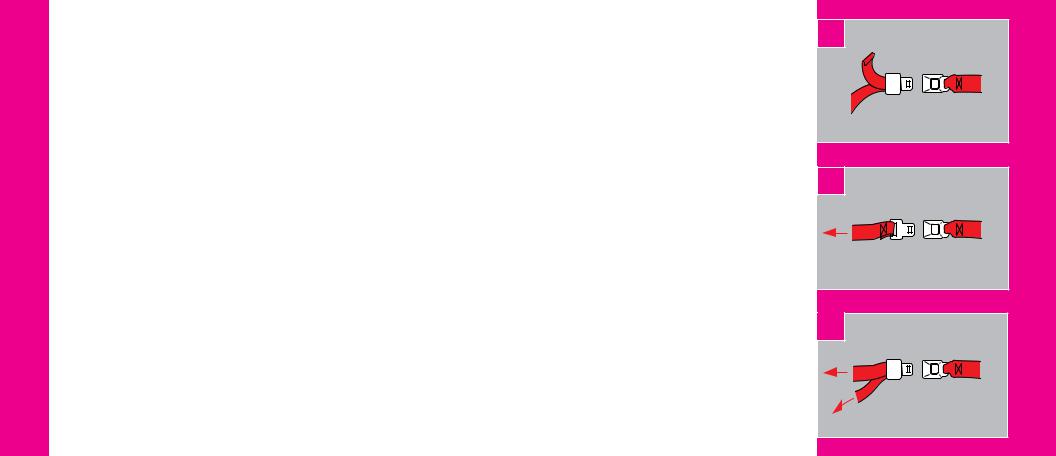
Safe Vehicle Seat Belt Systems:
The following vehicle seat belt systems CAN be used with this car seat if the seating location meets all the requirements of these instructions and those in the vehicle owner’s manual.
1.Vehicle lap belt – manually adjusted: The lap belt is tightened by manually pulling on the belt’s tail once it is buckled (Figure D).
2.Vehicle lap belt with Automatic Locking Retractor (ALR): The seat belt’s retractor remains locked once the belt is pulled out and buckled. It maintains a fixed seat belt length during use (Figure E).
3.Combination lap-shoulder belt: with locking latch plate or sliding latch plate used in combination with the belt lockoffs on the car seat or car seat base (Figure F).
D Belt Tail
E
F
Latch Plate
33
Usage Recommendations
33

34 |
G |
|
UsageRecommendations |
H |
|
|
|
I |
34
Installing with Vehicle Seat Belt cont’d
Unsafe Vehicle Seat Belt Systems:
The following types of vehicle seat belts are NOT compatible with this car seat. DO NOT install the child restraint using any of the vehicle seat belt systems listed below. Select another seating location or install using LATCH.
1.Vehicle Lap-only Belt with Emergency Locking Retractors (ELR) without additional locking hardware: The seat belt will remain loose and will only lock in the event of a crash.
2.Passive Restraint System: Lap or shoulder belt mounted to the vehicle door: Do not use a vehicle seat belt that is attached to the door. Belts will not stay tight when driving.
3.Passive Restraint: Lap belt with motorized shoulder belt: Do not use a vehicle seat belt that moves along a track to automatically surround the passenger (See Figure G).
4.Combination lap-shoulder belt with two retractors: Do not use a vehicle lap and shoulder belt that have separate retractors for the shoulder section and the lap section (See Figure H).
5.Lap belts forward of the seat bight (See Figure I).
6.Inflatable lap-shoulder belts. 
Need Help Securing Your Car Seat?
The following resources can provide assistance or check whether your car seat is properly installed:
In the U.S., contact:
•Orbit Baby at support@orbitbaby.com or 1-877-672-2229.
•Your vehicle dealer may help you locate a child safety seat inspection station in your area.
•Visit www.NHTSA.gov and select “Child Passenger Safety.”
•Call 1-866-SEAT CHECK (1-866-732-8243) or visit www.seatcheck.org.
•A certified child passenger safety technician in your area.
35
Usage Recommendations
35
36 Installing the Car Seat Rear-facing
|
Choosing Installation Options |
37 |
|
Installing the Car Seat on the Car Seat Base |
|
|
Overview |
38 |
|
Docking the Car Seat on the Car Seat Base |
39 |
Installation |
Rotating and Removing the Car Seat from the Car Seat Base |
42 |
Installing the Car Seat without the Car Seat Base |
|
|
|
|
|
|
Overview |
44 |
|
Attaching the Side Impact Braces to the Seat, Rear-facing |
47 |
|
Removing the Side Impact Braces |
50 |
facing |
Installing the Car Seat: With LATCH |
51 |
Installing the Car Seat: With Vehicle Seat Belt |
58 |
|
|
Un-installing the Car Seat: With LATCH |
57 |
Rear- |
Un-installing the Car Seat: With Vehicle Seat Belt |
65 |
|
|
|
|
|
NOTE: Safety technicians and the American Academy of Pediatrics recommend keeping your child in a rear-facing position for as long as possible and at
least until your child is age 2 provided they still meet the Weight and Height 36 Recommendations listed on pages 17-19.
Choosing Installation Options
The Orbit Baby Toddler Car Seat G2 is certified for use WITH or WITHOUT the Orbit Baby car seat base*.
1. Installing the car seat WITH the car seat base:
The car seat base allows convenient rear-facing installation of your car seat. The car seat base can be installed either using the included LATCH belt, or with a vehicle seat belt following instructions in
your car seat base manual (not included). The car seat can then be locked onto the car seat base following the instructions in the
Installing the Car Seat on the Car Seat Base section.
. Installing the car seat WITHOUT the car seat base:
If you do not own a car seat base, or are traveling without your car seat base, the car seat can be installed using the included LATCH belt, or a vehicle seat belt following
instructions Installing the Car Seat without the Car Seat Base section
WARNING
Death or Serious Injury Can Occur
DO NOT place rear-facing child seat on front seat with air bag. DEATH OR SERIOUS INJURY can occur. The back seat is the safest place for children 12 and under.
*NOTE: Your Orbit Baby car seat base must have a Green Circular Seal to use it with the Toddler Car Seat G2. See page 20 for details.
37
Rear-facing Installation
37

38 |
Installing the Car Seat on the Car Seat Base: Overview |
Once the car seat base is installed (see your car seat base manual), the car seat can be conveniently docked and locked onto the car seat base using the Orbit Baby SmartHub®. The car seat MUST be locked on the car seat base in the rear-facing position when the vehicle is in motion
1.Installing the car seat on the car seat base:
|
See Docking the Car Seat |
|
facing Installation |
on the Car Seat Base. |
|
WARNING |
||
Rear- |
Death or Serious Injury Can Occur |
|
Never operate your vehicle unless the car seat is LOCKED into |
||
|
||
|
the rear-facing position. Check both rotation indicators on the car |
|
|
seat base. If either rotation indicator is red, re-secure the car seat to |
|
|
properly lock it on the car seat base. |
|
|
When a release lever on the car seat is pulled, the car seat is not |
|
|
secured properly to the car seat base. Only use the release levers |
|
|
when rotating or removing the car seat. Do not allow children to |
|
38 |
operate the release levers. |
|
|
Docking the Car Seat on the Car Seat Base
WARNING
Death or Serious Injury Can Occur
PINCH HAZARD:
•Ensure that your child’s fingers and hands are clear of release levers and other moving parts.
•When installing the car seat, make sure the hands of other vehicle occupants are clear of the SmartHub area.
Securing the car seat to the car seat base requires first lowering the car seat to snap into the SmartHub, then rotating the car seat to lock into the rear-facing position.
1.Make sure the top of the car seat base and SmartHub are clear of objects (Photo A) before docking the car seat.
2.Grasp the car seat firmly (Photo B). Dock the bottom of the car seat into the
A
B
39
Rear-facing Installation
39
 Loading...