

Page 1
DIGITAL
SATELLITE
RECEIVER
USER
MANUAL
XTRA DIGITAL-XD 300
RECEPTEUR
NUMERIQUE
LIVRET
UTILISATEUR
1 Couverture.p65 28/05/01, 17:191
Page 2

OK
P-
P+
-
+
0
4
5
6
7
8
9
1
G
@
2
3
TV
GUIDE MENU
PPV
ESC
Be sure to point the remote control unit directly towards the Set Top Box.
Touche / Key Function
Standby
TV
Zap list
GUIDE
Guide
MENU
Menu
PPV
Pay Per view
Up
Down
Left
Right
OK
Confirm
Pilot
Mail
Mosaic
Subtitles
Information
Last channel
Mute
orange Color function key
yellow Color function key
red Color function key
green Color function key
blue Color function key
P+
Next program
P-
Previous program
-
Volume -
+
Volume +
Radio services
G
Games
@
Internet
ESC
Escape
0
... 90 to 9
CONGRATULATIONS!
This new generation of Set Top Box gives you access to new digital services and makes it
easy for you and your family to choose the best entertainment in the world of Digital TV and
radio.
Once you have connected your Set Top Box and adjusted it according to your preference,
you can enjoy all the services.
You can update your Set Top Box through the satellite stream as new functions and services
become available.
ORBIT Set Top Box operates a policy of continuous development. Therefore we
reserve the right to make changes and improvements to any of the products described
in this manual without any prior notice.
The EMC Directive 89/336/EEC is applied to this product.
DiSEqC is a trademark of EUTELSAT.
SAGEM is a registred trademark of SAGEM SA.
2 Couverture.p65 28/05/01, 17:211
Page 3

1
ENGLISH CONTENTS
1. GENERAL INFORMATION ..................................................................................................... 2
1-1 Safety..................................................................................................................... ............ 2
1-2 Packing list ......................................................................................................................... 2
1-3 Connection to the mains supply ......................................................................................... 2
1-4 Glossary ............................................................................................................................. 2
2. GENERAL DESCRIPTION ...................................................................................................... 3
2-1 Front panel description ...................................................................................................... 3
2-2 Rear panel connectors .......................................................................................................3
2-3 Remote Control Unit .......................................................................................................... 3
2-3-1 Battery installation .................................................................................................... 3
3. CONNECTIONS ...................................................................................................................... 4
3-1 Introduction ........................................................................................................................ 4
3-2 Connection to TV set with Scart cord and VCR with RCA cord .......................................... 4
3-3 Connection to TV set and VCR without Scart cord............................................................. 4
3-4 Connection to TV set and VCR with Scart cord ................................................................. 4
3-5 Connection to analog satellite receiver .............................................................................. 5
3-6 Connection to Hi-Fi amplifier (optional) .............................................................................. 5
3-6-1 Outputs ..................................................................................................................... 5
3-6-2 Digital audio output optical connector ....................................................................... 5
3-7 Modem ............................................................................................................................... 5
3-8 RS232 serial port ............................................................................................................... 5
3-9 USB interface ..................................................................................................................... 5
4. SET TOP BOX INSTALLATION.............................................................................................. 6
4-1 Main Menu ......................................................................................................................... 6
4-2 Installation Setup ............................................................................................................... 6
4-2-1 Auto configuration ..................................................................................................... 6
4-2-2 Manual configuration ................................................................................................ 6
4-2-3 Technical parameters................................................................................................ 7
4-2-4 Auto Update.............................................................................................................. 7
4-3 Satellite Signal ................................................................................................................... 7
4-4 List of Services........................................................................................................... ........ 8
4-4-1 Favourite................................................................................................................... 8
4-4-2 Lock/Unlock .............................................................................................................. 8
4-5 Options .............................................................................................................................. 8
4-5-1 Preferred audio language selection .......................................................................... 8
4-5-2 Preferred subtitle language selection........................................................................ 8
4-5-3 TV screen width selection ......................................................................................... 8
4-5-4 Channel Info selection .............................................................................................. 8
4-5-5 Set PIN code ............................................................................................................ 9
4-5-6 Parental guidance ..................................................................................................... 9
4-5-7 TV signal................................................................................................................... 9
4-5-8 TV audio ................................................................................................................... 9
4-5-9 VCR signal ................................................................................................................9
4-5-10 VCR audio .............................................................................................................. 9
4-6 Personalised Scheduler ..................................................................................................... 9
4-7 Messages .......................................................................................................................... 9
5. USING YOUR SET TOP BOX ............................................................................................... 10
5-1 Changing Channels ......................................................................................................... 10
5-2 Locked channels .............................................................................................................. 10
5-3 Parental guidance ............................................................................................................ 10
5-4 Region Blackout ................................................................................................................11
5-5 Audio volume Adjustment ................................................................................................. 11
5-5-1 Muting the sound .....................................................................................................11
5-5-2 Volume level ............................................................................................................ 11
5-6 Setting audio and subtitles ................................................................................................11
5-7 Reception signal level strength ......................................................................................... 11
5-8 Front panel display............................................................................................................ 11
5-9 Front panel keys ............................................................................................................... 11
5-10 Remote control keys used by the Set Top Box application.............................................. 11
5-10-1 Menu...................................................................................................................... 11
5-10-2 Standby ................................................................................................................ 12
5-10-3 Accessing interactive applications ........................................................................ 12
5-11 Phone numbers to contact for further information .......................................................... 12
6. CHANNEL LIST..................................................................................................................... 13
6-1 Channel lists .................................................................................................................... 13
6-2 Favourite channel list ....................................................................................................... 13
6-3 All channel list .................................................................................................................. 13
6-4 Error screen ..................................................................................................................... 13
6-5 TV pilot ............................................................................................................................. 13
6-5-1 Main screen ............................................................................................................ 13
6-5-2 Info screen .............................................................................................................. 14
6-5-3 Remote control key functions ................................................................................. 14
6-6 Channel guide .................................................................................................................. 14
6-6-1 Main screen ............................................................................................................ 14
6-6-2 Info screens ............................................................................................................ 15
6-6-3 Future programs screen ......................................................................................... 15
6-6-4 Accessing current event ......................................................................................... 15
6-6-5 Setting future programs for Viewing / Recording .................................................... 15
6-6-6 Entering PIN code................................................................................................... 15
7. TROUBLESHOOTING .......................................................................................................... 16
8. OUTLINE SPECIFICATIONS ................................................................................................ 17
GB Chapitre 00.p65 28/05/01, 18:071
Page 4
2
ENGLISH 1. GENERAL INFORMATION
1. General information
1-1 SAFETY
In order to keep the high technological performance of your Set Top Box, it should be:
• located in an indoor place to protect it from lightning, rain and direct sunlight,
• located in a dry and well-ventilated place,
• protected from damp,
• installed in a way to avoid violent shocks,
• plugged directly into the mains, the use of an extension cord is not recommended,
• without anything on top to permit ventilation.
Be careful
• Contact with a liquid would lead to deterioration of your Set Top Box, which could cause failure.
Never open your Set Top Box; in case of technical problems contact qualified service personnel.
• Like any electronic device, the Set Top Box contains fragile components. It should thus be
installed in a place where it is unlikely to fall down and should be out of reach of children.
• The case of the Set Top Box can be cleaned with a soft and dry cloth. Do not use any type of
abrasive pad, scouring powder nor solvents, such as alcohol or turpentine, as they could damage
the surface of the case.
• The Set Top Box must be disconnected from the mains supply (from wall socket or rear panel)
before any modification of connection between TV, the VCR or the antenna. Take care to provide
free access to mains plug and socket.
• Do not forget to put the batteries inside the remote control unit.
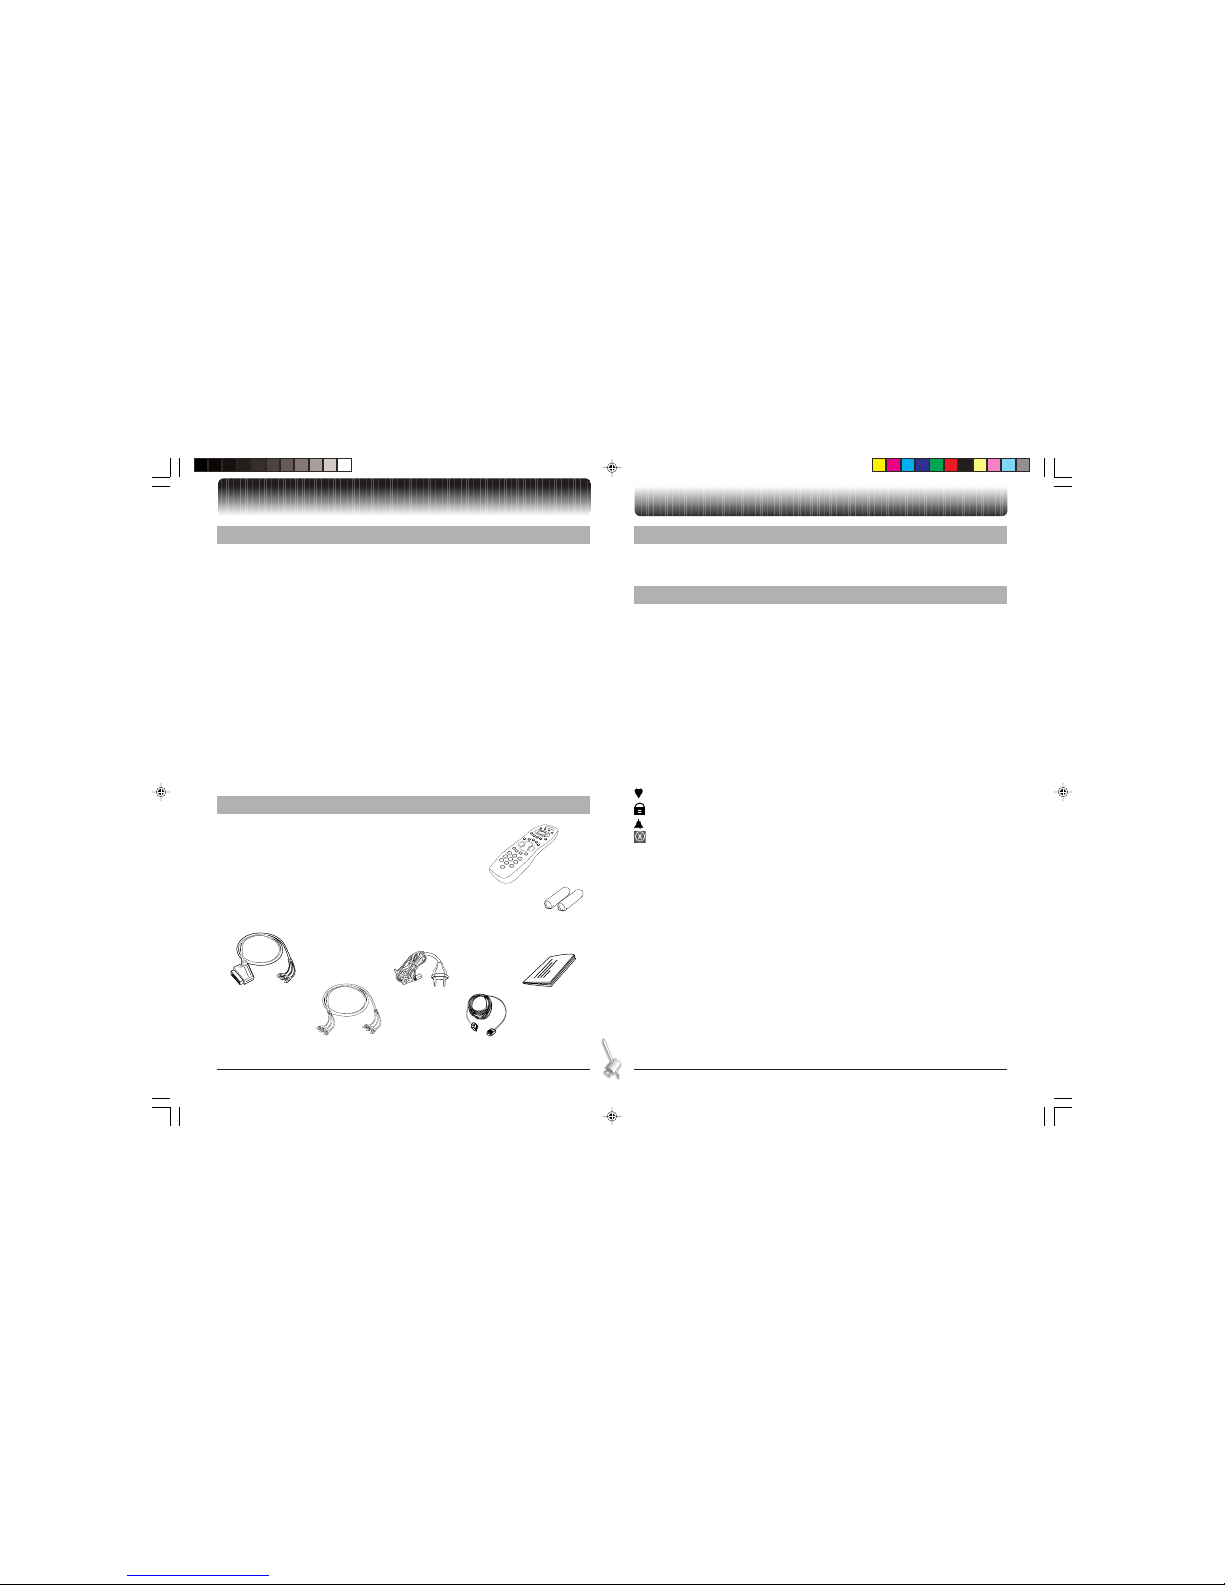
1-2 PACKING LIST
Your Set Top Box is delivered with the following accessories:
• a remote control unit (1),
• 2 batteries (R6-AA) for the remote control unit (2),
• a scart to RCA cord for connection to the TV set or VCR (3),
• a 3 RCA to RCA cord for connection to the VCR or TV set (4),
• a power cord (5),
• a modem RJ11-RJ11 cord (6),
• this user manual (7).
1
2
3
4
5
6
7
1-3 CONNECTION TO THE MAINS SUPPLY
The Set Top Box must be connected by the power cord to a 110V to 220V wall socket. Turn on the mains
power on the wall.
1-4 GLOSSARY
BER Bit Error Rate
CA Conditional Access
DiSEqC Digital Satellite Equipment Control
DVB Digital Video Broadcasting
EPG Electronic Program Guide
FTA Free To Air
LNB Low Noise Block converter
LO Local Oscillator
MPEG Motion Pictures Experts Group
MVM Mediahighway Virtual Machine
NIT Network Information Table
OSD On-Screen Display
PIN Personal Identification Number
PPV Pay Per View
Favourite channel
Locked channel
Event programmed for viewing or recording
Parental guidance
GB Chapitre 01.p65 28/05/01, 18:072
Page 5
3
ENGLISH 2. GENERAL DESCRIPTION
2. General description
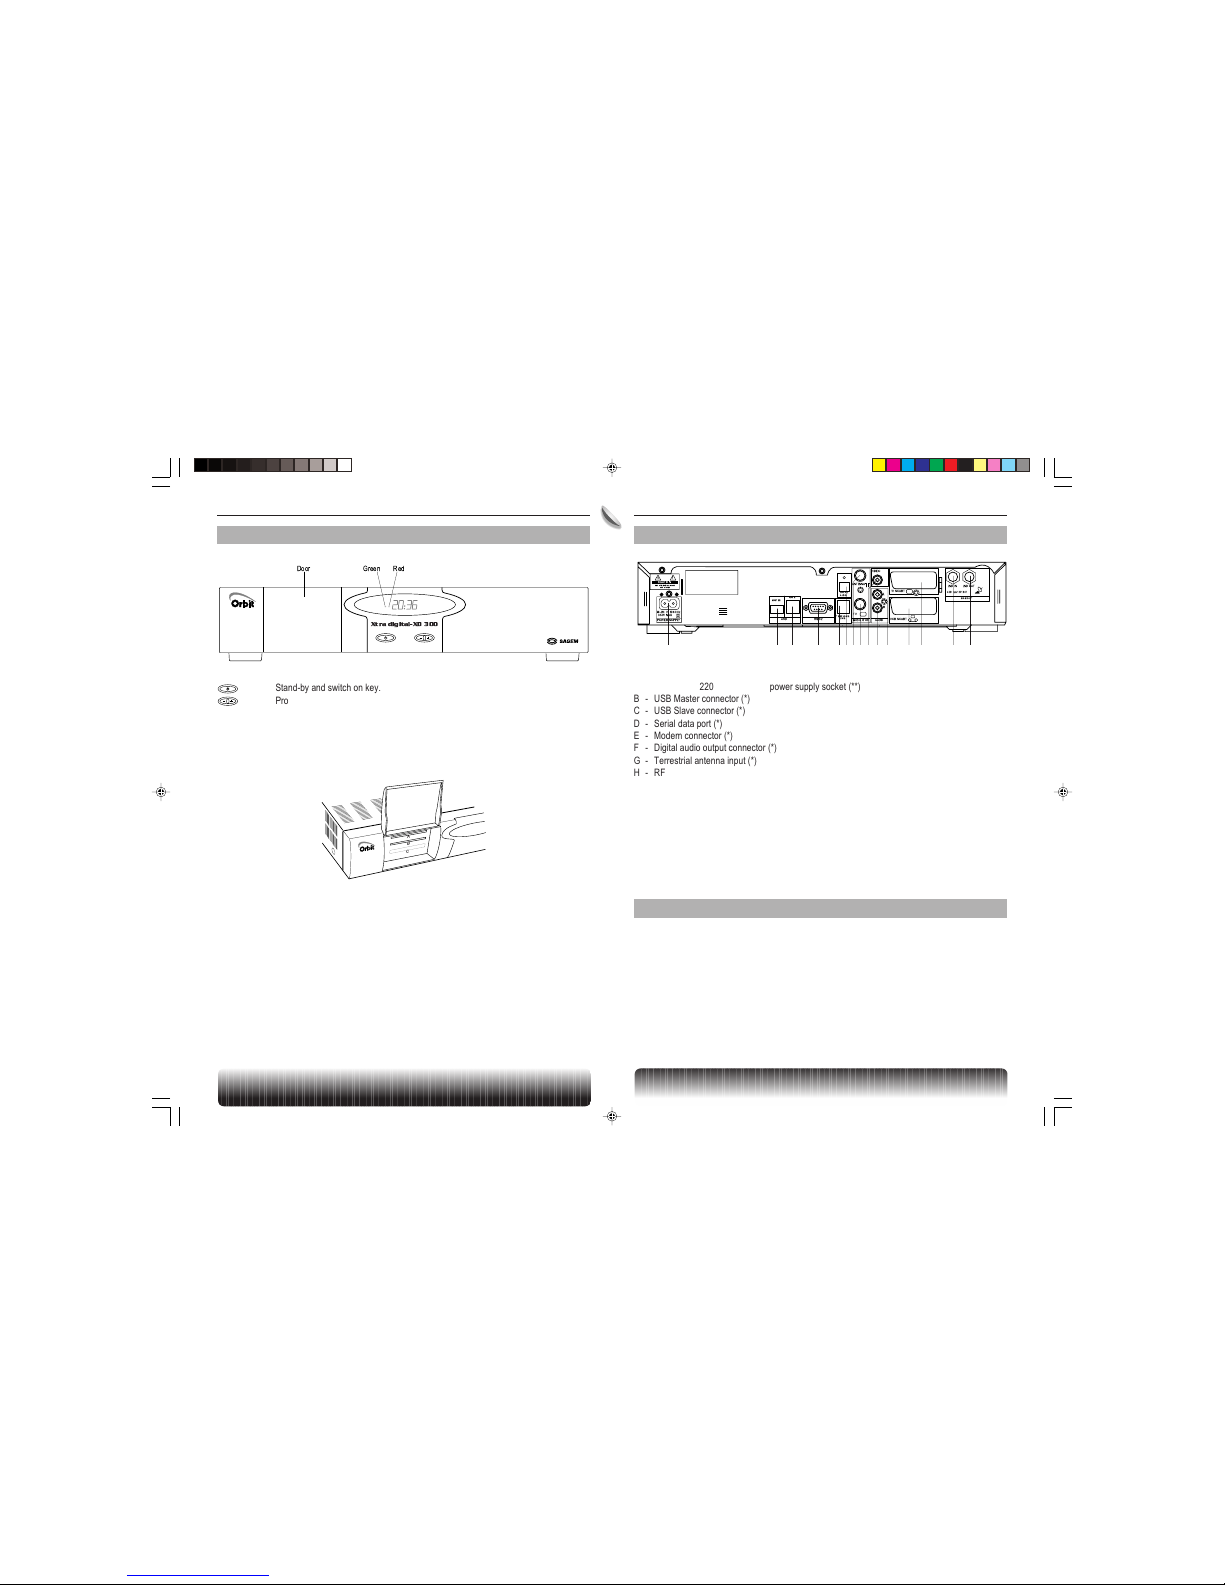
2-1 FRONT PANEL DESCRIPTION
GreenDoor Red
s
Xtra digital-XD 300
Stand-by and switch on key.
Program changing key.
Red LED(*) Stand-by mode.
Green LED Reception of commands from remote control.
4 digit front panel display
Card slot Two card slots are present for future use.
(*) Not used.
B
C
A
LMIH
JNO
KGEDCBA F
CAUTION
RISKOFELECTRICALSHOCK
DONOTOPEN
98-264V~ 50-60Hz
35W MAX
POWERSUPPLY
TELEPHONE
LINE
SLAVE
MASTER
VIDEO
TVSCART
AUDIO
L
R
RS232USB
VCRSCART
TV
ANTENNA
MODULATOR
400mA 13/18V
BISIN/OUT
LNBIN
LNBOUT
!
DIGITAL
AUDIO
A - 110 volts to 220 volts 50-60Hz power supply socket (**)
B - USB Master connector (*)
C - USB Slave connector (*)
D - Serial data port (*)
E - Modem connector (*)
F - Digital audio output connector (*)
G - Terrestrial antenna input (*)
H - RF output for TV or VCR (*)
I - Composite video output (*)
J - Hi-Fi audio, right channel (*)
K - Hi-Fi audio, left channel (*)
L - Scart socket for connection to the VCR (*)
M - Scart socket for connection to the TV set (*)
N - LNB input (*)
O - LNB output (*)
(*) : Security electric low voltage TRT3 as specified in standard EN60065
(**) : Excessive voltage as specified in standard EN60065
2-3 REMOTE CONTROL UNIT
2-3-1 Battery installation
The remote control unit requires two R6-AA batteries for operation.
The diagram inside the battery compartment will show you how to insert the batteries.
Remote control description: see internal cover of this manual.
2-2 REAR PANEL CONNECTORS
GB Chapitre 02.p65 28/05/01, 18:083
Page 6

4
ENGLISH 3. CONNECTIONS
3. Connections
3-1 INTRODUCTION
There are several ways of connecting the Set Top Box to your audio/TV system. Some of the methods
enable you to listen to music in stereo sound with CD quality.
Please contact your local supplier for assistance in setting up an audio/video configuration that will be
best suited to your requirements.
Warning:
Disconnect the Set Top Box from the mains before connecting or disconnecting any device to it.
3-2 CONNECTION TO TV SET WITH SCART CORD AND VCR WITH RCA CORD
Connect your satellite antenna when the Set Top Box is unplugged from the mains supply.
The Set Top Box connects directly to your TV by a Scart connector. Connect the supplied Scart to RCA
cord between TV Scart connector of the Set Top box and the RCA inputs of the TV set:
• audio R = red,
• audio L = white,
• composite video = yellow.
Then connect the Set Top Box with the supplied RCA to RCA cord to the VCR. Please use the same
color coded connector for identification of audio and video.
CAUTION
RISKOFELECTRICALSHOCK
DONOTOPEN
98-264V~ 50-60Hz
35W MAX
POWERSUPPLY
TELEPHONE
LINE
SLAVE
MASTER
VIDEO
TVSCART
AUDIO
L
R
RS232USB
VCRSCART
TV
ANTENNA
MODULATOR
400mA 13/18V
BISIN/OUT
LNBIN
LNBOUT
!
DIGITAL
AUDIO
(not supplied)
VIDEO
3-3 CONNECTION TO TV SET AND VCR WITHOUT SCART CORD
Connect your satellite antenna when the Set Top Box is unplugged.
Please note that the RF cables are not supplied for that configuration.
The modulator configuration is: PAL B/G, channel62.
CAUTION
RISKOFELECTRICALSHOCK
DONOTOPEN
98-264V~ 50-60Hz
35W MAX
POWERSUPPLY
TELEPHONE
LINE
SLAVE
MASTER
VIDEO
TVSCART
AUDIO
L
R
RS232USB
VCRSCART
TV
ANTENNA
MODULATOR
400mA 13/18V
BISIN/OUT
LNBIN
LNBOUT
!
DIGITAL
AUDIO
RF in
VIDEO
RF out
RF in
Terrestrial
antenna
3-4 CONNECTION TO TV SET AND VCR WITH SCART CORD
Connect your satellite antenna when the Set Top Box is unplugged from the mains supply.
CAUTION
RISKOFELECTRICALSHOCK
DONOTOPEN
98-264V~ 50-60Hz
35W MAX
POWERSUPPLY
TELEPHONE
LINE
SLAVE
MASTER
VIDEO
TVSCART
AUDIO
L
R
RS232USB
VCRSCART
TV
ANTENNA
MODULATOR
400mA 13/18V
BISIN/OUT
LNBIN
LNBOUT
!
DIGITAL
AUDIO
(not supplied)
(not supplied)
VIDEO
GB Chapitre 03.p65 28/05/01, 18:084
Page 7
5
ENGLISH 3. CONNECTIONS
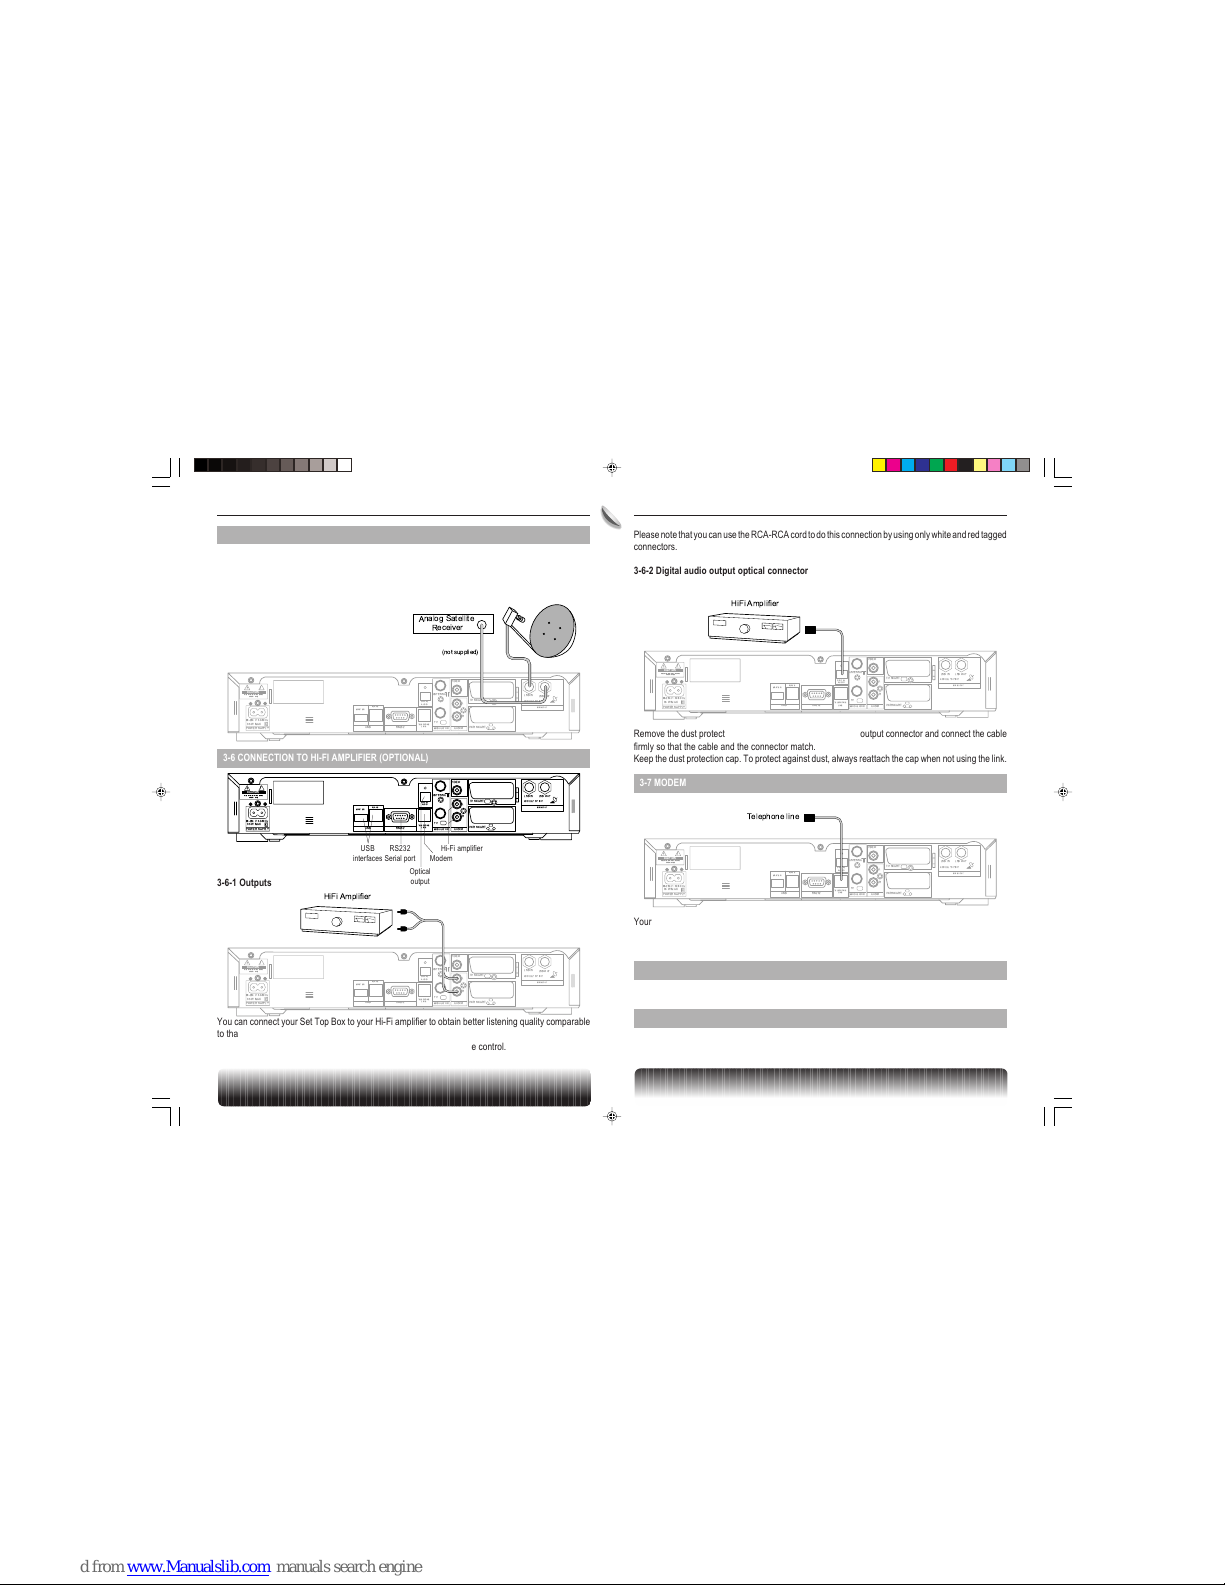
3-5 CONNECTION TO ANALOG SATELLITE RECEIVER
Connect your satellite antenna when the Set Top Box is unplugged from the mains supply.
You can continue to receive analog satellite programs from the satellite by connecting the LNB output
of your Set Top Box to the input of your analog satellite receiver. The analog satellite receiver will work
correctly when your Set Top Box is in standby mode.
CAUTION
RISKOFELECTRICALSHOCK
DONOTOPEN
98-264V~ 50-60Hz
35W MAX
POWERSUPPLY
TELEPHONE
LINE
SLAVE
MASTER
VIDEO
TVSCART
AUDIO
L
R
RS232USB
VCRSCART
TV
ANTENNA
MODULATOR
400mA 13/18V
BISIN/OUT
LNBIN
LNBOUT
!
DIGITAL
AUDIO
(not supplied)
Analog Satellite
Receiver
3-6 CONNECTION TO HI-FI AMPLIFIER (OPTIONAL)
Modem
RS232
Serial port
Hi-Fi amplifier
CAUTION
RISKOFELECTRICALSHOCK
DONOTOPEN
98-264V~ 50-60Hz
35W MAX
POWERSUPPLY
TELEPHONE
LINE
SLAVE
MASTER
VIDEO
TVSCART
AUDIO
L
R
RS232USB
VCRSCART
TV
ANTENNA
MODULATOR
400mA 13/18V
BISIN/OUT
LNBIN
LNBOUT
!
DIGITAL
AUDIO
USB
interfaces
Optical
output
3-6-1 Outputs
CAUTION
RISKOFELECTRICALSHOCK
DONOTOPEN
98-264V~ 50-60Hz
35W MAX
POWERSUPPLY
TELEPHONE
LINE
SLAVE
MASTER
VIDEO
TVSCART
AUDIO
L
R
RS232USB
VCRSCART
TV
ANTENNA
MODULATOR
400mA 13/18V
BISIN/OUT
LNBIN
LNBOUT
!
DIGITAL
AUDIO
HiFi Amplifier
You can connect your Set Top Box to your Hi-Fi amplifier to obtain better listening quality comparable
to that of CD audio.
Volume adjustment is possible directly from your Set Top Box volume control.
Please note that you can use the RCA-RCA cord to do this connection by using only white and red tagged
connectors.
3-6-2 Digital audio output optical connector
CAUTION
RISKOFELECTRICALSHOCK
DONOTOPEN
98-264V~ 50-60Hz
35W MAX
POWERSUPPLY
TELEPHONE
LINE
SLAVE
MASTER
VIDEO
TVSCART
AUDIO
L
R
RS232USB
VCRSCART
TV
ANTENNA
MODULATOR
400mA 13/18V
BISIN/OUT
LNBIN
LNBOUT
!
DIGITAL
AUDIO
HiFi Amplifier
Remove the dust protection cap from the optical digital audio output connector and connect the cable
firmly so that the cable and the connector match.
Keep the dust protection cap. To protect against dust, always reattach the cap when not using the link.
3-7 MODEM
CAUTION
RISKOFELECTRICALSHOCK
DONOTOPEN
98-264V~ 50-60Hz
35W MAX
POWERSUPPLY
TELEPHONE
LINE
SLAVE
MASTER
VIDEO
TVSCART
AUDIO
L
R
RS232USB
VCRSCART
TV
ANTENNA
MODULATOR
400mA 13/18V
BISIN/OUT
LNBIN
LNBOUT
!
DIGITAL
AUDIO
Telephone line
Your Set Top Box can be connected to your telephone line.
Your telephone is connected directly in piggy-back mode to the cable.
This connection will provide you access to ORBIT services.
3-8 RS232 SERIAL PORT
This interface is not used at the moment.
3-9 USB INTERFACE
This interface is used to connect peripheral systems.
GB Chapitre 03.p65 28/05/01, 18:095
Page 8

6
ENGLISH 4. SET TOP BOX INSTALLATION
Inter
active
Welcometo the world of
ORBIT
Continue
ok
Inter
active
Installationsetup1
Satellitesignal2
MENU
Select
ok
Inter
active
Installationsetup1
Satellitesignal2
Options4
Listof services3
Personalisedscheduler5
Messages6
MENU
Exit
Esc
Select
ok
Inter
active
Autoconfiguration1
Manualconfiguration2
Autoupdate4
Technicalparameters3
INSTALLATIONSETUP
SelectokMenu
M
Inter
active
Thesystem has been
configuredto ORBIT's default
settings
AUTOCONFIGURATION
Menu
M
Inter
active
No.of services found: 103
DOWNLOAD LISTOF SERVICES
Downloading...
Menu
M
Inter
active
Inter
active
1
2
4
3
INSTALLATIONSETUP
SelectokMenu
M
PINEntry
EnterPIN
++++
Cancel
Esc
Confirm
ok
Press OK to scan; the list of channels is stored in memory.
Inter
active
Country1
LNBPowering2
Basefrequency4
Polarisation3
Coderate5
Symbolrate6
Jordan
Off
Vertical
11.920GHz
7/8
27.5Mbauds
LNBUniversal7
LOFrequency8
No
10700
MANUALCONFIGURATION
Menu
M
The unit can be set up in several ways. Press 1 through 6 to
change corresponding parameter or press and to
select the field.
Press
MENU
to return to the main menu screen. Any changes made
will be saved.
4-2-2-1 Country (1)
This option sets the country where the Set Top Box is used.
The list of available countries is :
ALGERIA, BAHRAIN, CHAD, CYPRUS, DJIBOUTI, EGYPT, IRAQ, IRAN, JORDAN, KUWAIT,
LEBANON, LIBYA, MAURITANIA, MOROCCO, OMAN, PALESTINE, QATAR, SAUDI ARABIA,
SOMALIA, SUDAN, SYRIA, TUNISIA, UNITED ARAB EMIRATES, YEMEN.
This country list is not restrictive.
4. Set Top Box installation
4-1 MAIN MENU
The first time the Set Top Box is turned on, this is called the INITIAL
STATE.
The setup menu is automatically launched and the following startup screen appears.
Press OK to go to the main menu screen.
In the INITIAL STATE, only two selections of the main menu are
available:
1. INSTALLATION SETUP
2. SATELLITE SIGNAL.
All others are not shown, therefore not accessible.
Once the Set Top Box is correctly installed, there are six selections
in the main menu.
In the main menu, press
ESC
to return to the normal TV mode or
select any of the other options with your navigation keys and press
OK
to validate your choice.
4-2-1 Auto configuration
MAIN MENU
Ê INSTALLATION SETUP
Ê AUTOCONFIGURATION
Press
MENU
to return to the main menu screen.
The default technical parameters values are loaded, except for LO
frequency.
During the INITIAL STATE, the list of channel download is not
possible. It must be done by the menu satellite signal.
4-2-2 Manual configuration
MAIN MENU
Ê INSTALLATION SETUP
Ê MANUAL CONFIGURATION
Enter PIN code and confirm with OK.
The default PIN number is 0000.
4-2 INSTALLATION SETUP
MAIN MENU
Ê INSTALLATION SETUP
Press
MENU
to return to the main menu.
Press 1, 2, 3 or 4 to go directly to the specific submenu,
or press and to select one of these four submenus,
then press OK to go to the selected field.
GB Chapitre 04.p65 28/05/01, 18:156
Page 9
7
ENGLISH 4. SET TOP BOX INSTALLATION
Inter
active
LNBpowering1
Polarisation2
Basefrequency4
LOfrequency3
Coderate5
Symbolrate6
Off
Horizontal
09.750GHz
11.400GHz
3/4
27.5Mbauds
39
MANUALCONFIGURATION
Menu
M
ERROR
Invalidvalue entered
Thedefault value has been restored
Note:The valid range is between
10000and 13000
Exit
Esc
4-2-2-2 LNB powering (2)
This selection sets the LNB power to ON or OFF. The following can be selected using and .
4-2-2-3 Polarity (3)
This selection sets the polarity to HORIZONTAL or VERTICAL. The following can be selected using
and .
4-2-2-4 Base frequency (4)
This selection sets the base frequency by entering a value
between 10000 and 13000.
If an incorrect entry is made, the following menu is displayed:
Inter
active
TECHNICALPARAMETERS
Country1
LNBpowering2
LOfrequency4
Polarisation3
Basefrequency5
Coderate6
:Jordan
:On
:Vertical
:10.600 GHz
:11.920 GHz
:7/8
Symbolrate7 :27.5
Nextpage
Menu
M
Inter
active
:SAGEMManufacturer8
Hardwareversion9
Manufacturerupdate11
Runupdate version14
:12
:16Softwareversion10
:0.0.0.0
:0.40.30.4APIversion12
:0.7.4.0Runversion13
:0.0.0.0
:049-123456789-76Authorisationnumber15
TECHNICALPARAMETERS
Previouspage
Menu
M
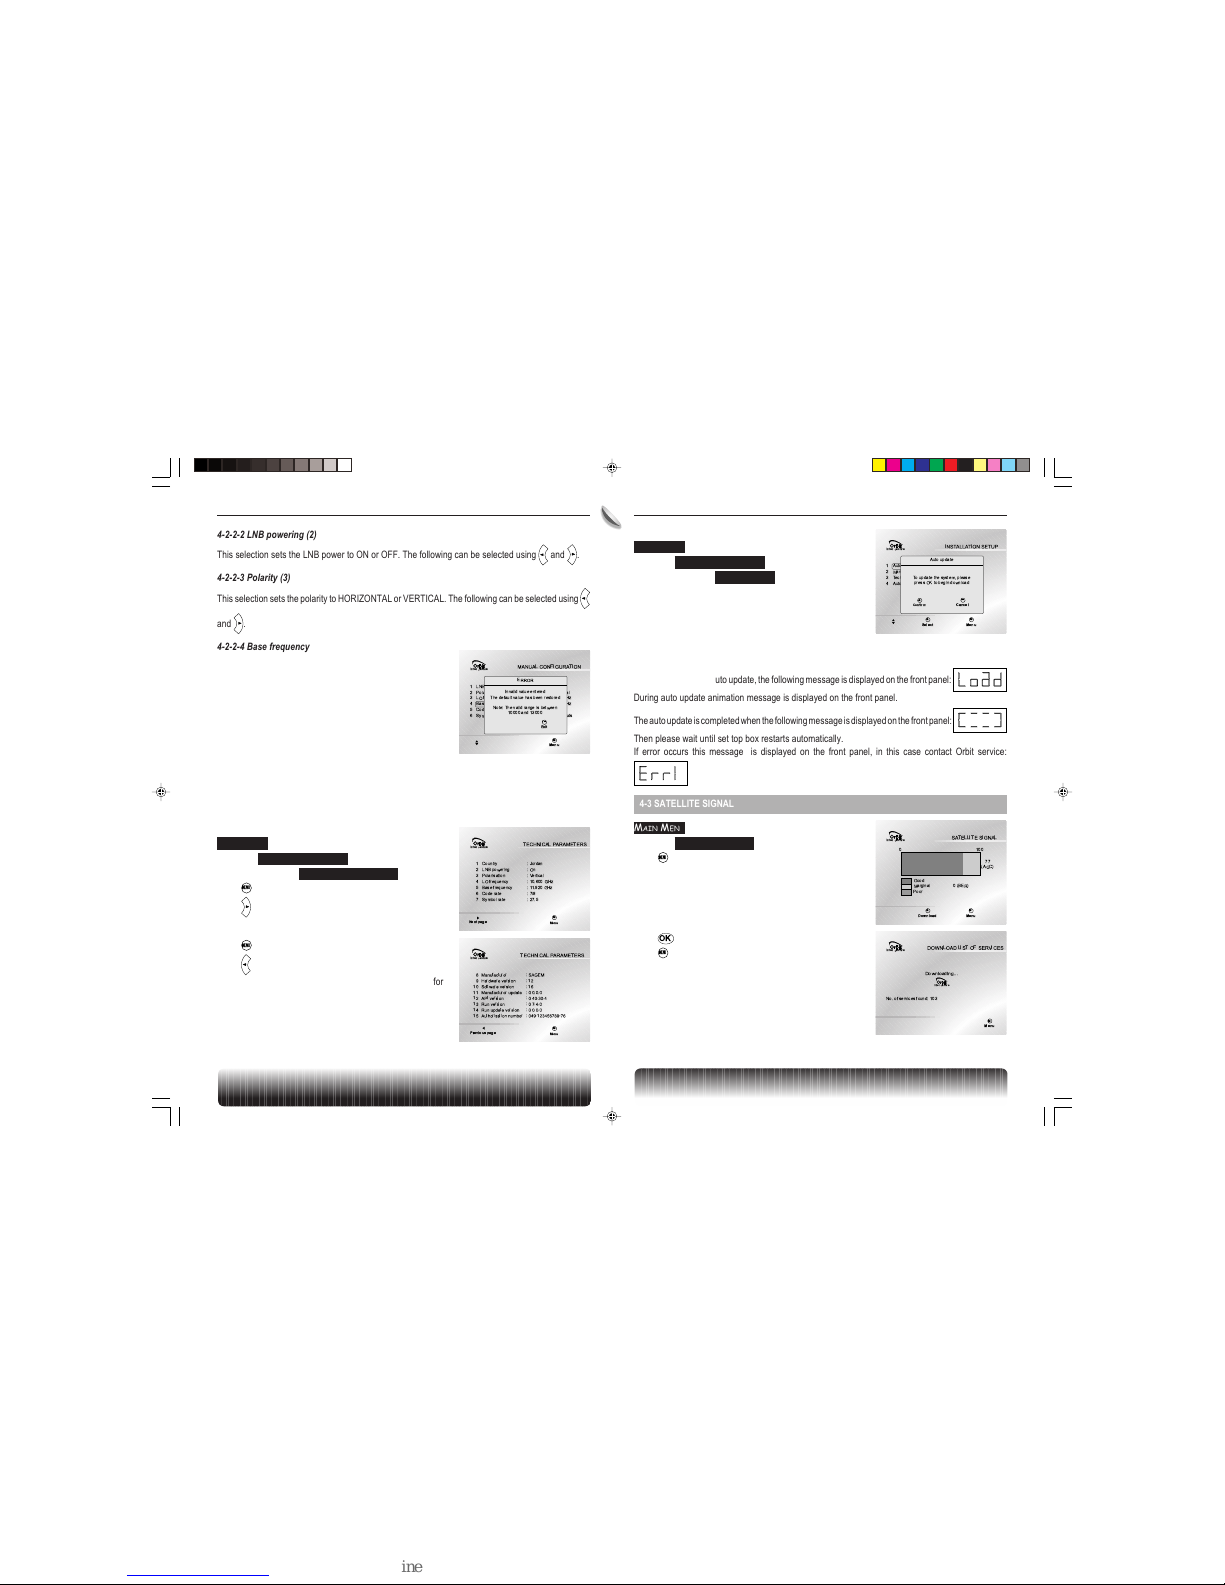
4-2-4 Auto Update
MAIN MENU
Ê INSTALLATION SETUP
Ê AUTO UPDATE
Before starting the auto update, the following screen is displayed.
During auto update and flash memory writing process, the remote control and front panel keys are
disabled.
At the first step of the auto update, the following message is displayed on the front panel:
During auto update animation message is displayed on the front panel.
The auto update is completed when the following message is displayed on the front panel:
Then please wait until set top box restarts automatically.
If error occurs this message is displayed on the front panel, in this case contact Orbit service:
4-3 SATELLITE SIGNAL
MAIN MENU
Ê SATELLITE SIGNAL
Press
MENU
to return to the main menu.
The list of service download is possible if BER indicator is equal
to0.
Inter
active
Autoconfiguration1
Manualconfiguration2
Autoupdate4
Technicalparameters3
INSTALLATIONSETUP
SelectokMenu
M
Autoupdate
Toupdate the system, please
pressOK to begin download
Cancel
Esc
Confirm
ok
Press OK to perform the list of service download.
Press
MENU
to cancel downloading.
Inter
active
0 100
77
(AGC)
0(BER)Marginal
Good
Poor
SATELLITESIGNAL
DownloadokMenu
M
4-2-2-5 Code rate (5)
The code rate can be set from the following choices: 1/2, 2/3, 3/4, 5/6, 7/8 or Auto.
4-2-2-6 Symbol rate (6)
The symbol rate can be set from the following choices: 22, 27, 27.5 or 30.
4-2-3 Technical parameters
MAIN MENU
Ê INSTALLATION SETUP
Ê TECHNICAL PARAMETERS
Press
MENU
to return to the main menu screen.
Press to go to the next page.
Press
MENU
to return to the main menu screen.
Press to go to the previous page.
This set of information is useful for technical troubleshooting for the
operator.
Inter
active
No.of services found: 103
DOWNLOAD LISTOF SERVICES
Downloading...
Menu
M
Inter
active
GB Chapitre 04.p65 28/05/01, 18:177
Page 10
8
ENGLISH 4. SET TOP BOX INSTALLATION
When downloading is finished without problem, the following
screen is displayed:
Press and to scroll through the list of channels.
Press to see the next page (eight channels).
Press to see the previous page.
Press OK to watch the TV channel.
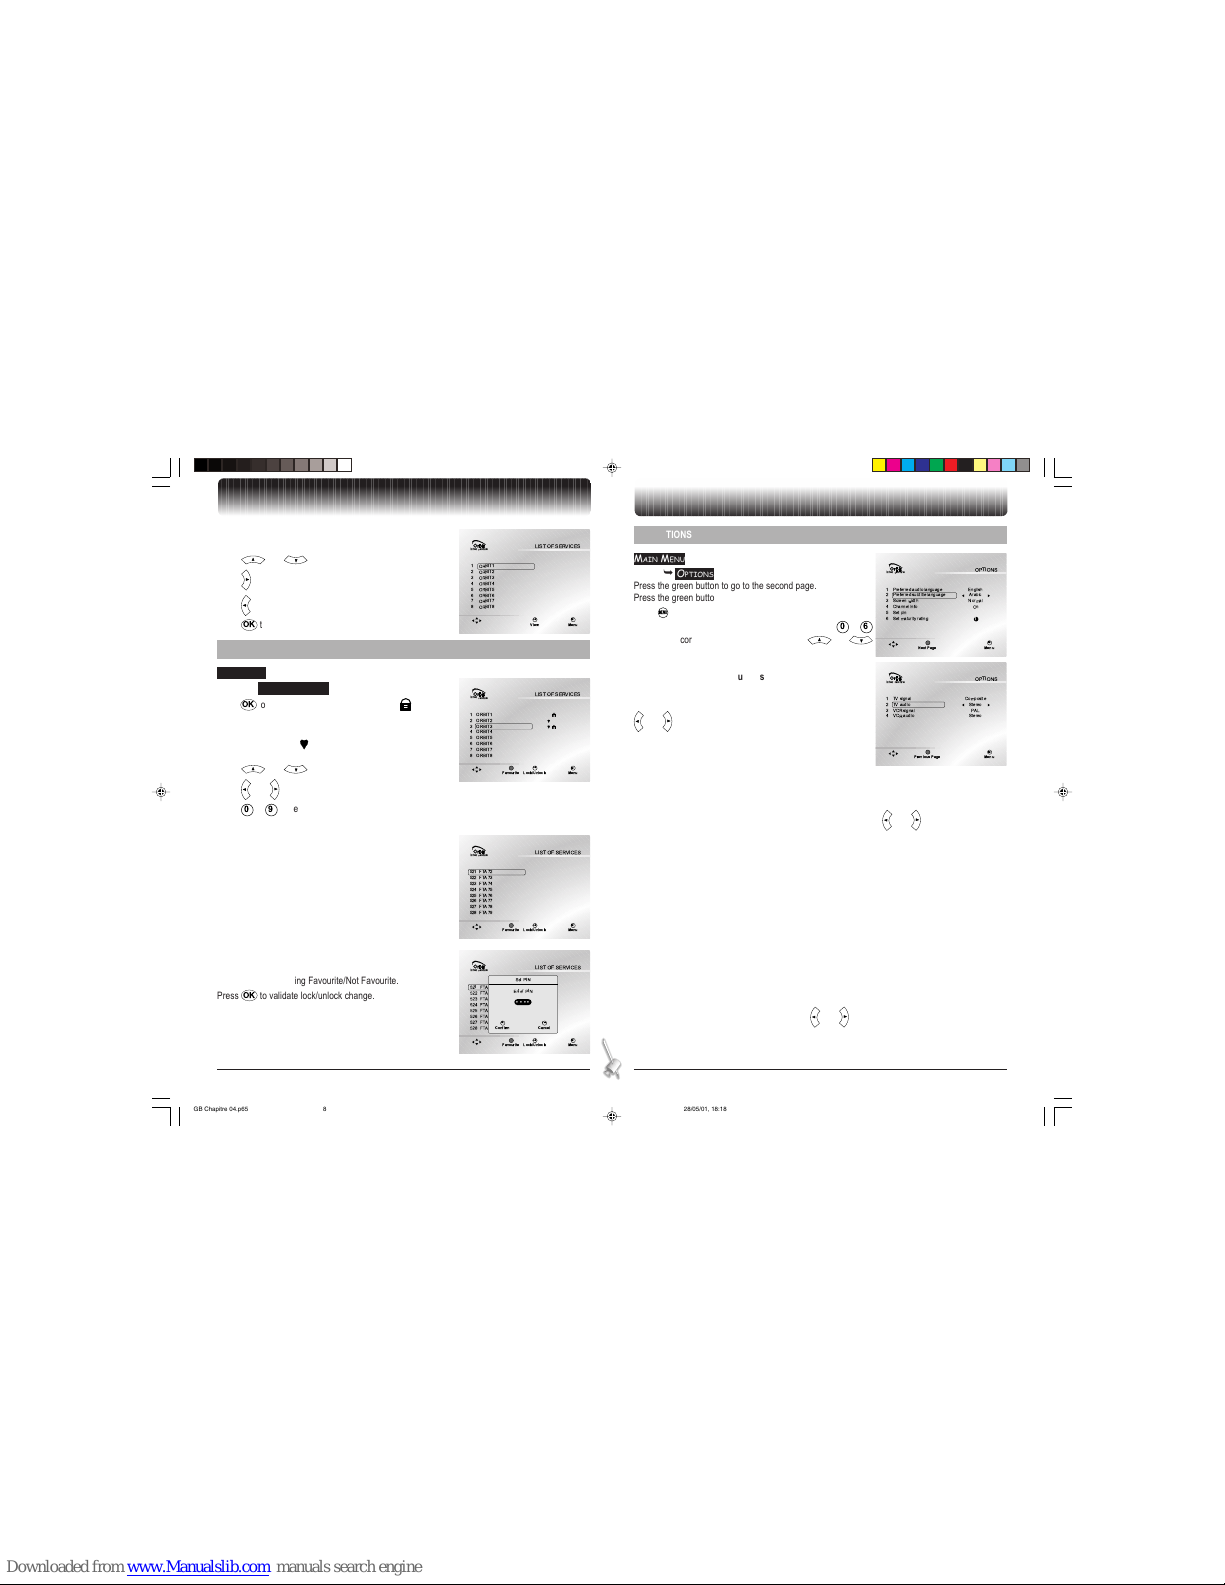
4-4 LIST OF SERVICES
MAIN MENU
Ê LIST OF SERVICE
Press OK to lock or unlock a channel. A lock icon is displayed
for a locked channel.
Press Green button to set or unset a channel to be a favourite
channel. In this case a icon shows that the channel is part of the
favourite list.
Press and to scroll through the list of channels.
Press and to jump to the previous page of eight channels.
Press 0 to 9 to select the channel number.
4-4-1 Favourite
The first time you enter this menu, the PIN code is asked if it was
not asked before during Lock/Unlock.
Press the green button to enable or disable favourite channel.
Inter
active
ORBIT11
ORBIT22
ORBIT44
ORBIT77
ORBIT33
ORBIT55
ORBIT66
ORBIT88
LISTOF SERVICES
ViewokMenu
M
4-5 OPTIONS
MAIN MENU
Ê OPTIONS
Press the green button to go to the second page.
Press the green button to go to the first page.
Press
MENU
to return to the main menu.
The Set Top Box can be set up in several ways. Press 0 to
6
to select the corresponding parameter or press and
to select the field.
4-5-1 Preferred audio language selection
(option 1 - page 1)
The following audio language, if available, can be selected using
and :
• ARABIC
• ENGLISH
• FRENCH
4-5-2 Preferred subtitle language selection
(option 2 - page 1)
The following subtitle language, if available, can be selected using and :
• ARABIC
• ENGLISH
• FRENCH
• OFF
4-5-3 TV screen width selection
(option 3 - page 1)
When using a scart to scart cable from TV set to Set Top Box; then:
• set to Normal (4/3) if you have a regular TV set,
• set to Wide (16/9) if you have wide screen TV set.
With this function, the Set Top Box will automatically drive the video format on your TV set.
4-5-4 Channel Info selection
(option 4 - page 1)
The channel info can be displayed or not using and :
• ON - in this case the zapping banner is displayed
• OFF - in this case the zapping banner is not displayed
Inter
active
ORBIT11
ORBIT22
ORBIT44
ORBIT77
ORBIT33
ORBIT55
ORBIT66
ORBIT88
LISTOF SERVICES
Lock/UnlockokMenu
M
Favourite
Inter
active
FTA72521
FTA73522
FTA75524
FTA78527
FTA74523
FTA76525
FTA77526
FTA79528
LISTOF SERVICES
Lock/UnlockokMenu
M
Favourite
Inter
active
521
522
524
527
523
525
526
528
LISTOF SERVICES
Lock/UnlockokMenu
M
Favourite
FTA72
FTA73
FTA75
FTA78
FTA74
FTA76
FTA77
FTA79
SetPIN
EnterPIN
++++
Cancel
Esc
Confirm
ok
Inter
active
Preferredaudio language1
Preferredsubtitle language2
Channelinfo4
English
Arabic
Screenwidth3 Normal
On
Setpin5
Setmaturity rating6
1
OPTIONS
NextPage Menu
M
Inter
active
TVsignal1
TVaudio2
VCRaudio4
Composite
Stereo
VCRsignal3PAL
Stereo
OPTIONS
PreviousPage Menu
M
4-4-2 Lock/Unlock
The first time you enter this menu, the PIN code is asked if it was
not asked before during Favourite/Not Favourite.
Press OK to validate lock/unlock change.
GB Chapitre 04.p65 28/05/01, 18:188
Page 11
9
ENGLISH 4. SET TOP BOX INSTALLATION
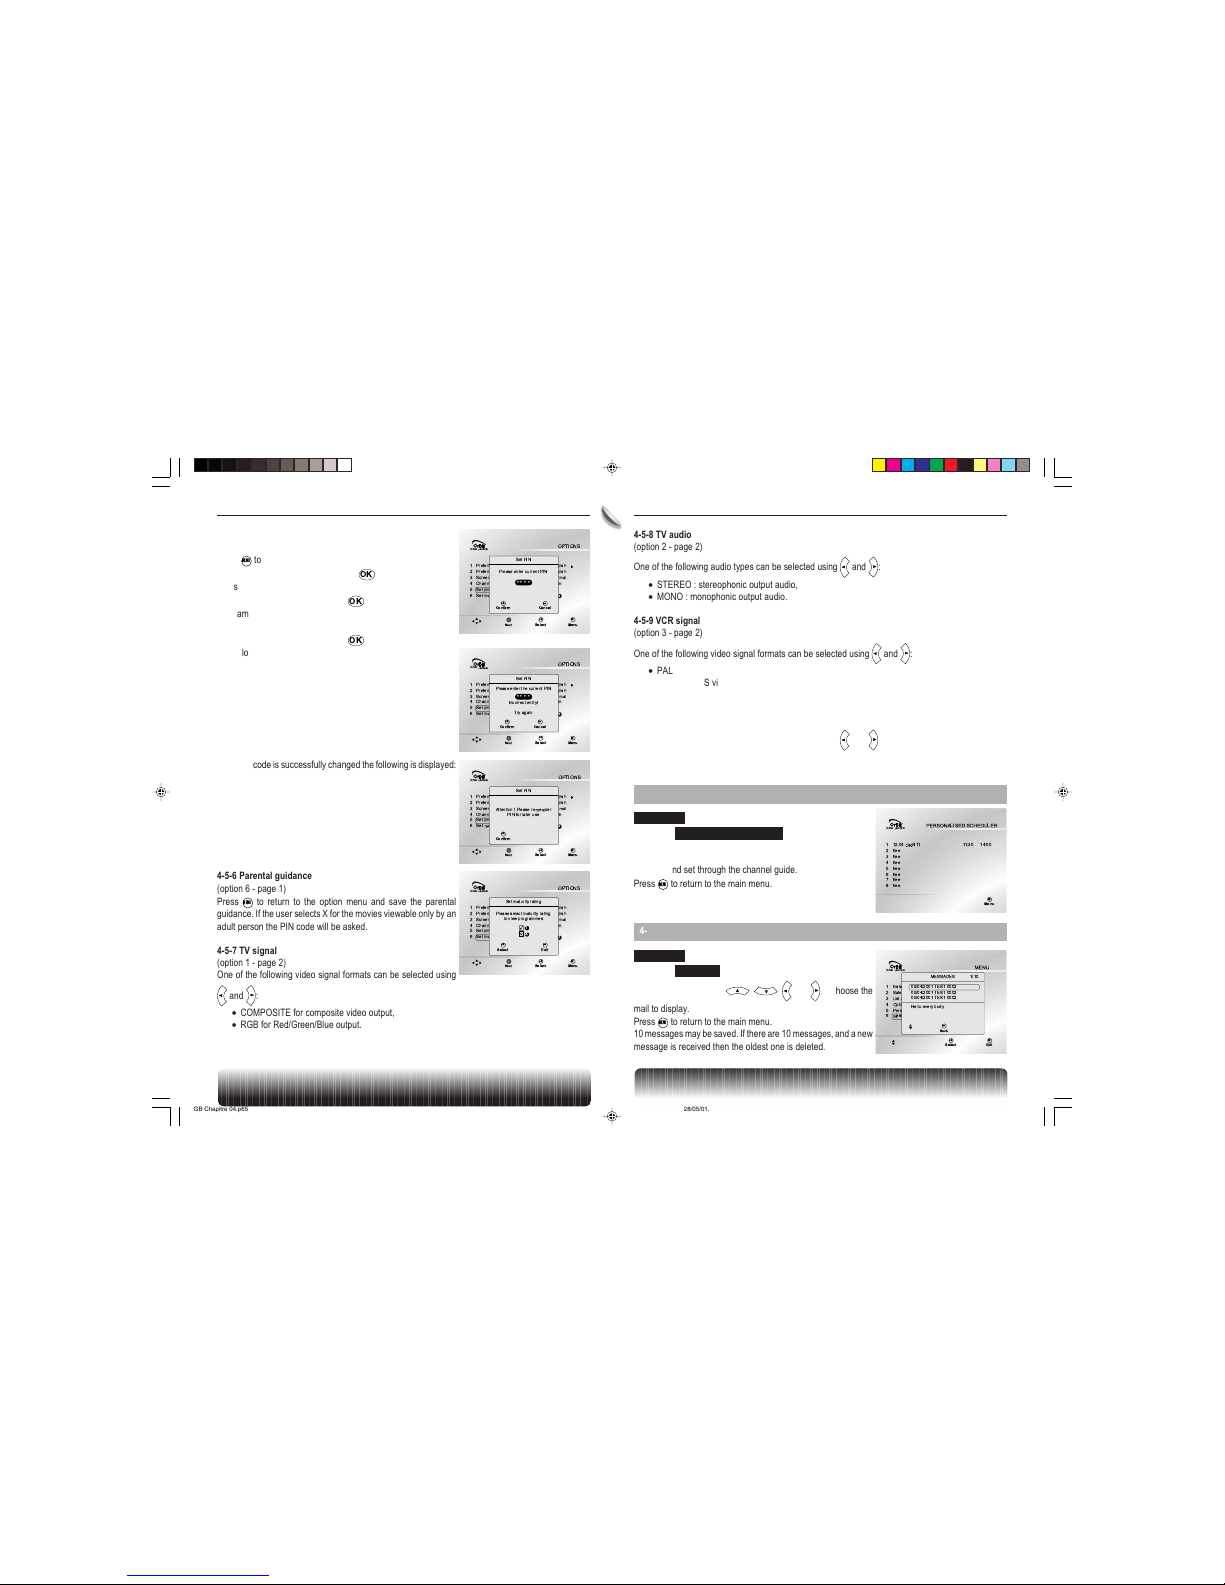
4-5-5 Set PIN code
(option 5 - page 1)
Press
MENU
to return to the options menu.
Enter the current PIN code and press OK.
The same screen is displayed with the title Please enter new PIN.
Enter the new PIN code and press OK.
The same screen is displayed with the title Please confirm new PIN
code.
Enter the new PIN code and press OK.
The following screen shows the case of a first try with incorrect PIN
code.
Inter
active
Preferredaudio language1
Preferredsubtitle language2
Channelinfo4
English
English
Screenwidth3 Normal
On
Setpin5
Setmaturity rating6
A
OPTIONS
Menu
M
Select
ok
Next
SetPIN
Pleaseenter current PIN
++++
Cancel
Esc
Confirm
ok
Inter
active
Preferredaudio language1
Preferredsubtitle language2
Channelinfo4
English
English
Screenwidth3 Normal
On
Setpin5
Setmaturity rating6
A
OPTIONS
Menu
M
Select
ok
Next
SetPIN
Pleaseenter the current PIN
Incorrectentry!
Tryagain
++++
Cancel
Esc
Confirm
ok
If the PIN code is successfully changed the following is displayed:
Inter
active
Preferredaudio language1
Preferredsubtitle language2
Channelinfo4
English
English
Screenwidth3 Normal
On
Setpin5
Setmaturity rating6
A
OPTIONS
Menu
M
Select
ok
Next
SetPIN
Attention! Please remember
PINfor later use
Confirm
ok
Inter
active
Preferredaudio language1
Preferredsubtitle language2
Channelinfo4
English
English
Screenwidth3 Normal
On
Setpin5
Setmaturity rating6
1
OPTIONS
Menu
M
Select
ok
Next
Setmaturity rating
Pleaseselect maturity rating
toview programmes
Exit
Esc
Select
ok
1
X
4-5-6 Parental guidance
(option 6 - page 1)
Press
MENU
to return to the option menu and save the parental
guidance. If the user selects X for the movies viewable only by an
adult person the PIN code will be asked.
4-5-7 TV signal
(option 1 - page 2)
One of the following video signal formats can be selected using
and :
• COMPOSITE for composite video output,
• RGB for Red/Green/Blue output.
Inter
active
12.04ORBIT11
free2
free4
free7
11:30 14:00
free3
free5
free6
free8
PERSONALISED SCHEDULER
Menu
M
4-7 MESSAGES
MAIN MENU
Ê MESSAGES
Press navigation arrows , , and to choose the
mail to display.
Press
MENU
to return to the main menu.
10 messages may be saved. If there are 10 messages, and a new
message is received then the oldest one is deleted.
4-5-8 TV audio
(option 2 - page 2)
One of the following audio types can be selected using and :
• STEREO: stereophonic output audio,
• MONO: monophonic output audio.
4-5-9 VCR signal
(option 3 - page 2)
One of the following video signal formats can be selected using and :
• PAL: regular composite PAL video output,
• SVHS: SVHS video output.
4-5-10 VCR audio
(option 4 - page 2)
One of the following audio types can be selected using and :
• STEREO: stereophonic output audio,
• MONO: monophonic output audio.
4-6 PERSONALISED SCHEDULER
MAIN MENU
Ê PERSONALISED SCHEDULER
(information menu only)
This screen shows programs tagged for VCR recording previously
selected and set through the channel guide.
Press
MENU
to return to the main menu.
Inter
active
Installationsetup1
Satellitesignal2
Options4
Listof services3
Personalisedscheduler5
Messages6
MENU
SelectokExit
M
MESSAGES 1/10
05/04/2001TEST 0002
05/04/2001TEST 0002
05/04/2001TEST 0002
Helloevery body
Back
Esc
GB Chapitre 04.p65 28/05/01, 18:199
Page 12
10
ENGLISH 5. USING YOUR SET TOP BOX
5-1 CHANGING CHANNELS
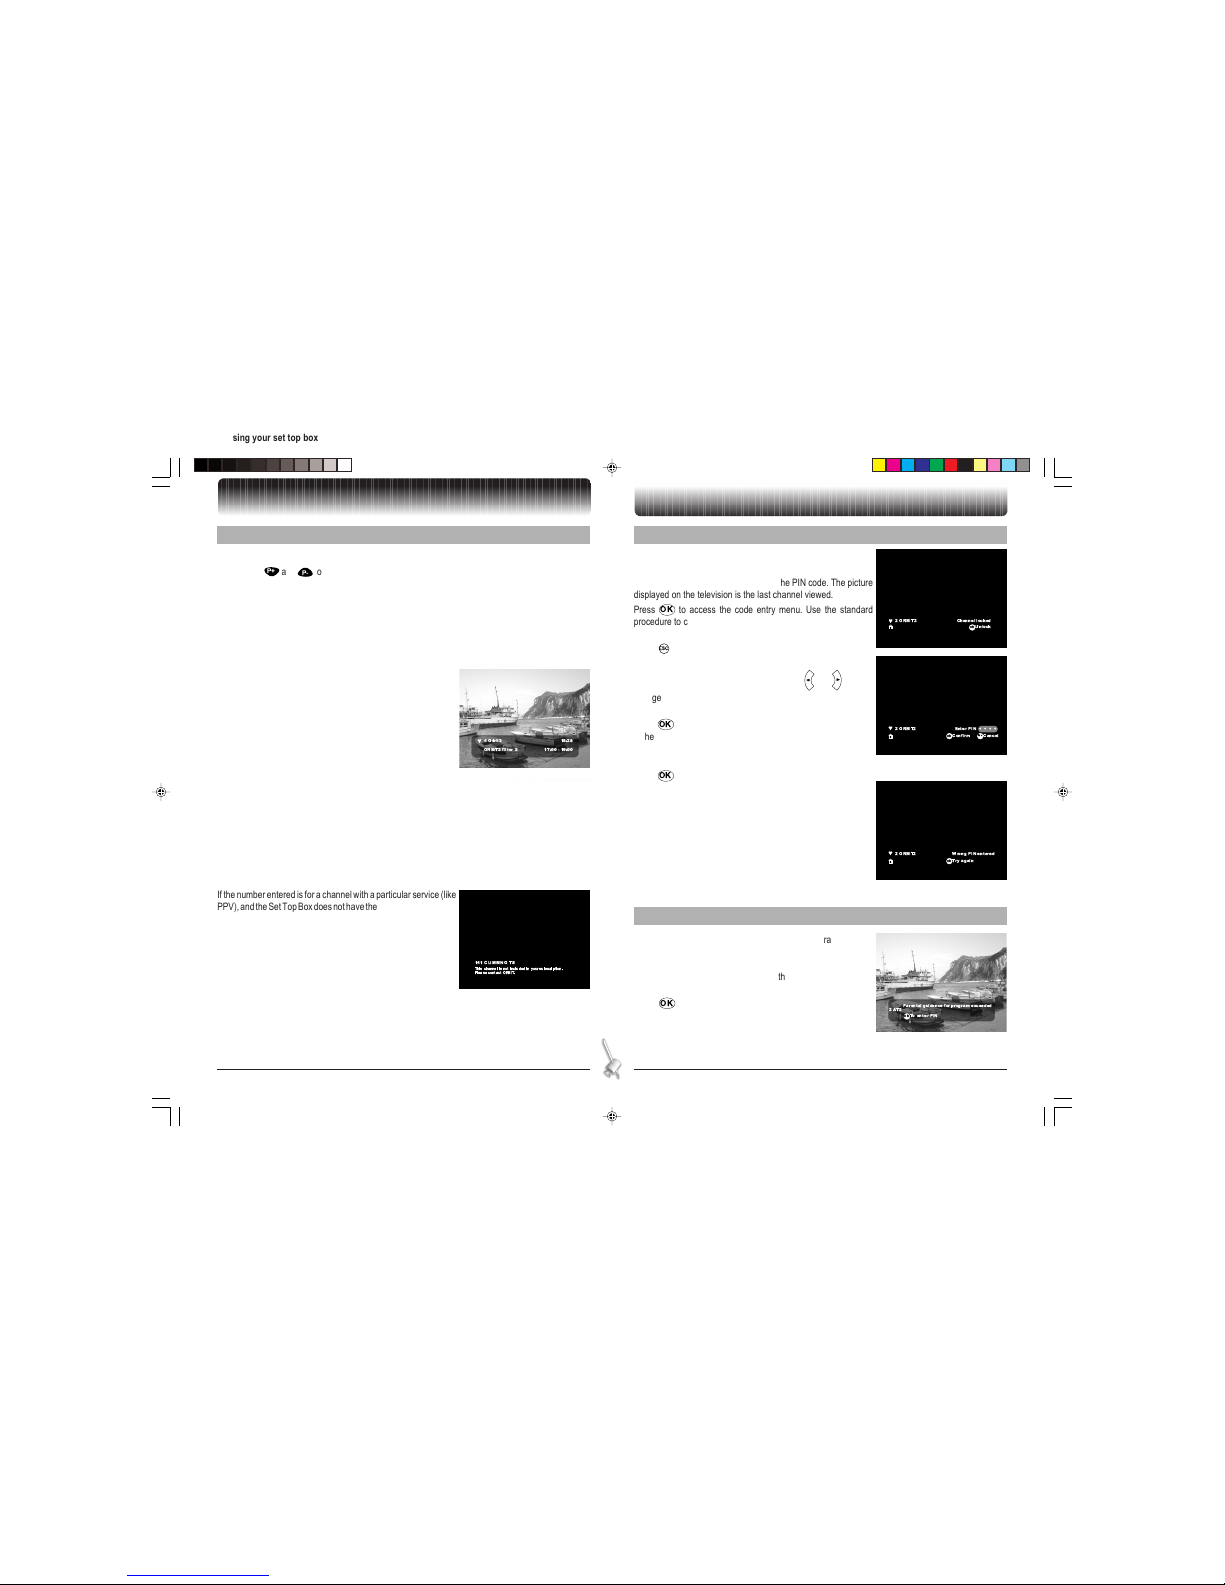
While watching a TV channel:
• Press P+ and P- to change the channel, in the same order as the assigned number. When a
channel is displayed on the screen, the on-screen display banner appears for a few seconds,
according to set up in the main menu.
• Press the numeric keypad to enter the channel number directly. The number with 1 to 3 digits is
taken into account only after 1 second without pressing any key. As it is entered, the channel
number appears on the right of the screen.
There is no confirmation procedure. As soon as either the channel number or three digits are entered,
the appropriate channel appears.
A banner appears for about 5 seconds. It shows the channel name
with its attributes, the current event being broadcast and its start
and end time.
If the number entered does not correspond to an existing channel,
the following on-screen display appears, and the previous channel
remains displayed (for example, if channel 75 does not exist).
4 Orbit3 18:28
ORBIT3 filter 5 17:00- 19:00
75
Nochannel at thisnumber
141 CLIMBING TS
This channel is not includedin your subscription.
Please contact ORBIT.
5. Using your set top box
If the number entered is for a channel with a particular service (like
PPV), and the Set Top Box does not have the corresponding rights,
then the following on-screen display appears.
2 ORBIT2 Channel locked
Unlock
ok
2 ORBIT2
Enter PIN
++++
Cancel
Esc
Confirm
ok
2 ORBIT2
Wrong PIN entered
Try again
ok
2AT2
Parental guidance forprog ram exceeded
Toenter PIN
ok
5-2 LOCKED CHANNELS
If the user selects a locked channel, the following warning message is displayed.
The channel cannot be viewed without the PIN code. The picture
displayed on the television is the last channel viewed.
Press OK to access the code entry menu. Use the standard
procedure to change the channel.
The on-screen display code entry menu appears as follows.
Press
ESC
to cancel the current procedure and to return to the
previous on-screen display.
Use the number buttons to enter the code, and and to make
changes. For confidentiality reasons, the code is not visible on the
screen but, instead, asterisks (*) are displayed.
Press OK to confirm the entry.
If the code is correct, the current program is accessible and
viewed.
If the entry is not correct, the following message is displayed.
Press OK to return to previous entry menu and try another PIN
code.
5-3 PARENTAL GUIDANCE
If user selects a channel and the parental guidance rating for that
program is exceeded, the following on-screen display appears, on
the top of the screen, with a warning message.
The channel cannot be viewed without the PIN code. The picture
displayed on the television is the last channel viewed.
Press OK to access the code entry menu. Use the standard
procedure to change the channel.
GB Chapitre 05.p65 28/05/01, 18:2410
Page 13

11
ENGLISH 5. USING YOUR SET TOP BOX
4 Channel Audio English
Subtitle English
5-4 REGION BLACKOUT
If geographical criteria forbidding display are detected for the
current program of the current service, the following on-screen
display appears on the top of the screen with a warning message.
2AT2
This channel is not available
in yourr egion
5-5 AUDIO VOLUME ADJUSTMENT
The audio output level from the television Scart connector can be disabled completely or adjusted from
the remote control. The audio output level from the other outputs (RCA and VCR) is calibrated and
cannot be changed.
5-5-1 Muting the sound
Press to toggle between disabling and enabling the sound. If the sound is disabled [muted] the
symbol appears briefly on the right of the screen.
If the sound is restored, the symbol appears briefly on the right of the screen.
5-5-2 Volume level
Press + and - to increase or decrease the sound level, in 2dB increments, from -12dB to +6dB. If the
sound has been muted, adjusting the volume level will reactivate it.
Press - to decrease the sound level. The symbol appears briefly on the right of the screen.
Press + to increase the sound level. The symbol appears briefly on the right of the screen.
5-6 SETTING AUDIO AND SUBTITLES
While a television program is displayed, press to activate the
audio and subtitles pop-up menu.
A banner is displayed at the bottom of the screen. It disappears
after 3 seconds.
Press and to select the audio or the subtitle field.
Press and to select the audio or the subtitle language (only
the available audio track broadcast can be selected).
For subtitles, the value "no" allows to disable subtitle. If no subtitles are available the only value will be
"none".
800 DT Services currently not available
Front panel
button
Remote control
button
P+
P-
5-7 RECEPTION SIGNAL LEVEL STRENGTH
If the television signal received is too weak for normal service, one
of the following symbols may appear on the right of the screen:
• Orange Circle: Poor reception (equivalent to the colour
orange on the satellite dish reception bar-graph).
• Red Square: No carrier (equivalent to the colour red on the
satellite dish reception bar-graph).
5-8 FRONT PANEL DISPLAY
5-10 REMOTE CONTROL KEYS USED BY THE SET TOP BOX APPLICATION
5-10-1 Menu
Press
MENU
once to access to the main setup menu from any channel. Press
ESC
to disable the main menu
and return to the previous program.
Standby
Video program +
Video program -
Turning on the Set Top Box initialises its internal clock, which changes to 00:00, then
begins incrementing accordingly.
When the Set Top Box is turned on and not tuned to an interactive
program, the readout displays a P and the channel number, as
follows (for example, for channels 10 and 200).
5-9 FRONT PANEL KEYS
The three keys on the front of the Set Top Box are equivalent to the following remote control keys:
Before setting up the Set Top Box for the first time, the front display appears as follows.
GB Chapitre 05.p65 28/05/01, 18:2511
Page 14

12
ENGLISH 5. USING YOUR SET TOP BOX
5-10-2 Standby
Regardless of the current mode of the Set Top Box, press to put the Set Top Box in the standby
mode. The Set Top Box returns to the active mode by pressing numerical keys or , or when a preprogrammed operation begins.
5-10-3 Accessing interactive applications
Pressing launches the Pilot application.
Pressing
GUIDE
launches the Channel Guide application.
Pressing TV launches the Channel List application.
5-11 PHONE NUMBERS TO CONTACT FOR FURTHER INFORMATION
KSA - (Toll free) 800 124 4455 Fax: (966) 1 4761846
Kuwait - (965) 802 999 Fax: (965) 2437767
UAE - 800 4442 Fax: (971) 4 3369684
Jordan - (962) 6 5511615 Fax: (962) 6 5511617
Lebanon - (961) 1 748410 Fax: (961) 748407
North Africa - (216) 1 766953 Fax: (216) 1 766990
Africa - (971) 4 3351513 Fax: (971) 4 3352523
Egypt - (202) 5242888 Fax: (202) 5241700
Europe and other markets:
Cyprus - 24hr service (357) 909 5000 Fax: (357) 909 5333
GB Chapitre 05.p65 28/05/01, 18:2512
Page 15

13
ENGLISH 6. CHANNEL LIST
6-1 CHANNEL LISTS
The Channel list function allows display of two kinds of list:
• Favourite channel list: only the favourite channels are displayed
• All channel list: all the channels are displayed
Pressing TV launches the Channel List application.
The first list displayed is the favourite channel list.
When TV is toggled when a channel list is displayed, the application switches between "favourite
channel" mode and the channel normal mode.
6-2 FAVOURITE CHANNEL LIST
The Channel List is displayed on the lower left quarter of the screen. It shows a scrolling list of memorised
channels with the corresponding attributes (favourite, locked).
Each channel is displayed in numeric order with its name, and its
attributes (a heart means that it is a favourite channel, a lock
symbol means that a parental code must be entered to watch the
channel).
The Channel List is user interactive.
Use and to move the focus.
Use and to change pages.
Use
ESC
to close the Channel List.
Use OK to close the Channel List and zap to the selected channel.
Use the numeric keys to move the focus on a particular channel number.
Use TV to toggle to the "All channels" list.
6-3 ALL CHANNEL LIST
Use TV to go to the favourite list.
100
88
25
54
55
26
Exit
Esc
SelectokAll
TV
Star movies
Orbit ISPN
CNN
Orbit News
Nationalgeo
CBS
100 Star movies
88 Orbit ISPN
25 CNN
54 Orbit News
55 CBS
26 National geo
Exit
Esc
SelectokFavourite
TV
6. Channel list
No channel
atthis number
Back
ok
2 ORBIT2 16:24
NOW ORBIT2 titres 28
NEXT ORBIT2 titres 29
15:55 - 16:30
16:30 - 18:00
Exit
Esc
SelectokInfo+
Channel
name
Program
name
Navigational
information
Current
time
Channel
number
Service
attributes
(preferred,
locked)
Current
even
name
Start
time
End
time
6-5 TV PILOT
The TV Pilot provides rapid access to information on current and next programs on the various channels
of the broadcaster. It is accessed from any channel by pressing .
6-5-1 Main screen
When the TV Pilot is launched, the banner displays information on
the running service.
The banner appears at the bottom of the screen. It displays
information on the current event of the current service. The
channel number and name are displayed. A heart appears if this
service has been added to the favourite list in the user configuration. A lock is displayed if this channel is locked.
The service from which the TV Pilot was launched keeps running,
so the channel's video and audio are not interrupted.
Along with the name of the program, the event is summarized, its
start time and end time are displayed.
The TV Pilot allows the user to navigate on current and next events broadcast on each service and,
eventually, to directly access them.
To do this, a focus can be selected on one of the events. It is seen as a blue frame on the focused event
name.
Press or to select the focus on the current or the next event of the service. Then press
to get additional information about the selected event.
The banner can be used to consult current and future events broadcast on the other channels too.
Using navigational keys and allows the user to consult the information for the other services.
6-4 ERROR SCREEN
If the user enters a channel number that does not correspond to an
accessible channel, an error message is displayed, then the
channel list comes back as soon as the OK button is pressed.
GB Chapitre 06.p65 28/05/01, 18:2913
Page 16

14
ENGLISH 6. CHANNEL LIST
98 Channelnot found
Exit
Esc
16:25
15:55 - 16:30Match
News and factual
First rafting eventof theseason,
counting forthe national championship
41 Orbit ESPN
Exit
Esc
Back
Current
time
Event
description
Parental
guidance
Event
name
Start
time
End
time
Channeldescription:
number,name, preferred, locked
Direct access with TV Pilot information is possible on one service
by selecting the corresponding channel number with the numeric
keys. If there's no channel at this location, an error message
appears on the screen for about 3 seconds.
If the number entered is correct, the events of the selected channel
are displayed. Then, by pressing OK, the Set Top Box switches
to that channel.
Press
MENU
to exit the TV Pilot and to return to the current channel.
6-5-2 Info screen
When the key is pressed, while the focus is on the current event,
the following banner appears.
The info screen displays the event name, with its start time and end
time and a short summary of the event.
A symbol may be displayed too, to show some characteristics of
the event.
This symbol is used to prevent children from viewing unsuitables
programmes. It is displayed when the event should be viewable
only by an adult person.
If the event description is too long, press to have access to
the rest of the event description.
Press to return to the previous screen. Press to go back to the main banner.
While the information screen is displayed, the video and audio remain active.
Caution: The video still shows the channel from which the TV Pilot has been launched, even if another
service is displayed by the TV Pilot.
When the key is pressed, while the focus is on the next event, the same Info screen is displayed
describing the next program.
Press
ESC
, while the info screen is displayed to exit the TV Pilot and return to the current channel.
Button Main banner
Launches the Info screen
Event description window
Go back to the main screen
Select previous or next channel No action
Navigate in the banner Scroll text
OK
Exits the TV Pilot and switches to the
highlighted channel
Exits the TV Pilot and switches to the
highlighted channel
ESC
Back to TV mode Back to TV mode
0
to
9
Numeric entry, navigation in the
banner
No action
Mutes the audio output Mutes the audio output
Active / Standby mode Active / Standby mode
Inter
active
Friday31 March
CHANNELGUIDE
16:30
Futureprog. Exit
Esc
Info Select
ok
Animatedpicture
Inter
active
Thursday5 April
CHANNELGUIDE
19:39
Exit
Esc
Noinformation available
Channelguide will be ended
Exit
ok
6-5-3 Remote control key functions
The other keys have no action.
6-6 CHANNEL GUIDE
The Channel Guide provides list of events broadcast on each service for seven days starting from the
current day.
It is accessed from any channel by pressing
GUIDE
.
6-6-1 Main screen
When the Channel Guide is launched, the main screen appears
and a running animation is displayed while loading data.
If no data are available on the stream, an error message appears
indicating the Channel Guide will be ended.
Press OK makes Channel Guide stop. The service from where
the Channel Guide application was called is displayed.
GB Chapitre 06.p65 28/05/01, 18:3114
Page 17

15
ENGLISH 6. CHANNEL LIST
Inter
active
Thursday5 April
Thursday5 April
Hook(U)HBOASIA1
WAILAI T2
16:30- 19:00
18:00- 19:00
Goosed(18)STAR WORL3
MTVASIA4
10:30- 11:45
FavouriteVideos 18:00- 19:00
CARTOONT5 18:00 - 19:00
TVBSASIA6
DISNEY7
18:00- 19:00
SonicThe Hedgehog 18:00 - 18:30
SonicUnderground 18:30 - 19:00
CHANNELGUIDE
18:18
Futureprog. Exit
Esc
Info+ Select
ok
Inter
active
Friday31 March
BrainscranAl Thania99
Brainscranis a new CD-ROM computer game that promisesto
"interfacewith your unconscious". But what it delivers to
teenagecomputer whiz Edward FURLONG is involvement in
murderand mutilation. Under the game's influence, he dreams
ofkilling...
14:54- 15:32
MORE INFORMATION
16:30
Exit
Esc
Back
When Channel Guide is started, the List Screen appears.
It contains a list of eight events. For each event, the channel
number, the channel name (max 9 characters), the title, the start
and end time of the event are displayed. Events are sorted by
channels and according to the start times for each channel which
correspond to the current timetable.
On the top left of the screen the current date and the current time
are displayed.
The date of the selected event is displayed just above the list.
Use and to move the focus.
Press or to display the next or previous timetable event list (if any).
Enter a service number with numerical keypad to put the focus on the first event.
GREEN key allows access to future program content.
ESC
key stops the channel Guide and the service from which it was called is displayed.
key allows access to Info functionality.
OK
key allows zapping to the selected service, to view or to record the selected event.
The bell icon is displayed when an event is selected for viewing or for recording.
6-6-2 Info screens
Press to have additional information about the selected event.
6-6-2-1 Synopsis
Synopsis Screen displays the short summary of the selected
event.
The bell icon is displayed when the event is set for view or
record at a later time.
Press to go back to the List Screen.
Inter
active
Thursday5 April
Thursday5 April
CHANNELGUIDE
16:24
Futureprog. Exit
Esc
Info+ Select
ok
Hook(U)HBOASIA1
WAILAI T2
16:30- 19:00
18:00- 19:00
Goosed(18)STAR WORL3
MTVASIA4
10:30- 11:45
FavouriteVideos 18:00- 19:00
CARTOONT5 18:00 - 19:00
TVBSASIA6
DISNEY7
18:00- 19:00
SonicThe Hedgehog 18:00 - 18:30
SonicUnderground 18:30 - 19:00
Futureprogrammes
Pleaseselect date and time
DATE Thursday 5April
TIME 18:00
Cancel
Esc
Display
ok
6-6-3 Future programs screen
From the List Screen pressing the GREEN button allows access to
future events defined by a date and a time.
Press and to move the focus from Time to Date.
Press and to choose the Time or Date.
Press
ESC
key to cancel the operation and go back to List Screen.
Press OK key to display the list from selected Time and Date.
Inter
active
Thursday5 April
CHANNELGUIDE
18:25
Futureevent Exit
Esc
Info+ Select
ok
Thursday5 April
Hook(U)HBOASIA1
WAILAI T2
16:30- 19:00
18:00- 19:00
Goosed(18)STAR WORL3
MTVASIA4
10:30- 11:45
FavouriteVideos 18:00- 19:00
CARTOONT5 18:00 - 19:00
TVBSASIA6
DISNEY7
18:00- 19:00
SonicThe Hedgehog 18:00 - 18:30
SonicUnderground 18:30 - 19:00
Yourselection is
MTVMost Wanted
Back
Esc
Programyour system
ok
Inter
active
Thursday5 April
Thursday5 April
Heaven'sBurning (18)HBOASIA1 19:00 - 20:45
Michael(U) 20:45 -22:30
WAILAI T2
STARWORL3
TVBSASIA6
20:00- 21:00
Goosed(18) 10:30 - 11:45
MTVMost WantedMTVASIA4 20:00 - 21:00
CARTOONT5 20:00 - 21:00
20:00- 21:00
WitchWorldDISNEY7 20:00 - 20:30
CHANNELGUIDE
18:19
Futureprog. Exit
Esc
Info+ Select
ok
6-6-4 Accessing current event
Press OK from the main screen when a current event is selected, which will stop the Channel Guide
application and will change channel to the corresponding service.
6-6-5 Setting future programs for Viewing / Recording
6-6-5-1 Program system
Press OK from the main screen when a future event is selected
to display the Program System screen.
For a locked service, the Channel Guide application will ask for PIN
code before tagging the event.
Press OK to program the system for viewing/recording the
selected event at a later time.
Press
ESC
to cancel the operation and go back to List Screen.
When system is programmed for recording or viewing an event, the
tag icon is displayed on the List Screen for the corresponding
event title.
Inter
active
CHANNELGUIDE
Futureevent Exit
Esc
Info Select
ok
Thursday5 April
Thursday5 April
Heaven'sBurning (18)HBOASIA1 19:00 - 20:45
Michael(U) 20:45- 22:30
WAILAI T2
STARWORL3
TVBSASIA6
20:00- 21:00
Goosed(18) 10:30 - 11:45
MTVMost WantedMTVASIA4 20:00 - 21:00
CARTOONT5 20:00 - 21:00
20:00- 21:00
WitchWorldDISNEY7 20:00 - 20:30
18:28
Yourselection is
Michael(U)
Back
Esc
Cancelyour prog.
ok
Inter
active
Futureprog. Exit
Esc
Info+ Select
ok
Thursday5 April
Friday6 April
Hook(U)HBOASIA1
WAILAI T2
16:30- 19:00
18:00- 19:00
Goosed(18)STAR WORL3
MTVASIA4
10:30- 11:45
FavouriteVideos 18:00- 19:00
18:00- 19:00
CARTOONT5
TVBSASIA6
DISNEY7
18:00- 19:00
SonicThe Hedgehog 18:00 - 18:30
SonicUnderground 18:30 - 19:00
CHANNELGUIDE
18:18
Lockedchannel
EnterPIN
++++
Cancel
Esc
Confirm
ok
6-6-5-2 Cancel program system
Press OK from the main screen when a future event with tagged
icon is selected to display the Cancel Program System Screen.
Press OK to cancel the program system.
Press
MENU
to cancel the operation; system will keep the pro-
grammed event for viewing / recording.
6-6-6 Entering PIN code
PIN code is required to program for recording an event broadcast
on a locked channel. The Channel Guide application will display
the PIN code Screen.
Press numerical button to enter the PIN code
Press OK to confirm the entered PIN code.
Press
ESC
to cancel the PIN code entering, in this case it will be
impossible to program system for recording the event associate to
the locked channel.
GB Chapitre 06.p65 28/05/01, 18:3415
Page 18

16
ENGLISH 7. TROUBLESHOOTING
7. Troubleshooting
Before requesting service for this Set Top Box, check the chart below for a possible cause of the problem
you are experiencing. Some simple checks or minor adjustment on your part may eliminate the problem
and restore proper operation.
If you are in doubt about some of the check points, or if the remedies indicated in the chart do not solve
the problem, consult Orbit services.
Symptom Remedy
No power Insert the AC mains lead securely into the AC mains supply.
No picture Ensure that the equipment is connected properly.
No sound • Ensure that the equipment is connected properly.
• Ensure that the input setting for the TV and stereo system are
correct.
• Adjust the master volume of the Set Top Box and/or the TV set.
No operation can be performed
with the remote control
• Check the batteries are installed with correct polarities.
• The batteries are depleted: replace them with new ones.
• Point the remote control unit at the front panel and operate.
• Operate the remote control unit at a distance of not more than
7m from the front panel.
• Remove the obstacles between the remote control unit and the
front panel.
You forgot your PIN code Contact Orbit services.
Error number displayed on the
front panel display
Contact Orbit services.
For others problems Contact Orbit services.
GB Chapitre 07.p65 28/05/01, 18:3716
Page 19

17
ENGLISH 8. OUTLINE SPECIFICATIONS
System capabilities
DVB compliant
Demodulator
Wave form QPSK
Symbol rate 3-30Mbauds
Code rate 1/2 to 7/8
Bandwidth 36Mhz
Video decoder
MPEG-2 Main Profile @ Main Level
Data rates 1.5 to 15 Mbit/s
Video formats 4:3, 16:9
Audio decoder
MPEG-2 layer I and II (Musicam Audio)
MPEG-1 supported
Mono, Stereo, Joint stereo (only in MPEG-2)
LNB / Tuner input
Connector 2 x F type
Input frequency 950 to 2150 MHz
LNB supply 13/18V, 400mA, max
Band switch control 22 KHz
Tuner : loop-through
Input signal level: -25 to 65 dBm
DiSEqC 1.1: (4 positions)
TV scart
RGB, CVBS, Audio
VCR scart
CVBS,Y/C out, RGB in, Audio
8. Outline specifications
Hi-Fi quality Audio output
Connector 2 x RCA (L/R)
Hi-Fi digital Audio output
Optical connector IEC958
Video CVBS output
Connector 1 x RCA
UHF modulator
Connector : 2 IEC (M/F)
Standard : PAL, K, B/G, I
Channels : 21-69 PLL
RS232 serial data interface
Connector 9-pin D-sub F
Signals RS232, max.115.2 Kbauds
Note: IRD seen as DCE
USB interface
USB host version 1.1
1.5 or 12Mbits/s
USB slave compliant with USB1.1
12Mbits/s
Return channel
Connector : 6 pin RJ11
Standard : V32Bis
Remote control
Type Sagem TLM-01
Operating distance up to 7 m
Batteries 2 x 1.5 V (type AA)
Back panel
2 x F LNB in and out
2 x IEC in / out Modulator in and out
2 x SCART TV, VCR
2 x RCA Audio L/R
1 x RCA Video CVBS
1 x 9-pin D-sub RS232
1 x RJ11 Modem V32bis
1 x optical connector Digital audio output
1 x USB typeA USB master
1 x USB typeB USB slave
1 x AC receptacle Main power supply
Front panel
Digit display 4
LEDs 2
Keys 3
IR receiver 1
Slot 2
General data
Color Gray
Accessories AC cord
Scart/RCA cable
RCA/RCA cable
Modem Cord
User manual
Operating temp. +5°C to +45°C
Supply voltage 110-220 VAC
50-60 Hz
Power consumption : max. 30 W
(stand-by 9 W)
Weight 2.5 kg
Dimensions 380 x 260 x 70 mm
Packaging 495 x 325 x 160 mm
Storage temp. -40°C to +70°c
GB Chapitre 08.p65 28/05/01, 18:3717
Page 20

18
FRANÇAIS
OK
P-
P+
-
+
0
4
5
6
7
8
9
1
G
@
2
3
TV
GUIDE MENU
PPV
ESC
Veillez à orienter directement la télécommande vers le terminal.
Touche / Key Fonction
Veille
TV
Liste des chaînes
GUIDE
Guide
MENU
Menu
PPV
Achat à la séance
Haut
Bas
Gauche
Droite
OK
Confirmer
Pilote
Message
Mosaïque
Sous-titres
Information
Dernière chaîne
Silence
orange Touche de couleur
jaune Touche de couleur
rouge Touche de couleur
vert Touche de couleur
bleu Touche de couleur
P+
Chaîne suivante
P-
Chaîne précédente
-
Volume -
+
Volume +
Stations radio
G
Jeux
@
Internet
ESC
Quitter/Annuler
0
... 90 à 9
FELICITATIONS !
Cette nouvelle génération de terminaux vous donne accès aux nouveaux services
numériques et vous permet, ainsi qu'à votre famille, de choisir les meilleurs programmes numériques proposés par les chaînes de télévision et les stations de radio.
Vous pourrez profiter pleinement de l'ensemble des services après avoir raccordé
votre terminal et l'avoir réglé selon vos préférences.
Vous pouvez mettre à jour votre terminal par l'intermédiaire des données émises par
le satellite au fur et à mesure de la disponibilité de nouvelles fonctions et de nouveaux
services.
ORBIT Set Top Box a mis en place une politique de développement permanent.
C'est pourquoi tout produit décrit dans ce livret peut faire l'objet de modifications et d'améliorations sans préavis.
Ce produit respecte la Directive CEM 89/336/EEC.
DiSEqC est une marque d'EUTELSAT.
SAGEM est une marque déposée de SAGEM SA.
FR Chapitre 00.p65 28/05/01, 17:2418
Page 21

19
FRANÇAIS SOMMAIRE
1. GÉNÉRALITÉS ..................................................................................................................... 20
1-1 Sécurité ............................................................................................................................ 20
1-2 Contenu du coffret ........................................................................................................... 20
1-3 Raccordement au secteur ................................................................................................ 20
1-4 Glossaire .......................................................................................................................... 20
2. DESCRIPTION GÉNÉRALE.................................................................................................. 21
2-1 Description de la face avant ............................................................................................. 21
2-2 Connecteurs de la face arrière ......................................................................................... 21
2-3 Télécommande ................................................................................................................21
2-3-1 Installation des piles ............................................................................................... 21
3. RACCORDEMENTS.............................................................................................................. 22
3-1 Introduction ...................................................................................................................... 22
3-2 Raccordement au téléviseur avec le cordon Scart et au magnétoscope
avec le cordon RCA ......................................................................................................... 22
3-3 Raccordement au téléviseur et au magnétoscope sans le cordon Scart.......................... 22
3-4 Raccordement au téléviseur et au magnétoscope avec le cordon Scart.......................... 22
3-5 Raccordement à un récepteur satellite analogique .......................................................... 23
3-6 Raccordement à un amplificateur Hi-Fi (option) ............................................................... 23
3-6-1 Sorties .................................................................................................................... 23
3-6-2 Connecteur optique de sortie audio numérique ...................................................... 23
3-7 Modem ............................................................................................................................. 23
3-8 Port série RS232 .............................................................................................................. 23
3-9 Interface USB................................................................................................................... 23
4. INSTALLATION DU TERMINAL ........................................................................................... 24
4-1 Menu principal.................................................................................................................. 24
4-2 Configuration.................................................................................................................... 24
4-2-1 Configuration automatique ...................................................................................... 24
4-2-2 Configuration manuelle ........................................................................................... 24
4-2-3 Paramètres techniques ........................................................................................... 25
4-2-4 Mise à jour automatique ......................................................................................... 25
4-3 Signal satellite .................................................................................................................. 25
4-4 Liste des services ............................................................................................................ 26
4-4-1 Chaînes favorites .................................................................................................... 26
4-4-2 Verrouillage/Déverrouillage..................................................................................... 26
4-5 Options ............................................................................................................................ 26
4-5-1 Choix de la langue du son ...................................................................................... 26
4-5-2 Choix de la langue des sous-titres .......................................................................... 26
4-5-3 Choix de la largeur de l'écran TV ............................................................................ 26
4-5-4 Sélection des Infos sur chaîne ................................................................................ 26
4-5-5 Saisie du code PIN ................................................................................................. 27
4-5-6 Contrôle parental .................................................................................................... 27
4-5-7 Signal vidéo TV....................................................................................................... 27
4-5-8 Signal audio TV ...................................................................................................... 27
4-5-9 Signal vidéo magnétoscope .................................................................................... 27
4-5-10 Signal audio magnétoscope.................................................................................. 27
4-6 Programmation personnalisée ......................................................................................... 27
4-7 Messages ........................................................................................................................ 27
5. UTILISATION DE VOTRE TERMINAL .................................................................................. 28
5-1 Changement de chaîne .................................................................................................... 28
5-2 Chaînes verrouillées ........................................................................................................28
5-3 Contrôle parental ............................................................................................................. 28
5-4 Occultation régionale .......................................................................................................29
5-5 Réglage du niveau sonore ............................................................................................... 29
5-5-1 Coupure du son ...................................................................................................... 29
5-5-2 Niveau sonore ........................................................................................................ 29
5-6 Choix de la langue du son et des sous-titres ................................................................... 29
5-7 Niveau du signal de réception .......................................................................................... 29
5-8 Afficheur de la face avant................................................................................................. 29
5-9 Touches de la face avant ................................................................................................. 29
5-10 Touches de la télécommande utilisées par le terminal................................................... 29
5-10-1 Menu.....................................................................................................................29
5-10-2 Mise en veille ........................................................................................................ 30
5-10-3 Accès aux applications interactives ...................................................................... 30
5-11 Numéros de téléphone à utiliser pour plus d'information................................................ 30
6. LISTE DES CHAÎNES ........................................................................................................... 31
6-1 Listes des chaînes ........................................................................................................... 31
6-2 Liste des chaînes favorites............................................................................................... 31
6-3 Liste de l'ensemble des chaînes ...................................................................................... 31
6-4 Message d'erreur ............................................................................................................. 31
6-5 Pilote TV .......................................................................................................................... 31
6-5-1 Écran principal ........................................................................................................ 31
6-5-2 Écran Info ............................................................................................................... 32
6-5-3 Fonctions des touches de la télécommande ........................................................... 32
6-6 Guide des chaînes ...........................................................................................................32
6-6-1 Écran principal ........................................................................................................ 32
6-6-2 Écrans Info ............................................................................................................. 33
6-6-3 Écran "Programmes à venir"................................................................................... 33
6-6-4 Accès à l'émission en cours.................................................................................... 33
6-6-5 Regarder / Enregistrer des programmes à venir ..................................................... 33
6-6-6 Saisie du code PIN ................................................................................................. 33
7. EN CAS DE PROBLÈME ...................................................................................................... 34
8. CARACTÉRISTIQUES .......................................................................................................... 35
FR Chapitre 00.p65 28/05/01, 17:2419
Page 22

20
FRANÇAIS 1. GÉNÉRALITÉS
1. Généralités
1-1 SÉCURITÉ
De façon à conserver les performances de votre terminal, veillez à :
• l'installer dans un endroit protégé contre la foudre, la pluie et le rayonnement solaire,
• l'installer dans un endroit sec et bien ventilé,
• le préserver de l'humidité,
• ne pas lui faire subir de chocs violents,
• le raccorder directement au secteur, l'utilisation d'une rallonge n'étant pas recommandée,
• ne rien poser sur le terminal afin de ne pas obstruer les ouïes d'aération.
Attention
• N'exposez pas le terminal à des projections liquides, qui pourraient l'endommager et entraîner
une panne. Ne tentez pas d'ouvrir le terminal : en cas de problème technique, contactez un
réparateur qualifié.
• Comme tout appareil électronique, le terminal contient des composants fragiles - mettez-le dans
un endroit où il ne risque pas de tomber, et hors de portée des enfants.
• Le boîtier du terminal peut être nettoyé avec un linge doux et sec. N'utilisez pas de tampon abrasif
ni de poudre décapante ou de solvants tels que l'alcool ou la térébenthine, qui pourraient
endommager la finition du coffret.
• Avant toute modification des raccordements TV, magnétoscope ou antenne, débranchez le
cordon secteur (depuis la prise murale ou le panneau arrière). Veillez à dégager l'accès à la prise
secteur.
• N'oubliez pas de mettre les piles dans la télécommande.
1-2 CONTENU DU COFFRET
Votre terminal est livré avec les accessoires suivants:
• une télécommande (1),
• 2 piles (R6-AA) pour la télécommande (2),
• un cordon Scart-RCA de raccordement au téléviseur ou au magnétoscope (3),
• un cordon triple RCA-RCA de raccordement au magnétoscope ou au téléviseur (4),
• un cordon secteur (5),
• un cordon modem RJ11-RJ11 (6),
• le présent livret utilisateur (7).
1
2
3
4
5
6
7
1-3 RACCORDEMENT AU SECTEUR
Le terminal doit être raccordé au moyen de son cordon secteur à une prise murale alimentée en
110/220V. Le cas échéant, actionnez l'interrupteur correspondant à cette prise murale.
1-4 GLOSSAIRE
BER Taux d'erreur binaire (Bit Error Rate)
CA Accès conditionnel (Conditional Access)
DiSEqC Digital Satellite Equipment Control
DVB Norme de diffusion numérique pour la télévision (Digital Video Broadcasting)
EPG Guide électronique de programmes (Electronic Program Guide)
FTA Diffusion libre (Free To Air)
LNB Tête de réception (Low Noise Block Converter)
LO Oscillateur local (Local Oscillator)
MPEG Motion Pictures Experts Group
MVM Mediahighway Virtual Machine
NIT Tableau d'informations réseau (Network Information Table)
OSD Affichage sur écran (On Screen Display)
PIN Code d'identification personnel (Personal Identification code)
PPV Achat à la séance (Pay Per View)
Chaîne favorite
Chaîne verrouillée
Émission programmée pour visualisation ou enregistrement
Contrôle parental
FR Chapitre 01.p65 28/05/01, 17:2620
Page 23

21
FRANÇAIS 2. DESCRIPTION GÉNÉRALE
2. Description générale
2-1 DESCRIPTION DE LA FACE AVANT
VertPorte Rouge
s
Xtra digital-XD 300
Touche de mise en veille / sortie de veille.
Touches de changement de chaîne.
LED rouge(*) Témoin de veille.
LED verte Témoin d'utilisation de la télécommande.
Afficheur à quatre chiffres
Carte à puce Deux emplacements pour cartes à puce sont prévus pour une utilisation future.
(*) non utilisée.
B
C
A
LMIH
JNO
KGEDCBA F
CAUTION
RISKOFELECTRICALSHOCK
DONOTOPEN
98-264V~ 50-60Hz
35W MAX
POWERSUPPLY
TELEPHONE
LINE
SLAVE
MASTER
VIDEO
TVSCART
AUDIO
L
R
RS232USB
VCRSCART
TV
ANTENNA
MODULATOR
400mA 13/18V
BISIN/OUT
LNBIN
LNBOUT
!
DIGITAL
AUDIO
2-2 CONNECTEURS DE LA FACE ARRIÈRE
A - Connecteur d'alimentation 110 volts à 220 volts, 50-60 Hz (**)
B - Connecteur USB Maître (*)
C - Connecteur USB Esclave (*)
D - Port données série (*)
E - Prise modem (*)
F - Connecteur de sortie audio numérique (*)
G - Entrée de l'antenne hertzienne (*)
H - Sortie RF TV ou magnétoscope (*)
I - Sortie vidéo composite (*)
J - Audio Hi-Fi, voie droite (*)
K - Audio Hi-Fi, voie gauche (*)
L - Prise Scart de raccordement au magnétoscope (*)
M - Prise Scart de raccordement au téléviseur (*)
N - Entrée LNB (*)
O - Sortie LNB (*)
(*) : Connecteur à basse tension de sécurité (TRT3) au sens de la norme EN60065
(**) : Connecteur à tension excessive au sens de la norme EN60065
2-3 TÉLÉCOMMANDE
2-3-1 Installation des piles
La télécommande fonctionne avec deux piles R6-AA.
Le schéma placé à l'intérieur du logement des piles indique comment les mettre en place.
Description de la télécommande page18.
FR Chapitre 02.p65 28/05/01, 17:2621
Page 24

22
FRANÇAIS 3. RACCORDEMENTS
3. Raccordements
3-1 INTRODUCTION
Il existe plusieurs façons de raccorder le terminal à votre système audio/TV. Certaines méthodes vous
permettront d'écouter de la musique en stéréo avec une qualité équivalente à celle d'un CD.
Contactez votre revendeur, qui pourra vous aider à configurer votre ensemble audio/vidéo afin de
répondre au mieux à vos besoins.
Avertissement:
Débranchez la prise secteur du terminal avant tout branchement ou débranchement d'un appareil.
3-2 RACCORDEMENT AU TÉLÉVISEUR AVEC LE CORDON SCART ET AU MAGNÉTOSCOPE AVEC LE CORDON RCA
Avant de procéder au raccordement de l'antenne satellite, débranchez le cordon secteur du terminal.
Le terminal se raccorde directement au téléviseur au moyen d'un cordon Scart. Branchez le cordon
Scart-RCA fourni avec l'appareil entre le connecteur TV Scart du terminal et les entrées RCA du
téléviseur:
• audio D = rouge,
• audio G = blanc,
• vidéo composite = jaune.
Raccordez ensuite le terminal au magnétoscope à l'aide du cordon RCA-RCA fourni. Utilisez le même
connecteur repéré par des couleurs pour l'identification de l'audio et de la vidéo.
CAUTION
RISKOFELECTRICALSHOCK
DONOTOPEN
98-264V~ 50-60Hz
35W MAX
POWERSUPPLY
TELEPHONE
LINE
SLAVE
MASTER
VIDEO
TVSCART
AUDIO
L
R
RS232USB
VCRSCART
TV
ANTENNA
MODULATOR
400mA 13/18V
BISIN/OUT
LNBIN
LNBOUT
!
DIGITAL
AUDIO
(non fourni)
VIDEO
3-3 RACCORDEMENT AU TÉLÉVISEUR ET AU MAGNÉTOSCOPE SANS LE CORDON
SCART
Avant de procéder au raccordement de l'antenne satellite, débranchez le cordon secteur du terminal.
A noter que les câbles RF nécessaires à cette configuration ne sont pas fournis.
La configuration du modulateur est: PAL B/G, canal62.
CAUTION
RISKOFELECTRICALSHOCK
DONOTOPEN
98-264V~ 50-60Hz
35W MAX
POWERSUPPLY
TELEPHONE
LINE
SLAVE
MASTER
VIDEO
TVSCART
AUDIO
L
R
RS232USB
VCRSCART
TV
ANTENNA
MODULATOR
400mA 13/18V
BISIN/OUT
LNBIN
LNBOUT
!
DIGITAL
AUDIO
Entrée RF
VIDEO
Sortie RF
Entrée RF
Antenne
hertzienne
3-4 RACCORDEMENT AU TÉLÉVISEUR ET AU MAGNÉTOSCOPE AVEC LE CORDON
SCART
Avant de procéder au raccordement de l'antenne satellite, débranchez le cordon secteur du terminal.
CAUTION
RISKOFELECTRICALSHOCK
DONOTOPEN
98-264V~ 50-60Hz
35W MAX
POWERSUPPLY
TELEPHONE
LINE
SLAVE
MASTER
VIDEO
TVSCART
AUDIO
L
R
RS232USB
VCRSCART
TV
ANTENNA
MODULATOR
400mA13/18 V
BISIN/OUT
LNBIN
LNBOUT
!
DIGITAL
AUDIO
(non fourni)
(non fourni)
VIDEO
FR Chapitre 03.p65 28/05/01, 17:2722
Page 25

23
FRANÇAIS 3. RACCORDEMENTS
3-5 RACCORDEMENT À UN RÉCEPTEUR SATELLITE ANALOGIQUE
Avant de procéder au raccordement de l'antenne satellite, débranchez le cordon secteur du terminal.
Pour continuer à recevoir des chaînes analogiques par l'intermédiaire du satellite, raccordez la sortie
LNB de votre terminal numérique à l'entrée de votre récepteur satellite analogique. Le récepteur satellite
analogique fonctionnera correctement après mise en veille de votre terminal.
CAUTION
RISKOFELECTRICALSHOCK
DONOTOPEN
98-264V~ 50-60Hz
35W MAX
POWERSUPPLY
TELEPHONE
LINE
SLAVE
MASTER
VIDEO
TVSCART
AUDIO
L
R
RS232USB
VCRSCART
TV
ANTENNA
MODULATOR
400mA 13/18V
BISIN/OUT
LNBIN
LNBOUT
!
DIGITAL
AUDIO
(non fourni)
Récepteur
satellite analogique
3-6 RACCORDEMENT À UN AMPLIFICATEUR HI-FI (OPTION)
Modem
Port
série RS232
Amplificateur Hi-Fi
CAUTION
RISKOFELECTRICALSHOCK
DONOTOPEN
98-264V~ 50-60Hz
35W MAX
POWERSUPPLY
TELEPHONE
LINE
SLAVE
MASTER
VIDEO
TVSCART
AUDIO
L
R
RS232USB
VCRSCART
TV
ANTENNA
MODULATOR
400mA 13/18V
BISIN/OUT
LNBIN
LNBOUT
!
DIGITAL
AUDIO
Interfaces
USB
Sortie
optique
3-6-1 Sorties
CAUTION
RISKOFELECTRICALSHOCK
DONOTOPEN
98-264V~ 50-60Hz
35W MAX
POWERSUPPLY
TELEPHONE
LINE
SLAVE
MASTER
VIDEO
TVSCART
AUDIO
L
R
RS232USB
VCRSCART
TV
ANTENNA
MODULATOR
400mA 13/18V
BISIN/OUT
LNBIN
LNBOUT
!
DIGITAL
AUDIO
AmplificateurHiFi
Vous pouvez raccorder votre terminal à un amplificateur Hi-Fi afin d'obtenir un meilleur confort d'écoute
comparable à celui des CD audio.
Le niveau sonore peut être réglé directement à partir de la commande de volume du terminal.
A noter que ce raccordement peut être effectué par l'intermédiaire du cordon RCA-RCA, en n'utilisant
que les connecteurs rouges et blancs.
3-6-2 Connecteur optique de sortie audio numérique
CAUTION
RISKOFELECTRICALSHOCK
DONOTOPEN
98-264V~ 50-60Hz
35W MAX
POWERSUPPLY
TELEPHONE
LINE
SLAVE
MASTER
VIDEO
TVSCART
AUDIO
L
R
RS232USB
VCRSCART
TV
ANTENNA
MODULATOR
400mA 13/18V
BISIN/OUT
LNBIN
LNBOUT
!
DIGITAL
AUDIO
Amplificateur HiFi
Retirez le capuchon de protection du connecteur optique de sortie audio numérique et insérez le câble
à fond dans son connecteur.
Conservez le capuchon de protection, et replacez-le sur le connecteur lorsque le câble n'est pas utilisé.
3-7 MODEM
CAUTION
RISKOFELECTRICALSHOCK
DONOTOPEN
98-264V~ 50-60Hz
35W MAX
POWERSUPPLY
TELEPHONE
LINE
SLAVE
MASTER
VIDEO
TVSCART
AUDIO
L
R
RS232USB
VCRSCART
TV
ANTENNA
MODULATOR
400mA 13/18V
BISIN/OUT
LNBIN
LNBOUT
!
DIGITAL
AUDIO
Ligne téléphonique
Le terminal peut être raccordé à une ligne téléphonique.
Raccordez votre téléphone en gigogne sur la prise modem.
Ce raccordement vous donne accès aux services proposés par ORBIT.
3-8 PORT SÉRIE RS232
Cette interface n'est pas utilisée pour l'instant. Veuillez contacter votre opérateur pour plus de détails.
3-9 INTERFACE USB
Cette interface sert au raccordement de systèmes périphériques.
FR Chapitre 03.p65 28/05/01, 17:2723
Page 26

24
FRANÇAIS 4. INSTALLATION DU TERMINAL
Inter
active
Welcometo the world of
ORBIT
Continue
ok
Inter
active
Installationsetup1
Satellitesignal2
MENU
Select
ok
Inter
active
Installationsetup1
Satellitesignal2
Options4
Listof services3
Personalisedscheduler5
Messages6
MENU
Exit
Esc
Select
ok
Inter
active
Autoconfiguration1
Manualconfiguration2
Autoupdate4
Technicalparameters3
INSTALLATIONSETUP
SelectokMenu
M
Inter
active
Thesystem has been
configuredto ORBIT's default
settings
AUTOCONFIGURATION
Menu
M
Inter
active
No.of services found: 103
DOWNLOAD LISTOF SERVICES
Downloading...
Menu
M
Inter
active
Inter
active
1
2
4
3
INSTALLATIONSETUP
SelectokMenu
M
PINEntry
EnterPIN
++++
Cancel
Esc
Confirm
ok
Appuyez sur OK pour lancer la recherche;la liste des canaux est
stockée en mémoire.
Inter
active
Country1
LNBPowering2
Basefrequency4
Polarisation3
Coderate5
Symbolrate6
Jordan
Off
Vertical
11.920GHz
7/8
27.5Mbauds
LNBUniversal7
LOFrequency8
No
10700
MANUALCONFIGURATION
Menu
M
L'appareil peut être configuré de différentes manières. Appuyez
sur les touches 1 à 6 pour modifier le paramètre correspondant
ou appuyez sur e t pour sélectionner le champ désiré.
Appuyez sur
MENU
pour revenir au menu principal. Toutes les
modifications effectuées seront enregistrées.
4-2-2-1 Pays (1)
Ce choix sert à définir le pays d'utilisation du terminal.
Liste des pays disponibles:
ALGERIE, ARABIE SAOUDITE, BAHREIN, CHAD, CHYPRE, DJIBOUTI, EGYPTE, EMIRATS ARABES UNIS, IRAN, IRAQ, JORDANIE, KOWEIT, LIBAN, LYBIE, MAROC, MAURITANIE, PALESTINE,
QATAR, SOMALIE, SOUDAN, SULTANAT D'OMAN, SYRIE, TUNISIE, YEMEN.
La liste de ces pays n'est pas limitative.
4. Installation du terminal
4-1 MENU PRINCIPAL
A la première mise sous tension du terminal, celui-ci se trouve
dans ce qui est appelé l'ETAT INITIAL.
Le menu d'installation est lancé automatiquement, et l'écran de
démarrage ci-contre s'affiche.
Appuyez sur OK pour afficher l'écran du menu principal.
Dans l'ETAT INITIAL, le menu principal ne propose que deux
choix:
1. INSTALLATION SETUP (CONFIGURATION)
2. SATELLITE SIGNAL (SIGNAL SATELLITE).
Les autres choix n'apparaissent pas et sont donc inaccessibles.
Une fois le terminal correctement installé, le menu principal
propose six choix.
Dans le menu principal, appuyez sur
ESC
pour revenir au mode TV
normal ou sélectionnez l'une des autres options à l'aide des
touches de navigation et appuyez sur OK pour confirmer votre
choix.
4-2-1 Configuration automatique
MAIN MENU
Ê INSTALLATION SETUP
Ê AUTOCONFIGURATION
Appuyez sur
MENU
pour revenir au menu principal.
Le chargement des valeurs par défaut des paramètres techniques
s'effectue, à l'exception du paramètre LO frequency.
Le téléchargement de la liste des canaux est impossible dans
l'ETAT INITIAL. Il doit s'effectuer depuis le menu satellite signal.
4-2-2 Configuration manuelle
MAIN MENU
Ê INSTALLATION SETUP
Ê MANUAL CONFIGURATION
Composez votre code PIN et confirmez par OK.
Le code PIN par défaut est 0000.
4-2 CONFIGURATION
MAIN MENU
Ê INSTALLATION SETUP
Appuyez sur
MENU
pour revenir au menu principal.
Appuyez sur 1, 2, 3 ou 4 pour accéder directement au
sous-menu désiré ou appuyez sur et pour sélectionner l'un de ces quatre sous-menus, et appuyez sur OK pour
accéder au champ sélectionné.
FR Chapitre 04.p65 28/05/01, 17:2924
Page 27

25
FRANÇAIS 4. INSTALLATION DU TERMINAL
Inter
active
LNBpowering1
Polarisation2
Basefrequency4
LOfrequency3
Coderate5
Symbolrate6
Off
Horizontal
09.750GHz
11.400GHz
3/4
27.5Mbauds
39
MANUALCONFIGURATION
Menu
M
ERROR
Invalidvalue entered
Thedefault value has been restored
Note:The valid range is between
10000and 13000
Exit
Esc
4-2-2-2 Alimentation LNB (2)
Ce choix sert à mettre l'alimentation LNB en ou hors service. Le réglage s'effectue au moyen des
touches et .
4-2-2-3 Polarité (3)
Cette option sert à régler la polarité sur HORIZONTAL ou VERTICAL. Le réglage s'effectue au moyen
des touches et .
4-2-2-4 Fréquence de base (4)
Cette option sert à régler la fréquence de base sur une valeur
comprise entre 10000 et 13000.
La saisie d'une valeur incorrecte provoque l'affichage du message
d'erreur ci-contre:
Inter
active
TECHNICALPARAMETERS
Country1
LNBpowering2
LOfrequency4
Polarisation3
Basefrequency5
Coderate6
:Jordan
:On
:Vertical
:10.600 GHz
:11.920 GHz
:7/8
Symbolrate7 :27.5
Nextpage
Menu
M
Inter
active
:SAGEMManufacturer8
Hardwareversion9
Manufacturerupdate11
Runupdate version14
:12
:16Softwareversion10
:0.0.0.0
:0.40.30.4APIversion12
:0.7.4.0Runversion13
:0.0.0.0
:049-123456789-76Authorisationnumber15
TECHNICALPARAMETERS
Previouspage
Menu
M
4-2-4 Mise à jour automatique
MAIN MENU
Ê INSTALLATION SETUP
Ê AUTO UPDATE
L'écran ci-contre s'affiche avant le début de la mise à jour automatique :
Au cours du téléchargement et de l'écriture en mémoire flash, les touches de la télécommande et de
la face avant sont désactivées.
A la première étape du téléchargement, le message suivant s'affiche sur la face avant:
Pendant le téléchargement, un message de progression est affiché sur la face avant.
Le téléchargement est terminé lorsque le message suivant apparaît sur la face avant:
Patientez alors encore quelques instants pendant que le terminal redémarre automatiquement.
Si une erreur se produit, ce message est affiché sur la face avant; dans ce cas, contactez les services
d'ORBIT:
4-3 SIGNAL SATELLITE
MAIN MENU
Ê SATELLITE SIGNAL
Appuyez sur
MENU
pour revenir au menu principal.
Le téléchargement de la liste des services est possible si l'indicateur BER est à 0.
Inter
active
Autoconfiguration1
Manualconfiguration2
Autoupdate4
Technicalparameters3
INSTALLATIONSETUP
SelectokMenu
M
Autoupdate
Toupdate the system, please
pressOK to begin download
Cancel
Esc
Confirm
ok
Appuyez sur OK pour lancer le téléchargement de la liste des
services.
Appuyez sur OK pour télécharger les chaînes.
Appuyez sur
MENU
pour annuler le téléchargement.
Inter
active
0 100
77
(AGC)
0(BER)Marginal
Good
Poor
SATELLITESIGNAL
DownloadokMenu
M
4-2-2-5 Débit de code (5)
Le débit de code peut prendre l'une des valeurs suivantes : 1/2, 2/3, 3/4, 4/6, 7/9 ou Auto.
4-2-2-6 Débit des symboles (6)
Le débit des symboles peut prendre l'une des valeurs suivantes : 22, 27, 27,5 ou 30.
4-2-3 Paramètres techniques
MAIN MENU
Ê INSTALLATION SETUP
Ê TECHNICAL PARAMETERS
Appuyez sur
MENU
pour revenir au menu principal.
Appuyez sur pour passer à la page suivante.
Appuyez sur
MENU
pour revenir au menu principal.
Appuyez sur pour revenir à la page précédente.
Ces informations sont consultables par l'opérateur en cas de
problème technique.
Inter
active
No.of services found: 103
DOWNLOAD LISTOF SERVICES
Downloading...
Menu
M
Inter
active
FR Chapitre 04.p65 28/05/01, 17:3125
Page 28

26
FRANÇAIS 4. INSTALLATION DU TERMINAL
Une fois le téléchargement correctement effectué, l'écran cicontre apparaît :
Appuyez sur et pour parcourir la liste des chaînes.
Appuyez sur pour voir la page suivante (huit chaînes).
Appuyez sur pour voir la page précédente.
Appuyez sur OK pour voir la chaîne sélectionnée.
4-4 LISTE DES SERVICES
MAIN MENU
Ê LIST OF SERVICE
Appuyez sur OK pour verrouiller ou déverrouiller une chaîne.
Dans le cas du verrouillage, un symbole représentant un verrou
s'affiche.
Appuyez sur la touche verte pour activer ou désactiver le statut de
chaîne favorite. Dans le cas de l'activation, l'icône indique que
la chaîne fait partie de la liste des chaînes favorites.
Appuyez sur et pour parcourir la liste des chaînes.
Appuyez sur et pour afficher la page contenant les huit chaînes précédentes.
Appuyez sur 0 à 9 pour composer le numéro de la chaîne.
4-4-1 Chaînes favorites
A la première entrée dans ce menu, le code PIN est demandé s'il
ne l'a pas déjà été au cours de l'opération de Verrouillage/
Déverrouillage.
Appuyez sur la touche verte pour activer ou désactiver le statut de
chaîne favorite.
Inter
active
ORBIT11
ORBIT22
ORBIT44
ORBIT77
ORBIT33
ORBIT55
ORBIT66
ORBIT88
LISTOF SERVICES
ViewokMenu
M
4-5 OPTIONS
MAIN MENU
Ê OPTIONS
Appuyez sur la touche verte pour afficher la deuxième page.
Appuyez sur la touche verte pour afficher la première page.
Appuyez sur
MENU
pour revenir au menu principal.
Le terminal peut être réglé de différentes manières. Appuyez sur
les touches 0 à 6 pour sélectionner le paramètre correspondant ou sur et pour sélectionner le champ désiré.
4-5-1 Choix de la langue du son
(option 1 - page 1)
Choisissez la langue des programmes audio au moyen des
touches et . Les choix possibles sont:
• ARABE,
• ANGLAIS,
• FRANÇAIS.
4-5-2 Choix de la langue des sous-titres
(option 2 - page 1)
Choisissez la langue des sous-titres au moyen des touches et . Les choix possibles sont:
• ARABE,
• ANGLAIS,
• FRANÇAIS,
• OFF.
4-5-3 Choix de la largeur de l'écran TV
(option 3 - page 1)
Si votre téléviseur est raccordé au terminal par le cordon Scart, choisissez:
• 4/3 pour un téléviseur au format standard,
• 16/9 pour un téléviseur au format large.
Par ce réglage, le terminal adapte automatiquement l'affichage au format de votre téléviseur.
4-5-4 Sélection des Infos sur chaîne
(option 4 - page 1)
Les infos sur chaîne peuvent être affichées ou masquées au moyen des touches et :
• ON - dans ce cas, la bannière de zapping est affichée,
• OFF - dans ce cas, la bannière de zapping n'est pas affichée.
Inter
active
ORBIT11
ORBIT22
ORBIT44
ORBIT77
ORBIT33
ORBIT55
ORBIT66
ORBIT88
LISTOF SERVICES
Lock/UnlockokMenu
M
Favourite
Inter
active
FTA72521
FTA73522
FTA75524
FTA78527
FTA74523
FTA76525
FTA77526
FTA79528
LISTOF SERVICES
Lock/UnlockokMenu
M
Favourite
Inter
active
521
522
524
527
523
525
526
528
LISTOF SERVICES
Lock/UnlockokMenu
M
Favourite
FTA72
FTA73
FTA75
FTA78
FTA74
FTA76
FTA77
FTA79
SetPIN
EnterPIN
++++
Cancel
Esc
Confirm
ok
Inter
active
Preferredaudio language1
Preferredsubtitle language2
Channelinfo4
English
Arabic
Screenwidth3 Normal
On
Setpin5
Setmaturity rating6
1
OPTIONS
NextPage Menu
M
Inter
active
TVsignal1
TVaudio2
VCRaudio4
Composite
Stereo
VCRsignal3PAL
Stereo
OPTIONS
PreviousPage Menu
M
4-4-2 Verrouillage/Déverrouillage
A la première entrée dans ce menu, le code PIN est demandé s'il
ne l'a pas déjà été au cours de l'opération d'Activation/Désactivation des chaînes favorites.
Appuyez sur OK pour activer ou désactiver le verrouillage/
déverrouillage.
FR Chapitre 04.p65 28/05/01, 17:3226
Page 29

27
FRANÇAIS 4. INSTALLATION DU TERMINAL
4-5-5 Saisie du code PIN
(option 5 - page 1)
Appuyez sur
MENU
pour revenir au menu Options.
Composez votre code PIN et appuyez sur OK.
Le même écran s'affiche avec la mention Please enter new PIN.
Composez le nouveau code PIN et appuyez sur OK.
Le même écran s'affiche avec la mention Please confirm new PIN.
Composez à nouveau votre code PIN et appuyez sur OK.
L'écran ci-contre s'affiche lorsque le code saisi est incorrect:
Inter
active
Preferredaudio language1
Preferredsubtitle language2
Channelinfo4
English
English
Screenwidth3 Normal
On
Setpin5
Setmaturity rating6
A
OPTIONS
Menu
M
Select
ok
Next
SetPIN
Pleaseenter current PIN
++++
Cancel
Esc
Confirm
ok
Inter
active
Preferredaudio language1
Preferredsubtitle language2
Channelinfo4
English
English
Screenwidth3 Normal
On
Setpin5
Setmaturity rating6
A
OPTIONS
Menu
M
Select
ok
Next
SetPIN
Pleaseenter the current PIN
Incorrectentry!
Tryagain
++++
Cancel
Esc
Confirm
ok
L'écran ci-contre s'affiche si le code PIN a été modifié avec
succès:
Inter
active
Preferredaudio language1
Preferredsubtitle language2
Channelinfo4
English
English
Screenwidth3 Normal
On
Setpin5
Setmaturity rating6
A
OPTIONS
Menu
M
Select
ok
Next
SetPIN
Attention! Please remember
PINfor later use
Confirm
ok
Inter
active
Preferredaudio language1
Preferredsubtitle language2
Channelinfo4
English
English
Screenwidth3 Normal
On
Setpin5
Setmaturity rating6
1
OPTIONS
Menu
M
Select
ok
Next
Setmaturity rating
Pleaseselect maturity rating
toview programmes
Exit
Esc
Select
ok
1
X
4-5-6 Contrôle parental
(option 6 - page 1)
Appuyez sur
MENU
pour revenir au menu Options et sauvegarder le
contrôle parental. Si l'utilisateur choisit X, le code PIN sera
demandé pour les émissions réservées aux adultes.
4-5-7 Signal vidéo TV
(option 1 - page 2)
Sélectionnez l'un des formats de signal vidéo suivants à l'aide des
touches et :
• COMPOSITE: pour une sortie vidéo composite,
• RGB: pour une sortie en Rouge/Vert/Bleu (RVB),
Inter
active
12.04ORBIT11
free2
free4
free7
11:30 14:00
free3
free5
free6
free8
PERSONALISED SCHEDULER
Menu
M
4-7 MESSAGES
MAIN MENU
Ê MESSAGES
Appuyez sur les touches de navigation , , et
pour choisir le message à afficher.
Appuyez sur
MENU
pour revenir au menu principal.
Le terminal conserve 10 messages en mémoire. Si 10 messages
sont déjà présents, chaque nouveau message reçu efface le plus
ancien.
4-5-8 Signal audio TV
(option 2 - page 2)
Sélectionnez l'un des types audio suivants à l'aide des touches et :
• STEREO: pour une sortie audio stéréophonique,
• MONO: pour une sortie audio monophonique.
4-5-9 Signal vidéo magnétoscope
(option 3 - page 2)
Sélectionnez l'un des formats de signal vidéo suivants à l'aide des touches et :
• PAL: pour une sortie vidéo normale en PAL composite,
• SVHS: pour une sortie vidéo en SVHS.
4-5-10 Signal audio magnétoscope
(option 4 - page 2)
Sélectionnez l'un des types audio suivants à l'aide des touches et :
• STEREO: pour une sortie audio stéréophonique,
• MONO: pour une sortie audio monophonique.
4-6 PROGRAMMATION PERSONNALISÉE
MAIN MENU
Ê PERSONALISED SCHEDULER
(Menu information seulement)
Cet écran présente les émissions que vous avez choisi d'enregistrer, préalablement sélectionnées via le Guide des Chaînes.
Appuyez sur
MENU
pour revenir au menu principal.
Inter
active
Installationsetup1
Satellitesignal2
Options4
Listof services3
Personalisedscheduler5
Messages6
MENU
SelectokExit
M
MESSAGES 1/10
05/04/2001TEST 0002
05/04/2001TEST 0002
05/04/2001TEST 0002
Helloevery body
Back
Esc
FR Chapitre 04.p65 28/05/01, 17:3327
Page 30

28
FRANÇAIS
5. UTILISATION DE VOTRE TERMINAL
5-1 CHANGEMENT DE CHAÎNE
Pendant que vous regardez une chaîne TV:
• Appuyez sur P+ et P- pour passer d'une chaîne à l'autre dans l'ordre où elles ont été
mémorisées. Lorsqu'une chaîne apparaît à l'écran, la bannière reste affichée pendant quelques
secondes, selon le réglage effectué dans le menu principal.
• Entrez directement le numéro de la chaîne à l'aide des touches numériques de la télécommande.
Pour entrer un nombre de 1 à 3 chiffres, appuyez sur la ou les touches correspondantes et
attendez 1 seconde. Le numéro de la chaîne apparaît sur la droite de l'écran au fur et à mesure.
Il n'y a pas de procédure de confirmation. La chaîne apparaît dès que son numéro à 1, 2 ou 3 chiffres
a été entré.
Une bannière apparaît pendant environ 5 secondes. Elle indique
le nom et les attributs de la chaîne, l'émission en cours ainsi que
ses heures de début et de fin.
Si le numéro entré ne correspond à aucune chaîne, le message cicontre apparaît et la chaîne précédemment regardée reste à
l'écran (par exemple, si la chaîne 75 n'existe pas).
4 Orbit3 18:28
ORBIT3 filter 5 17:00- 19:00
75
Nochannel at thisnumber
141 CLIMBING TS
This channel is not includedin your subscription.
Please contact ORBIT.
5. Utilisation de votre terminal
Si le numéro entré correspond à une chaîne proposant un service
particulier (par exemple, chaîne offrant un service d'achat à la
séance) et que le terminal ne possède pas les droits correspondants, le message ci-contre apparaît à l'écran.
2 ORBIT2 Channel locked
Unlock
ok
2 ORBIT2
Enter PIN
++++
Cancel
Esc
Confirm
ok
2 ORBIT2
Wrong PIN entered
Try again
ok
2AT2
Parental guidance forpr ogram exceeded
Toenter PIN
ok
5-2 CHAÎNES VERROUILLÉES
Si l'utilisateur sélectionne une chaîne verrouillée, l'avertissement
ci-contre apparaît.
La chaîne ne peut être regardée sans le code PIN. L'image
affichée est celle de la dernière chaîne visualisée.
Appuyez sur OK pour accéder au menu de saisie du code. Utilisez
la procédure habituelle pour changer de chaîne.
Le menu d'entrée du code s'affiche à l'écran.
Appuyez sur
ESC
pour annuler la procédure en cours et revenir à
l'affichage précédent.
Entrez le code à l'aide des touches numériques et modifiez-le au
besoin à l'aide des touches et . Pour des raisons de
confidentialité, le code n'apparaît pas à l'écran et les chiffres sont
remplacés par des astérisques (*).
Appuyez sur OK pour confirmer la saisie.
Si le code est correct, l'émission en cours de la chaîne concernée
devient accessible et peut être regardée.
Dans le cas contraire, le message ci-contre apparaît.
Appuyez sur OK pour revenir au menu d'entrée du code et entrez
un autre code PIN.
5-3 CONTRÔLE PARENTAL
Si l'utilisateur sélectionne une chaîne et que l'émission en cours
n'est pas visible par tous publics, l'avertissement ci-contre apparaît en haut de l'écran.
La chaîne ne peut être regardée sans le code d'accès. L'image
affichée est celle de la dernière chaîne visualisée.
Appuyez sur OK pour accéder au menu de saisie du code. Utilisez
la procédure habituelle pour changer de chaîne.
FR Chapitre 05.p65 28/05/01, 17:3728
Page 31

29
FRANÇAIS
5. UTILISATION DE VOTRE TERMINAL
4 Channel Audio English
Subtitle English
5-4 OCCULTATION RÉGIONALE
Si des critères géographiques d'interdiction d'accès sont détectés
concernant l'émission en cours sur la chaîne sélectionnée, l'avertissement ci-contre apparaît en haut de l'écran.
2AT2
This channel is not available
in yourr egion
5-5 RÉGLAGE DU NIVEAU SONORE
Le niveau de sortie audio de la prise Scart du téléviseur peut être totalement désactivé ou réglé à l'aide
de la télécommande. Le niveau de sortie audio des autres sorties (RCA et magnétoscope) est étalonné
et ne peut être modifié.
5-5-1 Coupure du son
Appuyez sur pour couper et rétablir le son. Lorsque l'on coupe le son, le symbole reste
affiché un court instant sur la droite de l'écran.
Lorsqu'on rétablit le son, le symbole reste affiché un court instant sur la droite de l'écran.
5-5-2 Niveau sonore
Appuyez sur + et - pour augmenter ou diminuer le niveau sonore par incréments de 2dB, de -12dB
à +6dB. Si le son est coupé, l'appui sur l'une de ces touches le rétablira.
Appuyez sur - pour diminuer le niveau sonore. Le symbole reste affiché un court instant sur
la droite de l'écran. Appuyez sur + pour augmenter le niveau sonore. Le symbole reste affiché
un court instant sur la droite de l'écran.
5-6 CHOIX DE LA LANGUE DU SON ET DES SOUS-TITRES
En cours d'émission, appuyez sur pour accéder au menu de
modification de la langue du son et des sous-titres.
Une bannière s'affiche en bas de l'écran, elle disparaît au bout de
3 secondes.
Appuyez sur e t pour sélectionner le champ audio ou
sous-titres.
Appuyez sur et pour sélectionner la langue du son ou des
sous-titres (seule la piste audio diffusée peut-être sélectionnée).
La valeur "no" permet de désactiver les sous-titres. Si aucun sous-titre n'est disponible, la seule valeur
sera "none".
800 DT Services currently not available
Touche de la
face avant
Touche de la
télécommande
P+
P-
5-7 NIVEAU DU SIGNAL DE RÉCEPTION
Si le signal TV reçu est trop faible pour un service normal, l'un des
symboles suivants peut apparaître sur la droite de l'écran:
• Cercle orange: Mauvaise réception (équivaut à la couleur
orange sur le barographe de réception de l'antenne parabolique).
• Carré rouge: Pas de porteuse (équivaut à la couleur rouge
sur le barographe de réception de l'antenne parabolique).
5-8 AFFICHEUR DE LA FACE AVANT
Avant la première mise en service du terminal, l'afficheur se présente sous la forme
suivante:
5-10 TOUCHES DE LA TÉLÉCOMMANDE UTILISÉES PAR LE TERMINAL
5-10-1 Menu
Appuyez une fois sur
MENU
pour accéder au menu de configuration principal. Appuyez sur
ESC
pour sortir
du menu principal et revenir au programme précédent.
Mise en veille
Chaîne suivante
Chaîne précédente
La mise sous tension du terminal initialise l'horloge interne, qui passe à 00:00 et
commence à s'incrémenter.
Lorsque le terminal est activé et s'il n'est pas syntonisé sur un
programme interactif, la lettre P apparaît sur l'afficheur, suivie du
numéro de la chaîne (exemples pour les chaînes 10 et 200).
5-9 TOUCHES DE LA FACE AVANT
Les trois touches en face avant du terminal correspondent aux touches suivantes de la télécommande:
FR Chapitre 05.p65 28/05/01, 17:3829
Page 32

30
FRANÇAIS
5. UTILISATION DE VOTRE TERMINAL
5-10-2 Mise en veille
Indépendamment du mode dans lequel se trouve le terminal, appuyez sur pour mettre le terminal
en veille. Le terminal est réactivé par un appui sur n'importe quelle touche, ou lorsqu'une opération
préprogrammée commence.
5-10-3 Accès aux applications interactives
Un appui sur la touche lance le Pilote.
Un appui sur la touche
GUIDE
lance le guide des chaînes.
Un appui sur la touche TV lance la liste des chaînes.
5-11 NUMÉROS DE TÉLÉPHONE À UTILISER POUR PLUS D'INFORMATION
KSA - (appel gratuit) 800 124 4455 Fax: (966) 1 4761846
Koweit - (965) 802 999 Fax: (965) 2437767
EAU - 800 4442 Fax: (971) 4 3369684
Jordanie - (962) 6 5511615 Fax: (962) 6 5511617
Liban - (961) 1 748410 Fax: (961) 748407
Afrique du Nord - (216) 1 766953 Fax: (216) 1 766990
Afrique - (971) 4 3351513 Fax: (971) 4 3352523
Egypte - (202) 5242888 Fax: (202) 5241700
Europe et autres pays:
Chypre - service 24h (357) 909 5000 Fax: (357) 909 5333
FR Chapitre 05.p65 28/05/01, 17:3830
Page 33

31
FRANÇAIS 6. LISTE DES CHAÎNES
6-1 LISTES DES CHAÎNES
La fonction Liste des Chaînes permet d'afficher deux types de liste:
• liste des chaînes favorites:seules les chaînes favorites sont affichées,
• liste de l'ensemble des chaînes: toutes les chaînes sont affichées.
Un appui sur la touche TV lance l'application Channel List.
La première liste affichée est celle des chaînes favorites.
Une action sur la touche TV pendant l'affichage d'une liste de chaînes permet de passer alternativement
du mode "chaîne favorite" au mode normal.
6-2 LISTE DES CHAÎNES FAVORITES
La Liste des Chaînes (Channel List) s'affiche dans le quart inférieur gauche de l'écran. Il s'agit d'une liste
déroulante de chaînes mémorisées et de leurs attributs propres (favorite, verrouillée).
Chaque chaîne est affichée par ordre numérique avec son nom et
ses attributs (un cur indique qu'il s'agit d'une chaîne favorite, un
symbole représentant un verrou indique que l'accès à la chaîne
n'est possible qu'après saisie d'un code parental).
L'utilisateur peut se déplacer à loisir dans cette liste.
La navigation dans la liste se fait au moyen des touches e t
.
Le changement de page se fait au moyen des touches et .
Pour fermer la Liste des Chaînes, utilisez la touche
ESC
.
Pour fermer la liste et accéder à la chaîne sélectionnée, utilisez la touche OK.
Pour accéder dans la liste à un numéro de chaîne particulier, utilisez les touches numériques.
Pour accéder à la liste de l'ensemble des chaînes, utilisez la touche TV.
6-3 LISTE DE L'ENSEMBLE DES CHAÎNES
Pour accéder à la liste des chaînes favorites, utilisez la touche TV.
100
88
25
54
55
26
Exit
Esc
SelectokAll
TV
Star movies
Orbit ISPN
CNN
Orbit News
Nationalgeo
CBS
100 Star movies
88 Orbit ISPN
25 CNN
54 Orbit News
55 CBS
26 National geo
Exit
Esc
SelectokFavourite
TV
6. Liste des chaînes
No channel
atthis number
Back
ok
2 ORBIT2 16:24
NOW ORBIT2 titres 28
NEXT ORBIT2 titres 29
15:55 - 16:30
16:30 - 18:00
Exit
Esc
SelectokInfo+
Nomde
lachaîne
Nomdu
programme
Navigateur
Heure
courante
Numérode
lachaîne
Attribut
duservice
(favori,
verrouillé)
Nomde
l'émission
encours
Heure
dedébut
Heure
defin
6-5 PILOTE TV
Le Pilote TV (TV Pilot) permet l'accès rapide aux informations concernant les émissions en cours et à
venir diffusées par les différentes chaînes du diffuseur. On y accède depuis n'importe quelle chaîne en
appuyant sur .
6-5-1 Écran principal
Lorsque le Pilote TV est lancé, la bannière affiche des informations
sur le service en fonctionnement.
La bannière est située au bas de l'écran. Elle affiche des informations sur l'émission en cours de la chaîne courante. Le numéro et
le nom de la chaîne sont affichés. Un cur apparaît s'il s'agit d'une
chaîne favorite, ainsi qu'un symbole représentant un verrou si
l'accès à cette chaîne est contrôlé. La chaîne depuis laquelle le
Pilote TV a été lancé n'est pas interrompue, l'image reste visible et
le son reste audible.
En plus du nom de l'émission, sont affichés un bref résumé de celle-ci, son heure de début et son heure
de fin.
Le Pilote TV permet à l'utilisateur de parcourir les émissions en cours et à venir diffusées par chacune
des chaînes et, éventuellement, d'y accéder directement.
Pour ce faire, on peut positionner une barre de sélection sur l'une des émissions, dont le titre figure alors
dans un encadré bleu.
Appuyez sur ou pour choisir l'émission en cours ou à venir de la chaîne courante. Appuyez
ensuite sur pour obtenir un complément d'information sur l'émission sélectionnée.
La bannière peut également être utilisée pour consulter les émissions en cours et à venir des autres
chaînes.
Les touches de navigation et permettent à l'utilisateur de consulter les informations relatives aux
autres services.
6-4 MESSAGE D'ERREUR
Si l'utilisateur entre un numéro de chaîne ne correspondant pas à
une chaîne accessible, un message d'erreur s'affiche et la liste des
chaînes réapparaît après appui sur le bouton OK.
FR Chapitre 06.p65 28/05/01, 17:5131
Page 34

32
FRANÇAIS 6. LISTE DES CHAÎNES
98 Channelnot found
Exit
Esc
16:25
15:55 - 16:30Match
News and factual
First rafting eventof theseason,
counting forthe national championship
41 Orbit ESPN
Exit
Esc
Back
Heure
courante
Description
del'émission
Contrôle
parental
Nomde
l'émission
Heure
dedébut
Heure
defin
Descriptionde la chaîne:
numéro,nom, verrouillée, favorite
Vous pouvez obtenir directement des informations de type Pilote
TV ayant trait au service en sélectionnant le numéro de chaîne
correspondant à l'aide des touches numériques. Si aucune chaîne
n'est associée à ce numéro, un message d'erreur apparaît à
l'écran pendant environ 3 secondes.
Si le numéro entré est correct, les émissions de la chaîne sélec-
tionnée sont affichées. Puis, si vous appuyez sur OK, le terminal
passe sur cette chaîne.
Appuyez sur
MENU
pour sortir du Pilote TV et revenir à la chaîne en
cours.
6-5-2 Écran Info
Un appui sur alors que la barre de sélection se trouve sur
l'émission en cours provoque l'affichage de la bannière ci-contre.
L'écran Info affiche le nom de l'émission, avec son heure de début
et son heure de fin, ainsi qu'un bref résumé.
Un symbole peut également être présent, donnant certaines
caractéristiques de l'émission.
Ce symbole sert à empêcher les enfants de regarder des
programmes qui ne leur sont pas destinés. Il s'affiche lorsque
l'émission n'est visible que par une personne adulte.
Si la description de l'émission est trop longue, appuyez sur pour accéder au reste de la
description.
Appuyez sur pour revenir à l'écran précédent. Appuyez sur pour revenir à la bannière
principale.
Le son est audible et l'image visible lorsque l'écran Info est affiché.
Attention: L'image à l'écran est celle de la chaîne depuis laquelle le Pilote TV a été lancé, même si
un autre service est affiché par le Pilote TV.
Lorsque l'on appuie sur alors que la barre de sélection se trouve sur l'émission à venir, le même écran
Info apparaît, décrivant l'émission suivante.
Appuyez sur
ESC
, pendant l'affichage de l'écran Info pour sortir du Pilote TV et revenir à la chaîne en
cours.
Touche Bannière principale
Lancer l'écran Info
Fenêtre de description
de l'émission
Revenir à l'écran principal
Sélectionner la chaîne précédente ou
suivante
Sans effet
Naviguer dans la bannière Faire défiler le texte
OK
Quitter le Pilote TV et accéder à la
chaîne sélectionnée
Quitter le Pilote TV et accéder à la
chaîne sélectionnée
ESC
Retour au mode TV Retour au mode TV
0
to
9
Saisie numérique, navigation dans la
bannière
Sans effet
Couper le son Couper le son
Mise en service/en veille Mise en service/en veille
Inter
active
Friday31 March
CHANNELGUIDE
16:30
Futureprog. Exit
Esc
Info Select
ok
Animatedpicture
Inter
active
Thursday5 April
CHANNELGUIDE
19:39
Exit
Esc
Noinformation available
Channelguide will be ended
Exit
ok
Les autres touches sont sans effet.
6-6 GUIDE DES CHAÎNES
Le Guide des Chaînes (Channel Guide) donne la liste des émissions diffusées par chaque chaîne au
cours des sept jours suivant le jour courant.
On y accède depuis n'importe quelle chaîne en appuyant sur
GUIDE
.
6-6-1 Écran principal
Au lancement du Guide des Chaînes, l'écran principal fait apparaître une animation pendant le chargement des données.
S'il n'y a pas de données émises par le satellite, un message
d'erreur apparaît, indiquant la fermeture du Guide des Chaînes.
Un appui sur OK provoque la fermeture du Guide des Chaînes et
le retour à la chaîne courante.
6-5-3 Fonctions des touches de la télécommande
FR Chapitre 06.p65 28/05/01, 17:5232
Page 35

33
FRANÇAIS 6. LISTE DES CHAÎNES
Inter
active
Thursday5 April
Thursday5 April
Hook(U)HBOASIA1
WAILAI T2
16:30- 19:00
18:00- 19:00
Goosed(18)STAR WORL3
MTVASIA4
10:30- 11:45
FavouriteVideos 18:00- 19:00
CARTOONT5 18:00 - 19:00
TVBSASIA6
DISNEY7
18:00- 19:00
SonicThe Hedgehog 18:00 - 18:30
SonicUnderground 18:30 - 19:00
CHANNELGUIDE
18:18
Futureprog. Exit
Esc
Info+ Select
ok
Inter
active
Friday31 March
BrainscranAl Thania99
Brainscranis a new CD-ROM computer game that promisesto
"interfacewith your unconscious". But what it delivers to
teenagecomputer whiz Edward FURLONG is involvement in
murderand mutilation. Under the game's influence, he dreams
ofkilling...
14:54- 15:32
MORE INFORMATION
16:30
Exit
Esc
Back
A l'ouverture du Guide des Chaînes, un écran s'affiche.
Cet écran contient une liste de huit émissions. Pour chacune
d'entre elles sont affichés le numéro de la chaîne, le nom de la
chaîne (sur 9 caractères au maximum), le titre et les heures de
début et de fin de l'émission. Les émissions sont classées par
chaîne et, à l'intérieur de ce classement, par heure de début,
correspondant à l'horaire courant.
La date et l'heure courantes sont affichées en haut et à gauche de
l'écran.
La date de l'émission sélectionnée apparaît juste au-dessus de la liste.
Utilisez les touches et pour déplacer la barre de sélection.
Appuyez sur ou pour afficher les horaires de la liste d'émissions suivantes, le cas échéant.
Entrez un numéro de chaîne à l'aide des touches numériques pour placer la barre de sélection sur la
première émission de la chaîne.
La touche VERTE permet d'accéder au contenu des programmes à venir.
La touche
ESC
ferme le Guide des Chaînes et fait revenir à la chaîne courante.
La touche permet d'accéder à la fonction Info.
La touche OK permet d'accéder à la chaîne sélectionnée afin de programmer l'émission choisie, pour
la regarder ou l'enregistrer.
L'icône apparaît à côté du titre de l'émission que l'on a choisi de regarder ou d'enregistrer.
6-6-2 Écrans Info
Appuyez sur pour obtenir des informations complémentaires sur l'émission sélectionnée.
6-6-2-1 Synopsis
L'écran Synopsis affiche un bref résumé de l'émission sélectionnée.
L'icône est présente si l'émission a été programmée pour être
regardée ou enregistrée.
Appuyez sur pour revenir à la liste du Guide des Chaînes.
6-6-3 Écran "Programmes à venir"
Un appui sur la touche VERTE depuis le Guide des Chaînes
permet l'accès à la liste des émissions à venir, définies par une
date et une heure.
Appuyez sur et pour déplacer la barre de sélection
de l'heure à la date.
Appuyez sur et pour choisir l'heure ou la date.
Appuyez sur
ESC
pour annuler l'opération et revenir à la liste du
Guide des Chaînes.
Inter
active
Thursday5 April
Thursday5 April
CHANNELGUIDE
16:24
Futureprog. Exit
Esc
Info+ Select
ok
Hook(U)HBOASIA1
WAILAI T2
16:30- 19:00
18:00- 19:00
Goosed(18)STAR WORL3
MTVASIA4
10:30- 11:45
FavouriteVideos 18:00- 19:00
CARTOONT5 18:00 - 19:00
TVBSASIA6
DISNEY7
18:00- 19:00
SonicThe Hedgehog 18:00 - 18:30
SonicUnderground 18:30 - 19:00
Futureprogrammes
Pleaseselect date and time
DATE Thursday 5April
TIME 18:00
Cancel
Esc
Display
ok
Inter
active
Thursday5 April
CHANNELGUIDE
18:25
Futureevent Exit
Esc
Info+ Select
ok
Thursday5 April
Hook(U)HBOASIA1
WAILAI T2
16:30- 19:00
18:00- 19:00
Goosed(18)STAR WORL3
MTVASIA4
10:30- 11:45
FavouriteVideos 18:00- 19:00
CARTOONT5 18:00 - 19:00
TVBSASIA6
DISNEY7
18:00- 19:00
SonicThe Hedgehog 18:00 - 18:30
SonicUnderground 18:30 - 19:00
Yourselection is
MTVMost Wanted
Back
Esc
Programyour system
ok
Inter
active
Thursday5 April
Thursday5 April
Heaven'sBurning (18)HBOASIA1 19:00 - 20:45
Michael(U) 20:45 -22:30
WAILAI T2
STARWORL3
TVBSASIA6
20:00- 21:00
Goosed(18) 10:30 - 11:45
MTVMost WantedMTVASIA4 20:00 - 21:00
CARTOONT5 20:00 - 21:00
20:00- 21:00
WitchWorldDISNEY7 20:00 - 20:30
CHANNELGUIDE18:19
Futureprog. Exit
Esc
Info+ Select
ok
Appuyez sur OK pour afficher la liste correspondant à l'heure et à la date sélectionnées.
6-6-4 Accès à l'émission en cours
Un appui sur OK depuis l'écran principal après sélection d'une émission en cours ferme le Guide des
Chaînes et permet l'accès direct à la chaîne correspondante.
6-6-5 Regarder / Enregistrer des programmes à venir
6-6-5-1 Programmation
Pour afficher l'écran de Programmation, appuyez sur OK depuis
l'écran principal après sélection d'une émission en cours.
S'il s'agit d'une chaîne verrouillée, le Guide des Chaînes demande
la saisie du code PIN avant de valider la programmation.
Appuyez sur OK afin de programmer l'émission que vous désirez
voir ou enregistrer ultérieurement.
Appuyez sur
ESC
pour annuler l'opération et revenir à la liste du
Guide des Chaînes.
Une fois l'émission programmée, l'icône apparaît dans la liste
du Guide des Chaînes à côté de son titre.
6-6-5-2 Annulation d'une programmation
Pour afficher l'écran d'annulation de programmation, appuyez sur
OK
depuis l'écran principal après sélection d'un programme à
venir repéré par l'icône .
Appuyez sur OK pour annuler la programmation.
Appuyez sur
MENU
pour annuler l'opération;l'émission que vous
souhaitez regarder / enregistrer reste programmée.
6-6-6 Saisie du code PIN
Le code PIN est nécessaire pour programmer l'enregistrement
d'une émission diffusée par une chaîne verrouillée. Le Guide des
chaînes affiche dans ce cas l'écran de saisie du code PIN.
Utilisez les touches numériques pour entrer le code PIN.
Appuyez sur OK pour confirmer le code PIN saisi.
Appuyez sur
ESC
pour annuler la saisie du code PIN. Dans ce cas,
il sera impossible de programmer l'enregistrement de l'émission
retransmise par la chaîne verrouillée.
Inter
active
CHANNELGUIDE
Futureevent Exit
Esc
Info Select
ok
Thursday5 April
Thursday5 April
Heaven'sBurning (18)HBOASIA1 19:00 - 20:45
Michael(U) 20:45- 22:30
WAILAI T2
STARWORL3
TVBSASIA6
20:00- 21:00
Goosed(18) 10:30 - 11:45
MTVMost WantedMTVASIA4 20:00 - 21:00
CARTOONT5 20:00 - 21:00
20:00- 21:00
WitchWorldDISNEY7 20:00- 20:30
18:28
Yourselection is
Michael(U)
Back
Esc
Cancelyour prog.
ok
Inter
active
Futureprog. Exit
Esc
Info+ Select
ok
Thursday5 April
Friday6 April
Hook(U)HBOASIA1
WAILAI T2
16:30- 19:00
18:00- 19:00
Goosed(18)STAR WORL3
MTVASIA4
10:30- 11:45
FavouriteVideos 18:00- 19:00
18:00- 19:00
CARTOONT5
TVBSASIA6
DISNEY7
18:00- 19:00
SonicThe Hedgehog 18:00 - 18:30
SonicUnderground 18:30 - 19:00
CHANNELGUIDE
18:18
Lockedchannel
EnterPIN
++++
Cancel
Esc
Confirm
ok
FR Chapitre 06.p65 28/05/01, 17:5433
Page 36

34
FRANÇAIS 7. EN CAS DE PROBLÈME
7. En cas de problème
Avant de demander de l'aide concernant ce terminal, examinez le tableau ci-dessous pour identifier la
ou les causes possibles du problème constaté. Quelques simples vérifications ou réglages peuvent
vous permettre de résoudre le problème et d'obtenir un fonctionnement optimal.
Si vous avez un doute concernant certaines vérifications ou si le remède indiqué ne résoud pas le
problème constaté, contactez les services Orbit.
Symptôme Remède
Pas d'alimentation Branchez le cordon secteur dans la prise murale.
Pas d'image Assurez-vous que votre terminal est correctement raccordé.
Pas de son • Assurez-vous que votre terminal est correctement raccordé.
• Assurez-vous que les réglages d'entrée pour le téléviseur et la
chaîne stéréo sont corrects.
• Ajustez le volume sonore du terminal et/ou du téléviseur.
La télécommande est inopérante
• Vérifiez que les piles soient installées dans le bon sens (polarité).
• Les piles sont déchargées: remplacez-les par des neuves.
• Pour utiliser la télécommande, pointez-la en direction de la face
avant du terminal.
• Utilisez la télécommande à une distance maximale de 7m de la
face avant du terminal.
• Retirez les obtacles situés entre la télécommande et la face
avant du terminal.
Vous avez oublié votre code
PIN
Contactez les services ORBIT.
Un code d'erreur apparaît sur
l'afficheur de la face avant
Contactez les services ORBIT.
Autres problèmes Contactez les services ORBIT.
FR Chapitre 07.p65 28/05/01, 18:0634
Page 37

35
FRANÇAIS 8. CARACTÉRISTIQUES
Capacités du système
Compatibilité DVB
Démodulateur
Forme d'onde QPSK
Débit des symboles 3-30 Mbauds
Débite de code De 1/2 à 7/8
Bande passante 36 MHz
Décodeur vidéo
MPEG-2 Profil Principal @ Niveau Principal
Débits de données De 1,5 à 15 Mbit/s
Formats vidéo 4:3, 16:9
Décodeur audio
MPEG-2 layer I et II (Musicam Audio)
MPEG-1 supporté
Mono, Stéréo, Joint stereo (MPEG-2 seulement)
Entrée LNB / Tuner
Connecteur 2 x type F
Fréquence d'entrée De 950 à 2150 MHz
Alim. LNB 13/18 volts, 400 mA maxi
Commutateur de gamme d'onde 22 kHz
Tuner A rebouclage
Niveau des signaux d'entrée De -25 à -65 dBm
DiSEqC 1.1 (4 positions)
Scart TV
RVB, CVBS, Audio
Scart Magnétoscope
CVBS, sortie Y/C, entrée RGB, Audio
8. Caractéristiques
Sortie Audio qualité HiFi
Connecteur 2 x RCA (G/D)
Sortie Audio numérique Hi-Fi
Connecteur optique IEC958
Sortie CVBS Vidéo
Connecteur 1 x RCA
Modulateur UHF
Connecteur 2 IEC (M/F)
Normes PAL, K, B/G, I
Canaux 21-69 PLL
Interface de données série RS232
Connecteur D-sub 9 pts - F
Signaux RS232, 115,2 Kbauds maxi
Nota : Terminal vu comme un DCE
Interface USB
USB hôte Version 1.1
1,5 ou 12 Mbits/s
USB esclave Compatible USB 1.1
12 Mbits/s
Voie retour
Connecteur RJ11 8 pts
Norme V32Bis
Télécommande
Type Sagem TLM-01
Portée Jusqu'à 7 m
Piles 2 x 1,5 volts (type AA)
Panneau arrière
2 x F Entrée et sortie LNB
2 x IEC entrée / sortie Entrée et sortie modulateur
2 x SCART TV, Magnétoscope
2 x RCA Audio G/D
1 x RCA Vidéo CVBS
1 x D-sub 9 pts RS232
1 x RJ11 Modem V32Bis
1 x connecteur optique Sortie audio numérique
1 x USB type A USB maître
1 x USB type B USB esclave
1 x connecteur secteur Alimentation secteur
Panneau avant
Affichage numérique 4 chiffres
LED 2
Touches 3
Récepteur IR 1
Logements de carte 2
Informations générales
Coloris Gris
Accessoires Cordon d'alim. secteur
Cordon Scart/RCA
Cordon RCA/RCA
Cordon modem
Livret utilisateur
Température de fonctionnement De +5°C à +45°C
Tension d'alimentation 110-220 VCA
50-60 Hz
Consommation 30 W maxi
(9 W en veille)
Poids 2,5 kg
Dimensions 380 x 260 x 70 mm
Emballage 495 x 325 x 160 mm
Température de stockage De -40°C à +70°C
FR Chapitre 08.p65 28/05/01, 18:0735
Page 38

Fin liasse.p65 28/05/01, 19:081
Page 39

3 Couverture.p65 28/05/01, 19:081
Page 40

21662747-9
Toutes les informations contenues dans ce document sont mentionnées à titre indicatif et peuvent faire
l'objet de modifications sans préavis.
Ind. A
All characteristics contained in this manual are meant for information only and are subject to change without
notice.
4 Couverture.p65 28/05/01, 17:2120
 Loading...