

Orbit Tublr Sideways Medium, Tublr Sideways Mini Installation Manual
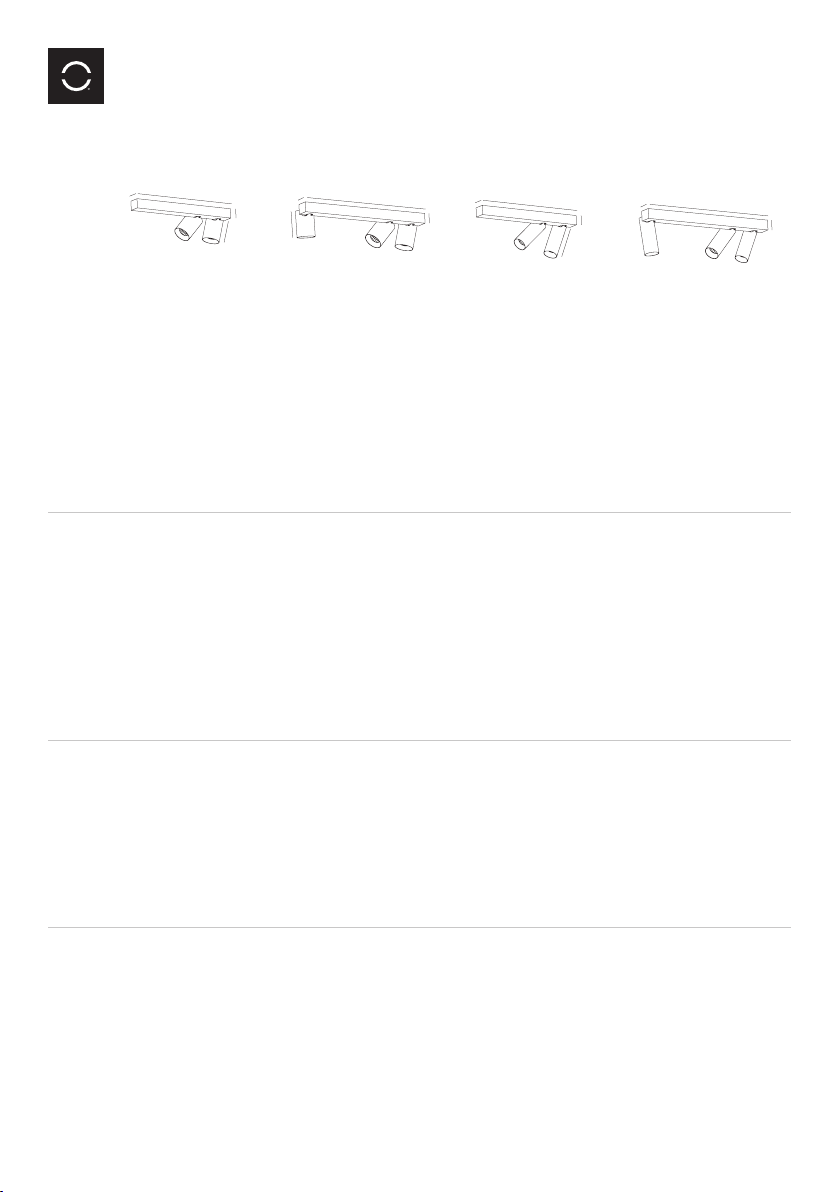
tublr sideways medium/mini
installation manual
50
460
105
Ø 72
• Het verlichtingsartikel moet worden geïnstalleerd door een erkend
NED
vakman.
• Schakel altijd eerst de elektriciteit uit voor installatie,
onderhoud of herstelling
• Vervang een gebarsten of gebroken beschermglas
onmiddellijk en gebruik uitsluitend originele wisselstukken.
• Gebruik hittebestendige kabel om de armatuur aan te
sluiten op het net.
• De armatuur is enkel geschikt voor vaste bevestiging en mag
daarom niet worden aangesloten aan de stroombron door mid
del van een aansluitsnoer.
• Gebruik uitsluitend lampen van het juiste type en overschrijd nooit
• Halten Sie die lokalen Installtionsvorschriften ein. Die
DEU
Installation vorschriften geben an, dass ein Beleuchtungsartikel
von einem zugelassenen Fachmann installiert werden muss.
• Schalten Sie vor der Installation, Wartung oder Reparatur
immer zuerst die Elektrizität aus.
• Ersetzen Sie ein geborstenes oder gebrochenes Schutzglas
unmittelbar und verwenden Sie ausschließlich originale
Ersatzteile.
• Verwenden Sie ein hitzebeständiges Kabel, um die Leuchte am
Stromnetz anzuschließen.
• Die Leuchte eignet sich nur für eine feste Befestigung und darf
deshalb nicht mit Hilfe eines Anschlusskabels an der Stro quelle
angeschlossen werden.
• Verwenden Sie ausschließlich Lampen des richtigen
Typs und überschreiten Sie niemals den Höchs wert
• The light fittings must be installed by a qualified electrician.
ENG
• Always switch off the power before any installation, maintenance
or repair work
• Replace cracked or broken protective glass covers immediately
and only use original replacement parts.
• Use a heat resistant cable to connect the light fitting to the mains.
• The fitting is only suitable to be installed as a fixture. Therefore, do
not connect it to the power supply with a power lead.
• Only use the correct type of light bulb and never exceed the
maximum stated wattage.
• Always ensure that the fixing screws of all electrical
connections are screwed in tightly, especially in the case of
50
40
105
Ø 72
550
50
40
het maximum aangegeven wattage.
• Draai steeds de klemschroeven van alle elektrische
aansluitingen stevig aan, vooral bij 12V laagspanningsdraden.
• Houd bij de aansluiting van de bedrading de juiste kleuren in
acht: blauw (N), bruin of zwart (L) en bij beschermklasse I, geel
groen (aardleiding). Let er bij installatie ook op dat er geen
elektrische leidingen in de muur of in het plafond worden door
boord. Onderhoud binnenverlichting met een droge doek of een
borsteltje, gebruik geen schuur- of oplosmiddelen. Vermijd vocht
-
op alle elektrische onderdelen.
• Respecteer altijd alle technische specificaties &
veiligheidsinstructies ivm uw armatuur, zie gebruiksaanwijzing.
der angegebenen Wattzahl. Ziehen Sie immer die
Klemmschrauben aller ele trischen Anschlüsse fest an, vor
allem bei 12V-Niederspannungdrähten.
• Achten Sie beim Anschluss der Verdrahtung auf die
richtigen Farben: blau (N), braun oder schwarz (L) und bei
Schutzklasse I, gelbgrün (Erdleitung).
• Achten Sie bei der Installation auch darauf, dass keine
£elektrischen Leitungen in der Wand oder an der Decke
durchbohrt werden.Reinigen Sie die Innenbeleuchtung mit
einem trockenen Tuch oder einer Bürste, verwenden Sie keine
Scheuer- oder Lösungsmittel. Vermeiden Sie Feuchtigkeit auf allen
elektrischen Bestandteilen.
• Beachten Sie immer alle technischen Spezifikationen &
Siche heitsinstruktionen in Zusammenhang mit Ihrer Leuchte, siehe
Gebrauchsanweisung.
12 V low voltage wires.
• Ensure that you use the correct colours when connecting the
wires, for example, blue (N), brown or black (L) and in the case
of category I protection, yellow/green (earth).When installing the
fitting, ensure that you do not drill through any electrical wiring in
the wall or in the ceiling.
• Interior light fittings should be cleaned with a dry cloth or a small
brush. Do not use any abrasives or solvents. Ensure that electrical
parts do not come into contact with any moisture.
• Always comply with all the technical specifications and safety
instructions relating to your fitting, see instructions for use.
460
150
Ø 57
50
40
150
550
Ø 57
40
-
-
• Respectez dans tous les cas les consignes d’installation
FRA
locales. Toutes consignes d’installation prévoient en effet
l’installation des armatures d’éclairage par un spécialiste agréé.
• Toujours éteindre l’électricité pour l’installation, l’entretien ou le
dépannage.
• Remplacez immédiatement un verre de protection fendu ou cassé
et n’utilisez que des pièces d’origine.
• Utilisez des câbles résistants à la chaleur pour connecter l’arma
ture au réseau.
• L’armature convient exclusivement pour une installation fixe et ne
peut dès lors être connectée à la source de courant au moyen
d’une rallonge électrique.
• N’utilisez que des lampes du type adéquat et
n’excédez jamais la puissance maximum indiquée
(nombre de watts).
• Serrez toujours fermement les vis de serrage de toute
connexion électrique, surtout pour les câbles basse tension de
12V.
• Respectez la couleur des câbles lors du raccordement:
bleu (N), brun ou noir (L) et, pour la classe de protection I,
vert - jaune (prise de terre).Lors de l’installation, veillez à ne pas
perforer de gaines électriques situées dans le mur ou le plafond.
-
• Pour l’entretien des éclairages d’intérieur, utilisez un chiffon sec ou
une brosse. N’utilisez jamais de produits abrasifs ou de solvants.
Évitez toute humidité sur les éléments électriques.
• Respectez toujours toutes les spécifications techniques &
consignes de sécurité concernant votre armature, voir mode
d’emploi.
1 / 4
tublr sideways medium/mini
Al
installation manual
850°C
IP20
230V
417 105
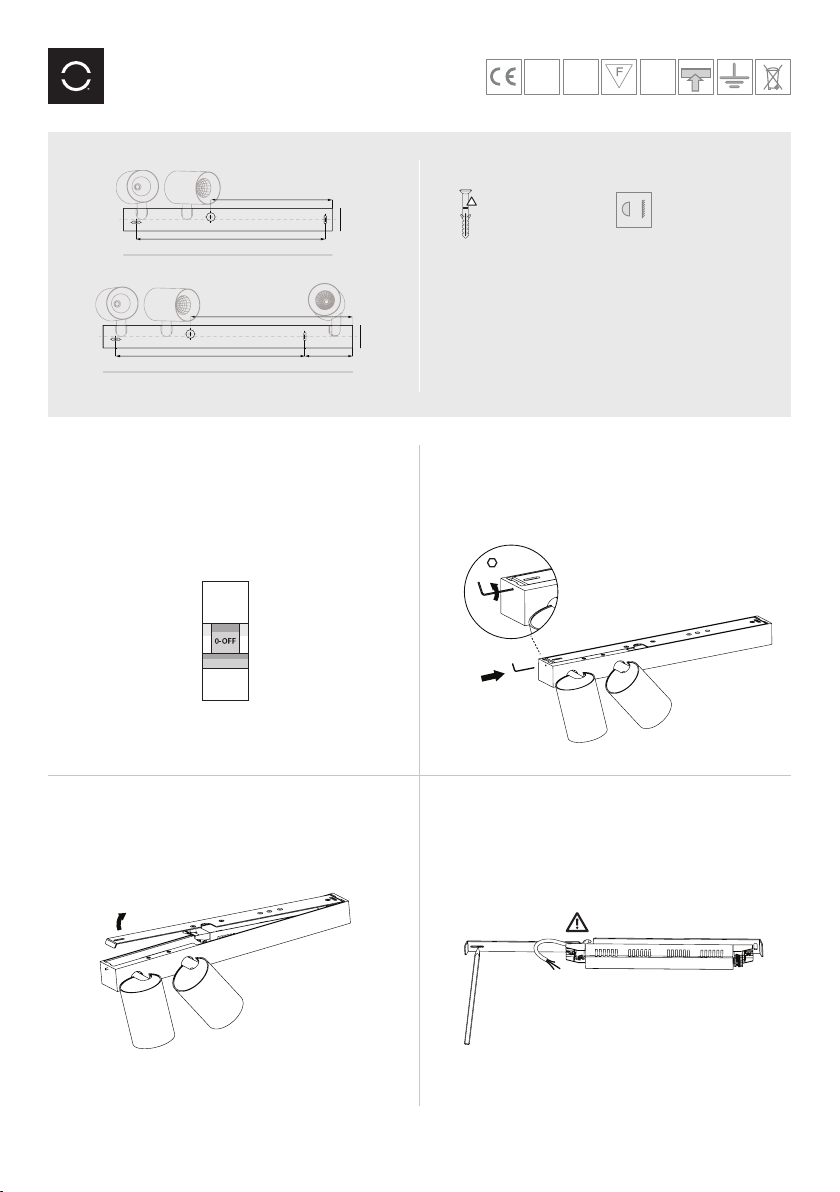
Shut down power before installation
1
CEILING REQUIREMENTS
268
230V
417
460
358
550
50
50
1. Use correct plugs
!
according to ceiling
structure
Loosen set screw with a 1,5 mm allen key
2
1,5 mm
LIGHT SOURCE
0,5m
COB LED
Remove mounting bracket from body
3
for more information and products
visit orbit-lighting.com
Mark mounting holes
4
2 / 4
 Loading...