

Page 1
STARTSTART
INTERVALINTERVAL
DURATIONDURATION
99
00
6
6
00
33
0
0
11
55
1
1
0
0
11
2
2
0
0
O
O
FF
FF
OO
NN
22
mm
ii
nn
55
33
rr
dd
22
n
n
dd
DD
AA
I
I
L
L
YY
11
22
hh
rr
88
h
h
r
r
44
t
t
h
h
77
tt
hh
OO
NN
CC
E
E
22
hh
r
r
44
hh
rr
Features
• One button sets time of day
, another button sets watering
start time
• T
wo rotary dials for setting the watering interval and
watering duration.
• Battery operated (three AA), not included.
• Ten watering interval options (once, 2 hr, 4 hr, 8 hr, 12 hr, daily,
2nd day, 3rd day, 4th day, 7th day).
• Ten watering duration options (on, OFF, 2 min, 5 min,
10 min, 15 min, 30 min, 60 min, 90 min, 120 min).
• Manual watering without interrupting the watering interval.
• Weather resistant design.
• Dependable valve design.
• Low power consumtion soleniod.
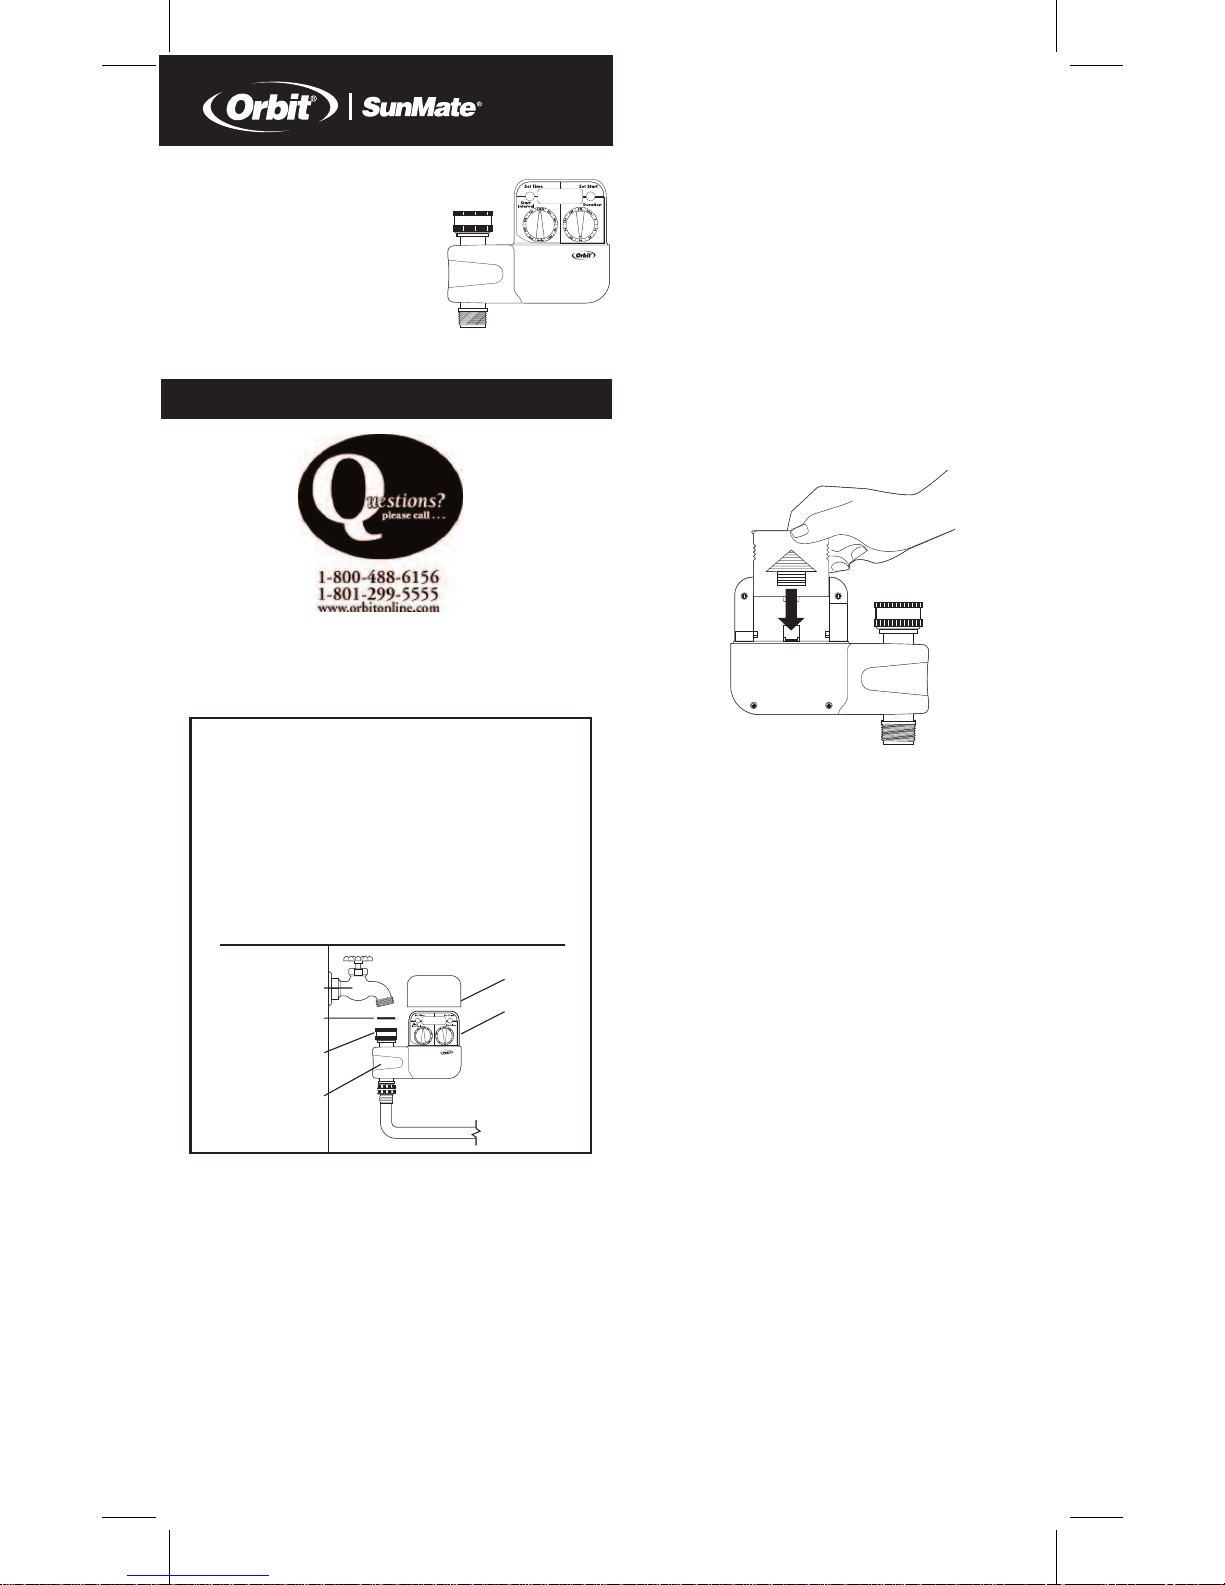
Battery installation
Note:
O
rbit recommends the use of Duracell
®
o
r Energizer
®
b
rand
A
A alkaline batteries for optimum timer performance.
(
see figure 1).
1. Remove the timer cover.
2. Pull the battery compartment out of the timer.
3. Install three AA alkaline batteries. Refer to the battery
c
ompartment for the correct orientation of the batteries,
(
see figure 1).
4
. Place the battery compartment back in the timer.
• Three fresh AA alkaline batteries should last for an entire
watering season. When the battery voltage is below a safe
o
perating voltage the valve will not open. The batteries
s
hould be replaced with new ones when this occurs.
5
. Replace the timer cover to protect the timer from moisture
and debris.
Figure 1
Set the time of day and watering start time
• Press the Set Time button, holding it down for 2 seconds. The
digital readout will cycle through a.m. and p.m. time settings.
Release the Set Time Button just before the correct time of
day is reached. T
ap the button to advance the time in 1
minute increments until correct time is reached.
• Press the Set Start button, holding it down for 2 seconds. The
digital readout will cycle through a.m. and p.m. time settings.
Release the Set Start button just before the desired watering
start time is reached. Tap the button to advance the time in 1
minute increments until desired start time is reached.
Note:
The timer valve will close when making entries using the Set
Time and Set Start buttons. Set Time and Set Start settings are
accepted by the timer 5 seconds after buttons are released,
except at the ON setting.
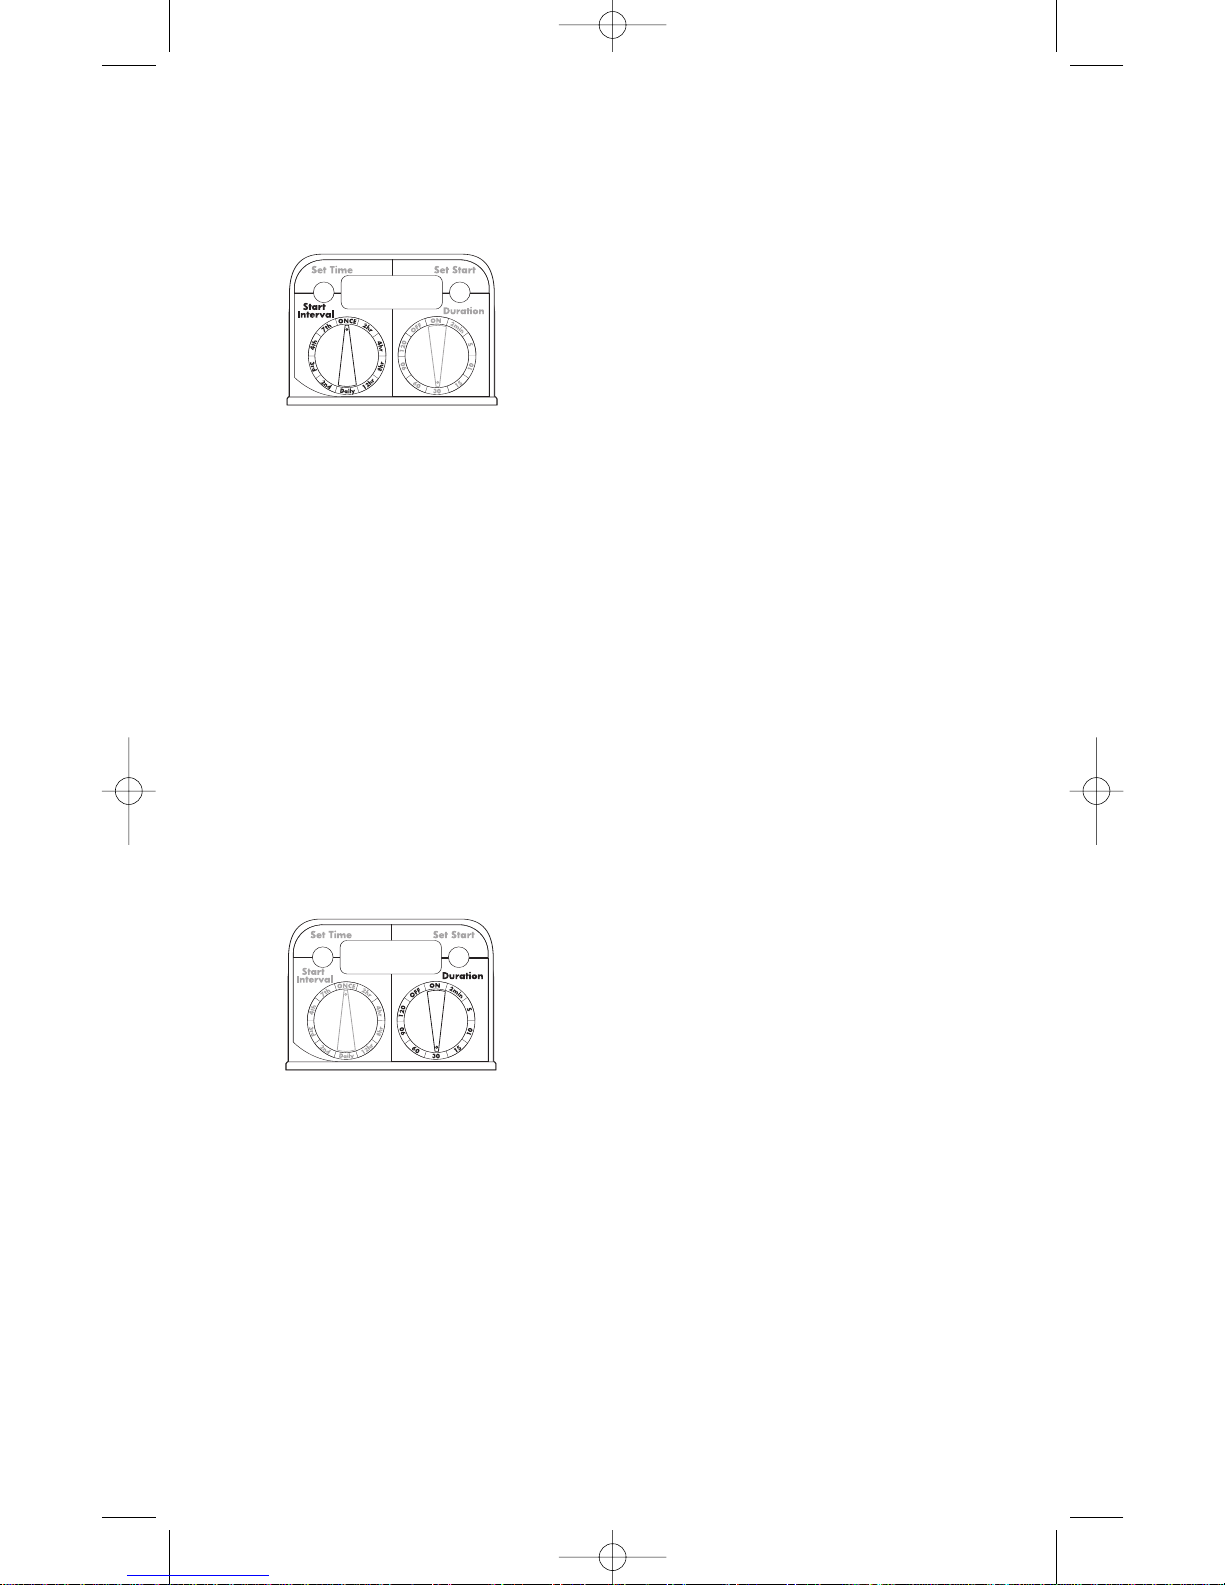
Set the watering start interval
Turn the Start Interval dial to the desired watering interval.
(see figure 2).
Note:
All Start Interval settings begin timing at the Set Start time
shown on the digital readout.
The Start Interval dial has ten possible settings:
• Once – the valve will open once for the amount of time on
the Duration dial and then remains inactive until the Start
Interval dial is rotated to another setting.
•
2 hr – the water will come on every two hours.
•
4 hr – the water will come on every four hours.
•
8 hr – the water will come on every eight hours.
•
12 hr – the water will come on every twelve hours.
•
Daily – the water will come on once every day
.
•
2nd day – the water will come on every other day
.
Environmental Conditions
Working Temperature: 32 to 122°F
Storage Temperature: -14 to 140°F
Conditions environnementales
Température propre au fonctionnement : 0 à 50°C (32 à 122°F)
Température d’entreposage : -10 à 60°C (-14 à 140°F)
Condiciones ambientales
Temperatura de trabajo: 0 a 50°C (32 a 122°F)
Temperatura de almacenamiento: -10 a 60°C (-14 a 140°F)
HOSE
F
AUCET
HOSE WASHER
BRASS
CONNECTOR
AUTOMATIC HOSE
F
AUCET V
AL
VE
COVER
TIMER
Installation and User’s Guide
D
ual Dial Hose Timer with Electronic Display
Model 62040, 62055 and 91050
Minuterie numérique
d’arrossage à deux boutons,
m
odèles 62040, 62055 et 91050
Timer Digital de 2 cuadrantes
para riego,
modelos 62040, 62055 y 91050
Orbit®Irrigation Products, Inc.
845 North Overland Rd.
North Salt Lake, Utah 84054
PN 62040-24 Rev B
© 2005 Orbit®Irrigation Products, Inc.
A
ll rights reserved. All trade names
are registered trademarks of respective
manufacturers listed.
http://waterheatertimer.org/Woods-timers-and-manuals.html#sprinkler
Page 2
Maintenance and off-season storage
• Remove the timer from the faucet during the winter or during
extended periods of inactivity.
• Open and close the valve several times to allow the water to
drain out.
• Remove the batteries and clean the battery contacts. Discard
the batteries if signs of corrosion are present.
• Store the timer with the timer cover installed in a warm dry
location.
Trouble shooting checklist
❑ Batteries are installed properly.
❑ New alkaline batteries are installed.
❑ The hose faucet is turned on.
❑ T
ry operating the timer manually by rotating the Duration dial
to the ON setting.
To turn the valve off
R
otate the Duration Dial to the OFF setting. The valve will not
open while the dial is in this setting.
Low battery indication
W
hen the battery voltage level drops below the ideal operating
voltage the valve will close. The batteries should be replaced
with three fresh alkaline batteries as soon as possible.
CAUTION:
The timer swivel connection to the hose faucet and the timer’s
threaded connection to the hose swivel are designed to withstand normal, lateral hose adjustments. Abrupt or forceful hose
movements should be avoided.
O
NCE watering can only be stopped when:
•
Entering a Set Time in the digital display (except when
Duration dial is in the ON position).
• Entering a Set Start in the digital display (except when
D
uration dial is in the ON position).
•
Turning the Duration dial to the OFF position.
Manual watering
T
urn the Duration dial to the ON setting. The valve will open
a
nd remain open until the dial is rotated to another setting. The
dial can be rotated to a duration setting, and the valve will
remain open for that amount of time. The watering interval is
not interrupted when the valve is operated manually.
N
ote:
M
anual watering overrides the Set Start time, allowing imme-
diate watering.
To change the watering duration while the valve is open simply
rotate the dial to the new duration. The valve will remain open
for the duration shown on the Duration dial regardless of how
long the valve had been open prior to the change.
W
atering once
T
urn the Start Interval dial to the
ONCE setting and turn the
Duration dial to the desired setting. The valve will open for the
duration shown on the Duration dial beginning at the Set Start
time, then close after Duration setting is reached. The timer
will remain inactive until the Start Interval dial is rotated to a
new setting, or until the valve is activated manually.
If the Duration dial is changed to a new position during watering, the watering duration will reset to the new dial position.
Note:
Watering in the ONCE setting with a new Duration setting
allows one-time watering at the Set Start time.
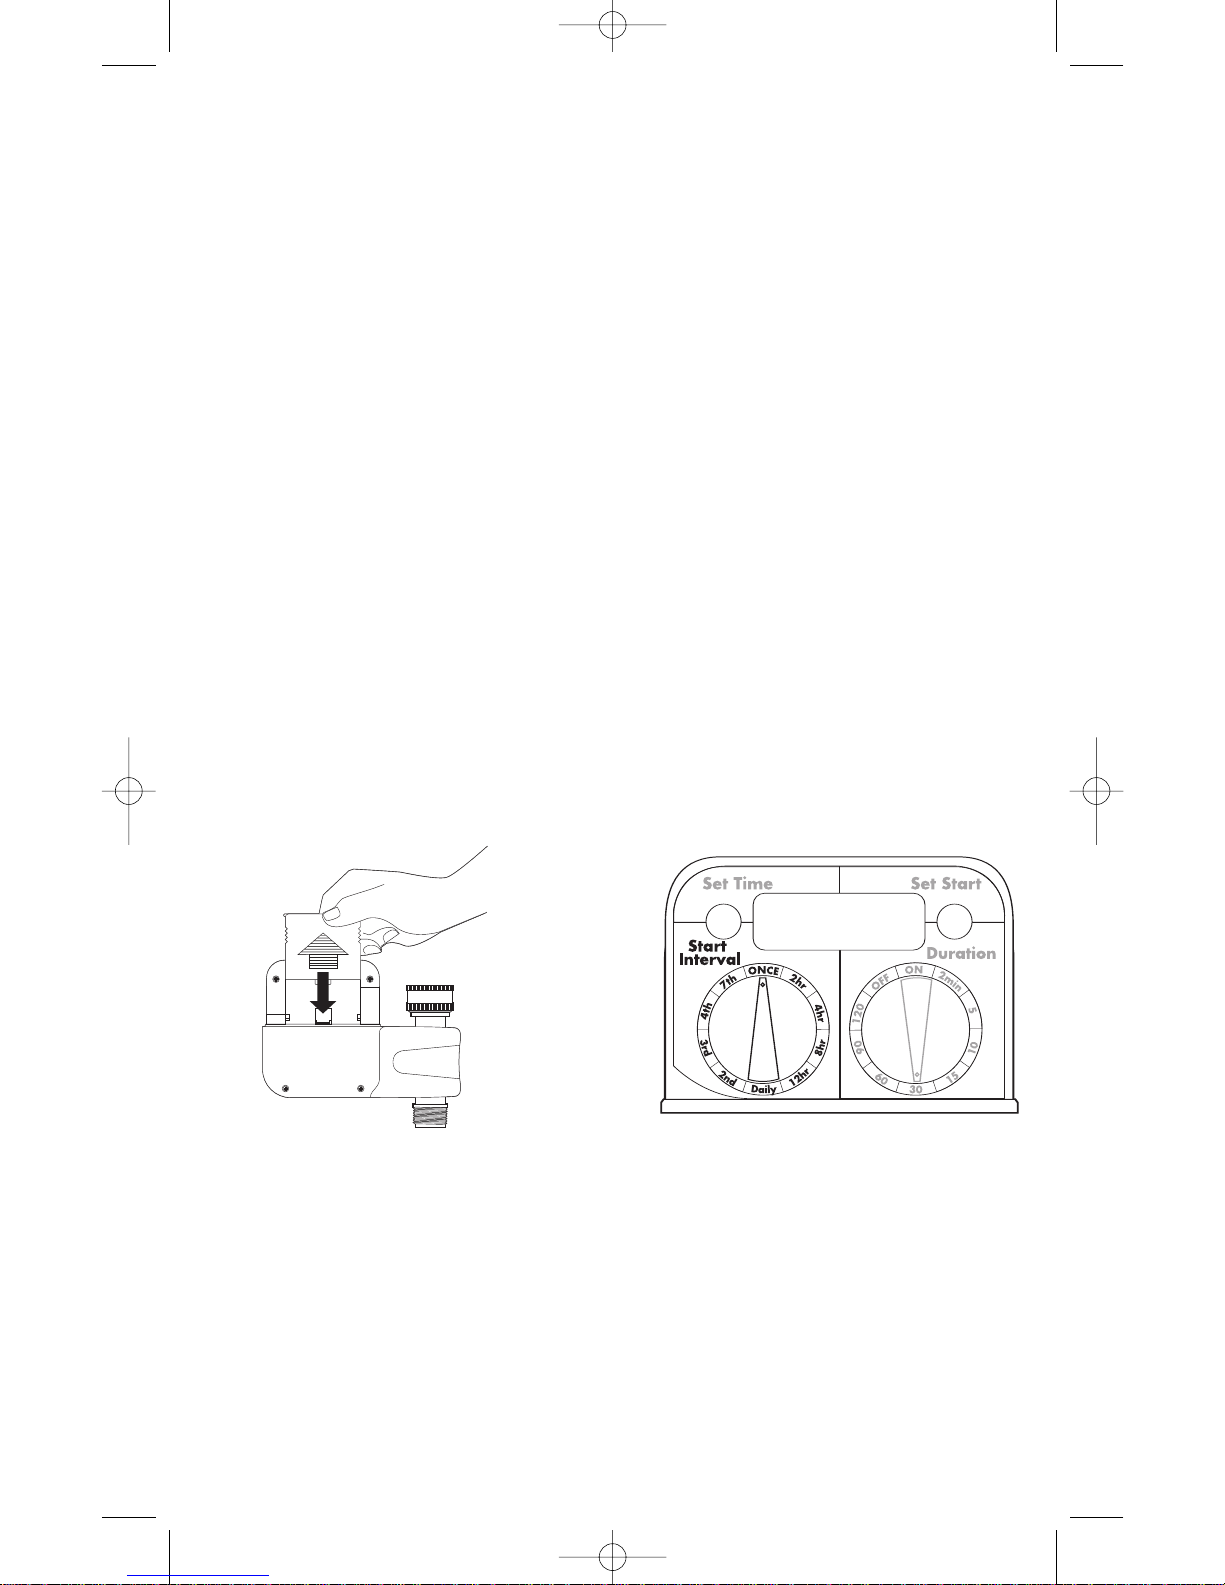
Set the watering duration
R
otate the Duration dial to the desired watering duration.
(see figure 3).
N
ote:
A
ll Duration settings begin timing at the Set Start time shown
o
n the digital readout.
The Duration dial has ten possible settings:
• OFF – the valve will close and remain closed when the dial is
in this setting.
• ON – the valve will open and remain open when the dial is in
this setting.
• 2 min, 5 min, 10 min, 15 min, 30 min, 60 min, 90 min, 120 min -
the water will come on automatically at the intervals shown
by the Start Interval dial and remain on for the chosen duration before automatically switching off.
Figure 2
Figure 3
•
3rd day – the water will come on every third day.
• 4th day – the water will come on every fourth day.
• 7th day – the water will come on once a week.
N
ote:
T
he watering interval will begin after the dial has been station-
a
ry for 2 seconds. Whenever the Start Interval dial is rotated,
the interval resets to the new setting.
07SUM002524 62040-24 rB.qxd 12/28/06 12:45 PM Page 2
Page 3
Caractéristiques
•
Un bouton règle l’heure de la journée et l’autre bouton règle
l
e moment de mise en marche de l’arrosage
•
Deux cadrans rotatifs qui marquent l’intervale entre deux
arrosages et la durée d’arrosage.
• Alimentation par piles (trois AA alcaline), non-comprises.
•
Dix choix d’intervales d’arrosage (une fois, 2 heures, 4
h
eures, 8 heures, 12 heures, quotidien, 2ème jour, 3ème day,
4
ème, 7ème jour).
• Dix choix de durée d’arrosage (MARCHE, ARRêT, 2 min, 5 min,
10 min, 15 min, 30 min, 60 min, 90 min, 120 min).
•
Arrosage manuel sans interrompre l’intervalle entre les
a
rrosages.
•
Fabrication étanche.
• Valve fiable.
• Solénoïde à consommation électrique économique.
•
Appuyez sur le bouton Set Start, en restant appuyé 2 secondes. L’affichage visuel numérique opère un cycle de tous les
réglages matin et après-midi. Relâchez le bouton Set Time
j
uste avant d’arriver à l’heure de mise en marche de l’arr
osage. Tapez légèrement sur le bouton pour faire avancer
l’heure en intervalles d’ 1 minute jusqu’à arriver à l’heure de
m
ise en marche
R
EMARQUE :
L
a valve de la minuterie se ferme automatiquement lors du
réglage des boutons Set Time et Set Start. Les réglages de
Set Time et de Set Start sont acceptés par la minuterie 5 seco
ndes après avoir relâché les boutons, hormis lorsque l’ap-
pareil est mis sous tension (position ON).
Réglage de l’intervalle de mise en marche de l’arrosage
T
ournez le bouton de Start Interval jusqu’à l’intervalle d’a
r
osage désiré. (Voir illustration 2
)
.
Illustration 1
REMARQUE : Tous les réglages de Start Interval commence le
compte à rebours à partir de l’heure de mise en marche
a
ffichée sur l’affichage numérique.
Le bouton de Start Interval comprend dix réglages possibles :
o
ù le bouton est immobile deux secondes.
• Une fois (Once) - la valve s’ouvre une seule fois pendant la
durée réglée sur le bouton de Durée (Duration) puis demeure
ainsi jusqu’à ce que le bouton Start Interval
dial soit mis sur un autre réglage.
• 2 hr – l’arrosage commence toutes les deux heures.
• 4 hr - l’arrosage commence toutes les quatre heures.
• 8 hr - l’arrosage commence toutes les huit heures.
A
VERTISSEMENT : Le raccord pivotant de la minuterie au robi-
n
et de tuyau et le raccord vissé de la minuterie au pivot du
tuyau sont conçus pour supporter des ajustements latéraux
n
ormaux du tuyau. Il convient d’éviter les mouvements
a
brupts ou énergiques du tuyau.
.
Installation des piles
REMARQUE : Pour une performance optimale de la minuterie,
Orbit recommande l’utilisation des marques de piles alcalines
AA de marque Duracell ou Energizer.
(voir illustration 1).
1. Retirez le couvercle de la minuterie.
2. Enlevez le receptacle des piles de la minuterie.
3. Installez les trois piles alcalines AA. Consultez le graphique
à l’intérieur du receptacle pour respecter la bonne orientatio
des piles
4. Replacez le receptable des piles dans la minuterie.
• La durée normale de fonctionnement de trois nouvelles piles
alcalines AA est d’une saison d’arrosage. Lorsque le voltage
de la pile se trouve en dessous du niveau nécessaire de volt
-
age, la valve cesse de s’ouvrir
. Dans ce cas, il faut alors rem
-
placer les piles par de nouvelles piles.
5. Repositionez le couvercle de la minuterie pour la protéger de
l’humidité et des poussières.
Réglage de l’horaire de la journée et de mise en
marche de l’arrosage
• Appuyez sur le bouton Set T
ime, en restant appuyé 2 secondes. L’affichage visuel numérique opère un cycle de tous les
réglages matin et après-midi. Relâchez le bouton Set Time
juste avant d’arriver à l’heure correcte de la journée. T
apez
légèrement sur le bouton pour faire avancer l’heure en inter
-
valles d’ 1 minute jusqu’à arriver à l’heure juste.
Illustration 2
• 12 hr - l’arrosage commence toutes les douze heures.
• Quotidien (Daily) - l’arrosage commence une fois par jour
.
• 2ème jour - l’arrosage commence tous les deux jours.
• 3 ème jour - l’arrosage commence tous les trois jours.
• 4 ème jour - l’arrosage commence tous les quatre jours.
• 7 ème jour - l’arrosage commence une fois par semaine.
REMARQUE : L
’intervalle d’arrosage compte à partir du
moment où le bouton est immobile deux secondes. Chaque
fois que tourne le bouton Start Interval, l’intervalle change en
nouveau réglage.
07SUM002524 62040-24 rB.qxd 12/28/06 12:45 PM Page 3
Page 4

L
iste de diagnostic des pannes
_
Mauvaise installation des piles.
_
Nouvelle installation de piles alcalines.
_
Le robinet du tuyau est ouvert.
_
Réglez manuellement la minuterie en tournant le bouton de
durée (Duration) en position ON.
Réglage de la durée d’arrosage
T
ourner le cadran de durée (Duration) jusqu’à la durée désirée
d’arrosage. (Voir illustration 3).
REMARQUE : Tous les réglages de durée (Duration) commence
l
e compte à rebours à partir de l’heure Set Start affichée sur
l
’affichage numérique
Arrosage unique
T
ournez le bouton Start Interval jusqu’au réglage ONCE et
tournez le bouton de durée (Duration) jusqu’au réglage désiré.
La valve s’ouvre durant le laps de temps affiché sur le bouton
Duration à partir le l’heure de Set Start, puis se ferme au
m
oment d’atteindre l’heure réglée sur le réglage de durée
(Duration). La minuterie cesse toute activité jusqu’à ce que le
bouton Start Interval soit mis sur un nouveau réglage ou
jusqu’à ce que la valve soit ouverte manuellement.
Si le bouton de durée (Duration) est réglé sur une nouvelle
position pendant l’arrosage, la durée d’arrosage se règle alors
sur la nouvelle position du bouton.
REMARQUE : L’arrosage sur le réglage ONCE et sur le nouveau
règlage de durée (Duration) programme un arrosage unique
qui commence à l’heure de mise en marche Set Start.
Illustration 3
L’arrosage unique ONCE ne peut s’interrompre que :
• Par le réglage de Set Time sur l’affichage numérique (sauf
lorsque le bouton de durée –Duration- est en position ON). •
Par le réglage de Set Start sur l’affichage numérique (sauf
lorsque le bouton de durée –Duration- est en position ON). •
En tournant le bouton de durée (Duration) sur la position OFF.
Arrosage manuel
Tournez le bouton de durée (Duration) en position ON. La valve
s’ouvre et reste ouverte jusqu’à ce que le bouton soit tourné
sur un nouveau réglage. Il est possible de tourner le bouton
sur un nouveau réglage de durée. La valve reste alors ouverte
pendant le laps de temps indiqué. L’intervalle d’arrosage ne
s’interrompt pas lors de l’opération manuelle de la valve.
REMARQUE : L’arrosage manuel annule l’heure de mise en
marche Set Start et permet l’arrosage immédiat.
Fermeture de la valve
Tournez le bouton de durée (Duration) en position OFF. La valve
ne s’ouvrera pas tant que le bouton reste sur cette position.
Indication d’épuisement des piles
La valve se ferme lorsque le niveau de voltage des piles
descend en dessous du niveau d’alimentation électrique idéal.
Il convient alors de remplacer les piles par trois nouvelles piles
alcalines aussitôt que possible.
Entretien et entreposage pendant la saison morte
• Retirez la minuterie du robinet en hiver ou pendant les
longues durées d’inactivité.
• Ouvrez et fermez la valve plusieurs fois pour vider l’eau.
• Retirez les piles et nettoyez les contacts des piles. Jetez les
piles qui présentent des signes de corrosion.
• Rangez la minuterie dans son couvercle dans un lieu sec et
tempéré.
07SUM002524 62040-24 rB.qxd 12/28/06 12:45 PM Page 4
Page 5

justo antes de alcanzar la hora deseada para inicio del riego.
D
é golpecitos al botón para adelantar la hora en incrementos
d
e 1 minuto hasta alcanzar la hora correcta.
NOTA:La válvula del timer se cerrará cuando esté trabajando
c
on los botones de fijar la hora y la hora de inicio. Los ingresos
d
e fijación de la hora y de la hora de inicio son aceptados por
el timer 5 segundos después de soltar los botones, salvo en el
caso del encendido [ON].
Fijar el intervalo de inicio del riego
Gire el cuadrante de Intervalo de inicio hasta el intervalo
deseado de riego. (ver la illustration 2).
NOTA: Todas las puestas del Intervalo de inicio comienzan la
temporización a la hora de inicio que se muestra en
e
l lector digital
• Tres baterías alcalinas AA nuevas deben durar toda la temporada de riego. Cuando el voltaje de las baterías está por
debajo del voltaje de operación, la válvula no se abrirá. Las
baterías deben reemplazarse por otras nuevas cuando esto
ocurra.
5. Vuelva a colocar la cubierta del timer para protegerlo de la
humedad y la suciedad.
Fijar la hora del día y la hora de inicio del riego
• Pulse el botón de fijar la hora [Set Time], manteniéndolo
apretado 2 segundos. El lector digital recorre los ciclos a.m.
[mañana] y p.m. [tarde] para fijar la hora. Suelte el botón de
fijar la hora justo antes de llegar a la hora correcta del día.
Dé golpecitos al botón para adelantar la hora en incrementos de 1 minuto hasta alcanzar la hora correcta.
• Pulse el botón de fijar la hora, manteniéndolo apretado 2
segundos. El lector digital recorre las horas a.m. [mañana] y
p.m. [tarde] para fijar la hora. Suelte el botón de fijar la hora
El cuadrante del Intervalo de inicio tiene diez posiciones posib
les:
•
Una vez – la válvula se abrirá una vez durante la cantidad de
t
iempo del cuadrante de Duración y luego quedará inactiva
hasta que el cuadrante del Intervalo de inicio sea girado a
otra posición.
• 2 h – el agua saldrá cada dos horas.
• 4 h – el agua saldrá cada cuatro horas.
• 8 h – el agua saldrá cada ocho horas.
• 12 h – el agua saldrá cada doce horas.
• Diariamente – el agua saldrá una vez todos los días.
• 2º día – el agua saldrá día por medio.
• 3º día – el agua saldrá cada tres días.
• 4º día – el agua saldrá cada cuatro días.
• 7º día – el agua saldrá una vez por semana.
Illustration 2
Características
• Un botón fija la hora del día, otro botón fija la
h
ora de inicio del riego
•
Dos cuadrantes giratorios para fijar el intervalo
y
la duración del riego.
•
Operación con baterías (tres baterías
alcalinas AA), no incluidas.
• Diez opciones de intervalo de riego (una vez, 2 h, 4 h, 8 h, 12
h, diariamente, 2º día, 3º día, 4º día, 7º día).
•
Diez opciones de duración del riego (ON, OFF, 2 min, 5 min, 10
m
in, 15 min, 30 min, 60 min, 90 min, 120 min).
•
Riego manual sin interrupción del intervalo de riego.
• Diseño resistente a las condiciones meteorológicas.
• Diseño confiable de la válvula.
• Solenoide de bajo consumo eléctrico.
PRECAUCIÓN: La conexión basculante del timer a la llave de la
m
anguera y la conexión roscada del timer a la rótula de la
manguera están diseñadas para soportar los ajustes normales laterales de la manguera. Deben evitarse los
movimientos bruscos o forzados de la manguera.
.
Instalación de las baterías
NOTA: Orbit recomienda usar baterías alcalinas AA de las marcas Duracell o Energizer para lograr un óptimo desempeño del
timer.
(ver la illustration 1).
1. Quite la cubierta del timer.
2. Extraiga del timer el compartimento de baterías.
3. Instale tres baterías alcalinas AA. Mire en el compartimento
para la correcta orientación de las baterías,
(ver la illustration 1).
4. Vuelva a colocar en el timer el compartimento de baterías.
Illustration 1
NOTA: El intervalo de riego comenzará luego de que el cuad-
rante quede detenido durante 2 segundos. Cada vez que gire
el cuadrante de Intervalo de inicio, el intervalo se fija en la
nueva posición.
Fijar la duración del riego
Gire el cuadrante de Duración a la duración deseada de riego.
(ver la illustration 3)
NOTA: Todas las puestas de Duración comienzan la temporización a la hora de inicio que se muestra en el lector digital.
El cuadrante de Duración tiene diez posiciones posibles:
• OFF – la válvula se cerrará y permanecerá cerrada cuando el
cuadrante esté en esta posición.
• ON – la válvula se abrirá y permanecerá abierta cuando el
cuadrante esté en esta posición.
07SUM002524 62040-24 rB.qxd 12/28/06 12:45 PM Page 5
Page 6

Indicador de batería baja
Cuando el voltaje de la batería caiga por debajo del voltaje
i
deal de operación, la válvula se cerrará. Las baterías deberán
s
er reemplazadas por otras nuevas lo antes posible.
Mantenimiento y almacenamiento fuera de temporada
• Retire el timer de la llave de agua durante el invierno
o períodos prolongados de inactividad.
• Abra y cierre la válvula varias veces para permitir
que el agua drene.
• Retire las baterías y limpie los contactos de las
baterías. Deseche las baterías si presentan signos de
corrosión
.• Guarde el timer con la cubierta colocada en un sitio
seco y cálido.
Lista de controles para resolver problemas
? Las baterías están correctamente instaladas.
? Hay nuevas baterías alcalinas instaladas.
? La llave de la manguera está abierta.
? Intente operar el timer manualmente girando el cuad-
rante de Duración a la posición ON.
• Se gira el cuadrante de Duración a la posición OFF
.
Riego manual
Gire el cuadrante de Duración a la posición ON. La válvula se
abrirá y quedará abierta hasta que el cuadrante sea girado a
otra posición. El cuadrante puede ser rotado a una posición de
duración y la válvula quedará abierta durante esa cantidad de
tiempo. El intervalo de riego no se interrumpe cuando opera la
válvula manualmente.
NOTA: El riego manual anula la hora de inicio fijada, permitiendo el riego inmediato.
Para apagar la válvula
Gire el cuadrante de Duración a la posición OFF. La válvula no
se abrirá mientras el cuadrante esté en esta posición
•
2 min, 5 min, 10 min, 30 min, 60 min, 90 min,
1
20 min – el agua saldrá automáticamente a los intervalos
q
ue muestra el cuadrante del Intervalo de inicio y seguirá
s
aliendo durante el tiempo seleccionado antes de apagarse
automáticamente.
Para cambiar la duración del riego mientras la válvula está
abierta, simplemente gire el cuadrante a la nueva duración. La
v
álvula permanecerá abierta durante el tiempo que se muestra
e
n el cuadrante de Duración independientemente del tiempo
en que la válvula haya estado abierta antes del cambio.
Riego una vez [ONCE]
Gire el cuadrante del Intervalo de inicio a la posición ONCE y
g
ire el cuadrante de Duración a la posición deseada. La válvu-
l
a se abrirá por el tiempo indicado en el cuadrante de
Duración empezando a la hora de Inicio fijada, luego se cerrará tras alcanzar la posición de Duración. El timer permanecerá inactivo hasta que el cuadrante del Intervalo de inicio sea girado a una nueva posición o hasta que la válvula sea
activada manualmente.
Si se cambia a una nueva posición en el cuadrante de
Duración, la duración del riego se fijará en la nueva posición
del cuadrante.
NOTA: El riego en la posición ONCE con una nueva posición
de Duración permite el riego una vez a la hora de Inicio fijada.
El riego UNA VEZ sólo puede detenerse cuando:
• Se ingresa una nueva hora en la pantalla digital (salvo que
el cuadrante de Duración esté en posición ON).
• Se ingresa una nueva hora de inicio en la pantalla digital
(salvo que el cuadrante de Duración esté en posición ON).
Illustration 3
07SUM002524 62040-24 rB.qxd 12/28/06 12:45 PM Page 6
Page 7

NOT USED
NOT USED
NOT USED
NOT USED
BLACK
NOT USED
NOT USED NOT USED
07SUM002524 62040-24 RB.QXD
DOUBLE SIDED PAGES PLEASE
046878
5.5"
SM
07SUM002524
12.20.06
XX
6
1
XX
9" XX
ORBIT
07SUM002524 62040-24 rB.qxd 12/28/06 12:45 PM Page 7
 Loading...