

Page 1

PROPRIETARY
INFORMATION
Orbit Reader 20™ User Guide
5th March, 2018
Version 1.8
Page 2

Orbit Reader 20 – User guide Version 1.8
Orbit Research Confidential and Proprietary Information 2
Contents
1 INTRODUCTION ------------------------------------------------------------------------------------------------ 5
2 HOW THE ORBIT READER 20 IS USED ---------------------------------------------------------------- 5
2.1 STAND-ALONE MODE ------------------------------------------------------------------------------------- 5
2.2 REMOTE MODE--------------------------------------------------------------------------------------------- 6
3 TRANSCRIBED BRAILLE ----------------------------------------------------------------------------------- 6
4 AUTOMATIC TRANSLATION------------------------------------------------------------------------------- 6
5 TRANSLATE BRAILLE --------------------------------------------------------------------------------------- 7
6 DOCUMENTATION CONVENTIONS --------------------------------------------------------------------- 7
7 IN THE BOX ----------------------------------------------------------------------------------------------------- 8
8 FEATURES ------------------------------------------------------------------------------------------------------ 8
9 ORIENTATION -------------------------------------------------------------------------------------------------- 8
9.1 KEY PLACEMENT AND USE ------------------------------------------------------------------------------- 9
9.2 PANNING KEYS ------------------------------------------------------------------------------------------- 10
9.3 8-DOT BRAILLE CELLS ---------------------------------------------------------------------------------- 11
10 GETTING STARTED ---------------------------------------------------------------------------------------- 11
10.1 CHARGING THE DEVICE --------------------------------------------------------------------------------- 11
10.2 POWER ON AND OFF ------------------------------------------------------------------------------------ 12
10.3 INSERTING AND FORMATTING THE SD CARD -------------------------------------------------------- 12
10.4 ABOUT MENUS AND FILE NAMES ---------------------------------------------------------------------- 13
10.5 ENTERING AND EXITING MENUS ----------------------------------------------------------------------- 13
10.6 DEVICE OPERATIONAL MODES ------------------------------------------------------------------------ 13
11 THE MENU ----------------------------------------------------------------------------------------------------- 14
11.1 MENU AVAILABILITY ------------------------------------------------------------------------------------- 14
11.2 MENU OPTIONS ------------------------------------------------------------------------------------------ 14
Battery --------------------------------------------------------------------------------------------- 15
Cursor Blink (1) ---------------------------------------------------------------------------------- 15
Sort (Name: Ascend)--------------------------------------------------------------------------- 16
Split Words (Off) -------------------------------------------------------------------------------- 16
Filter Dot 7 (On) --------------------------------------------------------------------------------- 16
Wrapping (On) ----------------------------------------------------------------------------------- 16
Compress Spaces (On) ----------------------------------------------------------------------- 17
Load Language ---------------------------------------------------------------------------------- 17
Switch Language ------------------------------------------------------------------------------- 17
Encoding ------------------------------------------------------------------------------------------ 18
Version -------------------------------------------------------------------------------------------- 18
Serial ----------------------------------------------------------------------------------------------- 18
Reset Defaults ----------------------------------------------------------------------------------- 18
USB (HID) ---------------------------------------------------------------------------------------- 18
Bluetooth (Auto) --------------------------------------------------------------------------------- 18
Pair (Just Works) ------------------------------------------------------------------------------- 19
Emulate (Off) ------------------------------------------------------------------------------------- 19
Mode (Stand-Alone) -------------------------------- -------------------------------- ------------ 19
12 STAND-ALONE MODE ------------------------------------------------------------------------------------- 20
13 FILE MANAGER ---------------------------------------------------------------------------------------------- 20
Page 3

Orbit Reader 20 – User guide Version 1.8
Orbit Research Confidential and Proprietary Information 3
13.1 FILE MANAGER COMMANDS ---------------------------------------------------------------------------- 20
13.2 MORE ABOUT COPYING AND PASTING FILES -------------------------------------------------------- 22
File Movement Commands ------------------------------------------------------------------- 23
13.3 FILE TYPES ----------------------------------------------------------------------------------------------- 23
Supported File Types -------------------------------------------------------------------------- 23
13.4 PREPARING FILES --------------------------------------------------------------------------------------- 24
14 THE READER ------------------------------------------------------------------------------------------------- 24
14.1 READER COMMANDS ------------------------------------------------------------------------------------ 24
14.2 POWER MOVE FORWARD AND BACK ----------------------------------------------------------------- 26
14.3 FIND BRAILLE --------------------------------------------------------------------------------------------- 27
15 EDIT BOX ------------------------------------------------------------------------------------------------ ------ 28
15.1 EDIT BOX COMMANDS ---------------------------------------------------------------------------------- 28
16 THE EDITOR -------------------------------------------------------------------------------------------------- 29
16.1 EDITOR COMMANDS ------------------------------------------------------------------------------------- 30
16.2 EDITOR BLOCK TEXT COMMANDS --------------------------------------------------------------------- 31
17 CONTEXT MENU --------------------------------------------------------------------------------------------- 32
17.1 REMOTE MODE------------------------------------------------------------------------------------------- 32
17.2 BEFORE YOU CONNECT --------------------------------------------------------------------------------- 33
17.3 USING THE BLUETOOTH CONNECTION --------------------------------------------------------------- 34
17.4 MANAGE CONNECTIONS -------------------------------------------------------------------------------- 34
17.5 CONNECT TO MULTIPLE HOSTS ----------------------------------------------------------------------- 35
17.6 USB ------------------------------------------------------------------------------------------------------- 35
Human Interface Device (HID) -------------------------------------------------------------- 36
Serial ----------------------------------------------------------------------------------------------- 36
Mass Storage ------------------------------------------------------------------------------------ 36
17.7 BUFFERING TEXT INPUT TO REMOTE DEVICES ----------------------------------------------------- 37
17.8 IOS DEVICES --------------------------------------------------------------------------------------------- 37
Connecting iOS with Bluetooth -------------------------------------------------------------- 37
iOS Resources ---------------------------------------------------------------------------------- 38
iOS Commands --------------------------------------------------------------------------------- 38
17.9 MAC COMPUTERS --------------------------------------------------------------------------------------- 40
Connecting Mac with USB -------------------------------------------------------------------- 40
Connecting Mac with Bluetooth ------------------------------------------------------------- 40
Controlling Orbit Reader 20 from Mac ----------------------------------------------------- 41
17.10 ANDROID DEVICES--------------------------------------------------------------------------------------- 41
Connecting Android with Bluetooth --------------------------------------------------------- 41
Input and Output Text with BrailleBack ---------------------------------------------------- 41
BrailleBack Commands ----------------------------------------------------------------------- 42
17.11 CHROMEBOOK -------------------------------------------------------------------------------------------- 42
Connecting Chromebook with USB -------------------------------------------------------- 42
ChromeVox Settings/Commands ----------------------------------------------------------- 43
17.12 WINDOWS PCS ------------------------------------------------------------------------------------------ 43
Connecting Windows with USB ------------------------------------------------------------- 43
Connecting Windows with Bluetooth ------------------------------------------------------- 43
Non-Visual Desktop Access (NVDA) ------------------------------------------------------ 44
Job Access with Speech (JAWS) ----------------------------------------------------------- 44
System Access ---------------------------------------------------------------------------------- 48
Dolphin Screen Reader ----------------------------------------------------------------------- 48
Windows-Eyes ----------------------------------------------------------------------------------- 49
18 KEY LOCK COMMAND ------------------------------------------------------------------------------------ 49
Page 4

Orbit Reader 20 – User guide Version 1.8
Orbit Research Confidential and Proprietary Information 4
19 SYSTEM ALERTS -------------------------------------------------------------------------------------------- 49
20 REBOOT THE DEVICE ------------------------------------------------------------------------------------- 50
21 DEVICE UPGRADE PROCEDURE ---------------------------------------------------------------------- 50
21.1 DOWNLOAD THE SOFTWARE --------------------------------------------------------------------------- 50
21.2 INSTALL SOFTWARE --------------------------------------------- ERROR! BOOKMARK NOT DEFINED.
22 LANGUAGE OPTIONS (LOCALIZATION) ------------------------------------------------------------ 53
22.1 GET LOCALIZATION FILES ------------------------------------------------------------------------------ 53
22.2 UPLOAD EXISTING LOCALIZATION FILES ------------------------------------------------------------- 54
22.3 SWITCH LOCALIZATION FILES -------------------------------------------------------------------------- 54
23 TROUBLESHOOTING -------------------------------------------------------------------------------------- 54
24 BATTERY USE AND REPLACEMENT ---------------------------------------------------------------- - 55
25 ACCESSORIES INFORMATION ------------------------------------------------------------------------- 56
26 GENERAL SPECIFICATIONS ---------------------------------------------------------------------------- 56
27 APPENDICES ------------------------------------------------------------------------------------------------- 57
27.1 APPENDIX A - COMPUTER BRAILLE CHART ---------------------------------------------------------- 57
27.2 APPENDIX B - PROPER TRADEMARK NOTICE AND ATTRIBUTION --------------------------------- 59
Hardware Limited Warranty ------------------------------------------------------------------ 60
EXCLUSIONS AND LIMITATIONS--------------------------------------------------------- 61
27.3 APPENDIX C - FCC INFORMATION -------------------------------------------------------------------- 63
FCC Notice ----------------------------------------------------------------------------------------------------- 63
FCC Caution --------------------------------------------------------------------------------------------------- 63
Page 5
Orbit Reader 20 – User guide Version 1.8
Orbit Research Confidential and Proprietary Information 5
1 Introduction
The Orbit Reader 20 is a portable, refreshable braille display and stand-alone
reader with the following features:
• A line of 20 braille cells with pins that can be transformed to accurately
represent any six- or eight-dot braille code, in any language, and for any
discipline
• Reads the content of files on an SD™ (Secure Digital) card for Stand-Alone Mode
• Remote connectivity to PCs and mobile devices for use with a screen reader
• Simple editing functions
• Signage-quality braille
2 How the Orbit Reader 20 Is Used
2.1 Stand-Alone Mode
Content stored on an SD card can be read in one of the following two ways:
• Sent by library.
• Prepared on computer and copied to the device.
Page 6

Orbit Reader 20 – User guide Version 1.8
Orbit Research Confidential and Proprietary Information 6
In Stand-Alone mode, the Orbit Reader 20 displays the contents of files stored on
an SD card. Here, there are no translations or interpretations involved. You
prepare the files on your computer, and then store them on the SD card. For
example, if you want to read in Unified English Braille (UEB), prepare the UEB
transcribed title on your computer and then store it on the card.
2.2 Remote Mode
Connect the device to a computer or portable device with a screen reader and
then do one of the following:
• Read commercially available titles on Kindle™, Adobe® Digital Editions, or
iBooks® application programs.
• Employ any accessible technology for browsing, utilities, and education.
The screen reader translates text into braille code of choice.
3 Transcribed Braille
There are multiple sources for files transcribed into high quality braille. Below are
some examples:
• National Library Service (NLS) provides professionally transcribed, formatted
files through the Web Braille project.
• American Printing House for the Blind (APH) transcribes textbooks for K-12
students.
• National Braille Press (NBP) produces braille books, textbooks, tests, and
information for adults and children.
• Louis Database lists titles produced by over 160 organizations.
4 Automatic Translation
In addition to professionally transcribed titles, you may also use dynamic
translation to obtain braille.
Automatically translated braille may be appropriate for some forms of reading.
• NFB-NEWSLINE® is a free audio information service providing downloadable
Braille files of up-to-the-minute content from over 400 national,
international, and state newspapers.
• Bookshare® dynamically generates braille formatted files from the titles in its
library.
Page 7

Orbit Reader 20 – User guide Version 1.8
Orbit Research Confidential and Proprietary Information 7
5 Translate Braille
• BrailleBlaster™ is a full-featured transcription software package for creating
quality formatted braille.
• DAISY™ Pipeline provides a comprehensive solution for converting text
documents into accessible formats, including braille PEF (Portable Embosser
Format).
Send to Braille is a shortcut that adds braille to the Windows® Send To menu,
which can convert files on your computer into unformatted BRL (Braille Ready
Format) files.
6 Documentation Conventions
For consistency and clarity, we have used the following conventions in this
document.
Braille keys are indicated by a number. For example, if the documentation
indicates Dot 1, it shows: Dot 1.
If multiple braille keys are required, the documentation indicates those keys by
showing the numbers separated by a space like this: Dots 1 4.
When modifier keys are used, the documentation separates the modifiers from
the rest of the keys with a plus (+) sign like this: Space + Dot 1. Modifiers [like the
Shift key on a regular QWERTY keyboard], are keys you hold down while
pressing another key to modify the effect of the pressed key. On a braille
keyboard, Space is often used as a modifier key. Key mnemonics are written in
capital letters for emphasis but are typed in braille lowercase (unless otherwise
stated). When one key follows another, the two keys are shown with a comma
between them. For example, the command Select, M means to press and
release the Select key, then press and release M (Dots 1 3 4 simultaneously).
The Up, Down, Right, and Left directional buttons on the navigation pad are
interchangeably referred to as arrows, buttons, arrow buttons, and arrow keys.
All messages from the device are proceeded with Dots 2 5, 2 5 and a space. In
documentation, this is indicated by a double hyphen.
The word Keys and Buttons are used interchangeably.
In descriptions of each Menu option, this documentation indicates the default
setting.
Any reference to navigation by “page” while in Stand-Alone mode only means
navigation by 1000 characters (page = 1000 characters).
Page 8

Orbit Reader 20 – User guide Version 1.8
Orbit Research Confidential and Proprietary Information 8
7 In the Box
In addition to the basic package that includes Orbit Reader 20 and the printed
quick start guide, the following accessories are available for sale:
• Standard-A to Micro-B USB cable
• AC adapter
• SD card
• Carrying case
• Braille Quick-Start Guide
Check that all purchased items are in the box that you have received.
8 Features
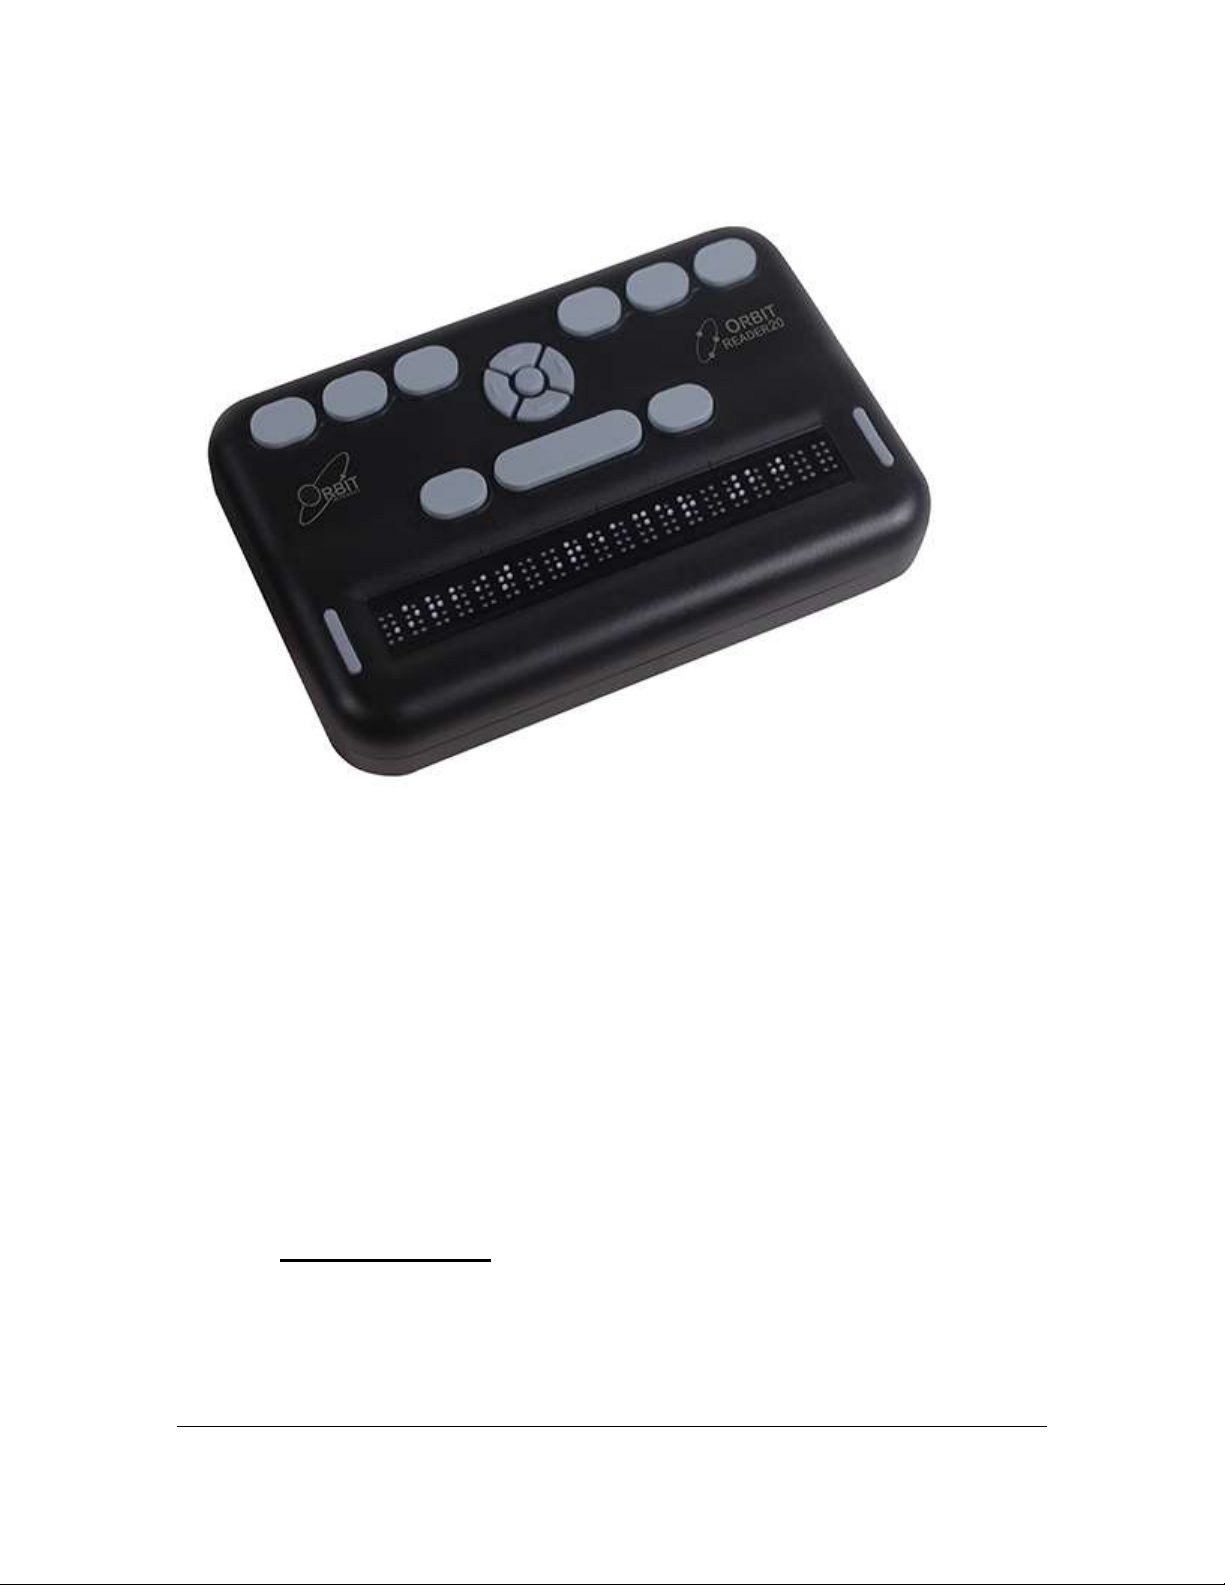
Orbit Reader 20 has the following features:
• 20 refreshable eight-dot braille cells
• Eight Braille Input keys and Space bar
• Navigation pad with four directional buttons (Up, Down, Left, Right) and the
Select button
• Micro-B USB charging port
• SD card slot
• 2 Panning rocker keys
• Bluetooth® wireless technology
• User-replaceable, rechargeable batteries
9 Orientation
Orientation of buttons, keys, cells, and slots is important for understanding how
the device operates and how you input and receive information on the device.
To begin with, place the device on a flat surface in front of you with the row of
braille cells closest to you. This is the proper operational orientation.
Page 9
Orbit Reader 20 – User guide Version 1.8
Orbit Research Confidential and Proprietary Information 9
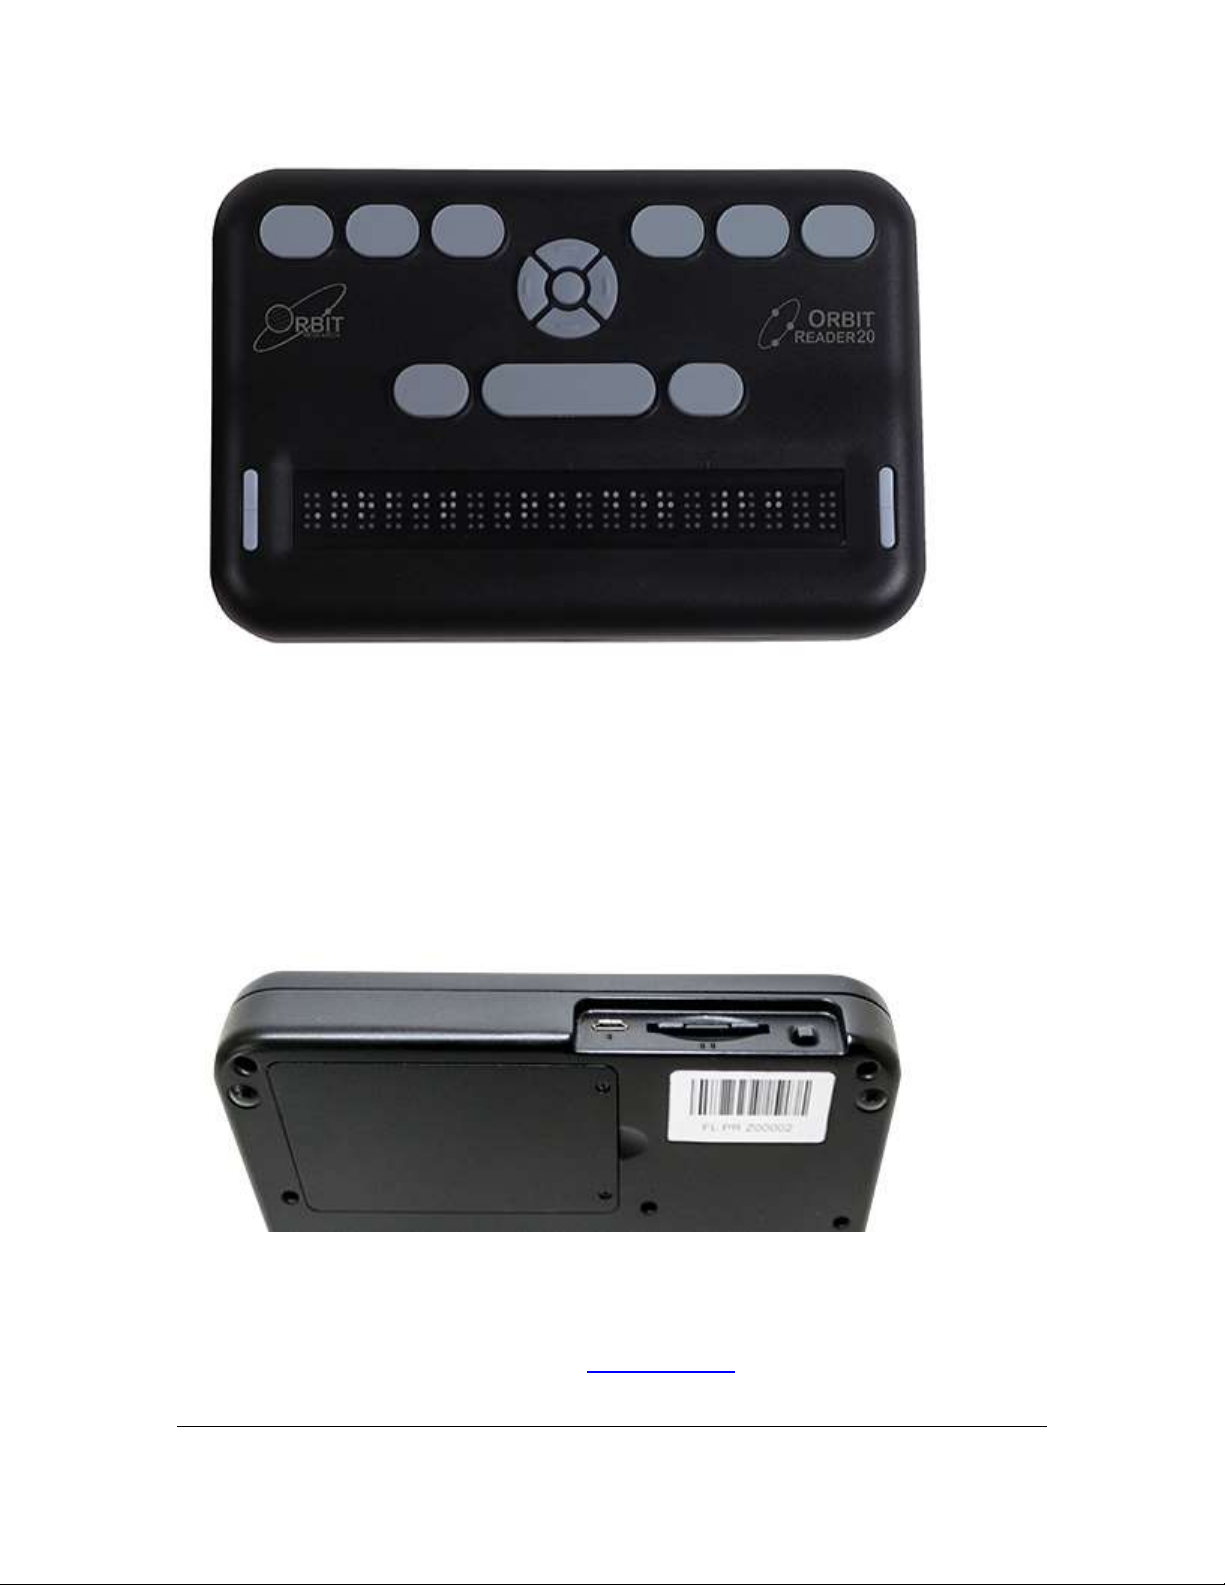
At the back of the device, from left to right, is the Power button (left), an SD card
slot (middle), and a Micro-B USB port (right). (Image is reversed in the picture).
They are all recessed in an area in the left half of the back edge. The Power
button sticks out enough to make it identifiable. The SD card slot has two small
bumps directly below it and the USB port has one bump below it.
The SD card slot is a standard type with spring feedback. The SD card is
inserted with the card connector fingers facing down. To remove the card, press
in and remove your finger to allow the card to pop out.
The battery compartment is located at the bottom of the device.
9.1 Key Placement and Use
When properly oriented, the braille cells are closest to you. The Panning keys are
at each end of the braille display. See Panning Keys section for more
information.
Page 10
Orbit Reader 20 – User guide Version 1.8
Orbit Research Confidential and Proprietary Information 10
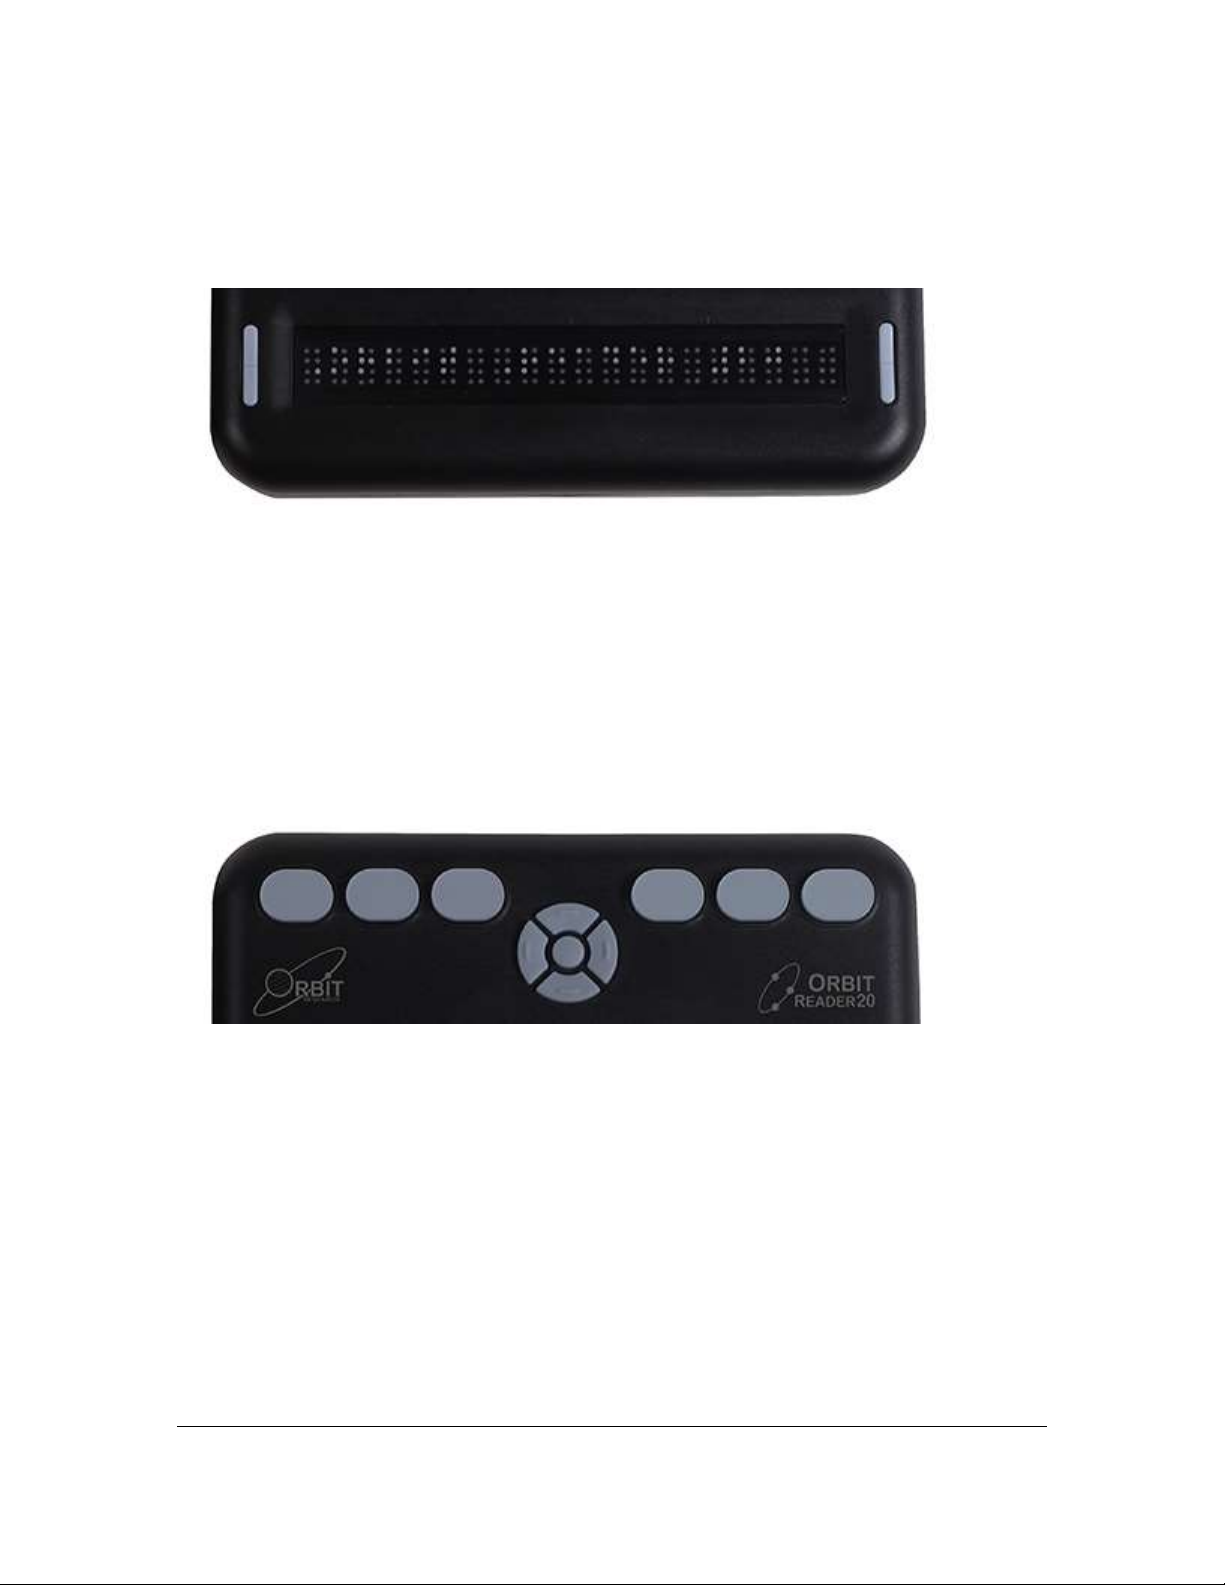
For orientation purposes, there are three slightly raised tick marks located above
the braille cells. These orientation marks are spaced by every fifth braille cell. For
example, the first tick mark from the left is between the fifth and sixth braille cell.
Moving towards the top and away from you, find a row of three keys, with a wider
key- in the middle. The wide key is the Space bar. The Dot 7 input key is to the
left of the Space Bar, and the Dot 8 input key is to the right of the Space Bar.
Above the three keys, is a navigation pad in the middle, between the Braille Input
keys and Space bar. The navigation pad contains four directional arrow buttons
(Up, Down, Left, Right) and the Select button.
The six traditional braille input keys are aligned horizontally along the top edge of
the face of the display, Dots 3 2 1 on the left and Dots 4 5 6 on the right.
In Stand-Alone mode, the Braille Input keys are used for navigation and
editing/writing.
In Remote mode, while using the display with a screen reader on a host device,
like an iPhone, the Braille Input keys can be used to input text or control
functionality of applications.
9.2 Panning Keys
The Panning keys are two-function rocker keys found at either end of the braille
display. These keys control how you read the lines of the text: either next or
previous. Pressing one end of the key results in one action, while pressing the
opposite end results in the opposite action.
Page 11

Orbit Reader 20 – User guide Version 1.8
Orbit Research Confidential and Proprietary Information 11
To read the next display of text (panning forward), press the bottom part of the
key (down) on either Panning key. To read the previous display of text (panning
backward), press the top part of the key (up) on either Panning key.
9.3 8-Dot Braille Cells
It is similar to six-dot braille with two additional dots below Dot 3 and Dot 6.
These two additional dots are called Dot 7 and Dot 8, and they are used to
indicate capitalization in the Computer Braille Code (Computer Braille) or to
indicate some attributed text or a cursor. Their exact use depends on the
software you use with the display. Check the software documents for information
on exact usage.
Eight-dot Computer Braille is similar to uncontracted braille, except that it
features a one-to-one correspondence with the plain text (ASCII) characters.
Computer Braille does not require an additional cell to show a capitalization
indicator. Instead, Dot 7 is added to the lowercase version of the letter. For the
ASCII equivalencies in Braille, go to Appendix A - Computer Braille Chart at the
end of this document.
10 Getting Started
The Orbit Reader 20 has two modes: Stand-Alone mode and Remote mode. In
Stand-Alone mode, the device is a book reader that uses an SD card as reading
media. In Remote mode, the device works like other braille display and needs to
be connected to a computer or other host with a screen reader.
This section explains how to charge, turn the device on and off, insert the SD
card, and enter and exit the menus.
10.1 Charging the Device
When you receive the Orbit Reader 20, it may be already charged; however, we
recommend that it should be fully charged before or during first use. You can use
the device and charge it at the same time, so it saves reading time. When the
battery in Orbit Reader 20 gets to 10%, Dot 8 of the 20th cell on the display
blinks on and off. This behavior is normal, indicating that the battery is low.
To charge the device, use the Standard-A to Micro-B USB cable and the power
plug provided with the unit. Insert the small end of the cable into the Orbit Reader
20's USB port with the bumps facing down. It should slide in without resistance;
do not force it. Now insert the large end of the cable into a computer USB
connector or the AC adapter provided. Plug the adapter into an AC wall
connector.
If the device is on when you connect the charger, the display shows "-- Charger
connected" When you unplug the charger, it shows "-- Charger unplugged" The
Page 12

Orbit Reader 20 – User guide Version 1.8
Orbit Research Confidential and Proprietary Information 12
charger plugged and unplugged indications are briefly displayed even when the
unit is off. For more information, see the Battery section under The Menu.
If you have charged the device for 4 or more than 4 hours, and it does not power
on, contact Customer Service at techsupport@orbitresearch.com
10.2 Power On and Off
A square Power (on/off) button is situated at the back of the device. See
Orientation section for more information.
To power on the device, press and hold the Power button for 2 seconds. If for
some reason power on is taking more time, Orbit Reader 20 flashes the first
braille cell to let you know it is coming on.
When you turn the device on, Orbit Reader 20 resumes from the place u left. If
you are using the device or inserting the SD card for the first time, Orbit Reader
20 shows the first file or folder name on the SD card.
If the operating mode of the unit was Bluetooth when last powered off, then the
device restarts in Bluetooth mode.
The Orbit Reader 20 displays, --" No SD card" when the SD card slot is empty.
To turn off the device, press and hold the Power button for 2 seconds.
The Orbit Reader 20 has a low-power standby/sleep mode. Quickly tapping the
Power button puts the unit in sleep mode. Tapping the Power button while the
device is in sleep mode, wakes the device. While editing or when connected to
Bluetooth, if no keys are pressed for 1 hour, the unit automatically goes into
sleep mode. Ideally otherwise, the device goes to sleep after 10 minutes of
inactivity. After 5 hours in sleep mode, the unit shuts off to conserve power.
10.3 Inserting and Formatting the SD Card
The device comes with an inserted SD card with translated braille files already on
it, so that you can quickly learn to use the device by reading the material.
The Orbit Reader 20 uses standard full-size SD cards from 4GB to 32 GB in
capacity. The card must be formatted as FAT32. There is no way to format a
card on the device. Most cards come already formatted. However, you can
format one as FAT32 on a desktop computer for use with the Orbit Reader.
To insert the SD card, find the large slot at the back.
On one of the short sides of the SD card, there are some ridges called SD fingers
or teeth. Position the SD card with the teeth facing down. Now insert the short
side with teeth into the device. The SD card should go in smoothly until it gets
about a quarter of an inch from being fully in the device. At this point you feel a
Page 13

Orbit Reader 20 – User guide Version 1.8
Orbit Research Confidential and Proprietary Information 13
slight resistance. The card slot works like a toaster, gently push the SD card in
until you hear a click. The card is aligned with the rear edge when properly
inserted.
To remove the card, press it ‘in’ a little until it pops out and then gently remove it.
10.4 About Menus and File Names
Orbit Reader 20 shows internal menus and file names in eight-dot Computer
Braille.
For a complete reference to the characters comprising Computer Braille, see the
Appendix A - Computer Braille Chart.
10.5 Entering and Exiting Menus
To…
Do this
Open the menu
Press Select + Up Arrow
Exit the menu
Press Dot 7
Move through the menu choices
Press the Up or Down Arrows
See choices within a menu option
Use the Right and Left Arrows
Select a menu item
Press Select
10.6 Device Operational Modes
The Orbit Reader 20 has two functional modes. Stand-Alone mode and Remote
mode.
Stand-Alone mode is the default operational mode and allows you to read, edit,
and browse files without being connected to another device. An SD card must be
inserted in the Orbit Reader 20 while operating in Stand-Alone mode. See the
Stand-Alone Mode section of this document for more information.
Remote mode allows you to connect the Orbit Reader 20 to iPhone®, iPad®, and
Android™ mobile devices, as well as desktop computers. In Remote mode, Orbit
Reader 20 acts as an input and output device for the remotely connected host via
USB or Bluetooth. See the Remote Mode section of this document for more
information.
To move back and forth between Stand-Alone and Remote modes, use the
following commands:
• To switch to Remote mode: press Select + Right Arrow
• To switch to Stand-Alone mode: press Select + Left Arrow
Stand-Alone mode operates in the following ways:
• Menu
Page 14

Orbit Reader 20 – User guide Version 1.8
Orbit Research Confidential and Proprietary Information 14
• File Manager
• Reader
• Editor
Remote mode connects in the following ways:
• Bluetooth
• USB: HID, Serial, or Mass Storage
11 The Menu
Orbit Reader 20 provides a menu for setting options, checking battery, and
changing modes of operation.
To open the menu, press Select + Up Arrow. Battery Status is the first menu
option displayed.
Some menu item lets you select among a number of choices. For example, the
Sort item allows you to choose one of the various options of arranging files in the
file manager. Other menu items provide information about the device, such as
serial number and version. The selected option is underlined with Dots 7 8.
To scroll through the other possibilities, press the Right Arrow key. To select the
option, press Select. Orbit Reader 20 responds by underlining the word with Dots
7 8 to indicate the choice.
To close the menu and return to your work, press Dot 7.
To move to another menu item, press the Up or Down Arrow. When you get to
the end of the list of options and press the Down Arrow again, Orbit Reader 20
moves back to the top menu item. Similarly, when you press the Up Arrow from
the first menu item, Orbit Reader 20 moves to the last item in the list. This feature
allows quick access to the last few menu items. That is why some options that
may be frequently used are located at the bottom of the menu list.
11.1 Menu Availability
The menu is available for the Remote and Stand-Alone modes. Press Select +
Up Arrow to open the menu in either mode.
To exit the menu and return to the previous mode, press Dot 7.
11.2 Menu Options
Some of the Menu options have a default setting (indicated in the list below). For
most of these options, you can move among alternatives by pressing the Right or
Left Arrows and then pressing Select. Selected items are underlined with Dots 7
8. Refer to the specific section for further information.
Page 15

Orbit Reader 20 – User guide Version 1.8
Orbit Research Confidential and Proprietary Information 15
Battery
Cursor Blink (1)
Sort (Name: Ascend)
Split Words (Off)
Filter Dot 7 (On)
Wrapping (On)
Compress Spaces (On)
Load Language
Switch Language
Encoding (ANSI)
Load Files
Switch Files
Encoding
Version
Serial
Reset Defaults
USB (HID)
Bluetooth (On)
Pair (Just Works)
Emulate (Off)
Mode (Stand-Alone)
Battery
The Battery status menu item displays the amount of power (percentage) left in
the battery. When the battery in Orbit Reader 20 gets to 10%, Dot 8 of the 20th
cell on the display blinks on and off. This behavior is normal, indicating that the
battery is low.
It also notes when the unit is charging. For example, when plugged in for
charging, the message "-- Charging XX%" is displayed, where XX is the
percentage number. Similarly, for first-time use, the message "-- Battery XX%" is
displayed.
Cursor Blink (1)
The Cursor Blink option works only while editing in the Edit Box or Editor mode.
This option allows to select the number of seconds between blinks. The default
setting for the Cursor Blink option is one second between blinks. The setting
choices are 1, 5, 15, 30, and 60 seconds, and 0 where the cursor does not blink.
To make a selection, press Select.
Page 16

Orbit Reader 20 – User guide Version 1.8
Orbit Research Confidential and Proprietary Information 16
Sort (Name: Ascend)
The Sort menu item lets you change the order of the files on the SD card, using
Orbit Reader 20's built-in File Manager. The sorting options are - Name
(Ascend/Descend), Date, Size, and Last Read. The default setting for Sort is
Name (Ascend). To return to the File Manager, press Dot 7 from Stand-Alone
mode. To make a selection, press Select.
You cannot sort in Remote mode, but you can view and change the Menu
options. In Remote mode, press Select + Up Arrow. This command takes you to
the Menu. Use Down Arrow to Sort list item.
If you are in File Manager or Reader, press Select + Up Arrow to enter the Menu,
then Down Arrow to Sort.
If you are in Editor, first exit (Select, E OR Select, Select) and then press Select
+ Up Arrow to enter the Menu. Down Arrow to Sort.
Additionally, you may sort files within the selected category in Ascending or
Descending order. After selecting a category, press the Right Arrow until you
reach either Ascend or Descend in the list and press the Select button. Orbit
Reader 20 arranges the files in the indicated order. The default setting for this
menu item is Ascending (A to Z).
Split Words (Off)
The default setting for Split Words is Off. In the default setting, the Reader tries
to put as much content on the display as possible without splitting a word.
However, if you want 20 cells of braille, no matter the content, set Split Words to
On. When Split Words is on, the Reader shows partial words. When you pan to
the next 20 cells of braille, the remainder of that word appears at the beginning of
the line. To make a selection, press Select.
Filter Dot 7 (On)
The default setting for Filter Dot 7 is On. The Filter Dot 7 menu item lets you turn
off the Dot 7 that frequently appears in some BRL and BRF files. The Dot 7 is
filtered by default, but if you want to make a BRL or BRF file that uses eight-dot
braille, turn this setting off. To make a selection, press Select.
Wrapping (On)
The default setting for Wrapping is On. The Wrapping option is Orbit Reader 20's
way of reflowing files that are already formatted for embossing. Normally,
formatted files contain line-end indicators every 38-40 characters, which starts a
new line. This option eliminates extra spaces, making it easier to read on a 20cell display. To make a selection, press Select.
Page 17

Orbit Reader 20 – User guide Version 1.8
Orbit Research Confidential and Proprietary Information 17
Compress Spaces (On)
Carriage returns, blank lines, and tabs represent extra spaces (or white space) in
a document. These spaces take up lots of room and therefore slow down reading
on a braille display. The Compress Spaces option eliminates superfluous blank
lines and spaces. If multiple blank lines or spaces appear in the file, they are
compressed to a single space. This setting is especially useful when reading
formatted text files that contain many blank lines.
The default setting for Compress Spaces is On. To make a selection, press
Select.
Load Language
The Load Language menu option is used to upload language files to flash
memory of the Orbit Reader 20 device. The default translation table for Orbit
Reader 20 is English Braille ASCII, which comes preloaded on the device.
The Load Language option has a sub menu. This sub menu has three options
namely Load Locale, Load .loc Only, and Load .lan Only. To navigate and select
the sub menu options:
#Press the Right or Left Arrow keys to navigate the sub menu.
# then press Select, to select the sub menu option.
• Load Locale - Orbit Reader 20 displays a region-code-name list for the
languages. The list has both the Table files (.lan) and System Messages
files (.loc) in the Locale folder on the SD card, along with the default
option. Press Select to choose a file...
• Load .loc Only - Orbit Reader 20 displays the list of System Message files,
along with the default option. Press Select to choose a file.
Note: You need to ensure that the correct ASCII to Braille table of the
desired region has been uploaded.
• Load lan Only - Orbit Reader 20 displays the list of Table files, along with
the default option. Press Select to choose a file.
Please refer Upload the Localization Files under the section Language Options
(Localization) for additional information.
Switch Language
The Switch Language menu option is used to change between a loaded
language and the default English language.
Note: You must first load a language to the flash memory of the device, before
using the Switch Language option.
Page 18

Orbit Reader 20 – User guide Version 1.8
Orbit Research Confidential and Proprietary Information 18
Encoding
Text files are created in either ASCII or Unicode encoding format. Text files for
some of the languages are created in Unicode only. When creating a file in
languages other than the ASCII-based ones, you must select the Unicode option.
Press Select to choose the option.
ASCII is the default option. You can choose from the following encoding formats
to create a new file on the system:
1. ASCII
2. UNICODE16LE
3. UNICODE16BE
4. UTF-8
If you want to create the BRF/BRL files, choose the ASCII option. Otherwise, the
file might be unreadable by other programs.
This setting is applied only to the files created by using the “create new”
command. It has no impact on the existing files.
The format cannot be changed while a file is open for editing.
Version
The Version menu item displays the version of the software running on your
device. You may need the version number when talking to Customer Service. For
the latest version update, see http://www.orbitresearch.com/support/orbit-reader-
20-support/orbit-reader-firmware-download/
Serial
The Serial Number menu item shows the individualized serial number of the
device you are using. This number may be important for warranty purposes.
Reset Defaults
The Reset Defaults menu item resets all your menu settings to the factory
settings. To reset to default settings, press the Select button. This action resets
defaults and takes you to the top of the Menu Options list (Battery Status).
USB (HID)
The USB menu item selects between the three possible USB protocols: Human
Interface Device (HID), Serial, or Mass Storage. The default setting for USB is
HID. To select the option, press Select.
For more information, see the USB Connectivity section under Remote Mode.
Bluetooth (Auto)
There are three choices under this menu option.
Page 19

Orbit Reader 20 – User guide Version 1.8
Orbit Research Confidential and Proprietary Information 19
• Bluetooth Auto
• Bluetooth manual
• Bluetooth OFF
The default setting for Bluetooth is Auto. If there is any screen reader activity
running on the paired device, the Orbit Reader automatically switches to
Bluetooth Remote mode. If you do not want automatic Bluetooth connection,
switch to manual option. To disable Bluetooth completely, select OFF. To select
another option, press select.
For more information, see the Using the Bluetooth Connection section under
Remote Mode.
Pair (Just Works)
The Pair menu item selects a Bluetooth pairing scheme. Orbit Reader 20 uses
the selected scheme when it responds to a Bluetooth pairing request from a host
device. To select the option, press Select.
The two choices are:
Just Works – This is the default Bluetooth pairing scheme. When using this
scheme, Orbit Reader 20 automatically pairs to any device that sends pair
request.
Confirm code - is the most secure pairing scheme. With this scheme, Orbit
Reader 20 responds to pairing requests by showing a random number on both
the Orbit Reader 20's braille display and on the host device. To confirm the
request, ensure that the numbers match and press Dot 8 on the Orbit Reader. To
reject the pairing request, press dot 7.
Emulate (Off)
The Emulation option allows you to choose how the device appears to the Host
screen reader applications while operating in Remote mode. If RB18
(Refreshabraille 18™) Emulation mode is selected, the Orbit Reader appears as
a Refreshabraille 18 and only the first 18 cells are used. If Emulation mode is Off,
it appears as Orbit Reader 20. To select the option, press Select.
The default setting for Emulation mode is Off.
Mode (Stand-Alone)
By default, Orbit Reader 20 operates in Stand-Alone mode where you read and
write files stored on the SD card. To specifically set the unit to another mode,
select among Remote, BT (for Bluetooth,) or USB. Orbit Reader 20 tries to
automatically switch to Bluetooth or USB depending on screen reader activity,
but if you want to, for instance, specifically switch back to Stand-Alone mode
Page 20

Orbit Reader 20 – User guide Version 1.8
Orbit Research Confidential and Proprietary Information 20
from Remote mode, or switch the interface from Bluetooth to USB, use this
option. To select the option, press Select.
12 Stand-Alone Mode
Stand-Alone mode is the default operational mode and allows you to read, edit,
and browse files without being connected to another device. A formatted SD card
must be inserted in the Orbit Reader 20 while operating in Stand-Alone mode.
This card must contain the files you wish to read.
Stand-Alone mode operates in the following ways:
• File Manager
• Menu
• Reader
• Editor
13 File Manager
File Manager is where you select a file stored on the SD card to read on the Orbit
Reader 20. You can also create new files and folders, view the properties (such
as the file size and current reading position), and copy, rename, and delete files.
When moving through the list of files, Orbit Reader 20 shows the first 20
characters of the file name. You may scroll to the rest of the information about
the file, such as the rest of a long file name, its size, and date, by using the
panning keys to move the display window. You can change the way files are
sorted in the file list using related menu options.
Each item on the file list includes the following items:
• File name and extension
• Current position in the file in number of characters
• Size in KB (kilobytes)
• Last modified date
• Protected or Unprotected
Only one column is displayed per line (with panning as necessary). Pressing Left
or Right Arrow moves to the previous or next column heading (file information).
When you exit a file, you return to the original place and column in the File
Manager.
13.1 File Manager Commands
Following are the commands which you can use in the File Manager. Most of the
commands for files also work for folders.
Page 21

Orbit Reader 20 – User guide Version 1.8
Orbit Research Confidential and Proprietary Information 21
To...
Press
Additional information
Open a file or
folder
Select or
Dot 8
Pressing Select or Dot 8 opens the file or folder.
Go to previous
or next file or
folder
Up or
Down
Arrow
Pressing Up or Down Arrow moves to the previous or next file
in the list.
Go back one
folder level
Dot 7
Dot 7 acts like a "back" key to exit current activity. If you are
already in File Manager, pressing Dot 7 moves back one level
where you have multiple subfolders open.
If you are at the root level, Dot 7 does nothing. If you are in
one of the columns of information, for example size or date,
then pressing Dot 7 returns to filename.
Move through
file
information
Left or
Right
Arrow
This command moves you through the file information by
headings. See File Manager section for more information.
Open the
Menu
Select +
Up Arrow
Pressing Select + Up Arrow opens the menu.
Scroll text
Left or
Right
Panning
keys
If the file name is longer than the display, panning left or right
displays more of the file name. When you get to the end of the
file name, pressing the panning key moves you to the next
item of file information, like position, size, date, and so on.
Make a New
File
Space + N
(Dots 1 3
4 5)
The New File command starts the Editor mode with a new file.
To exit the Editor, press Select, Select.
Make a New
Folder
Space + O
(Dots 1 3
5)
The New Folder command opens the Edit Box where you may
type the name of the new folder. Pressing Dot 8 saves the
folder name and returns you to the file list with the new folder
selected. If you do not name the folder, pressing Select names
the folder as New Folder. Press Select to exit without making a
new folder.
Delete a file or
folder
Space + D
(Dots 1 4
5)
This action deletes the currently selected file(s) or folder(s).
Only empty folders and unprotected files can be deleted. A
confirmation is required before the file or folder is deleted.
When the message "-- Confirm action" is displayed, press Dot
8 to confirm or press Dot 7 to cancel.
Rename a file
or folder
Space + R
(Dots 1 2
3 5)
The Rename File command allows you to change the name of
a file or folder. To use it, press the Rename command. Orbit
Reader 20 responds with an Edit Box containing the original
file or folder name. Edit the name or type a new one and press
Dot 8. Press Select to exit without renaming a file or folder.
Cut a file
Space + X
(Dots 1 3
4 6)
This action cuts the currently selected file(s) or empty folders
from their location and places it (them) on the clipboard to be
used with the paste command.
Page 22

Orbit Reader 20 – User guide Version 1.8
Orbit Research Confidential and Proprietary Information 22
Copy a file
Space + C
(Dots 1 4)
The Copy File command makes a copy of the currently
selected file(s) or empty folders and places it (them) on the
clipboard to be used with the paste command.
Paste a file
Space + V
(Dots 1 2
3 6)
This action pastes the file(s) or folder(s) that are currently on
the clipboard into the current location in the File Manager. If
no file or folder is on the clipboard, no action is taken.
Mark a file
Space +
M (Dots 1
3 4)
When moving multiple files, use the Mark File command to
mark each individual file before using Cut, Copy, or Delete.
To Mark a file, place arrow on the file and press Space + M.
To clear a marked file, press Space + M again.
File Manager indicates marked files by raising Dots 7 and 8 of
the first letter of the file name.
Protect or
unprotect a
file
Space + P
(Dots 1 2
3 4)
To protect a file from accidental changes, arrow to the file and
press Space + P. To remove the protected status, select the file
and press Space + P again. To determine if a file is Protected,
arrow Right or Left to the Unprotected/Protected heading.
Edit the
current file
Space + E
(Dots 1 5)
When editing the current file Orbit Reader 20 switches to Edit
mode, which is indicated by a cursor at the point of input. The
cursor is at the first character shown on the display when you
pressed the edit command. As you type, everything is saved to
the file. To exit, press Select, Select. See The Editor section
for more information.
Edit Last
Edited File
Space +
Dots 1 2 4
6
This command reopens the last file you edited and returns the
cursor to its last position in that file. “The Edit Last Edited
File” command is useful for taking notes on what you read.
Use the command to quickly switch back to the Editor. Then
close the Editor to return to the title you are reading. This
command has no effect if you are already editing a file. The
device displays the error message "-- File not found" when no
previous file has been opened or if the file was deleted. Press
Select, Select to return to the file you were reading.
13.2 More about Copying and Pasting Files
When copying or pasting a file that results in another file with the same name,
File Manager adds an extension to indicate that the new file is a copy. For
example: if you copy book.brf to a folder that already contains book.brf, the new
file becomes book_1.brf and the original book.brf remains unchanged.
If the SD card runs out of space before a file operation is completed, File
Manager shows, "-- Error copying file xxx" where xxx is the file name.
When copying large number of files, or large files that can take some time, File
Manager displays progress messages during the copy operation.
Page 23

Orbit Reader 20 – User guide Version 1.8
Orbit Research Confidential and Proprietary Information 23
If copying a file takes more than five seconds, File Manager displays, "-- Copying
xxx (yy%)" where xxx is the name of the file and yy is the percentage complete.
This percentage is updated after every 10% of the progress.
For the command keys, go to the File Manager Commands table under the File
Manager section.
File Movement Commands
To...
Press
Additional information
Move to first file
Press Space +
Dots 1 2 3
Pressing Space + Dots 1 2 3 moves File Manager
selection to the first file in the current folder.
Move to last file
Press Space +
Dots 4 5 6
Pressing Space + Dots 4 5 6 moves File Manager
selection to the last file in the current folder.
Incrementally
search file list
Type the file
name quickly
To find a file quickly, type the first few letters of the
file's name. File Manager highlights the first file
matching the letters you typed.
13.3 File Types
Orbit Reader 20 does not translate or interpret any file. It simply displays the
contents of a file in braille. So, if you put a plain text file onto the SD card, Orbit
Reader 20 displays that file as it was written. Similarly, if you put a BRF file on
the SD card, no matter the language or code, Orbit Reader 20 accurately shows
its contents. To use Word or PDF files, you must first translate them on a desktop
computer, and then send the translated file to the SD card.
Braille files may contain any kind of braille, either six or eight-dot, in any
language and for any topic. You create these files on a computer with a
translation software package, such as Duxbury or LibLouis, or you create them in
the Editor on the Orbit Reader 20.
Supported File Types
Extension
Type
Explanation
BRF
Translated, formatted braille
displays exact representation
BRL
Translated, unformatted braille
displays all text
TXT
Text
displays eight-dot Computer Braille
In addition to the supported file types, Orbit Reader 20 shows the contents of any
file.. This feature is useful to examine files that contain readable text even if it is
not a supported file type. However, some files may not contain readable content.
There are several excellent braille translation systems available in the U.S. If you
obtain textbooks from APH or get transcribed titles from NLS or NBP, the braille
should be correct and formatted. You may also get braille translation software
that produces automatically translated braille using programs like ‘Liblouis’.
Page 24

Orbit Reader 20 – User guide Version 1.8
Orbit Research Confidential and Proprietary Information 24
Alternatively, you can have ‘Bookshare’ automatically generate braille files of the
titles available.
13.4 Preparing Files
To prepare files for placement on the Orbit Reader 20, follow these guidelines:
• Determine the translation type.
• Translate the file.
• Place the file onto the SD card or use the Mass Storage protocol to copy from
your desktop computer.
To copy files to the SD card, remove card from the Orbit Reader 20 and place it
into a card reader on your computer. Alternatively, you can connect the USB
cable from the Orbit Reader 20 to your computer and activate the Mass Storage
protocol on Orbit Reader 20 by either pressing Space + Dots 5 7 or selecting
Mass Storage from the USB option in the menu. When using the Mass Storage
protocol, Orbit Reader 20 shows up as a drive on the computer, and here, you
cannot use other functions of Orbit Reader 20.
14 The Reader
In Stand-Alone mode, the Orbit Reader 20 displays the content of files stored on
an SD card. It does not do any translation or interpretation.
The Orbit Reader 20 is designed to be a stand-alone reader. Placing BRF, BRL,
or TXT content (see File Types section) on an inserted SD card turns it into an
on-the-go braille book reader. When first powered on, the Orbit Reader 20
displays the contents of the first file on the SD card. To get to the file list, press
Dot 7. Go to the desired file using up or down arrow key. Press Dot 8 or Select
to open the file. Use Left and Right Panning keys to read it. There are many
other functions in reading mode such as Find, Power Move, Bookmarks, and
even a menu to set preferences. The following sections describe commands and
settings that can be used while reading.
When you turn the device on, Orbit Reader 20 resumes from the last place of the
last file in use. For first-time use, it displays the first file or folder on the SD card.
Press Dot 7 to close the file and display File Manager, which shows a list of files
on the SD card. If there is no SD card inserted, the message "-- No SD card" is
displayed.
When you reach the end of a file, "-- End of file" is displayed by the Reader.
Similarly, if you are at the beginning of the file, "-- Start of file" is displayed.
14.1 Reader Commands
While in Stand-Alone mode, the following commands are available.
Page 25

Orbit Reader 20 – User guide Version 1.8
Orbit Research Confidential and Proprietary Information 25
To...
Press
Additional information
Go to Previous
or Next display
Panning
keys
See Panning Keys section for more information.
Go to Previous
or Next
Character
Left or
Right
Arrows
If you press Right Arrow key, the next letter appears on the
right side of the display.
To conform to traditional braille display navigation
commands, the Reader also supports Space + Dot 3 and
Space + Dot 6.
Go to Previous
or Next Word
Space +
Left or
Right
Arrows
If you press Space + Right Arrow, the next word appears
on the right side of the display. The Reader also supports
Space + Dot 2 and Space + Dot 5.
Go to Previous
or Next Page
Dot 3 or
Dot 6
Pressing Dot 3 or Dot 6 moves the cursor back or forward
in the file to the next page marker (form
feed) or 1000 characters, whichever comes first.
Go to Top or
Bottom of a file
Dot 1 or
Dot 4
Pressing Dot 1 moves to the top of a file; pressing Dot 4
moves to the bottom of a file. Alternatively, Long press Up
and Long press down keys can be used to jump to the top
and bottom of a file, respectively. (For compatibility with
other devices, Space + Dots 1 2 3 moves to the top and
Space + Dots 4 5 6 moves to the bottom of a file.)
Exit File
Dot 7
If reading a file, pressing Dot 7 returns you to your
previous location.
Open the Menu
Select +
Up Arrow
Pressing Select + Up Arrow opens the Menu.
Set or Clear a
Bookmark
Space + M
In addition to the automatic bookmark placed when you
close a file, Orbit Reader 20 lets you set additional
bookmarks. Reader displays the message "-- Bookmark
added" or "-- Bookmark cleared" if there was already a
bookmark at that position.
Go to Previous
or Next
Bookmark
Dot 2 or
Dot 5
The Reader responds by moving the cursor to the
bookmarked position. The bookmarked location appears as
the first character on the display. If there are no marks in
the indicated direction, "-- No more bookmarks" is
displayed.
Power
Move/Search
Forward and/or
Back
Dots 8 +
Left or
Dots 8 +
Right
Press Dots 8 + left to move back. Press Dots 8 + right to
move forward. See Power Move Forward and Back section
for more information.
Find Braille
Space + F
(Dots 1 2
4)
Pressing Space + F opens an input field (Edit Box) with a
cursor. By default, it shows the last search string on the
display. This allows you to perform search in a specific
braille format by typing the text in the same braille format.
Press Dot 8 to begin the search. To exit the Edit Box
Page 26

Orbit Reader 20 – User guide Version 1.8
Orbit Research Confidential and Proprietary Information 26
without performing a search, press Select. See Edit Box
and Find Braille sections for more information.
Find Next Braille
Dots 8 +
Right
Arrow
Pressing Dots 8 + Right Arrow repeats a previous search
forward from the point in the file where you are. If there is
no text in the Find Edit buffer, the Reader uses the text at
the cursor. See the Find Braille section for more
information.
Find Previous
Braille
Dots 8 +
Left Arrow
Pressing Dots 8 + Left Arrow repeats a previous search
backwards from the point in the file where you are. If there
is no text in the Find Edit buffer, the Reader uses the text at
the cursor. See the Find Braille section for more
information.
Edit Current File
Space + E
Space + E to edit the file you are currently reading. Press
Select, Select to exit the Editor and continue reading.
Open New File
Space + N
Space + N opens a new file in the Editor for editing/note
taking. Press Select, Select to return to the file you were
reading.
Edit Last Edited
File
Space +
Dots 1 2 4
6
Using this command reopens the last file you edited and
returns the cursor to its last position in that file. The Edit
Last Edited File command is useful for taking notes on
what you read. Use the command to quickly switch back to
the Editor. Then close the Editor to return to the title you
are reading. This command has no effect if you are already
editing a file. The device displays the error message "-File not found" when no previous file has been opened.
Press Select, Select to return to the file you were reading.
14.2 Power Move Forward and Back
Orbit Reader 20's power move commands provide a quick means of
moving/searching through large sections of a file to find a known location in the
document. A power move operates by using boundaries and moving 50%
between them with each press of the key command. In essence, by using a
power move to search within a file, you are drilling down to the information using
a binary command. When you press Dot 8 + Down Arrow or Dot 8 + Up Arrow,
the Reader moves in the following ways:
On the first press, the cursor moves half way between the current position and
the start (Dot 8 + Up Arrow) or end (Dot 8 + Down Arrow) of the file, which act as
boundaries for the power search.
Subsequent presses treat the moved-from position as the new boundary in that
direction. So, if you are at the beginning of the file (or 0%) when you press the
Dot 8 + Down Arrow, the Reader moves the cursor to half way between 0% and
100%. You are now at 50%, and this becomes the new boundary. The initial
boundary is at the original position of 0%. Therefore, if you press Dot 8 + Up
Page 27

Orbit Reader 20 – User guide Version 1.8
Orbit Research Confidential and Proprietary Information 27
Arrow, you move half way between 50% and 0% to end at 25%. Or, if you press
the Dot 8 + Down Arrow, you move half way between 50% and 100% to end at
75%.
Each time you press Dot 8 + up arrow or Dot 8 + down arrow keys, the Reader
shows the percentage in the first few cells of the display line and fills rest of the
cells with text at that position. This continues till you press some other key. See
Panning Keys section for more information.
14.3 Find Braille
To find specific braille text, use the Find command (Space + F). Orbit Reader 20
responds by opening an input field (see Edit Box section) with a cursor, which is
indicated by Dots 7 and 8. By default it shows the text at current cursor location
in edit box. Unlike the Power Move, which searches by known location of text,
the Find command searches the entire file for instances of the braille text you
enter in the input field. If you have searched for something previously, that text
appears in the Edit Box with your cursor at the end. See the Power Move
Forward and Back section for more information.
To find a word, first press Space + F to enter the Edit Box. Type the braille text
you wish to find, and then press Dot 8. This word is shown as the first word on
the display. If the word is not found, the message "-- Not found" is displayed.
Press Dot 7 to clear the message. To exit the Edit Box without finding the word,
press Select.
After the word is found, to continue searching, press Dot 8 + right arrow to find
the next occurrence (forward in the file) or Dot 8 + left arrow to find a previous
occurrence (towards the beginning of the file).
If you are searching for text in a contracted braille file, you must type the text you
want to search in contracted braille.
If you are searching in a plain text file, you must type the text you want to search
in Computer Braille. See Appendix A - Computer Braille Chart for details.
You can search for terms up to 255 characters long. Searches are generally not
case sensitive. A search for the word "animal" results in finding both lowercase
and uppercase versions of that word (animal/Animal). However, if you want to
find words with upper case letters only, type the text you wish to find with the
braille indicator for capitalization included (in contracted braille, one dot 6
precedes a capital letter, while two dot 6s precede an entirely capitalized word. In
Computer Braille, capital letters include dot 7). For example, a search for the
capitalized word "Animal" gives the results for "Animal" (capitalized), but not
"animal" (lowercase).
Page 28

Orbit Reader 20 – User guide Version 1.8
Orbit Research Confidential and Proprietary Information 28
Additionally, searches match both whole and partial words. Searching for "an"
finds "an" (whole) and "man" (partial). To restrict searches to whole words, add a
space at the beginning or end of the word. The Reader matches the space with
any non-printing character such as spaces, tabs, and line feeds.
Read the section on Edit Box for editing commands and navigation functionality.
In” search files”, the Reader moves from reading files to searched text and
displays it at the beginning of display line. If the text is not found, then the Reader
displays “Not found” and gets back to its previous position. While searching
through large documents, Orbit Reader 20 displays “Busy” while conducting the
search.
To repeat a search moving forward towards the end of the file, press Dot 8 +
Right Arrow.
To repeat a search moving back towards the beginning of the file, press Dot 8 +
Left Arrow.
15 Edit Box
Orbit Reader 20 presents a text dialog or input field called an Edit Box when you
want to find text or rename a file. The Edit Box permits only one line of text.
Press Space + F to begin a search or press Space + R to rename a file.
Once in the Edit Box, insert text by typing the desired braille text and then use
the Edit Box commands to navigate. The Edit Box displays a blinking cursor
(Dots 7 8) to indicate the beginning of text that you are searching or editing.
When Orbit Reader 20 shows an edit box, it often provides default text, such as a
file name or a previously entered search term. To delete or replace the selected
text, type a letter or press the backspace key (Dot 7). To edit the existing text in
insert mode, press one of the arrow keys to move the cursor letter by letter to the
position where you wish to edit.
15.1 Edit Box Commands
To...
Press
Additional information
Move Left or
Right One
Letter
Left or
Right
Arrow
Pressing left or right arrow moves the cursor in the desired
direction. When the cursor reaches the end of the edit box, it
stops--it can move no further.
Move to Start
or End of
Text
Up or
Down
Arrow
Press Up or Down arrow to move the cursor to the beginning
or end of the text.
Backspace
Dot 7
The Backspace key Dot 7, deletes the letter immediately left of
the cursor. Use Backspace key in case of a typing mistake or
to remove small amounts of text.
Page 29

Orbit Reader 20 – User guide Version 1.8
Orbit Research Confidential and Proprietary Information 29
Accept typed
text
Dot 8
Here, pressing Dot 8 acts as an Enter/OK key.
Close the Edit
Box
Select
To close the edit box, use the Close command. In single line
controls, Close removes what you have typed. In multiple line
controls, all text is automatically saved in the editor.
16 The Editor
In addition to serving as a tool for reading braille, Orbit Reader 20 offers the
ability to write and edit text. This feature allows you to create/edit new or existing
files on the SD card.
While you are in the Editor mode, the cursor notes the current position by
blinking Dots 7 8. The default setting for the cursor is 1 second. The blinking of
cursor can be turned off from the Menu.
There are three ways to edit a file. Each of these three commands is available
both from the Reader and the File Manager.
• Edit new file: Space + N
• Edit current file: Space + E
• Switch to last edited file: Space + Dots 1 2 4 6
To insert text, type or paste the text at the cursor. You can insert any text into an
open file using the braille keys (Dot 1 to Dot 8). The Editor adds the typed or
pasted text.
To exit Editor, press Select, E or Select, Select. The cursor disappears, returning
you to the Reader in the file you were editing.
If you are exiting a new file, the editor automatically names the file with the first
20 characters in the file. If a file already exists with that name, the Editor appends
a number to it until it produces a unique name. To rename a file or to add an
extension to the file name, highlight the file name in File Manager, and use the
rename command. If there are Computer Braille characters that cannot be used
in a filename, such as a forward slash (/) or an asterisk (*), the characters are
replaced with an underscore (_). Once you exit, the new file name in the File
Manager is selected. If you wish to rename the file, use the rename command
(Space + R). If you want to give the file a specific name, write that name as the
first line in the file.
Note: It is recommended that you exit the Editor before you perform a system
update, reset the device, or remove the SD card. Exiting the Editor saves your
work. Not exiting the Editor first could result in lost work.
Page 30

Orbit Reader 20 – User guide Version 1.8
Orbit Research Confidential and Proprietary Information 30
16.1 Editor Commands
To ...
Press
Additional information
Edit New
File
Space + N
Creates a new file in the Editor.
Edit Current
File
Space + E
Opens the selected file for editing.
Switch to
Last Edited
File
Space +
Dots 1 2 4
6
Opens the last edited file for further editing. The device
displays the error message "-- File not found" if the file has
been deleted.
Add a new
line (Enter)
Dot 8
Pressing Dot 8 adds a new line (enters a carriage return) at the
end of a paragraph and places the editing cursor in the first cell
of the next paragraph.
Delete a
character
Dot 7
Pressing Dot 7 deletes the character to the left of the editing
cursor.
Exit Editor
Select,
Select OR
Select, E
When you close a file, Editor saves and returns back to the
Reader or File Manager, depending on your earlier location. It
automatically saves your work.
If you have opened the file from File Manager, File Manager
makes the new file the current item in the list.
If you edited an existing file, Reader moves the reading
position to the place where the cursor was.
Save current
work
Select, S
The Orbit Reader automatically saves files every 1 kB of data
or about 1000 characters, as you edit. However, small file
increments could be lost during certain situations such as, SD
card removal, system updates, or device resets. Pressing Select,
S saves the file as you deem necessary.
Go to next or
previous
character
Left or
Right
Arrow
Pressing Left or Right Arrow moves the cursor to the previous
or next character.
Go to next or
previous
word
Space +
Left or
Right
Arrow
Pressing Space + Left or Right Arrow moves the cursor to the
start of the previous word or next word.. This is also used to
navigate between digits.
Previous or
next display
Pan up or
down
Pressing up or down on the Panning rocker keys allows you to
move to the previous or next display of braille. If you press the
bottom part of the rocker key, the display pans forward. If you
press the top of the rocker key, the display pans backward. The
editing cursor is placed at the first cell. See Panning Keys
section for more information.
Previous or
next
paragraph
Up or
Down
Arrow
Pressing the Up or Down Arrow moves the editing cursor to
the start of the previous or next paragraph. If start of the
previous or next paragraph is not on the display, then the
display pans to the start of previous or next paragraph of the
Page 31

Orbit Reader 20 – User guide Version 1.8
Orbit Research Confidential and Proprietary Information 31
first cell on the display. The editing cursor is placed in the first
cell.
Start or end
of paragraph
Space +
Dot 7 +
Left or
Right
Arrow
Pressing Space + Dot 7 + Left or Right Arrow moves the
cursor to the start or end of the current paragraph. If the start or
end is not on the current display, then the display pans to the
start or end of the first cell of the display. The editing cursor is
placed in the first cell.
Previous or
next page
Space +
Dot 7 + Up
or Down
Arrow
Pressing Space + Dot 7 + Up or Down Arrow moves the cursor
to the previous or next page (1000 characters or form feed
character).
Go to top or
end of
document
Long press
Up or
Down
Arrow
Long pressing Up or Down Arrow moves the cursor to the top
or bottom of the document.
Find Next
Braille
Dots 8 +
Right
Arrow
Pressing Dots 8 + Right arrow repeats a previous search
forward from the point in the file where you are. If there is no
text in the Find Edit buffer, the Editor uses the text at the
cursor.
Find
Previous
Braille
Dots 8 +
Left Arrow
Pressing Dots 8 + Left arrow repeats a previous search
backwards from the point in the file where you are. If there is
no text in the Find Edit buffer, the Editor uses the text at the
cursor.
16.2 Editor Block Text Commands
The Editor block operations depend on a selection. The selection is the text
between the cursor and the location mark.
Note: The size limit for a cut/copy/paste operation is 5 KB of data.
Adding a location mark does not change the content. Marks are used for
copying/cutting a selection of text. To copy or cut using marks, press Select, M to
place a mark. Only one mark can be placed/added at a time. Once the mark is
placed, the text between the cursor and the mark can be copied (Select, C) or cut
(Select, X). Once text is copied or cut, the mark is cleared.
To ...
Press
Additional information
Set or clear
Location
Mark
Select,
M
The editor indicates a mark by raising both Dots 7 and 8 on the
character where the mark occurs. To set or clear a mark in the file,
press the Mark command. If there was already a mark at the cursor,
the editor shows "-- Mark cleared" on the display and removes the
mark. If there was no mark, it shows -" Mark set" and adds a mark.
Copy
Select,
C
The copy command places the selected text onto the clipboard for
later use in this file or another file.
Page 32

Orbit Reader 20 – User guide Version 1.8
Orbit Research Confidential and Proprietary Information 32
Cut
Select,
X
The cut command removes the selected text from the document and
places it onto the clipboard for later use. If you want to put that text
somewhere else, move to the desired position, then use the Paste
command.
Paste
Select,
V
To paste the contents of the clipboard before the cursor, use the Paste
command.
17 Context Menu
The Context menu gives you quick access to functions such as cut, copy, and
mark for use in Editor.
While in Editor, press Select to open the Context menu. There are two ways to
make a selection from the Context menu after it is open.
1. If you do not know the braille shortcut, press the Up or Down Arrow key to scroll
to your selection and press Select or Dot 8.
2. If you know the braille shortcut for the command (the braille letter associated
with the function), press that letter.
Braille Shortcut
Function
E
Exit
M
Mark
C
Copy
V
Paste
X
Cut
F
Find
S
Save
You can also press Select twice to quickly exit the Editor. The first press opens
the Context menu; the second press selects the first option in the menu, which is
Exit.
17.1 Remote Mode
In addition to using Orbit Reader 20 as a portable reading tool and editor, it
connects with host devices (i.e., computers, phones, and tablets) to provide
braille input and output to that device. The host device must be running software
that supports braille.
Host Device
Screen Reader
Windows PCs
JAWS®, Window-Eyes, System Access, NVDA
Mac® computers and iOS® devices
VoiceOver
Android devices
BrailleBack, Braille TTY
Chromebook
ChromeVox
Page 33

Orbit Reader 20 – User guide Version 1.8
Orbit Research Confidential and Proprietary Information 33
When you use Orbit Reader 20 as a display for other hosts, the screen reader on
that host device provides translation and other braille settings. Refer documents
for screen reader.
The only hotkeys used with Remote mode that are not sent to the remote device
are:
• Pressing Select + Up Arrow opens the Orbit Reader 20 Menus.
• Pressing Select + Left Arrow returns Orbit Reader 20 to Stand-Alone mode.
• Pressing Select + Right Arrow returns Orbit Reader 20 to Remote mode.
• Pressing Select + Down Arrow brings up an Edit box where you can type and
submit up to 255 characters of text to the remote device. Press Dot 8 to submit
or Select to cancel.
17.2 Before you Connect
Before you connect Orbit Reader 20 to a host, it is important to set the device so
that the screen reader(s) you use, recognize it. Newer versions of screen readers
recognize the Orbit Reader 20. The table below shows the first version of the
screen reader to directly support Orbit Reader 20.
Screen Reader
Version
VoiceOver on iOS
10.2
VoiceOver on Mac
10.11
NVDA
2017.1
Chrome
58
System Access
3.7.85
Dolphin
16.05
If you have an earlier version of screen reader, or one that does not support Orbit
Reader 20, you must set Orbit Reader 20 to emulate Refreshabraille 18.
Note: In Refreshabraille 18 emulation, only the first 18 braille cells are used.
To set the device to emulate Refreshabraille 18, select Emulation from the Orbit
Reader 20 menu and select RB18. If you plan to connect multiple host devices
and any of your preferred screen readers do not support Orbit Reader 20, you
must use the same emulation setting for each device. Note that if you already
have emulation set and you want to change the setting, you must disconnect the
device from the host first. Temporarily turn off your screen reader's braille
support before altering the setting.
If you have paired Orbit Reader 20 with Emulation off, unpair it from Bluetooth
connections before using it again.
Page 34

Orbit Reader 20 – User guide Version 1.8
Orbit Research Confidential and Proprietary Information 34
17.3 Using the Bluetooth Connection
Bluetooth is a technology that wirelessly connects devices, such as the Orbit
Reader 20, to host devices, such as phones, tablets, and computers. For
example, when using an iPhone with VoiceOver, you can control the iPhone with
keys and buttons on Orbit Reader 20, and you can read the entire interface in
braille as you interact with it.
If the Orbit Reader 20 is on, when you turn on the host device, it connects
automatically. When the host device enters sleep mode or is turned off, Orbit
Reader 20 reverts to showing stand-alone content. When connected to another
device through the USB port, Orbit Reader 20 reconnects to screen reader on
the other host device.
It is currently not possible to wake up the host from the braille keyboard on Orbit
Reader 20, like you can with a Bluetooth keyboard.
There are only two ways to wake up a host:
• Pressing the Power button
• Receiving a notification
In order to activate Bluetooth, you must perform the one-time procedure of
pairing Orbit with the host device. With newer devices, Orbit Reader 20 makes
pairing easy by employing a Bluetooth profile named "Just Works." If you use an
older host device that does not support this profile, you need to alter this setting
in Orbit Reader 20's menu.
If you set Emulation to RB18, it shows up in the remote device pair list as
Refreshabraille#### (where the # sign represents the last four digits of the serial
number of your Orbit Reader 20).
To pair Orbit Reader 20 to a host device, see Bluetooth section for the device
type.
Connecting iOS with Bluetooth
Connecting Mac with Bluetooth
Connecting Android with Bluetooth
Connecting Windows with Bluetooth
17.4 Manage Connections
When you use Bluetooth, it is possible to interrupt Orbit Reader 20 activities with
a connected host device. Each time you wake up the host device, it takes over
the Orbit Reader 20. This behavior makes it very convenient to interact with your
host in braille, but if you use Orbit Reader 20 in Stand-Alone mode or connect it
to a screen reader with USB, you may not want the interruption when your phone
wakes up. To return Orbit Reader 20 to what you were doing before the
interruption, put the host back to sleep by tapping the Power button.
Page 35

Orbit Reader 20 – User guide Version 1.8
Orbit Research Confidential and Proprietary Information 35
To prevent interruptions from occurring altogether, turn off Bluetooth in the Orbit
Reader 20 menu or temporarily turn off notifications on the host device. When
you are ready to resume using Bluetooth, either turn it back on from the Orbit
Reader 20 menu or use the hotkey Space + Dots 4 7 from Stand-Alone mode on
the Orbit Reader 20. (You can always return to Stand-Alone mode by pressing
Select + Left Arrow on Orbit Reader 20.)
17.5 Connect to Multiple Hosts
It is possible to pair Orbit Reader 20 with more than one device. For example,
you can pair it with both your phone and tablet. The device you use must offer a
braille interface.
To use Bluetooth with multiple devices, the screen reader on each of the device
should be set to work with the same emulation. In other words, if you have an
iPad with a version prior to 10.2, then it does not recognize Orbit Reader 20.
Therefore, you should set all Emulation modes to be compatible with the older
version. If all the hosts you are using support Orbit Reader 20 directly, turn
Emulation mode off. If any of them do not support Orbit Reader 20, set the
Emulation mode for all to RB18.
While it is possible to pair a device with Emulation off and later pair to a second
device with Emulation on, if you set the emulation differently between the
devices, commands will fail to work correctly. Therefore, it is important to pay
particular attention when Orbit Reader 20 is set to be used with multiple devices.
The first device appears to work, but it does not function correctly, because it still
uses Orbit Reader 20 commands instead of Refreshabraille commands.
When connecting to host devices that do not support Orbit Reader 20 set the
device to emulate RB18. This will ensure proper functioning of commands
between Orbit Reader 20 and host devices.
Note: In Refreshabraille 18 emulation, only the first 18 braille cells are used.
17.6 USB
Universal Serial Bus (USB) is a technology that makes connecting devices with
hosts easy. It provides some advantages over Bluetooth, because it is both faster
and charges Orbit Reader 20 simultaneously.
Orbit Reader 20 supports three kinds of USB connections (all with the same
cable available in the box.)
1. Human Interface Device (recommended)
2. Serial
3. Mass Storage (for turning Orbit Reader 20's SD card into a drive on your
computer)
Page 36

Orbit Reader 20 – User guide Version 1.8
Orbit Research Confidential and Proprietary Information 36
Human Interface Device (HID)
When using Orbit Reader 20 with a screen reader that supports HID, follow these
steps:
1. Turn on Orbit Reader 20. Orbit reader 20 displays the last braille you were
reading.
2. Connect the USB cable to the host and to the Orbit Reader 20. "-- Charger
connected" is displayed.
3. On the Orbit Reader 20, press Space + Dots 2 7. "-- Remote HID mode" is
displayed.
4. Start the screen reader. Orbit responds by displaying what the screen reader is
showing. If your screen reader does not support HID, see Serial below.
To switch back to Stand-Alone mode, press Select + Left Arrow.
Serial
When using a screen reader that only supports Serial protocol, follow these
steps:
1. Turn on Orbit Reader 20. It displays the last read material.
2. Connect the USB cable. "-- Charger connected" is displayed.
3. On Orbit Reader 20, press Space + Dots 3 7. "-- Remote Serial mode" is displayed.
4. Install any necessary drivers. See the Orbit Reader 20 Resources page or screen
reader manufacturer's support webpages.
5. Configure the screen reader. Refer screen reader section in this document or
refer to your screen reader documents.
Mass Storage
To use an SD card inserted in the Orbit Reader 20 as a drive on your computer,
follow these steps:
1. Turn on Orbit Reader 20. It responds with braille from your last activity.
2. Connect Orbit Reader 20 with your computer using USB cable. "-- Charger
connected" is displayed.
3. On the Orbit Reader 20, press Space + Dots 5 7. "-- Mass Storage mode" is
displayed. Depending on your settings, the computer also responds with a
notification of a new drive that is now available.
4. Use your PC to read and write files on the new drive.
To switch back to Stand-Alone mode, press Select + Left Arrow. Do not switch
back to Stand-Alone mode while file transfers are in progress.
Note: If you have hidden files enabled on your device, you may encounter the
following files:
Page 37

Orbit Reader 20 – User guide Version 1.8
Orbit Research Confidential and Proprietary Information 37
• .BKP-FILEHISTORY - This file contains information of the last read position of last
100 files that were opened on the device.
• .BKP-RECENTHISTORY - This file contains information required for software to
generate the recent file list.
• .Logfile - Log file containing software debug information.
Do not delete these files. You will only see them if you have hidden files
enabled.
17.7 Buffering Text Input to Remote Devices
If you are typing fast on braille display, there will be times when remote device
lags behind, slowing down your ability to input text quickly. Orbit Reader 20 has a
Buffer mode that allows you to input text up to 255 characters and send them
faster to a remote device.
To open an input field in the Buffer mode, press’ Select + Down Arrow’. Once
open, a cursor indicates that you can start entering text. Press Dot 8 to send the
entire block of text to an “edit text field” on the remote device. Note that nothing
happens when you send text with no edit box open. Press Select to cancel the
action and exit the Buffer mode, without sending any text.
17.8 iOS Devices
You can connect iOS using Bluetooth only.
Connecting iOS with Bluetooth
Connecting Orbit Reader 20 to an iOS device provides both braille feedback and
the ability to type and control the device with the Orbit Reader 20 keyboard and
directional buttons.
If you are using a version of iOS before 10.2, you must set Orbit Reader 20 to
emulate RB18 in the menu.
In default configuration (Just Works), the Orbit Reader 20 is ready to pair with
iOS via Bluetooth. Follow these steps to pair with Bluetooth:
1. Turn on Bluetooth. Bluetooth can be turned on in the Menu or by pressing Space
+ Dots 4 7 on the Orbit Reader 20.
2. On the iOS device, go to Settings > General > Accessibility > VoiceOver > Braille
3. Look for the name of the unit in the list of possible braille displays. It will show
either as Orbit Reader 20 or Refreshabraille18 plus the last four digits of the
device serial number.
4. Activate the Orbit Reader 20 device in the list to pair.
Page 38

Orbit Reader 20 – User guide Version 1.8
Orbit Research Confidential and Proprietary Information 38
Confirm code configuration shows a random number on both the Orbit Reader
20's braille display and on the host device. To confirm request, ensure that the
numbers match and then press Dot 8 on Orbit Reader 20. Then press the Pair
button on your iOS device.
Once you pair the unit, iOS starts sending braille to Orbit Reader 20, and you can
use Orbit Reader 20 input and navigation keys to control your iOS device.
For more information about iOS and braille displays, see Braille Displays for iOS
on the Apple® Accessibility website.
iOS Resources
• Apple Blind and Visually Impaired User Community
• Andrea's Head Wiki
• TechVision Tutorials
• Youtube Videos on iPad/iPhone and Braille
• Braille Displays for iOS
• Common braille commands for VoiceOver navigation using iPhone, iPad, and
iPod® touch
iOS Commands
iOS Navigation Commands
Function
Keys
Move to previous item
Space + Dot 1 or Left Arrow
Move to next item
Space + Dot 4 or Right Arrow
Pan braille left
Space + Dot 2
Pan braille right
Space + Dot 5
Move to the first element
Space + Dots 1 2 3
Move to the last element
Space + Dots 4 5 6
Scroll right one page
Space + Dots 1 3 5
Scroll left one page
Space + Dots 2 4 6
Move to the status bar
Space + S (Dots 2 3 4)
Select previous rotor setting
Space + Dots 2 3
Select next rotor setting
Space + Dots 5 6
Move to previous item using rotor setting
Space + Dot 3
Move to next item using rotor setting
Space + Dot 6
Launch the Task Switcher
Space + Dots 1 2 5 twice quickly
Scroll up one page
Space + Dots 3 4 5 6
Scroll down one page
Space + Dots 1 4 5 6
Go to Notification Center
Space + Dots 4 6
Go to Control Center
Space + Dots 2 5
Page 39

Orbit Reader 20 – User guide Version 1.8
Orbit Research Confidential and Proprietary Information 39
iOS Reading Commands
Function
Keys
Read all, starting at the selected item
Space + R
Read all, starting from the top
Space + Dots 2 4 5 6
Pause or continue speech
Space + P
Announce page number OR number of rows displayed
Space + Dots 3 4
iOS General Commands
Function
Keys
Activate the Back button if present
Space + B (Dots 1 2)
Activate the Delete key
Space + D OR Space +
Dot 7
Activate the Return key
Space + E OR Space +
Dot 8
Switch between contracted and uncontracted braille
Space + Dots 1 2 4 5
Activate the Home button (twice quickly to launch the task
switcher)
Space + H (Dots 1 2 5)
Toggle speech on and off
Space + M
Activate the Tab key
Space + T (Dots 2 3 4 5)
Context menu
Space + Dots 3 5 6
Switch braille input
Space + Dots 2 3 6
Volume up
Space + Dots 3 4 5
Volume down
Space + Dots 1 2 6
Toggle screen curtain on/off
Space + Dots 1 2 3 4 5 6
Select all
Space + Dots 2 3 5 6
Cut
Space + X
Copy
Space + C
Paste
Space + V
Undo typing
Space + Dots 1 3 5 6
Redo typing
Space + Dots 2 3 4 6
Activate Eject key
Space + Dots 1 4 6
Toggle announcement history
Space + Dots 1 3 4 5
Keyboard Help
Space + Dots 1 3
iOS iPad Commands
Function
Keys
Move to previous container
Space + Dots 1 7
Move to next container
Space + Dots 4 7
Page 40

Orbit Reader 20 – User guide Version 1.8
Orbit Research Confidential and Proprietary Information 40
17.9 Mac Computers
Orbit Reader 20 can be connected to Mac in two ways. One is to connect using
the USB cable available in the box. The second is to use Bluetooth for a wireless
connection.
Connecting Mac with USB
The simplest way to connect Orbit Reader 20 to a Mac is to connect using a USB
Standard-A to Micro-B cable. First, switch Orbit Reader 20 to the HID protocol by
picking HID in the USB option in the menu. Next, run VoiceOver by pressing the
Apple CMD key + F5. Then, attach the small end of the USB cable to Orbit
Reader 20 with the bumps facing down and the big end to Mac. VoiceOver
automatically recognizes and starts using the display.
Connecting Mac with Bluetooth
The default configuration for pairing with Mac through Bluetooth is ‘Just Works’. If
Bluetooth has been turned off, it can be turned on in the Menu or by pressing
Space + Dots 4 7 on the Orbit Reader 20.
If Orbit Reader 20 is in default connection, follow these steps to pair the device
with a Mac:
1. Turn on Bluetooth. Bluetooth can be turned on in the Menu or by pressing Space
+ Dots 4 7 on the Orbit Reader 20.
2. When VoiceOver is on, open VoiceOver Utility by pressing VO-F8
3. Click the Braille category, click Displays, and then click the Add (+) button
4. Select Orbit Reader 20 in the list. VoiceOver filters the devices it detects to list
only the Bluetooth braille displays that are within range of your computer and
that appear to match a VoiceOver braille display driver.
5. Activate the Orbit Reader 20 device in the list to pair.
Confirm code configuration shows a random number on both Orbit Reader 20's
braille display and on the host device. Follow steps 1 through 3. Mac shows you
a dialog with a security code. To confirm the request, compare the numbers in
the Bluetooth dialog on the Mac with the code shown on your display. If they are
same, select ‘Yes’ in the dialog on Mac. If the numbers do not match, select ‘No’
and try the next Orbit Reader 20 in the list. Pairing request can be accepted by
pressing dot 8 or rejected by pressing dot 7 from Orbit Reader 20 device. The
purpose of this procedure is to allow more than one Orbit Reader 20 device to be
paired in the same room at the same time without pairing the wrong device.
If Orbit Reader 20 does not work with VoiceOver, it is possible that you are not
using the latest Mac OS. In that case, you have two choices:
1. Put the Orbit Reader 20 in Refreshabraille 18 (RB18) Emulation mode. Then
connect it as an RB18,
2. Check for updates. We suggest you update to the latest operating system.
Page 41

Orbit Reader 20 – User guide Version 1.8
Orbit Research Confidential and Proprietary Information 41
If Orbit Reader 20 is not listed, make sure you have turned on Bluetooth in the
Menu.
Controlling Orbit Reader 20 from Mac
To control how VoiceOver treats the display, follow these steps:
1. Open the VoiceOver Utility by pressing Command + F8 while VoiceOver is
running.
2. Scroll down to the Braille option.
3. Select the Braille Display tab.
To turn on contracted braille, check the Contracted Braille box.
For the Mac documentation on connecting and using braille displays, see Apple's
VoiceOver Info Guide.
17.10 Android Devices
You can connect Android devices using Bluetooth only.
Connecting Android with Bluetooth
In default configuration, the Orbit Reader 20 is ready to pair with Bluetooth. If
Bluetooth has been turned off, it can be turned on in the Menu or by pressing
Space + Dots 4 7.
1. Turn on Bluetooth. Bluetooth can be turned on in the Menu or by pressing Space
+ Dots 4 7 on the Orbit Reader 20.
2. Turn on the Android device. Android and BrailleBack make a sound to indicate
successful communication.
3. Check for support.
4. Switch to Emulation mode if necessary.
Currently, to use the Orbit Reader 20, you must change the Emulation mode to
Refreshabraille 18 (RB18) in the Menu. Once Orbit Reader 20 is supported by
BrailleBack, it will no longer be necessary to use the Emulation mode
5. Set up Android device.
To set up your Android device, follow the Install and enable BrailleBack
instructions found on the Google™ Android Accessibility Help webpage.
Input and Output Text with BrailleBack
To input text with your braille keyboard, first enable the keyboard in your Android
settings under Language and Input. If you try to use the keyboard before
completing this step, you will receive a prompt to change your settings.
To edit a text field, focus and activate the text field. You can then use the Up and
Down Arrow keys to move in the text field. When editing text, BrailleBack
Page 42

Orbit Reader 20 – User guide Version 1.8
Orbit Research Confidential and Proprietary Information 42
switches to eight-dot braille known as Computer Braille. Currently, BrailleBack
does not support any other braille as input.
By default, Android is set to display English Computer Braille.
To set BrailleBack to display Unified English Braille (UEB) - grade 2 braille, follow
the steps below:
1. Press H to open the Home screen.
2. Arrow to and select Apps > Settings > Accessibility > BrailleBack > Settings.
3. Select "Braille type".
o Android generates a dialog screen which indicates the type of braille
being displayed and provides two choices: Literary braille or Computer
Braille.
o Computer Braille is checked by default.
4. Arrow to "Literary braille" and select to check this item.
o When you check "Literary braille," you are returned to the BrailleBack
Settings screen.
5. Arrow to "Literary braille table" and select.
o Another dialog screen opens with a selection of output translation tables.
6. Select English (UEB) - grade 2.
o You are returned to the BrailleBack Settings screen.
BrailleBack Commands
Function
Keys
Back
Space + B
Home
Space + H
BrailleBack help
Space + Dots 1 2 3
Notifications
Space + N
Recent Apps
Space + R
Enter (in Edit field)
Space + Dot 8
Backspace (in Edit field)
Space + Dot 7
17.11 Chromebook
Currently, you can only use USB to connect to a braille display from a
Chromebook™ notebook computer.
Connecting Chromebook with USB
To connect to Chromebook with USB, follow these steps:
1. Press Dots 2 7 + Space to put the Orbit Reader 20 in Remote HID mode. Alternatively,
Press Up Arrow + Select in the menu, and then arrow to USB.
2. Put the Orbit Reader into the Chromebook USB port. After a few seconds, the
Chromebook detects the device and turns on ChromeVox.
Page 43

Orbit Reader 20 – User guide Version 1.8
Orbit Research Confidential and Proprietary Information 43
ChromeVox Settings/Commands
To adjust ChromeVox settings or learn commands, follow the Use a braille
device with your Chromebook on Chromebook Accessibility Help webpage.
17.12 Windows PCs
Before connecting Orbit Reader 20 with a PC, you must first decide how you
wish to connect: Bluetooth or USB. This is a personal choice. USB charges the
device as you use it, so it is a good choice when your battery is low. Bluetooth
does not use wires, so it is a good choice when you are on the go.
Connecting Windows with USB
If your screen reader does not support HID, switch to the Serial protocol on the
Orbit Reader 20 with the hotkey or selecting Serial from the USB option in the
menu.
For Windows versions 7 and newer, the serial interface requires the installation
of two drivers: one for the USB and one to make the USB port appear like a COM
port. The only exception is Windows XP. Because it is Serial only, it can just be
plugged in. The second driver is required because many screens reading
programs handle braille displays like a serial device. The COM port assignment
driver shows the assigned port number used to communicate with the display.
Take a note of the COM port number for later use. If you need to look at it later,
go to Device Manager while the display is connected and look in the section for
Ports: COM and LPT. One of the COM ports is assigned to Orbit Reader 20. You
need to use that number when you set up your screen reader.
Once the display is connected to the device you wish to use, configure the
software to use Orbit Reader 20.
Connecting Windows with Bluetooth
When connecting the Orbit Reader 20 with Bluetooth, you must first choose a
pairing configuration.
The default configuration is ‘Just Works’. If Orbit Reader 20 is in default
connection, follow these steps to pair the device:
1. On the PC, perform a Bluetooth search.
2. Select Orbit Reader 20 from the list of Bluetooth devices.
Confirm code configuration shows a random number on both the Orbit Reader
20's braille display and on the host device. Follow steps 1 and 2; then, to confirm
the request, compare the numbers in the Bluetooth dialog on the Windows PC
with the code shown on your display. If they are the same, select ‘Yes’. If the
numbers do not match, select ‘No’ and try the next Orbit Reader 20 in the list.
Pairing request can be accepted by pressing dot 8 or rejected by pressing dot 7
from Orbit Reader 20 device. The purpose of this procedure is to allow more than
Page 44

Orbit Reader 20 – User guide Version 1.8
Orbit Research Confidential and Proprietary Information 44
one Orbit Reader 20 device to be paired in the same room at the same time
without pairing the wrong device.
The device pairs with the Orbit Reader 20 and an incoming Bluetooth virtual
serial port is set up on the PC.
Next, check the Ports list in the Windows Device Manager to find the COM port
number assigned to the incoming Bluetooth serial port. Make a note of this
number.
In your screen reader on the PC, set the active Braille display COM port to use
as the relevant Bluetooth serial port COM number.
Non-Visual Desktop Access (NVDA)
If you have NVDA (version 2017.1 or later) installed on your PC, it automatically
recognizes the Orbit Reader 20. If NVDA is not recognizing the display, go to the
NVDA Preferences menu and select Braille Settings from the list. From the braille
display drop-down menu, select "Baum/Humanware/APH/Orbit Displays" and
click OK.
Note: NVDA works in HID only, not Serial.
If Orbit Reader 20 is not one of the displays shown in the Braille Display list,
upgrade NVDA to the newest version and repeat the process.
NVDA turns ‘On’ braille output when it is configured for the display. To turn ‘Off’
braille support, select "No Braille" from Braille Display options in the Braille
Settings menu.
17.12.3.1 NVDA Commands
Function
Key
Move up one line
Up Arrow
Move down one line
Down Arrow
Move left one character
Left Arrow
Move right one character
Right Arrow
Enter
Select
Job Access with Speech (JAWS)
Currently, the Orbit Reader 20 supports JAWS version 11 or newer. JAWS
versions prior to 11 are not supported.
When connecting Orbit Reader 20 to JAWS by USB, it must be set to use the
HID protocol by pressing Space + Dots 2 7.
To connect Orbit Reader 20 by USB, follow these steps:
Page 45

Orbit Reader 20 – User guide Version 1.8
Orbit Research Confidential and Proprietary Information 45
1. Start or restart JAWS.
2. Insert + J to bring up JAWS menu.
3. Press Enter on Options.
4. Down Arrow to Braille and press Enter.
5. Tab to Add and press Enter.
6. Arrow Up or Down to Aph Refreshabraille 18 and press Space to check the box
and select it.
7. Tab to the Next button and press Enter.
8. Select USB.
9. Tab to the Next button and press Enter.
10. Select Aph Refreshabraille 18 as primary device.
11. Tab to the Finish button and press Enter.
12. Restart JAWS.
Alternate Steps for Bluetooth Connection:
1. Press Space + Dots 4 7.
2. Follow steps 1-7 of USB connection.
3. Select the COM port where the Orbit Reader 20 is connected (check device
manager for COM port or use COM port you saved from previous steps).
4. Follow steps 9-12 of USB connection.
To turn off braille support, follow these steps:
1. Insert + J to bring up JAWS menu.
2. Press Enter on Options.
3. Down Arrow to Braille and press Enter.
4. Up Arrow to No Braille Display.
5. Tab to Ok and press Enter.
6. Restart JAWS.
Note: For a longer description of any of the following commands, turn JAWS
keyboard Help ‘on’ by pressing Insert + 1 and type the command. Quickly type
the command twice to get an even longer description. Press Insert + 1 again to
exit JAWS keyboard Help mode.
17.12.4.1 Jaws Commands
Jaws Reading Commands
Function
Key(s)
Move display to the left
Left Arrow
Move display to the right
Right Arrow
Move display up one line
Up Arrow
Move display down one line
Down Arrow
Page 46

Orbit Reader 20 – User guide Version 1.8
Orbit Research Confidential and Proprietary Information 46
Pan left one braille window
Back panning keys
Pan right one braille window
Front panning keys
Top of active window
Select + Dots 1 2 3
Bottom of active window
Select + Dots 4 5 6
Route braille to active cursor
Select + R
Say current line
Space + Dots 1 4
Say current word
Space + Dots 2 5
Say current character
Space + Dots 3 6
Jaws Navigation Commands
Function
Keys
Previous document window
Space + Dots 1 3
Next document window
Space + Dots 4 6
Beginning of file
Space + Dots 1 2 3
End of file
Space + Dots 4 5 6
Page Up
Space + Dots 1 2 3 4 5
Page Down
Space + Dots 1 2 4 5 6
Home
Space + Dots 1 2 3 4
End
Space + Dots 1 4 5 6
Up Arrow
Space + Dot 1
Down Arrow
Space + Dot 4
Previous word
Space + Dot 2
Next word
Space + Dot 5
Previous character
Space + Dot 3
Next character
Space + Dot 6
Jaws Editing Commands
Function
Keys
Backspace (acts as shift key when typing braille characters)
Space + Dot 7
Enter
Space + Dot 8
Tab
Space + Dots 4 5
Shift + Tab
Space + Dots 1 2
Delete current character
Space + D
Select all
Space + Dots 1 8
Select to top of document
Space + Dots 1 2 3 7 8
Select to bottom of document
Space + Dots 4 5 6 7 8
Select previous page
Space + Dots 1 2 3 4 5 7 8
Select next page
Space + Dots 1 2 4 5 6 7 8
Select to beginning of line
Space + Dots 1 2 3 4 7 8
Select to end of line
Space + Dots 1 4 5 6 7 8
Page 47

Orbit Reader 20 – User guide Version 1.8
Orbit Research Confidential and Proprietary Information 47
Select previous line
Space + Dots 1 7 8
Select next line
Space + Dots 4 7 8
Select previous word
Space + Dots 2 7 8
Select next word
Space + Dots 5 7 8
Select previous character
Space + Dots 3 7 8
Select next character
Space + Dots 6 7 8
Copy to clipboard
Space + Dots 1 4 8
Cut to clipboard
Space + Dots 1 3 4 6 8
Paste clipboard
Space + Dots 1 2 3 6 8
Undo
Space + Dots 1 3 5 6 8
Jaws Windows Commands
Function
Keys
Start menu
Space + Dots 1 3 4 7 8
Toggle menu bar
Space + M
Escape
Space + Dots 1 3 5 6
Alt Tab
Space + T
Minimize all applications
Space + Dots 1 4 5 7 8 Jaws General Commands
Function
Keys
Toggle keyboard help
Space + Dots 1 4 5 6
Toggle type keys mode
Space + Dots 1 2 3 4 5 6
JAWS cursor
Select + J
PC cursor
Select + P
Route JAWS cursor to PC cursor
Select + Dots 1 4
Say all to bottom
Space + Dots 1 2 3 4 5 6 7 8
Toggle grade 2 translation
Space + G (Dots 1 2 4 5)
Toggle grade 2 translation of current word
Select + W (Dots 2 4 5 6)
Display last flash message
Select + F
JAWS find
Space + F
JAWS find next
Dots 2 5 7 8
JAWS find previous
Space + Dots 2 5 7 8
Toggle active cursor follows braille
Select + Dot 1
Toggle braille follows active cursor
Select + Dot 4
Cycle through braille modes
Select + M
Display six-dot braille
Select + Dots 2 3 5
Display eight-dot braille
Select + Dots 2 3 6
Toggle cursor shape
Select + Dots 1 4 6
Restrict braille cursor
Select + R
Page 48

Orbit Reader 20 – User guide Version 1.8
Orbit Research Confidential and Proprietary Information 48
Toggle characters and attributes
Select + Dots 1 6
Braille color marking
Select + Dots 1 4
Select attributes to be displayed
Select + Dots 1 3
Set 8 characters per space
Space + Dots 2 3 6
Set unlimited characters per space
Space + Dots 1 3 6
Toggle 8/unlimited characters per space
Select + Dots 1 3 4 6
Cycle table reading options
Select + T
Cycle table header options
Select + H
Graphics labeler
Select + G
Adjust JAWS options
Select + Dots 1 2 3 6
JAWS window
Space + J
Announce time
t + Dots 7 and 8
Show script file name
Select + Dots 1 2 3 4 5
Run Jaws manager
Space + 2 3 7 8
Jaws Special Key Commands
Function
Keys
Ctrl + A - Ctrl + Z
Dot 8 + any letter
F1 - F10
Dot 7 + Computer Braille number 1 - 0 (0 = F10)
Ctrl + F1 - Ctrl + F10
Dot 8 + Computer Braille number 1 - 0
System Access
To connect Orbit Reader 20 to System Access, the device must be connected by
a Standard-A to Micro-B USB cable and set in HID protocol mode.
1. Press Select + Up Arrow to open menu
2. Down Arrow to the USB selection
3. Right Arrow to select HID
4. Press Select
5. Press Dot 7 to return to the last location
Another way to quickly switch to HID mode is to use the shortcut keys Space +
Dots 2 7.
After running System Access in HID mode, connect the USB cable and wait for
30 seconds. System Access will announce when Orbit Reader 20 gets
connected.
Dolphin Screen Reader
To connect Orbit Reader 20 to Dolphin Screen Reader, the device must be
connected by a Standard-A to Micro-B USB cable and set in HID protocol mode.
Page 49

Orbit Reader 20 – User guide Version 1.8
Orbit Research Confidential and Proprietary Information 49
1. Press Select + Up Arrow to open menu
2. Down Arrow to the USB selection
3. Right Arrow to select HID
4. Press Select
5. Press Dot 7 to return to the last location
Dolphin Screen Reader automatically detects Orbit Reader 20 and begins
displaying braille.
Another way to quickly switch to HID mode is to use the shortcut keys Space +
Dots 2 7.
Windows-Eyes
Window-Eyes is no longer being updated. For this reason, there are no Orbit
Reader 20 drivers for Window-Eyes. To use Window-Eyes with Orbit Reader,
you must emulate Refreshabraile 18.
To connect to Window-Eyes using USB, the Orbit Reader 20 USB protocol must
be set to Serial. To do this, follow these steps:
1. Press Select + Up Arrow to open the menu
2. Down Arrow to USB and press Select
3. Press Right or Left Arrow keys to select Serial
4. Press Select
5. To exit, press Dot 7
To select a display, open the Braille Display option in the Window-Eyes File
menu. There is no driver for Window-Eyes for versions prior to 7.1. However, you
may use Orbit Reader 20 by selecting any Baum display with input keys. The
Vario Connect and the Braille Connect are two displays that work. Select the
display and set the COM port number established while connecting to Windows
PC.
18 Key Lock Command
The Key Lock command prevents accidental key presses. The command is to
hold Dots 7 8 for two seconds or more. Pressing and holding these same keys
again, unlocks the keys. You can also unlock the keys by turning the device off
and then on again.
19 System Alerts
System alerts, such as — “Battery low" are indicated by a periodic cycling of dot
8 in the last cell of the device.
Page 50

Orbit Reader 20 – User guide Version 1.8
Orbit Research Confidential and Proprietary Information 50
Alerts are seen by invoking the Menu or the Editor Context Menu. Pressing
Select causes the next alert to appear, if there are any. The alert is removed from
the alert list once it has been displayed.
If no more alerts are in the list, the first Menu or Editor Context Menu item
appears. Pressing Dot 7 clears all pending alerts and puts you back on the first
Menu or Editor Context Menu item.
If the alert message length is longer than 20 characters, you can navigate
through the message using Panning keys. If you are already in Menu or Editor
Context Menu when an alert appears, you can review the alert by pressing
Space key.
20 Reboot the Device
If the Orbit Reader 20 suddenly does not respond to button presses, and you
know that the battery is not fully discharged, then you may try rebooting the
device by pressing the lower Right Panning key + Dot 8. There is no indication of
the reset event. The unit is in power off condition after reset and needs to be
powered on before it can be used.
21 Device Upgrade Procedure
There are two parts to upgrade: 1) downloading the software and 2) upgrading
the Orbit Reader 20. Each part of the upgrade is explained in the following two
sections of this document. Read each section carefully before proceeding.
21.1 Download the Software
To implement this release, you need a PC running Microsoft® Windows XP or
later. The latest version of the software can be downloaded from
http://www.orbitresearch.com/support/orbit-reader-20-support/orbit-readerfirmware-download/
When download is complete, follow these steps:
1. Open the folder on your computer where the firmware file was downloaded.
2. Right click on the file and choose "Extract all" OR select the file by placing arrow
to it. Press the application key and choose "Extract all" from the Context menu.
3. Follow the dialog steps to extract it to a folder of your choice.
When finished, your chosen folder should contain a folder named after the
version of the release, for example, OR20_XX.XX.XX. Make a note of the
location of this folder for use in the next section of this document.
Page 51

Orbit Reader 20 – User guide Version 1.8
Orbit Research Confidential and Proprietary Information 51
21.2 Install Software
TO upgrade Orbit Reader 20, we require the following:
• Orbit Reader 20 Unit.
• Standard-A to Micro-B USB cable.
• A PC running Windows XP or later.
• Orbit Reader 20 Upgrade Utility file found in the Orbit Reader 20 folder.
• Orbit Reader 20 release bin file found in the Orbit Reader 20 folder.
To upgrade the firmware, follow these steps:
1. Make sure the Orbit Reader 20 is turned off.
2. Connect the Orbit Reader 20 to the PC using the USB cable.
3. In the Release folder on your PC, run the Orbit Reader 20 Firmware Upgrade Utility. If
you receive an error message, see Troubleshooting section. The utility shows message
“Orbit Reader 20 is connected” in device status field. It also shows the message “Do you
want to upgrade the device?” in the message field at the bottom of the dialog.
4. Press and hold down the Right Panning forward button + Dot 5, then press and hold Dot
8.
5. Release Dot 8 first, then release the Right Panning key and Dot 5. This switches the Orbit
reader 20 into Upgrade mode. You will hear a tone on your PC.
6. The utility shows the device serial number and the software version of the device at top
right corner of the window. If the serial number is blank, repeat steps 4 and 5.
7. Activate the Browse button found in the dialog.
8. Browse and select the firmware bin file from your PC. The file is in the folder you
unzipped previously.
9. Once the file is selected, the dialog shows the software version of the selected file.
Page 52

Orbit Reader 20 – User guide Version 1.8
Orbit Research Confidential and Proprietary Information 52
10. Activate the Upgrade button.
11. The utility starts upgrading the device.
12. Do not unplug the cable. Wait for the message “Device upgrade has been completed”
on the upgrade utility or until the Orbit Reader 20 reboots and shuts down.
Page 53

Orbit Reader 20 – User guide Version 1.8
Orbit Research Confidential and Proprietary Information 53
13. The Orbit Reader 20 is upgraded. Turn on to start using the device.
To check for successful upgrade of the device, press Select + Up Arrow to open
the Orbit Reader 20 Menu and arrow to "Version" in the list. The version number
of the firmware release should match the number on the display.
22 Language Options (Localization)
In Stand-Alone mode, you can change the operating language to meet your
language needs (known as localization). The default translation table used is
English Braille ASCII. The English table is available always within the device and
can be used even after performing localization. Only one language can be loaded
at a time other than English.
To perform localization of Orbit Reader 20, you can either create and upload the
localization files or just upload existing files to the device. See the link
http://www.orbitresearch.com/support/orbit-reader-20-support/orbit-readerlocalization-download/ for instructions on how to create and upload localization
files.
After the localization files are uploaded, you can switch between files for different
language options.
22.1 Get Localization Files
To get the Localization files:
1. Go to Orbit Support page at http:/www.orbitresearch.com/support/orbit-
reader-20-support/orbit-reader-localization-download/ and download the
language of your choice.
2. Go to the saved as file name and extract the zip file to a location that you
will remember.
3. Create a folder on the SD card called Locale.
Page 54

Orbit Reader 20 – User guide Version 1.8
Orbit Research Confidential and Proprietary Information 54
4. Copy the extracted files to the Locale folder on the SD card.
22.2 Upload Existing Localization Files
To upload existing localization files:
1. Select ‘Load language’ from the Localization Preference menu.
2. Select one of the three options:
• Load Locale - Orbit Reader 20 shows Region code name list for the
languages that have both the Table files (.lan) and System Messages files
(.loc) available in the "locale" folder on the SD card, along with the default
option. Press Select for the language file of your choice.
• Load.loc Only - Orbit Reader 20 shows the list of System Messages files,
along with the default option. Press Select for the language file of your
choice. Note: You need to ensure that the correct ASCII to Braille table of
the desired region has been uploaded.
• Load .lan Only - Orbit Reader 20 shows the list of Table files, along with
the default option. Press Select for the language file of your choice.
22.3 Switch Localization Files
1. Up + Select to open the Menu
2. Arrow down to Switch language
3. Right arrow to Switch Locale.
4. Press Up/Down Arrow to navigate through options.
5. Press Select to select a language.
If you want to switch only messages, follow steps 1-3 for switching localization
files and press Right Arrow to go to switch .loc only. Then press Select to select
from the options.
If you only want to switch the braille language tables, follow steps 1-3 for
switching localization files and press Right Arrow twice. Then press Select to
select from the options.
23 Troubleshooting
If the Orbit Reader 20 does not power on or seems to freeze, try these options in
the following order:
Option 1: Plug in the device
1. Plug in the unit with the supplied AC wall connector and cable to ensure
that the battery is charged. This is the most reliable power source.
2. Let the unit ‘charge’ for at least an hour or more.
Page 55

Orbit Reader 20 – User guide Version 1.8
Orbit Research Confidential and Proprietary Information 55
3. Hold the Power button for at least two seconds. If the unit is on, it should
turn off. If it is off, it should come on.
Option 2: Check SD card
1. Remove the SD card.
2. Hold the Power button for two seconds.
Option 3: Unplug the device
1. If the unit is plugged in, unplug the power cord.
2. Hold the Power button for at least two seconds.
Option 4: Reset device
1. Press the Reset command (Dot 8 + right-bottom Panning key). Note: On
reset, the unit is unresponsive, and there is no change to the display.
2. Hold the Power button for at least two seconds.
Option 5: Remove the battery
Note: Use this option as a last resort.
1. Call customer service for guidance on safely removing the battery.
2. Leave it out for a few minutes.
3. Reconnect it, then try the options again.
If none of the options work and the device does not come on, contact Customer Service at
techsupport@orbitresearch.com.
24 Battery Use and Replacement
The Orbit Reader 20 includes a rechargeable Lithium-ion 3000 mAh capacity
battery. It fully charges in about three hours under optimal conditions. A full
battery charge lasts approximately three days of typical use. You can check
Battery status in the Menu.
When the battery in Orbit Reader 20 gets to 10%, Dot 8 of the 20th cell on the
display starts blinking. This behavior is normal, indicating that the battery is low.
The battery in Orbit Reader 20 should last several years. Gradually, the battery
begins discharging faster than usual. When the amount of time that the battery
holds charge becomes inconvenient, it is time for replacement.
To replace the battery, follow these steps:
Page 56

Orbit Reader 20 – User guide Version 1.8
Orbit Research Confidential and Proprietary Information 56
1. Obtain a replacement battery. Use only the battery designed for Orbit
Reader 20. Batteries are available from:
o American Printing House for the Blind, Inc.
o Orbit Research, Inc.
2. Remove the battery door screws.
3. Remove the battery door.
4. Carefully unplug the connector. Do not pull the wire. Use connector
instead.
5. Insert new battery.
6. Replace the cover and screws.
To dispose of batteries properly, call the recycling center at 1-800-822-8837.
25 Accessories Information
Orbit Reader 20 has two holes on the lower-front corners of the device, one on
each corner. The holes are there to provide a means to attach a strap to the
device, with the use of key rings. The key rings can be 10-40 mm in diameter and
up to 3 mm in thickness.
26 General Specifications
Dimensions
(WxHxD)
6.61 x 1.4 x 4.41 inch (168 x 35.56 x 112 mm)
Weight
0.99 lbs (450 grams)
Braille Cells
20 refreshable eight-dot braille cells; Refresh rate < .75 sec
Braille Input Keys
8-key Perkins style keypad, with space bar
High-quality scissor-type keys
Additional Keys
Power on/off button
4-way cursor keys and select key
2 panning keys, rocker type
Supported File
Formats
.txt, .brl, .brf
OS Support
Windows: NVDA, JAWS, Window-Eyes, System Access
Mac OS X: Voiceover
iOS: Voiceover
Page 57

Orbit Reader 20 – User guide Version 1.8
Orbit Research Confidential and Proprietary Information 57
Android: Brailleback
Chromebook: ChromeVox
Interfaces and Ports
1x Micro-B USB port, USB 2.0, for host interface, firmware
upgrade and battery charging
Bluetooth 2.1, Class 2
Flash Media Slot
1x SD card (4GB to 32GB capacity)
Battery
User-replaceable, rechargeable Lithium-Ion battery; 2200 mAh
Battery Life
3 days of typical use
Charging Method
PC charger: Charge over USB Port – 5V, 500 mA Max
Wall charger: Charge over USB Port – 5V, 1000 mA Max; USB
BC1.2 compliant charger required
Environmental
Conditions
Operational
Temperature: 5° C to 45° C
Humidity: 10% - 70% relative humidity
Storage
Temperature: -15° C to 70° C
Humidity: 5% - 90% relative humidity
27 Appendices
27.1 Appendix A - Computer Braille Chart
ASCII Code
Character
Dot Combination
33 ! 2-3-4-6
34 " 5
35 # 3-4-5-6
36 $ 1-2-4-6
37 % 1-4-6
38 & 1-2-3-4-6
39 ' 3
40 ( 1-2-3-5-6
41 ) 2-3-4-5-6
42 * 1-6
43 + 3-4-6
44 , 6
45 - 3-6
46 . 4-6
47 / 3-4
48 0 3-5-6
49 1 2
50 2 2-3
51 3 2-5
Page 58

Orbit Reader 20 – User guide Version 1.8
Orbit Research Confidential and Proprietary Information 58
52 4 2-5-6
53 5 2-6
54 6 2-3-5
55 7 2-3-5-6
56 8 2-3-6
57 9 3-5
58 : 1-5-6
59 ; 5-6
60 < 1-2-6
61 = 1-2-3-4-5-6
62
>
3-4-5
63 ? 1-4-5-6
64 @ 4-7
65 A 1-7
66 B 1-2-7
67 C 1-4-7
68 D 1-4-5-7
69 E 1-5-7
70 F 1-2-4-7
71 G 1-2-4-5-7
72 H 1-2-5-7
73 I 2-4-7
74 J 2-4-5-7
75 K 1-3-7
76 L 1-2-3-7
77 M 1-3-4-7
78 N 1-3-4-5-7
79 O 1-3-5-7
80 P 1-2-3-4-7
81 Q 1-2-3-4-5-7
82 R 1-2-3-5-7
83 S 2-3-4-7
84 T 2-3-4-5-7
85 U 1-3-6-7
86 V 1-2-3-6-7
87 W 2-4-5-6-7
88 X 1-3-4-6-7
89 Y 1-3-4-5-6-7
90 Z 1-3-5-6-7
91 [ 2-4-6-7
Page 59

Orbit Reader 20 – User guide Version 1.8
Orbit Research Confidential and Proprietary Information 59
92 \ 1-2-5-6-7
93 ] 1-2-4-5-6-7
94 ^ 4-5-7
95 _ 4-5-6
96 ` 4
97 a 1
98 b 1-2
99 c 1-4
100
d
1-4-5
101
e
1-5
102
f
1-2-4
103
g
1-2-4-5
104
h
1-2-5
105
i
2-4
106
j
2-4-5
107
k
1-3
108
l
1-2-3
109
m
1-3-4
110
n
1-3-4-5
111
o
1-3-5
112
p
1-2-3-4
113
q
1-2-3-4-5
114
r
1-2-3-5
115
s
2-3-4
116
t
2-3-4-5
117
u
1-3-6
118
v
1-2-3-6
119
w
2-4-5-6
120
x
1-3-4-6
121
y
1-3-4-5-6
122
z
1-3-5-6
123
{
2-4-6
124
|
1-2-5-6
125
}
1-2-4-5-6
126
~
4-5
27.2 Appendix B - Proper Trademark Notice and Attribution
Adobe® is either a registered trademark or trademark of Adobe Systems
Incorporated in the United States and/or other countries.
Page 60

Orbit Reader 20 – User guide Version 1.8
Orbit Research Confidential and Proprietary Information 60
Android™, Chromebook™, and Google™ are trademarks of Google Inc.
Apple®, iPad®, iPhone®, iPod®, and Mac® are registered trademarks or service
marks of Apple Inc., registered in the U.S. and other countries.
Bluetooth® is a registered trademark of Bluetooth SIG, Inc.
Bookshare® is registered trademarks of Beneficent Technology, Inc.
BrailleBlaster™ and Refreshabraille 18™ are trademarks of the American
Printing House for the Blind, Inc.
DAISY, A Better Way to Read is a trademark of the DAISY Consortium.
iOS® is a registered trademark of Cisco in the U.S. and other countries and is
used under license by Apple Inc.
JAWS® is a registered trademark of Freedom Scientific, Inc.
Kindle™ and all related logos are trademarks of Amazon.com, Inc. or its
affiliates.
Microsoft® and Windows® are registered trademarks of Microsoft Corporation in
the U.S. and/or other countries.
NFB-NEWSLINE® is a registered trademark of the National Federation of the
Blind.
Orbit Reader 20™ is a trademark of Orbit Research.
SD is a trademark or registered trademark of SD-3C, LLC in the United States,
other countries or both.
Hardware Limited Warranty
Warranty obligations for the Orbit Reader 20 are limited to the terms set forth
below:
Orbit Research warrants this hardware product against defects in materials and
workmanship under normal use for a period of ONE (1) YEAR from the purchase
by the original purchaser ("Warranty Period"). If a hardware defect arises and a
valid claim is received by the Orbit Research LLC within the Warranty Period, at
its option and to the extent permitted by law, Orbit Research will either:
Repair the product free of charge (or) replace it with a product that is
manufactured from new or serviceable used parts and is at least functionally
equivalent to the original product.
Page 61

Orbit Reader 20 – User guide Version 1.8
Orbit Research Confidential and Proprietary Information 61
A replacement product or part assumes the remaining warranty of the original
product or thirty (30) days from the date of replacement or repair, whichever
provides longer coverage. Parts provided in fulfillment of its warranty obligation
must be used in products for which warranty service is claimed.
EXCLUSIONS AND LIMITATIONS
This Limited Warranty applies only to the hardware product manufactured by
Orbit Research LLC that can be identified by the “Orbit Research" trademark,
trade name, or logo affixed to it. Orbit Research is not responsible for damage
arising from failure to follow instructions relating to the product's use.
This warranty does not apply in the following cases:
1. Damage caused by accident, abuse, misuse, flood, fire, earthquake, or other
external causes
2. Damage caused by operating the product outside the permitted or intended uses
described by Orbit Research LLC
3. Damage caused by service (including upgrades and expansions) performed by
anyone who is not a representative of Orbit Research
4. A product or part that has been modified to alter functionality or capability
without the written permission of Orbit Research
5. The serial number has been removed or defaced
TO THE EXTENT PERMITTED BY LAW, THIS WARRANTY AND THE
REMEDIES SET FORTH ABOVE ARE EXCLUSIVE AND IN LIEU OF ALL OTHER
WARRANTIES, REMEDIES AND CONDITIONS, WHETHER ORAL OR WRITTEN,
STATUTORY, EXPRESS OR IMPLIED.
EXCEPT AS PROVIDED IN THIS WARRANTY AND TO THE MAXIMUM
EXTENT PERMITTED BY LAW, ORBIT RESEARCH IS NOT RESPONSIBLE FOR
DIRECT, SPECIAL, INCIDENTAL, OR CONSEQUENTIAL DAMAGES
RESULTING FROM ANY BREACH OF WARRANTY OR CONDITION, OR UNDER
ANY OTHER LEGAL THEORY, INCLUDING BUT NOT LIMITED TO LOSS OF
USE; LOSS OF REVENUE; LOSS OF ACTUAL OR ANTICIPATED PROFITS
(INCLUDING LOSS OF PROFITS ON CONTRACTS); LOSS OF THE USE OF
MONEY; LOSS OF ANTICIPATED SAVINGS; LOSS OF BUSINESS; LOSS OF
OPPORTUNITY; LOSS OF GOODWILL; LOSS OF REPUTATION; LOSS OF,
DAMAGE TO, OR CORRUPTION OF DATA; OR ANY INDIRECT OR
CONSEQUENTIAL LOSS OR DAMAGE HOWSOEVER CAUSED INCLUDING
THE REPLACEMENT OF EQUIPMENT AND PROPERTY, ANY COSTS OF
RECOVERING, PROGRAMMING OR REPRODUCING ANY PROGRAM OR DATA
STORED IN OR USED WITH THE ORBIT RESEARCH PRODUCT, AND ANY
FAILURE TO MAINTAIN THE CONFIDENTIALITY OF DATA STORED ON THE
PRODUCT. THE FOREGOING LIMITATION SHALL NOT APPLY TO DEATH OR
Page 62

Orbit Reader 20 – User guide Version 1.8
Orbit Research Confidential and Proprietary Information 62
PERSONAL INJURY CLAIMS, OR ANY STATUTORY LIABILITY FOR
INTENTIONAL AND GROSS NEGLIGENT ACTS AND/OR OMISSIONS. ORBIT
RESEARCH DISCLAIMS ANY REPRESENTATION THAT IT WILL BE ABLE TO
REPAIR ANY PRODUCT UNDER THIS WARRANTY OR MAKE A PRODUCT
EXCHANGE WITHOUT RISK TO OR LOSS OF PROGRAMS OR DATA.
CONSUMER PROTECTION LAWS
FOR CONSUMERS WHO ARE COVERED BY CONSUMER PROTECTION LAWS
OR REGULATIONS IN THEIR COUNTRY OF PURCHASE OR, IF DIFFERENT,
THEIR COUNTRY OF RESIDENCE, THE BENEFITS CONFERRED BY THIS
WARRANTY ARE IN ADDITION TO ALL RIGHTS AND REMEDIES CONVEYED
BY SUCH CONSUMER PROTECTION LAWS AND REGULATIONS. Some
countries, states, and provinces do not allow the exclusion or limitation of incidental or
consequential damages or allow limitations on how long an implied warranty or condition
may last, so the above limitations or exclusions may not apply to you. This warranty
gives you specific legal rights, and you may also have other rights that vary by country,
state, or province. This Limited Warranty is governed by and construed under the laws of
the country in which the product purchase took place. ORBIT RESEARCH LLC., the
warrantor under this Limited Warranty, is identified at the end of this document
according to the country or region in which the product purchase took place.
OBTAINING WARRANTY SERVICE
Please access and review the online help resources referred to in the documentation
accompanying this hardware product before seeking warranty service. If the product is
still not functioning properly after making use of these resources, please send an e-mail
to: techsupport@orbitresearch.com, for instructions on how to obtain warranty service.
You must follow ORBIT RESEARCH warranty procedures.
ORBIT RESEARCH will maintain and use customer information in accordance with its
Customer Privacy Policy.
If your product is capable of storing software programs, data, and other information, you
should make periodic backup copies of the information contained on the product's hard
drive or other storage media to protect the contents and as a precaution against possible
operational failures. Before you deliver your product for warranty service, it is your
responsibility to keep a separate backup copy of the contents, and disable any security
passwords. IT IS POSSIBLE THAT THE CONTENTS ON THE DEVICE BEING
SERVICED WILL BE LOST OR REFORMATTED IN THE COURSE OF
WARRANTY SERVICE, AND ORBIT RESEARCH IS NOT RESPONSIBLE FOR
ANY DAMAGE TO OR LOSS OF PROGRAMS, DATA, OR OTHER
INFORMATION CONTAINED ON THE MEDIA OR ANY PART OF THE PRODUCT
SERVICED.
Page 63

Orbit Reader 20 – User guide Version 1.8
Orbit Research Confidential and Proprietary Information 63
Your product will be returned to you configured as originally purchased, subject to
applicable updates. You will be responsible for reinstalling all other software programs,
data, and passwords. Recovery and reinstallation of software programs and user data are
not covered under this Limited Warranty.
27.3 Appendix C - FCC Information
FCC Notice
This equipment has been tested and found to comply with the limits for a Class B
digital device, pursuant to part 15 of the FCC rules. These limits are designed to
provide reasonable protection against harmful interference in a residential
installation. This equipment generates uses and can radiate radio frequency
energy and, if not installed and used in accordance with the instructions, may
cause harmful interference to radio communications. However, there is no
guarantee that interference will not occur in a particular installation. If this
equipment does cause harmful interference to radio or television reception, which
can be determined by turning the equipment off and on, the user is encouraged
to try to correct the interference by one or more of the following measures:
• Reorient or relocate the receiving antenna.
• Increase the separation between the equipment and the receiver.
• Connect the equipment into an outlet on a circuit different from that to which the
receiver is connected.
• Consult the dealer or an experienced radio/TV technician for help.
This device complies with Part 15 of the FCC Rules. Operation is subject to the
following two conditions:
(1) This device may not cause harmful interference, and
(2) This device must accept any interference received, including interference that
may cause undesired operation.
FCC Caution
To ensure continued compliance follow the installation instructions and this device must
be installed with a computer or peripheral device certified to comply with Part 15 of the
FCC rules for the Class B limits. Use shielded interface cables only. Use the power
adapter that is supplied with the device to charge its internal battery pack.
Any changes or modifications not expressly approved by the party responsible for
compliance could void the user’s authority to operate this equipment.
 Loading...