

ORANGE CR12L, Pix Crush 12L Owner's Manual

IMPORTANT
ARA
P
F
ER
ORANGE MUSIC ELECTRONIC CO.,LTD
Printed in PRC.
To prevent serious damage be sure that the rated AC line voltage shown on the amplifier's rear panel agrees with
the line voltage available from your AC inlet before connecting the AC power cord.
CAUTION!TO REDUCE THE RISK OF FIRE. REPLACE ONLY WITH SAME TYPE FUSE
ATTENTION!#UTILISER UN FUSIBLE DE RECHANGE DE MEME TYPE
WARNING!
TO REDUCE THE RISK OF FIRE OR ELECTRIC SHOCK
DO NOT EXPOSE THIS PRODUCT TO RAIN OR MOISTURE.
DO NOT REMOVE CHASSIS(OR BACK), NO USER SERVICEABLE PARTS INSIDE.
REFER SERVICING TO QUALIFIED SERVICE PERSONNEL.
THE UNIT SHOULD BE INSTALLED SO THAT ITS LOCATION OR POSITION DOES NOT INTERFERE WITH ITS PROPER
VENTILATION. FOR EXAMPLE, IT SHOULD NOT BE SITUATED ON A BED, SOFA, RUG OR SIMILAR SURFACE THAT MAY
BLOCK THE VENTILATION OPENINGS.
RZQHU*V PDQXDO
C
O
OCSOCOS
S
ATT
T
O
T
LSE
N
S
LE
ECHANGD
ME
T
Y
P
W
A
IG!
T
O
CTSOO
CTCSO
C
OOOSSOCOOOS
O
O
TOVCA
SS
S
O
A
C)O
S
SVC
AAT
S
S
SCG
OQSCS
O
T
T
S
O
S
T
A
S
O
TAT
T
SOC
A
T
OOO
S
T
OOS
O
TTWTT
S
O
E
LONOE
M
SHO
D N
OSOASOGOSSC
O
C
O
O
G
S
AVIS! RESQUE DE CHOC ELECTIQUE-NE PAS OUV RIR.
INTRODUCTION
Congratulations on your Orange Pix Crush series purchase. You have chosen to buy the coolest practice amp
in the world! We hope you have lots of fun using your Crush amp, but before you start playing please take a
moment to read this manual and familiarize your self with your amplifier and its controls.
USING YOUR AMPLIFIER
Turn amplifier master Volume to "0" before turning amplifier ON or OFF.
To prevent hum operate your amplifier and instruments as far away from fluorescent and neon lamps as possible,
as they generate extremely high levels of electronic noise.
WARRANTY
Please refer to the enclosed warranty information sheet for details of your amplifier warranty.
You can register your purchase online on our website www.orangeamps.com
12L
PANEL FUNCTIONS
SPECIFICATIONS
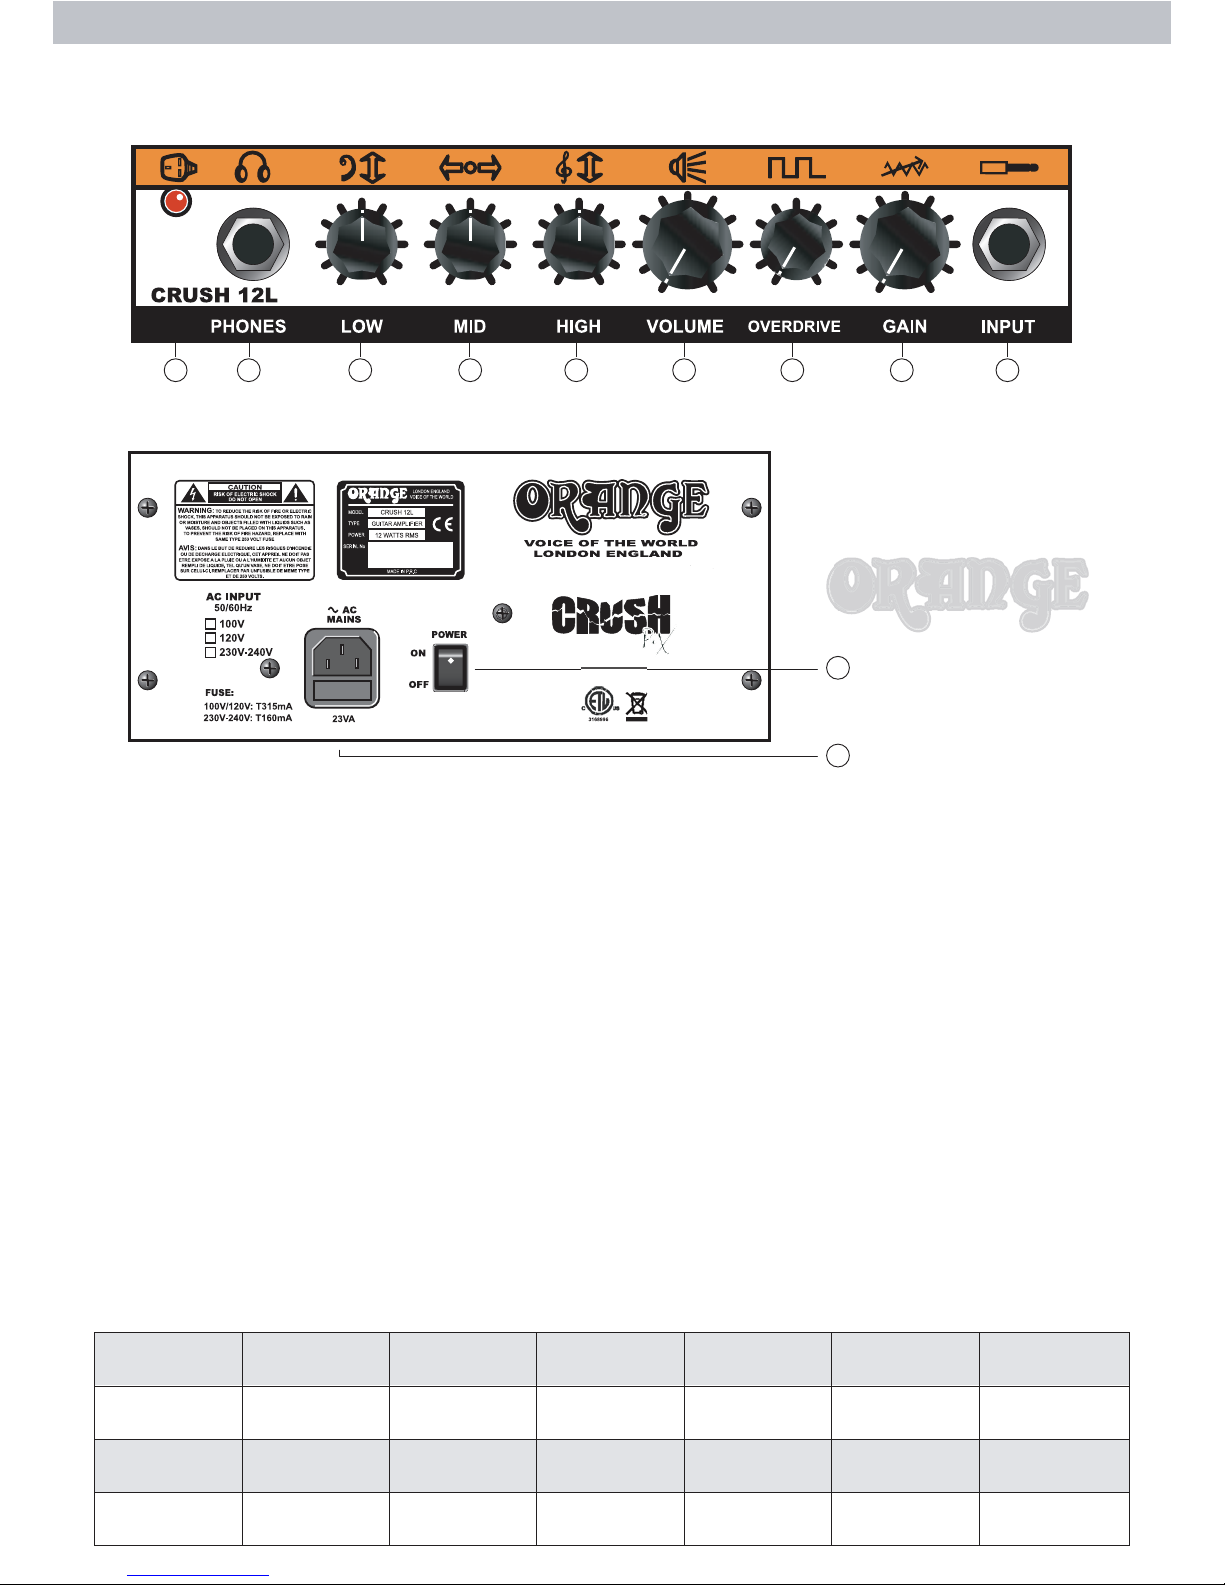
FRONT PANEL
REAR PANEL
FUNCTION DESCRIPTIONS
2- GAIN : This controls pre-gain level.
3- OVERDRIVE : This controls high gain and distortion level.
4- VOLUME : This controls the overall volume of the amplifier.
5- HIGH : Provides high frequency equalization as required.
6- MID : Provides middle frequency equalization with cut and boost.
7- LOW : Provides low frequency equalization as required.
8- HEADPHONE : For use with most stereo headphones.
9- POWER INDICATOR : LED indicates whether the power switch is ON or OFF.
10- AC MAIN POWER SWITCH : This switch turns the AC MAIN Power ON or OFF.
11- AC INLET & FUSEHOLDER : Connect the supplied standard 3-pin 'IEC' plug here.
9 8 7 6 5 4 3 2 1
10
11
OUTPUT POWER SPEAKER INPUT
INPUT SENSITIVITY
NOISE EFFECT
FOOT S/W JACK
&PUSHSWITCH
HEADPHONE
JACK LEVEL
POWER
CONSUMPTION
POWER
REQUIREMENT
DIMENSIONS
(W)X(H)X(D)
WEIGHT CABINET COLOR & FINISH
12Watts RMS
@ 10% THD, 8 ohm
200mV @ 12W
(Headphone Impe. 8 ohm)
100V,120V,230V-
240V, 50/60Hz
11.9x10.5x7 inch
302x267x178 mm
Sturdy
Particleboard
Orange
Leatherette
15mV F=1KHz,
Volumes Tone Controls at Max
1X 6.5" 1 Input -45dB N/A N/A
23VA
11 lbs.(5.2kg)
1- INPUT : Use this jack to connect your guitar to the amplifier by means of a shielded instrument cable.
CAUTION: To avoid possible damage to your hearing, do not use headphones for extended periods of time at extremely loud levels.
 Loading...