

Page 1

Oracle® Application Server
Installation Guide
10g (10.1.4.0.1) for HP-UX Itanium
B32100-01
September 2006
Page 2

Oracle Application Server Installation Guide 10g (10.1.4.0.1) for HP-UX Itanium
B32100-01
Copyright © 2006, Oracle. All rights reserved.
Primary Authors: Brintha Bennet, Megan Ginter
Contributors: Rupesh Das, Nagesh Jayaram, Suresh Kesavan, Arun Kuzhimattathil, Sonal Pandey, Divya
Shankar, Janelle Simmons, Shashidhara Varamballi
The Programs (which include both the software and documentation) contain proprietary information; they
are provided under a license agreement containing restrictions on use and disclosure and are also protected
by copyright, patent, and other intellectual and industrial property laws. Reverse engineering, disassembly,
or decompilation of the Programs, except to the extent required to obtain interoperability with other
independently created software or as specified by law, is prohibited.
The information contained in this document is subject to change without notice. If you find any problems in
the documentation, please report them to us in writing. This document is not warranted to be error-free.
Except as may be expressly permitted in your license agreement for these Programs, no part of these
Programs may be reproduced or transmitted in any form or by any means, electronic or mechanical, for any
purpose.
If the Programs are delivered to the United States Government or anyone licensing or using the Programs on
behalf of the United States Government, the following notice is applicable:
U.S. GOVERNMENT RIGHTS Programs, software, databases, and related documentation and technical data
delivered to U.S. Government customers are "commercial computer software" or "commercial technical data"
pursuant to the applicable Federal Acquisition Regulation and agency-specific supplemental regulations. As
such, use, duplication, disclosure, modification, and adaptation of the Programs, including documentation
and technical data, shall be subject to the licensing restrictions set forth in the applicable Oracle license
agreement, and, to the extent applicable, the additional rights set forth in FAR 52.227-19, Commercial
Computer Software--Restricted Rights (June 1987). Oracle USA, Inc., 500 Oracle Parkway, Redwood City, CA
94065.
The Programs are not intended for use in any nuclear, aviation, mass transit, medical, or other inherently
dangerous applications. It shall be the licensee's responsibility to take all appropriate fail-safe, backup,
redundancy and other measures to ensure the safe use of such applications if the Programs are used for such
purposes, and we disclaim liability for any damages caused by such use of the Programs.
Oracle, JD Edwards, PeopleSoft, and Siebel are registered trademarks of Oracle Corporation and/or its
affiliates. Other names may be trademarks of their respective owners.
The Programs may provide links to Web sites and access to content, products, and services from third
parties. Oracle is not responsible for the availability of, or any content provided on, third-party Web sites.
You bear all risks associated with the use of such content. If you choose to purchase any products or services
from a third party, the relationship is directly between you and the third party. Oracle is not responsible for:
(a) the quality of third-party products or services; or (b) fulfilling any of the terms of the agreement with the
third party, including delivery of products or services and warranty obligations related to purchased
products or services. Oracle is not responsible for any loss or damage of any sort that you may incur from
dealing with any third party.
Page 3

Contents
Preface ............................................................................................................................................................... xiii
Intended Audience.................................................................................................................................... xiii
Documentation Accessibility................................................................................................................... xiii
Related Documents ................................................................................................................................... xiv
Conventions ............................................................................................................................................... xiv
1 Product and Installation Overview
1.1 Product Overview....................................................................................................................... 1-1
1.2 Where Do I Find Installation Instructions for My Product?................................................. 1-2
1.3 Recommended Topologies ........................................................................................................ 1-3
1.3.1 Installing Oracle Identity Management in a Single Oracle Home................................ 1-4
1.3.2 Installing a Distributed Oracle Identity Management with an Integrated Oracle HTTP
Server ....................................................................................................................... 1-5
1.3.3 Installing a Distributed Oracle Identity Management with a Standalone Oracle HTTP
Server ....................................................................................................................... 1-7
2 Requirements
2.1 Using OracleMetaLink to Obtain the Latest Oracle Application Server Hardware and
Software Requirements ................................................................................................... 2-1
2.2 System Requirements................................................................................................................. 2-2
2.2.1 Installing from the Console or X Windows ..................................................................... 2-5
2.2.2 Tips for Reducing Memory Usage .................................................................................... 2-5
2.3 Software Requirements.............................................................................................................. 2-5
2.4 Kernel Parameters....................................................................................................................... 2-7
2.4.1 Kernel Parameter Settings for OracleAS Metadata Repository.................................... 2-7
2.5 Ports .............................................................................................................................................. 2-8
2.5.1 Checking If a Port Is in Use................................................................................................ 2-9
2.5.2 Using Default Port Numbers ............................................................................................. 2-9
2.5.3 Using Custom Port Numbers (the "Static Ports" Feature) .......................................... 2-10
2.5.3.1 Format of the staticports.ini File.............................................................................. 2-10
2.5.3.2 Error Conditions that Will Cause the Installer to Use Default Ports Instead of
Specified Ports ................................................................................................. 2-12
2.5.3.3 Example....................................................................................................................... 2-13
2.5.4 If Port 1521 Is in Use......................................................................................................... 2-13
2.5.4.1 If Port 1521 Is In Use by an Existing Oracle Database ......................................... 2-13
2.5.4.2 If Port 1521 Is In Use by Some Other Application................................................ 2-15
iii
Page 4

2.6 Operating System Groups ...................................................................................................... 2-16
2.6.1 Create a Group for the Inventory Directory................................................................. 2-16
2.6.2 Create Groups for Database Administrators................................................................ 2-16
2.7 Operating System User ........................................................................................................... 2-17
2.8 Environment Variables ........................................................................................................... 2-18
2.8.1 Environment Variable Tips ............................................................................................. 2-18
2.8.2 ORACLE_HOME and ORACLE_SID............................................................................ 2-19
2.8.3 PATH, CLASSPATH, and LD_LIBRARY_PATH........................................................ 2-19
2.8.4 DISPLAY............................................................................................................................ 2-19
2.8.5 TMP and TMPDIR............................................................................................................ 2-20
2.8.6 TNS_ADMIN..................................................................................................................... 2-20
2.9 The /etc/hosts File .................................................................................................................. 2-21
2.9.1 Location of the Default Oracle Identity Management Realm .................................... 2-21
2.9.2 Hostname for OracleAS Single Sign-On........................................................................ 2-21
2.10 Network Topics........................................................................................................................ 2-22
2.10.1 Installing on Multihomed (Multi-IP) Computers ........................................................ 2-22
2.10.2 Copying CD-ROMs or DVD-ROM to Hard Drive, and Installing from the Hard Drive..
.................................................................................................................................. 2-22
2.10.3 Installing from a Remote CD-ROM or DVD-ROM Drive........................................... 2-23
2.10.4 Installing on Remote Computers.................................................................................... 2-24
2.10.5 Installing on NFS-Mounted Storage .............................................................................. 2-25
2.10.6 Running Multiple Instances from One Installation..................................................... 2-25
2.10.7 Support for NIS and NIS+............................................................................................... 2-26
2.11 Prerequisite Checks Performed by the Installer.................................................................. 2-26
3 Things You Should Know Before Starting the Installation
3.1 Oracle Home Directory .............................................................................................................. 3-1
3.1.1 Installing in an Existing Oracle Home.............................................................................. 3-2
3.1.2 Installing in a Non-Empty Oracle Home ......................................................................... 3-2
3.2 Can I Use Symbolic Links? ........................................................................................................ 3-2
3.3 First-Time Installation of Any Oracle Product ....................................................................... 3-2
3.4 Installing Additional Languages .............................................................................................. 3-3
3.5 Oracle Application Server Instances and Instance Names................................................... 3-3
3.6 The ias_admin User and Restrictions on its Password.......................................................... 3-4
3.7 Comparing Installing Components against Configuring Components.............................. 3-5
3.8 Where Does the Installer Write Files?...................................................................................... 3-5
3.9 Why Do I Need to be Able to Log In as Root at Certain Times During Installation?....... 3-6
3.10 Running root.sh During Installation........................................................................................ 3-6
3.11 Can I Modify Other Oracle Application Server Instances During Installation?................ 3-6
3.12 Connecting to Oracle Internet Directory Through SSL Connections.................................. 3-7
3.13 Obtaining Software from Oracle E-Delivery........................................................................... 3-7
3.13.1 Finding and Downloading the Oracle Application Server 10g (10.1.4.0.1) E-Pack.... 3-7
3.13.2 Finding Required and Optional Downloads ................................................................... 3-7
3.13.3 Disk Space Requirements ................................................................................................... 3-7
3.13.4 Software Requirements for Unzipping Files ................................................................... 3-7
3.13.5 Extracting Software from the Zip Files............................................................................. 3-8
3.14 Setting the Mount Point for the CD-ROM or DVD................................................................ 3-8
iv
Page 5

3.15 Starting the Oracle Universal Installer..................................................................................... 3-8
4 Installing OracleAS Infrastructure
4.1 Infrastructure Installation Types .............................................................................................. 4-1
4.2 Why Would I Select the Different Infrastructure Installation Types?................................. 4-2
4.3 Order of Installation for the Infrastructure............................................................................. 4-3
4.4 Can I Install Components on Separate Computers?.............................................................. 4-4
4.5 Tips for Installing Oracle Identity Management Components Separately......................... 4-5
4.6 Do I Need the Oracle Delegated Administration Services or the Oracle Directory
Integration Platform Components? ................................................................................ 4-6
4.7 Can I Configure Components After Installation? .................................................................. 4-6
4.8 Can I Use an Existing Database for the OracleAS Metadata Repository?.......................... 4-6
4.9 Can I Use an Existing Oracle Internet Directory? .................................................................. 4-7
4.10 Registration of OracleAS Metadata Repository in Oracle Internet Directory and Password
Randomization ............................................................................................................... 4-7
4.11 Contents of the OracleAS Metadata Repository..................................................................... 4-8
4.12 Can I Use Multiple Metadata Repositories?............................................................................ 4-9
4.13 What High Availability Options Does Oracle Application Server Support?.................. 4-10
4.14 Restrictions on the Passwords for the SYS, SYSTEM, SYSMAN, and DBSNMP Users 4-10
4.15 Support for NE8ISO8859P10 and CEL8ISO8859P14 Characters Sets............................... 4-11
4.16 What Do I Enter in the "Specify Namespace in Internet Directory" Screen? .................. 4-11
4.17 How to Determine Port Numbers Used by Components.................................................. 4-11
4.18 Can I Add OCA After Installation?....................................................................................... 4-12
4.19 How to Deploy Oracle Delegated Administration Services on a Separate Host............ 4-12
4.20 Installing OracleAS Infrastructure ........................................................................................ 4-12
4.21 Installing OracleAS Infrastructure Against an Existing Oracle Internet Directory ....... 4-14
4.22 Installing OracleAS Metadata Repository in a New Database.......................................... 4-15
4.23 Installing Oracle Identity Management Components Only (Including Oracle Internet
Directory) ..................................................................................................................... 4-16
4.24 Installing Oracle Identity Management Components Only (Excluding Oracle Internet
Directory) ..................................................................................................................... 4-18
4.25 Installing Oracle Internet Directory Only ............................................................................ 4-20
4.26 Installing OCA and OracleAS Metadata Repository Only ................................................ 4-21
4.27 Install Fragment: The First Few Screens of the Installation............................................... 4-23
4.28 Install Fragment: The Last Few Screens of the Installation ............................................... 4-25
4.29 Install Fragment: Database Screens....................................................................................... 4-26
4.30 Install Fragment: OCA Screens.............................................................................................. 4-27
5 Configuring Oracle Internet Directory for Oracle Application Server
Installation Privileges
5.1 Default Users in Oracle Internet Directory ............................................................................. 5-1
5.2 Groups in Oracle Internet Directory ........................................................................................ 5-2
5.2.1 "Global" Groups ................................................................................................................... 5-2
5.2.2 Groups for Each Metadata Repository............................................................................. 5-3
5.2.3 Groups for Each Component ............................................................................................. 5-3
5.3 Groups Required to Configure or Deinstall Components.................................................... 5-4
5.4 Groups Required to Install Middle Tiers................................................................................. 5-7
v
Page 6

5.4.1 Groups Required to Install Against the Desired Metadata Repository....................... 5-7
5.4.2 Groups Required to Install Middle-tier Components .................................................... 5-7
5.4.3 Example................................................................................................................................. 5-7
5.5 Groups Required to Install Additional Metadata Repositories ........................................... 5-8
5.6 Example of Installation with Different Users ......................................................................... 5-8
5.7 How to Create Users in Oracle Internet Directory.............................................................. 5-10
5.8 How to Add Users to Groups in Oracle Internet Directory .............................................. 5-10
5.8.1 Using Oracle Directory Manager to Add Users to Groups ........................................ 5-11
5.8.1.1 Navigating to "Global" Groups................................................................................ 5-11
5.8.1.2 Navigating to Metadata Repository Groups ......................................................... 5-12
5.8.1.3 Navigating to Component Groups ......................................................................... 5-13
5.8.2 Using Deployment Delegation Console to Add Users to Groups............................. 5-14
5.9 Contents of a New Oracle Internet Directory...................................................................... 5-16
5.10 On the Specify Login for Oracle Internet Directory Screen, What Username and Realm Do I
Enter? ........................................................................................................................... 5-16
6 Installing Oracle Internet Directory in Replicated Mode
6.1 Oracle Internet Directory Replication Overview ................................................................... 6-1
6.1.1 Fan-Out Replication (LDAP Replication)......................................................................... 6-2
6.1.2 Multimaster Replication (Advanced Replication) .......................................................... 6-2
6.2 Requirements............................................................................................................................... 6-3
6.2.1 Database Requirements ...................................................................................................... 6-3
6.2.2 Clock Synchronization........................................................................................................ 6-4
6.3 Installation Order........................................................................................................................ 6-4
6.4 Installing a Master Oracle Internet Directory......................................................................... 6-4
6.5 Installing an Oracle Internet Directory Replica...................................................................... 6-5
6.5.1 Overview of Installing a Replica ....................................................................................... 6-5
6.5.2 Installing an Oracle Internet Directory Replica with a New Database........................ 6-5
6.5.3 Installing an Oracle Internet Directory Replica against an Existing Database........... 6-8
6.6 Accessing OracleAS Single Sign-On and Oracle Delegated Administration Services .. 6-10
7 Installing in High Availability Environments: Overview
7.1 Overview of High Availability Configurations...................................................................... 7-1
7.1.1 OracleAS Cold Failover Cluster ........................................................................................ 7-1
7.1.2 OracleAS Clusters................................................................................................................ 7-3
7.1.3 OracleAS Disaster Recovery .............................................................................................. 7-4
7.1.4 Summary of Differences ..................................................................................................... 7-4
7.2 Installation Order for High Availability Configurations...................................................... 7-4
7.3 Requirements for High Availability Configurations............................................................. 7-5
7.3.1 Check Minimum Number of Nodes ................................................................................. 7-5
7.3.2 Check That Groups Are Defined Identically on All Nodes........................................... 7-5
7.3.3 Check the Properties of the oracle User ........................................................................... 7-5
7.3.4 Check for Previous Oracle Installations on All Nodes................................................... 7-6
8 Installing in High Availability Environments: OracleAS Cold Failover Cluster
8.1 OracleAS Cold Failover Cluster: Introduction ....................................................................... 8-1
vi
Page 7

8.2 Pre-Installation Steps for OracleAS Cold Failover Cluster................................................... 8-2
8.2.1 Map the Virtual Hostname and Virtual IP Address....................................................... 8-2
8.2.2 Set Up a File System That Can Be Mounted from Both Nodes..................................... 8-4
8.2.3 Review Recommendations for Automatic Storage Management (ASM).................... 8-5
8.2.4 Check That Clusterware Is Running (Automated Failovers only)............................... 8-5
8.2.5 Modify listener.ora file for Existing Database................................................................. 8-5
8.3 Installing an OracleAS Cold Failover Cluster (Infrastructure) Configuration .................. 8-6
8.3.1 OracleAS Cold Failover Cluster (Infrastructure): Overview of Installation Steps..... 8-8
8.3.2 OracleAS Cold Failover Cluster (Infrastructure): Details of Installation Steps.......... 8-8
8.4 Installing a Distributed OracleAS Cold Failover Cluster (Infrastructure) Configuration .......
......................................................................................................................................... 8-11
8.4.1 Distributed OracleAS Cold Failover Cluster (Infrastructure): Overview of Installation
Steps ....................................................................................................................... 8-13
8.4.2 Distributed OracleAS Cold Failover Cluster (Infrastructure): Details of Installation
Steps ....................................................................................................................... 8-13
8.5 Installing an OracleAS Cold Failover Cluster (Identity Management) Configuration.. 8-14
8.5.1 OracleAS Cold Failover Cluster (Identity Management): Overview of Installation Steps
................................................................................................................................. 8-16
8.5.2 OracleAS Cold Failover Cluster (Identity Management): Details of Installation Steps ....
.................................................................................................................................. 8-17
8.6 Installing a Distributed OracleAS Cold Failover Cluster (Identity Management)
Configuration ................................................................................................................ 8-19
8.6.1 Distributed OracleAS Cold Failover Cluster (Identity Management): Overview of
Installation Steps ............................................................................................................... 8-21
8.6.2 Distributed OracleAS Cold Failover Cluster (Identity Management): Details of
Installation Steps .................................................................................................... 8-22
8.7 Installing Oracle Delegated Administration Services and OracleAS Single Sign-On in an
OracleAS Cold Failover Cluster .................................................................................... 8-24
8.7.1 Oracle Delegated Administration Services and OracleAS Single Sign-On in OracleAS
Cold Failover Cluster: Overview of Installation Steps ........................................... 8-26
8.7.2 Oracle Delegated Administration Services and OracleAS Single Sign-On in OracleAS
Cold Failover Cluster: Details of Installation Steps ................................................ 8-26
8.8 Installing Only the OracleAS Metadata Repository in an OracleAS Cold Failover Cluster
Environment ................................................................................................................. 8-30
8.9 Post-Installation Steps for OracleAS Cold Failover Cluster .............................................. 8-31
8.9.1 Edit the ORACLE_HOME/Apache/Apache/htdocs/index.html File.................... 8-31
8.9.2 Copy the /var/opt/oracle Directory to the Other Node ........................................... 8-31
8.9.3 Running Database Console against a Cold Failover Cluster Database .................... 8-31
8.9.4 Create a Clusterware Agent for Automatic Failover................................................... 8-32
8.10 Installing Middle Tiers Against an OracleAS Cold Failover Cluster Infrastructure ..... 8-32
8.10.1 If You Plan to Install Middle Tiers on OracleAS Cold Failover Cluster Nodes ...... 8-32
8.10.1.1 Create a staticports.ini File for the Middle Tier .................................................... 8-32
8.10.1.2 Rename the /var/opt/oracle Directory Used for the Infrastructure................ 8-33
8.10.2 Procedure for Installing Middle Tiers Against an OracleAS Cold Failover Cluster
Infrastructure ......................................................................................................... 8-33
8.11 Installing Regular Middle-Tiers on OracleAS Cold Failover Cluster Nodes.................. 8-34
vii
Page 8

9 Installing in High Availability Environments: OracleAS Cluster (Identity
Management)
9.1 OracleAS Cluster (Identity Management): Introduction ...................................................... 9-1
9.2 Pre-Installation Steps for OracleAS Cluster (Identity Management).................................. 9-2
9.2.1 Use the Same Path for the Oracle Home Directory (recommended)........................... 9-2
9.2.2 Synchronize Clocks on All Nodes..................................................................................... 9-3
9.2.3 Configure Virtual Server Names and Ports for the Load Balancer.............................. 9-3
9.2.4 Configure Your LDAP Virtual Server............................................................................... 9-3
9.2.4.1 Load Balancer Supports LDAP Service Monitoring................................................ 9-4
9.2.4.2 Load Balancer Does Not Support LDAP Service Monitoring................................ 9-4
9.3 About Oracle Internet Directory Passwords........................................................................... 9-4
9.4 About Configuring SSL and Non-SSL Ports for Oracle HTTP Server ................................ 9-5
9.4.1 Case 1: Client ---[HTTP]---> Load Balancer ---[HTTP]---> Oracle HTTP Server........ 9-5
9.4.2 Case 2: Client ---[HTTPS]---> Load Balancer ---[HTTPS]---> Oracle HTTP Server.... 9-6
9.4.3 Case 3: Client ---[HTTPS]---> Load Balancer ---[HTTP]---> Oracle HTTP Server...... 9-6
9.5 Installing an OracleAS Cluster (Identity Management) Configuration.............................. 9-7
9.5.1 Installation Order................................................................................................................. 9-8
9.5.2 Installing OracleAS Metadata Repository........................................................................ 9-9
9.5.3 Installing OracleAS Cluster (Identity Management) on the First Node...................... 9-9
9.5.3.1 Create staticports.ini File............................................................................................. 9-9
9.5.3.2 Disable TCP Monitoring on Load Balancer for First Node ................................. 9-10
9.5.3.3 Configure the Load Balancer to Return Immediately to the Calling Client ..... 9-10
9.5.3.4 Ensure that the OracleAS Metadata Repository Is Not Registered with any Oracle
Internet Directory ............................................................................................ 9-10
9.5.3.5 Select the Same Components for Each Node......................................................... 9-10
9.5.3.6 Run the Installer......................................................................................................... 9-10
9.5.4 Installing OracleAS Cluster (Identity Management) on Subsequent Nodes ........... 9-12
9.6 Installing a Distributed OracleAS Cluster (Identity Management) Configuration........ 9-15
9.6.1 Installation Order.............................................................................................................. 9-17
9.6.2 Installing OracleAS Metadata Repository..................................................................... 9-17
9.6.3 Installing Oracle Internet Directory on the First Node............................................... 9-17
9.6.3.1 Set up staticports.ini File .......................................................................................... 9-17
9.6.3.2 Select the Same Components for Each Installation .............................................. 9-18
9.6.3.3 Start the Installer........................................................................................................ 9-18
9.6.4 Installing Oracle Internet Directory on Subsequent Nodes........................................ 9-19
9.6.4.1 Staticports.ini File Not Needed ............................................................................... 9-19
9.6.4.2 Select the Same Components for Each Installation .............................................. 9-19
9.6.4.3 Start the Installer........................................................................................................ 9-19
9.6.5 Installing OracleAS Single Sign-On and Oracle Delegated Administration Services on
Each Node .............................................................................................................. 9-21
9.6.5.1 Set up staticports.ini File .......................................................................................... 9-21
9.6.5.2 Start the Installer........................................................................................................ 9-22
9.7 Post-Installation Steps ............................................................................................................. 9-24
9.7.1 Cluster the OC4J_Security Instance for State Replication (First Oracle Delegated
Administration Services node only) ....................................................................... 9-24
9.7.2 Changing the Ports for Oracle Internet Directory........................................................ 9-25
9.7.3 Update targets.xml (Case 2 only) ................................................................................... 9-25
viii
Page 9

9.8 Installing Middle Tiers Against OracleAS Cluster (Identity Management) Configurations...
......................................................................................................................................... 9-26
10 Installing in High Availability Environments: OracleAS Disaster Recovery
10.1 OracleAS Disaster Recovery: Introduction .......................................................................... 10-1
10.2 Setting up the OracleAS Disaster Recovery Environment................................................. 10-3
10.2.1 Ensure Nodes Are Identical at the Operating System Level...................................... 10-3
10.2.2 Set Up staticports.ini File................................................................................................. 10-3
10.2.3 Set Up Identical Hostnames on Both Production and Standby Sites........................ 10-4
10.2.4 If You Want to Use OracleAS Cold Failover Cluster on the Production Site .......... 10-8
10.3 Installing Oracle Application Server in an OracleAS Disaster Recovery Environment 10-8
10.3.1 Installing the OracleAS Infrastructure........................................................................... 10-9
10.3.2 Installing Middle Tiers..................................................................................................... 10-9
10.4 Installing the OracleAS 10g (10.1.2.0.2) Standalone Install of OracleAS Guard into Oracle
Homes .......................................................................................................................... 10-9
10.5 Patching OracleAS Guard Release 10.1.2.0.0 with Release 10.1.2.0.2............................. 10-10
10.6 What to Read Next................................................................................................................. 10-11
11 Post-Installation Tasks
11.1 State of Oracle Application Server Instances After Installation........................................ 11-1
11.2 Passwords for Oracle Application Server Components..................................................... 11-1
11.3 NFS Installations ...................................................................................................................... 11-2
11.4 Backup and Recovery.............................................................................................................. 11-2
11.5 SSL.............................................................................................................................................. 11-2
11.6 Operating System Locale and NLS_LANG Environment Variable ................................. 11-2
11.6.1 Check the Operating System Locale .............................................................................. 11-2
11.6.2 Check the NLS_LANG Setting ....................................................................................... 11-2
11.7 Component Configuration After Installation ...................................................................... 11-3
11.7.1 Configuring mod_osso (Required for Oracle Delegated Administration Services) 11-3
11.8 Components that Require Post-Installation Tasks.............................................................. 11-5
11.9 What to Do Next ...................................................................................................................... 11-5
A Installing the Oracle Identity Management Grid Control Plug-in
A.1 Installation Requirements......................................................................................................... A-1
A.2 Starting the Grid Control Plug-in Installer............................................................................. A-1
A.3 Installing Oracle Identity Management Grid Control Plug-in............................................ A-2
A.4 Installing Oracle Identity Management Grid Control Plug-in Agent ................................ A-3
B Silent and Non-Interactive Installation
B.1 Silent Installation........................................................................................................................ B-1
B.2 Non-Interactive Installation ..................................................................................................... B-2
B.3 Pre-Installation ........................................................................................................................... B-2
B.4 Notes for Silent and Non-Interactive Installations ............................................................... B-2
B.4.1 Installing OracleAS Certificate Authority....................................................................... B-2
B.5 Create the Response File........................................................................................................... B-3
B.5.1 Creating Response Files from Templates........................................................................ B-3
ix
Page 10

B.5.2 Creating Response Files by Using the Record Mode in the Installer.......................... B-3
B.5.3 Variables to Modify in the Response Files...................................................................... B-3
B.5.4 Example Response Files..................................................................................................... B-4
B.5.4.1 Example Response File for OracleAS Infrastructure: Oracle Identity Management
Only ...................................................................................................................B-4
B.5.4.2 Example Response File for OracleAS Infrastructure: OracleAS Metadata
Repository Only ................................................................................................B-6
B.5.4.3 Example Response File for OracleAS Infrastructure: Identity Management and
OracleAS Metadata Repository ......................................................................... B-8
B.5.4.4 Example Response File for Oracle Identity Federation ......................................... B-9
B.6 Start the Installation................................................................................................................. B-10
B.7 Post-Installation........................................................................................................................ B-11
B.8 Security Tips for Silent and Non-Interactive Installations................................................. B-11
B.9 Deinstallation............................................................................................................................ B-12
C Default Port Numbers
C.1 Method of Assigning Default Port Numbers......................................................................... C-1
C.2 Default Port Numbers............................................................................................................... C-1
C.3 Ports to Open in Firewalls ........................................................................................................ C-3
D Deinstallation and Reinstallation
D.1 Deconfig Tool ............................................................................................................................. D-1
D.1.1 Parameters ........................................................................................................................... D-2
D.1.2 Log Files Generated by the Deconfig Tool...................................................................... D-3
D.2 Deinstallation Procedure: Overview....................................................................................... D-3
D.3 Deinstalling OracleAS Cold Failover Cluster Installations ................................................. D-4
D.4 Deinstalling OracleAS Single Sign-On Instances in OracleAS Cluster (Identity
Management) .................................................................................................................D-4
D.5 Deinstalling OracleAS Cluster (Identity Management) ....................................................... D-5
D.6 Deinstalling OracleAS Infrastructure...................................................................................... D-5
D.6.1 Deinstallation Order........................................................................................................... D-5
D.6.2 Deinstallation Steps............................................................................................................ D-5
D.7 Harmless Errors in the Log File............................................................................................... D-7
D.8 Cleaning Up Oracle Application Server Processes ............................................................... D-8
D.9 Reinstallation.............................................................................................................................. D-8
D.10 Troubleshooting ......................................................................................................................... D-8
E Configuration Assistants
E.1 Troubleshooting Configuration Assistants............................................................................ E-1
E.1.1 General Tips......................................................................................................................... E-1
E.1.2 Configuration Assistant Result Codes............................................................................. E-2
E.2 Description of Oracle Application Server Configuration Assistants ................................. E-2
F Troubleshooting
F.1 Log Files ...................................................................................................................................... F-1
F.2 General Troubleshooting Tips ................................................................................................. F-1
x
Page 11

F.3 Installation Problems and Solutions ....................................................................................... F-2
F.3.1 Location of Log Files .......................................................................................................... F-2
F.3.2 Linking Failed, ORA Errors .............................................................................................. F-3
F.3.3 Prerequisite Checks Fail at the Start of Installation ....................................................... F-3
F.3.4 Message About Installing in a Non-Empty Directory................................................... F-3
F.3.5 Messages About SHMMAX and SEMMSL..................................................................... F-4
F.3.6 Installer Disappears After Running the Pre-Installation Checks................................. F-4
F.3.7 Unable to Clean Up a Failed Installation ........................................................................ F-5
F.3.8 Forgot the Password for the cn=orcladmin Account .................................................... F-5
F.3.9 cn=orcladmin Account Becomes Locked ........................................................................ F-5
F.3.10 User Interface Does Not Display in the Desired Language, or Does Not Display
Properly ...................................................................................................................F-5
F.3.11 Installer Does Not Display Correct Database Name for OracleAS Metadata Repository
....................................................................................................................................F-6
F.3.12 Configuration Assistant Failures - General .................................................................... F-6
F.3.13 OracleAS Randomize Password Configuration Assistant Failures ............................ F-7
F.3.14 Database Configuration Assistant (DBCA) Failures ..................................................... F-7
F.3.15 Harmless Error Message from Database Configuration Assistant (DBCA) .............. F-8
F.3.16 OPMN Configuration Assistant - Start HTTP Server Failures .................................... F-8
F.3.17 OPMN Configuration Assistant - Start DAS Instance Failures ................................... F-9
F.3.18 OPMN Configuration Assistant - Start OCA Failures .................................................. F-9
F.3.19 WARNING: DCM service may not be available at this time....................................... F-9
F.3.20 OracleAS Cluster (Identity Management)- Cluster Configuration Assistant Fails. F-10
F.3.21 OracleAS Cluster (Identity Management) - Installation Fails on Second Oracle Internet
Directory Node ......................................................................................................F-10
F.3.22 OracleAS Cluster (Identity Management) - Installation Fails on Second Oracle
Delegated Administration Services and OracleAS Single Sign-On Node .............. F-10
F.4 Deinstallation Problems and Solutions................................................................................. F-11
F.4.1 Obsolete Partner URLs Still Remain on the OracleAS Single Sign-On Administration
Screen ..................................................................................................................... F-11
F.4.2 Unable to Reuse Instance Name of a Deleted Instance............................................... F-12
F.4.3 Unable to Reuse Database Name ................................................................................... F-12
F.4.4 Deconfiguration Failed on Distributed OracleAS Cluster (Identity Management) F-13
F.5 Need More Help?..................................................................................................................... F-14
Index
xi
Page 12

xii
Page 13

The Oracle Application Server Installation Guide covers requirements, new features in the
Oracle Universal Installer, Oracle Application Server concepts that affect installation,
installation procedures, and troubleshooting tips. In addition, this guide also provides
some sample topologies for installing and running Oracle Application Server.
Intended Audience
This guide is intended for users who are comfortable running some system
administration operations, such as creating users and groups, adding users to groups,
and installing operating system patches on the computer where Oracle Application
Server is going to be installed. Users who are installing Oracle Application Server need
root access to run some scripts.
Documentation Accessibility
Our goal is to make Oracle products, services, and supporting documentation
accessible, with good usability, to the disabled community. To that end, our
documentation includes features that make information available to users of assistive
technology. This documentation is available in HTML format, and contains markup to
facilitate access by the disabled community. Accessibility standards will continue to
evolve over time, and Oracle is actively engaged with other market-leading
technology vendors to address technical obstacles so that our documentation can be
accessible to all of our customers. For more information, visit the Oracle Accessibility
Program Web site at
Preface
http://www.oracle.com/accessibility/
Accessibility of Code Examples in Documentation
Screen readers may not always correctly read the code examples in this document. The
conventions for writing code require that closing braces should appear on an
otherwise empty line; however, some screen readers may not always read a line of text
that consists solely of a bracket or brace.
Accessibility of Links to External Web Sites in Documentation
This documentation may contain links to Web sites of other companies or
organizations that Oracle does not own or control. Oracle neither evaluates nor makes
any representations regarding the accessibility of these Web sites.
xiii
Page 14

TTY Access to Oracle Support Services
Oracle provides dedicated Text Telephone (TTY) access to Oracle Support Services
within the United States of America 24 hours a day, seven days a week. For TTY
support, call 800.446.2398.
Related Documents
For additional information, see the following manuals:
■ Oracle Application Server Administrator’s Guide
■ Oracle Application Server Concepts
■ Oracle Application Server High Availability Guide
Conventions
The following text conventions are used in this document:
Convention Meaning
boldface Boldface type indicates graphical user interface elements associated
italic Italic type indicates book titles, emphasis, or placeholder variables for
monospace Monospace type indicates commands within a paragraph, URLs, code
with an action, or terms defined in text or the glossary.
which you supply particular values.
in examples, text that appears on the screen, or text that you enter.
xiv
Page 15

Product and Installation Overview
This chapter describes what is contained in Oracle Application Server and
recommended topologies. It contains the following sections:
■ Section 1.1, "Product Overview"
■ Section 1.2, "Where Do I Find Installation Instructions for My Product?"
■ Section 1.3, "Recommended Topologies"
1.1 Product Overview
Oracle Application Server is made up of a middle tier and OracleAS Infrastructure.
You deploy and run your applications on the middle tiers. The infrastructure provides
services that are used by middle tiers. These services can be shared by one or more
middle tiers.
Oracle Application Server 10g (10.1.4.0.1) provides a comprehensive Identity and
Access Management solution. The Identity and Access Management Suite includes:
1
■ Oracle Internet Directory: Provides scalable, robust LDAP V3-compliant directory
services implemented on the Oracle Database.
■ Oracle Identity Federation: Provides standards-based, multi-protocol, and
cross-domain single sign-on.
■ Oracle Security Developer Tools: Provides a APIs for developing federation and
secure web services applications.
■ Oracle Access Manager: Provides a state-of-the-art solution for centralized identity
administration and access control.
■ Oracle Identity Manager: Provides a powerful and flexible enterprise identity
management system that automatically manages users’ access privileges within
enterprise IT resources.
■ Oracle Virtual Directory: Provides Internet and industry-standard LDAP and XML
views of existing enterprise identity information, without synchronizing or
moving data from its native locations.
In addition to the Identity and Access Management Suite, this release provides a
revision of OracleAS Infrastructure, which includes the following Oracle Identity
Management components and OracleAS Metadata Repository:
■ Oracle Internet Directory: A scalable, robust LDAP V3-compliant directory service
implemented on the Oracle Database.
Product and Installation Overview 1-1
Page 16

Where Do I Find Installation Instructions for My Product?
■ Oracle Directory Integration Platform: A component of Oracle Internet Directory
designed to perform directory synchronization with third party directory
products.
■ Oracle Application Server Certificate Authority: A component that issues, revokes,
renews, and publishes X.509v3 certificates to support PKI-based strong
authentication methods.
■ Oracle Application Server Single Sign-On (OracleAS Single Sign-On): Provides
single sign-on access to Oracle and third-party Web applications.
■ Oracle Delegated Administration Services: Provides trusted proxy-based
administration of directory information by users and application administrators.
■ OracleAS Metadata Repository: Provides a collection of schemas used by other
Oracle Application Server components.
■ Oracle Enterprise Manager 10g Application Server Control Console: Enables you
to manage and configure the OracleAS Infrastructure.
This guide focuses on installation instructions for OracleAS Infrastructure. See
Section 1.2, "Where Do I Find Installation Instructions for My Product?" for the
location of installation instructions for other components.
You can integrate Oracle Application Server 10g (10.1.4.0.1) Identity Management with
an existing Oracle Application Server environment that includes:
■ 10g (9.0.4), 10g Release 2 (10.1.2), or 10g Release 3 (10.1.3) middle tier
■ 10g (9.0.4) or 10g Release 2 (10.1.2) OracleAS Metadata Repository
You can integrate Oracle Application Server 10g (10.1.4.0.1) Metadata Repository with
an existing Oracle Application Server environment that includes:
■ 10g Release 2 (10.1.2) middle tier
■ 10g (9.0.4) or 10g Release 2 (10.1.2) Identity Management
See Also: Oracle Application Server Upgrade and Compatibility Guide
for more information about which specific versions are compatible
with 10g (10.1.4.0.1).
1.2 Where Do I Find Installation Instructions for My Product?
Tab le 1– 1 summarizes the products available in Oracle Application Server 10g
(10.1.4.0.1) and the books where the installation instructions are located.
Table 1–1 Product and Installation Documentation Locations
Product See This Documentation for Installation Details
OracleAS Infrastructure Chapter 4, "Installing OracleAS Infrastructure"
Oracle Identity Federation Oracle Identity Federation Administrator’s Guide
Oracle Identity Management
Grid Control Plug-in
Appendix A, "Installing the Oracle Identity Management Grid Control Plug-in"
OracleAS Metadata Repository
Oracle Application Server Metadata Repository Creation Assistant User’s Guide
in an existing database
Oracle Access Manager Oracle Access Manager Installation Guide
1-2 Oracle Application Server Installation Guide
Page 17

1.3 Recommended Topologies
Tab le 1– 2 provides a road map of where to find information about the supported 10g
(10.1.4.0.1) topologies.
Table 1–2 Recommended Topologies
Topology See This Documentation for Details
10.1.4.0.1 OracleAS Infrastructure Topologies
An Oracle Application Server instance containing
all Oracle Identity Management components in
one Oracle home.
Section 1.3.1, "Installing Oracle Identity Management in a
Single Oracle Home"
Recommended Topologies
Two Oracle Homes, one containing Oracle HTTP
Server, OracleAS Single Sign-On, and Oracle
Delegated Administration Services. and the other
containing Oracle Internet Directory and Oracle
Directory Integration Platform.
Three Oracle Homes, one containing Oracle HTTP
Server, a second containing OracleAS Single
Sign-On and Oracle Delegated Administration
Services. and a third containing Oracle Internet
Directory and Oracle Directory Integration
Platform.
An enterprise data center for J2EE applications
that uses one of the following methods for user
authentication:
■ OracleAS Single Sign-On
■ Oracle Access Manager
■ Oracle Application Server Java Authentication
and Authorization Service (JAAS) Provider
LDAP
Each of these topologies contains a web tier, an
application tier, and a data tier. The three tiers are
separated by firewalls.
Oracle Identity Federation Topologies
An Oracle Identity Federation instance configured
with OracleAS Infrastructure so that it is
integrated with OracleAS Single Sign-On.
Section 1.3.2, "Installing a Distributed Oracle Identity
Management with an Integrated Oracle HTTP Server"
Section 1.3.3, "Installing a Distributed Oracle Identity
Management with a Standalone Oracle HTTP Server"
"myJ2EECompany," in the Oracle Application Server
Enterprise Deployment Guide
"Deploying Oracle Identity Federation with OracleAS Single
Sign-On," in the Oracle Identity Federation Administrator’s
Guide
An Oracle Identity Federation instance configured
with OracleAS Infrastructure and Oracle Access
Manager.
High-Availability Topologies
An OracleAS Cluster (Identity Management)
configuration in which two or more Oracle
Identity Management instances serve the same
content. A load balancer distributes requests
equally among the active instances.
An OracleAS Cold Failover Cluster configuration
in which two or more OracleAS Infrastructure or
Oracle Identity Management instances serve the
same content, but only one instance is active at any
one time.
"Deploying Oracle Identity Federation with Oracle Access
Manager," in the Oracle Identity Federation Administrator’s
Guide
Chapter 9, "Installing in High Availability Environments:
OracleAS Cluster (Identity Management)"
Chapter 8, "Installing in High Availability Environments:
OracleAS Cold Failover Cluster"
Product and Installation Overview 1-3
Page 18

Recommended Topologies
Table 1–2 (Cont.) Recommended Topologies
Topology See This Documentation for Details
An OracleAS Disaster Recovery configuration in
which a standby site mirrors a production site.
Chapter 10, "Installing in High Availability Environments:
OracleAS Disaster Recovery"
During normal operation, the production site
handles all the requests. If the production site goes
down, the standby site takes over and handles all
the requests.
An active-active topology in which two or more
Oracle Access Manager instances serve the same
"High Availability for Oracle Access Manager" in the Oracle
Application Server High Availability Guide
content. A load balancer distributes requests
equally among the active instances.
An OracleAS Cold Failover Cluster configuration
in which two or more Oracle Identity Federation
instances serve the same content, but only one
instance is active at any one time.
OracleAS Cold Failover Cluster or Real
Application Clusters configurations for OracleAS
Metadata Repository.
10.1.4.0.1 OracleAS Infrastructure with Existing
10.1.2 or 10.1.3 Environments
10.1.2 or 10.1.3 Middle Tiers: Configure a 10g
Release 2 (10.1.2) or 10g Release 3 (10.1.3)
middle-tier instance to use a new 10g (10.1.4.0.1)
OracleAS Infrastructure.
This topology also supports associating a 10g
Release 2 (10.1.2) or 10g Release 3 (10.1.3)
middle-tier instance with a new 10g (10.1.4.0.1)
Oracle Identity Management for the following
scenarios:
■ Moving to a new host
■ Creating a failover environment
■ Moving applications from a test environment
to a new production environment
"High Availability for Oracle Identity Federation" in the
Oracle Application Server High Availability Guide
"High Availability for OracleAS Metadata Repository" in the
Oracle Application Server High Availability Guide
"Configuring 10.1.2 and 10.1.3 Middle Tiers to Use OracleAS
Infrastructure" in the Oracle Application Server
Administrator’s Guide
"Moving Identity Management to a New Host" in Oracle
Application Server Administrator’s Guide
"Changing from a Test to a Production Environment" in the
Oracle Application Server Administrator’s Guide
The remainder of this section addresses the recommended topologies for installing
OracleAS Infrastructure instances. It contains the following topics:
■ Section 1.3.1, "Installing Oracle Identity Management in a Single Oracle Home"
■ Section 1.3.2, "Installing a Distributed Oracle Identity Management with an
Integrated Oracle HTTP Server"
■ Section 1.3.3, "Installing a Distributed Oracle Identity Management with a
Standalone Oracle HTTP Server"
1.3.1 Installing Oracle Identity Management in a Single Oracle Home
This topology has all of the Oracle Identity Management components installed in the
same Oracle home, as depicted in Figure 1–1. This topology can be associated with a
10g Release 2 (10.1.2) or 10g Release 3 (10.1.3) middle tier.
1-4 Oracle Application Server Installation Guide
Page 19
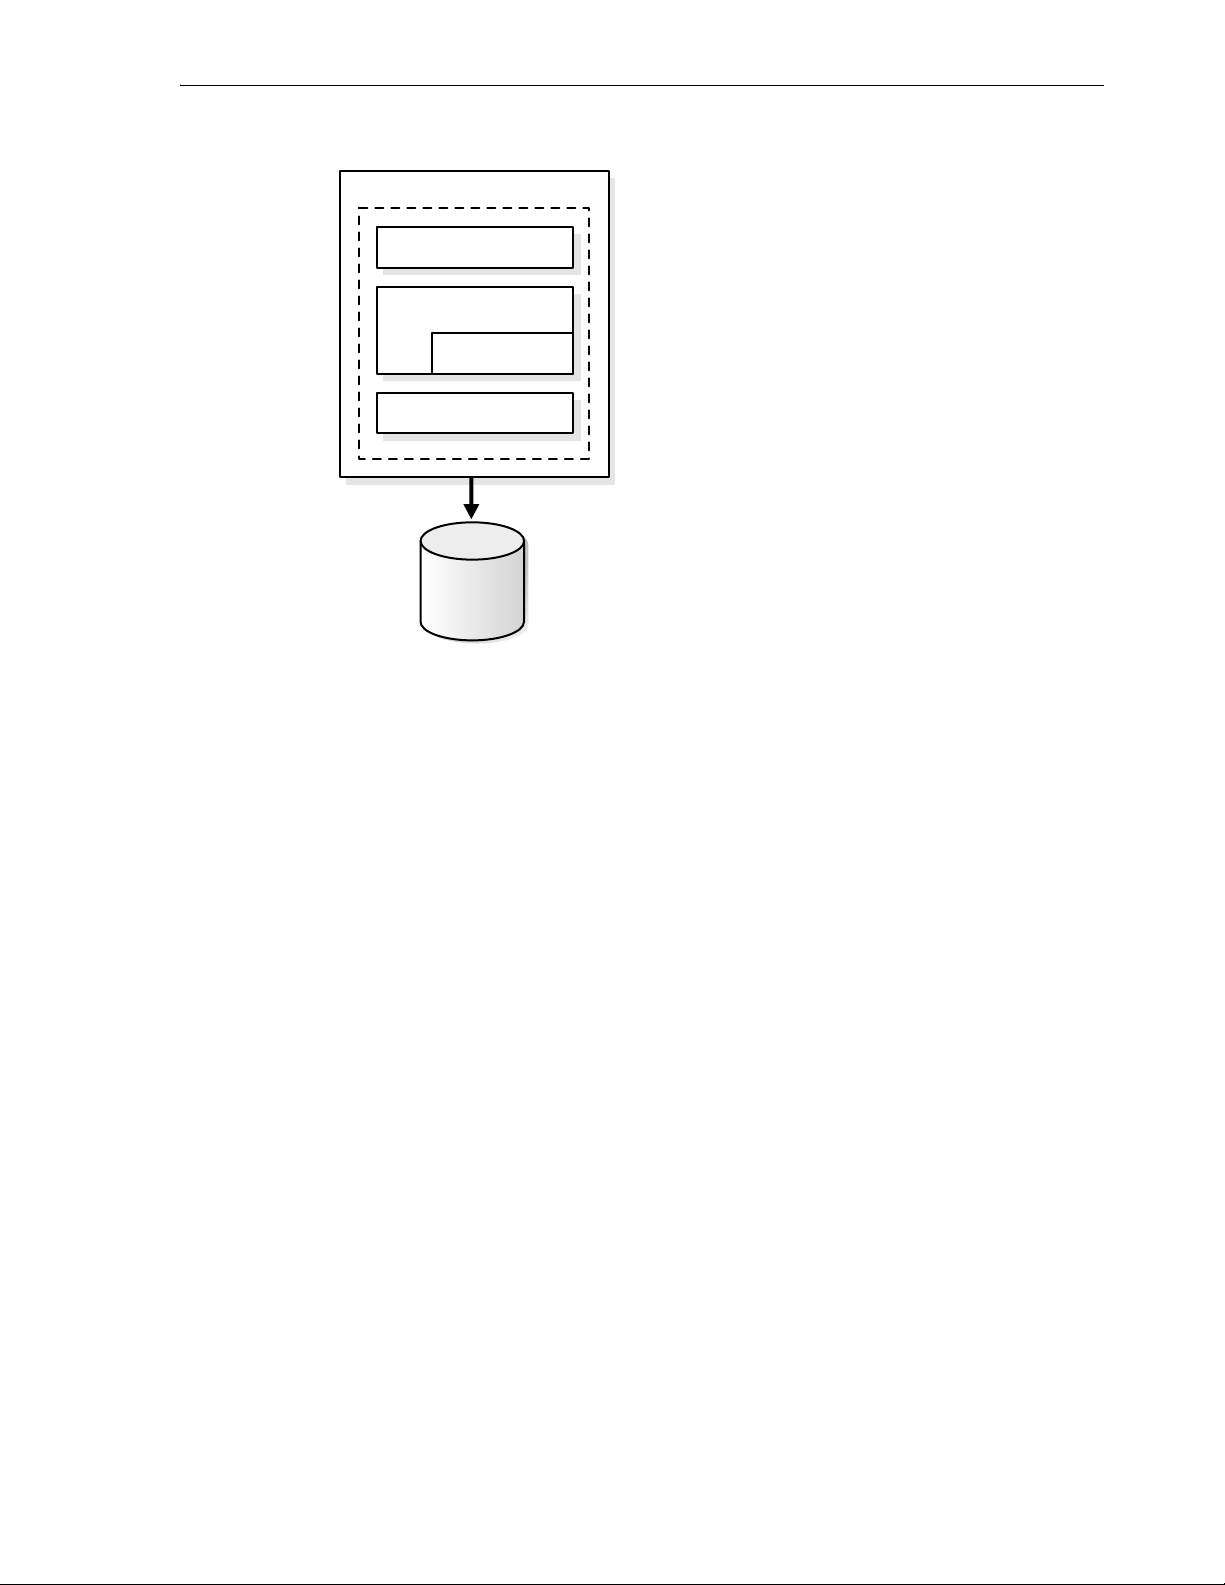
Figure 1–1 Oracle Identity Management in a Single Oracle Home
Oracle Home 1
Oracle HTTP Server
OC4J
SSO / DAS
Application Server
Control
OID / DIP
OracleAS
Metadata
Repository
Recommended Topologies
Requirements
The requirements are the same as those listed in Chapter 2, "Requirements".
Installation Sequence
Perform an installation of Oracle Identity Management as described in Section 4.23,
"Installing Oracle Identity Management Components Only (Including Oracle Internet
Directory)".
It is recommended that you install OracleAS Metadata Repository in an existing
database. See the Oracle Application Server Metadata Repository Creation Assistant User’s
Guide for details.
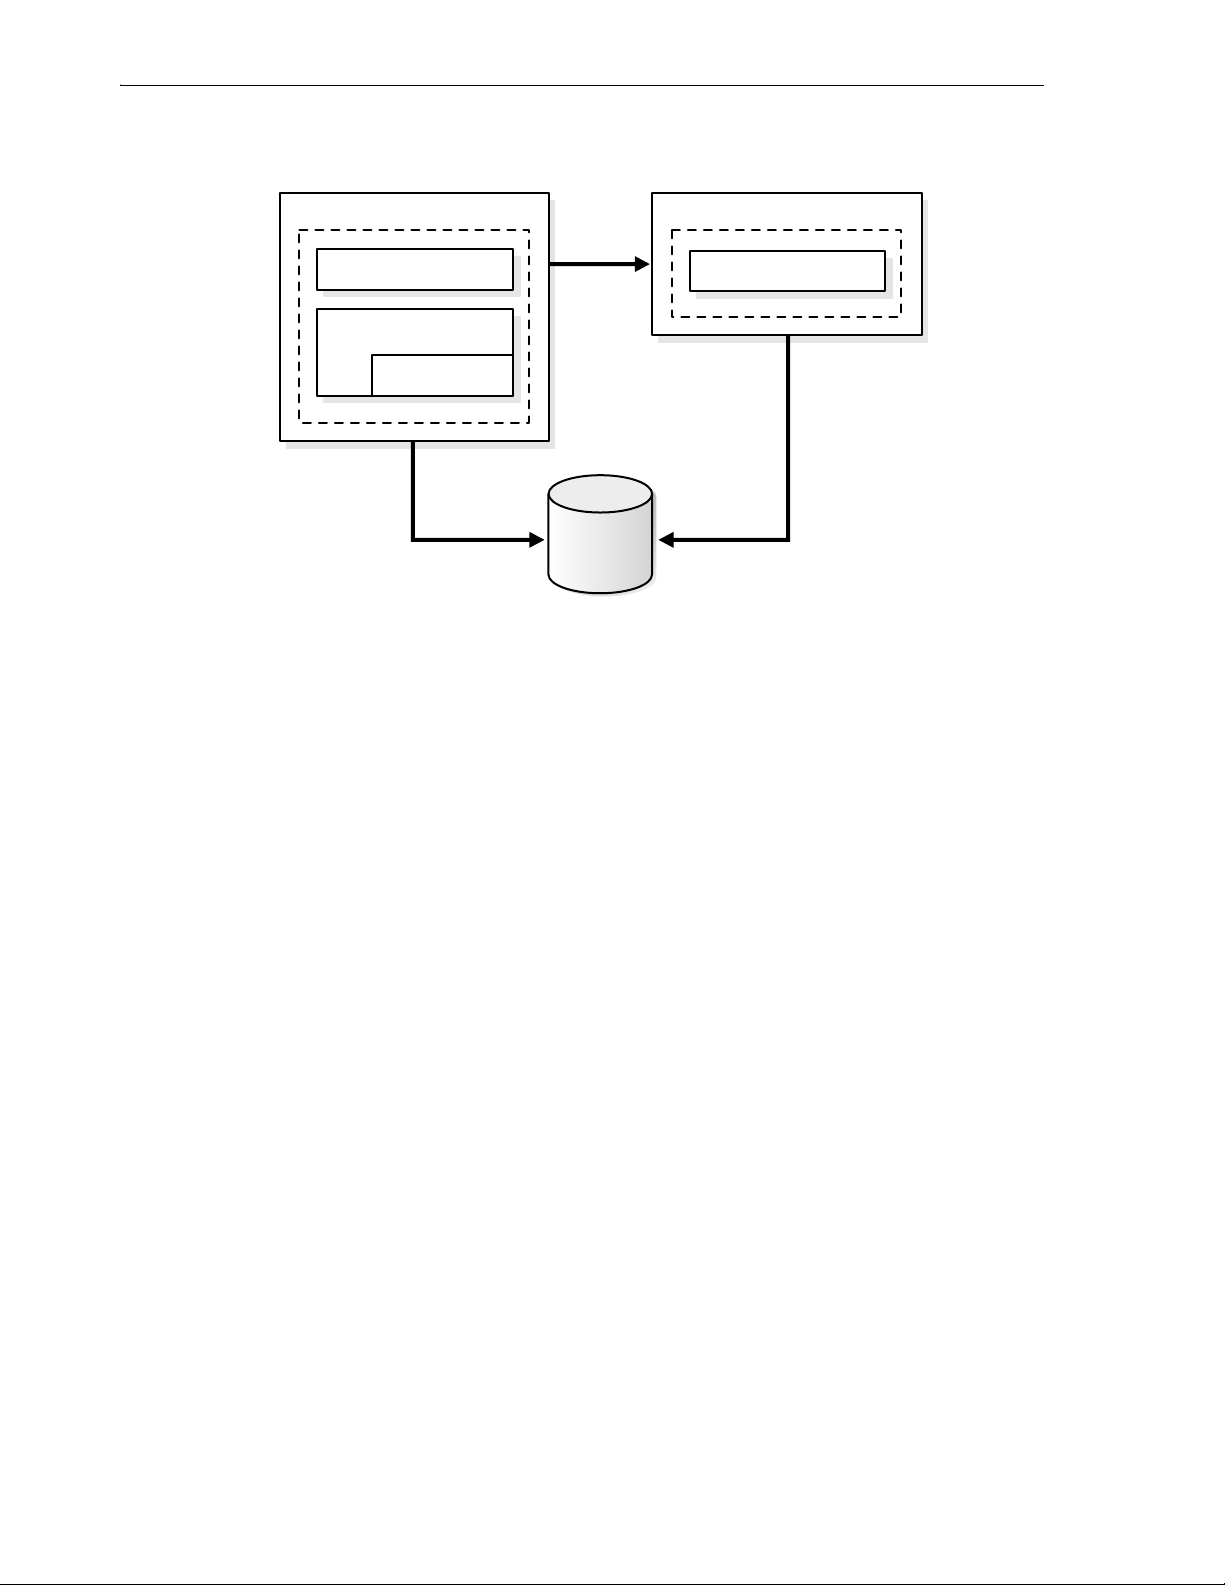
1.3.2 Installing a Distributed Oracle Identity Management with an Integrated Oracle HTTP Server
In this topology, there are two Oracle Homes as depicted in Figure 1–2. The first Oracle
Home contains Oracle HTTP Server, OracleAS Single Sign-On, and Oracle Delegated
Administration Services. The second Oracle Home contains Oracle Internet Directory
and Oracle Directory Integration Platform. This topology can be associated with a 10g
Release 2 (10.1.2) or 10g Release 3 (10.1.3) middle tier.
Product and Installation Overview 1-5
Page 20
Recommended Topologies
Figure 1–2 Cluster with a Distributed Oracle Identity Management with an Integrated
Oracle HTTP Server
Oracle Home 1
Oracle HTTP Server
Oracle Home 2
OID / DIP
OC4J
SSO / DAS
Application Server
Control
Host 1
OracleAS
Metadata
Repository
Requirements
The requirements are the same as those listed in Chapter 2, "Requirements".
Installation Sequence
To install this topology:
1. Install OracleAS Metadata Repository on a shared disk. It is recommended that
you install OracleAS Metadata Repository in an existing database. See the Oracle
Application Server Metadata Repository Creation Assistant User’s Guide for details.
2. For Oracle Home 2, follow the installation instructions in Section 4.23, "Installing
Oracle Identity Management Components Only (Including Oracle Internet
Directory)". On the Select Configuration Options screen, perform the following
steps:
■ Select Oracle Internet Directory.
■ Do not select Oracle Application Server Single Sign-On.
■ Do not select Oracle Application Server Delegated Administration Services.
■ Select Oracle Directory Integration Platform.
■ Do not select Oracle Application Server Certificate Authority (OCA).
■ Select High Availability and Replication.
3. For Oracle Home 1, follow the installation instructions in Section 4.24, "Installing
Oracle Identity Management Components Only (Excluding Oracle Internet
Directory)". On the Select Configuration Options screen, perform the following
steps:
■ Do not select Oracle Internet Directory.
■ Select Oracle Application Server Single Sign-On.
■ Select Oracle Application Server Delegated Administration Services.
■ Do not select Oracle Directory Integration Platform.
■ Do not select Oracle Application Server Certificate Authority (OCA).
1-6 Oracle Application Server Installation Guide
Page 21
Recommended Topologies
■ Select High Availability and Replication.
4. On Oracle Home 2, perform the following commands to disable Oracle HTTP
Server:
a. Edit the ORACLE_HOME/opmn/bin/opmn.xml file to change the Oracle
HTTP Server status to disabled, as shown in bold.
<ias-component id="HTTP_Server" status="disabled" > <process-type
id="HTTP_Server" module-id="OHS"> <module-data>...</ias-component>
b. Perform the following command to stop OPMN:
prompt> ORACLE_HOME/opmn/bin/opmnctl stopall
c. Perform the following command to start OPMN:
prompt> ORACLE_HOME/opmn/bin/opmnctl startall
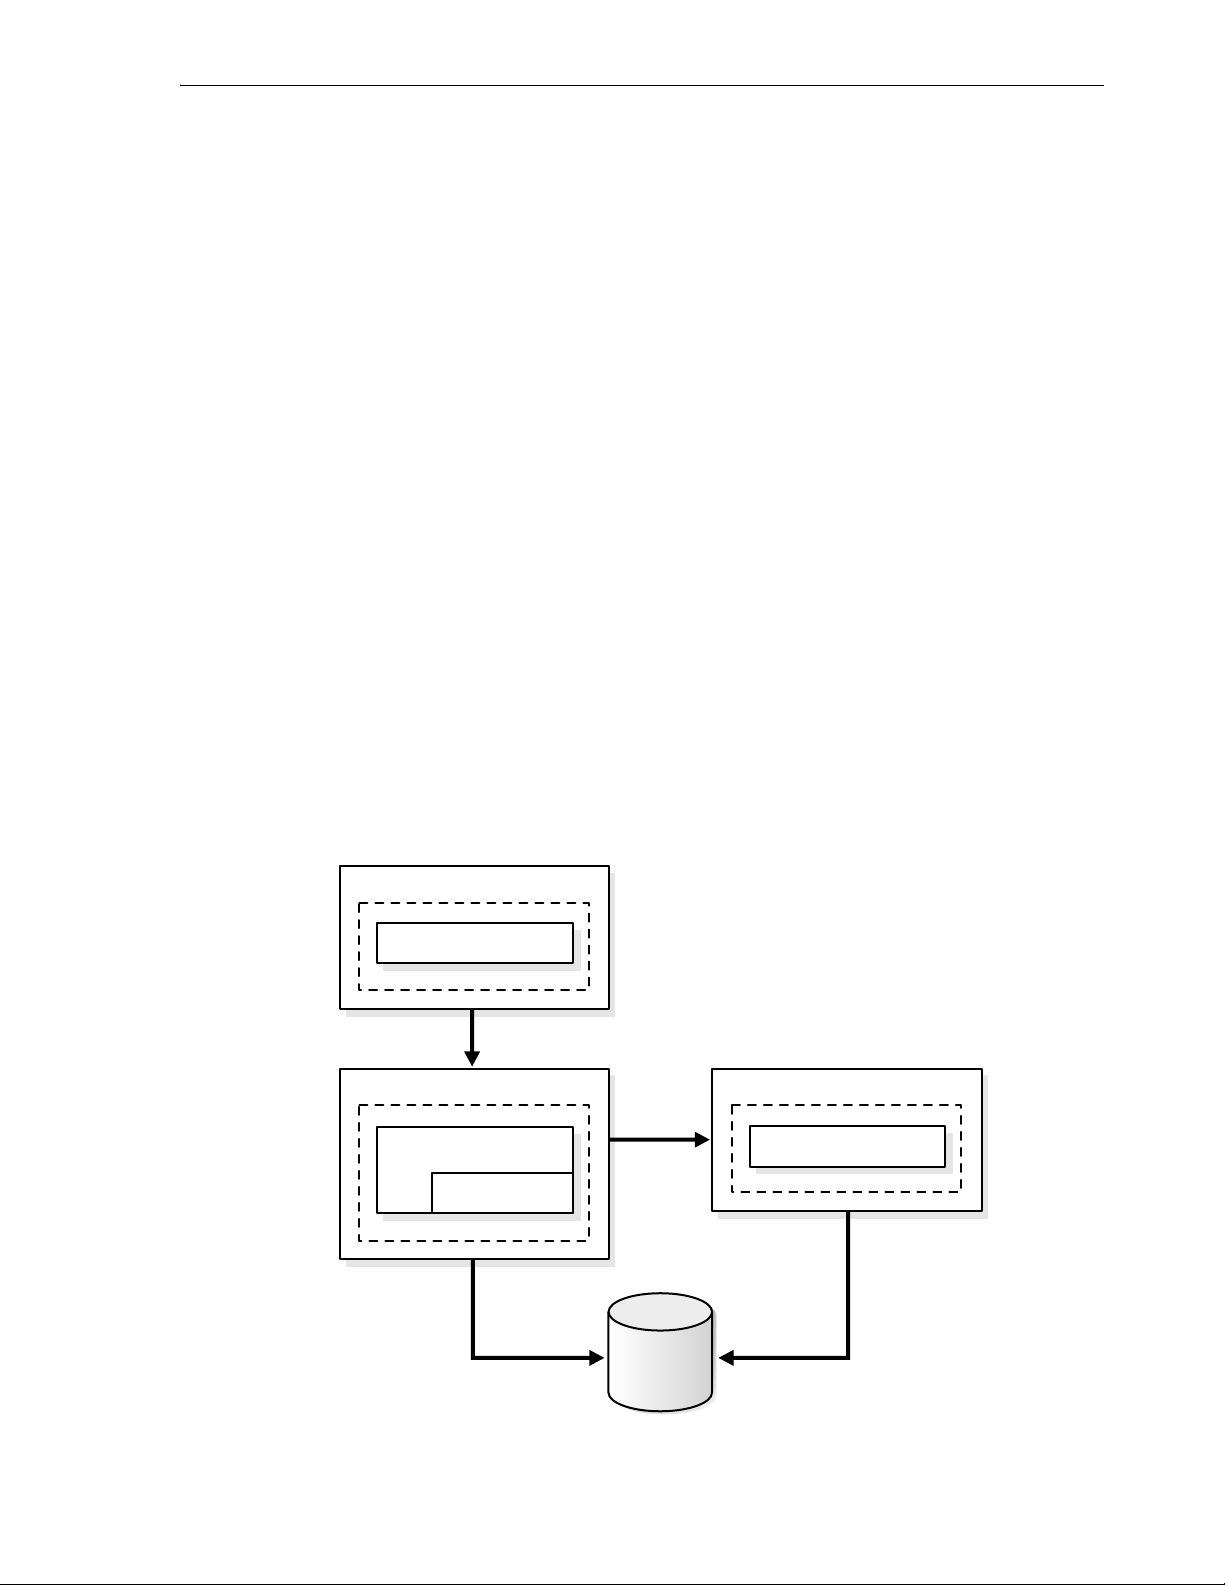
1.3.3 Installing a Distributed Oracle Identity Management with a Standalone Oracle HTTP Server
In this topology, there are three Oracle Homes as depicted in Figure 1–3. The first
Oracle Home contains Oracle HTTP Server. The second Oracle Home contains
OracleAS Single Sign-On and Oracle Delegated Administration Services. The second
Oracle Home contains Oracle Internet Directory and Oracle Directory Integration
Platform. This topology can be associated with a 10g Release 2 (10.1.2) or 10g Release 3
(10.1.3) middle tier.
Figure 1–3 Cluster with a Distributed Oracle Identity Management with a Standalone
Oracle HTTP Server
Oracle Home 1
Oracle HTTP Server
Oracle Home 2
OC4J
SSO / DAS
Application Server
Control
OracleAS
Metadata
Repository
Oracle Home 3
OID / DIP
Product and Installation Overview 1-7
Page 22

Recommended Topologies
Requirements
The requirements are the same as those listed in Chapter 2, "Requirements".
Installation Sequence
To install this topology:
1. Install OracleAS Metadata Repository on a shared disk. It is recommended that
2. Install Oracle HTTP Server with Apache 2.0 from Oracle Application Server
3. For Oracle Home 3, follow the installation instructions in Section 4.23, "Installing
you install OracleAS Metadata Repository in an existing database. See Oracle
Application Server Metadata Repository Creation Assistant User’s Guide for details.
Companion CD, included in the 10g Release 2 (10.1.2) or 10g Release 3 (10.1.3) CD
Pack.
Oracle Identity Management Components Only (Including Oracle Internet
Directory)". On the Select Configuration Options screen, perform the following
steps:
■ Select Oracle Internet Directory.
■ Do not select Oracle Application Server Single Sign-On.
■ Do not select Oracle Application Server Delegated Administration Services.
■ Select Oracle Directory Integration Platform.
■ Do not select Oracle Application Server Certificate Authority (OCA).
■ Select High Availability and Replication.
4. For Oracle Home 2, follow the installation instructions in Section 4.24, "Installing
Oracle Identity Management Components Only (Excluding Oracle Internet
Directory)". On the Select Configuration Options screen, perform the following
steps:
■ Do not select Oracle Internet Directory.
■ Select Oracle Application Server Single Sign-On.
■ Select Oracle Application Server Delegated Administration Services.
■ Do not select Oracle Directory Integration Platform.
■ Do not select Oracle Application Server Certificate Authority (OCA).
■ Select High Availability and Replication.
5. On Oracle Home 2 and 3, perform the following commands to disable Oracle
HTTP Server:
a. Edit the ORACLE_HOME/opmn/bin/opmn.xml file to change the Oracle
HTTP Server status to disabled, as shown in bold.
<ias-component id="HTTP_Server" status="disabled" > <process-type
id="HTTP_Server" module-id="OHS"> <module-data>...</ias-component>
b. Perform the following command to stop OPMN:
prompt> ORACLE_HOME/opmn/bin/opmnctl stopall
c. Perform the following command to start OPMN:
prompt> ORACLE_HOME/opmn/bin/opmnctl startall
1-8 Oracle Application Server Installation Guide
Page 23

Recommended Topologies
Configure the standalone Oracle HTTP Server in Oracle Home 1. See "Configuring
6.
Standalone Oracle HTTP Server with Oracle Application Server" in Oracle HTTP
Server Administering a Standalone Deployment Based on Apache 2.0 in the 10g Release
2 (10.1.2) or 10g Release 3 (10.1.3) documentation library.
Product and Installation Overview 1-9
Page 24

Recommended Topologies
1-10 Oracle Application Server Installation Guide
Page 25

2
Requirements
Before installing Oracle Application Server, ensure that your computer meets the
requirements described in this chapter.
Table 2–1 Sections in This Chapter
Section Highlights
Section 2.1, "Using OracleMetaLink to Obtain
the Latest Oracle Application Server
Hardware and Software Requirements"
Section 2.2, "System Requirements" Lists requirements such as supported processor speed, memory,
Section 2.3, "Software Requirements" Lists requirements such as supported operating systems,
Section 2.4, "Kernel Parameters" Lists required values for kernel parameters.
Section 2.5, "Ports" Describes how to configure components to use ports other than
Section 2.6, "Operating System Groups" Describes why the operating system user who installs Oracle
Describes how to find the most current requirements for Oracle
Application Server 10g (10.1.4.0.1).
disk space, and swap space.
operating system patches, software packages, and Linux x86-64
certification informations.
the default ports.
Application Server should belong to certain operating system
groups.
Section 2.7, "Operating System User" Describes why you should create an operating system user to
Section 2.8, "Environment Variables" Describes how to set or unset environment variables required for
Section 2.9, "The /etc/hosts File" Describes how the installer uses the information in the hosts file.
Section 2.10, "Network Topics" Describes network issues such as installing Oracle Application
Section 2.11, "Prerequisite Checks Performed
by the Installer"
install Oracle Application Server.
installation.
This section also describes how to specify the same information
without editing the file.
Server on a remote computer, using a remote
CD-ROM/DVD-ROM drive, or installing from a hard disk.
Lists the items checked by the installer, such as length of the
Oracle home name and whether or not the Oracle home directory
already contains another Oracle product.
2.1 Using OracleMetaLink to Obtain the Latest Oracle Application Server Hardware and Software Requirements
The Oracle Application Server 10g (10.1.4.0.1) hardware and software requirements
included in this guide were accurate at the time this manual was released to
Requirements 2-1
Page 26

System Requirements
manufacturing. For the most up-to-date information about hardware and software
requirements, refer to OracleMetaLink:
http://metalink.oracle.com/
After logging into OracleMetaLink, click Certify. From the resulting Web page, you can
view the latest certifications by product, platform, and product availability.
2.2 System Requirements
Tab le 2– 2 lists the system requirements for running Oracle Application Server. The
installer checks many of these requirements at the start of the installation process and
warns you if any of them is not met. To save time, you can manually check only the
ones that are not checked by the installer. Refer to Tab le 2 –2 to see which requirements
are not checked by the installer.
You can also run the system checks performed by the installer without doing an
installation, by running the runInstaller command as shown. The runInstaller
command is on the Oracle Application Server CD-ROM (Disk 1) or DVD-ROM (in the
application_server directory).
CD-ROM:
prompt> mount_point/1014disk1/runInstaller -executeSysPrereqs
DVD-ROM:
prompt> mount_point/application_server/runInstaller -executeSysPrereqs
The results are displayed on the screen as well as written to a log file. For more
information on the types of checks performed, see Section 2.11, "Prerequisite Checks
Performed by the Installer".
Table 2–2 System Requirements
Item Requirement
Operating system HP-UX 11i Version 2 (11.23) Itanium or higher
See Section 2.3, "Software Requirements" for a list of required patches.
Checked by Installer: Yes
Network You can install Oracle Application Server on a computer that is connected to a network, or
IP The computer’s IP address must be static. Oracle Application Server does not support
on a "standalone" computer (not connected to the network).
If you are installing
connect the computer to a network after installation. You have to perform some
configuration tasks when you connect it to the network; see theOracle Application Server
Administrator’s Guide for details.
Checked by Installer: No
HP-UX systems using DHCP.
Oracle Application Server supports DHCP computers on Linux and Microsoft Windows.
Checked by Installer: No
Oracle Application Server on a standalone computer, you can
Hostname Ensure that your hostnames are not longer than 255 characters.
Checked by Installer: No
2-2 Oracle Application Server Installation Guide
Page 27

System Requirements
Table 2–2 (Cont.) System Requirements
Item Requirement
Processor type 64-bit HP-UX Itanium processor
To determine the processor type, run the following command:
prompt> /usr/bin/getconf KERNEL_BITS
Checked by Installer: No
Processor speed 400 MHz or faster
Checked by Installer: Yes
Memory The memory requirements provided for the various installation types represents enough
physical memory to install and run Oracle Application Server. However, for most
production sites, you should configure at least 1 GB of physical memory. For sites with
substantial traffic, increasing the amount of memory further may improve your
performance. For Java applications, you should either increase the maximum heap allocated
to the OC4J processes, or configure additional OC4J processes to utilize this memory. See the
Oracle Application Server Performance Guide for details.
To determine the optimal amount of memory for your installation, the best practice is to
load test your site. Resource requirements can vary substantially for different applications
and different usage patterns. In addition, some operating system utilities for monitoring
memory can overstate memory usage (partially due to the representation of shared
memory). The preferred method for determining memory requirements is to monitor the
improvement in performance resulting from the addition of physical memory in your load
test. Refer to your platform vendor documentation for information on how to configure
memory and processor resources for testing purposes.
OracleAS Infrastructure:
■ OracleAS Metadata Repository and Identity Management: 1 GB
■ Identity Management only: 1 GB
■ OracleAS Metadata Repository only: 1 GB
Oracle Identity Federation: 512 MB
Note:
■ The installer checks the amount of memory on your computer and will warn you if
your computer does not meet the minimum memory requirements.
To determine the amount of memory, enter the following command:
# /usr/sbin/dmesg | grep "Physical"
Checked by Installer: Yes
Requirements 2-3
Page 28

System Requirements
Table 2–2 (Cont.) System Requirements
Item Requirement
Disk space OracleAS Infrastructure:
■ OracleAS Metadata Repository and Oracle Identity Management: 6.5 GB
You can install the data files for the OracleAS Metadata Repository database on a disk
that is different from the disk where you are installing OracleAS Infrastructure. If you
do this, make sure the disk for the Oracle Home has at least 3.5 GB of free space and the
disk for the data files has at least 3.0 GB of free space.
■ Oracle Identity Management only: 3 GB
■ OracleAS Metadata Repository only: 6.5 GB
Oracle Identity Federation: 2.3 GB
The installer may display inaccurate disk space requirement figures. Refer to the figures
listed above for disk space requirements.
To determine the amount of free disk space, use the bdf command:
prompt> bdf dir
Replace dir with the Oracle home directory or with the parent directory if the Oracle home
directory does not exist yet. For example, if you plan to install
Server in /opt/oracle/infra, you can replace dir with /opt/oracle or
/opt/oracle/infra.
Checked by Installer: No
Space in /tmp or
directory
400 MB
To determine the amount of free disk space in the /tmp directory, use the bdf command:
prompt> bdf /tmp
Oracle Application
If the /tmp directory does not have enough free space, you can specify a different directory
by setting the TMP or TMPDIR environment variable. See Section 2.8.5, "TMP and TMPDIR"
for details.
Checked by Installer: Yes
Swap space 1.5 GB of available swap space
To determine the amount of available swap space, use the following command:
prompt> # /usr/sbin/swapinfo -a
If necessary, see your operating system documentation for information on
how to configure additional swap space.
Checked by Installer: Yes
Supported browsers Oracle Enterprise Manager 10g is supported on the following browsers:
■ Microsoft Internet Explorer 6.0 SP2 (supported on Microsoft Windows only)
■ Netscape 7.2
■ Mozilla 1.7. You can download Mozilla from http://www.mozilla.org.
■ Firefox 1.0.4. You can download Firefox from http://www.mozilla.org.
■ Safari 1.2, 2.0 (on Apple Macintosh computers)
For the most current list of supported browsers, check the
OracleMetaLink site
(http://metalink.oracle.com).
Checked by Installer: No. However, if you access
Oracle Enterprise Manager 10g
using a non-supported browser, you will get a warning message.
2-4 Oracle Application Server Installation Guide
Page 29

2.2.1 Installing from the Console or X Windows
If you are performing the installation from the console or X Windows, then add the
following line to the /etc/pam.d/xdm file:
session required pam_limits.so
2.2.2 Tips for Reducing Memory Usage
If you need to reduce memory consumption:
■ Configure only the components that you need.
■ After installation, start up only the components that you need. See the Oracle
Application Server Administrator’s Guide for details.
■ Run Application Server Control only when you need to administer an instance. In
most cases, you do not need Application Server Control running all the time.
If you are running multiple Oracle Application Server instances on one computer,
each Application Server Control can consume a lot of memory. Running
Application Server Control only when you need it can free up memory for other
components.
Software Requirements
■ Configure Application Server Control so that it can manage multiple instances. See
the Oracle Application Server Administrator’s Guide for details.
2.3 Software Requirements
Check that the software listed in Ta bl e 2– 3 is installed on the system. The procedure
that follows the table describes how to ensure the correct software is installed on the
system.
Note: Oracle Application Server 10g (10.1.4.0.1) is certified with the
following Operating System specific software. For the most current list
of supported Operating System specific software, for example JDK
version, Operating System version, check OracleMetaLink
(http://metalink.oracle.com).
Table 2–3 Software Requirements for HP-UX 11i version 2 Itanium Systems
Item Requirement
Operating
System
HP-UX 11i Version 2 (11.23) Itanium or higher
Requirements 2-5
Page 30

Software Requirements
Table 2–3 (Cont.) Software Requirements for HP-UX 11i version 2 Itanium Systems
Item Requirement
Patches for 11.11
(or higher
versions)
■ BUNDLE11i B.11.23.0409.3 (Patch Bundle for HP-UX 11i v2 (B.11.23),
September 2004)
■ PHSS_31850 (11.23 assembler patch)
■ PHSS_31851 (11.23 Integrity Unwind Library)
■ PHSS_31854 (11.23 milli cumulative patch)
■ PHSS_31855 (11.23 aC++ Runtime (IA: A.05.60, PA A.03.60))
■ PHSS_33275 + PHSS_32213 (11.23 linker + fdp cumulative patch)
■ PHSS_33276 (11.23 Math Library Cumulative Patch)
The following patches are required by JDK 1.4.2.05 or higher. JDK 1.4.2.05
is installed with this release. Refer to the HP Support site for a list of all
JDK patches.
■ PHCO_31553: pthread library cumulative patch
■ PHKL_31500: 11.23 Sept04 base patch
■ PHSS_32213: 11.23 Aries cumulative patch
The following patches are required if ANSI C and C++ are installed on
the system:
■ PHSS_33278: aC++ Compiler (A.06.02)
■ PHSS_33277: HP C Compiler (A.06.02)
■ PHSS_33279: u2comp/be patch
To ensure that the system meets these requirements, follow these steps:
1. To determine which version of HP-UX Itanium is installed, enter the following
command:
# uname -a
HP-UX hostname B.11.23 U ia64 1221911087 unlimited-user license
In this example, the version of HP-UX Itanium 11i is 11.23.
2. To determine whether the bundle is installed, enter the following command:
# /usr/sbin/swlist | grep BUNDLE
If the bundle is not installed, download it from the following Web site and install
it:
http://www.software.hp.com/SUPPORT_PLUS/qpk.html
To determine whether a bundle or product is installed, enter the following
3.
command:
# /usr/sbin/swlist -l product | more
If a required product is not installed, you must install it. See your operating
system or software documentation for information about installing products.
4. To determine whether a patch is installed, enter a command similar to the
following:
# /usr/sbin/swlist -l patch | grep PHKL_29198
Alternatively, to list all installed patches, enter the following command:
2-6 Oracle Application Server Installation Guide
Page 31

# /usr/sbin/swlist -l patch | more
If a required patch is not installed, download it from the following URL and install
it:
http://itresourcecenter.hp.com
2.4 Kernel Parameters
The computers on which you plan to install OracleAS Metadata Repository require
their kernel parameters to be set to the minimum values listed in the following
sections:
■ Section 2.4.1, "Kernel Parameter Settings for OracleAS Metadata Repository"
2.4.1 Kernel Parameter Settings for OracleAS Metadata Repository
Verify that the kernel parameters shown in the following table are set either to the
formula shown, or to values greater than or equal to the recommended value shown.
The procedures following the table describe how to verify and set the values.
Parameter Recommended Formula or Value
Kernel Parameters
ksi_alloc_max (nproc*8)
max_thread_proc 3000
maxdsiz 2063835136 (2 GB)
maxdsiz_64bit 2147483648 (2 GB)
maxfiles 2048
maxfiles_lim 2048
maxssiz 134217728 (128 MB)
maxssiz_64bit 1073741824 (1 GB)
maxuprc ((nproc*9)/10)
msgmap (2+msgmni)
msgmni 4096
msgseg 32767
msgtql 4096
ncsize (ninode+1024)
nfile (15*nproc+2048)
nflocks 4096
ninode (8*nproc+2048)
nkthread (((nproc*7)/4)+16)
nproc 4096
semmni 4096
semmns (semmni*2)
semmnu (nproc-4)
semvmx 32767
Requirements 2-7
Page 32

Por ts
Parameter Recommended Formula or Value
shmmax The size of physical memory or 0X40000000 (1073741824), whichever
is greater.
Note: To avoid performance degradation, the value should be greater
than or equal to the size of the SGA.
shmmni 512
shmseg 120
tcp_conn_request_max 2048
vps_ceiling 64
To view the current value specified for these kernel parameters, and to change them if
necessary, follow these steps:
1. Optionally, set the DISPLAY environment variable to specify the display of the
local system:
■ Bourne, Bash, or Korn shell:
$ DISPLAY=localhost:0.0 ; export DISPLAY
2.5 Ports
■ C shell:
$ setenv DISPLAY localhost:0.0
2. Start System Administration Manager (SAM):
# /usr/sbin/sam
3. Choose the Kernel Configuration area, then choose the Configurable Parameters
area.
4. Check the value or formula specified for each of these parameters and, if
necessary, modify that value or formula.
If necessary, see the SAM online help for more information on completing this
step.
5. Exit from SAM.
6. If you modified the value specified for any parameter, reboot the system:
# /sbin/shutdown -r now
7. If necessary, when the system restarts, log in and switch user to root.
Many Oracle Application Server components, such as Oracle HTTP Server, OracleAS
Web Cache, and Oracle Enterprise Manager 10g, use ports. You can have the installer
assign default port numbers, or use port numbers that you specify.
■ Section 2.5.1, "Checking If a Port Is in Use"
■ Section 2.5.2, "Using Default Port Numbers"
■ Section 2.5.3, "Using Custom Port Numbers (the "Static Ports" Feature)"
■ Section 2.5.4, "If Port 1521 Is in Use"
2-8 Oracle Application Server Installation Guide
Page 33

Why the Default Port for Oracle HTTP Server Is Port 7777 and Not Port 80
By default, the installer configures Oracle HTTP Server to use port 7777, not port 80.
Port 7777 is the default port because on UNIX, components that use port numbers
lower than 1024 require additional steps to be done as the root user before the
components can run. Because the installer does not have root access, it has to use a
port greater than 1024.
If you want Oracle HTTP Server to use a different port, such as port 80, use the "static
ports" feature, which enables you to specify port numbers for components. Although
you can change the port number after installation, it is easier to set the port number
during installation.
2.5.1 Checking If a Port Is in Use
To check if a port is being used, you can run the netstat command as follows:
prompt> netstat -an | grep portnum
2.5.2 Using Default Port Numbers
If you want to use the default port numbers for components, you do not have to do
anything. See Appendix C, "Default Port Numbers" for a list of the default port
numbers and ranges. Make sure that at least one port is available in the port range for
each component. If the installer is unable to find a free port in the range, the
installation will fail.
Por ts
Requirements 2-9
Page 34

Por ts
Note:
■ In the default configuration of the /etc/services file
includes ports 389 and 636 (for LDAP and LDAP/SSL). These
happen to be the default ports for Oracle Internet Directory.
This means that if you want to use these port numbers for
Oracle Internet Directory, you must either delete or comment
out these lines in the /etc/services file. To comment out a
line, add a # at the beginning of the line, as shown:
# ldap 389/tcp # Lightweight Directory Access Protocol
# ldap 389/udp # Lightweight Directory Access Protocol
# ldaps 636/tcp # LDAP protocol over TLS/SSL (was sldap)
# ldaps 636/udp # LDAP protocol over TLS/SSL (was sldap)
If you do not comment out or remove the lines from /etc/services,
then the installer will not assign ports 389 and 636. It assigns a number
from the port number range for Oracle Internet Directory. Refer to
Appendix C.2, "Default Port Numbers" for a list of default port
numbers.
■ The installer will not assign port numbers that are specified in
the /etc/services file. If you do not want the installer to
assign a specific port number, then add the port number to the
/etc/services file. For example, if you want to reserve port
7777 for an application, you can add something like the
following line to /etc/services:
myApplication 7777/tcp
The installer will not assign port 7777 to any component if this line
exists in the /etc/services file.
2.5.3 Using Custom Port Numbers (the "Static Ports" Feature)
To instruct the installer to assign custom port numbers for components:
1. Create a file containing the component names and port numbers. Section 2.5.3.1,
"Format of the staticports.ini File" describes the file format. This file is typically
called the staticports.ini file, but you can name it anything you want.
2. In the installer, on the Specify Port Configuration Options screen, select Manual
and enter the full path to the staticports.ini file.
If you do not specify the full path to the file, the installer will not be able to find
the file. The installer will then assign default ports for all the components, and it
will do this without displaying any warning.
Difference from Previous Release: In 10g (9.0.4), you used
command-line options to specify the staticports.ini file. In this release,
you specify the file in the new Specify Port Configuration Options
screen.
2.5.3.1 Format of the staticports.ini File
The staticports.ini file has the following format. Replace port_num with the port
number that you want to use for the component.
# J2EE and HTTP Server
2-10 Oracle Application Server Installation Guide
Page 35

Por ts
Oracle HTTP Server port = port_num
Oracle HTTP Server Listen port = port_num
Oracle HTTP Server SSL port = port_num
Oracle HTTP Server Listen (SSL) port = port_num
Oracle HTTP Server Diagnostic port = port_num
Java Object Cache port = port_num
DCM Discovery port = port_num
Oracle Notification Server Request port = port_num
Oracle Notification Server Local port = port_num
Oracle Notification Server Remote port = port_num
Application Server Control port = port_num
Application Server Control RMI port = port_num
Oracle Management Agent port = port_num
Log Loader port = port_num
ASG port = port_num
# Infrastructure
Oracle Internet Directory port = port_num
Oracle Internet Directory (SSL) port = port_num
Oracle Certificate Authority SSL Server Authentication port = port_num
Oracle Certificate Authority SSL Mutual Authentication port = port_num
The easiest way to create the file is to use the staticports.ini file on the CD-ROM
(Disk 1) or DVD-ROM as a template:
1. Copy the staticports.ini file from the CD-ROM or DVD-ROM to your hard
disk.
Table 2–4 Location of the staticports.ini File on CD-ROM and DVD-ROM
Media Location of staticports.ini File
CD-ROM Disk 1: mount_point/1014disk1/stage/Response/staticports.ini
DVD-ROM mount_point/application_server/stage/Response/staticports.ini
2. Edit the local copy (the file on the hard disk) to include the desired port numbers.
You do not need to specify port numbers for all components in the
staticports.ini file. If a component is not listed in the file, the installer uses
the default port number for that component.
Note that the staticports.ini may contain ports for components that are not
included in 10g (10.1.4.0.1).
You cannot change the port used by the OracleAS Metadata Repository (port 1521)
during installation, but you can do so after installation. See the Oracle Application
Server Administrator’s Guide for details.
The following example sets the Application Server Control port and some
OracleAS Web Cache ports. For components not specified, the installer will assign
the default port numbers.
Application Server Control port = 2000
Oracle Internet Directory port = 2001
Oracle Internet Directory (SSL) port = 2002
When installation is complete, you can check the ORACLE_
HOME/install/portlist.ini file to see the assigned ports.
Requirements 2-11
Page 36

Por ts
Notes on Choosing Port Numbers:
■ Port numbers cannot be greater than 65535.
■ If you use a port number less than 1024 for a component, you
must run the component as the root user.
■ If you use a port number less than 1024 for a component, the
installer will not be able to start up the component at the end of
installation. You may need to configure the component first
before you can start it up. See the appropriate component
documentation for details.
■ You still have to comment out ports 389 and 636 in the
/etc/services file if you want to use these port numbers for
Oracle Internet Directory. See the Note on page 2-10 for details.
The installer verifies that the ports specified in the file are available by checking
memory. This means that it can only detect ports that are being used by running
processes. It does not look in configuration files to determine which ports an
application is using.
If the installer detects that a specified port is not available, it displays an alert. The
installer will not assign a port that is not available. To fix this:
1. Edit the staticports.ini file to specify a different port, or shut down the
application that is using the port.
2. Click Retry. The installer re-reads the staticports.ini file and verifies the
entries in the file again.
Using portlist.ini as the staticports.ini File
The staticports.ini file uses the same format as the ORACLE_
HOME/install/portlist.ini file, which is created after an Oracle Application
Server installation. If you have installed Oracle Application Server and you want to
use the same port numbers in another installation, you can use the portlist.ini file
from the first installation as the staticports.ini file for subsequent installations.
However, note this difference: in staticports.ini, the line "Oracle Management
Agent port" corresponds to "Enterprise Manager Agent port" in
portlist.ini.
2.5.3.2 Error Conditions that Will Cause the Installer to Use Default Ports Instead of Specified Ports
Check your staticports.ini file carefully because a mistake can cause the installer
to use default ports without displaying any warning. Here are some things that you
should check:
■ If you specify the same port for more than one component, the installer will use
the specified port for the first component, but for the other components, it will use
the components’ default ports. The installer does not warn you if you have
specified the same port for multiple components.
■ If you specify different ports for one component on multiple lines, the installer
assigns the default port for the component. The installer does not warn you if you
have specified different ports for one component.
2-12 Oracle Application Server Installation Guide
Page 37

■ If you specify the same port for one component on multiple lines, the installer
assigns the default port for the component. The installer does not warn you if you
have specified the same port on multiple lines.
■ If you have syntax errors in the staticports.ini file (for example, if you
omitted the = character for a line), the installer ignores the line. For the
components specified on such lines, the installer assigns the default ports. The
installer does not display a warning for lines with syntax errors.
■ If you misspell a component name, the installer assigns the default port for the
component. Names of components in the file are case sensitive. The installer does
not display a warning for lines with unrecognized names.
■ If you specify a non-numeric value for the port number, the installer ignores the
line and assigns the default port number for the component. It does this without
displaying any warning.
■ If you specify a relative path to the staticports.ini file (for example,
"./staticports.ini" or just "staticports.ini"), the installer will not find
the file. The installer continues without displaying a warning and it will assign
default ports to all components. You must specify a full path to the
staticports.ini file.
Por ts
2.5.3.3 Example
This example configures Oracle HTTP Server to use ports 80 and 443. Create a
staticports.ini file that includes the following lines:
Oracle HTTP Server port = 80
Oracle HTTP Server Listen port = 80
Oracle HTTP Server SSL port = 443
Oracle HTTP Server Listen (SSL) port = 443
2.5.4 If Port 1521 Is in Use
The installer configures port 1521 for the OracleAS Metadata Repository listener
(version 10.1.0.3). This port cannot be changed through the staticports.ini file.
Note: If your computer has a listener that uses the IPC protocol
with the EXTPROC key, you should change the key to have some
other value. This is because the OracleAS Metadata Repository
listener requires access to the EXTPROC key.
If port 1521 on your computer is already in use by an existing application, such as
Oracle database listener or some other application, you might have to take some action
before running the installer. See the following sections for details.
■ Section 2.5.4.1, "If Port 1521 Is In Use by an Existing Oracle Database"
■ Section 2.5.4.2, "If Port 1521 Is In Use by Some Other Application"
2.5.4.1 If Port 1521 Is In Use by an Existing Oracle Database
If you are installing a new database for the OracleAS Metadata Repository on a
computer that is already running an Oracle database, ensure that the listeners for both
databases do not conflict.
Requirements 2-13
Page 38

Por ts
You might be able to use the same listener for both the existing database and the
OracleAS Metadata Repository database. You have to consider the version of the
existing listener as well as the port number. Table 2–5 shows scenarios and outcomes.
You can change the OracleAS Metadata Repository listener to use a different port after
installation. See the Oracle Application Server Administrator’s Guide for details.
Table 2–5 Scenarios and Outcomes if You Have an Existing Database on the Computer Where You Want to
Install the OracleAS Metadata Repository
Version of the
Existing Listener Existing Listener Uses Port 1521
Earlier than 10.1.0.2 You need two listeners: one for the existing
database and one for the OracleAS Metadata
Repository.
See Section 2.5.4.1.1, "Scenario 1: Existing
Listener Uses Port 1521 and Listener Version
Is Earlier Than 10.1.0.2".
10.1.0.2 or later The existing listener supports both the
existing database and the OracleAS
Metadata Repository.
See Section 2.5.4.1.2, "Scenario 2: Existing
Listener Uses Port 1521 and Listener Version
Is 10.1.0.2 or Later"
To check the listener version, run the following command:
prompt> $ORACLE_HOME/bin/lsnrctl VERSION
where ORACLE_HOME is the home directory for your database.
You can also use the same command to check the listener port.
Here is an example of the command’s output:
bin/lsnrctl VERSION
LSNRCTL for HPUX: Version 10.1.0.5 - Production on 23-SEP-2005 19:15:32
Copyright (c) 1991, 2004, Oracle. All rights reserved.
Connecting to
(DESCRIPTION=(ADDRESS=(PROTOCOL=TCP)(HOST=plhpxm11.us.oracle.com)(PORT=1521)))
TNSLSNR for HPUX: Version 10.1.0.5 - Production
TNS for HPUX: Version 10.1.0.4.0 - Production
Unix Domain Socket IPC NT Protocol Adaptor for HPUX: Version 10.1.0.4.0 Production
Oracle Bequeath NT Protocol Adapter for HPUX: Version 10.1.0.4.0 Production
TCP/IP NT Protocol Adapter for HPUX: Version 10.1.0.4.0 - Production,,
The command completed successfully
Existing Listener Uses a Port Other Than
1521
You need two listeners: one for the existing
database and one for the OracleAS Metadata
Repository.
See Section 2.5.4.1.3, "Scenario 3: Existing
Listener Uses a Port Other Than 1521".
You need two listeners: one for the existing
database and one for the OracleAS Metadata
Repository.
See Section 2.5.4.1.3, "Scenario 3: Existing
Listener Uses a Port Other Than 1521".
2.5.4.1.1 Scenario 1: Existing Listener Uses Port 1521 and Listener Version Is Earlier Than
10.1.0.2 Listeners earlier than version 10.1.0.2 are not compatible with the OracleAS
Metadata Repository from this Oracle Application Server release. What you need to do
is to install the OracleAS Metadata Repository, which installs a version 10.1.0.3
listener. You can then use this new listener to service your existing database and the
OracleAS Metadata Repository database.
1. Stop the existing listener before you install the OracleAS Metadata Repository.
2-14 Oracle Application Server Installation Guide
Page 39

prompt> $ORACLE_HOME/bin/lsnrctl stop
ORACLE_HOME is the home directory for your existing database.
If you do not stop the existing listener, the installation will fail.
2. Install the OracleAS Metadata Repository.
See any of the procedures that install an OracleAS Metadata Repository in
Chapter 4, "Installing OracleAS Infrastructure" (for example, Section 4.20,
"Installing OracleAS Infrastructure" or Section 4.21, "Installing OracleAS
Infrastructure Against an Existing Oracle Internet Directory").
3. Update the configuration file of the new listener, as necessary. The name of the
listener configuration file is listener.ora, located in the ORACLE_
HOME/network/admin directory.
a. Check network address entries in the existing listener’s configuration file.
If the existing listener’s configuration file contains only the following network
addresses:
* TCP Port 1521
* IPC key EXTPROC
Por ts
you do not have to edit the OracleAS Metadata Repository listener’s
configuration file for network addresses.
If the configuration file contains other network addresses, you need to add
them to the OracleAS Metadata Repository listener’s configuration file.
b. Check SID_DESC entries in the existing listener’s configuration file.
If the existing listener’s configuration file contains SID_DESC entries for the
existing database, you need to add these entries to the OracleAS Metadata
Repository listener’s configuration file.
c. Do not start the existing listener (version earlier than 10.1.0.2). Now that the
new listener supports both databases, you do not need to run the existing
listener any more.
Note: Step c above is very important. You only need to run one
listener (the new listener) to support both databases.
2.5.4.1.2 Scenario 2: Existing Listener Uses Port 1521 and Listener Version Is 10.1.0.2 or Later
The existing listener will support both the existing database and the OracleAS
Metadata Repository. The installer will perform this configuration automatically.
The listener can be running during installation.
2.5.4.1.3 Scenario 3: Existing Listener Uses a Port Other Than 1521 You will end up running two listeners: one for the existing database and one for the OracleAS Metadata Repository, regardless of the version of the existing listener.
The existing listener can be running during installation, because it is not using port
1521.
2.5.4.2 If Port 1521 Is In Use by Some Other Application
If you have some other application listening on port 1521, you need to reconfigure it to
listen on a different port. If that is not possible, shut it down while you install the
Requirements 2-15
Page 40

Operating System Groups
OracleAS Metadata Repository. After installation, you can reconfigure the OracleAS
Metadata Repository to use a port other than 1521. See the Oracle Application Server
Administrator’s Guide for instructions on how to do this.
2.6 Operating System Groups
You need to create operating system groups in these situations:
■ If you plan to install Oracle Application Server on a computer that does not have
Oracle products, create a group to own the "inventory" directory. Refer to
Section 2.6.1, "Create a Group for the Inventory Directory".
■ If you plan to install the OracleAS Metadata Repository in a new database (that is,
one created by the installer), create groups for database administrators. Refer to
Section 2.6.2, "Create Groups for Database Administrators".
To create the oinstall group enter the following command:
# /usr/sbin/groupadd oinstall
For more information about operating system users and groups, see your operating
system documentation or contact your system administrator.
2.6.1 Create a Group for the Inventory Directory
If you plan to install Oracle Application Server on a computer that does not have
Oracle products, create a group to own the inventory directory. The installer writes its
files in the inventory directory to keep track of the Oracle products installed on the
computer.
This guide uses the name oinstall for this operating system group.
By having a separate group for the inventory directory, you allow different users to
install Oracle products on the computer. Users need write permission for the inventory
directory. They can achieve this by belonging to the oinstall group.
For the first time installation of any Oracle product on a computer, the installer
displays a screen where you enter a group name for the inventory directory, and a
screen where you enter the location of the inventory directory.
The default name of the inventory directory is oraInventory.
If you are unsure if there is already an inventory directory on the computer, look in the
/var/opt/oracle/oraInst.loc file. This file lists the location of the inventory
directory and the group who owns it. If the file does not exist, the computer does not
have Oracle products installed on it.
2.6.2 Create Groups for Database Administrators
This section applies only if you plan to install the OracleAS Metadata Repository in a
new database created by the installer.
When the database is not mounted and database authentication is unavailable, the
database uses operating system groups to determine user privileges. The database
recognizes these groups and privileges:
2-16 Oracle Application Server Installation Guide
Page 41

Operating System User
Table 2–6 Privileges for the OSDBA and OSOPER Groups
Group Description
OSDBA This is the database administrator group. Users in this group are granted
SYSDBA privileges.
OSOPER Users in this group are granted SYSOPER privileges, which comprise
privileges required for basic maintenance. These include database startup
and shutdown, and other privileges required for database operation.
SYSOPER privileges are a subset of SYSDBA privileges.
You need to create operating system groups for these groups.
If you want an operating system group called dba to have SYSDBA privileges:
1. Create the dba group.
2. Ensure that the user running the installer is a member of the dba group.
If you want a different operating system group to have SYSDBA privileges, or if you
want to associate SYSDBA and SYSOPER privileges with different groups, ensure the
user running the installer does not belong to the dba group.
If the user running the installer does not belong to the dba group, the installer
displays a screen where you can enter the names of groups to have the database
administrator privileges. The screen has two fields: one for the OSDBA group and one
for the OSOPER group (refer to Tab le 2 –6). You can enter the same operating system
group for both fields.
2.7 Operating System User
Create an operating system user to install and upgrade Oracle products. This guide
refers to this user as the oracle user. The oracle user running the installer must
have write permission for these directories:
■ the Oracle home directory, which contains files for the product you are installing
■ the inventory directory, which is used by the installer for all Oracle products
If the computer contains other Oracle products, you might already have a user for this
purpose. Look in the /var/opt/oracle/oraInst.loc file. This file lists the
location of the inventory directory and the group who owns it. If the file does not exist,
the computer does not have Oracle products installed on it.
If you do not already have a user for installing Oracle products, create a user with the
following properties:
Table 2–7 Properties of the Operating System User Who Runs the Installer
Item Description
Login name You can use any name for the user. This guide refers to the user as the
Group identifier The primary group of the oracle user must have write permission for
oracle user.
the oraInventory directory. See Section 2.6.1, "Create a Group for the
Inventory Directory" for more information about this group.
You can use any name for the group. This guide uses the name
oinstall.
Home directory The home directory for the oracle user can be consistent with the
home directories of other users.
Requirements 2-17
Page 42

Environment Variables
Table 2–7 (Cont.) Properties of the Operating System User Who Runs the Installer
Item Description
Login shell The default login shell can be the C, Bourne, or Korn shell.
Note: Use the oracle user only for installing and running Oracle
products. Do not use root as the oracle user.
To create the oracle user:
1. Enter a command similar to the following:
# /usr/sbin/useradd -g oinstall -G dba[,oper] oracle
In this command:
– The -g option specifies the primary group, which must be the Oracle
Inventory group, for example oinstall
– The -G option specifies the secondary groups, which must include the OSDBA
group and if required, the OSOPER group, for example dba or dba,oper
2. Set the password of the oracle user:
# passwd oracle
To check which groups an operating system user belongs to, run the groups
command with the name of the user. For example:
prompt> groups oracle
For more information about operating system users and groups, see your operating
system documentation or contact your system administrator.
2.8 Environment Variables
The operating system user who will be installing Oracle Application Server needs to
set (or unset) the following environment variables.
Tab le 2 –8 summarizes whether you set or unset an environment variable.
Table 2–8 Environment Variable Summary
Environment variable Set or Unset
ORACLE_HOME and
ORACLE_SID
PATH, C LA SSPATH, and
LD_LIBRARY_PATH
DISPLAY Set it to the monitor where you want the installer window to
TMP and TMPDIR Optional. If unset, defaults to /tmp.
TNS_ADMIN Must not be set.
Must not be set.
Must not contain references to directories in any Oracle home
directories
appear.
2.8.1 Environment Variable Tips
Here are some tips when working with environment variables:
2-18 Oracle Application Server Installation Guide
Page 43

■ If you set environment variables in the .profile file, they might not be read. To
ensure environment variables are set to the correct values, check their values in the
shell where you will be running the installer.
■ To check the value of environment variables, use the env command. This displays
all the currently defined environment variables and their values.
% env
■ If you use the su command to switch users (for example, switching from the root
user to the oracle user), check the environment variables when you are the new
user because the environment variables might not be passed to the new user. This
can happen even if you run su with the - parameter (su - user).
# /* root user */
# su - oracle
% env
2.8.2 ORACLE_HOME and ORACLE_SID
These environment variables must not be set.
Environment Variables
2.8.3 PATH, CLASSPATH, and LD_LIBRARY_PATH
Edit your PATH, CLASSPATH, and LD_LIBRARY_PATH environment variables so
that they do not reference any Oracle home directories.
2.8.4 DISPLAY
Set the DISPLAY environment variable to point to the X server that will display the
installer. The format of the DISPLAY environment variable is:
hostname:display_number.screen_number
Example (C shell):
% setenv DISPLAY test.mydomain.com:0.0
Example (Bourne or Korn shell):
$ DISPLAY=test.mydomain.com:0.0; export DISPLAY
You can test the display by running the xclock program:
$ /bin/x11/xclock
Oracle Application Server requires a running X server during installation only. The
frame buffer X server installed with your operating system requires that you remain
logged in and have the frame buffer running during installation. If you do not wish to
do this, then you must use a virtual frame buffer, such as X Virtual Frame Buffer
(XVFB) or Virtual Network Computing (VNC).
Visit Oracle Technology Network (http://www.oracle.com/technology) for
information about obtaining and installing XVFB or other virtual frame buffer
solutions. Search OTN for "frame buffer".
Requirements 2-19
Page 44

Environment Variables
2.8.5 TMP and TMPDIR
The installer uses a temporary directory for swap space. The installer checks for the
TMP and TMPDIR environment variables to locate the temporary directory. If this
environment variable does not exist, the installer uses the /tmp directory.
If you want the installer to use a temporary directory other than /tmp, set the TMP
and TMPDIR environment variables to the full path of an alternate directory. The
oracle user must have right permission for this directory and the directory must
meet the requirements listed in Tab le 2 –2 .
Example (C shell):
% setenv TMP /tmp2
% setenv TMPDIR /tmp2
Example (Bourne or Korn shell):
$ TMP=/tmp2; export TMP
$ TMPDIR=/tmp2; export TMPDIR
If you do not set this environment variable, and the default directory does not have
enough space, then the installer displays an error message that says the environment
variable is not set. You can either set the environment variable to point to a different
directory or free up enough space in the default directory. In either case, you have to
restart the installation.
2.8.6 TNS_ADMIN
This section describes two requirements:
■ The TNS_ADMIN environment variable must not be set. If set, it can cause errors
■ The /etc and the /var/opt/oracle directories must not contain a
These requirements are necessary to prevent conflicts between the Net configuration
files for different Oracle products.
If you need to set TNS_ADMIN or if you have the tnsnames.ora file in /etc or
/var/opt/oracle, do the following steps before installing Oracle Application
Server.
1. If you have the tnsnames.ora file in /etc or /var/opt/oracle, move the file
2. Make sure the TNS_ADMIN environment variable is not set.
during installation. Section F.3.14, "Database Configuration Assistant (DBCA)
Failures" shows such an error.
tnsnames.ora file.
from these directories to a different direc to ry. Alterna ti ve ly, you can re na me th e
file.
Example (C shell):
% unsetenv TNS_ADMIN
Example (Bourne or Korn shell):
$ unset TNS_ADMIN
After installation, you can merge the contents of the newly created tnsnames.ora
file with your existing tnsnames.ora file.
2-20 Oracle Application Server Installation Guide
Page 45

2.9 The /etc/hosts File
Although the contents of the /etc/hosts file affect these items:
■ Section 2.9.1, "Location of the Default Oracle Identity Management Realm"
■ Section 2.9.2, "Hostname for OracleAS Single Sign-On"
the installer provides alternative methods for you to enter the values that you want
without editing the hosts file. See the following subsections for details.
2.9.1 Location of the Default Oracle Identity Management Realm
The installer reads the hosts file to construct the location of the default Oracle
Identity Management realm. It displays this location in the "Specify Namespace in
Internet Directory" screen.
The hosts file should use the following format:
ip_address fully_qualified_hostname short_hostname
Example:
123.45.67.89 primaryHost.mydomain.com primaryHost
The /etc/hosts File
In the preceding example, the location of the default Oracle Identity Management
realm would look like "dc=mydomain,dc=com".
If the file uses a different format, the installer displays an incorrect value in the screen.
For example, if the hosts file contains:
123.45.67.89 primaryHost primaryHost.mydomain.com <--- incorrect format
the installer would display "dc=primaryHost,dc=com" as the default Oracle
Identity Management realm. This is probably not the value that you want for the
default Oracle Identity Management realm.
Tip: If you need the hosts file to use a different format, you can
edit the file to use the required format, perform the installation,
then revert the file back to its original format after installation.
If you are unable, or unwilling, to edit the hosts file, you can enter
the desired value for the default Oracle Identity Management realm
in the Custom Namespace field on the "Specify Namespace in
Internet Directory" screen.
2.9.2 Hostname for OracleAS Single Sign-On
If you are installing OracleAS Single Sign-On, and your hosts file contains only the
hostname of your computer, without the domain name, then you will only be able to
sign on to the Single Sign-On server using the hostname by itself (without the domain
name).
If you want to require a domain name when connecting to the Single Sign-On server,
you can edit the hosts file to include the domain name. If you do not want to edit the
file, you can use the OUI_HOSTNAME command-line parameter to the installer to
override the value in hosts. For example:
prompt> mount_point/1014disk1/runInstaller OUI_HOSTNAME=myserver.mydomain.com
Requirements 2-21
Page 46

Network Topics
2.10 Network Topics
Typically, the computer on which you want to install Oracle Application Server is
connected to the network, has local storage to contain the Oracle Application Server
installation, has a display monitor, and has a CD-ROM or DVD-ROM drive.
This section describes how to install Oracle Application Server on computers that do
not meet the typical scenario. It covers the following cases:
■ Section 2.10.1, "Installing on Multihomed (Multi-IP) Computers"
■ Section 2.10.2, "Copying CD-ROMs or DVD-ROM to Hard Drive, and Installing
from the Hard Drive"
■ Section 2.10.3, "Installing from a Remote CD-ROM or DVD-ROM Drive"
■ Section 2.10.4, "Installing on Remote Computers"
■ Section 2.10.5, "Installing on NFS-Mounted Storage"
■ Section 2.10.6, "Running Multiple Instances from One Installation"
■ Section 2.10.7, "Support for NIS and NIS+"
2.10.1 Installing on Multihomed (Multi-IP) Computers
You can install Oracle Database on a multihomed computer. A multihomed computer
is associated with multiple IP addresses. This is typically achieved by having multiple
network cards on the computer. Each IP address is associated with a hostname;
additionally, you can set up aliases for the hostname. By default, Oracle Universal
Installer uses the OUI_HOSTNAME environment variable setting to find the hostname.
If OUI_HOSTNAME is not set and you are installing on a computer that has multiple
network cards, Oracle Universal Installer determines the hostname by using the first
name in the /etc/hosts file.
Clients must be able to access the computer using this hostname (or using aliases for
this hostname). To check, ping the hostname from the client computers using the short
name (hostname only) and the full name (hostname and domain name). Both must
work.
2.10.2 Copying CD-ROMs or DVD-ROM to Hard Drive, and Installing from the Hard Drive
Instead of installing from the Oracle Application Server CD-ROMs or DVD-ROM, you
can copy the contents of the CD-ROMs or DVD-ROM to a hard drive and install from
there. This might be easier if you plan to install many instances of Oracle Application
Server on your network, or if the computers where you want to install Oracle
Application Server do not have CD-ROM or DVD-ROM drives.
(You can install from remote CD-ROM or DVD-ROM drives; see Section 2.10.3,
"Installing from a Remote CD-ROM or DVD-ROM Drive".)
When you install from the hard drive, the installer does not prompt you to swap
CD-ROMs. It can find all the files if they are in the proper locations (see Figure 2–1).
Space Requirement
Ensure that the hard drive contains enough space to hold the contents of the
CD-ROMs or the application_server directory on the DVD-ROM. Each CD-ROM
contains approximately 650 MB. This means that if you are copying three CD-ROMs,
you need approximately 1.9 GB of disk space.
On the DVD-ROM, the application_server directory is approximately 1.6 GB.
2-22 Oracle Application Server Installation Guide
Page 47

Network Topics
This space is in addition to the space required for installing Oracle Application Server
(listed in Table 2–2).
To Copy the CD-ROMs:
1. Create a directory structure on your hard drive as shown in Figure 2–1.
You need to create a parent directory (called OracleAS_10g in the example, but
you can name it anything you like), and, under the parent directory, create
subdirectories called Disk1, Disk2, and so on. The names of the subdirectories
must be DiskN, where N is the CD-ROM number.
Figure 2–1 Directory Structure for Copying CD-ROMs to Disk
OracleAS_10g
Disk1 Disk2 Disk3
Contents
of Disk1
Copy the contents of each CD-ROM into the corresponding directory.
2.
prompt> cp -pr /cdrom_mount_point/10.1.4disk1/* /path/to/hard/drive/Disk1/
prompt> cp -pr /cdrom_mount_point/10.1.4disk2/* /path/to/hard/drive/Disk2/
... Repeat for each CD-ROM.
Contents
of Disk2
Contents
of Disk3
To run the installer from the copied files, invoke the runInstaller executable from
the Disk1 directory. Run it from the computer that will be running Oracle Application
Server.
prompt> /path/to/hard/drive/Disk1/runInstaller
To Copy the application_server Directory from the DVD-ROM
1. (optional) Create a directory to contain the application_server directory.
2. Copy the application_server directory from the DVD-ROM to your hard
disk.
prompt> cp -pr /dvd_mount_point/application_server /path/to/hard/drive
To run the installer from the copied files, invoke the runInstaller executable from
the computer that will be running Oracle Application Server:
prompt> /path/to/hard/drive/application_server/runInstaller
2.10.3 Installing from a Remote CD-ROM or DVD-ROM Drive
If the computer where you want to install Oracle Application Server does not have a
CD-ROM or DVD-ROM drive, you can perform the installation from a remote
CD-ROM or DVD-ROM drive.
You can run the installer on a remote computer ("remote_computer"), but have the
installer screens display on your local computer ("local_computer"). The installer will
install Oracle Application Server on the remote computer.
Requirements 2-23
Page 48

Network Topics
Allow remote_computer to display on local_computer. You need to run this
1.
command on the local computer’s console.
local_computer> xhost +remote_computer
If you do not run xhost, you might get an Xlib error similar to "Failed to connect
to server", "Connection refused by server," or "Can’t open display" when starting
the installer.
2. On local_computer, perform a remote login (using telnet or rlogin) to remote_
computer. Log in as the oracle user, as described in Section 2.7, "Operating
System User". Ensure that the user has set the environment variables correctly, as
described in Section 2.8, "Environment Variables".
local_computer> rlogin -l oracle remote_computer.mydomain.com
- OR local_computer> telnet remote_computer.mydomain.com
3. Set the DISPLAY environment variable on remote_computer to point to local_
computer.
Example (C shell):
remote_computer> setenv DISPLAY local_computer.mydomain.com:0.0
Example (Bourne or Korn shell):
remote_computer> DISPLAY=local_computer.mydomain.com:0.0; export DISPLAY
4. Run the installer. See Section 3.15, "Starting the Oracle Universal Installer".
Note: You can use a PC X emulator to run the installer if it
supports a PseudoColor color model or PseudoColor visual. Set the
PC X emulator to use a PseudoColor visual, and then start the
installer. Refer to the X emulator documentation for instructions on
how to change the color model or visual settings.
2.10.4 Installing on Remote Computers
You can run the installer on a remote computer ("remote_computer"), but have the
installer screens display on your local computer ("local_computer"). The installer will
install Oracle Application Server on the remote computer.
1. Allow remote_computer to display on local_computer. You need to run this
command on the local computer’s console.
local_computer> xhost +remote_computer
If you do not run xhost, you might get an Xlib error similar to "Failed to connect
to server", "Connection refused by server," or "Can’t open display" when starting
the installer.
2. On local_computer, perform a remote login (using telnet or rlogin) to remote_
computer. Log in as the oracle user, as described in Section 2.7, "Operating
System User". Ensure that the user has set the environment variables correctly, as
described in Section 2.8, "Environment Variables".
local_computer> rlogin -l oracle remote_computer.mydomain.com
- OR local_computer> telnet remote_computer.mydomain.com
2-24 Oracle Application Server Installation Guide
Page 49

Set the DISPLAY environment variable on remote_computer to point to local_
3.
computer.
Example (C shell):
remote_computer> setenv DISPLAY local_computer.mydomain.com:0.0
Example (Bourne or Korn shell):
remote_computer> DISPLAY=local_computer.mydomain.com:0.0; export DISPLAY
4. Run the installer. See Section 3.15, "Starting the Oracle Universal Installer".
Note: You can use a PC X emulator to run the installer if it
supports a PseudoColor color model or PseudoColor visual. Set the
PC X emulator to use a PseudoColor visual, and then start the
installer. Refer to the X emulator documentation for instructions on
how to change the color model or visual settings.
2.10.5 Installing on NFS-Mounted Storage
To run Oracle Application Server on NFS systems, you have to use a certified
NFS-mounted storage system.
Network Topics
Currently Oracle Application Server is certified to run on these NFS systems:
■ Network Appliance (NetApp) filers
The NetApp system should be exported to at least the remote install user and remote
root user. You can do this using exportfs command:
prompt> exportfs -i /vol/vol1
Before installing, verify that the NFS mount setuid permission is set to suid. The
nosuid option will cause the install to fail.
To check the latest certification list for any updates, visit Oracle Technology Network
(http://www.oracle.com/technology).
2.10.6 Running Multiple Instances from One Installation
Oracle Application Server components are intended to be run only on the computer
where they are installed. You cannot run the components on remote computers, even
though the computers can access the files through NFS.
Figure 2–2 Run Oracle Application Server Only on the Computer Where It Is Installed
Computer A
If OracleAS is installed
on this computer, OracleAS
components must run
on this computer only.
Although other computers can access OracleAS files installed on Computer A,
they should not run OracleAS components from that installation. For a computer
to run OracleAS components, it must have its own OracleAS installation.
Requirements 2-25
Page 50

Prerequisite Checks Performed by the Installer
2.10.7 Support for NIS and NIS+
You can install and run Oracle Application Server in NIS and NIS+ environments.
2.11 Prerequisite Checks Performed by the Installer
Tab le 2 –9 lists the checks performed by the installer:
Table 2–9 Prerequisite Checks Performed by the Installer
Item Description
Operating system version See Table 2–3 for supported versions.
Operating system patches See Section 2.3, "Software Requirements" for a list of required patches.
Operating system kernel
parameters
Memory See Table 2–2 for recommended values.
Swap space See Table 2–2 for recommended values.
TMP space See Table 2–2 for recommended values.
Instance name The installer checks that the computer on which you are installing Oracle
Oracle home directory name The installer checks that the Oracle home directory name does not contain any
Path to Oracle home directory The installer checks that the path to the Oracle home directory is not longer than
Oracle home directory
contents
See Section 2.4, "Kernel Parameters" for a list of required kernel parameters.
Application Server does not already have an instance of the same name.
spaces.
127 characters.
The installer checks that the Oracle home directory does not contain any files that
might interfere with the installation.
2-26 Oracle Application Server Installation Guide
Page 51

Prerequisite Checks Performed by the Installer
Table 2–9 (Cont.) Prerequisite Checks Performed by the Installer
Item Description
Oracle home directory You should install Oracle Application Server in a new directory. Here are some
examples of installations that are not allowed:
■ Any type of Oracle Application Server into an 8.0, 8i, 9.0.1, or 9.2 database
Oracle home
■ Any type of Oracle Application Server into an Oracle Management Service
Oracle home
■ Any type of Oracle Application Server into an Oracle Collaboration Suite
Oracle home
■ Any type of Oracle Application Server into an Oracle HTTP Server standalone
Oracle home
■ Any type of Oracle Application Server into an OracleAS Web Cache
standalone Oracle home
■ Any type of Oracle Application Server into an Oracle9i Developer Suite 9.0.2
Oracle home
■ Any type of Oracle Application Server into an Oracle Containers for J2EE
standalone Oracle home
■ Any type of Oracle Application Server into an Oracle9iAS 1.0.2.2 Oracle home
■ Oracle Application Server middle tier into an infrastructure 9.0.2, 9.0.4, or 10g
(10.1.4.0.1) Oracle home
■ Oracle Application Server middle tier into an Oracle9iAS 9.0.2, 9.0.3, or 9.0.4
middle tier Oracle home
■ OracleAS Developer Kits into an infrastructure 9.0.2, 9.0.4, or 10g (10.1.4.0.1)
Oracle home
■ OracleAS Developer Kits into an Oracle9iAS middle tier 9.0.2, 9.0.3, 9.0.4, or
10.1.2 Oracle home
■ OracleAS Developer Kits into an Oracle Developer Suite 9.0.2, 9.0.4, or 10g
(10.1.4.0.1) Oracle home
■ OracleAS Infrastructure into any Oracle9iAS 9.0.2, 9.0.3, or 9.0.4 Oracle home
■ OracleAS Infrastructure into an Oracle Application Server 10g (10.1.4.0.1)
middle tier or OracleAS Developer Kits Oracle home
■ OracleAS Infrastructure into an Oracle Developer Suite 9.0.2, 9.0.4, or 10g
(10.1.4.0.1) Oracle home
■ OracleAS Infrastructure or middle tier into an Oracle home installed from the
Business Intelligence CD-ROM
Port 1521 The installer displays a warning if port 1521 is in use by any application, including
database listeners of any version. You need to stop the application that is using
port 1521, then click OK in the warning dialog.
If it is a database listener that is using port 1521, you might be able to use it for the
metadata repository database. See Section 2.5.4, "If Port 1521 Is in Use" for details.
If it is another application that is using port 1521, you need to stop it or configure it
to use a different port. Alternatively, you can change the database listener to use a
port other than 1521, but you can do this only after installation. See the Oracle
Application Server Administrator’s Guide for details.
Static port conflicts The installer checks the ports listed in the staticports.ini file, if specified. See
Section 2.5, "Ports".
Monitor The installer checks that the monitor is configured to display at least 256 colors.
Display permission The installer checks that the user has permissions to display on the monitor
specified by the DISPLAY environment variable.
DISPLAY environment
The installer checks that the DISPLAY environment variable is set.
variable
Requirements 2-27
Page 52

Prerequisite Checks Performed by the Installer
Table 2–9 (Cont.) Prerequisite Checks Performed by the Installer
Item Description
TNS_ADMIN environment
variable
The TNS_ADMIN environment variable must not be set.
There must not be a tnsnames.ora file in the /etc or /var/opt/oracle
directories.
DBCA_RAW_CONFIG
environment variable
If you are installing the OracleAS Infrastructure in a Real Application Clusters
environment, you need to set this environment variable to point to a file that
describes the locations of your raw partitions.
Cluster file system The installer checks that you are not installing Oracle Application Server in a
cluster file system (CFS).
Oracle Enterprise Manager
directories are writable
The installer runs this check only if you are expanding a middle tier or if you are
reinstalling Oracle Application Server in the same Oracle home. The installer
checks that these directories are writable by the operating system user running the
installer:
■ ORACLE_HOME/sysman/emd
■ ORACLE_HOME/sysman/config
■ ORACLE_HOME/sysman/webapps/emd/WEB-INF/config
Oracle Enterprise Manager
files exist
The installer runs this check only if you are expanding a middle tier or if you are
reinstalling Oracle Application Server in the same Oracle home. The installer
checks that these files exist:
■ ORACLE_HOME/sysman/config/iasadmin.properties
■ ORACLE_
HOME/sysman/webapps/emd/WEB-INF/config/consoleConfig.xml
2-28 Oracle Application Server Installation Guide
Page 53

3
Things You Should Know Before Starting the
Installation
This chapter contains the following topics:
■ Section 3.1, "Oracle Home Directory"
■ Section 3.2, "Can I Use Symbolic Links?"
■ Section 3.3, "First-Time Installation of Any Oracle Product"
■ Section 3.4, "Installing Additional Languages"
■ Section 3.5, "Oracle Application Server Instances and Instance Names"
■ Section 3.6, "The ias_admin User and Restrictions on its Password"
■ Section 3.7, "Comparing Installing Components against Configuring Components"
■ Section 3.8, "Where Does the Installer Write Files?"
■ Section 3.9, "Why Do I Need to be Able to Log In as Root at Certain Times During
Installation?"
■ Section 3.10, "Running root.sh During Installation"
■ Section 3.11, "Can I Modify Other Oracle Application Server Instances During
Installation?"
■ Section 3.12, "Connecting to Oracle Internet Directory Through SSL Connections"
■ Section 3.13, "Obtaining Software from Oracle E-Delivery"
■ Section 3.14, "Setting the Mount Point for the CD-ROM or DVD"
■ Section 3.15, "Starting the Oracle Universal Installer"
3.1 Oracle Home Directory
The directory in which you install Oracle Application Server is called the Oracle home.
During installation, you specify the full path to this directory and a name for this
Oracle home.
For example, you can install OracleAS Infrastructure in /opt/oracle/OraHome_
Infra, and you can name it "Infra".
Names of Oracle homes must be 128 characters or fewer, and can contain only
alphanumeric characters and underscores.
Things You Should Know Before Starting the Installation 3-1
Page 54

Can I Use Symbolic Links?
Notes: Spaces are not allowed anywhere in the Oracle home
directory path. For example, you cannot install in
"/opt/oracle/app server/Infra" because of the space character
in "app server". The installer does not check for this until several
screens after you have entered the path.
If you plan to install a middle tier and an infrastructure on the same computer, you
must install them in different Oracle home directories. The installer does not allow you
to install a middle tier and an infrastructure in the same Oracle home.
Tip: If you install multiple Oracle Application Server instances
(for example, an OracleAS Infrastructure and a middle tier) on the
same computer, create scripts for setting the environment for each
instance. This is to ensure that you run the binaries from the proper
Oracle home. Environment variables that you need to set include
ORACLE_HOME and PATH.
3.1.1 Installing in an Existing Oracle Home
Generally, you cannot install Oracle Application Server in an existing Oracle home. See
"Oracle home directory" on page 2-27 for a list of combinations that are not allowed.
3.1.2 Installing in a Non-Empty Oracle Home
You cannot install Oracle Application Server in a directory that already contains some
files, except for the cases mentioned in Section 3.1.1, "Installing in an Existing Oracle
Home". For example, if you cancel an installation, or if an installation failed, you have
to clean up the directory before you can reinstall Oracle Application Server in it. Also,
the installer cannot "repair" an installation. See Section F.3.4, "Message About Installing
in a Non-Empty Directory" for instructions on how to clean up the directory.
3.2 Can I Use Symbolic Links?
You can create symbolic links before installing Oracle Application Server and use them
during installation. For example, if you run the following commands:
prompt> mkdir /home/basedir
prompt> ln -s /home/basedir /home/linkdir
then, when you run the installer, you can specify /home/linkdir as the Oracle
Home.
After installation, you cannot create symbolic links to the Oracle Home. You also may
not move the Oracle Home to a different location and create a symbolic link to the
original Oracle Home.
3.3 First-Time Installation of Any Oracle Product
If Oracle Application Server is the first Oracle product to be installed on a computer,
the installer displays a screen where you specify an "inventory" directory (also called
the "oraInventory" directory). This inventory directory is used by the installer to keep
track of all Oracle products installed on the computer.
The inventory directory is separate from the Oracle home directory for Oracle
Application Server.
3-2 Oracle Application Server Installation Guide
Page 55

To ensure other users in the oinstall group have access to the inventory directory
(so that they can install Oracle products), do not use the oracle user’s home directory
as the inventory directory because home directories might not have the proper
permissions set up for the oinstall group. Instead, you can put the inventory
directory in the /opt/oracle directory (for example,
/opt/oracle/oraInventory).
If you have installed an Oracle product previously on the computer, the installer uses
the existing inventory directory. Ensure that you have write permissions on that
directory. The best way of ensuring this is to run the installer as the same operating
system user who installed the existing Oracle products.
Oracle recommends creating an operating system user to perform all tasks related to
installation of Oracle products. See Section 2.7, "Operating System User".
3.4 Installing Additional Languages
By default, the installer installs Oracle Application Server with text in English and in
the operating system language. If you need additional languages, click the Product
Languages button in the "Select a Product to Install" screen.
When you select additional languages to install, the installer installs text in the
selected languages. It also installs fonts required to display the languages.
Oracle Application Server Instances and Instance Names
For some components, languages are installed only if you select them during
installation. In this case, if you access the application in a language that is not
available, it will fall back on the server locale language.
For other components, available languages are installed regardless of what you select
during installation. In this case, however, fonts are installed only for the languages that
are explicitly selected. When you access the application, it uses text in your language
because the language was installed. However, if you do not have the appropriate fonts
to render the text, the text appears as square boxes. This usually applies to the Chinese,
Japanese, and Korean languages.
You can install fonts after installation. See Section F.3.10, "User Interface Does Not
Display in the Desired Language, or Does Not Display Properly".
Note that you cannot install additional languages after installation. You must install
all languages that you need during installation. If you run Oracle Application Server
in an environment that uses a language that you did not install, the user interface can
display text in that language and/or in English, or it can display square boxes (caused
by missing fonts) instead of text.
3.5 Oracle Application Server Instances and Instance Names
When you install the infrastructure, what you get is an Oracle Application Server
instance. The installer prompts you to provide a name for the Oracle Application
Server instance you are installing. For example, you can name an instance "infra". This
name can be different from the Oracle home name.
You cannot change this name after installation.
Oracle Application Server appends the hostname and domain name to the given
instance name to form a complete instance name. For example, if you are installing an
instance on a computer named c1, and you name the instance infra1, then the full
name of the instance is infra1.c1.mydomain.com, assuming the domain name is
mydomain.com.
Things You Should Know Before Starting the Installation 3-3
Page 56

The ias_admin User and Restrictions on its Password
Valid Characters in Instance Names
Instance names can consist only of the alphanumeric characters (A-Z, a-z, 0-9) and the
_ (underscore) character.
The maximum length for an instance name is 64 characters.
Restrictions on Oracle Application Server Instance Names
Do not use the hostname of the computer when naming Oracle Application Server
instances.
If you are planning to place the Oracle Application Server instance in an OracleAS
Cluster, the instance name must not contain the following:
■ hostname or IP address of any computer in the OracleAS Cluster
■ Oracle home of any Oracle Application Server installation in the OracleAS Cluster
How Oracle Application Server Uses Instance Names
Instance names are important because Oracle Application Server uses them to
uniquely identify instances. This means that if you install multiple Oracle Application
Server instances on the same computer (for example, an OracleAS Infrastructure and a
J2EE and Web Cache instance), you must give them different names.
When you administer Oracle Application Server using Oracle Enterprise Manager 10g
Application Server Control (or Application Server Control for short), the instance
name appears on the screens. You can click the instance name to see details about the
instance, such as the components that are installed in that instance, if the components
are running or stopped, and the log files for the components. The Application Server
Control is a browser-based administration tool for Oracle Application Server. See the
Oracle Application Server Administrator’s Guide for details about this administration tool.
In addition, some dcmctl commands require an instance name as a parameter.
dcmctl is a command-line tool for administering Oracle Application Server instances.
See the Distributed Configuration Management Administrator’s Guide for details about
dcmctl.
3.6 The ias_admin User and Restrictions on its Password
The installer prompts you to specify the password for the ias_admin user. The ias_
admin user is the administrative user for Oracle Application Server instances. To
manage Oracle Application Server instances using Application Server Control, you log
in as ias_admin.
On a computer, you can install multiple Oracle Application Server instances, each with
its own unique instance name, but the name of the administrative user is ias_admin
for all instances. The password for the ias_admin user can be different for each
instance.
Password for the ias_admin User
The password for the ias_admin user must conform to Oracle Internet Directory’s
password policy:
■ If you are using the Oracle Internet Directory that is shipped with this release of
Oracle Application Server and you did not change the default password policy,
passwords have the following restrictions:
■ The minimum length is five alphanumeric characters.
■ At least one of the characters must be a number.
3-4 Oracle Application Server Installation Guide
Page 57

Where Does the Installer Write Files?
■ If you are using any other version of Oracle Internet Directory (for example, you
are using an existing Oracle Internet Directory), your Oracle Internet Directory
administrator might have defined a different password policy. The password you
enter for the ias_admin user must conform to the existing Oracle Internet
Directory’s password policy.
In addition to the password policy defined in Oracle Internet Directory, the password
for the ias_admin user has these restrictions:
■ Passwords must be shorter than 30 characters.
■ Passwords can contain only alphanumeric characters from your database character
set, the underscore (_), the dollar sign ($), and the number sign (#).
■ Passwords must begin with an alphabetic character. Passwords cannot begin with
a number, the underscore (_), the dollar sign ($), or the number sign (#).
■ Passwords cannot be Oracle reserved words. The Oracle Database SQL Reference
lists the reserved words. You can find this guide on Oracle Technology Network
(http://www.oracle.com/technology/documentation). Or you can just
avoid using words that sound like they might be reserved words.
Note: When entering your password, check that the state of the Caps
Lock key is what you want it to be. Passwords are case-sensitive.
You must remember the password because you need to enter it to perform the
following tasks:
■ When you log on to Application Server Control to manage Oracle Application
Server, you log on as the ias_admin user.
■ For middle-tier installations: if you want to install a larger middle tier in an
ORACLE_HOME that already contains a middle tier (for example, you want to
install the Portal and Wireless type over an existing J2EE and Web Cache type),
you must enter the existing password during the installation.
If you forget the password, you can reset it. See the Oracle Application Server
Administrator’s Guide for details.
3.7 Comparing Installing Components against Configuring Components
When you select components on the Select Configuration Options screen, the installer
installs and configures the selected components. For the unselected components, the
installer still installs them, but does not configure them.
In most cases, you can configure components that you did not select on the Select
Configuration Options screen after installation using the Application Server Control.
See the Oracle Application Server Administrator’s Guide for details.
3.8 Where Does the Installer Write Files?
The installer writes files to the following directories:
Table 3–1 Directories Where the Installer Writes Files
Directory Description
Oracle home directory This directory contains Oracle Application Server files. You
specify this directory when you install Oracle Application Server.
Things You Should Know Before Starting the Installation 3-5
Page 58

Why Do I Need to be Able to Log In as Root at Certain Times During Installation?
Table 3–1 (Cont.) Directories Where the Installer Writes Files
Directory Description
Inventory directory When you install the first Oracle product on a computer, you
specify this directory, which the installer uses to keep track of
which Oracle products are installed on the computer. In
subsequent installations, the installer uses the same inventory
directory.
/var/opt/oracle
directory
/tmp directory The installer writes files needed only during installation to a
This directory contains information on locations of Oracle homes
on the computer.
If you installed Oracle9iAS Release 2 (9.0.2) on your computer,
this directory also contains files that provide information for
Oracle Enterprise Manager 10g.
"temporary" directory. By default, the "temporary" directory is
/tmp. To specify a different directory, set the TMP environment
variable. See Section 2.8.5, "TMP and TMPDIR" for details.
3.9 Why Do I Need to be Able to Log In as Root at Certain Times During Installation?
At least once during installation, the installer prompts you to log in as the root user
and run a script. You need to be root because the script edits files in the
/var/opt/oracle directory.
3.10 Running root.sh During Installation
The installer prompts you to run the root.sh script in a separate window. This script
creates files in the local bin directory (/usr/local/bin, by default).
If the script finds files of the same name, it prompts you if you want to override the
existing files. You should back up these files (you can do this from another window),
then overwrite them.
The following lines show the prompts from the root.sh script. The default values are
enclosed in square brackets.
Enter the full pathname of the local bin directory: [/usr/local/bin]:
The file "dbhome" already exists in /usr/local/bin. Overwrite it? (y/n)[n]: y
Copying dbhome to /usr/local/bin ...
The file "oraenv" already exists in /usr/local/bin. Overwrite it? (y/n)[n]: y
Copying oraenv to /usr/local/bin ...
The file "coraenv" already exists in /usr/local/bin. Overwrite it? (y/n)[n]: y
Copying coraenv to /usr/local/bin ...
After you run root.sh, you may see warnings that begin with "chmod: WARNING:
Corresponding set-ID also disabled..." You may ignore these warnings.
3.11 Can I Modify Other Oracle Application Server Instances During Installation?
During the installation of an Oracle Application Server instance, you should not
change the configuration or passwords of other installations in your environment. For
example, if there is an OracleAS Infrastructure installation in your environment, you
should not modify it during the installation of a middle tier.
3-6 Oracle Application Server Installation Guide
Page 59

Obtaining Software from Oracle E-Delivery
3.12 Connecting to Oracle Internet Directory Through SSL Connections
When you install OracleAS Infrastructure or middle tiers, you can specify that Oracle
Application Server components connect to Oracle Internet Directory only through SSL
connections. On screens where you specify the hostname and port for Oracle Internet
Directory, you can select the Use Only SSL Connections With This Oracle Internet
Directory option.
Note that Oracle HTTP Server is not set up for SSL connections during installation. If
you need Oracle HTTP Server to use SSL, you can set it up after installation. See the
Oracle HTTP Server Administrator’s Guide for details.
3.13 Obtaining Software from Oracle E-Delivery
You can obtain Oracle products from Oracle E-Delivery at
http://edelivery.oracle.com/. Oracle products are distributed as "E-Packs".
An E-Pack is an electronic version of the software that is also available to Oracle
Customers on CD-ROM or DVD-ROM.
3.13.1 Finding and Downloading the Oracle Application Server 10g (10.1.4.0.1) E-Pack
Refer to the CD/Media Pack description or the list of products that you purchased on
your Oracle Ordering Document. Then, view the License List to help you decide which
Product Pack you need to select in order to search for the appropriate E-Pack(s) to
download. Prior to downloading, verify that the product you are looking for is in the
License and Options section of the E-Pack README. Oracle recommends that you
print the README for reference.
3.13.2 Finding Required and Optional Downloads
Refer to the README link that is on each E-Pack Download page. In addition to
listing the licensable products and options contained in the pack, the README lists
downloadable files that are required to run each product and which downloadable
files are optional. Oracle recommends that you print the README for reference.
3.13.3 Disk Space Requirements
In addition to having the required disk space necessary to install and run your Oracle
software, you'll need to have sufficient disk space to download all the required
software files and have enough disk space to extract them.
After extracting the software from the Zip files, you can burn them onto CD-ROM and
install from them, or install from your computer's hard drive.
3.13.4 Software Requirements for Unzipping Files
All Oracle E-Delivery files have been archived using Info-ZIP's highly portable Zip
utility. After downloading one or more of the archives, you will need the UnZip utility
to extract the files.You must unzip the archive on the platform for which it was
intended. For example, if you download the file for the Solaris Operating System
(SPARC) version of Oracle Application Server, you must unzip the file on a Solaris
Operating System (SPARC) computer. If you unzip the file on a Windows computer,
and then move the stage area to a Solaris Operating System (SPARC) machine, the
stage area files will be corrupted because Windows will not preserve the case
sensitivity or the permission bits of UNIX file names.
Things You Should Know Before Starting the Installation 3-7
Page 60

Setting the Mount Point for the CD-ROM or DVD
3.13.5 Extracting Software from the Zip Files
Verify that the file size of your downloaded file matches the file size displayed on
E-Delivery. Unzip each Zip file to its own temporary directory. For example, create a
directory structure called oraAS10g on your hard drive:
c:\oraAS10g
Then create a new directory for each Zip file you downloaded:
c:\oraAS10g\Disk1
c:\oraAS10g\Disk2
etc.
If you plan burn the files on a CD-ROM, create a separate CD-ROM from the contents
of each directory. Do not burn a CD-ROM containing the Zip file itself; you need the
unzipped contents of the Zip files to do the installation. When you burn the files to
CD-ROM, the contents of each disc must be at the root of the CD image.
To install from CD-ROM or from your hard drive, see Section 3.15, "Starting the Oracle
Universal Installer".
3.14 Setting the Mount Point for the CD-ROM or DVD
The Oracle Application Server CD-ROMs are in RockRidge format. The DVD is in
DVD format.
To mount the first disc:
1. Insert Oracle Application Server disk 1 into the disk drive.
2. Create the /SD_CDROM directory if it does not already exist:
# /usr/bin/mkdir /SD_CDROM
3. Enter a command similar to the following:
# /usr/sbin/mount -F cdfs -o rr /dev/dsk/cxdytz /SD_CDROM
In the preceding example, /SD_CDROM is the disk mount point directory and
/dev/dsk/cxdytz is the device name for the disk device, for example
/dev/dsk/c0d2t0.
3.15 Starting the Oracle Universal Installer
1. If you are installing from a CD-ROM or DVD-ROM and your computer does not
mount CD-ROMs or DVDs automatically, you need to set the mount point
manually. See Section 3.14, "Setting the Mount Point for the CD-ROM or DVD" for
details.
2. Log in as the oracle user.
3. If you are installing Oracle Application Server on a multihomed computer, create
the OUI_HOSTNAME environment variable. Set this variable to point to the
hostname of the computer on which you are installing Oracle Application Server.
See Also:
■ Section 2.10.1, "Installing on Multihomed (Multi-IP) Computers"
4. If you are installing from your hard drive, go to the next step.
3-8 Oracle Application Server Installation Guide
Page 61

Starting the Oracle Universal Installer
CD-ROM users: Insert Oracle Application Server Disk 1 into the CD-ROM drive.
DVD-ROM users: Insert the Oracle Application Server DVD-ROM into the
DVD-ROM drive.
5. Run the Oracle Universal Installer using the command shown after the notes:
Notes:
■ Be sure you are not logged in as the root user when you start
the Oracle Universal Installer. The installer gives an error
message if you try to run it as the root user.
■ Do not start the installation inside the mount_point directory. If
you do, then you may not be able to eject the installation disk.
The cd command below changes your current directory to your
home directory.
CD-ROM:
prompt> cd
prompt> mount_point/10.1.4disk1/runInstaller
DVD-ROM:
prompt> cd
prompt> mount_point/application_server/runInstaller
Hard Drive:
prompt> cd disk1_directory
prompt> runInstaller
where disk1_directory is the directory where you unzipped the Disk 1 file.
This launches Oracle Universal Installer, through which you install Oracle Application
Server.
Things You Should Know Before Starting the Installation 3-9
Page 62

Starting the Oracle Universal Installer
3-10 Oracle Application Server Installation Guide
Page 63

Installing OracleAS Infrastructure
This chapter contains the following sections:
Table 4–1 Contents of This Chapter
Topics Procedures
■ Section 4.1, "Infrastructure Installation Types"
■ Section 4.2, "Why Would I Select the Different Infrastructure
Installation Types?"
■ Section 4.3, "Order of Installation for the Infrastructure"
■ Section 4.4, "Can I Install Components on Separate Computers?"
■ Section 4.5, "Tips for Installing Oracle Identity Management
Components Separately"
■ Section 4.6, "Do I Need the Oracle Delegated Administration
Services or the Oracle Directory Integration Platform
Components?"
■ Section 4.7, "Can I Configure Components After Installation?"
■ Section 4.8, "Can I Use an Existing Database for the OracleAS
Metadata Repository?"
■ Section 4.9, "Can I Use an Existing Oracle Internet Directory?"
■ Section 4.10, "Registration of OracleAS Metadata Repository in
Oracle Internet Directory and Password Randomization"
■ Section 4.11, "Contents of the OracleAS Metadata Repository"
■ Section 4.12, "Can I Use Multiple Metadata Repositories?"
■ Section 4.13, "What High Availability Options Does Oracle
Application Server Support?"
■ Section 4.14, "Restrictions on the Passwords for the SYS, SYSTEM,
SYSMAN, and DBSNMP Users"
■ Section 4.15, "Support for NE8ISO8859P10 and CEL8ISO8859P14
Characters Sets"
■ Section 4.16, "What Do I Enter in the "Specify Namespace in
Internet Directory" Screen?"
■ Section 4.17, "How to Determine Port Numbers Used by
Components"
■ Section 4.18, "Can I Add OCA After Installation?"
■ Section 4.19, "How to Deploy Oracle Delegated Administration
Services on a Separate Host"
■ Section 4.20, "Installing OracleAS Infrastructure"
■ Section 4.21, "Installing OracleAS Infrastructure
Against an Existing Oracle Internet Directory"
■ Section 4.22, "Installing OracleAS Metadata
Repository in a New Database"
■ Section 4.23, "Installing Oracle Identity
Management Components Only (Including Oracle
Internet Directory)"
■ Section 4.24, "Installing Oracle Identity
Management Components Only (Excluding Oracle
Internet Directory)"
■ Section 4.25, "Installing Oracle Internet Directory
Only"
■ Section 4.26, "Installing OCA and OracleAS
Metadata Repository Only"
■ Section 4.27, "Install Fragment: The First Few
Screens of the Installation"
■ Section 4.28, "Install Fragment: The Last Few
Screens of the Installation"
■ Section 4.29, "Install Fragment: Database Screens"
■ Section 4.30, "Install Fragment: OCA Screens"
4
4.1 Infrastructure Installation Types
Infrastructure components can be grouped into Oracle Identity Management
components and the OracleAS Metadata Repository component. Table 4–2 describes
these components:
Installing OracleAS Infrastructure 4-1
Page 64

Why Would I Select the Different Infrastructure Installation Types?
Table 4–2 OracleAS Infrastructure Components
Infrastructure
Components Description
Oracle Identity
Management components
These components provide directory, security, and user
management functionality. Some of these components have
schemas in the OracleAS Metadata Repository.
■ Oracle Internet Directory
■ OracleAS Single Sign-On
■ Oracle Delegated Administration Services
■ Oracle Directory Integration Platform
■ OracleAS Certificate Authority
OracleAS Metadata
Repository
OracleAS Metadata Repository is a collection of schemas used
by other Oracle Application Server components. The schemas
can be grouped into these categories:
■ Product metadata
■ Oracle Identity Management metadata
■ Management metadata
See Section 4.11, "Contents of the OracleAS Metadata
Repository" for details.
When you install the infrastructure, the installer asks if you want to install the Oracle
Identity Management components, OracleAS Metadata Repository, or both. These are
the installation types for the OracleAS Infrastructure:
■ Oracle Identity Management and OracleAS Metadata Repository
■ Oracle Identity Management
■ OracleAS Metadata Repository
In addition to the components listed in Tab le 4 –2 , when you install the OracleAS
Infrastructure, you also get the Oracle HTTP Server, Oracle Containers for J2EE, and
Oracle Enterprise Manager 10g components. These components are always installed
and configured, regardless of which installation type you selected.
See the next section, Section 4.2, "Why Would I Select the Different Infrastructure
Installation Types?"
4.2 Why Would I Select the Different Infrastructure Installation Types?
By separating the infrastructure into Oracle Identity Management components and
OracleAS Metadata Repository, the installer enables you to install the OracleAS
Infrastructure components over multiple computers. For example, you can install the
OracleAS Metadata Repository on one computer, and the Oracle Identity Management
components on another computer. Within the Oracle Identity Management option, you
can install Oracle Identity Management components over multiple computers as well.
These options also enable you to create a new database or use an existing database for
the OracleAS Metadata Repository. Selecting either the "OracleAS Metadata
Repository" or the "OracleAS Metadata Repository and Oracle Identity Management"
option causes the installer to create a new database and populate it with the OracleAS
Metadata Repository.
To use an existing database, see Section 4.8, "Can I Use an Existing Database for the
OracleAS Metadata Repository?"
4-2 Oracle Application Server Installation Guide
Page 65

4.3 Order of Installation for the Infrastructure
If you plan to install both OracleAS Metadata Repository and Oracle Identity
Management components on the same computer, select the "Oracle Identity
Management and OracleAS Metadata Repository" option. The installer installs the
components in the proper order. See Section 4.20, "Installing OracleAS Infrastructure"
for the step-by-step procedure.
If you plan to install the infrastructure components on separate computers, install
them in this order:
1. Install the OracleAS Metadata Repository.
You can have the installer create a new database and populate it with the OracleAS
Metadata Repository, or you can run the Oracle Application Server Repository
Creation Assistant to install the OracleAS Metadata Repository in an existing
database.
Note that you cannot register the OracleAS Metadata Repository with Oracle
Internet Directory at this point, because you do not have an Oracle Internet
Directory yet. The registration is done in the next step.
See:
■ Section 4.22, "Installing OracleAS Metadata Repository in a New Database"
Order of Installation for the Infrastructure
■ For information on how to install the OracleAS Metadata Repository in an
existing database, see the Oracle Application Server Metadata Repository Creation
Assistant User’s Guide.
2. Install the Oracle Identity Management components.
The installer prompts you to enter the connect information for the OracleAS
Metadata Repository database.
See Section 4.23, "Installing Oracle Identity Management Components Only
(Including Oracle Internet Directory)" for the step-by-step procedure.
The installer registers the OracleAS Metadata Repository with the newly created
Oracle Internet Directory. See Section 4.10, "Registration of OracleAS Metadata
Repository in Oracle Internet Directory and Password Randomization" for details
about registration.
Installing Only the OracleAS Metadata Repository Does Not Give You an Oracle
Application Server Instance
If you install only the OracleAS Metadata Repository when installing the
infrastructure, the installer creates a new database and populates it with the OracleAS
Metadata Repository schemas. This instance is different from other Oracle Application
Server instances in the following ways:
■ The installer does not prompt you to name this Oracle Application Server instance.
■ At the end of installation, Oracle Enterprise Manager 10g Application Server
Control is not started up, because it is not configured for this instance. You do not
need it to manage this instance, which consists of only the metadata repository
database.
To manage this instance, you use database management tools. For more
information, see the chapter "Introduction to Administration Tools" in the Oracle
Application Server Administrator’s Guide.
■ At the end of installation, Oracle HTTP Server is also not started up, because you
do not need it to manage this instance.
Installing OracleAS Infrastructure 4-3
Page 66

Can I Install Components on Separate Computers?
4.4 Can I Install Components on Separate Computers?
You already know that you can install Oracle Application Server instances on separate
computers. In addition, you can also distribute components over multiple computers.
This is especially useful for infrastructure components. You might want to do this to
improve performance, security, scalability, and availability of infrastructure services.
Examples:
■ The OracleAS Infrastructure uses an Oracle database to contain the OracleAS
Metadata Repository. You can install this database on its own computer.
■ You can install the Oracle Identity Management components in the infrastructure
on one or more computers.
Tab le 4 –3 shows some possible OracleAS Infrastructure configurations:
Table 4–3 OracleAS Infrastructure Configurations
Configuration Description / How to Install
In this configuration, the OracleAS Metadata Repository and the
OracleAS Metadata Repository
Identity Management components
OracleAS Metadata Repository
Identity Management components
Oracle Identity Management components run from the same
Oracle home.
To install this configuration, install the OracleAS Metadata
Repository and the Oracle Identity Management components at
the same time. For installation steps, see Section 4.20, "Installing
OracleAS Infrastructure".
In this configuration, the OracleAS Metadata Repository and the
Oracle Identity Management components run on separate
computers.
To install this configuration:
1. Install the OracleAS Metadata Repository first. See
Section 4.22, "Installing OracleAS Metadata Repository in a
New Database".
Alternatively, you can install the OracleAS Metadata
Repository in an existing database. See the Oracle
Application Server Metadata Repository Creation Assistant
User’s Guide for details.
2. Then install the Oracle Identity Management components.
See Section 4.23, "Installing Oracle Identity Management
Components Only (Including Oracle Internet Directory)".
4-4 Oracle Application Server Installation Guide
Page 67

Tips for Installing Oracle Identity Management Components Separately
Table 4–3 (Cont.) OracleAS Infrastructure Configurations
Configuration Description / How to Install
In this configuration, the OracleAS Metadata Repository runs on
OracleAS Metadata Repository
Oracle Internet Directory
Identity Management components
- Oracle Directory Integration and
Provisioning
- Oracle Delegated Administration
Services
- OracleAS Single Sign-On
- OracleAS Certificate Authority
Oracle Internet Directory
OracleAS Metadata Repository
Identity Management components
- Oracle Directory Integration and
Provisioning
- Oracle Delegated Administration
Services
- OracleAS Single Sign-On
- OracleAS Certificate Authority
OracleAS Certificate Authority
OracleAS Metadata Repository
one computer, Oracle Internet Directory runs on a second
computer, and the remaining Oracle Identity Management
components run on a third computer.
To install this configuration:
1. Install the OracleAS Metadata Repository first. See
Section 4.22, "Installing OracleAS Metadata Repository in a
New Database".
Alternatively, you can install the OracleAS Metadata
Repository in an existing database. See the Oracle
Application Server Metadata Repository Creation Assistant
User’s Guide for details.
2. Install Oracle Internet Directory. See Section 4.25, "Installing
Oracle Internet Directory Only".
3. Install the remaining Oracle Identity Management
components. See Section 4.24, "Installing Oracle Identity
Management Components Only (Excluding Oracle Internet
Directory)".
In this configuration, you want OCA to use its own OracleAS
Metadata Repository (for security reasons). Other Oracle
Identity Management components use another OracleAS
Metadata Repository.
To install this configuration:
1. Install OracleAS Metadata Repository and Oracle Identity
Management components, but not OCA.
You can install all these items in the same Oracle home (see
the first configuration), or you can distribute them. The
figure shows a distributed configuration.
2. Install OCA with its own OracleAS Metadata Repository.
See Section 4.21, "Installing OracleAS Infrastructure Against
an Existing Oracle Internet Directory".
Note that if you install Oracle Identity Management components on a separate
computer from OracleAS Metadata Repository, then the OracleAS Metadata
Repository will need network access to the Oracle Identity Management components.
See also Chapter 1, "Product and Installation Overview", which describes
configurations involving multiple computers and distributed components.
4.5 Tips for Installing Oracle Identity Management Components Separately
If you are installing Oracle Identity Management components separately, keep the
following guidelines in mind when choosing which components to configure in the
Select Configuration Options screen:
■ You cannot install and configure more than one OCA against the same OracleAS
Metadata Repository. You can install and configure more than one OracleAS Single
Sign-On, Oracle Delegated Administration Services, or Oracle Directory
Installing OracleAS Infrastructure 4-5
Page 68

Do I Need the Oracle Delegated Administration Services or the Oracle Directory Integration Platform Components?
Integration Platform against the same OracleAS Metadata Repository. If you want
to configure more than one Oracle Internet Directory against the same OracleAS
Metadata Repository, see the Oracle Internet Directory Administrator’s Guide.
■ You must select at least one component to configure. Otherwise the installation
will not succeed.
■ If you configure OracleAS Single Sign-On and Oracle Delegated Administration
Services in separate installations against the same Oracle Internet Directory, make
sure you configure OracleAS Single Sign-On before Oracle Delegated
Administration Services. This is because Oracle Delegated Administration Services
depends on mod_osso, which will not be set up during installation unless the
Oracle Internet Directory it points to already has OracleAS Single Sign-On
configured.
■ If you have an Oracle Identity Management installation that includes Oracle
Directory Integration Platform but does not include Oracle Internet Directory, you
will still see an Oracle Internet Directory process in the opmnctl status
output. This is because oidmon must be installed and started in order to start the
Oracle Directory Integration Platform process.
4.6 Do I Need the Oracle Delegated Administration Services or the Oracle Directory Integration Platform Components?
These components are optional, but you might want to install them because they
provide the following services:
■ Oracle Delegated Administration Services provide a browser-based interface to
Oracle Internet Directory. Users can use the interface to perform tasks such as
changing their passwords, searching for other users in the directory, and creating
groups. Users can even create additional users (if they have the proper privilege).
■ Oracle Directory Integration Platform enables you to integrate applications and
third-party LDAP directories with Oracle Internet Directory. You can use Oracle
Directory Integration Platform to synchronize data in all directories, and to send
notifications to applications when data in Oracle Internet Directory changes (for
example, when you add users or groups to Oracle Internet Directory).
4.7 Can I Configure Components After Installation?
If you did not configure a component during installation (that is, you did not select the
component in the Select Configuration Options screen), you can configure some
components after installation.
You cannot configure Oracle Internet Directory after installation. You need to install
and configure Oracle Internet Directory through the installer.
See Section 11.7, "Component Configuration After Installation" for details.
4.8 Can I Use an Existing Database for the OracleAS Metadata Repository?
You can install the OracleAS Metadata Repository in a new database, or in an existing
database.
If you want to install the OracleAS Metadata Repository in an existing database, see
Oracle Application Server Metadata Repository Creation Assistant User’s Guide for details.
4-6 Oracle Application Server Installation Guide
Page 69

Registration of OracleAS Metadata Repository in Oracle Internet Directory and Password Randomization
4.9 Can I Use an Existing Oracle Internet Directory?
You can use an existing Oracle Internet Directory instead of having the installer create
a new one. You might want to do this if your applications need to authenticate users
that are already stored in your Oracle Internet Directory. During the infrastructure
installation, do not select "Oracle Internet Directory" in the Select Configuration
Options screen.
You need to provide the connect information (hostname, port, username, password)
for the existing Oracle Internet Directory.
The Oracle Internet Directory must be version 9.0.4 or later. Note that Oracle Internet
Directory version 9.2.x is not supported.
To determine the Oracle Internet Directory version, make sure that Oracle Internet
Directory is up and running. Then run the following command:
prompt> oidldapd -version
The oidldapd command can be found in the ORACLE_HOME/bin directory, where
ORACLE_HOME is the root directory where you installed Oracle Internet Directory.
4.10 Registration of OracleAS Metadata Repository in Oracle Internet Directory and Password Randomization
The OracleAS Metadata Repository and the Oracle Internet Directory work closely
together. Before you can use an OracleAS Metadata Repository (in most cases), ensure
that it is registered with an Oracle Internet Directory.
An exception to this rule is when you want to use a J2EE and Web Cache middle tier
with the Database-Based Farm feature but without the Oracle Identity Management
Access feature. In this case, you need an OracleAS Metadata Repository, but it need
not be registered with an Oracle Internet Directory.
Tab le 4 –4 shows the scenarios where the installer automatically registers the OracleAS
Metadata Repository with an Oracle Internet Directory, and the scenarios where you
decide whether to register or not.
Table 4–4 Database Registration Scenarios
Scenario Registration Schema Passwords
Install and configure the OracleAS Metadata Repository
and Oracle Internet Directory in the same installation
session
For steps, see Section 4.20, "Installing OracleAS
Infrastructure".
Install the OracleAS Metadata Repository against an
existing Oracle Internet Directory
See Section 4.21, "Installing OracleAS Infrastructure
Against an Existing Oracle Internet Directory".
Automatic Randomized
Automatic Randomized
Installing OracleAS Infrastructure 4-7
Page 70

Contents of the OracleAS Metadata Repository
Table 4–4 (Cont.) Database Registration Scenarios
Scenario Registration Schema Passwords
Install an Oracle Internet Directory against an existing
OracleAS Metadata Repository
See Section 4.25, "Installing Oracle Internet Directory
Only".
Install the OracleAS Metadata Repository only (without
installing Oracle Identity Management components)
and you choose to register it with Oracle Internet
Directory
This scenario applies to installing it in a new database
or in an existing database.
To install OracleAS Metadata Repository in a new
database, see Section 4.22, "Installing OracleAS
Metadata Repository in a New Database".
To install OracleAS Metadata Repository in an existing
database, see theOracle Application Server Metadata
Repository Creation Assistant User’s Guide.
Install the OracleAS Metadata Repository only (without
installing Oracle Identity Management components)
and you choose not to register it with Oracle Internet
Directory
This scenario applies to installing it in a new database
or in an existing database.
Automatic Randomized (the metadata
repository schemas are given new
randomized passwords)
Yes Randomized
No The schemas are locked, and the
passwords are expired.
In the last two scenarios, the installer asks you if you want to register the OracleAS
Metadata Repository with an Oracle Internet Directory. If you answer yes, you
provide connect information for the Oracle Internet Directory. If you answer no, the
installer does not register the OracleAS Metadata Repository with an Oracle Internet
Directory.
Note: If you did not register the OracleAS Metadata Repository with
an Oracle Internet Directory during installation, you can register it
later using the Oracle Application Server Repository Creation
Assistant. See the Oracle Application Server Metadata Repository Creation
Assistant User’s Guide for details.
4.11 Contents of the OracleAS Metadata Repository
The OracleAS Metadata Repository contains schemas that can be grouped into these
categories:
■ Product Metadata schemas
These schemas are used by middle-tier components, such as OracleAS Portal and
OracleAS Wireless.
■ Oracle Identity Management schemas
These schemas are used by Oracle Identity Management components, such as
Oracle Internet Directory, OracleAS Single Sign-On, and OCA.
■ Management schemas
These schemas are used by components such as DCM.
4-8 Oracle Application Server Installation Guide
Page 71

If you are interested in seeing the names of all the schemas, see the Oracle Application
Server Metadata Repository Creation Assistant User’s Guide.
4.12 Can I Use Multiple Metadata Repositories?
You can install multiple metadata repositories to increase performance. This enables
different components in your topology to use different metadata repositories. To use
multiple metadata repositories, follow these guidelines:
■ To enable a Portal and Wireless or a Business Intelligence and Forms middle tier to
use a second metadata repository for product metadata:
a. Install the second metadata repository and register it with the Oracle Internet
Directory.
You can do this using the installer or the OracleAS RepCA. Use the installer to
create a new database containing the OracleAS Metadata Repository, or use
the OracleAS RepCA to install the OracleAS Metadata Repository in an
existing database. See the Oracle Application Server Metadata Repository Creation
Assistant User’s Guide for details.
b. When you install the Portal and Wireless or the Business Intelligence and
Forms middle tier, select the second metadata repository from the list of
registered repositories. This is the metadata repository that the middle tier will
use for its product metadata.
Can I Use Multiple Metadata Repositories?
■ To use a second metadata repository for a J2EE and Web Cache middle tier, you
have different options, depending on which J2EE and Web Cache features you
need:
■ If you need both the Oracle Identity Management Access feature and the
Database-Based Farm feature, you need to register the second metadata
repository with the Oracle Internet Directory.
■ If you need only the Database-Based Farm feature, you do not need to register
the second metadata repository. The reason for this is that you might not have
an Oracle Internet Directory.
Figure 4–1 shows a topology that involves two metadata repositories. It uses four
computers:
■ Computer 1 runs a metadata repository and Oracle Identity Management
components. The Oracle Identity Management components use this metadata
repository.
■ Computer 2 has a metadata repository that is registered with the Oracle Internet
Directory running on Computer 1.
■ Computer 3 has a Portal and Wireless middle tier. This middle tier knows to use
the metadata repository on Computer 1 for its product metadata because it was
registered with that metadata repository during installation.
■ Computer 4 also has a Portal and Wireless middle tier. This middle tier knows to
use the metadata repository on Computer 2 for its product metadata because it
was registered with that metadata repository during installation.
Installing OracleAS Infrastructure 4-9
Page 72

What High Availability Options Does Oracle Application Server Support?
Figure 4–1 Multiple Metadata Repositories in Use
Computer 1
OracleAS Infrastructure
Computer 3
Portal
Wireless
Computer 4
and
Product Metadata
OracleAS
Single
Sign-On
Identity
Management
Metadata
Repository 1
Computer 2
Directory
Oracle
Internet
Both metadata repositories are
registered in the Internet Directory.
Portal
and
Wireless
Product Metadata
Metadata
Repository 2
Notes:
■ If you are installing multiple metadata repositories on the same
computer, each metadata repository must have a unique global
database name and system identifier (SID).
■ If you are registering multiple metadata repositories with the
same Oracle Internet Directory, each metadata repository must
have a unique global database name and SID. If not, the Oracle
Internet Directory Configuration Assistant will fail when you
install the second metadata repository with the same name.
4.13 What High Availability Options Does Oracle Application Server Support?
Oracle Application Server can run in the following high availability environments:
■ OracleAS Cold Failover Cluster
■ OracleAS Cluster (Identity Management)
■ OracleAS Disaster Recovery
See Chapter 7, "Installing in High Availability Environments: Overview" for details.
4.14 Restrictions on the Passwords for the SYS, SYSTEM, SYSMAN, and DBSNMP Users
When you install the OracleAS Metadata Repository in a new database, the installer
prompts you to set the passwords for the SYS, SYSTEM, SYSMAN, and DBSNMP
4-10 Oracle Application Server Installation Guide
Page 73

How to Determine Port Numbers Used by Components
users, which are privileged users for the database. The passwords for these users have
the following restrictions:
■ Passwords must be shorter than 30 characters.
■ Passwords can contain only alphanumeric characters from your database character
set, the underscore (_), the dollar sign ($), and the number sign (#).
■ Passwords must begin with an alphabetic character. Passwords cannot begin with
a number, the underscore (_), the dollar sign ($), or the number sign (#).
■ Passwords cannot be Oracle reserved words. The Oracle SQL Reference lists the
reserved words. You can find this guide on Oracle Technology Network
(http://www.oracle.com/technology/documentation). Or you can just
avoid using words that sound like they might be reserved words.
■ Passwords cannot be the default passwords, which are change_on_install and
manager.
4.15 Support for NE8ISO8859P10 and CEL8ISO8859P14 Characters Sets
If you use characters in the NE8ISO8859P10 or CEL8ISO8859P14 character sets, make
sure that your database uses the Unicode character set AL32UTF8. If you are installing
a new database, select "AL32UTF8" in the Specify Database Configuration Options
screen.
The reason for this is that Java does not support the NE8ISO8859P10 or
CEL8ISO8859P14 character sets. If you configure the database to use a character set not
supported by Java, you will get an "Unsupported IANA character encoding" error in
OracleAS Portal.
4.16 What Do I Enter in the "Specify Namespace in Internet Directory" Screen?
The distinguished name (DN) that you specify on this screen will be designated as the
namespace in Oracle Internet Directory where users and groups are administered.
Select the suggested namespace if it meets your deployment requirements. If not, enter
a DN that you want in the custom namespace field. The installer determines the
suggested namespace from the /etc/hosts file. See Section 2.9, "The /etc/hosts
File".
If you plan to integrate your Oracle Identity Management components with a
third-party directory, you should specify the DN of a namespace that matches the DN
of the default namespace in the third-party directory. See the Oracle Internet Directory
Administrator’s Guide for details on integration with third-party directories.
4.17 How to Determine Port Numbers Used by Components
During installation, you might need to know port numbers used by certain Oracle
Application Server components. For example, if you install OracleAS Infrastructure
against an existing Oracle Internet Directory, the installer prompts for the Oracle
Internet Directory hostname and port number.
You can get a list of port numbers in the following ways:
■ Use Oracle Enterprise Manager 10g Application Server Control.
Installing OracleAS Infrastructure 4-11
Page 74

Can I Add OCA After Installation?
Click the Ports link on the Enterprise Manager home page. This takes you to a
page that lists all ports in use and the suggested port ranges for different
components.
■ Look in the ORACLE_HOME/install/portlist.ini file. ORACLE_HOME refers
to the directory containing the Oracle Application Server installation.
Note that if you change a component’s port number after installation, the
portlist.ini file is not updated. The portlist.ini file is not updated after
installation.
4.18 Can I Add OCA After Installation?
If you installed OracleAS Infrastructure but did not select to configure OCA, and later
decide that you want to use OCA, you have to install it in a separate Oracle home. You
cannot install it in an existing Oracle home.
When you install OCA in a new Oracle home, you can install it on the same or
different computer as the OracleAS Infrastructure. You can also install it with its own
OracleAS Metadata Repository or install it against an existing OracleAS Metadata
Repository:
■ Install OCA only.
OCA will share the OracleAS Metadata Repository that you installed earlier. If you
are installing OCA on the same computer as the OracleAS Infrastructure instance,
you might want to consider this option for performance reasons. (The second
option requires running two databases on the same computer; this could degrade
performance.)
See Section 4.24, "Installing Oracle Identity Management Components Only
(Excluding Oracle Internet Directory)" for details. In the Select Configuration
Options screen, select Oracle Application Server Certificate Authority (OCA)
only.
■ Install OCA with its own OracleAS Metadata Repository.
4.19 How to Deploy Oracle Delegated Administration Services on a Separate Host
To configure Oracle Delegated Administration Services in a separate Oracle Home,
you perform a standalone installation of it. To do this, select the Identity Management
installation type, and, on the Configuration Options screen, select Delegated
Administration Services.
4.20 Installing OracleAS Infrastructure
Perform this procedure to install an OracleAS Metadata Repository and Oracle
Identity Management components. This procedure provides a complete OracleAS
Infrastructure in a single Oracle home.
If you want to use an existing Oracle Internet Directory, see Section 4.21, "Installing
OracleAS Infrastructure Against an Existing Oracle Internet Directory".
If you want to use an existing database for the OracleAS Metadata Repository, see the
Oracle Application Server Metadata Repository Creation Assistant User’s Guide.
4-12 Oracle Application Server Installation Guide
Page 75

Installing OracleAS Infrastructure
Table 4–5 Steps for Installing OracleAS Infrastructure
Screen Action
1. -- Start up the installer and complete the first few screens. See Section 4.27, "Install
Fragment: The First Few Screens of the Installation" for details.
Notes:
■ In the Select Installation Type screen, select Identity Management and
Metadata Repository.
2. Select Configuration
Options
Select Oracle Internet Directory.
Select Oracle Application Server Single Sign-On.
Select Oracle Application Server Delegated Administration Services.
Select Oracle Directory Integration Platform.
Select Oracle Application Server Certificate Authority (OCA) if you want to
configure your own certificate authority which can issue certificates for users and
servers.
Do not select High Availability and Replication.
Click Next.
3. Specify Port
Configuration Options
If you want to use default ports for the components, select Automatic.
If you do not want to use the default ports, and you have created a staticports.ini
file, select Manual and enter the fullpath to your staticports.ini file.
Click Next.
4. Specify Namespace in
Internet Directory
Select the suggested namespace, or enter a custom namespace for the location of
the default Oracle Identity Management realm.
Ensure the value shown in Suggested Namespace meets your deployment needs.
If not, enter the desired value in Custom Namespace. See Section 4.16, "What Do I
Enter in the "Specify Namespace in Internet Directory" Screen?".
Click Next.
5. OCA screens If you select Oracle Application Server Certificate Authority (OCA) in the Select
Configuration Options screen, the installer displays screens where you need to
enter OCA information. See Section 4.30, "Install Fragment: OCA Screens".
6. Oracle Database screens Enter information for the OracleAS Metadata Repository database. See
Section 4.29, "Install Fragment: Database Screens".
7. Specify Instance Name
and ias_admin Password
Instance Name: Enter a name for this infrastructure instance. Instance names can
contain alphanumeric characters and the _ (underscore) character. If you have
more than one Oracle Application Server instance on a computer, the instance
names must be unique. See Section 3.5, "Oracle Application Server Instances and
Instance Names" for instance name details.
Example: infra
ias_admin Password and Confirm Password: Set the password for the ias_admin
user. This is the administrative user for the instance. See Section 3.6, "The ias_
admin User and Restrictions on its Password" for restrictions on the password.
Example: welcome99
Click Next.
8. -- Finish the installation. See Section 4.28, "Install Fragment: The Last Few Screens of
the Installation" for details.
Installing OracleAS Infrastructure 4-13
Page 76

Installing OracleAS Infrastructure Against an Existing Oracle Internet Directory
4.21 Installing OracleAS Infrastructure Against an Existing Oracle Internet Directory
Perform this procedure to install Oracle Identity Management components (except
Oracle Internet Directory) and the OracleAS Metadata Repository.
Prerequisite: Oracle Internet Directory version 9.0.4 or later
You would perform this procedure in cases where you already have an Oracle Internet
Directory (and its associated OracleAS Metadata Repository), and you want to:
■ Install OCA with its own OracleAS Metadata Repository, or
■ Install another OracleAS Metadata Repository for Oracle Internet Directory
replication.
You cannot use this procedure to install other Oracle Identity Management
components (OracleAS Single Sign-On, Oracle Delegated Administration Services, or
Oracle Directory Integration Platform). To install Oracle Identity Management
components without OracleAS Metadata Repository, follow the procedure in
Section 4.24, "Installing Oracle Identity Management Components Only (Excluding
Oracle Internet Directory)".
Table 4–6 Steps for Installing OracleAS Infrastructure Against an Existing Oracle Internet Directory
Screen Action
1. -- Start up the installer and complete the first few screens. See Section 4.27, "Install
Fragment: The First Few Screens of the Installation" for details.
Notes:
■ In the Select Installation Type screen, select Identity Management and
Metadata Repository.
2. Select Configuration
Options
3. Specify Port
Configuration Options
4. Register with Oracle
Internet Directory
Do not select Oracle Internet Directory because you want to use an existing one.
Do not select Oracle Application Server Single Sign-On.
Do not select Oracle Application Server Delegated Administration Services.
Do not select Oracle Directory Integration Platform.
Select Oracle Application Server Certificate Authority (OCA) if you want to
configure your own certificate authority which can issue certificates for users and
servers.
Do not select High Availability and Replication.
Click Next.
If you want to use default ports for the components, select Automatic.
If you do not want to use the default ports, and you have created a staticports.ini
file, select Manual and enter the fullpath to your staticports.ini file.
Click Next.
Hostname: Enter the name of the computer where Oracle Internet Directory is
running.
SSL Port: Enter the SSL port at which Oracle Internet Directory is listening. See
Section 4.17, "How to Determine Port Numbers Used by Components" if you do
not know the port number.
Click Next.
4-14 Oracle Application Server Installation Guide
Page 77

Installing OracleAS Metadata Repository in a New Database
Table 4–6 (Cont.) Steps for Installing OracleAS Infrastructure Against an Existing Oracle Internet Directory
Screen Action
5. Specify Oracle Internet
Directory Login
Username: Enter the username to log in to Oracle Internet Directory. You must log
in as a user who belongs to the necessary groups in Oracle Internet Directory.
Which groups are necessary depends on which components you are installing. See
Section 5.3, "Groups Required to Configure or Deinstall Components" for details.
Password: Enter the password for the username.
Realm: Enter the realm against which to validate the username. This field appears
only if your Oracle Internet Directory has multiple realms.
Click Next.
6. OCA screens If you select Oracle Application Server Certificate Authority (OCA) in the Select
7. Oracle Database screens Enter information for the OracleAS Metadata Repository database. See
8. Specify Instance Name
and ias_admin Password
9. -- Finish the installation. See Section 4.28, "Install Fragment: The Last Few Screens of
Configuration Options screen, the installer displays screens where you need to
enter OCA information. See Section 4.30, "Install Fragment: OCA Screens".
Section 4.29, "Install Fragment: Database Screens".
Instance Name: Enter a name for this infrastructure instance. Instance names can
contain alphanumeric characters and the _ (underscore) character. If you have
more than one Oracle Application Server instance on a computer, the instance
names must be unique. See Section 3.5, "Oracle Application Server Instances and
Instance Names" for instance name details.
Example: infra
ias_admin Password and Confirm Password: Set the password for the ias_admin
user. This is the administrative user for the instance. See Section 3.6, "The ias_
admin User and Restrictions on its Password" for restrictions on the password.
Example: welcome99
Click Next.
the Installation" for details.
4.22 Installing OracleAS Metadata Repository in a New Database
Perform this procedure to create a new database and populate it with the OracleAS
Metadata Repository. This procedure does not install any Oracle Identity Management
components.
Installing OracleAS Infrastructure 4-15
Page 78

Installing Oracle Identity Management Components Only (Including Oracle Internet Directory)
Table 4–7 Steps for Installing OracleAS Metadata Repository in a New Database
Screen Action
1. -- Start up the installer and complete the first few screens. See Section 4.27, "Install
Fragment: The First Few Screens of the Installation" for details.
Notes:
■ In the Select Installation Type screen, select Metadata Repository.
2. Select Configuration
Options
Do not select High Availability and Replication.
Click Next.
3. Register OracleAS
Metadata Repository
4. Specify Oracle Internet
Directory Login
5. Oracle Database screens Enter information for the OracleAS Metadata Repository database. See
6. -- Finish the installation. See Section 4.28, "Install Fragment: The Last Few Screens of
7. -- Unlock the dcm schema, and set its password. This step is required only if you
If you already have an Oracle Internet Directory and know its connect information,
select Yes and enter the name of the computer where Oracle Internet Directory is
running and the port number. See Section 4.17, "How to Determine Port Numbers
Used by Components" if you do not know the port number.
Use Only SSL Connections with this Oracle Internet Directory: Select this option
if you want Oracle Application Server components to use only SSL to connect to
Oracle Internet Directory.
If you do not have an Oracle Internet Directory, or do not know its connect
information, select No.
Click Next.
This screen appears only if you selected Ye s in the previous screen.
Username: Enter the username for logging into Oracle Internet Directory. The user
must belong to the iAS Admins group in Oracle Internet Directory.
Password: Enter the password.
Realm: This field appears only if your Oracle Internet Directory contains multiple
realms. Enter the name of the realm against which to authenticate the user.
Click Next.
Section 4.29, "Install Fragment: Database Screens".
the Installation" for details.
want to use the metadata repository for database clustering of middle-tier
instances.
1. Set the ORACLE_HOME environment variable to point to the full path of the
directory where you installed the OracleAS Metadata Repository.
2. Set the ORACLE_SID environment variable to the SID of the OracleAS
Metadata Repository.
3. Unlock the dcm schema and set its password using SQL*Plus.
The following alter user command sets the password to "welcome1", but
you can set it to any value.
prompt> $ORACLE_HOME/bin/sqlplus "sys/password as sysdba"
SQL> alter user dcm identified by welcome1 account unlock;
4.23 Installing Oracle Identity Management Components Only (Including
Oracle Internet Directory)
Perform this procedure to install Oracle Identity Management components without
installing an OracleAS Metadata Repository.
4-16 Oracle Application Server Installation Guide
Page 79

Installing Oracle Identity Management Components Only (Including Oracle Internet Directory)
Follow this procedure to configure Oracle Internet Directory against a remote
OracleAS Metadata Repository. You have installed the OracleAS Metadata Repository
in an existing database (see the Oracle Application Server Metadata Repository Creation
Assistant User’s Guide) or in a new database (Section 4.22, "Installing OracleAS
Metadata Repository in a New Database").
Prerequisite: OracleAS Metadata Repository that is not already registered with any
Oracle Internet Directory
Table 4–8 Steps for Installing Oracle Identity Management Components Only (Including Oracle Internet
Directory)
Screen Action
1. -- Start up the installer and complete the first few screens. See Section 4.27, "Install
Fragment: The First Few Screens of the Installation" for details.
Notes:
■ In the Select Installation Type screen, select Oracle Identity Management.
2. Select Configuration
Options
Select Oracle Internet Directory.
Select Oracle Application Server Single Sign-On.
Select Oracle Application Server Delegated Administration Services and/or
Oracle Directory Integration Platform if you need the services provided by these
components. See Section 4.6, "Do I Need the Oracle Delegated Administration
Services or the Oracle Directory Integration Platform Components?"
Select Oracle Application Server Certificate Authority (OCA) if you want to
configure your own certificate authority which can issue certificates for users and
servers.
Do not select High Availability and Replication.
Click Next.
3. Specify Port
Configuration Options
4. Specify Repository Username: Enter the username to use to log in to the OracleAS Metadata
5. Specify Namespace in
Internet Directory
If you want to use default ports for the components, select Automatic.
If you do not want to use the default ports, and you have created a staticports.ini
file, select Manual and enter the fullpath to your staticports.ini file.
Click Next.
Repository database. The user must have DBA privileges.
Password: Enter the user’s password.
Hostname and Port: Enter the name of the computer where the database is
running, and the port number at which it is listening. Use the format: host:port.
Service Name: Enter the service name of the database. Note that the service name
must include the database domain name.
Example: orcl.mydomain.com
Click Next.
Select the suggested namespace, or enter a custom namespace for the location of
the default Oracle Identity Management realm.
Ensure the value shown in Suggested Namespace meets your deployment needs.
If not, enter the desired value in Custom Namespace. See Section 4.16, "What Do I
Enter in the "Specify Namespace in Internet Directory" Screen?".
Click Next.
Installing OracleAS Infrastructure 4-17
Page 80

Installing Oracle Identity Management Components Only (Excluding Oracle Internet Directory)
Table 4–8 (Cont.) Steps for Installing Oracle Identity Management Components Only (Including Oracle
Internet Directory)
Screen Action
6. Enter information to
configure OCA
7. Specify Instance Name
and ias_admin Password
8. -- Finish the installation. See Section 4.28, "Install Fragment: The Last Few Screens of
Provide the information as prompted by the OCA screens. See Section 4.30, "Install
Fragment: OCA Screens" for details.
Instance Name: Enter a name for this infrastructure instance. Instance names can
contain alphanumeric characters and the _ (underscore) character. If you have
more than one Oracle Application Server instance on a computer, the instance
names must be unique. See Section 3.5, "Oracle Application Server Instances and
Instance Names" for instance name details.
Example: id_mgmt
ias_admin Password and Confirm Password: Set the password for the ias_admin
user. This is the administrative user for the instance. See Section 3.6, "The ias_
admin User and Restrictions on its Password" for restrictions on the password.
Example: welcome99
Click Next.
the Installation" for details.
4.24 Installing Oracle Identity Management Components Only (Excluding
Oracle Internet Directory)
Perform this procedure to install Oracle Identity Management components without
installing an OracleAS Metadata Repository or Oracle Internet Directory.
Use this procedure to install additional OracleAS Single Sign-On, Oracle Delegated
Administration Services, or Oracle Directory Integration Platform components against
an existing Oracle Internet Directory.
Prerequisites: OracleAS Metadata Repository, Oracle Internet Directory version 9.0.4
or later.
4-18 Oracle Application Server Installation Guide
Page 81

Installing Oracle Identity Management Components Only (Excluding Oracle Internet Directory)
Table 4–9 Steps for Installing Oracle Identity Management Components Only (Excluding Oracle Internet
Directory)
Screen Action
1. -- Start up the installer and complete the first few screens. See Section 4.27, "Install
Fragment: The First Few Screens of the Installation" for details.
Notes:
■ In the Select Installation Type screen, select Oracle Identity Management.
2. Select Configuration
Options
3. Specify Port
Configuration Options
4. Register with Oracle
Internet Directory
5. Specify Oracle Internet
Directory Login
Do not select Oracle Internet Directory.
Select Oracle Application Server Single Sign-On.
Select Oracle Application Server Delegated Administration Services and/or
Oracle Directory Integration Platform if you need the services provided by these
components. See Section 4.6, "Do I Need the Oracle Delegated Administration
Services or the Oracle Directory Integration Platform Components?"
Select Oracle Application Server Certificate Authority (OCA) if you want to
configure your own certificate authority which can issue certificates for users and
servers.
Do not select High Availability and Replication.
Click Next.
If you want to use default ports for the components, select Automatic.
If you do not want to use the default ports, and you have created a staticports.ini
file, select Manual and enter the fullpath to your staticports.ini file.
Click Next.
Hostname: Enter the name of the computer where Oracle Internet Directory is
running.
SSL Port: Enter the SSL port at which Oracle Internet Directory is listening. See
Section 4.17, "How to Determine Port Numbers Used by Components" if you do
not know the port number.
Click Next.
Username: Enter the username to log in to Oracle Internet Directory. You must log
in as a user who belongs to the necessary groups in Oracle Internet Directory.
Which groups are necessary depends on which components you are installing. See
Section 5.3, "Groups Required to Configure or Deinstall Components" for details.
Password: Enter the password for the username.
Realm: Enter the realm against which to validate the username. This field appears
only if your Oracle Internet Directory has multiple realms.
Click Next.
6. Specify ODS Password Enter the password for the ODS schema in the OracleAS Metadata Repository. The
ODS schema is the main schema used by Oracle Internet Directory.
By default, the ODS password is the same as the ias_admin password (the
password that you entered in the Specify Instance Name and ias_admin Password
screen).
Click Next.
Installing OracleAS Infrastructure 4-19
Page 82

Installing Oracle Internet Directory Only
Table 4–9 (Cont.) Steps for Installing Oracle Identity Management Components Only (Excluding Oracle
Internet Directory)
Screen Action
7. Enter information to
configure OCA
8. Specify Instance Name
and ias_admin Password
9. -- Finish the installation. See Section 4.28, "Install Fragment: The Last Few Screens of
Provide the information as prompted by the OCA screens. See Section 4.30, "Install
Fragment: OCA Screens" for details.
Instance Name: Enter a name for this infrastructure instance. Instance names can
contain alphanumeric characters and the _ (underscore) character. If you have
more than one Oracle Application Server instance on a computer, the instance
names must be unique. See Section 3.5, "Oracle Application Server Instances and
Instance Names" for instance name details.
Example: id_mgmt
ias_admin Password and Confirm Password: Set the password for the ias_admin
user. This is the administrative user for the instance. See Section 3.6, "The ias_
admin User and Restrictions on its Password" for restrictions on the password.
Example: welcome99
Click Next.
the Installation" for details.
4.25 Installing Oracle Internet Directory Only
Perform this procedure to install an Oracle Internet Directory.
Prerequisite: OracleAS Metadata Repository
Table 4–10 Steps for Installing Oracle Internet Directory
Screen Action
1. -- Start up the installer and complete the first few screens. See Section 4.27, "Install
Fragment: The First Few Screens of the Installation" for details.
Notes:
■ In the Select Installation Type screen, select Identity Management.
2. Select Configuration
Options
3. Specify Port
Configuration Options
Select Oracle Internet Directory.
Do not select Oracle Application Server Single Sign-On.
Do not select Oracle Application Server Delegated Administration Services.
Do not select Oracle Directory Integration Platform.
Do not select Oracle Application Server Certificate Authority (OCA).
Do not select High Availability and Replication.
Click Next.
If you want to use default ports for the components, select Automatic.
If you do not want to use the default ports, and you have created a staticports.ini
file, select Manual and enter the fullpath to your staticports.ini file.
Click Next.
4-20 Oracle Application Server Installation Guide
Page 83

Installing OCA and OracleAS Metadata Repository Only
Table 4–10 (Cont.) Steps for Installing Oracle Internet Directory
Screen Action
4. Specify Repository Username: Enter the username to use to log in to the OracleAS Metadata
Repository database. The user must have DBA privileges.
Password: Enter the user’s password.
Hostname and Port: Enter the name of the computer where the database is
running, and the port number at which it is listening. Use the format: host:port.
Service Name: Enter the service name of the database. Note that the service name
must include the database domain name.
Example: orcl.mydomain.com
Click Next.
5. Specify Namespace in
Internet Directory
6. Specify Instance Name
and ias_admin Password
Select the suggested namespace, or enter a custom namespace for the location of
the default Oracle Identity Management realm.
Ensure the value shown in Suggested Namespace meets your deployment needs.
If not, enter the desired value in Custom Namespace. See Section 4.16, "What Do I
Enter in the "Specify Namespace in Internet Directory" Screen?".
Click Next.
Instance Name: Enter a name for this infrastructure instance. Instance names can
contain alphanumeric characters and the _ (underscore) character. If you have
more than one Oracle Application Server instance on a computer, the instance
names must be unique. See Section 3.5, "Oracle Application Server Instances and
Instance Names" for instance name details.
Example: infra
ias_admin Password and Confirm Password: Set the password for the ias_admin
user. This is the administrative user for the instance. See Section 3.6, "The ias_
admin User and Restrictions on its Password" for restrictions on the password.
Example: welcome99
Click Next.
7. -- Finish the installation. See Section 4.28, "Install Fragment: The Last Few Screens of
the Installation" for details.
4.26 Installing OCA and OracleAS Metadata Repository Only
Perform this procedure to install the OCA and the OracleAS Metadata Repository
components only.
Prerequisites: Oracle Internet Directory version 9.0.4 or later
Installing OracleAS Infrastructure 4-21
Page 84

Installing OCA and OracleAS Metadata Repository Only
Table 4–11 Steps for Installing OCA and OracleAS Metadata Repository
Screen Action
1. -- Start up the installer and complete the first few screens. See Section 4.27, "Install
Fragment: The First Few Screens of the Installation" for details.
Notes:
■ In the Select Installation Type screen, select Identity Management and
OracleAS Metadata Repository.
2. Select Configuration
Options
Do not select Oracle Internet Directory because you want to use an existing one.
Do not select Oracle Application Server Single Sign-On.
Do not select Oracle Application Server Delegated Administration Services.
Do not select Oracle Directory Integration Platform.
Select Oracle Application Server Certificate Authority (OCA).
Do not select High Availability and Replication.
Click Next.
3. Specify Port
Configuration Options
If you want to use default ports for the components, select Automatic.
If you do not want to use the default ports, and you have created a staticports.ini
file, select Manual and enter the fullpath to your staticports.ini file.
Click Next.
4. Register with Oracle
Internet Directory
Hostname: Enter the name of the computer where Oracle Internet Directory is
running.
SSL Port: Enter the SSL port at which Oracle Internet Directory is listening. See
Section 4.17, "How to Determine Port Numbers Used by Components" if you do
not know the port number.
Click Next.
5. Specify Oracle Internet
Directory Login
Username: Enter the username to log in to Oracle Internet Directory. You must log
in as a user who belongs to the Trusted Application Admins group and to the iAS
Admins group in Oracle Internet Directory.
Password: Enter the password for the username.
Realm: Enter the realm against which to validate the username. This field appears
only if your Oracle Internet Directory has multiple realms.
Click Next.
6. OCA screens Enter information to configure OCA. See Section 4.30, "Install Fragment: OCA
Screens".
7. Oracle Database screens Enter information for the OracleAS Metadata Repository database. See
Section 4.29, "Install Fragment: Database Screens".
8. Specify Instance Name
and ias_admin Password
Instance Name: Enter a name for this infrastructure instance. Instance names can
contain alphanumeric characters and the _ (underscore) character. If you have
more than one Oracle Application Server instance on a computer, the instance
names must be unique. See Section 3.5, "Oracle Application Server Instances and
Instance Names" for instance name details.
Example: infra_oca
ias_admin Password and Confirm Password: Set the password for the ias_admin
user. This is the administrative user for the instance. See Section 3.6, "The ias_
admin User and Restrictions on its Password" for restrictions on the password.
Example: welcome99
Click Next.
9. -- Finish the installation. See Section 4.28, "Install Fragment: The Last Few Screens of
the Installation" for details.
4-22 Oracle Application Server Installation Guide
Page 85

Install Fragment: The First Few Screens of the Installation
4.27 Install Fragment: The First Few Screens of the Installation
The first few screens of the installer are described here because they are the same for
all installations. Most installation procedures in this chapter refer to this section as
their starting point.
Table 4–12 First Few Screens of the Installation
Screen Action
1. -- Start the installer. See Section 3.15, "Starting the Oracle Universal Installer" for
details.
2. We lc om e Cl ic k Next.
3. Specify Inventory
Directory and
Credentials
4. Run orainstRoot.sh This screen appears only if this is the first installation of any Oracle product on this
5. Specify File Locations Name: Enter a name to identify this Oracle home. The name can consist of
6. Specify Hardware
Cluster Installation Mode
7. Select a Product to Install Select Oracle Application Server Infrastructure 10g.
This screen appears only if this is the first installation of any Oracle product on this
computer.
Enter the full path of the inventory directory: Enter a full path to the inventory
directory. Enter a directory that is different from the Oracle home directory for the
product files.
Example: /opt/oracle/oraInventory
Specify Operating System group name: Select the operating system group that
will have write permission for the inventory directory.
Example: oinstall
Click Next.
computer.
Run the orainstRoot.sh script in a different shell as the root user. The script is
located in the oraInventory directory.
After running the script, click Continue.
alphanumeric and the underscore (_) characters only, and cannot be longer than
128 characters.
Example: OH_INFRA
Path: Enter the full path to the destination directory. This is the Oracle home. If the
directory does not exist, the installer creates it. If you want to create the directory
beforehand, create it as the oracle user; do not create it as the root user.
Example: /opt/oracle/infra
Click Next.
This screen appears only if the computer is part of a hardware cluster.
If you are installing an infrastructure, select the computers in the hardware cluster
where you want to install the infrastructure. You can select multiple computers, or
you can just select the current computer.
Click Next.
If you need to install additional languages, click Product Languages. See
Section 3.4, "Installing Additional Languages" for details.
Click Next.
Installing OracleAS Infrastructure 4-23
Page 86

Install Fragment: The First Few Screens of the Installation
Table 4–12 (Cont.) First Few Screens of the Installation
Screen Action
8. Select Installation Type The options displayed on this screen depend on what you selected in the Select a
Product to Install screen.
The installation types for OracleAS Infrastructure are:
■ Identity Management and Metadata Repository
■ Identity Management
■ Metadata Repository
Click Next.
If you get an error message saying that the TMP environment variable is not set, it
means that the default temp directory does not have enough space. You can either
set the TMP environment variable to point to a different directory or free up
enough space in the default temp directory.
For details on the TMP environment variable, see Section 2.8.5, "TMP and
TMPDIR".
9. Upgrade Existing
Oracle9iAS Infrastructure
This screen appears if the installer detects an Infrastructure Release 2 (9.0.2)
instance on the computer and you selected to install OracleAS Infrastructure.
This screen presents you with the option to upgrade the existing Release 2 (9.0.2)
Infrastructure, or install the current version of the OracleAS Infrastructure. If you
want to upgrade, see the Oracle Application Server Upgrade and Compatibility Guide.
10. Confirm Pre-Installation
Requirements
Figure 4–2 summarizes the screen sequence.
Verify that your computer meets all the requirements. Click Next.
4-24 Oracle Application Server Installation Guide
Page 87

Install Fragment: The Last Few Screens of the Installation
Figure 4–2 Sequence for the First Few Screens in the Installation
Welcome
If this is the first Oracle product to be installed on
this computer
Specify File Locations
If the computer is part of hardware cluster
Select a Product to Install
Select Installation Type
Specify Inventory Directory
and Credentials
Run orainstRoot.sh (located
in the inventory directory)
Specify Hardware Cluster Installation Mode
Oracle Application Server 10g
Oracle Application Server Infrastructure 10g
Oracle Application Server Developer Kits 10g
For OracleAS Infrastructure:
● Identity Management and Metadata Repository
● Identity Management
● Metadata Repository
For Oracle Application Server middle tier:
● J2EE and Web Cache
● Portal and Wireless
● Business Intelligence and Forms
Confirm Pre-Installation Requirements
4.28 Install Fragment: The Last Few Screens of the Installation
The last few screens of the installer are described in this section because they are the
same for all installations. Most installation procedures in this chapter refer to this
section as their end point.
Table 4–13 Last Few Screens in the Installation
Screen Action
1. Summary Verify your selections and click Install.
2. Install Progress This screen shows the progress of the installation.
3. Run root.sh Note: Do not run the root.sh script until this dialog appears.
1. When you see this dialog, run the root.sh script in a different shell as the
root user. The script is located in this instance’s Oracle home directory.
2. Click OK.
4. Configuration Assistants This screen shows the progress of the configuration assistants. Configuration
5. End of Installation Click Exit to quit the installer.
assistants configure components.
Installing OracleAS Infrastructure 4-25
Page 88

Install Fragment: Database Screens
4.29 Install Fragment: Database Screens
If you are installing a new database for the OracleAS Metadata Repository, the
installer displays the following screens:
Table 4–14 Database Screens
Screen Action
1. Specify Database
Configuration Options
Global Database Name: Enter a name for the OracleAS Metadata Repository
database. Append a domain name to the database name. This domain name for the
global database name can be different from your network domain name.
The domain name portion of the global database name has the following naming
restrictions:
■ Can contain only alphanumeric, underscore (_), minus (-), and pound (#)
characters
■ Must not be longer than 128 characters
The database name portion of the global database name has the following naming
restrictions:
■ Can contain only alphanumeric, underscore (_), and pound (#) characters
■ Must not be longer than eight characters
■ Must not contain PORT or HOST in uppercase characters. If you want the name
to contain "host" or "port", use lowercase characters.
Example: orcl.mydomain.com
Note: Be sure that you do not enter two or more periods together, for example,
orcl.mydomain.com. The installer does not check for this, and this will lead to
errors later during the installation process.
SID: Enter the system identifier for the OracleAS Metadata Repository database.
Typically this is the same as the global database name, but without the domain
name. The SID must be unique across all databases on this system.
SIDs have the following naming restrictions:
■ Must contain alphanumeric characters only
■ Must not be longer than eight characters
■ Must not contain PORT or HOST in uppercase characters. If you want the name
to contain "host" or "port", use lowercase characters.
Example: orcl
Database Character Set: Select the character set to use. See also Section 4.15,
"Support for NE8ISO8859P10 and CEL8ISO8859P14 Characters Sets".
Database File Location: Enter the full path to the parent directory for the data files
directory. This parent directory must already exist, and you must have write
permissions in this directory.
The installer will create a subdirectory in this parent directory, and the
subdirectory will have the same name as the SID. The data files will be placed in
this subdirectory.
Example: If you enter /u02/oradata, and the SID is orcl, then the data files will
be located in /u02/oradata/orcl.
Click Next.
2. Specify Database Schema
Passwords
Set the passwords for these privileged database schemas: SYS, SYSTEM, SYSMAN,
and DBSNMP. You can set different passwords for each schema, or you can set the
same password for all the schemas.
Click Next.
4-26 Oracle Application Server Installation Guide
Page 89

4.30 Install Fragment: OCA Screens
If you select Oracle Application Server Certificate Authority (OCA) in the Select
Configuration Options screen when you are installing an OracleAS Infrastructure, the
installer displays the screens listed in Table 4–15.
Note that you cannot install more than one OCA against the same OracleAS Metadata
Repository. When you are installing Oracle Identity Management components only
against an existing OracleAS Metadata Repository, be sure that the metadata
repository does not already have an instance of OCA configured against it.
Example: You install OracleAS Metadata Repository and Oracle Identity Management
components including OCA on a computer. Then if you try to install additional Oracle
Identity Management components (including OCA) on the same or different computer
against the same OracleAS Metadata Repository, this installation would fail.
Table 4–15 OCA Screens
Screen Action
1. Select OracleAS Metadata
Repository
This screen appears only if you are configuring OCA and you are using an existing
Oracle Internet Directory and you are using an existing OracleAS Metadata
Repository. The Oracle Internet Directory must contain the registration for the
OracleAS Metadata Repository that you want to use.
Select the OracleAS Metadata Repository that you want OCA to use.
Click Next.
Install Fragment: OCA Screens
2. Specify OCA
Distinguished Name
3. Select OCA Key Length Key Length (bits): Select the key length used in RSA algorithm to sign all
OCA uses the DN specified on this screen to populate the Issuer field of certificates
that it issues.
Typical DN: Use this section if your DN uses only the attributes listed in this
section. You do not have to fill in all the attributes specified in this section. Only
the o (organization) attribute is required. Note that the ’ (single quote) character is
not a valid character in any of the attributes.
■ Common Name (CN): Enter the name that you want on the certificate. This
name must be different from your hostname. Example: John Doe.
■ Organizational Unit (OU): Enter the name of your division or department.
Example: Sales.
■ Organization (O)*: Enter the name of your company or organization.
Example: Oracle Corporation.
■ Country (C): Select your country from the drop-down list.
Custom DN: If your DN uses attributes not listed in the Typical DN section,
specify your DN in this section.
Click Next.
certificates issued by OCA. Oracle recommends that you use at least a 2048-bit key
length. Longer key lengths provide greater security, but require more time to issue
each new certificate.
Click Next.
Installing OracleAS Infrastructure 4-27
Page 90

Install Fragment: OCA Screens
Table 4–15 (Cont.) OCA Screens
Screen Action
4. Specify OCA
Administrator’s
Password
Administrator’s Password and Confirm Password: Specify and confirm the
password for the OCA administrator. The password has the following restrictions:
■ It must contain at least eight characters.
■ It must contain at least one alphabetic character.
■ It must contain at least one non-alphabetic character (for example, a number).
■ Its first character cannot be a number.
You need this password to manage OCA. This password is also used by the OCA
Configuration Assistant.
You can change the password after installation using the ocactl command. See
the OCA Online Help for details.
Click Next.
4-28 Oracle Application Server Installation Guide
Page 91

5
Configuring Oracle Internet Directory for
Oracle Application Server Installation
Privileges
When you install certain infrastructure components, the installer prompts you for a
username to log in to Oracle Internet Directory. For the installation to complete
successfully, this user must belong to certain groups in Oracle Internet Directory. The
groups that are required depend on what you are installing.
By putting users into groups, you allow other users to perform installations. Users do
not have to log in as the cn=orcladmin superuser to perform the installations.
This chapter contains the following sections:
■ Section 5.1, "Default Users in Oracle Internet Directory"
■ Section 5.2, "Groups in Oracle Internet Directory"
■ Section 5.3, "Groups Required to Configure or Deinstall Components"
■ Section 5.4, "Groups Required to Install Middle Tiers"
■ Section 5.5, "Groups Required to Install Additional Metadata Repositories"
■ Section 5.6, "Example of Installation with Different Users"
■ Section 5.7, "How to Create Users in Oracle Internet Directory"
■ Section 5.8, "How to Add Users to Groups in Oracle Internet Directory"
■ Section 5.9, "Contents of a New Oracle Internet Directory"
■ Section 5.10, "On the Specify Login for Oracle Internet Directory Screen, What
Username and Realm Do I Enter?"
5.1 Default Users in Oracle Internet Directory
When you install Oracle Internet Directory, it has two users: cn=orcladmin and
orcladmin:
■ cn=orcladmin is the Oracle Internet Directory superuser. This user has all the
privileges to perform all tasks in Oracle Internet Directory.
The initial password for cn=orcladmin is the same as the password for the ias_
admin user for the Oracle Application Server instance. You specified this
password during installation.
cn=orcladmin is the owner of the objects created in the same installation session.
For example, if you installed Oracle Internet Directory, OracleAS Metadata
Configuring Oracle Internet Directory for Oracle Application Server Installation Privileges 5-1
Page 92

Groups in Oracle Internet Directory
Repository, and Oracle Delegated Administration Services, the cn=orcladmin
user is created and becomes a member of the Repository Owners group and the
DAS Component Owners group. cn=orcladmin also becomes a member of the
iAS Admins group.
Note that you cannot log in to Oracle Internet Directory as the superuser
(cn=orcladmin) using Oracle Delegated Administration Services. To log in as
cn=orcladmin, you must use the Oracle Directory Manager.
■ The orcladmin user is also created when you install Oracle Internet Directory.
The DN for this user is: cn=orcladmin,cn=users,<default realm DN>.
The initial password for orcladmin is the same as the password for the ias_
admin user for the Oracle Application Server instance. You specified this
password during installation.
You can log in to Oracle Internet Directory as orcladmin using Oracle Delegated
Administration Services to manage other Oracle Internet Directory users. You can
do this because orcladmin is a valid OracleAS Single Sign-On user.
For more information on the cn=orcladmin and orcladmin users, see the Oracle
Internet Directory Administrator’s Guide.
5.2 Groups in Oracle Internet Directory
Groups in Oracle Internet Directory can be classified into these categories:
■ Section 5.2.1, ""Global" Groups"
■ Section 5.2.2, "Groups for Each Metadata Repository"
■ Section 5.2.3, "Groups for Each Component"
5.2.1 "Global" Groups
Tab le 5 –1 describes the groups that affect all Oracle Application Server instances and
components registered with Oracle Internet Directory.
Table 5–1 "Global" Groups
Group Description
IAS Admins
DN: cn=IASAdmins, cn=groups,
cn=OracleContext
Trusted Application Admins
DN: cn=Trusted Application Admins,
cn=groups, cn=OracleContext
IAS & User Management Application
Admins
DN: cn=IAS & User Mgmt Application
Admins, cn=groups, cn=OracleContext
IAS Admins have the following privileges:
■ Install and register new metadata repositories. IAS Admins have
no privileges to manage existing repositories already registered
with Oracle Internet Directory.
■ Install middle tiers.
To install Oracle Identity Management, OracleAS Portal, or OracleAS
Wireless components, you must belong to several groups, one of which
is the Trusted Application Admins group. Table 5–4 lists the required
groups for each component.
To install OracleAS Portal or OracleAS Wireless, you must belong to
several groups, one of which is the IAS & User Management
Application Admins group. Table 5–4 lists the required groups for each
component.
5-2 Oracle Application Server Installation Guide
Page 93

Groups in Oracle Internet Directory
5.2.2 Groups for Each Metadata Repository
Each metadata repository registered with Oracle Internet Directory has its own
groups, as described in Tabl e 5– 2. This enables you to assign different owners and
users for each repository.
Table 5–2 Groups Associated with Each Metadata Repository Registered with Oracle Internet Directory
Group Description
Repository Owners
DN: cn=Repository Owners,
orclReferenceName=dbName,
cn=IAS Infrastructure
Databases, cn=IAS,
cn=Products,
cn=OracleContext
Mid-Tier Administrators
DN: cn=Repository Mid-tiers,
orclReferenceName=dbName,
cn=IAS Infrastructure
Databases, cn=IAS,
cn=Products,
cn=OracleContext
Associated Middle Tiers
DN: cn=Associated Mid-tiers,
orclReferenceName=dbName,
cn=IAS Infrastructure
Databases, cn=IAS,
cn=Products,
cn=OracleContext
The user who installs the metadata repository becomes a member of this group.
Repository Owners have the following privileges:
■ Add/remove users to/from this group.
■ De-register this repository.
■ Add/remove users to/from the Mid-Tier Admins group for this repository.
■ Add/remove middle-tier instances to/from this repository.
■ All privileges of the Mid-Tier Administrators group.
Mid-Tier Administrators have the following privileges:
■ Add/remove middle-tier instances from the Associated Middle Tiers group
for this repository. This is required to install a middle tier or to configure a
middle-tier component to use a different repository.
■ Access metadata for the repository database object.
Members of this group are middle-tier instances associated with this metadata
repository. The middle-tier instances are added to this group during installation.
You do not have to add the instances manually to this group.
Members of this group have the following privilege:
■ Access metadata for the repository database object and its schemas.
5.2.3 Groups for Each Component
Oracle Application Server components also have groups in Oracle Internet Directory.
Each component has a Component Owners group and an Associated Middle Tiers
group, as described in Table 5–3.
Table 5–3 Groups Associated with Each Component
Group Description
Component Owners
DN: cn=Component Owners,
orclApplicationCommonName=component
CommonName, cn=componentName,
cn=Products, cn=OracleContext
Associated Middle Tiers
DN: cn=Associated Mid-tiers,
orclApplicationCommonName=component
CommonName, cn=componentName,
cn=Products, cn=OracleContext
Configuring Oracle Internet Directory for Oracle Application Server Installation Privileges 5-3
Component Owners have the following privileges:
■ Add/remove owners for this component.
■ De-register this component.
■ Associate additional middle tiers with this component.
Members of this group are middle-tier instances.
Page 94

Groups Required to Configure or Deinstall Components
Figure 5–6 shows these groups for the Oracle Delegated Administration Services
component.
5.3 Groups Required to Configure or Deinstall Components
Tab le 5 –4 shows the groups that a user needs to belong to in order to configure or
deinstall Oracle Application Server components.
The user who installs and configures the components becomes the owner of the
components.
Table 5–4 Oracle Internet Directory Groups Required to Configure Components
To Configure This Component User Must Be a Member of ALL Listed Groups:
Infrastructure Components
OracleAS Metadata Repository To register OracleAS Metadata Repository against Oracle Internet
Directory, you must log in to Oracle Internet Directory as a user who
belongs to the iAS Admins group.
Oracle Internet Directory In OracleAS Cluster (Identity Management) environments,
to install subsequent Oracle Internet Directory instances after
Oracle Internet Directory
Oracle Delegated Administration
Services
the first one, you must be the
superuser (cn=orcladmin).
■ Trusted Application Admins
■ iAS Admins
■ Mid-Tier Admins group for the metadata repository used by
OracleAS Single Sign-On
If you are unsure which metadata repository is used by
OracleAS Single Sign-On, see "To Determine the Metadata
Repository Used by OracleAS Single Sign-On" on page 5-6.
■ Component Owners for the Oracle Delegated Administration
Services component
Note: This is required only if you are installing multiple
instances of
When you are installing the second and subsequent instances,
then you need to belong to the Component Owners group. You
do not need to be a member when you install the first
Oracle Delegated Administration Services.
Oracle
Delegated Administration Services instance.
See Section 5.8.1, "Using Oracle Directory Manager to Add Users
to Groups" for steps on how to add users to groups.
OracleAS Single Sign-On You must install OracleAS Single Sign-On as the superuser
(cn=orcladmin).
Oracle Directory Integration
Platform
■ iAS Admins
■ Trusted Application Admins
■ Admin for Oracle Directory Integration Platform, which
is identified by "cn=dipadmingrp,cn=odi,cn=oracle
internet directory"
■ Mid-Tier Admins group for the metadata repository used by
OracleAS Single Sign-On.
If you are unsure which metadata repository is used by
OracleAS Single Sign-On, see "To Determine the Metadata
Repository Used by OracleAS Single Sign-On" on page 5-6.
5-4 Oracle Application Server Installation Guide
Page 95

Groups Required to Configure or Deinstall Components
Table 5–4 (Cont.)
Oracle Internet Directory Groups Required to Configure Components
To Configure This Component User Must Be a Member of ALL Listed Groups:
OCA, configured against an existing
OracleAS Metadata Repository
OCA, configured against a new
OracleAS Metadata Repository (that
■ Trusted Application Admins
■ iAS Admins
■ Repository Owners group for the existing metadata repository
■ Trusted Application Admins
■ iAS Admins
is, you are installing and configuring
OCA and OracleAS Metadata
Repository in the same installation
session)
J2EE and Web Cache Middle-tier Features
Oracle Identity Management Access
■ iAS Admins
only
Oracle Identity Management Access
and Farm Repository (Database-Based or
File-Based)
■ iAS Admins
■ Mid-Tier Admins or Repository Owners group for the metadata
repository
Portal and Wireless, and Business
Intelligence and Forms Middle-tier
Components
OracleAS Portal
■ Trusted Application Admins
■ IAS & User Management Application Admins
■ iAS Admins
■ Mid-Tier Admins or Repository Owners group for the metadata
repository
■ Component Owners group for the OracleAS Portal component
Note: This group is applicable only when you are installing
additional OracleAS Portal instances. It does not apply for
the first
OracleAS Portal installation. For subsequent
OracleAS Portal installations, you can perform the
installation as the same
performed the first installation. If you want to allow a different
Oracle Internet Directory user who
Oracle Internet Directory user to install OracleAS
, you have to add this user to the Component Owners
Portal
group for the Portal application entity.
Configuring Oracle Internet Directory for Oracle Application Server Installation Privileges 5-5
Page 96

Groups Required to Configure or Deinstall Components
Table 5–4 (Cont.)
To Configure This Component User Must Be a Member of ALL Listed Groups:
OracleAS Wireless
Oracle Internet Directory Groups Required to Configure Components
■ IAS & User Management Application Admins
■ iAS Admins
■ Mid-Tier Admins or Repository Owners group for the metadata
repository
■ Component Owners group for the OracleAS Wireless component
Note: This group is applicable only when you are installing
additional OracleAS Wireless instances. It does not apply for
the first
OracleAS Wireless installation. For subsequent
OracleAS Wireless installations, you can perform the
installation as the same Oracle Internet Directory user who
performed the first installation. If you want to allow a different
Oracle Internet Directory user to install OracleAS
Wireless, you have to add this user to the Component Owners
group for the Wireless application entity.
■ In addition, the user must be one of the owners of the OracleAS
Wireless application entity. To determine the name of the
OracleAS Wireless application entity, run the following
command from the first OracleAS Wireless installation:
prompt> $ORACLE_HOME/wireless/bin/getAppEntityName.sh
Then add the user as a component owner for this application
entity. You can do this using the Deployment Delegation Console
or the Oracle Directory Manager.
OracleAS Reports Services
OracleAS Forms Services
■ iAS Admins
■ Mid-Tier Admins or Repository Owners group for the metadata
repository
OracleAS Personalization
OracleBI Discoverer
To Determine the Metadata Repository Used by OracleAS Single Sign-On
1. Run the following command (all on one line):
2. If the command in the preceding step does not return the name of the metadata
prompt> ldapsearch -h oidhostname -p oidport -D cn=orcladmin -w password
-b "orclapplicationcommonname=orasso_ssoserver,cn=sso,cn=products,
cn=oraclecontext"
-s base "objectclass=*" seealso
Values you need to provide:
oidhostname - name of the computer running Oracle Internet Directory. Example:
dbmachine.mydomain.com.
oidport - port number on which Oracle Internet Directory is listening. Example:
389.
password - password for the cn=orcladmin user.
repository, then run the following commands:
a. Run this command first to get the "orclreplicaid" value, which you need for the
next command.
prompt> ldapsearch -h oidhostname -p oidport -D cn=orcladmin -w password
5-6 Oracle Application Server Installation Guide
Page 97

Groups Required to Install Middle Tiers
-b "" -s base "objectclass=*" orclreplicaid
b. Then run this command.
prompt> ldapsearch -h oidhostname -p oidport -D cn=orcladmin -w password
-b "orclreplicaid=value_from_previous_command,cn=replication
configuration"
-s base "objectclass=*" seealso
This returns a "seealso" value in the format: cn=Metadata repository DB
Name,cn=oraclecontext.
5.4 Groups Required to Install Middle Tiers
When you install middle tiers, the installer prompts you to log in to Oracle Internet
Directory. Log in as a user who is a member of these groups:
■ Section 5.4.1, "Groups Required to Install Against the Desired Metadata
Repository"
■ Section 5.4.2, "Groups Required to Install Middle-tier Components"
5.4.1 Groups Required to Install Against the Desired Metadata Repository
To install middle tiers against a metadata repository, the user must belong to these
groups:
■ IAS Admins group
■ Mid-Tier Admins group for the metadata repository to be used with the middle
tier. When the installer prompts for the OracleAS Metadata Repository to use with
this middle tier, the installer displays only the metadata repositories for which the
user is a mid-tier admin. For example, in Figure 5–2, userA can see only the
repository for orcl.oracle.com, and userB can see only the repository for
orcl1.oracle.com.
5.4.2 Groups Required to Install Middle-tier Components
To install middle-tier components, such as OracleAS Portal and OracleAS Wireless, the
user must belong to additional groups. See Table 5–4 for a list of components and
required groups.
5.4.3 Example
Figure 5–1 shows an Oracle Internet Directory with one metadata repository and one
middle-tier instance. userA can install middle tiers against the orcl metadata
repository because userA belongs to the Mid-Tier Admins and the IAS Admins
groups. userA can also install middle-tier components because userA belongs to the
Trusted Application Admins group, the IAS & User Management Application Admins
group, and the Component Owners group for Wireless.
Configuring Oracle Internet Directory for Oracle Application Server Installation Privileges 5-7
Page 98

Groups Required to Install Additional Metadata Repositories
Figure 5–1 Contents of Oracle Internet Directory with One Infrastructure and One Middle Tier
Oracle Context
IAS
IAS Instances Infrastructure DB
Portal and Wireless 1
Repository
Owners
Members:
- orcladmin
orcl.oracle.com
Mid-tier
Admins
Members:
- orcladmin
- userA
Products
Component
Owners
Members:
IAS
Instances
Members:
- Portal and Wireless 1
- orcladmin
- userA
IAS Admins
Members:
- orcladmin
- userA
Wireless
Wireless Application Entity
Associated
Mid Tiers
Trusted Application
Admins
Members:
- orcladmin
- userA
Groups
IAS & User Mgmt
Application Admins
Members:
- orcladmin
- userA
5.5 Groups Required to Install Additional Metadata Repositories
To install additional metadata repositories, a user must be a member of the IAS
Admins group. After installation, the user then becomes a member of the Repository
Owners group for that metadata repository.
5.6 Example of Installation with Different Users
Figure 5–2 shows an Oracle Internet Directory with two metadata repositories and two
middle tiers installed by different users.
5-8 Oracle Application Server Installation Guide
Page 99

Example of Installation with Different Users
Figure 5–2 Oracle Internet Directory with Two Metadata Repositories and Two Middle Tiers
Oracle Context
Products
IAS
IAS Instances Infrastructure DB
2
J2EE PW1
4
1
orcl.oracle.com
Repository
Owners
Members:
- orcladmin
Mid-Tier
Admins
Members:
- orcladmin
- userA
The numbers in the figure correspond to these steps:
Associated
Mid-Tiers
Members:
- J2EE
3
Repository
Owners
Members:
- orcladmin
- userB
Groups
IAS Admins
orcl1.oracle.com
Mid-Tier
Admins
Members:
- orcladmin
- userB
Members:
- orcladmin
- userA
- userB
Associated
Mid-Tiers
Members:
- PW1
1. Install OracleAS Infrastructure (including Oracle Internet Directory and
OracleAS Metadata Repository)
This first installation creates an Oracle Internet Directory and a metadata repository.
The installer registers the metadata repository with Oracle Internet Directory by
creating the "orcl.oracle.com" entry.
The orcladmin user becomes a member of the Repository Owners group and the
Mid-Tier Admins group for this repository.
2. Install J2EE and Web Cache Middle Tier
userA was added to the following groups:
■ Mid-Tier Admins group of "orcl.oracle.com"
This enables userA to use the "orcl.oracle.com" repository for this middle tier. Note
that this group is required only if you install the J2EE and Web Cache middle tier
with the OracleAS Database-Based Cluster option. If you install the middle tier
without this option, userA does not need to belong to this Mid-Tier Admins
group.
■ iAS Admins group
The installer registers this middle tier with Oracle Internet Directory by creating the
"J2EE" entry. (The "J2EE" is the name of the middle-tier instance, specified by userA.)
The middle tier becomes a member of the Associated Mid-Tiers group for
"orcl.oracle.com".
Configuring Oracle Internet Directory for Oracle Application Server Installation Privileges 5-9
Page 100

How to Create Users in Oracle Internet Directory
3. Install OracleAS Infrastructure (OracleAS Metadata Repository only)
userB was added to the iAS Admins group so that userB can perform this installation.
See Section 5.5, "Groups Required to Install Additional Metadata Repositories".
The installer registers this new repository with Oracle Internet Directory by creating
the "orcl1.oracle.com" entry.
userB becomes a member of the Repository Owners group and the Mid-Tier Admins
group for the new repository.
4. Install Portal and Wireless Middle Tier
userB was added to these groups:
■ Mid-Tier Admins group of "orcl1.oracle.com", so that userB can use the repository
for this middle tier
■ Trusted Application Admins, required for installing OracleAS Portal
■ IAS & User Management Application Admins, required for installing OracleAS
Portal and OracleAS Wireless
■ iAS Admins, required for installing OracleAS Portal and OracleAS Wireless
The installer registers this middle tier with Oracle Internet Directory by creating the
"PW1" entry.
The middle tier becomes a member of the Associated Mid-Tiers group for
"orcl1.oracle.com".
5.7 How to Create Users in Oracle Internet Directory
You can create users in Oracle Internet Directory using the Self-Service Console, which
is part of the Oracle Delegated Administration Services. See the Oracle Internet
Directory Administrator’s Guide for details.
Note: Yo u cannot connect to Oracle Internet Directory as the
cn=orcladmin superuser using the Oracle Delegated
Administration Services consoles. To connect to Oracle Internet
Directory as the superuser, use Oracle Directory Manager.
5.8 How to Add Users to Groups in Oracle Internet Directory
To add users to groups in Oracle Internet Directory, you can use these tools:
■ Oracle Directory Manager is a Java-based tool for managing Oracle Internet
Directory.
■ Oracle Delegated Administration Services is a Web-based tool intended for
end-users to perform tasks such as changing their passwords and editing their
personal information. If users have the proper privileges, they can also use this
tool to create groups and users.
Note: You cannot log in to Oracle Internet Directory as the
cn=orcladmin superuser using Oracle Delegated Administration
Services. In cases where you have to log in as the superuser to add
users to groups (or to perform other Oracle Internet
Directory-related tasks), you have to use Oracle Directory Manager.
5-10 Oracle Application Server Installation Guide
 Loading...