

Page 1

Oracle® Application Server
Adapters for IMS/DB User’s Guide
10g Release 3 (10.1.3.4)
E13832-01
December 2008
Page 2

Oracle Application Server Adapters for IMS/DB User's Guide, 10g Release 3 (10.1.3.4)
E13832-01
Copyright © 2005, 2008, Oracle and/or its affiliates. All rights reserved.
Primary Author: Jeanne Wiegelmann, David Goldman
Contributors: Yishai Hadas, , Adeeb Massad, Dror Harari, , Meera Srinivasan, Bo Stern, Shashi Suravarapu,
Costi Zaboura, Sheela Vasudevan
This software and related documentation are provided under a license agreement containing restrictions on
use and disclosure and are protected by intellectual property laws. Except as expressly permitted in your
license agreement or allowed by law, you may not use, copy, reproduce, translate, broadcast, modify, license,
transmit, distribute, exhibit, perform, publish, or display any part, in any form, or by any means. Reverse
engineering, disassembly, or decompilation of this software, unless required by law for interoperability, is
prohibited.
The information contained herein is subject to change without notice and is not warranted to be error-free. If
you find any errors, please report them to us in writing.
If this software or related documentation is delivered to the U.S. Government or anyone licensing it on
behalf of the U.S. Government, the following notice is applicable:
U.S. GOVERNMENT RIGHTS Programs, software, databases, and related documentation and technical data
delivered to U.S. Government customers are "commercial computer software" or "commercial technical data"
pursuant to the applicable Federal Acquisition Regulation and agency-specific supplemental regulations. As
such, the use, duplication, disclosure, modification, and adaptation shall be subject to the restrictions and
license terms set forth in the applicable Government contract, and, to the extent applicable by the terms of
the Government contract, the additional rights set forth in FAR 52.227-19, Commercial Computer Software
License (December 2007). Oracle USA, Inc., 500 Oracle Parkway, Redwood City, CA 94065.
This software is developed for general use in a variety of information management applications. It is not
developed or intended for use in any inherently dangerous applications, including applications which may
create a risk of personal injury. If you use this software in dangerous applications, then you shall be
responsible to take all appropriate fail-safe, backup, redundancy, and other measures to ensure the safe use
of this software. Oracle Corporation and its affiliates disclaim any liability for any damages caused by use of
this software in dangerous applications.
Oracle is a registered trademark of Oracle Corporation and/or its affiliates. Other names may be trademarks
of their respective owners.
This software and documentation may provide access to or information on content, products, and services
from third parties. Oracle Corporation and its affiliates are not responsible for and expressly disclaim all
warranties of any kind with respect to third-party content, products, and services. Oracle Corporation and
its affiliates will not be responsible for any loss, costs, or damages incurred due to your access to or use of
third-party content, products, or services.
Page 3

Page 4

Page 5

Contents
Preface ................................................................................................................................................................. xi
Audience....................................................................................................................................................... xi
Documentation Accessibility..................................................................................................................... xi
Related Documents .................................................................................................................................... xii
Conventions ................................................................................................................................................ xii
1 Introduction
OracleAS Adapter for IMS/DB Overview........................................................................................... 1-1
OracleAS Adapter for IMS/DB Architecture ...................................................................................... 1-2
Integration Flow from Oracle Application Server to the Legacy Application.......................... 1-2
2 Installing and Configuring the OracleAS Adapter for IMS/DB
Preinstallation Tasks................................................................................................................................ 2-1
IBM z/OS Hardware and Software Requirements....................................................................... 2-1
Hardware Requirements............................................................................................................ 2-1
Software Requirements.............................................................................................................. 2-2
Installing Oracle Connect on an IBM z/OS Series Platform............................................................ 2-2
Installation Worksheet....................................................................................................................... 2-3
Preinstallation Tasks.......................................................................................................................... 2-4
Importing the Installation Kit........................................................................................................... 2-5
Installation Instructions..................................................................................................................... 2-5
Post-Installation Instructions............................................................................................................ 2-8
Post-Installation Procedures...................................................................................................... 2-8
Starting the Daemon................................................................................................................ 2-10
Setting Up Oracle Connect for Reentrancy .......................................................................... 2-10
Setting Up Oracle Connect to Update IMS/DB Data ......................................................... 2-11
Updating an Existing Oracle Connect Installation with IMS/DB ............................................... 2-11
Installing Oracle Studio....................................................................................................................... 2-12
Oracle Studio Requirements.......................................................................................................... 2-12
Installing Oracle Studio on Windows.......................................................................................... 2-13
Installing Oracle Studio on Linux................................................................................................. 2-13
Installing Oracle Studio with the Wizard (SH installation)............................................... 2-13
Installing with a Silent Installation (RPM) ........................................................................... 2-13
Configuring Oracle Connect ............................................................................................................... 2-13
Setting Up the IBM z/OS Platform in Oracle Studio................................................................. 2-14
v
Page 6

Securing Access to Oracle Connect .............................................................................................. 2-15
Setting Password Access to Oracle Studio........................................................................... 2-15
Specifying Users with Administrative Rights ..................................................................... 2-16
Setting Up Run-Time User Access to the IBM z/OS Platform.......................................... 2-17
Modeling Interactions for OracleAS Adapter for IMS/DB........................................................... 2-19
Setting Up the IMS/DB Data Source............................................................................................ 2-19
Configuring the Data Source Driver ............................................................................................ 2-21
Configuring the Data Source Driver Advanced Properties............................................... 2-23
Importing Metadata for the IMS/DB Data Source..................................................................... 2-25
Selecting the Imput Files......................................................................................................... 2-25
Applying Filters ....................................................................................................................... 2-27
Selecting Tables ........................................................................................................................ 2-29
Matching DBD to COBOL ...................................................................................................... 2-29
Import Manipulation............................................................................................................... 2-30
Metadata Model Selection ...................................................................................................... 2-38
Import the Metadata................................................................................................................ 2-40
Setting Up an Oracle Connect Adapter ....................................................................................... 2-41
Generating Outbound Interactions .............................................................................................. 2-42
Modifying Existing Interactions.................................................................................................... 2-45
3 Integrating OracleAS Adapter for IMS/DB with OC4J
Integrating OracleAS Adapter for IMS/DB with OC4J .................................................................... 3-1
Configuring the J2CA 1.5 IMS/DB Adapter........................................................................................ 3-2
Using the CCI API to Develop Applications ...................................................................................... 3-3
Configuring Multiple Adapters ............................................................................................................ 3-4
Updating Configuration Information .................................................................................................. 3-4
4
Integrating OracleAS Adapters for IMS/DB with Oracle BPEL Process Manager
Integrating OracleAS Adapters for IMS/DB with Oracle BPEL Process Manager ..................... 4-1
Configuring Oracle BPEL Process Manager ....................................................................................... 4-2
Setting up the Connection to the Oracle Connect Server............................................................. 4-2
Checking Metadata Availability Using Oracle JDeveloper ......................................................... 4-2
Configuring the WSDL for Outbound Applications .................................................................... 4-2
5 BPEL Process Manager Examples
Getting Started.......................................................................................................................................... 5-1
Deploy a BPEL Outbound Process........................................................................................................ 5-2
Beginning Tasks ................................................................................................................................. 5-2
Design-Time Configuration.............................................................................................................. 5-3
Create a BPEL Project for a BPEL Outbound Process............................................................ 5-3
Create a Database Adapter to Read the Doctor Table........................................................... 5-4
Design a BPEL Outbound Process to Read the String........................................................... 5-5
Create a Partner Link to the Database Adapter...................................................................... 5-6
Edit the Invoke_1 Activity......................................................................................................... 5-7
Edit the Assign_1 Activity......................................................................................................... 5-8
vi
Page 7

Runtime Configuration ..................................................................................................................... 5-9
6 Configuring an OracleAS Adapter for IMS/DB for Outbound Interactions
Creating Outbound Interactions with the OracleAS Adapter for IMS/DB .................................. 6-1
Requirements...................................................................................................................................... 6-1
Adding the IMS/DB Hospital Data Source......................................................................................... 6-1
Prepare the System............................................................................................................................. 6-1
Set up Machine Access to Oracle Connect...................................................................................... 6-2
Add an IMS/DB Data Source........................................................................................................... 6-2
Import the Metadata.......................................................................................................................... 6-3
Create the findDoctor and findPatient Interactions.......................................................................... 6-4
Add a Database Adapter................................................................................................................... 6-4
Create Interactions ............................................................................................................................. 6-4
7 Troubleshooting OracleAS Adapter for IMS/DB
Troubleshooting the Daemon ................................................................................................................ 7-1
Starting the Daemon.......................................................................................................................... 7-1
Task: Starting the Daemon ........................................................................................................ 7-2
Shutting Down the Daemon............................................................................................................. 7-2
Monitoring the Daemon During Run Time.................................................................................... 7-2
Daemon (Computer) Options ................................................................................................... 7-2
Workspace Options .................................................................................................................... 7-3
Server Options............................................................................................................................. 7-4
Daemon Logs...................................................................................................................................... 7-4
The Daemon Log Monitor ......................................................................................................... 7-5
The Workspace Log Monitor..................................................................................................... 7-5
The Server Log Monitor............................................................................................................. 7-5
Resolving Communication Errors......................................................................................................... 7-6
Resolving Specific Errors........................................................................................................................ 7-6
8 Advanced Features of OracleAS Adapter for IMS/DB
Configuring the Daemon for High Availability ................................................................................ 8-1
Adding a New Daemon Workspace Configuration...................................................................... 8-1
Editing the Workspace ...................................................................................................................... 8-2
Configuring the Server Mode........................................................................................................... 8-2
Configuring a Binding Environment ................................................................................................... 8-6
Debug................................................................................................................................................... 8-7
General................................................................................................................................................. 8-8
Language ............................................................................................................................................. 8-8
Modeling ............................................................................................................................................. 8-9
ODBC ................................................................................................................................................... 8-9
OLEDB................................................................................................................................................. 8-9
Optimizer ............................................................................................................................................ 8-9
Query Processor ................................................................................................................................. 8-9
Parallel Processing ............................................................................................................................. 8-9
Transactions ........................................................................................................................................ 8-9
vii
Page 8

Tuning............................................................................................................................................... 8-10
XML................................................................................................................................................... 8-10
Migration Considerations.................................................................................................................... 8-11
Security Considerations ....................................................................................................................... 8-11
Setting Design Time Security ........................................................................................................ 8-12
Setting Runtime Security................................................................................................................ 8-12
Transaction Support.............................................................................................................................. 8-13
A Advanced Tuning of the Metadata
Metadata for the IMS/DB Data Source ............................................................................................... A-1
General Tab........................................................................................................................................ A-2
Columns Tab...................................................................................................................................... A-3
Column Definition Section ....................................................................................................... A-4
Column Properties..................................................................................................................... A-5
Indexes Tab ........................................................................................................................................ A-7
Table Information ...................................................................................................................... A-7
Properties .................................................................................................................................... A-8
Statistics Tab....................................................................................................................................... A-8
Generating Statistics ................................................................................................................ A-10
Advanced Tab.................................................................................................................................. A-11
Adapter Metadata.................................................................................................................................. A-13
Adapter Metadata General Properties......................................................................................... A-13
Adapter Metadata Interactions ..................................................................................................... A-15
Interaction Advanced Tab ...................................................................................................... A-16
Adapter Metadata Schema Records ............................................................................................. A-18
Adapter Metadata XML ................................................................................................................. A-20
B Back-end Adapter Data Type Support
Data Type Mapping ................................................................................................................................ B-1
C Advanced Tuning of the Daemon
Control....................................................................................................................................................... C-1
Logging...................................................................................................................................................... C-3
Security..................................................................................................................................................... C-5
Workspac es ............................................................................................................................................... C-7
General................................................................................................................................................ C-7
Server Mode..................................................................................................................................... C-11
Security ............................................................................................................................................. C-16
D Supported SQL Syntax and SQL Enhancements
Supported SQL Statements ................................................................................................................... D-1
Supported Operators .............................................................................................................................. D-1
Supported Functions............................................................................................................................... D-2
SQL Enhancements................................................................................................................................. D-3
Generating Hierarchical Results ..................................................................................................... D-3
Accessing Hierarchical Data Using SQL........................................................................................ D-4
viii
Page 9

Flattening Hierarchical Data Using SQL ....................................................................................... D-4
Using an Alias ............................................................................................................................ D-4
E Globalization Settings
Defining the Language and Codepage................................................................................................ E-1
Index
ix
Page 10

x
Page 11

Audience
Preface
This guide is the primary source of user and reference information on OracleAS
Adapters for IMS/DB, which enables client applications to access transactions running
under IMS/DB through the Sun J2EE Connector Architecture (J2CA) API.
This document describes the features of OracleAS Adapters for IMS/DB.
This preface covers the following topics:
■ Audience
■ Documentation Accessibility
■ Related Documents
■ Conventions
This manual is intended for Oracle integration administrators who perform the
following tasks:
■ Installing and configuring OracleAS Adapters for IMS/DB
■ Diagnosing errors
■ Using OracleAS to access IMS/DB transactions
Note: You should understand the fundamentals of OracleAS,
OC4J, the UNIX and Microsoft Windows operating system before
using this guide to install or administer OracleAS Adapters for
IMS/DB.
Documentation Accessibility
Our goal is to make Oracle products, services, and supporting documentation
accessible to all users, including users that are disabled. To that end, our
documentation includes features that make information available to users of assistive
technology. This documentation is available in HTML format, and contains markup to
facilitate access by the disabled community. Accessibility standards will continue to
evolve over time, and Oracle is actively engaged with other market-leading
technology vendors to address technical obstacles so that our documentation can be
accessible to all of our customers. For more information, visit the Oracle Accessibility
Program Web site at http://www.oracle.com/accessibility/.
xi
Page 12

Accessibility of Code Examples in Documentation
Screen readers may not always correctly read the code examples in this document. The
conventions for writing code require that closing braces should appear on an
otherwise empty line; however, some screen readers may not always read a line of text
that consists solely of a bracket or brace.
Accessibility of Links to External Web Sites in Documentation
This documentation may contain links to Web sites of other companies or
organizations that Oracle does not own or control. Oracle neither evaluates nor makes
any representations regarding the accessibility of these Web sites.
TTY Access to Oracle Support Services
To reach AT&T Customer Assistants, dial 711 or 1.800.855.2880. An AT&T Customer
Assistant will relay information between the customer and Oracle Support Services at
1.800.223.1711. Complete instructions for using the AT&T relay services are available at
http://www.consumer.att.com/relay/tty/standard2.html. After the
AT&T Customer Assistant contacts Oracle Support Services, an Oracle Support
Services engineer will handle technical issues and provide customer support according
to the Oracle service request process.
Related Documents
For more information, see the following documents in the Oracle Other Product One
Release 7.0 documentation set or in the Oracle Other Product Two Release 6.1
documentation set:
Conventions
■ Oracle Application Server Adapter Concepts Guide
■ Oracle Application Server Adapter Installation Guide
■ Oracle Application Server Adapter Concepts Guide
■ Oracle Application Server Containers for J2EE User’s Guide
■ Oracle Application Server Containers for J2EE Services Guide
■ Oracle Application Server Containers for J2EE Security Guide
The following text conventions are used in this document:
Convention Meaning
boldface Boldface type indicates graphical user interface elements associated
with an action, or terms defined in text or the glossary.
italic Italic type indicates book titles, emphasis, or placeholder variables for
which you supply particular values.
monospace Monospace type indicates commands within a paragraph, URLs, code
in examples, text that appears on the screen, or text that you enter.
xii
Page 13

Oracle Application Server Adapter for IMS/DB (OracleAS Adapter for IMS/DB)
provides connectivity and runs interactions on an Information Management System Data Base (IMS/DB) system. This section provides an overview of the features and
architecture of OracleAS Adapter for IMS/DB.
This section contains the following topics:
■ OracleAS Adapter for IMS/DB Overview
■ OracleAS Adapter for IMS/DB Architecture
OracleAS Adapter for IMS/DB Overview
IMS/DB (Information Management System - Data Base) is a high-performance
hierarchical database. The data access API to IMS/DB is called DL/I, which is a
function by which the IMS/DB database can be traversed and operated on. Working
with DL/I requires the caller to run under the control of IMS/DB. APIs are also
available to enable access to IMS/DB from CICS and IMS/TM transactions.
1
Introduction
OracleAS Adapter for IMS/DB includes the following feature:
■ Captures and maintains a metadata schema for IMS/DB by importing various IMS
definition files such as a PSB file, DBD files, and COBOL copybooks. These are
transformed into mapping definition for Oracle Connect for IMS/DB on the z/OS
computer.
■ Uses an enterprise application integration (EAI) model. Users of a requesting
application can model the interactions that they want implemented, specifying
what each interaction does, when it occurs, and the inputs and outputs expected
for each interaction. Moreover, the OracleAS Adapter for IMS/DB maps data
structures, facilitating access to IMS/DB data from within Oracle Application
Server.
■ Implements interactions as parameterized SQL with the parameters forming the
input record, and with the output (in cases where there is an output) aggregated
into an XML document forming the output record.
■ Includes the options to access IMS/DB data managed by CICS, IMS/TM, or
directly.
■ Does support global transactions under CICS and can fully participate in a
distributed transaction.
Introduction 1-1
Page 14
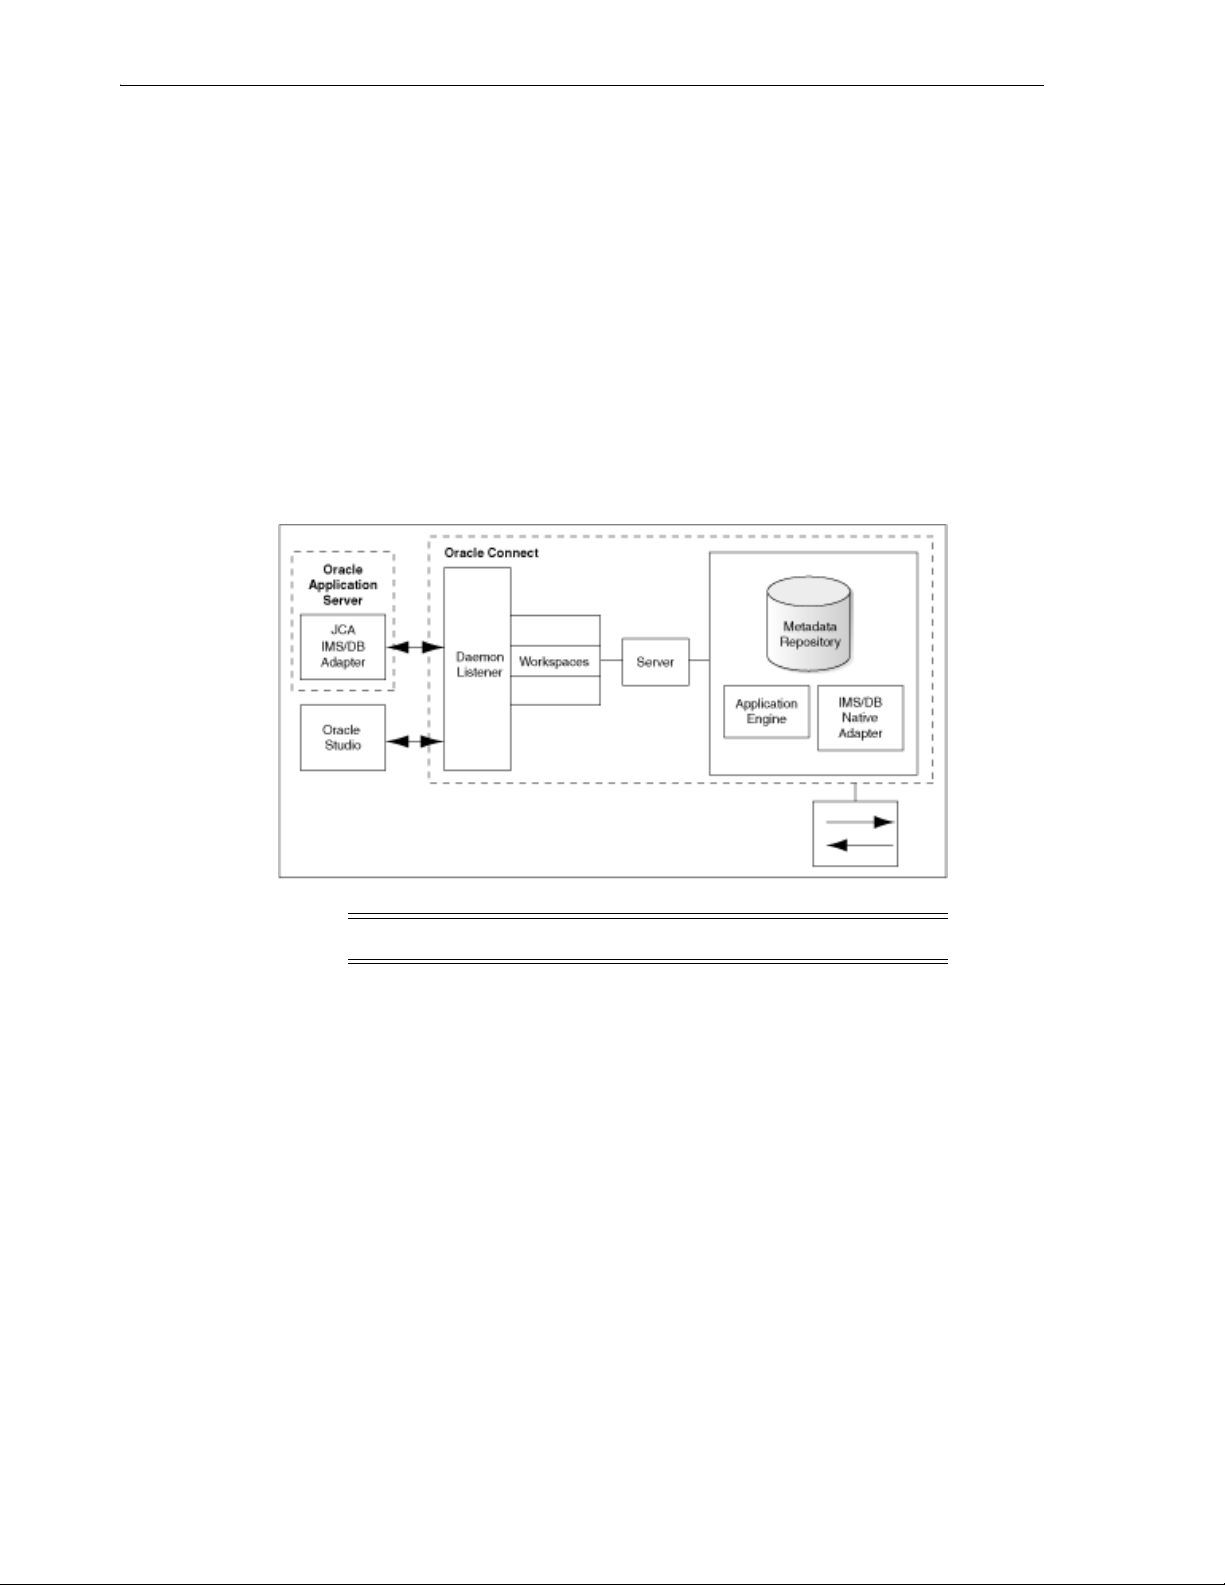
OracleAS Adapter for IMS/DB Architecture
OracleAS Adapter for IMS/DB Architecture
OracleAS Adapter for IMS/DB includes the following components:
■ J2CA 1.5 IMS/DB adapter: The J2CA IMS/DB adapter is a standard resource
adapter that is compliant with J2EE Connector Architecture, therefore, providing
J2EE components connectivity.
■ Oracle Connect: Oracle Connect runs on the legacy system and handles requests
from the J2CA 1.5 IMS/DB adapter, that runs within Oracle Application Server
Containers for J2EE (OC4J).
■ Oracle Studio: Oracle Studio is the configuration tool for Oracle Connect.
Configuration tasks using Oracle Studio are performed on a Windows or Linux
compuer. Oracle Studio uses perspectives that enables you to generate specific
information necessary to model OracleAS Adapter for IMS/DB.
The following figure illustrates the components of OracleAS Adapter for IMS/DB.
See Also: Oracle Application Server Adapter Concepts Guide
Integration Flow from Oracle Application Server to the Legacy Application
The J2CA 1.5 IMS/DB adapter converts the J2CA interaction invocation received from
Oracle Application Server to the XML format and passes the XML format to Oracle
Connect on the legacy server. The daemon listens for the request coming from the
J2CA 1.5 IMS/DB adapter client and assigns a server process to handle the request.
The properties of the server process, such as connection pooling requirements, are
defined by a workspace definition within the daemon.
The server process includes an instance of the application engine, which converts the
XML format into standard SQL which is passed to the data engine. The data engine
processes the SQL to create an efficient strategy for retrieving the data from IMS/DB
and then passes the SQL and execution strategy to the database back-end adapter. The
database back-end adapter passes the SQL to the back-end driver, which converts the
SQL to the language understood by IMS/DB and passes it to IMS/DB to be executed.
The results of the SQL statement are passed back to the application engine, through
the back-end adapter, where these results are converted to XML and passed back to the
client.
1-2 Oracle Application Server Adapters for IMS/DB User's Guide
Page 15

2
Installing and Configuring the OracleAS
Adapter for IMS/DB
This section describes how to install Oracle Connect and Oracle Studio, and how to
configure Oracle Connect using Oracle Studio.
Note: In addition to the installation procedures described in this
section, the J2CA 1.5 IMS/DB adapter must be installed with Oracle
Application Server. Installing the J2CA 1.5 IMS/DB adapter is
described in Oracle Application Server Adapter Installation Guide.
This section includes the following topics:
■ Preinstallation Tasks
■ Installing Oracle Connect on an IBM z/OS Series Platform
■ Updating an Existing Oracle Connect Installation with IMS/DB
■ Installing Oracle Studio
■ Configuring Oracle Connect
Preinstallation Tasks
Before installing OracleAS Adapter for IMS/DB, ensure that your computer meets the
following requirements:
■ IBM z/OS Hardware and Software Requirements
IBM z/OS Hardware and Software Requirements
This section describes the following requirements for installing Oracle Connect on an
IBM z/OS platform:
■ Hardware Requirements
■ Software Requirements
Hardware Requirements
The following table summarizes the hardware requirements for Oracle Connect.
Installing and Configuring the OracleAS Adapter for IMS/DB 2-1
Page 16

Installing Oracle Connect on an IBM z/OS Series Platform
Table 2–1 Oracle Connect Hardware Requirements
Hardware Component Requirements
Processor An IBM zSeries computer.
Memory The minimum requirement is 4MBfor each connection. A
connection is defined as a connection to a server process or
daemon. The actual memory requirement depends on such
things as the size of the database and the number of databases
accessed.
Disk Space (3380 and
150 cylinders.
3390 disks)
Software Requirements
The following table summarizes the software requirements for Oracle Connect:
Table 2–2 Oracle Connect Software Requirements
Software Component Requirements
Operating System IBM z/OS
CICS TP Monitor (if
accessing IMS/DB data
under CICS)
TCP/IP The operating system must support the TCP/IP protocol for
C Runtime Library The C runtime library has all the standard C runtime programs.
Oracle Application
Server
V4R1 or higher (recommended to use CICS V6R1 or higher)
CICS EXCI support must be installed and IRCSTRT=YES must
be specified in the CICS initialization parameters, so that the IRC
(Inter Region Communication) starts.
You can also set the IRC to open by issuing the following
command: CEMT SET IRC OPEN. Also the IBM group
DFH$EXCI (or an equivalent user-defined group) must be
installed in the CICS region: using the CEDA RDO facility.
using the Internet
Oracle Application Server 10g (10.1.3.4).
Installing Oracle Connect on an IBM z/OS Series Platform
This section explains how to install Oracle Connect. This section includes the
following:
■ Installation Worksheet
■ Preinstallation Tasks
■ Importing the Installation Kit
■ Installation Instructions
■ Post-Installation Instructions
2-2 Oracle Application Server Adapters for IMS/DB User's Guide
Page 17

Installing Oracle Connect on an IBM z/OS Series Platform
Note: If you have an Oracle Connect back-end adapter already
installed on the IBM z/OS platform, follow the instructions
described in "Updating an Existing Oracle Connect Installation
with IMS/DB" on page 2-11.
The other back-end adapters that run on an IBM z/OS platform
include:
■ OracleAS Adapter for CICS
■ OracleAS Adapter for IMS/TM
■ OracleAS Adapter for VSAM
Installation Worksheet
Verify that you have all the information detailed in the following installation
worksheets, so you can refer to it during the configuration process.
Table 2–3 Preinstallation Information
Topic Required Information Default Comment
General Operating system - z/OS
- Disk space - 150 cylinders.
- Memory - The minimum requirement is 4MBfor each
connection. A connection is defined as a
connection to a server process or daemon.
The actual memory requirement depends on
such things as the size of the database and
the number of databases accessed.
- Installation high-level
qualifier
-Volume - -
- Unit 3390 SMS only: unit where SMS resides.
OCL10134 -
- Output class A -
- JCL job card - An optional card (up to 6 lines) to replace
the prefix job (entered as it will appear in
the job).
- ISPF load library name ISP.SISPLOAD -
CICS CICS EXCI load library name CICS.CICS.SDFHEXCI To access IMS/DB data under CICS.
Table 2–4 Required Permissions
Permission
Permission to define an APF-authorized library
Permission to write to an active proclib, such as user.proclib
Permission to read the CICS EXCI library (when accessing IMS/DB data under CICS)
Permission to update the security manager, such as RACF
Optionally, permission to specify an output class for Oracle Connect output
Installing and Configuring the OracleAS Adapter for IMS/DB 2-3
Page 18

Installing Oracle Connect on an IBM z/OS Series Platform
Table 2–5 Installation Checklist
Step Comment/Outputs
tso profile noprefix Ensures that the user name is not used as part of
the dataset name allocated in the next steps.
Allocate dataset: {HLQ}.TRANSMIT.KIT 130 tracks (3390), format=FB, record length=80,
block size=3120
Allocate dataset: {HLQ}.TRANSMIT.LOAD 500 tracks (3390), format=FB, record length=80,
block size=3120
FTP files to z/OS FTP using binary mode.
RECEIVE INDSNAME('{HLQ}.TRANSMIT.KIT') -
da('{HLQ}.TRANSMIT.LIB') UNIT(unit) VOLUME(volume) -
EX {HLQ}.TRANSMIT.LIB(PREPARE) Successful MAXCC is 0, 4 or 8
BUILDKIT.SRC, BUILDKIT.LOAD and
BUILDKIT.GENDEMO created.
EX {HLQ}.BUILDKIT.SRC(NAVINST) Successful MAXCC is 0 or 4.
Preinstallation Tasks
Before starting the installation, ensure that you have the following information
available:
■ The output class for the installation output if you do not want to use the default
value, which is A
■ If you use SMS to manage all datasets (you cannot provide unit and volume
information), then the unit where SMS resides.
Before starting the installation, ensure that you have the following permissions:
■ Permission to define an APF-authorized library.
■ Permission to write to an active proclib, such as user.proclib.
■ Permission to read the CICS EXCI library, when accessing IMS/DB data under
CICS.
■ Permission to update the security manager, such as RACF.
Note: Optionally, ensure that you have permission to specify an
output class for Oracle Connect output. Assigning a device which is
set on HOLD prevents the loss of log information when Oracle
Connect started tasks finish.
Oracle Connect for the IBM z/OS platform is contained in the following datasets:
■ OCL10134.TRANSMIT.KIT
■ OCL10134.TRANSMIT.LOAD
These datasets are provided in the following directory.
Oracle_Connect\IMSDB_Legacy_Adapter
2-4 Oracle Application Server Adapters for IMS/DB User's Guide
Page 19

Importing the Installation Kit
Perform the following steps on the mainframe to import Oracle Connect installation
kit to the mainframe:
1. Run the following command:
tso profile noprefix
The user name will not be used as part of the dataset name. On some systems this
is the default.
2. Allocate datasets with the following space for each of these files:
■ OCL10134.TRANSMIT.KIT = 130 tracks (3380 and 3390 disks)
■ OCL10134.TRANSMIT.LOAD = 500 tracks (3380 and 3390 disks)
For each dataset: RECFM=FB and LRECL=80. The block size is 3120.
3. Using FTP, copy OCL10134.TRANSMIT.KIT and OCL10134.TRANSMIT.LOAD in
binary mode to the mainframe. You can replace the OCL10134 high-level qualifier
to any qualifier you want.
Installation Instructions
Perform the following steps to install Oracle Connect:
Installing Oracle Connect on an IBM z/OS Series Platform
1. Run the following command at the TSO prompt:
RECEIVE INDSNAME('nnn.TRANSMIT.KIT')
Where nnn represents the high-level qualifier you want to assign for the Oracle
Connect installation. Assign the high-level qualifier you specified in step 7 of the
preinstallation tasks. The default value is OCL10134.
Note: You can use more than one high-level qualifier (such as
ACME.DEV.OCL10134) with the following conditions:
■ The total length must be less than or equal to twenty characters.
■ The words transmit and buildkit cannot be used as high-level
qualifiers.
2. Enter the following command when prompted for the restore parameters:
da('nnn.TRANSMIT.LIB') [UNIT(unit) VOLUME(volume)]
This extracts the nnn.TRANSMIT.LIB library from the nnn.TRANSMIT.KIT kit
to the specified unit and volume. If a unit and volume are not specified the library
is extracted to the current unit and volume.
3. Execute the PREPARE member of the nn.TRANSMIT.LIB library:
ex PREPARE
Follow the instructions in the Response column in Tab le 2– 6 for each entry in the
Screen column.
Installing and Configuring the OracleAS Adapter for IMS/DB 2-5
Page 20

Installing Oracle Connect on an IBM z/OS Series Platform
Table 2–6 Installation Prepare Job Prompts and Responses
Screen Response
DO YOU WANT TO USE SMS MANAGED
STORAGE FOR THIS INSTALLATION Y/N [N] :
ENTER THE STORCLASS FOR INSTALLATION
TEMP DATASETS [ ] :
ENTER THE UNIT NAME FOR INSTALLATION
TEMP DATASETS [3390] :
ENTER THE VOLUME NAME FOR
INSTALLATION TEMP DATASETS :
If you want to manage the storage using SMS, then answer
Y, otherwise answer N.
This prompt is displayed only if SMS is used to manage the
installation (you answered Y to the first prompt).
Enter the storage class.
If a storage class is not specified, then enter the unit name
for temporary datasets used during the installation
procedure.
This prompt is displayed only if SMS is not used to manage
the installation (you answered N to the first prompt).
The volume name for temporary datasets used during the
installation procedure.
ENTER THE OUTPUT CLASS FOR
INSTALLATION OUTPUT [A] :
DO YOU WANT TO USE THE DEFAULT JOB
CARD Y/N [Y]
DO YOU WANT TO PERFORM A MANUAL
(M) OR AUTOMATIC (A) INSTALLATION [A] :
PLEASE REVIEW AND SUBMIT FOR
EXECUTION THE
HLQ.TRANSMIT.LIB(INSTJO)
The following libraries are generated:
nnn.BUILDKIT.LOAD
nnn.BUILDKIT.SRC
nnn.BUILDKIT.GENDEMO
Where nnn is the high-level qualifiers you assigned in step 1.
4. In the nnn.BUILDKIT.SRC library, execute the NAVINST member:
ex NAVINST
Enter the output class only if you do not want the default
class used (the default is A)
A job card is displayed. If you want to use a replacement
card, then it must be entered as it will appear in the job. You
can enter up to six lines. Enter a blank card to end input.
If you do not enter a card, then the Oracle Connect default
card is used.
If you want to review the JCL used to install Oracle Connect,
before it is submitted, then respond M for a manual
installation.
This prompt is displayed only if a manual installation is
requested (you answered M to the previous prompt).
Follow the instructions in the Response column in the following table for each
entry in the Screen column.
2-6 Oracle Application Server Adapters for IMS/DB User's Guide
Page 21

Table 2–7 Installation Prompts and Responses
Screen Response
DO YOU WANT TO USE SMS MANAGED
STORAGE FOR THIS INSTALLATION Y/N [N] :
THE SOFTWARE WILL BE INSTALLED UNDER
THE HIGH LEVEL QUALIFIER THAT YOU
WILL CHOOSE.
ENTER THE HIGH LEVEL QUALIFIER
["QUALIFIER"] :
ENTER THE STORCLASS FOR TEMP DATASETS
['STORCLASS'] :
ENTER THE UNIT NAME FOR INSTALLATION
TEMP DATASETS [3390] :
ENTER THE VOLUME NAME FOR
INSTALLATION TEMP DATASETS :
If you want to manage the storage using SMS, then answer
Y, otherwise answer N.
The high-level qualifier for the installation (referred to as
INSTROOT throughout this guide).
You can use more than one high-level qualifier (such as
ACME.DEV.VA10). The total length must be less than or
equal to twenty characters. The qualifiers can be the same
as the ones used for the installation (step 1).
The words transmit and buildkit cannot be used as
high-level qualifiers.
This prompt is displayed only if SMS is used to manage the
installation (you answered Y to the first prompt).
Enter the storage class.
The unit name for temporary datasets used during the
installation procedure.
This prompt is displayed only if SMS is not used to manage
the installation (you answered N to the first prompt).
The volume name for temporary datasets used during the
installation procedure.
Installing Oracle Connect on an IBM z/OS Series Platform
PLEASE CONFIRM (YES/NO/QUIT) [YES] : Confirm the entered details.
ENTER THE OUTPUT CLASS FOR
INSTALLATION OUTPUT [A] :
DO YOU WANT TO USE THE DEFAULT JOB
CARD Y/N [Y]
ADDING AND UPDATING ORACLE
CONNECT FOR IMS/DB CONFIGURATION ON
THIS MACHINE, FROM A REMOTE ORACLE
ADMINISTRATION CONSOLE, CAN ONLY BE
DONE BY SOMEONE DEFINED AS AN
ADMINISTRATOR FOR ORACLE CONNECT
ON THIS MACHINE.
ENTER A VALID USER NAME FOR AN
ORACLE CONNECT ADMINISTRATOR [ALL]:
DO YOU WANT TO PERFORM A MANUAL (M)
OR AUTOMATIC (A) INSTALLATION [A]:
PLEASE REVIEW AND SUBMIT FOR
EXECUTION THE DSN1 (INSTJBOR)
Enter the output class for Oracle Connect output. Assigning
a device which is set on HOLD prevents the loss of log
information when the Oracle Connect started tasks finish
(the default is A).
A job card is displayed. If you want to use a replacement
card, then it must be entered as it will appear in the job. You
can enter up to six lines. Enter a blank card to end input.
If you do not enter a card, then the Oracle Connect default
card is used.
To manage Oracle Connect on this computer from Oracle
Studio, you need to enter a user account of a user who will
have administrative authorization, or press Enter to enable
any user to administer Oracle Connect on this computer.
The administrative rights can be changed from within
Oracle Studio after the installation.
If you want to review the JCL used to install Oracle
Connect, before it is submitted, then respond M for a
manual installation.
This prompt is displayed only if a manual installation is
requested (you answered M to the previous prompt).
DSN1 is the dataset name where INSTJBOR is located.
5. In the nnn.BUILDKIT.SRC library, execute the IMSDB member:
ex IMSDB
Follow the instructions in the Response column in for each entry in the Screen
column.
Installing and Configuring the OracleAS Adapter for IMS/DB 2-7
Page 22

Installing Oracle Connect on an IBM z/OS Series Platform
Table 2–8 IMS/DB Adapter Installation Prompts and Responses
Screen Response
ENTER DBD LIBRARY NAME Enter the IMS DBD Library name for IMS on your system
ENTER PSB LIBRARY NAME Enter the IMS PSB Library name for IMS on your system
ENTER RES LIBRARY NAME Enter the IMS RES Library name for IMS on your system
ENTER PROC LIBRARY NAME Enter the IMS PROC Library name for IMS on your system
ENTER PGM LIBRARY NAME Enter the IMS PGM Library name for IMS on your system
ENTER YOUR PSB NAME Enter the name of the PSB file with the name of your IMS
database.
YOUR DBDLIB IS:
YOUR PSBLIB IS:
YOUR RESLIB IS:
YOUR PROCLIB IS:
YOUR PGMCLIB IS:
This is a summary of the IMS questions. Check the summary
to be sure all is correct. You can select:
■ Yes, to use the IMS database as configured
■ No, to not use the IMS database
■ Quit, to leave the CUST process
YOUR PSBNAME IS:
PLEASE CONFIRM (YES/NO/QUIT) :YES: :
DO YOU WANT ORACLE CONNECT TO
WORK WITH IMS/DB UNDER CICS
ENTER THE CICS EXCI LOAD LIBRARY NAME
[CICSTS13.CICS.SDFHEXCI]:
If you want Oracle Connect to work with IMS/DB under
CICS, then answer Y, otherwise answer N.
Enter the CICS EXCI load library name only if you do not
want the default
PLEASE CONFIRM (YES/NO/QUIT) [YES]: Confirm the entered details
The installation is completed. All JCL jobs and REXX procedures are written to the
INSTROOT.USERLIB library. INSTROOT is the high-level qualifier for the installation.
Post-Installation Instructions
The following post-installation tasks must be done to work with Oracle Connect:
■ Post-Installation Procedures
■ Starting the Daemon
■ Setting Up Oracle Connect for Reentrancy
Post-Installation Procedures
Perform the following procedures after completing the installation to configure Oracle
Connect.
■ Allocate a dataset for INSTROOT.DEF.BRANDBIN, using 1 track and with
RECFM=VB and LRECL=256. The block size is 6233.
INSTROOT is the high-level qualifier where Oracle Connect is installed.
Using FTP, copy the BRANDBIN file, in binary mode, from the
Oracle Connect\IMSDB Legacy Adapter directory to the mainframe, to
INSTROOT.DEF.BRANDBIN.
■ Define the LOADAUT library as an APF-authorized library
2-8 Oracle Application Server Adapters for IMS/DB User's Guide
Page 23

Installing Oracle Connect on an IBM z/OS Series Platform
Note: To define a DSN as APF-authorized, in the SDSF screen
enter the command:
"/setprog apf,add,dsn=INSTROOT.loadaut,volume=vol002"
where vol002 is the volume where you installed Oracle Connect and
INSTROOT is the high-level qualifier where Oracle Connect is
installed.
If the site uses SMS, then when defining APF-authorization in the
SDSF screen, enter the following command:
"/setprog apf,add,dsn=INSTROOT.loadaut,SMS"
Ensure that the library is APF-authorized, even after an IPL (reboot)
of the computer.
■ Move the INSTROOT.USERLIB(ATTDAEMN) and
INSTROOT.USERLIB(ATTSRVR) members to any active proclib, such as
user.proclib, ATTDAEMN and ATTSRVR are run as started tasks.
If you decide to change the name of the ATTSRVR member when you move it to a
general high-level qualifier, then change the name specified in the
StartupScript parameter in the daemon configuration to the new name:
■ Run INSTROOT.USERLIB(NAVCMD) and enter EDIT DAEMON IRPCDINI at
the prompt.
■ Change the startupScript parameter from ATTSRVR to the new name for
the server:
<Workspace name="Navigator"
startupScript="NEW_NAME"
serverMode="reusable"
... />
■ Exit and save the change.
■ Change the following line in the ATTDAEMN script to include the IP address and
port of the IBM z/OS platform.
For example, before:
// PARM='-B START IRPCDINI'
After:
// PARM='-B -L ip_address:2551 START IRPCDINI'
Where ip_address specifies the IP address of the computer, 2551 is the default
port for starting the daemon and IRPCDINI is the default daemon configuration.
■ The ATTDAEMN and ATTSRVR started tasks need permission to use an Open
Edition TCP/IP stack. The owner must be a user with OMVS segment defined and
OMVS UID= 0000000000.
■ In the security manager, such as RACF, define ATTDAEMN and ATTSRVR with a
started task class and a general profile that enables the following:
■ Permission to issue master console commands.
■ START authority for the ATTSRVR job.
Installing and Configuring the OracleAS Adapter for IMS/DB 2-9
Page 24

Installing Oracle Connect on an IBM z/OS Series Platform
■ Access to an Open z/OS segment (that defines access to TCP/IP OA sockets).
■ ALTER authority on datasets under INSTROOT (to access to read, write,
allocate and delete datasets under INSTROOT).
■ The installation includes a PS, INSTROOT.DEF.GBLPARMS, that contains global
environment information. This PS is read at startup and the correct software
version is used, based on the details provided in the startup task.
If you change the location of this member, you must also change the relevant cards
in the following jobs to the new locations:
■ ATTSRVR: located in an active proclib, such as user.proclib
■ ATTDAEMN: located in an active proclib, such as user.proclib
■ NAVSQL: located in INSTROOT.USERLIB
■ The input during the installation procedure is written to
nnn.BUILDKIT.SRC(PARS). You can use this file to provide the same inputs if
you rerun the installation, where nnn is the high-level qualifier you assign for the
installation.
■ For information about specifying Oracle Connect as the service using port 2551 in
the TCP/IP network services file, consult TCP/IP documentation.
Starting the Daemon
Activate INSTROOT.USERLIB(ATTDAEMN) as a started task to invoke the daemon.
For example, in the SDSF screen enter the following:
'/s ATTDAEMN'
Where INSTROOT is the high-level qualifier where Oracle Connect is installed.
To submit the daemon as a job, uncomment the first two lines of the ATTDAEMN JCL,
change the PARM line as described earlier, and run the job using the subcommand.
The ATTDAEMN JCL is similar to the following:
//*ATTDAEMN JOB 'RR','TTT',MSGLEVEL=(1,1),CLASS=A,
//* MSGCLASS=A,NOTIFY=&SYSUID,REGION=8M
//STEP1 EXEC PGM=IRPCD,
// PARM='-B START IRPCDINI'
//* PARM='-B -L :8883 START'
//STEPLIB DD DSN=INSTROOT.LOADAUT,DISP=SHR
//SYSPRINT DD SYSOUT=A
//GBLPARMS DD DSN=INSTROOT.DEF.GBLPARMS,DISP=SHR
// EXEC PGM=IRPCD,COND=((1,EQ,STEP1),(2,EQ,STEP1)),
// PARM='-KATTDAEMN START ''INSTROOT.DEF.IRPCDINI'''
//STEPLIB DD DSN=INSTROOT.LOADAUT,DISP=SHR
//SYSPRINT DD SYSOUT=A
//GBLPARMS DD DSN=INSTROOT.DEF.GBLPARMS,DISP=SHR
//SYSDUMP DD DUMMY
Setting Up Oracle Connect for Reentrancy
All Oracle Connect load modules are reentrant to enable sub-tasking. Therefore, move
INSTROOT.LOAD to the Link Pack Area (LPA).
Where INSTROOT is the high-level qualifier where Oracle Connect is installed.
Using the LPA reduces real storage usage (because everyone shares the LPA copy) and
fetch time.
2-10 Oracle Application Server Adapters for IMS/DB User's Guide
Page 25

Updating an Existing Oracle Connect Installation with IMS/DB
Note: If you intend on using impersonation, so that you can run
in a security context that is different than the context of the process
that owns the server, then do the following:
■ Place the INSTROOT.LOAD(ATYSVCW) member in an
APF-authorized library outside the LPA.
■ Change the ATTSRVR member (located in the active proclib), by
adding the following to the STEPLIB list:
// DD DSN=apf_library,DISP=SHR
Where apf_library is the APF-authorized library outside the
LPA where the ATYSCVW member was moved.
Setting Up Oracle Connect to Update IMS/DB Data
Perform the following to set up Oracle Connect so that you can update IMS/DB data.
IMS/DB Running Under CICS To set up Oracle Connect so that you can update IMS/DB
data from a CICS transaction, copy the ATYDBCTL load module from INSTROOT.LOAD
to a CICS DFHRPL library (such as CICS.USER.LOAD) and then define the ATYDBCTL
program under CICS using any available group such as ORA group:
CEDA DEF PROG(ATYDBCTL) G(ORA) LANG(C) DA(ANY) DE(ORACLE IMSDB UPDATE PROG)
Where INSTROOT is the high-level qualifier where Oracle Connect is installed.
After defining the ATYDBCTL program to a group, install it as follows:
CEDA IN G(ORA)
IMS/DB Not Running Under CICS To enable Oracle Connect to create and delete IMS/DB
data, run the following JCL:
// IDCSYSIN DD DSN=&&IMSDB,DISP=(NEW,DELETE,DELETE),
// SPACE=(TRK,(1)),UNIT=SYSDA,
// DCB=(BLKSIZE=3200,LRECL=80,RECFM=FB)
Updating an Existing Oracle Connect Installation with IMS/DB
Verify that you have all the information detailed in the following installation
worksheets, so you can refer to it during the configuration process.
Table 2–9 Preinstallation Information
Topic Required Information Default Comment
CICS CICS EXCI load library name CICS.CICS.SDFHEXCI -
Table 2–10 Required Permissions
Permission
Permission to read the CICS EXCI library
In the nnn.BUILDKIT.SRC library, execute the IMSDB member:
ex IMSDB
Installing and Configuring the OracleAS Adapter for IMS/DB 2-11
Page 26

Installing Oracle Studio
Follow the instructions in the Response column in for each entry in the Screen column.
Table 2–11 IMS/DB Adapter Installation Prompts and Responses
Screen Response
ENTER DBD LIBRARY NAME Enter the IMS DBD Library name for IMS on your system
ENTER PSB LIBRARY NAME Enter the IMS PSB Library name for IMS on your system
ENTER RES LIBRARY NAME Enter the IMS RES Library name for IMS on your system
ENTER PROC LIBRARY NAME Enter the IMS PROC Library name for IMS on your system
ENTER PGM LIBRARY NAME Enter the IMS PGM Library name for IMS on your system
ENTER YOUR PSB NAME Enter the name of the PSB file with the name of your IMS
database.
YOUR DBDLIB IS:
YOUR PSBLIB IS:
YOUR RESLIB IS:
YOUR PROCLIB IS:
YOUR PGMLIB IS:
YOUR PSBNAME IS:
PLEASE CONFIRM (YES/NO/QUIT) :YES: :
This is a summary of the IMS questions. Check the summary
to be sure all is correct. You can select:
■ Yes, to use the IMS database as configured
■ No, to not use the IMS database
■ Quit, to leave the CUST process
DO YOU WANT ORACLE CONNECT TO
WORK WITH IMS/DB UNDER CICS
ENTER THE CICS EXCI LOAD LIBRARY NAME
[CICSTS13.CICS.SDFHEXCI]:
If you want Oracle Connect to work with IMS/DB under
CICS, then answer Y, otherwise answer N.
Enter the CICS EXCI load library name only if you do not
want the default
PLEASE CONFIRM (YES/NO/QUIT) [YES]: Confirm the entered details
The installation is completed. All JCL jobs and REXX procedures are written to the
INSTROOT.USERLIB library. INSTROOT is the high-level qualifier for the installation.
After completing the installation, perform post-installation tasks, as described in
"Post-Installation Instructions" on page 2-8, as required.
Installing Oracle Studio
This following sections explain how to install Oracle Studio.
■ Oracle Studio Requirements
■ Installing Oracle Studio on Windows
■ Installing Oracle Studio on Linux
Note: If you have Oracle Studio version 10.1.3.4 or higher
installed on your computer because you are using an Oracle AS
legacy adapter or OracleAS CDC adapter , you do not need to
reinstall it. If you have an older version of Oracle Studio, you must
install the newest version.
Oracle Studio Requirements
The following are the hardware requirements for Oracle Studio:
■ Processor: Intel or 100% compatible computer, based on a Pentium processor.
2-12 Oracle Application Server Adapters for IMS/DB User's Guide
Page 27

■ Memory: 256 MB
■ Disk space: 120 MB of free disk space
You can install Oracle Studio on the following operating systems:
■ Windows XP with Service Pack 2 or higher
Windows 2003
Windows Vista
■ Linux OS with GTK
Installing Oracle Studio on Windows
Oracle Studio is installed with a standard install wizard. Do the following to install
Oracle Studio.
■ Run the installation file, either using the Run option in the Windows Start menu or
through Windows Explorer. Follow the instructions on the wizard screen.
Installing Oracle Studio on Linux
The Oracle Studio installation on Linux can be caried out by one of the following:
Configuring Oracle Connect
■ Installing Oracle Studio with the Wizard (SH installation)
■ Installing with a Silent Installation (RPM)
Installing Oracle Studio with the Wizard (SH installation)
You can install Oracle Studio by using the installation wizard. This allows you to
easily carry out any standard or custom installation. Do the following for the Linux SH
installation.
1. Install into a directory where you have permission.
2. Change the mode to execute mode. Type in:
Chmod +x <file name>
3. Enter the following:
./ <file name>
If you are not installing to the current directory, enter the full path.
Installing with a Silent Installation (RPM)
You can use the Linux RPM method to install Oracle Studio. Do the following to carry
out a silent installation on Linux.
■ Enter the following:
rpm -i <file name>
You can use RPM parameters to create a custom inslallation.
Configuring Oracle Connect
All modeling of Oracle Connect is performed using Oracle Studio. To use Oracle
Studio, you first configure it to enable access to the IBM z/OS platform where the
IMS/DB data resides.
To configure Oracle Connect, refer to the following sections:
■ Setting Up the IBM z/OS Platform in Oracle Studio
Installing and Configuring the OracleAS Adapter for IMS/DB 2-13
Page 28
Configuring Oracle Connect
■ Securing Access to Oracle Connect
■ Modeling Interactions for OracleAS Adapter for IMS/DB
Note: The following tasks assume you have permission to access
the IBM z/OS platform and that the Oracle Connect daemon is
running on this computer.
Check with the system administrator to ensure these requirements
are fulfilled.
Setting Up the IBM z/OS Platform in Oracle Studio
Using Oracle Studio, perform the following steps to configure the IBM z/OS platform:
1. From the Start menu, select Programs, Oracle, and then select Studio. Oracle
Studio opens, displaying the Design perspective.
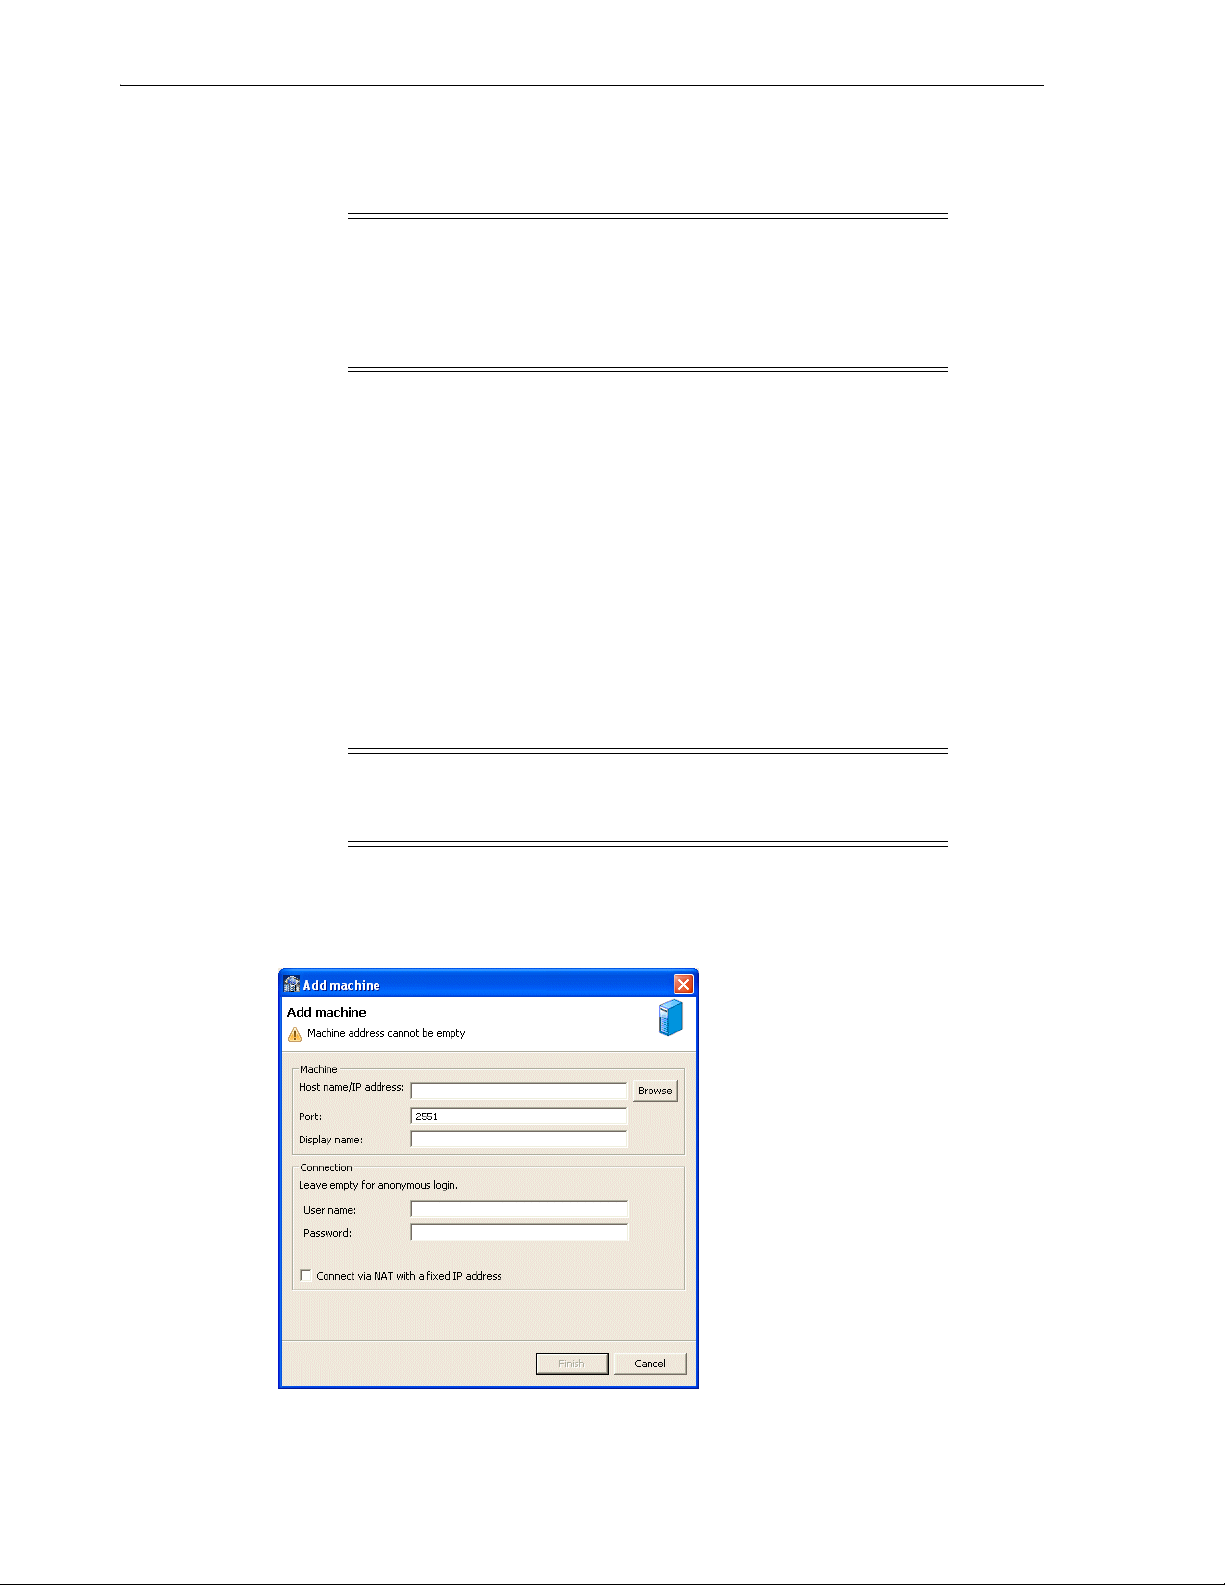
2. Right-click Machines in the Configuration Explorer and select Add Machine. The
Add Machine screen is displayed (see Figure 2–1).
3. Enter the name of the computer you want to connect to, or click Browse to select
the computer from the list of computers that is displayed and which use the
default port (2551).
4. Specify the username and password of the user who was specified as the
administrator when Oracle Connect was installed.
Note: Selecting Anonymous connection enables anyone having
access to the computer to be an administrator, if this was defined
for the computer.
The Add Machine screen is shown in the following figure:
Figure 2–1 The Add Machine screen
Click Finish.
5.
2-14 Oracle Application Server Adapters for IMS/DB User's Guide
Page 29
The computer is displayed in the Configuration Explorer.
Securing Access to Oracle Connect
Oracle Studio includes mechanisms to secure access to Oracle Connect both during
modeling and at run time.
During modeling, the following security mechanisms can be applied:
■ Setting Password Access to Oracle Studio
■ Specifying Users with Administrative Rights
At run time client access to Oracle Connect is provided by the user profile:
■ Setting Up Run-Time User Access to the IBM z/OS Platform
Setting Password Access to Oracle Studio
Initially, any operation performed using Oracle Studio does not require a password.
You can set a password so that the first operation that involves accessing the server
from Oracle Studio requires a password to be entered.
Perform the following steps to set password access to Oracle Studio:
1. From the Start menu, select, Programs, Oracle, and then select Studio. Oracle
Studio opens.
Configuring Oracle Connect
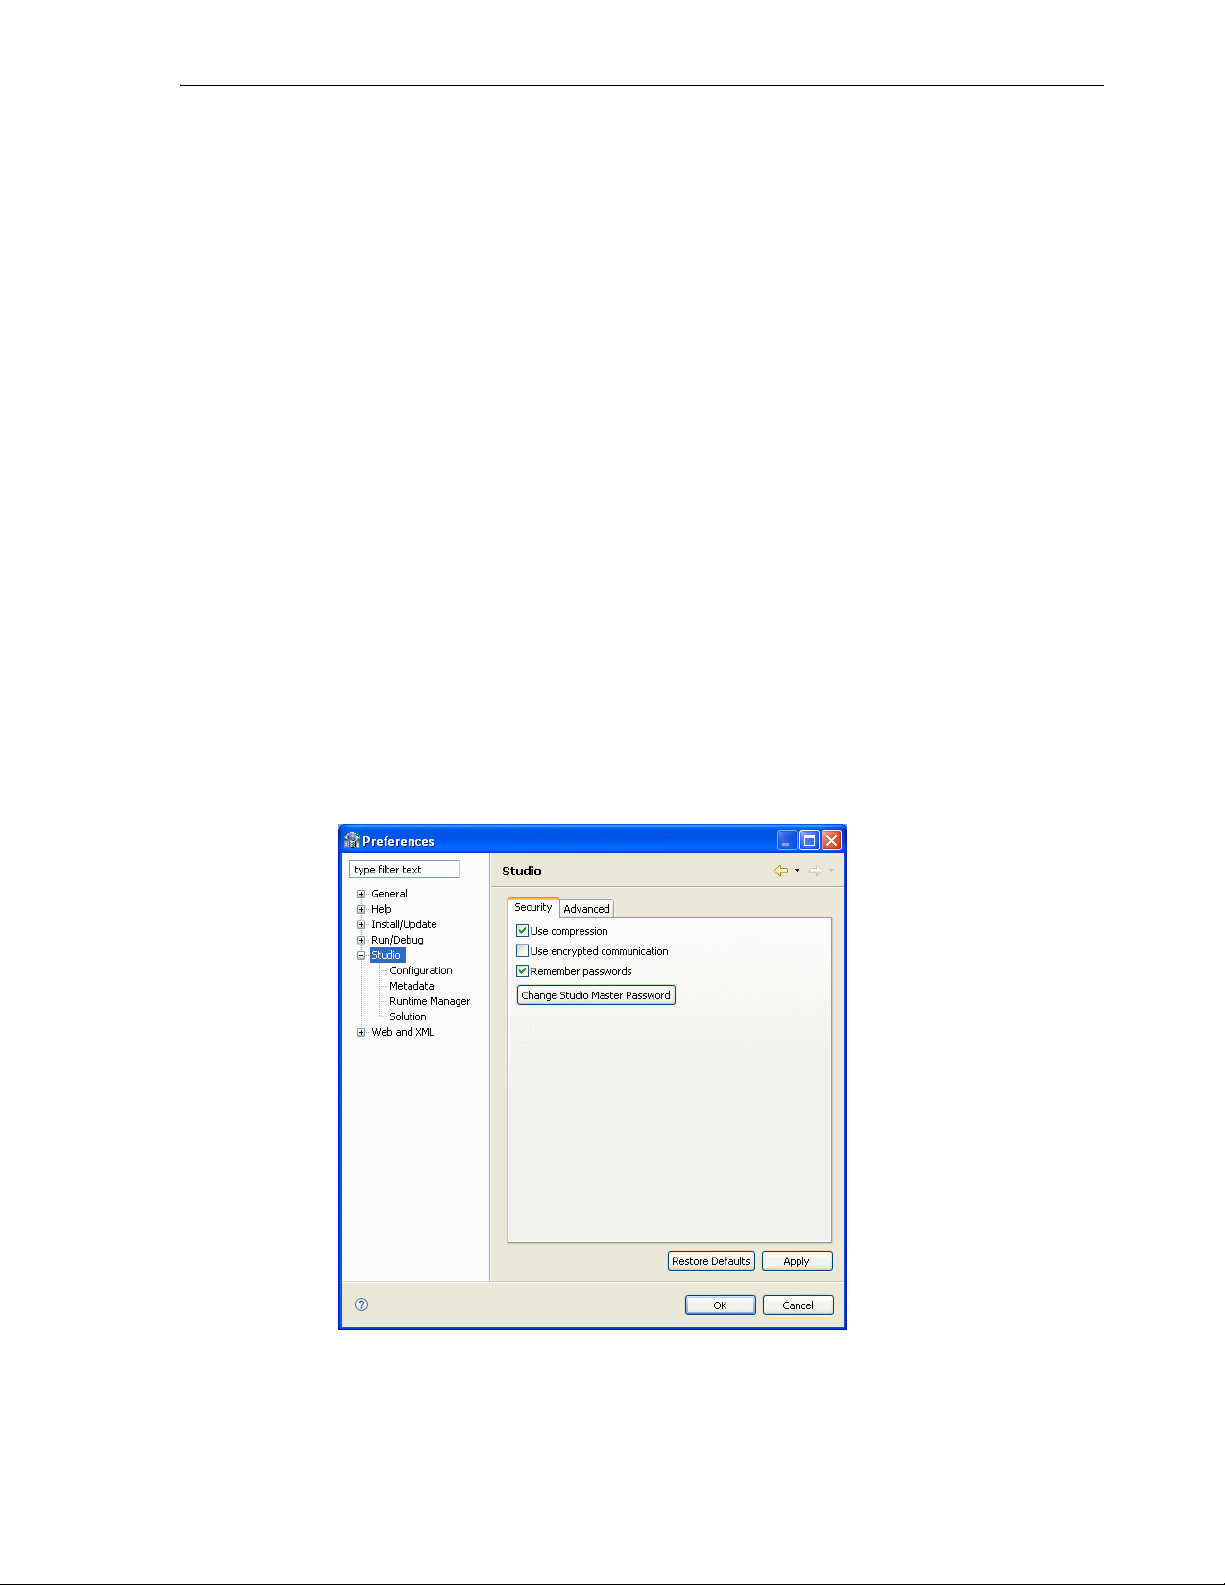
2. From the Window menu, select Preferences. The Preferences screen is displayed.
3. Select Studio as shown in the following figure:
Figure 2–2 The Preferences screen
4.
Click Change Studio Master Password. The Change Master Password screen is
displayed, as shown in the following figure:
Installing and Configuring the OracleAS Adapter for IMS/DB 2-15
Page 30
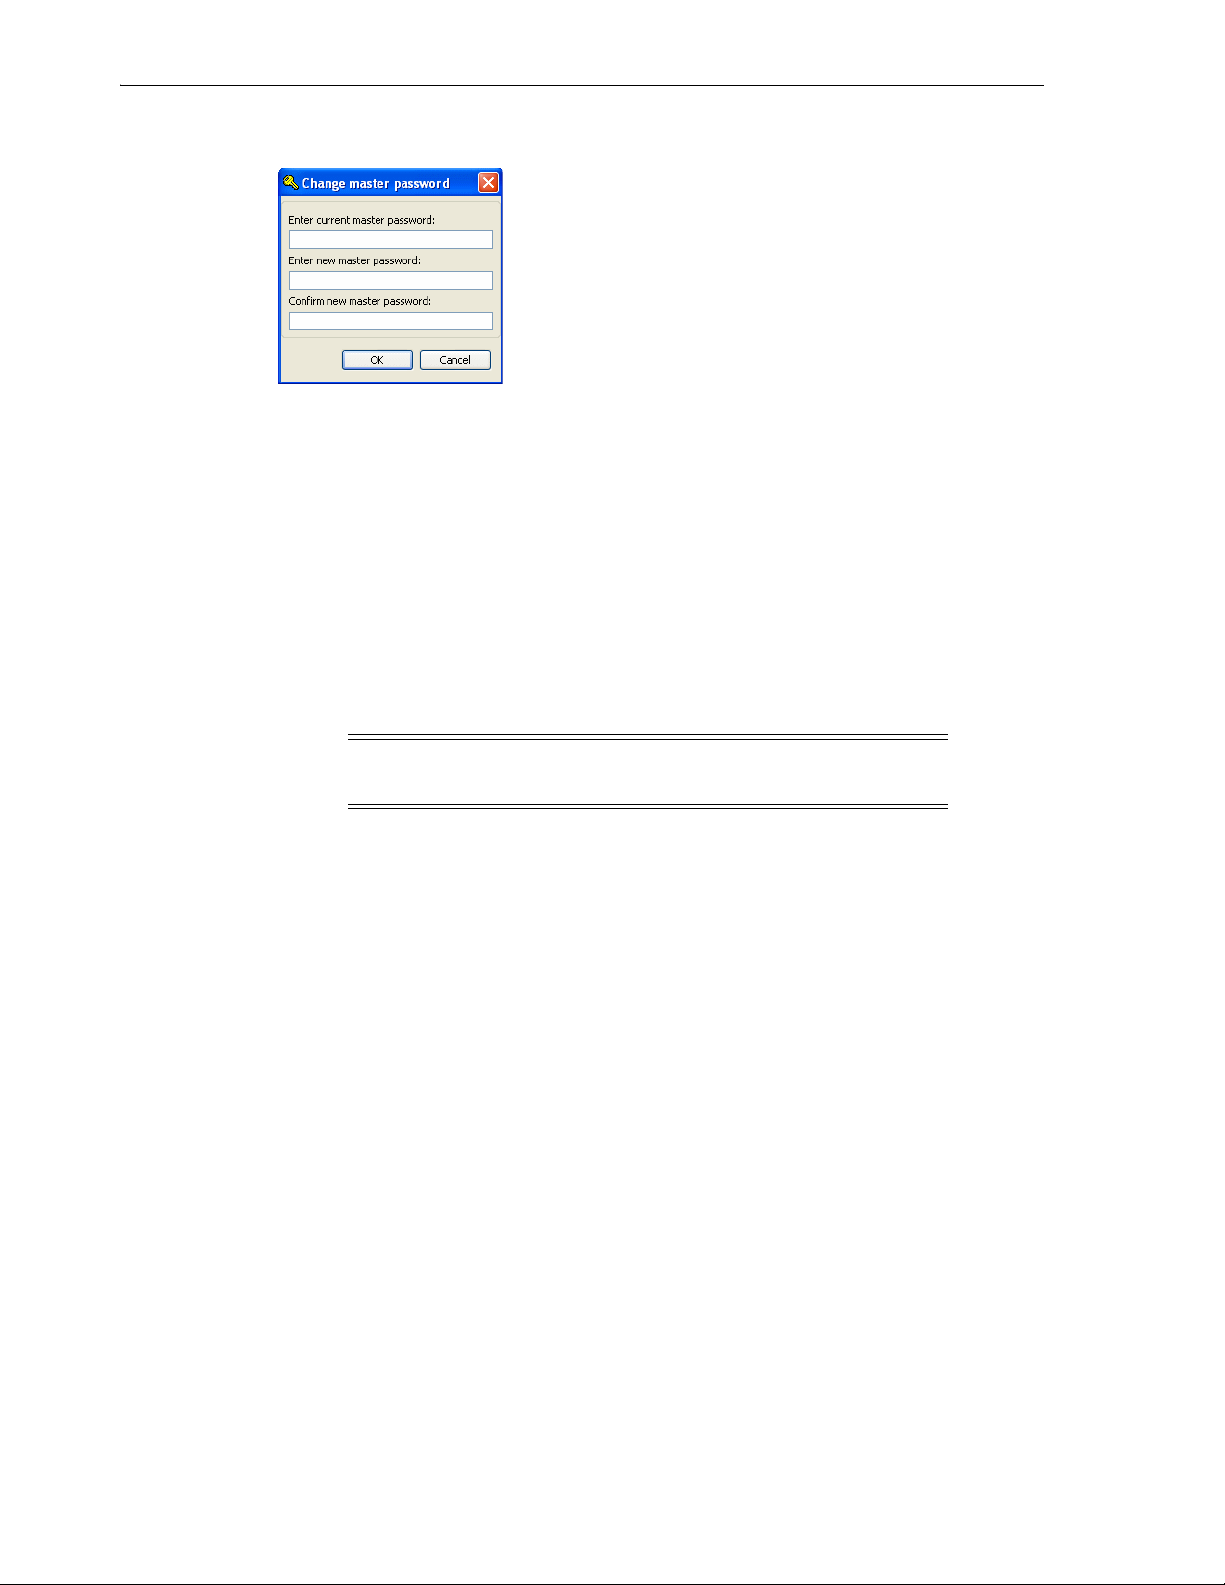
Configuring Oracle Connect
Figure 2–3 The Change Master Password Screen
5.
6. Confirm the password.
7. Click OK.
Specifying Users with Administrative Rights
By default, only the user who was specified during the installation as an administrator
has the authorization to modify settings on that computer from Oracle Studio. This
user can then authorize other users to make changes or to view the definitions for a
selected computer. Adding a computer to Oracle Studio is described in "Setting Up the
IBM z/OS Platform in Oracle Studio" on page 2-14.
Leave the Enter Current Master Password field blank and type a new master
password.
Note: The default during installation is to enable all users to be
administrators.
1. From the Start menu, select, Programs, Oracle, and then select Studio. Oracle
Studio opens.
2. In the Design perspective Configuration view, Right-click the computer and select
Administration Authorization.
The Administration Authorization screen is displayed as shown in the following
figure:
2-16 Oracle Application Server Adapters for IMS/DB User's Guide
Page 31

Figure 2–4 The Administration Authorization screen
Configuring Oracle Connect
The screen has the following sections:
Administrators: Administrators can view and modify all the definitions in Oracle
Studio for the selected computer. On initial entry to Oracle Studio, every user is
defined as a system administrator.
Designers: Designers can view all the definitions for the computer in Oracle
Studio and can modify any of the definitions under the Bindings and Users nodes
for the selected computer. For example, Oracle Studio database administrator can
add new data sources and adapters and can change metadata definitions for a
table in a data source.
Users: Users can view all the definitions for the computer in Oracle Studio for the
selected computer. Regular users cannot modify any of the definitions.
3. Add users or groups of users by clicking Add User or Add Group for the relevant
sections.
The user or group that is added must be recognized as a valid user or group for
the computer. Once a name has been added to a section, only the user or group
who logs on with that user name has the relevant authorization.
Setting Up Run-Time User Access to the IBM z/OS Platform
During run time, client access to Oracle Connect is provided by the user profile. A user
profile contains name and password pairs that are used to access a computer, data
source or application at run time, when anonymous access is not allowed.
1. From the Start menu, select, Programs, Oracle, and then select Studio. Oracle
Studio opens.
2. From the Design perspective, Configuration view, expand the Machines folder,
then expand the machine where you want to set the user name and password.
3. Expand Users.
Installing and Configuring the OracleAS Adapter for IMS/DB 2-17
Page 32

Configuring Oracle Connect
4.
Figure 2–5 The User Editor pane
Right-click the NAV user profile and select Edit User. The NAV user profile editor
is displayed as shown in the following figure:
5. In the User editor, click Add. The Add Authenticator screen is displayed as shown
in the following figure:
Figure 2–6 The Add Authenticator screen
6. Select Remote Machine from the Resource Type list.
7. Enter the name of the IBM z/OS computer defined in Oracle Studio.
8. Enter the name and password used to access the computer and confirm the
password.
9. Click OK.
2-18 Oracle Application Server Adapters for IMS/DB User's Guide
Page 33

Modeling Interactions for OracleAS Adapter for IMS/DB
Modeling Interactions for OracleAS Adapter for IMS/DB
Modeling interactions for OracleAS Adapter for IMS/DB involves defining an Oracle
Connect back-end adapter using Oracle Studio. All the definitions specified in Oracle
Studio are written to the IBM z/OS platform.
This section contains the following:
■ Setting Up the IMS/DB Data Source
■ Importing Metadata for the IMS/DB Data Source
■ Setting Up an Oracle Connect Adapter
■ Generating Outbound Interactions
■ Modifying Existing Interactions
Setting Up the IMS/DB Data Source
Oracle Connect requires you to specify the IMS/DB data source as the first step in
setting up the adapter.
Do the following to set up the IMS/DB data source:
1. From the Start menu, select, Programs, Oracle, and then select Studio.
2. In the Design perspective, Configuration view, expand the machine folder.
3. In the Configuration Explorer, expand the node of the computer defined in
"Setting Up the IBM z/OS Platform in Oracle Studio" on page 2-14.
4. Expand the Bindings folder. The binding configurations available on this
computer are listed.
5. Expand the NAV binding. The NAV binding configuration includes folders for
data sources and adapters that are located on the computer.
6. Right-click Data sources and select New data source, to open the New data source
wizard.
7. In the New dialog box, enter a name for the IMS/DB data source. The name can
contain letters and numbers and the underscore character only.
8. Select the data source type from the Typ e list, as follows:
■ If you are accessing IMS/DB data under CICS, then select IMS-DBCTL
■ If you are accessing IMS/DB data under IMS/TM, then select IMS-DBDC
■ If you are accessing IMS/DB data directly, then select IMS-DLI
Note: Only use the IMS-DLI option to connect directly to the
IMS/DB data in the following circumstances:
■ The IMS/DB records are not managed by CICS or by IMS/TM.
■ The IMS/DB records are required for read-only purposes and
changes to the data buffered by CICS or IMS/TM while reading
the data, are not expected.
The New Data Source screen is shown in the following figure:
Installing and Configuring the OracleAS Adapter for IMS/DB 2-19
Page 34

Modeling Interactions for OracleAS Adapter for IMS/DB
Figure 2–7 The New Data Source screen
9.
Click Next. The Data Source Connect String screen for the selected data source
type is displayed.
10. Enter the connect string for the selected data source, as follows:
If you select IMS-DBCTL, then the following screen is displayed:
Figure 2–8 The Data Source Connect String screen (for IMS-DBCTL)
Where:
■ PSB Name: Specify the name of the PSB file that contains details of all the
IMS/DB databases that you want to access.
■ Tar ge t S ys te m: Specify the VTAM APPLID of the CICS target system. The
default value is CICS. This parameter is used when updating IMS/DB data.
You can determine this value by activating the CEMT transaction on the target
CICS system. The legend APPLID=target_system appears in the bottom
right corner of the screen.
2-20 Oracle Application Server Adapters for IMS/DB User's Guide
Page 35

Modeling Interactions for OracleAS Adapter for IMS/DB
■ VTAM NetName: The VTAM netname of the specific connection being used
by EXCI (and MRO) to relay the program call to the CICS target system. For
example, if you issue the following command to CEMT:
CEMT INQ CONN
On the display screen that the netname is BATCHCLI (this is the default
connection supplied by IBM upon the installation of CICS). The default value
is ATYCLIEN.
If you select IMS-DBDC, then the following screen is displayed:
Figure 2–9 The Data Source Connect String screen (for IMS/TM)
Where:
■ XCF group: The Cross System Coupling Facility collection of XFC members
the connection belongs to. A group may consist of up to eight characters, and
may span between multiple systems.
■ XCF member: The Cross System Coupling Facility group member.
■ Tpipe prefix: The transaction pipe prefix used to associate between the
transaction and the transaction pipe it is using. The default value is ATTU.
■ User name: The security facility user identification.
■ Group name: The security facility group identification.
■ imsTrans name: The name of the IMS transaction that points to the program
that is used to access the PSB used to access the IMS/DB data. The default
name of the transaction is ATYIMSTM.
If you select IMS-DLI, then no connection information is required.
11. Click Finish. The new data source is displayed in the Configuration Explorer.
Configuring the Data Source Driver
After setting up the data source, you can set its driver properties according to specific
requirements, as follows:
1. Right-click the required data source in the Configuration Explorer and select Edit
Data source.
Installing and Configuring the OracleAS Adapter for IMS/DB 2-21
Page 36

Modeling Interactions for OracleAS Adapter for IMS/DB
Click the Properties tab.
2.
For IMS/DB under CICS, the following configuration properties are available:
■ cicsProgname: This parameter specifies the ATYDBCTL program that is
supplied with Oracle Connect to enable updating the IMS data source. To use
the ATYDBCTL program, copy the program from NAVROOT.LOAD to a CICS
DFHRPL library (such as CICS.USER.LOAD) and then define the ATYDBCTL
program under CICS using any available group such as ATY group:
NAVROOT is the high-level qualifier where Oracle Connect is installed.
After defining the ATYDBCTL program to a group, install it as follows:
CEDA IN G(ATY)
■ cicsTraceQueue: This parameter specifies the e name of queue for output
which is defined under CICS when tracing the output of the ATYDBCTL
program. When not defined, the default CICS queue is used.
■ disableExplicitSelect=true|false: When set to true, this parameter
disables the explicitSelect ADD attribute; every field is returned by a
SELECT * FROM... statement.
■ exciTransid: This parameter specifies the CICS TRANSID. This value must
be EXCI or a copy of this transaction.
■ pbsName=string: The PSB Name in the connect string, this parameter
contains details of all the IMS/DB databases that you want to access.
■ targetSystemApplid: The Target System in the connect string, this
parameter specifies the VTAM applid of the CICS target system. The default
value is CICS. This parameter is used when updating VSAM data. You can
determine this value by activating the CEMT transaction on the target CICS
system. The legend APPLID=target_system appears in the bottom right
corner of the screen.
■ vtamNetname: The VTAM NetName in the connect string, this parameter
specifies the connection being used by EXCI (and MRO) to relay the program
call to the CICS target system. The default value is ATYCLIEN.
For IMS/DB under IMS/TM, the following configuration properties are available:
■ disableExplicitSelect: When set to true, this parameter disables the
explicitSelect ADD attribute; every field is returned by a SELECT *
FROM... statement.
■ imsTransname: This parameter specifies the name of the IMS transaction that
points to the program that is used to access the PSB used to access the IMS/DB
data. The default name of the transaction is ATYIMSTM.
■ maxSessions: This parameter specifies the maximum number of sessions
allowed. The default value is 5.
■ racfGroupId: This parameter specifies the security facility group
identification (for example, the RACF group identification).
■ racfUserId: This parameter specifies the security resource user name.
■ tpipePrefix: The TPipe prefix in the connect string, this parameter is used
to associate between the transaction and the transaction pipe it is using. The
default is ATTU.
■ xcfClient: This parameter specifies the client name for the Cross System
Coupling Facility to which the connection belongs.
2-22 Oracle Application Server Adapters for IMS/DB User's Guide
Page 37

Modeling Interactions for OracleAS Adapter for IMS/DB
■ xcfGroup: The XCF group in the connect string, this parameter specifies the
Cross System Coupling Facility collection of XCF members the connection
belongs to. A group may consist of up to eight characters, and may span
between multiple systems.
■ xcflmsMember: This parameter specifies the Cross System Coupling Facility
group member.
■ xcfServer: The XCF server in the connect string, this parameter specifies the
Cross System Coupling Facility group member.
For IMS/DB direct, the following configuration property is available:
■ disableExplicitSelect: When set to true, this parameter disables the
explicitSelect ADD attribute; every field is returned by a SELECT *
FROM... statement.
3. Click Save to save the changes you made to the configuration properties.
Configuring the Data Source Driver Advanced Properties
You configure the advanced properties for a data source in the Advanced tab of the
data source editor. The advanced settings are the same for every data source.
Advanced settings let you do the following:
■ Define the transaction type
■ Edit the syntax name
■ Provide a table owner
■ Determine if a data source is updateable or readable
■ Provide repository information
■ Set the virtual view policy
Use the following procedure to configure the data source advanced features.
1. Open Oracle Studio.
2. In the Design Perspective Configuration View, expand the Machine folder and
then expand the machine where you want to configure the data source.
3. Expand the Data sources folder, right click the data source you are configuring,
then select Open.
4. Click the Advanced tab and make the changes that you want. The table below
describes the available fields:
Table 2–12 Data Source Advanced Configuration
Field Description
Properties
Transaction type The transaction level (0PC, 1PC or 2PC) that is applied to this
data source, no matter what level the data source supports. The
default is the data source’s default level.
Installing and Configuring the OracleAS Adapter for IMS/DB 2-23
Page 38

Modeling Interactions for OracleAS Adapter for IMS/DB
Table 2–12 (Cont.) Data Source Advanced Configuration
Field Description
Syntax name A section name in the NAV.SYN file that describes SQL syntax
Default table owner The name of the table owner that is used if an owner is not
Read/Write information Select one of the following:
Repository Directory
Repository directory Enter the location for the data source repository.
variations. The default syntax file contains the following
predefined sections:
■ OLESQL driver and the SQL Server 7 OLE DB provider
(SQLOLEDB):
syntaxName="OLESQL_SQLOLEDB"
■ OLESQL driver and JOLT:
syntaxName="OLESQL_JOLT"
■ Rdb driver and Rdb version:
syntaxName="RDBS_SYNTAX"
■ ODBC driver and EXCEL data:
syntaxName="excel_data"
■ ODBC driver and SQL/MX data:
syntaxName="SQLMX_SYNTAX"
■ ODBC driver and SYBASE SQL AnyWhere data:
syntaxName="SQLANYS_SYNTAX"
■ Oracle driver and Oracle case sensitive data:
syntaxName="ORACLE8_SYNTAX" or,
syntaxName="ORACLE_SYNTAX"
For case sensitive table and column names in Oracle, use
quotes (") to delimit the names. Specify the case sensitivity
precisely.
indicated in the SQL
■ Updateable data: Select this if you want to be able to update
the data on the data source.
■ Read only data: Select this to allow users to only view the
data on the data source.
Repository name Enter the name of a repository for a data source. The name is
defined as a data source in the binding configuration. It is
defined as the type Virtual and is used to store Oracle
Connect views and stored procedures for the data source, if
required instead of using the default SYS data.
Virtual View Policy
Generate sequential view Select this to map a non-relation file to a single table. This
parameter is valid only if you are using virtual array views.
Generate virtual views Select this if you want to have an individual table created for
every array in the non-relational file. This parameter is valid
only if you are using virtual array views.
Include row number
column
Select this to include a column that specifies the row number in
the virtual or sequential view. This parameter is valid only if you
are using virtual array views.
2-24 Oracle Application Server Adapters for IMS/DB User's Guide
Page 39

Table 2–12 (Cont.) Data Source Advanced Configuration
Field Description
All parent columns Select this for virtual views to include all the columns in the
parent record. This parameter is valid only if you are using
virtual array views.
Importing Metadata for the IMS/DB Data Source
Oracle Connect requires metadata describing the IMS/DB data source records and the
fields in these records. Use the Import Metadata procedure in Oracle Studio Design
perspective to import metadata for the IMS/DB data source from DBD, COBOL
copybooks and PSB files, which describe the data.
The following information is needed during the import procedure:
■ DBD files: These files are copied to the computer running Oracle Studio as part of
the import procedure.
■ COBOL copybooks: These copybooks are copied to the computer running Oracle
Studio as part of the import procedure.
■ PSB file: This file is copied to the computer running Oracle Studio as part of the
import procedure.
Modeling Interactions for OracleAS Adapter for IMS/DB
The metadata import procedure is has the following steps:
■ Selecting the Imput Files
■ Applying Filters
■ Selecting Tables
■ Matching DBD to COBOL
■ Import Manipulation
■ Metadata Model Selection
■ Import the Metadata
Selecting the Imput Files
1. From the Start menu, select, Programs, Oracle, and then select Studio.
2. In the Configuration view, expand the computer defined in "Setting Up the IBM
z/OS Platform in Oracle Studio".
3. Expand Bindings. The binding configurations available on this computer are
listed.
4. Expand NAV binding.
5. Expand Data sources.
6. Right-click the IMS/DB data source defined in Setting Up the IMS/DB Data
Source.
7. Select Show in Metadata View, to open the Metadata tab, with the IMS/DB data
source displayed under the data sources list.
8. Right-click the IMS/DB data source and select New Import.
The New Import screen is displayed.
9. Enter a name for the import. The name can contain letters and numbers and the
underscore character only.
Installing and Configuring the OracleAS Adapter for IMS/DB 2-25
Page 40

Modeling Interactions for OracleAS Adapter for IMS/DB
From the Import Type list select, there should be only one choice in the list, which
10.
depends on the type of IMS data source that you selected. The New Import wizard
is shown in the following figure:
Figure 2–10 The Metadata Import dialog box
Click Finish. The Metadata Import wizard opens.
11.
12. Click Add in the Import Wizard to add DBD files. The Add Resource screen is
displayed, providing the option of selecting files from the local machine or
copying the files from another machine.
Figure 2–11 The Select Resources screen
Click Add.
13.
The Select Resources screen is displayed, which provides the option to select files
from the local computer or copy the files from another computer.
2-26 Oracle Application Server Adapters for IMS/DB User's Guide
Page 41

Modeling Interactions for OracleAS Adapter for IMS/DB
If the files are on another computer, right-click My FTP Sites and select Add.
14.
Optionally, double-click Add FTP site. The Add FTP Site screen is displayed.
15. Set the FTP data connection by entering the server name where the DBD files
reside and, if not using anonymous access, enter a valid username and password
to access the machine.
16. To browse and transfer files required to generate the metadata, access the machine
using the username as the high-level qualifier.
After accessing the machine, you can change the high-level qualifier by
right-clicking the machine and selecting Change Root Directory.
17. Select the files to import and click Finish to start the transfer.
18. Repeat the procedure for COBOL copybooks.
The format of the COBOL copybooks must be the same. For example, you cannot
import a COBOL copybook that uses the first six columns together with a COBOL
copybook that ignores the first six columns. In this type of case, repeat the import
process.
You can import the metadata from one COBOL copybook and later add to this
metadata by repeating the import using different COBOL copybooks.
19. Click Add in the Import wizard to add a PSB file, if necessary.
The selected files are displayed in the Get Input Files screen, as shown in the
figure below.
Figure 2–12 Get Input Files Screen
20. Click Next to go to the Applying Filters step.
Applying Filters
This section describes the steps required to apply filters on the COBOL Copybook files
used to generate the Metadata. It continues the Selecting the Imput Files step.
Installing and Configuring the OracleAS Adapter for IMS/DB 2-27
Page 42

Modeling Interactions for OracleAS Adapter for IMS/DB
Perform the following steps to apply filters.
1. Apply filters to the copybooks, as needed.
The following is theApply Filters editor.
Figure 2–13 Apply Filters Screen
The following COBOL filters are available:
■ COMP_6 switch: The MicroFocus COMP-6 compiler directive. Specify either
COMP-6’1’ to treat COMP-6 as a COMP data type or COMP-6’2’ to treat
COMP-6 as a COMP-3 data type.
■ Compiler source: The compiler vendor.
■ Storage mode: The MicroFocus Integer Storage Mode. Specify either
NOIBMCOMP for byte storage mode or IBMCOMP for word storage mode.
■ Ignore after column 72: Ignore columns 73 to 80 in the COBOL copybooks.
■ Ignore first 6 columns: Ignore the first six columns in the COBOL copybooks.
■ Prefix nested column: Prefix all nested columns with the previous level
heading.
■ Replace hyphens (-) in record and field names with underscores (_): A hyphen,
which is an invalid character in Oracle metadata, is replaced with an
underscore.
■ Case sensitive: Specifies whether to consider case sensitivity or not.
■ Find: Searches for the specified value.
■ Replace with: Replaces the value specified for in the Find field with the value
specified here.
The following DBD filters are available:
■ Ignore after column 72: Ignore columns 73 to 80 in the COBOL copybooks.
2-28 Oracle Application Server Adapters for IMS/DB User's Guide
Page 43

Modeling Interactions for OracleAS Adapter for IMS/DB
■ Ignore first 6 columns: Ignore the first six columns in the COBOL copybooks.
■ Ignore labels: Ignore labels in the DBD files.
The following PSB filters are available:
■ Ignore after column 72: Ignore columns 73 to 80 in the COBOL copybooks.
■ Ignore first 6 columns: Ignore the first six columns in the COBOL copybooks.
2. Click Next to go to the Selecting Tables step.
Selecting Tables
This section describes the steps required to select the tables from the COBOL
Copybooks.
The following procedure continues the Applying Filters step. Perform these steps to
select the tables.
1. From the Select Tables screen, select the tables that you want to access. To select all
tables, click Select All. To clear all the selected tables, click Unselect All.
The Select Tables screen is shown in the following figure:
Figure 2–14 Select Tables Screen
The import manager identifies the names of the segments in the DBD files that will
be imported as tables.
2. Click Next (the Import Manipulation screen opens) to continue to the Matching
DBD to COBOL step.
Matching DBD to COBOL
This step lets you match the DBD file to your COBOL copybook. It is a continuation of
the Selecting Tables step. The following figure shows the DBD to COBOL step that is
displayed in the Editor.
Installing and Configuring the OracleAS Adapter for IMS/DB 2-29
Page 44

Modeling Interactions for OracleAS Adapter for IMS/DB
Figure 2–15 Match DBD to COBOL Screen
1.
Match each table selected from the DBD file with the COBOL copybook that
contains the relevant table structure. Select the files and tables from the dropdown
lists for each DBD entry.
2. Click Next (the Import Manipulation screen opens) to continue to the Import
Manipulation step.
Import Manipulation
This section describes the operations available for manipulating the imported records
(tables). It continues the Matching DBD to COBOL step.
The import manager identifies the names of the records in the DDM Declaration files
that will be imported as tables. You can manipulate the general table data in the
Import Manipulation Screen.
Perform the following steps to manipulate the table metadata.
1. From the Import Manipulation screen (see Import Manipulation Screen figure),
right-click the table record marked with a validation error, and select the relevant
operation. See the table, Table Manipulation Options for the available operations.
2. Repeat step 1 for all table records marked with a validation error. You resolve the
issues in the Import Manipulation Screen.
Once all the validation error issues have been resolved, the Import Manipulation
screen is displayed with no error indicators.
3. Click Next to continue to the Metadata Model Selection.
Import Manipulation Screen
The Import Manipulation screen is shown in the following figure:
2-30 Oracle Application Server Adapters for IMS/DB User's Guide
Page 45

Figure 2–16 Import Manipulation Screen
Modeling Interactions for OracleAS Adapter for IMS/DB
The upper area of the screen lists the DDM Declaration files and their validation
status. The metadata source and location are also listed.
The Validation tab at the lower area of the screen displays information about what
needs to be resolved in order to validate the tables and fields generated from the
COBOL. The Log tab displays a log of what has been performed (such as renaming a
table or specifying a data location).
The following operations are available in the Import Manipulation screen:
■ Resolving table names, where tables with the same name are generated from
different files during the import.
■ Selecting the physical location for the data.
■ Selecting table attributes.
■ Manipulating the fields generated from the COBOL, as follows:
– Merging sequential fields into one (for simple fields).
– Resolving variants by either marking a selector field or specifying that only
one case of the variant is relevant.
– Adding, deleting, hiding, or renaming fields.
– Changing a data type.
– Setting the field size and scale.
– Changing the order of the fields.
– Setting a field as nullable.
– Selecting a counter field for array for fields with dimensions (arrays). You can
select the array counter field from a list of potential fields.
Installing and Configuring the OracleAS Adapter for IMS/DB 2-31
Page 46

Modeling Interactions for OracleAS Adapter for IMS/DB
– Setting column-wise normalization for fields with dimensions (arrays). You
can create new fields instead of the array field where the number of generated
fields will be determined by the array dimension.
– Creating arrays and setting the array dimension.
The following table lists and describes the available operations when you right-click a
table entry:
Table 2–13 Table Manipulation Options
Option Description
Fields Manipulation Customizes the field definitions, using the Field Manipulation screen.
Rename Renames a table. This option is used especially when more than one
Set data location Sets the physical location of the data file for the table.
Set table attributes Sets the table attributes.
XSL manipulation Specifies an XSL transformation or JDOM document that is used to
Remove Removes the table record.
You can also access this screen by double-clicking the required table
record.
table with the same name is generated from the COBOL.
transform the table definitions.
You can manipulate the data in the table fields in the Field Manipulation Screen.
Double-click a line in the Import Manipulation Screen to open the Field Manipulation
Screen.
Field Manipulation Screen
The Field Manipulation screen lets you make changes to fields in a selected table. You
get to the Field Manipulation screen through the Import Manipulation Screen. The
Field Manipulation screen is shown in the following figure.
2-32 Oracle Application Server Adapters for IMS/DB User's Guide
Page 47

Figure 2–17 Field Manipulation Screen
Modeling Interactions for OracleAS Adapter for IMS/DB
You can carry out all of the available tasks in this screen through the menu or toolbar.
You can also right click anywhere in the screen and select any of the options available
in the main menus from a shortcut menu. The following table describes the tasks that
are done in this screen. If a toolbar button is available for a task, it is pictured in the
table.
Table 2–14 Field Manipulation Screen Commands
Command Description
General menu
Undo Click to undo the last change made in the Field Manipulation
screen.
Select fixed offset The offset of a field is usually calculated dynamically by the
server at runtime according the offset and size of the proceeding
column. Select this option to override this calculation and
specify a fixed offset at design time. This can happen if there is a
part of the buffer that you want to skip.
When you select a fixed offset you pin the offset for that column.
The indicated value is used at runtime for the column instead of
a calculated value. Note that the offset of following columns that
do not have a fixed offset are calculated from this fixed position.
Installing and Configuring the OracleAS Adapter for IMS/DB 2-33
Page 48

Modeling Interactions for OracleAS Adapter for IMS/DB
Table 2–14 (Cont.) Field Manipulation Screen Commands
Command Description
Test import tables Select this table to create an SQL statement to test the import
table. You can base the statement on the Full table or Selected
columns. When you select this option, the following screen
opens with an SQL statement based on the table or column
entered at the bottom of the screen.
Enter the following in this screen:
■ Data file name: Enter the name of the file that contains the
data you want to query.
■ Limit query results: Select this if you want to limit the
results to a specified number of rows. Enter the amount of
rows you want returned in the following field. 100 is the
default value.
■ Define Where Clause: Click Add to select a column to use
in a Where clause. In the table below, you can add the
operator, value and other information. Click on the columns
to make the selections. To remove a Where Clause, select the
row with the Where Clause you want t remove and then
click Remove.
The resulting SQL statement with any Where Clauses that you
added are displayed at the bottom of the screen.
Click OK to send the query and test the table.
Attribute menu
Change data type Select Change data type from the Attribute menu to activate the
Ty pe column, or click on the Ty pe column and select a new data
type from the drop-down list.
2-34 Oracle Application Server Adapters for IMS/DB User's Guide
Page 49

Modeling Interactions for OracleAS Adapter for IMS/DB
Table 2–14 (Cont.) Field Manipulation Screen Commands
Command Description
Create array This command allows you to add an array dimension to the
field. Select this command to open the Create Array screen.
Enter a number in the Array Dimension field and click OK to
create the array for the column.
Hide/Reveal field Select a row from the Field manipulation screen and select Hide
field to hide the selected field from that row. If the field is
hidden, you can select Reveal field.
Set dimension Select this to change or set a dimension for a field that has an
array. Select Set dimension to open the Set Dimension screen.
Edit the entry in the Array Dimension field and click OK to set
the dimension for the selected array.
Set field attribute Select a row to set or edit the attributes for the field in the row.
Select Set field attribute to open the Field Attribute screen.
Click in the Va l u e column for any of the properties listed and
enter a new value or select a value from a drop-down list.
Nullable/Not nullable Select Nullable to activate the Nullable column in the Field
Manipulation screen. You can also click in the column.
Select the check box to make the field Nullable. Clear the check
box to make the field Not Nullable.
Set scale Select this to activate the Scale column or click in the column
Set size Select this to activate the Size column or click in the column and
Field menu
and enter the number of places to display after the decimal point
in a data type.
enter the number of total number of characters for a data type.
Installing and Configuring the OracleAS Adapter for IMS/DB 2-35
Page 50

Modeling Interactions for OracleAS Adapter for IMS/DB
Table 2–14 (Cont.) Field Manipulation Screen Commands
Command Description
Add Select this command or use the button to add a field to the table.
If you select a row with a field (not a child of a field), you can
add a child to that field. Select Add Field or Add Child to open
the following screen:
Enter the name of the field or child, and click OK to add the
field or child to the table.
Delete field Select a row and then select Delete Field or click the Delete
Move up or down Select a row and use the arrows to move it up or down in the
Rename field Select Rename field to make the Name field active. Change the
Sturctures menu
Columnwise Normalization Select Columnwise Normalization to create new fields instead
Field button to delete the field in the selected row.
list.
name and then click outside of the field.
of the array field where the number of generated fields will be
determined by the array dimension.
2-36 Oracle Application Server Adapters for IMS/DB User's Guide
Page 51

Modeling Interactions for OracleAS Adapter for IMS/DB
Table 2–14 (Cont.) Field Manipulation Screen Commands
Command Description
Combining sequential fields Select Combining sequential fields to combine two or more
sequential fields into one simple field. The following dialog box
opens:
Enter the following information in the Combining sequential
fields screen:
■ First field name: Select the first field in the table to include
in the combined field
■ End field name: Select the last field to be included in the
combined field. Make sure that the fields are sequential.
■ Enter field name: Enter a name for the new combined field.
Flatten group Select Flatten Group to flatten a field that is an array. This field
must be defined as Group for its data type. When you flatten an
array field, the entries in the array are spread into a new table,
with each entry in its own field. The following screen provides
options for flattening.
Do the following in this screen:
■ Select Recursive operation to repeat the flattening process
on all levels. For example, if there are multiple child fields
in this group, you can place the values for each field into the
new table when you select this option.
■ Select Use parent name as prefix to use the name of the
parent field as a prefix when creating the new fields. For
example, if the parent field is called Car Details and
you have a child in the array called Color, when a new
field is created in the flattening operation it will be called
Car Details_Color.
Installing and Configuring the OracleAS Adapter for IMS/DB 2-37
Page 52

Modeling Interactions for OracleAS Adapter for IMS/DB
Table 2–14 (Cont.) Field Manipulation Screen Commands
Command Description
Mark selector Select Mark selector to select the selector field for a variant. This
Replace variant Select Replace variant to replace a variant’s selector field.
Select counter field Select Counter Field opens a screen where you select a field that
is available only for variant data types. Select the Selector field
form the following screen.
is the counter for an array dimension.
Metadata Model Selection
This section lets you generate virtual and sequential views for imported tables
containing arrays. In addition, you can configure the properties of the generated
views. It continues the Import Manipulation procedure. This allows you to flatten
tables that contain arrays.
In the Metadata Model Selection step, you can select configure values that apply to all
tables in the import or set specific settings for each table. The following describes how
to configurations available in the The Metadata Model Selection editor.
■ Select one of the following:
■ Default values for all tables: Select this if you want to configure the same
values for all the tables in the import. Make the following selections when
using this option:
– Generate sequential view: Select this to map non-relational files to a
single table.
– Generate virtual views: Select this to have individual tables created for
each array in the non-relational file.
2-38 Oracle Application Server Adapters for IMS/DB User's Guide
Page 53

Modeling Interactions for OracleAS Adapter for IMS/DB
– Include row number column: Select one of the following:
true: Select true, to include a column that specifies the row number in
the virtual or sequential view. This is true for this table only, even in the
the data source is not configured to include the row number column.
false: Select false, to not include a column that specifies the row number in the virtual or sequential view for this table even if the data source is
configured to include the row number column.
default: Select default to use the default data source behavior for this
parameter.
For information on how to configure these parameters for the data source,
see Configuring the Data Source Driver Advanced Properties.
– Inherit all parent columns: Select one of the following:
true: Select true, for virtual views to include all the columns in the parent record. This is true for this table only, even in the data source is not
configured to include all of the parent record columns.
false: Select false, so virtual views do not include the columns in the
parent record for this table even if the data source is configured to include
all of the parent record columns.
default: Select default to use the default data source behavior for this
parameter.
For information on how to configure these parameters for the data source,
see Configuring the Data Source Driver Advanced Properties.
■ Specific virtual array view settings per table: Select this to set different values
for each table in the import. This will override the data source default for that
table. Make the selections in the table under this selection. See the item above
for an explanation.
When you are finished, click Next to go to the Import the Metadata step.
The Metadata Model Selection editor is shown in the following figure:
Installing and Configuring the OracleAS Adapter for IMS/DB 2-39
Page 54

Modeling Interactions for OracleAS Adapter for IMS/DB
Figure 2–18 The Metadata Model Selection editor
Import the Metadata
This section describes the steps required to import the metadata to the target
computer. It continues the Metadata Model Selection step.
You can now import the metadata to the computer where the data source is located, or
import it later (in case the target computer is not available).
Perform the following steps to transfer the metadata.
1. Select Yes to immediately transfer the metadata from the Windows computer to
the z/OS platform, or No to transfer the metadata later.
The metadata is imported based on the options selected in the previous steps and
it is stored on the IBM z/OS platform computer. An XML representation of the
metadata is generated. This XML file can be viewed by expanding the Output
node.
2. Click Finish.
After performing the import, you can view the metadata in the Metadata tab in Oracle
Studio Design perspective. You can also make any fine adjustments to the metadata
and maintain it, as necessary.
See Also: Metadata for the IMS/DB Data Source for details about
the data source metadata.
The Import Metadata screen is shown in the following figure:
2-40 Oracle Application Server Adapters for IMS/DB User's Guide
Page 55

Figure 2–19 The Import Metadata screen
Modeling Interactions for OracleAS Adapter for IMS/DB
After performing the import, you can view the metadata in the Metadata tab in Oracle
Studio. You can also make any fine adjustments to the metadata and maintain it, as
necessary.
Setting Up an Oracle Connect Adapter
To work with the Oracle Connect against the IMS/DB data source from Oracle
Application Server, you need to set up an adapter definition on the IBM z/OS
platform to handle the interactions to and from the IMS/DB data.
Perform the following steps to setup the adapter:
1. From the Start menu, select, Programs, Oracle, and then select Studio.
2. From the Design perspective, Configuration view expand the Machines folder.
3. In the Configuration view, expand the computer defined in "Setting Up the IBM
z/OS Platform in Oracle Studio" on page 2-14.
4. Expand the Bindings folder.
5. Expand the NAV binding.
6. Right-click Adapters and select New Adapter to open the New Adapter wizard.
7. Enter a name for the back-end adapter.
Note: The word event is a reserved word and cannot be used
when naming an adapter.
8. Select Database as the back-end adapter type from the Typ e list. The Database
adapter enables accessing the IMS/DB data source from Oracle Application
Server.
Installing and Configuring the OracleAS Adapter for IMS/DB 2-41
Page 56

Modeling Interactions for OracleAS Adapter for IMS/DB
Select Events.
9.
10. Click Finish. The back-end adapter is added to the Configuration view and the
Configuration properties open in the Editor.
Note: Other adapters that are displayed in the Typ e list are not
supported with the version of Oracle Connect installed at the site.
11. You can change any of the properties for the adapter, as required.
The Properties tab is shown in the following figure:
Figure 2–20 The Properties tab
The following properties are available:
Table 2–15 Adapter Properties
Property Description
ConnectString Leave this value blank.
DefaultDatasource The name of the data source defined in Oracle Studio that you
multipleResults Leave this value as true.
want to access with the Database adapter.
For example, Legacy.
Generating Outbound Interactions
Oracle Connect requires metadata describing the adapter interactions, including the
structures used to pass information to and from the adapter.
2-42 Oracle Application Server Adapters for IMS/DB User's Guide
Page 57

Modeling Interactions for OracleAS Adapter for IMS/DB
Use the Metadata Import wizard in Oracle Studio to generate interaction metadata, as
follows:
1. From the Start menu, select, Programs, Oracle, and then select Studio.
2. In the Design perspective, Configuration view expand the Machines folder.
3. In the Configuration view, expand the computer defined in "Setting Up the IBM
z/OS Platform in Oracle Studio" on page 2-14.
4. Expand the Bindings folder. The binding configurations available on this
computer are listed.
5. Expand the NAV binding.
6. Expand the Adapters folder.
7. Right-click the Database back-end adapter defined in "Setting Up an Oracle
Connect Adapter" on page 2-41.
8. Select Show Metadata View to open the Metadata tab, with the database back-end
adapter displayed under the Adapters list.
9. Right-click Interactions and select New to open the New Interaction wizard. The
wizard opens with the following options displayed:
■ Automatic: Four interactions are generated for each IMS/DB table, enabling to
execute the SELECT, INSERT, UPDATE, DELETE command.
■ Manual: One interaction is generated, based on the type of SQL selected such
as database query (a SELECT statement) or Database Modification (an
INSERT, UPDATE, or DELETE statement).
Note: IMS/DB does not support the stored procedure option.
10. Select how you want to generate interactions (Automatic or Manual).
If you select Automatic generation, perform the following steps:
a. Click Next. The Select Tables screen opens, enabling you to add tables from
the IMS/DB data source that you want to access with the interaction.
b. Click Add to include tables.
The data sources that have been defined and all the tables, for each data
source, that have had metadata defined for them are displayed.
Select the tables that you want to access with the interaction and click the
right-pointing arrow to move these tables to the right-hand pane.
c. Click Finish. The selected tables are displayed.
d. Click Finish. Four interactions are generated for each table selected (SELECT,
INSERT, UPDATE, DELETE), together with the record structures to support the
interactions and the responses from the IMS/DB data source.
e. Click Yes to complete the task. The interactions and the record structures that
relate to the interactions are displayed in the Metadata tab.
If you select Manual generation, perform the following steps:
a. Select the type of SQL (query or modification) for the interaction and click
Next. The Interaction Name screen is displayed.
b. Enter a name for the interaction, and select Create new query.
Installing and Configuring the OracleAS Adapter for IMS/DB 2-43
Page 58

Modeling Interactions for OracleAS Adapter for IMS/DB
Note: The option to use a previously saved query is not
applicable.
c.
Click Next. The Define Interaction screen is displayed enabling you to build
the query.
Note: If the database query option was selected in step a, then the
Define Interaction screen is displayed, enabling you to build a
SELECT statement only, as indicated in the Query type field. If the
database modification option was selected, then this field enables
you to select the required SQL modification statement from a list
(INSERT, UPDATE, or DELETE).
d. Click Next. The Interaction Properties screen is displayed, enabling you to
define the interaction parameters. You can set the following interaction
prameters:
Table 2–16 Interaction Definition Parameters
Parameter Description
passThrough Defines whether the query is passed directly to the
Reuse compiled
query
Encoding Sets the encoding method used to return binary data in
Event Defines whether the interaction mode is sync-send or
Fail on no rows
return
Root element Defines the root element name for records returned by the
Record element Defines the record element name for records returned by
Max. records Sets the maximum number of record returned by the
Null string Sets the string returned in place of a null value. If not
back-end database for processing or processed by the
Query Processor.
Defines whether the query is saved in cache for reuse.
text format. You can select between the base 64 and the
hexadecimal encoding methods.
sync-receive.
Defines whether an error is returned in case no data is
returned
query, using the <root> \ <record> format.
the query, using the <root> \ <record> format.
query.
specified, the column is skipped.
e. Click Next. The Interaction Parameters screen is displayed, where you specify
input parameters for the interaction. The following parameters are specified:
Table 2–17 Interaction Parameters
Parameter Description
Name The name of the parameter.
Type The type of parameter (such as string, number, binary).
2-44 Oracle Application Server Adapters for IMS/DB User's Guide
Page 59

Table 2–17 (Cont.) Interaction Parameters
Parameter Description
Nullable The nullable value (true or false).
Default The default value for the parameter.
Context
Field
Bind to Sqls This field is not applicable.
Click Finish to generate the interaction, including the record schema required
f.
This field is not applicable.
to support the interaction input and output.
See Also: "Adapter Metadata" on page A-13 for details about the
data source metadata.
Modifying Existing Interactions
You can modify the interaction definitions to the exact requirements of the application,
in the Design perspective Metadata tab.
The following example uses the DELETE interaction, generated in the previous task, to
describe how the interactions can be modified:
Modeling Interactions for OracleAS Adapter for IMS/DB
Note: The interaction modification procedure is the same for all
types of SQL statements (INSERT and UPDATE) as described, using
a DELETE SQL statement.
1. In the Metadata tab, right-click the interaction to modify and select Open.
The adapter metadata editor opens, displaying the General tab.
The General tab displays general information about the way the interaction is
executed. You can add a description of the interaction and define the mode of
operation for the interaction. The following modes are available:
■ sync-send-receive: The interaction sends a request and expects to receive a
response.
■ sync-send: The interaction sends a request and does not expect to receive a
response.
■ sync-receive: The interaction expects to receive a response.
The information for a request is passed in the input record. The information for the
response from the IMS/DB data source is passed in the output record.
For more information, see "Adapter Metadata General Properties".
2. Click the Advanced tab to display specific information about the interaction.
As required, change the SQL and the parameters associated with the SQL.
Parameters are specified in a SET clause or in a WHERE clause with the following
format:
:parameter_name
For more information, see "Interaction Advanced Tab"
Installing and Configuring the OracleAS Adapter for IMS/DB 2-45
Page 60

Modeling Interactions for OracleAS Adapter for IMS/DB
Depending on the changes made to the SQL, when you close the editor, or when
3.
clicking Save, the Context Selection screen is displayed.
Select the required adapter from the Adapters list and select Update
interaction-related records. Any changes that need making to the record
structures in the schema part of the metadata are done automatically.
The Context Selection screen is shown in the following figure:
Figure 2–21 The Context Selection screen
Note: The interaction records are built based on all the fields in
the table and cannot be changed manually, even if you change the
SQL so that less fields are involved.
4.
Click Finish to implement the modifications made to the interaction definitions.
2-46 Oracle Application Server Adapters for IMS/DB User's Guide
Page 61

Integrating OracleAS Adapter for IMS/DB
To deploy and integrate OracleAS Adapter for IMS/DB with Oracle Application
Server Containers for J2EE (OC4J), you need to configure the J2CA 1.5 IMS/DB
adapter.
This section includes the following topics:
■ Integrating OracleAS Adapter for IMS/DB with OC4J
■ Configuring the J2CA 1.5 IMS/DB Adapter
■ Using the CCI API to Develop Applications
■ Configuring Multiple Adapters
■ Updating Configuration Information
Integrating OracleAS Adapter for IMS/DB with OC4J
Oracle Application Server provides a complete Java 2 Enterprise Edition (J2EE)
environment that executes on the Java Virtual Machine (JVM) of the standard Java
Development Kit (JDK). OC4J is J2EE certified and provides all the J2EE specific
containers, APIs, and services. OC4J supports the J2CA 1.5 standard.
3
with OC4J
J2CA defines standard Java interfaces for simplifying the integration of applications
with the EIS. The Oracle adapters are deployed as a resource adapter within the OC4J
container.
The contract between the OC4J client application and the resource adapter is defined
by the common client interface (CCI). The contract between the OC4J container and
the resource adapter is defined by the service provider interface (SPI). The SPI API
addresses the connection management, transaction management and the security
management.
Connection management enables application components to connect to an EIS and
leverage any connection pooling provided by the application server.
Transaction management enables an application server to use a transaction manager to
manage transactions across multiple resource managers. Security management
provides authentication, authorization, and secure communication between the J2EE
server and the EIS.
Lifecycle management contracts enable an application server to initialize a resource
adapter instance during the deployment of the adapter or application server startup.
In addition, it enables the application server to notify the resource adapter instance
during server shutdown or undeployment of the adapter.
Integrating OracleAS Adapter for IMS/DB with OC4J 3-1
Page 62

Configuring the J2CA 1.5 IMS/DB Adapter
The lifecycle contract provides the mechanism for the application server to manage the
lifecycle of the resource adapter instance.
Work management contracts enable the resource adapter to carry out its logic by using
threads dispatched by an application server, rather than creating threads on its own.
The handshake is done through a Work instance submission. This makes the
application server threads management more efficient, providing better control over
their execution contexts (like security and transaction).
See Also: Oracle Application Server Adapter Concepts Guide,
Oracle Application Server Containers for J2EE User’s Guide, Oracle
Application Server Containers for J2EE Services Guide, and Oracle
Application Server Containers for J2EE Security Guide
Configuring the J2CA 1.5 IMS/DB Adapter
To connect to the J2CA 1.5 IMS/DB adapter under Oracle Application Server, perform
the following steps:
1. Edit the oc4j-ra.xml file, which is located at the following path:
root\j2ee\home\application-deployment\default\oracle\oc4j-ra.xml
Where root is the Oracle Application Server root directory.
2. Set the following settings for each connection:
<oc4j-connector-factories>
<connector-factory location=" " connector-name="Oracle Legacy Adapter">
<config-property name="userName" value=" "/>
<config-property name="password" value=" "/>
<config-property name="eisName" value=" "/>
<config-property name="serverName" value=" "/>
<config-property name="workspace" value=" "/>
<config-property name="portNumber" value=" "/>
<config-property name="persistentConnection" value=" "/>
<config-property name="keepAlive" value=" "/>
<config-property name="firewallProtocol" value=""/>
<config-property name="connectTimeout" value=""/>
<config-property name="encryptionProtocol" value=""/>
<config-property name="encryptionKeyName" value=""/>
<config-property name="encryptionKeyValue" value=""/>
<config-property name="fakeXa" value=" "/>
</connector-factory>
</oc4j-connector-factories>
The following table lists the properties that must be specified, and optional
properties:
Table 3–1 OC4J Connection Properties
Property Description
location Specifies the JNDI location where Oracle Application Server
should bind the connection factory instance for application
components.
eisName Sets the name of the adapter to use. The adapter is defined in
3-2 Oracle Application Server Adapters for IMS/DB User's Guide
the Oracle Connect server using Oracle Studio, as described
in "Setting Up an Oracle Connect Adapter" on page 2-41.
Page 63

Using the CCI API to Develop Applications
Table 3–1 (Cont.) OC4J Connection Properties
Property Description
serverName Sets the TCP/IP address or host name where the Oracle
Connect daemon is running. The daemon runs on the
computer specified at the beginning of "Setting Up the IBM
z/OS Platform in Oracle Studio" on page 2-14.
workspace Specifies to the name of a Oracle Connect server workspace
to use. The default workspace is Navigator.
See Also: "Workspaces" on page C-7 for details about
workspaces.
portNumber Specifies to the TCP/IP port where the Oracle Connect
userName
(optional)
password
(optional)
persistentConnection
(optional)
keepAlive
(optional)
firewallProtocol
(optional)
connectTimeout
(optional)
encryptionProtocol
(optional)
encryptionKeyName
(optional)
encryptionKeyValue
(optional)
fakeXa
(optional)
daemon is running on the server. The default port is 2551.
Specifies a user who can access the Oracle Connect server.
The user is defined in the Oracle Connect daemon
configuration.
See Also: Daemon "Security" and Workspace "Security" for
details about users allowed to access an Oracle Connect
server.
Specifies a valid password for the user.
Set to true or false. When set to true, connections can
persist across multiple requests or connection context
changes. It is recommended to set this property to true.
Set to true or false. When set to true, the socket used for
the connection is always kept open. It is recommended to set
this property to true.
Specifies the firewall protocol used: either none or fixedNat
(the Nat protocol using a fixed address for the daemon). The
default value is none.
Specifies the connection timeout in seconds. The default is 0,
meaning that there is no connection timeout.
Specifies the name of encryption protocol to use. The default
is null. The RC4 protocol is supported.
Specifies the name of the symmetric encryption key to use.
Specifies the value of the symmetric encryption key to use.
When set to true, the XA APIs are internally converted to
local transaction APIs. Always set to true
.
Using the CCI API to Develop Applications
You can develop applications to run adapter interactions using the Common Client
Interface (CCI) API.
Perform the following steps to use the CCI API with the J2CA 1.5 IMS/DB adapter:
1. Select a ConnectionFactory entry for the J2CA 1.5 IMS/DB adapter.
2. Create a Connection object using this ConnectionFactory. A Connection is
a handle to the underlying network connection to the EIS, which is identified in
the oc4j-ra-xml file by the serverName property.
Integrating OracleAS Adapter for IMS/DB with OC4J 3-3
Page 64

Configuring Multiple Adapters
Create a Connection object using this ConnectionFactory. Specify the
3.
interaction properties using an AttuInteractionSpec object. The
AttuInteractionSpec object has the following format:
AttuInteractionSpec(java.lang.String name, int verb, int timeOut)
The following table describes the properties that can be specified:
Table 3–2 Interaction Spec Properties
Property Description
name Specifies the interaction name.
verb Specifies the mode for the interaction: SYNC_SEND, SYNC_
timeOut Specifies the time (in milliseconds) to wait for an EIS to
SEND_RECEIVE, or SYNC_RECEIVE.
run the specified interaction.
The following is an InteractionSpec sample:
AttuInteractionSpec iSpeq = new AttuInteractionSpec("query",
javax.resource.cci.InteractionSpec.SYNC_RECEIVE, 60);
javax.resource.cci.RecordFactory rf = new AttuRecordFactory(con,
mcf.getLogger());
javax.resource.cci.MappedRecord queryRecord = rf.createMappedRecord("query"),
queryRecord.put("##text", "select * from disam:nation");
javax.resource.cci.Record oRec = interaction.execute(iSpec, queryRecord);
4. Invoke the execute method on the interaction to initiate a call to the EIS. Pass
any data for the interaction as input and output records.
5. Once the interactions have been processed, close the Interaction and
Connection objects.
Configuring Multiple Adapters
Each J2CA 1.5 IMS/DB adapter requires an entry in the oc4j-ra.xml file as
described in "Configuring the J2CA 1.5 IMS/DB Adapter" on page 3-2.
See Also: Oracle Application Server Adapter Concepts Guide
Updating Configuration Information
You can change the configuration settings for a resource adapter by editing the
relevant connector-factory entry in the oc4j-ra.xml file. For these changes to
take effect, you need to stop and restart Oracle Application Server.
3-4 Oracle Application Server Adapters for IMS/DB User's Guide
Page 65

Integrating OracleAS Adapters for IMS/DB
with Oracle BPEL Process Manager
To deploy and integrate OracleAS Adapters for IMS/DB with Oracle BPEL Process
Manager, you need to configure BPEL Process Manager.
This section includes the following topics:
■ Integrating OracleAS Adapters for IMS/DB with Oracle BPEL Process Manager
■ Configuring Oracle BPEL Process Manager
Integrating OracleAS Adapters for IMS/DB with Oracle BPEL Process Manager
Oracle BPEL Process Manager provides a comprehensive solution for creating,
deploying, and managing BPEL business processes. Oracle BPEL Process Manager is
based on the Service Oriented Architecture (SOA) to provide enterprises with
flexibility, interoperability, reusability, extensibility, and rapid implementation of Web
services and business processes. It reduces the overall costs of management,
modification, extension, and redeployment of existing business processes. Each
business activity is a self-contained, self-describing, and modular application whose
interface is defined by the WSDL, and the business process is modeled as a Web
Service.
4
A Web Service is first published and then composed or orchestrated into business
flows. Publishing a service is implemented by taking a function within an existing
application or system and making it available in a standard way, while orchestration is
implemented by composing multiple services into an end-to-end business process. The
interactions that are defined as part of the configuration of the OracleAS Adapter for
IMS/DB are integrated into the orchestration as PartnerLinks. Every PartnerLink is
linked to a WSDL that describes the Web service.
To integrating the OracleAS Adapter for IMS/DB with Oracle BPEL Process Manager,
you must perform the following tasks in the specified order:
1. Installing and Configuring the OracleAS Adapter for IMS/DB
2. Integrating OracleAS Adapter for IMS/DB with OC4J
3. Configuring Oracle BPEL Process Manager
See Also: Oracle Application Server Adapter Concepts Guide.
Integrating OracleAS Adapters for IMS/DB with Oracle BPEL Process Manager 4-1
Page 66

Configuring Oracle BPEL Process Manager
Configuring Oracle BPEL Process Manager
This section includes the following topics:
■ Setting up the Connection to the Oracle Connect Server
■ Checking Metadata Availability Using Oracle JDeveloper
■ Configuring the WSDL for Outbound Applications
Setting up the Connection to the Oracle Connect Server
Perform the following steps to set up the connection to the Oracle Connect server:
1. Open the Oracle BPEL Admin window.
2. On the Server tab, on the Configuration tab, specify the following:
■ LegacyServer: The IP address of the server where Oracle Connect is
installed. For a single server, the default is localhost.
■ LegacyPort: The port number of the server where Oracle Connect is
installed. For a single port, the default is 2551.
3. Repeat the previous step for each Oracle Connect server to be used by Oracle
BPEL Process Manager. Use a comma as a separator between the different servers
and ports.
4. Click Apply.
5. Restart the server where Oracle BPEL Process Manager is installed.
Checking Metadata Availability Using Oracle JDeveloper
Perform the following steps to verify that the metadata of the Oracle Connect server is
available in Oracle BPEL Process Manager:
1. Open Oracle JDeveloper.
2. On the Connections tab, expand the Integration Server node to view the list of
OC4J servers.
3. Expand the node of the OC4J server on which you configured the JCA 1.5 IMS/DB
adapter (see Integrating OracleAS Adapter for IMS/DB with OC4J).
4. Under the Adapters node, expand the Legacy node to view a list of the Oracle
Connect servers that you defined by using the Oracle BPEL Admin window.
5. Under the node of the Oracle Connect server whose metadata you want to check,
expand the node of the daemon (IRPCDINI) to view a list of workspaces.
6. Under the node of the workspace that contains the adapter that you want to work
with, expand the node of the relevant adapter to view a list of interactions.
7. Double-click an interaction to view the WSDL.
Configuring the WSDL for Outbound Applications
When you build an outbound application, Oracle BPEL Process Manager
automatically creates the WSDL that corresponds to the interaction. The WSDL
specifies the name of the adapter’s connection factory as the value of the
adapterInstanceJndi attribute of the <jca:address> element in the
<service> section. This name is generated automatically. You need to verify that a
connection factory with this name exists on the OC4J server. If it does not, you need to
4-2 Oracle Application Server Adapters for IMS/DB User's Guide
Page 67

Configuring Oracle BPEL Process Manager
create it, or change the name of the connection factory to the name of a connection
factory that exists.
The following is an example of a WSDL for outbound applications:
<?xml version = '1.0' encoding = 'UTF-8'?>
<definitions name="findAccount"
targetNamespace="http://xmlns.oracle.com/pcbpel/findIMSAccount/findAccount"
xmlns="http://schemas.xmlsoap.org/wsdl/"
xmlns:legacyReq="noNamespace://findIMSAccount"
xmlns:tns="http://xmlns.oracle.com/pcbpel/findIMSAccount/findAccount"
xmlns:plt="http://schemas.xmlsoap.org/ws/2003/05/partner-link/"
xmlns:jca="http://xmlns.oracle.com/pcbpel/wsdl/jca/"
xmlns:pc="http://xmlns.oracle.com/pcbpel/"
xmlns:legacyRes="noNamespace://findIMSAccount">
<types>
<xsd:schema xmlns:xsd="http://www.w3.org/2001/XMLSchema"
xmlns="noNamespace://findIMSAccount"
targetNamespace="noNamespace://findIMSAccount" elementFormDefault="qualified"
attributeFormDefault="unqualified">
<xsd:element name="CA_INPUT" type="CA_INPUT"/>
<xsd:complexType name="CA_INPUT">
<xsd:attribute name="CA_EYE_CATCH">
<xsd:simpleType>
<xsd:restriction base="xsd:string">
<xsd:maxLength value="8"/>
</xsd:restriction>
</xsd:simpleType>
</xsd:attribute>
<xsd:attribute name="CA_ACCT_I_NUM" type="xsd:int"/>
</xsd:complexType>
</xsd:schema>
<xsd:schema xmlns:xsd="http://www.w3.org/2001/XMLSchema"
xmlns="noNamespace://findIMSAccount"
targetNamespace="noNamespace://findIMSAccount" elementFormDefault="qualified"
attributeFormDefault="unqualified">
<xsd:element name="CA_OUTPUT" type="CA_OUTPUT"/>
<xsd:complexType name="CA_OUTPUT">
<xsd:sequence>
<xsd:element minOccurs="0" maxOccurs="1" name="CA_ACCT_DATA"
type="CA_OUTPUT__CA_ACCT_DATA"/>
</xsd:sequence>
<xsd:attribute name="CA_RET_CODE" type="xsd:int"/>
</xsd:complexType>
<xsd:element name="CA_OUTPUT__CA_ACCT_DATA" type="CA_OUTPUT__CA_ACCT_
DATA"/>
<xsd:complexType name="CA_OUTPUT__CA_ACCT_DATA">
<xsd:sequence>
<xsd:element minOccurs="0" maxOccurs="1" name="CA_CUST_INFO"
type="CA_OUTPUT__CA_ACCT_DATA__CA_CUST_INFO"/>
<xsd:element minOccurs="0" maxOccurs="10" name="CA_TRAN_HIST"
type="CA_OUTPUT__CA_ACCT_DATA__CA_TRAN_HIST"/>
</xsd:sequence>
<xsd:attribute name="CA_ACCT_NUM" type="xsd:int"/>
<xsd:attribute name="CA_ACCT_BAL" type="xsd:int"/>
</xsd:complexType>
<xsd:element name="CA_OUTPUT__CA_ACCT_DATA__CA_TRAN_HIST"
type="CA_OUTPUT__CA_ACCT_DATA__CA_TRAN_HIST"/>
<xsd:complexType name="CA_OUTPUT__CA_ACCT_DATA__CA_TRAN_HIST">
<xsd:attribute name="CA_TRAN_YYYYMMDD">
<xsd:simpleType>
Integrating OracleAS Adapters for IMS/DB with Oracle BPEL Process Manager 4-3
Page 68

Configuring Oracle BPEL Process Manager
<xsd:restriction base="xsd:string">
<xsd:maxLength value="8"/>
</xsd:restriction>
</xsd:simpleType>
</xsd:attribute>
<xsd:attribute name="CA_TRAN_AMT" type="xsd:int"/>
<xsd:attribute name="CA_TRAN_REF" type="xsd:int"/>
<xsd:attribute name="CA_TRAN_TYPE" type="xsd:int"/>
</xsd:complexType>
<xsd:element name="CA_OUTPUT__CA_ACCT_DATA__CA_CUST_INFO"
type="CA_OUTPUT__CA_ACCT_DATA__CA_CUST_INFO"/>
<xsd:complexType name="CA_OUTPUT__CA_ACCT_DATA__CA_CUST_INFO">
<xsd:sequence>
<xsd:element minOccurs="0" maxOccurs="4" name="CA_CUST_PHONE">
<xsd:simpleType>
<xsd:restriction base="xsd:string">
<xsd:maxLength value="14"/>
</xsd:restriction>
</xsd:simpleType>
</xsd:element>
</xsd:sequence>
<xsd:attribute name="CA_CUST_NAME_F">
<xsd:simpleType>
<xsd:restriction base="xsd:string">
<xsd:maxLength value="10"/>
</xsd:restriction>
</xsd:simpleType>
</xsd:attribute>
<xsd:attribute name="CA_CUST_NAME_M">
<xsd:simpleType>
<xsd:restriction base="xsd:string">
<xsd:maxLength value="1"/>
</xsd:restriction>
</xsd:simpleType>
</xsd:attribute>
<xsd:attribute name="CA_CUST_NAME_L">
<xsd:simpleType>
<xsd:restriction base="xsd:string">
<xsd:maxLength value="10"/>
</xsd:restriction>
</xsd:simpleType>
</xsd:attribute>
<xsd:attribute name="CA_CUST_SOC_SEC">
<xsd:simpleType>
<xsd:restriction base="xsd:string">
<xsd:maxLength value="11"/>
</xsd:restriction>
</xsd:simpleType>
</xsd:attribute>
</xsd:complexType>
</xsd:schema>
</types>
<message name="request">
<part name="input_findAccount" element="legacyReq:CA_INPUT"/>
</message>
<message name="response">
<part name="output_findAccount" element="legacyReq:CA_OUTPUT"/>
</message>
<portType name="findAccountPortType">
<operation name="findAccount">
4-4 Oracle Application Server Adapters for IMS/DB User's Guide
Page 69

Configuring Oracle BPEL Process Manager
<input name="Input_findAccount" message="tns:request"/>
<output name="Output_findAccount" message="tns:response"/>
</operation>
</portType>
<binding name="findAccountJCABinding" type="tns:findAccountPortType">
<jca:binding
XMLRecordConverterCallout="oracle.tip.adapter.fw.record.oracle.AttuXMLRecordConver
terImpl"/>
<operation name="findAccount">
<jca:operation FunctionName="findAccount"
InteractionSpec="com.oracle.adapter.AttuInteractionSpec" ExecutionTimeout="120"/>
<input/>
<output/>
</operation>
</binding>
<service name="findAccountService">
<port name="findAccountPort" binding="tns:findAccountJCABinding">
<jca:address adapterInstanceJndi="eis/legacy/findIMSAccount"/>
</port>
</service>
<plt:partnerLinkType name="findAccountPartnerLinkType">
<plt:role name="findAccountRole">
<plt:portType name="tns:findAccountPortType"/>
</plt:role>
</plt:partnerLinkType>
/definitions>
Integrating OracleAS Adapters for IMS/DB with Oracle BPEL Process Manager 4-5
Page 70

Configuring Oracle BPEL Process Manager
4-6 Oracle Application Server Adapters for IMS/DB User's Guide
Page 71

This chapter contains the following topics:
■ Getting Started
■ Deploy a BPEL Outbound Process
Getting Started
This topic describes the components necessary to work with the samples and how to
prepare your system.
Prerequisites
The following are installation and configuration requirements for using the examples.
■ Personal computer running Microsoft Windows XP or Windows Server 2003 with
■ The IMS/DB adapter that you are using must be deployed to the Oracle
5
BPEL Process Manager Examples
one GB of RAM.
Application Server.
■ OracleAS IMS/DB Adapter must be configured for outbound processing. See
Generating Outbound Interactions.
■ Oracle JDeveloper must be installed.
■ Legacy adapter must be deployed.
■ Oracle Studio with the necessary machines loaded. See Configuring Oracle
Connect.
This chapter provides examples of the configuration steps that are used when using
BPEL to work with the Oracle IMS/DB adapters. You should be familiar with the
following before working with these examples:
■ How to create J2CA connections. See Chapter 3, "Integrating OracleAS Adapter for
IMS/DB with OC4J" for more information.
■ How to configure the OracleAS adapters for IMS/DB using Oracle Studio. See
Configuring Oracle Connect for more information.
Integration between the OracleAS adapters for IMS/DB and BPEL has the following
processes:
■ Design Time: The OracleAS adapters for IMS/DB are configured with Oracle
Studio as described in Configuring Oracle Connect.
■ Runtime: After you deploy the BPEL process with JDeveloper, you can test your
configurations. See Runtime Configuration.
BPEL Process Manager Examples 5-1
Page 72

Deploy a BPEL Outbound Process
Deploy a BPEL Outbound Process
This section describes how to create a BPEL outbound process that connects to a
OracleAS adapter for IMS/DB. For information on how to configure an IMS/DB
adapter for outbound, see Modeling Interactions for OracleAS Adapter for IMS/DB.
To configure a process with the BPEL process manager, you use JDeveloper. This
section describes how to create a BPEL outbound process for IMS/DB reource
adapters using JDeveloper. The following sections describe how to deploy a BPEL
outbound process. The following steps describe the steps necessary to carry out this
outbound sample.
■ Beginning Tasks
■ Design-Time Configuration
■ Runtime Configuration
Before you design the outbound process, make sure to integrate and connect your
OracleAS adapter for IMS/DB with the BPEL process manager. See Chapter 4,
"Integrating OracleAS Adapters for IMS/DB with Oracle BPEL Process Manager" for
more information.
Beginning Tasks
Before you design the outbound process, you must carry out the following:
■ Integrate the OracleAS Adapter for IMS/DB with OC4J. See Integrating OracleAS
Adapter for IMS/DB with OC4J for more information.
■ Configure the connection for the J2CA IMS/DB resource adapter. You do this by
creating a connection factory. See Configuring the J2CA 1.5 IMS/DB Adapter for
information on how to do this.
■ Write a schema file. First, create an interaction called findDoctor using Oracle
Studio. See Configuring an OracleAS Adapter for IMS/DB for Outbound
Interactions for a description on how to create the findDoctor interaction.
Write a schema file called FINDDOCTORSchema.xsd to define the message
schema. The following is an example of the findDoctor.xsd file:
<schema targetNamespace="http://xmlns.oracle.com/Esb/findDoctorData"
xmlns:cust="http://xmlns.oracle.com/Esb/findDoctorData"
xmlns="http://www.w3.org/2001/XMLSchema">
<element name="findDoctorData" type="cust:findDoctorDataType"/>
<complexType name="findDoctorDataType">
<sequence>
<element name="Record1" type="string"/>
</sequence>
</complexType>
</schema>
■ Create a BPEL PM Server Connection in JDeveloper.
■ Create the WSDL for the interaction. You do this in JDeveloper Connections
explorer before you begin to build your endpoint in JDeveloper. JDeveloper will
create the WSDL automatically based on the interaction you create. In the
Connections explorer, browse for the Oracle Connect server you configured in
Oracle Studio (see Installing Oracle Connect on an IBM z/OS Series Platform),
then double-click the findDoctor interaction to view and create the WSDL. For a
description on how to do this, see Configuring Oracle BPEL Process Manager.
5-2 Oracle Application Server Adapters for IMS/DB User's Guide
Page 73

See Configuring an OracleAS Adapter for IMS/DB for Outbound Interactions for
an explanation on how to create the findDoctor interaction and for an
explanation on the WSDL.
Design-Time Configuration
This section describes the design-time steps necessary to deploy two BPEL outbound
processes. The processes use the Web service called FINDDOCTOR. This service finds
a list of doctors from IMS data. The following are the steps required to create the
outbound process.
■ Create a BPEL Project for a BPEL Outbound Process
■ Create a Database Adapter to Read the Doctor Table
■ Design a BPEL Outbound Process to Read the String
■ Create a Partner Link to the Database Adapter
■ Edit the Invoke_1 Activity
■ Edit the Assign_1 Activity
Create a BPEL Project for a BPEL Outbound Process
Do the following to create a BPEL project for outbound.
Deploy a BPEL Outbound Process
1. In JDeveloper, from the View menu, select Application Navigator.
2. In the Application Navigator, right-click the application you are working with and
select New Project. The New Gallery dialog box is displayed.
3. From the Items list, select BPEL Process Project then click OK. The BPEL Project
Creation Wizard-Project Settings dialog box is displayed.
Figure 5–1 Outbound Project Settings
Do the following in BPEL Project Creation Wizard-Project Settings dialog box:
4.
■ Enter a name for the BPEL process, for example BPELOutbound1.
■ From the Template list, select Empty BPEL Process.
BPEL Process Manager Examples 5-3
Page 74

Deploy a BPEL Outbound Process
Click Next to review the input/output schema elements or click Finish.
5.
Create a Database Adapter to Read the Doctor Table
You create a database adapter to read the DOCTOR table. SOA executes the SQL
statement defined in the interaction and passes it to a resource adapter. The resource
adapter then processes the information and returns the data. Do the following to create
the database adapter.
1. Drag a PartnerLink into a service lane of the visual editor. The Create Partner Link
dialog box is displayed.
Figure 5–2 Partner Link for Database Adapter
2. Click the Adapter Wizard button. This is the third button in the WDSL Settings
section of the Create Partner Link dialog box, as shown in the figure above.
3. Enter the following information in the Adapter Configuration wizard:
a. Step 1, Adapter Type: Select Database Adapter.
b. Step 2, Service Name: type findDoctor
c. Step 3, Service Connection. In this step select the database you want to work
with.
Click New to open the Create Database Connection wizard.
Step 1: Select the connection type:
Connection Name: dbConnection1
Connection Type: Oracle (JDBC)
Step 2: Authentication.
Enter the User Name, Password, and Role for the database connection
Step 3: Enter the database connection information.
Enter the driver type (thin, oci), the name of the computer where JDBC is
deployed, and its port number. This information should be the same as
defined in the JDBC connecton facrory. See Configuring the J2CA 1.5 IMS/DB
Adapter.
Select Service Name and enter findDoctor.
Click Finish to go back to the Adapter Configuration wizard.
5-4 Oracle Application Server Adapters for IMS/DB User's Guide
Page 75

Deploy a BPEL Outbound Process
Step 4, File Directories
d.
Directory Names are Specified as: Select Physical Path
Directory for Incoming Files (physical path): Enter the full path to the folder
where you want the incoming files, for example C:\temp.
e. Step 5, File Filtering:
Includes Files with Name Pattern: Enter *xml
f. Step 6, File Polling:
Polling Frequency: enter 1 then select seconds from the list.
g. Step 7, Messages:
Schema File URL: Enter findDoctor.xsd
Schema Element: Enter FindDoctorData
4. Click Finish.
Design a BPEL Outbound Process to Read the String
In this step, you design the BPEL process. Do the following to design the BPEL
outbound process:
1. From the Component Palette-Process Activities pane, drag a Receive, Assign, and
Invoke activity into the editor for the process you created in the Create a BPEL
Project for a BPEL Outbound Process step.
Figure 5–3 Outbound Process
In the Visual Editor, connect the Recieve_1 activity to the findDoctor database
2.
adapter. The Edit Receive dialog box is displayed.
BPEL Process Manager Examples 5-5
Page 76

Deploy a BPEL Outbound Process
Figure 5–4 Outbound Receive Properties
3.
Do the following in the Edit Receive dialog box:
■ Enter a name for the Receive activity, in this example it is Receive_1.
■ Make sure to create the variable. Click the first button to the right of the
Va r ia b l e field, then click OK in the Create Variable dialog box that is
displayed.
■ Make sure that the Create Instance check box is selected.
■ Click OK to close the dialog box and accept the information.
Create a Partner Link to the Database Adapter
In this step, create a partner link to the Database adapter you defined when you
created the IMD/DB configuration in Oracle Studio. Do the following to create a
partner link.
1. Drag a PartnerLink into a service lane of the visual editor. The Create Partner Link
dialog box is displayed.
Figure 5–5 Partner Link to IMS/DB Outbound
2.
From the Create Partner Link dialog box, click the Service Explorer button. This
button is the second form the left and is shown in the figure in the previous step.
The Service Explorer dialog box is displayed.
5-6 Oracle Application Server Adapters for IMS/DB User's Guide
Page 77

Deploy a BPEL Outbound Process
In the Service Explorer, expand the connection you are using, then expand
3.
adapters and then applications, and continue to browse until you find the WDSL
file you are using. Select the file and click OK.
The WSDL File field in the Create Partner Link dialog box displays the path to the
WSDL file you selected. The Partner Link Type field displays the Partner Link
defined in the WSDL file.
4. Enter the following information in the Create Partner Link dialog box:
■ In the Partner Role list, select FINDDOCTORRole.
■ In the My Role list, select Not Specified.
Edit the Invoke_1 Activity
Edit the Invoke_1 activity that you added to the Visual Editor so that it will invoke
the FINDDOCTOR service. Do the following to edit the Invoke_1 activity.
1. Double-click the Invoke_1 activity to edit it. The Invoke dialog box is displayed.
Figure 5–6 Invoke Dialog Box
2.
In the Invoke dialog box, make sure that the Partner Role Web Service Interface
section has the following values:
■ Partner Link: FINDDOCTOR
■ Operation: FINDDOCTOR
3. Click the Automatically Create Input Variable button. It is the first icon to the
right of the Input Variable field as shown in the figure in the previous step. The
Create Variable dialog appears with the input variable.
4. The Input Variable should be Invoke_1_FINDDOCTOR_InputVariable. Click
OK.
5. Click the Automatically Create Input Variable button for the Output Variable
field.
6. The Output Variable should be Invoke_1_FINDDOCTOR_OutputVariable.
Click OK.
BPEL Process Manager Examples 5-7
Page 78

Deploy a BPEL Outbound Process
Edit the Assign_1 Activity
You use the assign activity to assign a value to the resource adapter. Do the following
to edit the Assign_1 activity.
1. Double-click the Assign_1 activity to edit it. The Assign dialog box is displayed.
Figure 5–7 Assign Dialog Box
Click the Create list and select Copy Operation. The Create Copy Operation
2.
dialog box is displayed.
Figure 5–8 Create Copy
3. On the From side, expand Variables then expand Read_1_SelectDoctor_
InputVariable, then expand nsx:findDoctor and select Record1.
4. On the To side, expand Variables then expand Read_1_SelectDoctor_
InputVariable, then expand input:findDoctor, then expand nsx:Record1 and
select Record1_data.
5-8 Oracle Application Server Adapters for IMS/DB User's Guide
Page 79

Deploy a BPEL Outbound Process
Click OK. The Copy Operation tab in the Assign window updates to show the
5.
rule.
The following figure shows how the final process looks:
Figure 5–9 Final Outbound Process
Runtime Configuration
This section describes how to test the project and run it to see that the outbound
process is executed successfully. Do the following to test the outbound process.
1. Create a file and call it FindDoctor.xml as shown in the following example:
<?xml version="1.0" encoding="UTF-8"?>
<CU:FindDoctorData
xmlns:CU="http://xmlns.oracle.com/Esb/FindDoctorData"
xmlns:xsi="http://www.w3.org/2001/XMLSchema-instance">
<Record1>IMSDB</Record1>
</CU:FindDoctorData>
2. Save the file to the C:/temp folder that was defined for the first adapter. The file
is deleted after the SOA server reads the file and complete the process.
3. Open the C:\tempOut folder that was defined in the second adapter. A file with
the following contents is copied to this folder.
<?xml version="1.0"?>
<findDoctorData xmlns="http://xmlns.oracle.com/Esb/findDoctorData">
<Record1 xmlns>="">IMSDB</Record1>
BPEL Process Manager Examples 5-9
Page 80

Deploy a BPEL Outbound Process
5-10 Oracle Application Server Adapters for IMS/DB User's Guide
Page 81

6
Configuring an OracleAS Adapter for IMS/DB
for Outbound Interactions
This chapter provides an example for creating an OracleAS adapter for IMS/DB. In
this case it describes the steps necessary to create an adapter that will get find the
names of a doctor and a patient from an IMS/DB data source. To work with an
OracleAS adapter for IMS/DB, you must also configure a BPEL endpoint connection.
For information on how to create an endpoint, see BPEL Process Manager Examples.
Creating Outbound Interactions with the OracleAS Adapter for IMS/DB
To work with the OracleAS Adapter for IMS/DB and create outbound interactions you
must create an IMS/DB data source, import the metadata from IMS/DB, create a
database adapter, then create interactions that will be used to access the data.
Requirements
The following is required to carry out the tasks described in this chapter:
■ Computer with Windows operating system
■ Mainframe computer with z/OS operating system
■ Oracle Connect v 10.1.3.4 installed on the Mainframe computer
■ Oracle Studio v 10.1.3.4 installed on the Windows computer.
Adding the IMS/DB Hospital Data Source
To create an IMS/DB data source you must do the following:
■ Prepare the System
■ Set up Machine Access to Oracle Connect
■ Add an IMS/DB Data Source
■ Import the Metadata
Prepare the System
Make sure that the Hospital database is available under IMS/DB on the Mainframe
computer.
Configuring an OracleAS Adapter for IMS/DB for Outbound Interactions 6-1
Page 82

Adding the IMS/DB Hospital Data Source
Set up Machine Access to Oracle Connect
You begin by configuring access to the Mainframe computer with your IMS/DB data.
You configure this access with Oracle Connect. Open Oracle connect and follow the
directions Setting Up the IBM z/OS Platform in Oracle Studio. Enter the following
information in the Add machine dialog box:
■ Host name/IP address: Enter the name or IP address for the Mainframe computer
whith the Hospital database. This should be installed in the same directory as
Oracle Connect.
■ Port: Enter the port number where the daemon is running. The default port is
2551.
■ Display name: You do not need to enter any information in this field (By default,
the display name will be the host name and the port number).
■ User name: If the computer you are accessing needs an administrator password. If
so enter the name o f the computer’s administrator.
■ Password: If necessary, enter the computer administrator’s password.
■ Connect via NAT with fixed IP address: Select this if the machine uses the NAT
(Network Address Translation) firewall protocol, with a fixed configuration,
mapping each external IP to one internal IP, regardless of the port specified.
The following figure shows the Add Machine dialog box with the correct information:
Figure 6–1 Add Machine Dialog Box
Add an IMS/DB Data Source
After you add the computer configuration to Oracle Studio, you can add your IMS/DB
data source to the Configuration view. To add an IMS/DB data source, do the
following:
1. Expand the computer you just added and then expand the NAV binding.
2. Right-click the Data sources folder and then select New data source.
3. In the New data source dialog box, type Hospital in the Name field.
6-2 Oracle Application Server Adapters for IMS/DB User's Guide
Page 83

Adding the IMS/DB Hospital Data Source
In the Type field, select IMS-DLI and then click Finish. You do not need to add
4.
any additional connection information.
For detailed information on adding the IMS/DB data source, see Configuring the Data
Source Driver.
The following figure shows the Add data source dialog box with the correct
information:
Figure 6–2 Add Data Source Dialog Box
Import the Metadata
You now import the metadata from the IMS/DB data into the data source. For
information on how to import data, see Importing Metadata for the IMS/DB Data
Source.
In this example you should import the metadata for the Doctor and Patient
coluumns of the Hospital database. This database is supplied as an example with
Oracle Connect and should be installed when you install Oracle Connect on your
Mainframe computer.
You will need the following information for the metadata import:
■ In the Get Input Files step, add the files, hospital.dbd, hospital.cob, and
hospital.psb.
■ In the Apply Filters step, just click Next.
■ In the Select Tables step, select DOCTOR and PATIENT.
■ In the Match DBD to COBOL screen, click Next.
■ In the Import Manipulation step, click Next.
■ In the Metadata Model Selection step, select Default value for all tables, then click
Next.
■ In the Import Metadata step, select Yes and then click Finish.
Configuring an OracleAS Adapter for IMS/DB for Outbound Interactions 6-3
Page 84

Create the findDoctor and findPatient Interactions
Create the findDoctor and findPatient Interactions
You use a database adapter to create the interactions used to get the data that you
need. The interactions are used as services when you set up the endpoint in
JDeveloper. For more information on using JDeveloper to create an endpoint, see BPEL
Process Manager Examples.
Do the following to create the interactions.
■ Add a Database Adapter
■ Create Interactions
Add a Database Adapter
You now create a database adapter, which lets you create interactions to get the
information you are seeking. To create a database adapter, do the following
1. Expand the computer you just added and then expand the NAV binding.
2. Right-click the Adapters folder and then select New adapter.
3. Enter the following information for your adapter, then click Finish.
■ Name: findDoctor
■ Typ e: Database
■ Select Create event queue for the adapter.
For a detailed explanation on how to set up a database adapter, see Setting Up an
Oracle Connect Adapter.
The following figure shows the Add adapter dialog box with the correct information:
Figure 6–3 Add Adapter Dialog Box
Create Interactions
You create interactions to work with the data under the Oracle Application Server. You
use the interactions that you create when you create your endpoint using JDeveloper.
In this example, you should create an interaction called findDoctor. To create an
intearction, do the following:
6-4 Oracle Application Server Adapters for IMS/DB User's Guide
Page 85

Create the findDoctor and findPatient Interactions
Expand the computer you just added and then expand the NAV binding.
1.
2. Right-click the adapter you are using and select Show in Metadata.
3. Right-click Interactions and select New.
4. Enter the following information for in the wizard, then click Finish.
■ Name: findDoctor
■ Typ e: Database
■ Select Create event queue for the adapter.
■ In Creation Mode: select Manual, and Database query.
■ Interaction Name: findDoctor.
■ Select Create New Query
■ Create a Select statement find a doctor in the database.
For detailed information on how to create an interaction, see Generating Outbound
Interactions.
Save all of your infomation and exit Oracle Studio.
Configuring an OracleAS Adapter for IMS/DB for Outbound Interactions 6-5
Page 86

Create the findDoctor and findPatient Interactions
6-6 Oracle Application Server Adapters for IMS/DB User's Guide
Page 87

Troubleshooting OracleAS Adapter for
Troubleshooting Oracle AS Adapter for IMS/DB involves checking various definitions
and properties in Oracle Connect, including daemon status, workspace options, server
parameters, and various system logs.
This section contains the following topics:
■ Troubleshooting the Daemon
■ Resolving Communication Errors
■ Resolving Specific Errors
Troubleshooting the Daemon
Troubleshooting the daemon and the communication between Oracle Application
Server and OracleAS Adapter for IMS/DB is performed using Oracle Studio. It is used
to monitor the daemon and server activity and control what happens to the daemon
and server processes.
7
IMS/DB
This section contains the following topics:
■ Starting the Daemon
■ Shutting Down the Daemon
■ Monitoring the Daemon During Run Time
■ Daemon Logs
Starting the Daemon
The daemon is started when OracleAS Adapter for IMS/DB is installed. In case you
have shut down the daemon, as described in "Shutting Down the Daemon" on
page 7-2, you can restart the daemon as described in the following task.
See Also: Appendix C, "Advanced Tuning of the Daemon" for
details about the configuration settings.
Note: The daemon is started on the IBM /OS platform. It cannot
be started remotely using Oracle Studio.
Troubleshooting OracleAS Adapter for IMS/DB 7-1
Page 88

Troubleshooting the Daemon
Task: Starting the Daemon
Activate INSTROOT.USERLIB(ATTDAEMN) as a started task to invoke the daemon.
For example, in the SDSF screen, enter the following command:
'/s ATTDAEMN'
Where INSTROOT is the high-level qualifier where Oracle Connect is installed.
See Also: "Starting the Daemon" on page 2-10 for details about
the ATTDAEMN JCL
Shutting Down the Daemon
To shut down the daemon use Oracle Studio, as follows:
1. From the Start menu, select Start, Programs, Oracle, and then select Studio.
2. Select the computer defined in "Setting Up the IBM z/OS Platform in Oracle
Studio" on page 2-14.
3. Right-click the computer and select Open Runtime Perspective.
4. In the Runtime Explorer, right-click the computer and select Shutdown Daemon.
Monitoring the Daemon During Run Time
Use the Runtime Manager perspective of Oracle Studio to monitor the daemon during
run time.
Perform the following steps:
1. From the Start menu, select Start, Programs, Oracle, and then select Studio.
2. Right-click the computer defined in "Setting Up the IBM z/OS Platform in Oracle
Studio" on page 2-14, and select Open Runtime Perspective.
You can manage the daemon by expanding the relevant node, daemon, workspace or
server process, as described in the following sections.
Daemon (Computer) Options
Right-click the daemon to display the options available for it, including the ability to
display the daemon log.
The following table lists the available daemon options:
Table 7–1 Daemon Options
Option Description
Edit Daemon
Configuration
Opens the daemon editor, which enables you to reconfigure
the daemon.
See Also: Appendix C, "Advanced Tuning of the Daemon" for
details about the configuration settings.
Status Checks the status of the daemon. The information about the
Reload Configuration Reloads the configuration after any changes. Any servers
7-2 Oracle Application Server Adapters for IMS/DB User's Guide
daemon includes the name of the daemon configuration used,
the active client sessions, and logging information.
currently started are not affected by the changed
configuration.
See Also: Appendix C, "Advanced Tuning of the Daemon" for
details about the configuration settings.
Page 89

Troubleshooting the Daemon
Table 7–1 (Cont.) Daemon Options
Option Description
View Log Displays the daemon log. For details see "Daemon Logs" on
page 7-4.
View Events Displays the daemon events log.
Daemon Properties Displays information about the computer where the daemon
is running, such as the physical address and any username
and password needed to access the computer.
Recycle servers Closes all unused servers and prepares all active servers to
Kill servers Immediately closes all active and unused servers.
Shutdown Daemon Shuts down the daemon on the computer.
Rename Enables changing the name of the daemon displayed in the
Remove Removes the daemon from the Runtime Explorer.
Refresh Refreshes the display.
close when the client disconnects. New connection requests
are allocated with new servers.
Note: It is recommended to use this option with caution, as it
may lead to data loss.
Runtime Explorer.
Workspace Options
Right-click a workspace to display the options available for the workspace, including
the ability to display the workspace log.
The following table lists the available options:
Table 7–2 Workspace Options
Option Description
Edit Workspace
Configuration
Opens the daemon editor to enable you to reconfigure the
workspace.
See Also: Appendix C, "Advanced Tuning of the Daemon"
for details about the configuration settings.
Status Checks the status of the workspace whether it is available
Reload Configuration Reloads the configuration of the workspace after any
View Log Displays the log for all servers for the workspace. For
View Events Displays the workspace events log.
Recycle Servers Closes all unused servers and prepares all active servers to
Kill Servers Immediately closes all active and unused servers.
Remove Removes the selected workspace from the Runtime
or not.
changes. Any servers currently started are not affected by
the changed configuration.
details see "Daemon Logs" on page 7-4
close when the client disconnects. New connection
requests are allocated with new servers.
Note: It is recommended to use this option with caution,
as it may lead to data loss.
Explorer.
Troubleshooting OracleAS Adapter for IMS/DB 7-3
Page 90

Troubleshooting the Daemon
Table 7–2 (Cont.) Workspace Options
Option Description
Disable Disables the selected workspace.
Refresh Refreshes the display.
Server Options
Right-click a server to display the options available for the server, including the ability
to display the server log.
The options available at the server level are listed in the following table:
Table 7–3 Server Options
Option Description
Status Checks the status of the server. The information about the
server includes the server mode and the number of active
client sessions for the server.
Daemon Logs
View Log Displays the server log. For details see "Daemon Logs" on
page 7-4.
View Events Displays the server events log.
Kill server Ends the server process, regardless of its activity status.
Note: It is recommended to use this option with caution,
as it may lead to data loss.
Refresh Refreshes the display.
Oracle Connect produces a number of logs that you can use to troubleshoot problems.
The daemon manages the following logs:
■ Daemon
■ Wor ks pa ce
■ Server process
The Runtime Manager perspective of Oracle Studio provides a monitor for these logs
as shown in the following figure:
7-4 Oracle Application Server Adapters for IMS/DB User's Guide
Page 91

Troubleshooting the Daemon
Display the required log by right-clicking the level you want (daemon, workspace or
server) and selecting View Log. Each log is displayed in a different tab. You can flick
between logs by clicking the required tab.
The Daemon Log Monitor
The daemon log displays activity between clients and the daemon, including clients
logging in and logging out from the daemon.
You can change the level of logging by clicking Properties. The following levels of
logging are available:
■ none: The log displays who has logged in and out from the daemon.
■ error: The log displays who has logged in and out from the daemon and any
errors that have been generated.
■ debug: The log displays who has logged in and out from the daemon, any errors
that have been generated, and any tracing that has been specified in the daemon
configuration.
See Also: Daemon "Logging" on page C-3.
The Workspace Log Monitor
The workspace log displays information about the workspace being used by the client.
You can change the level of logging by clicking Properties. The following levels of
logging are available:
■ none: The log displays who has connected and disconnected from the server
process.
■ error: The log displays who has connected and disconnected from the server
process and any errors that have been generated.
■ debug: The log displays who has connected and disconnected from the server
process, any errors that have been generated, and any tracing that has been
specified in the daemon configuration.
See Also: Wor ks pa ce "General" on page C-7.
The Server Log Monitor
The server log displays activity between clients and the server process used by that
client to handle the client request.
You can change the level of logging by clicking Properties. The following levels of
logging are available:
■ none: The log displays who has connected and disconnected from the server
process.
■ error: The log displays who has connected and disconnected from the server
process and any errors that have been generated.
■ debug: The log displays who has connected and disconnected from the server
process, any errors that have been generated, and any tracing that has been
specified in the daemon configuration.
See Also: Wor ks pa ce "General" on page C-7.
Troubleshooting OracleAS Adapter for IMS/DB 7-5
Page 92

Resolving Communication Errors
Resolving Communication Errors
When Oracle Studio disconnects from the IBM z/OS computer, the computer is
displayed in Oracle Studio with an X in a red circle. If this situation occurs, try to
access the computer later.
The following table describes the various scenarios that may exist when Oracle
Application Server disconnects from the IBM z/OS computer.
Table 7–4 Scenarios When a Client Is Disconnected
Idle (Not Processing a Client
Scenario
Explicit Disconnect
(client explicitly
closes connection
or client program
terminates)
Request) Processing a Client Request
The server is immediately notified of
the disconnect and either becomes
available for use by another client or
terminates (if it is not reusable).
The server does not know that the client has
disconnected and continues processing. When
processing completes, the server tries to reply to
the client and immediately gets an error that the
connection was lost. The server either becomes
available for use by another client or terminates (if
it is not reusable).
Abrupt Disconnect
(client closed
without proper
shutdown or client
system hanged
and
communication
disconnected)
The server does not know that the
client has disconnected and remains
in the idle state.
After timing out based on whichever
comes first of the value for the client
idle timeout daemon workspace
parameter or the TCP/IP KEEPALIVE
parameter, the server is notified of the
disconnect and either becomes
available for use by another client or
terminates (if it is not reusable).
To troubleshoot client/server communication problems, you need to be familiar with
the following:
■ Daemon configuration settings
■ Oracle Connect security
■ TCP/IP subsystem. Oracle Application Server Adapter for IMS/DB uses TPC/IP
for internal intercomputer communications.
■ System details, such as the account name and password of the administrator
account, the IP address of the computers involved and whether a portmapper is
being used.
Resolving Specific Errors
The following error messages relate to errors received from Oracle Connect.
The server does not know that the client has
disconnected and continues processing. When
processing completes, the server tries to reply to
the client. After an interval (typically several
minutes, depending on the TCP/IP configuration),
during which the TCP/IP subsystem retries
sending the message to the client, the server
assumes that the client has terminated and notifies
the server that the connection has been closed. The
server either becomes available for use by another
client or terminates (if it is not reusable).
C007: Server initialization failed.
Cause: The daemon failed to start its network service.
Action: Check the processes being run on the system to see whether another
daemon or program is using the port specified in the oc4j-ra-xml file for the
adapter.
Action: Check the TCP/IP subsystem on the current computer by trying to ping it
or run FTP or Telnet to or from it.
7-6 Oracle Application Server Adapters for IMS/DB User's Guide
Page 93

Resolving Specific Errors
Action: Check whether the daemon has privileges to use the TCP/IP services on
the current computer with the port specified in the oc4j-ra-xml file for the adapter.
C008: Setting server event handler failed.
Cause: Internal error.
Action: Contact Oracle Support Services.
C009: IRPCD process has been terminated by user request.
Cause: This message is informational only. The daemon successfully shut down.
Action: No action required.
C00A: Application %s not found.
Cause: The requested workspace does not exist.
Action: Check that the workspace defined in the oc4j-ra-xml file is also defined in
the daemon configuration on the IBM z/OS platform. Use the Status option in the
Runtime Manager perspective.
C00B: Invalid IRPCD client context.
Cause: A non-Oracle Connect program is trying to connect to the daemon.
Action: Check the processes and kill the relevant process with a system
command.
C00C: Daemon request requires a server login.
Cause: A non-Oracle Connect server or program was trying to use a daemon
service reserved for Oracle Connect servers.
Action: Check the processes and kill the relevant process with a system
command.
C00D: Daemon request requires a client login.
Cause: The requested daemon requires a valid client login, which was not
supplied.
Action: Reissue the command and specify a username and password.
Action: Edit the user profile in Oracle Studio to specify a valid username and
password for the IBM z/OS platform.
See Also: "Setting Up Run-Time User Access to the IBM z/OS
Platform" on page 2-17.
C00E: Daemon request requires an administrator login.
Cause: The requested daemon service requires an administrative login.
Action: Edit the daemon security in Oracle Studio to specify a valid administrator
username and password.
See Also: "Security" on page C-5.
C00F: Anonymous client logins are not allowed.
Cause: The daemon is configured to require a valid username and password,
which were not supplied.
Action: Enable anonymous client access in daemon security in Oracle Studio.
See Also: "Security" on page C-5.
Troubleshooting OracleAS Adapter for IMS/DB 7-7
Page 94

Resolving Specific Errors
C010: Anonymous server logins are not allowed.
C011: Client has already timed out.
C012: Invalid username/password.
Action: Edit the user profile in Oracle Studio to specify a valid username and
password for the IBM z/OS platform.
See Also: "Setting Up Run-Time User Access to the IBM z/OS
Platform" on page 2-17.
Cause: Internal error.
Action: Contact Oracle Support Services.
Cause: A server process was started on behalf of a client and the client has timed
out before the server completed its startup.
Action: Increase the Connect timeout value for the server workspace in the WS
Info. tab of the daemon configuration.
See Also: "General" on page C-7.
Cause: Invalid username/password supplied when logging on to the daemon.
Action: See the daemon log file for the reason that the username/password were
not accepted.
Action: Edit the user profile in Oracle Studio to specify a valid username and
password for the IBM z/OS platform.
See Also: "Setting Up Run-Time User Access to the IBM z/OS
Platform" on page 2-17.
Action: Make sure the daemon is started from an APF-authorized account that is
allowed to check for system usernames and passwords.
C014: Client connection limit reached - try later.
Cause: The maximum number of server processes for the workspace has been
reached, and none of the active servers could accept the client connection.
Action: Increase the value of the Number of sub-tasks in the WS Server
section of the daemon configuration.
See Also: "Server Mode" on page C-11.
Action: Try running the command later.
C015: Failed to start server process.
Cause: The Oracle Connect daemon failed to start a server process or the started
server failed upon starting up.
Action: See the daemon and server logs for the reason the server did not start. For
example, you might receive an message with a reason specified in the log file
similar to the following: [C015] Failed to start NAVIGATOR server
process: No server account name defined for anonymous client;
code: -1601: SQL code: 0
Action: If you use impersonation, check the user profile on the client. Also see
C069.
7-8 Oracle Application Server Adapters for IMS/DB User's Guide
Page 95

Resolving Specific Errors
To set impersonation: APF authorize all the steplibs in the server
script on z/OS computer. For example:
setprog... ada622-volume adavol
CICS.CICS.SDFHEXCI - p390dx
INSTROOT.load - 111111
INSTROOT.loadaut - 111111
INSTROOT is the high level qualifier where Oracle Connect is
installed.
In the Security tab of the Navigator workspace, under the daemon
node in the Configuration Explorer, check Use specific workspace
account and clear the Workspace account field of all values.
C016: Unexpected server state.
Cause: Internal error.
Action: Contact Oracle Support Services.
C017: Active daemon clients exist. Shutdown canceled.
Cause: One or more clients are still connected to the daemon.
Action: Wait until all the clients log off the daemon and then retry the shutdown
operation.
C019: Request is not granted because someone else is locking it.
Cause: A request to lock a resource managed by the daemon was denied because
another user has locked the resource.
Action: Wait for the other user to release the resource.
C01A: Lock %s not found.
Cause: A request to free a resource was denied because the caller did not lock that
resource (for example, another user shut down the daemon you are working with).
Action: Contact Oracle Support Services.
C01B: Unexpected error in %s.
Cause: Internal error.
Action: Contact Oracle Support Services.
C01C: Cannot update configuration without _APPLICATIONS lock.
Cause: Internal error.
Action: Contact Oracle Support Services.
C01D: Need to lock the application first.
Cause: Internal error.
Action: Contact Oracle Support Services.
C01F: Cannot set configuration of a deleted application.
Cause: Internal error.
Action: Contact Oracle Support Services.
C020: Failed in looking up host name (gethostname())
Cause: Cannot connect to the remote computer.
Troubleshooting OracleAS Adapter for IMS/DB 7-9
Page 96

Resolving Specific Errors
C021: Required variable %s not found
C022: Server failed to connect and register with the daemon.
Action: Check that the name specified for the computer in the oc4j-ra-xml file is
correct.
Action: Check that a domain name server (DNS) is available to look up the host
name.
Action: Check the TCP/IP subsystem on the computer by trying to ping it or run
FTP or Telnet to or from it.
Cause: An environment variable required by the Oracle Connect server was not
defined when the server started up.
Action: Check whether the startup script makes any changes to the environment
variables used by Oracle Connect.
Action: Check whether the system-defined environment size is sufficiently large
for Oracle Connect.
Cause: An Oracle Connect server started by the daemon was not able to connect
or register back with the daemon.
Action: Try to connect again.
Action: Increase the Connect timeout value for the server workspace in the WS
Info. section of the daemon configuration.
See Also: "General" on page C-7.
Action: Check that the startup script for the workspace launches the correct
version of Oracle Connect.
Action: Increase the value of the Set maximum number of servers and
Maximum parameter for the Clients per server limit in the WS Server section of the
daemon configuration.
See Also: "Server Mode" on page C-11.
C023: Call made to unregistered module %d.
Cause: Internal error.
Action: Contact Oracle Support Services.
C024: Failed to create a socket.
Cause: An error occurred within the TCP/IP subsystem.
Action: Check whether you have sufficient system privileges.
Action: Check the TCP/IP subsystem on the computer by trying to ping it or run
FTP or Telnet to or from it.
C025: Failed to set socket option %s
Cause: An error occurred within the TCP/IP subsystem.
Action: Check whether you have sufficient system privileges.
Action: Check the TCP/IP subsystem on the computer by trying to ping it or run
FTP or Telnet to or from it.
7-10 Oracle Application Server Adapters for IMS/DB User's Guide
Page 97

Resolving Specific Errors
C026: Failed to bind server to port %s
Cause: An Oracle Connect server or daemon was not able to bind to the specified
port.
Action: Check whether another program is holding the port that was specified in
the oc4j-ra-xml file for the adapter.
Action: Check whether you have sufficient system privileges.
C027: Cannot create TCP service for %s
Cause: An error occurred within the TCP/IP subsystem
Action: Check the TCP/IP subsystem on the computer by trying to ping it or run
FTP or Telnet to or from it.
C028: Unable to register (%s, %d, tcp)
Cause: This error may happen when a portmapper is used (host:a) but the
portmapper is not available.
Action: Enable the portmapper.
Action: Avoid using the portmapper (by not using :a when starting the daemon).
C029: Failed to create a server thread
Cause: Internal error.
Action: Contact Oracle Support Services.
C02A: Server thread failed to start
Cause: Internal error.
Action: Contact Oracle Support Services.
C02B: Stopping the %s server - no client
Cause: A server that was started by the Oracle Connect daemon to service a client
did not get a client connection request within one minute. The server terminates.
Action: In most cases, the client was terminated by a user request, so no specific
action is required.
Action: If no client can connect to the server, it may be that the server has multiple
network cards and the Oracle Connect daemon is not aware of this. In this case,
start the daemon with an IP address.
C02C: Unexpected event - a termination signal intercepted
Cause: Internal error.
Action: Contact Oracle Support Services.
C02D: Modified transport, context unknown/lost
Cause: Internal error.
Action: Contact Oracle Support Services.
C02F: Corrupted arguments passed to procedure
Cause: Internal error.
Action: Contact Oracle Support Services.
C030: Unable to free arguments for %s() of %s
Cause: Internal error.
Troubleshooting OracleAS Adapter for IMS/DB 7-11
Page 98

Resolving Specific Errors
C031: Cannot register a non-module RPC %s
C032: An IRPCD program is required
C033: An IRPCD super-server is required for module events
C034: An invalid super-server module ID was specified, %d
C035: Out of memory
Action: Contact Oracle Support Services.
Cause: Internal error.
Action: Contact Oracle Support Services.
Cause: Internal error.
Action: Contact Oracle Support Services.
Cause: Internal error.
Action: Contact Oracle Support Services.
Cause: Internal error.
Action: Contact Oracle Support Services.
Cause: Not enough memory to service a client request.
Action: Increase process memory quota or add memory to the system.
C036: Failed to register RPC procedure module %s
Cause: Internal error.
Action: Contact Oracle Support Services.
C037: Failed to register an invalid RPC procedure number %x
Cause: Internal error.
Action: Contact Oracle Support Services.
C038: Cannot reregister RPC procedure number %x
Cause: Internal error.
Action: Contact Oracle Support Services.
C042: Remote call to %s failed; %s
Cause: Remote call to API failed.
Action: Check the daemon log file.
Action: If necessary, change the level of detail written to the log file to help
resolve the problem.
See Also: "Logging" on page C-3.
C043: Failed to connect to host %s;%s
Cause: The remote host is not correctly defined to Oracle Connect or is not
working.
Action: Check the remote computer definition in the oc4j-ra-xml file for the
adapter.
Action: Check that the daemon is up on the IBM z/OS platform. Use the Status
option in the Runtime Manager perspective.
7-12 Oracle Application Server Adapters for IMS/DB User's Guide
Page 99

Resolving Specific Errors
Action: Check the network connection by trying to ping the host computer or run
FTP or Telnet to or from it.
C045: Failed to create a service thread
Cause: The server failed to create a thread to service a client request.
Action: A system or process quota limit has been exceeded. Either increase the
quota or lower the Clients per server limit field value in the WS Info.
section of the daemon configuration.
See Also: "General" on page C-7.
C047: %s out of memory
Cause: Not enough memory was available to Oracle Connect to complete a
requested operation.
Action: Terminate unnecessary processes running on the server.
Action: Add more memory to the system.
Action: Allow the process to use more memory.
Action: Limit the number of processes the daemon may start. If the demand for
servers exceeds the number of available servers, clients get a message telling them
the maximum number of servers has been reached and asking them to try again
later.
C066: Communication error with the server%s
Cause: Connection to the Oracle Connect daemon or server failed, or an
established session with a server has failed.
Action: Check the remote computer definition in the oc4j-ra-xml file.
Action: Check that the daemon is up on the IBM z/OS platform. Use the Status
option in the Runtime Manager perspective.
Action: In case of a network problem, check the network connection by trying to
ping the host computer or run ftp or telnet to or from it.
C067: Unexpected error occurred in server function %s
Cause: One of the server functions has exited with an exception (such as an
abend, or an Invalid Instruction).
Action: Contact Oracle Support Services.
C068: Fail to login daemon
Cause: The daemon is not running on the server computer.
Action: Use the Status in Oracle Studio Runtime Manager perspective to check
whether a daemon is running on the server
Action: Have the system administrator reinstall Oracle Connect on the server.
C069: Fail to get server
Cause: The Oracle Connect daemon on the server computer could not start a
server process to serve the client. A separate message provides more detail on why
the server process could not start.
Action: There are many possible causes of this error. If the cause is not clear from
the related message, see the Oracle Connect daemon log file on the server
Troubleshooting OracleAS Adapter for IMS/DB 7-13
Page 100

Resolving Specific Errors
C06A: Failed to connect to server
Action: The resolution to this error is highly dependent on the particular cause.
The following are some typical causes and resolutions.
Action: Some process creation quota was exceeded. Either try again later or
increase the quota or the other relevant system resources.
Action: The server startup script failed.
Action: The username given is not allowed to use the requested server. Use an
authorized username.
Action: A limit on concurrent clients for a server has been reached. Try again later.
Action: If you use impersonation, check the user profile on the client. Also see
C015.
Cause: The server assigned to the client did not accept the client connection. A
separate message provides more detail about why the server process did not
accept the connection.
Action: See the daemon and server log files for the reason that the server was not
available to accept its assigned client.
C06B: Disconnecting from server
Cause: A network failure, or a server computer failure or a server program failure
caused the connection to abort. The currently active transaction is aborted as well.
Action: Oracle Connect automatically tries to reestablish a connection with a
server upon the next SQL command issued against the server. Once the network
or computer failure is corrected, the connection to the daemon is reestablished
automatically.
C070: Server failed to send reply to the client
Cause: Server terminated unexpectedly.
Action: Unless the client was intentionally stopped (for example, using
Control-C), contact Oracle Support Services.
C071: Connection to server %s was disconnected. Cursors state was lost.
Cause: Either a network failure, a server computer failure or a server program
failure caused the connection to abort. The currently active transaction is aborted
as well.
Action: Normally, Oracle Connect automatically tries to create a new session with
the server upon the next attempt to access the server. If the network and server are
accessible, the next operation should succeed. Otherwise, the network or server
computer should be fixed before connection can be resumed.
Action: In case of a server crash not related to callable user code, contact Oracle
Support Services.
C072: Reconnect to server %s
Cause: This is an informational message only. The client has reestablished its
connection with the server.
Action: No action is required.
C073: The parameters passed to the admin server are invalid: %s
Cause: Internal error.
7-14 Oracle Application Server Adapters for IMS/DB User's Guide
 Loading...